Cooking for Engineers Pan Pizza
42
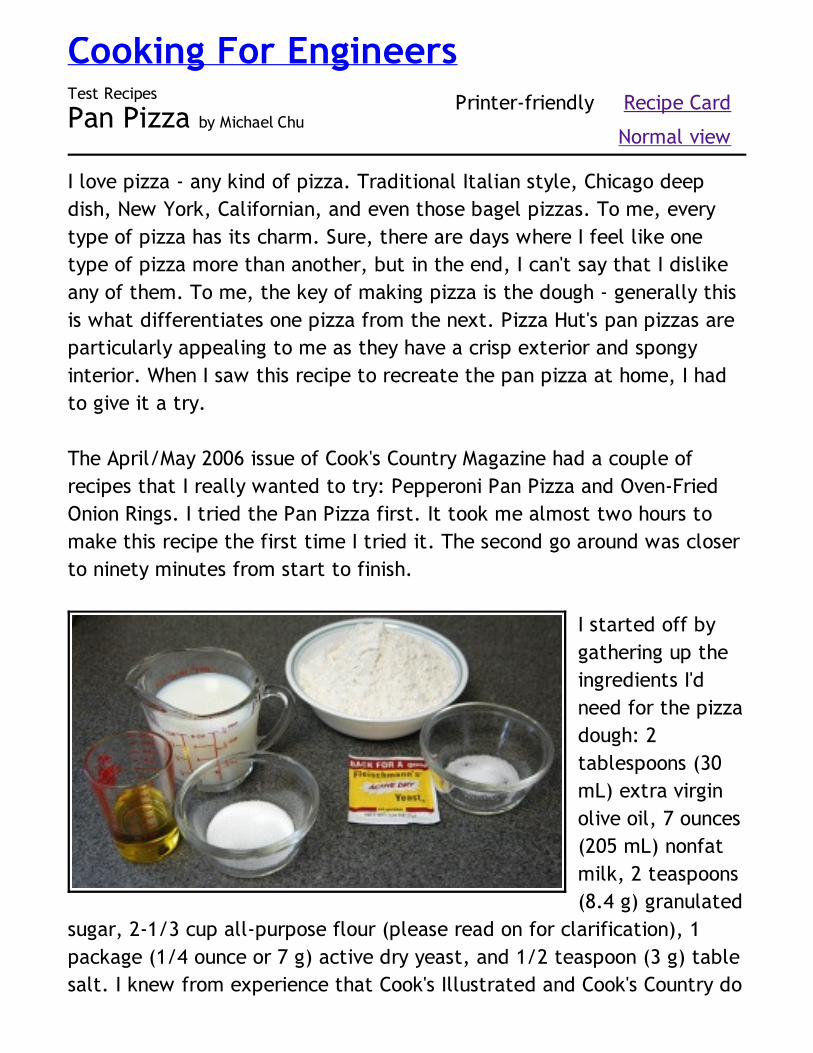
Test Recipes Pan Pizza by Michael Chu Recipe Card Printer-friendly Normal view Cooking For Engineers I love pizza - any kind of pizza. Traditional Italian style, Chicago deep dish, New York, Californian, and even those bagel pizzas. To me, every type of pizza has its charm. Sure, there are days where I feel like one type of pizza more than another, but in the end, I can't say that I dislike any of them. To me, the key of making pizza is the dough - generally this is what differentiates one pizza from the next. Pizza Hut's pan pizzas are particularly appealing to me as they have a crisp exterior and spongy interior. When I saw this recipe to recreate the pan pizza at home, I had to give it a try. The April/May 2006 issue of Cook's Country Magazine had a couple of recipes that I really wanted to try: Pepperoni Pan Pizza and Oven-Fried Onion Rings. I tried the Pan Pizza first. It took me almost two hours to make this recipe the first time I tried it. The second go around was closer to ninety minutes from start to finish. I started off by gathering up the ingredients I'd need for the pizza dough: 2 tablespoons (30 mL) extra virgin olive oil, 7 ounces (205 mL) nonfat milk, 2 teaspoons (8.4 g) granulated sugar, 2-1/3 cup all-purpose flour (please read on for clarification), 1 package (1/4 ounce or 7 g) active dry yeast, and 1/2 teaspoon (3 g) table salt. I knew from experience that Cook's Illustrated and Cook's Country do
-
Upload
jyoti-patel -
Category
Documents
-
view
49 -
download
0
Transcript of Cooking for Engineers Pan Pizza
Test Recipes
Pan Pizza by Michael ChuRecipe CardPrinter-friendly
Normal view
Cooking For Engineers
I love pizza - any kind of pizza. Traditional Italian style, Chicago deep
dish, New York, Californian, and even those bagel pizzas. To me, every
type of pizza has its charm. Sure, there are days where I feel like one
type of pizza more than another, but in the end, I can't say that I dislike
any of them. To me, the key of making pizza is the dough - generally this
is what differentiates one pizza from the next. Pizza Hut's pan pizzas are
particularly appealing to me as they have a crisp exterior and spongy
interior. When I saw this recipe to recreate the pan pizza at home, I had
to give it a try.
The April/May 2006 issue of Cook's Country Magazine had a couple of
recipes that I really wanted to try: Pepperoni Pan Pizza and Oven-Fried
Onion Rings. I tried the Pan Pizza first. It took me almost two hours to
make this recipe the first time I tried it. The second go around was closer
to ninety minutes from start to finish.
I started off by
gathering up the
ingredients I'd
need for the pizza
dough: 2
tablespoons (30
mL) extra virgin
olive oil, 7 ounces
(205 mL) nonfat
milk, 2 teaspoons
(8.4 g) granulated
sugar, 2-1/3 cup all-purpose flour (please read on for clarification), 1
package (1/4 ounce or 7 g) active dry yeast, and 1/2 teaspoon (3 g) table
salt. I knew from experience that Cook's Illustrated and Cook's Country do
not use the USDA standard of 125 g per cup of flour (which is based on
the sifted flour mass and is the conversion I typically use on this website).
They assume you are measuring flour by the scoop-and-level method and
that your bag of flour has settled somewhat, but not to its maximum
reasonable compressibility (which has a density around 160 g per cup). At
least in Baking Illustrated, the editors thought it would be helpful to
include weights (in ounces) - but not in Cook's Country where this recipe
comes from. After a little trial and error, I settled upon 140 g per cup of
flour or a total of 330 g all-purpose flour (which is closer to 2-2/3 cup
than 2-1/3 cup). So, you'll see the 2-2/3 cup (330 g) all-purpose flour in
the recipe summary.
I heated the milk in the microwave to about 110°F (43°C). If you've got a
Thermapen available, this is a great use for it because the readings are
fast and accurate. On my microwave, this took about 45 seconds. I also
preheated my oven to 200°F (95°C) to provide a warm chamber for my
dough to rise in. Once the oven reached 200°F, I turned it off and kept
the door closed for it to cool slowly.
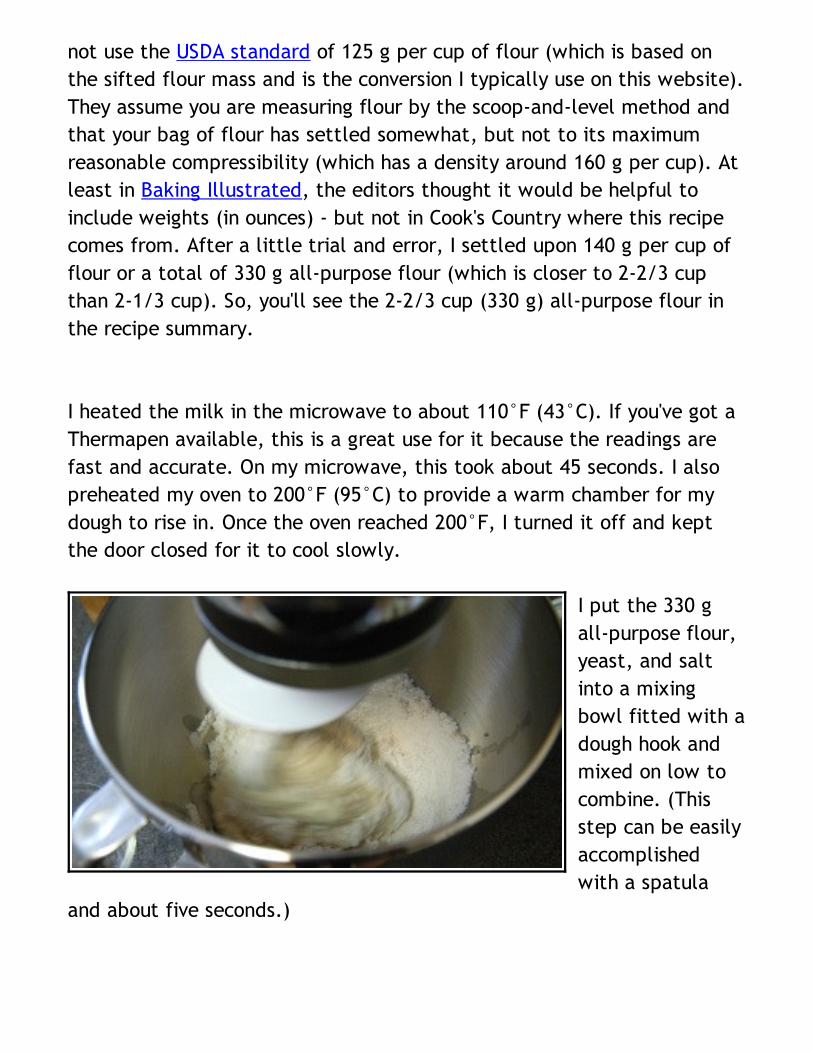
I put the 330 g
all-purpose flour,
yeast, and salt
into a mixing
bowl fitted with a
dough hook and
mixed on low to
combine. (This
step can be easily
accomplished
with a spatula
and about five seconds.)
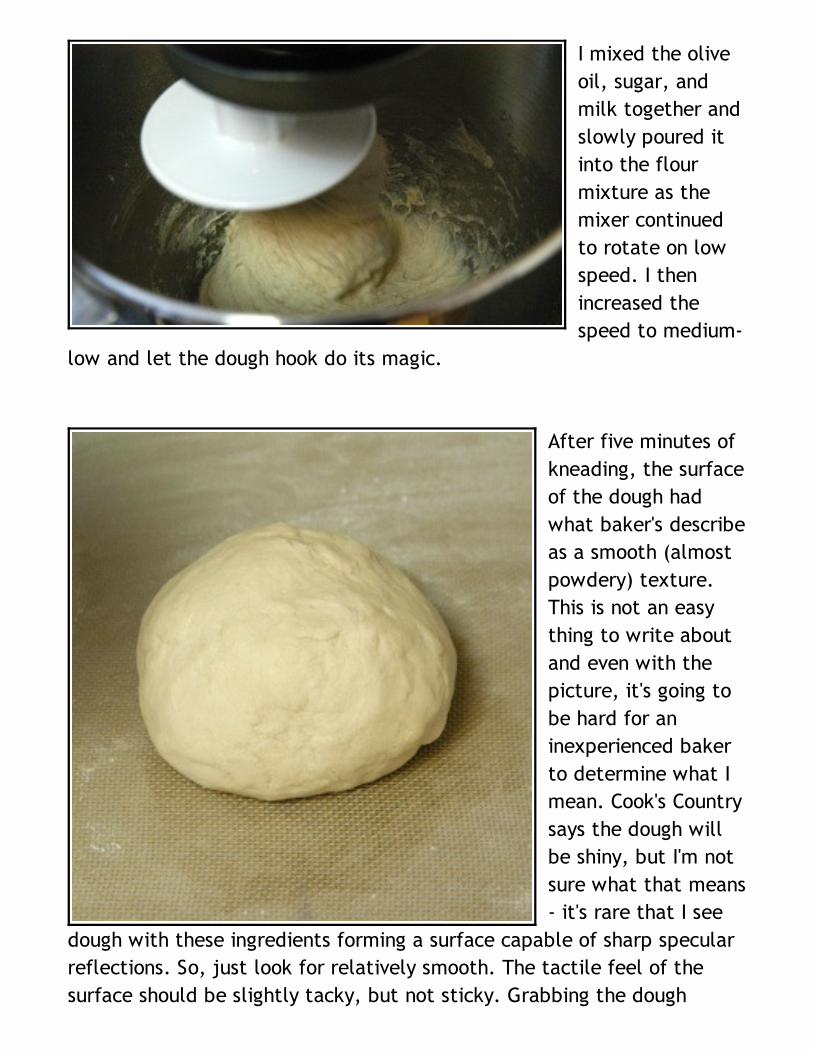
I mixed the olive
oil, sugar, and
milk together and
slowly poured it
into the flour
mixture as the
mixer continued
to rotate on low
speed. I then
increased the
speed to medium-
low and let the dough hook do its magic.
After five minutes of
kneading, the surface
of the dough had
what baker's describe
as a smooth (almost
powdery) texture.
This is not an easy
thing to write about
and even with the
picture, it's going to
be hard for an
inexperienced baker
to determine what I
mean. Cook's Country
says the dough will
be shiny, but I'm not
sure what that means
- it's rare that I see
dough with these ingredients forming a surface capable of sharp specular
reflections. So, just look for relatively smooth. The tactile feel of the
surface should be slightly tacky, but not sticky. Grabbing the dough
should not leave dough pieces on your (dry) hand. Sticking your finger into
the dough will, however, cause dough to stick to your finger (especially to
your knuckle hair if you have it - which you should wash well or else when
the dough dries you may inadvertently pull out knuckle hair when rubbing
you hands). I removed the dough from the mixing bowl and formed it into
a ball (with my hands).
I'm working on a lightly floured silicone baking mat because it provides a
relatively non-stick surface. Wet dough sticks to everything (including
non-stick stuff), but once it dries a little it won't stick to the mat. In this
case, after five minutes of machine kneading, the dough should be in such
a condition that it doesn't stick to the baking mat. As a little added
insurance, the baking mat is lightly floured. To lightly flour the mat, just
take a few pinches of flour and throw it on the mat. Then use the palms
of your hand and rub it all over. It'll be easy to tell what's been coated
with a thin layer of flour and what hasn't. Working with a tiny bit of flour
on the surface makes the dough easier to work with (the surface of the
dough that touches the flour will pick up that little bit and that part of
the dough will be temporarily drier and easier to work with). Such a small
amount of flour will not affect the final consistency of the dough because
it will hydrate pretty quickly and isn�t enough to alter the ingredient
proportions in any measurable way.
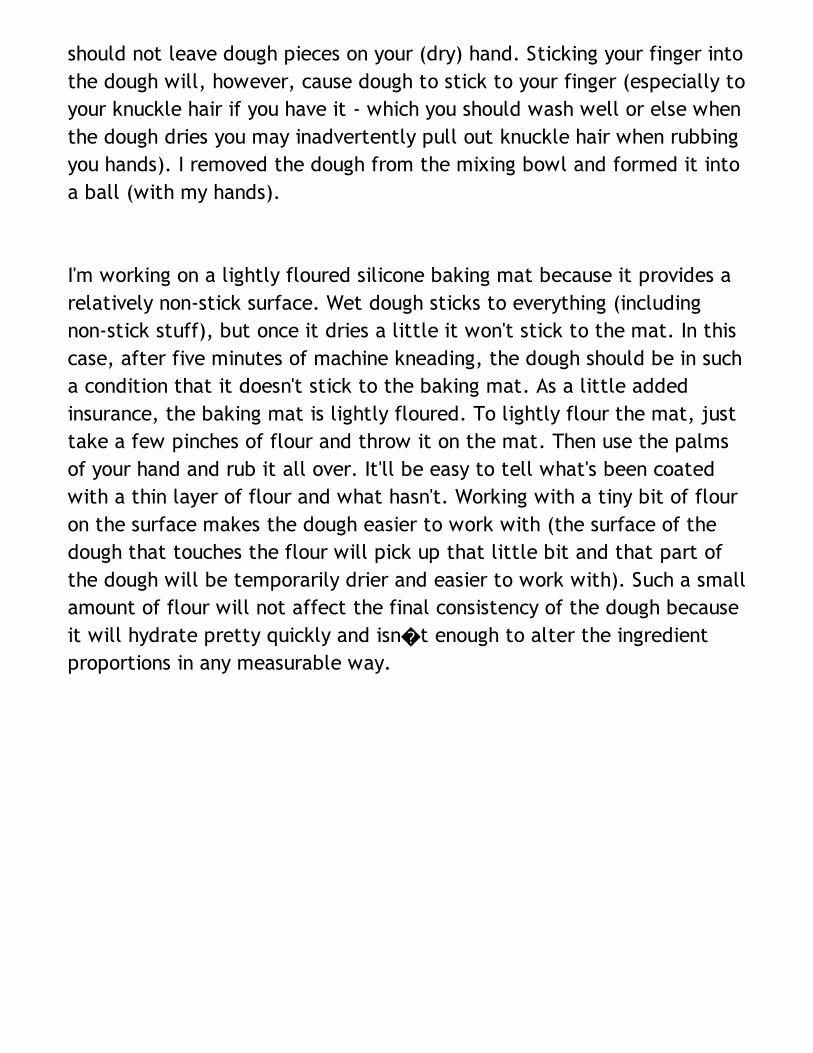
I rubbed a thin
layer of olive oil
to the inside of a
large bowl. Then I
set the dough ball
into the bowl,
covered with
plastic wrap, and
placed it in the
warm (but turned
off) oven to rise
for thirty minutes.
We grease the
bowl to prevent the dough from sticking to it. If the dough sticks to the
sides of the bowl, it will somewhat inhibit the rising of the dough and
that's bad. If there's a seam to your ball of dough, this should be placed
on the bottom of the bowl to prevent excess gases from escaping as the
dough rises.
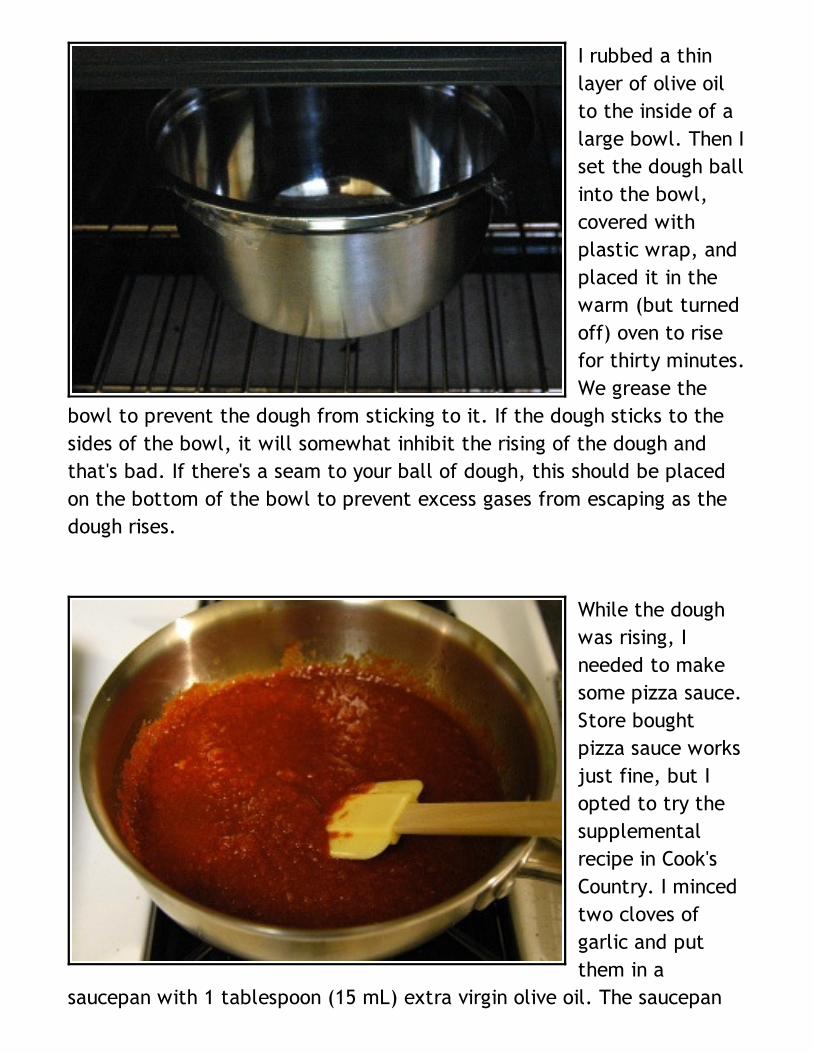
While the dough
was rising, I
needed to make
some pizza sauce.
Store bought
pizza sauce works
just fine, but I
opted to try the
supplemental
recipe in Cook's
Country. I minced
two cloves of
garlic and put
them in a
saucepan with 1 tablespoon (15 mL) extra virgin olive oil. The saucepan
was heated over low heat until the garlic was fragrant but not yet
browned (about two minutes). Then I added a 28-ounce can of crushed
tomatoes. This was cooked on medium until heated through and slightly
thickened - about twenty minutes. This makes way too much pizza sauce
- enough for six pizzas (maybe even eight). I'd scale the recipe down, but
unfortunately, in my part of the United States, I can't seem to find
crushed tomatoes in cans smaller than 28 ounces. Why crushed tomatoes?
Crushed tomatoes are a canned product which is a mix of pureed
tomatoes and diced tomatoes. Because pureed tomatoes are fully cooked,
they have a fairly bland taste when compared to diced tomatoes which
have only been blanched. The crushed tomato product combines these
two into one convenient can. Most crushed tomato cans also contain salt,
so I didn't have to add any to my pizza sauce.
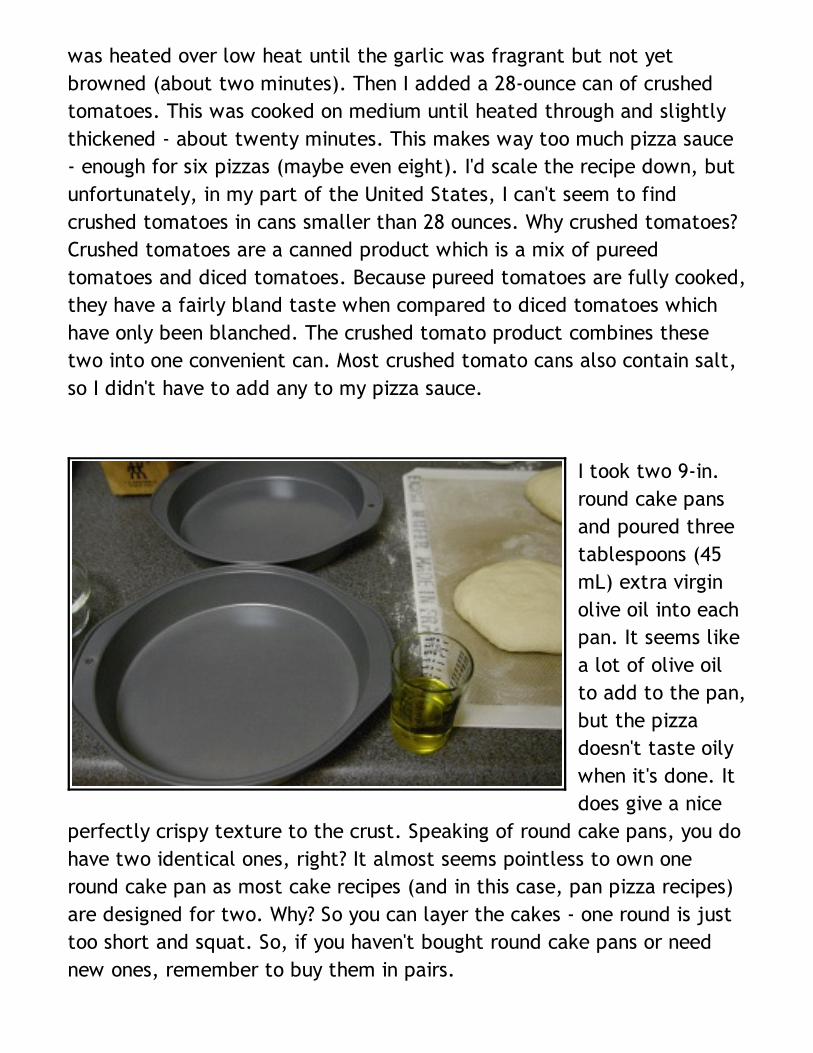
I took two 9-in.
round cake pans
and poured three
tablespoons (45
mL) extra virgin
olive oil into each
pan. It seems like
a lot of olive oil
to add to the pan,
but the pizza
doesn't taste oily
when it's done. It
does give a nice
perfectly crispy texture to the crust. Speaking of round cake pans, you do
have two identical ones, right? It almost seems pointless to own one
round cake pan as most cake recipes (and in this case, pan pizza recipes)
are designed for two. Why? So you can layer the cakes - one round is just
too short and squat. So, if you haven't bought round cake pans or need
new ones, remember to buy them in pairs.

After I pulled the dough out of the oven, I split the dough in half and
formed each into a ball. I flattened each ball into a round circle. I did this
by hand, but Cook's Country recommends using a rolling pin. I didn't think
it was necessary to dirty another tool. When the pizza dough was just a
little smaller than the cake pan (9 inches in diameter), I picked it up and
positioned my hands underneath the dough, holding the dough up with my
fists. I guess it's sort of like adopting a defensive boxing position but with
pizza dough draped over your hands. I then stretched the dough using my
knuckles and the weight of the dough. (Sorry, no pictures - my hands
were covered in dough.) Once the dough was a little bigger than the cake
pan, I laid it on top of the olive oil and positioned it nicely within the
pan. The elasticity of the dough pulled back a little to create almost a
perfect fit. I did the same to the other dough and round cake pan. If
you're not fast at shaping dough, simply cover the unused piece of dough
with plastic wrap to keep it from drying out while you patiently work
your dough into the desired shape.
Cover the cake
pans with plastic
wrap and place in
a warm place
(such as the
slowly cooling
oven) for twenty
minutes to rise.
Now it's time to deal with the pepperoni and cheese. During this last rise
time, it's a good idea to grate some mozzarella or run to the store and
time, it's a good idea to grate some mozzarella or run to the store and
buy a bag of the pre-grated cheese. Normally, I'd scoff at the idea of
using pre-grated cheese because a lot of ingredients are added to grated
cheese to prevent clumping and mold growth. These extraneous
ingredients can usually be tasted, but on a pizza with strong flavors like
tomato sauce and pepperoni, this is not really going to be a problem.
Also, pre-grated cheeses are typically lower in moisture which works very
well on a pizza.
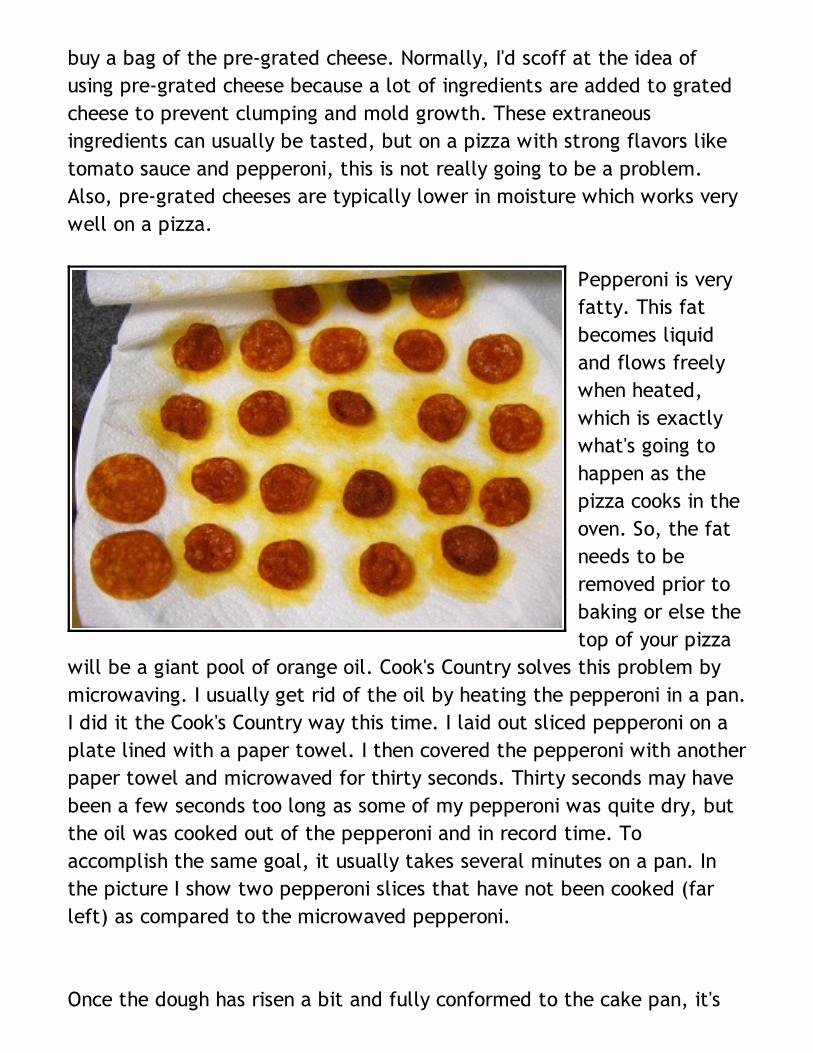
Pepperoni is very
fatty. This fat
becomes liquid
and flows freely
when heated,
which is exactly
what's going to
happen as the
pizza cooks in the
oven. So, the fat
needs to be
removed prior to
baking or else the
top of your pizza
will be a giant pool of orange oil. Cook's Country solves this problem by
microwaving. I usually get rid of the oil by heating the pepperoni in a pan.
I did it the Cook's Country way this time. I laid out sliced pepperoni on a
plate lined with a paper towel. I then covered the pepperoni with another
paper towel and microwaved for thirty seconds. Thirty seconds may have
been a few seconds too long as some of my pepperoni was quite dry, but
the oil was cooked out of the pepperoni and in record time. To
accomplish the same goal, it usually takes several minutes on a pan. In
the picture I show two pepperoni slices that have not been cooked (far
left) as compared to the microwaved pepperoni.
Once the dough has risen a bit and fully conformed to the cake pan, it's
time to top the pizzas. Increase the oven temperature to 400°F and top
the pizzas while the oven preheats.
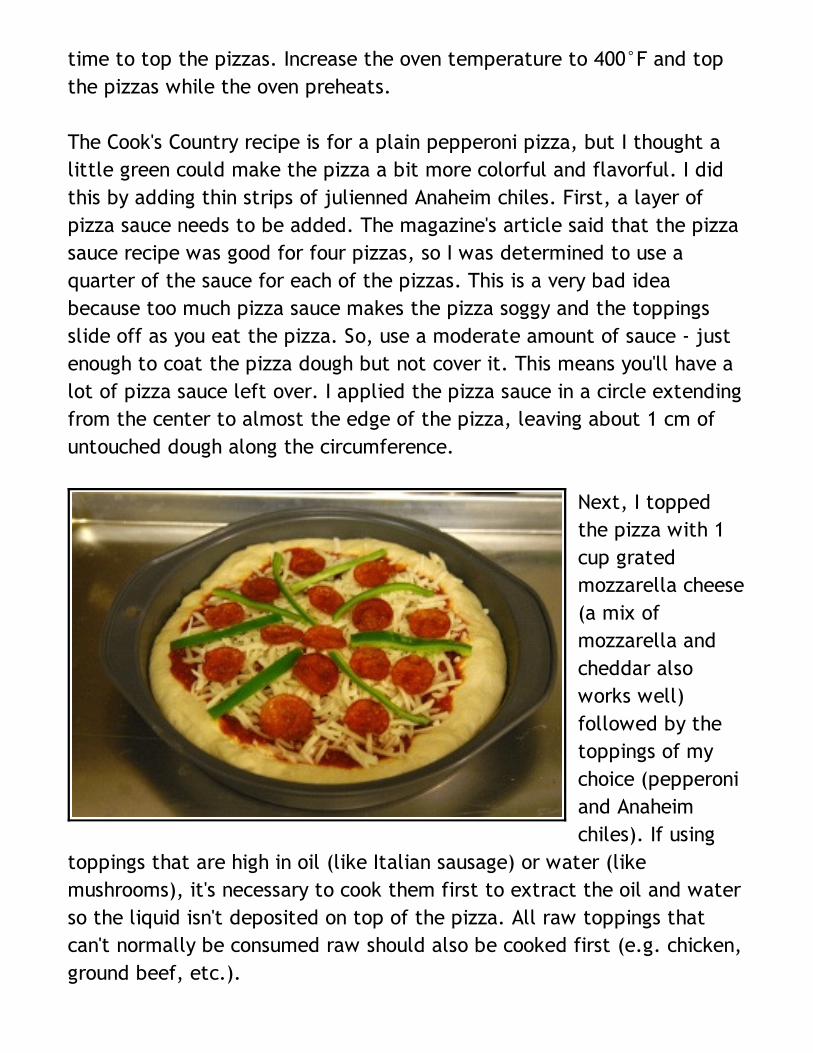
The Cook's Country recipe is for a plain pepperoni pizza, but I thought a
little green could make the pizza a bit more colorful and flavorful. I did
this by adding thin strips of julienned Anaheim chiles. First, a layer of
pizza sauce needs to be added. The magazine's article said that the pizza
sauce recipe was good for four pizzas, so I was determined to use a
quarter of the sauce for each of the pizzas. This is a very bad idea
because too much pizza sauce makes the pizza soggy and the toppings
slide off as you eat the pizza. So, use a moderate amount of sauce - just
enough to coat the pizza dough but not cover it. This means you'll have a
lot of pizza sauce left over. I applied the pizza sauce in a circle extending
from the center to almost the edge of the pizza, leaving about 1 cm of
untouched dough along the circumference.
Next, I topped
the pizza with 1
cup grated
mozzarella cheese
(a mix of
mozzarella and
cheddar also
works well)
followed by the
toppings of my
choice (pepperoni
and Anaheim
chiles). If using
toppings that are high in oil (like Italian sausage) or water (like
mushrooms), it's necessary to cook them first to extract the oil and water
so the liquid isn't deposited on top of the pizza. All raw toppings that
can't normally be consumed raw should also be cooked first (e.g. chicken,
ground beef, etc.).

I baked the pizzas
in the 400°F oven
on a rack set in
the center
position for
twenty minutes -
when the cheese
fully melts and
just starts to
brown at the
edges.
After pulling the
pizzas out of the
oven and allowing
them to rest a
couple minutes, I
cut them into
quarters and
served. The crust
was flavorful
(although not
quite the same
flavor as Pizza
Hut's) and the
texture was dead on - crispy on the bottom and fluffy and chewy on the
inside. Having all that extra pizza sauce means I'm going to have to make
more pizzas, but with this recipe for pan pizza, I don't mind at all.
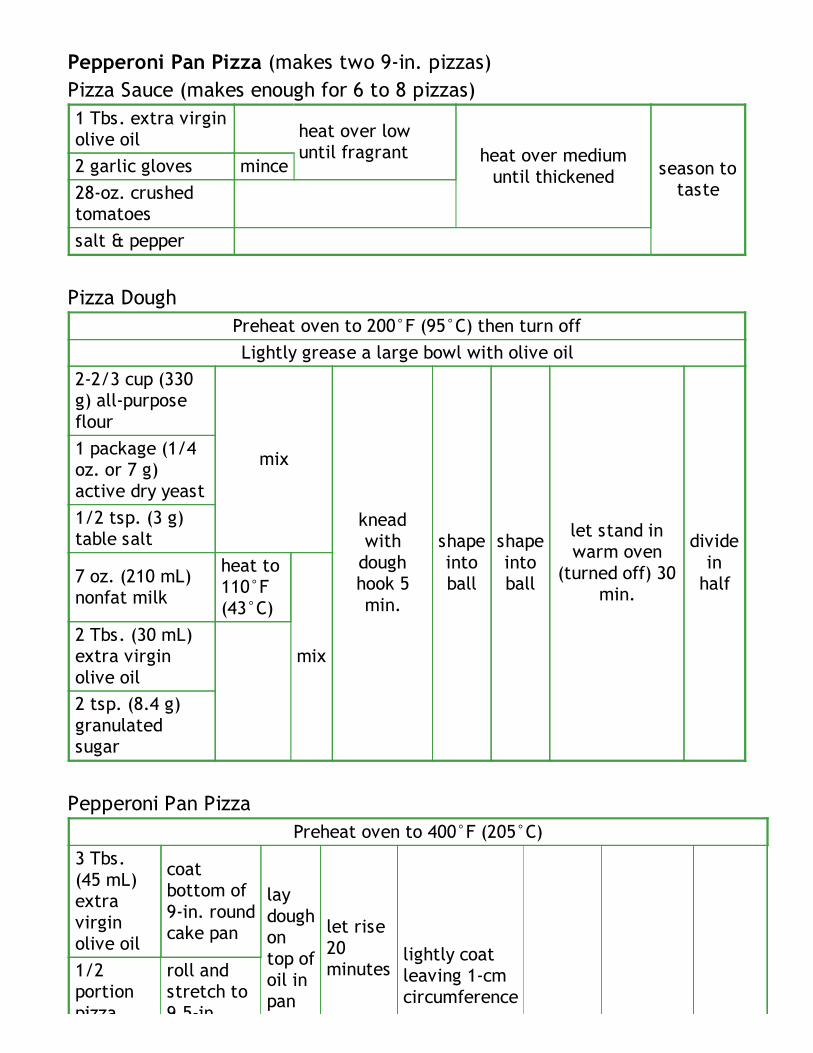
Pepperoni Pan Pizza (makes two 9-in. pizzas)
Pizza Sauce (makes enough for 6 to 8 pizzas)
1 Tbs. extra virginolive oil heat over low
until fragrant heat over mediumuntil thickened season to
taste
2 garlic gloves mince
28-oz. crushedtomatoes
salt & pepper
Pizza Dough
Preheat oven to 200°F (95°C) then turn off
Lightly grease a large bowl with olive oil
2-2/3 cup (330g) all-purposeflour
mix
kneadwithdoughhook 5min.
shapeintoball
shapeintoball
let stand inwarm oven
(turned off) 30min.
dividein
half
1 package (1/4oz. or 7 g)active dry yeast
1/2 tsp. (3 g)table salt
7 oz. (210 mL)nonfat milk
heat to110°F(43°C)
mix2 Tbs. (30 mL)extra virginolive oil
2 tsp. (8.4 g)granulatedsugar
Pepperoni Pan Pizza
Preheat oven to 400°F (205°C)
3 Tbs.(45 mL)extravirginolive oil
coatbottom of9-in. roundcake pan
laydoughontop ofoil inpan
let rise20minutes
lightly coatleaving 1-cmcircumference
1/2portionpizza
roll andstretch to9.5-in.

Written by Michael Chu Published on March 14, 2006 at 12:05 PM
pizza
dough
9.5-in.
circle uncoated sprinkleliberally lay
pepperonito covercheese
bake400°F
(205°C)20 min.
4-6 Tbs.(60-90mL) pizzasauce
1 cup(110 g)gratedmozarellacheese
about 16slices ofpepperoni
microwave20-30 sec.with papertowels
General Pizza In Pan Layer Diagram
toppings
1 cup (110 g) grated mozzarella cheese
thin coating of tomato sauce
pizza dough
3 Tbs. extra virgin olive oil
9-in. round cake pan
Hide comments
78 comments on Pan Pizza:(Post a comment)
On March 17, 2006 at 06:13 AM, *morningstar said...
I don't have a dough hook attachment for my mixer, so I make
all of my bread dough manually. About how long do you think
this dough would be kneaded by hand? I'm guessing around 10-
ish minutes.
I love homemade pizza dough. After eating that, it's hard to go
back to the crap delivery kind. I also really enjoy pan pizza, so
I'll definitely be trying this one out. <3

I'll definitely be trying this one out. <3
On March 17, 2006 at 06:55 AM, Michael Chu said...
Yep, about 10 minutes of kneading will do it. For others
without a dough hook here are my instructions:
If you don't have a dough hook on your stand mixer, just
incorporate the liquids and solids using a wooden spoon or a
stiff spatula (I like using silicone because it cleans up pretty
easily). When the dough comes together into a scrappy ball,
just put that onto a lightly floured surface and knead. Proper
kneading technique involves pushing with the palms of your
hands away from your body, dragging part of the dough with
your palm. The idea is to create friction as you push against the
dough. Then fold over the part that you pushed out and push
again. Every couple times you push and fold, rotate the dough
90&3176; and repeat. Do this for about ten minutes (use a
watch or a clock - time will feel like it's slowing down while
you knead the dough). The surface of the dough should not be
sticky and should be fairly smooth by this point in time.
On March 17, 2006 at 06:50 PM, Elizabeth (guest) said...
I used to make pizza like this all the time (I don't have as much
time between when I get home and when I serve dinner now
that I have a two-year-old). I recommend adding a couple of
teaspoons of chopped garlic with the olive oil - it gives a very
nice flavor to the crust.
On March 17, 2006 at 06:50 PM, LAN3 (guest) said...
I too made this recipe from Cook's Country, and while I had a
less successful sauce, I found the dough to be almost spot-on
once it had been baked-- very tasty. It rose a little thick,
though, so I think I'm going to work harder next time at getting
the center area of the dough thinner and make the crust
thicker.
As for the hand-knead time, I agree that 10 minutes should do
the trick-- I did mine partly by hand because I'm still learning
to get the feel for dough texture, and even I could tell that it
came together and became smooth in less time than my usual
pizza crust recipe (which can take 15 minutes). This is a good
firm dough, probably thanks to those milk proteins. (So many
bread recipes call for powdered milk these days...)
The pepperoni par-cooking is such a benefit-- I picked that up
from Cook's Country's little "send in your own tips" section at
the front a couple months ago, and I'm glad to see that the
Test Kitchen folks have integrated it into their recipes! Another
tip I picked up was, instead of warming an oven up, I throw a
half-full (or slightly more) mug of water into the back corner of
the microwave and heat it until boiling or nearly so. Leave it in
there and, when it's time for the dough to rise, put the oiled
bowl in there containing the dough and covered with a tea-
towel or plastic wrap. The hot water will warm the whole
microwave for several hours-- I heat up the water again when
bench-proofing (dough rising in the pans-- I stack them with a
piece of cardboard in between to keep them separate).
The obvious drawback is doing without your microwave for the
duration of the rise, so you have to work around it for the
pepperoni thing.
At any rate, the whole recipe was awesome, and as of last
night (another pizza-making frenzy for work potluck) I have
about a quart of really good slow-simmered sauce to put to
work, so I'll make pan pizza again quite soon. I bet when she
gave me those cakepans for Christmas, my sister thought I'd be
baking cake, but I've only made pizza in them!
On March 17, 2006 at 09:38 PM, sw (guest) said...
Subject: Whole Wheat

Subject: Whole Wheat
Any good recommendations on substituting whole wheat flour?
Maybe half and half? The weights might not work out?
Love your site!
On March 17, 2006 at 11:56 PM, dirtgirl (guest) said...
I love the idea of pre-cooking the pepperoni.
One thing I've found to be really helpful is pre-baking the dough
for a few minutes before putting on the sauce and toppings.
Otherwise, I have problems where the dough is still too doughy
underneath all the toppings, requiring eating it with a fork, or
cooking it so long that the edges start to burn.
On March 18, 2006 at 02:14 AM, PizzaChef (guest) said...
Subject: Topping Tips
Quote:
One thing I've found to be really helpful is pre-baking the
dough for a few minutes before putting on the sauce and
toppings
For those that would consider this route, be warned! Some
ovens will accelerate the 'golden-brown'-itude of your outside
crust and leave you with perfect inside dough and a super
crusty outside! Not quite the flaky quality you may desire.
A suggestion: Melt some butter/margarine or use a light oil to
coat the outer rim of crust. This will mitigate some baking
acceleration. Also, depending on how you spice this coating
(garlic, salted, whatever), you may well add some extra kick
to your crust!
On March 18, 2006 at 06:57 AM, blessedmomma said...
Subject: More suggestions
Subject: More suggestions
for pizza cheese I like to use 2/3 motz and 1/3 munster, the
texture and flavors really bled well. I also like cornmeal on the
bottom of the pan, dosen't make a difference to me that it's
already oiled, I like the added crispy texture. Last thought, if
you don't hace round cake pans, a rectangle one will work just
fine in fact I prefer to make them rectangular (less work, cute
square slices)
still adore this site. Heather
On March 21, 2006 at 03:09 PM, HowardHuhn said...
Subject: Crisper Crust
I make a similar pan pizza, but use a pre-heated 12" cast iron
skillet. This gives me a crisp outer layer to a chewy crust.
On March 23, 2006 at 12:24 AM, Auntizzy (guest) said...
Subject: sauce for 2 pizzas
easy sauce for two pizza without the large can of tomatoes, 1
can tomatoe soup, 1 small can of tomatoe puree, spices -
usually 2 garlic cloves, dried oregano 1 tsp, dried basil leaves 1
tsp, 1 TBSP sugar, and 2 TBSP vinegar(better with red wine
vinegar) mix together and add salt and pepper to taste.
Commercial sauces are often lacking in taste(spice). Can also
use crushed chili flakes for more spice or grated parmasean
cheese.
On March 23, 2006 at 04:54 PM, tiggerbone said...
Subject: High Altitude
Has anyone tried this at high altitudes? I live in Los Alamos,
New Mexico (~7000 ft above sea level) and am curious what
adjustments, if any, might need to be made.
On March 24, 2006 at 01:28 AM, LAN3 said...
Subject: Adjustments for baking while high and dry
As far as I know, and this is from reading and not personal

experience, the adjustments for yeast breads at high altitude
are these:
--Flour tends to be drier on the shelf and dries out more quickly
at high altitude. I've read that you should be conservative with
the flour, as you'll probably use 1/4 to 1/3 cup less flour than
the recipe calls for (for the given amount of water) for a dough
of this size. Aside from your altitude, the fact that you're in dry
country should be reason enough for dry flour.
--Dough rises faster, so ignore whatever times the recipes
suggest and catch it when it has doubled. If it was a really
short rise, punch it down aggressively and let it rise again--
more flavor that way.
--Dough dries out faster, so when you've put it down for a rise,
make sure it's completely coated in oil (helps prevent the "skin"
that forms on doughs that dry out) and you might even dampen
the tea-towel or washcloth you throw over the bowl. Another
possibility is using plastic wrap to cover the oiled bowl/dough
while the dough rises, and put the plastic wrap in contact with
the dough to eliminate even more air. (This is also good for
anything that forms a skin (e.g. pudding) when left in contact
with the air.) If you put it aside for any reason, do something
to keep the moisture in.
I don't know about baking temperature-- what I've read says
that you add 25F for quickbreads and such, but don't do so for
yeast breads. You might have to experiment a bit with temp
and time.
As you said, you're in Los Alamos, and for those of us who've
never been there, we get the idea that the population might
still be mainly physicists and engineers, so you might just pose
this question to the man-on-the-street. :^)
this question to the man-on-the-street. :^)
On March 26, 2006 at 03:58 AM, tiggerbone said...
Subject: High Altitudes
Thanks! I shall do some experimenting this week and post my
results. ^_^
On April 05, 2006 at 05:29 PM, an anonymous reader said...
Thank you for sharing your exquisite attention to detail with
those of us, while process hogs, don't always get things "right."
I am and will continue to be a Cooks Illustrated fan, but you
make them look downright sloppy. Specifically, in this test,
you point out the actual gram measurement of a cup of flour. I
have always wondered why Cooks doesn't do this, as well. Of
course it can make the difference between almost and a-ha!
Your pictures, precise timing, target temps for cooking
processes and equipment layouts allow me to be mucho mise-
en-place avoiding the distraction and frustration of mid-cooking
foraging around.
And you give measurements of salt and pepper. A blessing. "To
taste" causes me to panic. You have made my quest for great
cooking much more satisfying. Details matter!
On April 07, 2006 at 12:09 PM, Ivano (guest) said...
Subject: SALAME, not PEPERONI!
The correct name is peperoni, with only one P.
And peperoni is the translation for capsicum (or, as you say,
Anaheim chiles)!!!!!
The red slices are named SALAME.
So, the recipe you are trying to do is PIZZA with SALAME or, if
you wish, PIZZA with SALAME and PEPERONI.
Bye!
On April 07, 2006 at 04:41 PM, Michael Chu said...
Subject: Re: SALAME, not PEPERONI!
Ivano wrote:
The correct name is peperoni, with only one P.
And peperoni is the translation for capsicum (or, as you
say, Anaheim chiles)!!!!!
The red slices are named SALAME.
In Italian and other languages that have not changed the base
words substantially, that is true. In English, the word
pepperoni (two 'p's) means what we show in the picutres: a
spicy beef and pork sausage. It does indeed derive from the
Italian word peperoni (one 'p') for chiles (or capsicums). If
you're in an English class, please use the two 'p' version of
pepperoni when referring to this particular type of salami.
Using the one 'p' version is currently not considered correct
spelling (but if you italicize it, then you can claim you are using
the italian word - but then you'd be referring to chilis...)
On April 10, 2006 at 03:07 AM, fadtomute (guest) said...
Subject: pizza grease
have you tried putting the pepperoni on first? not really a good
idea for thin crust, but for pan pizza i top the shell with a layer
of pepperoni, then add sauce, and then top with cheese. yes,
there is more oil, but that brings some of the flavor from the
sauce into the crust. it also leaves more room for toppings...
like crumbled bacon, onions, and freshly diced tomatoes.
-fadetomute
http://myspace.com/appleeaten

http://myspace.com/appleeaten
On April 17, 2006 at 03:37 AM, an anonymous reader said...
Subject: wow
WOW...impressive set up, never seen a site like this... i love
researching recipies and seeing how they are done. It's very rare
to come across something this detailed and well presented.
im not a kitchen iliterate...i just like to see every aspect of
something before i jump in and experiment.
i love the scientific approach and sense of knowledge behind
the preperations/ingredients...wow.
On May 07, 2006 at 02:00 AM, golem (guest) said...
Subject: crisp crust, soggy inside
I noticed "dirtgirl" mentioned that the crust is firm or the inside
is soggy - its really a compromise, unless you experiement a
bit.
I am curious to hear other opinions on this, since I myself am
fighting this problem.
Some partial solutions are
1) 2% milk in place of 50% of the water
2) pre-baking (obviously, but at 350deg for 4 mins)
3) adding 100% wheat gluten, in attempt to emulate store
bought (yuck!) dough. The wheat glueten gives some resiliance
to the dough, and it will retalliate kneading.
On May 14, 2006 at 09:30 PM, Katie (guest) said...
I think you can freeze the pizza dough at the point where it
enters the pans (my mother makes pizza quite often, but not
pan pizza, and freezes it in balls before rolling it out). Then if
you take it out of the freezer in the morning and defrost it out
you take it out of the freezer in the morning and defrost it out
of the fridge all day, it has a) defrosted and b) risen by the
evening. Good if you want a quick pizza when you come home.
I'll have to try your method and see if it works with pan pizza,
too.
On June 23, 2006 at 02:20 AM, Sandra (guest) said...
Subject: Question About Pizza Dough?
Love your blog! Have you tried making this recipe with bread
flour? I made it twice with AP flour but will try bread flour
next time as we like the crust to be a little bit chewier.
Keep up the great work!
On August 16, 2006 at 08:07 PM, Solinga (guest) said...
Subject: Merci beaucoup!
Thank you so much for your recipe M. Chu.
I was desperately trying to make a pizza pan by my own it was
really helpful following your instructions. Everybody in my
house want me to
cook another pan pizza this week-end because it had alot of
success!
Merci beaucoup!
Solinga, from Toulouse (France).
On September 04, 2006 at 06:56 PM, Deep (guest) said...
Subject: More info on Pan Pizza
I worked for and managed Pizza Hut from 1983 to 1992. I don't
have much to add in terms of ingredients, but the process is
very important to make original pan Pizza. The recipe I saw
posted here for Pan Pizza dough looks to be fairly close. I never
needed to kneed the dough. Once the dough is put out on the
table , cover it and let it set for about 5 minutes. I'm not sure
abought the measurements here, but I believe 16 oz. of dough
abought the measurements here, but I believe 16 oz. of dough
makes a 12 inch pizza. After you portion the dough roll it into a
ball, spray it lightly with pam and cover for 5 minutes. While
you're waiting, put about 1/8 inch of vegatable oil into a 12
inch pan. The pan depth should be around 1.5 to 2 inches deep.
Now roll out the dough ball intto a circle. It should be about
1/4 inch in height once rolled. Now place the rolled out dough
into the pizza pan on top of the oil. Turn the dough in the pan
1/4 turn to ensure proper oil distribution. Now spray the outer
edge of the dough with apray release. Cover the pan and
placein a lightly warm oven for abought 45 minutes or until the
dough is very close to the cover. Once the dough has finished
proofing, place the pan of dough in the fridge for about and
hours. The will suspend dough proofing and firms up the dough
and makes it easier to spoon the sauce on. Refrigerated pan
dough is good for abought 8 hours. Pizza Hut uses hot air
injected ovens to achieve even cooking. A convection oven
would probably do better than a conventional oven. If you like
to load your pizza down, then lower the oven temp a little and
cook for a longer time. After you top your pan pizza, spray the
outer edge of the dough again with spray release to help brown
the crust.
On September 12, 2006 at 07:12 PM, RobG (guest) said...
Subject: Pizza stones?
Has anyone tried using an unglazed quarry tile as a pizza stone?
I'm eager to try that, but I'm not sure about the pros and cons
of buying cookware from the hardware store.
On September 12, 2006 at 09:40 PM, an anonymous reader
said...
Subject: Re: Pizza stones?
RobG wrote:
Has anyone tried using an unglazed quarry tile as a pizza
stone? I'm eager to try that, but I'm not sure about the pros
and cons of buying cookware from the hardware store.
I haven't tried that. I can only think of two risks. It may not
withstand rapid heating and cooling, or there may be
something in the gaze that becomes caustic at certain
temperatures. Might be worth a try.
On September 13, 2006 at 07:48 AM, Michael Chu said...
Subject: Re: Pizza stones?
RobG wrote:
Has anyone tried using an unglazed quarry tile as a pizza
stone? I'm eager to try that, but I'm not sure about the pros
and cons of buying cookware from the hardware store.
I use an $14 unglazed 18-in. square travertine tile that fits on
the bottom of my oven almost perfectly. I only remove it when
I utilize the self cleaning option (which is once in three years).
The travertine tile cracked on the first heating, but still holds
together (and is too heavy for me to want to move).
I don't usually bake directly on the stone because I find results
are just as good if I use a piece of parchment paper cut to size.
The parchment paper doesn't catch fire or burn if it's not
sticking out too much and the results are as fine as any other
pizza stone I've used.
On November 19, 2006 at 10:17 PM, fabio_vr said...
Subject: Pizza
I have been visiting your site for a while, and I really like the
way you aproach things: maybe just because it's "Cooking for
Engineers", and after years of work as engineer you get used to
see things a certain way.
As regards pizza making, there is basically no official recipe for
the dough: every region in italy and every pizza shop has his

the dough: every region in italy and every pizza shop has his
own tricks and secrets, so that you can find a variety of pizza
stiles.
To my experience, the best results are achieved with natural
yeast, or with very little yeast quantities (2g per 1000g of
flour...) and very long proofing times: there are some reactions
going on -it's basically a fermentation- that take time to
develop. But dry yeast will do if you are on a hurry or you don't
want to start your pizza making th day before!
As regards the ingredients, I prefer to use just plain water
instead of milk (50%in weight of the flour), it makes your pizza
more crispy (and you avoid unnecessary fat addiction), but it's a
matter of taste.
The way I proceed is slightly different: I usally start to mix
flour yeasty and sugar, add the olive oil and keep on mixing. At
this point I start adding water slowly, and just before the
whole mmixture clumps together I add the salt: this is just to
have the yeast doing his work properly, as salt is reducing it's
action; so whatever you do avoid to have yeast getting in touch
with salt.
To spread the dough, do it directly in the pan: form a disk, put
in the pan you have slightly oiled, and spread it with your
hands, this will give you a softer result, and is much faster as
well.
To have a crispy result try to use some malt instead of sugar, it
will give a nice brown crust.
As regards cooking your pizza the refractory stone makes sense
if you are making thin and crispy pizza (like what you get in a
pizzeria in Italy), for a pan pizza a conventional oven is
suitable. I do not like the effect of convection ovens in pizza
making as you may get a burned surface and an uncooked pizza
making as you may get a burned surface and an uncooked pizza
at the middle of the pan: I sitch it on if I need to dry out the
topping (watery mozzarella chees for example).
Sorry for my english, I hope I did not annoy anyone.
Buona Pizza.
On December 23, 2006 at 05:46 AM, fkay (guest) said...
Subject: pizza
I go to any pizza place (one you like) and they will sell you
enough dough for a pizza. Too much to go thru all that trouble
to make your own.
Then I carmalize 3 onions and place them on the uncooked
pizza; chop up a can of anchovies and sprinkle them on it. Then
add some cut up artichokes and anything else you like.
Delicious
On January 03, 2007 at 04:06 AM, STL Cook (guest) said...
Subject: Mmmmmm....
That carmelized onion, anchovy & artichoke pizza sounds
fabulous! You wouldn't even need cheese! Also, I wouldn't have
to share it with anyone else in the house...
If you don't want to make your own dough, you can buy regular
or whole wheat dough at Trader Joes, if it's in your area. But
really, once you've made it a couple of times it is very easy and
pretty quick. Has anyone tried making large batches and
freezing the extra? Do you need to mix smaller batches, or can
you double the recipe?
On February 26, 2007 at 08:33 PM, iwan from de (guest)
said...
i forgot to heat the milk and had no yeast, used soda instead

o_O let's see how it'll come out. T minus 20 minutes
On April 16, 2007 at 08:21 AM, Nobody (guest) said...
Subject: Poor iwan from de
Quote:
i forgot to heat the milk and had no yeast, used soda
instead o_O let's see how it'll come out. T minus 20 minutes
We didn't hear back from him. I guess it didn't go so well.
On August 03, 2007 at 10:07 PM, Mike (guest) said...
Subject: Pizza Crust
I didn't have any all purpose flour, so I substituted self rising
instead. The crust turned out soft and didn't taste very good. It
was nothing like Pizza Hut...
Would self rising flour make that much of a difference?
Mike
On August 04, 2007 at 01:03 AM, Michael Chu said...
Subject: Re: Pizza Crust
Mike wrote:
Would self rising flour make that much of a difference?
Self rising flour contains salt and baking powder. The baking
powder will through the balance of ingredients off and could
produce an off taste with nothing to neutralize it. The baking
powder could also react with any acid in the dough. Both things
will make it taste funny.
On August 04, 2007 at 05:09 PM, GaryProtein said...
The type of flour you use, be it bread flour, cake flour, all

The type of flour you use, be it bread flour, cake flour, all
purpose flour or self rising flour will make a world of difference
in how your baked good come out. The use of other ingredients
aside, the textures will be different on all of them.
On August 04, 2007 at 08:05 PM, Mike (guest) said...
Subject: Pizza Crust
I picked up some All Purpose Flour and will give this another
try today or tomorrow. It's confusing how many types of flour
they have at the store. Cake Flour, Bread Flour, Self Rising
Flour, All Purpose Flour, High Altitude, Bleached, Unbleached,
etc. :shock:
If I double the recipe for the crust, do I need to use two packs
of yeast?
On August 05, 2007 at 12:57 AM, GaryProtein said...
Subject: Re: Pizza Crust
Mike wrote:
If I double the recipe for the crust, do I need to use two
packs of yeast?
In my experience, yes. You need a certain number of yeast
organisms in the flour/dough mixture to make it rise in the
time range specified in the recipe. Waiting for the yeast to
reproduce to double their numbers to produce the needed CO2
to leaven the dough could take more then enough time for
other characteristics of the dough to change. You probably
won't get enough rise without the extra yeast.
If you like a thin crisp dough, you may be ok with less yeast.
On August 26, 2007 at 05:56 AM, John (guest) said...
Just made this pizza tonight, on a whim, and with no prior
Just made this pizza tonight, on a whim, and with no prior
pizza-making experience, and it turned out great! Everyone
loved the crust and home made tomato sauce as well. The
worst part was making a huge mess and not being prepared
with my ingredients. I didn't let the dough rise in the pans for
an additional 20 minutes, but it still turned out very tasty and
a nice texture. I'll have to experiment with that.
Keep up the great work with the website, love the recipes and
the presentation!
On September 01, 2007 at 03:58 AM, an anonymous reader
said...
Bread flour makes the best pizza dough. For everything else, I
use unbleached white flour.
On December 01, 2007 at 04:07 AM, nmdive said...
Subject: Deep Dish Pizza Crust?
Is this dough recipe suitable for use a deep dish pizza crust?
On December 03, 2007 at 08:10 AM, Michael Chu said...
Subject: Re: Deep Dish Pizza Crust?
nmdive wrote:
Is this dough recipe suitable for use a deep dish pizza crust?
You could probably make it work, but it won't taste as you
expect. The dough is well leavened and has enough springiness
that I'll be hard to get it to wrap up the side of a pan...
On December 29, 2007 at 08:33 PM, Mech - PE (guest) said...
Subject: my engineering experience
Nice recipe but it can really be improved upon. The difference
between good pizza and great pizza is the crust. Interestingly
enough, technique is more important than the ingredients in
achieving a world class dough/crust. The dough contains bread
achieving a world class dough/crust. The dough contains bread
flour, water, salt and yeast. The pies I make are anywhere
from 11 to 16 oz for a 16 inch pie. The 11 oz produces a paper
thin crust which if you keep the toppings on the dry side
produces a crispy marvel. The 16 oz produces the conventional
pizza parlor ny pizza. The trick is to kneed the dough to
produce the a window pane. It should be on the dry side -
tacky not sticky. Upon kneading the dough let rise till double,
then bench and form dougn balls of the required weitht and
place into oiled covered bowls. Let rise on the table for half
hour then place in the refrigerator for at leat 5 hours but not
necessary to do more than 10. When ready to bake: dont use
rolling pin- spread out with finger and fist by letting the weight
of the dough stretch itself in the air being careful not to
disturb the edges of the crust. Your toppings should be on the
dry side so that pies is not soggy. If you use fresh mozzarella
chease- salt it and let sit on paper towels to dry out a bit.
Bake in the oven at 550 for 7 to 9 minutes. You will get an
incredibly cripy blistered crust like you have never had before. I
have been making pizza for about 10 years- so be patient and
experiment. And above all keep it simple- it is after all a
peasant dish.
On December 29, 2007 at 09:28 PM, objective oriented
enginr (guest) said...
Subject: Re: my engineering experience
Mech - PE wrote:
Nice recipe but it can really be improved upon
Really? This is a really good approximation of the Pizza Hut Pan
Pizza... Can it be better (better = closer to the pizza hut crust
since that's the goal of this particular recipe)? Possibly, but not
the way you described.
Mech - PE wrote:
Mech - PE wrote:
You will get an incredibly cripy blistered crust like you have
never had before. I have been making pizza for about 10
years- so be patient and experiment. And above all keep it
simple- it is after all a peasant dish.
That sounds like great pizza... Unfortunately, that's not how a
pizza hut crust is and so it fails at the goal.
On December 30, 2007 at 05:29 PM, Mech - PE (guest) said...
Subject: my engineering experience
I was not responding to your pizza hut recipe. Frankly any
estblishment that fills the crust with cheese is not worth
takiing about. Have a happy new year and ..... lighten up.
The Professional Engineer
On February 03, 2008 at 05:59 PM, LauraK (guest) said...
This turned out great!
Next time I probably won't use quite as much oil in the pan... I
thought the crust was a little greasy for my taste, and the
flavor of the EVOO was strong, but otherwise it was delicious
and surprisingly fast!
On March 09, 2008 at 12:46 AM, W8ing4daybreak (guest)
said...
Subject: dough answers
For the person who asked, Yes, you can use half whole wheat
flour. If you shop around you can even find whole wheat bread
flour. It won't taste the same, but you can't really expect it to.
I add a little flax seed to my dough too.
You can freeze pizza dough. I make individual rounds of dough
and stack them in a round container, separated by oiled
and stack them in a round container, separated by oiled
disposable plastic plates. I put the whole thing in the freezer,
then move it to the fridge the day before I plan to use it. I even
take it camping with me. I put it in the cooler. Throw the
rounds of dough on the grill a couple at a time, flip them over,
top them quickly, and there you have it grilled pizza.
On March 25, 2008 at 01:37 PM, rich.bronson said...
Subject: Re: my engineering experience
Mech - PE wrote:
I was not responding to your pizza hut recipe. Frankly any
estblishment that fills the crust with cheese is not worth
takiing about. Have a happy new year and ..... lighten up.
The Professional Engineer
I agree with your Pizza Hut comment completely. It's big
businesses like them that have ruined cooking. I tried their
stuffed crust pizza one time and I wasn't impressed at all.
On April 12, 2008 at 12:17 AM, CanadianNancy (guest)
said...
Subject: Yeast Proofing
Hi there! Love the web site! I have a quick question. Nowhere
in the recipe do you say if you proof the yeast or not. If you do,
how much water do you add to it???
Thanks so much and happy baking!!!
On April 12, 2008 at 02:20 AM, Michael Chu said...
Subject: Re: Yeast Proofing
CanadianNancy wrote:
Nowhere in the recipe do you say if you proof the yeast or
not. If you do, how much water do you add to it???
not. If you do, how much water do you add to it???
I used Active Dry yeast which does not need proofing.
On April 20, 2008 at 01:28 AM, Noahzark (guest) said...
Subject: [email protected]
I use 14 % protien/gluten flour King Arthur Flour Co sells one
called
"Lancelot" and is available on line in 3 lb bags. They make
numerous flours but you will not see their "Sir Lancelot" in the
local market. If there is a Gordon Food Service store in your
state (check the yellow pages) they carry 14 % flour. that is
where I bought mine, in Florida. I bought a 25 lb bag for
$13.99. They had two choices. The one I bought is called
"Bouncer". It makes a great crust. For thin crust use 1/4 tsp
rapid rise yeast to 2-2 2/3 cups flour. Let proof to double in
size in refrigerator. Takes 2-3 days to achieve this doubling but
allows time for proper fermentat and flavor development.
On July 12, 2008 at 07:33 AM, joefish (guest) said...
Subject: Help!
This recipe seems to fail for me when I get to the second part
of making the dough (splitting it in two, and putting it back in
the oven to rise). It doesn't rise any more!
Since I'm new to bread-making, what could I be doing wrong?
On July 12, 2008 at 11:35 AM, Dilbert said...
.....what could I be doing wrong?
probably nothing. if the dough rose okay in the first round, then
the yeast is good. after shaping the dough is not going to poof
up hugely - you will not "see" a "doubling" of bulk/volume quite
the same as when in a ball - it's only a slight increase in
thickness....
thickness....
On October 14, 2008 at 04:12 AM, Jim_P (guest) said...
Subject: One warning
I've followed this recipe many times with good results. But the
last time, the cooking oil we had on hand was Smart Balance
Omega.
This recipe will pick up flavor from the oil, and in this case, we
wound up with a slightly fishy-tasting crust! Quite a shock.
:shock:
In any case, stick with the olive oil. Though frankly, I think I
prefer non-extra-virgin oil for this recipe. It's good either way.
(But no fish!)
-Jim
On November 11, 2008 at 05:57 PM, Pinky said...
1/ Lose the sugar unless you're the kinda cook who substitutes
Campbell's condensed tomato soup for the sauce. It's really
only a cheap shot way of browning the pizza without the
requisite BTU's.
2/ "Extra Virgin" on the olive oil can means very little. The key
words to look for are "First Cold Pressed".
3/ Line the bottom of your oven with firebricks (NOT tiles, but
bricks used to line a fireplace or a blast furnace). Nothing like
thermal mass to bring an oven to life. It takes a lot longer to
get the oven up to temperature, but it is worth the wait.
Temperature? 500�F.
4/ Bake off the pizza in a cast iron skillet placed directly on
the firebrick.
Pinky
On December 09, 2008 at 05:20 PM, an anonymous reader
said...
my microwave oven has convection and grill option....which one
of these three i should choose for baking pizza....
On December 29, 2008 at 04:17 AM, jazzguy (guest) said...
Subject: Dough in Bread maker
I don't have a mixer as they suggest using to make the dough.
Instead, I used my bread maker on the dough setting which is
what I always use to make pizza dough. I had guests over, and
everyone really liked this pizza! The dough came out great. It's
even easier in a bread maker, and you can elimate the step
about proofing in the oven.
On February 06, 2009 at 08:29 PM, guest (guest) said...
Subject: excess fat
I find that you can remove the excess fat that is left on the top
of the pizza by applying the towel directly to it once it's
cooked - the only problem is if there is lots of tomato sauce
coming though the cheese - in which case it will pick up some
of that as well.
On February 15, 2009 at 07:15 PM, keng (guest) said...
Subject: Pizza Peel
I have been using your receipe except cooking on a stone. I have
been spreading the dough out on an aluminum pizza peel.
Directions for using the aluminum pizza peel, suggest using corn
meal or semolina to keep the dough from sticking to the peel.
This is so after you have preheated the stone you transfer the
prepped pizza from the peel to the stone. My problem is the
dough keeps sticking to the peel and doesn't want to slide onto
the stone. My thinking is that as I strecth the dough it is
exposing areas that don't have any corn meal and is sticking to
exposing areas that don't have any corn meal and is sticking to
the peel. Any suggestions.
Ken
On February 15, 2009 at 07:26 PM, Dilbert said...
keng -
try making your dough on a floured+cornmeal surface - not
directly on the aluminum peel.
that way you can shuffle the dough around on a surface to
ensure it's loose and moves with the cornmeal, then lift an
edge and slide the peel under.
the problem with aluminum peels is they just don't "retain" any
flour dusting, cornmeal splash, etc. it all "runs off" vs a wood
peel or wood working surface . . .
On February 18, 2009 at 03:47 AM, guest (guest) said...
Subject: pan pizza
Just made this tonight.
I'd say it was better than pizza hut's pan pizza. A few things I
did differently: for the milk, i used half milk and half water.
Didn't use as much oil in the pan... and i also spread olive oil
on the crust then sprinkled it with granulated garlic and
permesan cheese, which gave the crust a good flavor.
Thanks for the great recipe!
On February 23, 2009 at 12:58 PM, joanlazell (guest) said...
Subject: Pan/Pizza
I love the recipe. I've worked with yeast before and have had
good luck. This time the yeast did not dissolve. I had
good luck. This time the yeast did not dissolve. I had
prewarmed the milk as directed. As I was kneading it and
handling it, the dough was not smooth. It was speckled with
undissolved yeast. It took longer to rise (I used your method
with the preheated/turned off oven). It took about 20 minutes
longer. The dough still had undissolved yeast on the surface. It
did, however, ultimately dissolve, by the second rising in the
pan (I used a 12 inch caste iron skillet and prewarmed the
skillet slightly. Ultimately the dough turned out good. It was
light and completely baked, not soggy, hwoever, it had a
strong taste of yeast. What did I do wrong? Maybe the milk
cooled too much by the time I used it. Please advise. Thank
you. jl
On March 04, 2009 at 08:28 PM, Tally (guest) said...
I love this recipe, but I'm surprised that it uses olive oil. Olive
oil, which is great usually, adds a fruity flavor to the dough
that really doesn't taste at all like Pizza Hut. The Pizza Hut
website has the ingredients list for their products, and they list
Soybean Oil or Cottonseed Oil as their oil of choice, which are
both neutrally flavored oils. I used peanut oil the second time I
made this recipe, which was much closer to what you get from
the restaurant.
Other than that, thanks a lot for this recipe! It really sates that
junk-food deep dish pizza urge for much cheaper than ordering
out!
On March 31, 2009 at 01:12 PM, latechef (guest) said...
Subject: pan pizza recipe
I made the pan pizza recipe and baked the pizza last night. As
for ease and taste, the dough was great. I made it in my food
processor with the dough blade (I have a heavy duty food
processor, don't try that with a little one). I did a double rise in
the oven (punching down in between) simply as I had a lot of
time to kill.
time to kill.
When I baked them I did load them down, I'll admit, but the
crust just wasn't quite done at the thickest part (done in the
center but not toward the outside rim on the bottom). I only
had 8" cake pans which possibly also caused trouble. I did 22
minutes at 400�F - should I raise the temp or lengthen the
baking time? Everything else was great, toppings were hot,
cheese bubbly, etc. This was honestly the easiest pizza dough
recipe I've ever used. Hardly even got my hands dirty.
As for making it more like Pizza Hut pan pizza (also a favorite),
you might try some garlic or onion salt in the dough, there is
definitely some additional flavor. Also, it could have a lot to do
with cooking it in a super-hot professional oven. Like true
Chinese food, it's just not possible to obtain that much heat in
a home kitchen.
On July 11, 2009 at 12:33 PM, jamie'smom (guest) said...
Subject: Pizza sauce
If you are going to make just a couple of pizzas and do not
want a lot of leftover sauce, Hunts makes a nice tomato sauce
(actual sauce, not paste). It comes in a very small can, about 8
ounces, and it comes in flavors. I like the Basil, Garlic, and
Oregano, but I think they have roasted Garlic and other flavors
also. I find it is just enough for about 3 small pizzas--and it is
very inexpensive.
You can also get real pan pizza pans rather than using cake
pans (which have kind of a high side and might mess the crust
up a bit. Instawares will sell to the public, though they might
be slow in shipping if they don't have an open box to take just
a few pans out for your order.
My daughter, the engineer, makes small pizzas from a similar
recipe. She does like to pre-brown a bit, and does brush the
recipe. She does like to pre-brown a bit, and does brush the
crust with olive oil first. It is a bit crispy, but since we use a lot
of sauce and cheese, it seems to even out in the second baking.
On September 10, 2009 at 01:09 AM, berkeley student :)
(guest) said...
Subject: conversions....
isn't 330 grams of flour equivalent to about 11.64 ounces which
is a little over a 1 1/2 cup of all purpose flour? where does the
2-2/3 cup come in? i really like the sound of your recipe and i'd
like to make it as accurately as possible!
thank you :)
On September 10, 2009 at 04:42 AM, Michael Chu said...
Subject: Re: conversions....
berkeley student :) wrote:
isn't 330 grams of flour equivalent to about 11.64 ounces
which is a little over a 1 1/2 cup of all purpose flour? where
does the 2-2/3 cup come in? i really like the sound of your
recipe and i'd like to make it as accurately as possible!
This is exactly why I measure all flour on a scale. Flour settles
and becomes more dense. All flour volume measurements
(unless from a prepublished recipe) on this site should be
assuming sifted flour - the only way we can get any consistency
when measuring flour by volume. Sifted flour is about 140 g per
US cup. The flour that comes in a bag at the grocery store is
labeled as pre-sifted which is not much use since after sifting it
has settled. The total amount of settling depends on length of
time and how it was handled. Commonly, you'll see this flour
weigh in at 160g to 220g per cup. That makes recipes really
hard to replicate since you don't know how much settling was
assumed by the recipe writer. I don't know why they don't
clarify this in cookbooks - either the author doesn't realize the
difference (seems really hard to believe that) or doesn't care
difference (seems really hard to believe that) or doesn't care
(also hard to believe). Pastry cookbooks and baking cookbooks
will often specify sifted flour and encourage the use of scales.
On September 18, 2009 at 12:36 AM, CompSci Engineer
(guest) said...
Subject: milk?
I have a similar dough recipe but just use water instead of the
milk. I can see how the milk can add a new flavor to the
dough, but would there be a big difference if i used whole/2%
milk instead of the nonfat? I personally never buy nonfat milk
and wouldnt want to buy it just for this recipe. Would it really
affect the consistency of the dough a lot?
Love the website btw, keep it up!! :D
On May 22, 2010 at 01:10 AM, KF2LD (guest) said...
Subject: Test Recipe
I have made this pizza many times and it always tastes great. I
think it belongs in the Recipe File, not Test Recipes. Please
reconsider.
Thank you for your time.
On July 20, 2010 at 11:45 PM, Amanda (guest) said...
Subject: Grid needs work
I loved this recipe the first time I made it, and am making it for
the second time tonight. However, the pizzas are in the oven
now and I realized I missed the step of the second rise, because
it wasn't in the grid.
(My first time through a recipe I work from the detailed
directions, and if I decide it gets a second chance, I print the
recipe or in your case, just the grid.) So, tonight I made the
recipe from the grid, and missed the second rise. I'm sure it
will still be edible, just not as fluffy. I made a note on my
will still be edible, just not as fluffy. I made a note on my
copy, but you might want to update the grid to show that
step!
Love the site and your food reviews on Orthogonal Thought!
On July 22, 2010 at 05:40 AM, Michael Chu said...
Subject: Re: Grid needs work
Amanda wrote:
I loved this recipe the first time I made it, and am making it
for the second time tonight. However, the pizzas are in the
oven now and I realized I missed the step of the second
rise, because it wasn't in the grid.
Sorry about that! I've fixed the recipe table to reflect the
second rise (in the pan).
On August 06, 2010 at 10:24 AM, Scott (guest) said...
Subject: What happened to my crust?
I've made this recipe many times and it's my favorite
homemade crust. Tonight, something went wrong. The crust
came out looking beautiful and golden brown as usual, but the
texture was all wrong. It was spongy and soft instead of airy
and crispy. Any idea what might cause this? Thanks!
On August 06, 2010 at 12:53 PM, Dilbert said...
one possibility is a not hot enough bake temp - a preheated
bake stone is recommended to help cook the crust evenly
this can also happen with an especially heavy/wet topping
'load'
On August 12, 2010 at 03:40 PM, lindsbinz (guest) said...
Great recipe. Tweeted it to my followers & my fiance, who
Great recipe. Tweeted it to my followers & my fiance, who
does most of the cooking. He was very appreciative. :)
On August 25, 2010 at 08:45 PM, guest (guest) said...
Subject: 12 inch
how would i make a 12 inch pizza
On November 12, 2010 at 01:39 PM, an anonymous reader
said...
Subject: metric conversion
hey, couldn't help but notice an error you made in paragraph 4
- 200 F is closer to 90 degrees centigrade than the 65 degrees
you listed.
On November 12, 2010 at 09:31 PM, Michael Chu said...
Subject: Re: metric conversion
Anonymous wrote:
hey, couldn't help but notice an error you made in
paragraph 4 - 200 F is closer to 90 degrees centigrade than
the 65 degrees you listed.
Thanks for catching that. I've fixed the error.
On November 25, 2010 at 02:35 AM, rosilu (guest) said...
Subject: So glad I found your site!
Recently got into making oven pan cakes and then I got the
idea for the pan pizza; which brought me here! Never would
have guessed there was such a place. After reading the
reviews/comments, know it has saved me some time. My kids
are so excited to make this tonight!
My pet peeve...some said use EVOO, but it's make up doesn't
suit it for baking/cooking at high temps.(Yuck! Sorry Rachel)
Anyhow, I know I'll be back for more recipe fun. Thanks a
bunch!

bunch!
On May 24, 2011 at 03:31 PM, an anonymous reader said...
the baking of a microwave is the convection right?
On May 24, 2011 at 04:55 PM, Dilbert said...
a microwave is not a convection oven
Post a comment on Pan Pizza
: