ConstructSim Work Package Server Work Package Server CONNECT...server class machine to provide a...
65
ConstructSim Work Package Server Setup Guide Last Updated: December 30, 2019
Transcript of ConstructSim Work Package Server Work Package Server CONNECT...server class machine to provide a...
ConstructSim Work Package Server
Setup Guide
Last Updated: December 30, 2019

Table of Contents
Chapter 1: Network, Hardware and Software Architecture ....................................................... 4Applications Installations ................................................................................................................................................................................ 4Hardware and Software Architecture .........................................................................................................................................................4
Role Permissions ...............................................................................................................................................................................7ConstructSim Work Package Server Architecture ................................................................................................................................ 9Chapter 2: Pre-Configuring the Environment ...........................................................................10To Register a Project ...................................................................................................................................................................................... 10Chapter 3: WPS Database Pre-Configuration ...........................................................................13To Set the Microsoft SQL Server Properties .........................................................................................................................................13To Create a Database ......................................................................................................................................................................................14To Modify the Database to Support SNAPSHOT_ISOLATION ........................................................................................................ 15Chapter 4: Configuring the ConstructSim Work Package Server Application Server ................. 16To Pre-Configure the ConstructSim Work Package Server Application Server ....................................................................16To Change User Account Control Settings ..............................................................................................................................................17To Configure the ConstructSim Work Package Server Application Server ............................................................................. 17To Create a Datasource ...................................................................................................................................................................................18To Create a Community ..................................................................................................................................................................................23To Create a Storage Device ........................................................................................................................................................................... 25To Create a Repository .................................................................................................................................................................................. 27To Configure the Work Queue Service .....................................................................................................................................................28To Configure a Secure Connection in the eB Application Server ................................................................................................. 29To Register the Engines ................................................................................................................................................................................ 30To Configure Mail Distribution .................................................................................................................................................................. 30To Turn off Audit for the Document and Tag .......................................................................................................................................31To Add a Certificate to the App Server ................................................................................................................................................... 32To Check the Domain of eB Services .........................................................................................................................................................33To Change/Update the Administrator Account Password ............................................................................................................. 33Chapter 5: Configuring the Web Server ................................................................................... 35To Pre-configure the Web Server ............................................................................................................................................................. 35To Configure the SQL Server Reporting Services Component on the Web Server ..............................................................36To Configure the ConstructSim Work Package Server ..................................................................................................................... 37To Register the Domain and URL for IMS ..............................................................................................................................................40To Register a Product to the IMS Environment ..................................................................................................................................41To Configure the Default Web Site for Permissions ......................................................................................................................... 41To Set Security Updates for SSRS Support ............................................................................................................................................41To Configure the Web Server for a Secure Connection .................................................................................................................... 42To Configure the SQL Reporting Server .................................................................................................................................................. 43To Set Up Site Settings Security ..................................................................................................................................................................44To Set Up to View Progress Reports ........................................................................................................................................................44To Set Full Permissions for SSRS User ....................................................................................................................................................47
ConstructSim Work Package Server 2 Setup Guide

Chapter 6: WPS Data Processing Server Pre-Configuration ......................................................48Chapter 7: WPS Data Processing Server Configuration ............................................................ 49ConstructSim Executive Server Installation .........................................................................................................................................49ConstructSim Planner Installation ........................................................................................................................................................... 50To Set Up the Licensing Server .................................................................................................................................................................. 50To Run EncryptWebConfig.ps1 PowerShell Script .............................................................................................................................51To Find System Certificate Names ............................................................................................................................................................52To Make the System Certificate Accessible on the Current User ................................................................................................ 52To Add the Current User to The Certificate User Group ................................................................................................................. 52To Configure the ConstructSim Executive Server for Secure Connection ...............................................................................53Chapter 8: Client Machine Pre-requisites and Configuration ................................................... 54To Install the ConstructSim Executive Client ...................................................................................................................................... 54
Stored Procedures ......................................................................................................................................................................... 59To Create a ConstructSim Executive Project ........................................................................................................................................61
ConstructSim Work Package Server 3 Setup Guide

1Network, Hardware and Software Architecture
Applications InstallationsThe ConstructSim product suite is comprised of two separate application installations. These applicationinstallations operate together based on whether the target computer is intended for use by the Data ProcessingAdministrator or Workface Planner. In addition, a Virtual Construction Model (VCM) database is deployed onto aserver class machine to provide a work-sharing environment for the collective team of administrative and fieldusers.
General Requirements
A CD drive or access to the Internet is required for product installation.ConstructSim products require machines running the Windows 8.1 (64-bit) or Windows 10 (64-bit) operatingsystem.
Applications Installations
The set of application installations include:• ConstructSim Planner: Desktop application for interaction in a Virtual Construction Model.• ConstructSim Executive Client: Workflow execution engine and associated utilities for generating and
updating a Virtual Construction Model.
Internet Access
The ConstructSim Work Package Server is a web-based interface that follows the complete life cycle of a workpackage and stores the engineering data and information modeling for a project. You need Internet access tolaunch this web site.
Hardware and Software ArchitectureRecommended hardware and software requirements for the ConstructSim Planner product suite and theConstructSim Work Package Server are listed below.Note: If you are using Windows 8 or Windows 10, Windows Identity Foundation is already installed on yoursystem but you need to turn it on. To do this, from the Start menu, go to Program and Features. Click TurnWindows features on or off. In the dialog, turn on Windows Identity Foundation.
ConstructSim Work Package Server 4 Setup Guide

File Server
This is optional if you want to use UNC path for your Application server's file repository. If you use theDistributed File Server replication for file backups, you should set up this server.• Microsoft Windows Server 2016• 64 bit, 4 cores• 16 GB RAM or better• 500 GB or better
Application Server Database
• Microsoft SQL Server 2016 SP1 Standard Edition• Microsoft Windows Server 2016• CPU: 64 bit, 4 cores• 56 GB RAM• Disk drives:
• <local drive>: 128 GB• <drive>: 500 GB (SSD) — database data files*• <drive>: 500 GB (SSD) — database log files*• <drive>: 1022 GB — database backups
* If you are creating a large number of projects, you may need 1022 GB.
Data Processing Database Server
• Microsoft SQL Server 2016 SP1 Standard Edition• Microsoft Windows Server 2016• CPU: 64 bit, 4 cores• 56 GB RAM• Disk drives:
• <local drive>: system 128 GB• <drive>: 500 GB (SSD) — database data files*• <drive>: 500 GB (SSD) — database log files*• <drive>: 1022 GB — database backups
* If you are creating a large number of projects, you may need 1022 GB.Note: For more information on disk partition sizes for SQL Servers, see Disk Partition Alignment Best Practicesfor SQL Server on the Microsoft website.
Web Server
• ConstructSim Work Package Server Web Application• Internet Information Services (IIS) 7.0 or better• Windows Identity Foundation• Microsoft Windows Server 2016
Network, Hardware and Software ArchitectureHardware and Software Architecture
ConstructSim Work Package Server 5 Setup Guide

• Microsoft SQL Server 2016 with Reporting Services• ConstructSim Work Package Server Extensions for SSRS• Web Services Gateway (WSG) (optional)• CPU: 64 bit, 4 cores• 16 GB RAM• 128 GB• web browser (Microsoft Internet Explorer is the recommended browser)Note:
If you are using Internet Explorer as your browser, go to Tools > Compatibility View settings and make surethe two options, Display intranet sites in Compatibility View and Display all websites in Compatibility View are off.Also in the Compatibility View Settings dialog, with the web server address in the Add this website: field, clickAdd and make sure the web server address appears in the Websites you've added to Compatibility View: list.
Application Server
You can have up to five communities and one project on each.• Microsoft SQL Server System CLR Types• Microsoft Sync Framework 2.1 Redistributable Package• ConstructSim Work Package Server Application Server (eB System Management Console)• ConstructSim Work Package Server Engines (Excel and Status Visualization)• Microsoft Windows Server 2016• 64 bit, 4 cores• 32 GB RAM• 1022 GB
Data Processing Server
• Command line Utilities for SQL Server 2016• Internet Information Services (IIS) 7.0 or better• ConstructSim Executive Server (Web API)• ConstructSim Planner• ConstructSim i-model Publisher (optional)• Microsoft Windows Server 2016• ConstructSim Work Package Server Application Server (eB System Management Console) to support engines• ConstructSim Work Package Server Engines (Publishing)• CPU: 64 bit, 4 cores• 56 GB RAM• Disk drives:
• <local drive>: system 128 GB• <drive>: 500 GB (large enough to hold the project files) *
* If you are creating a large number of projects, you may need 1022 GB.
Network, Hardware and Software ArchitectureHardware and Software Architecture
ConstructSim Work Package Server 6 Setup Guide

Workface Planner System Requirements
This system is typically a desktop used by the Workface Planner.• Windows Identity Foundation• Microsoft SQL Server Express 2014 SP1/2016 SP1/2017 (English)• Visual C++ Redistributable for Visual Studio 2015• Microsoft Sync Framework 2.1 Redistributable Package• ConstructSim Planner• Windows 8.1 x64 or Windows 10 x64• 64 bit, 4 cores• 32 GB RAM• 256 GB (Solid State Drive)
Data Processing Administrator System Requirements
The administrator system is typically a desktop used by the Data Processing Administrator.• Windows Identity Foundation• Microsoft SQL Server Express 2014 SP1/2016 SP1/2017 (English)• Visual C++ Redistributable for Visual Studio 2015• Microsoft Sync Framework 2.1 Redistributable Package• ConstructSim Planner• ConstructSim Executive Client• Windows 8.1 x64 or Windows 10 x64• 64 bit, 4 cores• 32 GB RAM• 256 GB (Solid State Drive)
Field User System Requirements
The field system can be a desktop, laptop or tablet used by the ConstructSim Work Package Server web user.• iOS 10.3, Safari• Android 6.0.1, Chrome• Windows 8.1 x64 or Windows 10 x64, Internet Explorer 11 or better• Microsoft Office 2016 64 bit or Office 365 (optional)
Role Permissions
The minimum required role permissions for the ConstructSim Work Package Server Architecture is as follows:
Application Database Server PermissionsAdmin permissions:• Login Properties > Server Roles > public• Login Properties > Server Roles > dbcreator
Network, Hardware and Software ArchitectureHardware and Software Architecture
ConstructSim Work Package Server 7 Setup Guide

• Login Properties > Server Roles > sysadmin
Data Processing Database Server PermissionsPrimary admin (for example, ConstructSim project creator):• Login Properties > Server Roles > public• Login Properties > Securables > permissions for <your server> > Create any database
Creator is the owner of the database. Also, creator automatically gets the db_owner fixed role for that database.In order to support multiple data processing admin personas:Second admin (for example, anyone who is not ConstructSim project creator):• Login Properties > Server Roles > public• Login Properties > User Mappings > select <your database> > db_owner• Login Properties > Server Roles > dbcreator
Client Systems(s) Permissions (ConstructSim Workstation)ConstructSim Planner (Local SQLExpress permissions):• Login Properties > Server Roles > public• Login Properties > Securables > permissions for <local machine instance> > Create any database
Network, Hardware and Software ArchitectureHardware and Software Architecture
ConstructSim Work Package Server 8 Setup Guide

ConstructSim Work Package Server Architecture
Network, Hardware and Software ArchitectureConstructSim Work Package Server Architecture
ConstructSim Work Package Server 9 Setup Guide

2Pre-Configuring the Environment
You need to register a CONNECT Project.
To Register a Project1. Sign in to Bentley CONNECT.
The Sign In screen opens.2. Type your email address (if not automatically populated) and password and click Sign In.
The Bentley Cloud Services window opens.3. Click the Projects tab and click the Register a Project button.
The Register a Project page opens.
ConstructSim Work Package Server 10 Setup Guide

Pre-Configuring the EnvironmentTo Register a Project
ConstructSim Work Package Server 11 Setup Guide

4. Complete the fields based on these descriptions:Project Number Project ID used in the organization for tracking the project
internally (for example, the EAP ID, like DMO-063 VP 778)Project Name Common name for the project within the organization (for example,
I-565 Interchange at County Line Road)Asset The AssetWise instance; once connected, AssetWise is accessible
directly from the CONNECTION CenterIndustry The industry to which the project belongs such as, Roads and
Highways, Rail and Transit, Buildings and Facilities, etc.Type Based on the Industry chosenUse Location or Latitude/Longitude For location, enter the location name in the field belowEngineering Location Location of the projectTime Zone Time zone of the project locationData Center Location If the project will be used for any of the CONNECT Services, you will
need to select the location. Upon selection an information dialogopens that explains the locations of the different data centers andhow they relate to each service
Billing Country Location of the billing organizationStatus Active/Inactive
Note: Setting a Project to Inactive hides it from view. If you wish tolocate it at a later time, turn on "Include Inactive" when searchingprojects
Team Member Management When Allow External Team Members is on, you can invite teammembers outside of your organization as long as their organizationis known to Bentley Systems.
5. When all fields are defined, click Save.After saving, you are taken to the portal of your newly-created project.
Pre-Configuring the EnvironmentTo Register a Project
ConstructSim Work Package Server 12 Setup Guide
3WPS Database Pre-Configuration
To set up the configuration for the WPS database, install Microsoft SQL Server 2016 Standard Edition or better.Then you need to set the SQL server properties and create a database.
To Set the Microsoft SQL Server Properties1. Select Start > All Programs > Microsoft SQL Server 2016 > SQL Server Management Studio.
The SQL Server Management Studio dialog opens.2. In the Object Explorer pane, select the server, right-click and select Properties.
The Server Properties dialog opens.
ConstructSim Work Package Server 13 Setup Guide

3. In the Select a page pane, click Security.4. In the Server authentication section, turn on SQL Server and Windows Authentication mode.5. Click OK to exit the Server Properties dialog.6. From the Control Panel, select Administrative Tools > Component Services.7. In the left pane of the Component Services window, select the Services (Local).8. From the list of Services in the middle pane, select SQL Server (MSSQLSERVER).9. From the Actions pane, expand More Actions.
10. Click Restart.11. When the SQL Server starts again, close the Component Services window.
To Create a Database1. Connect to your eB database machine.
WPS Database Pre-ConfigurationTo Create a Database
ConstructSim Work Package Server 14 Setup Guide

2. Open SQL Server Management Studio.3. Create a database with logical name (examples: wpsbuild872, wpsfullbgr).4. Run the script To Modify the Database to Support SNAPSHOT_ISOLATION (on page 15) to support
SNAPSHOT_ISOLATION.
To Modify the Database to Support SNAPSHOT_ISOLATION1. Go to the Start menu > All Programs > Microsoft SQL Server 2016 > SQL Server Management Studio and in
the dialog that opens, connect to the server.2. In the Object Explorer pane, right-click Databases and from the pop-up menu, select New Database.
The New Database dialog opens.3. In the Database name, enter a logical name for the new database.4. Click OK to create the new database.
The new database is created and is located under the Databases node in the Object Explorer.5. Select the new database you created and from the toolbar, click New Query.6. In the new query window, enter the command: ALTER DATABASE [new database name] SET
ALLOW_SNAPSHOT_ISOLATION ON.7. Click Execute to run the query.
The "Command(s) completed successfully" message appears. The database now supportsSNAPSHOT_ISOLATION.
8. Go to Security and right click on Logins. Enter Bentley\ and the user name, which you will use for futuresetups. You can use your Bentley login or default. Regarding the default login, talk to the Administrator of theenvironment you are using. If you setup a local project, it is in your account.
WPS Database Pre-ConfigurationTo Modify the Database to Support SNAPSHOT_ISOLATION
ConstructSim Work Package Server 15 Setup Guide

4Configuring the ConstructSim Work Package Server
Application Server
To Pre-Configure the ConstructSim Work Package Server ApplicationServerMicrosoft .NET Framework 4.5 or higher should be installed.1. To Change User Account Control Settings (on page 17).2. Turn on Remote Connection for Domain Users. (Go to Control Panel > System > Remote settings to open
the System Properties dialog. Open the Remote tab and in the Remote Desktop section, turn on Allow remoteconnections to this computer and click OK. )
3. Configure Windows Firewall. Your on-site IT group should handle this setup.4. Add your domain user to Administrator group on your machine. (Go to Control Panel > Administrative
Tools > Computer Management. In the Computer Management dialog, expand Local Users and Groups andselect Groups. In the middle pane, double-click Administrators. In the Administrators Properties dialog, clickAdd to add your domain user and then click OK.)
5. From the Microsoft website, install Microsoft Sync Framework 2.1 Redistributable Package in the followingorder:1. Synchronization-v2.1-x64-ENU2. Synchronization-v2.1-x86-ENU3. ProviderServices-v2.1-x64-ENU4. DatabaseProviders-v3.1-x64-ENU5. Windows Identity Foundation (Windows6.1-KB974405-x64.msu):
• Microsoft Windows Server 2016 - install through the Windows Server Roles and Features wizard.6. Install the CLR types on the Application Server for SQL Server support of Database and Data Processing
machines. If using SQL Server 2016, you must download and install the 2008, 2012, 2014 and 2016 versionsof SQL Server CLR Types.Version Go To
2008 https://www.microsoft.com/en-us/download/details.aspx?id=304402012 https://www.microsoft.com/en-us/download/details.aspx?id=433392014 https://www.microsoft.com/en-us/download/details.aspx?id=42295
ConstructSim Work Package Server 16 Setup Guide

Version Go To
2016 https://www.microsoft.com/en-us/download/details.aspx?id=52676
Click Download.Version Select
2008 SQLSysClrTypes_amd64.msi2012 ENU\x64\SQLSysClrTypes.msi2014 ENU\x64\SQLSysClrTypes.msi2016 ENU\x64\SQLSysClrTypes.msi
Click Next.7. Create a Windows user account, which you will use to run the eB services and grant local administrator
rights permissions on the eB Application Server.8. Add the created Windows user account for security policy Log on as a service:
1. Go to Control Panel > All Control Panel Items > Administrative Tools and in the right pane, double-click Local Security Policy.
2. In the Local Security Policy dialog, double-click Local Policies.3. In the Local Security Policy dialog Security Settings pane, expand Local Policies and click User Rights
Assignments.4. In the right pane, double-click Log on as a service. The Log on as a service Properties dialog opens.5. Click Add User or Group.6. In the Select Users, Computers, Service Accounts, or Groups dialog, add your windows credentials.7. Click OK.8. Click OK to close the Log on as a service Properties dialog and then close the Local Security Policy dialog.
To Change User Account Control SettingsThis procedure only applies to the Data Processing Server(s).1. Select Control Panel > All Control Panel Items > User Accounts > Change User Account Control Settings
to open the Change User Account Control Settings dialog.2. Change the setting to Never Notify.3. Click OK to accept the changes.4. Restart the computer to apply the changes, if required.
To Configure the ConstructSim Work Package Server Application Server1. Install the CLR Types.2. Install the ConstructSim Work Package Server Application Server.
Configuring the ConstructSim Work Package Server Application ServerTo Change User Account Control Settings
ConstructSim Work Package Server 17 Setup Guide

Use the default options. This also installs the eB System Management Console. Use the eB Domain usernameand password when prompted during installation.
3. Install the ConstructSim Work Package Server Engines:1. Excel Import Engine2. Work Package Publish Engine3. Status Visualization Processing Engine
4. Install eB Director.5. To limit direct log in to the Application Server Database and eB Application Server machines, it is
recommended that all access be done from the Data Processing Server. The eB System Management Consoleis used to set up the following components for the ConstructSim Work Package Server:• datasource• community• storage• repository• work queue services• enginesThis console is installed on the eB App Server and Data Processing Server (through the Engines install).You will use the eB Application Server, the one not set to (local), for all subsequent actions.
6. Use the eB System Management Console to set up the following components of the ConstructSim WorkPackage Server. To open the eB System Management Console, select Start > All Programs > Bentley > eB > eBSystem Management Console.1. create a datasource2. create a community3. create storage4. create a repository5. configure work queue services6. register engines
To Create a Datasource1. Open eB System Management Console (Start > Bentley > eB System Management Console).2. In the Explorer pane, under the Servers node, expand your server.3. Right-click the Data Sources node and select Add DataSource.
4. When Datasource Wizard opens, click Next.
Configuring the ConstructSim Work Package Server Application ServerTo Create a Datasource
ConstructSim Work Package Server 18 Setup Guide

5. On the Select Database Type page, select the Microsoft SQL Server driver and click Next.
Configuring the ConstructSim Work Package Server Application ServerTo Create a Datasource
ConstructSim Work Package Server 19 Setup Guide

6. On the Select Server page, in the Database Server field, enter the eB Data Processing machine’s name, oryou can select (Local), if the server is on your local machine or you can pick from the drop-down list or enterthe server domain.
7. On the Login Information page, enter the user name and password of the database account used to log in tothe selected SQL Server instance, or if database account is a Windows account select Use WindowsAuthentication, and click Next.Note: It is recommended that you use the public DNS name of the App Server Database.
8. On the Select Database page, select the database you created for eB and click Next.9. On the eB Data Source Name page, enter a name for the new eB datasource and click Next.
The name of the selected database is automatically supplied as the default name for the datasource. You cankeep these names the same, or you can enter a new name for the datasource.Note: It is recommended that you only use letters and numbers in the datasource name, and that you do notuse any special characters. While it is best to avoid all special characters, these characters in particular areknown to cause problems:% . _ < >
10. On the Ready page, click Finish.
Configuring the ConstructSim Work Package Server Application ServerTo Create a Datasource
ConstructSim Work Package Server 20 Setup Guide

11. On the Finished page, click Close.
The new datasource is added under the Data Sources node.
Configuring the ConstructSim Work Package Server Application ServerTo Create a Datasource
ConstructSim Work Package Server 21 Setup Guide

12. Select the new datasource.A dialog opens to inform you that the database used by this datasource needs to be updated.
13. Click Yes.The datasource expands in the Explorer pane with the Database Scripts item already selected.In the content pane, the Core database package is already selected.
14. In the content pane, in the Update Status section, click the link, Click to Start the Database Update.
15. When the database update is complete, click OK.
Note: The database update creates a log file which you can review by expanding your datasource in the Explorerpane and selecting Database Logs. There should be no error messages in the log file. If upgrading, error
Configuring the ConstructSim Work Package Server Application ServerTo Create a Datasource
ConstructSim Work Package Server 22 Setup Guide

messages may be expected due to the nature of the upgrade. If you are not sure what the error message means,file a service ticket at http://selectservices.bentley.com/.
Note: You can select a datasource and click the Test Connection icon on the toolbar to verify the connectionto the database. If the system fails to connect to the datasource, double-check that you are using the correctserver name, database name, user name and password. If not, return to step 1 of this procedure and redo thisprocess.
To Create a Community1. Open eB System Management Console (Start > All Programs > Bentley > eB > eB System Management
Console).2. In the Explorer pane, expand Servers > your_server.3. Right-click Communities and select Add Community.
The New Community Properties dialog opens.
Configuring the ConstructSim Work Package Server Application ServerTo Create a Community
ConstructSim Work Package Server 23 Setup Guide

4. From the Application Server list, enter or select the name of the computer on which Application Server isinstalled.
5. From the Datasource list, select the name of a datasource running on the server selected in the ApplicationServer field.
6. From the Site list, select the name of the ConstructSim Work Package Server website running on the serverselected in the Application Server field, usually it is Main.
7. Click OK.The Community Login dialog opens for you to log in to the selected datasource.
Configuring the ConstructSim Work Package Server Application ServerTo Create a Community
ConstructSim Work Package Server 24 Setup Guide

8. Enter the credentials of the default eB administrator account (ADMIN / ADMIN) and click OK.The new community is added under the Communities node.Note: After you finish working in eB System Management Console, it is recommended that you change thepassword for the default administrator account in eB Director. After changing this password, you will need toreturn to eB System Management Console, change the saved password for this community, and restart theService Manager.
To Create a Storage Device1. In the eB System Management Console (Start > Bentley > eB System Management Console) Explorer pane,
click the + sign next to the server name to expand the contents.2. Click Storage to show the list of storage devices and the communities served by the devices.
Configuring the ConstructSim Work Package Server Application ServerTo Create a Storage Device
ConstructSim Work Package Server 25 Setup Guide
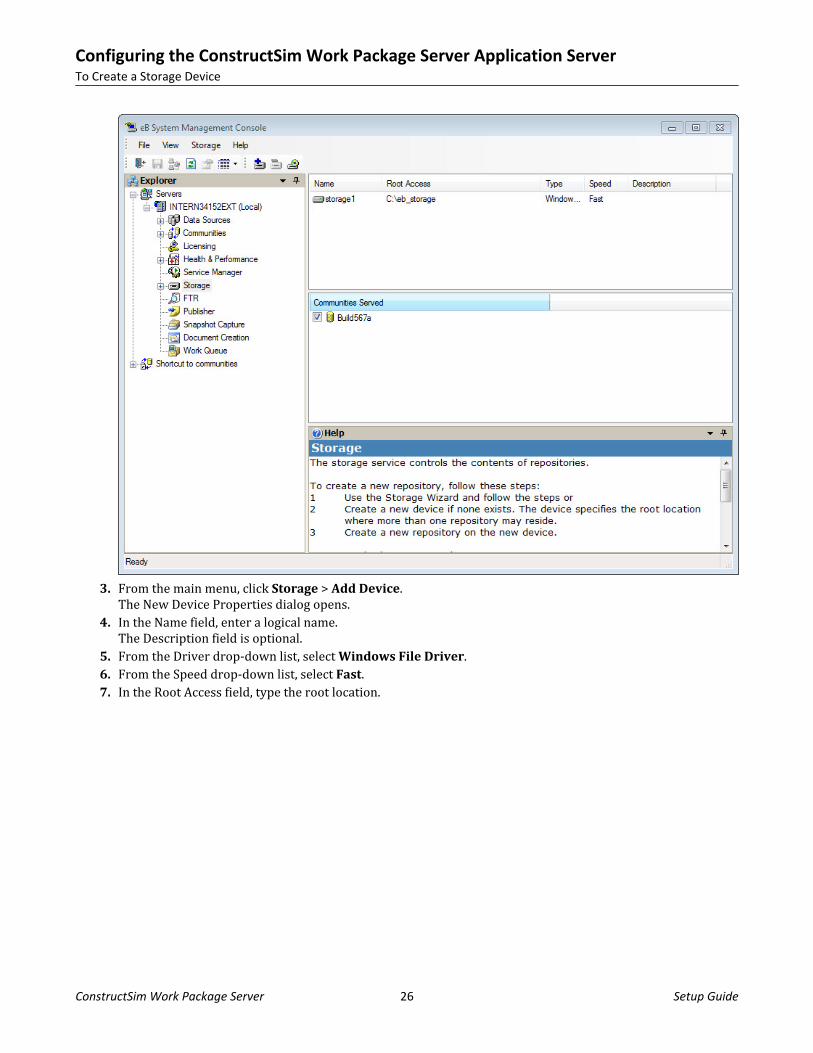
3. From the main menu, click Storage > Add Device.The New Device Properties dialog opens.
4. In the Name field, enter a logical name.The Description field is optional.
5. From the Driver drop-down list, select Windows File Driver.6. From the Speed drop-down list, select Fast.7. In the Root Access field, type the root location.
Configuring the ConstructSim Work Package Server Application ServerTo Create a Storage Device
ConstructSim Work Package Server 26 Setup Guide

8. Click OK to exit the New Device Properties dialog.Note: If the checkbox is not already checked, turn on the Community that will be using the storage devices inthe Communities Served section. If prompted, enter the credentials of the default eB administrator account(ADMIN / ADMIN)and click OK. The storage device is now added to the Community.
To Create a Repository1. Select the storage device that you created.
This shows the repositories that are being used on the device.2. Right click the newly-created storage and select Add Repository.
The New Repository Properties dialog opens.
Configuring the ConstructSim Work Package Server Application ServerTo Create a Repository
ConstructSim Work Package Server 27 Setup Guide

3. In the Name field, enter a name for the repository.4. From the Community drop-down list, select the community that you will use for this repository.5. In the Path field, specify the location of the repository within the storage device.
The Full path field is automatically updated to reflect the Path field.6. Leave the default check boxes as they are and click Ok to create the repository.
The Select Repository Group dialog opens.7. Select a repository group (Main) to which the new repository will belong and click Ok.
The new repository is listed on the storage device.
To Configure the Work Queue Service1. In the Explorer pane, expand Servers > your server.2. Select the Work Queue node.3. In the Communities Served list, check the check box next to your community.4. Log in to the community if prompted use ADMIN / ADMIN.
The Properties dialog opens.5. Turn on Generic, Bulk Transaction, Asynchronous Automation, External File Copy, and Copy Object.
Configuring the ConstructSim Work Package Server Application ServerTo Configure the Work Queue Service
ConstructSim Work Package Server 28 Setup Guide

6. Click OK.
To Configure a Secure Connection in the eB Application Server1. In the eB System Management Console Explorer panel, expand Communities.2. Select the Community you created.
The Main Site schema displays in the right side window.3. Select the Connection arrow (red arrow) from the schema, right click and from the menu select Properties.4. In the Connection info field, enter the WPS Application server Bentley certificated domain:
If using HTTPS as the SSL required proper name; for IMS use: DNS + domain.com.If using HTTP connect and the eB login, then enter DNS.
5. Click OK.6. Follow the same steps for the Publish Engine Data Processing machine connection.
Configuring the ConstructSim Work Package Server Application ServerTo Configure a Secure Connection in the eB Application Server
ConstructSim Work Package Server 29 Setup Guide

To Register the Engines1. Open the eB System Management Console (Start > All apps > Bentley > eB System Management Console)
and expand your server's node.2. In the Explorer tree, expand Communities, and then expand your project node.3. Click Engines.
A list of engines displays in the top right pane.
4. Select the Excel Import Engine and then click the Manage Server Registration icon or select Engines >Manage Server Registration.
5. In the Engine <name of engine> servers dialog that opens, click Add and select the server from the list. ClickOK and Close.
6. (Optional) If you will use Status Visualization, repeat steps 4 and 5 for the Status Viz Processing Engine.7. (Optional) If you plan to publish work packages, repeat steps 4 and 5 for the Work Package Publish Engine.
To Configure Mail Distribution1. Open the eB System Management Console (Start > All Programs > Bentley > eB > eB System Management
Console) and expand your server's node.2. In the Explorer tree, click Mail Distribution.3. In the Communities Served list, turn on the check box next to your community.
Configuring the ConstructSim Work Package Server Application ServerTo Register the Engines
ConstructSim Work Package Server 30 Setup Guide

4. Log in to the community, if prompted use ADMIN / ADMIN.The Properties dialog opens.
5. In the SMTP Server field, enter smtp.bentley.com.6. In the Sender Account, type [email protected]. In the SMTP Timeout (min) field, type 1.
8. When finished, click OK.
To Turn off Audit for the Document and Tag1. Open the eB System Management Console (Start > All Programs > Bentley > eB > eB System Management
Console) and expand your server's node.2. In the Explorer tree, expand Communities, and then expand your project node.3. Click Audit Trail.4. Select Document and uncheck Changed, Deleted, Purged. Save the changes.
Configuring the ConstructSim Work Package Server Application ServerTo Turn off Audit for the Document and Tag
ConstructSim Work Package Server 31 Setup Guide

5. Select Tag and uncheck Changed, Deleted, Purged. Save the changes.
To Add a Certificate to the App Server1. Open the eB System Management Console and in the Explorer pane, navigate to Servers > your server >
Service Manager.2. In the right pane, click the Ssl tab.
The certificate that is configured for the SSL port (443) displays.
Configuring the ConstructSim Work Package Server Application ServerTo Add a Certificate to the App Server
ConstructSim Work Package Server 32 Setup Guide

3. If no certificate is currently configured for the SSL port (443), click Configure Ssl.A list of available certificates displays.
4. Select a SSL certificate for port 443 and click OK.
To Check the Domain of eB ServicesAll eB Services should be running under a domain account, not a local account.Use the following procedure to make sure that all eB Services are running under a domain account.1. Open eB System Management Console (Start > All Programs > Bentley > eB > eB System Management
Console.2. In the Explorer pane, expand Servers > <your server> and click Service Manager.
The Services tab shows a list of all the eB Services.3. Make sure that the Log On as column shows a domain account (and not a local account).4. If the password for the Service user changes, make sure to change the password for the eB services also.
To Change/Update the Administrator Account Password1. To change the administrator account password, open eB System Management Console (Start > All
Programs > Bentley > eB > eB System Management Console ).2. In the Explorer pane, expand Servers > your_server and select the Communities node.3. In the Communities list, right-click your community and select Properties.4. In the Community Login Information section, change the password and click OK.5. In the Explorer pane, select the Service Manager node and restart eB Service Manager.
Configuring the ConstructSim Work Package Server Application ServerTo Check the Domain of eB Services
ConstructSim Work Package Server 33 Setup Guide
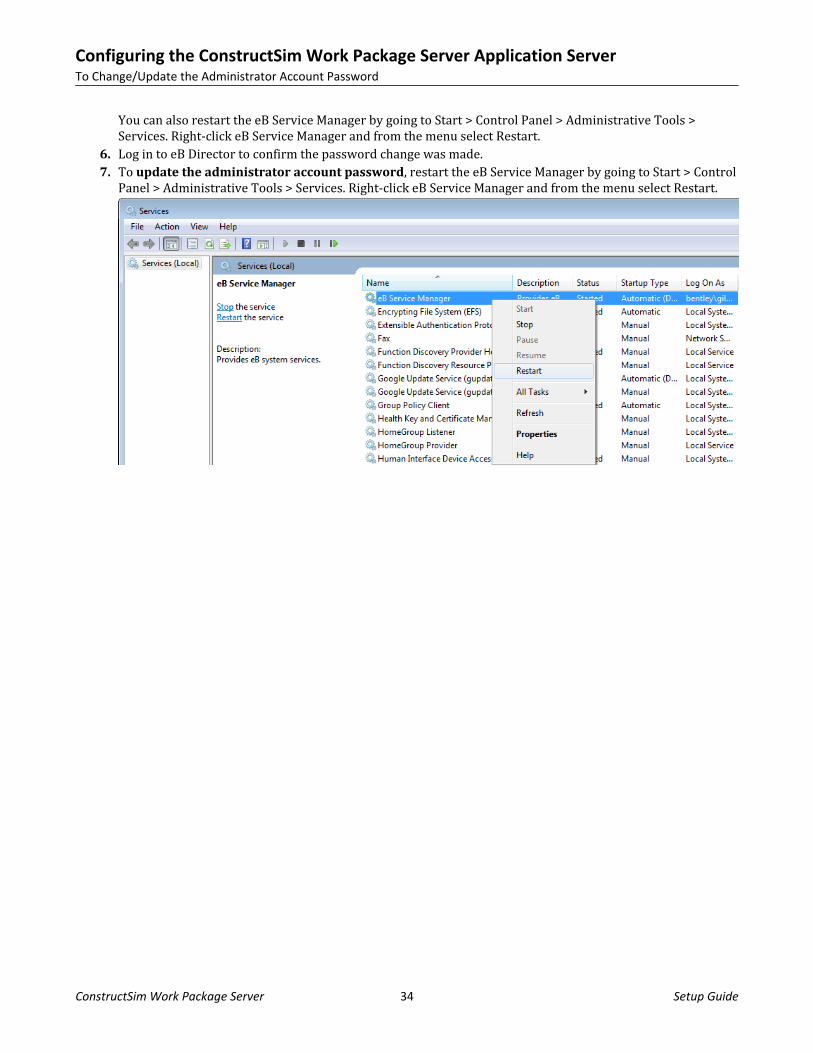
You can also restart the eB Service Manager by going to Start > Control Panel > Administrative Tools >Services. Right-click eB Service Manager and from the menu select Restart.
6. Log in to eB Director to confirm the password change was made.7. To update the administrator account password, restart the eB Service Manager by going to Start > Control
Panel > Administrative Tools > Services. Right-click eB Service Manager and from the menu select Restart.
Configuring the ConstructSim Work Package Server Application ServerTo Change/Update the Administrator Account Password
ConstructSim Work Package Server 34 Setup Guide

5Configuring the Web Server
To Pre-configure the Web Server1. From the Microsoft website, install the following:
• Microsoft SQL Server 2016 for SSRS• Microsoft Report Viewer 2015 Runtime• .NET Framework 4.5 or higher version• Microsoft Sync Framework 2.1 Redistributable Package in the following order
1. Synchronization-v2.1-x64-ENU2. Synchronization-v2.1-x86-ENU3. ProviderServices-v2.1-x64-ENU4. DatabaseProviders-v3.1-x64-ENU5. Windows Identity Foundation (Windows6.1-KB974405-x64.msu):
• Microsoft Windows Server 2016 – install through the Windows Server Roles and Features wizard2. Turn on Remote Connection for Domain users.3. Make sure that Default Web Site protocol is Started. To do this, go to Control Panel > Administrative Tools
and double-click Internet Information Services (IIS) Manager.The Internet Information Services (IIS) Manager window opens.
4. In the Connections pane, under the ConstructSim Work Package Server Web Server name, expand the list.5. Expand the Sites list.6. Start the Default Web Site protocol:
Right-click on Default Web Site and from the right-click menu, Manage Web Site > Start.orSelect the Start command at the right side panel in the Manage Web Site pane.
ConstructSim Work Package Server 35 Setup Guide

To Configure the SQL Server Reporting Services Component on the WebServerSQL Server Reporting Services requires that IIS APPPOOLDefaultAppPool have additional privileges. If this is notconfigured, you get this error when you select any hosted report:The permissions granted to user 'IIS APPPOOLDefaultAppPool' are insufficient for performing this operation.(rsAccessDenied)
1. From the Start menu, open the Internet Information Services (IIS) Manager.2. In the Connections pane, click Application Pools.3. In the Application Pools pane (right), double-click DefaultAppPool.
The Edit Application Pool dialog opens. The Name field is not editable.4. Set the following fields as below:
.NET Framework version .NET Framework V2.0.50727Managed pipeline mode IntegratedStart application pool immediately On (the default)
5. Click OK to close the Edit Application Pool dialog.6. In the Application Pools pane, right-click DefaultAppPool and select Advanced Settings.
The Advanced Settings dialog opens.
Configuring the Web ServerTo Configure the SQL Server Reporting Services Component on the Web Server
ConstructSim Work Package Server 36 Setup Guide

7. In the Process Model section, click the drop down button in the Load User Profile field and set this option toTrue.
8. In the same section, click the browse button on the Identity field.The Application Pool Identity dialog opens.
9. Select Custom account and click Set.The Set Credentials dialog opens.
10. Add the User name and password and confirm the password.The custom account information displays in the Identify field of the Process Model section.
11. Click OK to close the Advanced Settings dialog.
To Configure the ConstructSim Work Package ServerBefore setting up the ConstructSim Work Package Server, open the Server Manager and navigate to Manage >Add Roles and features > Server Roles > Web Server (IIS). Scroll down to the Role Services and check if thefollowing roles are installed:• Web Server
• Common HTTP Features• Static Content• Default Document• HTTP Errors
• Application Development• ASP.NET• .NET Extensibility• ISAPI Extensions• ISAPI Filters
• Health and Diagnostics• HTTP Logging (recommended, but not required)
• Security• Windows Authentication (required for eB users to log in with Windows accounts)
• Management Tools• IIS Management Console
1. Install WPS Extensions for SSRS (x64).2. If the instance name (Administrators Tools> Services SQL Server (<instance name> ) is NOT the default
(MSSQLSERVER), install WPS Extensions for SSRS (x64) using the command prompt with optionalparameter.1. Open the command prompt and enter: msiexec /I "optional\path\to\WPS Extensions for SSRS
(x64) (x??).msi" EB_REPORTINGSERVICES_INSTANCENAME=SQLInstanceName. For example,msiexec /I "C:\Users\Administrator\Desktop\WPS Extensions for SSRS (x64).msi "EB_REPORTINGSERVICES_INSTANCENAME=WPSSQL2012SP1
2. Run the command.3. Complete the steps in the Setup Wizard.
3. Install the ConstructSim Work Package Server Web application.
Configuring the Web ServerTo Configure the ConstructSim Work Package Server
ConstructSim Work Package Server 37 Setup Guide

4. Click Start > All Programs > Bentley > eB > eB Web Manager.5. In the eB Web Application Manager dialog, select File > New Web to create a new web interface.
The Edit Web dialog opens.6. In the Application Server field of the eB Server tab, enter certificated domain (APP machine) and click
Connect.7. Go to the Application tab and enter the following:
• In the Name field, enter the site name.
Configuring the Web ServerTo Configure the ConstructSim Work Package Server
ConstructSim Work Package Server 38 Setup Guide

Note: Site address should be certified for IMS.• In the Folder location field, enter c:\inetpub\wwwroot.• From Application pool drop-down select DefaultAppPool.
8. Open the Authentication tab.
• From the Authentication Provider drop-down, select Bentley IMS.• Enter the Realm URI; this is your WPS website URL.• Add the Audience URIs (enter your website URL).
9. Click the Functionality tab and turn on Work Packaging Services and eB Document Manager.
Configuring the Web ServerTo Configure the ConstructSim Work Package Server
ConstructSim Work Package Server 39 Setup Guide

10. At the bottom of the dialog, click the Ready to install (click here to start) link.When finished, an alert tells you that deployment is complete.
11. If you are using Internet Explorer as your browser, do the following:• In Internet Explorer, go to Tools > Compatibility View settings.• Make sure the two options, Display intranet sites in Compatibility View and Display all websites in are on.• Compatibility View is off. (The Display all websites in Compatibility View option is not present in Internet
Explorer version 11).
To Register the Domain and URL for IMS1. Follow the instructions in the procedure To Register a Product to the IMS Environment (on page 41).2. Log a help ticket to Bentley to register your domain and URL in IMS.3. Make sure your internal authentication supports IMS.4. Make sure you register all the URLs that you will use to connect to WPS Web.5. Make sure to register all domains, which users would be using (see example).
You are originally from Company1. Your domain is company1.com.
Your active users would be from a couple of companies, who have their own company’s credentials:
[email protected], [email protected] and [email protected]
You want them to have permission to your WPSConstructSim Work Package Server Web and work withConstructSim Planner.You have two options:
Configuring the Web ServerTo Register the Domain and URL for IMS
ConstructSim Work Package Server 40 Setup Guide

1. Create accounts for user2 and user3 in your company1.com domain, then you do not need to registerthe other two domains.
2. Register all three domains in the Bentley IMS system.
To Register a Product to the IMS Environment
Registration
To register the product, follow these steps:1. File a help request. ConstructSim Work Package Server (CWPS) needs to be registered to either the qa
environment or the production environment for Relying Party identification.2. Prepare a spreadsheet with required information and add it to help request. You should list all web sites you
want to register to IMS and also URLs for desktops or mobile clients.3. After registration you should:
• create an eB user with your email• ensure that you can login to the registered WPS Web via the qa environment or production environment
(depends on where you registered)
To Configure the Default Web Site for Permissions1. From the Internet Information Services (IIS) Manager Connections pane, expand Default Web Site and then
the project folder.2. Right-click on App_Data.3. From the pop-up menu, select Edit Permissions.4. In the App-Data Properties dialog, open the Security Tab.5. Click Edit.
The Permissions for App_Data dialog opens.6. Highlight the IIS_IUSRS account.7. From the Permissions window, turn on the Write option.8. Repeat these steps for any additional WPS Web Sites / Virtual directories.
To Set Security Updates for SSRS Support1. Launch Windows Explorer and go to C:\Windows\System32\inetsrv\config.2. In the Config folder, right-click and select properties.3. Select the Security Tab, than select Edit.4. Select Add and type the NETWORK SERVICE account and select check name.5. Once the NETWORK SERVICE account has been added, change the security settings.6. Toggle on all available permissions.7. Apply permissions and exit accepting thr changes.
Configuring the Web ServerTo Register a Product to the IMS Environment
ConstructSim Work Package Server 41 Setup Guide

Note: There may be warning/error dialogs stating that certain files or folders cannot be modified. Dismiss thedialogs.
To Configure the Web Server for a Secure ConnectionTo configure the Web Server for a Secure Connection, you need to add a HTTPS certificate through the InternetInformation Services (IIS) Manager.1. From the Start menu, open the Internet Information Services (IIS) Manager.2. In the Connections panel, navigate to the server name > Sites > Default Web Site.3. Right-click and from the pop-up menu, select Edit Bindings.
The Site Bindings dialog opens.
4. In the Site Bindings dialog, click Add.The Add Site Binding dialog opens.
Configuring the Web ServerTo Configure the Web Server for a Secure Connection
ConstructSim Work Package Server 42 Setup Guide

If the https binding already exists, click Edit and verify if the certificate is correct and has no errors bypressing the View button.
5. In the Add Site Binding dialog, change Type to https.6. Leave the default IP address to All Unassigned.7. From the drop-down menu, select the SSL certificate.
If you want to see the certificate, click View.8. Click OK to close the Add Site Binding dialog.9. If you get a warning message about overriding the current binding, click Yes.
10. Close the Site Bindings dialog.11. Check the Authenication option in the Default Web Site. Only Anonymous Authenication should be Enabled.12. In Internet Information Services (IIS) Manager, click SSL Settings.13. Turn on Require SSL.
You now have a secure connection for your web server.
To Configure the SQL Reporting Server1. From the Start menu, navigate to Microsoft SQL Server 2016 > Configuration Tools > Reporting Services
Configuration Manager.2. In the Reporting Services Configuration Connection dialog, verify the Server Name and select the Report
Server Instance.3. Click Connect to connect to your server.4. Additional security is defined through the SQL Server Reporting Services Site Settings. Make sure the service
account is NETWORK SERVICES in SERVICE ACCOUNT.Note: When changing a service account, the system asks you to create an encryption key. Make sure to save itand check password requirements. An example for a password: Q!w2e3r4.
5. In the left-hand pane, select Report Manager URL.The Report Manager URL page displays for HTTP and HTTPS. If not, add URLs through Advanced settings.Make sure the URL displays the correct server DNS. The same applies to the Web Service URL tab.Note: These links can be used when setting up the ConstructSim project to enable reporting services.
Configuring the Web ServerTo Configure the SQL Reporting Server
ConstructSim Work Package Server 43 Setup Guide

6. Navigate to the Database tab and verify that the SQL Server name is correct. If needed, change the database.7. Make sure that all links works. If something is wrong, verify that the Web server is working correctly.8. Navigate to the Execution Account tab and specify the user which you are using for the ConstructSim
Executive Client.
To Set Up Site Settings SecurityAdditional security is defined through the SQL Server Reporting Services Site Settings.1. Open https://servername.com:443/Reports and login with your domain account.2. From the top right corner of the SQL Server Reporting Services Home page, click Settings > Site Settings.3. From the left pane of the Site Settings window, click Security.4. To add folder security for specified users, in the menu bar, click Add group or user.5. In the New System Role Assignment window, type in the group or user name.6. Select a role(s) for the group or user and click OK.
The Site Settings window displays the new group or user and the role assigned.7. Return to the Home page and add the same users/groups to Folder Settings > Security.8. Exit the SQL Server Reporting Services window.
To Set Up to View Progress ReportsOnce you have set up a person, project and permissions for a Windows-authenticated user, you can set up theSQL Server Reporting Services Configuration Manager to view progress reports in the ConstructSim WorkPackage Server.1. Go to Start > All Programs > Microsoft SQL Server 2016 > Configuration Tools > Reporting Services
Configuration Manager.The Reporting Services Configuration Connection and Reporting Services Configuration Manager dialogsopen.
2. In the Reporting Services Configuration Connection dialog, type the Server Name (if not already displayed)and from the Report Server Instance drop-down, select the report server. Click Connect.
3. In the Reporting Services Configuration Manager dialog's Connect pane, click Report Manager URL.Two URLs display.
Configuring the Web ServerTo Set Up Site Settings Security
ConstructSim Work Package Server 44 Setup Guide

4. Click the second URL.The SQL Server Reporting Services Home page opens in your browser.
5. On the home page, click the datasource you created.Engineering Quantities, Project Scorecards, Work Packaging, and your Community display on the home page.
6. Select your Community.The Community's Properties pane displays.
Configuring the Web ServerTo Set Up to View Progress Reports
ConstructSim Work Package Server 45 Setup Guide

7. In the Credentials section, turn on Using the following credentials and enter Admin/Admin.
Configuring the Web ServerTo Set Up to View Progress Reports
ConstructSim Work Package Server 46 Setup Guide

8. Click Apply.9. Repeat the same for the -DP datasource.
10. Close the browser window.11. Close the Reporting Services Configuration Manager.
You are now able to view progress reports in the ConstructSim Work Package Server.
To Set Full Permissions for SSRS User1. Go to C:\Windows\System32\inetsrv.2. Right-click on Config > Properties > Security > Edit > Add.3. Type the user who is running SSRS.4. Turn on Full Control.5. Save.
Configuring the Web ServerTo Set Full Permissions for SSRS User
ConstructSim Work Package Server 47 Setup Guide

6WPS Data Processing Server Pre-Configuration
1. IIS is installed with these roles:• Web Server
1. Common HTTP Features2. Static Content3. Default Document4. HTTP Errors
• Application Development1. ASP.NET2. .NET Extensibility3. ISAPI Extensions4. ISAPI Filters
• Health and Diagnostics1. HTTP Logging (recommended, but not required)
• Security1. Windows Authentication (required for eB users to log in with Windows accounts)
• Management Tools1. IIS Management Console
2. Install VC++ 2015 redistributable [(64x) and (86x)].3. Install Microsoft Sync Framework 2.1 Redistributable Package in the following order:
a. Synchronization-v2.1-x64-ENUb. Synchronization-v2.1-x86-ENUc. ProviderServices-v2.1-x64-ENUd. DatabaseProviders-v3.1-x64-ENUe. Windows Identity Foundation (Windows6.1-KB974405-x64.msu):
• Microsoft Windows Server 2016 - install through the Windows Server Roles and Features wizard.4. Make sure Default Web Site protocol is running and port :443 (use 54595 if your setup is on a single
machine) has SSL certificate assigned.5. Install Microsoft ODBC Driver 13 for SQL Server.6. Install SQLCMDTools.7. Install .NET Framework 4.7.2 or higher.8. Restart the computer.
ConstructSim Work Package Server 48 Setup Guide

7WPS Data Processing Server Configuration
To get started, download and install the following products:1. ConstructSim Executive Server2. ConstructSim PlannerCreate a Windows user account, which you will use to run the ConstructSim Workflow Services and grant localadministrator rights permissions on the Data Processing Server.Add the created Windows user account for security policy Log on as a service:1. Go to Control Panel > All Control Panel Items > Administrative Tools and in the right pane, double-click Local
Security Policy.2. In the Local Security Policy dialog, double-click Local Policies.3. In the Local Security Policy dialog Security Settings pane, expand Local Policies and click User Rights
Assignments.4. In the right pane, double-click Log on as a service. The Log on as a service Properties dialog opens.5. Click Add User or Group.6. In the Select Users, Computers, Service Accounts, or Groups dialog, add your Windows credentials.7. Click OK.8. Click OK to close the Log on as a service Properties dialog and then close the Local Security Policy dialog.
ConstructSim Executive Server Installation1. Double-click the server installer to open the ConstructSim Executive Server Setup Wizard.
ConstructSim Work Package Server 49 Setup Guide

2. Click Next and specify the server installation location.3. Click Next and choose the ConstructSim Work Package Server installation location.4. Click Next and enter User credentials on which the service will be run, then click Next.5. Insert the WPS API port that the Server will use (usually 443).6. Insert the name of the server and WPS API database name, where the WPS API database will be stored.7. Click Install.
ConstructSim Planner InstallationDouble-click the installer. Check the box to accept the End User License Agreement and click Install. Follow theSetup Wizard instructions.ConstructSim Planner installs Connection Client version 10.00.14.18.
To Set Up the Licensing Server1. Open the Connection Client and update it to the latest version (at least 10.00.17.10 or higher).
WPS Data Processing Server ConfigurationConstructSim Planner Installation
ConstructSim Work Package Server 50 Setup Guide
2. Launch a command line.3. Go to the location where the licensing service is installed, for example: C:\Program Files\Common Files
\Bentley Shared\CONNECTION Client\LicService.4. Execute Bentley.Licensing.ActivationWizard.exe /serversetup.
If you want to specify ports use [-port1:port1number] [-port2:port2number], if not they will be selectedautomatically.
5. Log in with your IMS user and close the log-in window.6. Go to the Bentley Activation Wizard.7. Select Register Server and click Next.8. In the Machine Name field, enter the Data Processing server name.9. Select United States in Country field and click Next.
10. Add Product ConstructSim Executive to the list and click Next.11. Click Close.
To Run EncryptWebConfig.ps1 PowerShell ScriptThe script should be run in Administrator mode with following arguments:path directory of web.config file to encrypt. Directory is checked recursively for all web.config
files.settingsFile (optional) path to deployment scripts settings file. CertificateName property must be
defined for the script to find the machine certificate for encrypting. Either settingsFile orcertificateName property must be passed.
userToEncrypt (optional) user name to encrypt. If not passed, takes RBACUser node from web.config file.Should be passed in plaintext (either as a parameter or in web.config file).
passToEncrypt (optional) password to encrypt. If not passed, takes RBACPassword node from web.configfile. Should be passed in plaintext (either as a parameter or in web.config file).
certificateName (optional) certificate name to encrypt with. To check your machine’s certificate name, seeFinding machine’s certificate name.
Example of running the script:& .\EncryptWebConfig.ps1 -path "C:\inetpub\ConstructSim Executive Server" -settingsFile ..\settings.txt -userToEncrypt "[email protected]" -passToEncrypt "LxmH_kyhwB4Q?DaD"
The script goes through every web.config file in the given directory, and sets RBACUser and RBACPasswordnodes to the encrypted values.Known issues/errors:1. Invalid settings file — Make sure the settings file is in the given path.2. Settings file's certificateName property is null or empty — Make sure the settings file has a certificateName
property set.3. RBACUser or RBACPassword node not found in <path> — Make sure web.config file has RBACUser and
RBACPassword nodes defined. In case the file should not have the nodes, it will be skipped.4. Unable to save web config in <path> — Make sure you have write access to the web.config file (Administrator
mode is advised).
WPS Data Processing Server ConfigurationTo Run EncryptWebConfig.ps1 PowerShell Script
ConstructSim Work Package Server 51 Setup Guide

5. Failed to get certificate. Certificate is not found or expired — Open the local machine certificate store andcheck if a certificate with the name of the certificateName property in settings.txt file is under Personal/Certificates and has not expired.
6. Passed string is null or empty — Make sure that the userToEncrypt and passToEncrypt parameters arepassed as parameters or defined as plain text in web.config file.
7. System.Security.Cryptography.CryptographicException — Keyset does not exist is thrown on WPS API Sitewhen decrypting.
To Find System Certificate Names1. To Make the System Certificate Accessible on the Current User (on page 52).2. Go to Personal > Certificates.
You should see a Server/Client Authentication certificate issued by Bentley-Internal-CA. Its “Issued to” nameis used in the encryption scripts.Note: Passed names should not contain regex escape characters such as ‘*’, ‘-‘, ‘+’. In case the actual certificatename contains the characters (for example, “*.bentley.com”), a substring without the characters should bepassed (for example, “.bentley.com”).
To Make the System Certificate Accessible on the Current UserYou need to open the local machine certificate store.1. Open the Local machine certificate store:
by typing Manage computer certificates in the search barorby using mmc snap-in
2. If using mmc snap-in, do the following1. Execute Microsoft Management Console (mmc.exe).2. Click File > Add/Remove Snap-in (<Ctrl+M>).3. From the available snap-ins list, select Certificates and click Add.4. From the Certificates snap-in dialog, select Computer account and click Next.5. Select Local computer and click Finish.6. Click OK.
To Add the Current User to The Certificate User Group1. Open Certificates (Local Computer) > Personal > Certificates menu.2. In the right pane, right-click on the machine certificate and select All Tasks > Manage Private Keys.3. In the Group or user names panel, click Add.4. In the Enter the object names to select field, type in the account that is running WPS.API site and click
Check Names.5. After the account has been found, click OK.
WPS Data Processing Server ConfigurationTo Find System Certificate Names
ConstructSim Work Package Server 52 Setup Guide

6. Click OK.
To Configure the ConstructSim Executive Server for Secure ConnectionTo configure the Web Server for a Secure Connection, you need to add a HTTPS certificate through the InternetInformation Services (IIS) Manager.1. From the Start menu, open the Internet Information Services (IIS) Manager.2. In the Connections panel, navigate to Server name > Sites > Bentley.WPS.Api.3. Right-click and from the pop-up menu, select Edit Bindings.
The Site Bindings dialog opens.4. In the Site Bindings dialog, click Add.
The Add Site Binding dialog opens.5. If HTTPS binding already exists, click Edit and verify if the certificate is correct and has no errors by pressing
the View button.6. In the Add Site Binding dialog, change Type to https.7. Leave the default IP address to All Unassigned.8. From the drop-down menu, select the SSL certificate.9. To see the certificate, click View.
10. Use port 443 (unless you setup WPS Web on the same machine, then use port 54595).11. Click OK to close the Add Site Binding dialog.12. If you get a warning message about overriding the current binding, click Yes.13. Close the Site Bindings dialog.14. Check the Authentication option in the Default Web Site. Only Anonymous Authentication should be Enabled.15. In Internet Information Services (IIS) Manager, click SSL Settings.16. Turn on Require SSL.
You now have a secure connection for your web server.
WPS Data Processing Server ConfigurationTo Configure the ConstructSim Executive Server for Secure Connection
ConstructSim Work Package Server 53 Setup Guide

8Client Machine Pre-requisites and Configuration
Prerequisites:Install Microsoft SQL Server Express 2014 SP1/2016 SP1/2017 (English)Install Visual C++ Redistributable for Visual Studio 2015Install Microsoft Sync Framework 2.1 Redistributable Package in the following order:1. Synchronization-v2.1-x64-ENU2. Synchronization-v2.1-x86-ENU3. ProviderServices-v2.1-x64-ENU4. DatabaseProviders-v3.1-x64-ENU5. Windows Identity Foundation (Windows6.1-KB974405-x64.msu):
• Microsoft Windows 10 — enable it via the Features on/off wizard.Install the following applications:• ConstructSim Planner• ConstructSim Executive Client
To Install the ConstructSim Executive Client1. Double-click the installer to open ConstructSim Executive Client installer window and click Next.
ConstructSim Work Package Server 54 Setup Guide

2. Accept the terms of the End-User License Agreement and click Next.
Client Machine Pre-requisites and ConfigurationTo Install the ConstructSim Executive Client
ConstructSim Work Package Server 55 Setup Guide

3. Select the location where to install the CONNECTION client and click Install. (This window only displays ifCONNECTION Client is not already installed on the machine.)
4. Select the location for the Executive Client and click Next.
Client Machine Pre-requisites and ConfigurationTo Install the ConstructSim Executive Client
ConstructSim Work Package Server 56 Setup Guide

5. In the Ready to install ConstructSim Executive Client window, click Install.
Client Machine Pre-requisites and ConfigurationTo Install the ConstructSim Executive Client
ConstructSim Work Package Server 57 Setup Guide

6. When the installation finishes, close the installer window.The installation is complete.
7. Launch the Connection Client and login with your account information.8. Launch the ConstructSim Executive Client.
• If CONNECTION Client is running and the user is logged in there, then login to ConstructSim ExecutiveClient happens automatically and you will see your username next to Logged in as.
• If CONNECTION Client is running and the user is not logged in there, then the ConstructSim ExecutiveClient Login dialog appears.
Client Machine Pre-requisites and ConfigurationTo Install the ConstructSim Executive Client
ConstructSim Work Package Server 58 Setup Guide
Stored Procedures
To Create a Stored Procedure
1. Using SQL Server Management Studio, open the sp_Example_Stored_Procedure.sql file.2. Add the query that you want to get executed and any parameters, if needed.3. On Data Processing SQL Server, select WantedDb-DP and execute the stored procedure so that it is created.4. Verify that the stored procedure is created in the Data Processing database.
Client Machine Pre-requisites and ConfigurationTo Install the ConstructSim Executive Client
ConstructSim Work Package Server 59 Setup Guide

To Run a Stored Procedure
1. In ConstructSim Executive, open the project.2. Right-click the desired node and select Add Command.3. Select the Managed Command Run SQL-DP Stored Procedure and click OK.4. Rename the Managed Command (for example: Run SQL-DP Stored Procedure -
sp_Example_Stored_Procedure).5. Expand the Properties section and in the SPNAME field, add the name of the stored procedure in brackets, for
example: [sp_Example_Stored_Procedure].6. Click OK to save the modified custom Managed Command.
Client Machine Pre-requisites and ConfigurationTo Install the ConstructSim Executive Client
ConstructSim Work Package Server 60 Setup Guide

To Create a ConstructSim Executive Project1. From the Client machine, open ConstructSim Executive. In order to create a project, you need to launch it
with a CMD with the parameter /ProjectSetup. Login is handled by the CONNECTION Client. Notice when
Client Machine Pre-requisites and ConfigurationTo Create a ConstructSim Executive Project
ConstructSim Work Package Server 61 Setup Guide

CONNECTION Client is being launched and log in there. If CONNECTION Client is running and the user islogged in, login to the Client admin happens automatically and you will see your username in the upper rightcorner of the ConstructSim Executive window.
2. In the Project dialog, click Create.3. Complete the Project Setup Wizard's Project, WPS and SSRS sections.4. In the Project section, complete the following:
WPS Application server The fully qualified domain name of the Application serverCommunity Community name for the new project. Drop-down is disabled if there
is only one community on the eB ServerProject Name The name you would like for your projectProject Template StandardTemplate from the drop down listeB Credentials admin/admin – this user will be used by the server for data
processing
5. In the WPS section, complete the following:WPS Website web address of your ConstructSim Work Package Server websiteSQL Server field is populated and hardcoded
Client Machine Pre-requisites and ConfigurationTo Create a ConstructSim Executive Project
ConstructSim Work Package Server 62 Setup Guide

SQL Server Mirror optionalWPS Database field is populated and hardcodedUse Service Account If checked (the default), the service account is used to access the WPS
database. If unchecked, you need to define a username and passwordfor WPS database access.
DP SQL Server machine‘s name where Data Processing SQL database is located
6. Under SSRS section, complete the following:WPS SSRS SQL Server, DP SSRS SQL Server web address of your report server, for example:
https://constrtest85.bentley.com/ReportServerOverride Server Report If It Exists Overrides the report saved previously on the serverUse Service Account If checked (the default), the service account is used
to access the WPS/DP SSRS SQL Server. If unchecked,then you need to define a username and passwordfor WPS/DP SSRS SQL Server database access.
Client Machine Pre-requisites and ConfigurationTo Create a ConstructSim Executive Project
ConstructSim Work Package Server 63 Setup Guide

7. Click Finish.A project and an eB user associated with that project is created.
Client Machine Pre-requisites and ConfigurationTo Create a ConstructSim Executive Project
ConstructSim Work Package Server 64 Setup Guide

Index
AApp Server certificate 32
Ccommunity creation 23configure
eB Work Queue Service 28create
community 23datasource 18repository 27storage device 25
create ConstructSim Executiveproject 61
create stored procedure 59
Ddatasource
creation 18
EeB Work Queue Service
configuration 28
Hhardware requirements 4–7
Iinstallation 50
Mmail distribution configuration
30Microsoft SQL Server Properties
13
Nnetwork requirements 4–7
Rregister engines 30register project 10repository
creation 27requirements
hardware 4–7network 4–7
software 4–7run stored procedure 60
Ssecure connection 42set up
view progress reports 44settings
User Account Control 17SNAPSHOT_ISOLATION 15software requirements 4–7storage device 25
UUser Account Control
settings 17
Vview progress reports 44
ConstructSim Work Package Server 65 Setup Guide