EROSION RELATED INFORMATION FOR SOUTH ... Carolina DHEC Storm Water Management BMP Handbook
Construction Site Storm Water - Erosion Control Course No: C03-001
Credit: 3 PDH
Gilbert Gedeon, P.E.
Continuing Education and Development, Inc. 9 Greyridge Farm Court Stony Point, NY 10980 P: (877) 322-5800 F: (877) 322-4774 [email protected]
Construction Site Storm Water Runoff Control
Regulatory Text
• You must develop, implement, and enforce a program to reduce pollutants in any storm water runoff to your small MS4 from construction activities that result in a land disturbance of greater than or equal to one acre. Reduction of storm water discharges from construction activity disturbing less than one acre must be included in your program if that construction activity is part of a larger common plan of development or sale that would disturb one acre or more. If the NPDES permitting authority waives requirements for storm water discharges associated with small construction activity in accordance with Sec. 122.26(b)(15)(i), you are not required to develop, implement, and/or enforce a program to reduce pollutant discharges from such sites.
• Your program must include the development and implementation of, at a minimum:
(A) An ordinance or other regulatory mechanism to require erosion and sediment controls, as well as sanctions to ensure compliance, to the extent allowable under State, Tribal, or local law;
(B) Requirements for construction site operators to implement appropriate erosion and sediment control (ESC) best management practices;
(C) Requirements for construction site operators to control waste such as discarded building materials, concrete truck washout, chemicals, litter, and sanitary waste at the construction site that may cause adverse impacts to water quality;
(D) Procedures for site plan review which incorporate consideration of potential water quality impacts;
(E) Procedures for receipt and consideration of information submitted by the public, and
(F) Procedures for site inspection and enforcement of control measures.
Guidance
Examples of sanctions to ensure compliance include nonmonetary penalties, fines, bonding requirements, and/or permit denials for non-compliance. EPA recommends that procedures for site plan review include the review of individual pre-construction site plans to ensure consistency with local (ESC) requirements. Procedures for site inspections and enforcement of control measures could include steps to identify priority sites for inspection and enforcement based on the nature of the construction activity, topography, and the characteristics of soils and receiving water quality. You are encouraged to provide appropriate educational and training measures for construction site operators. You may wish to require a storm water pollution prevention plan for construction sites within your jurisdiction that discharge into your system. See Sec. 122.44(s) (NPDES permitting authorities' option to incorporate qualifying State, Tribal and local erosion and sediment control
National Menu of Best Management Practices
programs into NPDES permits for storm water discharges from construction sites). Also see Sec. 122.35(b) (The NPDES permitting authority may recognize that another government entity, including the permitting authority, may be responsible for implementing one or more of the minimum measures on your behalf).
BMP Fact Sheets
Runoff Control
Minimize clearing
Land grading
Permanent diversions
Preserving natural vegetation
Construction entrances
Stabilize drainage ways
Check dams
Filter berms
Grass-lined channels
Riprap
Erosion Control
Stabilize exposed soils
Chemical stabilization
Mulching
Permanent seeding
Sodding
Soil roughening
Protect steep slopes
Geotextiles
Gradient terraces
Soil retention
Temporary slope drain
2
National Menu of Best Management Practices
Protect waterways
Temporary stream crossings
Vegetated buffer
Phase construction
Construction sequencing
Dust control
Sediment Control
Install perimeter controls
Temporary diversion dikes
Wind fences and sand fences
Brush barrier
Silt fence
Install sediment trapping devices
Sediment basins and rock dams
Sediment filters and sediment chambers
Sediment trap
Inlet protection
Storm drain inlet protection
Good Housekeeping
Other wastes
General construction site waste management
Spill prevention and control plan
Vehicle maintenance and washing areas
Education and awareness
Contractor certification and inspector training
Construction reviewer
BMP inspection and maintenance
3

National Menu of Best Management Practices
Model ordinances
Additional Fact Sheets
Turf Reinforcement Mats
Vegetative Covers
Dust Control
4
National Menu of Best Management Practices
Erosion Control Stabilize exposed soils
Chemical Stabilization
Construction Site Storm Water Runoff Control
Description
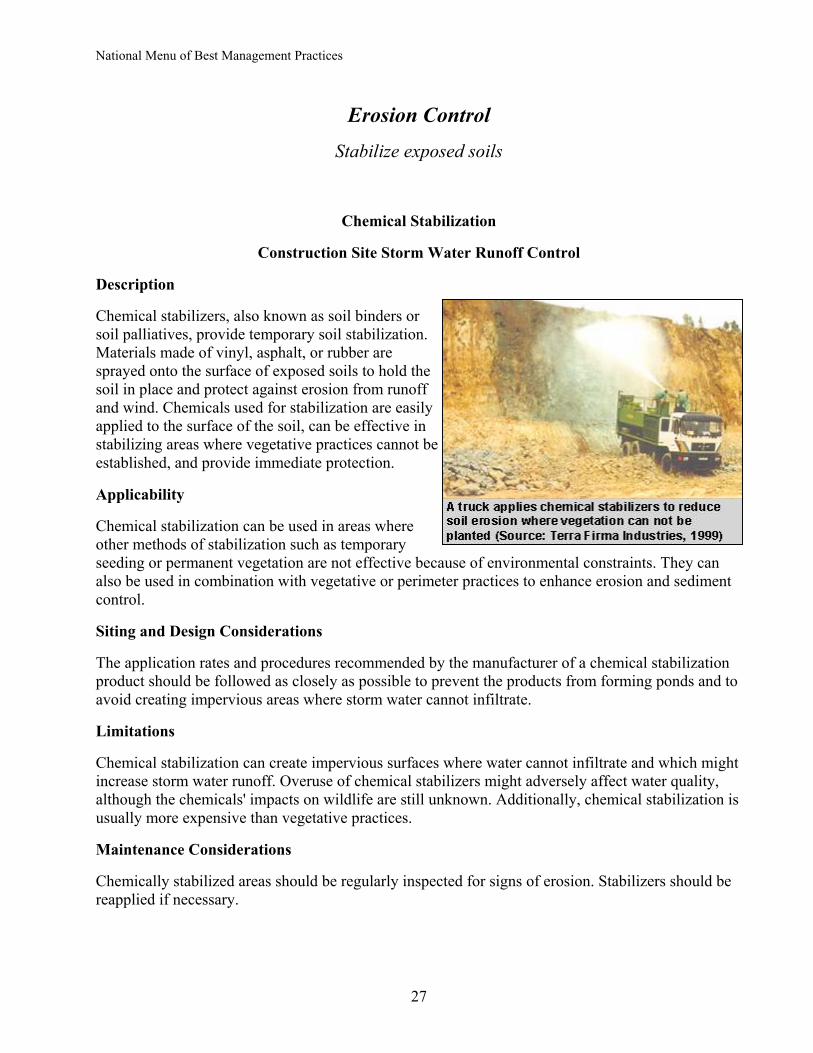
Chemical stabilizers, also known as soil binders or soil palliatives, provide temporary soil stabilization. Materials made of vinyl, asphalt, or rubber are sprayed onto the surface of exposed soils to hold the soil in place and protect against erosion from runoff and wind. Chemicals used for stabilization are easily applied to the surface of the soil, can be effective in stabilizing areas where vegetative practices cannot be established, and provide immediate protection.
Applicability
Chemical stabilization can be used in areas where other methods of stabilization such as temporary seeding or permanent vegetation are not effective because of environmental constraints. They can also be used in combination with vegetative or perimeter practices to enhance erosion and sediment control.
Siting and Design Considerations
The application rates and procedures recommended by the manufacturer of a chemical stabilization product should be followed as closely as possible to prevent the products from forming ponds and to avoid creating impervious areas where storm water cannot infiltrate.
Limitations
Chemical stabilization can create impervious surfaces where water cannot infiltrate and which might increase storm water runoff. Overuse of chemical stabilizers might adversely affect water quality, although the chemicals' impacts on wildlife are still unknown. Additionally, chemical stabilization is usually more expensive than vegetative practices.
Maintenance Considerations
Chemically stabilized areas should be regularly inspected for signs of erosion. Stabilizers should be reapplied if necessary.
27
National Menu of Best Management Practices
Effectiveness
Effectiveness of polymer stabilization methods ranges from 70 percent to 90 percent, although effectiveness of a particular polymer depends on soil type, application method, and individual chemical characteristics of the polymer (Aicardo, 1996).
Cost Considerations
Polyacrylamide, one of the more common soil palliatives, costs between $4 and $35 per pound; a pound can stabilize approximately 1 acre of land.
References
Aicardo, R. 1996. Screening of Polymers to Determine Their Potential Use in Erosion Control on Construction Sites. In Proceedings from Conference held at College of Southern Idaho: Managing Irrigation-Induced Erosion and Infiltration with Polyacrylamide, May 6–8, 1996, Twin Falls, ID. University of Idaho Miscellaneous Publication No. 101-96.
Terra Firma Industries. 1999. Soil Master WR. [www.terra-firma-ind.com/smaster.htm]. Last updated December 10, 1999. Accessed January 2001.
USEPA. 1992. Storm Water Management for Construction Activities: Developing Pollution Prevention Plans and Best Management Practices. EPA 832-R-92-005. U.S. Environmental Protection Agency, Washington, DC.
28
National Menu of Best Management Practices
Mulching
Construction Site Storm Water Runoff Control
Description
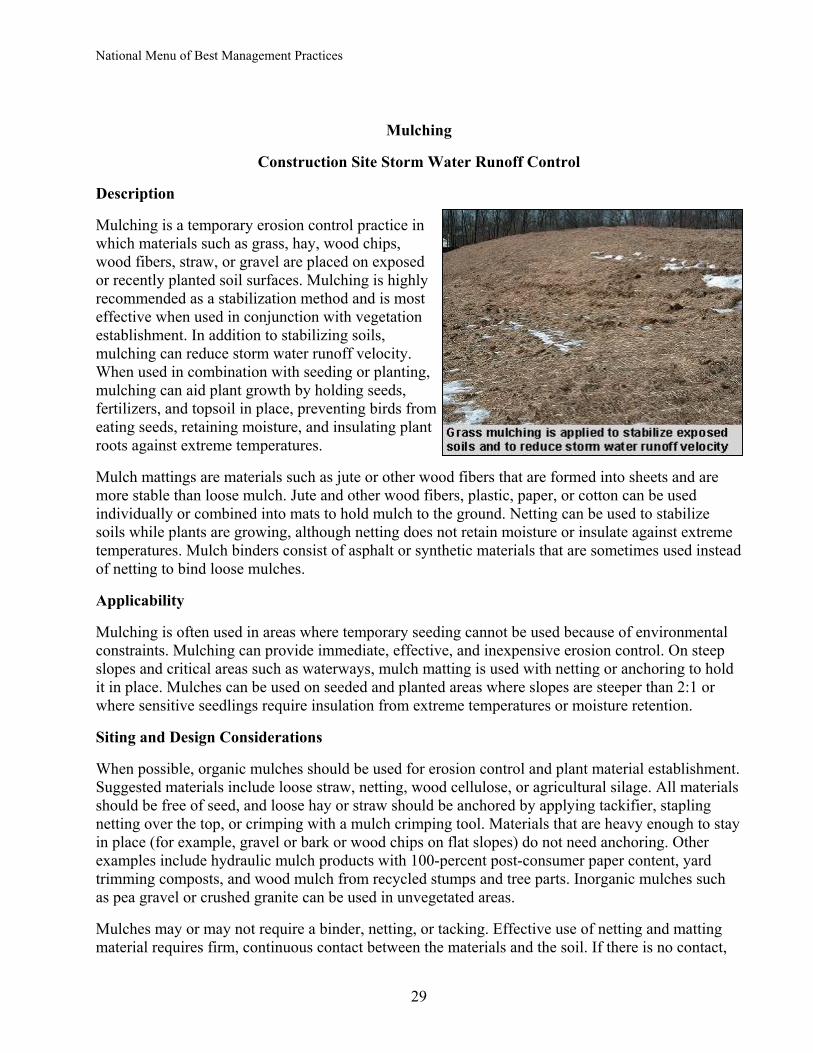
Mulching is a temporary erosion control practice in which materials such as grass, hay, wood chips, wood fibers, straw, or gravel are placed on exposed or recently planted soil surfaces. Mulching is highly recommended as a stabilization method and is most effective when used in conjunction with vegetation establishment. In addition to stabilizing soils, mulching can reduce storm water runoff velocity. When used in combination with seeding or planting, mulching can aid plant growth by holding seeds, fertilizers, and topsoil in place, preventing birds from eating seeds, retaining moisture, and insulating plant roots against extreme temperatures.
Mulch mattings are materials such as jute or other wood fibers that are formed into sheets and are more stable than loose mulch. Jute and other wood fibers, plastic, paper, or cotton can be used individually or combined into mats to hold mulch to the ground. Netting can be used to stabilize soils while plants are growing, although netting does not retain moisture or insulate against extreme temperatures. Mulch binders consist of asphalt or synthetic materials that are sometimes used instead of netting to bind loose mulches.
Applicability
Mulching is often used in areas where temporary seeding cannot be used because of environmental constraints. Mulching can provide immediate, effective, and inexpensive erosion control. On steep slopes and critical areas such as waterways, mulch matting is used with netting or anchoring to hold it in place. Mulches can be used on seeded and planted areas where slopes are steeper than 2:1 or where sensitive seedlings require insulation from extreme temperatures or moisture retention.
Siting and Design Considerations
When possible, organic mulches should be used for erosion control and plant material establishment. Suggested materials include loose straw, netting, wood cellulose, or agricultural silage. All materials should be free of seed, and loose hay or straw should be anchored by applying tackifier, stapling netting over the top, or crimping with a mulch crimping tool. Materials that are heavy enough to stay in place (for example, gravel or bark or wood chips on flat slopes) do not need anchoring. Other examples include hydraulic mulch products with 100-percent post-consumer paper content, yard trimming composts, and wood mulch from recycled stumps and tree parts. Inorganic mulches such as pea gravel or crushed granite can be used in unvegetated areas.
Mulches may or may not require a binder, netting, or tacking. Effective use of netting and matting material requires firm, continuous contact between the materials and the soil. If there is no contact,
29
National Menu of Best Management Practices
the material will not hold the soil and erosion will occur underneath the material. Grading is not necessary before mulching.
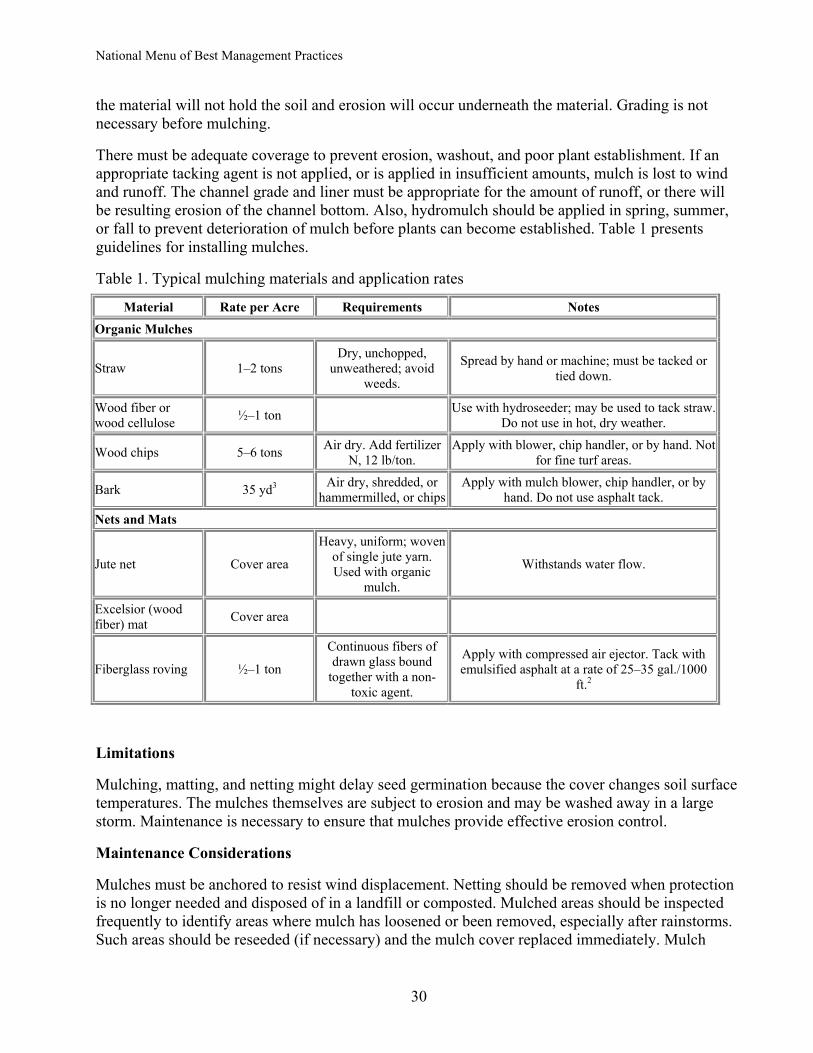
There must be adequate coverage to prevent erosion, washout, and poor plant establishment. If an appropriate tacking agent is not applied, or is applied in insufficient amounts, mulch is lost to wind and runoff. The channel grade and liner must be appropriate for the amount of runoff, or there will be resulting erosion of the channel bottom. Also, hydromulch should be applied in spring, summer, or fall to prevent deterioration of mulch before plants can become established. Table 1 presents guidelines for installing mulches.
Table 1. Typical mulching materials and application rates
Material Rate per Acre Requirements Notes Organic Mulches
Straw 1–2 tons Dry, unchopped,
unweathered; avoid weeds.
Spread by hand or machine; must be tacked or tied down.
Wood fiber or wood cellulose ½–1 ton Use with hydroseeder; may be used to tack straw.
Do not use in hot, dry weather.
Wood chips 5–6 tons Air dry. Add fertilizer N, 12 lb/ton.
Apply with blower, chip handler, or by hand. Not for fine turf areas.
Bark 35 yd3 Air dry, shredded, or hammermilled, or chips
Apply with mulch blower, chip handler, or by hand. Do not use asphalt tack.
Nets and Mats
Jute net Cover area Heavy, uniform; woven
of single jute yarn. Used with organic
mulch. Withstands water flow.
Excelsior (wood fiber) mat Cover area
Fiberglass roving ½–1 ton Continuous fibers of drawn glass bound
together with a non-toxic agent.
Apply with compressed air ejector. Tack with emulsified asphalt at a rate of 25–35 gal./1000
ft.2
Limitations
Mulching, matting, and netting might delay seed germination because the cover changes soil surface temperatures. The mulches themselves are subject to erosion and may be washed away in a large storm. Maintenance is necessary to ensure that mulches provide effective erosion control.
Maintenance Considerations
Mulches must be anchored to resist wind displacement. Netting should be removed when protection is no longer needed and disposed of in a landfill or composted. Mulched areas should be inspected frequently to identify areas where mulch has loosened or been removed, especially after rainstorms. Such areas should be reseeded (if necessary) and the mulch cover replaced immediately. Mulch
30

National Menu of Best Management Practices
binders should be applied at rates recommended by the manufacturer. If washout, breakage, or erosion occurs, surfaces should be repaired, reseeded, and remulched, and new netting should be installed. Inspections should be continued until vegetation is firmly established.
Effectiveness
Mulching effectiveness varies according to the type of mulch used. Soil loss reduction for different mulches ranges from 53 to 99.8 percent. Water velocity reductions range from 24 to 78 percent. Table 2 shows soil loss and water velocity reductions for different mulch treatments.
Table 2. Measured reductions in soil loss for different mulch treatments (Source: Harding, 1990, as cited in USEPA, 1993)
Mulch Characteristics Soil Loss Reduction (%)
Water Velocity Reduction
(% relative to bare soil)
100% wheat straw/top net 97.5 73
100% wheat straw/two nets 98.6 56
70% wheat straw/30% coconut fiber 98.7 71
70% wheat straw/30% coconut fiber 99.5 78
100% coconut fiber 98.4 77
Nylon monofilament/two nets 99.8 74
Nylon monofilament/rigid/bonded 53.0 24
Vinyl monofilament/flexible/bonded 89.6 32
Curled wood fibers/top net 90.4 47
Curled wood fibers/two nets 93.5 59
Antiwash netting(jute) 91.8 59
Interwoven paper and thread 93.0 53
Uncrimped wheat straw, 2,242 kg/ha 84.0 45
Uncrimped wheat straw, 4,484 kg/ha 89.3 59
In addition, a study by Hetzog et al. (1998) concluded that mulching provides a high rate of sediment and nutrient pollution prevention. In addition, this study also found that seeding or mulching added value to a site in the eyes of the developers, real estate agents, and homebuyers that more than offset the cost of seeding or mulching.
31
National Menu of Best Management Practices
Cost Considerations
Costs of seed and mulch average $1,500 per acre and range from $800 to $3,500 per acre (USEPA, 1993).
References
Harding, M.V. 1990. Erosion Control Effectiveness: Comparative Studies of Alternative Mulching Techniques. Environmental Restoration, pp. 149–156, as cited in USEPA. 1993. Guidance Specifying Management Measures for Sources of Nonpoint Pollution in Coastal Waters. EPA 840-B-92-002. U.S. Environmental Protection Agency, Office of Water, Washington, DC.
Hetzog et al., 1998. Journal of Soil and Water Conservation.
Smolen, M.D., D.W. Miller, L.C. Wyatt, J. Lichthardt, and A.L. Lanier. 1988. Erosion and Sediment Control Planning and Design Manual. North Carolina Sedimentation Control Commission, North Carolina Department of Environment, Health, and Natural Resources, and Division of Land Resources Land Quality Section, Raleigh, NC.
USEPA. 1993. Guidance Specifying Management Measures for Sources of Nonpoint Pollution in Coastal Waters. EPA 840-B-92-002. U.S. Environmental Protection Agency, Office of Water, Washington, DC.
USEPA. 1992. Storm Water Management for Industrial Activities: Developing Pollution Prevention Plans and Best Management Practices. U.S. Environmental Protection Agency, Office of Water, Washington, DC.
32
National Menu of Best Management Practices
Permanent Seeding
Construction Site Storm Water Runoff Control
Description
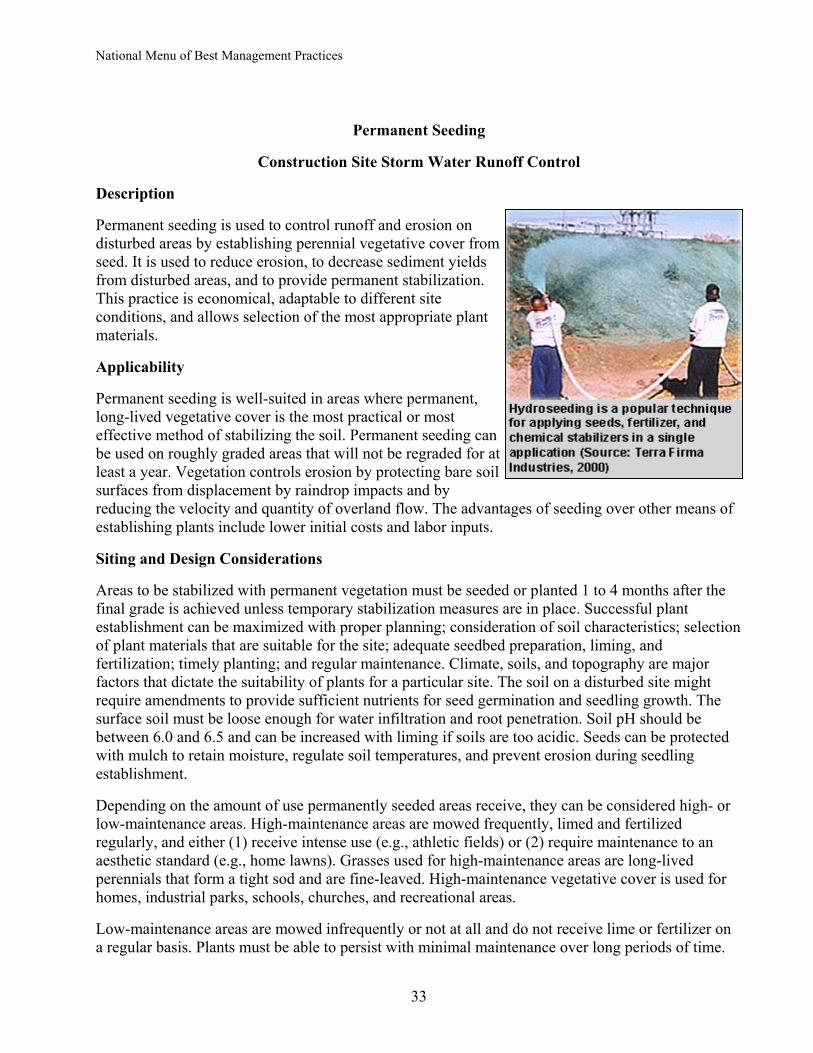
Permanent seeding is used to control runoff and erosion on disturbed areas by establishing perennial vegetative cover from seed. It is used to reduce erosion, to decrease sediment yields from disturbed areas, and to provide permanent stabilization. This practice is economical, adaptable to different site conditions, and allows selection of the most appropriate plant materials.
Applicability
Permanent seeding is well-suited in areas where permanent, long-lived vegetative cover is the most practical or most effective method of stabilizing the soil. Permanent seeding can be used on roughly graded areas that will not be regraded for at least a year. Vegetation controls erosion by protecting bare soil surfaces from displacement by raindrop impacts and by reducing the velocity and quantity of overland flow. The advantages of seeding over other means of establishing plants include lower initial costs and labor inputs.
Siting and Design Considerations
Areas to be stabilized with permanent vegetation must be seeded or planted 1 to 4 months after the final grade is achieved unless temporary stabilization measures are in place. Successful plant establishment can be maximized with proper planning; consideration of soil characteristics; selection of plant materials that are suitable for the site; adequate seedbed preparation, liming, and fertilization; timely planting; and regular maintenance. Climate, soils, and topography are major factors that dictate the suitability of plants for a particular site. The soil on a disturbed site might require amendments to provide sufficient nutrients for seed germination and seedling growth. The surface soil must be loose enough for water infiltration and root penetration. Soil pH should be between 6.0 and 6.5 and can be increased with liming if soils are too acidic. Seeds can be protected with mulch to retain moisture, regulate soil temperatures, and prevent erosion during seedling establishment.
Depending on the amount of use permanently seeded areas receive, they can be considered high- or low-maintenance areas. High-maintenance areas are mowed frequently, limed and fertilized regularly, and either (1) receive intense use (e.g., athletic fields) or (2) require maintenance to an aesthetic standard (e.g., home lawns). Grasses used for high-maintenance areas are long-lived perennials that form a tight sod and are fine-leaved. High-maintenance vegetative cover is used for homes, industrial parks, schools, churches, and recreational areas.
Low-maintenance areas are mowed infrequently or not at all and do not receive lime or fertilizer on a regular basis. Plants must be able to persist with minimal maintenance over long periods of time.
33
National Menu of Best Management Practices
Grass and legume mixtures are favored for these sites because legumes fix nitrogen from the atmosphere. Sites suitable for low-maintenance vegetation include steep slopes, stream or channel banks, some commercial properties, and "utility" turf areas such as road banks.
Limitations
The effectiveness of permanent seeding can be limited because of the high erosion potential during establishment, the need to reseed areas that fail to establish, limited seeding times depending on the season, and the need for stable soil temperature and soil moisture content during germination and early growth. Permanent seeding does not immediately stabilize soils—temporary erosion and sediment control measures should be in place to prevent off-site transport of pollutants from disturbed areas.
Maintenance Considerations
Grasses should emerge within 4–28 days and legumes 5–28 days after seeding, with legumes following grasses. A successful stand should exhibit the following:
• Vigorous dark green or bluish green seedlings, not yellow
• Uniform density, with nurse plants, legumes, and grasses well intermixed
• Green leaves—perennials should remain green throughout the summer, at least at the plant bases.
Seeded areas should be inspected for failure, and necessary repairs and reseeding should be made as soon as possible. If a stand has inadequate cover, the choice of plant materials and quantities of lime and fertilizer should be reevaluated. Depending on the condition of the stand, areas can be repaired by overseeding or reseeding after complete seedbed preparation. If timing is bad, rye grain or German millet can be overseeded to thicken the stand until a suitable time for seeding perennials. Consider seeding temporary, annual species if the season is not appropriate for permanent seeding. If vegetation fails to grow, soil should be tested to determine if low pH or nutrient imbalances are responsible.
On a typical disturbed site, full plant establishment usually requires refertilization in the second growing season. Soil tests can be used to determine if more fertilizer needs to be added. Do not fertilize cool season grasses in late May through July. Grass that looks yellow may be nitrogen deficient. Do not use nitrogen fertilizer if the stand contains more than 20 percent legumes.
Effectiveness
Perennial vegetative cover from seeding has been shown to remove between 50 and 100 percent of total suspended solids from storm water runoff, with an average removal of 90 percent (USEPA, 1993).
Cost Considerations
Seeding costs range from $200 to $1,000 per acre and average $400 per acre. Maintenance costs range from 15 to 25 percent of initial costs and average 20 percent (USEPA, 1993).
34
National Menu of Best Management Practices
References
FHWA. 1995. Best Management Practices for Erosion and Sediment Control. FHWA-SLP-94-005. Federal Highway Administration, Sterling, VA.
Smolen, M.D., D.W. Miller, L.C. Wyall, J. Lichthardt, and A.L. Lanier. 1988. Erosion and Sediment Control Planning and Design Manual. North Carolina Sedimentation Control Commission, North Carolina Department of Environment, Health, and Natural Resources, and Division of Land Resources Land Quality Section, Raleigh, NC.
Terra Firma Industries. 2000. Hydroseeding. [www.terra-firma-ind.com/hydroseeding.htm]. Last updated May 31, 2000. Accessed January 2001.
USEPA. 1992. Storm Water Management for Industrial Activities: Developing Pollution Prevention Plans and Best Management Practices. U.S. Environmental Protection Agency, Office of Water, Washington, DC.
USEPA. 1993. Guidance Specifying Management Measures for Sources of Nonpoint Pollution in Coastal Waters. EPA 840-B-92-002. U.S. Environmental Protection Agency, Office of Water, Washington, DC.
35
National Menu of Best Management Practices
Sodding
Construction Site Storm Water Runoff Control
Description
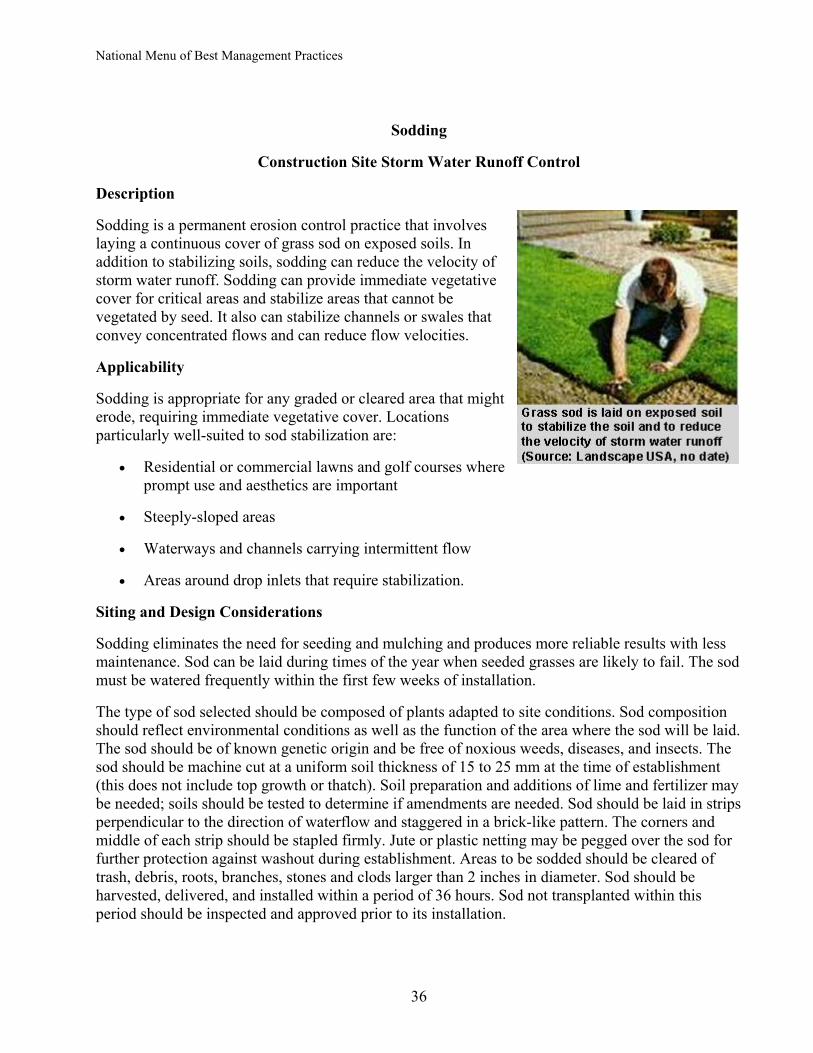
Sodding is a permanent erosion control practice that involves laying a continuous cover of grass sod on exposed soils. In addition to stabilizing soils, sodding can reduce the velocity of storm water runoff. Sodding can provide immediate vegetative cover for critical areas and stabilize areas that cannot be vegetated by seed. It also can stabilize channels or swales that convey concentrated flows and can reduce flow velocities.
Applicability
Sodding is appropriate for any graded or cleared area that might erode, requiring immediate vegetative cover. Locations particularly well-suited to sod stabilization are:
• Residential or commercial lawns and golf courses where prompt use and aesthetics are important
• Steeply-sloped areas
• Waterways and channels carrying intermittent flow
• Areas around drop inlets that require stabilization.
Siting and Design Considerations
Sodding eliminates the need for seeding and mulching and produces more reliable results with less maintenance. Sod can be laid during times of the year when seeded grasses are likely to fail. The sod must be watered frequently within the first few weeks of installation.
The type of sod selected should be composed of plants adapted to site conditions. Sod composition should reflect environmental conditions as well as the function of the area where the sod will be laid. The sod should be of known genetic origin and be free of noxious weeds, diseases, and insects. The sod should be machine cut at a uniform soil thickness of 15 to 25 mm at the time of establishment (this does not include top growth or thatch). Soil preparation and additions of lime and fertilizer may be needed; soils should be tested to determine if amendments are needed. Sod should be laid in strips perpendicular to the direction of waterflow and staggered in a brick-like pattern. The corners and middle of each strip should be stapled firmly. Jute or plastic netting may be pegged over the sod for further protection against washout during establishment. Areas to be sodded should be cleared of trash, debris, roots, branches, stones and clods larger than 2 inches in diameter. Sod should be harvested, delivered, and installed within a period of 36 hours. Sod not transplanted within this period should be inspected and approved prior to its installation.
36
National Menu of Best Management Practices
Limitations
Compared to seed, sod is more expensive and more difficult to obtain, transport, and store. Care must be taken to prepare the soil and provide adequate moisture before, during, and after installation to ensure successful establishment. If sod is laid on poorly prepared soil or unsuitable surface, the grass will die quickly because it is unable to root. Sod that is not adequately irrigated after installation may cause root dieback because grass does not root rapidly and is subject to drying out.
Maintenance Considerations
Watering is very important to maintain adequate moisture in the root zone and to prevent dormancy, especially within the first few weeks of installation, until it is fully rooted. Mowing should not result in the removal of more than one-third of the shoot. Grass height should be maintained between 2 and 3 inches. After the first growing season, sod might require additional fertilization or liming. Permanent, fine turf areas require yearly maintenance fertilization. Warm-season grass should be fertilized in late spring to early summer, and cool-season grass, in late winter and again in early fall.
Effectiveness
Sod has been shown to remove up to 99 percent of total suspended solids in runoff. It is therefore a highly effective management practice for erosion and sediment control, but its trapping efficiency is highly variable depending on hydrologic, hydraulic, vegetation, and sediment characteristics.
Cost Considerations
Average construction costs of sod average $0.20 per square foot and range from $0.10 to $1.10 per square foot; maintenance costs are approximately 5 percent of installation costs (USEPA, 1993).
References
FHWA. 1995. Best Management Practices for Erosion and Sediment Control. FHWA-SLP-94-005. Federal Highway Administration, Sterling, VA.
Landscape USA. No date. Installing Sod for an Instant Lawn. [www.landscapeusa.com/tips/turf.htm]. Accessed January 2001.
Smolen, M.D., D.W. Miller, L.C. Wyall, J. Lichthardt, and A.L. Lanier. 1988. Erosion and Sediment Control Planning and Design Manual. North Carolina Sedimentation Control Commission, North Carolina Department of Environment, Health, and Natural Resources, and Division of Land Resources Land Quality Section, Raleigh, NC.
USEPA. 1993. Guidance Specifying Management Measures for Sources of Nonpoint Pollution in Coastal Waters. EPA 840-B-92-002. U.S. Environmental Protection Agency, Office of Water, Washington, DC.
USEPA. 1992. Storm Water Management for Industrial Activities: Developing Pollution Prevention Plans and Best Management Practices. U.S. Environmental Protection Agency, Office of Water, Washington, DC.
37
National Menu of Best Management Practices
Soil Roughening
Construction Site Storm Water Runoff Control
Description
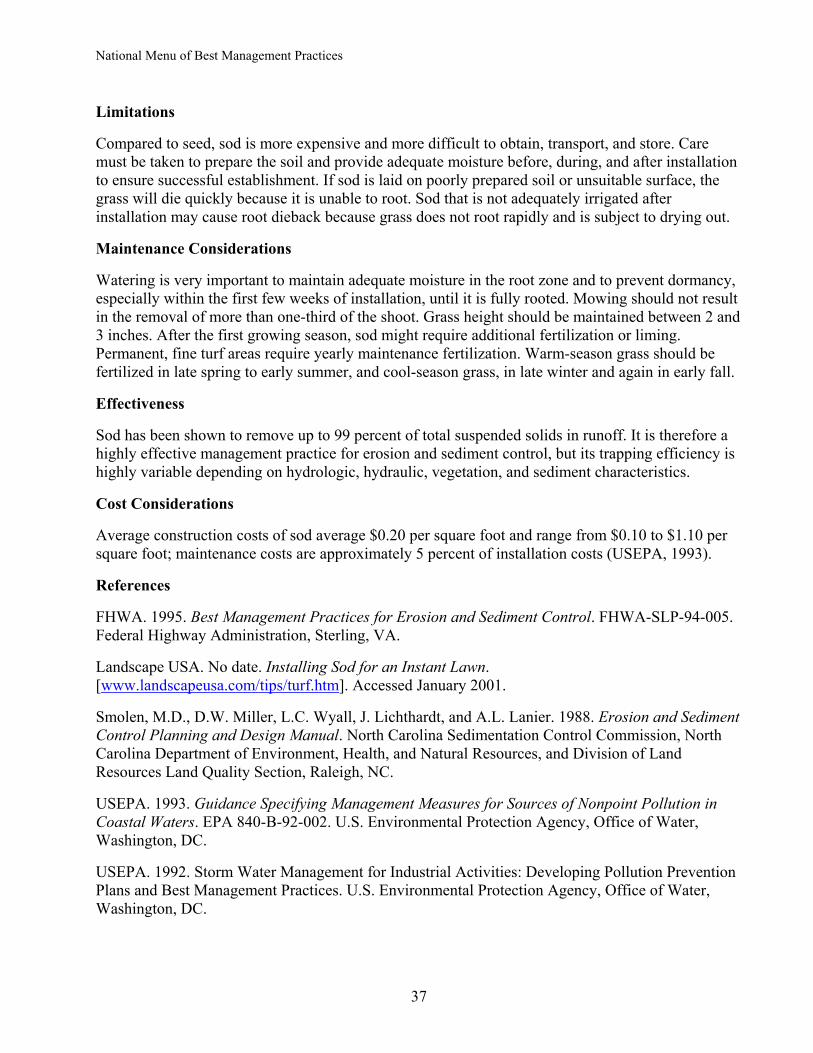
Soil roughening is a temporary erosion control practice often used in conjunction with grading. Soil roughening involves increasing the relief of a bare soil surface with horizontal grooves, stair-stepping (running parallel to the contour of the land), or tracking using construction equipment. Slopes that are not fine graded and that are left in a roughened condition can also reduce erosion. Soil roughening reduces runoff velocity, increases infiltration, reduces erosion, traps sediment, and prepares the soil for seeding and planting by giving seed an opportunity to take hold and grow.
Applicability
Soil roughening is appropriate for all slopes. Soil roughening works well on slopes greater than 3:1, on piles of excavated soil, and in areas with highly erodible soils. This technique is especially appropriate for soils that are frequently mowed or disturbed because roughening is relatively easy to accomplish. To slow erosion, roughening should be done as soon as possible after the vegetation has been removed form the slope. Roughening can be used with both seeding and planting and temporary mulching to stabilize an area. For steeper slopes and slopes that will be left roughened for longer periods of time, a combination of surface roughening and vegetation is appropriate. Roughening should be performed immediately after grading activities have ceased (temporarily or permanently) in an area.
Siting and Design Considerations
Rough slope surfaces are preferred because they aid the establishment of vegetation, improve infiltration, and decrease runoff velocity. Graded areas with smooth, hard surfaces might seem appropriate, but such surfaces may increase erosion potential. A rough soil surface allows surface ponding that protects lime, fertilizer, and seed. Grooves in the soil are cooler and provide more favorable moisture conditions than hard, smooth surfaces. These conditions promote seed germination and vegetative growth.
It is important to avoid excessive compacting of the soil surface, especially when tracking, because soil compaction inhibits vegetation growth and causes higher runoff velocity. Therefore, it is best to limit roughening with tracked machinery to sandy soils that do not compact easily and to avoid tracking on heavy clay soils, particularly when wet. Roughened areas should be seeded as quickly as possible. Proper dust control procedures also should be followed when soil roughening.
38
National Menu of Best Management Practices
There are different methods for achieving a roughened soil surface on a slope. The selection of an appropriate method depends on the type of slope and the available equipment. Roughening methods include stair-step grading, grooving, and tracking. Factors to consider when choosing a method are slope steepness, mowing requirements, whether the slope is formed by cutting or filling, and available equipment. The following methods can be used for surface roughening
Cut slope roughening for areas that will not be mowed. Stair-step grades or groove-cut slopes should be used for gradients steeper than 3:1. Stair-step grading should be used on any erodible material that is soft enough to be ripped with a bulldozer. Slopes consisting of soft rock with some subsoil are particularly suited to stair-step grading. The vertical cut distance should be less than the horizontal distance, and the horizontal portion of the step should be slightly sloped toward the vertical wall. Individual vertical cuts should not be made more than 2 feet deep in soft materials or more than 3 feet deep in rocky materials.
Grooving. This technique uses machinery to create a series of ridges and depressions that run across the slope along the contour. Grooves should be made using any appropriate implement that can be safely operated on the slope, such as disks, tillers, spring harrows, or the teeth on a front-end loader bucket. The grooves should be made more than 3 inches deep and less than 15 inches apart.
Fill slope roughening for areas that will not be mowed. Fill slopes with a gradient steeper than 3:1 should be placed in lifts less than 9 inches, and each lift should be properly compacted. The face of the slope should consist of loose, uncompacted fill 4 to 6 inches deep. Grooving should be used as described above to roughen the face of the slopes, if necessary. The final slope face should not be bladed or scraped.
Cuts, fills, and graded areas that will be mowed. Mowed slopes should be made no steeper than 3:1. These areas should be roughened with shallow grooves less than 10 inches apart and more than 1 inch deep using normal tilling, disking, or harrowing equipment (a cultipacker-seeder can also be used). Excessive roughness is undesirable where mowing is planned.
Roughening with tracked machinery. Roughening with tracked machinery should be limited to sandy soils to avoid undue compaction of the soil surface. Tracked machinery should be operated perpendicular to the slope to leave horizontal depressions in the soil. Tracking is generally not as effective as other roughening methods.
Limitations
Soil roughening is not appropriate for rocky slopes. Soil compaction might occur when roughening with tracked machinery. Soil roughening is of limited effectiveness in anything more than a gentle or shallow depth rain. If roughening is washed away in a heavy storm, the surface will have to be re-roughened and new seed laid.
Maintenance Considerations
Areas need to be inspected after storms, since roughening might need to be repeated. Regular inspection of roughened slopes will indicate where additional erosion and sediment control measures are needed. If rills (small watercourses that have steep sides and are usually only a few inches deep) appear, they should be filled, graded again, and reseeded immediately. Proper dust control methods should be used.
39
National Menu of Best Management Practices
Effectiveness
Soil roughening provides moderate erosion protection for bare soils while vegetative cover is being established. It is inexpensive and simple for short-term erosion control when used with other erosion and sediment controls.
Cost Considerations
Soil roughening is inexpensive with respect to cost of materials but requires the use of heavy equipment.
References
Smolen, M.D., D.W. Miller, L.C. Wyall, J. Lichthardt, and A.L. Lanier. 1988. Erosion and Sediment Control Planning and Design Manual. North Carolina Sedimentation Control Commission, North Carolina Department of Environment, Health, and Natural Resources, and Division of Land Resources Land Quality Section, Raleigh, NC.
USEPA. 1993. Guidance Specifying Management Measures for Sources of Nonpoint Pollution in Coastal Waters. EPA 840-B-92-002. U.S. Environmental Protection Agency, Office of Water, Washington, DC.
USEPA. 1992. Storm Water Management for Industrial Activities: Developing Pollution Prevention Plans and Best Management Practices. U.S. Environmental Protection Agency, Office of Water, Washington, DC.
40
National Menu of Best Management Practices
Protect steep slopes
Geotextiles
Construction Site Storm Water Runoff Control
Description
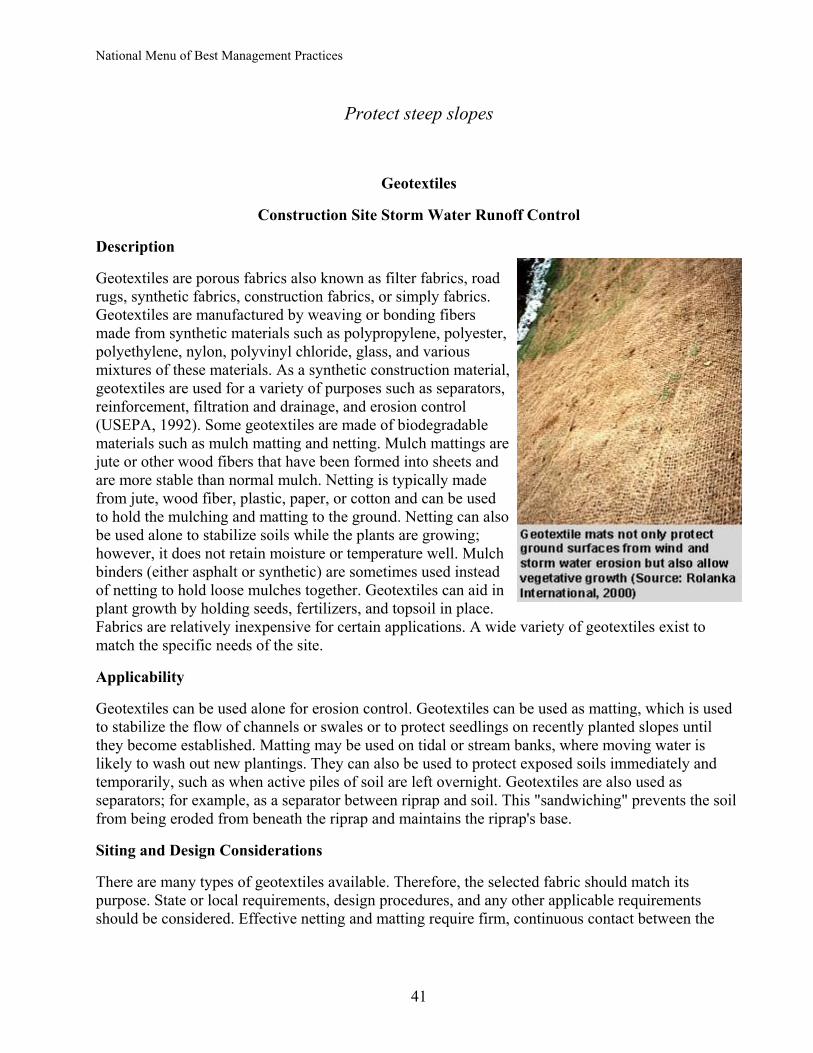
Geotextiles are porous fabrics also known as filter fabrics, road rugs, synthetic fabrics, construction fabrics, or simply fabrics. Geotextiles are manufactured by weaving or bonding fibers made from synthetic materials such as polypropylene, polyester, polyethylene, nylon, polyvinyl chloride, glass, and various mixtures of these materials. As a synthetic construction material, geotextiles are used for a variety of purposes such as separators, reinforcement, filtration and drainage, and erosion control (USEPA, 1992). Some geotextiles are made of biodegradable materials such as mulch matting and netting. Mulch mattings are jute or other wood fibers that have been formed into sheets and are more stable than normal mulch. Netting is typically made from jute, wood fiber, plastic, paper, or cotton and can be used to hold the mulching and matting to the ground. Netting can also be used alone to stabilize soils while the plants are growing; however, it does not retain moisture or temperature well. Mulch binders (either asphalt or synthetic) are sometimes used instead of netting to hold loose mulches together. Geotextiles can aid in plant growth by holding seeds, fertilizers, and topsoil in place. Fabrics are relatively inexpensive for certain applications. A wide variety of geotextiles exist to match the specific needs of the site.
Applicability
Geotextiles can be used alone for erosion control. Geotextiles can be used as matting, which is used to stabilize the flow of channels or swales or to protect seedlings on recently planted slopes until they become established. Matting may be used on tidal or stream banks, where moving water is likely to wash out new plantings. They can also be used to protect exposed soils immediately and temporarily, such as when active piles of soil are left overnight. Geotextiles are also used as separators; for example, as a separator between riprap and soil. This "sandwiching" prevents the soil from being eroded from beneath the riprap and maintains the riprap's base.
Siting and Design Considerations
There are many types of geotextiles available. Therefore, the selected fabric should match its purpose. State or local requirements, design procedures, and any other applicable requirements should be considered. Effective netting and matting require firm, continuous contact between the
41
National Menu of Best Management Practices
materials and the soil. If there is no contact, the material will not hold the soil, and erosion will occur underneath the material.
Limitations
Geotextiles (primarily synthetic types) have the potential disadvantage of being sensitive to light and must be protected prior to installation. Some geotextiles might promote increased runoff and might blow away if not firmly anchored. Depending on the type of material used, geotextiles might need to be disposed of in a landfill, making them less desirable than vegetative stabilization. If the fabric is not properly selected, designed, or installed, the effectiveness may be reduced drastically.
Maintenance Considerations
Regular inspections should be made to determine if cracks, tears, or breaches have formed in the fabric; if so, it should be repaired or replaced immediately. It is necessary to maintain contact between the ground and the geotextile at all times. Trapped sediment should be removed after each storm event.
Effectiveness
Geotextiles' effectiveness depends upon the strength of the fabric and proper installation. For example, when protecting a cut slope with a geotextile, it is important to properly anchor the fabric. This will ensure that it will not be undermined by a storm event.
Cost Considerations
Costs for geotextiles range from $0.50 to $10.00 per square yard, depending on the type chosen (SWRCP, 1991).
References
Rolanka International. 2000. Bio-D Mesh. [http://www.rolanka.com/biodmesh_2.shtml]. Accessed June 1, 2001.
SWRPC. 1991. Costs of Urban Nonpoint Source Water Pollution Control Measures. Technical Report No. 31. Southeast Wisconsin Regional Planning Commission, Waukesha, WI.
USEPA. 1992. Storm Water Management for Industrial Activities: Developing Pollution Prevention Plans and Best Management Practices. U.S. Environmental Protection Agency, Washington, DC.
42
National Menu of Best Management Practices
Gradient Terraces
Construction Site Storm Water Runoff Control
Description
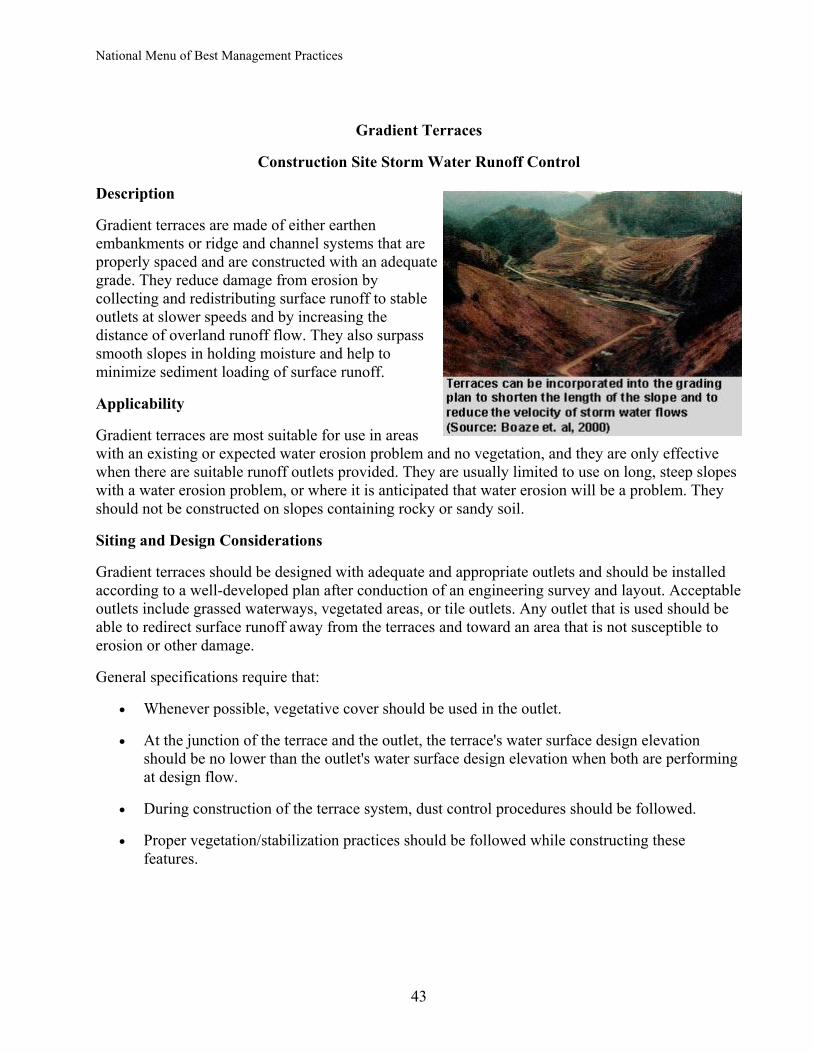
Gradient terraces are made of either earthen embankments or ridge and channel systems that are properly spaced and are constructed with an adequate grade. They reduce damage from erosion by collecting and redistributing surface runoff to stable outlets at slower speeds and by increasing the distance of overland runoff flow. They also surpass smooth slopes in holding moisture and help to minimize sediment loading of surface runoff.
Applicability
Gradient terraces are most suitable for use in areas with an existing or expected water erosion problem and no vegetation, and they are only effective when there are suitable runoff outlets provided. They are usually limited to use on long, steep slopes with a water erosion problem, or where it is anticipated that water erosion will be a problem. They should not be constructed on slopes containing rocky or sandy soil.
Siting and Design Considerations
Gradient terraces should be designed with adequate and appropriate outlets and should be installed according to a well-developed plan after conduction of an engineering survey and layout. Acceptable outlets include grassed waterways, vegetated areas, or tile outlets. Any outlet that is used should be able to redirect surface runoff away from the terraces and toward an area that is not susceptible to erosion or other damage.
General specifications require that:
• Whenever possible, vegetative cover should be used in the outlet.
• At the junction of the terrace and the outlet, the terrace's water surface design elevation should be no lower than the outlet's water surface design elevation when both are performing at design flow.
• During construction of the terrace system, dust control procedures should be followed.
• Proper vegetation/stabilization practices should be followed while constructing these features.
43
National Menu of Best Management Practices
Limitations
Gradient terraces are not appropriate for use on sandy, steep, or shallow soils. If too much water permeates the soil in a terrace system, sloughing could occur, and cut and fill costs could increase substantially.
Maintenance Considerations
Regular inspections of the terraces should occur after any major storms and at least once a year to ensure that the terraces are structurally sound and have not been subject to erosion.
References
Boaze, P., and B. Wiggins. Building a Major Highway in Mountainous East Tennessee: Environmental Impacts. Land and Water. July/August 2000: 20-23.
USEPA. 1992. Storm Water Management for Industrial Activities: Developing Pollution Prevention Plans and Best Management Practices. EPA 832-R-92-006. U.S. Environmental Protection Agency, Office of Water, Washington, DC.
44
National Menu of Best Management Practices
Soil Retention
Construction Site Storm Water Runoff Control
Description
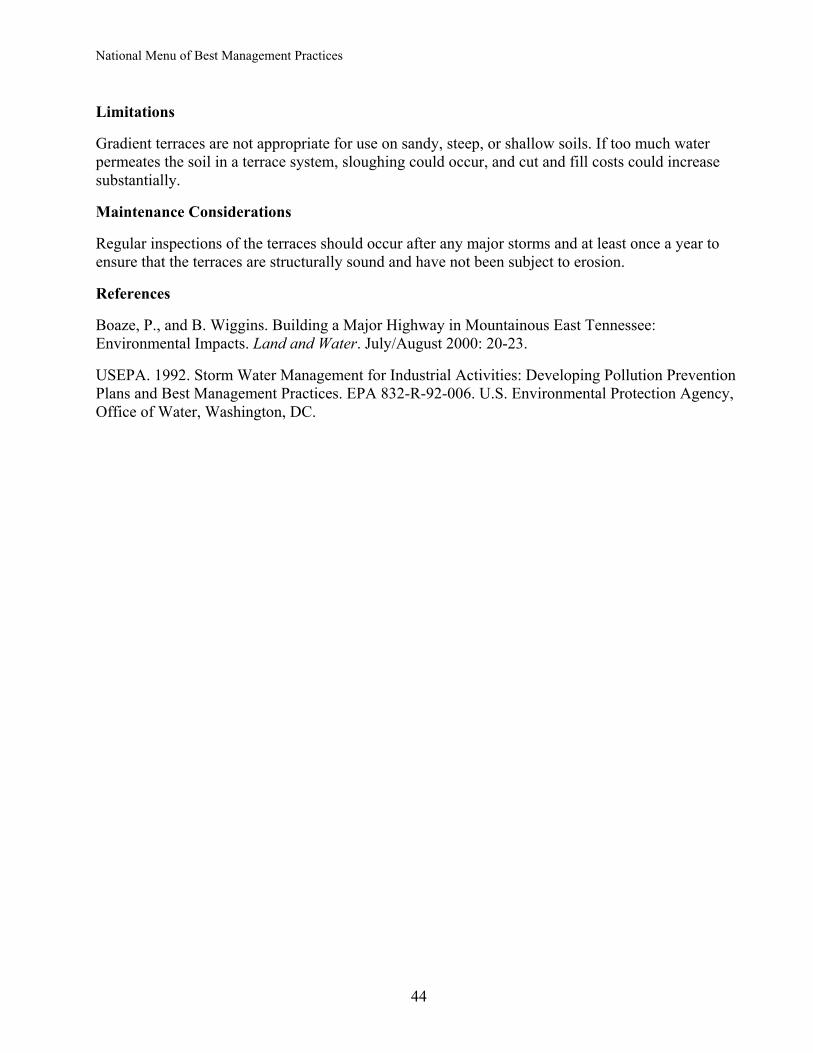
Soil retention measures are structures or practices that are used to hold soil in place or to keep it contained within a site boundary. They may include grading or reshaping the ground to lessen steep slopes or shoring excavated areas with wood, concrete, or steel structures. Some soil-retaining measures are used for erosion control, while others are used for protection of workers during construction projects such as excavations.
Applicability
Grading to reduce steep slopes can be implemented at any construction site by assessing site conditions before breaking ground and reducing steep slopes where possible. Reinforced soil-retaining structures should be used when sites have very steep slopes or loose, highly erodible soils that cause other methods, such as chemical or vegetative stabilization or regrading, to be ineffective. The preconstruction drainage pattern should be maintained to the extent possible.
Siting and Design Considerations
Some examples of reinforced soil retaining structures include:
• Skeleton sheeting. An inexpensive soil bracing system that requires soil to be cohesive and consists of construction grade lumber being used to support the excavated face of a slope
• Continuous sheeting. Involves using a material that covers the entire slope continuously, with struts and boards placed along the slope to support the slope face - steel, concrete, or wood should be used as the materials
• Permanent retaining walls. Walls of concrete masonry or wood (railroad ties) that are left in place after construction is complete in order to provide continued support of the slope
The proper design of reinforced soil-retaining structures is crucial for erosion control and safety. To ensure safety of the retaining structure, it should be designed by a qualified engineer who understands all of the design considerations, such as the nature of the soil, location of the ground water table, and the expected loads. Care should be taken to ensure that hydraulic pressure does not build up behind the retaining structure and cause failure.
45
National Menu of Best Management Practices
Limitations
To be effective, soil-retention structures must be designed to handle expected loads. However, heavy rains or mass wasting may damage or destroy these structures and result in sediment inputs to waterbodies. They must be properly installed and maintained to avoid failure.
Maintenance Considerations
Soil-stabilization structures should be inspected periodically, particularly after rainstorms, to check for erosion, damage, or other signs of deterioration. Any damage to the actual slope or ditch, such as washouts or breakage, should be repaired prior to any reinstallation of the materials for the soil-stabilization structure.
Effectiveness
Soil-retention structures, if properly designed and installed, can effectively prevent erosion and mass wasting in areas with steep slopes and erodible soils. Their potential for failure depends on their design, installation, maintenance, and the likelihood of catastrophic events such as heavy rains, earthquakes, and landslides.
Cost Considerations
Slope reduction can be accomplished during site development and might not incur any additional costs. Soil stabilization structures can be expensive because they require a professional engineer to develop a design (estimated to be 25 to 30 percent of construction costs [Ferguson et al., 1997]). Depending on the size of the proposed structure and the relief of the surrounding area, excavation and installation costs might be high. Capital costs include mobilization, grading, grooving, tracking and compacting fill, and installing the structures. Labor costs for regular inspection and repairs are also a consideration.
References
Fergusen, T., R. Gignac, M. Stoffan, A. Ibrahim, and J. Aldrich. 1997. Rouge River National Wet Weather Demonstration Project: Cost Estimating Guidelines Best Management Practices and Engineered Controls. Rouge River National Wet Weather Demonstration Project, Wayne County, MI.
USEPA. 1992. Storm Water Management for Construction Activities: Developing Pollution Prevention Plans and Best Management Practices. EPA 832-R-92-005. U.S. Environmental Protection Agency, Office of Water, Washington, DC.
Virginia Department of Conservation and Recreation. 1995. Virginia Erosion & Sediment Control Field Manual. Second Edition. Virginia Department of Conservation and Recreation, Division of Soil and Water Conservation, Richmond, VA.
46
National Menu of Best Management Practices
Temporary Slope Drain
Construction Site Storm Water Runoff Control
Description
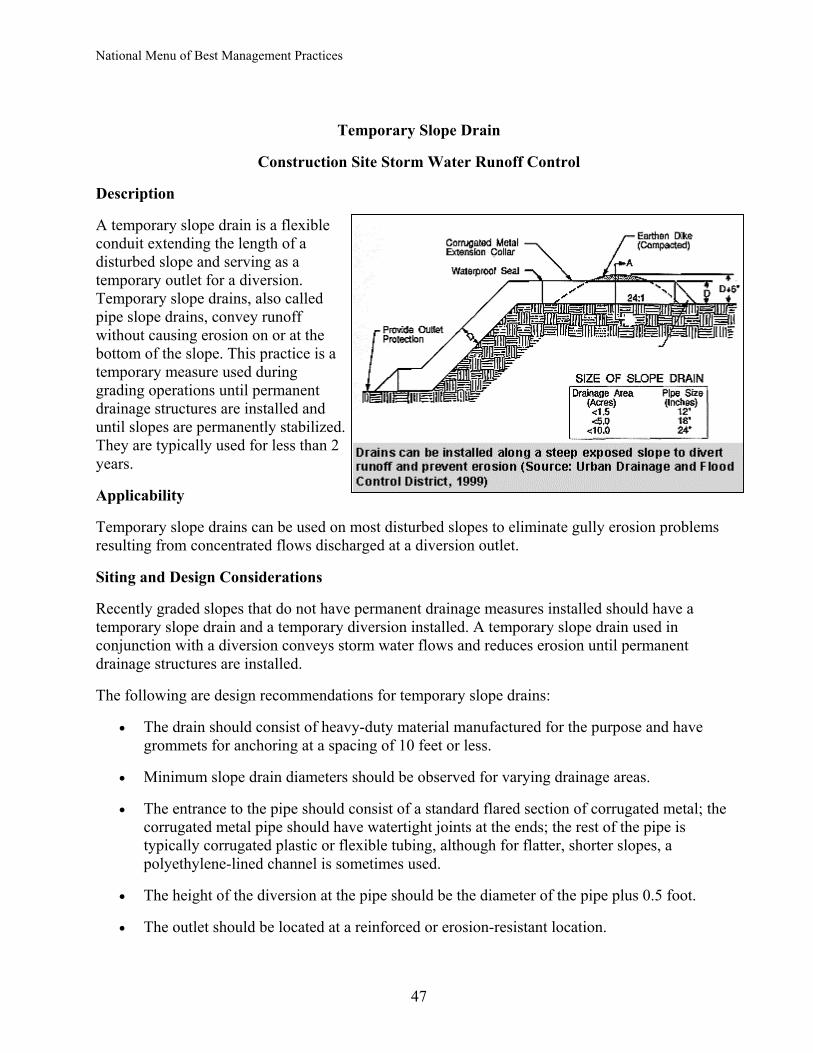
A temporary slope drain is a flexible conduit extending the length of a disturbed slope and serving as a temporary outlet for a diversion. Temporary slope drains, also called pipe slope drains, convey runoff without causing erosion on or at the bottom of the slope. This practice is a temporary measure used during grading operations until permanent drainage structures are installed and until slopes are permanently stabilized. They are typically used for less than 2 years.
Applicability
Temporary slope drains can be used on most disturbed slopes to eliminate gully erosion problems resulting from concentrated flows discharged at a diversion outlet.
Siting and Design Considerations
Recently graded slopes that do not have permanent drainage measures installed should have a temporary slope drain and a temporary diversion installed. A temporary slope drain used in conjunction with a diversion conveys storm water flows and reduces erosion until permanent drainage structures are installed.
The following are design recommendations for temporary slope drains:
• The drain should consist of heavy-duty material manufactured for the purpose and have grommets for anchoring at a spacing of 10 feet or less.
• Minimum slope drain diameters should be observed for varying drainage areas.
• The entrance to the pipe should consist of a standard flared section of corrugated metal; the corrugated metal pipe should have watertight joints at the ends; the rest of the pipe is typically corrugated plastic or flexible tubing, although for flatter, shorter slopes, a polyethylene-lined channel is sometimes used.
• The height of the diversion at the pipe should be the diameter of the pipe plus 0.5 foot.
• The outlet should be located at a reinforced or erosion-resistant location.
47
National Menu of Best Management Practices
Limitations
The area drained by a temporary slope drain should not exceed 5 acres. Physical obstructions substantially reduce the effectiveness of the drain. Other concerns are failures from overtopping because of inadequate pipe inlet capacity, and reduced diversion channel capacity and ridge height.
Maintenance Considerations
The slope drain should be inspected after each rainfall to determine if capacity was exceeded or if blockages occurred. Repairs should be made promptly. Construction equipment and vehicular traffic must be rerouted around slope drains.
References
FHWA. 1995. Best Management Practices for Erosion and Sediment Control. FHWA-SLP-94-005. Federal Highway Administration, Sterling, VA.
MPCA. 1998. Protecting Water Quality in Urban Areas. Minnesota Pollution Control Agency, Division of Water Quality, St. Paul, MN.
Smolen, M.D., D.W. Miller, L.C. Wyall, J. Lichthardt, and A.L. Lanier. 1988. Erosion and Sediment Control Planning and Design Manual. North Carolina Sedimentation Control Commission, North Carolina Department of Environment, Health, and Natural Resources, and Division of Land Resources Land Quality Section, Raleigh, NC.
Urban Drainage and Flood Control District. 1999. Urban Storm Drainage: Criteria Manual. Denver, CO.
48
National Menu of Best Management Practices
Protect waterways
Temporary Stream Crossings
Construction Site Storm Water Runoff Control
Description
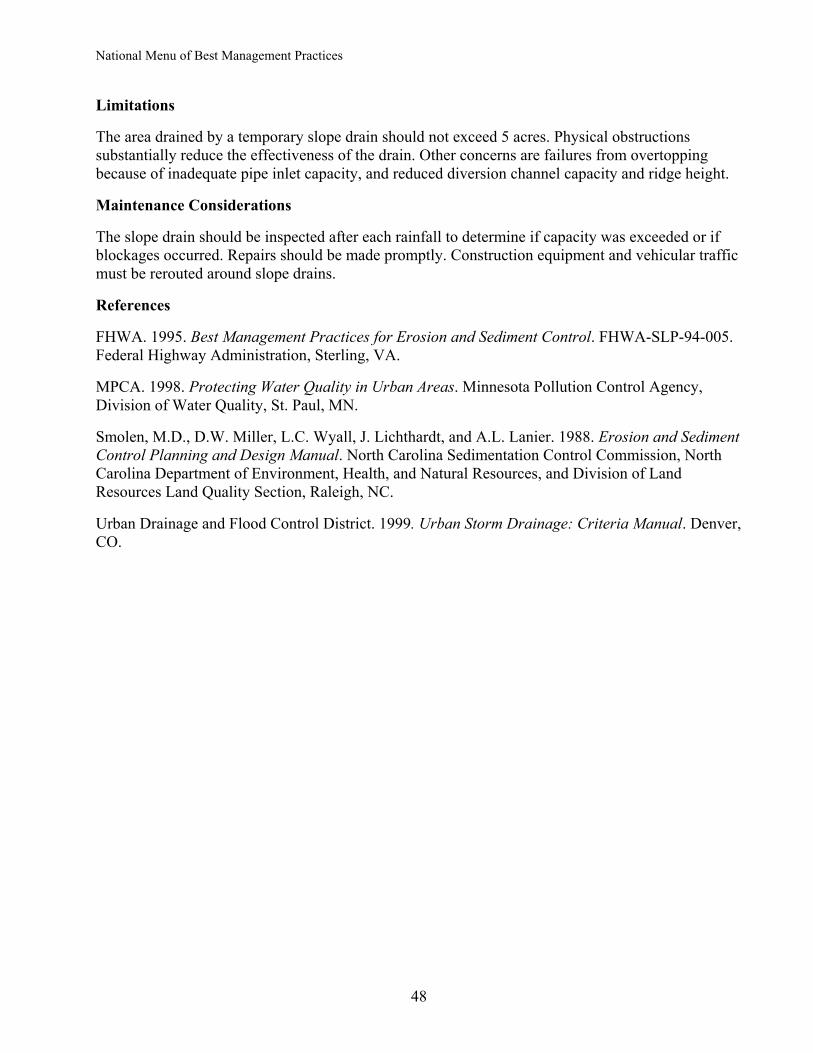
A temporary steam crossing is a structure erected to provide a safe and stable way for construction vehicle traffic to cross a running watercourse. The primary purpose of such a structure is to provide streambank stabilization, reduce the risk of damaging the streambed or channel, and reduce the risk of sediment loading from construction traffic. A temporary stream crossing may be a bridge, a culvert, or a ford.
Applicability
Temporary stream crossings are applicable wherever heavy construction equipment must be moved from one side of a stream channel to the other, or where lighter construction vehicles will cross the stream a number of times during the construction period. In either case, an appropriate method for ensuring the stability of the streambanks and preventing large-scale erosion is necessary.
A bridge or culvert is the best choice for most temporary stream crossings. If properly designed, each can support heavy loads and materials used to construct most bridges, and culverts can be salvaged after they are removed. Fords are appropriate in steep areas subject to flash flooding, where normal flow is shallow or intermittent across a wide channel. Fords should be used only where stream crossings are expected to be infrequent.
Siting and Design Considerations
Because of the potential for stream degradation, flooding, and safety hazards, stream crossings should be avoided on a construction site whenever possible. Consideration should be given to alternative routes to accessing a site before arrangements are made to erect a temporary stream crossing. If it is determined that a stream crossing is necessary, an area where the potential for
49
National Menu of Best Management Practices
erosion is low should be selected. If possible, the stream crossing structure should be selected during a dry period to reduce sediment transport into the stream.
If needed, over-stream bridges are generally the preferred temporary stream crossing structure. The expected load and frequency of the stream crossing, however, will govern the selection of a bridge as the correct choice for a temporary stream crossing. Bridges usually cause minimal disturbance to a stream's banks and cause the least obstruction to stream flow and fish migration. They should be constructed only under the supervision and approval of a qualified engineer.
As general guidelines for constructing temporary bridges, clearing and excavation of the stream shores and bed should be kept to a minimum. Sufficient clearance should be provided for floating objects to pass under the bridge. Abutments should be parallel to the stream and on stable banks. If the stream is less than 8 feet wide at the point a crossing is needed, no additional in-stream supports should be used. If the crossing is to extend across a channel wider than 8 feet (as measured from top of bank to top of bank), the bridge should be designed with one in-water support for each 8 feet of stream width.
A temporary bridge should be anchored by steel cable or chain on one side only to a stable structure on shore. Examples of anchoring structures include large-diameter trees, large boulders, and steel anchors. By anchoring the bridge on one side only, there is a decreased risk of downstream blockage or flow diversion if a bridge is washed out.
When constructing a culvert, filter cloth should be used to cover the streambed and streambanks to reduce settlement and improve the stability of the culvert structure. The filter cloth should extend a minimum of 6 inches and a maximum of 1 foot beyond the end of the culvert and bedding material. The culvert piping should not exceed 40 feet in length and should be of sufficient diameter to allow for complete passage of flow during peak flow periods. The culvert pipes should be covered with a minimum of 1 foot of aggregate. If multiple culverts are used, at least 1 foot of aggregate should separate the pipes.
Fords should be constructed of stabilizing material such as large rocks.
Limitations
Bridges can be considered the greatest safety hazard of all temporary stream crossing structures if not properly designed and constructed. Bridges might also prove to be more costly in terms of repair costs and lost construction time if they are washed out or collapse (Smolen et al., 1988).
The construction and removal of culverts are usually very disturbing to the surrounding area, and erosion and downstream movement of soils is often great. Culverts can also create obstructions to flow in a stream and inhibit fish migration. Depending on their size, culverts can be blocked by large debris in a stream and are therefore vulnerable to frequent washout.
If given a choice between building a bridge or a culvert as a temporary stream crossing, a bridge is preferred because of the relative minimal disturbance to streambanks and the opportunity for unimpeded flow through the channel.
The approaches to fords often have high erosion potential. In addition, excavation of the streambed and approach to lay riprap or other stabilization material causes major stream disturbance. Mud and
50

National Menu of Best Management Practices
other debris are transported directly into the stream unless the crossing is used only during periods of low flow.
Maintenance Considerations
Temporary stream crossings should be inspected at least once a week and after all significant rainfall events. If any structural damage is reported to a bridge or culvert, construction traffic should stop use of the structure until appropriate repairs are made. Evidence of streambank erosion should be repaired immediately.
Fords should be inspected closely after major storm events to ensure that stabilization materials remain in place. If the material has moved downstream during periods of peak flow, the lost material should be replaced immediately.
Effectiveness
Both temporary bridges and culverts provide an adequate path for construction traffic crossing a stream or watercourse.
Cost Considerations
Generally speaking, temporary bridges are more expensive to design and construct than culverts. Bridges are also associated with higher maintenance and repair costs should they fail. Additional costs may accrue to the site team in terms of lost construction time if a temporary structure is washed out or otherwise fails.
References
British Columbia Ministry of Forests. No date. Forest Practices Code Stream Crossing for Fish Streams Guidebook. [www.for.gov.bc.ca/tasb/legsregs/fpc/fpcguide/stream/figure19.htm]. Accessed January 2001.
Smolen, M.D., D.W. Miller, L.C. Wyatt, J. Lichthardt, and A.L. Lanier. 1988. Erosion and Sediment Control Planning and Design Manual. North Carolina Sedimentation Control Commission, North Carolina Department of Environment, Health, and Natural Resources, and Division of Land Resources Land Quality Section, Raleigh, NC.
VDCR. 1995. Virginia Erosion & Sediment Control Field Manual. Second Edition. Virginia Department of Conservation and Recreation, Division of Soil and Water Conservation, Richmond, VA.
51
National Menu of Best Management Practices
Vegetated Buffer
Construction Site Storm Water Runoff Control
Description
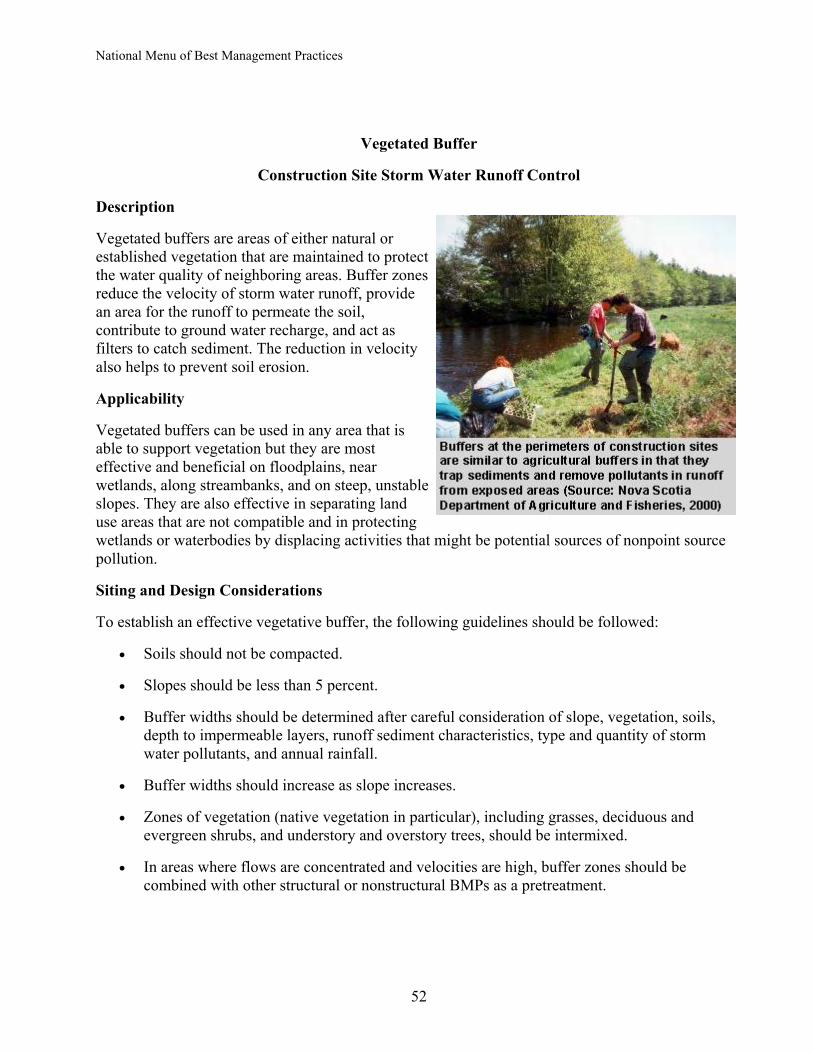
Vegetated buffers are areas of either natural or established vegetation that are maintained to protect the water quality of neighboring areas. Buffer zones reduce the velocity of storm water runoff, provide an area for the runoff to permeate the soil, contribute to ground water recharge, and act as filters to catch sediment. The reduction in velocity also helps to prevent soil erosion.
Applicability
Vegetated buffers can be used in any area that is able to support vegetation but they are most effective and beneficial on floodplains, near wetlands, along streambanks, and on steep, unstable slopes. They are also effective in separating land use areas that are not compatible and in protecting wetlands or waterbodies by displacing activities that might be potential sources of nonpoint source pollution.
Siting and Design Considerations
To establish an effective vegetative buffer, the following guidelines should be followed:
• Soils should not be compacted.
• Slopes should be less than 5 percent.
• Buffer widths should be determined after careful consideration of slope, vegetation, soils, depth to impermeable layers, runoff sediment characteristics, type and quantity of storm water pollutants, and annual rainfall.
• Buffer widths should increase as slope increases.
• Zones of vegetation (native vegetation in particular), including grasses, deciduous and evergreen shrubs, and understory and overstory trees, should be intermixed.
• In areas where flows are concentrated and velocities are high, buffer zones should be combined with other structural or nonstructural BMPs as a pretreatment.
52
National Menu of Best Management Practices
Limitations
Vegetated buffers require plant growth before they can be effective, and land on which to plant the vegetation must be available. If the cost of the land is very high, buffer zones might not be cost-effective. Although vegetated buffers help to protect water quality, they usually do not effectively counteract concentrated storm water flows to neighboring or downstream wetlands.
Maintenance Considerations
Keeping vegetation healthy in vegetated buffers requires routine maintenance, which (depending on species, soil types, and climatic conditions) can include weed and pest control, mowing, fertilizing, liming, irrigating, and pruning. Inspection and maintenance are most important when buffer areas are first installed. Once established, vegetated buffers do not require much maintenance beyond the routine procedures listed earlier and periodic inspections of the areas, especially after any heavy rainfall and at least once a year. Inspections should focus on encroachment, gully erosion, density of vegetation, evidence of concentrated flows through the areas, and any damage from foot or vehicular traffic. If there is more than 6 inches of sediment in one place, it should be removed.
Effectiveness
Several researchers have measured greater than 90 percent reductions in sediment and nitrate concentrations. Buffer/filter strips do a reasonably good job of removing phosphorus attached to sediment, but are relatively ineffective in removing dissolved phosphorus (Gilliam, 1994).
References
Gilliam, J.W. 1994. Reparian Wetlands and Water Quality. Journal of Environmental Quality. 23:896-900. As cited in Michigan Department of Environmental Quality. 1998. Guidebook of Best Management Practices for Michigan Watersheds. Michigan Department of Environmental Quality, Surface Water Quality Division, Lansing, MI.
Nova Scotia Department of Agriculture and Fisheries. 2000. Awareness and Communication Project Reports, Appendix E: Photographs. [http://www.gov.ns.ca/nsaf/home.htm]. Last updated January 1997. Accessed January 2001.
USEPA. 1992. Storm Water Management for Industrial Activities: Developing Pollution Prevention Plans and Best Management Practices. EPA 832-R-92-006. U.S. Environmental Protection Agency, Office of Water, Washington, DC.
USEPA. 1996. Protecting Natural Wetlands: A Guide to Stormwater Best Management Practices. EPA 843-B-96-001. U.S. Environmental Protection Agency, Office of Water, Washington, DC.
53
National Menu of Best Management Practices
Phase construction
Construction Sequencing
Construction Site Storm Water Runoff Control
Description
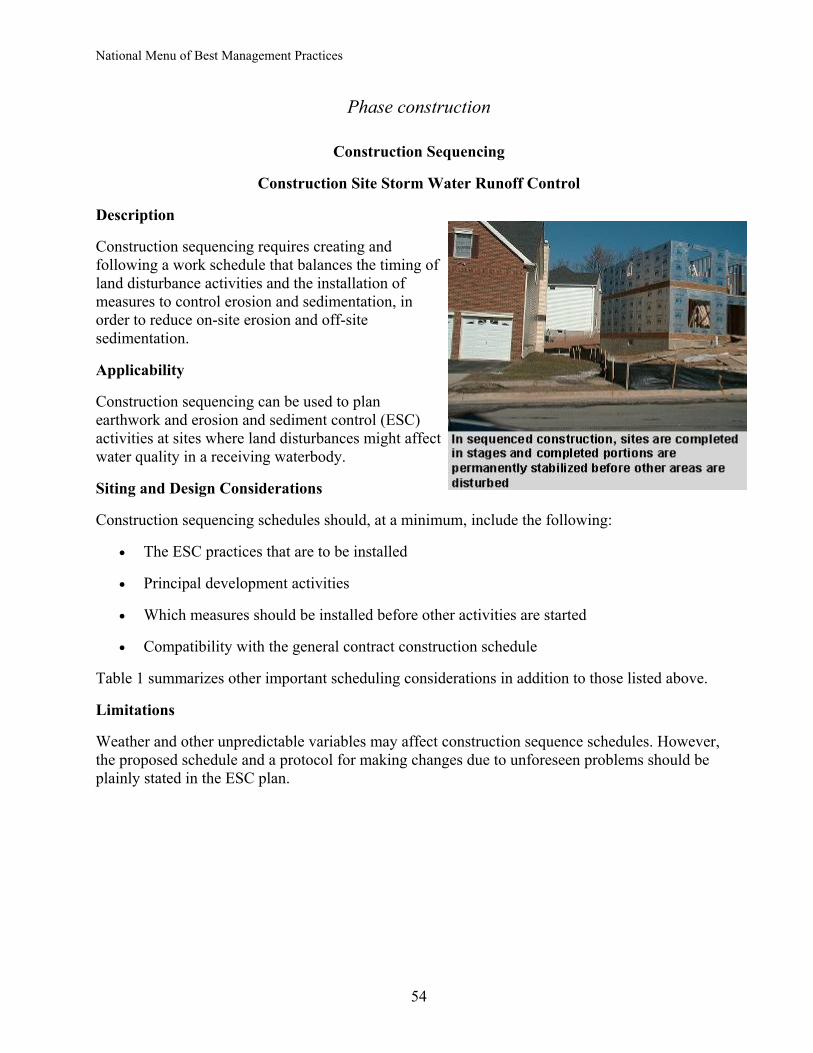
Construction sequencing requires creating and following a work schedule that balances the timing of land disturbance activities and the installation of measures to control erosion and sedimentation, in order to reduce on-site erosion and off-site sedimentation.
Applicability
Construction sequencing can be used to plan earthwork and erosion and sediment control (ESC) activities at sites where land disturbances might affect water quality in a receiving waterbody.
Siting and Design Considerations
Construction sequencing schedules should, at a minimum, include the following:
• The ESC practices that are to be installed
• Principal development activities
• Which measures should be installed before other activities are started
• Compatibility with the general contract construction schedule
Table 1 summarizes other important scheduling considerations in addition to those listed above.
Limitations
Weather and other unpredictable variables may affect construction sequence schedules. However, the proposed schedule and a protocol for making changes due to unforeseen problems should be plainly stated in the ESC plan.
54
National Menu of Best Management Practices
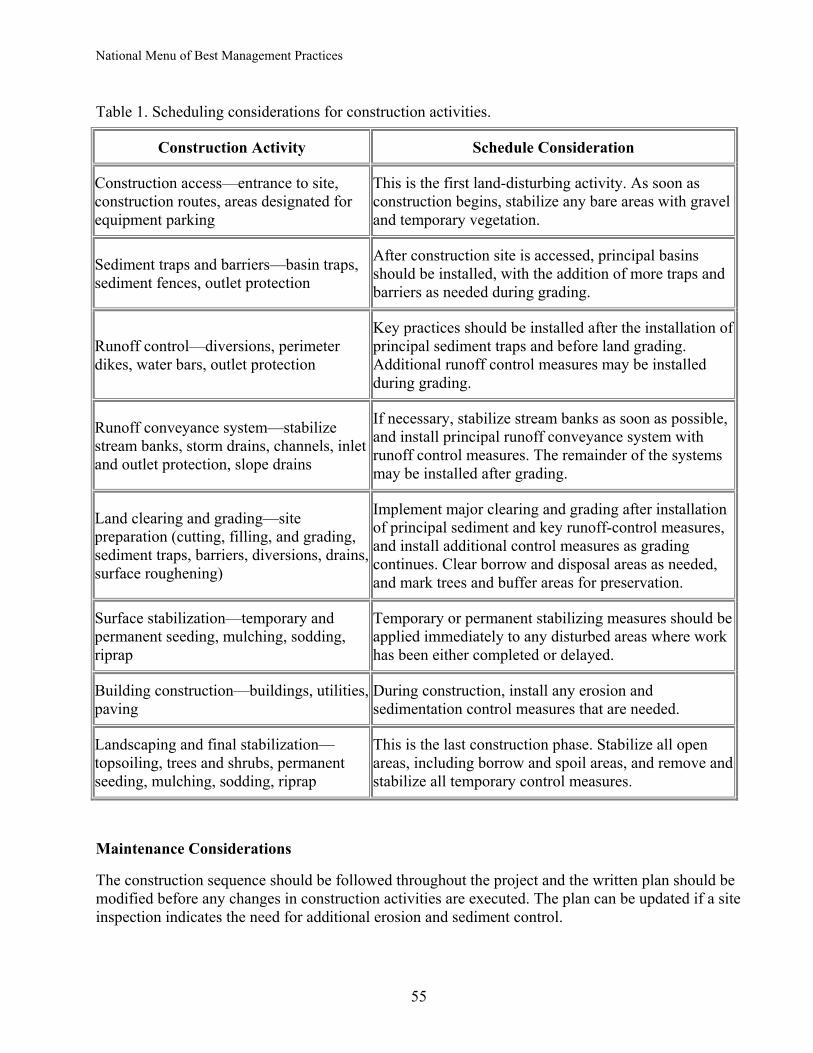
Table 1. Scheduling considerations for construction activities.
Construction Activity Schedule Consideration
Construction access—entrance to site, construction routes, areas designated for equipment parking
This is the first land-disturbing activity. As soon as construction begins, stabilize any bare areas with gravel and temporary vegetation.
Sediment traps and barriers—basin traps, sediment fences, outlet protection
After construction site is accessed, principal basins should be installed, with the addition of more traps and barriers as needed during grading.
Runoff control—diversions, perimeter dikes, water bars, outlet protection
Key practices should be installed after the installation of principal sediment traps and before land grading. Additional runoff control measures may be installed during grading.
Runoff conveyance system—stabilize stream banks, storm drains, channels, inlet and outlet protection, slope drains
If necessary, stabilize stream banks as soon as possible, and install principal runoff conveyance system with runoff control measures. The remainder of the systems may be installed after grading.
Land clearing and grading—site preparation (cutting, filling, and grading, sediment traps, barriers, diversions, drains, surface roughening)
Implement major clearing and grading after installation of principal sediment and key runoff-control measures, and install additional control measures as grading continues. Clear borrow and disposal areas as needed, and mark trees and buffer areas for preservation.
Surface stabilization—temporary and permanent seeding, mulching, sodding, riprap
Temporary or permanent stabilizing measures should be applied immediately to any disturbed areas where work has been either completed or delayed.
Building construction—buildings, utilities, paving
During construction, install any erosion and sedimentation control measures that are needed.
Landscaping and final stabilization—topsoiling, trees and shrubs, permanent seeding, mulching, sodding, riprap
This is the last construction phase. Stabilize all open areas, including borrow and spoil areas, and remove and stabilize all temporary control measures.
Maintenance Considerations
The construction sequence should be followed throughout the project and the written plan should be modified before any changes in construction activities are executed. The plan can be updated if a site inspection indicates the need for additional erosion and sediment control.
55
National Menu of Best Management Practices
Effectiveness
Construction sequencing can be an effective tool for erosion and sediment control because it ensures that management practices are installed where necessary and when appropriate. The plan must be followed and updated if needed to maximize the effectiveness of ESC under changing conditions.
Cost Considerations
Construction sequencing is a low-cost BMP because it requires a limited amount of a contractor's time to provide a written plan for the coordination of construction activities and management practices. Additional time might be needed to update the sequencing plan if the current plan is not providing sufficient ESC.
References
Smolen, M.D., D.W. Miller, L.C. Wyall, J. Lichthardt, and A.L. Lanier. 1988. Erosion and Sediment Control Planning and Design Manual. North Carolina Sedimentation Control Commission, North Carolina Department of Environment, Health, and Natural Resources, and Division of Land Resources Land Quality Section, Raleigh, NC.
56
National Menu of Best Management Practices
Dust Control
Construction Site Storm Water Runoff Control
Description
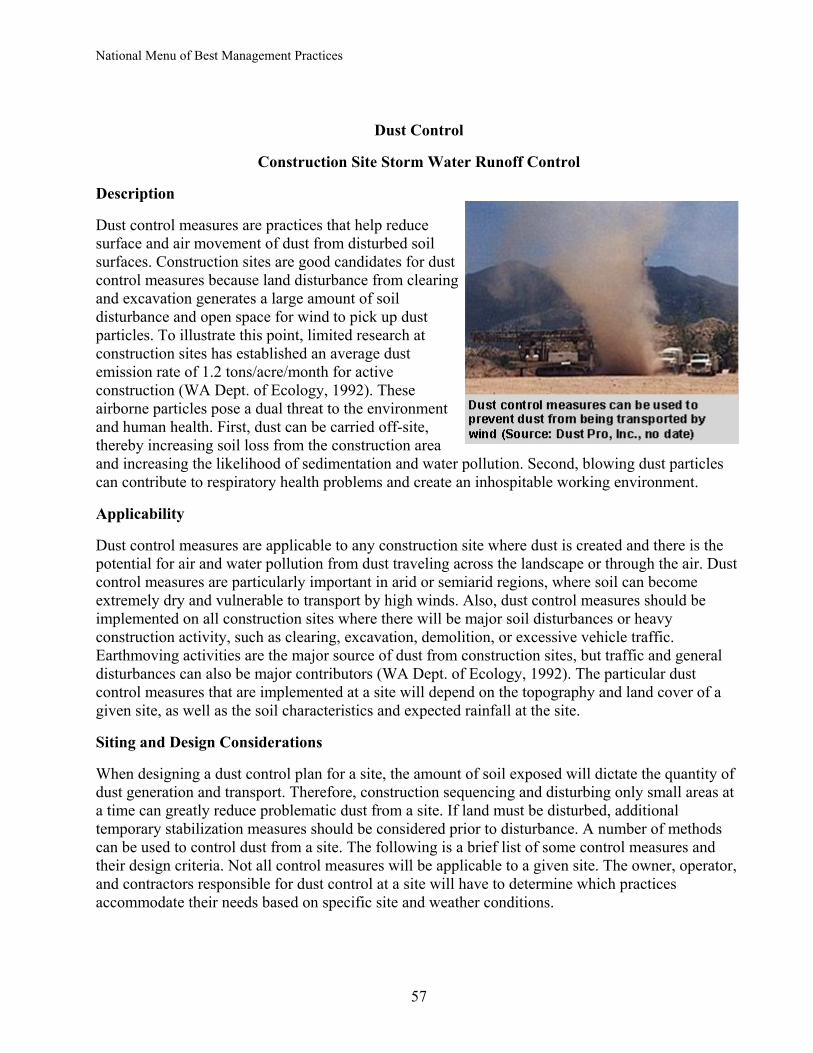
Dust control measures are practices that help reduce surface and air movement of dust from disturbed soil surfaces. Construction sites are good candidates for dust control measures because land disturbance from clearing and excavation generates a large amount of soil disturbance and open space for wind to pick up dust particles. To illustrate this point, limited research at construction sites has established an average dust emission rate of 1.2 tons/acre/month for active construction (WA Dept. of Ecology, 1992). These airborne particles pose a dual threat to the environment and human health. First, dust can be carried off-site, thereby increasing soil loss from the construction area and increasing the likelihood of sedimentation and water pollution. Second, blowing dust particles can contribute to respiratory health problems and create an inhospitable working environment.
Applicability
Dust control measures are applicable to any construction site where dust is created and there is the potential for air and water pollution from dust traveling across the landscape or through the air. Dust control measures are particularly important in arid or semiarid regions, where soil can become extremely dry and vulnerable to transport by high winds. Also, dust control measures should be implemented on all construction sites where there will be major soil disturbances or heavy construction activity, such as clearing, excavation, demolition, or excessive vehicle traffic. Earthmoving activities are the major source of dust from construction sites, but traffic and general disturbances can also be major contributors (WA Dept. of Ecology, 1992). The particular dust control measures that are implemented at a site will depend on the topography and land cover of a given site, as well as the soil characteristics and expected rainfall at the site.
Siting and Design Considerations
When designing a dust control plan for a site, the amount of soil exposed will dictate the quantity of dust generation and transport. Therefore, construction sequencing and disturbing only small areas at a time can greatly reduce problematic dust from a site. If land must be disturbed, additional temporary stabilization measures should be considered prior to disturbance. A number of methods can be used to control dust from a site. The following is a brief list of some control measures and their design criteria. Not all control measures will be applicable to a given site. The owner, operator, and contractors responsible for dust control at a site will have to determine which practices accommodate their needs based on specific site and weather conditions.
57
National Menu of Best Management Practices
• Sprinkling/Irrigation. Sprinkling the ground surface with water until it is moist is an effective dust control method for haul roads and other traffic routes (Smolen et al., 1988). This practice can be applied to almost any site.
• Vegetative Cover. In areas not expected to handle vehicle traffic, vegetative stabilization of disturbed soil is often desirable. Vegetative cover provides coverage to surface soils and slows wind velocity at the ground surface, thus reducing the potential for dust to become airborne.
• Mulch. Mulching can be a quick and effective means of dust control for a recently disturbed area (Smolen et al., 1988).
• Wind Breaks. Wind breaks are barriers (either natural or constructed) that reduce wind velocity through a site and therefore reduce the possibility of suspended particles. Wind breaks can be trees or shrubs left in place during site clearing or constructed barriers such as a wind fence, snow fence, tarp curtain, hay bale, crate wall, or sediment wall (USEPA, 1992).
• Tillage. Deep tillage in large open areas brings soil clods to the surface where they rest on top of dust, preventing it from becoming airborne.
• Stone. Stone may be an effective dust deterrent for construction roads and entrances or as a mulch in areas where vegetation cannot be established.
• Spray-on Chemical Soil Treatments (palliatives). Examples of chemical adhesives include anionic asphalt emulsion, latex emulsion, resin-water emulsions, and calcium chloride. Chemical palliatives should be used only on mineral soils. When considering chemical application to suppress dust, consideration should be taken as to whether the chemical is biodegradable or water-soluble and what effect its application could have on the surrounding environment, including waterbodies and wildlife.
Table 1 shows application rates for some common spray-on adhesives, as recommended by Smolen et al. (1988).
Table 1. Application rates for spray-on adhesives (Source: Smolen et al., 1988)
Spray-on Adhesive Water Dilution Type of Nozzle Application (gal/ac)
Anionic Asphalt Emulsion 7:1 Coarse Spray 1,200
Latex Emulsion 12.5:1 Fine Spray 235
Resin in Water 4:1 Fine Spray 300
Limitations
In areas where evaporation rates are high, water application to exposed soils may require near constant attention. If water is applied in excess, irrigation may create unwanted excess runoff from the site and possibly create conditions where vehicles could track mud onto public roads. Chemical
58
National Menu of Best Management Practices
applications should be used sparingly and only on mineral soils (not muck soils) because their misuse can create additional surface water pollution from runoff or contaminate ground water. Chemical applications might also present a health risk if excessive amounts are used.
Maintenance Considerations
Because dust controls are dependent on specific site and weather conditions, inspection and maintenance are unique for each site. Generally, however, dust control measures involving application of either water or chemicals require more monitoring than structural or vegetative controls to remain effective. If structural controls are used, they should be inspected for deterioration on a regular basis to ensure that they are still achieving their intended purpose.
Effectiveness
• Sprinkling/Irrigation. Not available.
• Vegetative Cover. Not available.
• Mulch. Can reduce wind erosion by up to 80 percent.
• Wind Breaks/Barriers. For each foot of vertical height, an 8-to 10-foot deposition zone develops on the leeward side of the barrier. The permeability of the barrier will change its effectiveness at capturing windborne sediment.
• Tillage. Roughening the soil can reduce soil losses by approximately 80 percent in some situations.
• Stone. The sizes of the stone can affect the amount of erosion to take place. In areas of high wind, small stones are not as effective as 20 cm stones.
• Spray-on Chemical Soil Treatments (palliatives). Effectiveness of polymer stabilization methods range from 70 percent to 90 percent, according to limited research.
Cost Considerations
Chemical dust control measures can vary widely in cost, depending on specific needs of the site and level of dust control desired. One manufacturer of a chloride product estimated a cost of $1,089 per acre for application to road surfaces, but cautioned that cost estimates without a specific site evaluation are rather inaccurate.
59
National Menu of Best Management Practices
References
Dust Pro, Inc. No date. Erosion Control. [www.dustpro.com/erosion.html]. Accessed January 2001.
Smolen, M.D., D.W. Miller, L.C. Wyatt, J. Lichthardt, and A.L. Lanier. 1988. Erosion and Sediment Control Planning and Design Manual. North Carolina Sedimentation Control Commission, North Carolina Department of Environment, Health, and Natural Resources, and Division of Land Resources Land Quality Section, Raleigh, NC.
USEPA. 1992. Storm Water Management for Construction Activities: Developing Pollution Prevention Plans and Best Management Practices. EPA 832-R-92-005. U.S. Environmental Protection Agency, Office of Water, Washington, DC.
USEPA. 1992. Storm Water Management for Industrial Activities: Developing Pollution Prevention Plans and Best Management Practices. EPA 832-R-92-006. U.S. Environmental Protection Agency, Office of Water, Washington, DC.
Washington State Department of Ecology. 1992. Stormwater Management Manual for the Puget Sound Basin. Washington State Department of Ecology, Olympia, WA.
60