Connect a Windows Device via the AirMedia® Troubleshooting If your device reuires a display adapter...
5
Audiovisual Services Hotline: Ext. 2467 (603-862-2467) www.unh.edu/it/av University of New Hampshire Audiovisual Services Technology Enhanced Classroom Training Crestron AirMedia® Connect a Windows Device via the AirMedia® 1. Turn on your Windows Device and connect to the university WIFI 2. Locate the Crestron AirMedia® touch panel in your classroom. Touch the display gently to start. 3. Select ‘AirMedia’ by pressing on the touch panel 4. Choose mode ‘Audiovisual’ for AirMedia by pressing on the touch panel AirMedia Windows V1 01/11/2019 KLWB
Transcript of Connect a Windows Device via the AirMedia® Troubleshooting If your device reuires a display adapter...

Audiovisual Services Hotline: Ext. 2467 (603-862-2467)
www.unh.edu/it/av
University of New HampshireAudiovisual ServicesTechnology Enhanced Classroom Training
Crestron AirMedia®Connect a Windows Device via the AirMedia®
1. Turn on your Windows Device and connect to the university WIFI
2. Locate the Crestron AirMedia® touch panel in your classroom. Touch the display gently to start.
3. Select ‘AirMedia’ by pressing on the touch panel
4. Choose mode ‘Audiovisual’ for AirMedia by pressing on the touch panel
AirMedia Windows V101/11/2019 KLWB
Audiovisual Services Hotline: Ext. 2467 (603-862-2467)
www.unh.edu/it/av
University of New HampshireAudiovisual ServicesTechnology Enhanced Classroom Training
5. Projector will begin warming up, while the projection screen, classroom blinds and lights will lower automatically
6. Open a webpage on your Windows Device and go to the URL provided on touch panel.
7. Select the ‘Client for Windows’ AirMedia Utili-ty Software Download
7a. You can download the AirMedia® software to your Windows Device prior to classroom use HERE
Audiovisual Services Hotline: Ext. 2467 (603-862-2467)
www.unh.edu/it/av
University of New HampshireAudiovisual ServicesTechnology Enhanced Classroom Training
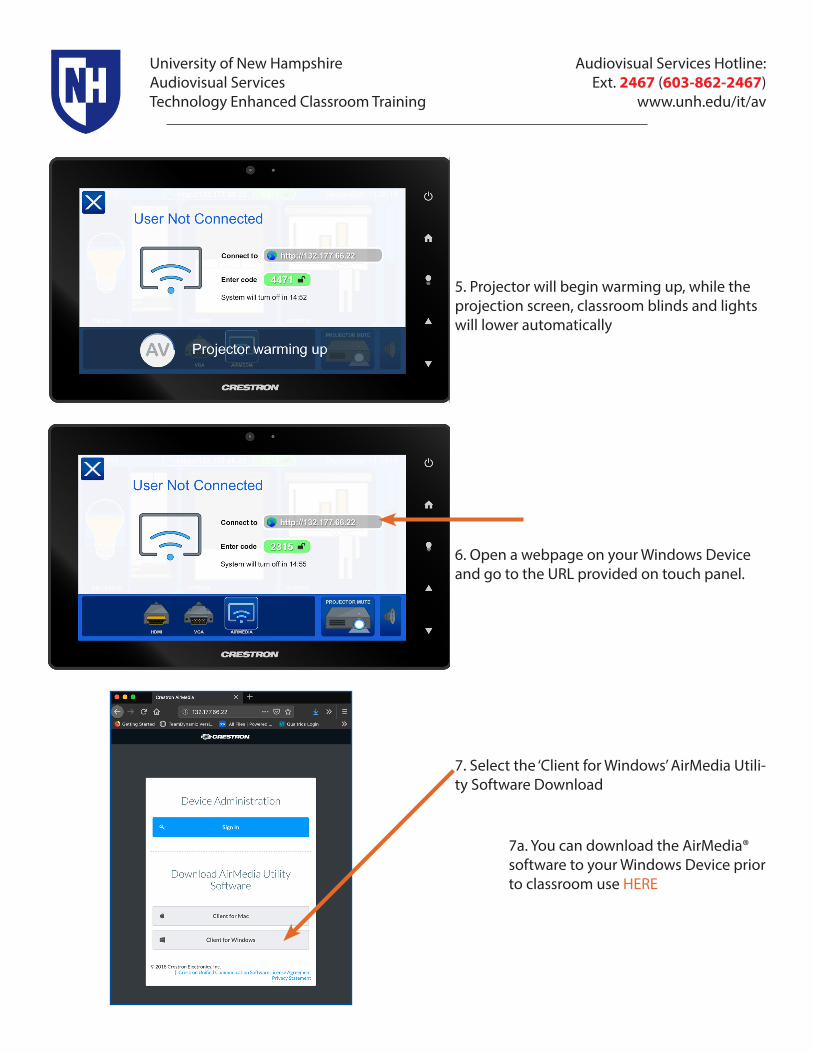
8. Open AirMedia software; enter the URL provided on the touch panel and projection screen, then select ‘Connect’
9. A password dialog box will generate. Enter the 4 digit passcode provided on both the touch panel display and projection screen.
10. A dialog box will appear in your Windows desktop that allows you to ‘Stop’ and ‘Start’ the AirMedia connection.

Audiovisual Services Hotline: Ext. 2467 (603-862-2467)
www.unh.edu/it/av
University of New HampshireAudiovisual ServicesTechnology Enhanced Classroom Training
13. You should now be connected wirelessly via the AirMedia and projecting to the screen.
14. Touch panel will appear with the lock open during your use.
15. When you are finished presenting please press the power button on the touch panel display. This will put the projector in cool down mode, lift the blinds and raise the lights.
AV TECH TIP #1: Volume control for applications like YouTube, QuickTime, Windows Me-dia Player and others will need to be adjusted within the application’s sound bar.

Audiovisual Services Hotline: Ext. 2467 (603-862-2467)
www.unh.edu/it/av
University of New HampshireAudiovisual ServicesTechnology Enhanced Classroom Training
Laptop TroubleshootingIf your device requires a display adapter to connect to the provided HDMI or VGA cable, connect the HDMI or VGA cable to the adapter first, then connect the adapter to your device. Select the HDMI or VGA source button on the AV touch panel.
If your classroom does not have an instructor podium, ensure HDMI or VGA cable is securely connected to the wall AV input plate.
Want to schedule a group or one-on-one AV training session? Call the AV Services Hotline at Ext. 2467 (603-862-2467) at any time.
Video MirroringMirroring displays the same image on each display.
Connect adapter to cable, then adapter to laptop.From the Apple () menu, choose System Preferences.Choose Displays. Click the Arrangement tab.Enable (check) “Mirror Displays” in the bottom-left corner.
Audio SettingsIt may be necessary to select the correct Sound Output settings.
From the Apple () menu, choose System Preferences.Choose Sound. Click the Output tab.If using HDMI, select HDMI as the output.If using VGA, select Headphones as the output.
Change Display ResolutionDisplay resolution determines the size of text and objects on your screen.
Connect adapter to cable, then adapter to laptop.From the Apple () menu, choose System Preferences.Choose Displays. Click the Display tab. Select the Scaled button.Select the highest resolution in the list.
Changing Display Color ProfileColor Profiles control the color balance and contrast levels for a display.
From the Apple () menu, choose System Preferences.Choose Displays. Click the Color tab.Select a color profile from the list on the left. Click through the profiles and select the one that looks the best.
Mac Laptop Troubleshooting
Windows Laptop TroubleshootingDuplicating DisplaysDuplicating displays the same image on each display.
Press and hold the Windows key + P. In the window that appears, select Duplicate.
Change Display ResolutionDisplay resolution determines the size of text and objects on your screen.
Right-click on the desktop and choose Screen Resolution. Set the screen resolution to the highest setting available.
Changing Display Color ProfileColor Profiles control the color balance and contrast levels for a display.
Click the Start button, and then click Control Panel. In the search box, type color management, and then click Color Management.Click the All Profiles tab, and then click Add. Locate and select the new color profile, and then click Add. Click Close.
Audio SettingsIt may be necessary to select the correct Sound Output settings.
Click the Start button, and then click Control Panel. Click Sound Settings.If using HDMI, select HDMI as the Sound Output.If using VGA, select Headphones as the Sound Output.