Confirm - MapInfo Pro™ - Desktop GIS | GIS Mapping | Pitney...
53
Location Intelligence Infrastructure Asset Management Confirm ® Works Management Version v18.10b.AM
-
Upload
nguyendang -
Category
Documents
-
view
224 -
download
3
Transcript of Confirm - MapInfo Pro™ - Desktop GIS | GIS Mapping | Pitney...
Location IntelligenceInfrastructure Asset Management
Confirm®
Works Management
Version v18.10b.AM

Information in this document is subject to change without notice and does not represent a commitmenton the part of the vendor or its representatives. No part of this document may be reproduced ortransmitted in any form or by any means, electronic or mechanical, including photocopying, withoutthe written permission of Pitney Bowes Inc., One Global View, Troy, New York 12180-8399.
© 2018 Pitney Bowes. All rights reserved. MapInfo, the MapInfo logo and Confirm are trademarks ofPitney Bowes and/or its affiliates.
Corporate Headquarters:Phone: 518 285 6000Fax: 518 285 6070Sales: 800 327 8627Government Sales: 800 619 2333Technical Support: 518 285 7283http://www.pitneybowes.com/us
UK and EMEA Headquarters:Phone: 1 800 840 0001Technical Support (UK): 1 800 840 0001Technical Support (International): 44 1634 880141http://www.pitneybowes.com/uk
Asia Pacific Headquarters:Phone: 61 2 9437 6255Fax: 61 2 9439 1773Technical Support: 1 800 648 899www.pitneybowes.com.au/software
Contact information for all Pitney Bowes offices is located at: http://www.pitneybowes.com/uk/contact-us.
Products named herein may be trademarks of their respective manufacturers and are hereby recognized.Trademarked names are used editorially, to the benefit of the trademark owner, with no intent to infringeon the trademark.
Open Source Attribution NoticeThe Confirm suite of products contain the following open source software:
• Feature Data Objects v 3.5.0, which is licensed under GNU Lesser General Public License, Version2.1, February 1999 with the unRAR restriction. The license can be downloaded from: http://fdo.os-geo.org/licenceAndGovernance.html. The source code for this software is available from ht-tp://fdo.osgeo.org/content/fdo-350-downloads
• MrSID software (specifically the mrsid32.dll) is used under license and is Copyright © 1995-2002,LizardTech, Inc., 1008 Western Ave., Suite 200, Seattle, WA 98104. All rights reserved. MrSID isprotected by U.S. Patent No. 5,710,835. Foreign patents are pending. Unauthorized use or duplicationprohibited.
Patented technology in the Software was developed in part through a project at the Los AlamosNational Laboratory, funded by the U.S. Government and managed by the University of California.The U.S. Government has reserved rights in the technology, including a non-exclusive, nontransfer-able, irrevocable, paid-up license to practice or have practiced throughout the world, for or on behalfof the United States, inventions covered by the patent, and has other rights under 35 U.S.C. § 200-212 and applicable implementing regulations.
For further information, contact Lizardtech.
• NodaTime, version number 1.3.10, which is licensed under the Apache license, version number 2.0.The license can be downloaded from http://www.apache.org/licenses/LICENSE-2.0 . The sourcecode for this software is available from http://nodatime.org/.
• Chromium Embedded Framework, version 3, which is licensed under the New BSD License. The li-cense can be downloaded from http://opensource.org/licenses/BSD-3-Clause. The source code forthis software is available from http://code.google.com/p/chromiumembedded/downloads/list.
• Xilium.CefGlue, version 3, which is licensed under the MIT License (with portions licensed underthe New BSD License). The licenses can be downloaded from http://opensource.org/licenses/MITand http://opensource.org/licenses/BSD-3-Clause. The source code for this software is availablefrom http://xilium.bitbucket.org/cefglue/.
• D3 Data Driven Documentation, version 3.4.1, which is licensed under the New BSD License. Thelicense can be downloaded from from https://github.com/mbostock/d3/blob/master/LICENSE. Thesource code for this software is available from http://d3js.org/.
• OpenLayers, version 2.12, which is licensed under the Modified BSD License. The license can bedownloaded from http://svn.openlayers.org/trunk/openlayers/license.txt. The source code for thissoftware is available from http://trac.osgeo.org/openlayers/browser.
• OpenLayers, version 3, which is licensed under the BSD 2-Clause Licence. The license which canbe downloaded from https://github.com/openlayers/ol3/blob/master/LICENSE.md. The source codefor this software is available from https://github.com/openlayers/ol3.
• Proj4js, version 1+, which is licensed under the Apache License, Version 2, January 2004.The licensecan be downloaded from http://www.apache.org/licenses/LICENSE-2.0.html. The source code forthis software is available from http://trac.osgeo.org/proj4js/.
• requireJS, version 2.1.2, which is licensed under the MIT License or the New BSD License.The licensecan be downloaded from https://github.com/jrburke/requirejs/blob/master/LICENSE. The sourcecode for this software is available from http://requirejs.org/.
• Apache Cordova, version 4.2.0, which is licensed under the Apache License, Version 2, January2004. The license can be downloaded from http://www.apache.org/licenses/LICENSE-2.0.html. Thesource code for this software is available from http://phonegap.com/download/.
May 08, 2018

Table of Contents
Works Management
Work Tickets 6
Print Daily Tickets for Routine 6
Print Beat Ticket for Routine 7
Print Period Ticket for Routine 8
Print Period Ticket for NonRoutine 9
Work Ticket Print Copy 11
Ticket Print Troubleshooting 12
Gang Allocation 14
Allocate Gangs to Routine 14
Allocate Gangs to Non Routine 15
Re-Allocate RoutineMaintenance 17
Re-Allocate Non RoutineMaintenance 18
Gang Lookups 18
Setting up Gang Allocation rules -Step-by-step 24
Scheduling 27
Scheduling 27
Scheduling Lookups 31
Works Costing 35
Pre-requisites for Works Costing 35
Cost Details 35
Prepare Cost Details 39
Allocate Overhead Types 40
Allocate Money to Overhead 41
Refresh Direct Cost Build Up 41
Prepare Rates from Cost Details 42
Print Completed Bill ofQuantities 43
Works Costing Lookups 44
Costing a BoQ - step-by-step 45
Works Management Forecasting 47
Cost Details Report 47
Labour Requirements 47
Plant Requirements 47
Material Requirements 47
Overhead Recovery 47
Annual Routine Workload Graph 47
Periodic Routine WorkloadGraph 47
Workload Profiling 49
Gang Allocation Graph 49
Gang Allocation By PriorityGraph 49
Gang Allocation by Priority 49
Profile Gang Requirements 49
Job Costing 50
Create Payment Requests From JobCosts 50
Import Job Costs 51
Refresh Job Cost Rates 52
Works ManagementThe Works Management module provides tools for the direct managementof the maintenance within Confirm.
The module is split into two broad areas: Gang Allocation, and WorksCosting.
The Works Costing section allows the client Bill of Quantities to be ac-cessed, and for each SOR Item contained in the BoQ to be priced usinga combination of Labour, Plant, Materials and Overhead costs. A StandardMinute Value is applied to each SOR Item, and this information is used tocalculate to SOR Item cost based on the costing quantities supplied in theBoQ.
The Gang Allocation section allows a set of rules to be set up which willbe automatically applied to allocate Routine Work to the appropriate Gangas soon as it is committed within the system. Allocations may be carriedout on an ad-hoc basis for Non Routine Works, and allocations may bechanged. Work Tickets can then be produced which route the work foreach gang.
In this section
Work Tickets 6Gang Allocation 14Scheduling 27Works Costing 35Works Management Forecasting 47Workload Profiling 49Job Costing 50

Work TicketsWork Tickets will provide each Gang with details of the SORs that must be carried out, in each Sitethat is allocated to them, in Route order.
In order for Tickets to be printed, work must be committed, and an allocation of work to Gangs musthave taken place. This may have happened automatically on committal of Routine Work, or the alloc-ation may have taken place manually for Non Routine Work.
Beat Tickets for Routine have a different appearance from Period and Daily tickets for Routine:
Beat Tickets will display the Site and SOR on the same line, thus reducing the length of the ticket,they will also provide SOR summaries giving measurement totals for each SOR.
Period and Daily tickets will show the site, and list beneath the Feature/Maintenance Regime, andSORs with their associated quantities and occasions.
Print Daily Tickets for Routine
The Daily ticket will print out committed Routine Work that is programmed in Maintenance Regimesfor days of the week.
The top half of the filter is used to restrict the data returned by the Ticket Print Filter.
The bottom half tells Confirm how to present the data returned. There are the following options:
Select a range of Print Copies to print. If these fields are left blank one ticket willbe printed in each Print Copy stored in the Print Copy library.
Print Copy From /To:
Select from:Ticket Types:
'New & Variance' - Prints all previously unprinted work, including previously un-printed Variations to work previously printed.
6 of 53Pitney Bowes
Works Management

'Current' - Prints a ticket reflecting the currently Committed work (regardless ofwhether a ticket has been printed before) including any amendments becauseof Variations.
'Reprint' - Reprints a ticket as it appeared when last printed, ignoring any Vari-ations to the work since the last print.
Select from:Collate Details:
'by Gang' - Each Gang will print in all Copy Types before beginning the nextGang.
'by Copy Type' - Each Copy Type will print for all the Gangs before beginningthe next Copy Type.
Checked by default to print ticket for non-beat Gangs only (ignoring Beat Gangs).Ignore Beat De-tails:
Print Beat Ticket for Routine
The Beat ticket will print out committed Routine Work that is allocated to Beat Gangs.
The top half of the filter is used to restrict the data returned by the Ticket Print Filter.
The bottom half tells Confirm how to present the data returned. There are the following options:
Select a range of Print Copies to print. If these fields are left blank one ticket willbe printed in each Print Copy stored in the Print Copy library.
Print Copy From /To:
Select from:Ticket Types:
'New & Variance' - Prints all previously unprinted work, including previously un-printed Variations to work previously printed.
'Current' - Prints a ticket reflecting the currently Committed work (regardless ofwhether a ticket has been printed before) including any amendments becauseof Variations.
7 of 53Pitney Bowes
Works Management

'Reprint' - Reprints a ticket as it appeared when last printed, ignoring any Vari-ations to the work since the last print.
Select from:Collate Details:
'by Gang' - Each Gang will print in all Copy Types before beginning the nextGang.
'by Copy Type' - Each Copy Type will print for all the Gangs before beginningthe next Copy Type.
Checked by default to provide a summary of each SOR included in the Ticket,at the end of each group*, with the total measurement for the SOR.
Show SOR Sum-mary:
Uncheck to omit the SOR summary from the ticket.
Check this to add totals for Income, Pay, or SMV (depending on which one isselected for the Ticket Print Copy), at the end of each group*.
Additional Totals..:
*Gang Routes may be divided into groups. If this is not done then the entire Route is treated as onegroup.
Checked by default to show each SOR individually. Uncheck this to remove thisdetail from the Ticket.
Show SOR Detail:
Check this to provide a summary of each SOR included in the Ticket, at the endof the ticket.
Show Overall Sum-mary:
Check this to increase font size for the group summariesLarge Font on SORSummary:
Check this to treat all the groups on the ticket as one group for the purpose ofSOR Summary.
Combine Groups:
Print Period Ticket for Routine
The Period ticket will print out the selected committed Routine Work, other than daily work.
8 of 53Pitney Bowes
Works Management

The top half of the filter is used to restrict the data returned by the Ticket Print Filter.
The bottom half tells Confirm how to present the data returned. There are the following options:
Select a range of Print Copies to print. If these fields are left blank one ticket willbe printed in each Print Copy stored in the Print Copy library.
Print Copy From /To:
Select from:Ticket Types:
'New & Variance' - Prints all previously unprinted work, including previously un-printed Variations to work previously printed.
'Current' - Prints a ticket reflecting the currently Committed work (regardless ofwhether a ticket has been printed before) including any amendments becauseof Variations.
'Reprint' - Reprints a ticket as it appeared when last printed, ignoring any Vari-ations to the work since the last print.
Select from:Collate Details:
'by Gang' - Each Gang will print in all Copy Types before beginning the nextGang.
'by Copy Type' - Each Copy Type will print for all the Gangs before beginningthe next Copy Type.
Checked by default to print ticket for non-beat gangs only (ignoring Beat Gangs).Ignore Beat De-tails:
Clear the check box to print Period Tickets for Beat Gangs as well as non-beatGangs.
Print Period Ticket for Non Routine
The Period ticket for Non Routine will print out the selected committed Non Routine Work that hasbeen allocated to Gangs.
9 of 53Pitney Bowes
Works Management

The top half of the filter is used to restrict the data returned by the Ticket Print Filter.
The bottom half tells Confirm how to present the data returned. There are the following options:
Select a range of Print Copies to print. If these fields are left blank one ticket willbe printed in each Print Copy stored in the Print Copy library.
Print from Copy /To:
Select from:Ticket Types:
'New' - Prints out all work not printed before.
'Variance' - Prints out Variations not printed before.
'New & Variance' - Prints all previously unprinted work, including previously un-printed Variations to work previously printed.
'Reprint (Current)' - Prints a ticket reflecting the currently Committed work (regard-less of whether a ticket has been printed before) including any amendmentsbecause of Variations.
'Reprint (Original)' - Reprints a ticket as it appeared when last printed, ignoringany Variations to the work since the last print.
Select from:Collate Details:
'by Gang' - Each Gang will print in all Copy Types before beginning the nextGang.
'by Copy Type' - Each Copy Type will print for all the Gangs before beginningthe next Copy Type.
Select from:Page Break:
'None' - Jobs will print continuously without a hard page break.
'Break By Job' - Each Job will start a new page
10 of 53Pitney Bowes
Works Management
'Break by Site' - All the Jobs on a Site will print without a hard page break. A newpage is started for a Job on a different Site.
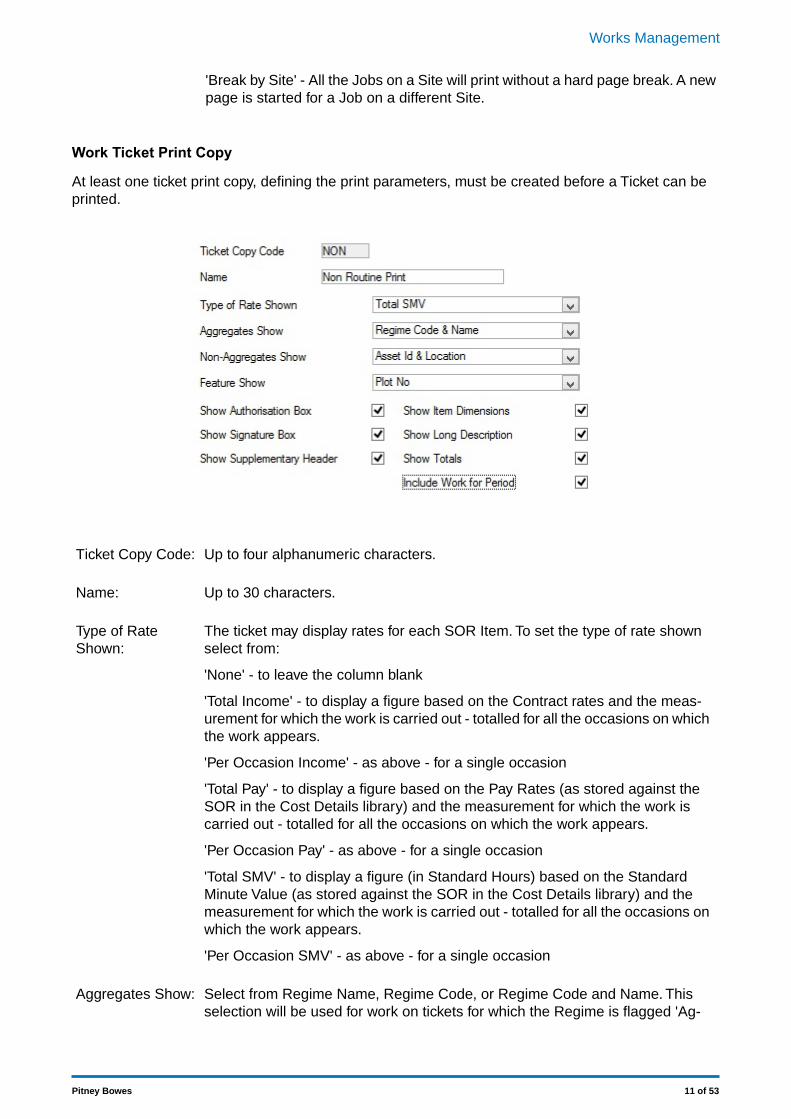
Work Ticket Print Copy
At least one ticket print copy, defining the print parameters, must be created before a Ticket can beprinted.
Up to four alphanumeric characters.Ticket Copy Code:
Up to 30 characters.Name:
The ticket may display rates for each SOR Item. To set the type of rate shownselect from:
Type of RateShown:
'None' - to leave the column blank
'Total Income' - to display a figure based on the Contract rates and the meas-urement for which the work is carried out - totalled for all the occasions on whichthe work appears.
'Per Occasion Income' - as above - for a single occasion
'Total Pay' - to display a figure based on the Pay Rates (as stored against theSOR in the Cost Details library) and the measurement for which the work iscarried out - totalled for all the occasions on which the work appears.
'Per Occasion Pay' - as above - for a single occasion
'Total SMV' - to display a figure (in Standard Hours) based on the StandardMinute Value (as stored against the SOR in the Cost Details library) and themeasurement for which the work is carried out - totalled for all the occasions onwhich the work appears.
'Per Occasion SMV' - as above - for a single occasion
Select from Regime Name, Regime Code, or Regime Code and Name. Thisselection will be used for work on tickets for which the Regime is flagged 'Ag-
Aggregates Show:
11 of 53Pitney Bowes
Works Management

gregate'. See "Asset Maintenance\Maintenance Regime' for information on ag-gregating work.
Select from Regime Name, Regime Code, Regime Code and Name, FeatureId & Location, or Feature Type. This selection will be used for work on tickets
Non-AggregatesShow:
for which the Regime is not flagged 'Aggregate'. See Asset Maintenance\Main-tenance Regime for information on aggregating work
Select Plot No or Feature Id. The ticket will then identify Features in the wayselected in this field.
Feature Show:
Check to show signature box at the bottom of the last page of the Ticket. Thebox is labelled 'Authorisation Date'.
Show Authorisationbox:
Check to show signature box at the end of the ticketShow SignatureBox:
Check to print with Supplementary header. A supplementary header appearsat the beginning of the ticket and provides space for entering the Gang member'snames and hours.
Show Supplement-ary Header:
Check to show item dimensions (where measurements are entered as lengthand width for instance)
Show item dimen-sions:
Check to show the long description in place of the short description for eachSOR.
Show Long De-scription:
Check to show totals for each Site.Show Totals:
Note: These are totals of rates, and therefore will reflect the 'Type of Rate' se-lected. Where 'None' has been selected, no totals can be displayed.
Check this to include work with Period occasions (as well as work with weeklyand daily occasions)
Include Work forPeriod:
Ticket Print Troubleshooting
At least one Print Copy must be in place before tickets can be printed.
Creating the Allocation rules (in the Gang Lookups) is NOT to carry out an allocation. Once the rulesare in place, automatic allocation for Routine Work will take place when Routine work is committed.
Therefore: if no Routine work has been committed since the Allocation rules were set up - no allocationhas been done, and no tickets can be printed.
To allocate work on a Routine Maintenance Works Order which was committed prior to the allocationrules being set up use Allocate Gangs to Routine on page 14 - where no default Gang is in place,or Re-Allocate Routine Maintenance on page 17 - where a dummy Gang is in place (and so allRoutine Work will have been allocated to the dummy Gang by default)
Select the correct Print Option for the work you want to print:
• Entering a Beat gang in the Period Ticket Print filter will return 'No Records Found' unless 'IgnoreBeat Details' is checked.
• Entering a non-Beat gang in the Beat ticket print filter will return 'No Records Found'. Use the PrintBeat Ticket for Routine option.
12 of 53Pitney Bowes
Works Management
Select the correct Ticket Type in the print filter:
• New & Variance prints work that is 'New' - i.e. hasn't been printed before.• Current prints the 'current' situation - i.e. all the work, new and already printed.• Reprint reprints a ticket in as it appeared when last printed.
Selecting New & Variance, when this ticket has already been printed, will return 'No Records Found'.
Tickets for Beat Gangs will only print the Sites that are in their Gang Route. Therefore, if Beat Gangshave been created, and given an allocation of work, but not assigned a Gang Route, an attempt toprint a ticket for Beat Gangs will return 'No Records Found'
The Un-Routed Beat Sites report will highlight Sites that are in a Beat Gang's allocation of work, butnot in their Gang Route.
Gang allocations have been carried out, but a Work Ticket Print returns 'No Records Found'
13 of 53Pitney Bowes
Works Management

Gang AllocationGang allocation assigns to each Gang the work that they will be responsible for at each Site. Theworks is defined as SOR Items, so an allocation is of a particular SOR Item (or group of SOR Items)on a particular Site. The gang may then go to another Site and carry out a different set of SOR Items.It's the combination of Site and SOR Item(s) that precisely defines a Gang's work.
Gangs may be responsible for a large variety of SOR items on a small number of Sites (or only oneSite), or may be responsible for a small range of SOR Items, across a great many Sites. The latter(lots of Sites, few tasks) will usually be considered as Beat Gangs.
Gangs will have the Sites in which they have work allocated Routed to provide a logical order in whichto visit the Sites. Gang Routes are not obligatory for Non Beat gangs (where no Gang Route is in place- the Sites will list alphabetically on the ticket), but Gang Routes are essential for Beat gangs sinceSites not in their Gang Route will simply not appear in the Beat ticket.
Allocation may be carried out in two ways:
1. According to rules set in the Gang Lookups, which define which Gang will do which SORs on whichSites.This is usually most appropriate to Routine Work, and the system will carry out the allocationautomatically when Routine Work is Committed if 'Rules' are in place.
2. On an Ad hoc basis, assigning the work to the gangs as the work is committed.This is usually mostappropriate to Non Routine work, although rules may be used to help in allocating work. Automaticallocation is not carried out on committal of Non Routine work - regardless of whether rules are inplace or not.
The Gang Allocation Folder is in two sections:
1. Allocation and re-allocation filters to carry out the allocation and re-allocation of committed work.2. Gang Lookups folder contains the tools and libraries for setting up Gangs and assigning them their
Gang Routes, and for setting up the allocation rules which will define the allocation of Routine Workon committal, and may be used to allocate Non routine work.
Allocate Gangs to Routine
To carry out an allocation of committed Routine Work where the allocation had not been carried outautomatically on committal (that is - allocation 'rules' for the work in question were not in place at thetime of the committal).
Where rules are now in place, this utility will use them to carry out the allocation - so it may be usedto carry out an allocation where rules are now in place, but were not at the time of the committal ofthe Routine Works.
Where rules covering this work are not in place, the gang entered as 'Default' gang, is the one to whomthe work defined in the top part of the filter will be allocated.
14 of 53Pitney Bowes
Works Management

The fields above the grey line allow the selection of the work and the Sites for allocation. Fields include:
Select the Finance Period for which the allocation is to take place.Finance Period:
Check this to display only the SOR short description in the allocation preview.Short DescriptionOnly:
The fields below the grey line define how the work is to be allocated.
Enter here the Gang who will be allocated any of the work defined above, whichcannot be allocated according to 'rules'.
Default Gang:
This means that where no rules are in place to define the allocation, the Gangwho will be doing the work should be entered in this field.
Where 'rules' are in place to define the allocation (rules have been put in placesince the committal of the work took place for instance) the 'dummy' gang shouldbe entered. In this case, any work for which rules are not in place will be 'caught'by the dummy gang.
Where a 'true' Gang has been entered (that is rules are not in place and theGang is the one to whom the work will be allocated) - use these fields to limit the
Include From \To:
allocation to the Sites in the Gang Route by entering the first and last Sites inthe From and To fields.
Note: If these fields are left blank the work will be allocated in all Sites for whichit is ordered, only limited by any filter entries in the top part of the form.
Click on OK to run the utility and display the allocation Preview. Save the preview to carry out the al-location.
Allocate Gangs to Non Routine
To carry out an allocation of committed Non Routine Work. This may be done in two ways:
15 of 53Pitney Bowes
Works Management

Using rules - where rules are in place, this utility will use them to carry out the allocation, and onlywork that cannot find a Gang according to the 'rules' will be allocated to the 'Default Gang'.
Ignoring rules - if this option is selected the gang entered as 'Default' gang, is the one to whom thework defined in the top part of the filter will be allocated.
Where rules have been set up such that a Job is allocated to more than one Gang, the Jobwill not be downloaded to ConfirmConnect. Splitting Jobs is only valid for Work being issuedusing Work Tickets.
Note:
The fields above the grey line allow the selection of the work and Sites for allocation. Fields include:
Will find all Jobs with a matching text string in the Work Location field.Location Contains:
Will find all Jobs with a matching text string in the Work Description field.Notes Contain:
The fields below the grey line define how the work is to be allocated.
Check this to carry out the allocation without reference to the allocation 'rules'.Ignore Rules:
Clear the check box to carry out an allocation using the allocation 'rules'
Where 'Ignore Rules' is checked, the Gang who will be doing the work shouldbe entered in this field.
Default Gang:
Where 'Ignore Rules' has not been checked, the 'dummy' gang should be entered.In this case, any work for which rules are not in place will be 'caught' by thedummy gang.
Where an allocation ignoring the rules is taking place - you may use these fieldsto limit the allocation to the Sites in the Gang Route by entering the first and lastSites in the From and To fields.
Include From \To:
Note: if these fields are left blank the work will be allocated in all the Sites forwhich it is ordered, only limited by any filter entries in the top part of the form.
16 of 53Pitney Bowes
Works Management
Click on OK to run the utility and display the allocation Preview. Save the preview to carry out the al-location.
Re-Allocate Routine Maintenance
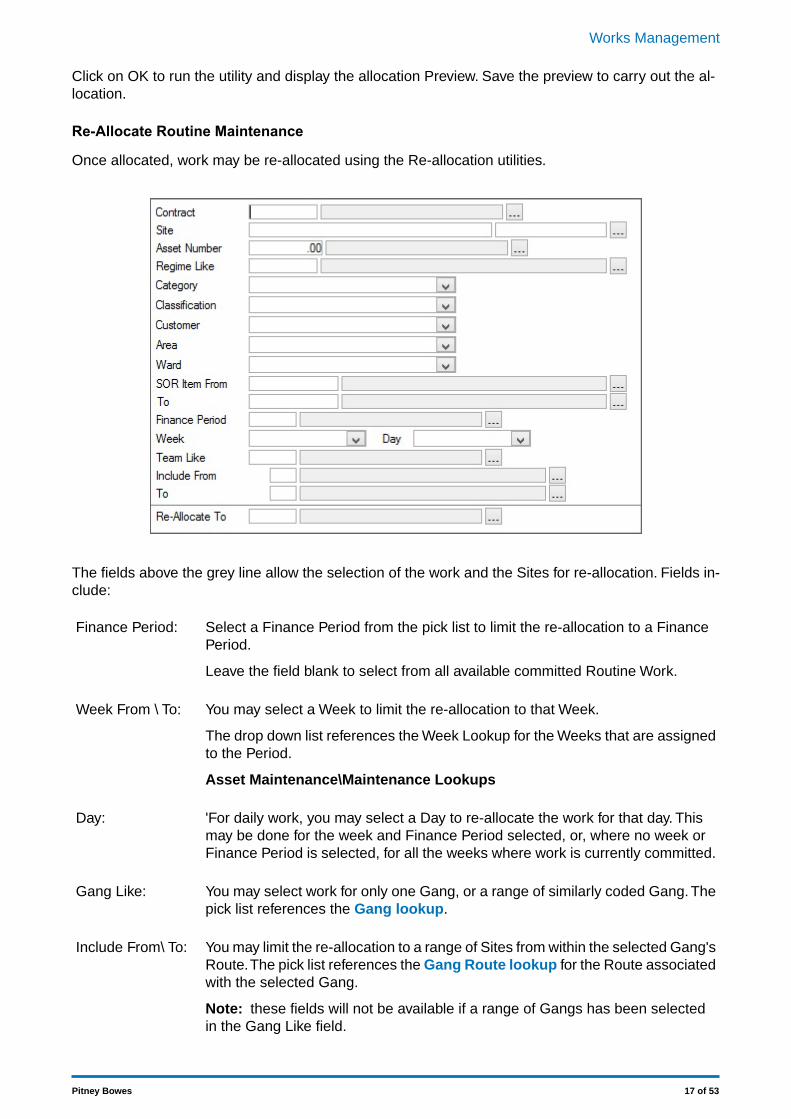
Once allocated, work may be re-allocated using the Re-allocation utilities.
The fields above the grey line allow the selection of the work and the Sites for re-allocation. Fields in-clude:
Select a Finance Period from the pick list to limit the re-allocation to a FinancePeriod.
Finance Period:
Leave the field blank to select from all available committed Routine Work.
You may select a Week to limit the re-allocation to that Week.Week From \ To:
The drop down list references the Week Lookup for the Weeks that are assignedto the Period.
Asset Maintenance\Maintenance Lookups
'For daily work, you may select a Day to re-allocate the work for that day. Thismay be done for the week and Finance Period selected, or, where no week orFinance Period is selected, for all the weeks where work is currently committed.
Day:
You may select work for only one Gang, or a range of similarly coded Gang. Thepick list references the Gang lookup.
Gang Like:
You may limit the re-allocation to a range of Sites from within the selected Gang'sRoute.The pick list references the Gang Route lookup for the Route associatedwith the selected Gang.
Include From\ To:
Note: these fields will not be available if a range of Gangs has been selectedin the Gang Like field.
17 of 53Pitney Bowes
Works Management

Select from the pick list, the Gang to whom the work is to be re-allocated. Thepick list references the Gang lookup.
Re-allocate to:
Re-Allocate Non Routine Maintenance
Once allocated, work may be re-allocated using the Re-allocation utilities.
Enter, or select from the pick list, the Job in which work is to be reallocated. Thepick list references all Committed Jobs that have been allocated to a Gang.
Job No:
All the fields, other than Gang, are populated from the details on the Job, and may not be edited.
This field may be amended to re-allocate the whole Job to another Gang. Thepick list references the Gang lookup.
Gang:
Selecting a new Gang in this field will re-allocate all the SOR Items on this Jobto the entered Gang.
(0850 - Gang Allocation & Scheduling)
If a Job has been Allocated using the Other | Allocate option on the Job screen by mistake, the itemswill need to be deleted from the Allocation before the Scheduling screen will display these Jobs. Thiscan be achieved by using the 'Delete' button to remove each item from the Allocation.
Re-Allocate Non Routine Maintenance Item
To re-allocate SORs on the Job to different Gangs, click on the 'Detail' button to display the Gang re-allocation Items form. The Gang field will be the only editable field. Use this field to select the Gangto whom this SOR Item is to be re-allocated.
Gang Lookups
The Gang Lookups provide libraries for creating and storing Gang details and Gang Routes.
18 of 53Pitney Bowes
Works Management

Utilities for setting up Gang Allocation 'rules' are provided, together with reports for checking the integrityof the 'rules'.
Where only Non Routine works are carried out, and these are to be allocated on an ad-hoc basis, asthe work is committed, then only Gangs and Gang Route lookups need be completed.
Where Routine Works are carried out, or Non Routine Works would benefit from allocation 'by rule',Gang Allocation 'rules' may be set up which will be implemented automatically when Routine Work iscommitted, and may be used when Non Routine Work is being allocated.
Note: Although the term 'Allocation' has been used in these Lookups, it refers to allocation rules, ratherthan actual allocation of committed works. An allocation rule defines the Sites and SOR Items that arethe responsibility of a Gang, and if this work should ever be ordered in this Site, the rules will allocatethe work to this Gang.
Gang
The Gang Lookup stored all the Gangs, and flags whether they are 'Beat' Gangs or not.
Up to 4 alphanumeric characters.Code:
Up to 30 characters.Name:
Check this to indicate that the Gang is a 'Beat' Gang.Beat:
Beat Gangs are defined as those who do a small number of tasks (SOR Items),and travel to a great number of Sites.
The implications of flagging a Gang as a Beat Gang are that it provides theability to divide the Route into Groups of Sites, and Beat Tickets may be printed.
Note: Gangs checked as Beat Gangs, may be unchecked at any stage, andvice-versa.
Optionally link the current Gang to a Contractor. The pick list references theContractor library.
Contractor:
Contract Preparation\Contractors
(0850 - Gang Allocation & Scheduling module)
If the currently logged in User is linked to an Action Officer assigned to a Con-tractor then the Contractor Access restriction will be enforced on the Schedulingscreen. Gang Booking slots will be restricted to those where the Contractor
19 of 53Pitney Bowes
Works Management
matches the currently logged in User's Contractor. Where there is no Contractorassigned to the Gang, this restriction will not be enforced.
Note: If a Contractor is not entered here then Contractor Action Officers usingContract Access Direct will not see this Gang record or perform any operationsagainst it. Contractor Action Officers can only see Gangs that are linked to theirContractor.
Contract Preparation\Contractor Officer
(0735 - Jobs in the Field module)Device Action Of-ficer:
Select an Action Officer from the list who will be responsible for Jobs which areassigned to this Gang. Any Job which is allocated to this Gang will be transferredto the device when this Action Officer transfers their tasks, not the Action Officerassigned to the Job itself.
When a Contractor is specified, the list of available Officers includes those whoare Contractor Officers for the selected Contractor and Action Officers who arenot assigned to any Contractor.
When no Contractor is specified the list is restricted to Action Officers who arenot assigned to any Contractor.
Contract Preparation\Contractors
(0850 - Gang Allocation & Scheduling module)Scheduler re-quires... :
Tick this to only enable Booking slots on the Scheduling screen where the Job'sSite is on the Gang's Route.
Note: Setting this after Jobs have been Scheduled will cause the Booking Slotin the Scheduling screen to display a warning.
Displays the Gang Route form with details of the selected Gang's Route.Route Button:
Displays the Gang Allocation form with details of any allocation rules that are inplace for the selected Gang.
Alloc button:
The coordinates of the location from which the Gang starts their working day.Used by ConfirmWorkzone for route planning. The coordinates can be typed
Home Location:
manually (if known), or can be found by clicking on the Map button and usingthe Georeference tool to plot the location.
Gang Routes
Gang Routes set an order for the Sites that the Gang will visit to carry out their allocated tasks.
Select a Gang from the pick list. The pick list references the Gang Lookup.Gang:
Enter the first Site in the route, or the next in the sequence of Sites for the GangRoute. The pick list references the Site Register.
Site:
Site Register\Site
Sites will be automatically numbered in this Route in increments of 10. Enter aRoute order number to alter the Route order.
Route Order:
20 of 53Pitney Bowes
Works Management

Default from the Site. Cannot be edited.Area:
Check this for the Site at which an SOR Summary will be required on the ticketprint.
Totals Required:
This field is only available when 'Totals Required' is checked. Enter a Groupnumber to group all the Sites from the end of the last Group up to this one.
Group:
The batch button displays the Gang Route Batch FilterBatch button:
Gang Routes - Batch button
The current Gang is entered by default. A different Gang may be selectedGang:
Select a Site Route from the pick list. The pick list references the Route Lookup.Route:
Site Register\Site Lookups\Operational Lookups
Select a range of Sites from the Site Route. The pick list references the RouteLookup for the selected Site Route.
From\To:
Site Register\Site Lookups\OperationalLookups
Using a Site Route as the basis for a Gang Route provides an easy way to assign the same Route toseveral Gangs.
Batch Gang Allocation
The Batch Gang Allocation utility provides the means of setting up Gang allocation rules on a batchbasis. For allocation of Routine Work, this is usually done after running the Batch Routine Allocationutility.
The fields above the grey line are used to define the work that will be assigned.
21 of 53Pitney Bowes
Works Management

The Fields below the grey line are used to specify the Gang to whom the work is being assigned.
Select a Gang from the pick list. The pick list references the Gang lookup.Allocate to:
Leave the Allocate to field blank to 'unallocate', which is to remove the selectedwork from the Gang to whom it is currently assigned.
You may use these fields to limit the allocation to the Sites in the Gang Routeby entering the first and last Sites in the From and To fields.You may also selecta range of Site from within the Gang Route.
Include From \To:
Note: if these fields are left blank the work will be assigned without referenceto the Gang Route.
An optional free text field. See for information on setting and using allocationreferences.
Reference:
Click on OK to view the preview. This will show the work that will be assigned to the Gang, with detailsof the previous Gang (if the selected work had already been assigned to another Gang), Save thepreview to set up this allocation as part of the Allocation rules.
Batch Routine Allocation
The Batch Routine Allocation will identity Routine Work in the Inventory (that is - SOR Items onMaintenance Regimes allocated to Features) within the parameters set in the filter.
This work is identified as a List of Sites, with a list of all the SORs that are carried out on that Site fol-lowing each Site.
This 'Routine Allocation' is then assigned to the Gang selected in the lower part of the filter.
The work will usually be assigned to the 'dummy' gang so that it can be ensured that allocation ruleswill deal with all Routine Work.
A Contract must be selected. The pick list references awarded Term Contracts,and Non Term Contracts.
Contract:
Contract Preparation\Contract
22 of 53Pitney Bowes
Works Management

The middle area of the filter, between the two grey lines, allow optional filters to be applied to restrictthe selection of work from within the Routine Maintenance for the selected Contract (as defined bythe Contract Areas covered by that Contract.)
Select the Gang to whom the selected Routine Work is to be assigned.Allocate New To:
Note: Only 'New' work will be assigned to this Gang - that is, work which isalready assigned to a Gang, will not be re-assigned to this one.
An optional free text field. A reference entered here will be applied to all the Itemsthat are allocated to the selected gang as a result of this Routine Batch Allocation.See '' on page for information on setting and using allocation references.
Set Reference To:
Click on OK to view the preview. This will list all the selected Routine Work, and, where the selectedwork had already been assigned to another Gang, that Gang will be shown. Save the preview to assignall 'New' work (that is - work which is not already assigned to a Gang) to the selected Gang.
Default Gang Allocation
Displays the Gang Allocation form, in which details of the allocation rules are held. The form can alsobe used to carry out allocations, and to reassign allocations.
The area above the grey line defines the allocation Item - an allocation of work is for an SOR Item ata Site.
The Area below the grey line defines the Gang to whom this allocation item is assigned.
To add a Site\SOR Item to a Gang's allocation, enter the Gang in the Gang field, and the Site andSOR Item in the Site and SOR Item fields.
To change the allocation from one Gang to another, Find the record of the current allocation, andchange the Gang in the Gang field to the new Gang who is to carry out this work.
Where rules are set up such that a Job is allocated to more than one Gang, the Job will notbe downloaded to ConfirmConnect. Splitting Jobs is only valid for Work being issued usingWork Tickets.
Note:
23 of 53Pitney Bowes
Works Management

Batch Update Reference
Use the area above the grey line to define the allocation items that will have the new reference applied.
Enter the required new reference in to the new reference field. Click OK to display the preview. Thiswill list all the Gang allocation Items that will be updated, and displays the current Reference whereone exists. Save the preview to update the references.
Un-Routed Sites
This report will list all Sites that have been included in a Gang's work allocation rules, but not includedin the Gang Route.
This will enable the missing Sites to be added to the Routes in the correct place in the Route order.
Un-Routed Beat Sites Report
This report will list all Sites that have been included in a Beat Gang's work allocation rules, but not in-cluded in the Gang Route.
It is important that Beat Gangs have all the Sites for which they have an allocation rule included in theRoute, since Beat tickets will simply ignore non-Routed Sites.
Setting up Gang Allocation rules - Step-by-step
Allocation Rules can be set up which will determine the way in which the system will allocate work toGangs. For Routine Maintenance, the allocation will take place automatically when Routine Work iscommitted. For Non-Routine Work, there is no automatic allocation on committal, but the rules can beused to allocate work once it is committed.
Setting up Rules:• Create Gangs. Include one 'dummy' gang - NGA No Gang Allocated - for instance. This gang will
be the 'default' gang and will be used throughout to 'catch' any work that does not have a rule to al-locate it to a Gang.
• Assign the default Gang to the Contractor. Select the Contractor form and enter the NGA defaultgang into the default Gang field. See Contract Preparation\Contractor for information on settingthe Default Gang.
24 of 53Pitney Bowes
Works Management

• Create Gang Routes for each of the Gangs (other than the default gang, which does not require aRoute).
Note: Gang Routes are optional for non-beat Gangs - their work will print out on the tickets alphabet-ically by Site if there is no Gang Route to provide the order.
Beat Gangs must have Routes set since only the work on Routed Sites will print on a Ticket.
• Setting up rules for Routine work only: - Run the Routine Batch Allocation utility assigning all thework identified to the Default (NGA) gang.The Routine Batch Allocation must be run in each Contract.This may be done consecutively, to allocate all work across all Contracts to NGA in one go, or youmay prefer to work in one Contract at a time, and re-run the Batch Routine Allocation in the nextContract, when the full allocation rules have been set up in the last one.
• Setting up rules - all work: - Use Batch Gang Allocation to assign work to Gangs. For Routine Workidentified by the Routine Batch Allocation, work will be removed from the NGA Gang as it is assignedto its proper Gang. When all the rules are in place, the NGA Gang should have no allocation of workleft.
• Use the Default Gang Allocation screen to fine tune the allocation rules, and change any singleitem of allocation.
• Use the Un-Routed Sites report, and Un-Routed Beat Sites report to check that all Sites allocatedto Gangs are correctly included in their Gang Routes.
• Where SMVs are assigned to SOR Items, the Annual, and Periodic Workload graphs may be usedto estimate the amount of Routine Work (in hours) that the rules assign to each Gang.
Note: Completing this process puts in place a set of allocation rules. No allocation of work has beencarried out until Routine Work is committed, when an automatic allocation will take place based onthe rules; or Non Routine Work is committed and manually allocated.
This means that rules may be set up at any time after the Inventory is complete, and Contracts are inplace.
Maintaining Rules
Rules, particularly for Routine Work, may become out-of-date as Sites are added, Features added,and new SORs and Regimes are introduced.
Where rules are required for Non Routine Work, the new Sites and SORs must be added to the Gangsallocations and Gang Routes.
For Routine Work, additions to work that do not have an allocation rule in place can be identified byrunning the Batch Routine Allocation utility.
This will identify all the Routine Works programmed in the system again, but, when the allocation issaved, only 'New' work, that is work that does not already have a Gang, will be sent to the default(NGA) gang entered in the 'Allocate New To:' field.
Routine Work without an existing allocation rule is now found in the allocation for the NGA gang andcan be allocated to the correct Gang using the Batch Allocation, and Gang Allocation forms.
The Un-routed Site, and Un-routed Beat Sites reports should be used to check that all new Sites arecorrectly included in their Gang Routes.
Note: Updating the Gang Allocation rules will not change allocation of committed work that havealready taken place. The rules will be used next time Routine Work is committed, or next time NonRoutine Work is allocated using rules.
Therefore, if Routine Work has been committed before the update to the rules, changes to the allocationof currently committed Routine Work must be done using 'Re-Allocate Routine Maintenance' - see ""on page
Using References
The Reference can be used to identify a set of rules. For instance:
25 of 53Pitney Bowes
Works Management

• A Routine Batch Allocation run for Routine Maintenance due to be committed in Period 1 of 2002,could carry a reference which identifies this - 'RM-0201-GM01-WMD' for instance. This wouldidentify a Routine Batch Allocation, in period 0201, for contract GM01, by [initials of officer carryingout the allocation].
• A Gang Allocation, to correctly assign work to Gangs, might then be referenced to identify the dateand officer ('GA-0201-WMD' for instance).
• The next Routine Batch Allocation run for Routine Maintenance due to be committed in 2003, couldcarry a reference of - 'RM-0301-GM01-WMD' for instance, indicating a rule set up in Routine BatchAllocation for period 1 - 2003. All work identified in this Routine Batch Allocation (whether alreadyallocated or not) will carry this new reference.
• Therefore, rules dealing with work which is no longer required (because Routine Maintenance haschanged) will carry the old reference RM-0201-GM01-WMD', or GA-0201-WMD.
• The reference number therefore identifies rules that can be removed.
26 of 53Pitney Bowes
Works Management
SchedulingThe Scheduling functionality provides allows Non-Routine works to be allocated to Gangs using theBookings facility within Confirm. Jobs can be interactively allocated to an available Gang's Bookingslot in the Scheduling screen using a 'drag and drop' interface.
A Booking record is created for each Job when it is Scheduled. This Booking is then progressed bythe Gang it is assigned to and can be Completed manually, or automatically by the Job status.
The Standard Minute Values (SMVs) entered in the Cost Details screen are used by the Schedulingmodule to display how long each Job will take to complete, and to work out which Gangs have capacityin their Booking slot to complete the Job.
SOR Items can also have Labour Types set against them in the Cost Details screen. In the Schedulingscenario these are treated as the skills/requirements for completing that particular SOR Item. If LabourTypes have been assigned to the Items, the Booking slots will be restricted to those Gangs whichhave the required Labour Types (skills).
Please note that this scheduling functionality is not related to the newer ConfirmWorkzonefunctionality. It is not recommended to use the two functionalities at the same time as this can
Note:
cause data anomalies. If you are using ConfirmWorkzone exclusively the Scheduling lookupsbelow relating to Bookings (Resources, Types and System Settings) do not need to be con-figured, however these lookups are required for the Scheduling functionality described in thesepages.
Scheduling
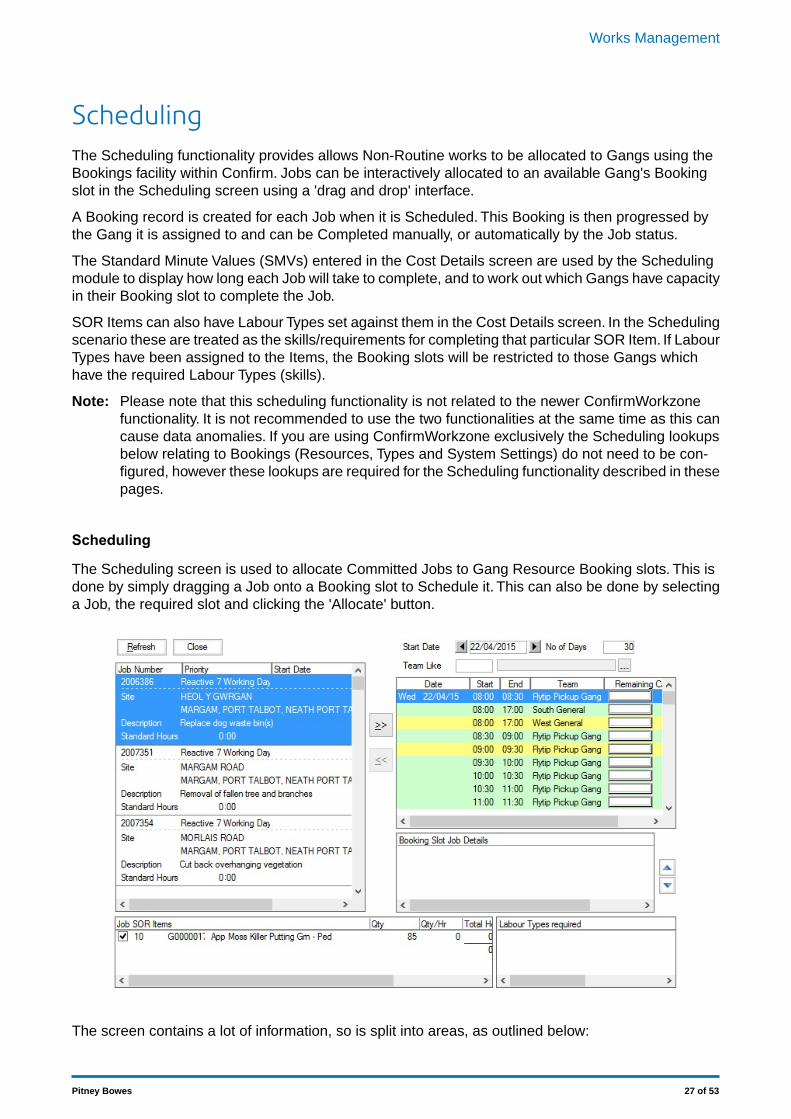
The Scheduling screen is used to allocate Committed Jobs to Gang Resource Booking slots. This isdone by simply dragging a Job onto a Booking slot to Schedule it. This can also be done by selectinga Job, the required slot and clicking the 'Allocate' button.
The screen contains a lot of information, so is split into areas, as outlined below:
27 of 53Pitney Bowes
Works Management

All Committed Jobs which have not been fully Scheduled will be displayed in thisarea of the screen. Archived Jobs will not be displayed. The 'Refresh' button canbe used at any time to restrict these Jobs.
Unallocated Jobs:
Note: Jobs can also be allocated to Gangs using the 'Allocate' option on theJob's 'Other' button. When this is done, the Job cannot be selected for use withthe Scheduling screen.The 'Reallocate Non-Routine Maintenance' utility can beused to remove the SOR Items from the allocation, at this point the Job will beavailable in the Scheduling screen.
This area displays all available Booking slots for the time period entered at thetop of the screen. The Gang slots can also be restricted by using the 'Gang Like'
Booking Slots:
field. If a partial Gang code is entered, then Confirm will do an automatic 'Like'search (without the need for a wildcard character) and display the appropriateslots. A wildcard can be used if required at the beginning. If a specific Gang isselected with the pick button, then the slots will be restricted to those for thatGang only.
The 'No of Days' value and the colour of the slots are set using the BookingSystem Settings. The colouring/availability of the slots will alter depending onthe Job currently selected.
Jobs can only be allocated to Gangs which have the required Labour Types as-signed to them in the Booking Resources screen.
Hovering over a Booking slot will display further information in a tool-tip e.g. itmay tell you why the slot is unavailable.
Once a Job has been Scheduled the Booking slot will be updated to reflect this.A graphical bar will display the percentage still available, and the Capacity valuewill be updated also.
This area of the screen displays the Jobs within the currently selected Bookingslot. The order that they are completed can be altered with the 'Up' and 'Down'buttons.
Booking Slot De-tails:
If changes are made to the lookups which invalidate currently Scheduled Jobs,Confirm will display a warning sign . When this is hovered over, a tool tip willexplain the reason why. The following examples are possible reasons for this:
28 of 53Pitney Bowes
Works Management

The number of hours Booked is different to the number of hours required by theSOR Items. This can occur when the SMV for items has been changed after theJob was Scheduled.
The Gang no longer has sufficient 'skills' to complete the Booking. This may bethe result of removing a Labour Type from the resource after the Job wasScheduled.
The Booking is not within the date range covered by Job Start Date and JobEstimated Completion Date (only if populated).
The SOR Items for the currently selected Job, or Booking Slot Job will be dis-played in this area of the screen.
Job SOR Items:
When Scheduling a Job, all SOR Items will be selected by default. Specific SORItems can be Booked by unchecking the checkbox next to the items not required.If a Job has been selected in the Booking Slot Job Details area, then the Itemsdisplayed will be the ones allocated to that Slot, and the other Items will be greyedout.
Note: Percentage Items are not displayed in the list.
This area of the screen will display the Labour Types that are required to completethe SOR Items currently selected.This is an easy way to see why a Booking slotis not available.
Required LabourTypes:
Available Buttons
The 'Refresh' button displays the Job Filter. This can be used to limit the Jobsdisplayed in the 'Unallocated Jobs' area of the screen.
Refresh:
Note: Only Committed Jobs that have not been cancelled or archived will beselected, regardless of the filter criteria.
The 'Close' button will close the Scheduling screen. All operations on theScheduling screen are saved when they occur.
Close:
The 'Allocate' button can be used once a Job and Booking slot has been high-lighted to perform the allocation.
>>
The 'Un-Allocate' button can be used to remove a Job from a Booking slot whena Job has been selected in the 'Booking Slot Job Details' area.
<<
Jobs within Booking slots can be reordered with the 'Up' and 'Down' buttons.
Note: Care should be taken when reordering Jobs within Booking slots, as a Jobmay have been split over slots, and it would not be practical to partially completeone Job, move onto the next, before finishing the first.
Up & Down
Job & Booking screenThe Job screen can be opened with the relevant records displayed from the Scheduling screen bydouble-clicking on a record in either the 'Unallocated Jobs' or 'Booking Slot Job Details' area.
The Booking screen can be opened by double-clicking on a Booking slot which has a Job scheduledto it.
29 of 53Pitney Bowes
Works Management

Scheduling Jobs
Jobs are Scheduled by transferring it from the 'Unallocated Jobs' area to the required Booking slot.When this is done Confirm will check to see if the slot is available for the Job, and if the Booking slotis outside the range of the Job's Start and Estimated Completion dates. If the slot is suitable then theGang will be allocated to the Job Items and the Booking for this slot will be made.
If the selected Items on a Job would require more than one Booking slot (the time is taken from theSMV and Pricing Quantity) then subsequent slots, for the same Booking Resource, will be checkedto make sure there are no existing Bookings that would prevent the Job Bookings from being createdconcurrently. If Bookings are found that would cause the Bookings to be split, or if any part of theBooking falls outside of the Jobs Start and Estimated Completion date range, then the User will beprompted to see if the Job should be Scheduled in this way. When a Booking is spread over morethan one slot a Booking will be created for each slot used. The 'Booking Slot Job Details' area willdisplay 'Previous' and 'Next' Booking dates when the Job covers multiple slots.
The order that the Jobs in a Booking slot appear in the Job details area is indicative of the order theGang would be expected to complete them.The order can be changed with the 'Up' and 'Down' buttonsprovided. If a Job is a continuation from a previous Booking Slot then it will default to the first positionin the list otherwise it is added to the end of the list.
When Items are Scheduled an entry in the Job Status Log will be created with Notes to indicate thechange, detailing the Items that were Scheduled and for when. The actual Job Status code will not bechanged.
To Un-allocate JobsA Job can be 'Unallocated' by moving the Job back from the 'Booking Slot Job Details' area back tothe 'Unallocated Jobs' area. If the Job spanned more than one Booking Slot then the Job will be removedfrom them all.
If Job Items are 'Unallocated' an entry in the Job Status Log will be created with Notes to indicate thechange. The Job Status Code will not be changed.
To Re-allocate JobsScheduled Jobs can be 'Re-scheduled' to different Booking slots by selecting the Job in the 'BookingSlot Job Details' area, and dragging it to a different available slot. As above, the Job Status Notes willbe updated to detail the Gang that the Items were re-allocated from and to.
To Update BookingsA 'Confirmed' Booking is created for each Job that is Scheduled. The Booking will at some point in itslife need to have its status updated to 'Completed', 'Cancelled' or 'Failed'. When the Booking statusis changed to one of these values, the Booking slot in the Scheduling screen is restored by the amountthe Booking was for, making it available again to take other Jobs if the slot is for a future date.
The Booking can be updated by:
• Manually changing the status to 'Completed', 'Cancelled' or 'Failed'.• The Booking Job's Status being changed to a Status which has the 'Complete' flag set e.g. a Batch
utility or import.• If a 'Cancelling' Payment is Committed for a Job which is Scheduled, the Booking will be set to a
'Cancelled' status when a cancellation payment for the Job is committed.
When a Booking's status is changed automatically by a Job Status change, the actual Start and Enddates for all of the Bookings related to that Job will be set using the Job actual Start and End dates.If the Start and End dates are already set on a Booking, Confirm will not update these values.
30 of 53Pitney Bowes
Works Management

Scheduling Lookups
The Scheduling Lookups folder contain the Booking Resources, Type and System Settings that areused by the Scheduling module.
These are the same lookups as found in the Customer Services Bookings module.
Booking Resources
Booking Resources define a Resource, and Booking templates for its availability. A template specifiesthe availability of the resource at an interval of a specified number of days (one day for daily, sevendays for weekly, etc.). A Resource may have several Templates specified to cover the full availability.
Up to 10 charactersCode:
Up to 50 charactersName:
A free text field to supply further information on the Booking Resource.Notes:
Select the physical or logical resource(s) that will fulfil Bookings. Select from:Type:
'Action Officer' - To display the Action officer field for selection of an Action officer.
'Feature' - To display the Site / Feature fields for selection of a Feature.
'Gang' - To display the Gang field for selection of a Gang.
Note: Confirm will prevent a Gang being allocated to more than one BookingResource.
'Not Linked' - To indicate that the Booking Template is not linked to a physicalor logical resource.
31 of 53Pitney Bowes
Works Management

Booking Types
Booking Types relate to the type of service that a customer requests for a Booking. Possible BookingTypes could include 'Bulky Uplift', 'Gardening Service', 'Tennis Court' etc.
An unique code up to 6 charactersCode:
Up to 50 charactersName:
Booking Type has a Unit of Measure specified against it, defining the meaningof the quantity that needs to be entered against a Booking (e.g. cubic metres fora Bulky Collection).
Unit of Measure:
Select from the drop down list.The drop down list references the Unit of Measurelookup.
Optional free text fieldNotes:
You may define a display order for this Booking TypeOrder:
Specify the maximum number of days in advance appointments of this BookingType can be entered.
Advance Day Limit:
Check this box to indicate that no appointments can be created for these BookingTypes. The unavailable Booking Types will only be used to configure templates
Unavailable:
for periods when the Resource will be unavailable (e.g. a Tennis Court closedfor repair).
32 of 53Pitney Bowes
Works Management

Note: A Warning will be given if the value of this flag is changed for an existingBooking Type
Check this to give the User a warning message if another Booking has beencreated in the same slot during the time between the User picking the slot and
Warn When Book-ing:
saving the Booking. When the Booking becomes 'Confirmed' the check, andhence potentially the warning, is repeated. This will allow the User making theBooking to make an informed decision whether to reschedule.
This will be used to define which Bookings a User can view, create and update.It will not restrict access to Booking Types themselves, or to the Booking Types
Bookings DataKey:
to which a User has access when Booking Templates and Enquiry Subject Sitesare being configured.
Select from the drop down list. The drop down list references the Data SecurityKeys Lookup.
System Administration\Security
Bookings System Settings
The Bookings System Settings define the defaults for Bookings.
Enter here the time interval during which a Booking slot will be protected afterselection but before 'Confirming' the Booking. Once this time has elapsed then
Protected Lifetimefor ProvisionalBookings: the Booking will not be taken into consideration in availability checks and hence
the slot may be taken by a different booking.
33 of 53Pitney Bowes
Works Management
Enter here the default number of days in advance to be displayed in the ResourceActivity tab of the Booking Resource screen.
Default PreviewRange for BookingResources:
Enter here the default number of days in advance to be displayed in the ResourceAvailability tab of the Booking screen.
Default PreviewRange for Book-ings:
(0850 - Gang Allocation & Scheduling)
This setting will also be used to display the number of days in advance for theBooking Slots on the Scheduling screen.
You may change the colours assigned to Booking slots in the Resource Activitytab of the Booking Resource screen and the Resource Availability tab of the
Display Colours:
Booking screen. To change a colour click on the colour box and choose a newcolour from the palette.
34 of 53Pitney Bowes
Works Management
Works CostingWorks Costing is carried out for each SOR Item contained in the Bills of Quantity (BoQ) for a Contract.This may be done at any time, but if it is done before the Contract is awarded in the system, then thecostings can be applied as Contractor's bids in the Contract, and will become the Contract Rates ifthe Contract is awarded to that bidding contractor.
Costings are based on a calculation of the labour, plant, and materials used to carry out the work,calculated with the pricing quantity and the Standard Minute Value (SMV). Overheads may be applied,as fixed amounts, as a percentage, and proportionally over all the SORs involved.
SORs may be priced directly, where they directly reflect the work, or they may need to be priced froma breakdown of operational SORs, where the Client SOR is a Performance item that does not describethe tasks involved.
Pre-requisites for Works Costing
Operations are priced directly from the SOR Item library. The required SOR Items must therefore bepresent in the SOR Items library.
Asset Maintenance\SOR Item.
Client SORs are priced from the client BoQ. A contract must therefore be prepared, with ContractAreas and Price Factors. The BoQ must be calculated and contain all the necessary SOR Items.
Contact Preparation\Contract
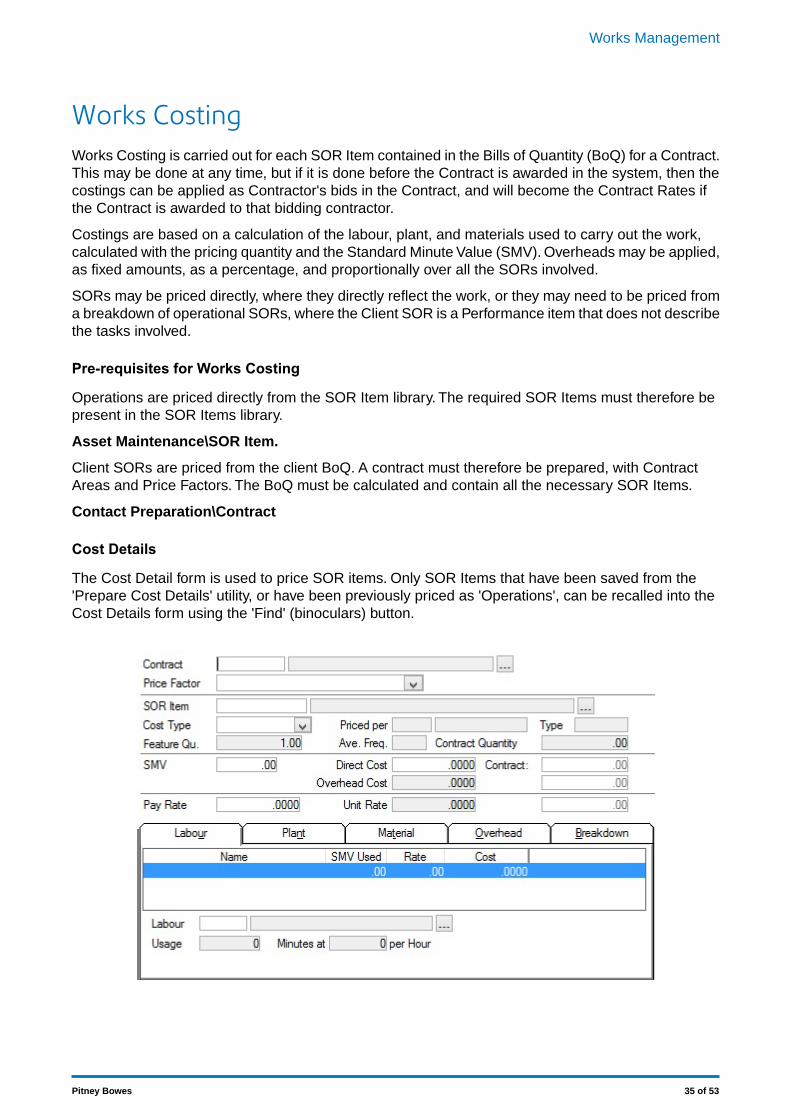
Cost Details
The Cost Detail form is used to price SOR items. Only SOR Items that have been saved from the'Prepare Cost Details' utility, or have been previously priced as 'Operations', can be recalled into theCost Details form using the 'Find' (binoculars) button.
35 of 53Pitney Bowes
Works Management

Where a client's SOR has been recalled for pricing, the Contract will be enteredand cannot be amended.
Contract:
Where an Operation is being created, enter the appropriate Contract.
Where client's SOR has been recalled for pricing, the Price Factor will be enteredand cannot be amended.
Price Factor:
Where an Operation is being created, enter the appropriate Price Factor.
Where client's SOR has been recalled for pricing, the SOR Item will be enteredand cannot be amended.
SOR Item
Where an Operation is being created, select an SOR to price from the pick list.The pick list references the SOR Item library.
Asset Maintenance\SOR Item
Entered from the SOR Item library - cannot be edited.Priced per:
Entered from the SOR Item library:Type:
SOR Items which have 'Annual Performance' checked, will be described in thisfield as 'Annual'.
SOR Items which do not have 'Annual Performance' checked, will be describedin this field as 'Frequency'.
Where client's SOR has been recalled for pricing, the Feature Quantity will becopied from the BoQ. The Feature Quantity may be amended.
Feature Qu:
Where an Operation is being created, the Feature Quantity will default to 1 andmay be amended.
Where client's SOR has been recalled for pricing, the Average Frequency willbe copied from the BoQ and will represent the total number of occasions pro-grammed in Maintenance Regimes. The Average Frequency may be amended.
Ave Freq:
Where an Operation is being created, the Feature Quantity, and Average Fre-quency will be blank.
The Contract quantity is automatically calculated from the Feature quantity andAverage Frequency. Contract Quantity will be amended, but if it is, the FeatureQuantity figure will change to reflect the amended Contract quantity.
Contract Quantity:
Standard Minute Value. Enter the number of minutes (as a decimal) that the workdescribed above, in the quantity given in the 'Priced per' field, would take toperform.
SMV:
The Cost of the work before Overheads are added. This will be automaticallycalculated from information entered on the Labour, Plant and Material tabs, andthe SMV.
Direct Cost:
A Direct Cost may be entered directly into the field, without using the LabourPlant and material tabs.
The cost of the Overheads. This is derived from the Overheads tab, and maynot be amended.
Overhead Cost:
36 of 53Pitney Bowes
Works Management

These three fields display the show the Contract Direct Cost, Contract Overheads,and Unit Rate based on the Contract quantities shown in the Contract Quantityfield.
Contract:
A Pay Rate may be entered, which may be shown on tickets and used in reports.The Pay Rate has not function in the calculation of Unit Rates.
Pay Rate:
The unit rate is calculated by adding the Direct Cost and the overhead.The entrymay not be amended.
Unit Rate:
The Unit Rate is the figure that will be returned as the 'Contractor Bid' for thisItem in this Contract.
Where an Operation is being calculated, the Unit rate is the figure that will beadded with the unit rates from other operations to give the Unit rate of the Com-posite SOR.
Labour tab
• To add Labour, select the Labour type from the pick list in the Labour field. The pick list referencesthe Labour lookup.
• The Usage field will copy the SMV from the SMV field and cannot be amended.• The At x per Hour field will copy the Cost per Hour from the Labour Lookup, when a Labour type is
selected.• Click on the 'Add' button to add another Labour type.
Plant tab
• To add Plant, select the Plant type from the pick list in the Plant field. The pick list references thePlant lookup.
• The Usage field will copy the SMV from the SMV field and cannot be amended.• The At per Hour field will copy the Cost per Hour from the Plant Lookup, when a Plant type is selected.• Click on the 'Add' button to add another Plant type.
Material tab
• To add Material, select the Material type from the pick list in the Material field.The pick list referencesthe Material lookup.
• Enter in the Usage field, the quantity of material that will be used to carry out the task to the pricingquantity.
• The At x per x [Unit of Measure] will copy pricing details from the Material Lookup, when a Materialtype is selected.
• Click on the 'Add' button to add another Material type.
Overhead tab
Select the Overhead tab and click on the 'Detail' button to display the Cost Details Overhead form:
37 of 53Pitney Bowes
Works Management
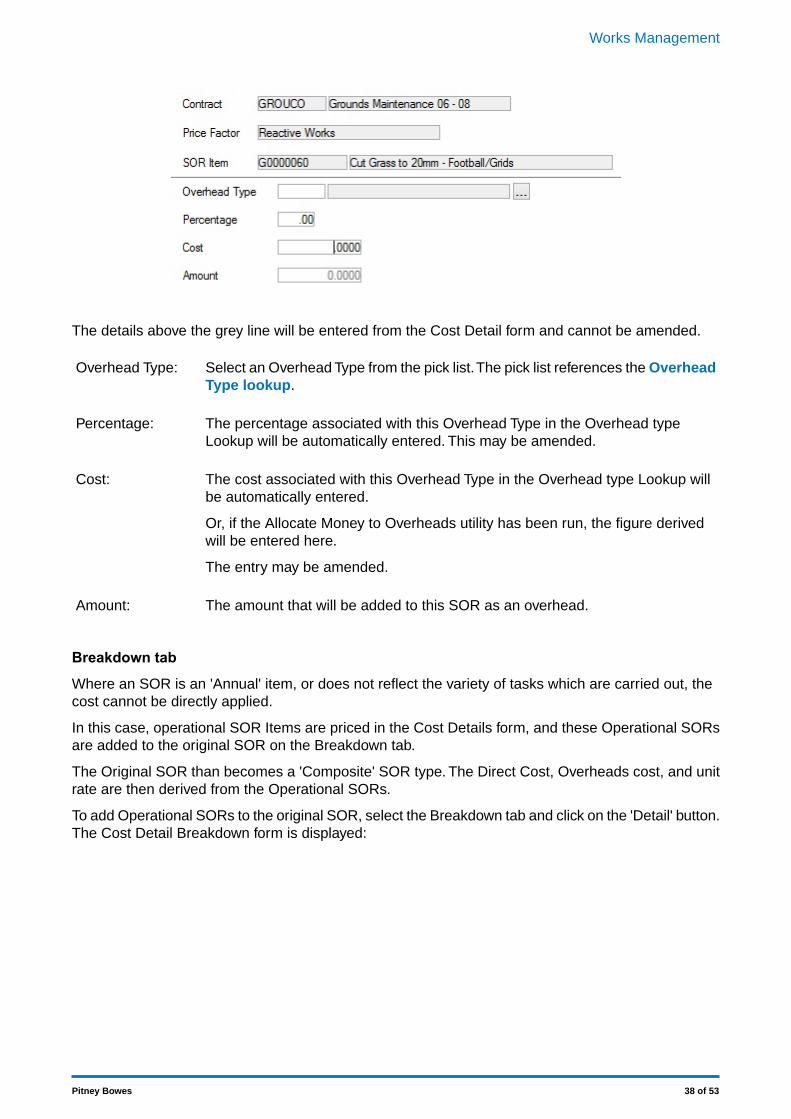
The details above the grey line will be entered from the Cost Detail form and cannot be amended.
Select an Overhead Type from the pick list.The pick list references the OverheadType lookup.
Overhead Type:
The percentage associated with this Overhead Type in the Overhead typeLookup will be automatically entered. This may be amended.
Percentage:
The cost associated with this Overhead Type in the Overhead type Lookup willbe automatically entered.
Cost:
Or, if the Allocate Money to Overheads utility has been run, the figure derivedwill be entered here.
The entry may be amended.
The amount that will be added to this SOR as an overhead.Amount:
Breakdown tab
Where an SOR is an 'Annual' item, or does not reflect the variety of tasks which are carried out, thecost cannot be directly applied.
In this case, operational SOR Items are priced in the Cost Details form, and these Operational SORsare added to the original SOR on the Breakdown tab.
The Original SOR than becomes a 'Composite' SOR type. The Direct Cost, Overheads cost, and unitrate are then derived from the Operational SORs.
To add Operational SORs to the original SOR, select the Breakdown tab and click on the 'Detail' button.The Cost Detail Breakdown form is displayed:
38 of 53Pitney Bowes
Works Management

The fields above the grey line carry information copied from the Cost Detail form and cannot be edited.
Select an operational SOR from the pick list. The pick list will display only SORItems that have been costed as 'Operational' Items.
Operation:
Copied from the costing details for the selected Operational Item. This fieldcannot be edited.
Price Per:
Copied from the costing details for the selected Operational Item. This field maybe edited.
Feature Quantity:
Enter the frequency for the Operation within the SOR.Average Fre-quency:
Where a frequency SOR is being broken down - the Average Frequency will re-main at the default of 1.
Where an Annual Performance SOR is being priced, this will be the number ofoccasions per year on which the operation is performed.
This will be calculated by the system from the Feature Quantity and the AverageFrequency.
Contract Quantity:
Prepare Cost Details
The Prepare Cost Details utility will copy the BoQ details and make them available for costing.
Select the appropriate Contract. The pick list references the Contract library.Contract:
39 of 53Pitney Bowes
Works Management

Contract Preparation\Contract
Select the appropriate Price Factor. The drop down list displays all the PriceFactors assigned to the selected Contract.
Price Factor:
Fields under the grey line need not be completed unless you wish to use the Costings already preparedin another Contract as the basis for the Costings in this Contract.
Select the Contract from which you want to copy Costings.Copy Cost Detail ..:
Check this to delete from the copied costings any SORs that are not present inthe BoQ for the Contract selected in the Contract field above.
Delete SORs ..:
Check this to delete from the copied costings, any Operations that are not partof an SOR breakdown.
Delete Opera-tions..:
Click on Ok to display a preview list of the BoQ Items that will be available for costing. Click on 'Save'in the preview to copy the SORs. Once the preview is saved, these items will be available to be recalledinto the Cost Detail form using the 'Find' (binocular) button. Where costings have been copied fromanother Contract, those costing will already be entered for the SORs concerned, but may be amendedin this (new) Contract.
Allocate Overhead Types
The Allocate Overhead Types utility will place the selected Overhead Type on each SOR costing forthe selected SORs. Where the Overhead Type has a fixed value, or a percentage entered, this willbe entered on the costing. Where no value has been assigned in the Overheads Lookup, the type willbe added to the SOR, but the value will be zero.
The fields above the grey line define the Costing SOR to which the Overhead is to be added. Only'Contract' must be completed.
Under the grey line, select the Overhead Type to be added. The pick list references the OverheadTypes lookup.
When an Overhead has been selected, the associated percentage, or Cost will be entered in the fieldbelow. The description of the field will change depending on whether it is a percentage, or a cost thathas been associated with this Overhead Type in the Overhead Type library.
Click on Ok to view the preview. Save the preview to carry out the allocation.
40 of 53Pitney Bowes
Works Management

Allocate Money to Overhead
The Allocate Money to Overhead utility will proportion the given amount over the SORs that carry theOverhead, based on the Contract Quantities.
The fields above the grey line define the Costing SOR to which the Overhead is to be added and themoney proportioned. Only 'Contract' must be completed.
Select the Overhead type that is to be added to the selected costing SOR Items,and have the money allocated.
Overhead Type:
Enter the amount of money to be proportioned. This will usually represent ayearly amount for the specified Overhead.
Amount of money:
Select from:Proportion by:
'Direct Cost' - To proportion the money, (within the parameters set in the filter)to all SORs that have a direct Cost entered.
'Labour' - To proportion the money, (within the parameters set in the filter) to allSORs that have Labour entered on the Labour tab.
'Plant' - To proportion the money, (within the parameters set in the filter) to allSORs that have Plant entered on the Plant tab.
'Material' - To proportion the money, (within the parameters set in the filter) toall SORs that have Material entered on the Material tab.
'Pay rate' - To proportion the money, (within the parameters set in the filter) toall SORs that have a Pay Rate entered.
Click on Ok to view the preview. Save the preview to carry out the allocation.
Note: This utility should be run when all costings are complete, since it will proportion the moneybased on the costings present in the system at the time the utility is run. To change the allocation totake account of new costings, the Allocate Money to Overheads utility must be run again and savedagain.
Refresh Direct Cost Build Up
The Refresh Direct Cost Build-up utility will update Costings to take account of changes subsequentlymade in the Costs associated with Labour, Plant or Material in the Lookups.
41 of 53Pitney Bowes
Works Management
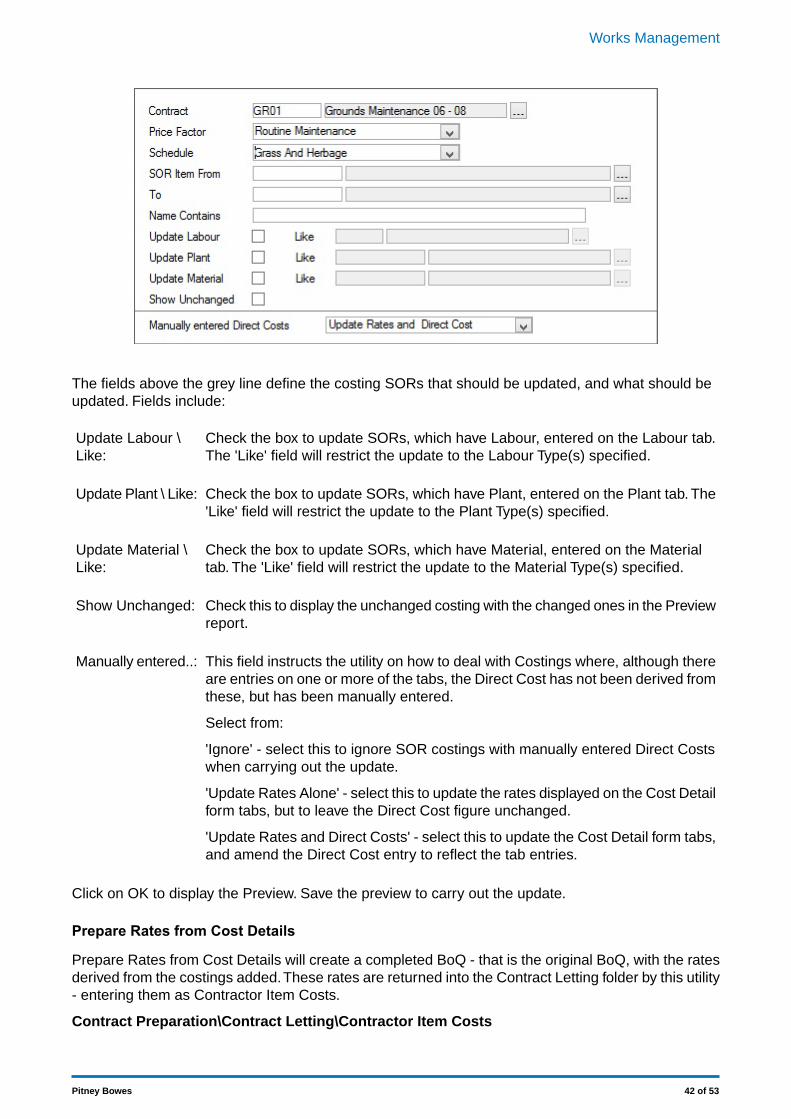
The fields above the grey line define the costing SORs that should be updated, and what should beupdated. Fields include:
Check the box to update SORs, which have Labour, entered on the Labour tab.The 'Like' field will restrict the update to the Labour Type(s) specified.
Update Labour \Like:
Check the box to update SORs, which have Plant, entered on the Plant tab. The'Like' field will restrict the update to the Plant Type(s) specified.
Update Plant \ Like:
Check the box to update SORs, which have Material, entered on the Materialtab. The 'Like' field will restrict the update to the Material Type(s) specified.
Update Material \Like:
Check this to display the unchanged costing with the changed ones in the Previewreport.
Show Unchanged:
This field instructs the utility on how to deal with Costings where, although thereare entries on one or more of the tabs, the Direct Cost has not been derived fromthese, but has been manually entered.
Manually entered..:
Select from:
'Ignore' - select this to ignore SOR costings with manually entered Direct Costswhen carrying out the update.
'Update Rates Alone' - select this to update the rates displayed on the Cost Detailform tabs, but to leave the Direct Cost figure unchanged.
'Update Rates and Direct Costs' - select this to update the Cost Detail form tabs,and amend the Direct Cost entry to reflect the tab entries.
Click on OK to display the Preview. Save the preview to carry out the update.
Prepare Rates from Cost Details
Prepare Rates from Cost Details will create a completed BoQ - that is the original BoQ, with the ratesderived from the costings added.These rates are returned into the Contract Letting folder by this utility- entering them as Contractor Item Costs.
Contract Preparation\Contract Letting\Contractor Item Costs
42 of 53Pitney Bowes
Works Management

The fields above the grey line define the costing SORs that should be included in the priced BoQ.
Enter the name of the Contractor against whom these bids should be entered.The pick list referencesbidding Contractor for the Contract
Contract Preparation\Contract - Bidding Contractors tab
Click on Ok to display the preview. Save the preview to enter these rates as the Contractors ItemCosts, for the selected Contractor in the Contract.
Contract Preparation\Contract Letting\Contractor Item Costs
Print Completed Bill of Quantities
To Print Completed Bill of Quantities:
Enter, or select from the pick list. The pick list references all live Contracts.Contract:
The field under the grey line may be used to restrict the BoQ print within the parameters shown.
The BoQ appearance can be altered by selecting:
Short Description: checked by default. Uncheck to substitute the full SOR description in the printout.
Report Level: select from 'Standard' which will give Annual Quantity and Unit Quantity, and 'Frequency'which will also show the Average Frequency for each SOR.
43 of 53Pitney Bowes
Works Management
Works Costing Lookups
The Works Costing Lookups provide costing details for Labour, Plant, Material and Overhead Type.
Labour
The Labour Lookup provides a list of all the possible types of Labour used to carry out the tasks forSORs or Operations. A Cost per hour is given to each library entry that is used, combined with theSMV in the Cost Detail form, to calculate the cost of Labour. Costs entered in the Lookup provide adefault, and may be altered on the Cost Detail form.
Up to four alphanumeric charactersLabour Code:
Up to thirty charactersName:
Up to four numerical characters, and four decimal places.Cost per hour:
Plant
The Plant Lookup provides a list of all the possible types of Plant used to carry out the tasks for SORsor Operations. A Cost per hour is given to each library entry. This is used, combined with the SMV inthe Cost Detail form, to calculate the cost of Plant. Costs entered in the Lookup provide a default, andmay be altered on the Cost Detail form.
Up to four alphanumeric charactersPlant Code:
Up to thirty charactersName:
Up to four numerical characters, and four decimal places.Cost per hour:
Up to 20 alphanumeric characters. A reference used by external systems toidentify this Plant type
External ref:
Optionally specify a Data Key to restrict which Users will have this lookup availableon the device.
Device Data Key:
Material
The Material Lookup provides a list of all the possible types of Material used to carry out the tasks forSORs or Operations. A Unit of Measure and pricing quantity, together with an associated price is givento each library entry. This is used, combined with the usage entered on the Material tab of the CostDetail form, to calculate the cost of Materials. Costs entered in the Lookup provide a default, and maybe altered on the Cost Detail form.
Up to four alphanumeric charactersMaterial Code:
Up to thirty charactersName:
Enter the Unit of Measure that is used to price the material. The drop down listreferences the Unit of Measure Lookup.
Unit of Measure:
Asset Register\Feature Lookups.
44 of 53Pitney Bowes
Works Management
Enter the quantity (associated with the Unit of Measure) used to price the Mater-ial.
Pricing Quantity:
Enter the Cost of the Quantity of Units of Measure (per 10 litres for instance).Unit Cost:
Up to four numerical characters, and four decimal places.
Up to 20 alphanumeric characters. A reference used by external systems toidentify this Material type
External ref:
Optionally specify a Data Key to restrict which Users will have this lookup availableon the device.
Device Data Key:
Overhead Type
The Overhead Type Lookup provides a list of all the possible Overheads that might be applied toCostings.
Up to four alphanumeric charactersOverhead TypeCode:
Up to thirty charactersName:
Where a percentage (of the Direct Cost) should be applied to an SOR carryingthis Overhead Type, enter the percentage.
Percentage:
A percentage entered here provides a default entry for costings, which may beamended in the Cost Details form for an individual SOR item.
Where a fixed cost should be applied to an SOR carrying this Overhead Type,enter the cost.
Cost:
A cost entered here provides a default entry for costings, which may be amendedin the Cost Details form for an individual SOR item.
Note: Where money will be allocated to an overhead type, or individual entries will be made for SORs,both Percentage and Cost should be left blank.
Costing a BoQ - step-by-step
Costing a BoQ may be done for awarded Contracts as well as Contracts still at the bidding stage.Where the Contract is awarded, Cost detail calculation will not affect the current BoQ prices for thatContract. It is only where the Contract is at the bidding stage, that costing returned as Contractor UnitRates, will subsequently become the Contract BoQ when the Contract is awarded to the relevantContractor. See Contract Preparation\Contract Letting for more information on setting up, pricingand awarding a Contract.
• Obtain the BoQ by running the Prepare Cost Details utility.• Obtain and cost any Operations that will be required to provide a breakdown for BoQ SORs:• Open the Cost Details form. Enter the appropriate Contract and Price Factor. Use the SOR Item
field pick button to select a SOR Item from the SOR Item library.• Cost the operation using the Labour, Plant, Material and Overhead tabs, or enter a direct cost. Enter
an SMV, and a pay rate if required.• Run Allocate Overhead Types on page 40, if necessary, to batch assign Overhead types to the
appropriate SORs.
45 of 53Pitney Bowes
Works Management

• Use the Cost Details form to recall the BoQ SORs, and price them.• SORs requiring a breakdown of Operations need only have the Operation added to the Breakdown
tab. The SOR Type field of the Costing Form will now display 'Composite' to indicate that this SORhas been costed from the combined unit rates of the Operational SOR Items.
• SORs being directly costed may have Labour, Plant, Material and/or Overheads added. WhereOverheads have been added by the Allocate Overhead Types utility they will carry the cost or per-centage assigned to them in the Overhead Type Lookup.
Note: SORs or Operations, which will have Money Allocated to Overheads, need not have theseOverheads added at this stage.
• When all SORs are priced, or have priced Operations added, you may run Allocate Money toOverhead on page 41 uto proportion yearly costs of Overheads over all the SORs requiring thatOverhead Type.
• To complete the process and return the rates as Contractor Unit Rates, run Prepare Rates fromCost Details on page 42.
46 of 53Pitney Bowes
Works Management

Works Management ForecastingWorks Management Forecasting reports will call on data held in the Works Costing folder, and, forWorkload Forecasting, on the information held in the Gang Lookups for Gang Allocation Rules.
The reports make no reference to actual allocations of committed work within Confirm - WorkloadProfiling reports should be used to report on this.
Cost Details Report
The Cost Details report calls on the costing for SORs and Operations to provide a breakdown on totalLabour, Plant, and Material costs for each Item, together with the Direct Cost, Overhead Cost andUnit rate for each Item.
Labour Requirements
This report lists Labour Types and details the SORs that use each Labour Type. Details of Hours(based on SMVs, and Contract Quantities, that is Feature Quantities times occasions for a Year), UnitCost and Contract Cost are given. Totals are given for each Price Factor, for each Labour Type and,at the end of the report - for all Labour Types included on the report.
Plant Requirements
This report lists Plant Types and details the SORs that use each Plant Type. Details of Hours (basedon SMVs, and Contract Quantities, that is Feature Quantities times occasions for a Year), Unit Costand Contract Cost are given. Totals are given for each Price Factor, for each Plant Type and, at theend of the report - for all Plant Types included on the report.
Material Requirements
This report lists Material Types and details the SORs that use each Material Type. Details of Usage(based on usage entered for each SOR, and Contract Quantities, that is Feature Quantities times oc-casions for a Year), Unit Cost and Contract Cost are given. Totals are given for each Price Factor, foreach Material Type and, at the end of the report - for all Materials included on the report.
Overhead Recovery
This report lists Overhead Types and details the SORs that use each Overhead Type. It shows detailsof Unit Recovery (Cost recovered per unit of Measure that the SOR uses) and Contract Recovery(Cost recovered over the Contract when Unit Recovery is multiplied by Contract Quantities). Totalsare given for each Price Factor, for each Overhead Type and, at the end of the report - for all Overheadsincluded on the report.
Annual Routine Workload Graph
This will display a bar chart, showing each Gang against a grid of hours required to carry out the year'swork allocated to them.
This is based on the SMV given for the SORs and Operations in the Cost Details from, the ContractQuantities, and the Sites and SORs assigned to them in the Gang Allocation rules.
Periodic Routine Workload Graph
This will display a bar chart, showing each Gang against a grid of hours required to carry out the workallocated to them for the selected Period.
47 of 53Pitney Bowes
Works Management

This is based on the SMV given for the SORs and Operations in the Cost Details from, the ContractQuantities, and the Sites and SORs assigned to them in the Gang Allocation rules.
48 of 53Pitney Bowes
Works Management

Workload ProfilingWorkload Profiling reports draw on information about actual allocation of committed work that hastaken place in the system. They all rely on an SMV having been entered in the Cost Details form,against each of the SORs used, to generate information about hours required to carry out work.
Gang Allocation Graph
Will display the allocation of work to Gangs as both committed Routine Work and committed NonRoutine works will be included.
Gang Allocation By Priority Graph
Will display the allocation of committed Non Routine Works as a bar chart against a grid of hours.Routine Works are not included.
Gang Allocation by Priority
Will display the committed, allocated, Jobs, giving the hours required for each.The Jobs are displayedin Priority Order, the Priority with the shortest Follow up time appearing at the top of the list. The finalcolumn gives a cumulative total of hours required for the jobs up to that point in the list, allowing youto select Jobs with the highest priority, down to the number of hours available.
Profile Gang Requirements
Provides information about the hours required by each Gang to carry out the Routine and Non RoutineWorks allocated to them.
49 of 53Pitney Bowes
Works Management

Job Costing
Create Payment Requests From Job Costs
This screen can be used to generate Payment Requests directly from the Job Cost details. The Valueof the Payment Request will be derived from the Total Costs value for a particular Job together withthe total uplift value of all the costs.
One Payment Request will be created for each Job.
The Payment Request Reference will consist of the Job Number, the Date Created (in yyyymmddformat) and a sequential number to ensure uniqueness.
Filter
Enter, or select from pick list, the Contract that you wish to filter on when selectingJob Costs to view or process. The Pick list references the Contract Library anddisplays awarded Contracts. This field is mandatory.
Contract Code:
50 of 53Pitney Bowes
Works Management

Displays the current Uplift Percentage stored against the selected Contract inthe filter. The value is taken from the Contract Lookup for that Contract.
Uplift:
The Effective To date can be edited by clicking on the date picker icon and se-lecting a date or by manually entering a date into the field. Editing of the field isoptional.
Effective To:
The date selected will be used to filter the Job Cost details returned. Only JobCosts with an import date prior to the selected date will be returned by the filter.
The Clear button will blank the contents of the Contract Code, Uplift, and Effective To fields.
When the Search Button is clicked, the Job Cost values that match the filter criteria will be displayedin the Job Cost Results panel. All Job Costs will be grouped against the Job that they apply to. EachJob will have a row displaying the Job Number, Job Status, Request Value (costs + uplift) and Costs(costs value only).
After a search has been performed, the fields in the Filter group box are greyed out. Another searchcan be performed by clicking the Refilter button on the Results navigator toolbar.
ResultsNavigator Toolbar
The Navigation Toolbar at the top of the results list shows how many results were returned.
This field will export the filtered Job Cost information to the specified location asa CSV file.
Export:
This button will re-enable the fields in the Filter group box allowed the user toperform another search.
Refilter:
Summary Values
This field will show the total value of all Job Costs returned by the filter criteriaTotal Cost Values:
This field will show the total value of all Job Costs plus the total Uplifted valuesfor all Job Costs returned by the filter.
Total Request Val-ues:
Buttons
This button will create Payment Requests in Confirm for every Job Cost retrievedby the search and then the screen will close.
Ok:
This button will close the window. If there are unsaved changes on the form, thenthe user will be asked if they wish to save those changes before proceeding.
Cancel:
This button will create Payment Requests in Confirm for every Job Cost retrievedby the search.
Save:
Import Job Costs
The Import Job Costs screen is used to manually import files which contain Job Costing information,and allows the user to:
• Specify the location of a file to be imported.• Specify a stylesheet that will be used to transform the import file into a form acceptable by Confirm.
51 of 53Pitney Bowes
Works Management

• The stylesheet transformation process must pass a minimum set of data fields to Confirm to be ac-cepted. For more information on configuring the stylesheet and import process please contact PitneyBowes, requesting document CHA18367; "Job Costing Import API Specification".
• Check the number of Job Costs that were processed and imported.• Check for import errors and warnings.• Export the Job Costing Log Details to a text file.
Import Files
The path and file name of the import file to be processed.Import file path:
The path and file name of the stylesheet to be used to transform the import file.Stylesheet file path:
The Clear button will blank the contents of the Import file path and Stylesheetfile path fields.
Clear button:
Clicking on this button will import the Job Costs in the file supplied in the Importfile path field. Log Details of the imported Job Costs will be displayed in the listbox on the screen.
After a read has been performed, the fields in the Import Files group box aregreyed out. Another read can be performed by clicking the Re-Import button onthe Results navigator toolbar.
Read and Validatebutton:
ResultsThe Toolbar at the top of the results provides two options:
Clicking this button will export the Job Cost Log Details displayed in the list to auser defined text file
Export:
This button will re-enable the fields in the Import Files group box allowed theuser to perform another read operation.
Re-Import:
Buttons
Any imported Job Costs will be permanently written to the database and thenthe screen will close.
Ok:
This button will close the window. If there are unsaved changes on the screenthen the user will be asked if they wish to save those changes before proceeding.
Cancel:
This button will permanently save the Job Costs to the database.Save:
Refresh Job Cost Rates
The Refresh Job Cost Rates utility will update historic Job Costs to reflect changes subsequently madein the unit costs associated with Labour, Plant and Material in the Lookups.
Check the box to update Costs that relate to Labour. The 'Like' field will restrictthe update to the Labour Type(s) specified.
Update Labour \Like:
Check the box to update Costs that relate to Plant.The 'Like' field will restrict theupdate to the Plant Type(s) specified.
Update Plant \ Like:
52 of 53Pitney Bowes
Works Management

Check the box to update Costs that relate to Materials.The 'Like' field will restrictthe update to the Material Type(s) specified.
Update Material \Like:
Only Costs logged on or after this date will be updated to the current unit cost.Update CostsLogged since:
Click on OK to display the Preview. Save the preview to carry out the update.
53 of 53Pitney Bowes
Works Management


![CS380 LAB IV OpenGL Jonghyeob Lee Reference1. [OpenGL course slides by Rasmus Stenholt] Reference2. [](https://static.fdocuments.net/doc/165x107/56649ec65503460f94bd2572/cs380-lab-iv-opengl-jonghyeob-lee-reference1-opengl-course-slides-by-rasmus.jpg)


![CS380 LAB III OpenGL Jonghyeob Lee Reference1. [OpenGL course slides by Rasmus Stenholt] Reference2. [](https://static.fdocuments.net/doc/165x107/5697bfab1a28abf838c9ae4e/cs380-lab-iii-opengl-jonghyeob-lee-reference1-opengl-course-slides-by-rasmus.jpg)