Configuring System Settings Lesson 3. Skills Matrix Technology SkillObjective DomainObjective #...
32
Configuring System Configuring System Settings Settings Lesson 3
-
Upload
darren-fox -
Category
Documents
-
view
229 -
download
1
Transcript of Configuring System Settings Lesson 3. Skills Matrix Technology SkillObjective DomainObjective #...
Configuring System Configuring System SettingsSettings
Lesson 3
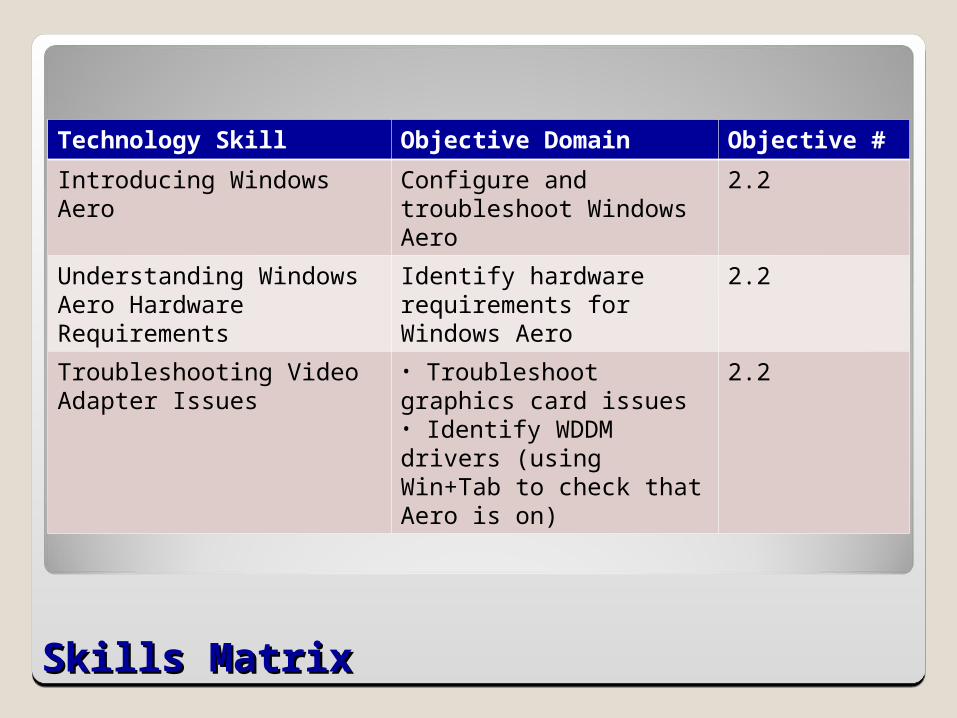
Skills MatrixSkills Matrix
Technology Skill Objective Domain Objective #
Introducing Windows Aero Configure and troubleshoot Windows Aero
2.2
Understanding Windows Aero Hardware Requirements
Identify hardware requirements for Windows Aero
2.2
Troubleshooting Video Adapter Issues
• Troubleshoot graphics card issues• Identify WDDM drivers (using Win+Tab to check that Aero is on)
2.2
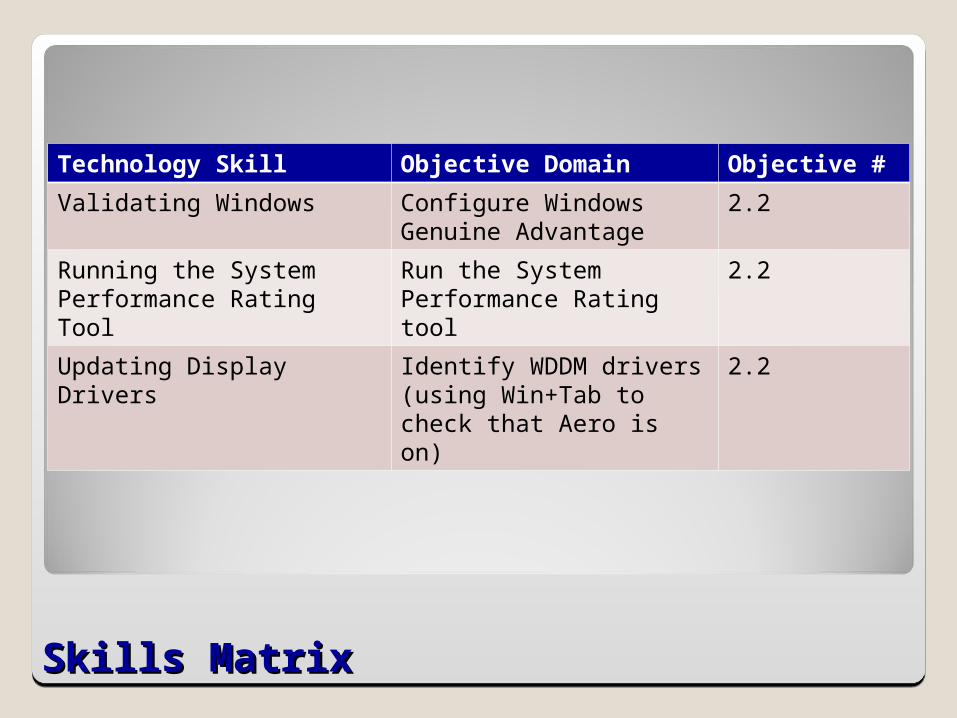
Skills MatrixSkills Matrix
Technology Skill Objective Domain Objective #
Validating Windows Configure Windows Genuine Advantage
2.2
Running the System Performance Rating Tool
Run the System Performance Rating tool
2.2
Updating Display Drivers Identify WDDM drivers (using Win+Tab to check that Aero is on)
2.2

Skills MatrixSkills Matrix
Technology Skill Objective Domain Objective #
Enabling Aero Display Settings
Change the desktop theme to Windows Aero
2.2
Configuring Windows Sidebar
Configure Windows Sidebar• Download and install Gadgets
5.6
Chapter 3Chapter 3
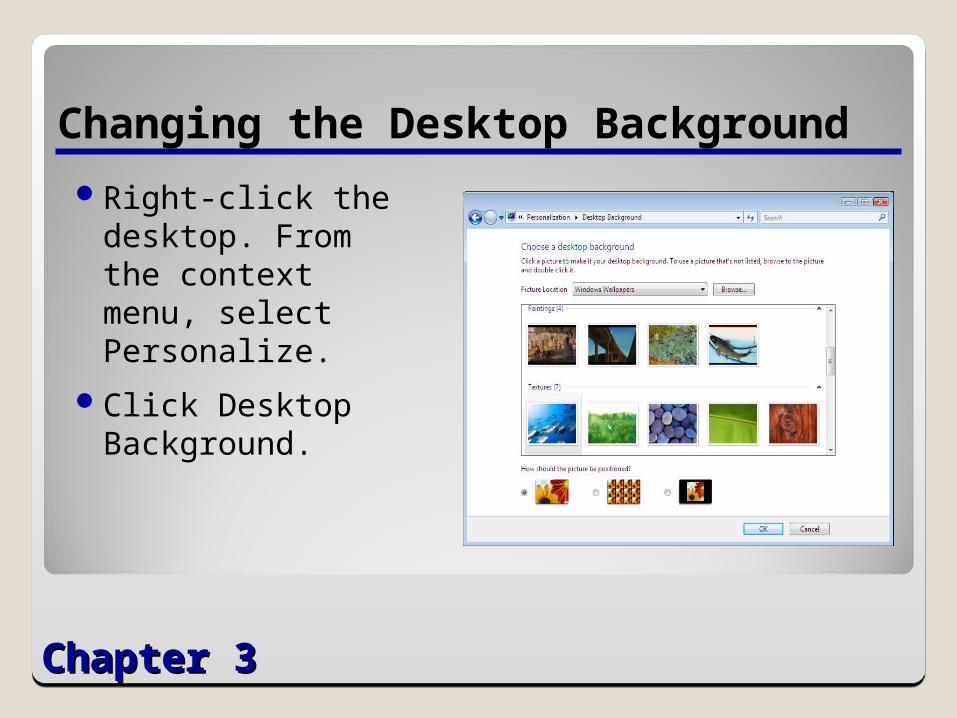
Changing the Desktop Background
Right-click the desktop. From the context menu, select Personalize.
Click Desktop Background.
Chapter 3Chapter 3
Changing the Desktop Background (cont.)
Click one of the Windows Wallpaper thumbnail images that appears in the box to apply it to the desktop.
Click OK to close the window.
Chapter 3Chapter 3
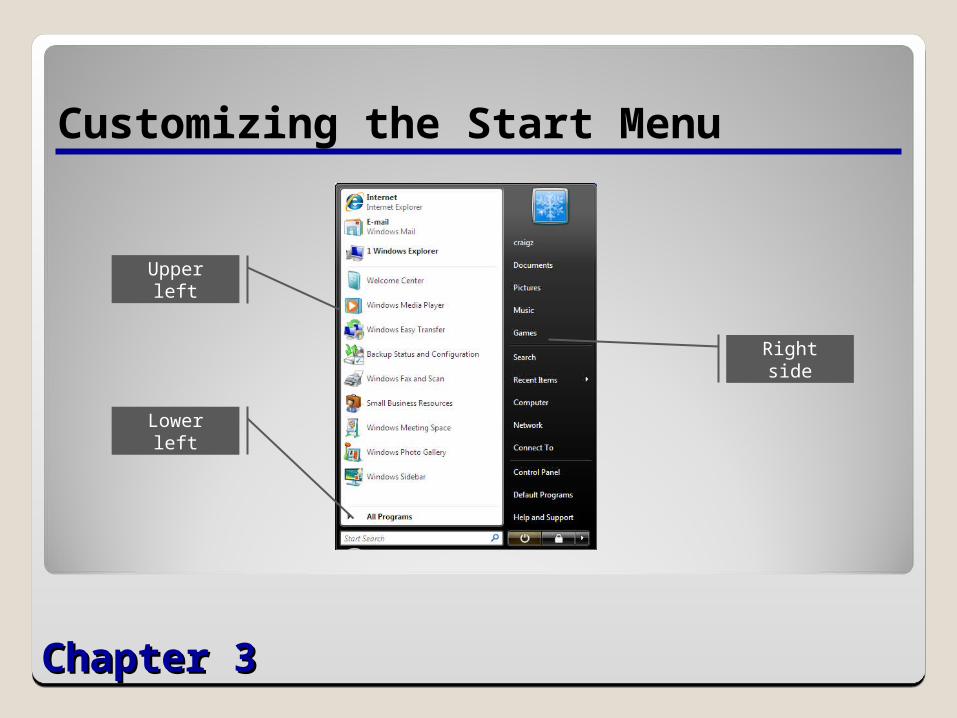
Customizing the Start Menu
Right side
Upper left
Lower left

Chapter 3Chapter 3
Adding Start Menu Icons
Click the Start button on the taskbar.
Right-click the background of the Start menu and, from the context menu, select Properties.
On the Start Menu tab, with the Start Menu radio button selected, click the Customize button.
Chapter 3Chapter 3
Adding Start Menu Icons (cont.)
In the Start Menu Size box, adjust the Number Of Recent Programs To Display spin box to a number greater than nine.
To increase the number of icons that can fit in the Start menu, scroll down to the bottom of the list of settings and clear the Use Large Icons checkbox.

Chapter 3Chapter 3
Adding Start Menu Icons (cont.)
Click OK to close the Customize Start Menu dialog box.
Click OK to close the Taskbar and Start Menu Properties dialog box.
Click Start again. Notice that there are more icons in the Start menu and that they are reduced in size.
Chapter 3Chapter 3
Adding Pinned Icons
Click the Start button on the taskbar.
Right-click one of the shortcuts that appears in the lower left section of the Start menu, or click All Programs and right-click one of the shortcuts found there.
From the context menu, select Pin To Start Menu.
Chapter 3Chapter 3
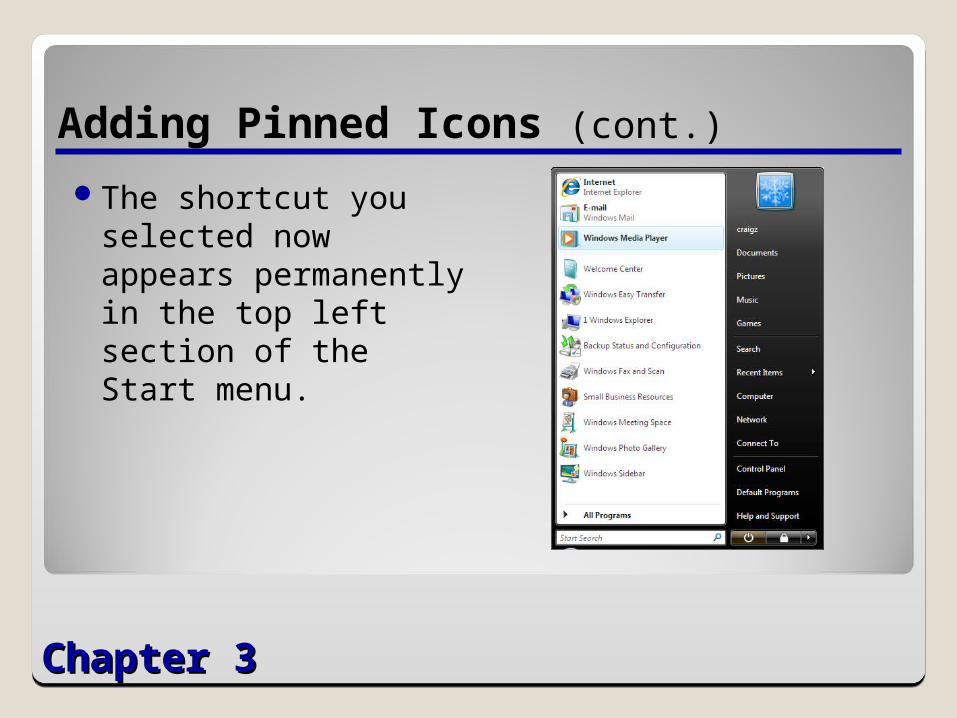
Adding Pinned Icons (cont.)
The shortcut you selected now appears permanently in the top left section of the Start menu.

Chapter 3Chapter 3
Converting Links to Menus
Click the Start button on the taskbar.
Right-click the background of the Start menu and, from the context menu, select Properties.
On the Start Menu tab, with the Start Menu radio button selected, click the Customize button.

Chapter 3Chapter 3
Converting Links to Menus (cont.)
Scroll through the list of settings. For the entries listed, select the Display As A Menu radio button.

Chapter 3Chapter 3
Converting Links to Menus (cont.)
Click OK to close the Customize Start Menu dialog box.
Click OK to close the Taskbar and Start Menu Properties dialog box. The items you modified now appear as menus when you click them in the Start menu.
Chapter 3Chapter 3
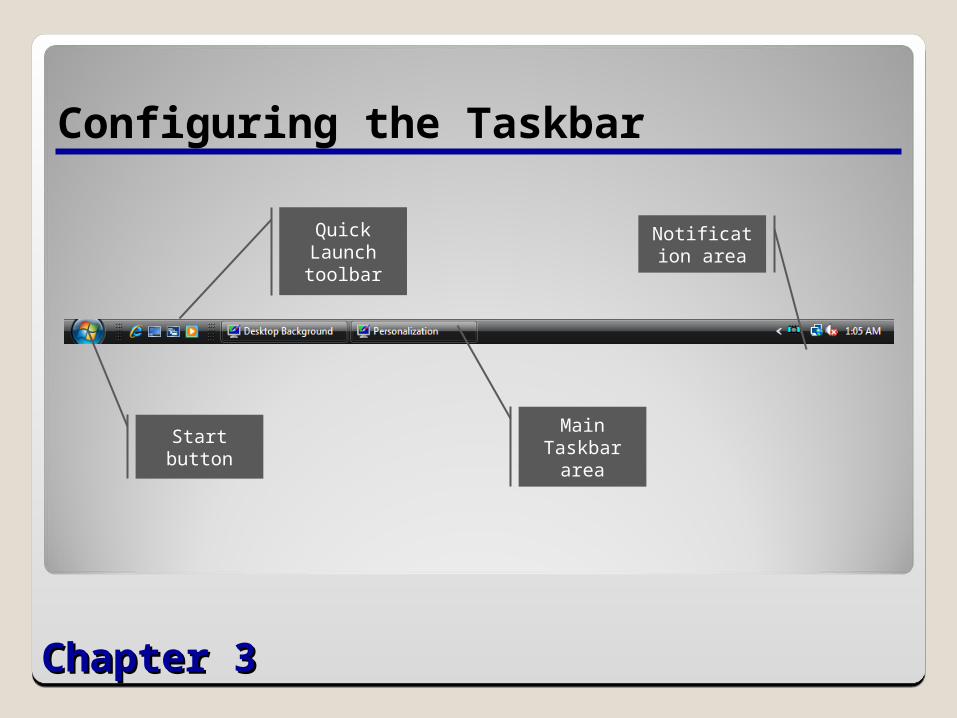
Configuring the Taskbar
Start button
Main Taskbar
area
Notification area
Quick Launch toolbar

Chapter 3Chapter 3
Adding Sidebar Gadgets
Click Start, and then click Control Panel.
Click Appearance And Personalization.
Under Windows Sidebar Properties, click the Add Gadgets To Sidebar link.

Chapter 3Chapter 3
Adding Sidebar Gadgets (cont.)
Select one of the gadgets shown on the page and drag it to the Sidebar. The gadget is added to the Sidebar.

Chapter 3Chapter 3
Downloading Sidebar Gadgets
Click Start, and then click Control Panel.
Click Appearance And Personalization.
Under Windows Sidebar Properties, click the Add Gadgets To Sidebar link.
Chapter 3Chapter 3
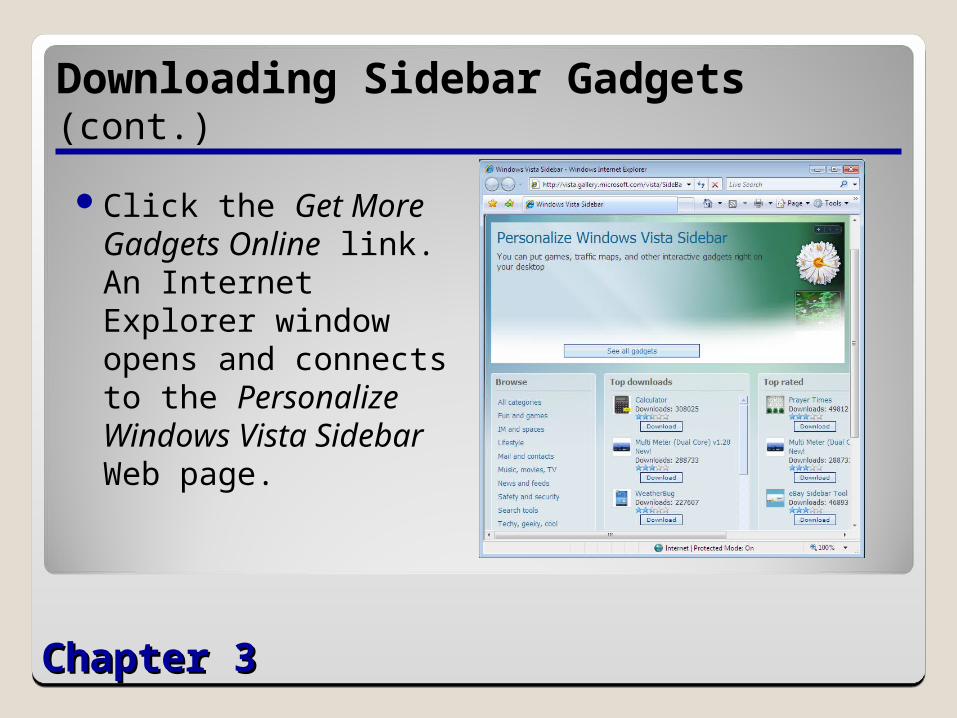
Click the Get More Gadgets Online link. An Internet Explorer window opens and connects to the Personalize Windows Vista Sidebar Web page.
Downloading Sidebar Gadgets (cont.)
Chapter 3Chapter 3
Choose one of the gadgets offered in the gallery and click its Download button.
Click OK, click Open, and then click Allow to begin the download.
When the download is complete, click Install to add the gadget to the Sidebar.
Downloading Sidebar Gadgets (cont.)

Chapter 3Chapter 3
Understanding Windows Aero Hardware Requirements
To run Windows Aero, a graphics processor must support
◦ WDDM drivers
◦ DirectX 9
◦ Pixel Shader 2.0
◦ 32 bits per pixel

Chapter 3Chapter 3
Identifying Windows Aero
Translucent windows
3D Flip
Live thumbnails
Display settings

Chapter 3Chapter 3
Validating Windows
Windows Genuine Advantage is a program that Microsoft has implemented to reduce the number of pirated Windows installations.
Chapter 3Chapter 3
Running the System Performance Rating Tool
Click Start, and then click Control Panel.
Click System And Maintenance.
Click System.
Chapter 3Chapter 3
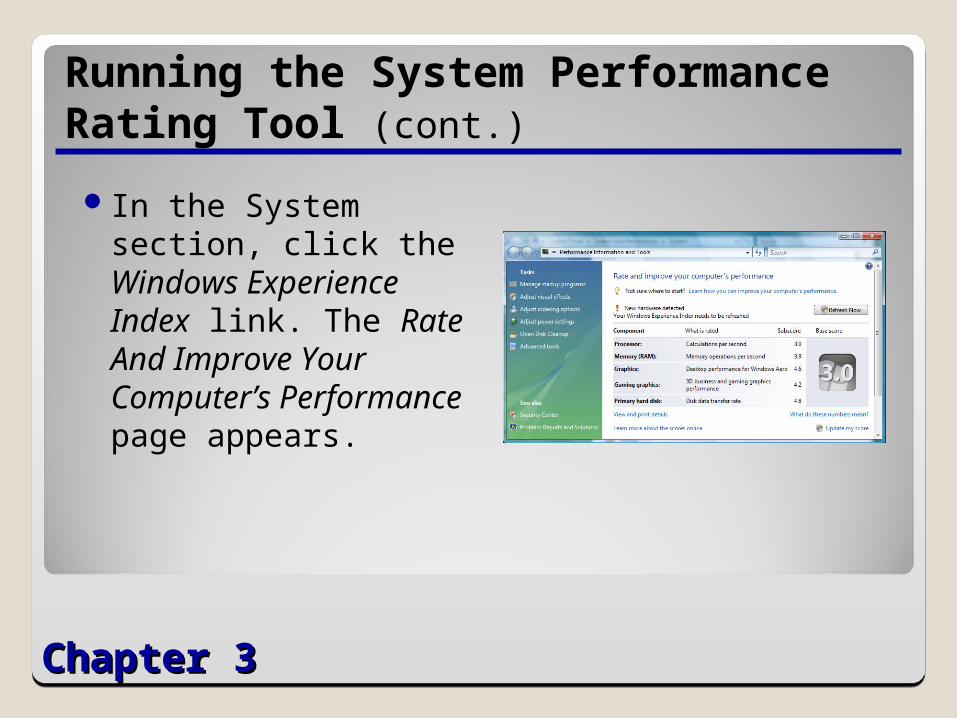
Running the System Performance Rating Tool (cont.)
In the System section, click the Windows Experience Index link. The Rate And Improve Your Computer’s Performance page appears.
Chapter 3Chapter 3
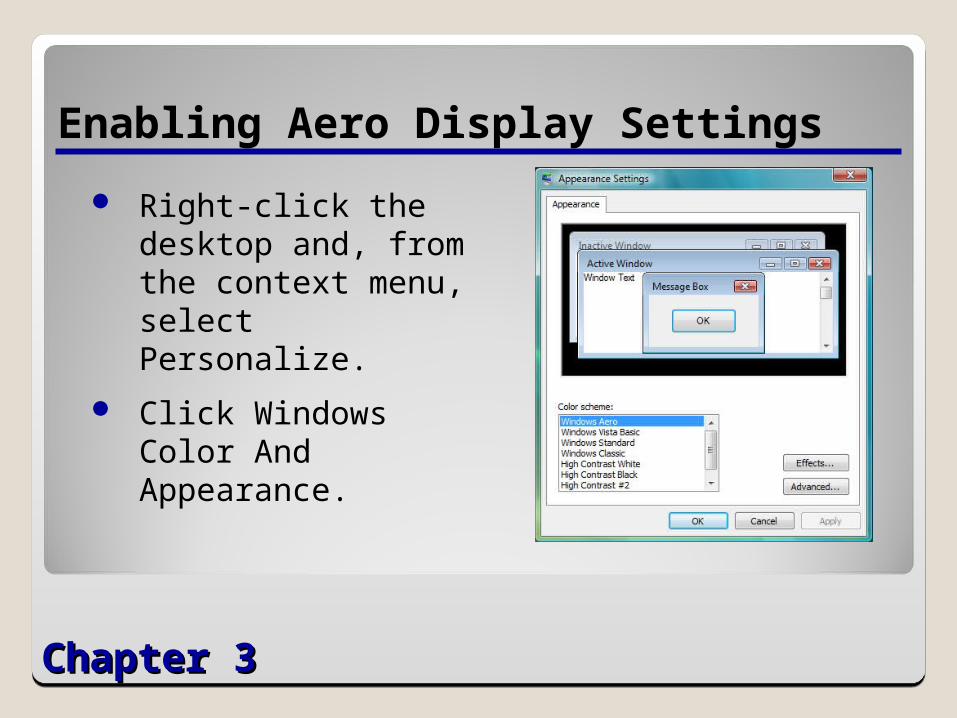
Enabling Aero Display Settings
Right-click the desktop and, from the context menu, select Personalize.
Click Windows Color And Appearance.

Chapter 3Chapter 3
Enabling Aero Display Settings (cont.)
In the Color Scheme list, select Windows Aero and click OK. The display changes to reflect the Windows Aero user experience.
Close the Personalize Appearance And Sounds page.
Press Win+Tab to display the 3D Flip screen, demonstrating that Windows Aero is running.
Chapter 3Chapter 3
You Learned
It is possible to customize the Start menu by changing the number of icons displayed, whether the icons change or are permanent, and whether the system elements appear as links or menus.
It is possible to customize the taskbar by changing its default behavior and adding any or all of six toolbars.

Chapter 3Chapter 3
You Learned (cont.)
The Windows Sidebar contains gadgets, which are mini-applications that run on the Windows desktop.
The graphics hardware requirements for a Windows Vista Premium Ready PC are needed if the computer is going to run the Windows Aero user experience.
Chapter 3Chapter 3
You Learned (cont.)
Windows Vista introduces Windows Display Driver Model (WDDM), a new display driver model that enables the operating system to utilize the graphics processing unit to create 3D screen elements.
WDDM drivers run primarily in user mode (instead of kernel mode), so they are less likely to crash the entire system.

Chapter 3Chapter 3
You Learned (cont.)
To run Windows Aero, a video adapter must have an appropriate GPU, sufficient graphics memory, and a WDDM driver.
A Windows Vista computer must be validated to run Windows Aero.
The System Performance Rating Tool assigns a numerical rating to each of five components in the computer. The lowest of these ratings becomes the base score of the computer.