
Configuration examples for the D-Link NetDefend Firewall ... file1. Firewall A - Addresses Go to...
16
Configuration examples for the D-Link NetDefend Firewall series Scenario: How to configure VPN Hub-and-Spoke (sometimes called VPN Concentrator) Platform Compatibility: All NetDefend Firewall Series Last update: 2008-03-10 Overview In this document, the notation Objects->Address book means that in the tree on the left side of the screen Objects first should be clicked (expanded) and then Address Book. Most of the examples in this document are adapted for the DFL-800. The same settings can easily be used for all other models in the series. The only difference is the names of the interfaces. Since the DFL-1600 and DFL-2500 has more than one lan interface, the lan interfaces are named lan1, lan2 and lan3 not just lan. The screenshots in this document is from firmware version 2.11.02. If you are using an earlier version of the firmware, the screenshots may not be identical to what you see on your browser.
Transcript of Configuration examples for the D-Link NetDefend Firewall ... file1. Firewall A - Addresses Go to...

Configuration examples for the D-Link NetDefend Firewall series
Scenario: How to configure VPN Hub-and-Spoke (sometimes called VPN
Concentrator)
Platform Compatibility: All NetDefend Firewall Series
Last update: 2008-03-10
Overview
In this document, the notation Objects->Address book means that in the tree on the left side of the screen Objects first should be clicked (expanded) and then Address Book. Most of the examples in this document are adapted for the DFL-800. The same settings can easily be used for all other models in the series. The only difference is the names of the interfaces. Since the DFL-1600 and DFL-2500 has more than one lan interface, the lan interfaces are named lan1, lan2 and lan3 not just lan. The screenshots in this document is from firmware version 2.11.02. If you are using an earlier version of the firmware, the screenshots may not be identical to what you see on your browser.
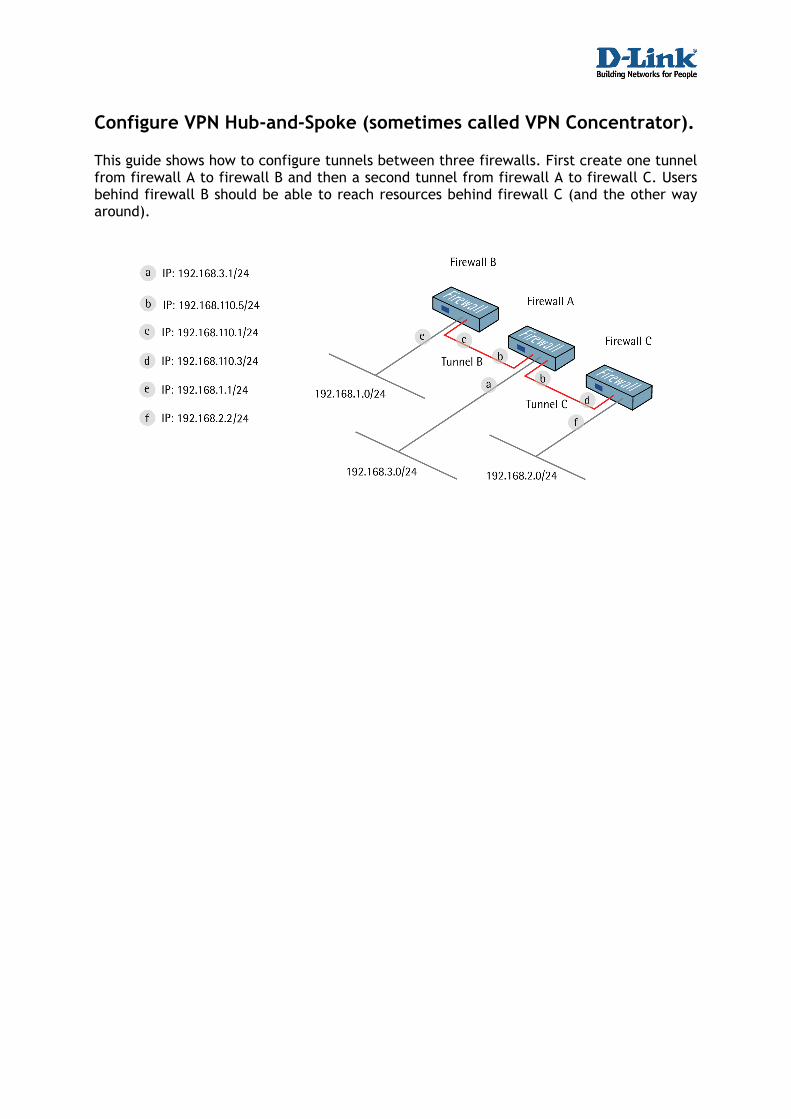
Configure VPN Hub-and-Spoke (sometimes called VPN Concentrator).
This guide shows how to configure tunnels between three firewalls. First create one tunnel from firewall A to firewall B and then a second tunnel from firewall A to firewall C. Users behind firewall B should be able to reach resources behind firewall C (and the other way around).
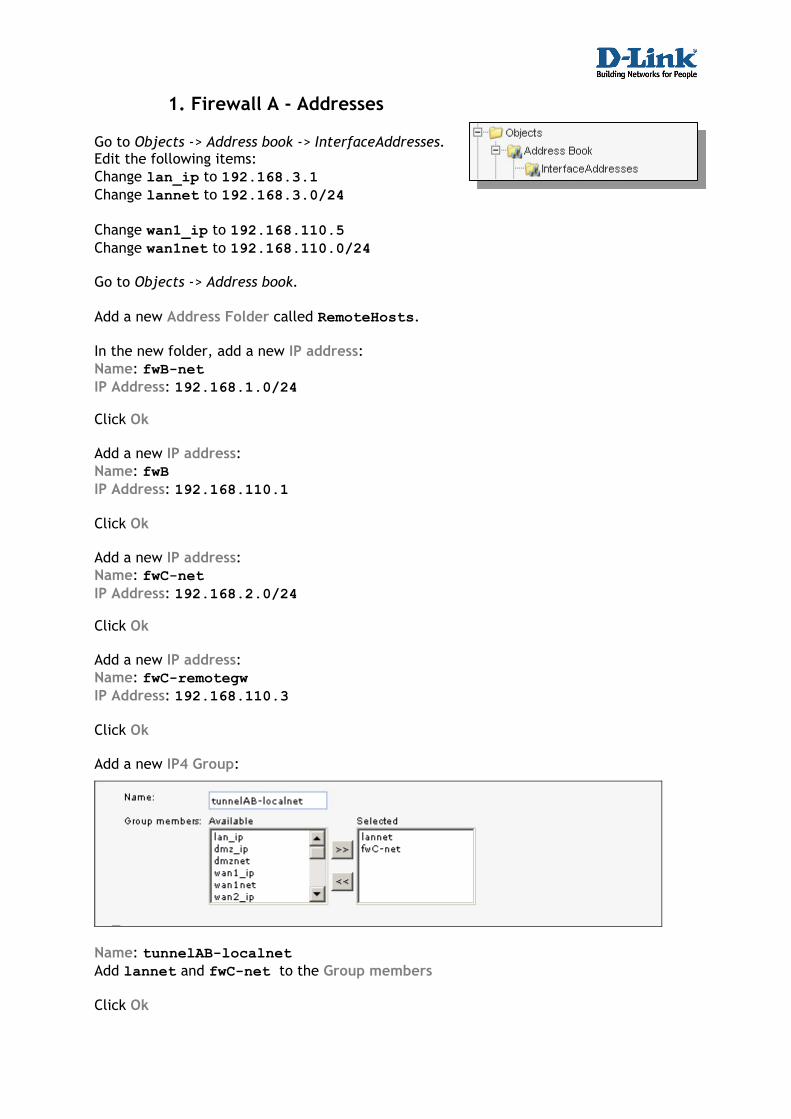
1. Firewall A - Addresses
Go to Objects -> Address book -> InterfaceAddresses. Edit the following items: Change lan_ip to 192.168.3.1 Change lannet to 192.168.3.0/24 Change wan1_ip to 192.168.110.5 Change wan1net to 192.168.110.0/24 Go to Objects -> Address book. Add a new Address Folder called RemoteHosts. In the new folder, add a new IP address: Name: fwB-net IP Address: 192.168.1.0/24 Click Ok Add a new IP address: Name: fwB IP Address: 192.168.110.1 Click Ok Add a new IP address: Name: fwC-net IP Address: 192.168.2.0/24 Click Ok Add a new IP address: Name: fwC-remotegw IP Address: 192.168.110.3 Click Ok Add a new IP4 Group:
Name: tunnelAB-localnet Add lannet and fwC-net to the Group members Click Ok
Add a new IP4 Group: Name: tunnelAC-localnet Add lannet and fwB-net to the Group members Click Ok
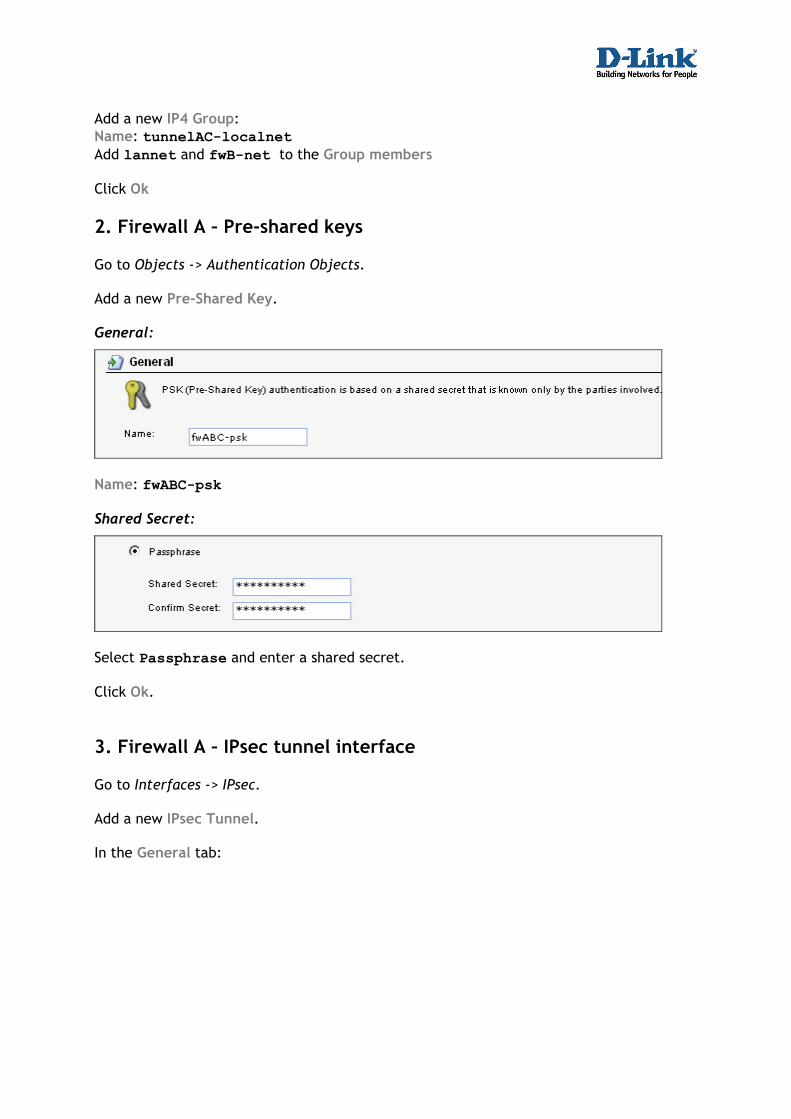
2. Firewall A – Pre-shared keys
Go to Objects -> Authentication Objects. Add a new Pre-Shared Key. General:
Name: fwABC-psk Shared Secret:
Select Passphrase and enter a shared secret. Click Ok.
3. Firewall A – IPsec tunnel interface
Go to Interfaces -> IPsec. Add a new IPsec Tunnel. In the General tab:

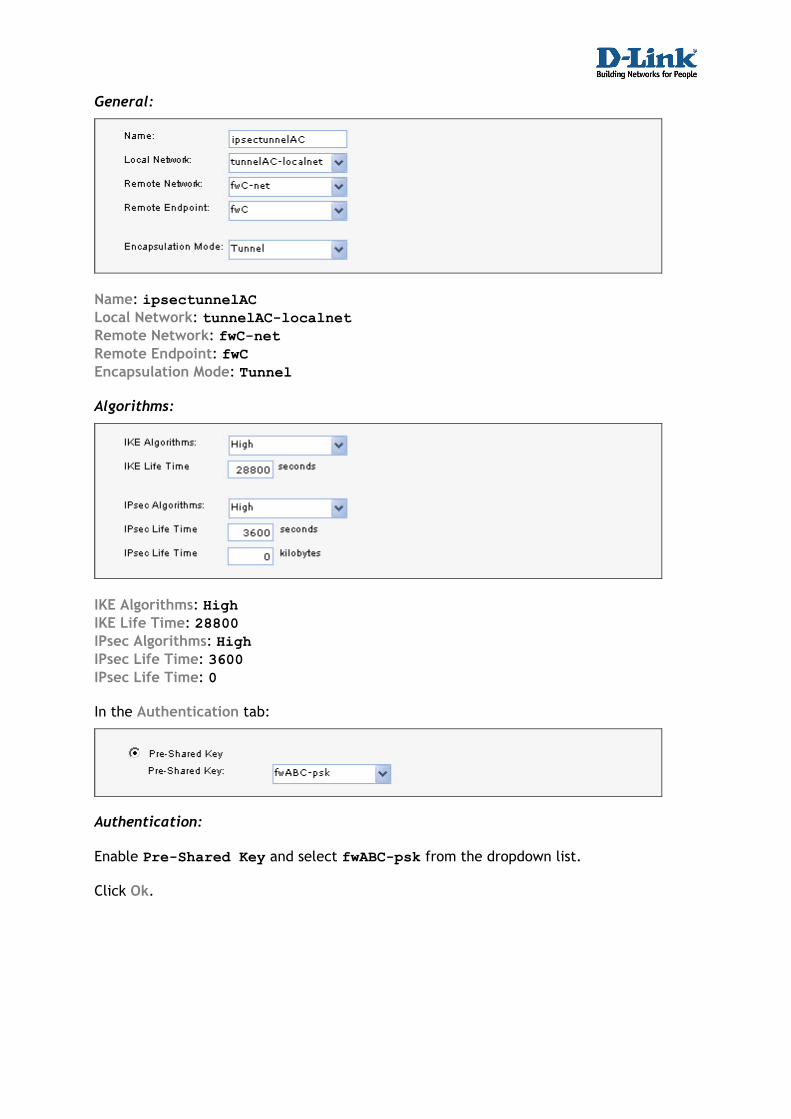
General:
Name: ipsectunnelAB Local Network: tunnelAB-localnet Remote Network: fwB-net Remote Endpoint: fwB Encapsulation Mode: Tunnel Algorithms:
IKE Algorithms: High IKE Life Time: 28800 IPsec Algorithms: High IPsec Life Time: 3600 IPsec Life Time: 0 In the Authentication tab: Authentication:
Enable Pre-Shared Key and select fwABC-psk from the dropdown list. Click Ok. Add a new IPsec Tunnel. In the General tab:
General:
Name: ipsectunnelAC Local Network: tunnelAC-localnet Remote Network: fwC-net Remote Endpoint: fwC Encapsulation Mode: Tunnel Algorithms:
IKE Algorithms: High IKE Life Time: 28800 IPsec Algorithms: High IPsec Life Time: 3600 IPsec Life Time: 0 In the Authentication tab:
Authentication: Enable Pre-Shared Key and select fwABC-psk from the dropdown list. Click Ok.

4. Firewall A – Rules
Go to Rules -> IP Rules. Create a new IP Rule Folder called lan_to_fwBC. In the new folder, add a new IP Rule. In the General tab: General:
Name: allow_all Action: Allow Service: all_services Address Filter:
Source Interface: lan Source Network: lannet Destination Interface: ipsectunnelAB Destination Network: fwB-net Click Ok. Add a new IP Rule. In the General tab: General: Name: allow_all Action: Allow Service: all_services

Address Filter:
Source Interface: ipsectunnelAC Source Network: fwC-net Destination Interface: ipsectunnelAB Destination Network: fwB-net Click Ok. Add a new IP Rule. In the General tab: General: Name: allow_all Action: Allow Service: all_services Address Filter: Source Interface: ipsectunnelAB Source Network: fwB-net Destination Interface: lan Destination Network: lannet Click Ok. Add a new IP Rule. In the General tab: General: Name: allow_all Action: Allow Service: all_services Address Filter: Source Interface: ipsectunnelAB Source Network: fwB-net Destination Interface: ipsectunnelAC Destination Network: fwC-net Click Ok. Add a new IP Rule. In the General tab:

General: Name: allow_all Action: Allow Service: all_services Address Filter: Source Interface: ipsectunnelAC Source Network: fwC-net Destination Interface: lan Destination Network: lannet Click Ok. Add a new IP Rule. In the General tab: General: Name: allow_all Action: Allow Service: all_services Address Filter: Source Interface: lan Source Network: lannet Destination Interface: ipsectunnelAC Destination Network: fwC-net Click Ok. Save and activate the configuration on firewall A.
5. Firewall B - Addresses
Go to Objects -> Address book -> InterfaceAddresses. Edit the following items: Change lan_ip to 192.168.1.1 Change lannet to 192.168.1.0/24 Change wan1_ip to 192.168.110.1 Change wan1net to 192.168.110.0/24 Go to Objects -> Address book. Add a new Address Folder called RemoteHosts. In the new folder, add a new IP address: Name: fwA-net IP Address: 192.168.3.0/24
Click Ok Add a new IP address: Name: fwA IP Address: 192.168.110.5 Click Ok Add a new IP address: Name: fwC-net IP Address: 192.168.2.0/24 Click Ok Add a new IP4 Group: Name: fwB-remotenets Add fwA-net and fwC-net to the Group members Click Ok
6. Firewall B – Pre-shared keys
Follow the instructions in step 2 to add a pre-shared key called fwABC-psk to firewall B. The passphrase has to be the same as the passphrase on firewall A.
7. Firewall B - IPsec tunnel interface
Go to Interfaces -> IPsec. Add a new IPsec Tunnel. In the General tab:

General:
Name: ipsectunnelBA Local Network: lannet Remote Network: fwB-remotenets Remote Endpoint: fwA Encapsulation Mode: Tunnel Algorithms:
IKE Algorithms: High IKE Life Time: 28800 IPsec Algorithms: High IPsec Life Time: 3600 IPsec Life Time: 0 In the Authentication tab: Authentication:
Enable Pre-Shared Key and select fwABC-psk from the dropdown list. Click Ok.
8. Firewall B – Rules
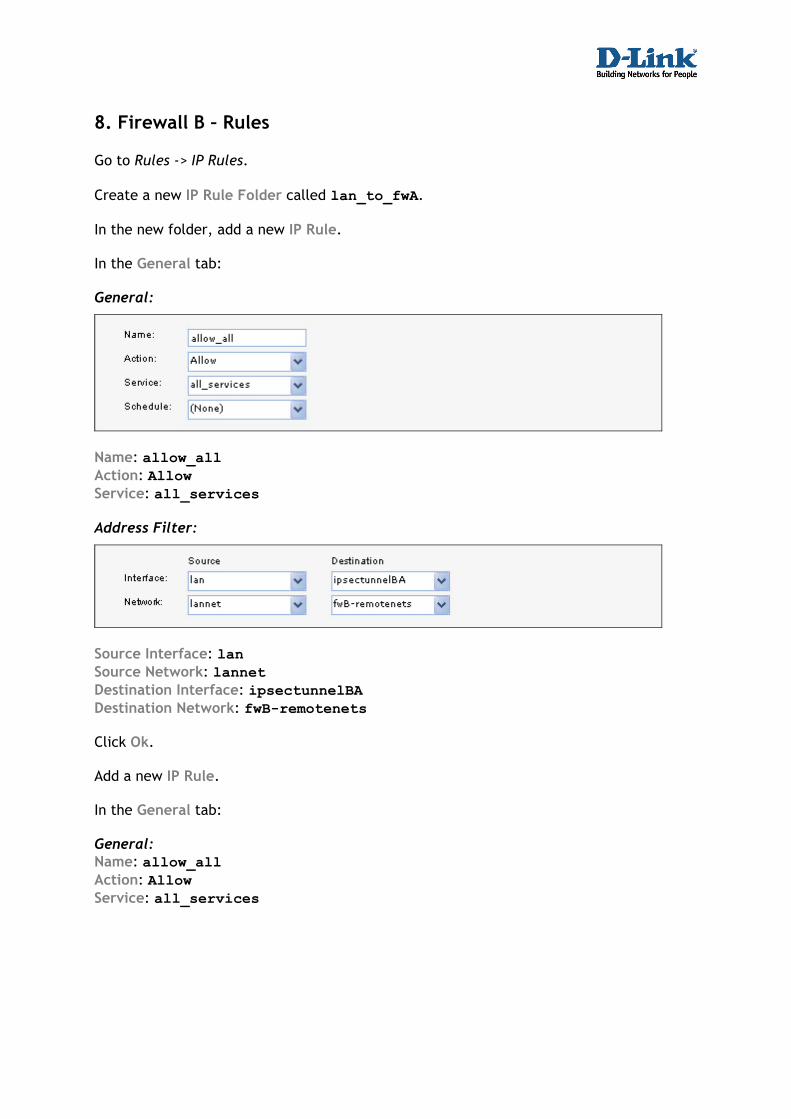
Go to Rules -> IP Rules. Create a new IP Rule Folder called lan_to_fwA. In the new folder, add a new IP Rule. In the General tab: General:
Name: allow_all Action: Allow Service: all_services Address Filter:
Source Interface: lan Source Network: lannet Destination Interface: ipsectunnelBA Destination Network: fwB-remotenets Click Ok. Add a new IP Rule. In the General tab: General: Name: allow_all Action: Allow Service: all_services

Address Filter:
Source Interface: ipsectunnelBA Source Network: fwB-remotenets Destination Interface: lan Destination Network: lannet Click Ok. Save and activate the configuration on firewall B.
9. Firewall C - Addresses
Go to Objects -> Address book -> InterfaceAddresses. Edit the following items: Change lan_ip to 192.168.2.1 Change lannet to 192.168.2.0/24 Change wan1_ip to 192.168.110.3 Change wan1net to 192.168.110.0/24 Go to Objects -> Address book. Add a new Address Folder called RemoteHosts. In the new folder, add a new IP address: Name: fwA-net IP Address: 192.168.3.0/24 Click Ok Add a new IP address: Name: fwA IP Address: 192.168.110.5 Click Ok Add a new IP address: Name: fwB-net IP Address: 192.168.1.0/24 Click Ok Add a new IP4 Group: Name: fwC-remotenets Add fwA-net and fwB-net to the Group members Click Ok

10. Firewall C – Pre-shared keys
Follow the instructions in step 2 to add a pre-shared key called fwABC-psk to firewall C. The passphrase has to be the same as the passphrase on firewall A.
11. Firewall C – IPsec interfaces
Go to Interfaces -> IPsec. Add a new IPsec Tunnel. In the General tab: General:
Name: ipsectunnelCA Local Network: lannet Remote Network: fwC-remotenets Remote Endpoint: fwA Encapsulation Mode: Tunnel Algorithms:
IKE Algorithms: High IKE Life Time: 28800 IPsec Algorithms: High IPsec Life Time: 3600 IPsec Life Time: 0

In the Authentication tab: Authentication:
Enable Pre-Shared Key and select fwABC-psk from the dropdown list. Click Ok.
12. Firewall C – Rules
Go to Rules -> IP Rules. Create a new IP Rule Folder called lan_to_fwA. In the new folder, add a new IP Rule. In the General tab: General: Name: allow_all Action: Allow Service: all_services Address Filter: Source Interface: lan Source Network: lannet Destination Interface: ipsectunnelCA Destination Network: fwC-remotenets Click Ok. Add a new IP Rule. In the General tab: General: Name: allow_all Action: Allow Service: all_services
Address Filter: Source Interface: ipsectunnelCA Source Network: fwC-remotenets Destination Interface: lan Destination Network: lannet Click Ok. Save and activate the configuration on firewall C.


![[MS-GPFAS]: Group Policy: Firewall and Advanced Security ...... · The example companies, organizations, products, domain names, email addresses, logos, people, places, and events](https://static.fdocuments.net/doc/165x107/5f2ff655816ba37d836b4a96/ms-gpfas-group-policy-firewall-and-advanced-security-the-example-companies.jpg)


![[MS-GPFAS-Diff]: Group Policy: Firewall and Advanced Security …... · 2018-09-10 · The example companies, organizations, products, domain names, email addresses, logos, people,](https://static.fdocuments.net/doc/165x107/5f2ff726df18bc70ab392ce5/ms-gpfas-diff-group-policy-firewall-and-advanced-security-2018-09-10.jpg)