ConcertoIII Usa
66
Operating Manual viscount Concerto III Ver. USA - 1.0
-
Upload
gian-vito-tannoia -
Category
Documents
-
view
23 -
download
0
Transcript of ConcertoIII Usa

Operating Manual
viscount
Concerto III
Ver. USA - 1.0

This symbol is intended to alert the user to thepresence of uninsulated “dangerous voltage”within the product’s enclosure that may be ofsufficient magnitude to constitute a risk ofelectric shock to persons.
This symbol is intended to alert the user tothe presence of important operating andmaintenance (servicing) instructions in theliterature accompanying the appliance.
CAUTIONTO REDUCE THE DANGER OF ELECTRIC SHOCK
DO NOT REMOVE COVER (OR BACK)NO USER-SERVICEABLE PARTS INSIDE
REFER SERVICING TO QUALIFIED SERVICE PERSONNEL
“INSTRUCTIONS PERTAINING TO A RISK OF FIRE,ELECTRIC SHOCK, OR INJURY TO PERSONS”
IMPORTANT SAFETY INSTRUCTIONS
WARNING:1) Read these instructions.2) Keep these instructions.3) Heed all warnings.4) Follow all instructions.5) Do not use this apparatus near water.6) Clean only with dry cloth.7) Do not block any ventilation openings. Install in accordance with the manufacturer’s instructions.8) Do not install near any heat sources such as radiators, heat registers, stoves,or other apparatus (including amplifiers) that produce heat.
9) Do not defeat the safety purpose of the polarized or grounding-type plug. A polarized plug has two blades with onewider than the other. A grounding type plug has two blades and a third grounding prong. The wider blade or the thirdprong are provided for your safety. If the provided plug does not fit in to your outlet, consult an electrician for replacementof the obsolete outlet.
11) Protect the power cord from being walked on on pinhead, particularly at plugs, convenience receptacles,and the point where they exit form the apparatus.
12) Only use attachments/accessories specified by the manufacturer.13) Use only with the cart, stand, tripod, bracket, or table specified by
the manufacturer, or sold, with the apparatus.When a cart is used, use caution when moving the cart/apparatuscombination to avoid injury from tip-over.
14) Unplug this apparatus during lightning storms or when unused for long periods of time.15) Refer all servicing to qualified service personnel. Servicing is required when the apparatus has been damaged
in any way, such ad power-supply cord or plug is damaged, liquid has been spilled or objects have fallen intothe apparatus, the apparatus has been exposed to rain or moisture, does not operate normally, or has been dropped.
SAVE THESE INSTRUCTIONS
WARNING: READ THIS FIRST!
WARNING
AVIS
RISK OF ELECTRIC SHOCKDO NOT OPEN
RISQUE DE CHOC ÉLECTRIQUENE PAS OUVRIR
10) The socket-outlet shall be installed near the equipment and shall be easily accessible.

1
Viscount Concerto III - Operating Manual
CONTENTS
1. Important notes ........................................................................................................................... 3
1.1 Looking after the product ....................................................................................................... 3
1.2 Notes on floppy disks ............................................................................................................. 3
1.3 Notes about the manual .......................................................................................................... 4
2. Controls and connections ........................................................................................................... 5
2.1 The side panels ....................................................................................................................... 5
2.2 The central panel..................................................................................................................... 6
2.3 The manuals splitter controls ................................................................................................. 8
2.4 Pedal board controls .............................................................................................................10
2.5 The conncections underneath the manuals .......................................................................... 11
2.6 The connections on the rear panel ........................................................................................ 12
3. Central control unit .................................................................................................................. 14
4. Functions for controlling the organ’s voices .......................................................................... 16
4.1 Loading voices from disk ..................................................................................................... 16
4.2 Voice sort .............................................................................................................................. 21
4.3 Regulating the voice volumes .............................................................................................. 21
4.4 Checking the stop labels ....................................................................................................... 22
4.5 Error messages - Voices menu.............................................................................................. 23
5. Floppy disk functions ................................................................................................................ 25
5.1 Displaying the contents of floppy disks ............................................................................... 26
5.2 Copying whole floppy disks ................................................................................................. 26
5.3 Formatting floppy disks ........................................................................................................28
5.4 Displaying floppy disk general parameters .........................................................................28
5.5 Saving the organ’s memories and settings on disk .............................................................. 29
5.6 Loading the organ’s memories and settings saved on disk.................................................. 30
5.7 Copying individual files ....................................................................................................... 31
5.8 Renaming files ...................................................................................................................... 33
5.9 Deleting files .........................................................................................................................34
5.10 File information .................................................................................................................. 35
5.11 Error messages - Disk menu ............................................................................................... 36
6. MIDI and Utility functions ...................................................................................................... 37
6.1 Regulating the display contrast ............................................................................................38
6.2 G/P Piston Combine function ............................................................................................... 38
6.3 MIDI functions ..................................................................................................................... 38
6.4 Manual setup .........................................................................................................................40
7. Organ general settings .............................................................................................................. 42
7.1 Setting the tremulants ........................................................................................................... 42
7.2 Setting the type of reverb ..................................................................................................... 43
7.3 Setting the equalizer .............................................................................................................43

2
Viscount Concerto III - Operating Manual
8. Recording and playing back musical performances .............................................................44
8.1 Recording a performance .....................................................................................................44
8.2 Playing back a performance ................................................................................................. 47
8.3 Switching on and setting the metronome .............................................................................48
8.4 Setting the time signature .....................................................................................................49
8.5 Quantizing the MIDI events in the songs recorded .............................................................49
8.6 MIDI sequences modification functions .............................................................................. 51
8.7 Error messages - Sequencer section .....................................................................................54
9. The remote control ....................................................................................................................56
10. Voice Local Off ........................................................................................................................56
11. Appendix................................................................................................................................... 57
11.1 Updating of the operating systems .....................................................................................57
11.2 Factory Settings .................................................................................................................. 59

3
Viscount Concerto III - Operating Manual
1. IMPORTANT NOTES
1.1 LOOKING AFTER THE PRODUCT
• Do not apply excessive force to the organ’s structures or the controls (knobs, stops, push-
buttons, etc.).
• When possible, do not place the instrument close to units which generate strong interference,
such as radios, TVs, computer videos, etc.
• Do not place the organ close to heat sources, in damp or dusty places or in the vicinity of strong
magnetic fields.
• Do not expose the instrument to direct sunlight.
• Never insert foreign bodies inside the instrument or pour liquids of any kind into it.
• For cleaning, use only a soft brush or compressed air; never use detergents, solvents or alcohol.
• Always use good quality screened cables for connection to amplification or diffusion systems.
When disconnecting cables from sockets, always take hold of the connector and not the cable
itself; when winding cables, do not knot or twist them.
• Before making the connections ensure that the other units (especially amplification and diffusion
systems) you are about to connect are switched off. This will prevent noisy or even dangerous
signal peaks.
• If the organ is to be out of use for lengthy periods, disconnect the plug from the power socket.
1.2 NOTES ON FLOPPY DISKS
• Use only good quality floppy disks.
• Do not extract the floppy disk when reading or writing operations are in progress (when the
LED on the drive is on); this may damage the head and the magnetic medium.
• Use only 3.5" DD and HD (720Kbyte and 1.44Mbyte) floppy disks formatted to the MS-DOS
standard.
• Take good care of your floppy disks and do not place them close to heat sources or magnetic
fields (computer videos, loudspeakers, etc.), or in damp or dusty places.
• The manufacturer does not accept any liability for damage to the floppy disk drive in case of
use of damaged floppy disks.

4
Viscount Concerto III - Operating Manual
1.3 NOTES ABOUT THE MANUAL
• Take good care of this manual.
• This manual constitutes an integral part of the instrument. The descriptions and illustrations in
this publication are not binding.
• While the instrument’s essential characteristics remain the same, the manufacturer reserves the
right to make any modifications to parts, details or accessories considered appropriate to improve
the product or for requirements of a construction or commercial nature, at any time and without
undertaking to update this publication immediately.
• All rights reserved; the reproduction of any part of this manual, in any form, without the
manufacturer’s specific written permission is forbidden.
• Read all the information described carefully. You will avoid wasting time and will obtain the
best performance from your instrument.
• The codes or numbers in square brackets ([ ]) indicate the names of the buttons, sliders, trimmers
or connectors on the instrument.
For example, “[ENTER/YES]” refers to the ENTER/YES button.
• The illustrations and display pages are purely guideline and may differ from those actually
shown on the display.

5
Viscount Concerto III - Operating Manual
2. CONTROLS AND CONNECTIONS
2.1 THE SIDE PANELS
1
2
1. [SWELL] stops: this section contains the stops of the Swell.
2. [PEDAL] stops: this section contains the pedal board stops.
3
4 5 6
3. [GREAT] stops: these stops allow you to set the voice of your
choice for the Great.
4. [EXT.SPK] Switch: this switch supplies power to any remote
amplified speakers connected to the [MAIN OUTPUTS]
connectors on the rear panel.
5. [POWER ] Switch: the switch used to switch the organ on
and off.
6. [CHOIR] stops: this section contains the stops of the Choir.
N.B.:
The remote speakers are optional. Contact your dealer for further information.

6
Viscount Concerto III - Operating Manual
2.2 THE CENTRAL PANEL
Version with Orchestra voices
7 8 9 10 11
12 13
14
7 8 1410 11
12 13
Version without Orchestra voices
7. [VOLUMES] slider: these sliders allow you to adjust the volumes of all the organ’s sections,
as follows:
o [PEDAL]: Pedal volume.
o [GREAT]: Great volume.
o [SWELL]: Swell volume.
o [CHOIR]: Choir volume.
o [ORCHESTRA]: volume of the Orchestra voices (on version with Orchestra voices
only).
o [REVERB]: reverb level.
o [GENERAL]: the organ’s general volume.
8. [CRESCENDO] LED bar: these LEDs display the steps of the Crescendo set with the pedal
of the same name.
WARNING!
The infrared sensor for receiving remote control commands is located underneath the
Crescendo LEDs. Take care not to block this area and try always to use the remote control at
an angle of not more than 30° (vertical or horizontal) to the organ’s panel.

7
Viscount Concerto III - Operating Manual
9. [ORCHESTRA SECTION] buttons (version with Orchestra voices only): this section contains
the organ’s Orchestra voices. One of the key features of the Concerto III is the provision of
these voices, allowing you to play all the instruments covered by the General MIDI standard,
enhancing your organ’s voice range.
The buttons are subdivided into four sections:
o [SWELL]: Swell voices.
o [GREAT]: Great voices.
o [CHOIR]: Choir voices.
o [PEDAL]: Pedal voices.
each of them containing four preset voices (indicated above the selection button) plus one
which can be freely selected (CUSTOM). The button LED will come on to confirm that the
voice has been activated.
SELECTING THE CUSTOM VOICE
To select the Custom voice from the 128 available in the GM standard, keep the [CUSTOM]
button of the section of choice pressed for a few moments; the first video page for selecting the
group of instructions will appear:
use the cursor keys ([LEFT], [RIGHT], [UP] and [DOWN] underneath the display) to select
the group you require and press [ENTER/YES]; the eight voices in the selected group will be
displayed:
use the cursor keys again and then press [ENTER/YES] to activate the voice.
10. Display function control panel: see chap. 3 for a detailed description of this section.
11. [MIDI TO] LED: these LEDs provide information about the MIDI status for each manual and
the pedal board, as follows:
o [MIDI TO PEDAL]: Pedal MIDI.
o [MIDI TO GREAT]: Great MIDI.
o [MIDI TO SWELL]: Swell MIDI.
o [MIDI TO CHOIR]: Choir MIDI.
Only when the LED is lightning, the section can transmit MIDI messages.
To set these parameters, recall the MIDI TO display function described in point 6.3.

8
Viscount Concerto III - Operating Manual
12. [C/G KEYB. INVERS.] LED: LED displaying the C/G KEYBOARD INVERSION function,
which enables you to reverse the positions of Great and Choir (LED on). To set the function,
refer to point 6.4.
13. [G/P PIST. COMB.] LED: LED which displays the status of the PISTON COMBINE function.
When the function is enabled (LED on), if a memory dedicated to the Great is activated, the
same memory dedicated to the pedal board will automatically be recalled.
For activation of this function, refer to point 6.2.
14. [COUPLERS] section: using these stops, you can enable (stop on) or disable (stop off) the
couplings between the manuals and the pedal board, as follows:
o [Great to Pedal]: the stops and Orchestra voices (in the version of the organ with
Orchestra voices) of the Great will also play on the pedal board.
o [Swell to Pedal]: the stops and Orchestra voices of the Swell will also play on the pedal
board.
o [Choir to Pedal]: the stops and Orchestra voices of the Choir will also play on the
pedal board.
o [Swell to Great]: the stops and Orchestra voices of the Swell will also play on the
Great.
o [Choir to Great]: the stops and Orchestra voices of the Choir will also play on the
Great.
o [Swell to Choir]: the stops and Orchestra voices of the Swell will also play on the
Choir.
2.3 THE MANUAL SPLITTER CONTROLS
15
16a
17
18c 16c 16d
18a
18b25
16b
2019 21 22 23
24
15. General memories: this section contains the instrument’s six general memories. You can use
the general memory to save the stops, the Couplers and the Orchestra voices (in the version of
the organ with Orchestra voices) of all the manuals and the pedal board.
16. Dedicated memories: the Concerto III also has six memories dedicated to the pedal board
(16a), to Swell (16b), to Great (16c) and to Choir (16d). In the dedicated memories you can
only save the setup of the stops, the couplers and the Orchestra voices (in the version of the
organ with Orchestra voices) of the section associated to the memory selected.
In actual fact, the organ has 48 general memories and 48 dedicated memories for each manual
and for the pedal board, since there are eight memory banks which can be selected on the

9
Viscount Concerto III - Operating Manual
display (MEMORY BANK parameter): this parameter is of fundamental importance if the
instrument is used by more than one organist, since each of them will be able to save his or her
own settings inside a memory bank.
For the memory saving procedure, see point 17.
The memories also include an [HR] button, also known as 0, which recalls the stop, Coupler
and Orchestra voice setup before a memory is activated.
17. [S] button: “Set” button which enables the saving of memories. To save a memory, simply
press the [S] button, keep it pressed and then press the button of the memory you wish to save,
which may be either dedicated or general.
18. Pedal couplers: these buttons activate the couplings of the manuals with the pedal board, as
follows:
o [SW/P] (18a): coupling of the Swell with the pedal board.
o [G/P] (18b): coupling of the Great with the pedal board.
o [C/P] (18c): coupling of the Choir with the pedal board.
19. Great couplers: these buttons activate the couplings with Great, as follows:
o [SW/G]: coupling of Swell with the Great.
o [C/G]: coupling of the Choir with the Great.
20. [SW/C] button: this button enables the coupling of the Swell with the Choir.
21. [SWS] button: pressing this button allows you to control the organ’s general volume by means
of the [SWELL] pedal.
22. [A.P.] button: this button enables the AUTOMATIC PEDAL, used to play the stops and the
Orchestra voice of the pedal board using the first 32 notes of Great. In this case the pedalboard
is disactivated and the Pedal voices play monophonically on the lowest note of Great.
23. [C] button: “Cancel” button, which switches off any stops, couplers and Orchestra voices
which may be on.
24. [T] button: “Tutti” button, which enables a preset series of stops, couplers and Orchestra voices.
The voice composition of the Tutti function is programmable. To save a new setup, switch on
the stops, couplers and Orchestra voices (in the version with Orchestra voices) of your choice,
press [S], keep it pressed and then press the [T] button or the [TUTTI] foot piston.
25. Display functions floppy disk drive: use only 720 Kb or 1.44 Mb 3.5" floppy disks.

10
Viscount Concerto III - Operating Manual
2.4 PEDAL BOARD CONTROLS
26 27 28 29 30 31 32
26. General memories: these pistons can be used to to select one of six general memories.
27. [CHOIR] pedal: pedal used to control the volume of the Choir.
28. [SWELL] pedal: you can use this pedal to control the volume of the Swell.
29. [CRESCENDO] pedal: you can use this pedal to select the Crescendo steps which activate a
preset series of stops. The step currently selected is displayed by the [CRESCENDO] LED bar
on the central panel.
Each Crescendo step is programmable. To do this, use the [CRESCENDO] pedal to select the
step you require, switch on the stops, couplers and Orchestra voices (in the version with Orche-
stra voices) of your choice, press [S], keep it pressed and then press the general memories [HR]
button.
30. [MIDI SUSTAIN] piston: Sustain piston for the Orchestra voices. It also transmits Control
Change ”CC64” on Midi Out (in the Concerto III without Orchestra section transmits only the
Control Change “CC64”).
31. Coupler pistons: these pistons replicate the functions of the [COUPLERS] stops on the central
panel. For a detailed description of each individual coupling, refer to point 14 of section 2.2.
32. [TUTTI] piston: piston used to activate the Tutti. For a more detailed description, refer to
point 24 of section 2.3.

11
Viscount Concerto III - Operating Manual
2.5 THE CONNECTIONS UNDERNEATH THE MANUALS
34 35 36 37
34. [HEADPHONES] connector: Jack socket to which a headphone set can be connected. With
headphones connected, the organ’s internal amplification is cut off.
N.B.:
To obtain the best results from the [HEADPHONES] output, phones with impedance of at
least 16Ω should be used.
35. [MIDI] connectors: five-pin DIN connectors for connection of instruments with MIDI interface.
The [IN] connector allows receipt of MIDI messages generated by remote MIDI sources, the
[OUT] connector transmits the MIDI messages generated by the Concerto III, and the [THRU]
connector transmits exactly the data received at the [IN] connector.
36. [INPUT] connectors: RCA input connectors which allow other instruments to be played using
the organ’s internal amplification. If the source is monophonic use the L(MONO) connector
only.
37. [OUTPUT] connectors: RCA connectors for output of the unamplified signal, for connection
of optional amplified speakers, remote amplification systems or recording systems. To use a
monophonic signal, connect to the [L/(MONO)] connector only.

12
Viscount Concerto III - Operating Manual
2.6 THE CONNECTIONS ON THE REAR PANEL
38 39
38. [EXT. +12V DC] connector: this socket can be used to obtain the +12 VDC voltage for remote
switch-on of the amplifiers connected to the [MAIN OUTPUTS] connectors using the [EXT.SPK]
switch on the right-hand side panel (see point 4 of section 2.1).
39. [MAIN OUTPUTS] connectors: Jack sockets for connecting optional remote speakers.
The signal distribution is as follows:
o [OUT 1 (GENERAL)]: if just these jacks are connected, these outputs will carry the church
organ voices of the entire organ, and the Orchestra voices.
o [OUT 2 (+ORCHESTRA)]: if these jacks are also connected, these outputs will carry the
Orchestra voices, while the church organ voices will be subdivided on the basis of the
AMPLIFICATION SYSTEM function, which can be set on the display.
o [ORCHESTRA]: if these jacks are also connected, these connectors will carry the
Orchestra voices, while the [OUT 1] and [OUT 2] will carry the church organ voices on the
basis of the AMPLIFICATION SYSTEM function.
In the Concerto III version without Orchestra voices, the outputs dedicated to these voices are
absent, so the setup will be:
o [OUT 1 (GENERAL)]: if these jacks are connected, these outputs will carry the voices of
the entire organ.
o [OUT 2]: if these jacks are also connected, the sections will be shared between the [OUT 1]
and [OUT 2] outputs basis of the AMPLIFICATION SYSTEM function settings.
N.B.
- The [MAIN OUTPUTS] outputs are unaffected by the general volume control function
implemented using the [GENERAL] slider on the central panel.
- For further information about the AMPLIFICATION SYSTEM function, refer to point 6.4.
13
Viscount Concerto III - Operating Manual
EXAMPLES OF USE OF THE [MAIN OUTPUTS] OUTPUTS
- Connection of all the [MAIN OUTPUTS] outputs
- Connection of outputs [OUT 1] and [OUT 2]
- Connection of output [OUT 1] only

14
Viscount Concerto III - Operating Manual
3. CENTRAL CONTROL UNIT
The central unit which controls all the Concerto III’s internal functions is located above the Swell,
behind the retracting panel.
1
2 4
3
1. Display: display of 40 characters on two lines for display of all the video pages relating to the
organ’s functions.
2. Menu selection buttons: these buttons allow you to select the four main display function
menus, as follows:
o [VOICES]: voice loading, sorting and volume control and labelling of the stops (chap.
4).
o [DISK]: functions relating to the floppy disks and the files they contain (chap. 5).
o [MIDI & UTILITY]: settings of the MIDI, manuals, Piston Combine and display
contrast (chap. 6).
o [SET-UP]: setting of the equalizer, Tremolants and Reverb (chap. 7).
3. Sequencer: this section contains the buttons of the multi-track sequencer of your Viscount
Concerto III (chap. 8).
o [RECORD]: button for starting a recording session (point 8.1).
o [PLAY]: this button allows playback of the MIDI sequences recorded (point 8.2).
o [METRONOME]: press quickly to activate the audio metronome; press for a few
moments to recall the metronome setting video page (point. 8.3).
o [TIME-SIGN]: press during recording to set the current Time Signature. Press during
playback to display the Time Signature of the MIDI sequence loaded (point. 8.4).
o [QUANTIZE]: recalls the quantizing function (point. 8.5).
o [EDIT]: display the menu of the functions for modifying the MIDI sequence loaded
(point. 8.6).
o [START-STOP]: starts / stop recording or playback of the MIDI sequence.

15
Viscount Concerto III - Operating Manual
4. Display function control buttons: these buttons allow you to move the cursor, set values,
select video pages and confirm or reject prompts from the system.
o [VALUE]: rotary encoder for setting parameters.
o [CURSOR (PG) UP]: button for moving the cursor (indicated by the flashing field) up
or for selecting the previous video page.
o [CURSOR LEFT]: button for moving the cursor to the left.
o [CURSOR (PG) DOWN]: button for moving the cursor down or for selecting the next
video page.
o [CURSOR RIGHT]: you can use this button to move the cursor to the right.
o [ENTER / YES]: button for displaying the content of functions or confirming any
problems which appear on the display.
o [EXIT/NO]: button for exiting the current video page or rejecting any system prompts.
When the instrument is switched on, the display shows the presentation video page:
This will indicate the software release installed in the organ. The first number to the left indicates
the “Loader” software release, the second the “System”software and the third the “Sound Driver”
software. After a few moments, the main video page will be displayed.
containing the following parameters:
o MEMORY BANK: this option can be used to select one of the eight memory banks for saving
the general and/or dedicated memories. As well as providing a total of 24 memories, this function
is especially important if the instrument is used by more than one organist, since each of them
will be able to save his or her own settings in a different Memory Bank.
o TEMPERAMENT: this parameter allows the selection of a series of historic temperaments of
different eras and national origins. The organist has a choice of a perfectly-tuned normal
temperament (EQUAL), two normal temperaments with tiny tuning errors which simulate the
imperfections which occur in the organ’s pipes due to wear over time and temperature
(ENSEMBLE 1 and ENSEMBLE 2), or the classical KIRNBERGER, WERCKMEISTER,
PYTHAGOREAN, MEANTONE, VALLOTTI temperaments.
o TUNING: allows adjustment of the fine tuning of the instrument within a range of +/- 1 semitone.
o TRANSPOSER: sets the instrument’s tuning within a range of +5 / -6 semitones (adjustments
in steps of one semitone).

16
Viscount Concerto III - Operating Manual
INFORMATION ABOUT THE DISPLAY PAGES
During display of video pages, two arrows may appear on the right of the display, informing
the user that further display pages are available. A downward-pointing arrow indicates that
there is another following page, accessible using the [CURSOR (PG) DOWN] button.
Conversely, a previous page is indicated by an upward-pointing arrow; to display it press the
[CURSOR (PG) UP] button.
A BRIEF NOTE ON TEMPERAMENTS
In the “natural” tuning system, based on the acoustic phenomenon of harmonic voices, two important musical intervals,
the major third and the perfect fifth, cannot be made to coexist in the “pure” state (i.e. beat-free). Therefore, over the
centuries a variety of compromise solutions known as TEMPERAMENTS have been invented and realised.
These give the priority to one interval or the other, and modify them in various ways..
In ancient times and in the Middle Ages, until the end of the 15th Century, the “Pythagorean” tuning system, in which
the fifths were kept perfectly pure, was used. The resulting major third interval was particularly unpleasant and was
therefore considered a dissonance. However, the music of the time was mainly monodic and the first vocal and
instrumental polyphonic forms made wide use of the interval of a fifth. With the early Renaissance and the start of the
great age of vocal polyphony, the interval of a major third gradually came to be heard as a consonance. The instruments
with fixed tuning, such as the organ and harpsichord, were adapted to this situation by using a system of temperament
known as meantone, which gave priority to the major third over the fifth. This temperament is particularly important
since it was in normal use in Europe in the 16th and 17th Centuries, until the beginning of the 18th. Here are the six
temperaments offered by the Concerto III, first of all the MEANTONE.
MEANTONE
- 8 pure major thirds: E flat – G / B flat – D / F – A / C – E / G – B / D – F # / A – C# / E – G.
- 4 unusable major thirds (diminished fourths): B – D# / F# - A# / C# - E# / A flat - C.
- 1 fifth known as the “wolf” (very dissonant extended fifth): G# - E flat.
- Highly irregular chromatic scale (meaning that chromatic compositions are given a very distinctive voice)
- Keys usable with this temperament: C maj. / D maj. / G maj. / A maj. / B flat maj. and the relative minors.
The temperaments which follow allow all the major and minor keys to be used, although those with the most alterations
have a highly distinctive voice, in contrast with the modern equal temperament.
WERCKMEISTER
This temperament, invented by the organist and musical theorist Andreas Werckmeister, is recommended for performing
the German musical repertoire of the late 1600s.
KIRNBERGER
This temperament, developed by Johann Philipp Kirnberger, pupil of J.S. Bach, is also suitable for playing the German
baroque composers and the works of Bach.
VALLOTTI
This Italian temperament by Francescantonio Vallotti was later reworked in England by Thomas Young. It can be used
effectively for the Italian 18th Century repertoire, and also for the English repertoire of the same period.
PYTHAGOREAN
This temperament, in which the fifths were preserved perfectly pure, dates from the Middle Ages up to the 15th century,
and can therefore be used for compositions of that period.

17
Viscount Concerto III - Operating Manual
4. FUNCTIONS FOR CONTROLLING THE ORGAN’S VOICES
One major innovation of the Concerto III organ is that it allows the user to load church organ voices
to replace those initially loaded by our workshops by just recalling a display function and using the
relevant floppy disks.
This means you will be able to set your organ’s entire voice setup exactly as you wish and at any
time, with considerable advantages for the customisation of the instrument, and for its use by more
than one organist (each of them will be able to have their own set of voices).
All the functions for controlling the organ’s voices can be recalled by pressing the [VOICES]
button underneath the display. This will call up the video page:
These functions are:
o LOAD VOICE FROM DISK: function for loading voices from disk.
o SORT MANUAL: sorts the voices.
o VOICES VOLUME: regulates the volume of each individual voice.
o LABEL CHECK: allows checking of the labels of the stops after new voices have been loaded
and/or after a voice sort.
To recall the function, place the cursor on the field required using the [CURSOR] keys and press
[ENTER/YES]. Otherwise, press the [VOICES] or [EXIT/NO] buttons to return to the main video
page.
4.1 LOADING VOICES FROM DISK
To load voices, insert the relevant floppy disk in the drive, select the LOAD VOICE FROM DISK
option in the VOICES menu and press [ENTER/YES]. The system will then verify the contents of
the disk:
and if it contains files for the installation of new voices, these will be shown on the display.

18
Viscount Concerto III - Operating Manual
This function contains two different loading systems, it is therefore possibile to install:
- all the voices of a manual or the pedal board.
- an individual voice.
LOADING OF VOICES OF A COMPLETE MANUAL OR OF THE COMPLETE
PEDALBOARD
To load a set of voices for the entire organ, or for a manual or the pedal board, select the LOAD
VOICE FROM DISK function from the VOICES menu, and once the contents of the disk have
appeared on the display, select one of the following .GRP files:
- Usa_Swl.grp: this file allows you to load all the voices of the Swell.
- Usa_Grt.grp: file for loading all the voices of the Great.
- Usa_Chr.grp: file for loading all the voices of the Choir.
- Usa_Ped.grp: file for loading all the voices of the Pedal.
After having selected the choosen .GRP file, the systems will first cancel all memorized datas
concerning the section where you would like to install the new voice or voices.
And then the name of the voice with the percentage of the datas loaded in the memory:
In the upper line of the display you will see the number of the voices loaded indicated by the
symbol #. The lines “-“ will indicate which voices still have to be loaded.
These two video pages will be displayed for all the voices installed.
After having loaded the first voice, the display will first show the name of the .KEY file
N.B.:
For more information about the files used in this stage, refer to the “Information about Voice
Files” at the end of this section.

19
Viscount Concerto III - Operating Manual
Once the procedure is complete, the display will show:
instructing you to check the labels on the stops against the new voices loaded.
Press [EXIT/NO] and perform the LABEL CHECK function described in point 4.4.
LOADING AN INDIVIDUAL VOICE
To load just one voice, select the LOAD VOICE FROM DISK option in the VOICES menu.
As we have already seen, the display will show all the voices files on the floppy disk.
Now select the voice you wish to load in the internal memory of the organ ( files: KEY, PED or
DET), The display will show:
The instrument uses this video page to ask where you wish to place the new voice.
Use the encoder to set the stop you have chosen; you will see that it lights up on the panel.
To simplify the procedure, the display shows the new voice (New parameter) and the voice to be
replaced (Old parameter).
Now press [ENTER/YES] to start the function: the system will request confirmation, showing the
new voice and the voice to be replaced (and therefore deleted).
Press [ENTER/YES] again to proceed with the installation or [EXIT/NO] to abort.
During loading, the following video page will be displayed:

20
Viscount Concerto III - Operating Manual
INFORMATION ABOUT VOICE FILES
The Concerto III is capable of loading new
voices in its own internal memory by means
of five types of file:
1) .GRP: indicates which voice .KEY, .PED
or .det files are to be read. This type of file
can be used to load all the voices of the
organ or each individual manual / pedal
board.
2) .KEY: indicates which manual voice .DAT
file is to be loaded.
3) .PED: indicates which pedal board voice
.DAT file is to be loaded.
4) .DET: indicates which detuned (or “beating”) voice .DAT file is to be loaded.
5) .DAT: contains the sound sample data.
Bearing this in mind, it is important to remember that:
o In view of the close relationship between the various types of file (the .GRP file recalls the
.KEY / .PED / .DET which calls the .DAT), do not rename the files, regardless of its extension.
o Do not modify the contents of the .GRP, .KEY, .PED and .DET files.
o Do not delete the files supplied together from the .GRP file from the floppy disks. If any of
these files is missing, during loading of the voices an error will appear on the display, so the
system will not be able to save the voice(s) in the memory.
o Please note that when you load a new voice in the organ, the original voice will be cancelled.
Please ensure that you have the disks delivered with the instrument with all the voices (files
.KEY, .PED, .DET and .DAT) and the .GRP files.
o The detuned voices (.DET files) have fixed positions (in the last 8' stop of the family to which
they belong), so they cannot be freely placed. In addition, voices with different footages (32’,
16’, 8’, etc.) cannot be loaded in the stops which contain these voices.
o The name of the .KEY / .PED / .DET file is not always exactly the same as the name of the
voice. However, the following video page will always indicate the name of the voice being
loaded:

21
Viscount Concerto III - Operating Manual
As the display states, once the operation is complete (i.e. when the display returns to the VOICES
menu) it will be necessary to verify the correspondence between the panel stop label and the voice
loaded using the LABEL CHECK function.
4.3 REGULATING THE VOICE VOLUMES
You can further customise your Concerto III’s sound setup by regulating the volumes of each
individual voice in a range from -12 dB to +6 dB.
To recall this function, select the VOICES VOLUME option and press the [ENTER/YES] button;
the display will show:
4.2 VOICE SORT
Once individual voices have been loaded in the manuals and/or the pedal board, it may be necessary
to rearrange them. Normally, the voices in an organ’s various sections are arranged from the lower
to the higher footages (32’, 16’, 8’, 4’, 2’, 1’). Within each group of the same footage, the families
are then arranged as follows:
- Principals
- Open Flutes
- Bourdons (or Closed Flutes)
- Violas (or Mordents)
- Detuned: these voices are placed in the group of 8' voices in last position in the relative family
- Trumpets
- Mixtures
The Reeds are placed after the last footage of the families listed above.
The SORT MANUAL function the VOICES menu allows all the organ’s voices to be sorted on the
basis of the criteria set out above.
To recall this function, select the SORT MANUAL option and press the [ENTER/YES] button.
The system will proceed to sort the voices, displaying the following video page for the time needed
to complete the operation:
Now use the buttons to move the cursor and [ENTER/YES] to confirm in order to select the manual
or pedal board containing the voice(s) the volume of which you wish to regulate.
After confirmation is provided with [ENTER/YES], the display will show the first four stops and
the current volume values.

22
Viscount Concerto III - Operating Manual
Locate the cursor on the voice of choice and use the encoder to modify the value (expressed in dB).
The modification will be audible in real time, making it easier for the user to obtain the setting
required.
Use buttons [CURSOR (PG) DOWN] and [CURSOR (PG) UP] in order to display the remaining
voices.
Once you have made all the changes you require, press [EXIT/NO] to return to display of the
VOICES menu.
4.4 CHECKING THE STOP LABELS
After having loaded the new voices in the internal memory of the organ, it could happen that the
name plates of the tabs do not correspond to the voices. Therefore please verify this and in case it
does not correspond, please change the name plates.
The LABEL CHECK function is available for this purpose. To recall this function, select the LABEL
CHECK option in the VOICES menu and press [ENTER/YES]:
The STOP field indicates the stop being checked (which will be constantly illuminated on the
panel), while the right of the display show the manual to which it belongs and the voice it now
controls.
Turning the Encoder you will read the names of the voices.
In case the display shows the message:
it will mean that the voice has been changed and that it is necessary to replace the name plate.
Once you have checked the labels of all the stops, press [EXIT/NO] to return to display of the
VOICES menu.

23
Viscount Concerto III - Operating Manual
CHANGING LABELS
As we have seen, once you have loaded a set of voices it may be necessary to change the labels of
the stops, since most of the voices will have changed and the name of the stop will no longer
correspond to the voice loaded in the memory.
However, it is very easy to change the labels because they are just pressed into the stop.
Remove the label with your fingers or using a small screwdriver (as shown below) and fit the
correct one (supplied with the set of disks for loading the voices).
4.5 ERROR MESSAGES - VOICES MENU
- NO FILES
This error is displayed if you recall the LOAD VOICE FROM DISK function and the floppy disk
inserted does not contain voice files.
- SELECTED VOICE IS WRONG
This error may appear during loading of the voices if one or more files are damaged and/or not
valid for completion of loading of the voice.
- FILE.DAT NOT FOUND

24
Viscount Concerto III - Operating Manual
The floppy disk does not contain file .DAT, shown in the display and necessary for the voice
load.
- FILE.KEY NOT FOUND
The system is not able to load the selected voice. Contact your nearest service centre, quoting the
Error Code shown on the display.
The floppy disk does not contain file .KEY, shown in the display and necessary for the voice load.
- LOAD ERROR
- UNABLE TO LOAD VOICE
It has happened a reading error whilst loading the voice.
Pressing [EXIT/NO] the system will try to re-read the datas. In case three trials are failing, the
display will show:
this will mean that the system is not able to load the necessary datas in order to complete the
operation. Press [EXIT/NO] and re-execute the procedure with a floppy disk error free.

25
Viscount Concerto III - Operating Manual
5. FLOPPY DISK FUNCTIONS
To access the functions for management of the floppy disks and the files saved on them, press the
[DISK] button after inserting a floppy disk in the drive. The system will proceed to read the disk
and display:
then:
As the video page shows, the top line contains the functions relating to the floppy disks:
o LIST: displays the contents of the floppy disk currently inserted in the drive.
o COPY: copy of whole floppy disks.
o FORMAT: floppy disk formatting.
o INFO: general information about the disk inserted in the drive.
The bottom line contains the file management functions:
o SAVE: saving on disk of all the memories (general and dedicated, Tutti and Crescendo) and of
the instrument’s settings (main video page parameters and functions of the MIDI&UTILITY
and SET-UP menus).
o LOAD: loading of the memories and/or of the organ settings saved using the SAVE function.
o COPY: copy of one or more files from one disk to another.
o REN: file rename.
o DEL: file deletion.
o INFO: information about the files saved on the floppy disk inserted in the drive.
To recall a function, simply place the cursor on the field required and press [ENTER/YES]. To exit
the menu, press [DISK] or [EXIT/NO].

26
Viscount Concerto III - Operating Manual
IMPORTANT NOTES
- The DISK menu can only be recalled with a floppy disk inserted in the drive.
- If the DISK menu is recalled with an unformatted floppy disk inserted, the system will
automatically start the formatting function described in point 5.3.
- To avoid saving errors and/or damage to floppy disks, never extract the disk when the
drive LED is on.
5.1 DISPLAYING THE CONTENTS OF FLOPPY DISKS
To check all the contents of the disk currently inserted in the drive, simply select the LIST field in
the DISK menu and press [ENTER/YES]. The display will show all the files saved on the floppy
disk:
If there are more than six files, use the [CURSOR (PG) UP] and [CURSOR (PG) DOWN] buttons
to display the other video pages.
Finally, press [EXIT/NO] to exit the current function and return to the DISK menu.
5.2 COPYING WHOLE FLOPPY DISKS
To copy the contents of a whole floppy disk onto another one, insert the disk to be copied in the
drive and recall the DISK menu. Since the system makes a physical copy (i.e. the whole of the
floppy disk is copied, regardless of the amount of data it contains), the two disks must have the
same capacity.
Now select the COPY option and press [ENTER/YES], the system will proceed to read the data,
showing on the display.
After which you will be prompted to extract the source disk:
Now extract the floppy disk and wait for the prompt for the destination disk (i.e. the disk onto
which you wish to copy the data).

27
Viscount Concerto III - Operating Manual
Here again, do not insert the disk until the display shows the relative prompt.
The system will now read the source disk again, and carry out another writing procedure, showing
the video pages described above. To show the percentage of the copy completed, a progress bar
appears on the bottom line of the display during the reading and writing operations.
During copying, the procedure can be aborted by pressing the [ESC[ button. In this case, wait until
the DISK menu is displayed, to allow any open files to be closed.
When the copy is complete the display will return to the DISK menu.
ATTENTION!
When using the Disk Copy function, you will re-write the original files on the disk.
now insert the floppy disk to proceed with writing of the data.
Since a physical copy is made, it will not be possible to copy a whole floppy disk in a single pass,
so the system will prompt you to extract the destination disk:
and to re-insert the source disk.

28
Viscount Concerto III - Operating Manual
ATTENTION!
Bear in mind that when a floppy disk is formatted, all the data memorised will be lost.
To proceed with formatting, select the FORMAT option in the DISK menu, and press [ENTER/
YES]. The display will show the video page for entering the label of the disk:
To type the label, use the [CURSOR LEFT] and [CURSOR RIGHT] buttons to move the cursor
(shown by the flashing letter) and the encoder to enter the characters.
As the video page prompts you, then press [ENTER/YES] to start formatting or [EXIT/NO] to
abort the function and return to the DISK menu.
During formatting, the display will show:
by means of which the system informs you of the percentage of formatting completed.
5.4 DISPLAYING FLOPPY DISK GENERAL PARAMETERS
The DISK INFO function allows you to show the main characteristics of the floppy disk inserted in
the drive.
To activate this function, select the INFO option and press [ENTER/YES]; the display will show:
5.3 FORMATTING FLOPPY DISKS
If unformatted floppy disks are used, they must be formatted before they can be used with the
Concerto III. The system formats the disks in MS-DOS® format, so that they can also be used with
personal computers and/or sequencers.
containing the following parameters:
o DISK LABEL: shows the label of the floppy disk.
o DISK SIZE: provides information about the disk’s capacity.

29
Viscount Concerto III - Operating Manual
o FREE SPACE: indicates the amount of empty space on the disk.
o FILE ON DISK: states the number of files currently stored on the floppy disk.
Press the [EXIT/NO] button to return to display of the DISK menu.
5.5 SAVING THE ORGAN’S MEMORIES AND SETTINGS ON DISK
The FILE SAVE function allows you to save all the organ’s general memories and/or settings
(including those in the MIDI&UTILITY and SET-UP menus) on floppy disks.
To recall this function, place the cursor on the SAVE field in the DISK menu and press [ENTER/
YES].
The display will show:
Through this display it is possibile to inform the system about the type of file you wish to save, i.e:
o ALL: All the general and dedicated memories (of the 8 banks, including the Tutti and Crescen-
do), the main video page settings (Temperament, Tuning and Transposer) and the settings of
the MIDI&UTILITY and SET-UP menus will be saved in an ALL file.
o MEMORY: this function will save a .MEM file containing all the memories (general and
dedicated) of the 8 banks, the Tutti and the Crescendo.
o SETUP: this saving operation creates a .SET file containing the main video page settings and
those of the MIDI&UTILITY and SET-UP menus.
Now use the cursor keys and the [ENTER/YES] button to select the type of saving operation you
require. The display will show the video page for composition of the name of the file to be saved:
With the usual procedure, use the [CURSOR] keys to move the cursor and the encoder to select the
letter you require. Press [ENTER/YES] again to go ahead with the saving operation.
After the saving procedure is started, the following video page will appear for a few moments:

30
Viscount Concerto III - Operating Manual
Use buttons [CURSOR (PG) DOWN] and [CURSOR (PG) UP] in order to display the remaining
voices. Now use the [CURSOR] keys to locate the cursor on the file you wish to load and press
[ENTER/YES]; the display will show a confirmation prompt to avoid loading the wrong file:
As the video page requests, press [ENTER/YES] again to load the data in the memory, or press
[EXIT/NO] to return to display of the DISK menu.
If you confirm, the system will proceed to load the selected file in the internal memory, displaying
the following video page for all the time needed to complete the operation:
IMPORTANT NOTE
Bear in mind that when a file is loaded, the settings and memories currently present in the
organ will be lost. To avoid this, it is best first to carry out a File Save of the memories and
settings, and then to load the file required.
the system is warning you that the floppy disk already contains a file with the name (and, of course,
the extension) you have just typed. Press [ENTER/YES] to overwrite the original file or [EXIT/
NO] to abort the saving operation.
5.6 LOADING THE ORGAN’S MEMORIES AND SETTINGS SAVED ON
DISK
In order to load in the internal memory of the organ the memories and or the settings saved on a
disk with function File Save, you have to procede with File Load function. Place cursor button on
LOAD and press [ENTER/YES]: the display will show the first 6 files dedicated to the memories
and settings of the organ contained in the floppy disk.
If the following message should appear before the video page shown above:

31
Viscount Concerto III - Operating Manual
5.7 COPYING INDIVIDUAL FILES
If you wish to copy one or more files from one floppy disk to another, recall the FILE COPY
function. This is done by selecting the COPY field on the bottom line of the DISK menu and
pressing [ENTER/YES].
Use this video page to inform the system about the file(s) you wish to copy. The fields refer to the
procedures for copying:
o DIRECTORY: one of the files on the disk.
o *.ALL: all the files with extension ALL (i.e. the files in which the organ’s general settings and
memories are saved).
o *.MEM: all the files with extension MEM (the general and dedicated memories, Tutti and
Crescendo).
o *.SET: all the files with extension SET (the organ’s general settings).
o *.MID: all the files with extension MID (the MIDI sequences recorded with the sequencer).
o *.*: all the files on the floppy disk.
After selecting the copy option you require, press [ENTER/YES] and the system will proceed to
read the first file with the selected extension on the source disk:
If you have recalled the DIRECTORY copy function, after [ENTER/YES] is pressed the display
will show all the files on the disk:
Use the [CURSOR] keys to select the file you wish to copy and press [ENTER/YES]. If there are
more than 6 files, press the [CURSOR (PG) DOWN] and [CURSOR (PG) UP] buttons to display
all the files.

32
Viscount Concerto III - Operating Manual
After the copying procedure is started, the display will show:
When reading of the first file is complete, you will be prompted to extract the source disk:
and insert the destination disk (i.e. the disk onto which you wish to copy the files).
The system will then proceed to write the file:
In case of a multiple copying operation (*.ALL, *.MEM, *.SET, *.MID and *.*), if there are more
files to be copied, you will have to extract the destination disk:
and carry out another reading and writing session, following the video pages shown above.
When all the files have been copied, the system will prompt you to reinsert the source disk, and
then return to display of the DISK menu.
N.B.:
Bear in mind that any files on the destination disk with the same names as those being copied
will automatically be overwritten.

33
Viscount Concerto III - Operating Manual
5.8 RENAMING FILES
The FILE RENAME function allows you to rename the files saved on the floppy disks.
To recall this function, select the REN option and press the [ENTER/YES] button; the display will
show the contents of the floppy disk:
now use the [CURSOR] buttons to select the file you wish to rename and press [ENTER/YES].
As for the other functions, press the [CURSOR (PG) DOWN] and [CURSOR (PG) UP] keys to
display all the files.
The display now shows a video page consisting of two files: ACTUAL NAME indicates the current
name of the selected file.. NEW NAME allows you to type the new name. As usual, use the
[CURSOR] buttons to move the cursor and the encoder to enter the letter you require.
Once you have created the new name, press [ENTER/YES] to complete the operation.
Press [EXIT/NO] to abort the function and leave the name of the file unchanged. If you confirm the
rename, the following video page will appear for a few moments:
which also informs you about the file you have just renamed.
If you save a file with a name already present on the floppy disk, the display will show the message:
indicating that the operation cannot be completed. Rename the file with a different name.

34
Viscount Concerto III - Operating Manual
5.9 DELETING FILES
To delete any files saved on the floppy disks, recall the FILE DELETE function: to do this, select
the DEL option and press [ENTER/YES].
These display options allow you to delete:
o DIRECTORY: one of the files on the disk.
o *.ALL: all the files with extension ALL (i.e. the files in which the organ’s general settings and
memories are saved).
o *.MEM: all the files with extension MEM (the general and dedicated memories, Tutti and
Crescendo).
o *.SET: all the files with extension SET (the organ’s general settings).
o *.MID: all the files with extension MID (the MIDI sequences recorded with the sequencer).
o *.*: all the files on the floppy disk.
If you select a multiple deletion procedure (*.ALL, *.MEM, *.SET, *.MID e *.*) the system will
warn you of the chosen procedure and wait for you to confirm with [ENTER/YES] or abort the
operation by pressing [EXIT/NO]:
If the DIRECTORY option has been selected, the display will show the entire contents of the disk,
to allow you to select the file you wish to delete:
Here again, to avoid accidental deletions the display will show a confirmation prompt indicating
the name of the file about to be deleted:

35
Viscount Concerto III - Operating Manual
Now press [ENTER/YES] to complete the operation [EXIT/NO] to abort the entire function.
During deletion, the following video page will be displayed:
which informs you about the file being deleted.
5.10 FILE INFORMATION
If you require information, such as size and type, about the files on the floppy disks, recall the FILE
INFO function in the DISK menu. To do this, select the INFO option and press [ENTER/YES].
The display will show all the files on the disk:
Now select the file by the usual procedures and press [ENTER/YES]: the display will show:
containing the following fields:
o FILE INFO: indicates the file to which the information displayed relates:
o SIZE: states the size of the file.
o TYPE: displays the type of file selected, as follows:
- ALL: file in which the organ’s general settings and memories are saved.
- MEMORY: file in which all the memories are saved.
- SET-UP: organ general settings.
- VOICE DATA: audio sample file.
- MANUAL VOICE: file of a voice for the Manual.
- PEDAL VOICE: file of a voice for the Pedal.
- DETUNED VOICE: file for a detuned voice.
- VOICES GROUP: file for a group of voices
Press [EXIT/NO] to return to display of the DISK menu.

36
Viscount Concerto III - Operating Manual
5.11 ERROR MESSAGES - DISK MENU
- DISK NOT IN DRIVE
The DISK menu has been recalled with no floppy disk inserted in the drive.
- NO FILES
There is no file on the floppy disk for completion of the current operation.
- DISK NOT FORMATTED
An unformatted disk has been inserted. The disk starts the formatting procedure automatically.
- DISK IS WRITE PROTECTED
The disk has write-protection so it is not possible to complete the current operation. Remove the
protection (the window in the top right-hand corner of the floppy disk must be closed) and repeat
the operation.
- WRONG TARGET SIZE
During a floppy disk copy operation, a destination disk with capacity different from the source disk
has been inserted. Remove the floppy disk and repeat the operation with the right disk.

37
Viscount Concerto III - Operating Manual
- DISK IS FULL
There is not enough empty space on the floppy disk inserted for completion of the file copying or
saving operation. Replace the disk or free some space.
- SAVE ERROR
A serious error has occurred during writing on the floppy disk. The disk might be damaged.
Try formatting the disk to correct the errors.
6. MIDI AND UTILITY FUNCTIONS
The Concerto III features a set of functions allowing the user to customise the organ’s MIDI interface
to his or her own requirements.
This section also contains the classical church organ settings, including Piston Combine and
Keyboard Inversion, and additional functions used to set up the audio output channels and the note
dynamics for each manual.
To access these functions, press the [MIDI&UTILITY] button; the display will show:
containing the following fields:
o LCD CONTRAST: regulates the display contrast.
o G/P PISTON COMBINE: Piston Combine setup.
o MIDI SETTINGS: MIDI settings
o KEYBOARDS SETTINGS: settings concerning the manuals.
To recall a function, place the cursor on the field required and press the [ENTER/YES] button.
Otherwise, press [MIDI&UTILITY] or [EXIT/NO] to return to the main video page.

38
Viscount Concerto III - Operating Manual
6.1 REGULATING THE DISPLAY CONTRAST
The Concerto III’s display has a contrast adjustment function allowing the maximum visibility to
be obtained for the organist’s performing angle.
The setting can be made directly from the MIDI&UILITY menu by locating the cursor on the LCD
CONTRAST field and setting the value using the encoder.
6.2 G/P PISTON COMBINE FUNCTION
The G/P PISTON COMBINE function allows the memories of the second manual to be “coupled”
to those of the pedal board. This means that when a Great memory is recalled, the same memory
will also be automatically activated for the pedal board.
To activate this function, select the G/P PISTON COMBINE field in the MIDI&UTILITY menu;
the system will display the following video page:
Use the encoder to set enable to activate the function or disable to deactivate it. The status of the
Piston Combine function is also indicated by the [G/P PIST. COMB.] LED on the right of the
display (when the LED is on, the function is active).
Press ESC to save the setting and return to the MIDI&UTILITY menu.
6.3 MIDI FUNCTIONS
To access the Concerto III’s MIDI functions, select the MIDI SETTINGS option in the
MIDI&UTILITY menu and press [ENTER/YES]. The first video page displayed enables or disables
the transmission of MIDI note date for each section of the organ:
The video page consists of four fields, representing the organ’s four sections (Pedal, Choir, Great
and Swell). The user can set whether the MIDI note codes are to be transmitted for each section by
selecting ON or OFF.
Press [EXIT/NO] to return to the MIDI&UTILITY menu or [CURSOR (PG) DOWN] to display
the video page for setting the MIDI channels:

39
Viscount Concerto III - Operating Manual
The top line of the video page contains the parameters for regulating each section’s MIDI transmission
channels. The bottom line consists of the four sections for setting the MIDI reception channels.
Use the encoder to make the settings.
The next display, using [CURSOR (PG) DOWN], will unable you to select PG to transmit on MIDI
Out.
PGs can be transmitted on the four MIDI channels associated to the four sections of the organ
(depending on the settings of the channel setting video page described earlier). To send a PG, locate
the cursor on the section to which the channel of choice is associated and turn the encoder.
When each value is selected, the relative PG will be transmitted automatically.
The Program Changes set in this video page will also be saved in the dedicated and general memories.
Therefore, each recall of a memory containing a PG will trigger transmission of the MIDI message.
If transmission of the PG is not necessary, saving of the PG can be cancelled by selecting the value
OFF in the video page shown above.
Press button [CURSOR (PG) DOWN] for the display concerning the adjustment of the MIDI
filters.
The filters for the following messages can be switched on and off:
o Note: Note On and Note Off (MIDI note messages)
o CC: Control Change (control messages)
o PG: Program Change (messages for selecting programs/voices)
o SysEx: system exclusive messages
o R.Time: Real Time messages (Start, Stop, Continue, MIDI Clock and Active Sensing).
The bottom line of the display contains the setting fields, defined by two letters.
The settings are:
- N/N: both filters off.
- Y/N: filter only active on messages received
- N/Y: filter only active on messages transmitted
- Y/Y: filter active on both received and transmitted messages.
After having done the regulations press [EXIT/NO] in order to stop the MIDI functions.

40
Viscount Concerto III - Operating Manual
EXAMPLE OF AN AMPLIFICATION SYSTEM SETUP
This is how the audio channels would be subdivided with the setting shown in the video page
illustrated above.
6.4 MANUAL SETUP
Selecting the KEYBOARD SETTINGS option in the MIDI&UTILITY menu gives access to all
the settings relating to the manuals, including the reversal of Choir and Great, regulation of the
audio output channels and the note dynamic settings.
The first video page displayed relates to the KEYBOARD INVERSION function:
allowing the positions of Choir and Great to be reversed. Select enable to activate the function or
disable to deactivate it. The status of this setting will also be displayed by the [KEYB. INV.] LED
on the right of the display (when the LED is on, the function is active).
Now press [EXIT/NO] to return to the MIDI&UTILITY menu or [CURSOR (PG) DOWN] to
display the AMPLIFICATION SYSTEM function:
on which one of the outputs [OUT1] and [OUT2] on the rear panel can be assigned to each manual
and pedal board. You can use these settings to distribute the organ’s sections over two different
amplification/diffusion systems to best effect.

41
Viscount Concerto III - Operating Manual
Pressing [CURSOR (PG) DOWN] again displays the following video page:
this function allows the dynamic to be used for playing the Orchestra voices (in the version with
Orchestra voices) and to be transmitted by MIDI to be set for each section of the organ.
The first video page relates to the dynamic setting for the pedal board and for Choir: a fixed value
(from 1 to 127) or a touch-sensitive dynamic (sense) can be set.
Press [CURSOR (PG) DOWN] to set the dynamic of the Great and Swell.

42
Viscount Concerto III - Operating Manual
7. ORGAN GENERAL SETTINGS
Pressing the [SET-UP] button on the central panel gives access to the organ’s general settings, such
as setting of the Tremulants, reverb and equalizer.
The video page displayed is as follows:
containing the following selection fields:
o TREMULANT: setting of the Tremulants for each manual.
o REVERBERATION: selection of the type of reverb required.
o EQUALIZER: setting of the organ’s equalizer.
To select the function of choice, place the cursor on the field required using the [CURSOR] buttons
and press [ENTER/YES]. Otherwise, press [EXIT/NO] or [SET-UP] to exit the current menu and
return to the main video page.
7.1 SETTING THE TREMULANTS
The TREMULANT function can be used to set the speed, depth and modulation of the tremulants
for each manual. After the TREMULANT field is selected in the SET-UP menu, the display will
show the video page:
containing the following parameters:
o SPEED: regulates the Tremulant modulation speed.
o DEPTH CHR – GRT – SWL: they set the modulation depth of the Tremulants for Choir,
Great and Swell respectively.
Once you have made all the settings you require, press [EXIT/NO] to return to display of the SET-
UP menu.

43
Viscount Concerto III - Operating Manual
7.2 SELECTING THE TYPE OF REVERB
The Concerto III provides a choice of eight types of reverb, allowing perfect adaptation of the
organ’s sound to the room in which it is being played. As described in chap. 2, the [REVERB]
slider on the central panel allows the level of the reverb to be adjusted.
To set the type of ambient effect required, select the REVERBERATION field in the SET-UP menu
and press [ENTER/YES] the following video page will be displayed:
Use the encoder to select the type of reverb and press [EXIT/NO] to save the selection and return to
display of the SET-UP menu.
N.B.:
The reverb selection only affects the church organ voices.
7.3 SETTING THE EQUALIZER
The Concerto III has its own internal graphic five-band equalizer allowing optimal setting of the
character of the sound generated by the organ. To display the setting video page, select the
EQUALIZER field in the SET-UP menu and press [ENTER/YES]:
As can be seen, the top of the video page contains the central frequencies of the five bands on
which the equalizer operates. The bottom line allows regulation of the attenuation (negative values)
or enhancement (positive values) of the signal in a range of +/- 12 dB.
Here again, after making the settings you require, press the [EXIT/NO] button to save the
modifications and return to display of the SET-UP menu.
N.B.:
The equalizer only affects the church organ voices and not the Orchestra voices.

44
Viscount Concerto III - Operating Manual
8. RECORDING AND PLAYING BACK MUSICAL
PERFORMANCES
The Concerto III has a multitrack sequencer allowing the user to record, save on floppy disk and
play back musical performances. Besides this, the system allows MIDI sequences to be recorded in
multidubbing mode (i.e. in different steps) and the quantizing of MIDI events, and offers three
editing functions for modifying your recordings. The sequencer and the relative modification
functions are simple and user-friendly, ensuring that it is quick and easy to set up the instrument.
Each of the organ’s sections (Choir, Great, Swell and pedal) is recorded on a different track. A fifth
track records the stop status, Tutti, Crescendo, Couplers and manual settings. The names of these
tracks are as follows:
- PED (Pedal): the track used to record the note and volume events performed on the pedal
board.
- CHR (Choir): the track used to record the Choir events.
- GRT (Great): the track used to record the Great events.
- SWL (Swell): track for the Swell events.
- CM (Common): “common” track used for the stops, Orchestra voices (in the version of the
organ with Orchestra voices), couplers, Enclosed, Automatic Pedal and Keyboard Inversion.
It will be possible to record musical sequences up to a maximum of 60,000 MIDI events with a
resolution of 192 tpqn (ticks per quarter note (or crotchet).
The recordings are saved on floppy disks as MIDI (.mid) files in format 1. In this format, the
channels used to record the accompaniments are subdivided by tracks (unlike format 0, which
combines all the channels on a single track), keeping the organ’s sections subdivided for quicker,
easier interpretation. This means that the songs recorded are compatible with even the most run-of-
the-mill computer MIDI software packages (for creating and printing out scores, modifying the
song’s advanced parameters, and so on).
8.1 RECORDING A PERFORMANCE
To start a recording session, simply press the [RECORD] button after inserting a floppy disk in the
drive. The system will proceed to read the disk and display:
after which it will show the video page used to set up the recording:
consisting of the fields described in next page.

45
Viscount Concerto III - Operating Manual
o RECORD: this displays the name of the MIDI sequence being recorded. For each new recording,
the name “NEWSONG” will always appear, while during a multidubbing recording, the song’s
current name will be displayed.
o TEMPO: indicates the current metronome tempo. Locate the cursor on this parameter and use
the encoder if you wish to modify its value.
o MEAS: displays the bar (measure) reached in the recording.
o PED – CHR – GRT – SWL – CM: these five parameters set the status of the Pedal, Choir,
Great, Swell and Common tracks, as follows:
- REC: the events performed on the organ are recorded.
- IN: the events present on the [MIDI IN] port are recorded. Select this mode if you wish to
record music performed on an instrument connected to the Concerto III.
- - - -: the selected track is deactivated. The events performed on the relative section are not
recorded.
Then press [START-STOP] to start the recording. The sequencer will start with the number of
precount bars set earlier (-2 in default condition) and the Led of the [START-STOP] button will
flash in time with the current tempo and the Time Signature set.
To modify the number of precount bars and the time signature, press [TIME SIGN] before starting
to record, and follow the instructions provided in point 8.4.
Otherwise, use [RECORD] or [EXIT/NO] to exit the sequencer function and return to display of
the main video page.
If you wish to over-record an existing song, locate the cursor on the RECORD field and press the
[ENTER/YES] button; all the .MID files on the floppy disk will be displayed:
Use the cursor keys and [ENTER/YES] to select the song of your choice; the display will show:
for the time it takes to load the song, and then:

46
Viscount Concerto III - Operating Manual
The tracks in the MIDI sequence are identified by the PLY code. There is now a choice of the
following modes:
- REC (Record): the track is recorded and re-writes all the original events
- OVD (Overdub): the new events recorded are added to those already in the track.
This mode is not selectable for the track Common..
- PLY (Play): the organ plays the track.
- IN: the track records the MIDI data received on the [MIDI IN] port, deleting all the events
present before the recording is made.
- OUT: the data in the track are transmitted on the [MIDI OUT] port for playback by a remote
MIDI module.
- - - -: the track is not included in the playback / recording.
The diagram below explains the differences between “Record” and “Overdub” recording modes.
The [CURSOR] keys can also be used to locate the cursor on the TEMPO field, to modify the
metronome tempo, and the MEAS. field, to select the bar from which recording is to start.
In this case, the following video page will be displayed:
Use the encoder to set the recording start bar. As the message instructs you, press [ENTER/YES] to
confirm the bar or [EXIT/NO] to abort the entire operation.
After setting all the parameters, press [START-STOP] to start the recording / playback.
The system will start with the number of precount bars set earlier and the Led of the [START-
STOP] button will start to flash in time with the current tempo and the Time Signature set.

47
Viscount Concerto III - Operating Manual
To stop the recording, press [START-STOP] again; the display will show the video page for saving
the sequence just recorded, in which the name of the song can be entered.
With the usual procedure, use the [CURSOR] buttons to move the cursor and the encoder to select
the characters. Then press [ENTER/YES] to save the recording on the floppy disk [EXIT/NO] to
abort the saving operation.
WARNING!
To take sure that existing recordings are not lost, when entering the name of the song take care
not to enter a name already on the disk. In this case, the original file will be overwritten.
8.2 PLAYING BACK A PERFORMANCE
To play back a song recorded using the sequencer, insert the floppy disk in the drive and press.
The system will proceed to read the floppy disk:
after which all the songs (.mid files) saved on the disk will be displayed:
Use the [CURSOR] keys to select the song you wish to play and press [ENTER/YES]. The display
will show the page:
As described in the previous point, the tracks which make up the song are identified by the PLY
code.

48
Viscount Concerto III - Operating Manual
The following playback modes (selected by locating the cursor on the track required and turning
the encoder) are available for each track:
- PLY (Play): the track is played by the organ and the data are transmitted to the [MIDI OUT]
gate according to the MIDI settings ( MIDI To, channels and filters)
- MUT (Mute): the track is not included in the playback.
- OUT: the data contained in this track are transmitted to the gate [MIDI OUT] indipendently
from the MIDI settings
Besides this, it is possible to regulate the playback tempo, by locating the cursor on the TEMPO
field and regulating its value using the encoder, and the bar from which playback is to start.
To regulate the starting bar, locate the cursor on the MEAS field and turn the encoder to display the
following video page:
Use the encoder to set the start bar. Press [ENTER/YES] to confirm the value or [EXIT/NO] to
abort the entire function.
After having setted the parameters you wish, press [ENTER/YES] and then [START-STOP] in
order to start reproduction of the MIDI sequence. The LED of the key will start to flash in time with
the current tempo and Time Signature.
If you wish to stop playback temporarily, press the [PLAY] button; press the same button again to
restart the song.
To stop the playback, press [START-STOP] again; press [EXIT/NO] or [PLAY] to exit sequencer
Play mode.
8.3 SWITCHING ON AND SETTING THE METRONOME
The Concerto III’s sequencer has its own metronome, which can be heard through the instrument’s
internal speakers.
To switch on the metronome, simply press the [METRONOME] button in the group of sequencer
buttons. The LED of the key displays the function’s status: when the LED is lit, the metronome is
on.
The metronome speed will be set according to the TEMPO parameter in the sequencer video pages
(both Record and Play), while the downbeat will depend on the Time Signature setting (see point
8.4).
To set up the metronome’s internal parameters, keep the [METRONOME] button pressed for a few
seconds. The following video page will be displayed:

49
Viscount Concerto III - Operating Manual
containing two parameters:
o LEVEL: regulates the metronome’s audio level.
o REC PRECOUNT: sets the number of Precount bars, meaning the number of bars after which
the sequencer will start to record the MIDI sequences.
After setting the parameters to suit your requirements, press [ENTER/YES] to confirm or [EXIT/
NO] to abort the whole procedure. In both cases the display will return to the previous video page.
8.4 SETTING THE TIME SIGNATURE
To select the time signature with which a song is to be recorded, press the [TIME-SIGN.] button
after recalling the sequencer Record mode; the display will show:
Use the encoder to select the Time Signature you require; the possible values are: 1/4, 2/4, 3/4, 4/4,
5/4, 7/4, 3/8, 6/8, 9/8 and 12/8.
Then press [ENTER/YES] to confirm the new value or [EXIT/NO] to abort it.
If you press the [TIME-SIGN.] button with the sequencer in Play mode, the system will inform you
about the Time Signature of the MIDI sequence currently loaded:
8.5 QUANTIZING THE MIDI EVENTS IN THE SONGS RECORDED
Quantizing is a very useful function since it allows small errors in the rhythm of a recording to be
corrected. Often, some notes may be played slightly before or after the correct moment.
This function allows the notes to be aligned to the closest beat inside the bar, also guaranteeing the
perfect synchronisation of the MIDI events on the various tracks.
One very useful feature of the quantizing function provided on the Concerto III’s sequencer is that
the user can set both the value of the beat within in the bar on which the notes will be positioned
and a given number of bars, so that it is not necessary to quantize the entire MIDI sequence.
To recall the function, after loading the song required with the sequencer, simply press the
[QUANTIZE] button and the display will show the setup video page.

50
Viscount Concerto III - Operating Manual
containing the following programming parameters:
o QUANTIZE: sets the value of the nearest beat on which all the notes in a given bar will be
placed.
o FROM M: sets the number of the initial bar (measure) from which the quantizing of the MIDI
events will start.
o TO M: sets the last bar number to be affected by the quantizing operation.
The name of the song currently being modified also appears on the left of the bottom line.
Now press [ENTER/YES] and a confirmation prompt will appear.
Press [ENTER/YES] again to confirm or [EXIT/NO] to abort.
If you confirm, the system will proceed with the quantizing operation, displaying the following
video page for all the time needed to complete the operation:
After which you will be prompted to assign a name to the new song.
Use the [CURSOR] keys to move the cursor and the encoder to select the letters. Then press [ENTER/
YES] to save the song definitively.

51
Viscount Concerto III - Operating Manual
8.6 MIDI SEQUENCE MODIFICATION FUNCTIONS
As described in the introductory notes to this section, the Concerto III’s sequencer allows you to
modify the main parameters of a recorded song using three Edit functions:
- TRANSPOSE: transposes the song by semitones.
- TEMPO: modifies the tempo of the song.
- CLEAR: deletes specific groups of bars from the tracks.
To access these functions, after loading a MIDI sequence with the sequencer (in Play or Record
mode), simply press the [EDIT] button and the display will show the menu:
which contains the three functions listed above. Use the [CURSOR] buttons to move the cursor and
[ENTER/YES] to recall the function you require.
TRANSPOSING THE KEY
To transpose the key of the loaded song, select the TRANSPOSE field from EDIT menu; the display
will show the video page:
Use the encoder to set the transposition value, bearing in mind that it is set in semitones.
After selecting the value you require, press [ENTER/YES] to proceed with modification and saving
of the song, or [EXIT/NO] to abort the whole procedure and return to display of the EDIT menu.
If the modification is started, the display will show a confirmation prompt:
Here again, press [ENTER/YES] to continue or [EXIT/NO] to abort the changes.
The system will then proceed to transpose the song:

52
Viscount Concerto III - Operating Manual
after which it will ask you to enter the name of the new song:
Use the [CURSOR] buttons to move the cursor and the encoder to select the characters required.
Press [ENTER/YES] again to go ahead with the final saving of the song, during which the display
will show:
MODIFYING THE TEMPO
To modify the tempo of the currently loaded song, select the TEMPO field in the EDIT menu and
press [ENTER/YES]; the following video page will be displayed:
Use the encoder to enter the new value, then press [ENTER/YES] again to go ahead with saving the
song. The display will show a confirmation prompt:
Here again, press [ENTER/YES] to continue or [EXIT/NO] to abort the change and return to display
of the EDIT menu.
If you confirm the change, the display will show:
for the time it takes to make the changes, and then:

53
Viscount Concerto III - Operating Manual
This video page allows you to enter the name of the modified song.
To do this, use the [CURSOR] buttons to move the cursor and the encoder to select the letter you
require.
Then press [ENTER/YES] to save the new song definitively.
DELETING GROUPS OF BARS
If you wish to delete given groups of bars from one or more tracks, recall the Clear function.
To do this, select the CLEAR field from the EDIT menu; the display will show:
consisting of the following parameters:
o TRACK: specifies the track on which you wish to delete the MIDI events in the interval of
bars set. Selecting “ALL” deletes all the data in all the tracks.
o FROM M: sets the number of the initial bar (measure) from which the deletion of the MIDI
events will start.
o TO M: sets the last bar number to be affected by the clear operation.
o MODE: selects the cancellation mode, as follows:
- DELETE: with this mode, all the MIDI events present after the deleted group of bars will
not be moved.
- ERASE: with this mode, all the MIDI events present after the deleted group of bars will be
repositioned from the bar specified with the FROM M parameter.
After setting the parameters you require, press [ENTER/YES] to proceed with the cancellation or
[EXIT/NO] to abort the whole procedure and return to display of the EDIT menu.
As for the other Edit functions, if you go ahead with the modification, the display will show a
confirmation prompt:
Pressing again [ENTER/YES] the system will procede with the change and the save on the disk
showing on the display:

54
Viscount Concerto III - Operating Manual
IMPORTANT NOTES ABOUT THE EDIT FUNCTIONS
- To avoid loss of synchronisation between the various tracks, an Erase cancellation can
only be carried out on the entire song. In this case, the Track field will be fixed at the ALL
value and it will not be possible to select individual tracks.
- Do not extract the floppy disk from the drive when reading operations are in progress
(when the LED on the drive is on); this may damage the magnetic medium.
- If a song is saved with a file name already present on the floppy during saving of
modifications, the following message will appear:
in which the system asks you if you wish to overwrite the original file (by pressing [ENTER/
YES]) or to abort the save operation (by pressing [EXIT/NO]).
8.7 ERROR MESSAGES - SEQUENCER SECTION
- DISK NOT IN DRIVE
The sequencer (Play or Record) has been recalled with no floppy disk inserted in the drive. Insert
the disk and repeat the operation.
- DISK NOT FORMATTED
The sequencer (Play or Record) has been recalled with an unformatted floppy disk. Format the disk
and repeat the procedure. If the display still shows the error after formatting, the disk might be
damaged.

55
Viscount Concerto III - Operating Manual
The Sequencer has been recalled in Play mode with no .mid files on the floppy disk.
- DISK IS WRITE PROTECTED
You have attempted to save a song on a write-protected floppy disk. Remove the protection and
repeat the procedure.
- SAVE ERROR
A serious error has occurred during writing on the floppy disk. The disk might be damaged.
Try formatting the disk to correct the errors
- DISK FULL
There is not enough room on the disk where you have attempted to save a song to complete the
operation. Free space on the disk or use another one.
- NO FILES

56
Viscount Concerto III - Operating Manual
9. THE REMOTE CONTROL
The Concerto III has an infrared remote control unit carrying
the main sequencer controls. The button functions are:
o [SONG]: you can use these two buttons to select the
MIDI sequences on the floppy disk.
o [VOLUME]: regulates the organ’s general volume.
o [TEMPO]: regulates the sequencer tempo.
o [PAUSE]: stops the MIDI sequence temporarily during
playback.
o [START-STOP]: press cyclically to start / stop recording
/ playback of the MIDI sequence.
WARNING!
The infrared sensor for receiving remote control commands is located underneath the
Crescendo LEDs. Take care not to block this area and try always to use the remote control at
an angle of not more than 30° (vertical or horizontal) to the organ’s panel.
10. VOICE LOCAL OFF
Setting a voice in Local Off mode means that it will not be played by the Concerto III’s internal
sound generation system, but when it is activated the relative MIDI (System Exclusive) message
will be transmitted, so that it can be turned on and played on a connected instrument.
For setting the Local off of the voices you have to press button [S] (Set) and keeping it pressed
press also [C] (cancel), All tabs will light and thedisplay will show:
To set a voice in Local Off mode, press its stop so that its light goes out.
After setting the setup required, press [S] and [C] together to save it.
Accessing the Local Off setting function after this will trigger display of the status of the voices as
follows:
- stop on: voice in Local On mode (plays with internal generation)
- stop off: voice in Local Off status
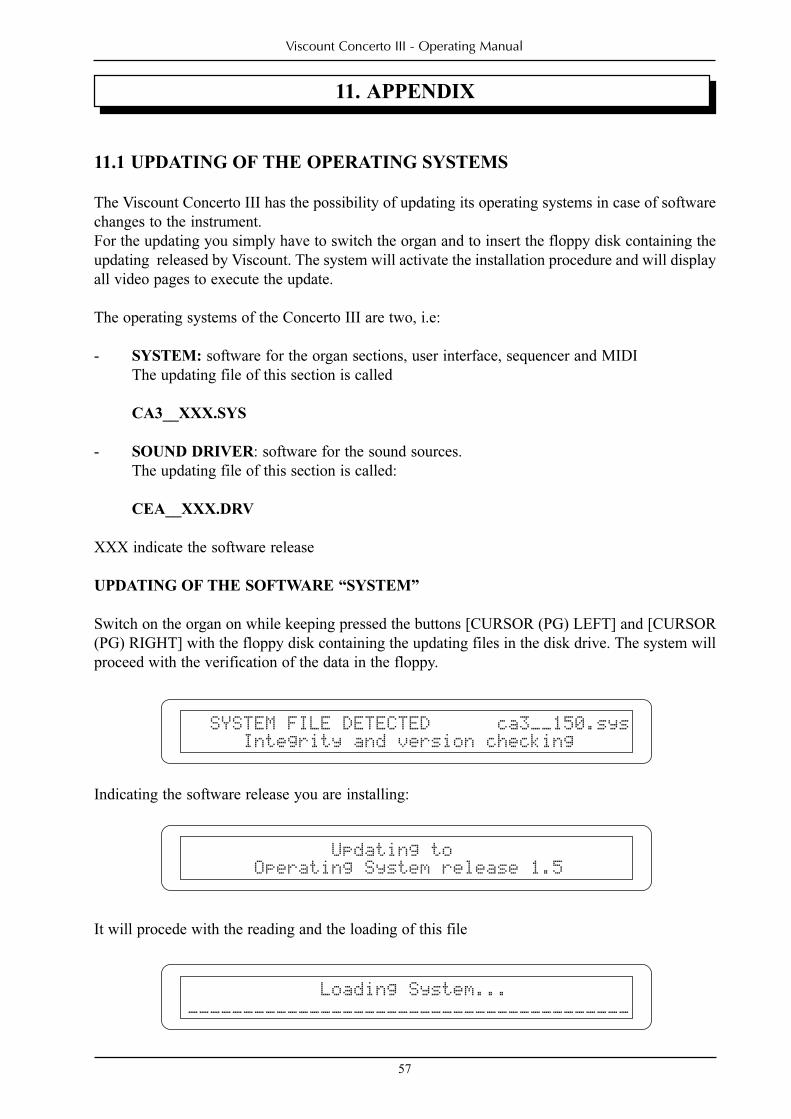
57
Viscount Concerto III - Operating Manual
11. APPENDIX
Indicating the software release you are installing:
11.1 UPDATING OF THE OPERATING SYSTEMS
The Viscount Concerto III has the possibility of updating its operating systems in case of software
changes to the instrument.
For the updating you simply have to switch the organ and to insert the floppy disk containing the
updating released by Viscount. The system will activate the installation procedure and will display
all video pages to execute the update.
The operating systems of the Concerto III are two, i.e:
- SYSTEM: software for the organ sections, user interface, sequencer and MIDI
The updating file of this section is called
CA3__XXX.SYS
- SOUND DRIVER: software for the sound sources.
The updating file of this section is called:
CEA__XXX.DRV
XXX indicate the software release
UPDATING OF THE SOFTWARE “SYSTEM”
Switch on the organ on while keeping pressed the buttons [CURSOR (PG) LEFT] and [CURSOR
(PG) RIGHT] with the floppy disk containing the updating files in the disk drive. The system will
proceed with the verification of the data in the floppy.
It will procede with the reading and the loading of this file

58
Viscount Concerto III - Operating Manual
and with the concerned check:
When the procedure is completed, the display will show:
UPDATING OF THE SOFTWARE “SOUND DRIVER”
Switch the organ on keeping pressed the buttons [CURSOR (PG) LEFT] and [CURSOR (PG)
RIGHT] with the floppy disk containing the updating files in the disk drive. The system will proceed
with the verification of the file.
The displays concerning the reading and the saving in the memory of the software as well as its
verification are those described in the updating of the “System” software.
ERROR MESSAGES – UPDATING OF OPERATING SYSTEMS
- SYSTEM FILE NOT FOUND / SYSTEM FILE ERROR
The file for the updating of the System software is damaged. Start the procedure again using a not
damaged file and disk.

59
Viscount Concerto III - Operating Manual
- UNABLE TO UPDATE SOUND DRIVER
The system is unable to install the updating of the Sound Driver section. Contact your nearest
service center with the information of the Error Code shown on the display.
- PROGRAM FLASH ERROR / VERIFY ERROR / CHECKING ERROR
There has been an error in the software loading in the memory. Repeat the updating after having
resetted the instrument with a Factory Settings. In case the error is still present, contact your nearest
service center.
11.2 FACTORY SETTINGS
The Factory Settings procedure resets all the user parameters as they were set on delivery of the
instrument, deleting all the changes made by the user.
To perform the Factory Settings procedure, switch the instrument on with the [CURSOR (PG) UP]
and [CURSOR (PG) DOWN] buttons pressed; the display will show:


MIDI IMPLEMENTATION CHART
Viscount Concerto III Version: 1.5Classic Organ Date: 21/07/03
FUNCTION ... TRANSMITTED RECOGNIZED REMARKSBASIC DefaultCHANNEL Changed
1 – 161 – 16
1 – 161 – 16
*1
MODE DefaultMessagesAltered
Mode 3XX
Mode 3XX
NOTENUMBER True Voice
30 – 10136 – 96
30 – 10130 – 101
VELOCITY Note ONNote OFF
OX
OO
AFTER Key’sTOUCH Ch’s
XX
XX
PITCH BENDER X XCONTROL 6CHANGE 7
113864
100101120121123
OOOOOOOOOO
OOOOOOOOOO
Data Entry MSB *2VolumeExpressionData Entry LSB *2SustainRPN LSB *2RPN MSB *2All sound offReset all controllersAll note off
PROGRAMCHANGE True #
O X *1
SYSTEM EXCLUSIVE O OSYSTEM Song PosCOMMON Song Sel
Tune
XXX
XXX
SYSTEM ClockREAL TIME Commands
OO
OO
*3
AUX Local On-OffMESSAGES All note Off
Active SenseReset
XOOX
XOOX
NOTES: *1: see chapt. 6.3 for more informations*2: RPN messages are used to control the Master Tuning*3: these messages are used to control the sequencer
Mode 1: Omni On, Poly Mode 2: Omni On, Mono O = YESMode 3: Omni Off, Poly Mode 4: Omni Off, Mono X = NO


NOTE: This equipment has been tested and found to comply with the limits for a Class Bdigital Device, persuant to Part 15 if the FCC Rules. These limits are designed to providereasonable protection against harmful interference in a residential installation. This equipmentgenerates, uses and can radiate radio frequency energy and, if not installed and used inaccordance with the instruction, may cause harmful interference to radio comunications.However, there is no guarantee that the interference will not occur in a particular installation. Ifthis equipment does cause harmful interference to radio or television reception, which can bedeterminated by turning the equipment off and on, the user is encuraged to try to correct theinterference by one or more of the following measures:
- Reorient or relocate the receiving antenna.- Increase the separation between the equipment and receiver.- Connect the equipment into an outlet on a circuit different from that to which the receiver
is connected.- Consult the dealer or an experienced Radio/Tv technician for help.
The user is cautioned that any changes or modification not expressly approved by the partyresponsable for compliance could void the user’s authority opearate the equipment.

viscount
Viscount International S.p.A.Via Borgo n.° 68/70 – 47836 Mondaino (RN), ITALYFrom Italy: TEL: 0541-981700 FAX: 0541-981052
From all other countries: TEL: +39-0541-981700 FAX: +39-0541-981052E-MAIL: [email protected]
WEB: http://www.viscount-organs.comhttp://www.viscount.it