Composting with Worms - Oregon State University is composting with worms?1 . The Worm Bin..... 2 The...
13
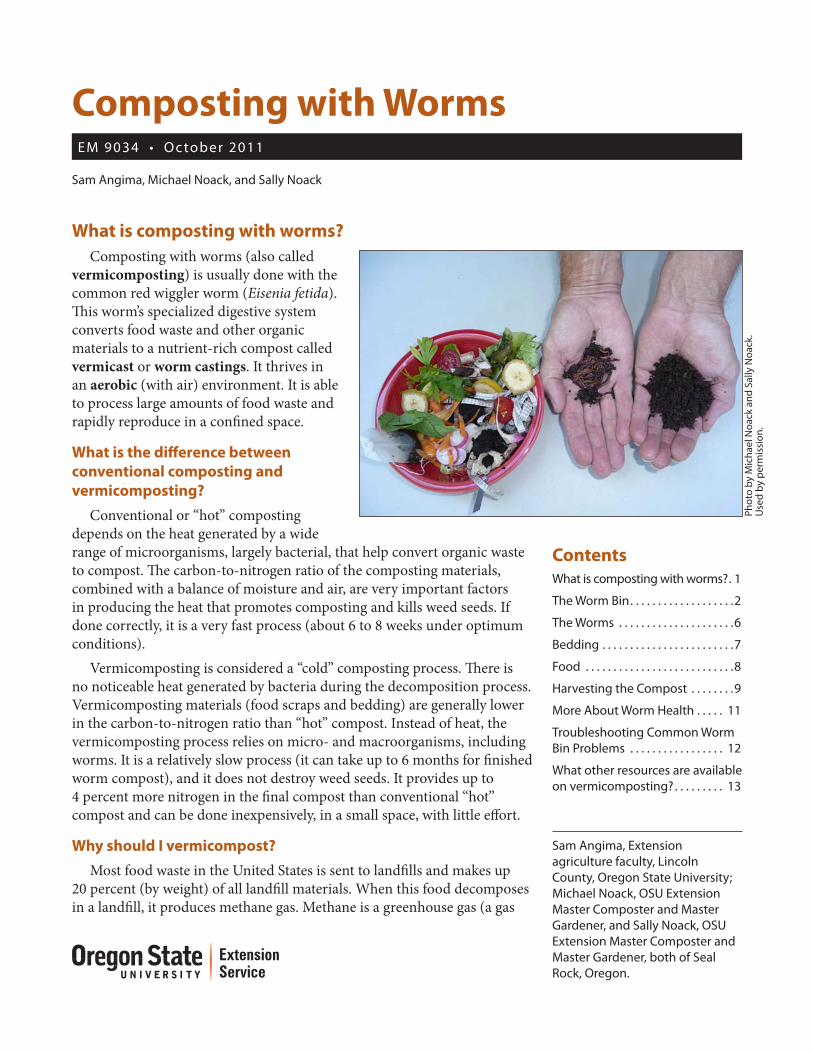
Sam Angima, Michael Noack, and Sally Noack EM 9034 • October 2011 Composting with Worms What is composting with worms? Composting with worms (also called vermicomposting) is usually done with the common red wiggler worm (Eisenia fetida). is worm’s specialized digestive system converts food waste and other organic materials to a nutrient-rich compost called vermicast or worm castings. It thrives in an aerobic (with air) environment. It is able to process large amounts of food waste and rapidly reproduce in a confined space. What is the difference between conventional composting and vermicomposting? Conventional or “hot” composting depends on the heat generated by a wide range of microorganisms, largely bacterial, that help convert organic waste to compost. e carbon-to-nitrogen ratio of the composting materials, combined with a balance of moisture and air, are very important factors in producing the heat that promotes composting and kills weed seeds. If done correctly, it is a very fast process (about 6 to 8 weeks under optimum conditions). Vermicomposting is considered a “cold” composting process. ere is no noticeable heat generated by bacteria during the decomposition process. Vermicomposting materials (food scraps and bedding) are generally lower in the carbon-to-nitrogen ratio than “hot” compost. Instead of heat, the vermicomposting process relies on micro- and macroorganisms, including worms. It is a relatively slow process (it can take up to 6 months for finished worm compost), and it does not destroy weed seeds. It provides up to 4 percent more nitrogen in the final compost than conventional “hot” compost and can be done inexpensively, in a small space, with little effort. Why should I vermicompost? Most food waste in the United States is sent to landfills and makes up 20 percent (by weight) of all landfill materials. When this food decomposes in a landfill, it produces methane gas. Methane is a greenhouse gas (a gas Sam Angima, Extension agriculture faculty, Lincoln County, Oregon State University; Michael Noack, OSU Extension Master Composter and Master Gardener, and Sally Noack, OSU Extension Master Composter and Master Gardener, both of Seal Rock, Oregon. Photo by Michael Noack and Sally Noack. Used by permission. Contents What is composting with worms? . 1 The Worm Bin ................... 2 The Worms ..................... 6 Bedding ........................ 7 Food ........................... 8 Harvesting the Compost ........ 9 More About Worm Health ..... 11 Troubleshooting Common Worm Bin Problems ................. 12 What other resources are available on vermicomposting? ......... 13
Transcript of Composting with Worms - Oregon State University is composting with worms?1 . The Worm Bin..... 2 The...
Sam Angima, Michael Noack, and Sally Noack
EM 9034 • Oc tober 2011
Composting with Worms
What is composting with worms?Composting with worms (also called
vermicomposting) is usually done with the common red wiggler worm (Eisenia fetida). This worm’s specialized digestive system converts food waste and other organic materials to a nutrient-rich compost called vermicast or worm castings. It thrives in an aerobic (with air) environment. It is able to process large amounts of food waste and rapidly reproduce in a confined space.
What is the difference between conventional composting and vermicomposting?
Conventional or “hot” composting depends on the heat generated by a wide range of microorganisms, largely bacterial, that help convert organic waste to compost. The carbon-to-nitrogen ratio of the composting materials, combined with a balance of moisture and air, are very important factors in producing the heat that promotes composting and kills weed seeds. If done correctly, it is a very fast process (about 6 to 8 weeks under optimum conditions).
Vermicomposting is considered a “cold” composting process. There is no noticeable heat generated by bacteria during the decomposition process. Vermicomposting materials (food scraps and bedding) are generally lower in the carbon-to-nitrogen ratio than “hot” compost. Instead of heat, the vermicomposting process relies on micro- and macroorganisms, including worms. It is a relatively slow process (it can take up to 6 months for finished worm compost), and it does not destroy weed seeds. It provides up to 4 percent more nitrogen in the final compost than conventional “hot” compost and can be done inexpensively, in a small space, with little effort.
Why should I vermicompost?Most food waste in the United States is sent to landfills and makes up
20 percent (by weight) of all landfill materials. When this food decomposes in a landfill, it produces methane gas. Methane is a greenhouse gas (a gas
Sam Angima, Extension agriculture faculty, Lincoln County, Oregon State University; Michael Noack, OSU Extension Master Composter and Master Gardener, and Sally Noack, OSU Extension Master Composter and Master Gardener, both of Seal Rock, Oregon.
Phot
o by
Mic
hael
Noa
ck a
nd S
ally
Noa
ck.
Use
d by
per
mis
sion
.
ContentsWhat is composting with worms? . 1
The Worm Bin . . . . . . . . . . . . . . . . . . .2
The Worms . . . . . . . . . . . . . . . . . . . . .6
Bedding . . . . . . . . . . . . . . . . . . . . . . . .7
Food . . . . . . . . . . . . . . . . . . . . . . . . . . .8
Harvesting the Compost . . . . . . . .9
More About Worm Health . . . . . 11
Troubleshooting Common Worm Bin Problems . . . . . . . . . . . . . . . . . 12
What other resources are available on vermicomposting? . . . . . . . . . 13
2
that traps heat in the atmosphere). Methane is about 20 times more potent than carbon dioxide, in terms of its warming potential.
Vermicomposting recycles organic waste that may otherwise end up in landfills. It is an easy process, compared to conventional composting, which requires frequent turning and the management of complex ratios of materials. Vermicomposting is also ideal for those who don’t have a place for a regular compost bin (such as apartment dwellers). As a bonus, vermicast provides many beneficial microorganisms and nutrients to the soil, including beneficial bacteria, fungi, and protozoa as well as nitrogen, phosphorus, potassium, calcium, and magnesium.
What materials do I need for vermicomposting?
You need:• a worm bin (pages 2–5)• worms (pages 6–7)• biodegradable bedding (pages 7–8)• some form of grit (page 8)• food (pages 8–9)On the following pages, you’ll find details and
steps to take to ensure that your vermicomposting setup is successful.
The Worm Bin
Where should I keep the worm bin?Before you choose the type of bin you want to
use, consider where you will place it. Indoors
A well-tended worm bin is odorless. You can keep it in a pantry, utility room, or under the kitchen sink. A garage, basement, or carport is also a potential site. Outdoors
Worms thrive in temperatures between 55 and 77°F. So, if you keep your bin outside, you’ll need to protect it from extreme temperatures. The north side of a structure (such as a house, shed, or garage) is preferred, because temperatures there don’t fluctuate as much. The bin also needs protection from rain and wind. Place it under the eaves or a deck, or build a cover that repels rain but still allows good air circulation. An outdoor bin must also be secured against rodents, raccoons, and other animals.
Depending on your local climate, you may choose to place your worm bin outside during the warmer months and bring it in under cover during the cooler months. Be sure to put the bin in a place you visit often!
What size worm bin should I have?To figure out the bin size you need, you must first
determine the amount of food waste your family generates in 1 week. Your worm bin must contain 1 cubic foot of space for each pound of kitchen waste. Note that this does not mean that the bin would always be full, but rather that it would provide ample space for worms to work at the right moisture and oxygen levels.
You’ll need approximately 1 cubic foot of bin space and 1 pound of food waste for each pound of worms you maintain. (There are about 1,000 worms per pound.) Be sure to follow this rule to avoid an overloaded or undernourished system. Too much food may result in overfeeding and harmful anaerobic conditions for the worms. Too little food slows the worms’ growth and reproduction and contributes to their demise.
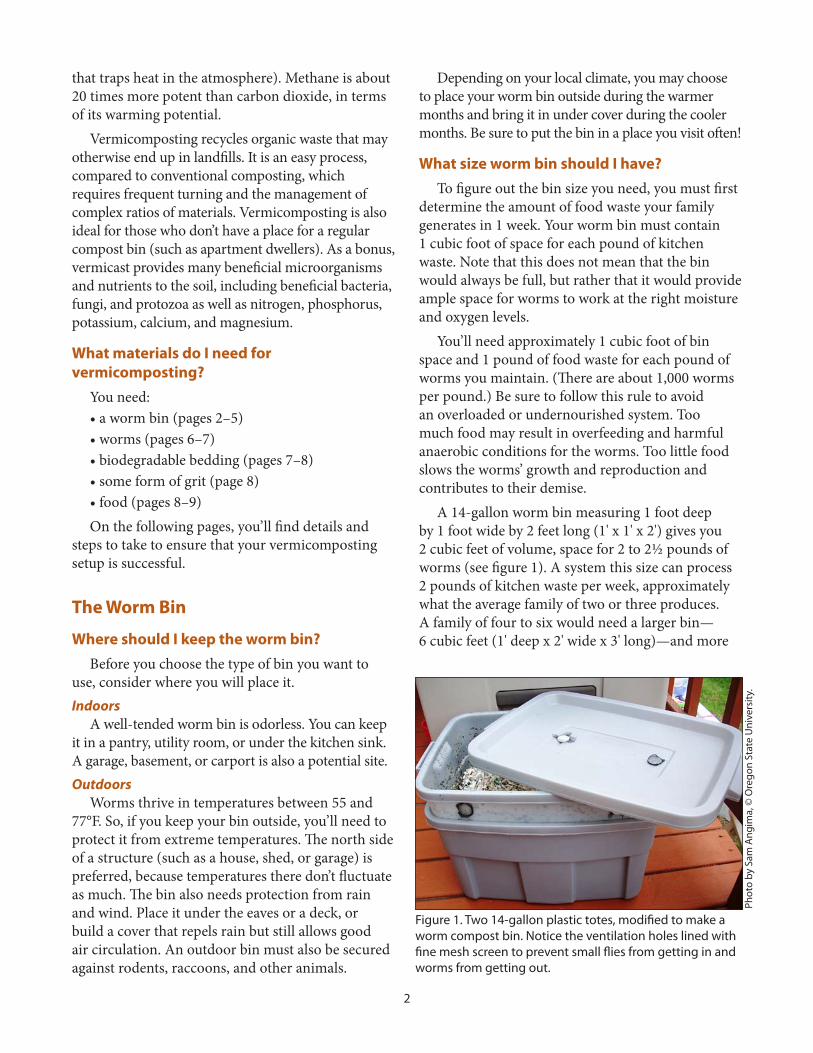
A 14-gallon worm bin measuring 1 foot deep by 1 foot wide by 2 feet long (1' x 1' x 2') gives you 2 cubic feet of volume, space for 2 to 2½ pounds of worms (see figure 1). A system this size can process 2 pounds of kitchen waste per week, approximately what the average family of two or three produces. A family of four to six would need a larger bin— 6 cubic feet (1' deep x 2' wide x 3' long)—and more
Phot
o by
Sam
Ang
ima,
© O
rego
n St
ate
Uni
vers
ity.
Figure 1. Two 14-gallon plastic totes, modified to make a worm compost bin. Notice the ventilation holes lined with fine mesh screen to prevent small flies from getting in and worms from getting out.
3
worms (up to 6 pounds) to process about 6 pounds of kitchen waste per week.
Notice that in both cases the container depth stays the same. Because red wiggler worms dwell near the surface of the soil in nature, their survival in a worm bin requires that the bin space be no more than 1 foot deep. This allows for healthy aerobic conditions in the worm bin habitat.
Make sure to prepare the bin before your worms arrive. Don’t worry if your measurements or methods are not exact. The worms won’t notice!
What materials should I use to build it?You can use a variety of materials to build a worm
bin. Plastic totes, wooden bins, and commercial, stackable worm towers all are popular (Table 1). You also can use a shipping crate or food storage barrel—a great way to repurpose and recycle one. Just be sure that the wood was not treated with chemicals and that other toxic materials have not been stored in the containers (food grade is best).Plastic totes
Most worm bins are made from plastic totes. Worms are very sensitive to light, so be sure the container is opaque and has a lid. The lid should fit snugly on the bin to prevent worms from escaping and unwanted pests from getting in. There are many different designs available. This publication focuses on the two-plastic-tote bin system (figure 1), because it is relatively low cost and easy to make.
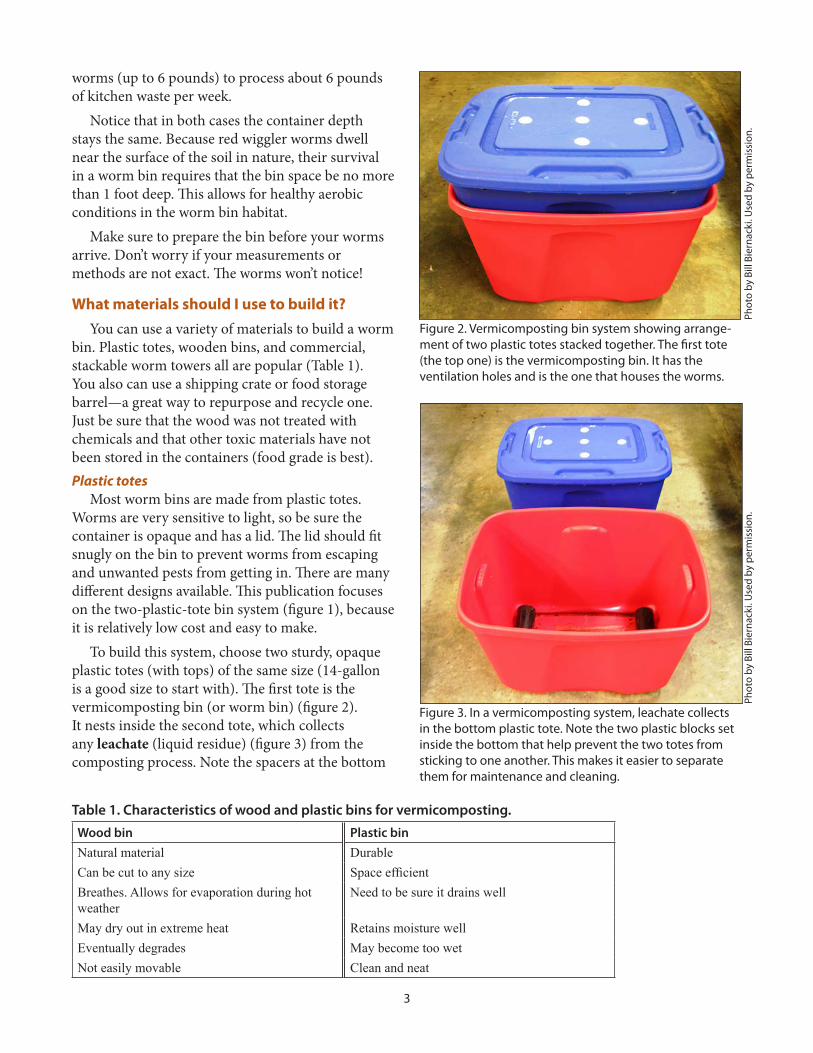
To build this system, choose two sturdy, opaque plastic totes (with tops) of the same size (14-gallon is a good size to start with). The first tote is the vermicomposting bin (or worm bin) (figure 2). It nests inside the second tote, which collects any leachate (liquid residue) (figure 3) from the composting process. Note the spacers at the bottom
Table 1. Characteristics of wood and plastic bins for vermicomposting.Wood bin Plastic binNatural material DurableCan be cut to any size Space efficientBreathes. Allows for evaporation during hot weather
Need to be sure it drains well
May dry out in extreme heat Retains moisture wellEventually degrades May become too wetNot easily movable Clean and neat
Phot
o by
Bill
Bie
rnac
ki. U
sed
by p
erm
issi
on.
Figure 2. Vermicomposting bin system showing arrange-ment of two plastic totes stacked together. The first tote (the top one) is the vermicomposting bin. It has the ventilation holes and is the one that houses the worms.
Phot
o by
Bill
Bie
rnac
ki. U
sed
by p
erm
issi
on.
Figure 3. In a vermicomposting system, leachate collects in the bottom plastic tote. Note the two plastic blocks set inside the bottom that help prevent the two totes from sticking to one another. This makes it easier to separate them for maintenance and cleaning.

4
of the second bin. They keep the top bin from sticking and make it easy to lift out. Use plastic for spacers. Wood and bricks are hard to clean.
Drill up to 20 ¼-inch holes in the bottom of the first tote (figure 4). These holes allow for drainage. If you have commercial vents (figure 5) for air circulation, drill four (or more) 1-inch holes for them along the top edge of the first bin. Otherwise, drill up to 10 ¼-inch holes on the sides, 2 to 3 inches below the lip of the tote (figure 6), for ventilation. You can drill up to five 1-inch holes fitted with vents on the lid of the vermicomposting bin (figure 2) to aid in air circulation. If you do this, be sure that the bin is not left out in the rain. If you wish, you can install a drain plug (figure 7) on the second bin to make it easier to drain the leachate. Stacking tray system
The stacking tray system operates on the fact that worms follow food. Put bedding and worms in the bottom tray along with food scraps (figure 8, page 5). Once the food scraps are converted to compost, the worms look for a new source of food. Stack a new tray of fresh bedding and food scraps on top of the first tray. The worms wriggle their way through small holes in the bottom of the top tray (figure 9, page 5) to get to the food above. You harvest the compost in the first tray, and keep stacking new trays on top. Most have a drainage tray (figure 10, page 5) at the very bottom to collect leachate.
Figure 4. Drill up to 20 ¼-inch drainage holes in the bottom of the first tote. Notice that most of the holes are drilled in what are the lowest places on the tote’s bottom. Leachate drains down to the lowest areas and out, so it won’t stagnate in the worm bin.
Phot
o by
Mic
hael
Noa
ck. U
sed
by p
erm
issi
on.
Figure 5. Commercial vents fit into 1-inch holes.
Phot
o by
Sal
ly N
oack
. Use
d by
per
mis
sion
.
Figure 6. If commercial vents are not available, drill up to 10 ¼-inch holes on the sides, 2 to 3 inches below the lip of the tote. You can glue screen material to the holes to prevent fruit flies from invading the system.
Phot
o by
Sam
Ang
ima,
© O
rego
n St
ate
Uni
vers
ity.
Figure 7. You can install a drain plug on the second bin to make it easier to drain leachate.
Phot
o by
Sam
Ang
ima,
© O
rego
n St
ate
Uni
vers
ity.

5
Other homemade bins Probably the most well-known type of worm bin
is a wooden box (1 foot deep x 2 feet wide x 3 feet long) with drainage holes drilled in the bottom and a hinged lid for access. Wooden bins breathe and have few odor or excess moisture problems. The main drawback is their weight. Installing wheels on the bottom of wooden bins makes them easier to move.
You can find plans for home-built plastic and wooden bins from the University of Kentucky Extension Service at http://www.ca.uky.edu/enri/enri312rev.pdf.
Do not use pressure-treated wood for worm bins. The chemicals are toxic to the worms. Suitable construction materials include exterior-grade plywood or construction-grade lumber. Wood that contains a natural pest deterrent (such as cedar, redwood, and cypress) may be toxic to worms.
If you paint the outside of your bin, leave the inside unpainted. White paint on the outside of the bin helps reflect light, keeping the worm bin cool in summer.
Figure 8. A commercial stacking tray system. Starting from the bottom, a series of trays are filled sequentially with food. As worms move upwards to fresh bedding and food, vermicast can be harvested from the bottom trays.
Phot
o by
Sam
Ang
ima,
© O
rego
n St
ate
Uni
vers
ity.
Phot
o by
Sam
Ang
ima,
© O
rego
n St
ate
Uni
vers
ity.
Figure 9. The trays in a stacking system are removable and have holes large enough to allow worms to move freely from one tray to the next.
Phot
o by
Sam
Ang
ima,
© O
rego
n St
ate
Uni
vers
ity.
Figure 10. The bottom of a stacking tray system is designed to capture leachate and allow its easy removal with a spout.
6
The Worms
Worm biology and other important facts The most effective worm for vermicomposting in
a bin is the red wiggler worm (Eisenia fetida), also known as manure worm, red worm, or tiger worm. In nature, red wiggler worms are specialized surface dwellers (epigeic). They live in the upper layers of the very rich organic matter in decaying litter piles. They do not develop burrows and aren’t found deep in the subsoil, as are common garden earthworms. These attributes make the red wiggler appropriate for worm bin composting. Earthworms will not survive in the environment of an indoor worm bin.
Red wiggler worms tolerate a temperature range of 40 to 90°F, but they do best between 55 and 77°F. Peak composting and reproduction occur between 71 and 89°F. Below 50°F, the worms feed less and become less active. Red wiggler worms are about 75 to 90 percent water by weight. Be sure to keep the right level of moist environment in the bedding so that the worms don’t dry out. These worms prefer a pH of about 5.5 but can tolerate a pH range from 4 to 9.
Red worms breathe through their skin. Although they have no “eyes,” their skin cells are very sensitive to light (photophobic). Use an opaque bin and lid that exclude light. Vent holes and fluffed-up bedding provide ventilation and aerobic conditions.
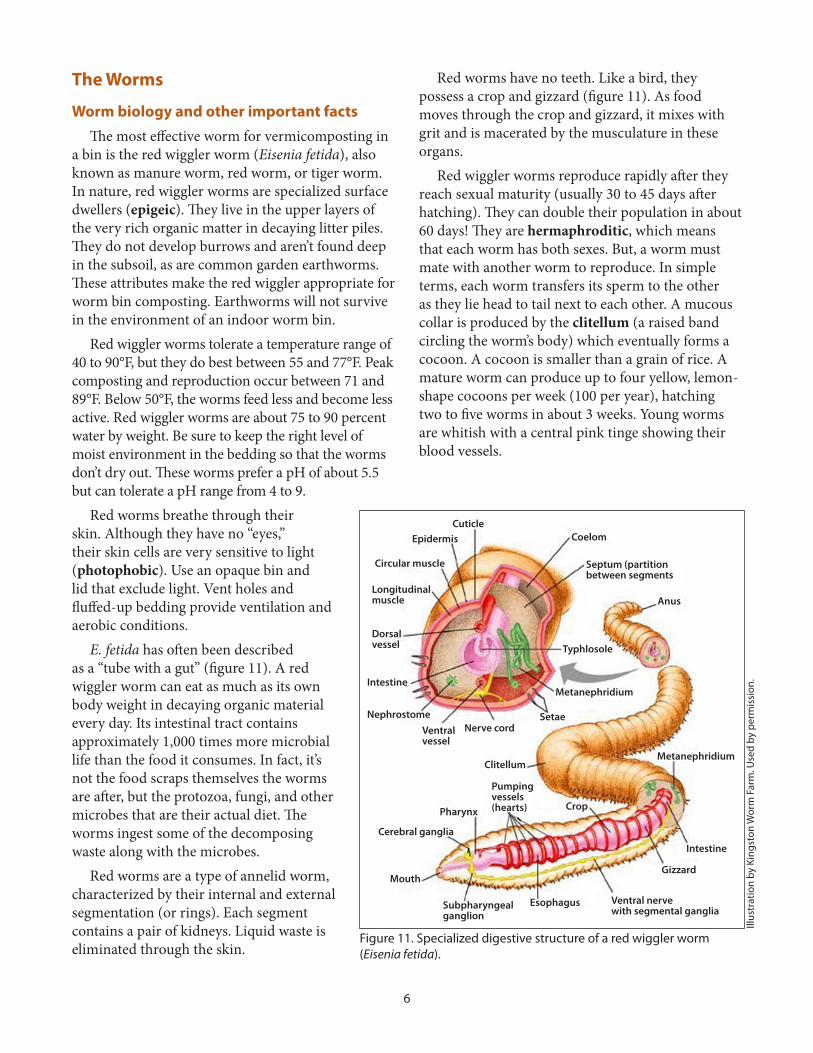
E. fetida has often been described as a “tube with a gut” (figure 11). A red wiggler worm can eat as much as its own body weight in decaying organic material every day. Its intestinal tract contains approximately 1,000 times more microbial life than the food it consumes. In fact, it’s not the food scraps themselves the worms are after, but the protozoa, fungi, and other microbes that are their actual diet. The worms ingest some of the decomposing waste along with the microbes.
Red worms are a type of annelid worm, characterized by their internal and external segmentation (or rings). Each segment contains a pair of kidneys. Liquid waste is eliminated through the skin.
Red worms have no teeth. Like a bird, they possess a crop and gizzard (figure 11). As food moves through the crop and gizzard, it mixes with grit and is macerated by the musculature in these organs.
Red wiggler worms reproduce rapidly after they reach sexual maturity (usually 30 to 45 days after hatching). They can double their population in about 60 days! They are hermaphroditic, which means that each worm has both sexes. But, a worm must mate with another worm to reproduce. In simple terms, each worm transfers its sperm to the other as they lie head to tail next to each other. A mucous collar is produced by the clitellum (a raised band circling the worm’s body) which eventually forms a cocoon. A cocoon is smaller than a grain of rice. A mature worm can produce up to four yellow, lemon-shape cocoons per week (100 per year), hatching two to five worms in about 3 weeks. Young worms are whitish with a central pink tinge showing their blood vessels.
Figure 11. Specialized digestive structure of a red wiggler worm (Eisenia fetida).
Illus
trat
ion
by K
ings
ton
Wor
m F
arm
. Use
d by
per
mis
sion
.
Ventral vessel
Nerve cordSetae
Metanephridium
Metanephridium
Typhlosole
Septum (partition between segments
CoelomCuticle
Epidermis
Circular muscle
Longitudinal muscle
Dorsal vessel
Intestine
Intestine
Nephrostome
Anus
Gizzard
Ventral nerve with segmental ganglia
EsophagusSubpharyngeal ganglion
Mouth
Cerebral ganglia
Pharynx
Pumping vessels (hearts) Crop
Clitellum

7
Where do I get the worms?You can get red wiggler worms from a variety of
sources. You can find commercial worm growers (vermiculturists) online who provide a mail-order service. Whenever you buy worms, whether from a commercial or private source, be sure to check that they are selling the right species (you want Eisenia fetida); the seasonal availability (since worms are most active during spring, summer, and fall); and their shipping methods. Also be aware that the pound of worms you order may not contain 1,000 worms—some bedding will be in the mix. Order only from reputable suppliers, and be sure to research their cultural methods (such as how they raise the worms and what and how they feed them). Check whether other customers have been pleased with their products.
Other sources of worms you may consider include your outdoor compost or manure pile, a friend or neighbor’s vermicompost bin, your local Extension Master Gardener program, or a local solid waste district. Remember that the common earthworm or European nightcrawler (Lumbricus terrestris) is a subterranean, burrowing worm and is not the worm you want for vermicomposting.
Adding the wormsOnce you have set up your vermi-
compost bin and have your worms, there are at least three methods of introducing worms into their new environment.
• Add kitchen scraps to fresh bedding and allow them to decompose for a few days before adding the worms.
• Add worms to fresh bedding and allow them to acclimate for a few days before feeding.
• Introduce worms and food scraps at the same time.
No matter which method you choose, be sure to observe the worms every day for a few weeks to see how they are feeding.
BeddingThe bedding in your worm bin provides a
balanced diet and a damp, aerated home for your worms. You need enough bedding to cover the bottom of the worm bin to a depth of 4 to 6 inches.
Dry materialsIt’s best to include several different materials
in the bedding. Mix at least two or three of the following materials for good bedding:
• Shredded newspaper or recycled printer paper. Do not use glossy paper. Shred paper by hand or machine (figure 12), but do not use cross-cut shredded paper. Cross-cut shreds are rectangular or diamond-shape and may increase compaction in the bin.
• Corrugated cardboard. Use small pieces.• Straw. Don’t use hay that has seed in it.• Coir (coconut fiber). You can get this at
nurseries and online. • Shredded leaves. It’s best to put in partially
decomposed leaves. Check carefully for pests such as slugs and snails.
• Sawdust. Use sawdust only in small amounts, as it can become compacted.
Figure 12. Always use hand- or machine-shredded newspaper or recycled printer paper. Do not use glossy paper or cross-cut shredded paper.
Phot
o by
Mic
hael
Noa
ck. U
sed
by p
erm
issi
on.

8
Some people have found that adding a handful of alfalfa meal or pellets helps stabilize the microorganisms that partially decompose food scraps. This helps the worms get established in their new home. Do not use green grass clippings, because they may create too much heat as they decompose.
GritRemember that worms have a gizzard similar to
birds and need grit to help break up food particles. Add a little grit (about ½ cup to a 14-gallon bin) every couple of months to aid digestion. There are several materials you can use:
• Crushed oyster shell• Non-medicated chick starter (crushed)• Calcium• Pulverized egg shells• Garden soil• Vermiculite• Sand
Sand tends to compact the bedding. Use it sparingly.
MoistureWorms need 75 to 85 percent moisture in their
bedding. Mix the dry materials together, then sprinkle them with water and continue mixing and adding water until the mixture feels like a wrung-out sponge (when you squeeze it in the palm of your hand, only a few drops come out).
Maintenance Always keep a 2-inch layer of fresh bedding over
the worms and food in your bin (figure 13). Add fresh bedding as needed depending on the season and the activity of your worms, as the old bedding is consumed, or whenever odors or fruit flies become a problem. Do not cover air vents or holes with bedding.
Keep bedding as moist as a wrung-out sponge. In a plastic bin, mix in dry bedding to absorb excess moisture. You may need to add water more often to wooden bins to keep the contents moist.
Food
How do I feed the worms?Add additional food scraps to the new worm bin
gradually at first. Introduce about ¼ to ½ a pound of food scraps per pound of worms per week until the worms become accustomed to their new diet. If you maintain a temperature of 55 to 77°F around your worm bin, you can gradually increase food amounts as the worms multiply. Pocket feeding
Pull aside some bedding, and make a hole where you can put food scraps. Cover the scraps with the bedding to help reduce fruit flies and odors. Choose a different spot each time you bury the food scraps to encourage worm distribution throughout the bin. Surface feeding
Spread food scraps in a thin layer (no more than 1¼ inches deep) on top of the bedding layer and add more fluffed-up bedding on top. The worms move upward toward the new food as they finish the old food. This makes harvesting the compost easier because most of the worms are in the uppermost layer of food and bedding. As worms burrow up through the deeper layers, their trails help circulate oxygen, which reduces odors.
If by chance you overfeed your worms, stop feeding and wait up to 2 weeks before feeding again. You’ll know you have overfed your worms if you find untouched food 2 to 3 weeks after you’ve added it. Observation is the key to success in vermicomposting!
Phot
o by
Sam
Ang
ima,
© O
rego
n St
ate
Uni
vers
ity.
Figure 13. Always keep a 2-inch layer of fresh bedding over the worms and food in your bin.

9
What should I feed them?Red wiggler worms have amazing powers of
digestion and will consume just about any organic matter you put in the worm bin. The following types of food are acceptable for feeding worms. Note: Chopping food items into small pieces (½ to 1 inch or smaller) ensures faster breakdown by microorganisms.
• Fruit and vegetable scraps and peels. Potatoes peels are okay, but worms tend to avoid them (figure 14).
• Eggshells or other source of grit (see page 8). These should be ground or pulverized.
• Coffee grounds, filters, and tea bags with staples removed. You can mix them into the worm bin at any time.
• Plain cereal, bread, and pasta. Use small amounts only, as they tend to clump up. Be sure to wet them first.
• Dryer lint (natural fibers only, such as cotton, linen, or wool). Lint provides the “fabric” for air circulation.
Food items that are NOT acceptableThough your worms will eat just about any
organic matter, some types of food may entice undesirable insects and animals to live in the worm bin, too. The foods in the list below are not
appropriate to feed the worms because they attract pests, can be toxic to worms, or create unpleasant odors.• Meat, poultry, or fish (bones, skin, or
drippings). These develop odors and easily attract other pests.
• Oils (such as butter, salad dressing, or mayonnaise). These smother worms (they breathe through their skin).
• Dairy products. These products may cause anaerobic conditions and odors.
• Highly acidic or spicy foods, such as citrus (especially peels) or onions. These may produce acidic conditions and may be toxic to worms.
• Pet feces. Feces can contain large quantities of pests that are not beneficial to worms or to the final compost product.
The guideline for vermicomposting is: When in doubt, leave it out!
Harvesting the Compost
When should I harvest my vermicompost?Vermicompost or vermicast is a mixture of worm
castings and decomposed organic matter (figure 15). It can be very wet at harvest time depending on the kitchen waste you use (for example, lots of banana and fruit peels). If you wish to use a sieve to make debris-free compost, then allow the vermicast to dry first.
Phot
o by
Sam
Ang
ima,
© O
rego
n St
ate
Uni
vers
ity.
Figure 14. In this finished vermicast, you can see that the worms did not consume the potato peels. Whenever possible, avoid putting potato peels in the worm bin. They contribute to anaerobic conditions in the bin. (The greenish material is colored paper towel, which worms do consume.)
Phot
o by
Sam
Ang
ima,
© O
rego
n St
ate
Uni
vers
ity.
Figure 15. Vermicast is a mixture of worm castings and decomposed organic matter.

10
It generally takes about 3 to 6 months from initial bin setup to finished worm compost. It is ready to harvest if it looks like crumbly chocolate cake and smells earthy and fresh.
Can I touch worms with my bare hands?It is okay to touch and handle worms with your
bare hands as you work with them. Remember that they are photophobic (sensitive to light), so they will tend to move away from you as you add new food waste and new bedding, or when you harvest the vermicast. If you are not fond of touching worms, latex or vinyl gloves are appropriate to use. Be sure to wash your hands thoroughly with soap after handling worms or worm bins.
How do I harvest my vermicompost?Harvesting involves removing the finished
compost from the bin and separating it from the worms. After several months, worms need to be separated from their castings. At high concentrations, the castings create an unhealthy environment for them. To keep your worms healthy, harvest at least twice a year.
There are several methods to separate worms from the compost. Some worms are lost in the process, but there should be enough worms saved to restock the bin. (If you don’t separate out the worms, you can still use the compost in the normal way. But, the worms in it will eventually die.)
Whichever method you choose, the compost you harvest will probably contain a worm or two, along with old food scraps and bedding. This is fine. If you use the compost outdoors, then (depending on moisture, temperature, and the composition of the soil) some worms might survive. If you use the compost for your indoor plants, it is best to remove all the worms. Conditions in pots are not beneficial for worms. Dump and sort (This is by far the most recommended method.)
Lay out a tarp in the sun or under a bright light (figure 16). Divide the contents of the bin into small, cone-shape piles on the tarp. Wait 20 minutes. (You can use this time to clean bins and add fresh bedding.) The worms will move away from the light and into the center of each pile. Brush the compost off the top of each pile until most of the worms are
in the pile’s center. Repeat until all the worms in each pile are at the bottom (figure 17).
Collect the worms and weigh them (you need to know space needs for your next composting project). Then, put them back in their bin with fresh bedding. If you have more worms than you need for your bin, start another worm bin or share your worms with someone else. Bait and switch (This method only works with large bins more than 2 cubic feet in volume.)
Move the worm bin contents to one side of the bin so it fills about ¾ of the bin’s volume. Add fresh bedding and food to the empty section. Let the new section stand for 2 to 4 weeks without adding fresh food to the old section.
Phot
o by
Sam
Ang
ima,
© O
rego
n St
ate
Uni
vers
ity.
Figure 16. The first step in the “dump and sort” method for harvesting vermicast. On a tarp in the sun or under a bright light, divide the contents of the bin into small, cone-shape piles.
Phot
o by
Bill
Bie
rnac
ki. U
sed
by p
erm
issi
on.
Figure 17. The pile on the right shows the last step in the “dump and sort” method, in which only the worms remain. The pile on the left has not been harvested.
11
Water and cover only the new side of the bin. The light and lack of moisture will cause the old side to dry out and speed up worm migration. As it dries out, the worms will leave it for the new side. After the worms have moved, harvest the old section as vermicompost.
Plan to not feed your worms for at least 2 weeks before starting this harvest method. That way, you can harvest much sooner.Scoop and return
Simply take out the top third of the bin, which is comprised mainly of bedding, worms, and undigested food scraps. Scoop out what is left on the bottom for use in the garden. Return the other contents to the bin, and mix well with fresh bedding.
How should I use my vermicompost?You can use worm compost straight from the
worm bin or store it for later use as a soil amendment or a slow-release fertilizer. To use it as a soil amendment, blend the worm compost with potting soil. Typically, worm compost makes up 25 percent of the total soil volume for container plants. You can also add it to garden soil when planting annuals, perennials, vegetables, trees, and shrubs.
Use it as a fertilizer by lightly topdressing houseplants or spreading 1 to 2 inches around the base of flowers and vegetables. Avoid letting the worm castings come into direct contact with stems or trunks.
Check the worm bin often for leachate. You can safely use diluted leachate (ratio of 10:1 water to leachate) in the garden rather than throwing it away. Fresh leachate is high in beneficial microorganisms.
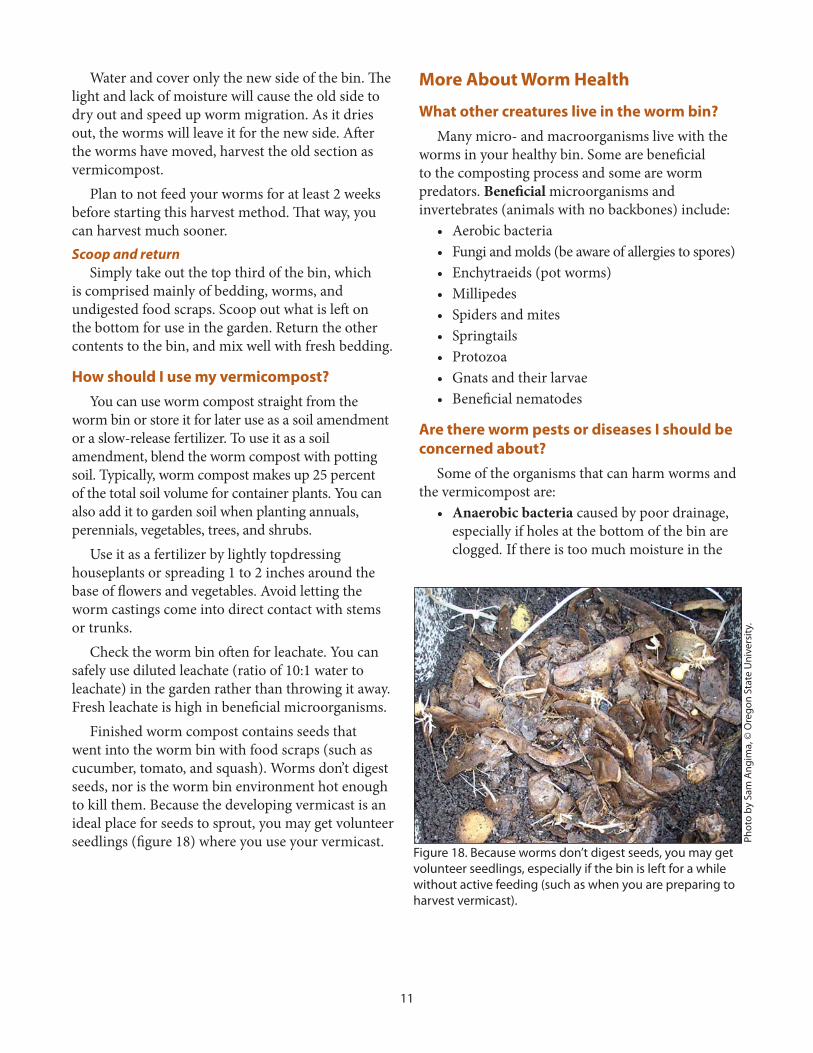
Finished worm compost contains seeds that went into the worm bin with food scraps (such as cucumber, tomato, and squash). Worms don’t digest seeds, nor is the worm bin environment hot enough to kill them. Because the developing vermicast is an ideal place for seeds to sprout, you may get volunteer seedlings (figure 18) where you use your vermicast.
More About Worm Health
What other creatures live in the worm bin? Many micro- and macroorganisms live with the
worms in your healthy bin. Some are beneficial to the composting process and some are worm predators. Beneficial microorganisms and invertebrates (animals with no backbones) include:
• Aerobic bacteria• Fungi and molds (be aware of allergies to spores)• Enchytraeids (pot worms)• Millipedes• Spiders and mites• Springtails• Protozoa• Gnats and their larvae• Beneficial nematodes
Are there worm pests or diseases I should be concerned about?
Some of the organisms that can harm worms and the vermicompost are:
• Anaerobic bacteria caused by poor drainage, especially if holes at the bottom of the bin are clogged. If there is too much moisture in the
Phot
o by
Sam
Ang
ima,
© O
rego
n St
ate
Uni
vers
ity.
Figure 18. Because worms don’t digest seeds, you may get volunteer seedlings, especially if the bin is left for a while without active feeding (such as when you are preparing to harvest vermicast).

12
bin, the worms will not consume the food waste, and the bin may smell.
• Fruit flies. These indicate that there is too much nitrogen-based material in the mix (such as banana peels, watermelon, and cantaloupe).
• Slugs and snails. These come in on bedding material (leaves, grass, etc.).
• Centipedes. Remove them. They are predators.• Soldier flies (maggots and adults). They
outcompete worms for food.
• Ants. This means the bedding is too dry. Moisten it.
• Mites, especially the worm mite (a small reddish to brownish mite, visible to the naked eye). High populations of mites may cause worms to stop feeding.
• Flatworms. Remove and destroy them.
Troubleshooting Common Worm Bin ProblemsProblem Cause Solution
Worms dying Too much food Reduce the amount of food you add. Increase worm population or add bedding.
Too wet Add dry bedding material.
Too dry Add water until slightly damp. Add moist bedding if needed.
Extreme temperatures Move bin to a place where temperature is between 55° and 77°F. Make sure bedding is adequate.
Food and bedding all eaten
Harvest compost. Add fresh bedding and food.
Bin attracting ants Too dry Moisten bedding
Bin attracting flies Food exposed Cover food completely.
Fruit or high sugar-based food scraps in the bin
Reduce amount of fruit peels or freeze them before adding to bin. Cover bedding with cardboard. Put a small cup filled with vinegar or wine in the bin to attract the flies and drown them. Stop feeding for 2 to 3 weeks.
Rotten odor Too wet Make sure drain holes are not blocked or too small.
Not enough oxygen Add more holes for airflow.
Too much food Cover food with dry bedding, and reduce the amount of food you add.
Bin smells bad/attracts flies
Too wet; food scraps exposed
Add a 4-inch layer of dry bedding and stop feeding for 2 to 3 weeks.
Problem materials Remove meat, dairy, grease, etc.
Rodents in bin Bin is not rodent resistant Use traps or baits and a rodent-resistant bin (no holes or gaps larger than ¼ inch).
Problem materials Remove meat, dairy, grease, etc.
Too many fruit and vegetable trimmings
Add a 4-inch layer of bedding, and stop feeding for 2 to 3 weeks.
Sowbugs, beetles in bin
These are good for your worm compost!
This is not uncommon. Sowbugs and beetles coexist with worms.
13
How do I take care of the worms in the winter?You can continue worm composting all winter
long if your bin is in a place that does not freeze (such as a pantry, laundry room, basement, or heated garage or porch).
Another way to keep your worms alive and active through the winter is to put mature compost from any source in a regular composting bin and add worms to the center. To this compost, add food throughout the winter by digging a hole in the center, putting in the food, and burying it. Worms will congregate in the center where there is food and warmth, and stay active (though not as active as when the weather is warmer). Due to the cold, they will consume food at only about half the rate as in summer months. This method works well in schools where there is no space for a bin in the classroom, and it also helps eliminate fly problems.
Or, you can let your worms rest outside through the winter by burying the bottom half of your bin in the ground and piling straw or leaves around and on top of it for insulation. Don’t cover air holes. There is a risk with this method that your worms might die during an uncommonly cold or wet winter.
© 2011 Oregon State University. This publication was produced and distributed in furtherance of the Acts of Congress of May 8 and June 30, 1914. Extension work is a cooperative program of Oregon State University, the U.S. Department of Agriculture, and Oregon counties. Oregon State University Extension Service offers educational programs, activities, and materials without discrimination based on age, color, disability, gender identity or expression, marital status, national origin, race, religion, sex, sexual orientation, or veteran’s status. Oregon State University Extension Service is an Equal Opportunity Employer.
Published October 2011.
What if I will be away from home for a while?If you will be away from home for an extended
time (2 to 3 weeks), feed your worms well before you leave. Be sure their bedding is sufficient and that they are protected from temperature and moisture extremes. Worms can survive long periods without fresh food, as long as temperature and moisture conditions are favorable. Note that if they go without food, their reproductive capacities are reduced.
What other resources are available on vermicomposting?Constructing a Worm Compost Bin (ENRI-312).
University of Kentucky Extension Service. http://www.ca.uky.edu/enri/enri312rev.pdf
Earthworm Ecology, 2nd edition. 2005. Edited by Clive Edwards. CRC Press.
Vermicomposting Resources. University of Wisconsin Extension Service. http://www3.uwm.edu/Dept/shwec/publications/cabinet/factsheets/VermicompostingResources.pdf
Worms Eat My Garbage. 1997. Mary Appelhof. Flower Press.