Comanche Elementary Primaria Comanche Second Grade Segundo Grado Mrs. Burch Sra. Burch.

Tips from Comanche Flyer magazines Feb 1973 – Sep 2012
CCHHAAPPTTEERR SSEEVVEENN
LLAANNDDIINNGG GGEEAARR // BBRRAAKKEESS ((WWHHEEEELLSS,, TTIIRREESS,, SSTTRRUUTTSS,, BBRRAAKKIINNGG MMEECCHHAANNIISSMM))
Table of Contents
Gear Warning Horn ............................................................................................................................................. 4 Gear Failure, Missing Cotter Pin ......................................................................................................................... 4 Gear Maintenance............................................................................................................................................... 4 AD 77−13−21, Prevent Gear Collapse................................................................................................................ 4 Gear Failure, Misaligned Aligner ......................................................................................................................... 5 Brakes ................................................................................................................................................................. 5 Jammed Gear Retraction .................................................................................................................................... 6 Single Fork Modification ...................................................................................................................................... 6 Popped Gear Circuit Breakers ............................................................................................................................ 6 Gear Down Lights................................................................................................................................................ 7 Gear Down Light ................................................................................................................................................. 7 Pumped up Struts................................................................................................................................................ 8 Gear Circuit Breaker............................................................................................................................................ 8 Gear Failure, Gear Collapse ............................................................................................................................... 8 Hand Brake Support Bracket............................................................................................................................... 8 Gear Down Light ................................................................................................................................................. 9 Slow Gear Operations ......................................................................................................................................... 9 Sync the Gear.................................................................................................................................................... 10 Nose Gear Door Incorrectly Installed ................................................................................................................ 10 Toe Brakes ........................................................................................................................................................ 11 Gear Transmission Loose Motor ....................................................................................................................... 11 Observations: .................................................................................................................................................... 12 Gear Operations................................................................................................................................................ 12 Jammed Gear Extension................................................................................................................................... 12 Gear Transmission Assembly ........................................................................................................................... 13 Brake Cylinder Maintenance ............................................................................................................................. 13 Nose Gear Support Corrosion........................................................................................................................... 13 Gear Circuit Breaker.......................................................................................................................................... 14 Twin Gear Microswitch Wiring........................................................................................................................... 14 Gear Bungee Arms............................................................................................................................................ 15 Gear Transmission ............................................................................................................................................ 17 AD 7−13−21, Prevent Gear Collapse................................................................................................................ 17 Gear Warning Horn Adjustment ........................................................................................................................ 19
Copyright © 2012, International Comanche Society, Inc. All rights reserved.

Low Battery Effect on Landing Gear ................................................................................................................. 19 Main Gear Bolt Freeze−Up ............................................................................................................................... 19 Low Battery Effect on Landing Gear ................................................................................................................. 20 Gear Maintenance............................................................................................................................................. 20 Gear Transmission ............................................................................................................................................ 20 Nose Gear Door Worn Hinges .......................................................................................................................... 21 Jammed Gear Extension................................................................................................................................... 21 Gear Failure, Bent Extension / Retraction Rod ................................................................................................. 21 Gear Failure, Missing Spring and Cotter Pin..................................................................................................... 22 Nose Gear Worn Bell Crank and Bushings....................................................................................................... 24 Gear Bungee Arms............................................................................................................................................ 26 Gear Failure, Jammed Wheel Well Liner .......................................................................................................... 28 Gear Transmission ............................................................................................................................................ 28 Strut Maintenance ............................................................................................................................................. 30 Bungee Cord Tool ............................................................................................................................................. 31 Pumped up Struts.............................................................................................................................................. 32 Gear Down Light ............................................................................................................................................... 32 Twin Gear Side Link Brace................................................................................................................................ 33 Gear Position Indications .................................................................................................................................. 33 Gear Transmission ............................................................................................................................................ 33 AD 77−13−21, Prevent Gear Collapse.............................................................................................................. 34 Gear Transmission ............................................................................................................................................ 34 Gear Warning Horn System .............................................................................................................................. 35 Gear Warning Horn Modification ....................................................................................................................... 35 Tire Tubes ......................................................................................................................................................... 36 Gear Transmission Motor.................................................................................................................................. 36 Gear Bungee Arms............................................................................................................................................ 36 Shimmy Dampener Replacement ..................................................................................................................... 37 Gear Failure, Loose Gear Linkage.................................................................................................................... 37 Gear System Tests............................................................................................................................................ 38 Gear Wiring ....................................................................................................................................................... 38 Gear Transmission Broken Worm Screw.......................................................................................................... 38 Brake Lining for Stainless Steel Discs .............................................................................................................. 39 Gear Bungee Arms............................................................................................................................................ 39 Gear Door Connecting Rod............................................................................................................................... 40 Gear Upper Drag Link Bolt ................................................................................................................................ 40 Cracked Side Brace Stud .................................................................................................................................. 41 Nose Gear Damage .......................................................................................................................................... 42 Gear; Cracked Housing..................................................................................................................................... 45 Landing Gear Test............................................................................................................................................. 46 Nose Wheel / Brakes......................................................................................................................................... 46 Rudder Alignment.............................................................................................................................................. 47 Brakes 180 / 250 ............................................................................................................................................... 48 Bungee Arm Cracks .......................................................................................................................................... 49 Problems with Gear........................................................................................................................................... 50 Failed Nose Gear − Push / Pull Rod Assembly ................................................................................................ 51 Bungee Tool ...................................................................................................................................................... 51 Emergency Gear Release Arm Problems ......................................................................................................... 52 Under Carriage Problems with PA 30 ............................................................................................................... 54 Proper Documentation of Landing Gear AD 77−13−21 .................................................................................... 55 Emergency Gear Extension .............................................................................................................................. 56 Nose Gear Down Lock Spring........................................................................................................................... 56 Gear Studs ........................................................................................................................................................ 58 More on the Landing Gear Side Brace Stud ..................................................................................................... 58 Gear Warnings .................................................................................................................................................. 58 Eliminating the "Popping" of the Gear Motor Circuit Breaker............................................................................ 59
Copyright © 2012, International Comanche Society, Inc. All rights reserved.

From the Tool Box of MAURICE TAYLOR........................................................................................................ 59 Notes on the Landing Gear ............................................................................................................................... 60 The Comanche Landing Gear ........................................................................................................................... 60 FAA Gives Good Advice.................................................................................................................................... 62 The 1000 Hour Inspection ................................................................................................................................. 64 Mirror, Mirror on the Wall−Who has the Fairest Gear of All? ............................................................................ 66 Landing Gear Emergency ................................................................................................................................. 67 Comanche Accident / Incidents Statistics May 1, 1987 to Dec. 31, 1999......................................................... 69 R&R / A "How−I−did−It" Article.......................................................................................................................... 71 A Weak Link? .................................................................................................................................................... 72 Wiring to Limit Switch Comanche Landing Gear............................................................................................... 73 The Case of the Wobbling Coupling ................................................................................................................. 74 Making the Landing Gear Adjustments ............................................................................................................. 74 Jammed Gear Extension................................................................................................................................... 75 Abnormal Gear Operation ................................................................................................................................. 76 Abnormal Gear Operation Checklist ................................................................................................................. 76 Abnormal Gear Operation ................................................................................................................................. 78 Gear Down Light ............................................................................................................................................... 82 Gear Pre-Load Adjustment Non Believer (Jan 2002)........................................................................................ 84 From Maurice’s Toolbox- Adjusting The Landing Gear (Oct 2002) .................................................................. 84 Brake Problems (Mar 2003) .............................................................................................................................. 85 Care and Maintenance of Your Comanche Braking System (May 2003) ......................................................... 85 Further to the Case of the Wobbling Coupling (Landing Gear Transmission) (May 2003)............................... 87 The Retractable Gear That Wasn't (Nov 2003)................................................................................................. 87 Take Care of Your Gear and It Will Take Care of You (Apr 2004).................................................................... 90 Landing Gear Harness Preventive Maintenance (May 2004) ........................................................................... 92 Is Your Emergency Gear Extension Handle in Good Condition? (Jun 2004) ................................................... 93 Parking Brake Slipping (Feb 2004) ................................................................................................................... 95 Bungees Too Strong (Apr 2004) ....................................................................................................................... 95 Gearbox Inspection & Service (Nov 2004)........................................................................................................ 95 Difference Between Metal and Organic Brake Linings (Feb 2005)................................................................... 96 Tire Ads (Nov 2005) .......................................................................................................................................... 96 Rotating Tires (Dec 2005) ................................................................................................................................. 96 Landing Technique Affects Tire Wear (Dec 2005) ............................................................................................ 97 Brakes on Pre-Landing Checklist? (Dec 2005) ................................................................................................. 97 The Infamous Cracked Main Landing Gear (Jul 2007) ..................................................................................... 97 Cracked Bungee Arms: AD 77-13-21 and Service Letter 782B (Jun 2008) ..................................................... 99 Installation of Main Landing Gear Bungees (Jul 2008) ................................................................................... 100 Landing Gear and Brakes (May 2011) ............................................................................................................ 104 Toe Brakes (Sep 2011) ................................................................................................................................... 104 Toe Brakes Installation (Jun 2012) ................................................................................................................. 104 Cost of 1,000-Hour Landing Gear (Feb 2012) ................................................................................................ 104 Landing Gear Switch/Motor (Aug 2012).......................................................................................................... 105 Nose Wheel Orientation (Aug 2012) ............................................................................................................... 105
Copyright © 2012, International Comanche Society, Inc. All rights reserved.

Gear Warning Horn Here is a bit of trivia for your next hangar flying session with a bunch of PA−30 drivers. I discovered it one day while examining the landing gear schematic. Assume you extend the landing gear. It appears to go down, but you do not get a green light. If you retard both throttles to idle and the gear horn does not blow, it means that the nose wheel is down and locked. However, no information on the state of the mains is conveyed. Conversely, if the horn does blow it indicates that the nose wheel is not locked, and the mains are still in an unknown state. All of this obviously assumes that the nose wheel micro switch, the gear horn, the throttle switches, and all associated wiring are not broken.
Gear Failure, Missing Cotter Pin A couple of years ago, I had total electrical failure at night coming home from Massachusetts on IFR plan (I had three flashlights). I flew to Bangor International (11,400' by 300') to land. Read the cover over the emergency release carefully and followed instructions and the gear lever came up 45 and stuck. I put a 30 degree bend in the lever to no avail, so had to belly land. Later, I was told that there is a cotter pin, which supports the worm gear arm, that had broken, allowing the arm to drop enough to make it jam. (See article on Emergency Gear Extension Problems)
Gear Maintenance The secret I have discovered to keeping the landing gear in top condition is to grease all the fittings frequently (every oil change) and to use high quality lithium grease on the worm drive gear. The way to do this is carry a small tube in the plane, and while in the air, open the emergency gear cover plate and apply the grease (it's the only time you can cover the worm drive completely).
AD 77−13−21, Prevent Gear Collapse 21 Nov. '78: Keith Blythe, Chief Eng. & Mfg. Branch − FAA Atlanta, Georgia Re: AD 77−13−21 Dear Mr. Blythe: Reference Part B of this AD. May I, as pilot−owner, perform the repetitive inspection of the bungee cords on my PA−24−260 since this is one of the preventive maintenance items granted the pilot under Part 43? If so, would appreciate your authorization so that I can make reference to same in making log entries in continuing compliance with Part B of this AD. Reply from: Chief, Engineering & Manufacturing Branch, AEA−210 We have reviewed your subject inquiry, which was forwarded to us by our Southern Region for reply. It will be acceptable for you, as a pilot, to perform the yearly repetitive inspections of the bungee cords called for by the subject AD, and make the required logbook entries. However, the 500 hour inspection can be performed by an appropriately certificated person or shop. Raymond J. Borowski ED: The last sentence should read “can only be performed by an appropriately certified person or shop.”
Chapter 7 –Landing Gear / Brakes 4 of 106

Gear Failure, Misaligned Aligner When was the last time you checked your aligner assembly? If you've been flying around in your beautiful Comanche and don't even know what one is, now is the time to find out and check it out. If you are planning to buy that creampuff Comanche that's been hangared since new and only been flown on Sundays by that little ole "person" in tennis shoes (please disregard the beer cans in the luggage compartment), then you ought to check out the aligner assembly. The aligner assembly is a Y−shaped channel about six inches long on the rear side of the nose gear oleo − up near the top where the oleo is pumped up. If you follow the rudder peddle push rods through the fire wall to their connecting point on the what's it that makes the nose gear move to the right and left, you'll find a kind of half closed funnel shaped (Y−shaped) track in which a roller is supposed to be guided when the gear comes up. As the nose gear retracts, the roller is forced down to the bottom of the Y. If the rudder pressure is being held to the right or left (usually right to counteract P−factor), then the aligner forces the nose gear to retract straight into the wheel well. Okay, so now you've found the elusive aligner. Why should it be checked and how does one go about checking same? The following sad story will answer the first question. Once there was a Comanche pilot who had an unfortunate mishap and damaged his Comanche's nose gear. The Comanche was repaired, but the alignment of the aligner was not aligned correctly so that the aligner aligned, but not very well. The Comanche was sold to a good but unsuspecting pilot who flew his cherished bird for many happy hours. However, one fine “crosswindy” day our unsuspecting pilot took off with lots of rudder action and placed the gear switch in the up position. Up came the gear to the halfway point and pop went the gear motor circuit breaker. By 'n by, our good but unsuspecting pilot reset the breaker and placed the gear switch in the down position but again the breaker popped. So, here was our pilot with his gear stuck up. Now what would you have done in this situation? Yep, off came the emergency gear lever door and the emergency gear extension procedure was executed − all to no avail! The Landing Gear Was Stuck Halfway Up (or halfway down)! There was nothing left to do but to declare an emergency and bend the bird's belly − the prop got bent too. It cost a bunch to fix the whole mess up again. An expense that was not really necessary. What had caused the mishap? It seems that the aligner assembly was misaligned so that the aligner did not align. In other words, the roller which was supposed to ride down the inside of the Y had jumped out of the Y altogether and, once out, it could not find its way back in. Hence the gear came up crooked and would not return to the down position because the roller was caught outside the Y. How can one detect the misaligned aligner assembly? It's relatively easy if the plane is parked in the bright sunlight or there is a good flashlight handy. The aligner Y is usually dirty, oily, or slightly rusty; however, the track made by the roller can be plainly seen as a bright shiny line on the inside of each arm of the Y. This track is kept clean and shiny by rolling action of the roller as it does its straightening job when the gear comes up. Check very carefully to see if the shiny track is very near the edge of the Y or if it extends near the edge during part of its track. If this is the case, the possibility exists for the roller to jump over the edge of the aligner Y at some unexpected time during simultaneous heavy rudder peddle pressure and gear retraction. At your next annual inspection, you can watch the aligner at work; but it's not too healthy to try to watch the action while in flight − it's kinda windy and you might catch pneumonia. Checkout your aligner assembly and have it straightened if necessary. It might save you some loot. Notable Quote: "There's nothing as useless to a pilot as the runway behind or the altitude above.'' ED: "Or air in your fuel tank."
Brakes After much work on brakes, with no luck, I called Lock Haven and found somebody there who knew what was the matter. On early models, S/N 3295 and below, the brakes have a self adjust feature which works on a single screw on each brake. When the bushing gets corroded, it seizes within the housing. Clean it thoroughly and oil it and it will work much better.
Chapter 7 –Landing Gear / Brakes 5 of 106

Jammed Gear Retraction The tribe may be interested in my solution to a gear malfunction problem. My Comanche experienced gear−up malfunction in cold weather. On jacks in a heated hanger it worked perfectly. My local dealer's prognosis was $600 in a new gear motor and transmission. Before taking the $600 route, I jacked up the plane, outside for a gear cycle on a sub zero. We solved our $600 problem with fifteen cents worth of electrician's tape. Cold weather stiffened the brake hose on the left main. As the wheel retracted, the hose would not flex enough and protruded between the wheel door and the wheel door stop, thus keeping the wheel assembly from completing its cycle enough to activate the limit switch which turns on the wheel up light and shuts off power to the gear motor. A small amount of tape properly placed keeps the hose from sliding too far through the retaining eye thus solving the problem.
Single Fork Modification Modifications are generally for the purpose of improving appearance, improving performance or meeting safety requirements. In the case of changing the main gear on older Comanches of a single fork, you accomplish the first two changes surprisingly easily. What is involved: 1. A direct exchange of fork assembly 20709−00 for the appropriate right and left landing gear strut assemblies.
Both are illustrated on page 198 of the 1966 issue of the Piper Comanche Parts Manual. Essentially it is an exchange of the fork type used on the 260 and 400. The exchange I was involved with was made during the winter, so we put the housing assembly on the stove (to expand it) and we put the strut assembly in the snow to contract it). The two parts went together and have stayed so without any problem ever since;
2. the next step is to move the brake housing from the outside to the inside. As I recall, this was rather easy and only involved some spacers and perhaps a change in the length of the mounting bolts. When the gear is retracted, the housing will be in the clear inside the wheel well.
The change was made about three or four years ago, and probably took about 3 to 4 hours all together. The results? You will notice lots less drag when the gear is lowered for landing, so I assume there is less drag on takeoff. With the gear retracted and the brake housing on the inside, there should be less drag in level flight. Since the brake housing stuck straight out into the airstream, I can only conclude that there is some real benefit there. From the appearance standpoint, it does make the gear look more "uptown" and less like a part from the bicycle store, but how many people go around looking at the main gear of the Comanche? I feel that the changeover has helped top speed in level flight some, 2 to 3 mph perhaps, but I wouldn't want to argue that point with some sharpshooter. Another benefit is that you end up with two used forks. They clean up nicely and can be stored out of the way and can be used on the nose gear some day after those holes you put the tow bar in wear out. In fact, you will have a lifetime supply. Don't count on selling them. ED: Make sure that the modification is properly documented and signed off.
Popped Gear Circuit Breakers Several different causes have been described for landing gear retraction problems. Most of the problems manifest themselves by the gear motor breaker popping just as the gear reaches the fully retracted position. The more obvious ones are worn gears in the retraction mechanism, lack of or too heavy lubricant for cold weather operation, weak circuit breaker. These problems can usually be overcome by helping the gear motor by pushing down on the emergency gear extension handle as the gear comes up. Another not so obvious trouble can cause the gear to fail to retract all the way thereby causing the motor to overload and blow the breaker. The hydraulic brake line is fitted through a loop on the landing gear fork. It usually has freedom of movement through this loop or is positioned so that as the gear retracts the brake line folds inside the wheel well. In cold
Chapter 7 –Landing Gear / Brakes 6 of 106

weather, if the brake line gets stiff, it can sometimes become trapped between the gear door and the wing and not fold entirely into the wheel well. Since the gear door can not close entirely, the breaker pops. And one more cause came to light just a few days ago. The wheel well lining screws came loose and let the wheel well lining fall partially out of the well. When the gear came up, the wheel smashed the lining back into the wheel well in a not too graceful manner. The irresistible force met the immovable object and pop went the breaker. Take a tip from one who has had it happen. Manual extension of the gear does not always lock the gear in the down position. Upon landing, the manually extended gear can collapse. A good thing to do it you have a co-pilot is to have him put his left foot on the emergency gear handle and hold it firmly against the wheel well. ED: If the gear is properly adjusted and the downlock springs are installed per specification, the gear should remain locked.
Gear Down Lights I flew for a long time with an intermittent gear down light problem, and finally found a broken wire in the nose gear switch wiring harness. The safe way to live with the problem, I think is as follows: (John's description is for his twin. We are researching the comparable method for the single.) 1. Retard both throttles until you get a gear warning horn. 2. Put the gear switch in the "down" position. 3. Watch nose wheel in the mirror or watch the mechanism in the cockpit. 4. If the horn stops when the motor stops and the wheels look down, your gear is down and locked. The reason this works is that the light and horn have separate wiring circuits through all three wheel−down limit switches, at least for the Twin Comanche. A check of the wiring diagram for the single would confirm whether it also has the same arrangement. ED: It does.
Gear Down Light A recent, frustrating bout with gear position lights on my beautiful PA24−260B might be of interest to other members. Over a period of weeks, I had experienced occasions where the green gear position light would either; 1. Not come on, or 2. Come on after 5 − 10 second delay, or 3. Flicker after coming on. I had the microswitches checked on all gear legs and had the gear system checked for proper adjustment of "throw" of all gear legs. All checked out OK, but I still had the green light problem on occasion. The gear motor always shutdown normally after the selector was in the "down" position. At no time did I pop a circuit breaker, but the light problem was hard on the nerves, even though I always had confidence that all 3 legs were down and locked and never had to land without finally getting a steady "down" indication after numerous gear cyclings. The problem turned out to be a broken wire in the light circuit. The break was inside a plastic sheath on the left main gear leg and was found by simply my "jiggling" the wiring on each leg while the plane was on the ground, master switch on and a friend sitting in the cabin to monitor the light. Perhaps someone else is having this problem or will encounter it and can save some time, money and aggravation by checking in this fashion for broken wires.
Chapter 7 –Landing Gear / Brakes 7 of 106

Pumped up Struts Heavy landings are most undesirable any time, but this is particularly so with the struts pumped up as you have less shock absorption capability. So be very careful to avoid these. If you lower the nose strut, check your prop clearance. This may be a problem if you operate over any grass areas, since the clearance is reduced by several inches, you will also find that the step up to the wing is much larger with the longer legs so mounting and dismounting your chariot will take a little extra effort, especially if your own legs are not long. ED: Strut extension on all Comanches should be as Directed in the Comanche Service Manuals.
Gear Circuit Breaker When I first brought it home, I took my wife and kids around the pattern and had my first (and only) emergency. The gear wouldn't come down. After trying everything, I lowered the gear by hand and landed safely. I subsequently discovered two things. One, past annuals had not properly serviced the emergency gear and as a result it took a considerable amount of effort to get the emergency gear handle loose to lower the gear. (Have you tried lowering the gear by hand with your plane on jacks?) Also, I discovered the gear didn't come down because the breaker had popped when I tried to lower it at 150 mph. I thought the breaker was in because I didn't push the side panel in far enough to feel the right breaker. Anyway, I'm glad it happened when and where it did because we solved the problem while I had another good pilot on board.
Gear Failure, Gear Collapse I had trouble with the amber gear light on my PA24−250 blinking off and on. The circuit breaker would also pop. By lubricating the pull−rods in the wheel well more frequently than recommended, my problem seems to have been solved and saved costly repairs. I would like to comment on the service letter pertaining to gear system collapse after manual extension. In the summer of 1974, my ex−partner was flying to Florida from Lancaster, CA in our 1959 PA24−250. After takeoff from Lancaster, the gear up limit switch came loose, causing the gear motor to burn out (defective breaker) in the up position. Upon arriving at his first fuel stop, Winslow, AZ, he discovered the faulty motor. He had to use the back−up or manual extension. After cycling the gear several times by hand and receiving a "green" each time, he proceeded to land. As he touched down, he hit a dip in the runway and the gear collapsed. Later, that summer, I called the controlling GADO office in Phoenix to find the results of their investigation and they indicated that they have had five or six other accidents of this type. They said that when using the manual extension, the only locking device utilized is the gear linkage coming over center. When using the gear motor, the worm drive will prevent the gear collapsing, even if the gear linkage comes back over center. I don't know what the service letter entails as far as parts and labor, but until I comply with it, I am going to put a "big foot" against the manual extension lever pushing it forward anytime I use the gear back-up system.
Hand Brake Support Bracket I have a question for the owners of 1960 and older Comanches. When was the last time you or your mechanics looked at your hand brake support bracket? I would guess most of you would say "Never". I looked at ours for the first time the other day while checking out the brake system. I found a large elongated hole where the bolt passes through the bracket that holds the handle in place. Piper had installed a 1/4 inch bolt through two thin sheets of metal and after a few hours (2,200) of pulling the hole was elongated allowing the handle to rub on one side wearing it almost through. Four rivets hold these sheets in place and these I removed. Using the removed sheets as a
Chapter 7 –Landing Gear / Brakes 8 of 106

template, I made two new ones out of 1/8 inch aluminum. I installed these with 6/32 screws and locknuts, with the heads on the inside. You have to use a bolt 1/4 of an inch longer for the handle. I also found the brake cable was frayed where it ran over the bottom pulley. The cable is hard to remove due to the cotter pins used to keep the cable on the pulleys. The keys are hard to remove and even harder to replace, so be prepared for a fair amount of work or expense for the labor to replace.
Gear Down Light No Green Gear Light: We also had no gear horn but that was caused by another problem (read on), however, it did help lead me down the wary path. This problem has been with me since my plane was obtained about three years ago. The first attempt to solve the problem was to ohm out the wiring. It checked out OK. Next step − based on the schematic in the service manual was to look at the microswitch in the nose gear. Contact cleaner was sprayed in the switch. Now! Notice to other Comanche Flyers! Our gear switches (65 model) are self−contained Epoxy and spraying cleaner was useless and wasteful. Therefore check the type of switch your plane has. Things went along intermittently until its first annual. While discussing the light and no horn warning problems with our A&I, we found out that the horn didn't work because the thin aluminum band that rings the vibrator had been kicked once and dented so the vibrator was bound up and no longer free to move. Now with a new light on the problem one thing led to another and the cannon plug on the firewall was disconnected, cleaned, checked, re−soldered and put back together. The intermittent gear light continued until one day I turned on the navigation lights and there were no lights. Investigation with a VOM led to me taking apart the entire switch unit that controls these and panel lights. The switch on our plane has three sets of two contacts. Of the six contacts, four were worn and were refinished by soldering over them. The rocker switch that makes contact with the six contacts was cleaned with emery paper. Upon reinstallation, the gear light is much better (95% success I guess) and the navigation lights work just fine. May I add this point that the schematic supplied by Piper did not exactly match our switch so my advice is don't believe everything one reads. One should always make their own drawing as things are dismantled. One more thing I want to add. I spoke with fellow Flyer, John Willis, one day about my problem. He admitted he also had the same problem in his Comanche (59 model). The fix to his problem was to spray contact cleaner in the wire wound rheostat. ED: The wire wound rheostat does not affect dimming of the gear lights. The 10 ohm resistor on the switch does. One other item has been added to our plane relating to the gear problem. For $9 plus tax, a bubble mirror was bought and attached to a homemade bracket placed in front of the left wing tip. Now we are able to look at the mirror and visually verify Gear Down. Works best in the daylight though.
Slow Gear Operations Q. My Comanche gear works when it feels like it. After sitting on the ground for over 24 hours, the gear will not immediately cycle after takeoff but instead requires 30 seconds to several minutes before starting to cycle. There are no blown fuses. I have had the gear almost completely rebuilt to meet specs in the service bulletin and keep the aircraft on progressive maintenance. When the gear does cycle, it does so freely and swiftly.
Chapter 7 –Landing Gear / Brakes 9 of 106

A. Take a careful look at the nose and gear limit switches, in that order. They can get contaminated with dirt and oil. The only way to check them is to replace them one at a time − starting with the nose gear. Another possible problem is sticking brushes in the landing gear motor. On jacks or in flight, tap it with a hammer to see it this will make the contact. To determine if you are getting current to the motor, wire a test light to the plus side of the gear switch in the up position and the other to ground. An immediate current flow indicates a problem between the switch and the motor. No current flow indicates that the problem is at the switch or outboard. A sticky squat switch would prevent the gear up circuit from being active when the gear extends on take off. After a few minutes of flight vibration could cause it to finally close and energize the up−circuit.
Sync the Gear Q. What does the PIPER service manual mean when it says sync the gear? Is it important? A. The Service manual does not detail the procedure required to make certain that a Comanche landing gear is properly synchronized. As a result of complying with AD 77−21−13, we are receiving reports of gear problems, which include collapsed gear. Some have been determined to have been caused by the gear being improperly synchronized and tensioned. We suggest, especially if you have had the gear AD done, that you have your shop verify that they performed the following check. If they have not, it should be done as soon as possible − because the probability of ''popped" circuit breakers and a gear collapse exists. It is also possible that neither will occur at once; thus giving the Comanche owner a false sense of security about the integrity of his gear. 1. The Comanche must be on jacks. 2. Unhook gear at the transmission. 3. Get under Comanche and visually determine that the main gear retract links come over center at the same time.
Adjust as necessary. 4. Determine that the preload, in the down position is about the same on both main gears. Do this by pushing upward
on the center of the retract link. The important point here is not the number of pounds required to break the retract link over center, but the fact that the values on both gears are about the same. Adjust to get equal tension.
5. Repeat steps 3 and 4 for the nose gear. Remember that a Comanche gear is mechanical. Therefore, all three gears should come over the center at the same time and the tension should be approximately equal on all three gears. John Dean looks for about 20 pounds pressure to break each individual gear over center. It can be higher. A lower value means out of rig and/or worn gears. Adjust nose gear Down Preload?
6. Re−hook the gear. 7. Check for excessive play in the transmission bearing, i.e., is it tight in the transmission housing. There should be no
more than 0.015 inches play in a fore/aft motion. If it is greater, the worm gear will ride up on the ring gear and cause excessive friction.
If your gear passes these tests, it is in sync. Assuming that it is properly rigged and meets the over center limits; it should continue to provide many years of trouble free service.
Nose Gear Door Incorrectly Installed My "C" model PA−30, was in the shop for repaint. The only items that were separated from the aircraft were the HF and DME antennas and the nose gear doors. The rest of the aircraft was masked and painted in situ. The job was completed and as things have a habit of going wrong, I decided to check the operation of the HF and DME in flight, just to make sure the connections were not paint affected and that the sets would pick up the nearest stations. Looking terrific in the new livery, I rotated, selected up, got transit light, but no gear up light. Checking the CB, I found it had popped. Resetting caused it to pop again and a quick look in the mirror confirmed the nose gear was only half retracted. At 200 feet and climbing, I reduced power to think this thing out as the tower called to advise that the gear appeared not to have retracted.
Chapter 7 –Landing Gear / Brakes 10 of 106

Selecting either up or down and resetting the CB caused it to pop. The gear is nicely jammed halfway. Tell tower I'm moving out of the circuit to sort things out. I get out the emergency handle and engage it. There is no way I can budge it in either direction. With maximum physical effort a manual extension is completed and a successful landing ensued. What happened in the paint shop that could possibly cause that? In this case the doors had not been replaced in the correct manner. Taking the doors off, putting them back on opposite sides, jacking the aircraft and resetting the transmission and she was again, "just like a bought one."
Toe Brakes Q. As a new member of ICS, I am sure I would enjoy the society and my Comanche better if I had toe brakes. Our local mechanic knows of no conversion kit or STC. Do you? I sure hope so. A. An STC for PA−24 series was awarded to Atlas Aviation Inc., 8505 Montview Blvd., Denver, CO. Its number is SA891WE.
Gear Transmission Loose Motor A member wrote of an incident with his 250. On an attempted landing, the gear jammed one−half way out. Finally they were able to manually extend it. Examination revealed that the gear transmission motor assembly had broken loose from its mounts and allowed the assembly to ride on the jack screw in the compartment below the floor. The bulkhead is the one at the rear of the compartment viewable through the Man. Emergency extension opening, and the channel goes from the rear of this bulkhead to the next bulkhead aft, hence is NOT viewable. The channel has lightening holes, on both sides, which leave only narrow side strips of aluminum sheet to carry the load. In my opinion, the failure began there, and when the channel was sufficiently weakened, the bulkhead began to flex, tear and fail around the heavy, rigid mounting plates. Finally, they both failed completely, freeing the motor / transmission assembly. Both these center floorboard pieces ARE removable. Problem is, the seats, inboard tracks, floor to spar fairings, fuel selector trim, etc., must come out first. I have made a modification of the center, aft, floorboard, and its mounting system, to allow either removal of the entire section without seat track removal, (by installation of mounting angles on inboard side of the "fuselage beams," to take PK screws and Tinnermans); or an inspection plate over the area to the left of the fuel selector. This would require FAA approval. Then checking this area could become part of Annual inspection procedure. (Seats come out, and fuel selector trim off, in less than 20 minutes, so no appreciable increase in Annual costs.) Every so often, since '61 purchase, with mechanics setting up the gear, on jacks, so that in flight, they try to come up, too far, and blow the motor C.B. This, I feel, is the primary reason for the "over stressing" and failure of these parts. Other owners who have had retract C.B. popping problems, would do well to have that channel checked, visually, at the next downtime. Replacement, once access gained, is quick and easy. The channel is easily fabricated locally, and I suggest forgetting the lightening holes. Comparable A/C, with no previous up problems, C.B. popping, or trans failure), would probably not have any damage to the channel or bulkhead. I think the extra nose gear springs are not helping this situation, but it would take time for this extra load, on the retract cycle, to cause this sort of failure. One item you could do, to help all of us in this gear situation is: Get together with your technical reps, and print up; 1. A detailed, gear inspection sheet; 2. A detailed, gear "setting up" procedure for an A/C on jacks to insure any mechanic can do it without ending up with
the gear trying to overreact, in flight. Make these papers available to the membership, by mail, at the cost of your creating and mailing them. The manual (Piper), apparently doesn't do the job.
Chapter 7 –Landing Gear / Brakes 11 of 106

Observations: The condition you describe has not been a problem with these aircraft. The bulkhead cracking could be attributable to several things. One is a possible gear up landing sometime in the past when the weight of the aircraft was put on the gear with the gear part way up. The push retraction cables are very strong and have been known under such conditions to badly damage the area you speak of with no damage to the cables. Another possibility is, if the attachment to the bulkhead was loose for a long period, each time the gear went up or down; it would work on this area. Another thing we have found is that, if the gear is improperly rigged, and allowed to go too far in either direction, this can result in high stress on all parts. A circuit breaker popping indicates a malfunction of some nature and should be determined at once. The extra nose gear spring, if properly installed, has a negligible effect on a properly rigged Comanche. Through a cooperative effort with ICS, Piper has worked out changes to be published shortly concerning Comanche gear maintenance. However, a qualified mechanic, familiar with the Comanche should have no problems in setting up the gear using the current Piper installations and manual. Since Comanche gear has been a basically trouble free system, most mechanics are not too conversant with it; yet they will attempt to work on it, often with dire results. For instance it has been recently reported that the arms which attach the bungees to the gear were reversed on a Comanche. (Why they were removed is unknown since they have nothing to do with the gear AD). Now, instead of holding the gear "over center" and locked when extended; they tried to hold the gear retracted! Imagine this owner's surprise when he attempted to extend the gear, after flying 1,000 miles from the shop which had just done his Annual!
Gear Operations An article in the January 1979 ''Flyer" pertaining to the Comanche gear prompts me to write giving my thoughts. I'm neither an engineer nor an A & P mechanic, but I've owned, flown and maintained my 1968 PA24−260 for almost 8 years and love the machine and its performance. I cannot accept the statement that anyone should be "acutely aware of its gear folding reputation". Because I don't believe Comanches have an established reputation for gear folding at all. Rather, they have a comparatively trouble free and simply designed system compared to other airplanes. Furthermore, my gear doesn't "clunk", hasn't "clunked" in the past and "clunking" would not be acceptable as normal to me. My pilot friends have frequently remarked about the gear's smoothness and lack of "clunking" or banging. I would not recommend adjusting limit switches unless the designed mechanical "throw" of all gear legs is checked first. Otherwise, you may be adjusting switches to encourage their operation when gear legs (or leg) are not in the correct position. Using manual assistance on the gear handle is accurately described in the article as a "habit pattern". I think this is adopting a symptom that should be telling the owner there's something wrong. As a veteran airline pilot friend of mine likes to say referring to pilot habits, "if you do something wrong enough and long enough, you get good at it". It is amazing to me, on occasions of fly−ins, luncheons, etc. to learn how many owners accept symptoms of problems as normal and how they "learn" to reset popped circuit breakers almost as part of their pre−landing check list, etc. instead of going to the root of a problem. One owner told me he always got a couple cups of gas expelled out of the bottom cowling on engine shutdown and was told it was "normal". I had had much less of this and discovered a defective diaphragm in the injector servo which was an acute fire hazard.
Jammed Gear Extension I suggest that all Comanche owners immediately check their emergency gear release. I recently had a new gear motor and transmission installed. When the electric system failed, I found the manual release to be impossible to use. We even popped the rivets without moving the release. The problem was eventually traced to defective parts furnished by Piper. I am surprised that no service bulletin or AD has been issued for this condition.
Chapter 7 –Landing Gear / Brakes 12 of 106

ED: The slot that the motor release arm locks into was not true and once engaged, it could not be removed. He didn't mess up his Comanche. The gear finally lowered electrically. If you have replaced a transmission lately, check it closely. He tells me that you must see both parts together before you can notice the difference.
Gear Transmission Assembly After a recent manual landing gear extension as a result of a discharged battery, I thought it was as well to take the entire motor and actuator assembly out for a closer look. The log book never showed this item to be replaced or even worked on in the 2,000 hours of its existence. And I assume it has gone through at least 2,000 landing gear cycles in that time. Once disassembled several things were readily apparent. The main ball screw shaft was badly in need of new lubrication. The worm gear reduction had grease but it had dried out and was caked on the sides, and actually was doing little lubrication. The actuator assembly was thoroughly washed and packed with new grease. The actuator motor was a different story. I had purchased a spare a year ago with the intention of installing when needed and thereby avoid the delay at Piper dealer. The old motor was ready to fall. The brushes were 70 percent worn, carbon soot and particles coated everything, the armature was worn but worse were the wires holding the brushes. Because they were so worn the wires had to stretch to their limit but in the process they contacted the rotating armature which chewed them off. I was down to a few strands. Maybe 10 to 25 cycles and it would have quit dead. The new motor installed just fine. Just remember to disconnect and connect only one wire at a time. If your aircraft has more than 1,500 hours on it I recommend that you invest in a spare actuator motor, about $47. This is really cheap insurance, and is not difficult to install at all. Note that you will have to jack up the aircraft and cycle the gear after this exercise to check everything out. Especially the limit switches. If you have the time install a sensitive ammeter to check load during extension and retraction or if you do not then an accurate stopwatch will also reveal possible binding or other problems. Extension should be about 5 seconds and retraction 6 seconds.
Brake Cylinder Maintenance Saturday morning at Springbank field just outside of Calgary, Canada and the day was bright and clear − but cold. In fact, it was the first real cold snap of the winter. My 250, C−GCRM fired up after some coaxing and I taxied out behind C−FMFB a 260 owned by Joe Chomany. We had no particular destination in mind but we planned to look at the mountains and perhaps "stir up a little air" and maybe even visit some friends at a local field. I applied brakes as I approached the button and lo and behold nothing at all happened − they were frozen solid! I felt betrayed and disappointed but there was no alternative but to do a quick 180 and return to the tie down. The mechanic at Arrowhead Aero was not busy so he warmed the old dear in the hangar and then drained the brake fluid. Sure enough there was moisture evident. He then suggested that we had better look at both wheel cylinders as, he explained, the drain on these is not at the bottom but rather at the side of the unit, and water can collect in the lower portion of the wheel cylinder. We removed both and I was shocked to find the bottom half of each unit to be filled with a gooey emulsion of oil and water. What a mess! Further inspection revealed that one cylinder had been corroded by this guck and would have to be replaced. We cleaned everything, replaced the seals, flushed the system and had everything functioning in a couple of hours. I have no idea how the water entered but we suspect condensation as we know that it seldom rains in Sunny Alberta. For those of you who have not inspected these wheel cylinders lately, it might be in order for you to do so.
Nose Gear Support Corrosion Here is something that should be brought to the attention of all Comanche owners.
Chapter 7 –Landing Gear / Brakes 13 of 106

While installing a new engine in a 400 Comanche, the asbestos wrapping around the engine, just above the mufflers and exhaust pipes) was removed for inspection. The covered tubing was found to be rusted half way through, severely weakening the nose gear support. I have since seen another 400 mount that had resulted in so much corrosion that the nose gear mount failed on landing resulting in major damage. I suggest that everyone check under these wrappings and if necessary, have your A&E repair or reinforce the tubing as was done to mine. ED: It is not recommended that asbestos or any kind of wrap be applied directly to the tubing as moisture is trapped and corrosion as described will occur. A piece of metal held off the tube by ¼ inch will stop the effects of direct heat radiation.
Gear Circuit Breaker On the matter of the L.G. problem I spoke about: The problem started as no gear up action after a takeoff. The relay worked, the circuit breaker was not popped, but no action occurred. As it is an older PA−30, I decided to replace the motor "pro forma". With aircraft on jacks with new motor installed, still no action. Leaving the gear position switch in "UP" position, I pulled the circuit breaker out. The gear motor worked while the circuit breaker was being either pulled out or pushed in. Problem? Open circuit breaker. Solution − replace. Trouble shooting hint: When gear fails to operate and circuit breaker is not popped, put gear position lever in position opposite to the position of the gear and cycle the circuit breaker. If motor runs momentarily, probability is high that circuit breaker is bad. If motor does not run at all, probability is high that circuit breaker is OK
Twin Gear Microswitch Wiring I've wanted to send you a note on the PA−30 landing gear microswitch wiring − we had a broken wire on left main where the 4 wire bundle had to bend due to gear retraction, VIZ.
My diagnosis of the basic problem: The cable clamp at pivot arm if factory positioned − holding cable about 1 1/2" away (radius) from pivot point. The result has to be a large transverse motion of the bundle as the gear retracts. My solution: Reverse the position of the 4 bundle clamp on pivot arm as follows:
Chapter 7 –Landing Gear / Brakes 14 of 106

This reduces the transverse distance the clamp (ergo−bundle) has to travel to about 1/4" more / less. Basically, the clamp now rotates only instead of rotating and traveling. I installed all new micro−switch wiring in new spaghetti (splicing onto old wiring just inboard the wheel wells). The new wires had a "natural curl" to them as they had come off the supply reel. I took advantage of this and "flowed" the new bundle in an appropriate way to minimize bending. In actual operation, the wires now "curl", they don't bend at all: I have looked at the wiring on many Comanches and all seem to have a definite kink in the bundle at the bend point. I am convinced that this is the definitive fix for eliminating the possibility of broken wiring due to gear retraction.
Gear Bungee Arms Had the March 1981 issue in my briefcase when I left Lockheed, Burbank, on a business trip last week, I would have read "Piper Comanche Landing Gear Inspections". The first two paragraphs were right on! He recognizes a bunch of bureaucratic paper work issued to presumably cure a non-existent problem! When he said it took both he and his wife to manually extend the gear with their feet against the handle, an alarm bell went off in my mind − it's time for this supportive old engineer to open up! First, let's clear up some key points: 1. The toggles are not toggles. They are called drag struts in our trade. 2. The drag struts on the mains of a Comanche are assisted to both the full up and down and locked positions by the
bungee cords in the wings. 3. The nose gear drag strut is not as critical because it is driven by a clevis rod rather than Teleflex cables to reach the
down and locked (over center) position. 4. Dick is correct when he says the best way to check Comanche landing gear while extended on jacks is no fore and
aft free play in the nose gear and no transverse play on the mains. If excessive play exists, it is a relatively simple matter to install new bushings in the pivot points and maintain the six and one eighth inch (6 1/8") length in the drag link which is adjustable. This adjustment should be precise because it positions the gear correctly in the up and down positions in conjunction with limit switch adjustment.
5. Piper in its infinite wisdom designed the bungee roller cranks (which extend aft of the main landing gear trunion on the aft side of the wing spar) so the right hand part can be installed on the left side and the left hand part on the right side with a little strong arming by a good mechanic lacking a service manual and parts catalog. This happens because the mechanic incorrectly believes the bungee is only to assist the gear up and locked in conjunction with the up lock solenoid on the transmission housing under the floor.
I have made sketch "A" showing the bungee roller crank in the correct position when the gear is down with an arrow showing the direction of rotation through approximately 90 when the gear is cycled up.
Chapter 7 –Landing Gear / Brakes 15 of 106

Sketch "B" shows the bungee roller crank in the correct position when the gear is up with an arrow showing the direction of rotation when the gear is cycled down.
Notice in sketches "A" and "B" that the bungee tension is increased until it goes over geometric center (approximately 45 point of travel) then it begins to assist the gear in its direction of travel either up or down.
Sketch "C". Looking Forward Left Wing. Gear Down − Bungee Crank Incorrectly Installed
Chapter 7 –Landing Gear / Brakes 16 of 106
Now I recommend that Dick remove the under wing bungee cord access cover of his Comanche and check to see that the bungee roller crank is positioned as shown in Sketch "A''. If it is positioned as shown in Sketch "C" he should get it into his favorite Comanche mechanic without delay because when new bungees are installed he may get an open circuit breaker when he tries to cycle the gear down on the first landing attempt after new bungees are installed. I know of three such incidents including my own little sweetheart, N6734P. It took two men with shoulders against the back seat using their feet to get the gear down with a full blown airport alert at Burbank in my case. The other two were less fortunate and made wheels up landings. At Lockheed, we would impression stamp these parts to assure correct installation during routine maintenance procedures and even this would not prevent "Murphy's Law" but it would help. The FAA should revise their AD's to simplify inspection procedures to the fore and aft and transverse play criteria and require tagging of bungee roller cranks as left or right when they are removed for maintenance and all these so called problems would go away.
Gear Transmission Recently I had occasion to help out with a Comanche Transmission for lifting and dropping the retractable gear. The old fuse "pop" problem that many of us are familiar with. First I replaced the motor which had indeed burnt − one of the strands in the armature winding was black, and I was not able to get a motor replacement for an associate of mine. Also, there was excessive play in the gear box itself − and a 57 thou shim did wonders to take out the play. Had to install the shim between the ball bearing, and the ball bearing case right in the transmission itself − a real simple task, since we have our own machine shop and an excellent machinist. Wouldn't you know it − still have a fuse pop problem − Stripped it down again − and this time took apart the worm and nut end of the unit. We put a micrometer on the balls − which are the recirculating type much the same as in a car and truck manual steering box! We found many of the balls were no longer round − and that they were jamming against each other just when the power was needed the most − in such a way − that they were providing back pressure adding sufficiently to the load factor − and naturally "pop" went the fuse again. This time the fix was concluded.
AD 7−13−21, Prevent Gear Collapse I acquired a PA24−260 in February 1976. We have been Comanche flyers for about eleven years and are acutely aware of its gear−folding reputation. In 1972 we got a neat suggestion from another old Comanche flyer, who passed on his standard habit pattern intended to thwart a gear fold. His habit was to put his right hand on the gear lever and do two things while it moved upward: 1. Actively help it get up into position (this unloads the gear motor somewhat, and reduces the operating current,
making less likely a circuit breaker trip−out). Feeling with the hand the slight clunk through the linkage system as it locks into place.
2. We adopted his habit and use it routinely; and we also add out loud right after the clunk that we see a green gear light.
When the gear AD appeared, our first reaction went like this: "Why did it take so long?" It was several months before our annual came around and we would have to do ours. We were listening closely and hearing about many people having troubles after the gear mod had been done. This made us more apprehensive then ever. So when our turn came, we had made arrangements to work with an excellent A&P/AI mechanic. His name is Peter V. Wolfe. I have a degree in Mechanical Engineering; and I am a Registered Engineer. Pete and I got our heads together about this gear mod and came up with a couple of new ideas which we with Piper Aircraft Corporation. The first idea was to monitor the total energy flow in the gear system both before and after the mod. This arose from Bill Black's information that it sounded like many people were having a stiff system after the mod was done, and tripping circuit breakers. So the first thing Pete and I did was to jack up the plane and put a DC ammeter at the battery, turn off everything else and operate the gear. The current drain shown on the ammeter is a direct measure of the total energy required to operate the system, stiffness included.
Chapter 7 –Landing Gear / Brakes 17 of 106

Here is what we found: Note that the time is approximate. In retrospect, I wish we had had a recording ammeter; then the time scale would be precise. With an accurate time, we would have one additional factor measuring total energy. For instance, with a stiff gear, the gear motor will be more heavily loaded, and for a given battery voltage, the motor will run more slowly, and the operations will take longer time. Also, in retrospect, we should have measured battery voltage. Next year, I will try for these extras to get a more precise working baseline. During our disassembly and inspection process, we found only one bushing and bolt, in the nose gear, out of tolerance and needing replacing. We thought that pretty good for an airplane manufactured in December 1964, with 2,300 hours on the airframe. During the reassembly, we noted that there are several bearing surfaces which are not provided with grease fittings for on going lubrication. On all of these we used a silicone based grease. This material has several outstanding characteristics: it is very slippery; it absolutely protects against moisture, and does not evaporate. It is an ideal material for corrosion protection, and maintains its lubricity to very low temperatures, in addition to having about the best over-all useful temperature range of any grease. General Electric manufactures such a grease under the designation G 341, which complies with MIS−13041. Needless to say, we were surprised and delighted to find our current drain lower after the gear mod than it had been before! It was just about two amps lower all the way around, except for the brief peak near the end of retraction, where it was 15 amps lower. This was a substantial improvement. Our gear was not stiff! In trying to account for this fortuitous development, we had several thoughts. It was at this point that we realized we should have measured voltages. I had recharged our battery during the annual. This made it possible that we were working with a higher voltage after the mod than before. A higher voltage would give less current and faster action. But we were not impressed that it was any faster; this was what brought our attention to the precise timing need. Another possible factor was the bearing surfaces without grease fittings, which were not well lubricated. Another factor was Pete's careful readjustment of the limit switches for up limit on retraction. Something else caught my eye as I saw Pete double-checking each gear when all was reassembled. He was sitting there on the floor, with both hands on the right main gear, trying to shake it, side−to−side, and fore−and−aft. I asked what he was doing, and he said, "This gives me a feel for the total sideshake in the system now that it is in operational condition." My reply was, "Well, why don't we measure it?" So we did. This was our method. Pulling on the fish scale 5 lbs. outboard, we set the indicator to zero; then pulled 5 lbs. inboard, and the indicator read 0.020". The corresponding measurement on the right main was 0.030''. This gave us a concise, repeatable measurement of the accumulated tolerances in the whole operational system. It is only an index reading, because in with this is a certain amount of bending, and a small amount of resistance due to lubricant in the bearing spaces. I did sufficient other measurements to determine how much of this was due to bending, and how much due to lubricant motion; but these are somewhat academic to our principal practical concern. We are after a quick, easy method of checking the overall system for total accumulated wear; a method usable by anybody anyplace with simple equipment. Our 20/20 hindsight made us wish we had thought of this before the mod instead of afterwards. But at least we now have a further index for checking the health of our gear on the next annual; and if any of the rest of you wishes to do the same on your birds, we can soon have a pool of data that might prove to be quite valuable. Having done all of the above, and with our annual completed, we flight checked our bird. It is difficult to be objective when you are emotionally involved in something, but it did seem to us on first gear retraction that the operation was quieter than it had been before. On first gear extension we also found it was quieter, and the clunk we usually felt as the gear went into down and locked position was still there but it was markedly quieter than previously. SUMMARY: We suggest and recommend to all our fellow members these items: Standard practice on gear extension: help the gear into down and lock by hand, and feel for the clunk. At each annual, and any other time you have some doubts about your gear, perform these checks: 1. Total current drain:
a. With recording ammeter, or precisely timed b. recording the voltage.
2. Total side−shake on each main gear.
Chapter 7 –Landing Gear / Brakes 18 of 106

ED: For those of you, who follow these excellent checks, be sure that you also monitor voltages when checking current drain − multiplying the average voltage by average current drain (in amps) will give you the average power (in watts) required to raise the gear. If the power required to raise the gear after servicing is lower, then you have improved things. If the power required to raise the gear is higher, it's back to the boards.
Gear Warning Horn Adjustment In the October Flyer, a member asked for advice on intermittent operation of the gear warning horn. Yes, it can be corrected. Disconnect the two wires at the horn and remove the horn from its bracket. Once outside and exposed, connect it to the aircraft battery or other 12 volt DC source for testing, using one of the two test leads as a switch by touching the horn wire. Use a good light so you can see well and you'll soon discover how the horn works and how to adjust it. It works similar to a relay or solenoid except its contacts are in series with the coil itself. When power is first applied (via the throttle and landing gear switches) the armature pulls in, breaking the connection to the coil that exists through its own contacts. Then, upon returning to its original state, the contacts are again made and the cycle repeats itself. It thus vibrates, on and off. A diaphragm is physically connected to the moving armature to amplify the vibrating sound. The trick is to adjust the contacts for solid and reliable operation with the loudest sound. Adjust the contacts only 1/4 to 1/2 turn each time and make sure the locking nuts are tight. It is a rather critical adjustment but a few tries should do it. Make sure the contacts are clean and free of any build−up prior to adjusting. Also remember that the supply voltage is more nearly 13.8 volts when in flight and allow a little adjustment margin. Then, after reinstallation, put the aircraft on jacks and check the wiring and operation of each landing gear micro switch (the latter can be adjusted as to operating point. It may be a surprise to some, but it has nothing to do with MP. It is mounted to operate when the pilot's throttle lever, just behind the panel, is moved beyond a certain point.)
Low Battery Effect on Landing Gear Recently I had a gear problem evidenced by a popped circuit breaker as the gear reached or nearly reached its upward position. Each time the breaker was reset it immediately popped. A mechanic put it on jacks and after extensive recycling on 2 separate occasions was finally able to duplicate it, but could not find the cause. Some friends and I examined all the "Tips" re: gear problems and put the plane on jacks recycled it again. We finally adjusted the micro switch on the right main, however, even after that it popped in flight during retraction and even extension. Three days later I found a totally dead battery and replaced it: Result: No gear problems! In the course of the problem, at one point I attempted to lower the gear manually and could not, though I followed the procedures in the manual. I later discovered while using the manual system with the airplane on jacks that it is necessary to press the lever as though trying to further raise the gear to release tension before releasing the gear for lowering. When encountering a popping gear circuit breaker, check for a bad battery. This may be the real problem since low voltage apparently increases amperage (I am told).
Main Gear Bolt Freeze−Up In spite of supposedly "oilite" bushings in hinge end of scissor link, I had a main gear bolt freeze up and shear. Had to use hammer to free the bolt! I noticed "pull" on takeoff from paved surface but nothing else. Due to short distance to next landing, I did not retract gear. Next landing and takeoff on turf were both normal. Apparently gear turned and did not retract on second take off as found breaker "popped" before next landing. Gear went down OK after breaker pushed in but on rollout (on turf) did a 135 degree ground loop but suffered no damage.
Chapter 7 –Landing Gear / Brakes 19 of 106

Low Battery Effect on Landing Gear I was interested in your recent account describing gear problems related to a weak battery and particularly the remark that − "low voltage apparently increases amperage". While it is true that an alternating current induction motor on a shunt wound DC motor (delivering a constant torque load) near its rated speed will slow down and draw more current if the applied voltage is reduced, a healthy DC series motor will not behave that way. If one lowers the voltage on a series motor carrying a constant torque load (i.e., lifting the landing gear) the motor will slow down but require the same current. If one leaves the voltage constant but increases the load (torque req'd) four fold the current will double and the speed will drop by more than half. I suggest it would be prudent to check further: 1. Be sure the mechanism is not binding up for some reason near the end of the retraction cycle. Old dried out grease
can cause this. 2. Make sure the motor shaft is not bent, or that one of the motor armature winding leads has not come unsoldered
when it connects to the commutator. A "tight position" (bent shaft) or a "weak spot" in the armature (due to a loose lead) will cause the motor to slow down or nearly stall in one position as the load increases near the end of the retraction cycle. If the motor slows down enough the current will rise and the breaker may trip on or just after the "weak spot". The same excess current will flow with a better (higher voltage) battery, but it may not flow long enough to trip the breaker. A loose solder connection on the armature will cause evidence of arcing between that bar and the next. Or you can hear it with a head set connected across the brushes. A battery which will crank the engine (a bout 2 hp) should operate the landing gear motor (less than 1/2 hp) with the charging system helping − unless the gear motor is drawing more than normal Current?
Gear Maintenance On the gear lube: There are 2 small grease fittings at the top end bell fitting on the actuating arm at the top of the strut. They are almost impossible to get on with a grease gun short of disconnecting the arm to swing it down. Check yours after each annual for signs of being greased. That is a big, important ball joint. ED: These are best reached with airplane on jacks and gear at 45 degrees.
Gear Transmission The landing gear has been a problem and from all I have read in the ''Flyers" a lot of tribesmen have had problems. But I have not read of anyone who has taken the gear box apart that the motor is connected too. Inside this gear box casting is a ridge that is supposed to hold the bearing in place that is pressed onto the end of the jackscrew. I have two castings, one the ridge is broken off and the other is broken to the point of coming off. Have you heard of this problem? The only cure is to replace the whole thing, Part #25720−00 which is far too expensive. ED: The gear box is rebuildable. We suggest you check with your mechanic to see if he can rebuild it. Webco Aircraft, ICS 4012, Newton, KS advertises in the Flyer that they rebuild them. Their phone number is (316) 283−7929.
Chapter 7 –Landing Gear / Brakes 20 of 106

Nose Gear Door Worn Hinges I recently wrote you telling tribes people about all Jim Kinney (my local FBO and fellow Comanche owner) had done to improve our 5585P. Little did I know that a week or so later I would be struggling to get my gear down by hand and seriously looking at the possibility of having to bring her in on the grass of my destination airport. After almost 20 minutes of working the emergency lever back and forth with all my strength (gear stuck half down) and keeping the old bird in slow flight, I was able to break things loose and she popped down solidly − with a big sigh of relief! When I landed it didn't take long to see that the front gear door was hanging loose from its front hinge and had jammed up against the gear, the gear hub evidently having caught on the top edge of the door. The picture to the right shows how the hinge had worn through over the years. If you haven't had your hinges checked recently during your annuals, (oh yes, we usually wiggle them around a bit) you might want to take a look. As you know, the hinges curve up into a cowl channel where it is impossible to see their condition. Piper still manufactures the hinges but with a steel bushing pressed into the hole. Check Those Gear Door Hinges
Jammed Gear Extension Recently on departing Hinesville, GA in a strong cross wind I heard a loud bang during the gear retraction sequence. I got a gear up light and flew to Brunswick, GA, approximately a 15 minute flight. As I entered the pattern, I slowed to 140 mph and lowered the landing gear. The gear extended approximately half way and the gear motor breakers popped. I recycled the gear again with the same result. That left me with the emergency gear extension procedure. I followed through with the normal emergency procedure; however, I was not able to lock the gear in the down position. I contacted Brunswick Radio and notified them of the problem. I found as I worked the emergency gear extension lever that something was stopping the gear from locking into position. I was quite concerned about breaking the gear extension lever, it looked so fragile. However, I kept throwing the lever forward to try to dislodge whatever was stopping the gear from locking. After approximately 6 tries something broke loose and to our relief the gear locked into place. Green light, no horn! It was a feeling of relief to feel the mains and nose wheel contact the runway. We taxied to the FBO and found after a short inspection that the guide roller for the nose wheel was missing. Also the track that the roller rides in was bent up against the cross bar on the engine mount.
Gear Failure, Bent Extension / Retraction Rod We unfortunately had to file an accident / incident report in 1981, six months after owning our plane. The FAA called it a gear up, pilot error, but to the three pilots in the plane at the time it was a gear failure. We had been having a problem with the gear light coming on after extension, and lock. After many retractions on jacks our maintenance man informed us it was a micro switch out of adjustment, we had them all replaced. That weekend we were shooting approaches and on the third one the gear failed. After touchdown the left main retracted, under stress a few
Chapter 7 –Landing Gear / Brakes 21 of 106

seconds later, the right main failed. We were almost a complete stop before the nose failed and the gear horn came on. The gear light was green when we shut down and left the plane. We found the left gear extension/retraction rod sheared off at the threads. This rod extends and retracts the gear into the locks. The locks bear the stress of landings not the extension/retraction rods. Our guess, the previous owner made a hard landing, causing the gear down and locked light to go out. Apparently, all their maintenance man found was a micro switch out of adjustment. He readjusted the switch and that was the end of the problem, for them anyway. In reality, the extension / retraction rod became slightly bent, and was pushing the gear to the lock on the left side and into the locks on the right main and the nose. From that point on, we were landing with all the pressure on the left rod. As time went on, the left side started to fail, causing us to start having the problem with the down and locked light. And unfortunately, the real source of the problem was not found and corrected until the left− main failed.
Gear Failure, Missing Spring and Cotter Pin For the last twelve years I have flown the same PA−30 and thought that I was well acquainted with the airplane. That was before I spent forty-five sweaty minutes over Lakeland trying to make the emergency gear extension do its thing the way the ingenious gentlemen at Lock Haven proclaimed many years ago. When the gear finally went down and I had a green light and a reassuring look at the nose wheel in the nacelle mirror, I realized that the success of my efforts had not been due to cool and precise performance of published procedure or to prompt analysis of a mechanical malfunction followed by application of brilliant corrective measures. As near as I can say, I was able to get the gear down because; I have two big feet to push on the extension bar at the same time I had the airplane pulling two or three G's. Two pivot pins in the transmission release lever sheared off and because I have always been a very lucky fellow. It did not hurt the outcome that it was day light, VFR, I had plenty of fuel on board and I was too stubborn to scrape the pretty belly of 16Y on any runway. Later, with the airplane on three good solid jacks we discovered the problem. The initial cause of failure of the electric gear actuating system to lower the gear was likely due to an out of adjustment situation in the Landing Gear Retraction System Transmission Assembly. This overloaded the motor and kicked out the breaker. After resetting and kicking the breaker again I decided to use the emergency extension system. I remembered clearly how easy it had been to get the gear down and locked. A real thorough check pilot who knew everything about Comanches had demonstrated the system to me twice and each time he raised the gear in the air with the emergency extension lever and locked the release lever back on the actuating screw to return the system to electric operation. Thankful that I had been so well checked out I put the gear switch in the down position, took off the cover, flipped the release lever up allowing the gear to fall a little further down. I put the emergency extension lever in the extension socket and pushed forward to complete the cycle and lock the gear down. The assembly moved forward a small amount and the release lever jammed solidly under the torque tube. You may say, without fear of contradiction from that moment forward 16Y had my full and undivided attention. No amount of coaxing would move the gear more than an inch or so. The system was simply jammed. I tried every remedy I could imagine. I was pushing on the extension lever with both feet and pulling the airplane up at the same time. Gradually the pull ups got sharper, the pushing and grunting got harder, my eyes were bulging further and suddenly parts of the mechanism seemed to self destruct − and the gear went down and locked. This is page 2C 10 in the PA30 Service Manual.
Chapter 7 –Landing Gear / Brakes 22 of 106

My clever use of this strategy had sheared two pivot (clevis) pins in the release lever, torn off the brake assembly and jammed the jammed actuator on through its jammed position and let the gear go down and locked. Not caring to further
Chapter 7 –Landing Gear / Brakes 23 of 106

improve the situation at that time I landed the airplane without making further engineering changes in the geometry of the gear extension. Soon after landing I found time to read the PA−30 Service Manual on Landing Gear and the ICS Tips on problems other people have had with getting all three wheels in the best position to land on. I find that our opinion of the cause is different than we have learned of others. Hoping it will help someone avoid the indignity which I came near to facing, I enclose a copy of Fig. 7−14 from the PA−30 Service Manual and a suggestion of some adjustments you can check for yourself just by taking the cover off the gear mechanism well. You should have 10.875" between the center of the transmission mounting pin and the center of the through bolt (13) connecting the lower part of the torque arms. This adjustment should allow approximately a (minimum of 0.125") measured along the actuator screw (14) between the roll pin stop (16) and the screw nut (15). The above paragraph is quoted from 7−36 of the Piper Service Manual. You can take the top cover off and check the adjustments with no more than a 12" rule. Popping a breaker is small irritation, but it is no big deal as long as the emergency extension system works. The transmission, motor and actuating screw is spring loaded by the retracting spring (23). When the release lever is released, the retracting spring holds the whole mess up so it won't jam as mine did. This retract spring is held on the unmoving end by a cotter pin through the floorboard of the plane near the lower left corner of the opening. Piper noted on the drawing that the cotter pin should be adjusted as to allow the end of the retracting spring to be suspended .62 from the top of the floor board. I guess they meant for this to be interpreted to be 620 thousands of an inch with no plus or minus tolerance − or that it simply was not critical since such close calibration of a cotter pin could be somewhat demanding for us ordinary people. On my airplane the cotter pin had been pulled through the floorboard and had more than one inch below the floor. This slack allowed the end of the retracting spring to unhook and fall off. For lack of support of this spring the release lever jammed under the torque tube. All of us have gone through the expensive gear bulletins and there is no doubt in my mind that all of the adjustments outlined in the manual are important. I know of no item covered by the gear bulletin or by adjustments close to right that will stop the emergency gear extension system from working. The small spring and the 35 cotter pin will. The point I have been struggling to make is that in ten minutes of our time a visual inspection can be made of the adjustments described in Figure 7−14 and we can check the security of the cotter pin spring hanger and retracting spring. I intend to at regular intervals from now on and I will be more certain that if I have to use the emergency gear system it will work.
Nose Gear Worn Bell Crank and Bushings Items overlooked in a series of cheapie annual inspections have a way of snowballing and becoming (ultimately) very expensive. A case in point: When I took my first hard look at my Piper Comanche (a 180 model), I discovered that the nose gear steering bellcrank (Piper P/N 21768−00) showed evidence of peening on its cam faces. If you'll look at the accompanying photographs, you can see the distinct wear points on the cam(s) and on the steering arm bushings (Piper P/N 14976), which were worn to hourglass shapes and showed evidence of not turning. The steering arm bushings function as rollers on the bellcrank's cam faces.
Chapter 7 –Landing Gear / Brakes 24 of 106

According to the Piper Comanche service manual, these bushings ought to rotate with a slight drag. The book actually calls out several dash numbers of the part, representing several diameters, which can be used to obtain proper adjustment. It is evident that as wear of the bushings progressed, the excess clearances were enough to allow peening or hammering of the cam faces due to increased play in the nose steering. A couple of my otherwise inexplicable swerves on the runway are readily excused on the basis of this wear. Less explicable is the ongoing lack of inspection and maintenance during the 23 year life span of the all consuming ''period piece'' that I bought to fly (and maintain!) as a hobby. Thanks to years of oversight and neglect, I had to remove the abused pieces and suffer an inordinate assault on my cash flow for the machinists spent five hours setting up the bellcrank (and five minutes to do the actual cutting) because of the need for the bushing rollers to follow both cam profiles, simultaneously, without binding. Also, I spent a couple hours on a lathe cutting out new oversize bushings from 4130 steel bar stock.
Chapter 7 –Landing Gear / Brakes 25 of 106

Considering the need for repeated removal and installation of the offending pieces, and the time consumed obtaining a field approval of the repair from the FAA, I felt this whole exercise could have been much less expensive, had a whole series of mechanics more carefully inspected the nose steering parts over the years. How much simpler it would have been had the bushings been routinely inspected and replaced − for the steering bellcrank itself would not have been damaged, necessitating expensive repair or replacement. (I would guess that more than half the Comanches and Twin Comanches still in service have suffered similar wear and neglect.) These parts, incidentally, are common to all PA−24, PA−30, and PA−39 airplanes. Curiously, the steering bellcrank was stamped Piper 21687, while the parts book calls out P/N 21768−00. A Malfunction or Defect Report (FAA Form 8010−4) has been filed, along with a recommendation that the comments appear in Airworthiness Alerts for IA's. Again, these damaged and severely worn components only reinforce my ongoing argument that aircraft owners should demand − and pay for quality maintenance to meet factory service manual criteria.
Gear Bungee Arms Due to the number of cracked and broken gear arms we have found while working on Comanches, I thought it should be brought to the attention of the members. The picture shows one arm that has one side broken off − the other was cracked and would have broken soon. The arm cracks or breaks and gets so loose that the bungee, instead of holding down will actually hold it up and keep the arm from going past center and locking the gear down. Arrow points to missing piece
Pictured is the main landing gear showing arm (see arrows) and its position in the gear. A good way to check to see if there is a problem (crack), grab the arm where the bungee attaches and firmly try to move it. If there is any movement, it probably is cracked. The part of the arm that cracks is inside the main gear trunion housing and it − the arm − will have to be removed to check.
Chapter 7 –Landing Gear / Brakes 26 of 106

The one bolt on the end of the arm is what holds it in place. If you take the arm out, be sure to put the spacer washer back on the arm. The inside spacer could fall out − so be sure you put it back on. We are keeping some of the arms in stock due to the number we are finding that are cracked. The condition could get so bad that it could release the gear and let it dangle as the shaft of this arm is what the gear rides on. The newer arms have thicker walls even though they carry the same Piper part number.
Chapter 7 –Landing Gear / Brakes 27 of 106

I really question the FAA's decision of bushings being the culprit of gear up problems; rather suspect the gear transmission and this gear arm to be the main problem.
Gear Failure, Jammed Wheel Well Liner The enclosed excerpt from the Transport Canada circular "Maintainer" may be of interest. A few years ago, during an inspection, I found that one of the attachment screws holding the starboard wheel well liner in place, was missing, causing the liner to vibrate and crack. Checking the liners, at least once in a while, might be a good item to add to the "walk around'', making it a "crawl around". It was a beautiful weekend − ideal for a fishing trip − but they never got there. En route the pilot found he couldn't lower his gear by normal or emergency methods. After several attempts, and reference to the emergency checklist, he elected to return to his point of departure at a major airport. On the return flight he made several more unsuccessful attempts to lower the gear, and then made a wheels up landing. A section of the wheel well liner had broken off and wedged itself between the wheel frame and the tire, thereby preventing the gear from extending either by normal or emergency methods. It was also found that the landing gear motor release handle was incorrectly adjusted and did not permit motor disengagement. ED: If the motor could not be disengaged, then emergency extension was impossible. The main accident causal factor attributed was improper maintenance.
Gear Transmission When I gave "Charlie's" landing gear an inspection after this aircraft had recently had its annual, I found bungees so weak that I could have pulled them off the rollers by hand, although I did use my tool to remove them. The bungee tubes were OK because those bungees were too weak to put enough load on the bungee arms to cause any cracks! Our inspection also revealed several dry bushings and hinge points, especially where grease fittings were hard to get at. Upon taking out the Dura landing transmission and opening the transmission housing, I found just what I expected to see: grease that had hardened over many years to the point that it had to be picked out piece by piece. The gears had run dry for so long, the teeth, especially those of the driven gear, had worn so thin, they looked like knife blades. I recommended to Ken and Shirley that they should either replace that transmission or have it rebuilt soon, as it is only a matter of time before those teeth will strip. In the meantime, after cleaning the transmission thoroughly, I repacked it with MIL−G−21387 grease (Aeroshell No. 7 meets this spec.). According to the maintenance manual, this grease and grease meeting MIL−G−7118 are the only approved lubricants for the Dura transmission. DURA transmission with cover removed and old grease washed away.
Chapter 7 –Landing Gear / Brakes 28 of 106

Only Dukes No. 4 grease is approved for the transmission manufactured by Dukes. Again, no substitutes are permitted. Ten years ago, when we bought our 250, C−FZZV, one of the first things I did was to place the aircraft on jacks to check the landing gear, wiring, emergency release, squat switch, etc., and to lubricate in accordance with the maintenance manual. I also pulled out the transmission and opened it up. I found exactly the same condition as that encountered recently. I replaced the transmission in our 250, back in 1977, with a Dukes unit, which, I think, is a better engineered transmission.
Are you depending on worn teeth like this to raise and lower your landing gear?! Note the irregular, stepped appearance of the teeth. My point is that I am convinced that there are a lot of Comanches flying around with a transmission that hasn't been serviced for years, possibly running dry and wearing out those teeth which could eventually strip. I think we all have gotten the message about the importance of changing bungees regularly and it is time to pay more attention to another often neglected item, the transmission! Many people tell me they look after it by smearing some grease onto the transmission screw while in flight, when it is exposed with the gear in the up position. Lubrication of the screw is important, too, provided the old grease, which most likely has collected dirt, is first removed. But to lubricate the input and driven gears inside the housing, the unit has to be removed from the airframe and opened up! See the accompanying notes which are in the PA−24 maintenance manual. 3. Landing gear and flap transmissions and screws identify type of transmission installed. Dukes has label on transmission housing, Dura has part no. 1010250 stamped on transmission housing. Disassemble and clean. When reassembling transmission, fill Dukes transmission with Dukes no. 4 lubricant. Fill Dura transmission with MIL−G−7118 or MIL−G−23827 great. No substitution is allowed in either transmission. Apply a thin coat of MIL−G−7118 or MIL−G−23827 grease on actuator screws. See note 7. 7. Transmissions should be disassembled, cleaned, inspected, and lubricated at each 500 hour interval or annually, actuator screws should be lubricated at each 100 hour interval or annually. The transmission cover (7) has to be removed to clean and refill the transmission housing. − After reinstalling the transmission, make sure that the spring (14 or 15) is hooked up again!
Chapter 7 –Landing Gear / Brakes 29 of 106

These notes appear in the "Handling and Service" section of the maintenance manual. Since removal, disassembly etc. of the transmission should be performed by qualified maintenance personnel, make sure your mechanic, or shop, is aware of these notes.
Strut Maintenance Keep your struts clean! The enemy of strut seals is dirt. When you check the fuel sumps for water, save the gas you drained out and use it to clean the struts with a soft rag, then spray Teflon or silicon on them and rub it around all over the
Chapter 7 –Landing Gear / Brakes 30 of 106

strut. Of course, jacking the aircraft will let you do the full strut length. Also, take a strip of old T-shirt material and polish the struts. Making one loop around the strut and then pulling on both ends with a back and forth motion will polish the struts quite effectively. Do this after cleaning with gas and before spraying with Teflon or silicon.
Bungee Cord Tool Here is an inexpensive and easy to make bungee cord installation tool. All you need is an 11" piece of 1/2'' thin wall conduit, a 13" piece of 1/2" threaded rod, 2 nuts and 1 washer. First make a 1/4" deep cut in the end of the threaded rod. (Use two hacksaw blades in the saw. This makes the cut wider and facilitates spreading apart.) Then spread the rod apart to form a V as per drawing. Tighten the nut and washer against the base of the V. (The washer prevents the bungee roller from slipping off the side of the tool.) The next step is to make two cuts in the end of the 1/2'' conduit to form a 1/4 X 1/4 tab on each side. Bend the tabs out at right angles to the conduit. (The tabs serve the same purpose as the washer on the threaded rod.) Make two more cuts on the conduit to form a V as per drawing. Your bungee cord tool is now complete. Wasn't that easy? Now to put your new tool to use. Remove the bungee cord inspection plate and wheel well liners. Jack up the airplane and retract the gear part way to relieve some tension on the old bungee. You should leave enough room so you can get your head up into the wheel well area. (Needed for installation.) Insert the tool between the bungee with the conduit toward the outboard fixed roller. Turn the adjusting nut to put some tension on the bungee. Adjust as required to allow easy removal of the bungee roller retaining bolt on the gear arm. (Note the position of the washers for reinstallation.) Grasp the bungee and tool by the conduit and unscrew the fixed roller assembly. Before taking the old bungee off the tool, measure from one roller center to the other roller center. Measurement needed for installation of the new bungee.) Turn the adjusting nut to relieve tension on the bungee and remove the tool. Disassemble the fixed roller and reassemble with the new bungee. Insert the tool in the bungee with the fixed roller on the conduit end and the pivot roller on the bolt end. Now turn the adjusting nut so that the roller to roller measurement is the same as before removing the old bungee. Now cut a hole in a piece of duct tape and insert the bolt of the fixed roller through the tape folding the tape back over the roller and bracket. (This holds the bolt in line with the tool to facilitate installation.)
Chapter 7 –Landing Gear / Brakes 31 of 106

You are now ready for the installation. While looking outboard from the wheel well insert the bungee and tool into the wing. The mounting hole for the fixed roller should be clearly visible. Turn the bungee and tool to screw the fixed roller assembly in. Screw it in all the way and then back it out one turn. (This allows the fixed roller assembly to rotate slightly and stay aligned with the pivoting roller.) Reinstall the pivot roller on the gear arm with the washers in their correct position. The bolt should go in freely; a slight adjustment of the adjustment nut may be required. Either lower the gear slightly or turn the adjustment nut to facilitate removal of the tool. Now remove the duct tape from the fixed roller and bracket. (It may be left on the bolt if it is folded back and not interfering with the bungee roller.) Congratulations, one down and one more to go. When you are done, you will be an expert at Comanche bungee cord replacement.
Pumped up Struts Increasing air pressure in landing gear struts has little to do with landing qualities. Gas / oil struts on Comanches are always fully extended in flight and will touch down at the same time whether they have three inches or six inches of exposure when sitting on the ground. The angle of attack change is effective only when the nose gear is compressed on the runway.
Gear Down Light A. My 1964 Twin Comanche had a gear down green light out problem similar to that described in your most recent
issue. After changing all of the electrical parts in the system, we finally found the problem in my airplane: a worn spot in the wiring in the left well caused by contact with the wheel during retraction in flight.
B. I had this problem with my 1962 Comanche. I found the problem to be corroded contacts in the gear−down switch
itself. The way the switch is wired, one portion can fail (light indication), while the other continues to work (motor
Chapter 7 –Landing Gear / Brakes 32 of 106

down limit and gear horn). To remedy the situation, I changed all of the micro switches, including the squat switch, presuming if one is bad they probably all are bad.
When disassembling the switch from its mounting, I would suggest replacing the rubber washer located between the switch and the housing. Attention should also be given to the boot over the plunger. The switch can be purchased from most local wholesale electrical supply houses. It is Microswitch #DT−2R−A7.
Twin Gear Side Link Brace Had an experience with the Love of my Life (66 Twin) which I hope may be of value to someone else out there. During the annual, my trusty mechanic, in whom I have great faith, discovered that the right main gear side link brace had a very sloppy fit with the rod end into which it threads. There was so much end play that it looked as if a good hard jerk might pull the two pieces apart in spite of the threads. It's pretty hard to visualize how this could be a result of wear, even after countless cyclings of the gear over 21 years. I mean, threads just don't wear that much unless they're screwed and unscrewed. There was no appearance of fatigue deformation (stretching) of the part, either. A call to ICS elicited this advice: (1) They were all somewhat loose when they came from the factory, and (2) don’t place any part orders until you've checked all the threads with an ANSI gauge. We never got as far as the thread gauge. An enterprising young mechanic had the idea to swap the left side link brace with the right one. The left one was slightly loose too, but serviceable. Lo and behold, when interchanged, they both fit perfectly. No side play, no end play, nothing. Now this might not be worth taking up space in the Flyer if it were not for the cost of the part ($553). Yup, better than a half a thousand for a 61, long casting with threads on one end and a few holes on the other.
Gear Position Indications I am a registered Mechanical Engineer with an A&P License. I enjoyed P. K. Roberts' article on Comanche Landing Gear incidents. I believe that he failed to address one point that is left out of owner's manuals and even the AD on Comanche gear. The point is, "How does the pilot know when the gear is down and locked if he has had an electrical failure?" I believe that every Comanche driver should try a manual gear extension while on jacks. This procedure should be repeated several times or until he or she is sure what it feels like when the gear locks down. Also, if you haven't done so, with the gear down and plane parked, extend the manual gear arm and note where it is relative to the instrument panel. On the earlier models with gear handle on top of the floor, the distance will be less than 2". On the later models and twins, it may be as much as 10". Don't take my word for it, check your own plane. If the gear is down, but not locked, it may land beautifully and collapse when you turn off of the runway. Hope this prevents at least one gear up landing.
Gear Transmission I am writing this letter as a result of some recent experiences which we have had with our Comanche and its landing gear problems. We have flown the plane for about 10 years and about 1,000 hours with no gear problems, all of the time reading in the Flyer about people who were not so fortunate. About nine months ago, we began to experience occasional gear problems, which we overcame by resetting the circuit breaker. As the problem occurred more frequently, we took the plane to our two nearest Piper dealer FBO’s for repair. Each installed a new motor and new bungees and a few other parts, charged us between $400 and $500, and sent us on our way with no improvement in the situation. In the meantime, the problem became increasingly more difficult to handle and finally to the place where the gear wouldn't work at all.
Chapter 7 –Landing Gear / Brakes 33 of 106

In desperation, we called ICS who advised us to take the problem to Bob Weber at Newton, KS, operating as Webco Aircraft. To make a long story short, we flew the airplane in there, Bob had it up on jacks, immediately diagnosed the problem, repaired the transmission on the landing gear mechanism, and had us back in the air and on our way home in a matter of hours. The gear has operated flawlessly since then. The lesson to be learned is that if you are having gear problems, either take the airplane to Newton, KS, or have your fixed base operator remove the gear actuating mechanism, ship it UPS to Bob Weber, who will repair it the same day he receives it and send it back, where it can be reinstalled and you will have no further gear problem. Overhauling the transmission and the other aspects of the landing gear require special tools, special parts, special skills, and special knowledge with respect to the problem and apparently very few people have these on hand.
AD 77−13−21, Prevent Gear Collapse Landing Gear: Like most of us, I went through the time consuming, and expensive AD 77−13−21, complete rebuild of the system (for all practical purposes). One of the annoyances was after waiting for new bushing type bearings, and paying airplane prices for them, I found most of them to be "Sintered Iron" type vs. Oil Life, bronze or brass. Angry, I went through my local bearings house to 3 bearing mfg's looking for why. All three said, ''Cost." Of course, subject to FAA rules, I have to live with the sintered iron, rather than put in better bronze or Oil Life, etc. Now, 10 yrs. later, vs. the originals lasting 10 yrs., I am going through replacement again. Also this represents replacement at 1/2 the flight hours. Why? In automotive, after market items tend to last longer than OEM. The answer comes in a couple of things that ICS owners may want to note for the future. First, any machinist will tell you when installing precision fit bushings / bearings, that to press fit the holder you must restore bore size by reaming. To get the precision bore fit, this cannot be done "freehand'' with a hand drill without some sort of custom alignment jig. It should be done in a shop with a machine and everything aligned and clamped true. Few A&Ps have this capability, unfortunately. So the end result tends to be a NEW bushing / bearing with slop rivaling the removed one. On my A/C, the bearings I did at home with lathe and/or drill press are still good. Those done at the airport on the A/C are shot! So this time they are all being done by alignment jigs. Those that practicality requires on site reaming will be done with jigs made to provide reamer alignment. I found another reason for the bearings wearing out prematurely that I failed to notice the first time: Some of the parts with bearing inserts are equipped with grease fittings. The inserts were press fitted, but not drilled to let the grease into the bearing area. Hence greasing is not doing any good, and may do harm. The latter by encouraging the bearing to slip in the part. The part being aluminum, protected by the insert bearing, can be easily ruined by this occurrence. (As usual, an AD can do more harm than good than was originally present.) Next came the realization I that for some reason, Piper did not see fit to provide a grease fitting for the "Bolt'' bearing that attaches the draglink to the side brace support fitting. This joint both rotates and swivels during gear operation, and would seem to be as important a point to maintain lube, as any of those with grease fittings. Perhaps Maurice and/or Piper can say why it was omitted. Activity provides plenty of clearance for a fitting. ED: ICS advises that PN−20829−00 new production now has the extra grease fitting. At any rate, owners would do well to insure any bearing/bushing replacement is done with the required lube hole, and correctly reamed.
Gear Transmission Here is an item I have never seen addressed in the Flyer or Tips: When servicing the gear box and actuating ball screw, check the 1/8" steel balls. I have found the balls rough and some of them flat or broken in half.
Chapter 7 –Landing Gear / Brakes 34 of 106

On one plane that had just been repaired after a gear up landing and checked out on jacks, it failed on the test flight, necessitating the use of the emergency system. The cause was found to be a damaged ball on the ball screw. I have checked the steel balls on a N6286P and found the same problem beginning to develop. This problem can be checked by rotating the sleeve by hand, feeling for any roughness. Better yet − disassemble unit and visually check the screw and balls.
Gear Warning Horn System From what I am hearing at the seminars as well as the calls I receive, there are just too many gear up landings. There are certain items in your aircraft which can be a Go−No− Go situation. If any part of the landing gear warning system is not working, in my opinion this is a No-Go situation. There are certain things you must know are in working condition: Does the gear warning horn work properly? Can you hear it? Is the throttle switch(es) adjusted correctly to actuate the horn at approximately 12 to 14 In Hg.? Does the green light work properly? Your AI at the annual inspection should not return the aircraft to service until these items have been checked and found to be in working order and properly adjusted. I know that this is not being done in too many cases. In regard to item #2, many of you are now using the large headset to effectively block out the engine noise. Just remember it also blocks out the noise of the horn. Correct this potential hazard by getting the horn into the audio system or install a light on the panel in a conspicuous position to come on or to flash when the horn is activated at 12 to 14 In Hg. This won't help if the throttle switch(es) are not adjusted properly. The warning system is well designed. The horn and light circuits are separate so that if one does not work, the other will tell you when the gear is down. But most important of all, use your landing checklist every time.
Gear Warning Horn Modification The July issue of the Comanche Flyer had two excellent articles on avoiding gear−up landings. One was by Mark Pullmann in the Insurance Corner Landing Gear article and the other by Maurice Taylor in the "Is the Gear Down?" article. Both asked, ''Does the horn work?'' and secondly, "Can you hear it?" If the aircraft has had a proper annual, the gear horn has been checked for operation and sound. This check is done with the aircraft in a hangar up on jacks. The horn is a simple mechanical device directly equivalent to a Model A Ford horn. It is fairly loud in the hangar, but not really that loud in flight. The horn is mounted behind the panel on the firewall, and is probably closest to your ankle. As mentioned in the above articles, the widespread and proper use of David Clark type headsets further reduces the likelihood of your hearing the horn in flight. Wiring a tone generator to the gear horn warning switch, and then feeding this signal into the audio system has been suggested as one solution to the problem. I had an opportunity to take a demo−flight in August in a new Porsche − Mooney, and found that the gear horn is mounted in the overhead just beside the cabin speaker and directly in line with the pilot's ear. There is no chance of missing the warning. This appears to be a simple, logical, and low cost solution to the problem. To duplicate this system, one wire is run from the gear horn switch on the throttle up through the left windshield corner post into the overhead panel containing the cabin speaker and overhead lights. Radio Shack sells a solid state Piezo type horn for just under ten dollars that operates on 12 volts, weights about 1 1/2 ounces, and is small enough to fit into the plastic shroud that covers the cabin speaker. The wire from the throttle gear horn switch is attached to the red wire on the horn and the black wire on the horn is attached to ground. The horn has two mounting holes and can be mounted directly to the plastic shroud. This small lightweight horn puts out in excess of 100
Chapter 7 –Landing Gear / Brakes 35 of 106

decibels of sound! A slotted cover allows you to reduce the sound level if needed. With your best headset on and with the tower talking to you, you will not miss the sound of the gear horn. I left the original horn as installed and consider the new horn as a redundant system. The current drain is negligible, the weight is negligible, and the cost is very reasonable. The installation took approximately one hour of labor. The result is a gear warning horn that does the job.
Tire Tubes Look out for bad tubes! I bought new tires / tubes from Desser Tire and Rubber Company in California in July, 1986. The left main went flat while parked in hangar in August 1988. Upon removal, I discovered that the stem was one third of the way cracked from the tube. I pulled the stem the remainder of the way off with little effort, dug out my old receipt and called Desser. Joe answered and informed me that the warranty was expired and that tubes have a 1 year shelf life, and that they recommend changing tubes every 1 to 2 years. He said that I might send the tube back, and if they determined that it was defective, they would probably send a new one. I sent the tube back and did a survey of 3 mechanics and several pilots who said they never changed tubes that often for weekend type flyers. Meanwhile, I met a gentleman with a career in aviation tires and tubes, who knew of thousands of tubes that should not be sold, as they have valve stems in them which had been manufactured to the wrong specs. (The brass tube inside stops about 1/4" short of going all the way into the tube, making a weak area.) I was also told of an accident in which both mains blew on first flight, and that these defective tubes could be identified by the name ''Bridgeport" molded at the base of the valve stem. (I think Desser knows this same information, too.) I got goosy again and took the other tires back off, and they said "Schrader," which is supposed to be okay, so I reinstalled the second time (getting good at changing tires).
Gear Transmission Motor I might share an experience with the gear. A new Bosch motor was installed. On approach to Memphis, the gear failed to extend electrically. From experience, manual extension does not work above 95 MPH. I slowed to 85 and got it down. On the jacks, I ran the gear five times with no problems. After a thorough inspection I decided to fly home. After takeoff, the gear almost completed the up cycle before the breaker popped. After a few minutes in the air, I reset the breaker and the gear completed the cycle. On lowering the gear at Murfreesboro, it worked fine. I put the aircraft on jacks and totally went through the system, including a rebuilt gear transmission from very cooperative Bob Weber at Newton, KS. Although the motor was new, I decided to go through it. As I separated the motor, a piece of metal fell out. Upon close examination, it was evident that the small chunk of metal would get between the armature and field, jamming the motor. Also the bearings were totally without lubrication. Since that experience, my gear really works fine. I've also re−rigged the gear as per the maintenance manual, which I think a thorough re−rigging job is highly recommended. It's time consuming, but worth it for peace of mind, and especially the limits on the transmission.
Gear Bungee Arms Headquarters has advised me that they have received several inquiries about the bungee arms cracking or breaking. The bungee arms which are in the 180's and 250's are part #20846−00 for the left and #20846−01 for the right. The tube of this arm which supports one side of the main gear has a wall thickness which is thinner than the bungee arms on the 260's, the 400's and the twins. These have been no problem. The arms on your 180 or 250 have to be removed to check them for damage, and if this has not been done on your aircraft in some time, it would be wise to attend to it. PLEASE NOTE: There are three positions these arms will go on, but only one right way. 1. The left one will go on the right side − the arm then is in the wrong position. 2. The arm can be rotated approximately 180 and it will go on. Again, the arm is in the wrong position.
Chapter 7 –Landing Gear / Brakes 36 of 106

3. The right way − When viewed from behind (through the opening where the bungee is housed) and with the left gear in the full down position, the bungee arm should be approximately at a 4:30 to 5:00 position. On the right gear, the arm should be at approximately 7:00 to 7:30.
These arms can be obtained from Av−Pac by calling (800) 228− 1836. Bob Weber of Webco Aircraft Services also has these parts available. If you order a replacement arm, you will get #20846− 06 for the left and #20846−07 for the right. These will be the heavy walled ones that are on the 260's, the 400's and the twins.
Shimmy Dampener Replacement In mid 1987, ICS called me on one of his many, tireless parts hunting rounds, looking for a new Maeco Shimmy Dampener that just might happen to be left over from the great flood, or maybe accidentally filed away in the wrong parts bin. Of course, Maeco's had not been built for over ten years, and finding a new one was like discovering teeth in a hen's mouth. When one was found, they brought up to $200 a piece. Used Maeco's have been selling for $90 to $150 each. Anyway, to make a long story short, ICS asked me if we'd try to come up with a new shimmy dampener for the Comanche family, one that could be repaired if it ever went bad. I said I'd look into it. Well, two years later, $20,000 poorer and countless hours of agonizing stress has finally produced the results asked for. Airparts of Lock Haven has received two separate STC's from the FAA covering all Comanche and Twin Comanche models. We have currently available kit #ALH−001 for the singles and kit #ALH−002 for the twins. And as I promised, I have kit #ALH 1995 for repair of both above kits. Kits, though costing 33% higher than the last new Maeco's, are better, stronger, prettier and come with a complete change of hardware, including rod end and clamp for $297.50 Repair kit: $22.50. (Same Price; Jr., Airparts of Lockhaven, Inc.)
Gear Failure, Loose Gear Linkage I recently had a problem with the landing gear that my mechanic said he never heard of, and that the odds were 100 to 1 that it would happen. But it did! To make it short and to the point, I was coming in for a landing, and while on the downwind, I lowered the gear. The light did not come on. I said to the guy with me that I thought we may have a wheel not locking. I called the guys on the ground to let them know of a possible problem, and to ask if they would take a look which wheel wasn't down and locked as I flew by over the runway. They agreed.
Chapter 7 –Landing Gear / Brakes 37 of 106

I was very familiar with the emergency procedure, and the amount of space that should be between the gear handle and the wheel well. The handle was perfect. But I checked and locked it anyway by hand. But no light! As I came over the threshold of the 2,500 foot strip for a fly by at 120 mph, the cockpit filled with smoke. I decided to land without finding out which wheel wasn't locked. The next day I went in to find out what had happened, and found that the linkage for the right wheel had an all thread rod with a nut on both sides (like a clutch on a car), one nut had worked its way loose, then the other went the other way, and the wheel was sliding on the linkage rod, with no way to lock it. I had them add a safety wire to this setup after it was fixed and readjusted. The factory does not call for a safety wire. The odds are slim, but that's all it takes. Things could have been worse over a couple of little nuts. The smoke was caused by the gear motor burning up because one limit switch didn't shut it off because the wheel was never down all the way and locked. The mechanic said that the smoke probably wouldn't have gotten much worse, but I didn't know that at the time.
Gear System Tests It seems to me, that articles I have read give the impression to those unfamiliar with this fine airplane, that there are serious faults in the design or construction of the landing gear system. The basis for this is the frequent accident reports in which the landing gear has "failed to extend", or "collapsed". A number of accidents have been experienced by extending the landing gear at the limit speed or over. In most of these cases, the pilot may have noticed the nose gear in the mirror on the left engine cowling and assumed it to be fully extended. A warning gear horn should have been sounding and no green light would have been obtained. The reason the gear did not fully extend was that the wind load on the nose gear was greater than the electrical circuit breaker protection on the landing gear motor. If such as the above is experienced, first − check the circuit breaker of the landing gear motor; second − check the green light for operation by exchanging the gear up light; and third − check for horn operation. There should by no horn, but an in air check can be obtained by throttle closing with gear up. The horn is found not to be operating on a lot of aircraft that I have worked on and most of the time the horn is at fault due to age, dirt, lack of use, etc. It is important and there is an easy way to check it while on the ground. First, pull the circuit breaker marked "landing gear motor" with the master switch on. Move the landing gear selector switch to the "up" position and the horn should sound with throttles in any position (if your bird SN is after SN 24−656). If the horn does not function, have it repaired before flight. The green light should remain "on" during this check. Above all, replace the gear selector switch to the down position and then the "landing gear motor" circuit breaker to the "on" position.
Gear Wiring Here's a landing gear tip some of you Comanche owners may find useful. My landing gear would not retract. After making two visits to a mechanic, he finally found those five wire leads to the landing gear safety switch on the left landing gear. The switch itself and the solenoid on the interior firewall were at first suspects, but functioned perfectly. Of the five wires, two were broken from flexing and a third was hanging on by a strand. The mechanic spliced all five wires and I applied clear rubber silicone caulk to isolate the wires, reduce the possibility of shorts and to promote better flexing. If Piper had used proper wire and design in the first place, this trouble would not occur, but there are many practices in aviation as cheap and shoddy as in the automotive world. I first noticed trouble when the gear would not retract, so if you ever have that problem, check those wires leading to the safety switch very closely.
Gear Transmission Broken Worm Screw One night I reached down to extend the gear and it only extended about half way. After raising the gear and extending it to the same result a couple of times, I realized that I was going to have to manually extend the gear. The next day the shop found that the worm gear had cracked completely and was binding when the gear was extended. The complete gearbox was shipped to Bob Weber by UPS to be rebuilt. I figured that it made sense to rebuild the whole box rather than
Chapter 7 –Landing Gear / Brakes 38 of 106

just replace the gear. If the worm drive had gone bad, who knows what would be next? Within a couple of days, Bob had rebuilt the box and returned it After installation, we swung the gear a number of times and it was smooth as silk! Here is the rub. The satisfying clunk as the gear swung home was gone! What I had interpreted as locking into place was probably the worm gear binding. So if you have an older Comanche with the "Johnson Bar," I recommended checking it occasionally (actually I recommend checking it every time you extend the gear). If it isn't silky smooth, you may have a problem and I would recommend a trip to your A&P to check it.
Brake Lining for Stainless Steel Discs I purchased my Twin Comanche last May and immediately started having brake problems. As it turned out, I had metallic brakes on the left side and non-metallic on the right. I was getting about 25 landings out of the metallics and hundreds out of the non-metallic. Having gone through four sets of metallic brakes, I knew there was a problem! A call to ICS got me to look at the disks. Guess what, we had stainless steel brake disks. A call to ICS confirmed that metallic brake pads and stainless steel disks are a no-no. My TIP is simple, "if you have stainless steel disks, don't use the metallic brakes!"
Gear Bungee Arms After reading about the possibility of cracked bungee arms in the Flyer, I figured that annual time would be a good time to check this out. To put it mildly, I am very glad that I checked. I read over the description in the article, consulted with my A&P mentor, and proceeded to remove the right bungee arm. Well, at least I proceeded to try to remove the right bungee arm! Contrary to my expectations the arm would not come out. After trying to pull the right one for thirty minutes or so, I decided to try the left side. Piece of cake! It came out easily, just as promised by the manual and article. It was not cracked, but a rather significant looking groove was present where the shims ride. This, to me, seemed worse than the cracks shown in the article since the tube could split at the crack possibly letting the gear collapse. Upon further investigation of the right side, it was almost certain that the tube portion of the bungee arm was bent. The pivot action when retracting the gear or turning the bungee arm was slightly eccentric. Discussing "what to do next?" and "have you seen this before?" with my mechanic and briefly with the folks at WEBCO didn't give much in the way of clues. I spent six hours or more trying several different methods none of which worked. The following steps finally allowed removal of the dreaded stuck bungee arm. 1. Behind the arm to which the bungee cord attaches there is a hole through which the bungee arm bearing and
retaining ring can be seen. If you reach in with a pair of snap ring pliers, the retaining ring can be removed. 2. Check that the hole is large enough for the bearing to pass through. In my case, I had to remove the bolts holding the
bearing support to get it to move forward a bit, providing room to allow enlarging the hole slightly. 3. Support the area around the bearing. I cut a piece of plywood to fit up in the cavity and around the bungee arm and
two 2 x 4's to brace against the floor and the plywood. Place something against the end of the 2 x 4's on the floor to keep pressure on the surface around the bearing. My results from Step 4 indicate that the sharp blow provided to the arm may make all this support unnecessary. I took what I considered to be the safest course.
4. Reach into your tool bag and get your biggest slide hammer with the gripping jaws (mine came from Sears). Clamp the jaws on the bungee arm as near to the center as possible, not at the outer end where the bungee cord attaches. Hammer away with the slide and you should be rewarded with the bungee arm and bearing both coming out together. We applied mild heat from an electric heat gun to the bearing support which seemed to help. Of course, DON'T use a torch!
The bungee arm was indeed bent right at the area of the shims. It didn't bind in the bearing or in the landing gear housing, but it had to be cut in two to remove it from the bearing.
Chapter 7 –Landing Gear / Brakes 39 of 106

The service manual mentions Kit #761−082 for adding a second nose gear down lock spring. My Comanche now has this improvement as well. The manual also recommends that the assist spring, #83302−40, be replaced any time the bungee cords are replaced. I suspect this doesn't mean every three years, since I think the original intent was that bungee cords would go a longer time. I replaced my springs because they looked 30 years old. The pivoting attachment points for the assist spring needed a bit of cleaning and lube to correctly pivot again as well. All of this work has resulted in very smooth gear operation, as well as a marked increase in safety. One more comment on bungee arms. I saw a letter in the Flyer recommending using a large adjustable wrench to install the bungee by turning the arm with the wrench. I would heartily NOT recommend this practice after examining the bungee arm. The tapered nature of what you are grabbing with the wrench as well as the close proximity of welds looks to me like trouble. The weld could be cracked and/or the part of the arm being grabbed could be bent. Short cuts are only good if they are carefully evaluated for the possibility of damaging something. I would not risk that short cut. ED: We agree with the last paragraph completely.
Gear Door Connecting Rod Two items to check with your mechanic and in your post repair inspection are the landing gear door connecting rod if it has been disconnected. It is possible to reassemble the door with the spacing backward. This will shorten travel on retraction, jamming the gear before it is fully retracted and it will bend the rod. A paint shop did this to me. The gear will come back down and lock okay, but you will need a new arm and the circuit breaker will pop when the gear can't fully retract. So it is recommended to look at the rod bolt and make a sketch before disconnecting so that it goes back together the same way.
Gear Upper Drag Link Bolt We have another item which you or your mechanic will need to check. We have found the bolt (item 7) installed the opposite way to that shown in the drawing. This will permit the end of the bolt to dig into the spar web as the gear goes up and down. It can destroy the spar. This bolt must be installed as shown in the drawing, i.e.; head forward, nut aft.
Chapter 7 –Landing Gear / Brakes 40 of 106

Cracked Side Brace Stud Some recent calls from alert mechanics working on members' Comanches has brought to my attention that another look is needed with regard to the stud−main gear side brace. Check figure 25, item #19, part #20829−00 or #22512−00 on the drawing (Page 7−53). After removing this part for whatever reason, they have checked it for cracks using a dye penetrant and much to our surprise, have found some cracked. I got a recent call from George Adams, ICS #08288, advising that after having his Comanche serviced prior to a planned departure, on getting back into the aircraft the right gear collapsed. On examination, it was determined that this particular
Chapter 7 –Landing Gear / Brakes 41 of 106

stud had broken off at that moment. I have not seen this particular stud but would guess that it had been cracked for some time prior to the failure. So I strongly advise that at the next inspection, this part be checked − don't wait for the 1,000 hour gear inspection. When you have the aircraft on jacks, it will not take long to do this and could save you an expensive repair bill.
Nose Gear Damage We continue to have our aircraft damaged by some airport attendant using a tug to move the airplane. This may seem like an unimportant happening, but it can wind up costing you a great deal of money. There are steering limit markings painted on the gear, but usually the person on the tug is either ignorant of this, or not interested. If your Comanche has been parked by someone other than yourself, I suggest you inspect it very carefully before you start it. This service letter applies to the twin, but the information is basically the same for all of our aircraft, both single and twin models. Piper service letter 575 follows for your information.
Subject: Nose Landing Gear System Inspection Models Affected: PA−30 and PA−39 Twin Comanche Serial Numbers Affected: 30−2 to 30−2000 incl., 39−1 and up. Compliance Time: Recommended at the next 100 hour inspection and each 100 hour inspection thereafter. Purpose: Product serviceability information received at the factory indicates a that the nose landing gear system is possibly not being inspected and/or maintained at a level necessary for proper operation of the system. It is therefore recommended that the following specific areas of the nose landing gear system be carefully inspected at each 10 how inspection. Instructions: With the aircraft on jacks: 1. Inspect the nose gear aligner roller for indications of excessive wear and I improper function, and impact the aligner
roller mount for security. 2. Impact the nose gear oleo strut housing assembly and the strut housing collar for the following condition;
a. Cracked stops. b. Broken and/or missing stops.
Chapter 7 –Landing Gear / Brakes 42 of 106

c. Nonconformity with nose gear steering travel information contained in the current issue PA −30/39 Service Manual, Section VII, paragraph 7−13.
NOTE: It must be recognized that the three items above are of critical importance to the successful and proper operation of the nose landing gear system. Further, careful ground handling practices (i.e., during parking, etc.) must be followed to avoid damage to now landing gear components as specified in Items 1 and 2 above. 3. Perform a minimum of two (2) gear retraction cycles: one with rudder pedals completely depressed full left, and
another with rudder pedals completely depressed full right. During gear cycling, observe that the aligner roller is engaged within the gear aligner guide bracket channel (reference attached sketch for a pictorial description). a. If the aligner roller does not engage within the aligner guide bracket during gear cycling as specified above, it
will be necessary to readjust the nose gear steering travel limits. 4. Apply steering limit markings on the nose gear strut housing as denoted on attached sketch.
Chapter 7 –Landing Gear / Brakes 43 of 106

Chapter 7 –Landing Gear / Brakes 44 of 106

Gear; Cracked Housing
There are continuing incidences of cracks in Comanche main landing gear housings. To check for cracks, remove the bolt securing the clamp and slide clamp clear of web. Clean area in vicinity of hole and inspect for cracks visually with 1OX magnifier of dye check. If no cracks are found, modify hole and web as indicated.
Chapter 7 –Landing Gear / Brakes 45 of 106

Landing Gear Test In the January 1992 issue of the Comanche Flyer (page 5), there was an article relating to the P/N 20829−00 or 22512−00 being cracked. The big question is why should it fail? In all of the print that I have read regarding the Comanche landing gear, I have never seen any mention of what I think could cause this failure. To extend the landing gear by emergency means in the air, the forward speed of the airplane will load the nose wheel sufficiently to where the manual bar may have to be used to get the gear to lock in the down position. To extend the landing gear by emergency means while the aircraft is on jacks, the same action is taking place without the air load to resist the action. This is all happening if the landing gear is released from the full up position. I do not think this should be allowed to happen and I have seen it done a number of times. The total load is being exerted on this part mentioned in the article. As we all know, a steady load will not fracture a part such as this nearly as fast as a sharp striking load. The part mentioned is not designed for such treatment. Side loads from cross winds, fast taxi turns and the like will result in what the part is designed to experience. It is my opinion that the service manual should contain the warning that the landing gear should never be released from the full up position when checking the emergency gear operation. Run the landing gear down more than halfway prior to releasing the gear and allowing it to free fall. ED: We concur. If the gear are released while the aircraft is on jacks, one or more assistants should hold the gear and allow them to ease down gently and not allow them to fall precipitously.
Nose Wheel / Brakes It is most important that the ground to flight rigging of your Comanche compliment each other. Does your aircraft become decidedly "Squirrelly" or skip and swerve at the transition period of ground run to full flight? This would be noticed more likely in a nil wind still air situation where you would expect a smooth transition into the flight regime. If you do not attain this expectation, it is likely that your aircraft is not rigged correctly. It is most desirable that your aircraft runs straight down the runway with all the wheels and the rudder in line with the longitudinal center line of the aircraft. As the flight surfaces become effective, they are not trying to force the aircraft in one direction whilst the pilot is trying to steer the aircraft in a straight line down the runway. The first step in ground rigging the aircraft is to jack the aircraft and get it horizontally and laterally level. We start by getting the nose wheel to run a true line with the center line of the fuselage. The important thing to note is that the nose wheel of the Comanche does not set on the true center line, but sets to the right hand side somewhat. There are two methods of aligning the nose wheel. One is to use a Jig especially fabricated for the purpose, the other is by the chalk line and plumb bob method. As many of you would not have access to the aligning Jig, I will deal with the latter method here. With no load on the nose wheel, check the clearance of the steering rollers to the steering bellcrank. These bushes should rotate with a slight drag and have very little clearance. If clearance is excessive, correct it by fitting the appropriate oversize roller. These are available in sizes 0.625" D, 0.687" D, 0.750" D, 0.812" D and 1" D. Place a suitable length of bar across the nose wheel tunnel resting on the forward edge of the fuselage skin below the nose wheel drag link hinges. Measure from the inside lower wall of the nose wheel well on the right hand side 5" and tie a plumb bob weight to the bar at this point. Measure 0.5" to the right of the rear tie down point and attach a plumb bob weight at this point. Mark a chalk line on the floor using the plumb lines as references. You now have the true center line. With the rudder pedals clamped in the neutral position, adjust the steering push rods to align the nose wheel by sighting down the chalk line. Do not adjust one rod end but divide the adjustments amongst all four ends ensuring that the threads do not extend beyond the check holes in the rods.
Chapter 7 –Landing Gear / Brakes 46 of 106

When you have the nose wheel aligned, adjust the pedal bar angles to 13 aft of vertical. Measure 20 either side of the chalk line a line intersecting with the nose wheel contact center point on the floor. Check that the nose gear turns 20 left and right but not more than 25. If it turns more than 25, check for broken steering lock stops on the nose gear housing. Allowing travel of more than 25 causes the rudder stops to contact and strains the cables and pulley attachments. Having done this the rudder cables will have to be re−tensioned.
Rudder Alignment Following on from the previous article and whilst the aircraft is still on the jacks, we can continue on to the rudder alignment. With the rudder pedals clamped in the neutral position and the nose wheel aligned on the center line, disconnect the rudder trim rod at the steering arm. Adjust the trim indicator to read neutral. Turn the trim barrel in the engine compartment to maintain the following distance from the barrel to the firewall. PA24−180 SN 24−1 to 24−1676 7/8" PA24−180 SN 24−1684 and up 9/16" PA24−250 9/16" PA24−260 9/16"
Pa24−400 7/8" With the barrel held in this position adjust the rod end to allow the attaching bolt to slide into place. In order to check and set rudder travel disconnect the rudder cables at the rudder bellcrank. Insert a small round dowel into the rear curved corned of the rudder skin extending down sufficiently towards the elevator skin. Measure outwards each side of the fuselage center line a distance of 6 1/8" and make 2 small dots approx 6" apart each side on the elevator skin top surface. Run two pieces of masking tape outboard of these dots parallel with the fuselage center line. Move the rudder left and right and adjust the stops so that the pointer travels no further than the inside edge of the previously installed masking tape. You now have the correct 25 degrees travel angle. The elevator must be held in the level position to conduct this check. Reconnect the rudder cables and adjust their length to position the rudder pointer on the center line and readjust cable tension. On those aircraft with interconnected controls, adjust the coordinator springs to 1/16" extension with the rudder and ailerons in the neutral position. If you have done this correctly your aircraft is in proper ground to flight rigging. In the previous article I stressed the fact that the nose wheel travel should not exceed the prescribed amounts which are controlled by the installed travel stops. Serious damage is incurred if these distances are exceeded. At the recent San Diego Convention I observed your Comanches being towed with a unit which did not have a turntable fitted which left you at the mercy and intelligence of the operator not to exceed the steering limits. If these limits are exceeded, several things can happen. Firstly, the bolts holding the nose gear steering arm can shear off. Secondly, the bolt holding the pulley cluster in the floor below the pilot’s feet can bend and release cable tension. Thirdly, the rudder stops will contact and if exceeded far enough, the bellcrank will crack or break off. Having observed this operation, I conducted a walk around of the airport parking area and inspected each Comanche for broken steering lock stops. Of the 95 aircraft, only 14 still had the stops in place. Only 2 in the Flagship area had their stops intact. One twin and one single had taken the precaution of disconnecting and flagging the nose wheel torque links. This is a serious problem because once the stops are gone, who knows when and by how much the limits have been exceeded in later towings.
Chapter 7 –Landing Gear / Brakes 47 of 106

Brakes 180 / 250 I wanted to pass on some information concerning old style Comanche brakes. These are listed in the Comanche Parts Manual as Cleveland P/N 3000−250, and are normally installed on PA−24's serial #24−1 through #24−3295. They can be identified visually by noting that the hydraulic line connects to the middle of the brake assembly, as opposed to the newer style brake assembly which has the hydraulic line attaching at the top of the assembly. It is interesting to note that the Cleveland Prod. Directory lists the old style as P/N 30−12. At any rate, in working on the older model brakes, I have noticed some points that owners should be aware of that are not mentioned in the Piper Service Manual. I personally consider the older style brake to be a better brake than the newer styles, if certain procedures are followed. There seems to be some confusion concerning the adjustment feature of these brake assemblies. First of all, pads can be changed without removing the assembly from the aircraft. (I personally remove each brake assembly completely.) Service Manual page 1 K12, Fig. 6−28 is reproduced here for your convenience. When removing the pressure plate which has the pads attached to it with six rivets, you will have to remove a nut & washer and a spring & sleeve in order for it to come free. After these are all removed, what is left is the brake cylinder with three movable parts in it still. The two (2) pistons should be pressed back into their holes at this time. They should move easily with just thumb pressure. If not, there is something wrong and further disassembly is required. The third movable part is of prime importance. It is called the retract cylinder. It is basically a steel bushing which is pressed into a hole in the middle of the brake cylinder. You should not be able to move this bushing by hand pressure. It does have to be set to its starting position. I use a 3" C − clamp for this. Laying something flat and stiff across the back of the brake cylinder, the C − clamp can be centered and tightened in order to push the retract cylinder back flush with the same surface that the pistons are flush with. The retract cylinder should move fairly easy this way. Now the new pads can be riveted on and everything can be reassembled although there is an adjustment that has to be made, the spring & sleeves and the nut & washer. The nut should be self locking. If it moves too easily, it should be replaced with a new all metal self locking nut. Now tighten the nut down so that the washer doesn't quite touch the exposed end of the retract cylinder, about 1/32" space is good. This setting is how much the brake pads will be pulled away from the brake disc after brake application. See diagram "1". When tightening the back plates down, make sure the tire can roll freely at all times. The back plates have pads mounted on them with three rivets each and are tightened down with 1/4" bolts that have 7/16" heads. If the brakes lock, look for this possible situation. See diagram "2". Now that everything is tightened down, go inside the plane and push on the brake pedal several times. After the second or third push, the pedal should get noticeably harder. The cylinder pistons are moving out and the retract cylinder is being pulled into position. The tires should roll easily when the brakes are released − this is the reason for the space between the washer and the end of the retract cylinder. I hope this procedure will help some Comanche owners who have always had "sticky" brakes.
Chapter 7 –Landing Gear / Brakes 48 of 106

Bungee Arm Cracks Maurice Taylor − Technical Director In the list of FAA Malfunction and Defect reports which Headquarters sends on to me, one of them pertained to the bungee arms. A mechanic had removed thin walled bungee arms and found them cracked and these were replaced with new thin walled arms. I assume the crack was at the point shown in the drawing below. The thin walled arms were found only in the 180's and 250's. The thin walled is 0.062 and the heavy walled is 0.125 as found in the rest of the Comanche fleet. I am puzzled about the thin wall replacement as back in the mid '80's, if you ordered the proper part number from the parts book for a 180 / 250, you would automatically get a heavy walled bungee arm as Piper no longer made thin walled ones. If your 180 / 250 still has the thin walled arm, they should be checked every time you change the bungees. If the arm is in good shape, I see no harm in putting it back. If you find it cracked, it must be replaced. Replace it with the heavy walled unit as that is the only approved replacement part. We have talked about these arms in the past, but obviously the problem still exists.
Chapter 7 –Landing Gear / Brakes 49 of 106

Problems with Gear Maurice Taylor − Technical Director You may be saying to yourself, oh, no, not another article on the landing gear. Yes, indeed, and obviously needed with the calls I have had recently about gear up landings. In almost every case, lack of knowledge about the gear and its workings was at least partly to blame for what happened. Possibly neither the horn or the light was working, and perhaps the check list wasn't used. Sounds all too familiar. Fortunately for those owners I have talked to in the last couple weeks, they were lucky as their airplanes are repairable. If, for any reason, the gear does not go down by the normal method, do not be too quick to disconnect it and use the emergency extension. This should be the last item on your check list and used only when you have proved nothing else will work. 1. Know where the circuit breakers are. Usually there are three although some have only two. You should be able to put
your fingers on them unerringly even in the dark. 2. I hear of quite simple things as items getting left on the floor behind the telescopic handle and a frequent one is your
Jeppesen manual. When you select up and the handle gets to the manual, or whatever you left there as a blocking device, it will stop and the 30 amp circuit breaker will kick out. If this happens to you, select down on the gear switch. Put the circuit breaker back in. When the gear goes down, it will release the blocking object. Put whatever it is somewhere else. Then put the gear back up.
3. After take off and you have the gear up and are out of the traffic pattern, check the gear up light to determine that the gear went all the way up. If it did not, most likely the circuit breaker went out just before the gear finished its up travel. If you don't check this, when you put the gear down, nothing is going to happen until you reset the circuit breaker. This is far too common an occurrence due to improper or lack of maintenance on the gear.
4. For aircraft with the telescopic handle, there are three things to tell you if the gear is down. In order of importance they are the green light, the horn, and lastly, the position of the red knob on the handle. Note where this sits in the normal position. For the other aircraft, there are two methods − the green light and the horn. Be sure you know at what power setting the horn blows and it should be 12 to 14 In Hg. If it doesn't blow, get it fixed. DON'T fly the aircraft if the horn is not working and adjusted properly. If it doesn't annoy you when it comes on as you are slowing down in the traffic pattern, then it isn't adjusted properly. Most maintenance shops are far too casual in their attitude toward the horn adjustment. If you land gear up, it is your hard earned dollars which will go in the repairs.
5. If the gear doesn't go down: a. Check all circuit breakers b. With emergency door open, select down. Take note whether or not the transmission is trying to put the gear
down. If it is and you have a model with the exposed handle, try helping it.
Chapter 7 –Landing Gear / Brakes 50 of 106

c. If it is not trying at all and doesn't kick the circuit breaker back out, then it will have to be put down with the emergency system.
6. To do this, you must fly the airplane all the time. Piper says the airspeed is not to be above 100 mph. I would reduce it to approximately 90 mph. With the gear in the near full up position on a properly maintained Comanche, it will fall to the full down position with the airspeed not above 90 mph. But to be sure, check for your green light and no horn. For those with the exposed handle, the red knob should be in the right place.
7. Always keep in mind that with the gear disconnected, there is NO down lock. An exception to this is if you have the emergency extension security system either factory installed (some did) or added later. Gear will stay down because it is over center and this is so only when your gear has been properly adjusted. Putting the gear down by this method is an emergency method and always treat it as such.
And there is one other point which still crops up at regular intervals after all these years − do remember to put the gear down in the first place.
Failed Nose Gear − Push / Pull Rod Assembly Hubert Wren, ICS #08002 Out at Peterborou gh Airport the preflight went smoothly. Level at 2,600 ft, we decided to head for Lindsay which was only 22 miles to the northwest. When we arrived in the traffic pattern I couldn’t get the gear down no matter what I did and was forced to land gear up. The actual cause lay in the forward belly of the airframe. One of the end fittings on the push / pull rod assembly, part #21109− 00, had separated because of a poor weld, effectively disconnecting the nose gear from the extension / retraction mechanism. Thanks to Maurice Taylor we found out that a Piper Service Letter, SL−546A March 1970, addressed the problem and prescribed a simple solution. Using this information, Airtech remanufactured the rod to the later design. That still left the puzzle as to why I had a green light in the cockpit to indicate gear down and locked. Most retracts have a green light for each gear leg, but Piper chose to use only one on the Comanche with the limit switches for each gear leg wired in series so that all three had to be made to illuminate the green light. My first thought was that there was an internal short in the nose limit switch. Thanks to the diligent crew at Airtech who tracked down the real culprits. The gear limit switches were mis−wired to such an extent that you only needed one main gear down to get a green light, in effect bypassing the other main and the nose. They also found a minor glitch in the service manual's wiring diagram that had the green and orange lights in series.
Bungee Tool MauriceTaylor, ICS #00775 The Bungee Tool can be made easily from almost any wood − hardwood being preferred. I used white ash for mine. With a 24" x 2" x 3/4" piece of wood, mark out a center line. Locate from the drawing the two points and using a fly cutter drill a 7/8" hole at one end and a 5/ 8" hole at the other end. Saw to length as per the drawing and saw out notch as shown on end with 7/8" hole. With saw or plane, taper as shown. The smaller end now is shaped by a modified #18081−00 roller. With a three cornered file, file saw teeth on roller and these need to be quite deep (down to center radius) to shape the center portion of the tool. This can be done freehand as it does not matter if the teeth are not quite even. Now with a 5/16" AN bolt 2" long, thread it down so that a nut will grip the roller. This leaves about 1" of bolt to mount in a drill press chuck. Adjust the drill press spindle and table so that small end of tool can be milled to shape of roller. Note: This step is most important because this will prevent the roller from slipping off tool with bungee on it. To make the 3/8" notches, I used a ratchet handle with sandpaper around it. These are to help center the bungee. Two of these are required on each end as shown on the drawing.
Chapter 7 –Landing Gear / Brakes 51 of 106

To use the tool: mount the new bungee on the tool using a vise and a rod or screwdriver which will go through the hole in #18081−00 roller which you removed from the aircraft after removing the old bungee. Be sure that the roller is properly seated on the tool. The end of the tool is the exact shape of the roller so the roller won't slip off. Place #20845−00 bracket and bolt on the roller − these were also removed from the aircraft. With the gear in a full up position, fasten the bracket and roller with the shock ring and tool attached to the aircraft. Then with the large end of the tool over the bushing on the bungee arm assembly, have a helper lower the gear a small amount − just enough to take the bungee off the tool. Then remove the tool by pulling out the small end. The idea and design for this tool was given to me at the 1978 annual meeting in Vero Beach by a member.
Emergency Gear Release Arm Problems David R. Clark ICS #8592 Most of us have enough sense to know if our gear motor and transmission are not working smoothly or sounding right. If they aren't, we repair them immediately because we don't want to be at the mercy of the emergency gear extension mechanism even though theoretically it is designed to get the gear down, no matter what. A problem arises when our backup system doesn't work, i.e., the release arm doesn't uncouple the landing gear from the motor drive shaft. Many of us may be vaguely aware of how this system works and a few may have even pulled the handle when the plane was up on jacks at annual inspection. Maurice Taylor encourages us to familiarize ourselves with this system while on the ground and to learn how to reattach the extension mechanism to the gear motor so that we might eventually be able to practice lowering the gear by the emergency system while in flight (and then be able to reattach the gear to the motor again prior to landing). Note: Piper advises us that if we utilize the emergency gear extension system while in the air the proper technique is to land the airplane and put it up on jacks and reattach the gear motor torque tube to the landing gear drive shaft. You can judge for yourself what you are comfortable with, but not being knowledgeable about this system may unnecessarily distract you at a time when other things demand your full attention. Don't try activating the emergency system in the air for practice unless you are really adept at doing this task on the ground with the plane on jacks.
Chapter 7 –Landing Gear / Brakes 52 of 106

Although I realize that other things can go wrong with this mechanism, I have encountered two particular problems in my twin Comanche emergency gear release that I think ICS members should be aware of. I have found both situations: bent links and a missing cotter key / clevis pin on the emergency release arm.
INSPECTION 1. The next time you get in your Comanche, pull up the emergency gear extension door in the floor and look at two
things: the links attached to the red emergency gear release arm and the clevis pins which hold the release arm assembly on the drive shaft.
2. Inspect the release arm assembly carefully. This assembly rides on a bushing that encircles the tubular drive shaft and is held on by means of two small clevis pins. There should be a small flat washer and a cotter key on both of the pins. If either cotter key is missing, carefully replace the washer and insert a new cotter key without pushing on the clevis. (If you push it into the tube it will cause you great inconvenience). If the gear is operated with the cotter key missing, the clevis pin can fall into the tube and jam the landing gear in any position.
3. Next, inspect the two links attached to the red arm to see if they are parallel and straight when viewed from above. If they are bowed outward, you will need to straighten them with a large pair of pliers. The consequence of them being bowed out is that the sleeve (or release tube) cannot slide forward completely to uncouple the torque tube from the gear drive shaft. This will effectively prevent you from manually lowering the landing gear during a real emergency (I finally got your attention).
4. But the real acid test is to put the plane on jacks (like at the next annual) and test the emergency gear release arm to see what happens. If it is difficult to disengage the torque tube and even more difficult to hook it back up, then likely a problem with bent links has occurred. It should be fairly easy to do the "acid test" and if the gear extension system is not working smoothly, now is a better time to fix it than when in the clouds.
REPAIRS
Chapter 7 –Landing Gear / Brakes 53 of 106

A. The links: The most common problem by far is the links attached to the red arm being bent. Not only can they be bowed outward but can be bent fore and aft so that the approximate 110 degree angle the arms make could be compressed to 100 degrees. If after straightening out any bowing sideways you are still are not getting a good opening below (the sleeve is not sliding forward enough to allow access to the groove or slot in the shaft), you may need to bend or change the aforementioned angle to improve this access and thereby allow the drive shaft to engage and disengage easily with the mating pin on the torque tube. B. The clevis pins: A much rarer situation occurs if you find one of the clevis pins has lost its cotter key and the clevis has fallen back into the tube. If you have worked the gear motor, by now you have ground up the clevis in the worm drive. Don't despair. This can be fixed.
1. First of all you must remove the gear transmission and gear motor. 2. Remove the cotter key on me opposite side of the assembly and push that clevis pin back inside the tube. You
can now remove the red arm / release tube assembly and the bushing it attaches to. You can see two holes approx 3/16 inch diam on the sides of the tubular drive shaft. These serve as a recess for the clevis heads to rest in, so that they don't interfere with the transmission screw inside.
3. Twist the transmission screw up to the bottom of the holes, and holding the whole apparatus motor end down, tap lightly on the side of the drive shaft tube and see if you can fish any metal debris (as well as the good clevis you just pushed in ) out from inside the tube. If you can easily screw by hand the drive shaft tube up and down the shaft, chances are you don't have any metal left inside.
4. I assume that eventually you will want to put all this back together and here's how: Get two new clevis pins and cotter keys. The clevis pins must be identical to the old ones (not just close). If you have studied the reassembly of this drive shaft / bushing / arm you realize that it looks nearly impossible to put back together the way it was. So think of it like a puzzle with a kind of trick solution.
5. Before you start, make sure that there are no burrs on the clevis pin heads and that the clevis can pass easily through the holes in the bushing and the red arm assembly. Dress out the openings in all these parts with a drill bit if necessary. Take a small piece of 4# test monofilament fishing line and put it through the eye in the clevis and tie a small loop about one inch in diameter. Cut off the excess. Repeat this process with the other pin. Put both pins and their loops inside the holes in the drive shaft tube.
6. Next put the bushing over the drive shaft tube and center the holes over the openings in the tube. With a small 2 inch piece of safety wire with a tiny hook bent on the end, go inside the tube and patiently fish out the loops of fishing line through the holes (one on each side). Slide the red arm assembly over the tube and feed the fishing line loops through the holes in me phalanges from inside to outside.
7. At this point you are pulling the clevis pins through the holes in the bushing and the holes in the red arm assembly the outside through the bushing and the flange using the fishing line as your guide. You may need to make gentle alignments with an ice pick to insure the clevis pins come through easily. Pull the pins through the openings to where the eye in the clevis is showing. Engage the eye of the clevis with a dental pick or the like and twist and pull it until it is seated.
8. Put a washer over the clevis. Cut the fishing line loop and carefully insert a cotter key. The washer needs to be thick enough to insure that the clevis remains seated and doesn't work backward into the tube.
9. Now put the transmission and motor back into the plane. Hook them up and cycle the gear. I realize the last part of this procedure sounds far fetched but it can be done and I will be glad to answer questions about the method and if you really need some help put the whole thing in a box and send it to me and I'll put it back together for you.
Under Carriage Problems with PA 30 J. M. Bisco, ICS #08662 Not long ago I had a problem with G−AVPS. I selected down on the under carriage. The nose wheel was half down and the circuit breaker popped out and the motor was hot. I tried to disconnect the red lever on the undercarriage emergency. The weight of the undercarriage was holding the red lever in place and I could not disconnect it. I tried the circuit breaker after 5 minutes and still no motor.
Chapter 7 –Landing Gear / Brakes 54 of 106

I had two choices − to turn the rubber motor drive to up or down for under carriage. The up seemed less hassle. With one finger I turned the motor drive rubber until the under carriage up lights came on. It was now possible to disconnect the red lever and use the emergency system to lock the under carriage down. Thus I saved my aircraft from a wheel up landing and gave myself another lease on life.
Proper Documentation of Landing Gear AD 77−13−21 Larry Clark, A&P, IA, ICS #10059 Yesterday I completed a pre−buy inspection of a nice '59 '250 Comanche and as I went over the logbooks to check for any overdue AD inspections, I once again found improper entries for the landing gear inspection, AD 77−13−21. As Maurice Taylor has said many times, the landing gear on the Comanche is very reliable and trustworthy, so long as it is properly serviced and inspected to ensure that tolerances are maintained within the factory limits. In all of the Comanches that I have inspected, including my own PA−30, I have yet to find the correct FAA approved entries for the landing gear inspections and bungee cord replacements. I'm sure that there may be some logbooks out there that are correct, but I haven't seen one to date. Let's first look at the text of the AD and determine the required actions: NOTE: This is not the full text of the AD. To prevent collapse of the landing gear after manual extension; a. Accomplish the inspection described on page 3 of Piper Aircraft Corporation Service Letter No.782A, dated March
21, 1977, and replace components exceeding the specified wear limits, or an equivalent inspection and replacement procedures approved by the Chief, Engineering and Manufacturing Branch, FAA Eastern Region.
b. Inspect the main landing gear bungee cords for frayed protective covering, breaks, soft areas, and replace cords exhibiting these conditions. In addition, replace cords every 500 hours in service, or every three years, whichever occurs first.
c. Repeat paragraph (a) at each 1,000 hours in service after the prior inspection, and repeat paragraph (b) at each 500 hours in service after the prior inspection, or within one year after the prior inspection, whichever occurs first.
First and foremost, your mechanic must have a copy of Piper SL 782A in order to check the landing gear for wear limits. Do not let anyone who does not have these specifications directly at hand or does not have experience with this inspection touch your landing gear. Many gear failures occur after an inexperienced mechanic has disassembled and incorrectly reassembled a Comanche landing gear. The ICS has go−no−go wear limit check kits available for members to use that will help determine wear limits on the various landing gear parts. An entry in the logbook of; "Replaced all MLG bushings" does not meet the requirement of paragraph (a). A correct entry should read; "Inspected landing gear in accordance with AD−77−13−21 para. (a) and Piper SL 782A and determined to be within specified limits." Remember, it is all three landing gear assemblies, not just the Main Landing Gear (MLG). What I find in most Comanche logbooks are entries (every three years) that the bungee cords were replaced with an entry reading; Complied with AD 77−13−21, replaced bungee cords. Replacing the bungee cords every three years is only one requirement of paragraph (b) and does nothing to comply with para. (a). Note that para. (b) also requires that the bungee cords be inspected for specific defects, and para. (c) requires that the bungee cords be inspected every year or 500 hours, whichever occurs first. That means that every year, on your annual inspection, the mechanic should have made a logbook entry like this; inspected landing gear bungee cords per AD 77−13−21 para. (b) or Replaced MLG bungee cords per AD 77−13−21 para. (b). Check your logbook and see if your bungee cords were inspected last year and signed off per the AD requirement. Your aircraft maintenance records should include a list of AD’s plus information as to when it was last Complied with, and when the next inspection is due. This can be a list in the back of the logbook, or on a separate sheet of paper. AD’s are either one time or recurring. AD 77−13−21 is a recurring AD and your aircraft records must have an entry to indicate when
Chapter 7 –Landing Gear / Brakes 55 of 106
para. (a) is next due, and a clear understanding as to when para (b) is next due, both date and total hours. Take a look at FAR 91.417 (a) (2) (V) and you will find that it is the owner or operators responsibility to maintain the maintenance records (not your mechanic) and to know the status of any Airworthiness directives. I continue to find aircraft at annual time that have overflown required inspections. Several AD inspections on the Comanche series require 100 hour re−inspection to comply with the AD text. It is not acceptable to fly beyond the 100 hour re−inspection just because your annual inspection is due next month. An aircraft with good clean documentation is a joy to work on and shows the owner's knowledge and understanding of what is required to keep his Comanche airworthy and legal to fly. Overflying an inspection or improper record keeping could come back to haunt you should there ever be an accident or insurance claim, or heaven forbid, an FAA ramp check.
Emergency Gear Extension Maurice Taylor How do you get the gear down using the emergency method? The very best method that I have found is to work with a good flight instructor who can take you through the proper steps enough times so that you feel confident about it. If you cannot find a flight instructor that is able and willing to do this for you, although it is not as good, you can practice it with the aircraft on good solid jacks, but DO NOT DO THIS WITH THE GEAR ALL THE WAY UP as the gear will fall with a very hard crash and maybe damage the gear. To do this properly, see the LANDING GEAR VIDEO #3 for a step by step procedure. You need to practice it enough so that you can do this in the dark. One of our members lost the electrical system at night; he had no problem at all getting the gear down. Remember in this case you will not have a gear warning horn or green light. The flight instructor will have shown you where the emergency handle should be when the gear is down, not only on models with the gear handle above the floor boards but also for the ones that are below the floor boards.
Nose Gear Down Lock Spring Maurice Taylor I had a most interesting call from Wayne Damico ICS #12986. He just recently bought a 180 Comanche. After looking it over, he discovered that something about the nose gear didn't look right to him. The two springs on the nose gear weren't parallel to each other. My understanding is that a short time before he got the aircraft, the 1,000 hour gear inspection (Piper S/B 782B) had been C/W. The AP/IA had basically completely disassembled the gear and in putting it back together had installed the nose gear drag link cross brace backwards. Also the lugs that attach to it were on upside down. This action will make the springs (intended to hold the gear over center in the down position) do just the opposite; unlatch or pull the gear over center in the up position. Keep in mind that these springs have no effect on the gear when it's operating normally; they only come into play when the gear has been disconnected to use the emergency system. For example, a number of years ago a member had this same inspection done then flew the airplane a year or more. Then on a trip to Mexico the gear didn't go down (at this point, I don't remember why). He put it down using the emergency method and after a short roll out the gear came up. Inspection showed that the springs were on the wrong way causing the gear to come up. If you have had the inspection done on your aircraft, look it over to be sure that everything is together properly. I want to thank Wayne for being so observant on the new aircraft. We are also showing one page from kit #761−082 so that you can see how it should look.
Chapter 7 –Landing Gear / Brakes 56 of 106

Chapter 7 –Landing Gear / Brakes 57 of 106

Gear Studs Maurice Taylor I learned a long time ago that if you don't know very much about something, go ahead very carefully, so here I go. Regarding the landing gear studs, (inspection of) we had a few reports of the studs being inspected using Type I fluorescent liquid Penetrant to check for cracks, then for whatever reason, had them checked again using the magnetic particle inspection method. This indicated a crack where the first method did not. What I have learned from a technician for a major airline and from an Aeronautical University is if the part to be tested had been bead blasted or wire brushed this will probably prevent you from finding a crack using the liquid Penetrant. Clean the part using something like Varsol then inspect it.
More on the Landing Gear Side Brace Stud Bill Farmer, ICS #08995 On the advice of Maurice Taylor long before the AD was published, I had inspected the studs in Harley's PA−30 using the Dye Penetrant Type I Fluorescent and Type 2 Dye Penetrant procedures. Neither showed any signs of cracking then or when I did it again for the AD. A friend had the studs from his 250 Magnafluxed by Hadco, Inc., a local FAA approved test facility and both were rejected for cracks. This will make a good test piece I thought and proceeded to give them the works with everything I have access to, which is almost all field test equipment. To my dismay, I could not find the crack in one of the reject studs. (I have a level one certification in this type of NDT.) The other was obvious, but the first just wasn't there for me. About that time I read Maurice's article on whether the dye pen procedure is really good enough for this application and it got me wondering, so as I was doing the 1,000 hr. gear bushing AD, I sent the studs from Harley's airplane to Hadco for Magnaflux. They came back defect free but I still wondered about the dye pen process so I called Hadco and asked if they would re-inspect the defective studs from the 250 with both Magnaflux, and Type I Fluorescent to compare results. These people were great, taking me through the whole process, explaining step by step, and showing me the hairline crack I couldn't find. After Magnaflux, the parts were cleaned then checked with dye penetrant. Mr. Haddad (owner) did warn me that possibly some of the Penetrant from the Magnaflux would remain in the cracks, giving a not quite true dye pen test. The hairline crack was barely visible using dye pen, not nearly as plain as with the Magnaflux procedures. Mr. Haddad gave me a thorough explanation on the merits of both procedures, bottom line being if at all possible use Magnaflux, as it will find defects that dye pen will miss. Another caution is when cleaning parts for testing DO NOT wire brush or bead blast as this may cover cracks to the point being undetectable. Use a good solvent and soft brush. I use 1, 1, 1 Trichloroethane with good results. If anyone is interested in the different methods I used to check the studs, please call me. Otherwise I won't bore everyone with tedious details. Another thing I found during this was that one of the bushings did not have a chamfer to match the radius of the stud. This is easily fixed but just one more thing to watch for. Very special thanks to George Haddad, owner, and Loraine Fowler, office manager, of Hadco, Inc. 2420 Arnsler Street, Torrance, CA 90505 for all of their time and patience. Another good shop for our members to deal with: Tammy's Aviation Shop, (310) 635−1984, can take care of having parts tested if you wish.
Gear Warnings Maurice Taylor When was the last time that you heard your gear warning horn? If it isn't somewhat bothersome in the traffic patterns, then it isn't adjusted properly or isn't working at all. Testing this is required by your IA at annual inspection. It's item #19 in the gear section for both the single and the twin. Please believe me; in too many cases this is not getting done. Ask your IA at
Chapter 7 –Landing Gear / Brakes 58 of 106

what MP the horn is set to blow. You can be the best one to check this. When in the air with the gear up, ease the throttle or throttles back to 12 − 14 In Hg to be sure that horn blows (remember that with the twin you have to have both throttles back). I have sent a device that I made to a reliable company that, when they get approval from the FAA, that will have a warning in the head set and a flashing red light on the instrument panel, along with the regular gear horn when the MP is lowered to 12 − 14 In Hg. Remember that the horn is the back up or second method to tell if the gear is down and over center. As I have said so many times before, if either the horn or green light is not working properly, don't fly the airplane until both are working.
Eliminating the "Popping" of the Gear Motor Circuit Breaker Warren Cermak, ICS #01686 For several years I had been having trouble popping the circuit breaker on my 250 Comanche when retracting the gear during cold weather. Living in the northern, cold wintry climate, resetting the CB every time I raised the gear was not a thing that I had wanted to do. The problem only occurred when the gear was being raised at the end of the gear up travel. I developed the habit of assisting the gear up by using the emergency extension handle. This usually avoided popping the breaker. To make a long story short, a lot of time and effort and new parts went into the quest to try to eliminate this problem. It was finally solved by Bob Weber at Webco who replaced the push-pull cables. These cables had passed a torque test earlier, but this was done with the aircraft on jacks and without the air resistance one would encounter in flight. This resistance in addition to cables that were marginally sticking was enough to cause the circuit breaker to pop when the gear were lowered. P.S. Regarding Mr. Cermak's gear problems, we believe that the angle of the main gear door when in transition and its combination with the air pressure at the higher gear extension speed range is causing up pressure on the main gear conduit, even as it is being extended, or pushed down. This is putting the inner cable of the conduit in compression and pushing it against the back side of the inner casing. Since this is not the normal path, any dirt or grime which has built up over the years, or a bad area which normally is not contacted, is causing the excessive drag. In Mr. Cermak's situation we were thrown at first because it passed the torque test, as described in the service manual, when on jacks. Everything appeared fine. We realized that the only thing missing was the air pressure on the aircraft. Without the air pressure of flight, the weight of the gear is helping to pull the gear conduit inner wire down. After removing the conduits, we found that when placed in the same position as in the aircraft, they were very difficult to move.
From the Tool Box of MAURICE TAYLOR Just another reminder: is the gear down? It is my belief that the check list is not being used every time. Does the gear horn work properly and at the proper M/P 12 to 14 In Hg? If the horn doesn't bother you when you are getting slowed down in the pattern, then it's most likely not adjusted properly. Does the green light work properly? Remember the horn is a back up for the green light; either one tells you the gear is down. Have you asked your IA, AME, or LAME if he or she has checked the preload on all three gears? If he or she says no or doesn't know, it should be checked and adjusted if needed before it was flown. Do you really know how to put the gear down using the emergency method? Let's say it's a very black night (and maybe you are in IMC). If you have been properly taught and practiced it enough, you can do it with these conditions after a total electrical failure. Be sure you have a good flash light (with good batteries) in the aircraft. When you look under the emergency door, do you know if everything is normal and in its proper place? (Your flight instructor would've covered this very carefully when he or she checked YOU out in the Comanche). Is the spring that holds the screw up when the gear has been disconnected, in its place and properly hooked up? If it's not, don't fly the aircraft until it's repaired.
Chapter 7 –Landing Gear / Brakes 59 of 106

I just received in the mail today the recording of some 500 gear up or gear related items in our Comanches. It truly upset me as this cost all these people a lot of money. In going through them, in almost every case the lack of good maintenance or lack of knowledge of the pilot was the cause. At least that's the way I see it. As I said in a short article before this, the granddaddy of gear warnings is coming very soon.
Notes on the Landing Gear From the Tool Box of Maurice Taylor I have been learning a lot this year about what is happening to the landing gear on our COMANCHES. In many cases, it reminds me of what the sergeant said: "IF IT'S POSSIBLE TO PUT IT ON BACKWARDS SOMEBODY WILL". This certainly is taking place with the gear, from what I'm hearing from the members lately. Let's just take for example the bungee systems. How many of you know what position the bungee arms should be in with the aircraft sitting on the ground? Better yet, do your A&P and IA know? Also, do they have the service manual? It is required that they have it to work on your aircraft and return it to service. The bungee arms have 4 different positions that the bungees will go on to. ONLY ONE is correct. Plus, the arms from the left side will go on the right side; with this condition you still have 4 positions. NONE of them are correct. When you have them on correctly the left side arm will be at approximately at the 4:30 position, the right side arm will be at approximately the 7:30 position. I have learned from at least one case where the arms were put on the wrong side. Then the same person completed several annuals and returned the aircraft to service. Although the gear worked without any problem for some time, it's my opinion that when you have things put together backwards you are never right. You have an unairworthy condition. This aircraft was sold and the new owner was unable to get the gear down. From what I have learned I don't know why. I can easily understand if the gear transmission and other parts of the gear were not in very good condition (as the bungees would not be doing their normal job) that the gear will not go down by the normal method. But why couldn't it be put down by the emergency method? The reason could be that the push pull cables (conduit) are working too hard. Or maybe the pilot who hasn't been properly trained and really doesn't know all the steps to put the gear down. Please be sure you know this procedure very well from a qualified instructor. Another problem that is very common is the missing, or unhooked transmission retract spring. Just now, as I was typing this, I got a call from a member stating that the Comanche that he just bought had no retract spring. The spring is located in the landing gear transmission well and raises the landing gear transmission jack screw to prevent the jack screw from dropping down and interfering with the landing gear mechanism during manual extension of the gear. With the spring missing it possible that when you go to put the gear down by the emergency drop down method, it simply won't go down. (See S/L #447) .
The Comanche Landing Gear Larry Larkin The landing gear on the Single and Twin Comanche type aircraft is a very simple mechanical design. It contains an electric motor and transmission to supply the actual force required instead of the pilot having to manually raise and lower the gear as was done on some of the Mooney airplanes. The air/oil oleo struts on each gear provide the necessary shock absorbing capabilities necessary to minimize the landing loads on the main spar. The struts should be maintained at the proper shiny strut spacing, which is two and three quarters of an inch on most Comanches. The airplane should have a full static load. i.e., full fuel, but no baggage or passengers, when this measurement is taken. Twin hint: leave the nose strut a little low; 1/4 − 1/2 inch. You don't land on the nose, do you? And leaving the mains 1/4 to 1/2 inch higher, will, in conjunction with the small nose tire STC, allow the twin to remain on the runway until VMC is reached. We talk about the gear being locked down; however there are no locks per se, as there are on many other airplanes. The gear is held down by the over center adjustments of the drag links, which allows the weight of the airplane to insure the
Chapter 7 –Landing Gear / Brakes 60 of 106

gear stays down. In addition, the push−pull cables attached to the drive system add some force to insure the gear stays down. When the gear is extended by the emergency means, i.e., raising the motor release arm, only the over center adjustments, with some help from the bungee cords and assist springs on the main gear and two assist springs on the nose gear insure that the gear stays extended while taxiing over expansion joints or cracks in the pavement. In light of this, we have the gear AD that requires bolts and bushing wear tolerances to be checked every 1000 hours and replaced if necessary. In addition, it requires the bungee cords to be replaced every three years or 500 hours, whichever comes first. Part of this AD added the second assist spring to the nose gear. On "C" models and PA−39's, there is an additional locking bar in the emergency gear well that does lock the gear down once it has been extended by the emergency procedure. Always minimize side loads on the gear and especially if it has been extended by the emergency procedure. Always pursue all avenues to get the gear to extend normally prior to using the emergency procedures. You can, by exerting force on the handle, aid the motor in lowering the gear if it tends to overload and pop the gear motor circuit breaker. Be sure to allow the breaker to cool prior to resetting and trying to help the motor. I have used this procedure twice to lower the gear after it would pop the breaker when we selected "gear down" during training flights. This happened because the gear motor was on its last legs and in dire need of an overhaul. I have also run into situations where, if we lowered the gear at 140 MPH or so, the gear motor circuit breaker would pop. But if we slowed to 110 MPH, the gear would lower normally. If your gear won't lower after slowing to 150 MPH, get it fixed, something is wrong, so don't wait for a more serious situation to develop. Once you have decided that you must lower the gear by the emergency procedure, be sure to follow the procedure on the back cover of the access panel for your airplane. There are some slight differences in the different models. Hopefully you have gone through this procedure while the airplane was on jacks during an annual inspection or some other maintenance procedure. Probably the most important step is to reduce your speed to below 100 MPH. As you probably know from one of "Maurice's Seminars," he says 90 MPH is better and I am sure it is. Although getting the twin slowed to 90 MPH kind of leaves it hanging on the edge. With a couple of exceptions, all the people I have had in my classes, who have had to lower the gear by the emergency procedure, have said that slowing the airplane to 100 MPH, then raising the Motor Release Arm, allowed the gear to free fail down and latch over center with the green, Gear Down light coming on, and an uneventful landing. They did not have to touch the handle at all. Be sure to check that the Transmission Retract Spring is connected in your plane. This could prevent the gear from freefalling into place if not connected. I have found at least a dozen airplanes where the spring either was not connected or missing completely. In one case, an enterprising mechanic had used a four inch cotter key, which made installation easy, but would not have retracted the transmission and ball screw if the gear had to be lowered by the emergency procedure. Be sure your gear warning system is operating properly, and that the horn is LOUD. It should be loud enough that even with noise canceling headsets on, you can hear the horn without it being connected to your audio system. Try to check it on every landing by reducing the throttle/s enough to activate the horn while slowing down, then adding power to silence the horn. The switch/s should be adjusted so that it is impossible to slow enough for landing without sounding the horn. Of course, this assumes that you did not "EVER" lower your flaps until the gear was down, or you could very easily slow to landing speed with the gear up and not activate the horn. You twin drivers must be very careful if making a single engine landing as you will generally not reduce the power on the good engine enough to activate the horn prior to the flare. Thus, you must remember to lower the gear as the warning system probably won't warn you in time to correct the situation.
Chapter 7 –Landing Gear / Brakes 61 of 106

I am a firm believer that the "gear/flap interconnect warning system" offered by Knots 2U, LTD, should be considered by all Comanche drivers. In addition to its main purpose telling you that the gear is not down if you use flaps first, it puts a large red light directly in your line of vision, a back up to your gear horn, in case it has failed. Probably at least half of the single and twin Comanches that I have flown while, conducting my classes have either a horn that does not work at all, or is so weak that you have to remove your headset to hear it. It should be an ATTENTION GETTER. The louder, the better. An inoperative horn should be a no−fly item. Unfortunately there is no safe way to check it during pre-flight so I always checked mine during descent to insure it was working. In case you should have a total electrical failure, thus the gear must be lowered by the emergency procedure and the horn and light warning systems will be inoperative, the following should be considered: Mark or paint a line, or use tape, to align the moving pails of the gear drive with the floor, in the emergency gear well so that when seated in the pilots seat, there is no parallax in viewing that the marks line up. This will insure that the gear has gone through its complete cycle and that the gear is down. Remember, no one, not tower personnel, other pilots, mirrors or anyone else can tell you that the gear is down. They can say it looks down, or that it is only partially down, or it is still up, but they can't tell you that it is down. Don't get yourself into a dangerous situation by buzzing the tower, formation flying with an unknown pilot or anything else to trying to determine if the gear is down. You have all the necessary information in the airplane if you utilize it. Situation: You select "Gear Down", and it cycles and you feel the nose wheel steering engage, but no Gear Down Light. Some seconds, or minutes later, the light does come "ON". This usually indicates that the wires from the gear down switches to the gear down light are broken and need to be replaced. Remember, the "Gear Down" light does require all three down switches to be closed and that all relevant wiring is OK. The "Gear Warning Horn" operates only off the nose gear Down switch. Thus, if you know your warning horn is working and you retard the throttle/s, if the horn does not sound, the nose gear is down and since all three gear are mechanically tied together; all three gears discussed should be down. Always check the alignment marks discussed above to insure that the gear is in the down position. This will give you the "warm fuzzy" feeling you need while you are trying to make the softest landing of your career. Just to give you an idea of how dependable the Comanche gear system is, in the 1000 hours in my 180 and 2000 hours in my Twin, plus the hundreds of hours training in Comanches, I have yet to use the Emergency Gear Extension procedure except on jacks during an annual. I just knocked on my PC desk a few lines to insure that I will always be able to make that statement. Always remember, the traffic pattern is not the place to solve a gear problem. As soon as one is noted, depart the pattern, after informing the tower if appropriate. Climb to a safe altitude away from traffic, and then take your time to analyze and solve your problem. Remember to use your check list (back of access panel). A good autopilot, or co-pilot in the right hand seat, can sure help the situation. Usually you can take as much time as you need.
FAA Gives Good Advice Glenn Plymate, ICS #02658 In preparation for this special issue, much research of existing publications was conducted to see if any addressed landing gear problems. Choir member, Michael Dolin, uncovered a little known FAA document: Advisory Circular 20−34D, Prevention of Retractable Landing Gear Failures. Written in 1980, it has good information and advice for preventing landing gear accidents. A synopsis follows: AC 20−34D begins with citing retractable gear accidents that occurred in 1979. That year, there were 1,002 retractable gear airplanes involved in accidents. Of these, 106 were "landing gear" accidents. Human factors were the cause of 67 of
Chapter 7 –Landing Gear / Brakes 62 of 106

those accidents, and 39 were caused by mechanical / technical failures. The AC suggests the number of retractable gear accidents can be reduced with deliberate, careful, and continued use of a checklist, and proper maintenance. HUMAN FACTORS There were 67 accidents attributable to human factors... call it pilot error... categorized as: Neglected to extend landing gear (38); Activated gear, failed to check gear position (12); Inadvertent retraction of landing gear (11); Retracted gear prematurely on takeoff (3); Extended gear too late (2); and Misused emergency gear system (1). PREVENTION The AC recommends: Have a condensed checklist, mounted in full view, for easy reference; Periodically review the landing gear emergency extension procedures. Be familiar with the landing gear warning horn and warning light systems. Review the procedure for replacing light bulbs in the landing gear warning lights, and carry spare bulbs. Have known landing gear deficiencies corrected before flight. Complete your landing gear checklist on the downwind leg, or at the final approach fix inbound, to ensure that action is taken to lower the gear, and recheck geardown indicators before landing. Do not touch any levers or switches until you complete your landing roll and clear the runway. MECANICAL FACTORS Of the 39 accidents attributed to mechanical failures, most were caused by improper rigging and adjustment, lack of lubrication, or inadequate corrosion control. Factors that would pertain to Comanches included: Metal fatigue/failure; Improper installation or improperly secured parts; Use of non-standard parts; Failure of electrical wire connections, relays, contactors, and / or actuators; Malfunctions of warning systems; Inoperative limit and safety switches; Failures of downlocks; Wheels jammed or hung up in wheelwells; Cables fouled; Glide tubes bound due to contamination and corrosion; and Torque tubes and drag struts bent due to excessive loads. MAINTENANCE The AC recommends: Use information furnished by the aircraft manufacturer in servicing your aircraft. Keep switches, landing gear, wheelwell, and adjacent areas clean and free of mud and debris. Repair or replace damaged or missing protective boots. Do not use oversize or recapped tires that may cause landing gear to stick in the wheelwell. Keep shock struts properly inflated and the pistons clean. Lubricate landing gear in accordance with the manufacturer's instructions. Wipe off excess grease. Establish a program for corrosion prevention and control. INSPECTION During the annual, 100−hour, intermediate, or progressive inspection cycle, place the aircraft on jacks and inspect for condition, rigging, and proper operation, including the warning system. Follow the aircraft manufacturer's instructions for inspection frequency and procedures. When aircraft are operated from rough surfaces or used for student instruction, more frequent inspections may be in order. After a hard landing or if the gear strikes an object while taxiing, it is wise to inspect for damage. Rigging may be affected and damage may occur by sharp turns at high taxi speeds, by faulty technique during a crosswind landing, or by taxiing off a hard surface into deep mud or snow.
Chapter 7 –Landing Gear / Brakes 63 of 106

Preflight inspection should include the landing gear system. The AC concludes by suggesting we can substantially reduce retractable landing gear accidents and improve aviation safety by being self-aware, knowing our airplanes, and applying good maintenance practices. COMMENTS The FAA's sample shows that about 10 percent of all accidents involving retractable gear airplanes are gear related, with causes about two thirds pilot error and one third mechanical. If such an AC applied only to the Comanche fleet, the ratio of gear related accidents would probably be much higher. Pilot error would probably be higher, too, based on what we've seen on recent accident causes. Gear system problems appear to be the leading cause of Comanche accidents and that's why this special issue is devoted to the landing gear. If a Comanche landing gear advisory circular were written today the advice given by the FAA would still be fully applicable: Use a checklist. Know your airplane, and maintain it properly! Preservation of the fleet depends on it!
The 1000 Hour Inspection Bill Creech, ICS #03423 In our discussions about the maintenance requirements of our landing gear, the 1000 hour inspection is frequently mentioned. I want this article to be a discussion of the importance of this inspection, a bit on some of the techniques involved, and ways that the owner can assist the A&P to complete same. This article is NOT intended to be a "How to" instruction and should not be used as such. If your A&P is a qualified Comanche mechanic, he'll certainly have the skills necessary. I welcome questions or comments from your A&P or any Comanche owner. The 1000 hour inspection is required by AD 77−13−21 and the details of the inspection criteria are contained in Service Letter 782B dated December 1, 1977. This inspection, if religiously completed, is the foundation of a properly operating landing gear. It's only when our gear is abused by the operator and not maintained at acceptable standards, that we're likely to encounter problems. As an aside, in my rather limited experience as an A&P, I have seen many 1000 hour inspections that have been signed off with nothing done other than the installation of bungees, if needed. My own aircraft never had the full inspection completed until nearly 3000 hours had passed, and the AD 77−13− 21 was signed off only when new bungees were installed. Needless to say, this was before I got serious about my own maintenance. To do the inspection there are a few specialized tools required. They consist of a micrometer, a set of go no−go gages, and a multimeter for checking the switches. The ICS has a set of gages (test bars) available for loan from Maurice Taylor, but I had a set made for my own use. They're great time savers. So let's get on with it. First we jack up the bird and remove the wheels and bungees and then come the removal and disassembly phase of the gear itself. I make it a point to keep all the parts from one gear isolated from any other. One of the big jobs on most any gear is the clean up. After the gear has been removed and disassembled, it must be impeccably cleaned in the solvent bath. If there's paint to be removed, I use paint remover and/or MEK as necessary. Care must be used to prevent the loss of any bushings from the individual pads. I use a piece of safety wire loosely twisted through the hole and bushing to prevent the loss or misplacement of the bushings. At this point, let me suggest that you, as owner get personally involved in the project along with your A&P. This is an outstanding opportunity to clean and repaint your wheel wells. Also, at this point, it's not difficult to remove the strut for cleaning, resealing (if needed), inspection, and to gain access for your wheel well work. Of course, the AD doesn't specifically require this, but it's a heck of a lot cheaper to do this yourself, with A&P supervision as opposed to paying him to do it for you. And you'll be SO proud of your nice clean wheel wells! The same goes for the gear motor. If there's any doubt in your A&P's mind about it's condition, pull it out for a trip to Webco for overhaul. Wiring also falls into this category. If your wiring is like mine was i.e., lots of splices, cracked plastic tubing, (that's spelled "original") for heavens sake, call Matt Kurke and order a new set of marked, made to order, wiring for your gear. He also has switches if you need them. Is
Chapter 7 –Landing Gear / Brakes 64 of 106

this starting to sound like a complete gear overhaul? Is there a better time to do all this than when the entire landing gear is disassembled? With the gear parts all cleaned and lying on your shop table, it's a fairly simple procedure to check all wearing surfaces for unacceptable wear. The "go-no-go" gages have the minimum diameter on one end and the maximum diameter on the other end. The small end should drop right in the hole, but the large end shouldn't. If it does, the wear is unacceptable and the bushing needs to be replaced. All bolts are measured with the micrometer in the conventional manner and are replaced if wear is beyond limits. These tolerances are all listed in SL 782B. It goes without saying that the gages should NEVER be forced into a hole. The main gear side brace stud (commonly called "swivel pin") deserves some special attention. Due to some failures in other Piper products, it has its own AD to direct its inspection procedures. The effective AD is 07−01−01 R1, which replaced AD 95−20−07. The name of the game on this little gem is to take it to your local FAA approved Magnaflux facility for checking. If it has cracks, it must be replaced. There's no generalization that's accurate with regard to what parts are most likely to need replacing. Having said that, you should ALWAYS replace the over center springs and the bungees. The most likely bushings to need replacement are in the nose gear drag links. I've found most of the "swivel" pins acceptable, although in one case, I had to replace both of them, on a 250, due to cracks. A good philosophy at this point is to replace anything that's even questionable. We're fortunate to have Bob Weber's WEBCO for support. He has just about any pan, including bushings and bolts that you're likely to need for this operation. OK, so we've got all the parts cleaned, necessary bushings replaced, and new parts ready to be re assembled and installed into your nice clean, freshly painted, wheel well. Essentially, this operation is a reversal of what you just finished. I do the assembly very carefully, hand lubricating each movable part and then filling the lube channel with the lube gun. They go together nice and smoothly now that they're clean and lubed. If you removed the strut it needs to be replaced first, followed by the drag links, swivel pins, and over center springs. Then comes the new wiring (you did order it in, didn't you?) and adjustment. The gear adjustment is naturally very critical that it be done correctly, in accordance with the manual. First check the preload on the push pull cables. Then make sure that you hear one "clunk" when the gear is lowered with the emergency extension handle. Following this, head for the electrical. Hook up your new wiring (you did order it in, didn't you?) and mount and adjust your switches. Recheck for proper light indications, and check retraction force with a torque wrench as described in the shop manual. If you've done everything correctly, this step is really a waste of time. You can feel the gear with the emergency release handle and tell if there are any restrictions or binding. If there is any binding, go no further until it's fixed. So, you've got it all back together and your A&P says its right! You reconnect the motor and cycle it a time or two. Make sure you have a charger on the battery so you don't drain it. Go down and wiggle anything moveable and make sure that the lights are appropriate. You may want to adjust the up limit switch at this point to insure that the gear fully retracts to the rubber bumpers. When you're happy with everything, try an emergency extension. Play particular attention to the amount of force required to disconnect the motor. (Be sure to restrict the gear from falling full down.) If force required is excessive, you have your up limit switch too tight (too much pressure upward against the rubber bumpers). So adjust it a bit. Then check the safety switch (squat switch) for proper operation. Now you're finished. Right? Wrong! You haven't completed the paper work. Make sure the log entry includes the reference to AD 77−13−21, to SL 782B, and the fact that it's a 1000 hour inspection. When you're both totally satisfied with your work, it's time the TWO of you took the bird up for a test flight. Is everything up to speed? Of course it is. It's up to speed because you and your mechanic have done a quality job. Check normal operation and horn operation prior to landing but save the practice emergency extensions for the hanger while on jacks. What a feeling of satisfaction it is, to know that your gear is in virtually "as new" condition. And it even looks nice. Now as you and your mechanic return to the field and prepare for landing, at the completion of the test flight, please do me (and yourself) a big favor. DON'T FORGET TO PUT YOUR GEAR DOWN BEFORE LANDING!
Chapter 7 –Landing Gear / Brakes 65 of 106

Mirror, Mirror on the Wall−Who has the Fairest Gear of All? Bill Creech, ICS #03423 Maurice Taylor has frequently stated that the Comanche gear is "simple, strong and dependable." So how come we have gear up landings and gear failures? The answer comes in two basic categories. The first is pilot induced. We simply forget and don't put the gear down and sometimes we don't do the right thing to get the gear down when there is a problem. The second category is where the gear does not receive the necessary maintenance. If the pilot has more training and better knowledge of the gear, then both of these situations can be improved. All of the articles in this special issue address some phase of the problem. This article will address what the pilot needs to do to insure that the gear is properly maintained. Do you have a responsibility for the gear maintenance? The FAA considers the pilot responsible for having the maintenance done and for seeing that all the proper entries are made in the logbooks. The FAA and Piper work together to correct problems as they are recognized. When the problem results in catastrophic or frequent failures the FAA issues an Airworthiness Directive. These directives are mandatory and generally have a compliance time. It is the pilot's responsibility to see that the requirements are accomplished within the designated time period. The pilot also is responsible to see that the proper entries are made in the appropriate logbooks. The A&P has the responsibility to enter and sign off the work that he/she does. The pilot has the final responsibility to see that this is done. Piper issues Service Bulletins and Service Letters as situations are identified as problem areas. They may contain recommendations to install certain kits to resolve the problem. They may recommend changes in inspection intervals or lubrication intervals or procedures. In many instances, the problem is first identified in a Bulletin or Letter and then when the AD is issued it refers back to the Service Letter or Bulletin for the proper corrective action. The point needs to be made that a Service Bulletin or Letter is only issued after a problem area is identified. When they are issued, you need to be concerned. Apparently, some mechanics and some owners rationalize that AD's have to be complied with, while Service Letters and Bulletins do not carry a FAA mandate and are therefore optional. This rationale results in some Comanches being at much greater risk of mechanical problems than others. Since it is your neck and your loved ones and your airplane that is at risk, a review of the Service Bulletin and Service Letter compliance is highly recommended. I have located the following list of SB's and SL's that apply to the Comanche landing gear system. There may be others. 1. Service Bulletin 164 addresses the problem of the nose gear door retraction rod being installed improperly. It is very
easy to create this problem anytime that the lower cowling is removed. It is very easy to correct. 2. Service Bulletin 187, dated April 15, 1960, addresses a problem with landing gear safety switches and notes that
Service Letter 314A details the corrective measures to apply. 3. Service Letter 301, dated August 12, 1958, addresses circuit breaker popping when the gear is being lowered. It
addresses a temporary expedient to assist the motor by applying hand pressure to the emergency gear extension handle while the electric motor is operating.
4. Service Letter 314A, dated June 8, 1959, addresses the problem of the landing gear switch being inadvertently moved to the "gear up" position prior to take off. A kit is recommended that causes the horn to blow when the airplane is sifting on the ground and the switch is in the "gear up" position.
5. Service Letter 315, dated February 4, 1959, addresses a problem with a misadjusted micro switch at the down lock mechanism on one of the gears. The Letter contains an attachment with a seven page "Inspection and Rigging Instructions for the PA−24 Landing Gear System". A two page "trouble shooting guide" is included.
6. Service Letter 356, dated March 31, 1961, addresses the problem of 25−amp circuit Breakers popping in the landing gear circuit and recommends the installation of a 30 amp circuit Breaker.
7. Service Letter 365, dated January 3, 1962, addresses the need for a special lubricated bolt for the Nose Gear Drag Link.
Chapter 7 –Landing Gear / Brakes 66 of 106

8. Service Letter 366, dated January 3, 1962, addresses the replacement of the Nose Gear 8. Clevis with a new high strength fitting.
9. Service Letter 379, dated August 10, 1962, addresses the problem of wires in the landing gear switch harness becoming broken at the switch. A kit #754−475 is offered as a solution.
10. Service Letter 380, dated August 8, 1962, addresses a problem with Main Landing Gear Door Hinges and Nose Gear Door Hinge Bushings.
11. Service Letter 445, dated April 21, 1965, addresses the installation of a Nose Gear Drag Link Reinforcement Bracket. 12. Service Letter 447, dated March 26, 1965, addresses the necessity that the Landing Gear Transmission Retract
Spring be inspected and if missing, or not functioning properly, be replaced. 13. Service Letter 546A, dated March 10, 1970, addresses the need to reinforce the Nose Gear Push−Pull Rod
Assembly by installing a roll pin at each end of the subject rod assembly to supplement the weld 14. Service Letter 596A, dated September 5, 1975, addresses the need to install a new Nose Gear Aligner Guide
Bracket Assembly and new "High Strength" attachment bolts. 15. Service Letter 650, dated September 27, 1973, addresses Inspection of Landing Gear Retraction Transmission
Assemblies to ascertain that the sleeve is properly staked to the transmission body. 16. Service Letter 782B contains eight pages on Inspection of the Landing Gear ManualExtension System. This SL is the
basis of the 1,000−hour gear inspection AD. For most Comanches, the FAA has issued a total of six AD's addressing some gear problem. They are 59−06−05 on nose gear bungee, 63−27−03 on landing gear circuit, 64−22−03 on gear safety switch, 65−25−03 on nose gear drag clevis, 77−13−21 on preventing gear collapse, 95−20−07 on Landing gear side brace stud and 97−01 −01 that supersedes 95−20−07. A Service Letter or Bulletin preceded most of these. All of these Service Letters and Bulletins, and others as well, address some aspect of our landing gear operating system. Complying with each of these can be expected to reduce the incidence of gear problems. This will reduce our injuries to our persons, our aircraft and our pocket books. Where do you as a pilot learn about these issues? If you subscribe to the AdLog System of Aircraft Maintenance records you receive all of the AD's issued for your aircraft and receive new ones as they are issued plus a yearly checklist to provide to your mechanic. The FAA website site has a list of all AD's issued on all aircraft. It is extremely time consuming to attempt to locate all AD's applying to your aircraft, engine and accessories. One of our members in Canada passed along the tip that the Canadian Transportation Ministry has a website (www.tc.gc. / aviation / continaw / ad.html) that lists all AD's plus many SB's and SL's by aircraft registration number (Canadian C numbers) and by aircraft manufacturer and model. All of the AD's are listed by number and can be downloaded to your printer. The web site appears to be very popular and is occasionally overloaded. Your mechanic probably subscribes to a commercial service that provides him with updates on a CID on a regular basis. Try asking him to give you the next to last CD. They generally discard them. What do you do now that you have this list of AD's and the above Service Letters and Service Bulletins? Find a little quiet time and sit down with your logbooks and check to see if you have any that have not been complied with. If you find any that have not been complied with, please have them done now. Not at the next annual! We all know that no one that sets out on a car trip or airplane trip expects to have an accident. We all expect the gear to operate properly every time that we activate the switch. Your chances of that being the case on every flight will be enhanced by proper gear maintenance.
Landing Gear Emergency Joe Shelton Let's start with a basic premise; unless the airplane is low on fuel, the weather is a major factor, or there is some other mechanical problem, a landing gear problem is NOT an emergency. At least not immediately. If the landing gear won't extend for whatever reason the most important thing is to know what you have to do and then do it. A gentle reminder, the first and most important thing to do is to fly the airplane! It's Not An Emergency
Chapter 7 –Landing Gear / Brakes 67 of 106
Let's look at an example of a gear "emergency" in a Comanche. A number of years ago I was returning to my home airport, San Jose California, in relatively new (to me) Comanche. San Jose International Airport serves most of the major airlines and has mountain ranges parallel to the approach path on both the east and west sides. The weather was a high thin overcast with about 15 miles visibility. It was very dark and there was no moon. The time was approximately 12:30 AM. As I executed my pre−landing check list, I selected Gear Down and the landing gear only partially extended. When the Johnson Bar stopped in transit, I immediately switched the three position (up−off−down) landing gear switch to Off. Regarding Johnson bars, I have a 1960 250 Comanche with the landing gear Johnson bar between the seats. The Johnson bar moves to the floorboards when the gear is up and almost vertically to the back of the nose wheel well when the gear is extended. Based on a tip from the Comanche Tips book, I always apply light pressure by pushing the bar every time I extend the gear. By assisting the gear, I have the opportunity to feel if any part of the mechanism is binding. When the gear extends into locked down position, there is a tactile thump as the gear reaches full extension. In addition, the position of the lever arm against the wheel well also can be used as a rough indication that the gear is completely extended. I then turned the gear switch back on and selected Gear Up and when the gear had retracted, I selected Gear Down again. With the same result. The gear froze half way through the extension. This time I immediately turned the gear switch to Off. It was surprising that the circuit breaker did not pop. There are two probable reasons that it didn't pop. First, both times I selected Down, at the first sign of the gear stopping I immediately switched the gear switch to Off or Up so that the motor wasn't running against a jam. Second, I later checked and found that the circuit breakers were very old (most were original) and might not have been usable or effective. So I had my A&P replace all the circuit breakers. Fly The Airplane First I then notified the tower that I had a landing gear problem and turned east, away from the airport. My intent was to find a safe place to sort out the problem. I flew away from the approach and departure paths and began circling. Since there were high mountains only a few miles to the east, I devoted 80% of my time to flying the aircraft and 20% to resolving the problem. Had I been on an instrument approach in IMC, I would have notified the controller of the problem and asked for a clearance to depart to VFR conditions or to a holding pattern where I could take as much time as necessary to resolve the problem. Use Your Resources Luckily, I was not alone. Although not a pilot, my passenger Jon was an experienced Navy Air crewman and isn't prone to nerves. I verbally set the priorities. I would fly the aircraft as my primary responsibility, and Jon would hold a flashlight and read the emergency gear extension check list. With Jon's assistance, I would execute the checklist one step at a time. Had I been alone, I would have done exactly the same thing. The only difference is that it would have taken me longer to fly, read the check list, and execute the items on the check list. I was over fairly dark landscape and the only outside references were the lights of San Jose to the west. I knew that I was in a situation where I could either lose outside reference when turning to the east or even accidentally fly into the mountains. I had another card up my sleeve. Then, as now, I carry both Maurice Taylor's phone number and the number of my A&P with me when I fly. On the oft chance that I ever need help, help is as close as a phone call away, especially with a cell phone on board. It is funny, after my initial reaction, I didn't feel pressure at all. I knew I had a problem, but I also had two hours of fuel remaining, a number of very long runways nearby, and someone to help me resolve the problem. Follow Your Check List
Chapter 7 –Landing Gear / Brakes 68 of 106

I slowed the aircraft down to the recommended speed, executed the check list exactly as stated, with my passenger's help pushing on the gear extension bar, the gear fell easily into position. I had a green gear down light indicating a successful extension. But now there was a question. Green light or not, was the gear actually locked down? I called the tower again and asked for a flyby to verify that the gear looked extended. Was a flyby worth the risk? One theory is that no one on the ground will really be able to tell if the gear is actually locked down and the risk of low and slow flight isn't worth it. Because the three gear switches are wired in series on the Comanche, if all three switches are working correctly then a green light indicates that all three gear are down. But if you are careful, as I was, there is nothing that can be hurt by a flyby. But maybe nothing gained. After the flyby, the tower responded that the gear all looked down and cleared me to land on runway 12L. At this point, I believe I showed real common sense. First I knew I didn't need to rush to get on the ground and second, I felt that landing on runway 30 was the better alternative. Runway 30 is usually the active runway and I had undoubtedly made at least 95% of my day landings and probably 99% of my night landings on 30. So I decided to use a runway where all the visual clues were familiar. I also told the tower that I requested landing clearance for runway 30L, the longest of the three runways. I wanted everything on my side. I made a normal approach to a soft field landing. The touchdown was so soft and smooth that neither my passenger nor I felt the mains roll on. Our first indication that we were on the ground was when the nose started dropping. I have never made another landing like that in any airplane. Shows you what concentration (or fear!) will do! Be Careful When Taxiing We taxied to my tie down. I have subsequently learned that I was still at risk of gear collapse when I was taxiing. Even though the gear was down with a green gear light showing it is still possible for the gear to collapse. I now know that when the emergency gear extension is used, it is very important to treat the aircraft very carefully on the ground. It might even be better to stop the airplane on a taxiway and carefully tow it to a tie down. Certainly, it should never be taxied over rough ground, grass, or at any speed that might put side loads on the landing gear. All’s Well, That Ends Well The problem was in the transmission. Gears were broken and jammed. There was little evidence that this transmission had been serviced in many years. Webco repaired and returned the gearbox within five days. My Comanche has over 1,100 hours on it since that incident with good maintenance and without another gear problem. After sharing this experience with a couple of other Comanche pilots I learned a really good way to get experience manually extending the gear. During the annual inspection when my airplane is up on jacks and the A&P is cycling the gear I often take the opportunity to actually practice a manual extension. There are some caveats on practicing this kind of extension that are covered in another article in this issue. The important things to remember from this story are 1: Don't panic. Treat any gear issue as a problem, not an emergency. 2: Fly the airplane first. 3: Use whatever resources (passengers, approach, local controller, your A&P, etc) are at your command. 4: Follow the emergency extension checklist. 5: After landing be extremely careful when taxiing. And above all, use common sense. Use A Check List
Comanche Accident / Incidents Statistics May 1, 1987 to Dec. 31, 1999 Omri Talmon, ICS #07949 Since May, 1997, I have followed on a constant basis the publications of the FAA's Office of Accident Investigation on the Web. I have, through the same medium, access to the aircraft registration database. I have collected all the US accident / incident data related to the Comanche, as posted by the FAA. It soon became evident that the majority of accidents are related to the landing gear. Descriptions like "aircraft landed gear up", "gear collapsed on landing" and the like kept appearing at an alarming rate. I therefore stretched my classification of the accidents/incidents to "Gear" and "others" with "fatal" as a sub-classification included in the above.
Chapter 7 –Landing Gear / Brakes 69 of 106

Now to the figures: During the 32 month period from May 1st, 1997, to December 31st, 1999, there were 143 Comanche accidents/incidents in the USA, of which 83 (58%) were related to the landing gear and 60 (42%) to other causes. 13 (9%) were fatal. The annual average number of accident is, hence, 54, out of which 31 are related to the gear and 23 are due to other causes. The obvious observation is that by far and large the inappropriate operation and/or maintenance of the gear are the major causes of accidents/incidents of the Comanche fleet. In order to corroborate this conclusion I looked again in the Comanche Safety Review conducted for the ICS by the AOPA Air Safety Foundation. This document cited 440 accidents for the 11 years period of 1982−1992, or a yearly average of 44. During the 32 months of my survey, we seem to be above this average, but it is not so. A further study of the AOPA−ASF document shows that during the period of 11 years it counts 33 gear related accidents. The average annual rate of accidents, excluding gear related ones, is hence 41, compared to 23 during my survey. A meaningful comparison also requires the number of hours flown (as the accepted factor is the number of accidents for 100,000 flying hours) which I don't have. I cannot jump to the conclusion that the safety record of the Comanches (gear set aside) improved. In general, though, the AOPA−ASF observed and reported a continuous decrease in the General Aviation accident rate during the last years. The surprise is, however, in the landing gear accident figures: An annual average of 3 for the AOPA survey, compared to 31 during my survey, a factor of ten. Further conversations with the AOPA−ASF enabled to conclude that this remarkable difference is not due to a sudden decay in the flying qualities and maintenance procedures of the fleet, but to different definitions: The AOPAASF study is based on the NTSB database, which includes nearly only accidents (see appendix). As most gear related accidents are defined by the NTSB as "incidents", the NTSB neither investigates nor includes them it its data. Therefore, there is no contradiction between the two studies. However, the NTSB definition may have contributed to concealing the real magnitude of the gear problem. As far as the affected owner is concerned, I am sure he or she does not care whether the case is called accident or incident, but is more concerned with the consequences (new prop, teardown of the engine and more). We can, and should, do better. It is nearly entirely within our possibilities and reach to reduce this gear accident rate to nearly zero. Appendix: Here are some pertinent quotes from Part 830, para. 830.2 : "Aircraft accident means an occurrence associated with the operation of an aircraft which takes place between the time any person boards the aircraft with the intention of flight and all such persons have disembarked, and in which any person suffers death or serious injury, or in which the aircraft receives substantial damage." "Incident means an occurrence other than an accident, associated with the operation of an aircraft, which affects or could affect the safety of operations." "Substantial damage means damage or failure which adversely affects the structural strength, performance, or flight characteristics of the aircraft, and which would normally require major repair or replacement of the affected component. Engine failure or damage limited to an engine if only one engine fails or is damaged, bent fairings or cowling, dented skin, small punctured holes in the skin or fabric, ground damage to rotor or propeller blades, and damage to landing gear, wheels, tires, flaps, engine accessories, brakes, or wingtips are not considered "substantial damage" for the purpose of this part."
Chapter 7 –Landing Gear / Brakes 70 of 106

R&R / A "How−I−did−It" Article Glen Plymate, ICS #02658 For some, R&R means Rest and Recreation. But, for my Comanche, R&R means Raise and Retract... using my homemade jacks. Several years ago I had my first encounter with AD 77−13−21, the one that requires a gear inspection every 1000 hours and a change of bungee cords every 500 hours or three years. I had just read an article in the Comanche Flyer that told about making a tool for the bungee change and, being an avid do−it−yourselfer, I became intrigued with the idea of making my own tool and trying the bungee changing procedure myself. I built the tool and learned from an old pro at my airport about how to stretch the bungee cord for positioning on the tool (it's described in Tips Special). Then, with the blessing of my IA, using a set of borrowed jacks, and following the procedure prescribed in the maintenance manual, I did the bungee change myself. It was a real accomplishment, I thought, and quite satisfying to learn how it could be done, plus I got to know my airplane more intimately. Then, the jacks went back to their owner, and I knew I would again have to locate a set and beg to borrow them for next year's annual. It would be so convenient to have my own... but I knew they were costly (at least in those days). The idea of having my own jacks became almost an obsession. Then, one day I was in a tool store and saw some long stroke hydraulic jacks that looked like ones I'd seen in advertisements for aircraft jacks. The price of the ones in the store was reasonable; they looked like they'd fit under a Comanche wing, and I thought, "Why couldn't I build my own?" So, I bought a pair and conjured up a simple way (for me) to construct an aircraft jack using materials I was familiar with (calling on my carpentry mentality). I started with a plywood base and figured I'd brace the jack with four legs made of 3/4" electrical conduit fastened to a collar around the jack. The collar would be fashioned from a steel fence part I found at a building supply store while buying the plywood and conduit I needed. (Warning: The next part is dry technical stuff. Skip the next four paragraphs if making your own jacks is not your cup of tea.) I took the jacks to a machine shop and had the tops cut flush and machined with a recess to fit the jack points under the wings. Now I was ready to see if my concoction would go together. I cut the plywood into two 22" squares and drilled 1/4" holes in the corners 17 3/4" apart. Then, I cut the conduit into 24 1/2" lengths (8 pieces) and flattened each end in a vise. The ends were then drilled with 1/4" holes and bent to fit between the base and the collar. Each collar was drilled with four 1/4" holes spaced 90 degrees apart. For each jack, the conduit legs were fastened to the base using flat head 1/4" bolts through large washers on the bottom. Next, the jack was placed in position with the base of the jack in the center of the plywood base. Flat head 1/4" bolts were inserted in the collar with the threads sticking out and the collar was slipped over the jack. The legs were fastened to the collar; the collar was secured with a 3/8" bolt and all nuts were tightened. For the next step, the plywood base was placed on a level surface. The jack was then tapped into position making sure it was plumb vertically. The base was then held in place by a frame of wood around the bottom of the jack, using pieces of door trim 1 5/8" wide, glued and nailed into position. See... I told you I was using my carpentry skills. Now for the finishing touches, I gave the base a coat of paint, and screwed a pair of tension clips (broom holders) to each base for storing the jack handle. The black glossy base is a nice contrast with the red jacks and silvery colored braces. The jacks have proven invaluable, and they work as well for a twin Comanche as they do for a single. Maintenance which requires having my airplane's wheels off the ground can now be done anytime I want. (Okay, non−do−it−yourselfers can join in again here) If the challenge of building your own jacks doesn't turn you on, at least the idea of owning your own should. The advantages are inestimable. Prices are reasonable, too. While you'd spend only about $100 to build your own, you can purchase a pair ready-made for just a little over $300 with shipping. If you are a determined do-it-yourself, J.C. Whitney lists long stroke ram jacks in its catalog, Stock No. 07ND1507W for $39.99. Capacity is 3 tons; range is 24.9" to 44.6"; the same specifications as the ready−made jacks described below.
Chapter 7 –Landing Gear / Brakes 71 of 106

Air Sea, Inc., Auburn, WA, 1−888−939−7340 or (253) 939−7340 offers a 3−legged jack with a steel angle base for $149.00 each, plus shipping. The Jack House, Inc., North Little Rock, AR, (501) 835−6033 offers a 4−legged jack with a steel channel base for $154.00 each, plus shipping. The brace legs are round, similar to my homebuilt jacks. For stability, it's your choice, but I lean toward having four legs. Okay, you've decided having your own jacks is right for you, but wait, that's not all. You'll need a tail anchor, too. For me, I put an anchor in the hangar floor with a 3/8" eyebolt and have a chain for hooking to the tail skid. If a permanent anchor is not feasible, a portable one could be used. Others have said it requires about 200 lbs to hold the tail of a PA−24 down. I'd prefer a safety margin of at least 50% and would use more like 300 pounds. Two cubic feet of concrete in a roll around box or barrel should be enough. That'd be five 60 lb. bags of sack−mix concrete with an eyebolt anchored in the center. I'm sure there's other ingenious ways you can think of to secure the tail, too. Hey, it's an opportunity to be creative With your own jacks, either homemade or store bought, you can participate in as much landing gear maintenance as you want; change tires, lube bearings, replace bungees, adjust gear doors, practice manual gear extensions to your heart's content, reconnect your gear transmission... even do a 1000 hour inspection... under the watchful eye of a supervising IA, of course. If you really want to know your airplane up close and personal, a set of jacks can help!
A Weak Link? Glen Plymate, ICS #02658 With a 1000 hour gear check done on my 1959 PA−24 only a year ago, I thought this year's annual inspection would be a snap. Everything went well. The engine and airframe were all o.k., and it was time for the gear check. The plane was on jacks for the IA to have a look. So, into the cockpit I went. Master "on", and up went the gear, with the IA under the plane watching how everything worked. Then, he asked for gear down. Then up. Then down... and said there was something unusual he wanted me to see. With the gear half down, I got under the nose so he could show me. He pointed to the clevis at the end of the left drag link on the nose gear and showed how it would move if pressure was put on the nose wheel. He wanted me to see what he had observed with the gear in motion so we traded places; him in the cockpit and me under the plane. Sure enough, as the gear retracted, there was movement on the end of the drag link as the gear neared the up position and stopped. I could actually see a slight movement in the clevis. We discovered the drag link clevis had no torque. It was loose, in spite of being held in place by an "updated" reinforcement bracket that had been installed 34 years ago in compliance with AD 65−25−03, and Piper Service Letter No. 445, dated April 21, 1965. An earlier Service Letter No. 336, also done, called for a heat treated clevis marked "HT". The 1000 hour gear inspection, only recently done, does not call for the clevis torque to be checked. It "looked" okay at that time, and the AD for the clevis had been complied with and was not recurring. Everything was legal. But, the drag link clevis was loose, and it was difficult to detect. It was an unsafe condition. How long had it been loose? I don't have a clue. I've had the airplane for 21 years and as far as I know the clevis torque had never been checked. A more important question is: how long would it have gone before breaking? Thoughts raced through my mind about what could happen to my brand new prop and having to tear into my freshly rebuilt O−540 if the clevis broke... not to mention the sheet metal repairs. But, perish the thoughts. We had to get on with fixing that loose clevis. The clevis is shimmed with one or more shims between the clevis and drag link to give it the proper spacing for connection with the push−pull rod. On the early PA−24's, the clevis is threaded into the drag link and must have a torque of 13 to 40 foot pounds when it is aligned with the drag link. It is then held in place by a "drag link clevis reinforcement
Chapter 7 –Landing Gear / Brakes 72 of 106

bracket" as shown in SL 445. Apparently, over the past 34 years, the shims have worn enough to relax the torque and cause looseness in this connection. Another thin shim was fabricated and added to make the connection tight and restore the nose gear to a relatively safe condition. From now on, checking for looseness in the drag link clevis will be a standard part of my annual inspection by watching for it as the gear retracts. Since finding my loose clevis, I've heard of others. One shop that regularly sees Comanche gear estimates up to 80 percent are bad. Mine was. How is yours?
Wiring to Limit Switch Comanche Landing Gear Pat Barry, ICS #02198 During my recent extensive annual on N7523Y, a 1964 PA30, I observed a separated wire on the right side between the pivot attachment and the limit switch on the right landing gear. During the work I found another wire which had separated inside the plastic wire sleeve without having shown through (which meant that the wire was touching intermittently, clearly a double candidate for a problematic failure). On closer inspection, I saw the wiring harness had been patched decades before, and that the wire had broken due to the harness being secured on the pivot attachment and being tweaked every time the gear would retract and extend. The original system on Pipers is not good in this regard. The design is for the harness to be immobile on the pivot point (held by an Adel clamp), and the wire is bent in an S bend every retraction. Eventually this tweaks and bends the old wiring harness until wires break. I saw Matt Kurke's ad in the FLYER for his wiring harness, and decided to install it. Matt said he can do a PA30 installation in four hours (well.... took me more than four hours) however the result is outstanding. I recommend this wiring system of Matt Kurke to every Comanche owner. His system comes with more flexible wiring which is protected by a sleeve. The entire system comes in a box with screws, tie tapes, switch covers (to replace the old fabric ones on the switches which have eroded away on all Comanches by now), and the harnesses themselves are bundled and identified with original Piper codes, connectors installed, and totally ready for installation. His system contains all the parts you'll need, plus an outstanding wiring and installation book which is invaluable when you are dealing with old wiring like I was on this installation. Matt's system is not inexpensive, but when I look at the system, and the time it would have taken me to have figured it out, coded wire, crimped and installed connectors, my cost would have been through the roof, making Matt Kurke's system a good buy. In fact, it is a WIRING SYSTEM, not a bunch of wires, and should be looked at that way. Matt's system should be installed on EVERY Comanche, since the difference is enormous in safety and serviceability. I give this wiring system an unreserved recommendation. Once a mechanic has installed it, it will not be hard next time − the first time is a drain, since the adjustment of the limit switches must be redone and it takes some real figuring, as well as really fine work in installing wiring and matching the wires correctly. I found the old wires, having been patched, were now impossible to identify correctly to the old connection points. I also found an original switch that had the wires tightened down too hard and was cracked (this would have occurred at the Piper factory) and I replaced it. All switches were dirty and difficult, and needed time and attention. This aircraft is a very clean plane, yet the original wiring system was anything but clean as I learned because it was 35 years old and was just plain worn out. This was a big factor in the labor time. I also installed the wire holdouts from Webco which, with Matt Kurke's system, are a real winner. The end result is that I installed new wiring from the fuselage to the limit and squat switches, cleaned and adjusted (or replaced) all contact switches, removed the wiring from the pivot point and located them through the Webco holdout brackets so the wiring
Chapter 7 –Landing Gear / Brakes 73 of 106

doesn't get tweaked every time the gear is retracted, and for about $595 in Matt Kurke's parts and Webco's holdout brackets (another $30) plus a lot of labor. (Well, next time it won't take as long.) I now have a safe system which will last for another 35 years or more. The twins after #688 have more expensive switches and cost more, as for the singles. I recommend every Comanche owner call Matt Kurke toll free at (877) 643−6944 or look at his WebSite at www.comanchegear.com and learn about this improvement. I would combine his system with the Webco holdout brackets and you will enjoy safety and peace of mind. This is a real improvement over the Piper design.
The Case of the Wobbling Coupling Al Bieck, ICS #02171 Shortly after we bought our 1960 PA24−250 in 1975, I discovered that the landing gear motor had a tendency to get quite hot. Closer inspection of the Dura transmission revealed excessive endplay and badly worn, teeth on the driven gear inside. So, I replaced the motor and installed a new Dukes transmission. A new coupling, Piper part number 751 517, was also installed between motor and transmission. During the intervening years, the transmission was repacked with Dukes #4 lubricant at regular intervals while the motor and motor brake were inspected and checked for proper operation during and between annual inspections. Two weeks ago, as I retracted the gear after takeoff, the amber UP light illuminated, then extinguished, came on again, went off, came on again, staying illuminated for about two seconds each time until I placed the landing gear selector switch in the center OFF position. While returning to the airport, I thought that the UP limit switch must be out of adjustment or faulty. Gear extension was normal, and upon returning to our hangar we placed the aircraft on jacks. While observing the transmission assembly with the gear in transit, I noticed a distinct wobble of the coupling as it turned. When the up−limit switch cut off power to the motor, the motor brake could not function properly because of the wobbly coupling. I knew I had found the problem. Upon removing the coupling from the motor / transmission assembly, I found that the openings which accommodate the slotted motor shaft on one side, and the slotted input shaft of the transmission on the other, were elongated, as can be seen on the photograph. After installation of a new coupling, the motor brake functioned perfectly, and during subsequent flights gear operation was back to normal. While on the subject of the coupling, I remember a maintenance seminar given by Bob Weber of WEBCO during the Louisville convention. Bob suggested that the gear could be extended without benefit of electrical power and without disconnecting the transmission by placing a finger on the aft-facing part of the coupling and turning it, using upward strokes. I have tried it on jacks and it worked, but took a long time. It could not be done if the motor had seized. In the air, it would be hard to do. Especially the last part, when the nose wheel has to move forward against the slipstream. Also, the motor brake would have to be disabled. I think it would be easier to get the gear down by the emergency method and then to turn the transmission coupling by hand until the release mechanism on the jack screw has moved back far enough to be hooked up again. This would provide the "down lock" protection of a normal gear extension and avoid depending on the drag links to remain in the over−center position after landing and when taxiing. The February Flyer was very informative. After reading the article by Glen Plymate "A Weak Link?” I checked the torque of the clevis in our aircraft. With the torque wrench set to 30 ft./lbs., the clevis did not budge. Thanks for the tip!
Making the Landing Gear Adjustments Cecil Wachsman, ICS #02041 I just finished reading the Special Edition of the February Comanche FLYER for the Landing Gear. All articles were very worthwhile and very knowledgeable. I myself, being an A&P mechanic, found the articles extremely interesting.
Chapter 7 –Landing Gear / Brakes 74 of 106
However, I found a couple of items missing however. It seems that not many mechanics know about the gear adjustments. The adjustments are never mentioned and this is so important to the maintenance of our Comanche Airplanes. What is not mentioned is the up limits adjustment of the gear and the door. They go hand in hand. The reason it is so important. If done by the book, the gear and doors won't move up and down while in flight and encountering turbulence therefore wearing the bushings and affected parts. Singles: The book tells us to adjust the up limit switch until there is a 1/8 inch deflection, or less, with a 40 pound weight hanging from the Zen oleo where it meets the fork. This is for the mains. For the nose gear, a 3/8 deflection and use a 40 pound weight as specified per the Service Manual. This can be found in the Service Manual, section 6−42. For the doors. Hang a 3 pound weight from the inside edge, centered forward and aft − no more than 1/8 deflection. This is also found in the Service Manual, section 6−43. Twins: For reasons not known, the Twin Service Manual makes no mention of the 40 pound weight requirement. It says only "the main gear should be pulled snugly against the rubber block located in the wheel well and the nose gear should retract far enough." Service Manual, section 7−48. For the door. Hang a 9 pound weight from the inside edge centered forward and aft no more than 1/8 inch deflection. Service Manual, section 7−30. Now that we got the gear up like it is suppose to be, let's put it down in a manner in which it will stay down and locked. For the single: See Service Manual, section 6−35 − Installation of Gear Push−Pull Controls, items a and b, and Service Manual, section 6.36. − Adjustments, paying particular attention to NOTE: when adjusting the complete landing gear system, follow the adjusting procedures, in sequence, as outlined in paragraphs 6−37 through 6−42. Always jack the aircraft before attempting any adjustments. For the Twins: Follow instructions in Service Manual, section 7−46, items a, b, c and section 7−47, items a, b, c, and again paying attention to NOTE (under item b). This will ensure the Push − Pull Cables and Push − Pull Rods are adjusted properly, For some reason, these items are never mentioned, yet I am sure that most all mechanics know about these important adjustments. If the mechanic working on your aircraft does not have a Service Manual or use a Service Manual or have access to a Service Manual, there is no way he can make these adjustments without reference to the Service Manual. These adjustments should be performed at each 1000 hour inspection or when the landing gear has been removed and reinstalled. Safety, Safety − we cannot be too safe where lives are concerned and for the preservation of our Comanches. A NOTE OF CAUTION: Remember that over the years Piper has made these Service Manuals. The page numbers may and will vary, but the sections and paragraphs remain the same. You just need to pour over the Service Manual more carefully and be sure you have searched diligently enough to secure all the information for gear adjustments.
Jammed Gear Extension Readers of the Flyer may be interested in an experience I had recently in Twin Comanche.
Chapter 7 –Landing Gear / Brakes 75 of 106

I will have to set the stage. On a trip back east, we overnighted in Buffalo, NY. I noted that my tires looked a little soft. The book says 42 psi for the mains, but mechanics don't seem to fill the tires to that pressure, even though I've got a red painted sign on the wheel covers: "Please inflate to 42 psi". So I wrote the message on to the line crew’s work order. The next morning I gave the plane a careful pre-flight, and off we went toward Indianapolis. Preparing to land at Eagle Creek Airport, I was amazed to find that the landing gear wouldn't go down! This had never happened before! The circuit breaker popped when the gear was about halfway down, on several tries. I thought of holding the breaker in, but thought that might burn out my gear motor or do other damage. I thought I knew all about the Comanche manual extension system. I knew that after you use it you're supposed to have the airplane put on jacks, the gear inspected, and the gear motor reconnected. That would mean a weekend in Indy, but our daughter, Sue, lives there, so the stay would be pleasant and relatively economical. I went through the extension procedure according to the book − but Mabel and I together couldn't get the gear past the half down position! Suddenly the whole affair became serious! To make a long story short, after getting advice from others and trying several things I was able to man-handle the gear down. Later we found that one of the wheel covers had not been replaced properly when the tires were inflated and it had become jammed in the wheel well which would not let the gear extend when we tried to lower it to land.
Abnormal Gear Operation NTSB accident briefs on Comanche landing gear problems over a four year period indicate two cases where the gear transmission was separated from the aircraft, four cases of disconnected cables and/or rod ends, two incidents of gear train blockage, and one torque tube arm failure. Although these occurrences are unusual, there is no basis for assuming that they will not happen again. The abnormal gear operation checklist which follows therefore covers both simple and unusual causes for gear malfunction. Although the checklist includes owner's manual recommendations by Piper, it is not approved by either Piper or the FAA (nor is any such approval likely). In as much as the FAR's specify the pilot to be in command, the responsibility for its use is yours. Items which you may consider unusual are therefore preceded by the word "consider". We cannot command your aircraft. We are merely presenting argument as to what we believe is the best course of action. If objections or improvements exist, we would like to know. It can be revised. The checklist assumes that your transmission has been painted with red alignment stripes. (See Gear Operations). Read each item completely before taking action. If the specified conditions of an item do not apply proceed to the next item. Items should be completed in specified order. If the item states "proceed to manual extension," go direct. Do not continue with remaining items of the present section. Double failures are not considered.
Abnormal Gear Operation Checklist If Green Gear Light Not On: 1. Do not recycle gear. Move gear switch to OFF and then DOWN at least twice. If green light obtained (or at anytime
hereafter), proceed with normal landing. 2. If green light not obtained, depart traffic area to 3000 ft AGL, set power and monitor fuel. Fly the airplane. 3. Remove transmission cover. Inspect transmission for security and blockage. Inspect for broken gear train
components. Check gear alignment stripes. 4. If transmission unsecured or jammed, gear switch OFF. Clear blockage if appropriate. Proceed to manual extension. 5. If gear train components broken and one gear in−op, proceed to appropriate partial−gear landing checklist. If both
nose gear and right main in−op (left torque arm), proceed to Gear−up landing. 6. If gear stripes matched but not aligned full−travel, proceed to next section on "Gear stripes not full travel". 7. If all stripes aligned full travel and components not broken, recycle gear at least twice in an effort to obtain green
light. 8. If unable green light and stripes still aligned full travel, reset all breakers & test gear−warning circuits:
a. Cycle light dimmer to detent several times. b. Cycle gear indicator light CB several times. c. Test warning horn at retarded throttle to determine if nose gear down. d. Trade amber & green light bulbs as bulb test.
9. If unable green light, have tower visually inspect gear.
Chapter 7 –Landing Gear / Brakes 76 of 106

10. If any gear up or partially up, anticipate collapse of malfunctioning gear. Proceed to partial−gear landing 11. If gear stripes full travel and all gears appear down, consider landing on centerline without attempting manual
extension. Avoid crosswinds. Be alert for possible gear collapse. If Gear Stripes Not Full Travel: 1. Reduce to 1.3Vsf with full flap. Power for level flight. 2. Check Master switch NO and generator charging. Reset breakers if necessary. Reduce electrical load. 3. Check Landing gear motor and solenoid circuit breakers. 4. If either or both breakers popped, move gear selector to OFF, reset breakers and attempt gear down electrically
while pushing on emergency extension handle to assist motor. 5. If unable stripes full travel, consider placing gear selector down and forcibly holding breakers, in not to exceed 8
seconds. If available, have co-pilot push extension handle forward at the same time. Repeat procedure if required after five minute cooling.
6. If stripes now full travel but no green light, backtrack to Item 8 of first checklist and complete remainder. 7. If unable stripes full travel, proceed with manual extension. Manual Gear Extension (Last Resort): 1. Maintain 1.3Vsf. Landing gear switch OFF. 2. Remove transmission cover & pull motor release arm up and forward through full travel. 3. Extend (insert on some models) emergency handle and push forward full travel. 4. If unable extend, lift gear by pulling rearward on handle. Then push forward as hard and rapidly as possible. Repeat
procedure. 5. If unable extend, push handle forward using all available force. Use foot and leg pressure. Bend handle if necessary! 6. If gears extend but no green light, conduct gear warning circuitry check in Item 8 of first section. 7. If unable green light after circuitry check, request tower visual inspection. 8. If all gears appear down and both rod end stripes are full travel, proceed with landing. Avoid cross winds. Hold
extension handle firmly forward with foot to prevent possible collapse on landing roll. (Disregard this item if Safety lock installed.)
9. If unable extend all gears, see Gear−up or Partial−gear landing procedures below. Gear Up Landing: 1. Declare emergency. Fly to airport with emergency equipment and long runway into the wind. Consider excess fuel
burn off. Declare souls on board. Request emergency equipment. Consider zero flaps landing at higher approach speed if runway permits. Plan idle power touchdown. Brief passengers on bracing positions and rapid exit.
2. If two gears in−op, retract operative gear if possible. Have tower confirm gear positions. 3. Just before flare ... Fuel selector & Master Switch OFF. 4. At touchdown ... Ignition OFF. If Nose Gear Not Down: 1. Accomplish Item 1. under "Gear up Landing" except omit zero flap landing. 2. Extend main gears electrically to full travel on gear stripes if possible. (If manual extension previously conducted or
necessary and safety lock not installed, plan to hold extension handle firmly forward with foot on rollout.) 3. Have tower inspect gears to confirm positions. 4. Just before flare ... Fuel selector & Master Switch OFF. 5. At touchdown ... Ignition OFF. 6. Hold nose off as long as possible. If One Main Gear Not Down: 1. Accomplish Item 1. under "Gear up Landing". 2. Plan landing off centerline of concrete runway with extended gear near edge of runway. 3. Extend functional gears electrically to full travel on gear stripes if possible. (if manual extension previously conducted
or necessary and safety lock not installed, plan to hold extension handle firmly forward with foot during roll−out.) 4. Have tower inspect gears to confirm positions. 5. Just before flare ... Fuel selector & Master Switch OFF. 6. At touchdown ... Ignition OFF. 7. Use full aileron to hold wing up as long as possible.
Chapter 7 –Landing Gear / Brakes 77 of 106

8. Use maximum rudder & brake to hold aircraft on runway. Have passengers exit aircraft as rapidly as possible after landing.
Abnormal Gear Operation The following is an explanation of the abnormal gear operation checklist. Understanding is preferable to blind compliance. Explanation on some obvious items has been omitted. If Green Light Not On: The first probable instinct is to recycle the gear. This works most of the time, but if a blockage exists, a full recycle to the UP position could make matters worse. We therefore propose cycling the position switch OFF and then DOWN as a quick fix. If this doesn't work, then perhaps we should spend 5 minutes or so to save $12,000(?). Maurice believes steps 2 and 3 are most important. We must stop, think, and locate the problem. Use a sharp eye in looking for broken components. All components (motor drive shaft?) should have normal alignment. A mismatched stripe indicates a broken component, but an unfastened nose gear pushrod may result in matched stripes. A broken rod end should be easy to see, but torque arms are fastened together on both ends and will attempt to move together even if broken. If the motor drive shaft is stalled less than 1/2 travel it may be very difficult to see the nose pushrod connection. Inspect carefully and thoroughly. If we have an unsecured or jammed transmission, we have lost our electrical extension capability and step 4 directs us to proceed directly to manual extension. Any possible blockage to the manual gear train should be cleared (lift jackscrew out of the way if necessary). If components are broken, then we are not going to get that gear down by any means and step S directs us to proceed to the partial−gear or gear−up landing checklist. We should remember that the left torque arm controls both the right main gear and the nose gear, and the right torque arm controls the left main gear. We do not believe landing on the left main gear alone is feasible: due to loss of nose wheel steering, and that gear should be retracted if possible and the aircraft landed gear up. If the stripes are not full travel, then we have a different problem, and item 6 directs us to proceed directly to "Gear stripes not full travel." That checklist is an optional "insert" and you may be directed to return to this section. For now, we will assume that item 6 does not apply. Assuming the motor drive shaft moved normally and the transmission appeared normal, we believe it is now safe to recycle the gear in step 7 in an attempt to get the light green, followed by a gear warning circuitry check in step 8. A silent horn is confirmation (even without a green light) that the nose gear is locked, and gives us useful information as to what to expect on landing. Swapping bulbs on some aircraft isn't easy. If you have a plywood cover on the panel, it must be removed, which requires a midget alien wrench for the DG knobs and a Phillips screwdriver for the panel itself. Got those on board? We strongly recommend a tower inspection anytime we do not have a green light. Gear down probability is extremely high if the stripes are full travel, but there is an exception. If a rod end (gear cable) breaks at the gear during extension, everything will look normal in the transmission compartment, but the gear cannot be pushed over−center. Request the tower to inspect the main gear "head−on" and look for any slight angle in either gear. The nose gear should be inspected by a side view. Draglinks are not visible in flight from the ground. Item 10 specifies a partial−gear landing because you can't have two inoperative gears with stripes full travel and no visible broken components. In item 11, we propose to land without a green light and without attempting manual extension if our gear stripes are full travel and tower reports all gears down. Manual extension will only unlock the gear making matters worse. We propose to avoid crosswinds because these create side loads on the gear. But we do think you should be alert for possible gear collapse anytime the gear light is not green. Do not ignore that green light! If Gear Stripes Not Full Travel: In this case, you have most likely burned up the motor, or blown the gear motor CB due to high resistance from cold grease or blockage in the gear train. We propose to complete the extension by electrical means if at all possible, and our first step is to get the airplane stabilized with full flap at a low airspeed to reduce the air load on the gear. We chose 1.3Vsf (roughly 80 MPH on the 250 model) as a reasonably slow airspeed because that is FAA approach speed with familiar handling characteristics. We next troubleshot the 585 electrical power in steps 2 and 3 in item 4 we reset the breaker and made another try at extension, this time with physical help on the handle. Step 5 proposes that you now consider holding the breakers in for 8 seconds while attempting to lower the gear, again with help on the handle. The reasoning behind this item is that the gear resistance for whatever reason (and we have
Chapter 7 –Landing Gear / Brakes 78 of 106

reports of jammed gear doors) is enough to blow the breakers, manual extension may not work either. Before repeating the procedure, we specified a delay of five minutes for cooling purposes. Holding a CB closed may appear controversial, but is standard airline practice in solving emergencies. If this procedure moves the stripes to full travel but no green light, step 6 directs backtracking to item 8 on the first section and completing the remainder of that checklist. If we cannot get the stripes to full travel (burned out motor?), our only remaining option is to try manual extension. Don't give up! Manual Extension: If you have followed the checklist in order, you are still at 1.3 Vsf with full flap for the 9, emergency extension. Items 1 through 3 follow the aircraft manual. Items 4 and 5 reflect the experience and recommendations of members. Step 6 reminds us to go back and conduct a circuitry check in an effort to get a green light. Again, we would like a tower inspection. Item 8 reminds us to hold the extension handle firmly forward during roll out. By yourself? Can you do it? Co-pilot aboard? If we cannot extend all gears, you have won the $12,000(?) first prize for a belly landing or the $4,000 second prize for a partial gear landing. We had hoped to avoid that. Gear up Landing: Our first suggestion on a gear−up landing is to declare an emergency and accept all the help you can get. ICS member Gordon Graham reports on Tips page 344 a belly landing "slide" of almost double normal length, followed by a fire caused by grinding the belly fuel drain. A long landing surface, minimum fuel, and emergency equipment is therefore recommended. Grass would most likely cause less belly damage, but what grass field has emergency equipment? Long enough? The Piper handbook recommends landing with flaps up to minimize flap damage, but the airplane floats considerably with zero flap and previous practice is recommended. If you have passengers, they are most likely apprehensive and some reassurance is indicated. The airline bracing position of leaning forward with head in lap holding onto the lower front seat supports is possibly best for rear seat passengers. We do not anticipate serious injury, but you might save some teeth. Brace in the direction of flight, not backwards. If two gears are inoperative, step 2 recommends retracting the third due to loss of nose wheel steering (loss of both main gears is deemed impossible). At 20 feet we left you with only 3 things on your mind: fuel selector and master switch off about flare point. and ignition off on contact. There is conflict in deciding which comes first. We cut the fuel off early because the engine should run for over one minute at approach power on residual fuel and we can't see putting your head down after contact to feel for the selector (who's keeping the airplane on the concrete?) The master switch is needed only for radio contact and you might wish to inform the tower that it will be off for landing. If Nose Gear Not Down: On the check list for "nose gear not down," we omitted reference to a zero flap landing because the aircraft should tip forward after touchdown without flap damage. The remainder is obvious. If One Main Gear Not Down: Landing on the nose gear and one main gear is preferable to a full belly landing. But we do think you should choose a concrete landing surface. A wingtip digging into the turf may cause total loss of control. Numerous military and airline aircraft have been landed on one main gear without leaving the runway. This procedure involves landing off the centerline with the extended gear near the edge of the runway to provide more concrete in the direction of turning, holding the wingtip off as long as possible, and then using maximum brake and rudder as the wing contacts the runway. Manhandle the aircraft if necessary. If successful, damage should be limited to wing tip and prop. There is a strong feeling amongst our A&P/AS friends that landing totally gear up is much preferable to landing with one main gear down. Although this discussion is pretty much academic with Comanches because of the gear retraction design, this decision must be left to the PIC. If this checklist is ever necessary (even partially), have the equipment checked. Don't fly with poorly adjusted switches, etc. We'd like comments on possible error, and on making the checklist shorter.
Chapter 7 –Landing Gear / Brakes 79 of 106

MAIN LANDING GEAR CONDUITS CONSTRUCTION AND LUBRICATION CROSS SECTION M.L.G. RETRACTION CABLE.
(ONE HALF)
Legend A Swaged Threaded End L, M, N, O, P Parts making up outer Flex CableB Inner Push & Support Bearing L Spiro Band Sleeve C Outer Cover Sleeve M Coil Spring D Inner Push Rod N Spiral Wound Wires (ACW) E Inner Cover Sleeve O Spiral wires (Wound CW) F Inner Flex Cable P Flat Spiral Band (Wound CW) G Swivel Ball Joint Q, R, S, T, Parts making up inner Flex CableH Rubber Dust Seal Q Flat Spiral Band (Wound ACW) J Castle Nuts R Spiral Wires (Wound CW) K Main Outer Cable Body S Spiral Wires (Wound ACW) T Solid Wire Core Recently I have had several requests for advice on the feasibility and method for lubrication of these cables without removing them from the airframe. Notice in the cross sectional drawing that the construction of the conduit is robust and complex. As illustrated this conduit consists of an inner flexible core and an outer flexible casing with a rigid sliding sleeve and a flexible ball joint. The inner core consists of a solid center core wire which has six separate wires spirally wound around it in one direction and twelve separate wires in turn spirally wound around those in the opposite direction. Around all of this is wound a flat steel strip spirally wound around this again in the opposite direction again. This inner core is then swaged into a solid rod at each end of the cable and passes through an inner tube and bush assembly. At the end of the rod is a threaded area to which the rod and spherical bearing is attached. To this threaded end an outer sliding sleeve is attached to seal the sliding surfaces. The outer casings of the conduit has an inner core constructed of a strip of flat steel spirally wound in the opposite direction to the steel strip wound on the outer of the inner core. This augers for a smooth operation. Around this steel strip are some more steel wires which are wound around in one direction, followed by a further set of wires and spring wound in the other direction. These wires are individually separated by cotton type threads which effectively seal the conduit flex. This outer section of the conduit is then swaged into a thread boss at each end as depicted in the sectionalized drawing. Over the years the lubrication used at assembly time has often dried out: and the cables become stiff and sticky.
Chapter 7 –Landing Gear / Brakes 80 of 106

There are several other reasons for stiff and sticky cables. On occasion I have found that at some time the sliding sleeves at the end of the cable have been lubricated with grease. This causes dust to collect here and make a very sticky compound which rolls up between the tubes and effectively locked them together. The other reason is that the cable may have had an excessive compressive load incurred on it during a landing where the gear has failed to lock down. As you can see from the construction, the inner core is not designed to support the landing loads of the gear system. It can be seen that any compressive loads will tend to unwind the wires and steel strip which causes it to become larger in diameter. This will seize it in the conduits outer casing. The normal cable lubricated and in good condition should move freely with vend little resistance. My method of lubricating the cables is by the use of the tool depicted in the schematic drawing. This tool consists of a length of clear plastic, thick wall tubing of sufficient length to encompass the end of the cable at full extension, i.e.: in the down position one end has a plug and inflation valve clamped into it, the other end is clamped to the outer threaded boss of the outer casing. The method I use is as follows:
Legend 1. Inflation Valve 2. Hose Clamp 3. End Plug 4. Clear plastic Tubing. (Heavy Wall Nylex or Tygon) Place the aircraft up on jacks and disconnect the gear cables at the outer ends of the cables in the wheel well area. Disconnect the nose gear push pull rod. Remove the rod ends from the main gear cables at the wheel well end. Remove the rubber dust cover from the swivel joint on the cable. Remove the spider bracket from the wing spar. Remove the castle nuts from the outer cable and slide the spider bracket from the cable. This leaves the cable free to be moved around when attaching the lubrication tool. With badly stuck cables it is preferable to force a cleaning medium through the cable first to remove all of the old "gunk". With the cable held in a downward position approximately 2/3 fill the tool with cleaning fluid and slide off the cable and attach as depicted.
Chapter 7 –Landing Gear / Brakes 81 of 106

Hold the cable upwards as far as you can and apply air pressure to the inflation valve (approx. 5 psi) and whilst holding in this position have an assistant move the gear mechanism manually up and down to facilitate the progress of the cleaning medium ( I use kerosene or paraffin). When the level of fluid falls below half, re−instigate the process until a clear fluid issues from the other end of the cable. Having accomplished this repeat the operation using lubrication fluid. I make up a mixture of light oil and friction proofing compound such as STP or Nulon A35. STP and Nulon are brand names but consist of P.T.F.E. compounds manufactured by Dupont. Another additive you can use is collodial graphite in powdered or liquid form. Other control cables can be lubricated this way using the same style of operation with a longer piece of tubing for greater fluid capacity. The throttle mixture and propeller cables on the PA30 due to their length may have to be approached from both ends. This operation is a very messy job as oil will exude from areas along the cable and penetrate the fuselage area involving extensive cleaning up. Therefore do not wear your best white shirt and tie. After reassembly and adjustments, for some time afterwards, particularly after each landing the cable slide tubes in the wheel well area has to be wiped clean as lubrication will continue to be expelled at each gear cycle. Failure to do this will result in the lubricant collecting dust and you will soon be back to the same old drag again.
Gear Down Light The gear mechanism works great, but the green light doesn't work in flight. This problem occurred recently on Tres and Janice Renniess PA30. After much head scratching and work, we discovered a way to trouble shoot and fix the system. The following is a sketch of the green light circuit. This is a simplified sketch. In order to understand the total system, one should locate a schematic from the service manual. This will also enable you to use the wire number codes on the schematic to identify specific wires in the circuit. The circuit is fairly simple. Power for the green light comes from the cylinder head temperature and oil temperature circuit breaker. This enables the green light to function with the gear motor circuit breaker popped. The next item in the chain is the green light dimmer portion of the instrument light rheostat and switch. With the instrument light switch on, the resistor (R1) is in series with the green light, then the green light is dimmed for night operation. R2 is a resistor that is in parallel with the green light. The resistor provides current flow through the circuit when the light: bulb is burnt out. The resistor (R2) is located in the center of the flasher box under the nose cowl (PA−30/39) on the member where the voltage regulators are attached. R2 is the center resistor. The green light socket is insulated from the instrument paned with insulating washers. If these break down, the light will burn any time the master switch is on. A chain of gear limit switches provides the ground for the green light.
Chapter 7 –Landing Gear / Brakes 82 of 106

From the diagram, one can see if a wire were to be used to jump from A to B briefly, the light should go out and the circuit breaker will pop. If we jumped from A to B briefly with a wire, the light would come back on if the system was spiked with the master switch or the instrument light switch. Using the jumper, we induced the problem encountered in flight. If the above trick caused the malfunction; great. If not, don't despair. If only flight will induce the problem, put the aircraft on jacks, cycle the gear and make sure the gear is functioning properly. At this time, it is a good idea to open up the emergency gear access cover and put a mark below the push−pull cable ends in the full down position. This mark will enable one to determine if the motor and transmission has moved to full travel in flight. Alignment will not guarantee that the gear is locked, but malfunctions past this point in the system are fairly rare. While the aircraft is on jacks, check the gear limit switch adjustment and the general condition of the wiring. Careful attention should be paid to the butt splices, corrosion, fit, etc. Next, cause the malfunction with the jumper wire or by flying the aircraft if you must. Run a jumper from the seat track to the light socket housing. If the light comes on, the problem is in the limit switches and associated wiring. If the light remains off, the problem is in the other half of the system or the socket itself. If it turns out that the limit switches and wiring are at fault, use wires to bypass the switches one at a time until the culprit is located. If the problem can only be simulated in flight, this will involve a few landings. We found the nose wheel limit switch to be our problem. There could be more than one problem. It appears that over the years the contacts corrode in the limit switches. First, determine which half of the system is at fault, then use jumper wires to selectively eliminate portions of the circuitry to zero in on the problem. Sounds simple. It is. Just calm down and take your time. A careful logical approach will yield good results every time. Good Luck!
Chapter 7 –Landing Gear / Brakes 83 of 106

Gear Pre-Load Adjustment Non Believer (Jan 2002) Duane Wood #10128
When adjusting the pre-load, after all other adjustments have been made, you turn out the rod end bearing on the mains the prescribed amount, and the nose rod end bearing you turn in the prescribed amount. The idea is that when the gear extends, this adjustment will put pressure on the drag struts, keeping them tight. It doesn't work that way. The reason it does not work is this: the gear down switches are not on the transmission, they are on the gear legs! Think about it. It does not matter where the rod end is, the gear motor is going to stop when all 3 switches toggle. All the so-called pre-load adjustment does is change the position of the re-circulating ball assembly on the transmission shaft! If there were a Down switch on the transmission like the Up switch, then the pre-load adjustment would have an effect. The only pre-load you are going to get is the coast down of the gear motor after the Down switches have toggled. And it ain't much. Next time your plane is on the jacks, check it out. What adjustments are important? 1. All drag struts should go over center at precisely the same time. If they don't, the transmission will be the only thing holding the gear in place. This can damage the bulkhead supporting the transmission, as it is not designed for this much load. Also when you use the emergency extension, the gear may collapse. On this gear system, if one gear leg starts to go, they all go. 2. Down switches should be adjusted very carefully for maximum travel. I adjust the mains to toggle just slightly before the nose. I use the nose switch for fine adjustment. 3. There are actually 2 drag struts on the nose. Both must go over center at the same time. I have seen several planes where one strut is not going over center. It's a hassle to adjust, (you must shim the engine mount), so I think that's why it does not always get done. 4. Gear up switch adjustment. Some mechanics think the gear should fit tight against the rubber blocks. Not so. The mains should be just barely snug, and the nose just hangs in the well. If it is adjusted to where it is tight against the stops, the motor may trip the circuit breaker, or there may be so much tension on the transmission that the emergency release will not work. 5. Be sure the nose gear alignment roller fits the track properly. Follow the Service Manual instructions precisely for gear retraction test. 6. Lubricate the Teleflex cables as outlined by Maurice Taylor. I use a 50-50 mixture of Marvel Mystery Oil and Slick 50. The Teflon in the Slick 50 is a good high-pressure lubricant. When I renewed my insurance this year, the guy at AOPA told me that there are only two insurance companies that will insure a Comanche because of high loss rates. I don't know if this is true, but I do know that gear up landings or collapse seem to be a problem with Comanches. Maybe this will help. In the meantime, I will be watching out for a lynch mob. Editor's Note: Landing gear pre-load and "down" switch adjustments should be done strictly in accordance with the maintenance manual. No alterations are allowed. Lubrication of the landing gear cables is discouraged. It attracts dirt and the cables are difficult to lube unless removed from the aircraft.
From Maurice’s Toolbox- Adjusting The Landing Gear (Oct 2002) Maurice Taylor
At this point we are assuming that AD 77-13-21, and 95-20-07 have been complied with (required each 1000 hrs). Now after a good cleaning of the gear so that it can be properly inspected and if necessary adjusted. If this was done properly at last annual no adjustments should be necessary.
Chapter 7 –Landing Gear / Brakes 84 of 106

As the Comanche landing gear has no down locks as such, it locks because when the preload is adjusted per PIPER service manual the gear through the linkage has a constant force holding it over center all the time the gear is down. We have had proven to us when the gear is adjusted even just close to what PIPER says, the gear will withstand a side load strong enough to tear the gear out from under the aircraft and still not unlatch. To me, adjusting the gear micro switches that control the gear warning horn and the green light needs to be done precisely. However the Service Manual tells us that after adjusting them, one technician should get in the aircraft, with master switch on and gear motor circuit breaker pulled out and gear disconnected, using the emergency extension handle gently pull the gear up just until the green light goes out. At this point the technician on the outside tries to drive the nose gear back and the main gears inward - neither should budge at all. Now the next part of this problem is the sole responsibility of the owner (pilot) to use the check list every time, if he or she uses the noise cancelling head sets then the horn MUST be wired into the head set. Then frequent tests should be made in flight to prove that at 12 to 14 hgs that the horn does in fact work.
Brake Problems (Mar 2003) Mike Rohrer ICS #13392
… the first thing I noticed was that the brakes were very stiff, and it took awhile to actually catch when applied. I knew right away what the problem was. I have seen it before, and it is something that the owner really doesn't notice because it is insidious. The fluid had never been changed in the brake system. Yes, you need to change the fluid once in awhile. The viscosity was the same as honey. I changed the fluid by pressure bleeding the system from the brake assembly to the reservoir. In order to completely remove the fluid, and get back to normal in the shortest time, the brake pucks need to be disassembled and cleaned. If you don't clean these, it will take awhile for the new fluid to completely mix with the remaining old fluid. While I am on brakes, another area that needs special attention is the hand brake. For those with no foot brakes, these can be a problem if this cable breaks. A good area to investigate is behind the pulleys where the cable rides and be sure that the floor is removed under the pilot's feet for a good look. Furthermore, for those with the old style brakes, did you know that there is a self-adjusting screw on the side? If this screw, which goes through a bushing, is corroded, the brake will not operate efficiently. Just coat it with a good lubricant.
Care and Maintenance of Your Comanche Braking System (May 2003) Roy Sneesby - Technical Director, Australia
The braking Systems of an aircraft are often sadly in neglect... a syndrome of "out of sight, out of mind", or due to a lack of ability or knowledge on the part of the Operator. Any small defect is a message that a major fault or catastrophe is on the way. Do not wait for your engineer to notify you, or until the next Service, to rectify any faults, as the fault may manifest itself at some inopportune time. Keep your System clean and the reservoir topped up to the prescribed level. Do not overfill, as there is a particular reason for this. Due to the small capacity of the System, one emergency stop generates considerable heat, a lot of which is absorbed by the brake fluid, which in turn expands and takes up the allotted space left in the reservoir. Therefore, too fill a System will cause an overflow Situation; conversely, if the System is allowed to operate with too little fluid, contraction of the fluid will allow air to enter the braking System. In normal operations, you will have to keep topping up the fluid level due to wear of the brake linings and the resultant changing Position of the brake calliper pistons. Wear on the brake disks must also be taken into consideration. Since inception, the Comanche has been fitted with three different types of braking Systems. First models (i.e. 180 and 250) used a Single hand brake lever protruding from beneath the instrument panel, which was connected by a cable to a Single master cylinder beneath the floor, which operated both brakes in unison. There was no differential braking to assist
Chapter 7 –Landing Gear / Brakes 85 of 106

directional control. The park brake lock was an independent unit mounted beneath the floor and operated by a Single Bowden cable. This System was lacking in several areas, i.e.: 1. Ease of inspection for leaks in the Systems; 2. If one brake cylinder seal failed, there were no brakes at all; and 3. If one wheel brake was more efficient than the other, directional control was affected. Following this, toe brakes were installed to the pilot's rudder pedals which operated the wheel brakes independently. These master cylinders also incorporated an integral hand brake lock, which also was controlled by a Bowden cable. Earlier production series incorporated the central handbrake level, which was removed in the later series. This newer System allowed for better control due to the differential operation. Unfortunately, due to more sophistication and smaller moving parts, it was prone to leaks if not serviced or maintained correctly. I have witnessed many that have suffered abuse and incorrect assembly in their previous lives. A common fault is wear on the brake locking pin and plate. This safety device is intended to preclude the inadvertent application of the brake lock while the brakes are off. If this system is worn or maladjusted and the brake lock is inadvertently applied, the next time you apply the toe pedals you have a beautiful hard pedal feel but no braking effect whatsoever. In fact, the aircraft seems to accelerate alarmingly! The manufacturer's intention was, with the park brakes off, that the levers engaged on a Square shouldered pin, which precluded the lever from moving. To operate the brake lock, pedal1 pressure is applied which in turn causes the park brake lever and shaft to compress a spring and move sideways, thus disengaging the lock pin and allowing the lever to turn when the cable is pulled. This operation requires two separate and distinct movements on the part of the operator. If this is not accomplished, accelerated wear on the locking System occurs. If the system is operating correctly, the brake lock cable should not be moved to the locked position until brake pressure is applied by the foot pedals. Later models of the Comanche could be purchased or fitted with co-pilot toe brakes in series with the corresponding system used on the pilot's pedals, except that the co-pilot's brake cylinders did not incorporate the brake lock lever. Because the system was in series, the park brake lever on the pilot's cylinders solved this problem. The incorporation of co-pilot's brakes introduced some further complication as to increased maintenance and to bleeding the air from the system after servicing. The service manual does not cover this procedure in any great detail. More often than not, after bleeding the system, the pilot has good brakes and the co-pilot little or none. Other times, you can get mediocre brakes on both sides, but a gradual degradation in Performance on either side after a short period of time. This series of events is due to air being introduced to the system via a leak, failure to completely eradicate air during the bleeding process, or incorrect assembly of the components. If after servicing and bleeding, and you are confident all air is evacuated, you find that all pedals have a good hard feel except one, check that the main piston has not been inverted on assembly and that the nylon seal is in place. Spongy brake feel can also be caused from other regions of the system after servicing, such as defective brake disk surfaces, flexing brake callipers and hoses, bent brake plates, and carelessly fitted brake linings. The brake system has a very small amount of fluid displacement, and any of these faults can affect the pedal feel. I have seen cases where new linings were fitted and the rivets were set so hard that the linings were distorted between the rivet spacings causing the lining to buckle and not sit flush with the backing plate. As the brakes were applied, the system first had to compress the lining to the backing plate before coming up against any resistance, thus giving a soft pedal feel. It should be obvious that there is more to the braking system than just pushing the pedals and coming to a stop.
Chapter 7 –Landing Gear / Brakes 86 of 106

Further to the Case of the Wobbling Coupling (Landing Gear Transmission) (May 2003) Roy Sneesby -Technical Director Australian Tribe
In the September 2000 International Flyer, AI Bieck wrote about his experience with a wobbling flexible drive coupling in the undercarriage transmission. Al's remedy was to install both a new coupling and a new (dukes) transmission assembly. But he did not answer the question of "why the wobbling wheel" in the first place? Let me try and enlighten you. Comanches can be fitted with two types of transmissions - one is a DURA, the other a DUKES. Both use the same flexible coupling and the same approach for driving it. However, the DUKES differs, in that it has slotted mounting holes for the transmission motor. This allows you to adjust the position of the motor so as to align the two drive shafts (motor and transmission) that are joined by the flexible coupling. If these are not aligned correctly, then due to the slotted driving System employed, each quarter turn of the drive pinion causes the coupling wheel to tilt one way. Then at the next quarter turn, it will tilt the other way. The result is a wearing and elongation of the drive tongues, resulting in a "wobbling coupling". If you have the DURA transmission, no mechanism is provided to change the motor position. When replacing a DURA transmission, the technician must manually elongate and/or shim the motor to ensure correct alignment of the two drive shafts. This is NOT mentioned in the Comanche service manual. When fitting the motor to either transmission type, the motor must be bolted on first without the coupling to check the clearance between the two ends of the shafts. Too small a gap bottoms the drive tongues in the flexible coupling, which distorts the wheel and puts undue thrust loads on the motor and transmission drive pinion. Too large a gap results in insufficient engagement of the drive tongues. This too will cause a wobbly wheel and premature wear. Again the solution is for the technician to shim the motor mounting flanges appropriately, using normally accepted aircraft methods.
The Retractable Gear That Wasn't (Nov 2003) Marty Case - ICS #3155
It was a beautiful early January day in north Texas. N7316P, a 1961 250, was raring to go in her fresh white and red paint. The temperature was in the mid-50s and a 10-kt. wind was blowing from the northwest. Skies were absolutely clear and the sun was shining brightly. Today's mission was to give my No. 2 son, Matt, some practice with the Comanche so he could qualify for a complex and retractable signoff. The preflight was normal and takeoff was perfectly smooth (I swear!). Everything was normal until the gear lever stopped moving toward the floor about halfway through its normal travel. Hmmm. I haven't seen this one before. Moved the gear switch to OFF, completed the rest of the after-takeoff ritual, and climbed to a safe altitude and set up for cruise. I expected find that the landing gear circuit breaker had popped, but was surprised to find it had not. We checked the operating handbook for guidance, but could not find anything that really applied. (Book guidance is focused on getting the gear to go DOWN.) If I'm going to have a gear problem in flight, I'd sure rather have it be of the "failure to retract" category rather than the other way around! Happily, the gear extended normally from the mid-retracted position when the switch was moved to DOWN. I was really glad to see that bright green light. We went back to land (that was smooth, too!) to investigate. We discovered that the right main strut appeared to be almost completely deflated. There was about an inch of shiny strut showing - a lot less than had been visible on preflight. Examination of the bottom of the wing indicated the direct cause of our retraction problem: the gear scissors had contacted the wing as the gear had swung inboard. We figured we had a low strut and a little nitrogen would have us on our way in a jiffy. It didn't hit us until later that even with NO nitrogen, gravity in flight should pull the strut extended and allow the scissors to clear the wing skin.
Chapter 7 –Landing Gear / Brakes 87 of 106

A quick trip to our friendly I/A had us hooked up to a nitrogen bottle. We were all very surprised when the strut did not shoot up even when we applied up to 1,000 psi. That was the point we realized we had a real problem. It took two strong backs to lift the wing up enough to even get the jack under it. Once we had it jacked up, we again tried to extend the strut. After much head-scratching all around, the plane was rolled back to the hangar for a teardown. A couple of hours later we had the gear strut assembly on the workbench, but still couldn't figure out how to extend it or what the problem was. Everyone we talked to was puzzled - no one had heard of a jammed strut. Finally, after judicious application of the hammer and a 12-ton press, we realized that drastic measures were necessary. It was decided that a hacksaw was the best way to avoid damaging any potentially useful parts inside the strut. A couple of hours later, we had it apart.
Take a look at the gear strut exploded view in Figure 1 (I used a 260 single-fork diagram for clarity). What had happened was that one of the pins (#37) that secures the upper collar (#33) to the inner gear strut (#19) had aligned with the recess for the strut fill valve (#56-59) in the outer strut housing (#2). This allowed the pin to back out slightly into the recess and jam the strut!
Chapter 7 –Landing Gear / Brakes 88 of 106

Check out Figure 2 for a look at the interference and the damage. The bore should be smooth all around the valve recess. The valve recess is the larger circular opening at the upper end of the strut housing. Figure 3 shows that we had to cut the strut housing in three places to get it apart. One replacement out strut assembly, two new pins (those suckers are $50 each!), a new upper strut collar and three new o-ring seals later we were ready to fly. Now for the rest of the story. It turns out that this event traces back to seven or eight years ago when I installed single-fork struts to reduce gear drag in the retracted position. It turns out that I happened to press one of the strut tubes into the fork in such a way that die upper collar pins were aligned with the strut fill valve hole and could potentially cause trouble if the strut were ever to be fully compressed. Take another look at Figure 1. The Piper parts manual drawing makes it appear that there are four pins and holes for the upper collar, but ours had only two that were 180 degrees apart. If the strut is pressed into the fork with the upper pin holes aligned fore-aft, they will be 90 degrees away from the fill valve and there is no potential problem. If you have a strut and collar that has four holes, the tube should be pressed into the fork so that all the strut holes will be about 45 degrees away from the fill valve recess. Note that once the strut is pressed into the fork, a new hole must be
Chapter 7 –Landing Gear / Brakes 89 of 106

drilled through the strut for the bolt (#23). Next, the strut bottom piston (#18) is installed from the top of the strut so that its existing hole may be aligned with the strut holes since bolt #23 goes through all three. It took a couple of tries to get the piston past the upper collar pin holes without cutting the piston o-ring. We finally had to de-burr the inside radius of the pin holes just slightly to eliminate a razor sharp edge. My strut had worked fine for hundreds of hours and many years. Unfortunately, the combination of the strut/fork alignment, the cold night before, a slightly low strut, and an untimely bump allowed the strut to compress enough during taxi that one of the pins backed out into die fill valve recess. That really gummed up the works. After we reassembled and installed the right strut, we looked at the left and decided to check it out. Therein lies the point of this story. It was a simple matter to jack the wing, deflate the strut, removed the valve and check with a flashlight and mirror that the pin was not visible with the strut fully compressed. The peace of mind afforded by this relatively simple check (about an hour to check both sides) and the fact that an incorrectly indexed strut can be fixed with no damaged parts leads me to highly recommend this simple inspection to anyone who has an airplane retrofitted with the single-fork gear struts, or has had the strut pressed out of the fork (single or double) and reinstalled for any reason. I suspect that I am not the only ICS member who would prefer to fork out for an hour of shop labor instead of more than $1,100 in parts plus a couple of days’ labor. Happy flying!
Take Care of Your Gear and It Will Take Care of You (Apr 2004) Mike Rohrer ICS #13393
A friend of mine picked up his Twin Comanche from a shop that had just finished his annual inspection. When he took off, the gear went up part way and the airplane lost total power. Why? I have my theory, but we probably won’t know for sure. One thing that I do know is that if the airplane doesn’t have enough power to drive the gear down, you are going to have problems. Anyway, he had to manually extend the gear. As you should know by now, only because I have complained enough about this matter, if the gear is not rigged properly it is going to fold on roll out. I guarantee it. I know this airplane’s gear was rigged correctly because I did it last year. The gear went down normally, and showed a green light. He wanted to be sure, so he pulled back on the telescopic extend bar and pushed it forward again to be sure it was locked. What happened next is most likely the reason why the gear folded on roll-out. The lever that you pull up to disconnect the gear transmission from the push-pull cables turned sideways. This action caused the push-pull mechanism to jam. It’s unfortunate. See the photos. I want all to see what it should look like when the gear is extended manually, God forbid this should happen, but if it does, you will know what to look for. Also, it’s a good idea to put a red reference mark on the jackscrew tube and on the wall. This way you will have added insurance that the gear is completely down. And when you do extend the gear, leave it alone. Don’t think that having someone put his or her hand or foot against the pole is going to keep the gear down on roll-out. Remember the airplane weighs more than you do and I don’t believe you can hold it up. Just a good guess.
Chapter 7 –Landing Gear / Brakes 90 of 106

Putting a red reference mark on the jackscrew tube gives you peace of mind that the gear is completely down.
In these photos you can see that the lever used to disconnect the gear transmission from the push-pull cables.
Chapter 7 –Landing Gear / Brakes 91 of 106

Gear Side Brace Link Assembly Rod The next item should be looked at so it doesn’t cost you money down the road. It’s the MLG side brace link assembly rod end. (See photo). This should move freely. If it doesn’t and isn’t lubed correctly, it will cause problems. And it isn’t cheap. What happens is it will bind up and cause the gear transmission to work hard. With this and dirty push-pull cables, and other loose or binding components, the gear will eventually fail. This is hard to lube and if a person is lazy it will not get lubed. The easiest way to lube it is while on jacks and to retract the gear. (This is being performed, right?) With the gear up about halfway, it’s easy. For you who like to lube your own gears, it can be accomplished without jacking if you use grease fittings that “Snap-On” sells. It works well, or if you are careful you can get it with a flex tube.
The main landing gear side brace link assembly rod end. If lubed correctly, it should move freely. Nose Wheel Next item: be sure that when the nose wheel is removed and inspected, the axle should also be inspected. I find about one out of three that are pitted and corroded. Imagine what would happen if this broke in half? While we are on the subject of gears, it’s a good idea to replace the fluid in your oleo gear struts about every four or five years, depending on usage. It’s safe to say that most haven’t been changed for a very long time, maybe since new. Is Mil-H-5606 supposed to be black? I have mentioned before it’s also good to replace the brake fluid. A good way to tell if it’s time is to break open the bleeder screw on the bottom of the brake caliper or loosen the brake hose and see if the fluid flows like molasses. If it does, it’s time.
Landing Gear Harness Preventive Maintenance (May 2004) Mike Rohrer ICS #13393
As we all know, the Comanches are getting older, and it’s time to pay attention to the landing gear. Shown here is the wiring removed from a 1967 PA-30. As with many Comanches, the gear wiring harness is neglected and should be replaced now. I see a lot of “repaired” harnesses, and they’re not pretty! I guess the reason why replacement of the harness is put on hold is cost. But if you figure what it costs when you experience a malfunction, which usually occurs off-station, it is not really that bad.
Chapter 7 –Landing Gear / Brakes 92 of 106

Here at Altus we replace the harness wiring and it takes about six to eight hours using the original switches. If you want everything replaced, Mat, at “Comanche Gear,” sells a nice, easy-to-install harness kit. Either way, take a look at yours: If you can see cracks and bare wire, do yourself a favor and get it replaced.
Gear harness assemblies after removal.
Is Your Emergency Gear Extension Handle in Good Condition? (Jun 2004) Patric Barry - ICS #2198
As a Twin Comanche owner, A&P and IA, I recently completed four inspections (two pre-buys and two annuals) on PA30 aircraft where the emergency gear extension handle was unusable. The gear extension handle is there for a purpose – to get the gear down if it does not freefall in case of an emergency. It is designed to fit deep inside the receptacle on the gear, and is meant to fit into a horizontal bar that locks it in place. The handle should go into the receptacle and be turned until the slot in the handle meets the small bar, slips into place and turns and locks. The three handles I looked at in these three inspections were crimped at the tip and would not even go into the receptacle. Simply put, had the gear not free fallen into the down and locked position in an emergency, these three planes would probably have landed gear up solely because the pilot could not have used the emergency extension handle to get the gear down. What happens sometimes in an emergency extension is that the pilot only inserts the tip of the handle a small portion of the way into the receptacle, and in forcing the gear down he deforms the tip.
Another look at a damaged emergency gear extension handle.
Chapter 7 –Landing Gear / Brakes 93 of 106

When the handle is pushed, the pressure is taken in the area where the locking slots are and the metal swells out (stretches), which prevents the handle from being capable of entering the receptacle cleanly. If you have a handle that looks anything like these photographs (crimped, deformed, narrow at the tip) then get it fixed or replaced. It must be in good condition to work, and who wants to damage a $100,000 asset over anything as mere as a deformed extension handle.
Check your emergency gear extension handle to ensure it doesn’t look like this. The repair procedure that I use is to put the handle on a concrete floor and force a tapered socket into the tip and hammer it home so the crimped end is forced open. I then insert a piece of pipe into the tip of the handle and gently tap-hammer around the edge so that the stretched metal is persuaded back into place. I then see if it will insert freely into the gear receptacle. If it does not, I work it until it does. When it does I lubricate the tip of the handle and the receptacle with some synthetic grease and ensure that it works in and out freely. If this won’t work I won’t sign off the inspection since the aircraft is simply unairworthy.
Crimped, deformed and narrow at the tip -- not how you want your emergency gear handle to look. The most recent example was a pre-buy, and the seller had owned the plane for 28 years and had done an emergency extension only once. He had no idea that the handle was deformed, and left the maintenance to mechanics to tend to, assuming that a mechanic would discover the defects. The plane had been through numerous annuals and had been signed off, so the mechanics were not inspecting this simple item. Let me be clear – I consider the plane unairworthy with an emergency gear extension handle in unusable condition. I believe the problem starts with a handle that is not lubricated and will not freely insert into the receptacle so it sticks at the tip and the tip deforms which prevents the handle from being reinserted into the receptacle. This is a pilot-owner responsibility and could be part of a pre-flight perhaps.
Chapter 7 –Landing Gear / Brakes 94 of 106

Certainly every owner should practice with his extension handle, lubricate it and be comfortable with it. As a result, he has the comfort of knowing that it works if a problem arises.
Parking Brake Slipping (Feb 2004) Q When I am doing my run-up, sometimes my 250 likes to creep ahead. Applying additional pressure on the brakes doesn’t seem to help. The brakes seem to work fine otherwise. What’s happening? A I assume you are using the parking brake during run-up. The design of the Comanche parking brake system is such that once the park brake is applied, you must release it to obtain additional braking effort. For example, if at run-up, you have applied the brake but the aircraft moves forward, you must release the park brake before operating the toe brakes or hand brake. If you do not release the parking brake, then you can push (or pull) as much as you like, but no additional braking will be attained. So either apply more pressure before setting the parking brake, or just use the hand or toe brakes at run-up.
Bungees Too Strong (Apr 2004) Q We recently installed new bungees on my 250 and took off the next day for a $100 hamburger. The gear went up as usual after takeoff, but a half hour later when we went to lower the gear, the breaker popped. Resetting the breaker did not help. We disconnected the gear drive but it took both of us pushing hard to get the gear over center and locked down. We landed, had lunch, and took off back home leaving the gear down. Later with the airplane on jacks, we disconnected the linkage from the mains and nosewheel. We found the linkages to be free to move back and forth. We reconnected the jackscrew and found the gear motor would run the linkages in and out without a problem. We re-hooked the linkage to the landing gear, and again the breaker would pop out when trying to lower the gear. What in the heck is going on? A There recently has been a batch of bungee cords that are more powerful than normal. The breaker is popping because of the increased amperage draw on the gear motor. The circuit breaker is doing what it’s supposed to do. I suggest you remove the bungees and use a hoist, puller or block and tackle to stretch them out overnight and then replace them. That seems to be working.
Gearbox Inspection & Service (Nov 2004) Q I have a 1963 PA-24-250. I have had it for seven years, and I always help my mechanic with the annual. When we do the gear inspection, I always ask him if we should be doing anything with the small gear box under the floor that is attached to the motor. He says it is one of those ”if it ain’t broke, don’t fix it“ items. I keep thinking there must be some sort of inspection or maintenance involved. What is your opinion? A The service manual lists frequency of lubrication and types of grease which are to be used when servicing the gearbox. Many people think that a little grease on the exposed threaded portion of the jacking screws is adequate. The service manual, however, specifies that the grease in the geared “worm and pinion” transmission is to be cleaned out and replaced on a regular basis. The problem in not servicing the gears regularly is that the grease may drop off and consequently the gears are not lubricated. From personal experience, I have seen the gears wear because there was no longer any grease lubricating the gears. The owner in that case actually had to lower the gear manually because the gears were not engaging due to excessive wear. This was an extreme case, but points out the need to service the gearbox.
Chapter 7 –Landing Gear / Brakes 95 of 106

Since your Comanche is a 1963 model, it has another identical gearbox that also requires servicing. That is the gearbox for the flaps. Any Comanche with the Fowler flaps has this gearbox and it also requires the same maintenance.
Difference Between Metal and Organic Brake Linings (Feb 2005) Q My twin Comanche uses metallic brake linings while the 260 Comanche I had used organic linings. There is quite a big difference in price. What are the downfalls of using the organic linings on the twin? A The first and foremost answer is that your twin was not certified with organic linings. Metallic linings have better resistance to fading after repeated brake applications. This is important due to the weight of the twin versus the single. The heavier 400 Comanche also has metallic linings. If your time is worth anything, the cost of using metallic linings actually gets closer to the organics because of the ease of installing the metallic linings, which are not riveted in but held in place with pins. A technique I use in holding the linings onto the backing place is simply a little silicon on the pins, which will secure the lining until the brakes are all together.
Tire Ads (Nov 2005) Q The multitude of tire ads confuses me. What tires do you recommend for Comanche owners? A Tire ads certainly can be confusing. All the manufacturers want you to think that their tire brand is the world’s best. I spent five years in my young life working in tire R&D for the Air Force. One thing that I retained from that experience was you should buy tires designed for the job at hand. This means that the tire used consistently in training is not necessarily the best tire for the typical 100 hour per year Comanche pilot. The trainer aircraft operator is looking for lowest cost per landing. This means that he’s very interested in tread depth. He should seriously consider quality recaps on known good carcasses. The typical Comanche owner, however, wants a tire that will be safe for up to about 10 years. There are many variables in this formula, such as operation and storage conditions, ambient temperature of storage, hangared or not, etc. I’m a Goodyear enthusiast, personally, and I’ve never purchased anything for my bird except Flight Customs. Yes, Goodyear Flight Specials, Michelins and McCrarys are good also, but I’m admittedly prejudiced from my extensive Air Force experience. The point is that you should buy the highest quality that you can afford. Then you should take care of them, keep them out of sunlight as much as possible when stored or hangared, keep them clean, properly inflated, slow down for turns, and STAY OFF THE BRAKES except when you need to stop. Regardless of the brand, be good to them and they’ll be good to you.
Rotating Tires (Dec 2005) Q Should I have my A&P rotate my main gear tires on each annual to even up the wear? A If your main gear tires are consistently wearing either inboard or outboard rather than relatively even on each, the most probable answer is that they are in need of an alignment check. On a Comanche (and I’m quite sure yours are the same), it is easy to measure the out of alignment amount on each of them, with a long straight edge and a protractor, and adjust it by adding or subtracting washers to the main gear scissor. With correct pressure, normal use, and sensible breaking practice, your main gear tires should wear nearly even on both sides. And NO they don’t need to be reversed on each annual.
Chapter 7 –Landing Gear / Brakes 96 of 106

Landing Technique Affects Tire Wear (Dec 2005) Q Can landing technique, such as allowing lateral drift on landing, cause excessive wear on your main gear tires? A A quick answer is yes. But a very high percentage of our excessive tire wear is from misuse of brakes and poor pilot technique, rather than from a slip or skid at touchdown. The actual wear at touchdown is miniscule when compared to the wear caused by high speed turns and excessive breaking to make the next turn-off. It makes no sense to not use the runway in front of you and let the aircraft decelerate on it own volition, rather than jumping on the brakes soon after touchdown. It’s very hard on the brakes and devastating to the tires. And for what? You saved 13 seconds on your taxi run to parking. There are probably no parts on the airplane that are so dependent on good technique for long life as are your tires and brakes. And YES, as you suggested, they are not cheap to replace. Incidentally, the pilot, not the tower, makes the decision of which runway exit you’ll use. Don’t allow the tower to talk you into a quick turn-off that you think is inadvisable. After all, YOU ARE the Pilot In Command – don’t ever forget that fact.
Brakes on Pre-Landing Checklist? (Dec 2005) Q Should I add an item on my pre-landing check list to “check brakes?” A The probability that your brakes have failed after a normal taxi and takeoff is truly astronomical so the answer to your question is “No.” This is why Mr. Piper and Mr. Mooney didn’t include it in the POH. I say that realizing that there is certainly nothing wrong with checking to see that normal pump-up pressure is present during the approach. But let’s not garbage up GUMP any more than necessary. However, having said that, there IS an exception. If your airplane has been down for any brake maintenance, especially that when a break in a hydraulic line or bleeding was done, a pre-landing check of the brakes is surely in order. But that’s a special case.
The Infamous Cracked Main Landing Gear (Jul 2007) Charles Littwin, ICS #14089
Sometimes one’s misfortune can help others if they share. One of the first major repairs on my Comanche after purchasing it in December 1999 was repair of a cracked strut housing. It seems Piper decided to drill a hole in the strut housing to hold a clamp bracket. The technical description of the 3/16-inch hole is the bolt location for the girdle clamp assembly that holds the gear assist spring. The parts catalog specifically names the clamp assembly parts (items 28 & 29) as a “strap, main gear spring attachment” and “bracket assembly, main gear spring attachment.” In time, either from hard landings or forward-to-rear flexing of the housing, a slight crack will develop at this hole under the clamp band. I understand from several ICS members, including Matt Kurke of Comanche Gear, that there is a preventative-maintenance procedure to assist in preventing this crack from occurring. First, let me start with the scenario I experienced seven years ago on the right main, and again in January 2007 on the left side. The fluid started seeping out from the crack located behind the clamp band. If you find this problem, do not fly your airplane until it is repaired. The reasons are many – you could cause much more damage to your aircraft, the FAA tells you not to fly with a known deficiency, your insurance won’t cover you and if the crack gets too large it cannot be repaired. There is only one shop in the United States authorized to repair the crack – S & B Industries in Murray, Utah (telephone number (801) 261-4076). The maximum allowable crack size is 5/8-inch on each side of the hole or 11/4-inch total for the
Chapter 7 –Landing Gear / Brakes 97 of 106
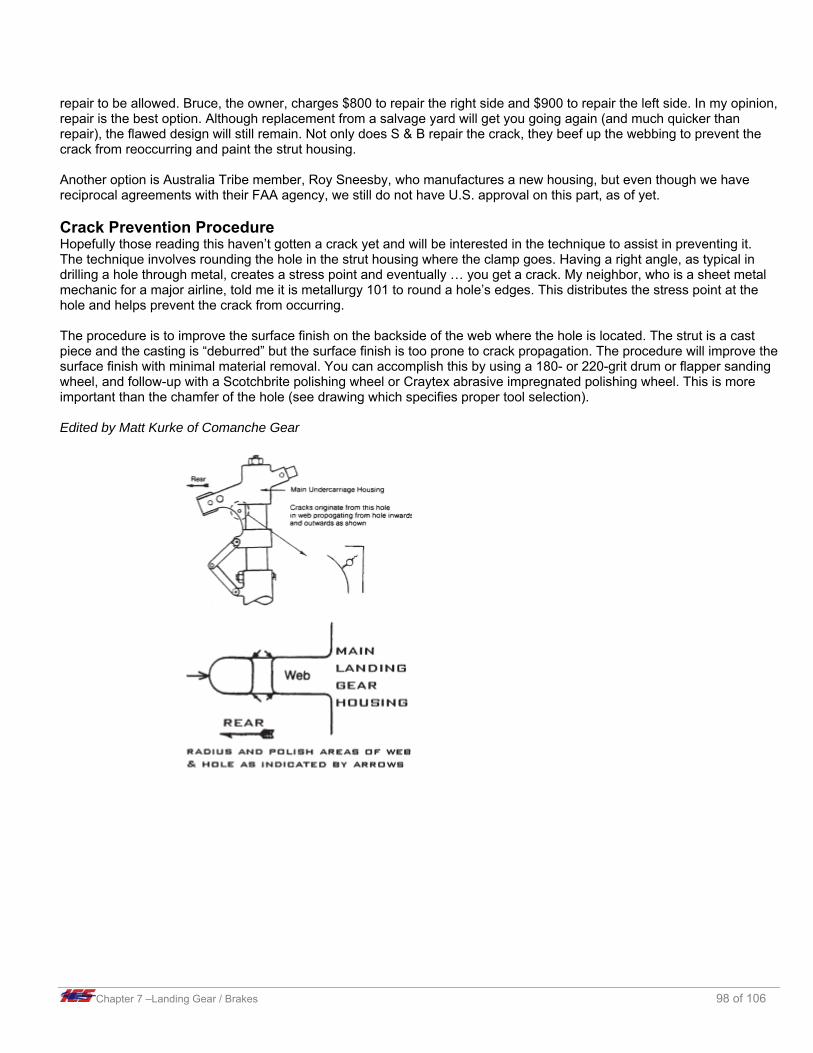
repair to be allowed. Bruce, the owner, charges $800 to repair the right side and $900 to repair the left side. In my opinion, repair is the best option. Although replacement from a salvage yard will get you going again (and much quicker than repair), the flawed design will still remain. Not only does S & B repair the crack, they beef up the webbing to prevent the crack from reoccurring and paint the strut housing. Another option is Australia Tribe member, Roy Sneesby, who manufactures a new housing, but even though we have reciprocal agreements with their FAA agency, we still do not have U.S. approval on this part, as of yet. Crack Prevention Procedure Hopefully those reading this haven’t gotten a crack yet and will be interested in the technique to assist in preventing it. The technique involves rounding the hole in the strut housing where the clamp goes. Having a right angle, as typical in drilling a hole through metal, creates a stress point and eventually … you get a crack. My neighbor, who is a sheet metal mechanic for a major airline, told me it is metallurgy 101 to round a hole’s edges. This distributes the stress point at the hole and helps prevent the crack from occurring. The procedure is to improve the surface finish on the backside of the web where the hole is located. The strut is a cast piece and the casting is “deburred” but the surface finish is too prone to crack propagation. The procedure will improve the surface finish with minimal material removal. You can accomplish this by using a 180- or 220-grit drum or flapper sanding wheel, and follow-up with a Scotchbrite polishing wheel or Craytex abrasive impregnated polishing wheel. This is more important than the chamfer of the hole (see drawing which specifies proper tool selection).
Edited by Matt Kurke of Comanche Gear
Chapter 7 –Landing Gear / Brakes 98 of 106

Cracked Bungee Arms: AD 77-13-21 and Service Letter 782B (Jun 2008) Dave Gitelman, ICS #866
I recently completed the 1,000-hour gear inspection. The smartest thing I did was to enlist Matt Kurke to do the AD as written. We made an agreement beforehand – Matt would provide the expertise, skill and specialized tools; I would provide the parts and money – a perfect arrangement. Working with Matt was the equivalent of an orderly working with a neurosurgeon; I was the orderly. The AD was completed without complication. We also replaced the push-pull conduits. While the gear was hanging free, unattached to anything other than the trunion on which it swings, Matt moved the left side gear towards the up position. A very audible “thunk” could be heard. I immediately removed the inspection plate covering the bungee so that I could observe and understand the source of the sound. It became quite obvious that the bungee arm was the source. I removed the bungee cord and then the bungee arm. The arm came out in two pieces (see picture). Fortunately, Matt had brought a good serviceable heavy wall arm, and it was for the left side. The broken arm was replaced, the bungee cord attached, and the “thunk” was gone. We then moved to the right side. The same noise was present. Knowing what that meant, I did not pull the arm until a replacement was in hand. The right side arm was slightly better then the left. It came out in one piece, but badly cracked. What can be learned from this experience? If you own a 180 or 250, they were all assembled with a thin wall bungee arm. If you are like me, you have never had these arms pulled and examined for cracks. Why? Because there is no requirement to do so. I would suggest the following: check your log book(s) and try to determine if the bungee arm (part number’s 20846-00, 01) have ever been replaced with the heavy wall arm part number’s 20846-06, 07. If they have been, go no further. If you cannot substantiate that the arms have been replaced, then have your A&P inspect and replace as necessary. How To It is a relatively easy operation to pull these arms from the trunion. First, the airplane must be on jacks with the bungee cord removed from the arm. It is not necessary to remove the bungee from the wing; it can stay on the stretcher. Next, put a board under the wheel and lower the plane so that the tire is just touching the board. You want to support the assembly without putting upward pressure on the gear. Remove the bolt that secures the bungee arm. On the trunion, locate what appears to be a bolt head with a safety wire running through it that goes around the trunion and through another bolt head located directly opposite of the first. Cut and remove the safety wire. These bolt heads are really pins used to locate and position the bungee arm. Pull out the inboard side pin. Using a drift, insert it into the hole and tap out the pin on the outboard side. Now, twist and pull the bungee arm from the trunion. There are spacers in the trunion that should remain in place when the arm is removed; make sure they do. Upon examination, if the arm is not cracked (the crack will appear in the radius of the machined groove on the top side of the tube), re-insert it into the trunion after lubricating with lubriplate, or some other grease. If you experience a problem reinserting the arm, the spacers have shifted or the gear itself may have moved. Use your finger to carefully align everything and when done, insert the arm. It will slide right in. If you have a thin wall arm that is not cracked, it will be sometime in the future. In that case, if you are re-using the same arm, make it a point to check it every time you put on new bungee cords. If a new arm is needed, Webco can supply the correct heavy wall new part. Make sure that you remove the spacer located at the end of the bungee arm tube and move it onto the new part. Position the tube so that the pins can be inserted into the trunion. You may need to tap them in using a non-marring hammer. Safety the pins using .041 safety wire. The wire goes through each pin, around the trunion and then gets
Chapter 7 –Landing Gear / Brakes 99 of 106

twisted. Insert the long bolt and tighten accordingly. If it’s a new arm, remove the roller from the old arm and transfer to the new arm. Re-attach the bungee and you’re done. While this documented problem has been around for at least 25 years, I suspect that many, like me, have never looked at this important part. Now would be a good time to do it.
Installation of Main Landing Gear Bungees (Jul 2008) Matt Kurke, ICS #10288
Following are additional comments for replacing the bungees on the main landing gear of your Comanche, in reference to Maurice Taylor’s procedure (see below). To make it easier to follow, I will reference Maurice’s specific steps (i.e. #X). It might make sense to read Maurice’s instructions before reading below, as it will give you an overall idea of the process. I’ve been asked what a reasonable time would be to do this procedure. My answer: one hour, if you are wicked-fast, one-and-a-half hours would be a more normal guess. One needs the airplane on jacks and the tail tied, allowing 30 minutes for placing the airplane on jacks and removing it. In reference (see Maurice Taylor’s Procedure below): #2: The procedure I have found most efficient for the bungees is as follows: With the airplane raised on jacks and the tail tied, open the 30-amp CB for the gear motor, disconnect the landing gear transmission and swing the gear a bit to get it away from over-center and block the nose wheel with a two-by-four, as shown in the photo above. Obviously you will have to remove the wood block to reattach the transmission. Don’t forget to reset the CB. #9: Lubricate with a tiny amount of Lubriplate® Aero on the threads and the bracket/bolt contact area, then reinstall. I suggest one-turn away from contact; there’s plenty of thread engagement. #10: You can proceed from here as suggested by Maurice, however an even easier trick is to remove the clevis screw at the side brace stud (see inset photo above), thus allowing more freedom of movement of the strut asm, and you won’t need the helper as suggested in Maurice’s instructions.
Chapter 7 –Landing Gear / Brakes 100 of 106
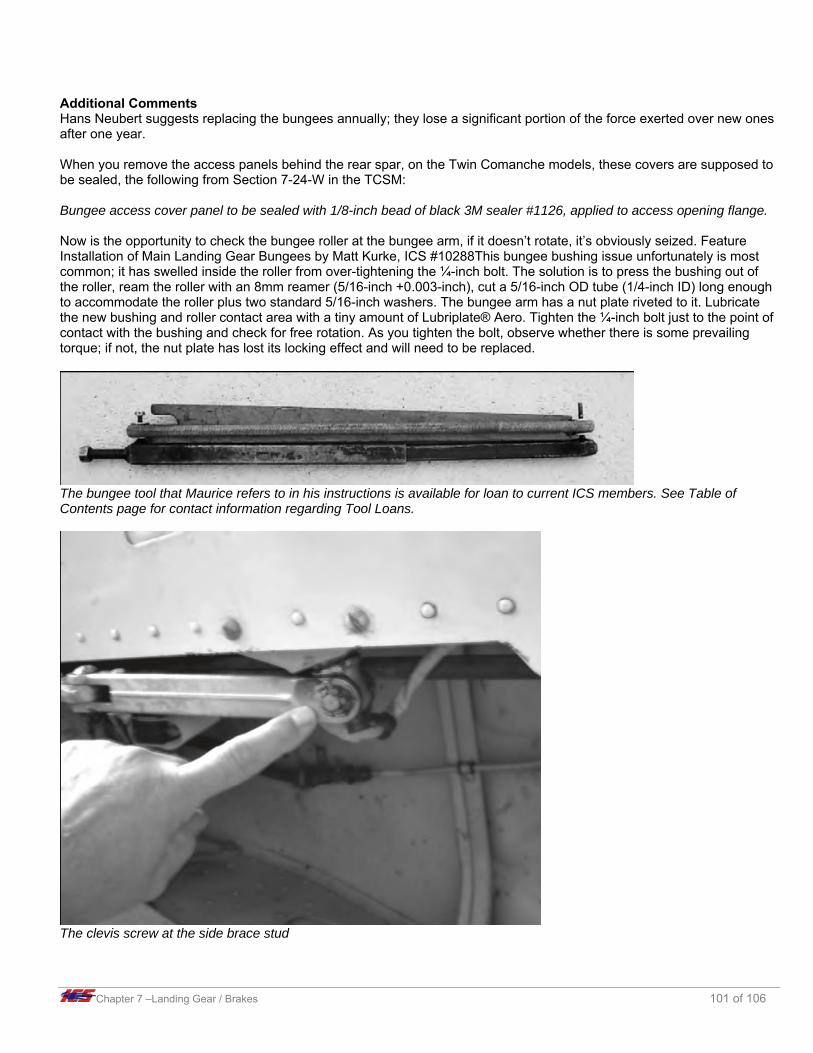
Additional Comments Hans Neubert suggests replacing the bungees annually; they lose a significant portion of the force exerted over new ones after one year. When you remove the access panels behind the rear spar, on the Twin Comanche models, these covers are supposed to be sealed, the following from Section 7-24-W in the TCSM: Bungee access cover panel to be sealed with 1/8-inch bead of black 3M sealer #1126, applied to access opening flange. Now is the opportunity to check the bungee roller at the bungee arm, if it doesn’t rotate, it’s obviously seized. Feature Installation of Main Landing Gear Bungees by Matt Kurke, ICS #10288This bungee bushing issue unfortunately is most common; it has swelled inside the roller from over-tightening the ¼-inch bolt. The solution is to press the bushing out of the roller, ream the roller with an 8mm reamer (5/16-inch +0.003-inch), cut a 5/16-inch OD tube (1/4-inch ID) long enough to accommodate the roller plus two standard 5/16-inch washers. The bungee arm has a nut plate riveted to it. Lubricate the new bushing and roller contact area with a tiny amount of Lubriplate® Aero. Tighten the ¼-inch bolt just to the point of contact with the bushing and check for free rotation. As you tighten the bolt, observe whether there is some prevailing torque; if not, the nut plate has lost its locking effect and will need to be replaced.
The bungee tool that Maurice refers to in his instructions is available for loan to current ICS members. See Table of Contents page for contact information regarding Tool Loans.
The clevis screw at the side brace stud
Chapter 7 –Landing Gear / Brakes 101 of 106

Maurice Taylor’s Procedure for Use of the Bungee Tool to Install Main Landing Gear Bungees 1. Do NOT use pry bars, screw drivers or any other tool of this nature to get the bungee on the tool. 2. Put aircraft on jacks (inside hangar) and raise the gear using the normal electrical system. If the aircraft has a two-
position gear switch only (up and down position) then this can be done by first, with master switch off, selecting up on gear. Then with the master switch on, just long enough to raise gear the few inches, disconnect the gear and put it back to down position by hand.
3. There are three ways to remove the old bungee and any of them will work: a. You can insert the bungee tool in the bungee – it is a bit hard to get the large end in at the bungee arm. Then with
the gear disconnected, use the emergency system to move the gear just enough to take the tool and bungee off the bungee arm.
b. Pry the bungee off the bungee arm roller using a Snap-on pry bar or large screw driver. Caution: This is a strong slingshot, but it won’t go very far as the outer cords will hold it.
c. You can cut the bungee; if you do this, cut it slowly so at the last end only a few of the bands are left as you finish cutting.
4. Once the bungee is free of the pulley on the bungee arm, grasp it and rotate it counter-clockwise to remove pulley (item 6 on Landing Gear Installation drawing) and bracket (item 7 on Landing Gear Installation drawing) with the old bungee.
5. Remove cotter pin from roller on the bracket just removed and remove roller. 6. Remove bungee tool from old bungee on stretcher. Then remove roller under wing nut and install pulley (item 6 on
Landing Gear Installation drawing) which was removed from the aircraft, and snug down the wing nut. 7. Install new bungee on stretcher. Tighten or turn in screw almost all the way; then install bungee tool in bungee. 8. Back screw out until small end of bungee tool is firmly against roller. Continue loosening screw until bungee and tool
are free. Loosen wing nut and remove bungee tool with bungee and roller attached. 9. Install the bracket (item 7 on Landing Gear Installation drawing) and pin removed, plus the cotter pin. Take this
assembly to the airplane and with the help of a flashlight, screw bolt the bracket and pulley with bungee and tool attached into fitting (item 8 on Landing Gear Installation drawing). Tighten until just snug by hand. If tool does not line up to go over pulley on bungee arm, loosen just enough so it will fit.
10. With helper in aircraft, move gear by hand until tool with bungee on it fits over pulley and then move gear enough to let you take the tool out with bungee on bungee arm pulley.
11. The gear transmission was left in the best position to easily hook it up. Move the gear by hand up, just enough to hook up transmission. Put gear switch in down position and then turn master switch on until gear is down and you have a green light.
12. REMEMBER: Bungee arms can be installed in two different positions but only one is correct. And the left and right arms are different, but they will go on either side. With the gear down and viewing from back to front, the left gear arm should be at approximately 3:30 to 4:30 position and the right side approximately 7:30 to 8:30. If you find they are correctly positioned, remove one at a time so there will be no confusion about their proper placement.
13. Now install roller that was removed from bungee stretcher, and install old bungee and bungee tool on the stretcher as you found it when it came to you. Properly repackage and return.
Chapter 7 –Landing Gear / Brakes 102 of 106

Chapter 7 –Landing Gear / Brakes 103 of 106

Landing Gear and Brakes (May 2011) Q I am installing some new bungees on my PA30 and my neighbor who is an IA (but not very familiar with Comanches) picked up the envelope with the two new bungees I had just received from Webco and was looking at them. They were both in a kind of cardboard “napkin ring” with the name of the manufacturer, the four digit part number and that is about it. He asked me where the PMA number or Piper Part number was and I told him that I honestly did not know. I have been using those bungees from for 22 years and for reasons that escape me, I have never questioned the legality of using these devices on my airplane. Can you tell me how the manufacturer gets around not having a PMA number on the product or a tag attached to the product with the PMA number? I looked at bungees at Aircraft Spruce online; they call them shock cords and they are only identified by part number 8097. They say they are made to a certain Mil Spec but here again, no mention of a PMA or other manufacturer authority, e.g., no Piper part number, etc. A Pat Barry contacted SBC Industries regarding this issue and received the following in reply: Our shock rings, including 8097, are manufactured according to Mil-C-5651 D Type II. It is considered a “standard part conforming to an established industry or United States specification.” For this reason, it is exempt from PMA under Subpart K, FAR 21.303 par, b, 4. We are also the OEM supplier to Piper.
Toe Brakes (Sep 2011) Q I have a 1960 Comanche 180 and I’d like to find out about toe brakes. Who has the STC or is one necessary? What do you think the approximate cost would be? A There is no STC that I know of. The 180 had a hand brake fitted so the type certificate does not allow for an installation of toe brakes, so without an STC, a 337 field approval would be necessary. You might call Webco. They used to market a toe brake system that used Beechcraft toe parts. Plumbing into the brake system is simple enough, but getting the 337 could be difficult. At one time, I tried to do this with my local FSDO and the chief inspector there would not agree to it. You may have better luck with your FSDO. Pat Barry
Toe Brakes Installation (Jun 2012) Q I own a 1960 PA 24-180 and would like to know if there is an STC to install toe brakes? A No, there is not. Webco did market a kit for a while, using a Beechcraft toe brake, but I heard that they don’t offer it any more. I tried, perhaps eight years ago, to get my local FSDO to approve a 337 field approval for it and they would not approve it, so I stopped pursuing it. The only chance is to get an original toe brake system and try to get your IA to install it – this is possible since toe brakes were approved for later serial numbers. However, I am certain that no STC-approved kit exists for this. Pat Barry•
Cost of 1,000-Hour Landing Gear (Feb 2012) Q What should a Twin Comanche 1,000-hour landing gear AD inspection cost (ballpark)? A We’ve done two Twincos recently that we had never seen before. Both landing gear systems were in need of parts. One ran 15 hours of labor and about $800 in parts (total was about $2,100). The other ran 19.5 hours of labor and about $800 in parts (total was about $2,450). We do a lot of the inspections and a lot of rigging, and have done them in as little
Chapter 7 –Landing Gear / Brakes 104 of 106

as eight hours, but that is when an airplane is in very nice condition – the owners have replaced things as needed within the previous 1,000 hours, and a properly done 1,000-hour inspection was done the last time. This means that the previous inspection was NOT just “shake the gear” and sign it off. Oh yes, we have had people call us and say that their guy did that and said it was okay. Note that the AD and SL do not call for removing the entire landing gear system (all gear legs, etc.); we have had calls from people who thought everything had to come out. Now, in saying that, we do have customers that have had us remove everything, strip the paint, inspect per the AD, and reinstall everything. If your gear is looking nasty and you want it cleaned up, this is a good time to do that. But be ready to pay for about 60-plus hours of labor for that. The AD and SL792B basically dictate the inspection of the retract linkages on the main gear and nose gear, and the nose gear pivot bolts/bushings. It is also a good time to comply with the 1,000-hour side brace stud AD (magnaflux inspect or replace). And, if the down-lock springs re not of recent vintage, change them out – they don’t cost that much. Cliff Wilewski A It takes about two-and-a-half days to do the job – some mechanics take more, few take less. Then there is the cost of parts. The skill comes in the reassembly and the rigging of the gear. If your mechanic doesn’t know how to rig the gear, then you should take the plane to somebody who does. Pat Barry
Landing Gear Switch/Motor (Aug 2012) Q Sometimes when I set the landing gear switch to “down,” nothing happens and the yellow light stays on. After several attempts, the gear will finally go down. I replaced the gear switch but that did not help. It never seems to happen when raising the gear, just when lowering it. A You probably have a flat spot on the gear motor. Because the motor ends up in the same point every time you retract the gear, often it helps to re-index the motor so that it burns a different part of the armature. To do this, put the aircraft on jacks, disconnect the gear transmission, and make sure the master switch is OFF. Use your finger to rotate the black coupler that is located between the motor and the transmission. Pull up on the back of the coupler. Continue doing this until the jackscrew bottoms out, and then continue another half turn. Using standard procedures, reconnect the transmission, and the motor will be reindexed, hopefully avoiding the flat spot. Zach Grant
Nose Wheel Orientation (Aug 2012) Q When we placed our PA30 on jacks to change the landing gear bungee cords, and the aircraft was completely off of the ground, we noticed our nose wheel turned about five degrees to the LEFT. Looking in the cockpit, we noticed the rudder pedals were set slightly left pedal down. This matched what we saw in our nose wheel. We then matched our rudder pedals to straight, and noticed our nose wheel was now oriented straight ahead also. Our rudder trim is set for cruise condition, which is very close to straight. Our questions are: Is this normal? Is there some tension spring that we need to adjust? A If your aircraft is equipped with the airflow modification kit, i.e., it has stall strips on the wings, then it is also equipped with an aileron rudder interconnect. You should notice that when you make turns on the ground that the ailerons will follow the rudder to some extent. This is normal as there are springs in the system, and they are the only other springs other than the rudder trim cartridge that is attached to the right nose wheel steering arm. The interconnect springs are not usually strong enough to overcome the system friction and cause any displacement on the ground, but they do have some effect airborne. As to what you are experiencing in nose wheel displacement on jacks,
Chapter 7 –Landing Gear / Brakes 105 of 106

I would bet that your rudder trim is, in fact, trimmed somewhat left, causing the displacement. Adjust the rudder trim and see if it makes a difference in the orientation of the nose gear. Just because the indicator on the knob says it is straight, doesn't mean that it really is. Are you truly flying straight, or are you trimmed slightly cross-controlled in cruise? Have you checked the true level of your skid ball? If everything is working as designed, I wouldn't be too worried about where it rests on jacks. Zach Grant
Chapter 7 –Landing Gear / Brakes 106 of 106