Colorquartz Tile Installation Guide 063014 - Tropical … Installation Guide. ... or mechanical,...
24
Tile Installation Guide
Transcript of Colorquartz Tile Installation Guide 063014 - Tropical … Installation Guide. ... or mechanical,...

1COLORQUARTZ FABRICATION MANUALVersion 1.0 July 2013 colorquartzstone.com
Tile Installation Guide

OVERVIEWThis publication manual recommends installers best practices for ColorQuartz tile panels cut directlyfrom slabs supplied directly and by distributors. Standard industry practices should be observed.
If purchasing from certified installers, end users are guaranteed product quality by a Lifetime Residential Warranty and a 10-year Limited Commercial Warranty. Any failure by an installer to comply with the recommended methods of installation may result in refusal of an end user claim. Please direct any questions about the recommendations in this manual to yoru local ColorQuartzoffice.
© ColorQuartz Tile Installation Guide
© ColorQuartz, Inc. All rights reserved.
No part of this publication may be reproduced in any form or by any means – graphic, electronic, or mechanical, including photocopying, recording, taping, or information storage and retrieval systems – without the written permission of ColorQuartz, Inc.
Products that are referred to in this document may be either trademarks and/or registered trademarks of the respective owners. The publisher and the author make no claim to these trademarks.
ColorQuartz, Inc. and/or its assignees are not responsible for errors or omissions, or for damages resulting from the use of information contained in this document. In no event shall the publisher and the author be liable for any loss of profit or any other commercial damage caused or alleged to have been caused directly or indirectly as a result of any person relying upon any information contained in this document. All work carried out by any user of this manual on any ColorQuartz slab must be done in accordance with all laws and regulations relating to that work and the slab, including but not limited to, occupational health and safety laws and laws relating to the protection of the environment.
This manual supersedes all previous manuals. Content is subject to change at any time without notice. The use of the term “Distributor” and “we” throughout this document refers to ColorQuartz, Inc. © ColorQuartz is a registered trademark of ColorQuartz, Inc.
Note: This manual is not for general distribution.
DOCUMENT EDITION DATE EFFECTIVE DISTRIBUTION
Version 2.0 July 2010 Installers, Fabricators, Distributors, Architects

Content: 1. Definitions ........................................................................................................................... 4
1.1. Engineered stone ............................................................................................................ 4 1.2. Tile .................................................................................................................................. 4
2. Technical parameters of the product ................................................................................... 4 2.1. Tiles ................................................................................................................................. 4
2.1.2. Tolerances of the tile sizes ......................................................................................... 4 2.1.3. Tolerances of the tile thickness ................................................................................ 5 2.1.4. Physical-mechanical characteristics of the product .................................................. 5 2.1.5. Linear thermal expansion coefficient ........................................................................ 6 2.1.6. Anti-slipperiness properties of the product surface ..................................................... 6
3. Recommended use of the product ........................................................................................ 7 3.1. Tiles ................................................................................................................................. 7
3.1.1. Recommended thickness depending on the dimension of the tile (standardly loaded areas) ....................................................................................................................... 7 3.1.2. The influence of the surface finish on the anti-slipperiness properties of the product (tiles) .................................................................................................................................... 7 3.1.3. Suitability of the usage of the product at higher mechanical load ............................. 8 3.1.4. Suitability of the usage of the product at high thermal load ........................................ 8 3.1.5. Recommended thickness of the tiles according to the dynamic (traveling) load of the area (resistance to damage, deformation⋯) ................................................................ 9 3.1.6. The recommended use of the individual production groups of the ColorQuartz® product and its dependence on the expected abrasive loading of the product ..................... 10
3.2. Raised floors .................................................................................................................... 10 3.3. Wall tiles ......................................................................................................................... 10 3.4. Stair components ............................................................................................................. 11
4. Installation of the product ...................................................................................................... 11 4.1. General rules .................................................................................................................. 11 4.2. Installation of floor and wall tiles ..................................................................................... 12
4.2.1. Recommended adhesives .......................................................................................... 12 4.2.2. Recommended jointing materials ............................................................................. 14 4.2.3. Tools and instruments ................................................................................................ 16
4.3. Subfloors ........................................................................................................................ 16 4.3.1. Generally .................................................................................................................. 16 4.3.2. Concrete .................................................................................................................. 16 4.3.3. Usual cement screeds................................................................................................ 17 4.3.4. Cement screed Mapecem ........................................................................................ 17 4.3.5. Cement screed Topcem ........................................................................................... 17 4.3.6. Previously existing floors and wall facing .................................................................. 17 4.3.7. Metal ........................................................................................................................ 17 4.3.8. Spattered dashes and plasters ................................................................................... 17 4.3.9. Walls from blocks of expanded cement .................................................................... 17 4.3.10. Anhydrite floors ...................................................................................................... 17
4.4. Leveling of subfloors ....................................................................................................... 18 4.5. Color shades consistency ............................................................................................... 18 4.6. Environment conditions during the installation ................................................................ 18 4.7. Preparation of adhesives ................................................................................................ 18 4.8. Application of adhesives ................................................................................................. 18 4.9. Dilatation and dividing joints ............................................................................................. 19 4.10. Jointing ......................................................................................................................... 20
4.10.1. Cleaning of the tiles after finished jointing .............................................................. 20 4.11. Installation of floor tiles on surface with floor heating .................................................... 21 4.12. Installation of the product at higher thermal load ............................................................ 21 4.13. Installation of the product as stair component ............................................................... 22 4.14. Installation of glued wall tiles .......................................................................................... 22

4
1 . Def in i t ions 1.1. E n g i n e e r e d s t o n e ColorQuartz® is produced from high-quality natural raw materials (quartzes, granites), mirror and glass granulates, from a small amount of color pigments and quality polyester resin. More than 90% of the product mass is formed by natural components.
� The polyester resin used as a binder causes not only the increase in the strength characteristics, but also in the thermal expansion of the product. Therefore, it is necessary to take this fact into consideration during designing the floors and wall claddings from ColorQuartz®. ColorQuartz material is suitable for surfaces with floor heating.
� Technique of production and used raw materials caused very low water absorption of the material. Therefore, pretensions for the base and adhesives or jointing materials are different as for natural stone or ceramic.
� The product is recommended for interior use only.
1.2. T i l e Finished products prepared by cutting from basic slab sizes into tiles formats, various thicknesses, sizes (max. 600 x 600 mm, bigger sizes are non-standard formats) and surface finishings (according to EN 15285 standard).
2 . Technica l parameters of the product
2.1. T i l e s Non-standard shapes, dimensions, sizes and physical-mechanical properties of the product can be made as well but must be agreed to by the manufacturer and customer in advance.
2.1.1. Sizes of the product
From the basic thickness of the slab a whole-format product can be prepared in the form of a slab or other elements may be cut – the tiles. The basic dimensions of the tiles are 30 x 30 cm, 40 x 40 cm, 60 x 30 cm and 60 x 60 cm. The products can be manufactured in thickness from 10 up to 30 mm, the standard thickness being 10, 12 and 20 mm.
2.1.2. Tolerances of the tile sizes Allowed deviations correspond with EN 15285 Agglomerated stone – Modular tiles for flooring and stairs (internal and external); techniques of measurement correspond with EN 14617-1 6.
Maximal permitted size tolerances of tiles
Characteristics Testing method Declared value
Size - length and width EN 14617-16 0,5 mm
Side straightness EN 14617-16 0,3 mm
Rectangularity EN 14617-16 0,9 mm
Flatness - central deformation
- side deformation - torsion
EN 14617-16 0,2 % related to length
Installation instructions for ColorQuartz® tiles, R ev i s i o n 2 o f 1 . 10 . 2 0 10 ColorQuartz

5
2.1.3. Tolerances of the tile thickness
Allowed deviations correspond with EN 15285 Agglomerated stone – Modular tiles for flooring and stairs (internal and external); techniques of measurement correspond with EN 14617-1 6. Tolerances: + 0, 5 mm / - 0, 5 mm from the basic thickness of the slab. Basic thickness for polished, antique and slate finish is 10 mm, 20 mm or 30 mm. Basic thickness for brushed finish is 19,2 mm or 29,2 mm.
2.1.4. Physical-mechanical characteristics of the product
Basic technical requirements for physical-mechanical specifications of the tiles (according to standard EN 1585 Agglomerated stone – Modular tiles for flooring and stairs ). The tests are performed on the machined product not earlier than 24 hours after the production of the semi-finished product. (The requirements for the absorbability are set at the level of surface machining: polished; the requirement for the flexural strength is set for the thickness 10 mm of the test sample.)
Classification of tiles according to their characteristics
Production group
Water absorption Flexural strength (bending)
Reaction to fire
Heat conductivity Slipperiness
(%) (MPa) - (W/mK) SRV dry/SRV wet (type of the
surface)
Sand W4 0,05 F4 40
Bfl, s1
1,3 (tabular value)
86/50 (slate) 83/44 (brushed) 80/32 (honed) 72/23 (polished)
Granite 0,5 W3 > 0,05 25 F3 < 40
Mirrors W4 0,05 F4 40
Crystal W4 0,05 F4 40
Applied standard EN 14617-1 EN 14617-2 EN
13501-1 EN 12524 EN 14231
Note: data shown in this table agree with Declaration of Compliance, average values of achieved basic physical and mechanical characteristics of the production groups are shown in chapter 4.3 (GCT III).
Another characteristics of tiles
Production group
Abrasion resistance maxim um
Coefficient of the linear thermal
expansion (30 up to 60 °C)
maximum
Coefficient of the linear thermal
expansion (- 20 up to + 130°C)
maximum
Coefficient of the linear thermal
expansion (20 up to 70 °C)
maximum
Coefficient of freeze resistance
minimum
(mm) (10-6 / °C) (10-6 / °C) (10-6 / °C) -
Sand
25
30 35 40
0,80 Granite 20 25 35 Mirrors 25 30 40 Crystal 35 40 43
EN 14617-4 EN 14617-11 EN 14617-11 EN ISO 10545-8 EN 14617-5 Applied standard
Installation instructions for ColorQuartz® tiles, R e v i s i o n 2 o f 1 . 1 0 . 2 0 1 0 ColorQuartz

6
2.1.5. Linear thermal expansion coefficient
Linear thermal expansion coefficient
Linear thermal expansion coefficient
Linear thermal
expansion Standard T (30-60)°C T (20-130)°C
Required values
(maximum)
Real values (average)
Required values
(maximum)
Real values (average)
Production Group
EN 14617-11
Unit [C -1 x 10⁻⁶ ]
Sand 30 21,8 35 30
Granite 20 13,4 25 17,3
Mirrors 25 17,5 30 22,7
Crystal 35 17,5-31 40 22,7-37,9
Source TZÚS Plzeinstitute Czech republic
The usage of the thermal expansion coefficient during the calculation:
Relation : 1 = x (c2 – c1) x l0
1 = length difference (mm) = thermal expansion coefficient c2
= final temperature (°C) c1 = initial temperature (°C) l0 = initial length (mm)
Exam ple: Tile Taurus Brown Pearl 40 x 40 cm, temperature change from 20 to 70 °C. The length difference of one tile due to temperature change 1 is 0,42 mm. To be calculated after substitution of the relevant values into the relation. According to that, the tile size will be 400,42 mm long at the temperature of 70 °C ( = 21x10-6, c2 = 70 °C, c1 = 20 °C, l 0 = 400,0 mm).
2.1.6. Antislipperness properties of the product surface
Antislipperness according to DIN 51130 ( S N 725191)
Slip - resistance DIN 51130 ( S N 725191, shoe)
Production group Surface finishing angle (°) classification
Sand Honed 12,0 R10
Granite Honed 10,2 R10
Installation instructions for ColorQuartz® tiles, R e v i s i o n 2 o f 1 . 1 0 . 20 1 0 ColorQuartz

7
Slip - resistance DIN 51130 ( S N 725191, shoe)
Production group Surface finishing angle (°) classification
Granite Brushed 15,0 R10
Granite Antique 8,8 R9
Mirrors Polished 7,0 R9
Mirrors Honed 13,0 R10
Mirrors Brushed 16,8 R10
Crystal Polished 9,0 R9
Crystal Slate 17,1 R10
Crystal Honed 11,1 R10
Source TZÚS Praha - branch P lze, period 1999 – 2009
3 . R e c o m m e n d e d u s e o f t h e p r o d u c t The engineered stone ColorQuartz® may be used for small-sized or large-sized wall and floor tiles, interior components, construction elements, furniture and accessory components.
The product is recommended for interior use only.
3.1. T i l e s To use the product for interior tiles it is necessary to follow these recommendations:
3.1.1. Recommended thickness depending on the dimension of the tile standardly loaded areas
Product sizes ( cm ) Minimal recommended product thickness (mm )
up to 60 x 60 10
larger and non-standard sizes the solution has to take the project conditions, installation and
load into account 12 – 20 mm
3.1.2. The influence of the surface finish on the antislipperness properties of the product (tiles
Increase of slip-resistance Surface finish
Brushed, Slate Honed
Polished, Antique
Installation instructions for ColorQuartz® tiles, R ev i s i o n 2 o f 1 . 10 . 2 0 10 ColorQuartz

8
3.1.3. Suitability of the usage of the product at higher mechanical load (including industrial, abrasive and travelling dynamic loading)
Load increase / increase of the
suitability of Production group Product thickness
(mm) Product color Surface finish
usage
Sand 14 Multicolor Brushed
Crystal 13 Light monocolor Honed
Granite 12 Dark monocolor Slate
Mirrors 10 White Polished, Antique
3.1.4. Suitability of the usage of the product at high thermal load (floor heating, permanent exposure to sunlight, alternation of high and low temperatures – entrances)
Load increase / increase of the
suitability of usage
Production group Product thickness (mm) Product color Granularity of the
product
Granite 14 White Coarser
Mirrors 13 Light
Crystal 12 Darker Medium
Sand 10 Dark Fine
Installation instructions for ColorQuartz® tiles, R ev i s i o n 2 o f 1 . 10 . 2 0 10 ColorQuartz

9
3.1.5. Recommended thickness of the tiles according to the dynamic traveling) load of the area (resistance to damage, deformation⋯
Average flexural Product group
9 10 11 12 13 14 20 strength (MPa) 6 mm mm mm mm mm mm mm mm
37
1 2 2 3 3 3 4 5
Red Jewel, Fashion Blue, Star Wars
42
1 2 3 3 3 4 4 5
47
1 2 3 3 4 4 4 5
French Tan, Sake, Concrete Grey
52
1 3 3 3 4 4 4 5
62 Frost White, Pewter, Bronze, Venatino 2 3 3 4 4 4 5 5
Source: ColorQuartz, a.s. laboratory, period 2004 – 2008
Classification, specification and use of groups
Group 1: residences without travel load
Group 2: public, shopping and industrial buildings with irregular transport by vehicles with inflatable tyres
Group 3: public, shopping and industrial buildings with transport by vehicles with elastic rubber tyres
Group 4: public, shopping and industrial buildings with transport by vehicles with hard plastic wheels
Group 5: public, shopping and industrial buildings with transport by vehicles with hard plastic wheels with very high load
Cleaning machines are meant under the term transport, too.
It is recommended to get acquainted with the publication �Mechanisch hoch belastbare keramische Bodenbelage“ – ZDB Germany 2002 (Ceramic flooring with high mechanical load).
Installation instructions for ColorQuartz® tiles, R ev i s i o n 2 o f 1 . 10 . 2 0 10 ColorQuartz
Calypso Brown, Oyster, Palisades
Coffee Bean, Starlight, Paloma White

10
3.1.6. The recommended use of the individual production groups of the ColorQuartz® product and its dependence on the expected abrasive loading of the product
Abrasive load of the floor
Recommended production group
Sand Granite Mirrors Crystal
High yes yes yes 1 yes Medium yes yes yes yes
Low yes yes yes yes
1 the surface finish – polished – may not be used!
Abrasive load of the floor
Recommended finish
Brushed Honed Antique, Slate Polished
High yes yes yes no
Medium yes yes yes yes
Low yes yes yes yes
At medium and high load, installation of a cleaning zone and regular maintenance of the product in use is necessary.
Examples of the dependence of the use of the product on its abrasive load: High load (heavy traffic + high presence of abrasive and liquid contaminants)
- installed in entrances and exits from the buildings and halls, in front of cash desks, receptions, counters, in underpasses, covered platforms, etc.
Medium load (heavy traffic without higher presence of abrasive contaminants) -
installed in shops, offices, halls, corridors, etc.
Low load (medium traffic without the presence of abrasive contaminants)
installed in residences, internal offices, halls, decorative places, etc.
3.2. R a i s e d f l o o r s When placing the product on the grates of raised floors it is necessary to follow the following recommendation:
Recommended thickness: Recommended product sizes (cm) Minimum recommended product thickness (mm)
up to 60 x 60 20
more than 60 x 60 30
3.3. W a l l t i l e s All product types and all surface finishes are appropriate for interior wall tiles. It is necessary to take the mass of the product into account, see section: Chyba! Nenalezen zdroj odkaz.)
Installation instructions for ColorQuartz® tiles, R ev i s i o n 2 o f 1 . 10 . 2 0 10 ColorQuartz

11
Recommended thickness and sizes
Glued wall tiles
(recommended height up to max. 2,5 m)
Wall tiles on supporting mounted grates
Dimensions of the product (cm) Minimum recommended thickness of the product (mm)
up to 60 x 60 30, exceptionally 20 (according to the system)
more than 60 x 60 30
3 . 4 . S t a i r c o m p o n e n t s When using the product for stair components it is necessary to follow this recommendation: Recommended thickness:
Way of laying down the component Minimum recommended thickness of the product (mm)
whole area on substrate concrete 10 - 20
into construction, self-supporting 30
All production groups of the engineered stone are suitable for usage as a stair component. Attention is to be paid to the antislipperness finish of the tread surface. For each concrete application of the product its sizes must always be considered in relation to its physical-mechanical characteristics and with respect to the system of fixing the product.
4 . I n s t a l l a t i o n o f t h e p r o d u c t
4 . 1 . G e n e r a l r u l e s During installation of the engineered stone ColorQuartz® it is necessary to conform to relevant standards, MSDSs (Material safety data sheets) of used products, recommendations of the producers of the subfloor mixtures and of the producers of glues, jointing and dilatation materials (some of the recommendations are listed in this document). Furthermore, it is necessary to assess and take into account the following facts, which are based on tests and practical experience. Only general hints are introduced here, because the manufacturer of the engineered stone has no influence on the individual building conditions and performance.
� the product is intended for internal use
� suitability of the individual product types of ColorQuartz® for the usage in the given environment should be considered especially with respect to the mechanical-physical
Installation instructions for ColorQuartz® tiles, R ev i s i o n 2 o f 1 . 10 . 2 0 10 ColorQuartz
Recommended dimensions of the product (cm) ______ Recommended thickness of the product (mm )
according to the used system and product
12
characteristics of the ColorQuartz® products (e.g. a higher thermal expansion and contraction, lower absorbability...)
� characteristics of the used product ColorQuartz® must be consistent with characteristics of all other used construction materials
� the behaviour of the ColorQuartz® product after installation depends on the quality of the installation and fixation
� during installation it is necessary to pay special attention to the quality of the subfloor surface
� carrying out jointless installation of the floor and wall tiles from the ColorQuartz® product is strongly not recommended
it is recommended to have the ColorQuartz® product installed by a specialized company, which is experienced in installing the ColorQuartz® product, engineered or natural stone it is necessary to adhere to the preparation technology and production procedures given by the producers of the used subfloor mixtures, gluing and jointing materials and other used constructional chemicals
� after jointing is performed it is necessary to follow correct technology of the product cleaning
4 . 2 . I n s t a l l a t i o n o f f l o o r a n d w a l l t i l e s
4 .2 .1 . Recommended adhes iv es The following adhesives are recommended by the producer for installation:
Elastorapid (Mapei)
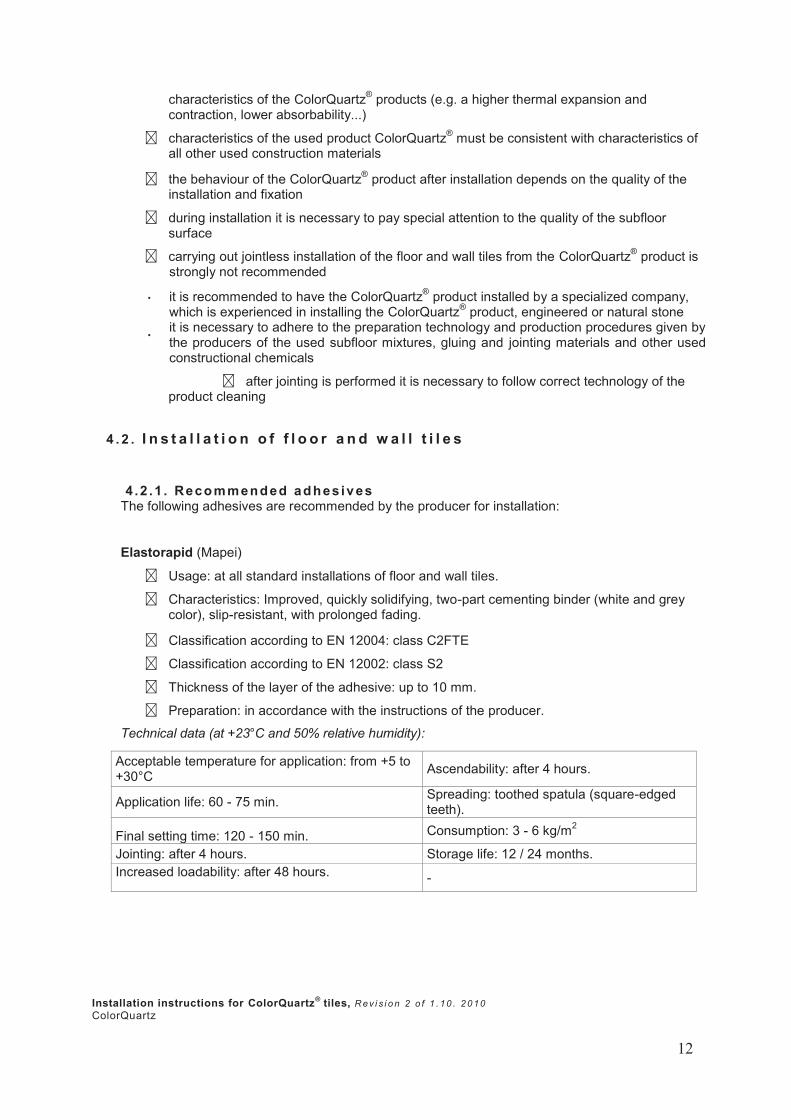
� Usage: at all standard installations of floor and wall tiles.
� Characteristics: Improved, quickly solidifying, two-part cementing binder (white and grey color), slip-resistant, with prolonged fading.
� Classification according to EN 12004: class C2FTE
� Classification according to EN 12002: class S2
� Thickness of the layer of the adhesive: up to 10 mm.
� Preparation: in accordance with the instructions of the producer.
Technical data (at +23°C and 50% relative humidity):
Acceptable temperature for application: from +5 to +30°C Ascendability: after 4 hours.
Application life: 60 - 75 min. Spreading: toothed spatula (square-edged teeth).
Final setting time: 120 - 150 min. Consumption: 3 - 6 kg/m2
Jointing: after 4 hours. Storage life: 12 / 24 months. Increased loadability: after 48 hours. -
Installation instructions for ColorQuartz® tiles, R ev i s i o n 2 o f 1 . 10 . 2 0 10 ColorQuartz
·
·

13
Granirapid (Mapei)
� Usage: at all standard installations of floor and wall tiles, especially when a quick solidification of the adhesive and a shorter waiting period for ascendability is needed.
� Characteristics: Quickly solidifying, two-part cementing binder (white and grey color).
� Classification according to EN 12004: class C2F
� Thickness of the layer of the adhesive: up to 10 mm.
� Preparation: in accordance with the instructions of the producer.
Technical data (at +23°C and 50% relative humidity):
Final setting time: 20 min. Jointing: after 3 hours.
Application life: 45 min. Spreading: toothed spatula (square-edged teeth).
Ascendability: after 4 hours. Consumption: 3 - 8 kg/m2 Loadability: after 24 hours. Storage life: 12 months. Increased loadability: after 48 hours. -
Keralastic (Mapei)
� Usage: in special cases – gluing on metal or wood, at stronger requirements for adherence, elasticity, waterproofness, at higher thermal loads, etc..
� Characteristics: Two-part elastic waterproof polyurethane binder for gluing and sealing.
� Preparation: in accordance with the instructions of the producer.
Technical data (at +23°C and 50% relative humidity):
Thermal resistance: - 40°C + 100°C Jointing: after 12 h Application life: 6 – 8 h Spreading: toothed spatula Final setting time: 2 h Consumption: 2 – 3,5 kg/m2
Time, when corrections are possible: 3h Storage life: 24 mounths
Full loadability: after 7 days -
Kerapoxy (Mapei)
� Usage: when increased chemical durability is required, at higher thermal loads, at simultaneously increased thermal and mechanical loads...
� Characteristics: see section 0, jointing materials.
AD 530 (Lasselsberger)
� Usage: Flexible adhesive with an extended open time, intended for gluing of all types of all wall tiles and floor tiles in internal and external environments, including materials with an extremely low absorption capacity, for gluing on surfaces where dimensional changes occur (such as heated floors, balconies, and terraces).
� This adhesive is suitable also for areas stressed by traversing of forklift trucks etc. The adhesive is characterised with simple processing, high stability and strength, frost resistance and flexibility.
� Characteristics: EN 12004: type C2TE
� Preparation: in accordance with the instructions of the producer.
Installation instructions for ColorQuartz® tiles, R ev i s i o n 2 o f 1 . 10 . 2 0 10 ColorQuartz

14
Technical data (at +23°C and 50% relative humidity):
Spreading rate: 1250 kg/m3 Full loadability: after 7 days
Application life: 3 - 4 h Spreading: toothed spatula
Jointing of wall cladding: after 1 day Amount of batch water: 0,26-0,30l/kg
Jointing of floor: after 2-3 days Granulity: 0-0,7 mm AD 570 (Lasselsberger)
� Usage: Highly treated hyperflexible adhesive with an extended open time and high value of lateral deformation. It is intended, in particular, for gluing of tiles with an extremely low absorption capacity and for gluing on problematic substrates.
� It is suitable also for gluing on substrates with extreme dimensional changes occurring due to excessive thermal stress (large-area terraces) and for areas stressed by traversing of forklift trucks etc.
� Characteristics: EN 12004: type C2TE
� Preparation: in accordance with the instructions of the producer.
Technical data (at +23°C and 50% relative humidity):
Spreading rate: 1250 kg/m3 Full loadability: after 7 days
Application life: 3 - 4 h Spreading: toothed spatula
Jointing of wall cladding: after 1 day Amount of batch water: 0,20-0,22 l/kg
Jointing of floor: after 2-3 days Granulity: 0-0,7 mm
4.2 .2 . Recommended joint ing materials
At the installation the producer recommends to use the following jointing materials. If silicone sealant is used it is necessary to use a neutral type only!
ColorQuartz® silicone sealant
Neutral silicone sealant ColorQuartz® is single – component sealant executed in the form of solid paste. As the paste is extruded out of the package, it turns vulcanized into a silicone rubber by air humidity. Vulcanization starts on the surface and penetrates the mass; the speed of this process depends on the relative air humidity. As per decrees by the Health Ministry of the Czech Republic, ColorQuartz® sealant can be used in direct contact with foodstuffs and meals. This sealant shades are based on as ColorQuartz color range (see in the table below).
Installation instructions for ColorQuartz® tiles, R ev i s i o n 2 o f 1 . 10 . 2 0 10 ColorQuartz
15
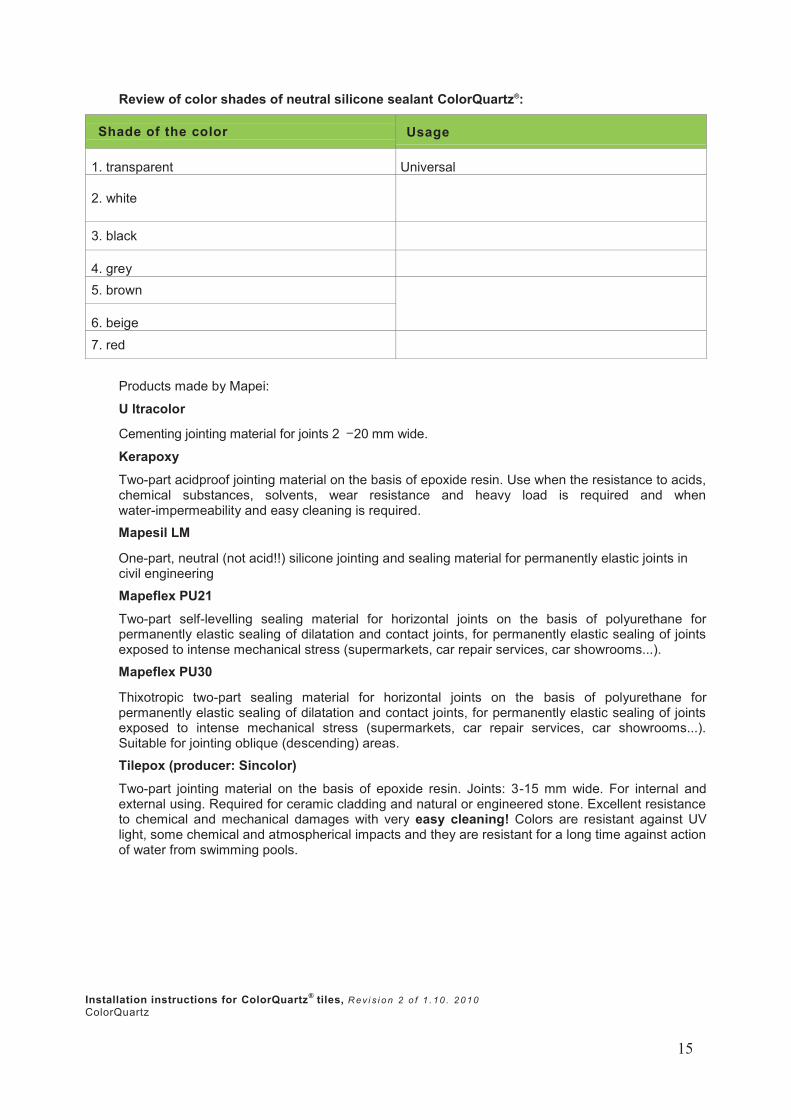
Review of color shades of neutral silicone sealant ColorQuartz®:
Shade of the color Usage
1. transparent Universal
2. white
3. black
4. grey 5. brown
6. beige
7. red
Products made by Mapei:
U ltracolor
Cementing jointing material for joints 2 – 20 mm wide.
Kerapoxy
Two-part acidproof jointing material on the basis of epoxide resin. Use when the resistance to acids, chemical substances, solvents, wear resistance and heavy load is required and when water-impermeability and easy cleaning is required.
Mapesil LM
One-part, neutral (not acid!!) silicone jointing and sealing material for permanently elastic joints in civil engineering
Mapeflex PU21
Two-part self-levelling sealing material for horizontal joints on the basis of polyurethane for permanently elastic sealing of dilatation and contact joints, for permanently elastic sealing of joints exposed to intense mechanical stress (supermarkets, car repair services, car showrooms...).
Mapeflex PU30
Thixotropic two-part sealing material for horizontal joints on the basis of polyurethane for permanently elastic sealing of dilatation and contact joints, for permanently elastic sealing of joints exposed to intense mechanical stress (supermarkets, car repair services, car showrooms...). Suitable for jointing oblique (descending) areas.
Tilepox (producer: Sincolor)
Two-part jointing material on the basis of epoxide resin. Joints: 3-15 mm wide. For internal and external using. Required for ceramic cladding and natural or engineered stone. Excellent resistance to chemical and mechanical damages with very easy cleaning! Colors are resistant against UV light, some chemical and atmospherical impacts and they are resistant for a long time against action of water from swimming pools.
Installation instructions for ColorQuartz® tiles, R ev i s i o n 2 o f 1 . 10 . 2 0 10 ColorQuartz

16
4.2.3. Tools and instruments
To fulfil the installation the worker has to be equipped with at least these tools and instruments:
� toothed spatulas: to apply and spread uniformly the adhesive binders
� smooth spatula: to rub the glue in the subfloor and to spread a layer of the glue on the back face of a tile
� angle, meter, ruler, water level, plumb, etc. for accurate measuring and levelling of the tiles and slabs
� lath batten, ruler, etc.: for fixing and continuously checking of the flatness of tiles and slabs during installation
� rubber or plastic spatulas: to apply and spread the jointing material or binder � sponge: for correcting the smoothness of the joint and for rubbing down the remains of
jointing material from the tile � hammer, drilling machine, drills, sawing machine with diamond circular saw cooled down
by water: for possible size adjustments or other corrections
� boards, plywood, foil: to protect newly-installed floor tiles
4.3. S u b f l o o r s
4.3.1. Generally
The preparation of subfloors must be in compliance with the requirements of relevant standards and project documentation.
All subfloors on which the product is installed must be dry, stable, solid, compression-resistant, sufficiently flat and cleared from removable particles, dry surface �cement grout“, dust, fats, oils, wax, paints, dismantling chemical agents and everything that could decrease their adherence. These removable particles must be removed in the best case by sand blasting, (milling off or honing also possible), which is followed by sucking up the remains with a vacuum cleaner. The subfloors have to be suitable for the acceptance of the load and endure the stress expected in the specific application.
In the case of concrete subfloors not only structural joints must be created, but also the dilatation joints or separation into cca 6 x 6 m large parts have to be accomplished, while taking into account the geometrical shape and seamless pouring of the concrete. The joints are obtained by mechanical cutting or by inserting plastic profiles and they must run through at least 1/3 of it. The peripheral joints must be created along of all walls, columns, stairs etc. and their minimum width must be 3 – 5 mm for all areas greater than 7 m2.
4.3.2. Concrete Sufficient maturing must be reached – at least 4 weeks! After the concreting is finished the concrete must be moistened properly and protected against too quick evaporation or against frost for at least 15 days. The humidity of the concrete must be max. 2 – 3% before the installation. The humidity is measured by a carbide moisture meter. Minimum compressive strength of the concrete must be to 22 MPa, when higher loads of floors are expected, it is necessary to achieve higher values of the strength. It is necessary to perform proper ground humidity insulation. The surface must be strong, cohesive, without dust, see section 4.3.1. The strength in tension of the subfloor (the strength of the surface layer) of the concrete must be at least 0.8 MPa. The strength of the surface layer may be determined also by the Schmidt impact hammer. It is necessary to apply bonding primer to the subfloor (e.g. Primer G of the Mapei company for absorbent subfloors), other types of the penetration according to the absorption capacity of the subfloor, which will increase the adherence of the used adhesive to the subfloor.
Installation instructions for ColorQuartz® tiles, R ev i s i o n 2 o f 1 . 10 . 2 0 10 ColorQuartz

17
4.3.3. Usual cement screeds The screed must be supporting and be at least 5 cm thick; the thickness depends on the expected load. It is composed of a concrete built up by inert heterogeneous material with the diameter from 0 to 8 mm and from Portland cement 425 kg/m3. Greater thickness requires inert material of greater diameter (up to ¼ of the thickness of the screed). After the screed is created, it must be moistened properly and protected against too quick evaporation or against frost for at least 15 days. The minimum compression strength of the screed must be 22 MPa min., when higher load of the floor is expected, it is necessary to achieve higher values of the strength.
Sufficient maturing must be reached – at least 4 weeks! The humidity of the screed must be max. 2 – 3% before the installation. The humidity is measured by a carbide moisture meter. The surface must be strong, cohesive, without dust, see section 4.3.1. The strength in tension (the strength of the surface layer) of the concrete base must be at least 0.8 MPa. The strength of the surface layer may be determined also by the Schmidt impact hammer. It is necessary to apply bonding primer to the base (e.g. Primer of the Mapei company for absorbent bases), other types of the penetration according to the absorption capacity of the base, which will increase the adherence of the used adhesive to the base.
4.3.4. Cement screed Mapecem Quick-setting and maturing cementing binder for creating floating and anchored screeds, on which the tiles have to be glued quickly. The thickness of the screed depends on the expected load. The installation of the engineered stone is possible after 24 hours.
4.3.5. Cement screed Topcem Special hydraulic binder for producing screeds. The installation of the engineered stone is possible after 7 days. The thickness of the screed depends on the expected load.
4.3.6. Previously existing floors and wall facing Cement floors or floors composed of old ceramics, floor tiles, marble, must be strong, well anchored to the subfloor and without cracks. Cleaning from oils, waxes, fats, etc. must be performed in such a way, that their overall and also in-depth removal is guaranteed. Existing coatings must be removed.
4.3.7. Metal The subfloor must be degreased by means of solvents of suitable cleaning agents. It is necessary to remove possible rust.
4.3.8. Spattered dashes and plasters They have to be sufficiently mature and strong to hold the weight of the tiles (when products are used, which are mixed in advance, it is necessary to follow the technical procedure described by the producer). The surface has to be dry, solid, without impurities and dust.
4.3.9. Walls from blocks of expanded cement Considering the great diversity of the products present on the market it is absolutely essential to consult producers, in order to learn about the properties and the suitability of their products. The surface must be dry, strong, without impurities and dust.
4.3.10. Anhydrite floors They must be sufficiently mature and supporting. The strength of the surface layer may be determined also by the Schmidt impact hammer.
The humidity of the anhydrite floor must be max. 0,5% before the installation!! The humidity is measured by a carbide moisture meter. The surface must be strong, cohesive, without dust, see section 4.3.1.
The surface has to be penetrated two times by means of the Primer G agent (Mapei), in order to achieve a good adherence of the used adhesive to the base. After finishing the penetration it is necessary to wait until it dries.
Installation instructions for ColorQuartz® tiles, R ev i s i o n 2 o f 1 . 10 . 2 0 10 ColorQuartz
18
4 . 4 . Levelling of subfloors In case of an uneven surface it is necessary to perform levelling or correction by using suitable levelling materials (e.g. Mapecem, Topcem, Ultraplan, Novoplan 21, Nivoplan, Nivorapid of Mapei company). Deviation from the flatness should be max. ±2 mm on 2 m of the surface. During the preparation and application of all levelling means the technical procedure described by the producer is to be followed strictly.
4 . 5 . Color shades consistency Being made from nature materials the color variations of the product could appear. The product is sorted by producer according to the basic color standards. Slight optical color differences are proper and should be respected. There is mostly one color shade packed on one pallet and always one color shade in the same cardboard box and the respective lot No. and color shade is given on the box label.
In spite of the fact, before starting the installation it’s necessary to open several boxes with the tiles, lay the tiles on the floor under natural light and check the color consistency.
To avoid any problems with color consistency on the floor is recommended to lay down the tiles consecutively one by one from several checked open cardboard boxes, simultaneously, not only from one card board box.
4 . 6 . Environment conditions during the installation The installation can be started only after making sure that the temperature and moisture conditions meet the conditions prescribed by the technical brochures of the used adhesives.
For a longer period than 24 hours the temperature cannot decrease beneath +5 °C and exceed +30 °C.
The surfaces must not be strongly heated up by the sun before the installation (it is recommended to accomplish the installation during colder hours). In a dry and ventilated environment it is necessary to pay special attention to a film creation on the adhesive. It is necessary to spread the adhesive on small areas and check the moistening. The bottom face of the formats must not be wet or dirty after previous cutting.
Every adverse situation is to be discussed with the work manager.
4 . 7 . Preparation of adhesives It is necessary to use a clean vessel for the preparation of adhesives, binders, levelling screeds, etc.
To mix the agents it is necessary to use a mechanical mixer with small number of revolutions (approximately 150 rpm). During mixing of all agents it is necessary to strictly follow the technical procedure described by the producer. It is always necessary to add powder to a liquid and not vice versa.
4 . 8 . Application of adhesives First, the actual base is checked, for it has to be perfectly flat, dry, mature, without cracks, and carefully cleaned. Parts that are not tightly bound with the base have to be removed.
The preparation and application of the adhesive is performed according to the technical conditions of the producer. The prepared adhesive must be perfectly homogeneous and easily spreadable. Always only such an amount is prepared, which is possible to apply before the adhesive starts to lose its adhesiveness and applicability.
The prepared adhesive is first well rubbed as a thin layer to the base by a smooth spatula to build a quality transition between the base, the adhesive and the tile. Only such an area will be prepared, which prevents drying of the surface layer of the adhesive at those places, where the tiles were still not installed. Afterwards the layer of the adhesive is spread on the base by a toothed spatula.
Installation instructions for ColorQuartz® tiles, R ev i s i o n 2 o f 1 . 10 . 2 0 10 ColorQuartz
19
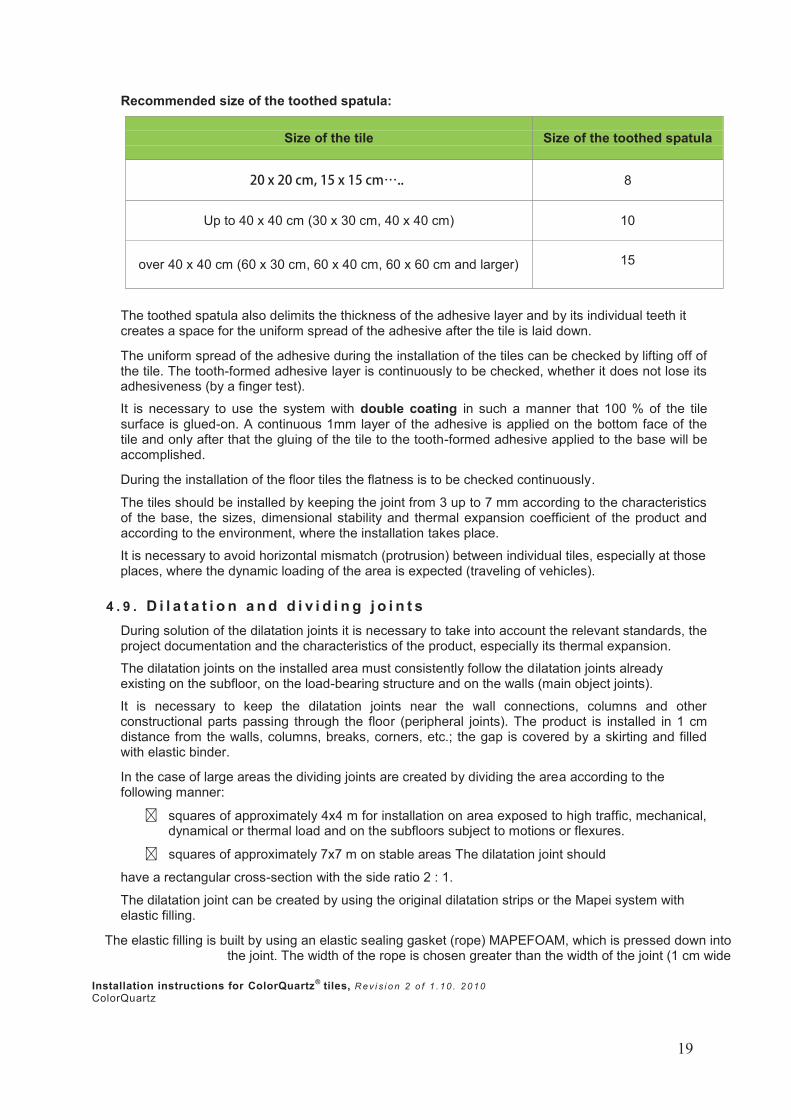
Recommended size of the toothed spatula:
Size of the tile Size of the toothed spatula
20 x 20 cm, 15 x 15 cm⋯.. 8
Up to 40 x 40 cm (30 x 30 cm, 40 x 40 cm) 10
over 40 x 40 cm (60 x 30 cm, 60 x 40 cm, 60 x 60 cm and larger) 15
The toothed spatula also delimits the thickness of the adhesive layer and by its individual teeth it creates a space for the uniform spread of the adhesive after the tile is laid down.
The uniform spread of the adhesive during the installation of the tiles can be checked by lifting off of the tile. The tooth-formed adhesive layer is continuously to be checked, whether it does not lose its adhesiveness (by a finger test).
It is necessary to use the system with double coating in such a manner that 100 % of the tile surface is glued-on. A continuous 1mm layer of the adhesive is applied on the bottom face of the tile and only after that the gluing of the tile to the tooth-formed adhesive applied to the base will be accomplished.
During the installation of the floor tiles the flatness is to be checked continuously.
The tiles should be installed by keeping the joint from 3 up to 7 mm according to the characteristics of the base, the sizes, dimensional stability and thermal expansion coefficient of the product and according to the environment, where the installation takes place.
It is necessary to avoid horizontal mismatch (protrusion) between individual tiles, especially at those places, where the dynamic loading of the area is expected (traveling of vehicles).
4 . 9 . D i l a t a t i o n a n d d i v i d i n g j o i n t s During solution of the dilatation joints it is necessary to take into account the relevant standards, the project documentation and the characteristics of the product, especially its thermal expansion.
The dilatation joints on the installed area must consistently follow the dilatation joints already existing on the subfloor, on the load-bearing structure and on the walls (main object joints).
It is necessary to keep the dilatation joints near the wall connections, columns and other constructional parts passing through the floor (peripheral joints). The product is installed in 1 cm distance from the walls, columns, breaks, corners, etc.; the gap is covered by a skirting and filled with elastic binder.
In the case of large areas the dividing joints are created by dividing the area according to the following manner:
� squares of approximately 4x4 m for installation on area exposed to high traffic, mechanical, dynamical or thermal load and on the subfloors subject to motions or flexures.
� squares of approximately 7x7 m on stable areas The dilatation joint should
have a rectangular cross-section with the side ratio 2 : 1.
The dilatation joint can be created by using the original dilatation strips or the Mapei system with elastic filling.
The elastic filling is built by using an elastic sealing gasket (rope) MAPEFOAM, which is pressed down into the joint. The width of the rope is chosen greater than the width of the joint (1 cm wide
Installation instructions for ColorQuartz® tiles, R ev i s i o n 2 o f 1 . 10 . 2 0 10 ColorQuartz

20
joint – rope with the diameter of 1,5 cm). The upper part of the joint is filled according to the requirements for the traffic on the floor with the jointing neutral silicone binder ColorQuartz silicone sealant or MAPESIL LM (standard traffic) or MAPEFLEX PU21 (heavy traffic, horizontal floor) or MAPEFLEX PU30 (heavy traffic, slanted floor). Before the binders are applied the edges of the dilatation joint are to be impregnated by the PRIMER FD agent.
The dilatation joints must be secured by the edge-protecting profiles in the case of dynamic loading (traveling of vehicles), in the case of increased dynamic loading protecting metal profiles are recommended, which have the shape of transitional bridge, that covers the joint.
Whole tiles must be installed along the dividing joints; cut sizes implied by the field dimensions must be installed inside the fields.
4.10. J o i n t i n g During the preparation and application of the jointing materials it is necessary to follow the instructions of their producers.
The tiles should be installed by keeping the joint size from 3 up to 7 mm according to the characteristics of the base, the sizes, dimensional stability and thermal expansion coefficient of the product and according to the environment, where the installation takes place.
In the case of small areas without a high mechanical or thermal load the width of the joint is chosen 3 – 6 mm.
In the case of large areas, larger tiles or higher mechanical or thermal load the width of the joint is chosen 5 – 7 mm and the joint after each 5th – 6th tile is jointed by a silicone jointing material.
The jointing of dilatation joints and of the joints done with silicone binder is carried out as the first. Then, the jointing with cement jointing materials is done after 24 hours (or earlier, according to recommendation of producer).
The cementing jointing materials are always spread over the whole tile. After the setting of the material in the joint starts (never earlier!), the surface of the joint is prepared (smoothed) with a moistened sponge and the remains of the jointing material are rubbed down from the tiles. The final cleaning of the surface by using recommended cleaning agents is done after the setting of the material in the joints is finished, circa after 24 hours or earlier, according to recommendation of producer).
The jointing materials listed in the section 3. 2. 2 are used for jointing.
The jointing material KERAPOXY or Tilepox is recommended for objects with chemical load. It
is necessary to wait before the start of the jointing:
· 24 hours in the case the adhesive KERALASTIC is applied during the installation (at the temperature 23°C)
· at least 4 hours in the case the adhesive ELASTORAPID or GRANIRAPID (at the temperature 23°C) are applied.
· at least 2 or 3 days in the case adhesive AD 530 or AD 570 (Lasselsberger company) are applied.
4.10.1. Cleaning of the tiles after finished jointing After the setting of the material in the joint starts (never earlier!), the surface of the joint is prepared (smoothed) with a moistened sponge and the remains of the jointing material are rubbed down from the tiles. Especially the thicker deposits of the jointing material are removed from the tiles surface. The redundant deposits of the material on the margins of joints, that would be difficult to wash out after the setting is finished, are removed by smoothing the material in the joints.
The final cleaning of the tiles surface is done by using recommended cleaning agents after the setting of the material in the joints is finished, not earlier than after 24 hours.
Installation instructions for ColorQuartz® tiles, R ev i s i o n 2 o f 1 . 10 . 2 0 10 ColorQuartz

21
The recommended cleaning agents are listed in GCT part III, some of them are listed below.
It is necessary to realise that the surface of a product made from the engineered stone, especially with the polished finish, is more sensitive to the erosion of surface that is exposed to strong chemicals or exposed to chemicals for a long time than a natural granite or hardened ceramics. These chemicals are also included in the used surface cleaning agents. Therefore the exposure to cleaning agents, especially the strong ones used at increased amount of impurities, has to be limited to a time period necessary to remove the impurity, which duration is in the order of minutes! After that time it is necessary to remove the cleaning agent together with the released remains of the jointing material and of the impurities from the surface, preferably by sucking them off, and immediately wash the surface carefully. This is the only way to clean the surface of the product without causing any damage to it.
Recommended cement film cleaners:
Company Product Note
Akemi Ceramics Cement Film Remover cement film remover, strong acid cleaner HG International
HG cement, mortar and efflorescence remover cement film remover, strong cleaner
HG International
HG marble cement & lime film remover removes cement film and lime scale
Moeller Chemie HMK-R63 Cement film remover cement film remover, strong acid cleaner
Lithofin Lithofin MN Builders Clean cement film remover, strong acid cleaner, necessary to dilute
Bellinzoni Extra strong detergent Bert 27 strong acid cleaner, deep cleaning, fats, grease and cement film remover
Bellinzoni Ultra Stripper effective fats, grease, wax and cement film remover
Lasselsberger CL 802 remover of cement residues
Mapei Keranet cleaning of staining caused by cement, lime, efflorescence including dirt and oil
4 . 1 1 . Installation of floor tiles on surface with floor heating In these cases, it is necessary to pay special attention to the quality of subfloor concrete and to take into account the thermal expansion of the product. It is recommended to use the cement screed Topcem for producing the subfloor, for further reading see sections:4.3.1till 4.3.5. Before the installation is started, it is necessary to switch the floor heating on, in order to achieve a complete drying-up and stabilization of the subfloor. After it is warmed up (dried-up and stabilized), the floor heating is to be switched off. After the subfloor is cooled down to its original temperature it is possible to start the installation. It is necessary to carry out higher number of dilatation and dividing joints. For gluing it is necessary to use the adhesive binder Elastorapid from the Mapei company or adhesive binder AD 570 from the Lasselsberger company.
4 . 1 2 . Installation of the product at higher thermal load Valid for e.g. the installations around fireplaces, stoves, on strongly insolated areas (shop windows exposed to sun)⋯.
In such cases it is necessary to pay special attention to the quality of the substrate concrete and take into consideration the thermal expansion of the product. It is recommended to use the cement screed Topcem for producing the base, for further reading see sections: 4.3.1till 4.3.5. As the adhesive binder is in the case of high load recommended the binder Keralastic, in the case of low or medium load the binder Elastorapid or AD 570. The adhesive binder Kerapoxy or Tilepox is recommended for usage in the case of concurrent thermal and mechanical load (strongly insolated travelling areas). Higher number of dilatation and dividing joints is to be carried out.
Installation instructions for ColorQuartz® tiles, R e v i s i o n 2 o f 1 . 1 0 . 20 1 0 ColorQuartz
22
4 . 1 3 . Installation of the product as stair component During the installation the mechanical-physical characteristics of the product have to be taken into account (flexural strength, thermal expansion ⋯). The junction to wall must enable longitudinal changes of the stair component, i.e. the space on the interface between the wall and the component must be filled with an elastic material, which enables dilatation.
In case of gluing to concrete, the substrate layer has to be made from quality and mature concrete. For gluing it is necessary to use the adhesive binder Elastorapid from the Mapei company or AD 570 from Lasselsberger company.
In case of gluing to metal construction it is necessary to use quality elastic-stable organic based adhesive binders, e.g. the binder Keralastic from the Mapei company.
4 . 1 4 . Installation of glued wall tiles The weight of the tiles from a ColorQuartz® product and its mechanical-physical characteristics, especially the thermal expansion, have to be taken into account during the installation of the glued wall tiles.
It is recommended to install the tiles at the total height higher than 2.5 m above the level of solid base by means of anchored or grate systems.
During the preparation and usage of the base and adhesives the above-mentioned principles are to be followed.
During the application of the adhesives it is necessary to use the system of double-coating, see section 4.8.
It is necessary to apply a penetration primer to the base (e.g. Primer G from Mapei company) to absorbent bases; other types of penetration according to the absorption capacity of the base. New bases must be properly matured.
The gluing is necessary to be performed by using the adhesive binder Elastorapid from the Mapei company or AD 570 from Lasselsberger company.
Installation of tiles is to be done piece by piece. The tiles should be pressed carefully into their required positions; distance segments can be placed in the corners.
The installation of the tiles should be started at the floor plane and if this base is not horizontal, then from a lath batten, which temporarily replaces a solid line. During the installation the horizontal and vertical flatness is to be checked.
After the adhesive is dried-up, the possible wooden lath, which replaced the first line of tiles, should be removed and the installation of the remaining line should be done.
The joints should be filled with a suitable jointing material by using a rubber or plastic spatula. The ColorQuartz silicone sealant or Mapesil LM is recommended.
Afterwards, the installed tiles should be firstly cleaned by a wet sponge and then careful cleaning is to be carried out by means of recommended cleaning agents.
4 . 1 5 . Product installation – quick guide Only general hints are introduced here, because the manufacturer of the engineered stone has no influence on the individual building conditions and performance.
Product installation – subfloors
All subfloors on which the product is installed must be dry, stable, solid, compression-resistant, sufficiently flat and cleared from removable particles, dry surface �cement grout“, dust, fats, oils, wax, paints, dismantled chemical agents and everything that could decrease their adherence!
Installation instructions for ColorQuartz® tiles, R ev i s i o n 2 o f 1 . 10 . 2 0 10 ColorQuartz

23
Product installation – general hints
1. The prepared adhesive is firstly well rubbed as a thin layer (cca 1 mm) to the base by a smooth spatula to build a quality transition between the base, the adhesive and the tile. Only such an area will be prepared, which prevents drying of the surface layer of the adhesive at those places, where the tiles were still not installed. Afterwards the layer of the adhesive is spread on the base by a toothed spatula. The toothed spatula also delimits the thickness of the adhesive layer and by its individual teeth it creates a space for the uniform spread of the adhesive after the tile is laid down (10-15 mm layer according to tile dimension).
2. It is necessary to use the system with double coating of adhesive in such a manner that 100 % of the tile surface is glued-on. A continuous 1mm layer of the adhesive is applied on the bottom face of the tile and only after that the gluing of the tile to the tooth-formed adhesive applied to the base will be accomplished.
3. Tiles are fixed to subfloor, with proper joints. The tiles should be installed by keeping joints from 3 up to 7 mm. Dividing joints in squares 7x7m for standard and 4x4m for heavy traffic floors should be realized. It is necessary to keep the dilatation joints near the wall connections, columns and other constructional parts passing through the floor (peripheral joints).
4. Flatness and rectangularity have to be controlled continously.
5. It is necessary to wait before the start of the jointing (cca 24 hours according to recommendation of adhesive producer). The cementing jointing materials are always spread over the whole tile. After the setting of the material in the joint starts, the surface of the joint is prepared (smoothed) with a moistened sponge and the remains of the jointing material are rubbed down from the tiles. The final cleaning of the surface by using recommended cleaning agents is done after the setting of the material in the joints is finished.
1. step 2. step
3. step 4. step
Installation instructions for ColorQuartz® tiles, R ev i s i o n 2 o f 1 . 10 . 2 0 10 ColorQuartz

25COLORQUARTZ FABRICATION MANUALVersion 1.0 July 2013 colorquartzstone.com
© Copyright ColorQuartz 2013.
ColorQuartz is a registered trademark of ColorQuartz USA, Inc.