Colorado Timing System Operator Training - Potomac … · Most meets in Potomac Valley Swimming use...
19
Colorado Timing System Operator Training September 2014 1
Transcript of Colorado Timing System Operator Training - Potomac … · Most meets in Potomac Valley Swimming use...

Colorado Timing System Operator
Training September 2014
1

INTRODUCTION
Most meets in Potomac Valley Swimming use some form of electronic timing. At almost all meets where electronic timing is used, the Colorado Time Systems Sports Timer is used to collect data that is generated by the pushbuttons and pads (if used.)
USA Swimming defines three types of timing systems (102.24.2):
• Automatic — A timing system activated by a starting device and stopped at the finish by the swimmer touching the touchpad.
• Semi-Automatic — A timing system activated by a starting device and stopped by buttons pushed by timers at the finish touch of the swimmer.
• Manual — A timing system consisting of individual lane timers, each operating a manual watch that is both started and stopped by the timer…
If semi-automatic or automatic timing is used, the number of timers that must be assigned to each lane is reduced. Additionally, automatic timing is required (102.24.1.C) for establishing World, American, and U.S. Open Records.
All data from automatic and semiautomatic timing systems are collected and recorded by the electronic timing system. This data is then printed and can be imported by meet management software for subsequent processing. USA Swimming defines the responsibilities of the Timing Equipment Operator as follows: (102.17.4):
The Timing Equipment Operator shall be responsible for the automatic or semi-automatic timing equipment, including the electronic starting system and scoreboard (if used), and shall advise the Referee or Administrative Official of any system problems that might affect the accuracy of times or whenever the touchpad is observed to have failed to record the finish when the swimmer completed the race. The timing equipment should be placed so that the operator is able to observe the finish of each race.
Potomac Valley Swimming offers a certification for Timing Equipment Operators. Certification as a Timing Equipment Operator requires working a minimum of five sessions as an apprentice under the supervision of a certified Timing Equipment Operator and successful evaluation by one of the officials who is designated to evaluate Timing Equipment Operators (the list can be found on www.pvswim.org.) PVS also offers Timing Equipment Operator training clinics; trainees are encouraged, but not required, to attend one of these clinics.
The purpose of this guide is to facilitate learning the set-up and operation of the Colorado Time Systems Sports Timer for the purpose of timing swimming (the Colorado Time Systems Sports Timer can be configured for other sports.) Diagrams and illustrations are based on Colorado Time Systems Sports
2

Timer System 6 (CTS6); however, almost all of the information in this guide is also applicable to the System 5 (the System 6 uses a color display, while the System 5 uses a LCD display.)
This guide is divided into three main sections: setup, operation, and troubleshooting. Since the most effective way to learn how to use the CTS6 is to actually use it at a meet, this guide is intended to be used as a resource as people train (or refresh their training).
OTHER RESOURCES
CTS Training Videos - http://www.pvswim.org/official/training/cts6-training.html
Configuring a Printer for the CTS6 - http://www.pvswim.org/official/training/CTS-6_Printer.pdf
PVS Setups for CTS6 - http://www.pvswim.org/official/training/cts-6_setups.pdf
CTS-6 Users Guide - http://www.pvswim.org/official/training/System6swim-man.pdf
3

SETUP
Setup of the CTS6 involves two aspects: hardware installation and configuring the settings. While the meet manager is responsible for installing the timing equipment hardware, occasionally the timing equipment operator will do this. Usually it is only necessary to install and connect hardware at the first session of a meet or if there is a problem with the timing equipment and it needs to be replaced.
Hardware
The timing equipment consists of the following components:
• CTS6 (or other ETS) • Cable Harness (connects all the components together) • Starting System • Touchpads (if automatic timing is used, minimum of one touchpad per lane) • Buttons (two or three per lane) • Printer • Scoreboard
Figure 1 shows the rear view of the CTS6 where the input and output devices connect. To the left (as viewed from behind) of the panel illustrated in Figure 1 is the on/off switch and the 1/4 inch jack connection for the cable to the scoreboard.
4

Figure 1 Rear View of CTS6
Some pools have hard-wired connections into which the pads and buttons and the output from the starting system connect. Buttons and pads connect to plates that are located below each lane. The plates have two-prong receptacles labeled "prime" (for the pads) and "A", "B" and "C" (for the buttons.) At these pools, a short harness will connect the in-ground wiring to the CTS6.
At pools that don't have in-deck wiring, for most meets at short course (25 yard) pools, there will be a set of two harness cables at the starting end of the pool. Each harness has twelve sets of two connections each. Ten sets of the connections are labeled 1-10, and two sets are labeled "start" and "start backup," one set at each end. On one of the harnesses, the connections for the lanes are labeled "prime" and "Button A" (see Figure 2). On the other harness, the connections for the lanes are labeled "B" and "C" for buttons (See Figure 3.)
5

Figure 2 Pad and Button “A” Harness Connections
Figure 3 Buttons “B” and “C” Harness Connections
6
If only buttons are used then one button should be attached to the harness or deck plate connection labeled "prime" and the second button should be attached to the connection labeled "Button A." If a wiring harness is used, then only one harness cable is required if only buttons are used.
The start-end harnesses plug into the back of the CTS6 as shown in Figure 1. On some harnesses, both cables attach to a single connector that attaches to either connection (top or bottom) on the back of the CTS6. Others have one connection for each harness cable. The complete setup is shown in Figure 5.
At long course meets, there will likely be another harness or set of harnesses at the turn end of the pool. Pads for intermediate splits would connect to the far end harness. Depending on the pool configuration, buttons or a starting unit would also be connected to the far end harness. Connections are made in the same manner as the near end harness, although there may be a 50 meter harness extension used to connect the far end harness to the CTS6.
The CTS6 is powered via a switch that is located on the back. Upon being turned on, the CTS6 goes through a bootup process. After this is complete you are presented with a menu of options. The purpose of this menu is to start up a SPORTS PROGRAM, SHUT DOWN the timer, automatically INSTALL new software or firmware and do some DIAGNOSTICS on the timer.
After the CTS6 is powered-on, press the soft key next to "Swimming." Once the startup is complete, a display similar to Figure 4 will appear.
7
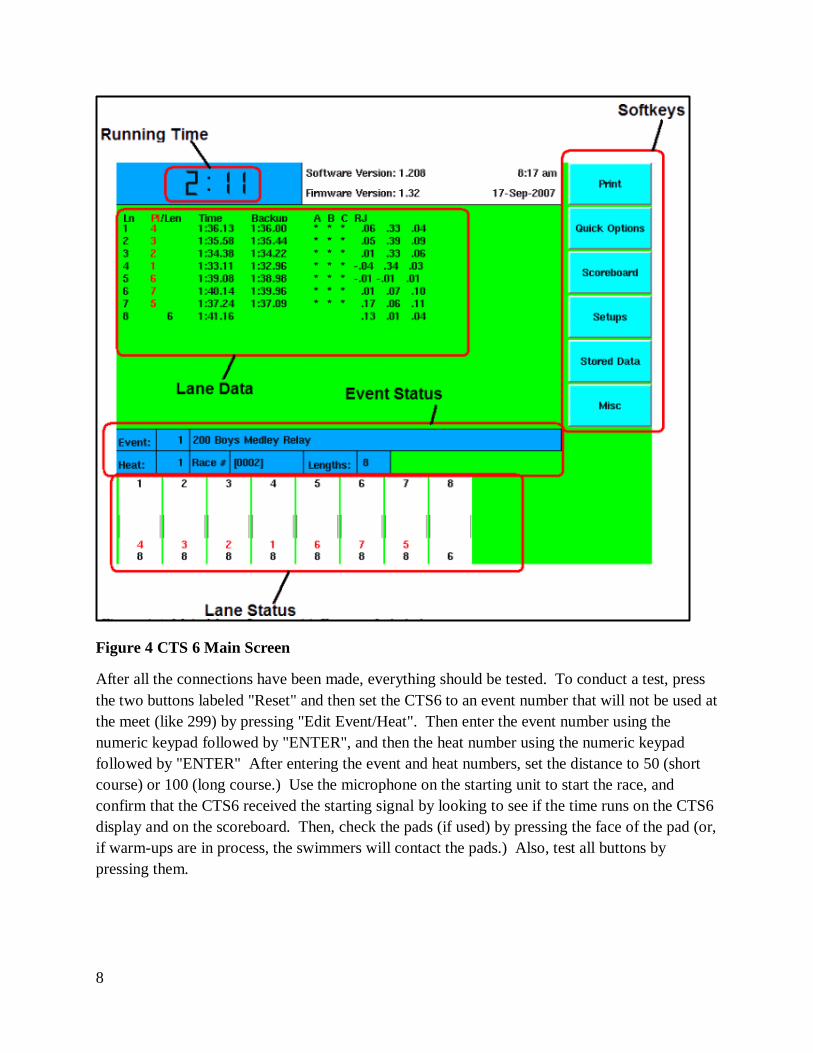
Figure 4 CTS 6 Main Screen
After all the connections have been made, everything should be tested. To conduct a test, press the two buttons labeled "Reset" and then set the CTS6 to an event number that will not be used at the meet (like 299) by pressing "Edit Event/Heat". Then enter the event number using the numeric keypad followed by "ENTER", and then the heat number using the numeric keypad followed by "ENTER" After entering the event and heat numbers, set the distance to 50 (short course) or 100 (long course.) Use the microphone on the starting unit to start the race, and confirm that the CTS6 received the starting signal by looking to see if the time runs on the CTS6 display and on the scoreboard. Then, check the pads (if used) by pressing the face of the pad (or, if warm-ups are in process, the swimmers will contact the pads.) Also, test all buttons by pressing them.
8

Figure 5 Complete Setup
Then, check the CTS6 display. Ideally, each lane should show a place number (instead of "Finish Arm") and have two asterisks next to the time. If pads are in use, and one or more lanes still flash "Finish Armed," then you will need to investigate if the pad connection to the harness is not secure or if the pad is malfunctioning. Similarly, if there are less than two asterisks in any lane, then you will need to investigate if the button connections are not secure or if the button is malfunctioning. Note that the CTS6 display aligns the asterisks in three columns labeled "A", "B" and "C"; these columns correspond to the positions into which the buttons are connected in the harness or deck plate.
There are buttons or pads that were not recorded by the CTS6, then you should first verify that the pad or button was properly plugged into the harness. After checking the harness connection, test the button or pad again to see if it was recorded by the CTS6.
If the button or pad still was not recorded by the CTS6, then you can check the button or pad by plugging it into the CTS Tester (see Figure 6 – usually the meet referee or meet director would know if one is available.) The pad or button can be tested by unplugging it from the harness and then plugging it into the CTS Tester. Test operation of the pad/button and see whether the CTS Tester registers operation of the pad or button. If it does not, then the pad/button will need to be replaced.
9

If the CTS Tester did record operation of the pad/button, then the harness/deck plate can be tested by plugging the tester into the harness/deck plate and pressing the button on the tester. Then, check to see whether the CTS6 recorded operation of the pad/button. If not, then the connections may need to be cleaned. A set of cleaning supplies should be available – again the meet referee or meet director should know.
If a CTS tester is not available, then simply find a replacement pad or button and see if that solves the problem.
Figure 6 CTS Tester
After the test is complete, press "Store/Print" and the two "Reset" buttons. The results for the test should print from the printer. If the results of the test did not print, check to see if the printer was configured properly (see appendix B.)
Configuration Settings
The CTS6 software configurations should also be checked prior to each session. At a minimum, the setups will change when the CTS6 is used at a different pool configuration than the last time it was used (e.g., 25 yard or 50 meter pool), but the settings may require changes even if the pool type is the same as the last time the CTS6 was used.
The setup menu is accessed from the home screen (see Figure 4.) The setups are separated into 10 categories, which can be navigated using the "UP" or "DOWN" softkeys to move the arrow pointer to the desired setup option. After the arrow points to the desired section, the options can be changed by pressing the number button on the keypad that corresponds to the option of interest. Repeatedly pressing the numeric button will toggle between different options. Pressing the "QUIT" button returns to the main screen.
10

Appendix A (at the end of this guide) identifies the settings commonly used within PVS.
Some setup information is also accessed via the "QUICK OPTIONS" and "MISC" softkeys. Under "QUICK OPTIONS", "FAR END" should be "ON" if there are pads at the tuning end of the pool (usually only at 50 meter pools). "DISPLAY LANES" should be "ON" so that current race information is displayed on-screen. Press the appropriate softkey to toggle between the settings.
The "MISC" softkey can be used to turn off the power to the pads until the next start is received. This can be done (but it is not required) during warmups. The CTS6 is powered-off via the "MISC" softkey at the end of the day.
Setup changes are made permanent only if you press the "SAVE SETUPS" softkey. Otherwise, setup changes apply to the current session only and are lost when you turn the CTS6 off. Press "QUIT" to exit the setups menu.
After the hardware is installed and the setups are verified, it's a good idea to set the scoreboard to "BLANK" (assuming one is in use.) This will display the current time on the scoreboard instead of data from the last race (or test of the CTS6.) This is done by pressing the "SCOREBOARD" softkey. If the incorrect time is displayed, the time can be set via the "SETUPS" softkey.
Setup Checklist
All Buttons and pads connected to harness or deck plate Starter connected to "start" connection in harness or deck plate Harnesses connected to CTS6 Printer connected to CTS6 and powered on CTS6 connected to the computer running Meet Manager Scoreboard connected to CTS6 CTS6 powered-on and "Swimming" selected All components tested Verify correct settings
11

RUNNING A MEET
Ideally, running a meet only involves pressing a few keys: "STORE/PRINT", "RESET", and "NEXT HEAT" or "NEXT EVENT", and occasionally tuning lanes off when they are empty (and back on again if the CTS5 is in use.). However, such an ideal meet is highly unlikely to occur. When problems occur, there is frequently time pressure (a heat is in the water or the next heat is about to start.) The number one rule of running the CTS6 is DON'T PANIC. Most problems can be solved if they are addressed before the next heat begins. If you need more time to solve a problem, let the deck referee know to wait before starting the next heat.
This section first reviews normal operation of the CTS6, then reviews some common problems and their solutions. A detailed list of common problems and solutions is presented in the next section. Figure 7 shows the keyboard from the CTS6.
Figure 7 CTS 6 Keyboard
Before a session begins, you will need a printed copy of the meet program. Make sure that the CTS6 is reset and confirm with the Hy-Tek Operator that they have downloaded the events to the CTS6. The first step in running a meet is to select the correct event and heat. This is done by pressing "EDIT EVENT/HEAT" on the keyboard (bottom row below the lane 8 buttons.) Then enter the event number from the meet program using the numeric keypad followed by "ENTER", and then the heat number using the numeric keypad followed by "ENTER".
After setting the correct event and heat, a description of the event (distance, possibly age, gender and stroke) will appear in the portion of the screen where the event status is displayed (see Figure 4.) If the correct event is displayed, but the description is not shown, confirm with the Hy-Tek Operator that they have downloaded the events. The deck referee should check to see if you are ready before starting the first race. Double-check that the CTS6 is reset (top left of screen) and that the correct event, heat, distance and description of the event is displayed before stating that you are ready.
After the race is started, "RESET" should be replaced with a running clock. If "RESET" is still displayed, press "START" in the lower left corner of the keypad and let the administrative official and deck referee know. The deck referee should not start the next race until the reason for the missed start is identified and corrected (e.g., loose cable.)
12
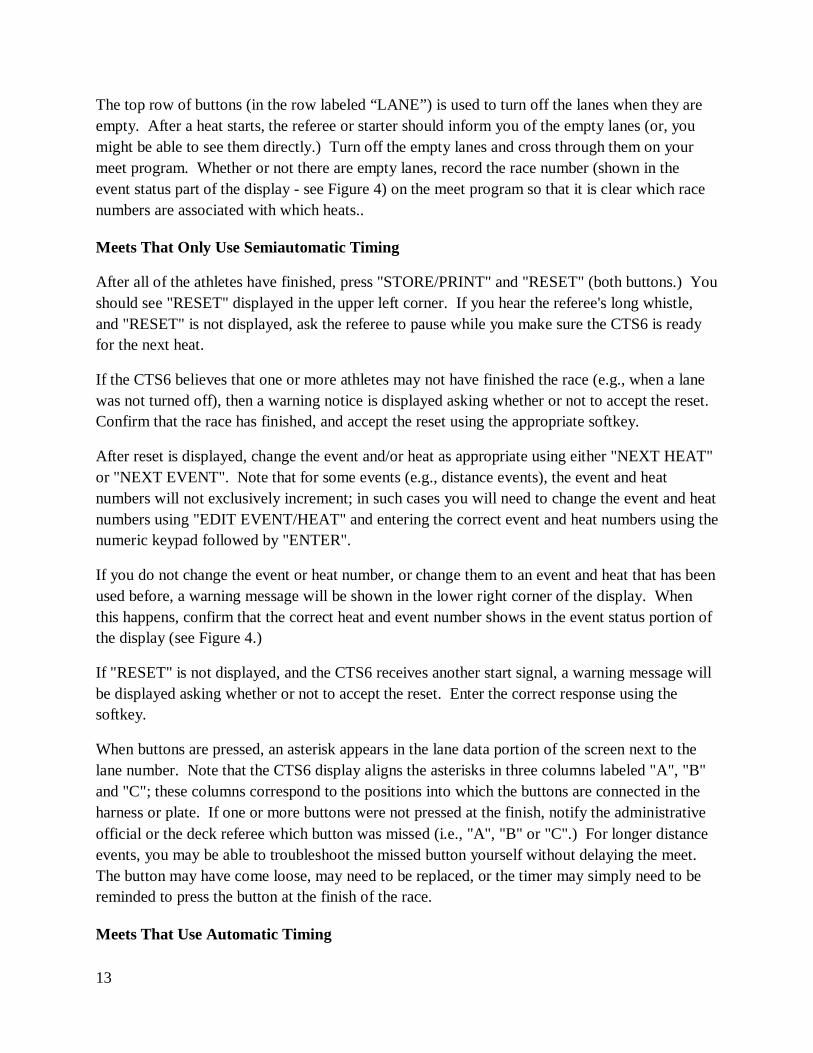
The top row of buttons (in the row labeled “LANE”) is used to turn off the lanes when they are empty. After a heat starts, the referee or starter should inform you of the empty lanes (or, you might be able to see them directly.) Turn off the empty lanes and cross through them on your meet program. Whether or not there are empty lanes, record the race number (shown in the event status part of the display - see Figure 4) on the meet program so that it is clear which race numbers are associated with which heats..
Meets That Only Use Semiautomatic Timing
After all of the athletes have finished, press "STORE/PRINT" and "RESET" (both buttons.) You should see "RESET" displayed in the upper left corner. If you hear the referee's long whistle, and "RESET" is not displayed, ask the referee to pause while you make sure the CTS6 is ready for the next heat.
If the CTS6 believes that one or more athletes may not have finished the race (e.g., when a lane was not turned off), then a warning notice is displayed asking whether or not to accept the reset. Confirm that the race has finished, and accept the reset using the appropriate softkey.
After reset is displayed, change the event and/or heat as appropriate using either "NEXT HEAT" or "NEXT EVENT". Note that for some events (e.g., distance events), the event and heat numbers will not exclusively increment; in such cases you will need to change the event and heat numbers using "EDIT EVENT/HEAT" and entering the correct event and heat numbers using the numeric keypad followed by "ENTER".
If you do not change the event or heat number, or change them to an event and heat that has been used before, a warning message will be shown in the lower right corner of the display. When this happens, confirm that the correct heat and event number shows in the event status portion of the display (see Figure 4.)
If "RESET" is not displayed, and the CTS6 receives another start signal, a warning message will be displayed asking whether or not to accept the reset. Enter the correct response using the softkey.
When buttons are pressed, an asterisk appears in the lane data portion of the screen next to the lane number. Note that the CTS6 display aligns the asterisks in three columns labeled "A", "B" and "C"; these columns correspond to the positions into which the buttons are connected in the harness or plate. If one or more buttons were not pressed at the finish, notify the administrative official or the deck referee which button was missed (i.e., "A", "B" or "C".) For longer distance events, you may be able to troubleshoot the missed button yourself without delaying the meet. The button may have come loose, may need to be replaced, or the timer may simply need to be reminded to press the button at the finish of the race.
Meets That Use Automatic Timing
13

For all races that are longer than 50 yards/meters, observe all lanes for touches when there are turns. When an athlete turns, the lane status should change from "ARMED" to blank or "FINISH LAP" (depending on how many laps remain) and the number of lengths displayed should increment (by one for touches at long course meets or by two for touches at short course meets.) See Figure 8.
Figure 8 - Lane Status for Touch
If the athlete turned, but the "ARMED" indicator did not change to blank or "FINISH LAP" and the number of lengths did not increment, then press "+ TOUCH" on the keypad, enter the lane number using the numeric pad, and then press "ENTER." After doing this, check that the correct number of completed lengths is displayed.
Note that there is a delay from the time that the athlete touches a pad to when the pad arms again; this delay is user-adjustable from the "SETUPS" menu (from the "operations" submenu.)
When the athlete approaches the finish of the race, "FINISH ARMED" should flash (see Figure 9.) If "FINISH ARMED" does not flash, then you can press "FINSH ARM" in the second row of the keypad (see Figure 7) below the correct lane number. “FINISH ARM” can save you, as you can always take away a touch, which will undo the finishing the race, or press “FINISH ARM” again the re-enable “FINISH ARMED”. So, if unsure if a swimmer is finishing or not, press “FINISH ARM”, then if you are wrong press the “FINISH ARM” again.
Figure 9 - Finish Armed
14

Occasionally, an extra touch is registered (for example, during a relay if one of the relay swimmers is slow to leave the pool after they finish.) In such a case, you can subtract the extra touch by pressing "— TOUCH" on the keypad, entering the lane number using the numeric keypad and pressing "ENTER." After doing this, check that the correct number of completed lengths is displayed.
The third row of buttons on the keypad (see Figure 7) is labeled "SPLIT ARM." Pressing "SPLIT ARM" for a lane arms the lane and subtracts a touch.
After all of the athletes have finished, press "STORE/PRINT" and "RESET" (both buttons.) If the display changes so that "RESET" is not shown in the upper left portion, then press "QUIT" to the right of the display (the display changes when the CTS6 suspects a late, early or missed pad.) You should see "RESET" displayed in the upper left corner. If you hear the referee's long whistle, and "RESET" is not displayed, ask the referee to pause.
Check to see whether pad finishes were registered (if pads are in use) and all buttons that are in use in each lane were pressed. If a pad finish was not registered, then "FINISH ARMED" will still be displayed in the lane. When a touch is registered at the finish, "FINISH ARMED" disappears and the finish place is shown in the lane in red. See Figure 4.
The reason that a pad finish was not recorded may simply be that the athlete missed the pad. However, if you observe that pad touches were not recorded in the same lane for multiple sequential heats, notify the administrative official or deck referee. The pad connection with the harness may have come loose, or the pad may need to be replaced.
When buttons are pressed, an asterisk appears in the lane data portion of the screen next to the lane number. Note that the CTS6 display aligns the asterisks in three columns labeled "A", "B" and "C"; these columns correspond to the positions into which the buttons are connected in the harness or plate. If one or more buttons were not pressed at the finish, notify the administrative official or the deck referee which button was missed (i.e., "A", "B" and "C".) For longer distance events, you may be able to troubleshoot the missed button yourself without delaying the meet. The button may have come loose, may need to be replaced, or the timer may simply need to be reminded to press the button at the finish of the race.
If the CTS6 believes that one or more athletes may not have finished the race (e.g., when a lane was not turned off or an athlete misses the pad and one or more buttons in that lane are not pressed), then a warning notice is displayed asking whether or not to accept the reset. Confirm that the race has finished, and accept the reset using the appropriate softkey.
After reset is displayed, change the event and/or heat as appropriate using either "NEXT HEAT" or "NEXT EVENT". Note that for some events (e.g., distance events), the event and heat numbers will not exclusively increment; in such cases you will need to change the event and heat
15

numbers using "EDIT EVENT/HEAT" and entering the correct event and heat numbers using the numeric keypad followed by "ENTER" after entering the event and the heat.
If you do not change the event or heat number, or change them to an event and heat that has been used before, a warning message will be shown in the lower right corner of the display. When this happens, confirm that the correct heat and event number shows in the event status portion of the display (see Figure 4.)
If you notice that one or more athletes missed the pad at the finish or were late to touch the pad at the finish, either make a note on the CTS6 printout or tell the administrative official.
If "RESET" is not displayed, and the CTS6 receives another start signal, a warning message will be displayed asking whether or not to accept the reset. Enter the correct response using the softkey.
Printing Stored Data
Occasionally, you will be asked to print stored data. An example of when this might occur is when heats of different events are combined. In such a case, the administrative official would want copies of the printout to include with the records from each event.
To print stored data, press the "STORED DATA" softkey. See Figure 4. This displays the results of the last race saved. You can navigate to the race that you need to print using the "NEXT RACE", "PREVIOUS RACE", "NEXT EVENT" and "PREVIOUS EVENT" softkeys. Once the correct race is displayed, press "PRINT RACE" and then the "RACE SUMMARY", "SPLITS SUMMARY" and then "FORM FEED". See Figure 10.
Figure 10 - Stored Data Print Options
16

PRINTOUT DATA
Annotated printouts are shown in Figure 11and Figure 12.
Figure 11 - Splits Summary
Figure 12 - Race Summary
17
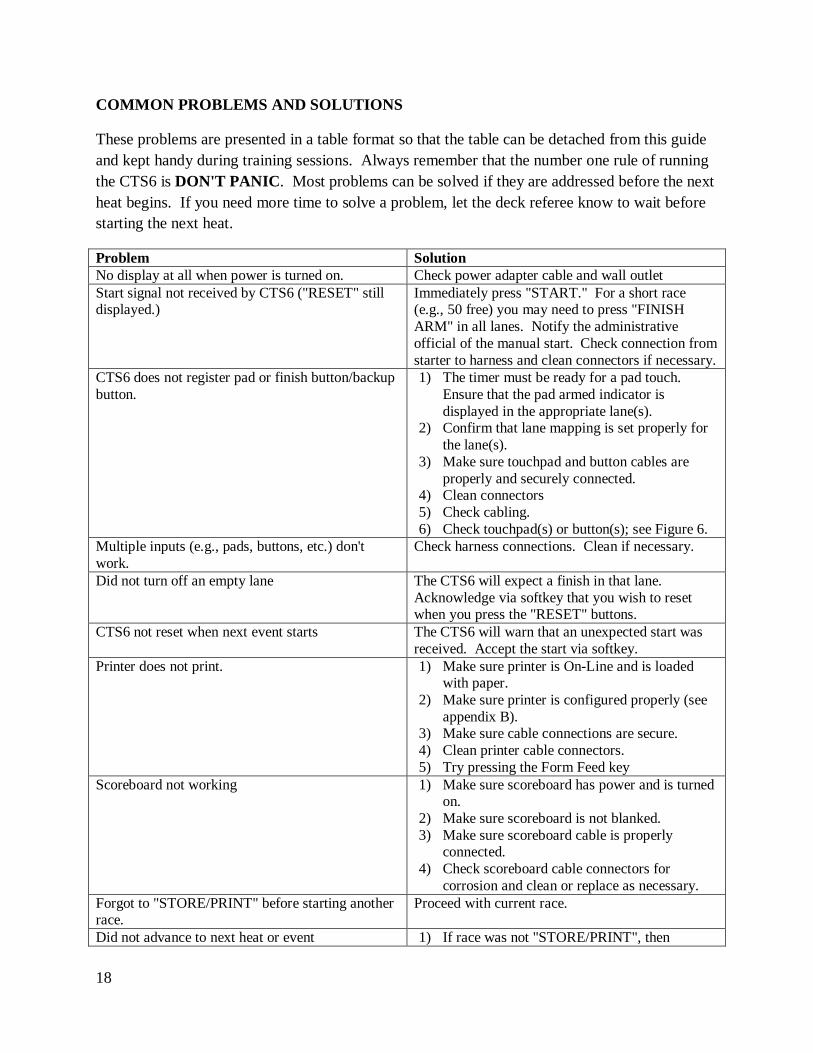
COMMON PROBLEMS AND SOLUTIONS
These problems are presented in a table format so that the table can be detached from this guide and kept handy during training sessions. Always remember that the number one rule of running the CTS6 is DON'T PANIC. Most problems can be solved if they are addressed before the next heat begins. If you need more time to solve a problem, let the deck referee know to wait before starting the next heat.
Problem Solution No display at all when power is turned on. Check power adapter cable and wall outlet Start signal not received by CTS6 ("RESET" still displayed.)
Immediately press "START." For a short race (e.g., 50 free) you may need to press "FINISH ARM" in all lanes. Notify the administrative official of the manual start. Check connection from starter to harness and clean connectors if necessary.
CTS6 does not register pad or finish button/backup button.
1) The timer must be ready for a pad touch. Ensure that the pad armed indicator is displayed in the appropriate lane(s).
2) Confirm that lane mapping is set properly for the lane(s).
3) Make sure touchpad and button cables are properly and securely connected.
4) Clean connectors 5) Check cabling. 6) Check touchpad(s) or button(s); see Figure 6.
Multiple inputs (e.g., pads, buttons, etc.) don't work.
Check harness connections. Clean if necessary.
Did not turn off an empty lane The CTS6 will expect a finish in that lane. Acknowledge via softkey that you wish to reset when you press the "RESET" buttons.
CTS6 not reset when next event starts The CTS6 will warn that an unexpected start was received. Accept the start via softkey.
Printer does not print. 1) Make sure printer is On-Line and is loaded with paper.
2) Make sure printer is configured properly (see appendix B).
3) Make sure cable connections are secure. 4) Clean printer cable connectors. 5) Try pressing the Form Feed key
Scoreboard not working 1) Make sure scoreboard has power and is turned on.
2) Make sure scoreboard is not blanked. 3) Make sure scoreboard cable is properly
connected. 4) Check scoreboard cable connectors for
corrosion and clean or replace as necessary. Forgot to "STORE/PRINT" before starting another race.
Proceed with current race.
Did not advance to next heat or event 1) If race was not "STORE/PRINT", then
18

advance to next heat or event 2) Otherwise, write correct event and heat on
CTS6 printout The event is a different distance 1) Advance to correct event or edit event/heat to
get to the proper event, or 2) Press correct distance on keypad (during or
after race finishes). Lane turned off, but someone was in that lane CTS6 will still record their times Swimmer missed, or lightly touched pad during turn
1) Press "+ TOUCH" and then enter the lane number
2) If it was the last touch before finishing, press "FINISH ARM" in the appropriate lane
Extra touch recorded in lane 1) Press "- TOUCH" and then enter the lane number
2) Press "SPLIT ARM" in the appropriate lane. This will subtract a touch and arm the pad.
19