Color Touch 16.0 User Guide - omnicellvs.com Touch 16.0 User Guide 60-0226 A.pdfColor Touch 16.0...
90
Color Touch 16.0 User Guide 60-0226 Rev-A A nurse’s guide to performing patient care and supporting tasks on Automated Medication Dispensing Cabinets
Transcript of Color Touch 16.0 User Guide - omnicellvs.com Touch 16.0 User Guide 60-0226 A.pdfColor Touch 16.0...
Color Touch 16.0 User Guide60-0226 Rev-A
A nurse’s guide to performing patient care
and supporting tasks on
Automated Medication Dispensing Cabinets
About Omnicell
Omnicell, Inc. (NASDAQ: OMCL) is a leading provider of systems and software solutions targeting patient safety and operational efficiency in healthcare facilities. Since 1992, Omnicell has worked with numerous healthcare facilities to enhance patient safety and allow clinicians to spend more time with their patients.
Omnicell’s medication-use product line includes solutions for the central pharmacy, nursing unit, operating room, and patient bedside. Solutions range from large central pharmacy “smart inventory” carousels to small handheld devices. From the point at which a medication arrives at the receiving dock to the time it is administered, Omnicell systems store it, package it, bar code it, order it, issue it, and provide information and controls on its use and reorder.
Our supply product lines provide a healthcare institution with fast, effective control of costs, capture of charges for payor reimbursement, and timely reorder of supplies. Products range from high-security closed-cabinet systems and software to open-shelf and combination solutions in the nursing unit, cath lab, and operating room.
Omnicell’s mission is to provide the best customer experience in healthcare, helping hospitals reduce medication errors, operate more efficiently, and decrease costs. For more information, visit www.omnicell.com.
This guide and accompanying software and/or hardware described in it are protected under copyright laws and may not be copied, wholly or in part, without the express written consent of Omnicell, Inc. The same proprietary and copyright notices must be attached to any permitted copies as were attached to the original documents.
Omnicell, Inc.1201 Charleston Road Mountain View, CA 94043 (650) 251-6100 www.omnicell.com
Omnicell and the Omnicell design mark, OmniBuyer, OmniCenter, OmniRx, OmniSupplier, Pandora, PandoraVIA, SafetyMed, SafetyStock, and Sure-Med are registered trademarks. Anesthesia TT, Anesthesia Workstation, Anywhere RN, Executive Advisor, FlexBin, Medication Surveillance, OmniDispenser, OmniLinkRx, OmniScanner, OmniTrack, Omni TT, Open Touch, OptiFlex, OptiFlex MobileTrack, Point-to-Point Medication Safety, ProServ1, SecureVault, See & Touch, SinglePointe, TempCheck, Touch & Go, vSuite, and WorkflowRx are trademarks of Omnicell, Inc. in the United States and internationally. All other trademarks and trade names are the property of their respective owners.
© 1999–2011 Omnicell, Inc. All rights reserved.
Color Touch 16.0 User Guide/60-0226 Rev-A © 1999–2011 Omnicell, Inc.
iii
Contents
IntroductionHow to Use this Guide . . . . . . . . . . . . . . . . . . . . . . . . . . . . . . . . . . . . . . . . . . . . . . . . . . . . . . . . . . . . . . . . . . . . . . . . . . . 1.1Online Quick Reference . . . . . . . . . . . . . . . . . . . . . . . . . . . . . . . . . . . . . . . . . . . . . . . . . . . . . . . . . . . . . . . . . . . . . . . . . . 1.1Technical Support . . . . . . . . . . . . . . . . . . . . . . . . . . . . . . . . . . . . . . . . . . . . . . . . . . . . . . . . . . . . . . . . . . . . . . . . . . . . . . . 1.1For More Information . . . . . . . . . . . . . . . . . . . . . . . . . . . . . . . . . . . . . . . . . . . . . . . . . . . . . . . . . . . . . . . . . . . . . . . . . . . . 1.1Cabinet Software . . . . . . . . . . . . . . . . . . . . . . . . . . . . . . . . . . . . . . . . . . . . . . . . . . . . . . . . . . . . . . . . . . . . . . . . . . . . . . . . 1.2Main Menu . . . . . . . . . . . . . . . . . . . . . . . . . . . . . . . . . . . . . . . . . . . . . . . . . . . . . . . . . . . . . . . . . . . . . . . . . . . . . . . . . . . . . . 1.3
BasicsLog On . . . . . . . . . . . . . . . . . . . . . . . . . . . . . . . . . . . . . . . . . . . . . . . . . . . . . . . . . . . . . . . . . . . . . . . . . . . . . . . . . . . . . . . . . . 2.1
Log on with Magnetic Card or Bar Code Card Reader . . . . . . . . . . . . . . . . . . . . . . . . . . . . . . . . . . . . . . . . . . . 2.1Log on with User ID and Password . . . . . . . . . . . . . . . . . . . . . . . . . . . . . . . . . . . . . . . . . . . . . . . . . . . . . . . . . . . . 2.1Log on with Touch & Go . . . . . . . . . . . . . . . . . . . . . . . . . . . . . . . . . . . . . . . . . . . . . . . . . . . . . . . . . . . . . . . . . . . . . . 2.2Short List . . . . . . . . . . . . . . . . . . . . . . . . . . . . . . . . . . . . . . . . . . . . . . . . . . . . . . . . . . . . . . . . . . . . . . . . . . . . . . . . . . . . . 2.2Fingerprint Scan Guidelines and Help. . . . . . . . . . . . . . . . . . . . . . . . . . . . . . . . . . . . . . . . . . . . . . . . . . . . . . . . . . 2.3
Access an Item . . . . . . . . . . . . . . . . . . . . . . . . . . . . . . . . . . . . . . . . . . . . . . . . . . . . . . . . . . . . . . . . . . . . . . . . . . . . . . . . . . 2.3Conclude Tasks . . . . . . . . . . . . . . . . . . . . . . . . . . . . . . . . . . . . . . . . . . . . . . . . . . . . . . . . . . . . . . . . . . . . . . . . . . . . . . . . . . 2.4Browse Drug Info . . . . . . . . . . . . . . . . . . . . . . . . . . . . . . . . . . . . . . . . . . . . . . . . . . . . . . . . . . . . . . . . . . . . . . . . . . . . . . . . 2.5Check Item Availability . . . . . . . . . . . . . . . . . . . . . . . . . . . . . . . . . . . . . . . . . . . . . . . . . . . . . . . . . . . . . . . . . . . . . . . . . . . 2.6Change Unit of Issue/Unit of Stock . . . . . . . . . . . . . . . . . . . . . . . . . . . . . . . . . . . . . . . . . . . . . . . . . . . . . . . . . . . . . . . 2.7 Scan a Bar Code . . . . . . . . . . . . . . . . . . . . . . . . . . . . . . . . . . . . . . . . . . . . . . . . . . . . . . . . . . . . . . . . . . . . . . . . . . . . . . . . . 2.7Verify Item by Bar Code Scan . . . . . . . . . . . . . . . . . . . . . . . . . . . . . . . . . . . . . . . . . . . . . . . . . . . . . . . . . . . . . . . . . . . . . 2.7
Sort Lists. . . . . . . . . . . . . . . . . . . . . . . . . . . . . . . . . . . . . . . . . . . . . . . . . . . . . . . . . . . . . . . . . . . . . . . . . . . . . . . . . . . . . . 2.8Select a Patient . . . . . . . . . . . . . . . . . . . . . . . . . . . . . . . . . . . . . . . . . . . . . . . . . . . . . . . . . . . . . . . . . . . . . . . . . . . . . . . . . . 2.8
Patient Bar Codes . . . . . . . . . . . . . . . . . . . . . . . . . . . . . . . . . . . . . . . . . . . . . . . . . . . . . . . . . . . . . . . . . . . . . . . . . . . . . 2.8Patient Medication Accounts (PMAs) . . . . . . . . . . . . . . . . . . . . . . . . . . . . . . . . . . . . . . . . . . . . . . . . . . . . . . . . . . . . . 2.9
PMA Details . . . . . . . . . . . . . . . . . . . . . . . . . . . . . . . . . . . . . . . . . . . . . . . . . . . . . . . . . . . . . . . . . . . . . . . . . . . . . . . . . . 2.9Outstanding Waste Prompts . . . . . . . . . . . . . . . . . . . . . . . . . . . . . . . . . . . . . . . . . . . . . . . . . . . . . . . . . . . . . . . . .2.10
Witness Requirements . . . . . . . . . . . . . . . . . . . . . . . . . . . . . . . . . . . . . . . . . . . . . . . . . . . . . . . . . . . . . . . . . . . . . . . . . .2.10Single Witness . . . . . . . . . . . . . . . . . . . . . . . . . . . . . . . . . . . . . . . . . . . . . . . . . . . . . . . . . . . . . . . . . . . . . . . . . . . . . . .2.10
SafetyStock . . . . . . . . . . . . . . . . . . . . . . . . . . . . . . . . . . . . . . . . . . . . . . . . . . . . . . . . . . . . . . . . . . . . . . . . . . . . . . . . . . . . .2.11
Patient CareIssue Items . . . . . . . . . . . . . . . . . . . . . . . . . . . . . . . . . . . . . . . . . . . . . . . . . . . . . . . . . . . . . . . . . . . . . . . . . . . . . . . . . . . . . . 3.1Issue Nurse-prepared Med Orders . . . . . . . . . . . . . . . . . . . . . . . . . . . . . . . . . . . . . . . . . . . . . . . . . . . . . . . . . . . . . . . . 3.2
Skip Items During Nurse-prepared Med Order Issue . . . . . . . . . . . . . . . . . . . . . . . . . . . . . . . . . . . . . . . . . . . . 3.5View Component Details. . . . . . . . . . . . . . . . . . . . . . . . . . . . . . . . . . . . . . . . . . . . . . . . . . . . . . . . . . . . . . . . . . . . . . 3.6
Override a Med Order . . . . . . . . . . . . . . . . . . . . . . . . . . . . . . . . . . . . . . . . . . . . . . . . . . . . . . . . . . . . . . . . . . . . . . . . . . . . 3.6Issue Item(s) of Equivalent Dose . . . . . . . . . . . . . . . . . . . . . . . . . . . . . . . . . . . . . . . . . . . . . . . . . . . . . . . . . . . . . . . . . . 3.7Issue Kits and Procedures . . . . . . . . . . . . . . . . . . . . . . . . . . . . . . . . . . . . . . . . . . . . . . . . . . . . . . . . . . . . . . . . . . . . . . . . 3.8Return Items . . . . . . . . . . . . . . . . . . . . . . . . . . . . . . . . . . . . . . . . . . . . . . . . . . . . . . . . . . . . . . . . . . . . . . . . . . . . . . . . . . . . 3.9
Show Account Detail. . . . . . . . . . . . . . . . . . . . . . . . . . . . . . . . . . . . . . . . . . . . . . . . . . . . . . . . . . . . . . . . . . . . . . . . .3.11Record Waste . . . . . . . . . . . . . . . . . . . . . . . . . . . . . . . . . . . . . . . . . . . . . . . . . . . . . . . . . . . . . . . . . . . . . . . . . . . . . . . . . .3.11Use Volume Converter . . . . . . . . . . . . . . . . . . . . . . . . . . . . . . . . . . . . . . . . . . . . . . . . . . . . . . . . . . . . . . . . . . . . . . . . . .3.12
© 1999–2011 Omnicell, Inc. Color Touch 16.0 User Guide/60-0226 Rev-A

iv Contents
Waste Partial Dose During Issue . . . . . . . . . . . . . . . . . . . . . . . . . . . . . . . . . . . . . . . . . . . . . . . . . . . . . . . . . . . . . . . . .3.12Considerations for Specific Item Types . . . . . . . . . . . . . . . . . . . . . . . . . . . . . . . . . . . . . . . . . . . . . . . . . . . . . . . . . . .3.14View Patient and Transaction Info . . . . . . . . . . . . . . . . . . . . . . . . . . . . . . . . . . . . . . . . . . . . . . . . . . . . . . . . . . . . . . .3.15
Patient Management . . . . . . . . . . . . . . . . . . . . . . . . . . . . . . . . . . . . . . . . . . . . . . . . . . . . . . . . . . . . . . . . . . . . . . . .3.15Allergy Information . . . . . . . . . . . . . . . . . . . . . . . . . . . . . . . . . . . . . . . . . . . . . . . . . . . . . . . . . . . . . . . . . . . . . . . . . .3.16Patient Lists. . . . . . . . . . . . . . . . . . . . . . . . . . . . . . . . . . . . . . . . . . . . . . . . . . . . . . . . . . . . . . . . . . . . . . . . . . . . . . . . . .3.16View Last Issued Details . . . . . . . . . . . . . . . . . . . . . . . . . . . . . . . . . . . . . . . . . . . . . . . . . . . . . . . . . . . . . . . . . . . . . .3.16Last Issued Alert . . . . . . . . . . . . . . . . . . . . . . . . . . . . . . . . . . . . . . . . . . . . . . . . . . . . . . . . . . . . . . . . . . . . . . . . . . . . .3.18
About Medication Orders . . . . . . . . . . . . . . . . . . . . . . . . . . . . . . . . . . . . . . . . . . . . . . . . . . . . . . . . . . . . . . . . . . . . . . .3.18View Med Order Information . . . . . . . . . . . . . . . . . . . . . . . . . . . . . . . . . . . . . . . . . . . . . . . . . . . . . . . . . . . . . . . . .3.18Browse Transactions . . . . . . . . . . . . . . . . . . . . . . . . . . . . . . . . . . . . . . . . . . . . . . . . . . . . . . . . . . . . . . . . . . . . . . . . .3.19View OmniLinkRx Order Status . . . . . . . . . . . . . . . . . . . . . . . . . . . . . . . . . . . . . . . . . . . . . . . . . . . . . . . . . . . . . . .3.19Med Order Icons . . . . . . . . . . . . . . . . . . . . . . . . . . . . . . . . . . . . . . . . . . . . . . . . . . . . . . . . . . . . . . . . . . . . . . . . . . . . .3.20Item Lists . . . . . . . . . . . . . . . . . . . . . . . . . . . . . . . . . . . . . . . . . . . . . . . . . . . . . . . . . . . . . . . . . . . . . . . . . . . . . . . . . . . .3.20
Remote Requests . . . . . . . . . . . . . . . . . . . . . . . . . . . . . . . . . . . . . . . . . . . . . . . . . . . . . . . . . . . . . . . . . . . . . . . . . . . . . . .3.21Notice of Incomplete Items . . . . . . . . . . . . . . . . . . . . . . . . . . . . . . . . . . . . . . . . . . . . . . . . . . . . . . . . . . . . . . . . . .3.21Complete Remote Requests . . . . . . . . . . . . . . . . . . . . . . . . . . . . . . . . . . . . . . . . . . . . . . . . . . . . . . . . . . . . . . . . . .3.22
SinglePointe and PSBsPSBs and Considerations for Specific Item Types . . . . . . . . . . . . . . . . . . . . . . . . . . . . . . . . . . . . . . . . . . . . . . . . .3.23
Multi-use Items . . . . . . . . . . . . . . . . . . . . . . . . . . . . . . . . . . . . . . . . . . . . . . . . . . . . . . . . . . . . . . . . . . . . . . . . . . . . . .3.23Patient’s Own Medications (POMs) . . . . . . . . . . . . . . . . . . . . . . . . . . . . . . . . . . . . . . . . . . . . . . . . . . . . . . . . . . .3.23Pharmacy-prepared Medication Orders . . . . . . . . . . . . . . . . . . . . . . . . . . . . . . . . . . . . . . . . . . . . . . . . . . . . . . .3.24
Issue Pharmacy-prepared Med Orders . . . . . . . . . . . . . . . . . . . . . . . . . . . . . . . . . . . . . . . . . . . . . . . . . . . . . . . . . . .3.24View Component Details. . . . . . . . . . . . . . . . . . . . . . . . . . . . . . . . . . . . . . . . . . . . . . . . . . . . . . . . . . . . . . . . . . . . .3.26
View Pending Patient Transfers . . . . . . . . . . . . . . . . . . . . . . . . . . . . . . . . . . . . . . . . . . . . . . . . . . . . . . . . . . . . . . . . . .3.27Transfer Patient Meds . . . . . . . . . . . . . . . . . . . . . . . . . . . . . . . . . . . . . . . . . . . . . . . . . . . . . . . . . . . . . . . . . . . . . . . . . . .3.28Stock Transferred Meds . . . . . . . . . . . . . . . . . . . . . . . . . . . . . . . . . . . . . . . . . . . . . . . . . . . . . . . . . . . . . . . . . . . . . . . . .3.28Transfer Patient to this Cabinet . . . . . . . . . . . . . . . . . . . . . . . . . . . . . . . . . . . . . . . . . . . . . . . . . . . . . . . . . . . . . . . . . .3.29Remove Patient’s Own Meds (POMs) . . . . . . . . . . . . . . . . . . . . . . . . . . . . . . . . . . . . . . . . . . . . . . . . . . . . . . . . . . . .3.29
Medication LabelsAutomatic Printing . . . . . . . . . . . . . . . . . . . . . . . . . . . . . . . . . . . . . . . . . . . . . . . . . . . . . . . . . . . . . . . . . . . . . . . . . . . . .3.31Print Medication Labels On Demand . . . . . . . . . . . . . . . . . . . . . . . . . . . . . . . . . . . . . . . . . . . . . . . . . . . . . . . . . . . .3.33Print Medication Labels After Issue . . . . . . . . . . . . . . . . . . . . . . . . . . . . . . . . . . . . . . . . . . . . . . . . . . . . . . . . . . . . . .3.35Medication Labels That Do Not Print or Are Unusable . . . . . . . . . . . . . . . . . . . . . . . . . . . . . . . . . . . . . . . . . . . .3.37Medication Labels for Nurse-prepared Medication Orders . . . . . . . . . . . . . . . . . . . . . . . . . . . . . . . . . . . . . . . .3.37Medication Labels for Items Stocked in Multiple Bins . . . . . . . . . . . . . . . . . . . . . . . . . . . . . . . . . . . . . . . . . . . . .3.37Medication Labels That Print with Gray Boxes . . . . . . . . . . . . . . . . . . . . . . . . . . . . . . . . . . . . . . . . . . . . . . . . . . . .3.37Scanning Bar Codes . . . . . . . . . . . . . . . . . . . . . . . . . . . . . . . . . . . . . . . . . . . . . . . . . . . . . . . . . . . . . . . . . . . . . . . . . . . .3.37
Cycle Count
DiscrepanciesHow to Recognize Discrepancies . . . . . . . . . . . . . . . . . . . . . . . . . . . . . . . . . . . . . . . . . . . . . . . . . . . . . . . . . . . . . . . . . 5.1How to Read the Discrepancy by User Report . . . . . . . . . . . . . . . . . . . . . . . . . . . . . . . . . . . . . . . . . . . . . . . . . . . . . 5.1
How the Sample Discrepancy Occurred. . . . . . . . . . . . . . . . . . . . . . . . . . . . . . . . . . . . . . . . . . . . . . . . . . . . . . . . 5.2Resolving Discrepancies . . . . . . . . . . . . . . . . . . . . . . . . . . . . . . . . . . . . . . . . . . . . . . . . . . . . . . . . . . . . . . . . . . . . . . . . . 5.3
Color Touch 16.0 User Guide/60-0226 Rev-A © 1999–2011 Omnicell, Inc.
Contents v
Resolve Discrepancy . . . . . . . . . . . . . . . . . . . . . . . . . . . . . . . . . . . . . . . . . . . . . . . . . . . . . . . . . . . . . . . . . . . . . . . . . . 5.3Research Discrepancy . . . . . . . . . . . . . . . . . . . . . . . . . . . . . . . . . . . . . . . . . . . . . . . . . . . . . . . . . . . . . . . . . . . . . . . . . 5.3Report Dispense Errors . . . . . . . . . . . . . . . . . . . . . . . . . . . . . . . . . . . . . . . . . . . . . . . . . . . . . . . . . . . . . . . . . . . . . . . . 5.4
Cabinet ReportsGenerate Reports . . . . . . . . . . . . . . . . . . . . . . . . . . . . . . . . . . . . . . . . . . . . . . . . . . . . . . . . . . . . . . . . . . . . . . . . . . . . . . . . 6.1Available Cabinet Reports . . . . . . . . . . . . . . . . . . . . . . . . . . . . . . . . . . . . . . . . . . . . . . . . . . . . . . . . . . . . . . . . . . . . . . . . 6.1
Transaction Reports . . . . . . . . . . . . . . . . . . . . . . . . . . . . . . . . . . . . . . . . . . . . . . . . . . . . . . . . . . . . . . . . . . . . . . . . . . . 6.1Admin Reports . . . . . . . . . . . . . . . . . . . . . . . . . . . . . . . . . . . . . . . . . . . . . . . . . . . . . . . . . . . . . . . . . . . . . . . . . . . . . . . 6.1Inventory Reports . . . . . . . . . . . . . . . . . . . . . . . . . . . . . . . . . . . . . . . . . . . . . . . . . . . . . . . . . . . . . . . . . . . . . . . . . . . . . 6.2Med Orders Reports. . . . . . . . . . . . . . . . . . . . . . . . . . . . . . . . . . . . . . . . . . . . . . . . . . . . . . . . . . . . . . . . . . . . . . . . . . . 6.2
Report Filter Criteria Details . . . . . . . . . . . . . . . . . . . . . . . . . . . . . . . . . . . . . . . . . . . . . . . . . . . . . . . . . . . . . . . . . . . . . . 6.2OmniExplorer . . . . . . . . . . . . . . . . . . . . . . . . . . . . . . . . . . . . . . . . . . . . . . . . . . . . . . . . . . . . . . . . . . . . . . . . . . . . . . . . . . . 6.3
AdministrationChange Your Password . . . . . . . . . . . . . . . . . . . . . . . . . . . . . . . . . . . . . . . . . . . . . . . . . . . . . . . . . . . . . . . . . . . . . . . . . . 7.1
Strong Password Requirements . . . . . . . . . . . . . . . . . . . . . . . . . . . . . . . . . . . . . . . . . . . . . . . . . . . . . . . . . . . . . . . 7.1Re-enroll Your Fingerprint . . . . . . . . . . . . . . . . . . . . . . . . . . . . . . . . . . . . . . . . . . . . . . . . . . . . . . . . . . . . . . . . . . . . . . . 7.2
General Tips for Enrolling Your Fingerprint . . . . . . . . . . . . . . . . . . . . . . . . . . . . . . . . . . . . . . . . . . . . . . . . . . . . . 7.2Re-enroll Your Fingerprint on Touch & Go G4 . . . . . . . . . . . . . . . . . . . . . . . . . . . . . . . . . . . . . . . . . . . . . . . . . . 7.2Re-enroll Your Fingerprint on Touch & Go G3 . . . . . . . . . . . . . . . . . . . . . . . . . . . . . . . . . . . . . . . . . . . . . . . . . . 7.8
Add New Patient . . . . . . . . . . . . . . . . . . . . . . . . . . . . . . . . . . . . . . . . . . . . . . . . . . . . . . . . . . . . . . . . . . . . . . . . . . . . . . .7.12
MaintenanceChange Printer Paper . . . . . . . . . . . . . . . . . . . . . . . . . . . . . . . . . . . . . . . . . . . . . . . . . . . . . . . . . . . . . . . . . . . . . . . . . . . . 8.1
Change Receipt Paper Roll . . . . . . . . . . . . . . . . . . . . . . . . . . . . . . . . . . . . . . . . . . . . . . . . . . . . . . . . . . . . . . . . . . . . 8.1Test Receipt Printer . . . . . . . . . . . . . . . . . . . . . . . . . . . . . . . . . . . . . . . . . . . . . . . . . . . . . . . . . . . . . . . . . . . . . . . . . . . 8.1Change Label Paper Roll . . . . . . . . . . . . . . . . . . . . . . . . . . . . . . . . . . . . . . . . . . . . . . . . . . . . . . . . . . . . . . . . . . . . . . 8.1Reset and Test the Label Printer . . . . . . . . . . . . . . . . . . . . . . . . . . . . . . . . . . . . . . . . . . . . . . . . . . . . . . . . . . . . . . . 8.2
Clean Cabinet . . . . . . . . . . . . . . . . . . . . . . . . . . . . . . . . . . . . . . . . . . . . . . . . . . . . . . . . . . . . . . . . . . . . . . . . . . . . . . . . . . . 8.2Flash LEDs . . . . . . . . . . . . . . . . . . . . . . . . . . . . . . . . . . . . . . . . . . . . . . . . . . . . . . . . . . . . . . . . . . . . . . . . . . . . . . . . . . . . . . 8.2Test Printer . . . . . . . . . . . . . . . . . . . . . . . . . . . . . . . . . . . . . . . . . . . . . . . . . . . . . . . . . . . . . . . . . . . . . . . . . . . . . . . . . . . . . . 8.3Troubleshoot the Medication Label Printer . . . . . . . . . . . . . . . . . . . . . . . . . . . . . . . . . . . . . . . . . . . . . . . . . . . . . . . 8.4
Unload and Reload Label Roll/Unlock and Relock Release Lever . . . . . . . . . . . . . . . . . . . . . . . . . . . . . . . . 8.4Perform a Test Print . . . . . . . . . . . . . . . . . . . . . . . . . . . . . . . . . . . . . . . . . . . . . . . . . . . . . . . . . . . . . . . . . . . . . . . . . . . 8.4Reset Label Printer . . . . . . . . . . . . . . . . . . . . . . . . . . . . . . . . . . . . . . . . . . . . . . . . . . . . . . . . . . . . . . . . . . . . . . . . . . . . 8.4
View FlexLock Temperature . . . . . . . . . . . . . . . . . . . . . . . . . . . . . . . . . . . . . . . . . . . . . . . . . . . . . . . . . . . . . . . . . . . . . . 8.5Check System Messages . . . . . . . . . . . . . . . . . . . . . . . . . . . . . . . . . . . . . . . . . . . . . . . . . . . . . . . . . . . . . . . . . . . . . . . . . 8.5Hardware Labels . . . . . . . . . . . . . . . . . . . . . . . . . . . . . . . . . . . . . . . . . . . . . . . . . . . . . . . . . . . . . . . . . . . . . . . . . . . . . . . . . 8.5
© 1999–2011 Omnicell, Inc. Color Touch 16.0 User Guide/60-0226 Rev-A

vi Contents
Color Touch 16.0 User Guide/60-0226 Rev-A © 1999–2011 Omnicell, Inc.
1-1
Introduction
How to Use this GuideThis guide is intended for users with privileges to use Color Touch software and covers patient care, cycle count, discrepancy resolution, select administrative tasks, and minor system maintenance.
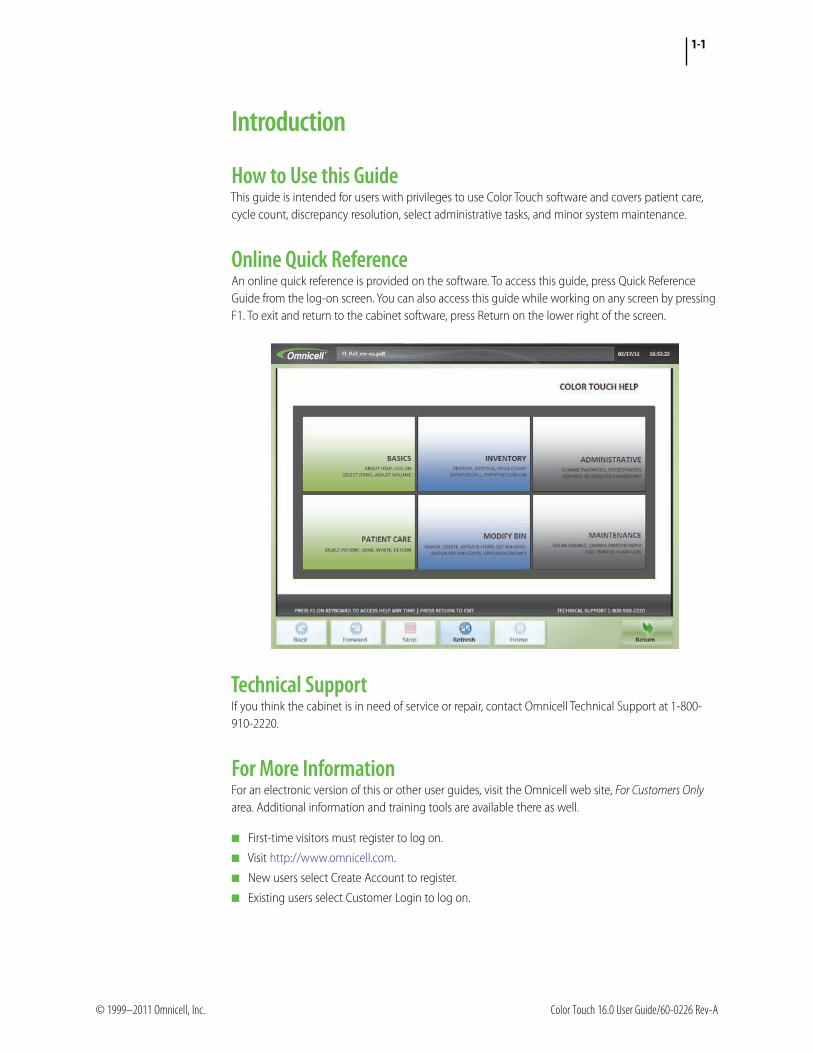
Online Quick ReferenceAn online quick reference is provided on the software. To access this guide, press Quick Reference Guide from the log-on screen. You can also access this guide while working on any screen by pressing F1. To exit and return to the cabinet software, press Return on the lower right of the screen.
Technical SupportIf you think the cabinet is in need of service or repair, contact Omnicell Technical Support at 1-800-910-2220.
For More InformationFor an electronic version of this or other user guides, visit the Omnicell web site, For Customers Only area. Additional information and training tools are available there as well.
■ First-time visitors must register to log on.
■ Visit http://www.omnicell.com.
■ New users select Create Account to register.
■ Existing users select Customer Login to log on.
© 1999–2011 Omnicell, Inc. Color Touch 16.0 User Guide/60-0226 Rev-A

1-2 Introduction
Cabinet Software
Cabinet SoftwareAccess to items stocked in the cabinet is controlled by Color Touch software. Most tasks can be completed by interacting with the screen.
■ Press the screen to make a selection, press buttons to initiate an action, or place cursor in data fields by touching the field.
■ In some cases, it may be necessary to enter information using the keyboard.
■ Arrows and buttons allow you to navigate within a screen or will lead you to another screen.
■ When not in use, the system is configured to default to a screen saver after a designated period of time.
Log-on screen for G3 Console (left) and G4 cabinet console (right) with Color Touch software.
Note: Color Touch 16.0 software is supported on two cabinet consoles: G3 (third generation) automated medication dispensing cabinets and G4 (fourth generation) automated medication dispensing cabinets. The functionality is the same on both cabinet consoles. This guide show screens for G4 cabinet console. Your screens may differ.
Color Touch 16.0 User Guide/60-0226 Rev-A © 1999–2011 Omnicell, Inc.
Introduction 1-3Main Menu
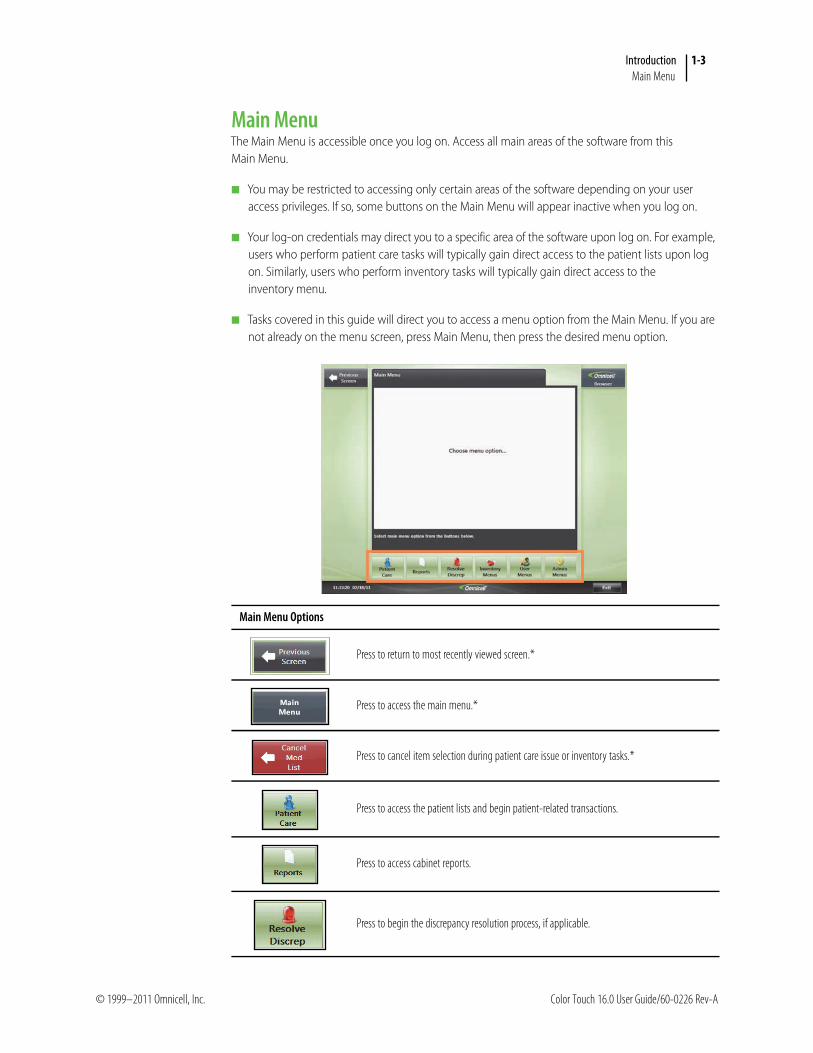
Main MenuThe Main Menu is accessible once you log on. Access all main areas of the software from this Main Menu.
■ You may be restricted to accessing only certain areas of the software depending on your user access privileges. If so, some buttons on the Main Menu will appear inactive when you log on.
■ Your log-on credentials may direct you to a specific area of the software upon log on. For example, users who perform patient care tasks will typically gain direct access to the patient lists upon log on. Similarly, users who perform inventory tasks will typically gain direct access to the inventory menu.
■ Tasks covered in this guide will direct you to access a menu option from the Main Menu. If you are not already on the menu screen, press Main Menu, then press the desired menu option.
Main Menu Options
Press to return to most recently viewed screen.*
Press to access the main menu.*
Press to cancel item selection during patient care issue or inventory tasks.*
Press to access the patient lists and begin patient-related transactions.
Press to access cabinet reports.
Press to begin the discrepancy resolution process, if applicable.
© 1999–2011 Omnicell, Inc. Color Touch 16.0 User Guide/60-0226 Rev-A

1-4 Introduction
Main Menu
Press to perform inventory task such as restock, cycle count, and assigning items.
Press to add a temporary patient or change your password.
Press to delete a patient or test the printer.
Press to log off the cabinet.
Note: *This button changes depending on where you are in the software.
Main Menu Options
Color Touch 16.0 User Guide/60-0226 Rev-A © 1999–2011 Omnicell, Inc.

2-1
Basics
Log OnUse of Omnicell cabinets is restricted, and all users are required to log on. There are multiple ways to log on depending on your hospital policy. Your User ID is created for you when you are first entered into the system.
■ Some cabinets may require strong passwords. See Strong Password Requirements on page 7-1.
■ A log-on message may be displayed after successfully entering your password. Press OK to acknowledge message.
■ Always remember to log off when you are done on the system and whenever you exit the room. This ensures that no transactions can be completed by another user with your ID.
Log on with Magnetic Card or Bar Code Card ReaderYou can also use a card reader when acting as a witness. You must be listed as a magnetic card user on the OmniCenter or you will not be recognized as a valid user after the card is swiped. Entry will be denied.
1. Swipe the card through the reader on the cabinet.
Vertical orientation: magnetic strip faces to the right.
Horizontal orientation: magnetic strip faces away from you.
2. Enter your password.
3. Press Enter on the keyboard.
Log on with User ID and PasswordPasswords are case sensitive. If you are having difficulty entering your password, make sure Caps Lock is off. When Caps Lock is on, a message is displayed on the log-on screen, lower right.
■ Enter your User ID and password.
■ Press Enter on the keyboard.
© 1999–2011 Omnicell, Inc. Color Touch 16.0 User Guide/60-0226 Rev-A
2-2 Basics
Log On
Log on with Touch & Go Your fingerprint must be enrolled in the system before you can log on with a fingerprint scan. If you are not enrolled, contact your designated fingerprint enroll to register your fingerprint. Until then, log on with your User ID and password.
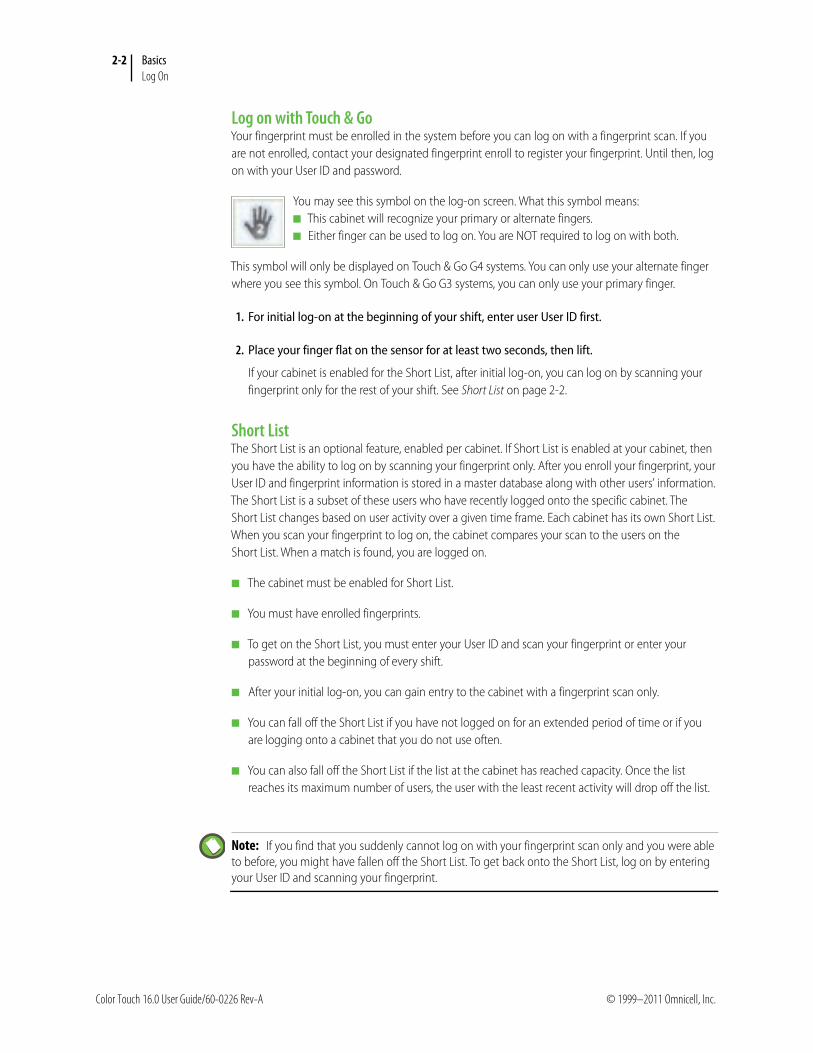
You may see this symbol on the log-on screen. What this symbol means:■ This cabinet will recognize your primary or alternate fingers.■ Either finger can be used to log on. You are NOT required to log on with both.
This symbol will only be displayed on Touch & Go G4 systems. You can only use your alternate finger where you see this symbol. On Touch & Go G3 systems, you can only use your primary finger.
1. For initial log-on at the beginning of your shift, enter user User ID first.
2. Place your finger flat on the sensor for at least two seconds, then lift.
If your cabinet is enabled for the Short List, after initial log-on, you can log on by scanning your fingerprint only for the rest of your shift. See Short List on page 2-2.
Short ListThe Short List is an optional feature, enabled per cabinet. If Short List is enabled at your cabinet, then you have the ability to log on by scanning your fingerprint only. After you enroll your fingerprint, your User ID and fingerprint information is stored in a master database along with other users’ information. The Short List is a subset of these users who have recently logged onto the specific cabinet. The Short List changes based on user activity over a given time frame. Each cabinet has its own Short List. When you scan your fingerprint to log on, the cabinet compares your scan to the users on the Short List. When a match is found, you are logged on.
■ The cabinet must be enabled for Short List.
■ You must have enrolled fingerprints.
■ To get on the Short List, you must enter your User ID and scan your fingerprint or enter your password at the beginning of every shift.
■ After your initial log-on, you can gain entry to the cabinet with a fingerprint scan only.
■ You can fall off the Short List if you have not logged on for an extended period of time or if you are logging onto a cabinet that you do not use often.
■ You can also fall off the Short List if the list at the cabinet has reached capacity. Once the list reaches its maximum number of users, the user with the least recent activity will drop off the list.
Note: If you find that you suddenly cannot log on with your fingerprint scan only and you were able to before, you might have fallen off the Short List. To get back onto the Short List, log on by entering your User ID and scanning your fingerprint.
Color Touch 16.0 User Guide/60-0226 Rev-A © 1999–2011 Omnicell, Inc.

Basics 2-3Access an Item
Fingerprint Scan Guidelines and Help■ During log-on, fingerprint images on the top right of the screen give you a visual indicator on how
the system is capturing your scan.
■ When the User ID field is highlighted in yellow, this is a prompt to enter your User ID. Enter your User ID and re-attempt your scan.
Access an ItemCabinets are divided into zones that allow the software to control access to items. Pharmacy zones are intended for pharmacy items where more secure control is required. Pharmacy zones can also store supply items. Supply zones are intended for supply items only. Selecting and accessing items vary slightly depending on the zone where the item is stocked.
1. Select the item.
In most cases, items are selected on screen. In some cases, you must select the item by opening a door or drawer first.
Fingerprint Image Guides What User Can Try if They See This Image
Arrows in the window are meant to guide you to better position your fingers on the sensor. The fingerprint image on-screen should fill the window. If it does not, you should re-position your finger on the sensor. Arrows can point up, down, right, or left. Arrow indicators are displayed on Touch & Go G4 systems only.
■ Re-position finger in the direction of the arrow. In this example, you should move your finger up to better fill the sensor.
■ Although Touch & Go G3 systems do not show the arrow indicators, the premise is the same: the fingerprint image should appear centered in the window. If not, you should re-position your fingers on the sensor and make sure your fingerprint covers as much of the sensor as possible.
Try Again indicates that the quality is good enough, but there is no match with this fingerprint scan. After a few attempts at scanning, you may see the message Fingerprint not recognized.
■ Pay attention to placement: it is important to match the same placement as during enrollment.
■ Make sure the same finger is being used as during enrollment.
■ Enter user ID first. The system may not have found a match on the Short List. See Short List on page 2-2.
Pharmacy items stocked in cabinet drawers. Select item on screen.
Pharmacy items stocked on cabinet shelves. Select item on screen
Remote item, supply or pharmacy Select item on screen.
Supply item stocked in a pharmacy zone in the cabinet, drawer or shelf.
Select item on screen.
Items stocked in a FlexLock-controlled refrigerator. Select item on screen.
Supply item stocked in a supply zone in a supply drawer or shelf.
Open the door or drawer and press the green button.
ReturnItem
© 1999–2011 Omnicell, Inc. Color Touch 16.0 User Guide/60-0226 Rev-A
2-4 Basics
Conclude Tasks
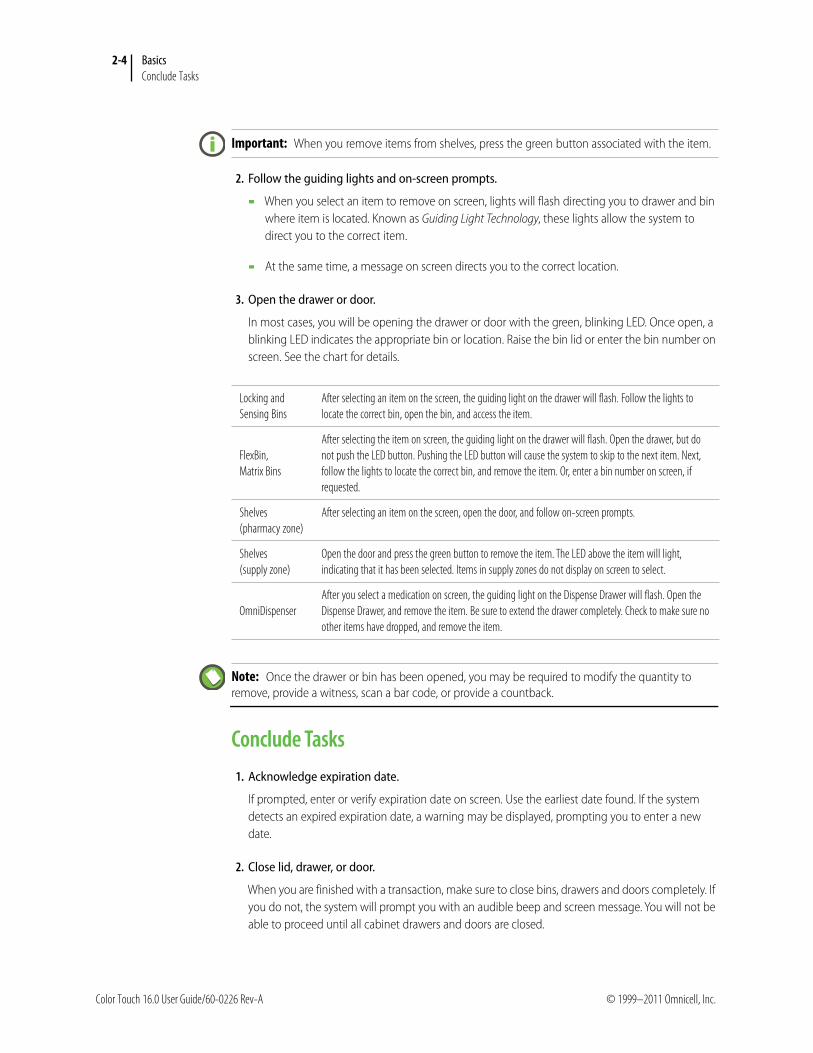
2. Follow the guiding lights and on-screen prompts.
When you select an item to remove on screen, lights will flash directing you to drawer and bin where item is located. Known as Guiding Light Technology, these lights allow the system to direct you to the correct item.
At the same time, a message on screen directs you to the correct location.
3. Open the drawer or door.
In most cases, you will be opening the drawer or door with the green, blinking LED. Once open, a blinking LED indicates the appropriate bin or location. Raise the bin lid or enter the bin number on screen. See the chart for details.
Conclude Tasks
1. Acknowledge expiration date.
If prompted, enter or verify expiration date on screen. Use the earliest date found. If the system detects an expired expiration date, a warning may be displayed, prompting you to enter a new date.
2. Close lid, drawer, or door.
When you are finished with a transaction, make sure to close bins, drawers and doors completely. If you do not, the system will prompt you with an audible beep and screen message. You will not be able to proceed until all cabinet drawers and doors are closed.
Important: When you remove items from shelves, press the green button associated with the item.
Locking and Sensing Bins
After selecting an item on the screen, the guiding light on the drawer will flash. Follow the lights to locate the correct bin, open the bin, and access the item.
FlexBin, Matrix Bins
After selecting the item on screen, the guiding light on the drawer will flash. Open the drawer, but do not push the LED button. Pushing the LED button will cause the system to skip to the next item. Next, follow the lights to locate the correct bin, and remove the item. Or, enter a bin number on screen, if requested.
Shelves (pharmacy zone)
After selecting an item on the screen, open the door, and follow on-screen prompts.
Shelves (supply zone)
Open the door and press the green button to remove the item. The LED above the item will light, indicating that it has been selected. Items in supply zones do not display on screen to select.
OmniDispenserAfter you select a medication on screen, the guiding light on the Dispense Drawer will flash. Open the Dispense Drawer, and remove the item. Be sure to extend the drawer completely. Check to make sure no other items have dropped, and remove the item.
Note: Once the drawer or bin has been opened, you may be required to modify the quantity to remove, provide a witness, scan a bar code, or provide a countback.
Color Touch 16.0 User Guide/60-0226 Rev-A © 1999–2011 Omnicell, Inc.

Basics 2-5Browse Drug Info
3. Log off.
Press Exit to log off the cabinet when you are finished with your transactions. This ensures that no transactions can be completed by another user with your ID.
Browse Drug InfoBrowse Drug Info is an optional feature that allows you to access the Gold Standard Media (GSM) Clinical Pharmacology online database to reference drug information. This option is available on cabinets that have internet connectivity. Access the database after an item is selected during the following tasks:
■ Issue and when viewing Med Order detail
■ Return
■ Supplemental Restock
■ Destock
1. Press Browse Drug Info, if available at the cabinet.
2. Select the specific medication from the linked choices on screen. Related options may also be displayed. Or, depending on how the item is set, you may be sent directly to the item monograph.
3. Select a a menu option: Patient Education, Indications/Dosage, Administration, Contraindications, Interactions, Adverse Reactions, Costs, and Chemical Structures.
4. Press Return to return to the task.
Locking and Sensing Bins
Close lid. If you are finished with all items in drawer, close the drawer.
FlexBin, Matrix Bins
Press Next Item to go to the next item, if necessary. If you are finished with all items in drawer, close the drawer.
Shelves (pharmacy zone)
Close the door.
Shelves (supply zone)
Close the door. To conclude restock in this location, press the green button associated with the item first.
Remote Items Press Next Item to go to the next item, if necessary. If you are finished with remote items, press Item Completed.
Note: Browse Drug Info is not available for nurse-prepared or pharmacy-prepared med orders.
© 1999–2011 Omnicell, Inc. Color Touch 16.0 User Guide/60-0226 Rev-A

2-6 Basics
Check Item Availability
Check Item AvailabilityCheck Item Availability is an optional feature that allows you to find other cabinets that stock the selected item. This option is available on cabinets that are enabled for this feature and that are communicating with the OmniCenter over the network. Access the database after an item is selected during the following tasks:
■ Issue and when viewing Med Order detail
■ Return
■ Supplemental Restock
■ Destock
1. Press Check Item Availability, if available at the cabinet.
2. Press Return to return to the task.
Change Unit of Issue/Unit of Stock The ability to change the unit type is an optional feature that allows you to choose between unit of issue and unit of stock for an item at your discretion. This option is an area-level setting. If enabled, all cabinets in the area will support it. Follow hospital policy. An option is selected for you by default. Changing the unit type is available during the following tasks:
■ Issue ■ Return■ Supplemental Restock■ Destock
Note: Check Item Availability is not available for nurse-prepared or pharmacy-prepared med orders.
Note: If your cabinet is connected to a network printer, then you may have the option to print information from Browse Drug Info or Item Availability screens. Press Print if available on screen.
Color Touch 16.0 User Guide/60-0226 Rev-A © 1999–2011 Omnicell, Inc.
Basics 2-7Scan a Bar Code
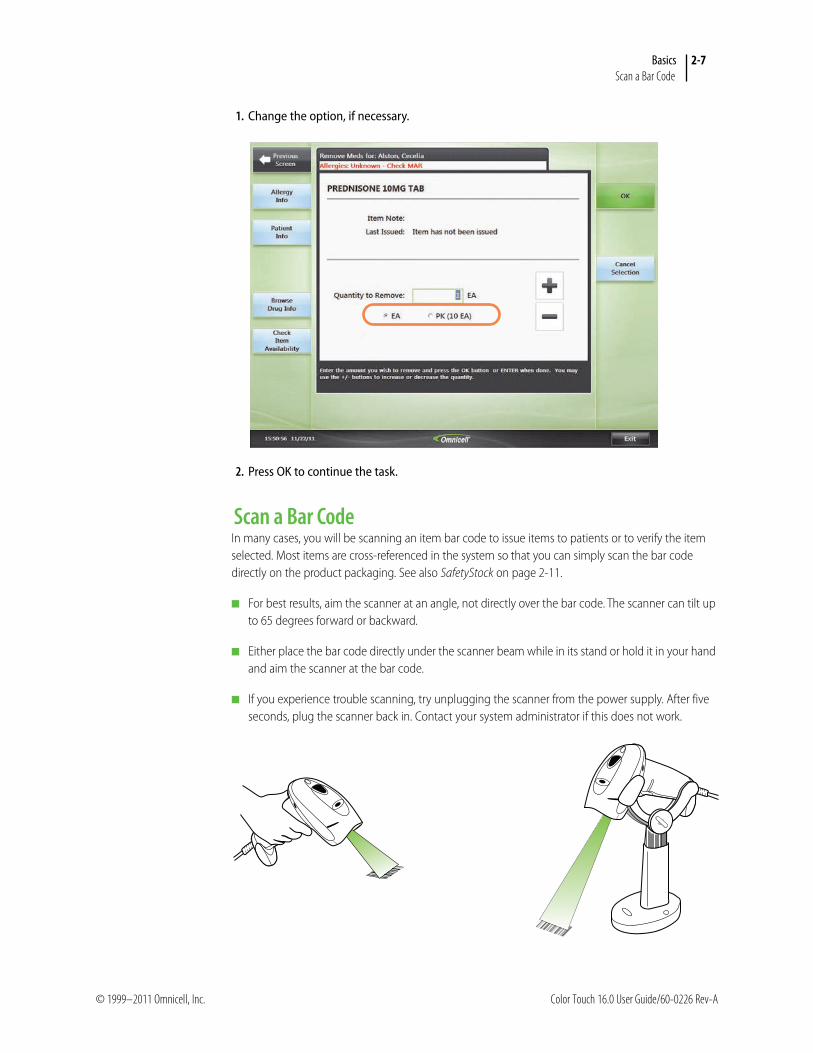
1. Change the option, if necessary.
2. Press OK to continue the task.
Scan a Bar CodeIn many cases, you will be scanning an item bar code to issue items to patients or to verify the item selected. Most items are cross-referenced in the system so that you can simply scan the bar code directly on the product packaging. See also SafetyStock on page 2-11.
■ For best results, aim the scanner at an angle, not directly over the bar code. The scanner can tilt up to 65 degrees forward or backward.
■ Either place the bar code directly under the scanner beam while in its stand or hold it in your hand and aim the scanner at the bar code.
■ If you experience trouble scanning, try unplugging the scanner from the power supply. After five seconds, plug the scanner back in. Contact your system administrator if this does not work.
© 1999–2011 Omnicell, Inc. Color Touch 16.0 User Guide/60-0226 Rev-A
2-8 Basics
Verify Item by Bar Code Scan
Verify Item by Bar Code ScanFollow these steps to verify an item via a bar code scan. You can also use this procedure to troubleshoot the bar code scanner by scanning a known item to make sure that it is reading the scan correctly. Supported for the following bar code types:
■ Pre-pack bar codes: created on site when repackaging bulk items.
■ Product bar codes: vendor or manufacturer created bar codes.
1. On the log-on screen, press Bar Code Item Check.
2. Scan the item bar code. The Bar Code Scan Item Check screen displays information about the item.
Sort Lists
Select a PatientFollow these steps to select a patient. You can also select to issue a Floor Charge item from this list.
1. From the Main Menu, press Patient Care.
2. Select the desired patient from the patient list screen. See Patient Lists on page 3-16.
3. To find the desired patient, enter the first few letters of the patient’s last name or use the up/down arrows.
4. If your patient is not on the Local or Global lists, press Add New Patient to add him or her to the system. See Patient Lists on page 3-16 and Add New Patient on page 7-12.
Once you select a patient, you are ready to begin issuing items.
Sort Patient List
When selecting a patient during patient care tasks, you can sort the list of patients by patient name or room number.
■ Press Sort by Room to list patients according to room number.
■ Press Sort by Name to list patients according to patient name.
Sort Item Lists on Scheduled Meds tab:
■ Press Sort by Due Time to sort the list by due time.
■ Press Sort by Alphabet to sort the list in alphabetical order.
Note: If populated, the Partial Dose List displays the names of patients who have undocumented medication issues. Complete waste documentation as soon as possible.
Global Patient List Lists all patients in the facility.
Color Touch 16.0 User Guide/60-0226 Rev-A © 1999–2011 Omnicell, Inc.
Basics 2-9Patient Medication Accounts (PMAs)
Patient Bar CodesYou can also scan a patient’s bar code by using the bar code scanner or by entering the patient ID number on the keyboard. Once the number is entered, the system searches for the patient in the list of patients.
If a match is found, the patient screen automatically appears. If no match is found, a new patient screen appears and you can enter information for the new patient. When the OmniCenter polls the cabinet, the new patient will be assigned a permanent ID number and the patient status will be updated from temporary.
Patient Medication Accounts (PMAs)The PMA is a method that the system uses to track the amount of medication you have outstanding for a given patient. When you issue an item for a patient, the system automatically creates a PMA in your name for the amount of the item you removed. The PMA remains open until you reconcile the outstanding amount. When the PMA equals zero, it is considered reconciled and closed.
The PMA is comprised of three components: unique user (you), unique patient, and unique item (by item ID). If you issue two different items to the same patient, you will have two PMAs open for that patient.
Only certain items will require this type of reconciliation, as determined by your facility. Examples may include high-security, high-priority medications. Follow your hospital policy for reconciliation requirements.
PMA Details■ You can have multiple PMAs open for a single patient and multiple PMAs open for multiple
patients.
■ Once the PMA is closed, it is no longer active in the system. If you issue the same item to the same patient again, you will generate a new PMA.
■ You can reconcile after each individual issue (recommended) or a sum of the total amount outstanding.
Local Patient List Lists all patients in the patient’s area.
Partial Dose List Displays a list of patients who have undocumented medication issues.
Amount added to PMA Amount subtracted from PMA
You issue an item from the cabinet to administer it to a patient.
You indicate how much of the item was actually administered to the patient on screen.
You choose to automatically commit the previous dose as administered during the current issue of the item. This prompt is configurable.
You return the item to the cabinet.
You record a waste amount.
© 1999–2011 Omnicell, Inc. Color Touch 16.0 User Guide/60-0226 Rev-A

2-10 Basics
Witness Requirements
■ You are allowed to waste and return against another user’s PMA, but you can only issue to your own.
■ You can issue at any cabinet that stocks the item, and you can waste and return at any cabinet (provided an issue was already generated).
■ If you have an open PMA, it is your responsibility to reconcile the outstanding amount.
Outstanding Waste PromptsSystem prompts may appear to remind you of outstanding waste. Note the following:
■ Upon log-on, you see the message You Have Partial Dose Issues That Require Waste. Press OK to acknowledge.
■ Before selecting a patient, the Partial Dose List tab is populated with patient names who have undocumented medication issues.
■ After selecting a patient and pressing the Waste Meds button, the Meds Requiring Waste tab is displayed by default with a list of items that require waste.
■ You generate a transaction report and filter it to view Waste Required Items.
Witness Requirements Some transactions may require a witness. Witness requirements may be set per item, per control level, or per transaction, as determined by hospital policy. You must have your witness present to enter their user ID and password otherwise you will not be permitted to complete the transaction. It is recommended that your witness remain present during the entire length of activity on the cabinet in case they are prompted to enter their user ID and password multiple times during the same log-on session.
Single WitnessThe cabinet can be enabled to allow a witness to enter their user ID and password once to satisfy witness requirements for multiple items during the same logon session (per transaction type and per patient). For items requiring witness verification, your witness may be required to re-enter their user ID and password during the same logon session when:
■ You change transaction type (issue, return, waste). The witness must enter their user ID and password once per transaction type.
■ You select more than one patient. The witness must enter their user ID and password once per patient for each transaction type.
■ You issue an item against a med order or you waste partial dose at time of issue. Single witness is not supported for these transactions; therefore, the witness must enter their user ID and password for each item individually.
■ If single witness is disabled, a witness is required for each bin that requires witness verification.
The chart below lists the transactions that may require a witness.
Color Touch 16.0 User Guide/60-0226 Rev-A © 1999–2011 Omnicell, Inc.

Basics 2-11SafetyStock
SafetyStockSafetyStock is a safety feature that enforces the use of bar code scans to ensure accurate placement of items during restock and/or to confirm correct item access during patient issue. This feature helps to support both patient safety and workflow efficiency. Only items that have been set to require this confirmation will prompt you for a bar code scan.
.
Transaction Witness Rules Single-Witness Support
Issue with MOA witness icon is displayed to the left of the listed med order, indicating that a witness is required. See Med Order Icons on page 3-20.
No
Issue w/o MO Witness may be required. Yes
Issue Partial Dose Required if item selected for partial dose issue requires a witness. No
Return, Waste, Admin Witness, Cycle CountRequired if item selected requires a witness. Items can be configured so that a witness is required for some transactions and not others.
Yes
Discrepancy Resolution
■ If the user to resolve the discrepancy is the same user listed on the transaction, a witness will always be required.
■ If user is not the user listed on the transaction, then witness requirements follow configuration settings, none or by control level. If the configuration is set to a control level that matches the item in the discrepancy, then a witness will be required.
No
Prompt What Will I See? When Will I See It? What to Do
IssueConfirmation
Scan Item Bar Code
At time of bin access during item issue if the item is set to require it. Only applies when the item is selected the Remove Meds screen and is stocked in a pharmacy zone.
Scan the item bar code. If you cannot scan the item bar code, press Override Bar Code Scan. Select an override reason. Press OK. Continue issue.
ReturnConfirmation
■ Scan Item Bar Code
■ Scan Bin Bar Code
At time of bin access during item return if the item is set to require it. Only applies when the item is selected from the Return Meds screen and is stocked in a pharmacy zone.
Scan the bin or item bar code. Continue return.
Set Bin Level Scan Item Bar CodeAfter a bin is accessed to set the bin level for the item.
Scan the item or bin bar code. Continue to set bin level.
Verify ItemBar Code
N/AOn Welcome/Login screen if SafetyStock is enabled.
Press Bar Code Item Check. Scan bar code. Item and bar code information is displayed on screen. Press Previous Screen to go back.
© 1999–2011 Omnicell, Inc. Color Touch 16.0 User Guide/60-0226 Rev-A

2-12 Basics
SafetyStock
Color Touch 16.0 User Guide/60-0226 Rev-A © 1999–2011 Omnicell, Inc.
3-1
Patient Care
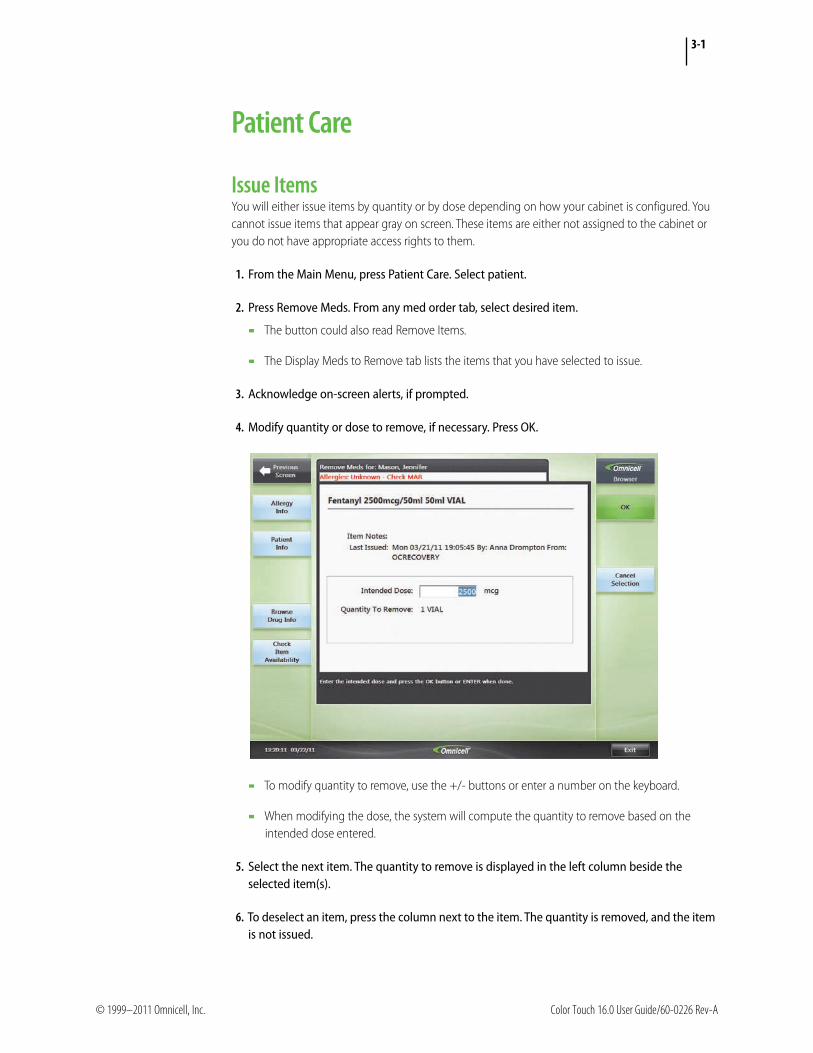
Issue ItemsYou will either issue items by quantity or by dose depending on how your cabinet is configured. You cannot issue items that appear gray on screen. These items are either not assigned to the cabinet or you do not have appropriate access rights to them.
1. From the Main Menu, press Patient Care. Select patient.
2. Press Remove Meds. From any med order tab, select desired item.
The button could also read Remove Items.
The Display Meds to Remove tab lists the items that you have selected to issue.
3. Acknowledge on-screen alerts, if prompted.
4. Modify quantity or dose to remove, if necessary. Press OK.
To modify quantity to remove, use the +/- buttons or enter a number on the keyboard.
When modifying the dose, the system will compute the quantity to remove based on the intended dose entered.
5. Select the next item. The quantity to remove is displayed in the left column beside the selected item(s).
6. To deselect an item, press the column next to the item. The quantity is removed, and the item is not issued.
© 1999–2011 Omnicell, Inc. Color Touch 16.0 User Guide/60-0226 Rev-A

3-2 Patient Care
Issue Nurse-prepared Med Orders
7. When all desired items are selected, press Remove Now.
8. Indicate whether to commit previous dose as administered, if prompted. If you choose to commit, the previous dose amount is considered administered. The previous PMA is then closed.
9. Follow prompts and guiding lights to access item(s).
10. Have your witness enter user ID/password, if prompted.
11. Confirm or edit correct count for the item, if prompted. Press OK. Re-confirm the count, if prompted. This indicates a discrepancy. See Resolving Discrepancies on page 5-3.
12. Scan issue confirmation bar code, if prompted.
13. Confirm or edit issue information:
Edit or enter expiration date, if requested. Use the earliest date found.
If you need to modify the existing bin level amount, press Change Bin Level. Enter the correct quantity Press OK. The bin level is updated.
Press Skip Item to remove the specific item from the selection list and discontinue issue of it.
14. Close bin, door, or drawer. Press Exit to conclude.
Issue Nurse-prepared Med OrdersNurse-prepared orders are medication orders comprised of multiple items. Nurse-prepared med orders are always identified with this icon on the Remove Meds, Med Order Detail, and item access screens. Follow hospital policy for preparing the med order, if necessary. Selecting the med order selects all components for this med order. Once selected for issue, you will be guided to each item until all items are issued. Components that make up the order are listed on screen.
■ If any of items that make up this med order is unavailable, either not stocked or assigned at this cabinet or the item is not within your access rights, then the med order will not be available for issue. The med order will appear gray on screen.
■ If you have selected an item from a different med order or as an override and that item is a component of this med order, you will not be allowed to issue this med order.
■ Overrides are not permitted for nurse-prepared med orders.
■ Browse Drug Info and Check Item Availability are not available for these items.
1. From the Main Menu, press Patient Care. Select patient.
2. Press Remove Meds. From any med order tab, select desired nurse-prepared med order. The med order will be labeled Nurse-prepared on screen.
3. Acknowledge on-screen alerts, if prompted.
Color Touch 16.0 User Guide/60-0226 Rev-A © 1999–2011 Omnicell, Inc.

Patient Care 3-3Issue Nurse-prepared Med Orders
4. Press Component Details or Med Order Details to view additional item and/or med order details, if necessary. See View Component Details on page 3-6 and View Med Order Information on page 3-18.
The Component Details button is configurable and may not be available on all cabinets.
5. Press OK.
6. Press Remove Now.
The quantity listed on left-hand side indicates the total number of items that make up this med order, which also indicates the number of items you will be removing from the cabinet for this med order. You can select the quantity to deselect the entire med order, but you cannot decrease this number.
Note: You cannot modify the intended dose or quantity.
© 1999–2011 Omnicell, Inc. Color Touch 16.0 User Guide/60-0226 Rev-A

3-4 Patient Care
Issue Nurse-prepared Med Orders
7. Follow prompts and guiding lights to access items.
Items that are part of the nurse-prepared order are identified on screen by the nurse-prepared icon. Also, the med order display name is referenced on screen.
8. Have your witness enter user ID/password, if prompted.
Note: You cannot remove individual items from issue on this screen. If you must remove items from issue, press Display Meds to Remove. This tab lists all components of the med order individually. Removing an item from this list will result in a partial issue of the med order. Follow hospital policy.
Color Touch 16.0 User Guide/60-0226 Rev-A © 1999–2011 Omnicell, Inc.
Patient Care 3-5Issue Nurse-prepared Med Orders
9. Confirm or edit correct count for the item(s), if prompted. Press OK. Re-confirm the count, if prompted. This indicates a discrepancy. See Resolving Discrepancies on page 5-3.
10. Scan issue confirmation bar code, if prompted.
11. Confirm or edit issue information:
Edit or enter expiration date, if requested. Use the earliest date found.
If you need to modify the existing bin level amount, press Change Bin Level. Enter the correct quantity Press OK. The bin level is updated.
Press Skip Item to remove the specific item from the selection list and discontinue issue of it. Press Yes to confirm or No to cancel. See Skip Items During Nurse-prepared Med Order Issue on page 3-5.
12. Close bin, door, or drawer.
13. Press Exit to conclude.
14. Prepare the med order prior to patient administration. Follow hospital policy.
Skip Items During Nurse-prepared Med Order IssueDuring an issue of a nurse-prepared med order, you may notice that there is insufficient quantity of a particular item to fulfill the med order needs. In this case, you can opt to skip the item. This means that you will skip issue of this item only not the entire med order, which will result in a partial issue of the med order. Follow hospital policy.
1. On the item access screen during med order issue, press Skip Item.
Once you select skip, do not attempt to remove the item from the cabinet, even if there is some quantity available.
2. Acknowledge the confirmation prompt.
Press Yes to confirm the skip and move on to the next item.
Press No to cancel the skip and return to the item access screen.
© 1999–2011 Omnicell, Inc. Color Touch 16.0 User Guide/60-0226 Rev-A

3-6 Patient Care
Override a Med Order
View Component DetailsThe components that make up the nurse-prepared order are provided in a list at the bottom of the Remove Meds screen. In addition, you may also be able to press a button to access a list of components that make up the med order.
1. From the Remove Meds screen, press Component Details. Each item in the med order is listed on screen, including dosage and strength information.
2. Press OK to return to the Remove Meds screen.
Override a Med OrderAn override allows you to issue an item that is stocked in the cabinet independent of the current medication order. Overrides can be initiated after selecting the item from a med order tab or from the stocked items tab.
■ You must have permission to override a med order. Some users may be given permission to override conditionally, always, or never.
■ Items may be set to require a med order for issue or to allow or deny overrides.
■ Witnesses may be required to override med orders.
■ You cannot override items stocked in patient-specific bins.
■ You cannot override nurse-prepared med orders.
■ You cannot override a pharmacy-prepared med order.
Note: The Component Details button is configurable and may not be available on all cabinets.
Color Touch 16.0 User Guide/60-0226 Rev-A © 1999–2011 Omnicell, Inc.
Patient Care 3-7Issue Item(s) of Equivalent Dose
1. Select the item from one of the med order lists or from stocked items.
If you select an item from the stocked items list that does not allow overrides or you do not have rights to override, then you will see the message Med Order Override Denied.
2. Press Override Med Order.
This button is displayed only if the item permits overrides and you have rights to override.
3. Press Yes if asked if you want to override this med.
4. Select a reason for the override or press Enter Override Reason to type a reason. Press OK.
5. Enter the intended dose or quantity. Press OK.
6. Press Remove Now.
If you selected the item from the stocked items tab, the quantity to remove is displayed to the left of the item. If you selected the item from a med order tab, the item is labeled Overridden.
7. Follow on-screen prompts/guiding lights to access item(s).
8. Have your witness enter user ID/password, if prompted.
9. Confirm or edit the correct count for the item, if prompted. Press OK. Re-confirm the count, if prompted. This indicates a discrepancy. See Resolving Discrepancies on page 5-3.
10. Scan issue confirmation bar code, if prompted.
11. Close bin, door, or drawer.
12. Press Exit to conclude.
Previous issue information is listed to the right of the item on the item list. Previous issue transactions that were overrides are marked by two asterisks (**).
Issue Item(s) of Equivalent DoseYou can issue the an item in a different strength to equal the total strength of the med order. You can issue an equivalent dose at your discretion or if the item on the med order is not stocked or available in the cabinet. You must have rights to the equivalent items.
1. Select a med order from the Active Med Orders, PRN Only, or Scheduled Meds, tab.
If the selected item is out of stock, and the item is part of an equivalent dose group, then a message automatically displays indicating that the issue can be fulfilled with equivalent items for the med order item. Press OK. Then, proceed with step 3 on page 3-8.
2. Press Select Equivalent Meds.
The list of equivalent items are displayed.
© 1999–2011 Omnicell, Inc. Color Touch 16.0 User Guide/60-0226 Rev-A
3-8 Patient Care
Issue Kits and Procedures
3. Use the +/- buttons to enter the intended dose. You cannot issue an equivalent amount greater than the med order.
Dose and quantity list to the left of the item.
At the bottom of the screen, a summary of the equivalent issue is listed.
To deselect an item, click to the left of the item, where the quantity is displayed. The quantity is removed, and the item will not be issued. All equivalent dose selections for that med order are deselected.
4. Press Remove Now.
5. Follow prompts and guiding lights to access item(s).
6. Have your witness enter user ID/password, if prompted.
7. Confirm or edit correct count for the item, if prompted. Press OK. Re-confirm the count, if prompted. This indicates a discrepancy. See Resolving Discrepancies on page 5-3.
8. Scan issue confirmation bar code, if prompted.
9. Close bin, door, or drawer.
10. Press Exit to conclude
Issue Kits and Procedures
1. From the Main Menu, press Patient Care. Select patient.
2. From the patient’s screen, do the following:
To issue kits, press Remove Kits.
To issue a chargeable procedure, press Select Procedure.
3. Select desired item:
From the Kits tab, select the desired kit
Select the desired procedure from the list.
4. Acknowledge on-screen alerts, if prompted.
5. Verify quantity on screen, if necessary.
For procedures, Charge for Procedure is automatically checked to indicate that the patient will be charged. This cannot be modified. Skip to step 13 on page 3-9.
6. To add another kit, press Add Kits.
The Display Selected Items tab lists the items from the kit(s) that will be added.
Color Touch 16.0 User Guide/60-0226 Rev-A © 1999–2011 Omnicell, Inc.

Patient Care 3-9Return Items
7. Press Remove Now.
8. Follow prompts and guiding lights to access item(s).
9. Have your witness enter user ID/password, if prompted.
10. Confirm or edit correct count for the item, if prompted. Press OK. Re-confirm count, if prompted. This indicates a discrepancy. See Resolving Discrepancies on page 5-3.
11. Scan issue confirmation bar code, if prompted.
12. Close bin and drawer.
13. Press Exit to conclude.
Return ItemsDepending on your hospital’s policies, you will either be directed to return an item back to the original location in the cabinet or to the external return bin. Return any unused items first before proceeding with your waste transactions and before attempting to complete the transaction.
■ You can return an item from one issue (recommended) or from multiple issues.
■ You can enter the return amount on any cabinet.
■ Miscellaneous returns, returns not linked to their original issue transaction, may allow the option to select the unit of return—each or box. This option is configurable and may not be available on all cabinets.
1. From the Main Menu, press Patient Care. Select patient.
2. Press Return Meds. The button could also read Return Items.
For multi-dose items, confirm that you want to return the container with an unused portion back to the original bin or to the return bin. Skip to step 5 on page 3-10.
3. From the Meds Eligible to Return tab, select the desired item(s). This list displays your open PMAs.
The Display Meds to Return tab lists the items that you have selected to return.
If you cannot find the item you need to return on this list, press All Meds. to show a list of open PMAs for you or another user.
If you still cannot find the item you need to return, select the item from the Stocked Meds tab. Reconciling an item from this tab may result in a Miscellaneous Return.
© 1999–2011 Omnicell, Inc. Color Touch 16.0 User Guide/60-0226 Rev-A
3-10 Patient Care
Return Items
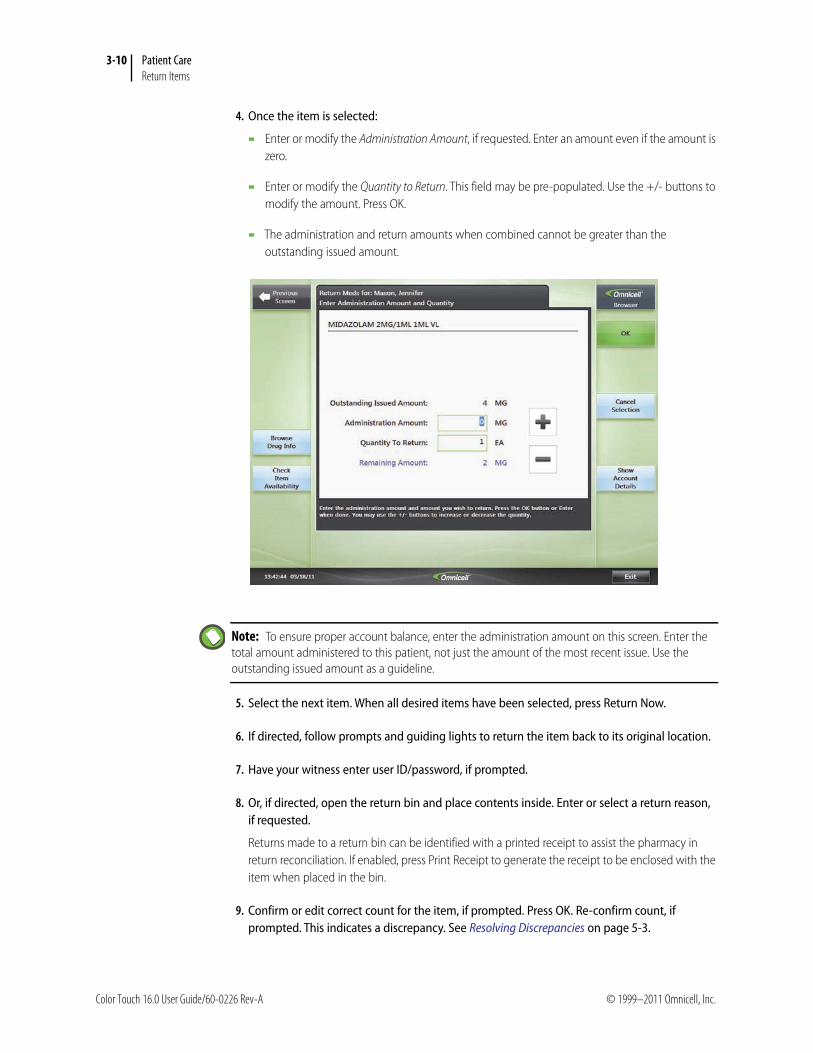
4. Once the item is selected:
Enter or modify the Administration Amount, if requested. Enter an amount even if the amount is zero.
Enter or modify the Quantity to Return. This field may be pre-populated. Use the +/- buttons to modify the amount. Press OK.
The administration and return amounts when combined cannot be greater than the outstanding issued amount.
5. Select the next item. When all desired items have been selected, press Return Now.
6. If directed, follow prompts and guiding lights to return the item back to its original location.
7. Have your witness enter user ID/password, if prompted.
8. Or, if directed, open the return bin and place contents inside. Enter or select a return reason, if requested.
Returns made to a return bin can be identified with a printed receipt to assist the pharmacy in return reconciliation. If enabled, press Print Receipt to generate the receipt to be enclosed with the item when placed in the bin.
9. Confirm or edit correct count for the item, if prompted. Press OK. Re-confirm count, if prompted. This indicates a discrepancy. See Resolving Discrepancies on page 5-3.
Note: To ensure proper account balance, enter the administration amount on this screen. Enter the total amount administered to this patient, not just the amount of the most recent issue. Use the outstanding issued amount as a guideline.
Color Touch 16.0 User Guide/60-0226 Rev-A © 1999–2011 Omnicell, Inc.
Patient Care 3-11Record Waste
10. Scan item or bin confirmation bar code, if prompted.
11. Close bin, door, or drawer.
12. Press Exit to conclude.
Show Account DetailIf you need to view your PMA details to verify transactions and totals, you can press Show Account Details, available during waste or return transactions. Account details displays an itemized list of transaction types and amounts that you have in the selected PMA. The total quantity in this detail should equal the Outstanding Issued Amount on the waste and return screens.
Record Waste Follow these steps to waste an item.
■ You can waste an item from one issue (recommended) or from multiple issues.
■ You can enter the waste amount on any cabinet.
■ Complete returns first. See Return Items on page 3-9.
1. From the Main Menu, press Patient Care. Select patient.
2. From the patient screen, press Waste Meds.
3. From the Meds Requiring Waste tab, select the item that you need to waste.
If you cannot find the item you need to waste on this list, press All Meds to show a list of all undocumented items by all users.
If you still cannot find the item you need to waste on this list, you can select it from the Stocked Meds tab. Reconciling an item from the Stocked Meds tab may result in a Miscellaneous Waste.
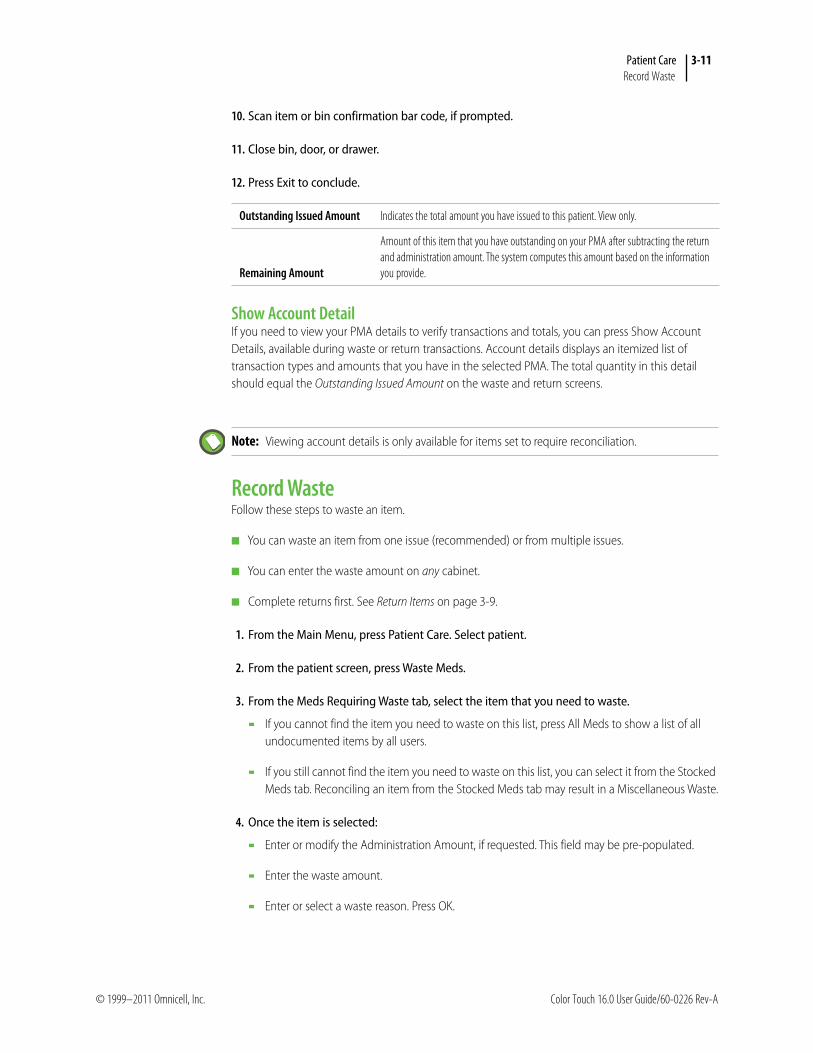
4. Once the item is selected:
Enter or modify the Administration Amount, if requested. This field may be pre-populated.
Enter the waste amount.
Enter or select a waste reason. Press OK.
Outstanding Issued Amount Indicates the total amount you have issued to this patient. View only.
Remaining Amount
Amount of this item that you have outstanding on your PMA after subtracting the return and administration amount. The system computes this amount based on the information you provide.
Note: Viewing account details is only available for items set to require reconciliation.
© 1999–2011 Omnicell, Inc. Color Touch 16.0 User Guide/60-0226 Rev-A
3-12 Patient Care
Use Volume Converter
5. Acknowledge on-screen alerts, if prompted.
6. Have your witness enter user ID/password, if requested.
7. Indicate whether you want to place the contents into the return bin, if prompted.
If yes, press Yes. Press Access Return Bin Now. Place waste in return bin; close lid. Wastes made to a return bin can be identified with a printed receipt to assist the pharmacy in waste reconciliation. If enabled, press Print Receipt to generate the receipt to be enclosed with the item when placed in the bin.
If no, press No. Press Record Waste Now. Follow hospital policy for properly disposing of waste.
8. Submit the waste receipt to pharmacy if required by hospital policy.
9. Press Exit to conclude.
Use Volume ConverterThe converter computes measurements for liquid medications.
1. From the Wasting Meds screens, press Volume Converter.
2. Enter either volume or amount. Press OK.
The give amount and waste amount will be displayed on screen and print on the cabinet receipt.
Waste Partial Dose During IssueUse these procedures to waste part of a medication during item issue. The ability to waste partial doses at time of issue is a configurable option. If it is not available, wastes must be performed separately from issue transactions.
Color Touch 16.0 User Guide/60-0226 Rev-A © 1999–2011 Omnicell, Inc.

Patient Care 3-13Waste Partial Dose During Issue
1. During issue, after you select the item, edit the default Intended Dose. Press OK.
The quantity to remove is noted in the left margin.
2. Press Remove Now.
3. Follow prompts and guiding lights to access item(s).
4. Have your witness enter user ID/password, if prompted.
5. Confirm or edit correct count for the item, if prompted. Press OK. Re-confirm count, if prompted. This indicates a discrepancy. See Resolving Discrepancies on page 5-3.
6. Press Waste Partial Dose. This button is displayed only after you access the bin.
7. Modify the waste amount, if necessary. Press OK.
The waste amount is computed automatically based on the intended partial dose.
© 1999–2011 Omnicell, Inc. Color Touch 16.0 User Guide/60-0226 Rev-A

3-14 Patient Care
Considerations for Specific Item Types
8. Have your witness enter user ID/password, if prompted.
9. Close the bin, door, or drawer.
10. Press Exit to conclude.
Considerations for Specific Item TypesFloor Charge Items The patient list may include an entry for Floor Charge, which typically appears as first or last entry, or alpha sorted in the list, depending on how your cabinet is configured. Floor charge items can be extra rolls of cabinet printer paper, paychecks, keys, surgical masks, etc.
■ Issue floor charge items as you would other items except, instead of selecting a patient, select Floor Charge instead. Your facility may use a different term for Floor Charge.
Implant Items Implant items are typically stocked in supply zones. The system can track information embedded within the item’s packaging bar codes, which can include lot number, serial number, and/or expiration date. The implant tracking feature prompts you to scan a bar code when issuing implant items. You must scan or enter the tracking number for each individual item package.
Multi-dose Items A container that holds more than one dose may be considered a multi-dose item. If you are issuing a multi-dose item, the amount you remove will be in units of issue, not total package amount. Return the container when finished. Multi-dose items can be returned to the original bin without incrementing the count. The system calculates waste amounts based on the strength amount of the unit of issue, not the total package.
Color Touch 16.0 User Guide/60-0226 Rev-A © 1999–2011 Omnicell, Inc.

Patient Care 3-15View Patient and Transaction Info
View Patient and Transaction InfoAll transactions associated with a patient are tracked by the system and can be generated on screen. Once you select a patient, information about that patient can be accessed, and transactions can be initiated.
You can log on to any cabinet in the system to initiate a transaction.
Patient ManagementPress Patient Management from the patient screen to review the patient’s admission stats.
Active Omni Cabinet in which all med order items are stocked for the patient.
Area Patient’s active room number.
Date of Birth Patient’s date of birth; can be used as a second identifier for the patient.
ICD9 Diagnosis code from ADT or DRG interface.
Med. Rec. # Patient’s medical record number.
Patient ID # Patient’s identification number.
Payor ID Insurance plan identification number.
Physician Patient’s primary doctor.
© 1999–2011 Omnicell, Inc. Color Touch 16.0 User Guide/60-0226 Rev-A

3-16 Patient Care
View Patient and Transaction Info
Allergy InformationKnown patient allergy information is available by pressing Allergy Info from the patient screen. Check MAR if no known allergies are displayed.
Patient ListsThe patient list is displayed as soon as you log on. From the patient list screen, tabs are provided on the bottom of the screen to help you locate the patient you need.
View Last Issued DetailsAll items or kits will display last-issued date and time information. Depending on how your cabinet is configured, you may see cabinet-specific information or system-wide information. System-wide support lists the most recent issue information, per patient and item, from all cabinets. Cabinet-specific support lists the most recent issue information for the cabinet in use only.
Room Patient’s active room number.
Patient Type
CF Confidential (1-4)
ERM Emergency Room
INP Inpatient
MS Other Type (1-4)
OP1 Same Day outpatient
OPB Outpatient in bed
REC Recurring (series) O/P
SDS Same Day Surgery
TMP Temporary Patient
Note: If you have SinglePointe enabled, then you have additional patient-specific functionality available from this screen. You can transfer the patient and/or their meds to this cabinet. You can also stock patient-specific meds or remove any meds that patient brought from home that was stocked in this cabinet. See SinglePointe and PSBs on page 3-23.
Global Patient List Lists all patients in the facility.
Local Patient List Lists all patients in the patient’s area.
Partial Dose List Displays a list of patients who have undocumented medication issues.
My Patients Displays a list of patient assigned to you. This tab is displayed for cabinets used with Anywhere RN.
Note: Last-issued information is not displayed for supply items.
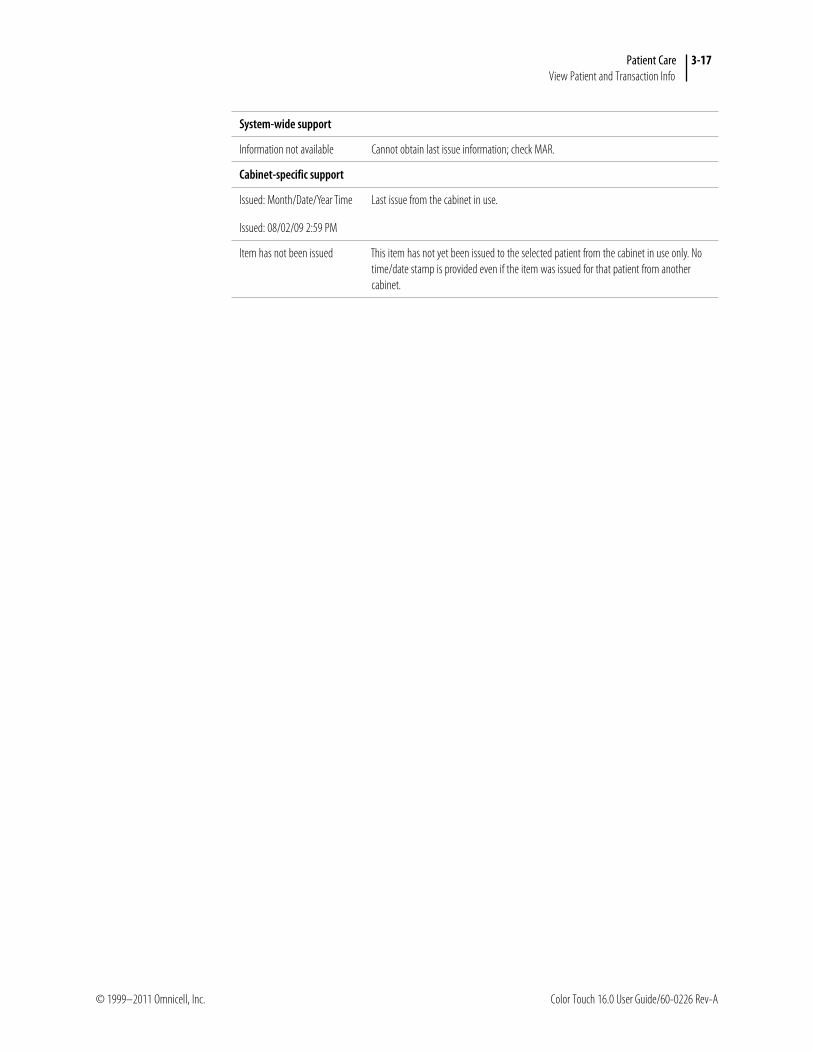
System-wide support
Issued: Month/Date/Year Time
Issued: 08/02/09 2:59 PM
Last issue from the cabinet in use or another cabinet in system.
Item has not been issued This item has not yet been issued to the selected patient.
Active Omni Cabinet in which all med order items are stocked for the patient.
Color Touch 16.0 User Guide/60-0226 Rev-A © 1999–2011 Omnicell, Inc.
Patient Care 3-17View Patient and Transaction Info
Information not available Cannot obtain last issue information; check MAR.
Cabinet-specific support
Issued: Month/Date/Year Time
Issued: 08/02/09 2:59 PM
Last issue from the cabinet in use.
Item has not been issued This item has not yet been issued to the selected patient from the cabinet in use only. No time/date stamp is provided even if the item was issued for that patient from another cabinet.
System-wide support
© 1999–2011 Omnicell, Inc. Color Touch 16.0 User Guide/60-0226 Rev-A

3-18 Patient Care
About Medication Orders
Last Issued AlertIf configured for the cabinet, you may see the message: This item was recently issued on [Date] at [Time]. Do you want to continue? Click OK to acknowledge the message or Cancel to cancel issue of the medication. If a medication has been issued recently, then the last issued information will also be displayed on screen in red, bold text.
About Medication OrdersFor information on multiple-component medication orders, see SinglePointe and PSBs on page 3-23.
View Med Order InformationWhen necessary, you can review a patient’s medication order information. Med order information is available when you access a med order from the Active, Scheduled Meds, and PRN Only tabs.
1. From the Remove Meds screen, press Med Order Info.
Color Touch 16.0 User Guide/60-0226 Rev-A © 1999–2011 Omnicell, Inc.
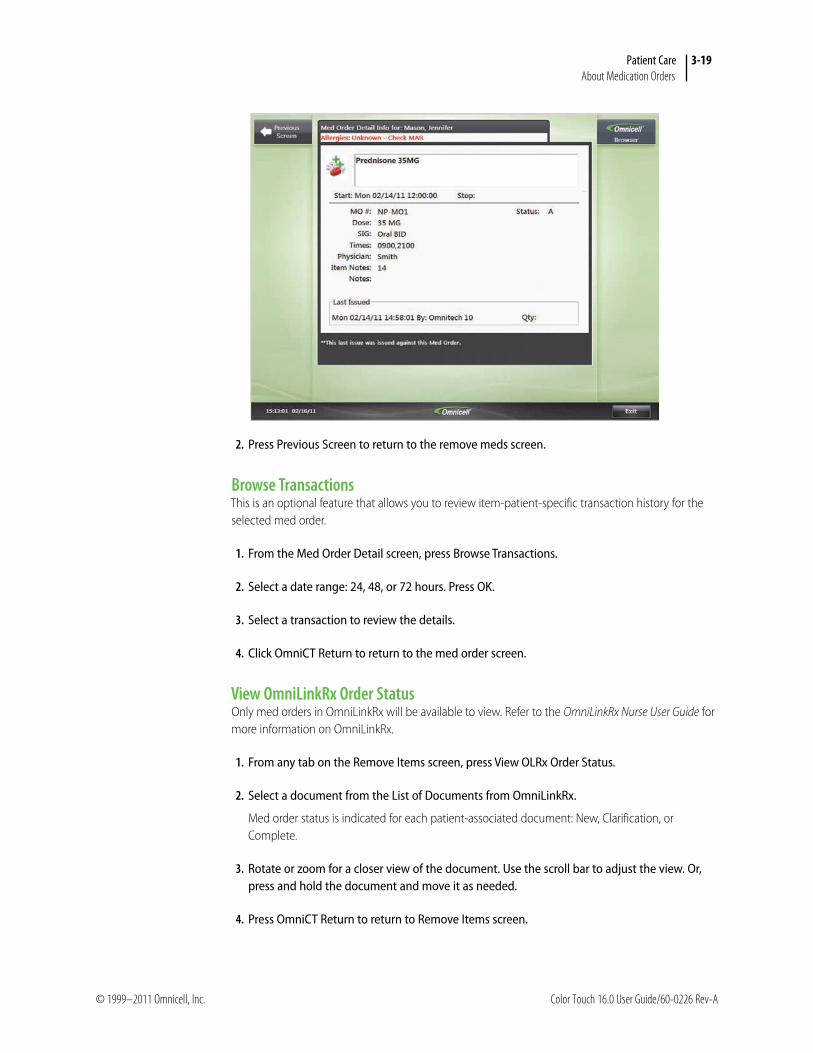
Patient Care 3-19About Medication Orders
2. Press Previous Screen to return to the remove meds screen.
Browse TransactionsThis is an optional feature that allows you to review item-patient-specific transaction history for the selected med order.
1. From the Med Order Detail screen, press Browse Transactions.
2. Select a date range: 24, 48, or 72 hours. Press OK.
3. Select a transaction to review the details.
4. Click OmniCT Return to return to the med order screen.
View OmniLinkRx Order StatusOnly med orders in OmniLinkRx will be available to view. Refer to the OmniLinkRx Nurse User Guide for more information on OmniLinkRx.
1. From any tab on the Remove Items screen, press View OLRx Order Status.
2. Select a document from the List of Documents from OmniLinkRx.
Med order status is indicated for each patient-associated document: New, Clarification, or Complete.
3. Rotate or zoom for a closer view of the document. Use the scroll bar to adjust the view. Or, press and hold the document and move it as needed.
4. Press OmniCT Return to return to Remove Items screen.
© 1999–2011 Omnicell, Inc. Color Touch 16.0 User Guide/60-0226 Rev-A

3-20 Patient Care
About Medication Orders
Med Order IconsCertain med orders will be tagged with an icon or group of icons to visually express important information about the order. The following chart defines these icons.
Item ListsSeveral tabs are available on the remove items screen to provide you with a quick way to find the item you need for the patient. Certain tabs are configurable per cabinet. You may not see all of the tabs listed here.
Display Items to Remove This tab displays the list of items that you have selected to remove for this patient during this session.
Stocked Items This tab is a list of all items stocked in this cabinet. Use this tab when you cannot find an item on the Scheduled Meds or Active Med Order tabs. Note that items stocked in supply zones do not display on this list.
Active Med Orders This tab displays a list of the profiled orders for the patient, including PRN and STAT items. A profiled order is one that has been reviewed and approved by a pharmacist.
Inactive Med Orders This tab displays med orders that are currently inactive, on hold, have not yet started, or have been discontinued.
Page View: Choice of three views: actual size, fit page, and fit width
Rotate Document Views: Rotates document clockwise or counter-clockwise.
Zoom In/Out: Expands portion of document and aids in document interpretation. Zoom out to decrease size of document.
Pages Tab: Thumbnails of document pages are displayed. Select thumbnail to view page.
A witness will be required when issuing this med order.
Give this med order as needed.
These icons indicate a new or recently added med order. The med order is considered new until an issue has been made against it or the first due time has passed.
This med order is not within its scheduled timeframe to be administered to the patient. It cannot be selected for issue. Note that the notebook icon is in color indicating that the med order will be active once within its designated timeframe. These two icons will always appear together when applicable on the Inactive Med Order tab.
This med order is inactive. This icon will only appear on the Inactive Med Order tab and is the most common icon that you will see on this tab.
Color Touch 16.0 User Guide/60-0226 Rev-A © 1999–2011 Omnicell, Inc.
Patient Care 3-21Remote Requests
Scheduled Meds This tab displays a filtered list of active med orders that are due to be administered. This list is updated as scheduled times are updated. From this tab, you have the option to select all items from this list to issue to the patient. If you need to issue an item that is outside of the scheduled time window, press the Active Med Orders tab. PRN and STAT items are not included on this list.
When an item is issued, it is removed from the scheduled meds list. You must exit and log in again to see this update on screen. If you later return the item to the cabinet, the returned item will re-appear on the list if still within its issue timeframe.
PRN Only This tab displays a filtered list of pro re nata (as needed) med orders only. These PRN med orders will remain displayed on the Active Med Orders tab as well.
Remote RequestsRemote requests can be completed for issues and/or returns requested from Anywhere RN™. Anywhere RN is an optional, licensed feature that allows you to create a request for items remotely before accessing the cabinet. For more information on Anywhere RN, see the Anywhere RN User Guide.
It takes several seconds for the remote request to be processed at the cabinet. In addition, if another user is logged into the cabinet when you send the request, then it takes a few seconds after the user logs out for the cabinet to be updated with any new requests. If either condition applies, you can:
■ Wait a few seconds before logging on.
■ Watch for the flashing Data Processing message to clear from the lower left of the log-on screen.
■ If you have already logged on and still do not see your remote requests, log off, wait a few seconds, then log on again.
■ Issue via standard issue process. In this case, remember to cancel your remote request when it eventually processes at the cabinet. See Issue Items on page 3-1.
Notice of Incomplete ItemsItems that could not be issued or returned are displayed on this list. The following is a list of possible reasons:
■ Item is not in database and/or not assigned to cabinet.
■ Cabinet did not have sufficient quantity to complete issue.
■ You do not have access rights to the item.
■ The item is not permitted to be returned to the cabinet and there is no available return bin.
■ The PMA status for the item is closed.
■ There are no active or future med orders for the item or the med order was discontinued.
© 1999–2011 Omnicell, Inc. Color Touch 16.0 User Guide/60-0226 Rev-A
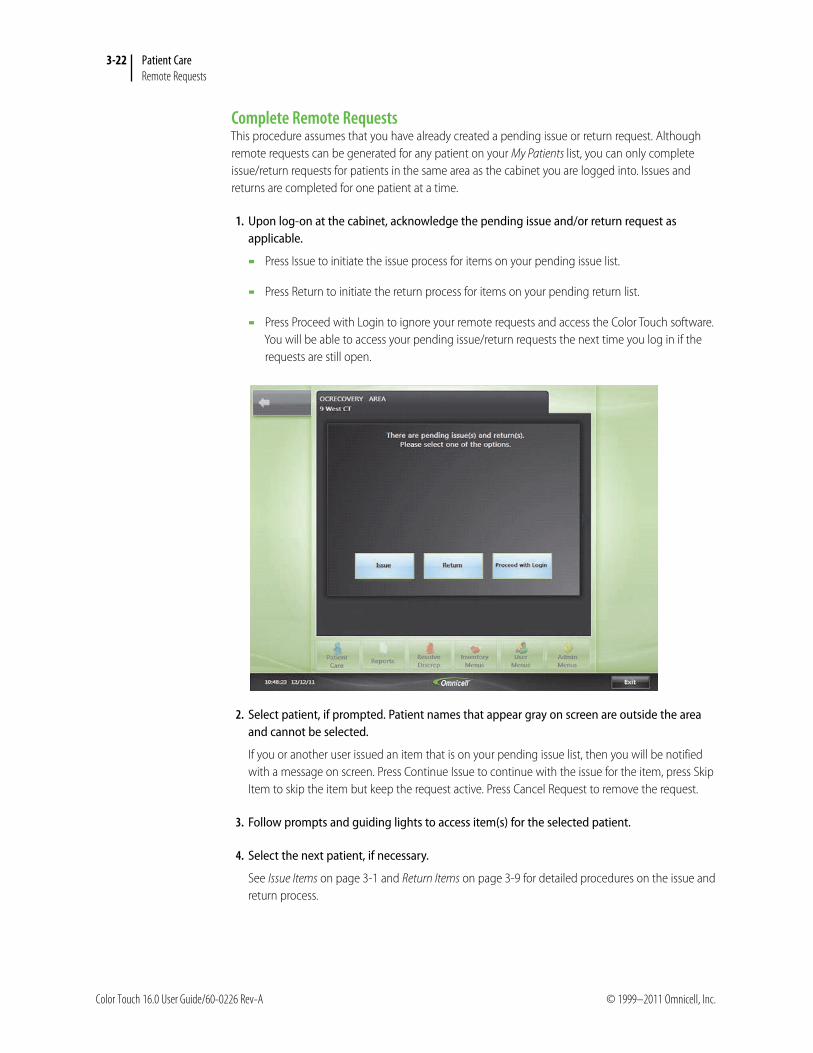
3-22 Patient Care
Remote Requests
Complete Remote RequestsThis procedure assumes that you have already created a pending issue or return request. Although remote requests can be generated for any patient on your My Patients list, you can only complete issue/return requests for patients in the same area as the cabinet you are logged into. Issues and returns are completed for one patient at a time.
1. Upon log-on at the cabinet, acknowledge the pending issue and/or return request as applicable.
Press Issue to initiate the issue process for items on your pending issue list.
Press Return to initiate the return process for items on your pending return list.
Press Proceed with Login to ignore your remote requests and access the Color Touch software. You will be able to access your pending issue/return requests the next time you log in if the requests are still open.
2. Select patient, if prompted. Patient names that appear gray on screen are outside the area and cannot be selected.
If you or another user issued an item that is on your pending issue list, then you will be notified with a message on screen. Press Continue Issue to continue with the issue for the item, press Skip Item to skip the item but keep the request active. Press Cancel Request to remove the request.
3. Follow prompts and guiding lights to access item(s) for the selected patient.
4. Select the next patient, if necessary.
See Issue Items on page 3-1 and Return Items on page 3-9 for detailed procedures on the issue and return process.
Color Touch 16.0 User Guide/60-0226 Rev-A © 1999–2011 Omnicell, Inc.

SinglePointe and PSBs 3-23PSBs and Considerations for Specific Item Types
SinglePointe and PSBs
The information provided in this section is applicable to patient-specific bins and applies only to cabinets enabled for SinglePointe™.
SinglePointe is an optional, licensed, patient-specific solution that provides one access point for all items necessary for a specific patient. Patients’ items are stored in bins assigned to them – patient-specific bins (PSBs). The difference between PSBs and single-item bins is PSBs are assigned to a specific patient with different items stored for that patient’s use. Single-item bins stored shared inventory, used for any patient. A cabinet can have a combination of PSBs and single-item bins.
■ All items stored in a PSB are associated with an active or future med order for a patient.
■ PSBs can store items like inhalers, eye drops, and creams, where multiple administrations are possible for a patient.
■ PSBs can store medications that the patient brings from home, referred to as Patient’s Own Meds (POMs).
■ If the patient requires transfer to a new location during their hospital stay, their assigned medications can be transferred with them.
■ Patient-specific items can only be issued against an active med order.
■ Patient-specific items can be returned to a PSB, a single-item bin, or to the return bin, depending on hospital policy.
PSBs and Considerations for Specific Item Types
Multi-use ItemsMulti-use items can be returned to PSBs provided that the location allows multi-use returns, and the item is associated with an active or future med order.
■ If the item was issued from a single-item bin, then you will be directed to a PSB for the return automatically, even if a PSB was not previously assigned to that patient. Subsequent issues of the item will occur from the newly assigned PSB.
■ Once the patient starts using the multi-use item, it cannot be returned to the single-item bin.
■ Multi-use items are charged upon initial use from the single-item bin. The item is not credited when returned back to the PSB.
■ If the multi-use item is out of stock in the PSB, then you will be directed to a single-item bin if stock is available. You can then issue a new, unused item.
Patient’s Own Medications (POMs)POMs cannot be returned to a single-item bin. At time of discharge, POMs are either returned to the patient, external return bin, or to pharmacy, depending on cabinet configuration.
© 1999–2011 Omnicell, Inc. Color Touch 16.0 User Guide/60-0226 Rev-A

3-24 SinglePointe and PSBs
Issue Pharmacy-prepared Med Orders
Pharmacy-prepared Medication OrdersA pharmacy-prepared medication order is a med order comprised of multiple items that are prepared by the pharmacy prior to stocking at a patient-specific bin at the cabinet. The components are listed together on one medication order but removed from the cabinet as one item.
Issue Pharmacy-prepared Med OrdersPharmacy-prepared med orders are comprised of multiple items that the pharmacy has prepared for a specific patient. Pharmacy-prepared med orders are identified with this icon on the Remove Meds, Med Order Detail, and item access screens.
■ You must have appropriate access rights to issue this item, which includes all components that make up the pharmacy-prepared item. If you do not, the med order will appear gray on screen and you will not be allowed to issue it.
■ If the med order is unavailable, either not stocked or assigned at this cabinet or the items that make up the med order are not within your access rights, then the med order will not be available for issue. The med order will appear gray on screen.
■ Pharmacy-prepared med orders can only be stocked in PSBs.
■ Overrides are not permitted for pharmacy-prepared med orders.
■ Browse Drug Info and Check Item Availability are not available for these items.
■ Med orders with Status E cannot be issued. Status E med orders are not dispensable. You will be notified on screen if you attempt to issue a non-dispensable med order.
1. From the Main Menu, press Patient Care. Select patient.
2. Press Remove Meds. From any med order tab, select desired pharmacy-prepared med order. The med order will be labeled Pharmacy-prepared on screen.
3. Acknowledge on-screen alerts, if prompted.
Color Touch 16.0 User Guide/60-0226 Rev-A © 1999–2011 Omnicell, Inc.
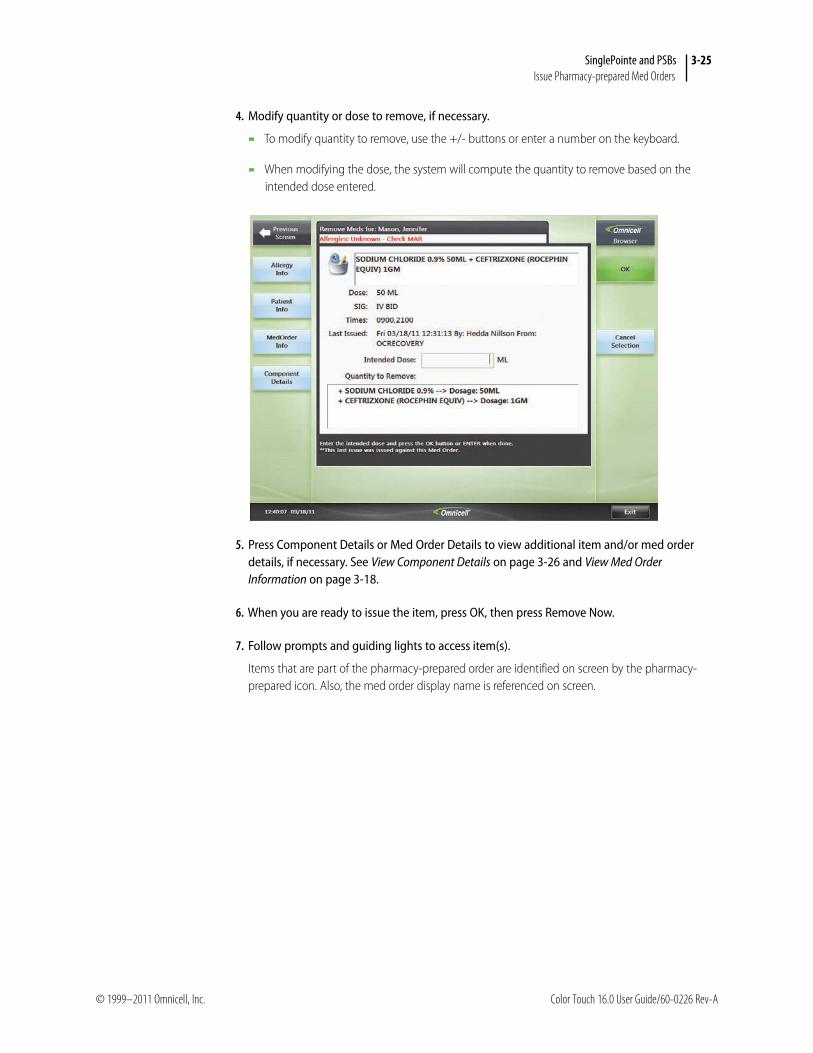
SinglePointe and PSBs 3-25Issue Pharmacy-prepared Med Orders
4. Modify quantity or dose to remove, if necessary.
To modify quantity to remove, use the +/- buttons or enter a number on the keyboard.
When modifying the dose, the system will compute the quantity to remove based on the intended dose entered.
5. Press Component Details or Med Order Details to view additional item and/or med order details, if necessary. See View Component Details on page 3-26 and View Med Order Information on page 3-18.
6. When you are ready to issue the item, press OK, then press Remove Now.
7. Follow prompts and guiding lights to access item(s).
Items that are part of the pharmacy-prepared order are identified on screen by the pharmacy-prepared icon. Also, the med order display name is referenced on screen.
© 1999–2011 Omnicell, Inc. Color Touch 16.0 User Guide/60-0226 Rev-A

3-26 SinglePointe and PSBs
Issue Pharmacy-prepared Med Orders
8. Have your witness enter user ID/password, if prompted.
9. Confirm or edit correct count for the item(s), if prompted. Press OK. Re-confirm the count, if prompted. This indicates a discrepancy. See Resolving Discrepancies on page 5-3.
10. Scan issue confirmation bar code, if prompted.
11. Confirm or edit issue information:
Edit or enter expiration date, if requested. Use the earliest date found.
If you need to modify the existing bin level amount, press Change Bin Level. Enter the correct quantity Press OK. The bin level is updated.
Press Skip Item to remove the specific item from the selection list and discontinue issue of it. Press Yes to confirm or No to cancel.
12. Close bin, door, or drawer.
13. Press Exit to conclude.
View Component DetailsThe components that make up the pharmacy-prepared order are provided in a list at the bottom of the Remove Meds screen. In addition, you may also be able to press a button to access a list of components that make up the med order.
1. From the Remove Meds screen, press Component Details. Each item in the med order is listed on screen, including dosage and strength information.
2. Press OK to return to the Remove Meds screen.
Color Touch 16.0 User Guide/60-0226 Rev-A © 1999–2011 Omnicell, Inc.

SinglePointe and PSBs 3-27View Pending Patient Transfers
View Pending Patient TransfersUse this procedure to access a list of PSBs with items that require transfer to another location.
1. From the patient screen, press Pending Patient Transfers.
This button is only available when there are patient items to transfer and if you have permission to transfer patient items; otherwise, it does not display on screen.
2. From the Patients Pending Transfer list, select a patient.
3. Follow prompts and guiding lights to remove inventory from each PSB, one at a time.
Selecting a patient from this list initiates the transfer patient meds process. Once the PSB is selected, the process for removing the items is the same. For more detail, see Transfer Patient Meds on page 3-28.
4. Press OK to confirm transfer and return to the Patients Pending Transfer list.
5. Select another patient with a pending transfer or press Previous Screen to return to the patient list.
Note: The Component Details button is configurable and may not be available on all cabinets.
© 1999–2011 Omnicell, Inc. Color Touch 16.0 User Guide/60-0226 Rev-A
3-28 SinglePointe and PSBs
Transfer Patient Meds
Transfer Patient MedsFollow these steps to remove items from PSBs for transfer to a new cabinet.
■ You must have permission to transfer patient items.
■ If applicable, the Pending Patient Transfers button is displayed on the patient selection screen. Press this button to initiate the transfer process, then skip to step 4 on page 3-28.
1. From the Main Menu, press Patient Care. Select patient.
2. Press Patient Management.
3. Press Transfer Patient Meds.
4. Follow prompts and guiding lights to remove inventory from each patient-specific bin, one at a time.
You cannot transfer discontinued items. Follow prompts to return discontinued items to the external return bins or to pharmacy, if necessary.
5. Have your witness enter user ID/password, if prompted.
6. Confirm or edit correct count for the item, if prompted. Press OK. Re-confirm count, if prompted. This indicates a discrepancy. See Resolving Discrepancies on page 5-3.
7. Press OK to confirm transfer and return to patient screen.
The Transfer Patient Meds receipt prints at the cabinet, if enabled. Keep printed receipt with the item to transfer and physically move all items to the new cabinet.
Stock Transferred MedsUse these procedures to stock patient-specific items to this cabinet during a patient transfer. Stocking transferred meds is similar to the normal restock process, except that items restocked are those that were destocked using the transfer patient meds function at the previous cabinet location.
■ You must have permission to stock transferred meds.
■ Follow hospital policy and procedure for stocking transferred meds.
1. From the Main Menu, press Patient Care. Select patient.
2. Press Patient Management.
3. Press Stock Transferred Meds.
4. Follow on-screen prompts to complete stocking.
Color Touch 16.0 User Guide/60-0226 Rev-A © 1999–2011 Omnicell, Inc.

SinglePointe and PSBs 3-29Transfer Patient to this Cabinet
Transfer Patient to this CabinetManual patient transfers modify the patient’s room assignment and associated cabinet. This may be necessary if the patient transfer must be completed before the ADT system can send the transfer information or in the event that ADT is down. When the transfer is complete, the patient’s information is updated on the cabinet and at the OmniCenter. Active medication orders will follow the patient to the new location.
■ This procedure assumes that you have already removed all meds that were stocked in the old cabinet. See Transfer Patient Meds on page 3-28.
■ You must have permission to transfer a patient.
■ Follow hospital policy for transferring patients to a cabinet.
1. From the Main Menu, press Patient Care. Select patient.
2. Press Patient Management.
3. Press Transfer Patient.
4. Select new location from the list of available rooms.
Upon room selection, the system returns to admin screen, which displays the updated room information.
5. Verify that data processing has concluded on cabinet.
The message Processing Data displays on the lower left of screen. Processing is complete when this message clears.
6. Log off cabinet to complete transfer and transmit the patient transfer data to the OmniCenter.
After the patient transfer is complete, you can stock the patient’s items to this cabinet. See Stock Transferred Meds on page 3-28.
Remove Patient’s Own Meds (POMs)Follow these steps to remove POMs from this cabinet, typically done as part of patient discharge process. Patient’s meds can be returned directly to the patient, the external return bin, or to the pharmacy depending on how the cabinet is configured.
■ You must have permission to remove patient’s meds.
■ Follow hospital policy and procedure for removing patient’s meds.
1. From the Main Menu, press Patient Care. Select patient.
2. Press Patient Management.
Note: This transfer function only allows you to transfer a patient onto the cabinet you are using. You cannot transfer a patient to another cabinet, only from a cabinet to this one.
© 1999–2011 Omnicell, Inc. Color Touch 16.0 User Guide/60-0226 Rev-A

3-30 SinglePointe and PSBs
Remove Patient’s Own Meds (POMs)
3. Press Remove Patient’s Own Meds.
4. Follow prompts and guiding lights to stock inventory to each PSB, one at a time.
5. Have your witness enter their user ID and password, if prompted.
6. Confirm or edit correct count for the item, if prompted. Press OK. Re-confirm count, if prompted. This indicates a discrepancy. See Resolving Discrepancies on page 5-3.
7. Press OK to confirm removal of POMs and return to the patient screen.
8. Follow on-screen prompts for returning items.
The POM Returned to Patient receipt prints at the cabinet automatically. This receipt must be signed by the receiver of the medication for proper record keeping to ensure that the medication has been returned to the patient.
Note: The Pending Patient Transfers button directs you to a list of patients with patient-specific items requiring transfer to another cabinet. See View Pending Patient Transfers on page 3-27.
Color Touch 16.0 User Guide/60-0226 Rev-A © 1999–2011 Omnicell, Inc.

Medication Labels 3-31Automatic Printing
Medication Labels
You can print medication labels at the cabinet during three main workflows:
■ Automatically during medication issue (if item is enabled for auto print).
■ On-demand upon nurse discretion during medication issue (if item is disabled for auto print)
■ After medication issue for previously issued items
Automatic PrintingIf enabled for the item, medication labels will print automatically during medication issue. The medication label prints upon accessing the item.
1. Follow on-screen prompts during issue.
2. Scan bar code on medication package, if prompted.
The medication label prints when you open the bin to remove the medication.
Important: The Integrated Medication Label is designed to assist the nurse in patient-identifying medications issued from the Omnicell cabinet. The design includes many checks and balances to promote safe labeling (i.e., right label for right medication item). Regardless, clinicians should never rely entirely on the issued label to identify the labeled medication. Clinicians should always visually inspect both the medication and the label as part of their workflow process and ensure the medication is accurately represented on the label before affixing to the medication.
Washington, GeorgePt ID: 1234567890123456 DOB: 02/22/1932
Intended Dose: 400 mg
Medroxyprogesterone Acetate(Depo-Provera) 400mg / 1 ml(2.5 ml vial)
Printed by: Jefferson, Thomas Issued: 09/20/2011 13:35
Prep by:
Medication Label Size: 2” x 4”
Beyond Use: 09/20/2011 15:35
Patient Name, Patient ID, Date of BirthDate of birth (DOB) prints if available in ADT.
DoseAmount intended to be
administered to this
patient for this issue.
Medication DescriptionDescription of medication, including alias name
and strength information. Modifiable by pharmacy.
Bar Code (optional)Prints when medication is
configured to include bar
code. Requires successful
SafetyStock bar code scan.
Prep byArea for handwriting
initials of user who
prepared medication for
administration.
Printed byName of user who printed
the label.Beyond Use (optional)Auto-calculated use-by date and time when configured
for the item. Expiration tracking must also be enabled
for the item.
Issued Date and time medication was issued
from cabinet.
© 1999–2011 Omnicell, Inc. Color Touch 16.0 User Guide/60-0226 Rev-A
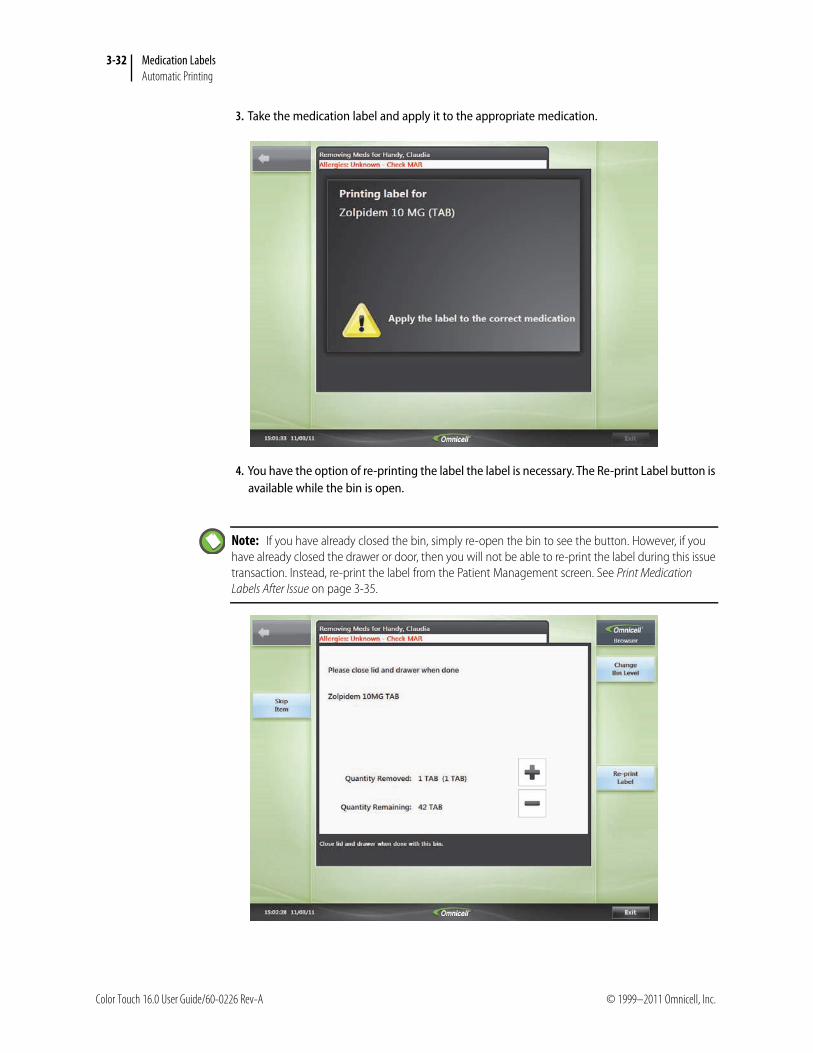
3-32 Medication Labels
Automatic Printing
3. Take the medication label and apply it to the appropriate medication.
4. You have the option of re-printing the label the label is necessary. The Re-print Label button is available while the bin is open.
Note: If you have already closed the bin, simply re-open the bin to see the button. However, if you have already closed the drawer or door, then you will not be able to re-print the label during this issue transaction. Instead, re-print the label from the Patient Management screen. See Print Medication Labels After Issue on page 3-35.
Color Touch 16.0 User Guide/60-0226 Rev-A © 1999–2011 Omnicell, Inc.

Medication Labels 3-33Print Medication Labels On Demand
Print Medication Labels On DemandIf a medication label does not print automatically, you have the option of printing one at your discretion.
1. Follow on-screen prompts during issue.
2. Open the bin to remove the med; press Print Label.
3. Scan the bar code on the medication package, if prompted.
The medication label prints when you open the bin to remove the medication.
4. Take the medication label and apply it to the appropriate medication.
© 1999–2011 Omnicell, Inc. Color Touch 16.0 User Guide/60-0226 Rev-A
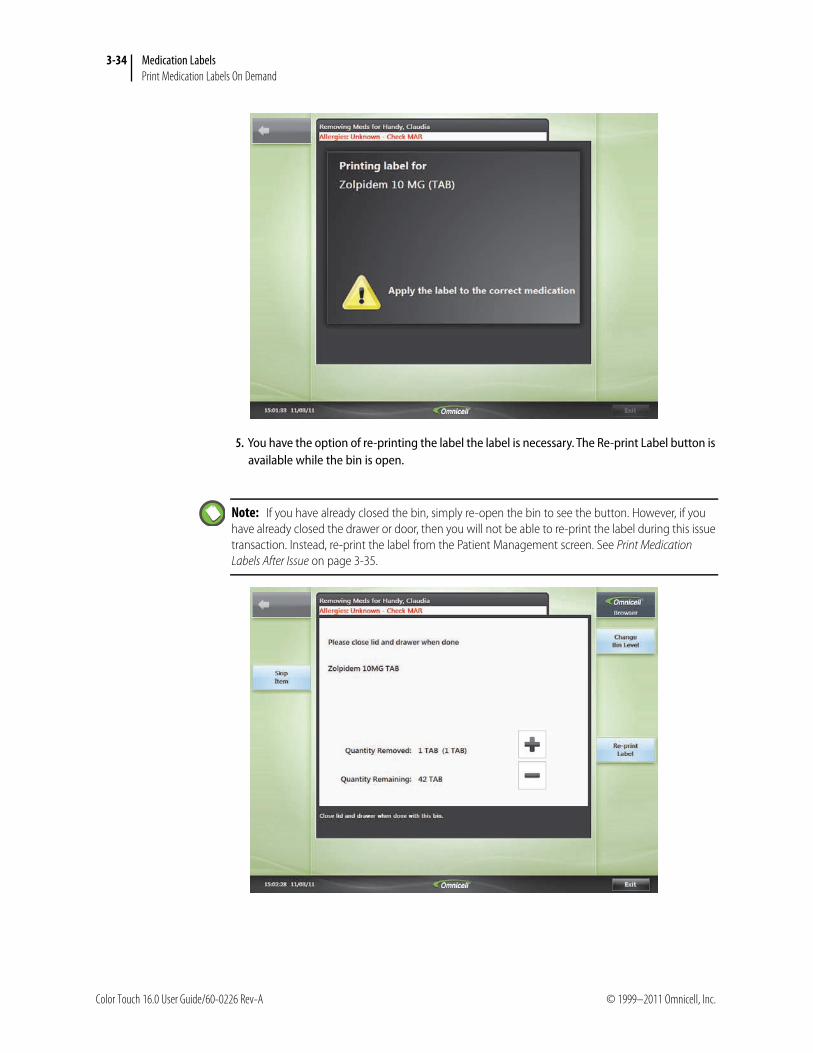
3-34 Medication Labels
Print Medication Labels On Demand
5. You have the option of re-printing the label the label is necessary. The Re-print Label button is available while the bin is open.
Note: If you have already closed the bin, simply re-open the bin to see the button. However, if you have already closed the drawer or door, then you will not be able to re-print the label during this issue transaction. Instead, re-print the label from the Patient Management screen. See Print Medication Labels After Issue on page 3-35.
Color Touch 16.0 User Guide/60-0226 Rev-A © 1999–2011 Omnicell, Inc.

Medication Labels 3-35Print Medication Labels After Issue
Print Medication Labels After IssueFollow these steps if you need to go back and print a medication label for a medication that was previously issued.
■ You might be prompted to scan the bar code for the item.
■ You can choose to print a medication label that was issued by a different user.
■ The medication label will print with the name of the nurse who printed the label, not the name of the nurse who originally issued the item.
1. The nurse logs on and selects a patient.
2. Press Patient Management.
3. Press Print Label.
4. Select a medication from the list.
© 1999–2011 Omnicell, Inc. Color Touch 16.0 User Guide/60-0226 Rev-A
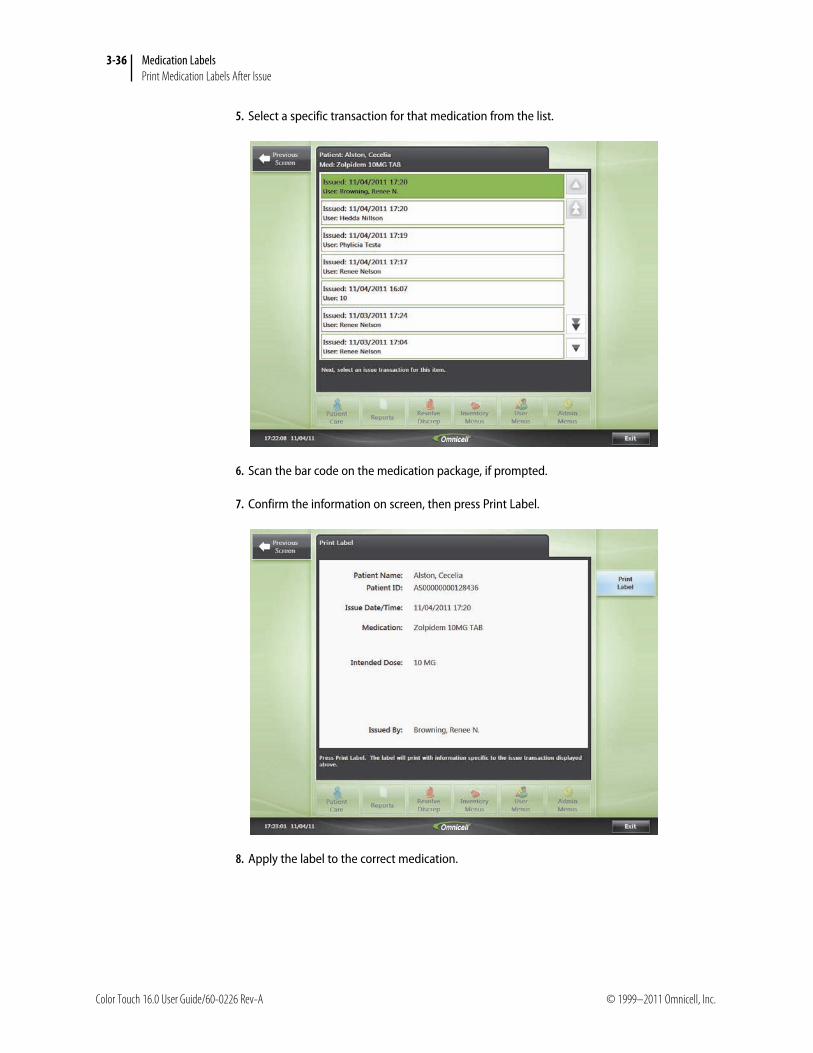
3-36 Medication Labels
Print Medication Labels After Issue
5. Select a specific transaction for that medication from the list.
6. Scan the bar code on the medication package, if prompted.
7. Confirm the information on screen, then press Print Label.
8. Apply the label to the correct medication.
Color Touch 16.0 User Guide/60-0226 Rev-A © 1999–2011 Omnicell, Inc.

Medication Labels 3-37Medication Labels That Do Not Print or Are Unusable
Medication Labels That Do Not Print or Are Unusable■ If the medication label does not print at all, open the printer door and check to see if the label roll
needs to be changed. If so, change the paper roll.
■ If you notice that the medication label is damaged or unreadable, press Re-print Label before you close the bin or log out.
Medication Labels for Nurse-prepared Medication Orders■ One medication label prints for each component.
■ The Med Order ID is printed on each med label.
■ The medication label is titled:
■ # is the total number of components that make up the med order.
Medication Labels for Items Stocked in Multiple BinsDuring medication issue, if you are prompted to access more than one bin to remove the appropriate quantity of that med, note:
■ The medication label prints after you access the last bin for that med.
■ For on-demand printing, the Print Label button is shown when you open the first bin for that med.
■ If you decide to print a label but do not see the button, complete the issue, then go to the Patient Management screen and print from there. See Print Medication Labels After Issue on page 3-35.
Medication Labels That Print with Gray Boxes■ Gray boxes indicate an area for you to fill in. Follow hospital policy for how to fill in information on
the medication label.
■ You might see a gray box for dose, medication name, or beyond-use date.
■ Prep by will always print with a gray box. This is for the initial’s of the user who prepared the medication for administration.
Scanning Bar CodesSome meds will prompt you to scan a bar code. If prompted, scan the bar code on the medication package. Some meds require the scan in order to print the bar code on the medication label while others only require the scan to confirm the correct medication. If you scan the bar code and get an error message, continue the issue transaction.
Nurse Prepared—Components: #
© 1999–2011 Omnicell, Inc. Color Touch 16.0 User Guide/60-0226 Rev-A

3-38 Medication Labels
Scanning Bar Codes
Color Touch 16.0 User Guide/60-0226 Rev-A © 1999–2011 Omnicell, Inc.

4-1
Cycle Count
Cycle counts help to verify the count of items in the cabinet matches the count in the cabinet database. You may be required to perform a cycle count at regular intervals as determined by your facility. Procedures for counting an entire drawer or an individual item are provided in this section.
1. From the Main Menu, press Inventory Menus.
2. Press Cycle Count.
If you need to count an individual item only, press Find Item and select the item from the list. Press OK. Follow the guiding lights to access the item. Open the bin, select the item from the list, or enter bin number, if requested. Then, skip to step 5 on page 4-1.
To count a remote item, press Select Remote Item. Select the item from the list. Then, skip to step 5 on page 4-1.
3. Press the drawer button to open desired drawer to count or open door to count items on shelves.
For items in drawers, if you have already accessed the drawer but only need to count an individual item, press Find Drawer Item (for locking or sensing bins) or Select Drawer Item (for matrix or FlexBins).
4. Access the item: open the lid, enter a bin number, press the green button on the shelf, or select an item on screen.
5. Have your witness enter their user ID and password, if prompted.
6. Enter the current count for the item. Edit or enter the expiration date for the item, if requested. Press OK.
The expected quantity may or may not be displayed on screen depending on how your cabinet is configured.
7. Confirm count if prompted. This indicates a discrepancy. See Resolving Discrepancies on page 5-3.
8. Continue until all items have been counted.
9. Press Flash Un-counted Bins to identify bins that you have not counted yet.
10. To complete the cycle count for this item, do one of the following: close lid, enter the next bin number, press the green button on the shelf, or select the next item on screen.
11. To complete the cycle count for the location, close the drawer or door. For remote items, press Item Completed.
12. Press Exit to conclude.
© 1999–2011 Omnicell, Inc. Color Touch 16.0 User Guide/60-0226 Rev-A

4-2 Cycle Count
Color Touch 16.0 User Guide/60-0226 Rev-A © 1999–2011 Omnicell, Inc.

5-1
Discrepancies
The Color Touch system considers a discrepancy to be the difference between the expected amount of an item stocked in the cabinet and the actual amount. When an item is accessed and the quantity in the bin differs from what the system expects it to be, then a discrepancy is created. This could be triggered during issue, return, restock, cycle count, or bin level change.
Examples of different ways in which a discrepancy will occur include the following:
■ You indicate 1 item to remove on screen but you actually remove 2. ■ You remove a remote item without accessing or indicating it in the system.■ You close the drawer without actually removing the item.■ The count was off during restock or countback.
How to Recognize DiscrepanciesThere are three ways that the system notifies you that a discrepancy exists.
■ Active Resolve Discrepancy ButtonThe Resolve Discrepancy button is active on the login screen, even before you log on. Press to view the resolve discrepancy message. Press OK to return to the login screen. This does not indicate that you created the discrepancy, only that an open discrepancy exists and needs to be addressed.
■ Discrepancy ReceiptA Discrepancy Receipt prints as soon as a discrepancy is triggered. This occurs only if your cabinet is configured to print this receipt. You may need to give this receipt to a nurse manager or to Pharmacy. Follow your hospital’s policies and procedures for how to handle these receipts. See How to Read the Discrepancy by User Report on page 5-1.
■ Screen SaverA screen saver displays in red if there are open discrepancies: There are unresolved discrepancies. Press any key.
How to Read the Discrepancy by User ReportThis report provides information to help you determine why the discrepancy occurred. Two key pieces of information to note on this report is the user who found the discrepancy and the user or users with previous access to the item.
Who found the discrepancy? This is the name of the user whose transaction triggered the discrepancy at the cabinet and not necessarily the user currently logged in. This could be you or another user.
Who had previous access to that item? Who had access to the item before the discrepancy transaction, when and for what purpose? Follow up with the users on this report to figure out what happened.
Print this Page Press Print this Page to print the report on the cabinet printer. The printed report provides further detail on the transactions leading up to the discrepancy. You may need to provide this report to the system administrator.
Note: All discrepancies should be resolved by the end of the shift in which they were created or found.
© 1999–2011 Omnicell, Inc. Color Touch 16.0 User Guide/60-0226 Rev-A

5-2 Discrepancies
How to Read the Discrepancy by User Report
How the Sample Discrepancy OccurredAfter Nurse Browning reviewed the discrepancy report, she determined that the discrepancy most likely occurred with the previous user, Pharmacy Tech Testa.
During their conversation, Pharmacy Tech Testa confirmed to Nurse Browning that she restocked an entire pack of 10 tabs instead of the expected 4 because she was not allowed to break the pack into individual units. She inadvertently accepted the actual restock amount as 4 on screen instead of modifying the restock amount to 10, which later triggered the discrepancy for Nurse Browning. They returned to the cabinet to resolve the discrepancy..
****Discrepancy by User****
OmnicellOmniCT Version 5.10.0.204
Unresolved Discrepancies OnlyControl Levels: 2345Time Range: 8 hoursTue 02/24/09 11:47:10 AMOMNI: OCOMNIRX3=============================
User: Renee N. BrowningTue 02/24/09 11:44:23 AMMeperidine 50MG TABSFor: Tangiers, MirandaPatient ID: 5554879Room 211Qty Expected . . .10 TABSQty Found . . .16 TABS!!Qty Adjusted Up . . . 6 TABSQty Remaining . . .16 TABSBin ID: 33657Loc: Main Zone 1, Drawer 1, Bin 7
Accessed: Tue 02/24/09 11:12:33 AMBy: Phylicia TestaRestock #: CPC01-0006883.00Restock Transaction:Qty Expected . . .6 TABSQty Found . . .6 TABSQty Restocked . . . 4 TABSQty Remaining . . .10 TABSWitness: Hedda Nillson
Accessed: Tue 02/24/09 11:09:55 AMBy: Norvell, RhondaPatient ID: 7777Room: 210Physician: WeissmanIntended Dose: 50.0000 MGIssue TransactionQty Expected . . .7 TABSQty Found . . .7 TABSQty Removed . . . 1 TABSQty Remaining . . .6 TABS
Number of Inactive Transactions: 0Number of Null Transactions: 0
Area: MED1
Name of user who founddiscrepancy and details
of transaction thatcaused discrepancy
Printed version
Prior user with accessto the item and
transaction details
Previous user withaccess to the item and
transaction details
Color Touch 16.0 User Guide/60-0226 Rev-A © 1999–2011 Omnicell, Inc.

Discrepancies 5-3Resolving Discrepancies
Resolving DiscrepanciesFollow these steps if you notice that a discrepancy exists on the cabinet. This does not indicate that the discrepancy is yours necessarily, only that an open discrepancy exists and needs to be addressed. See How to Read the Discrepancy by User Report on page 5-1.
1. Log on to the cabinet. The patient list is displayed.
2. From the patient list, press Main Menu.
3. Press Resolve Discrep. Select Control Level 2-5; press Resolve Discrep.
4. Select your discrepancy. If you have a discrepancy receipt in hand, use the information on the receipt to find your discrepancy.
Press Next Discrep to find other discrepancies, if necessary.
Press Print Discrep to print the discrepancy information.
5. If you are ready to resolve the discrepancy, continue with step 1 in Resolve Discrepancy. If you need help determining the cause of the discrepancy, proceed to Research Discrepancy.
Resolve Discrepancy
1. Enter a Resolution Reason or press List of Resolve Reasons to select one from the list.
2. Press Resolve Discrep to resolve the discrepancy.
3. Have your witness enter their user ID and password. Press OK.
Research Discrepancy
1. Press Reports; select Admin Reports. Select Discrepancy by User.
2. Analyze the information on this report.
See How to Read the Discrepancy by User Report on page 5-1 for detailed information. This should provide you all the information you need, but if you need more, you can also generate the Transaction by Item or Transaction by User reports at the cabinet (Transaction Reports).
3. Press Exit to log off the cabinet.
4. Follow up with the previous user(s) listed on the Discrepancy by User report to investigate the cause of the discrepancy.
5. Once a resolution is verified and confirmed, return to the cabinet with another user to act as a witness for the cycle count and discrepancy resolution (ideally the previous user identified on the discrepancy report).
6. Log on to the cabinet; press Main Menu.
© 1999–2011 Omnicell, Inc. Color Touch 16.0 User Guide/60-0226 Rev-A

5-4 Discrepancies
Resolving Discrepancies
7. Verify bin levels to ensure the quantity is correct. This will help prevent another discrepancy. To do this:
Press Inventory Menus; press Cycle Count.
Press Find Item. Select the item from the list.
Follow guiding lights to access the item.
Have your witness enter their User ID and password.
Count the item.
8. Return to Resolving Discrepancies, step 3 on page 5-3 and follow the procedures to resolve the discrepancy.
Report Dispense Errors Use these procedures to confirm and log the actual quantity found in the dispense drawer if a discrepancy occurs. It is possible that the dispenser may dispense too many items dispense or too few. If the system detects the discrepancy, you will be notified with a message on screen. If the system does not, you have the ability to report the discrepancy manually.
If the system detects the error, you will notice the message: There are dispense errors! Press OK to open dispense drawer.
■ Open the dispense drawer and enter the actual quantity found in the drawer. Press OK.
If more items were found in the dispense drawer than you requested, the return bin will unlock to accept the excess quantity. Place item(s) in the return bin. Close lid.
If you notice the discrepancy after dispensing the item:
1. Select the item from the Meds Dispensed list.
2. Press Report Dispense Error.
3. Enter the actual quantity found in the drawer. Press OK.
4. Press Done to conclude.
Color Touch 16.0 User Guide/60-0226 Rev-A © 1999–2011 Omnicell, Inc.

6-1
Cabinet Reports
Reports provide a history of activity for a specific cabinet. Reports can be viewed on screen or printed on the cabinet printer. Access to some reports may be restricted to certain users.
Generate Reports
1. From the Main Menu, press Reports.
2. From the Reports Menu, press desired report category, then select the desired report from the list.
Transaction Reports are listed on screen by default.
3. Select to produce all or one of a specific report topic, if prompted. If you choose to select one, select it from the list.
Report topics could be items, users, patients, cases, or kits.
4. Filter the report criteria. See Report Filter Criteria Details on page 6-2. Press Run Report.
For Post-Case Reconciliation Reports, once the case is selected, the report prints on the cabinet printer automatically.
5. Press Previous/Next Page to navigate reports on screen.
6. Press Print this Page or Print All Pages to print.
Available Cabinet ReportsThe list of available cabinet reports is provided below. Transactions include issue, item transfer, delete, assign, restock, discrepancy, null transaction, bin modify, cycle count, waste, return, witness info, inactive access. See also OmniExplorer on page 6-3.
Transaction Reports
■ Transaction by Item: Review transactions on this cabinet by item.■ Transaction by Patient: Review transactions on this cabinet by patient.■ Transaction by User: Review transactions on this cabinet by user.■ Post-Case Reconciliation: Includes waste transactions generated at the time post-case reconciliation
(PCR) was completed. Each patient or case has one report for each completed PCR. Applies to Anesthesia Workstations only.
Admin Reports
■ Discrepancy by User: To review user discrepancies on this cabinet. Transactions are grouped by user, and then by resolution status.
© 1999–2011 Omnicell, Inc. Color Touch 16.0 User Guide/60-0226 Rev-A
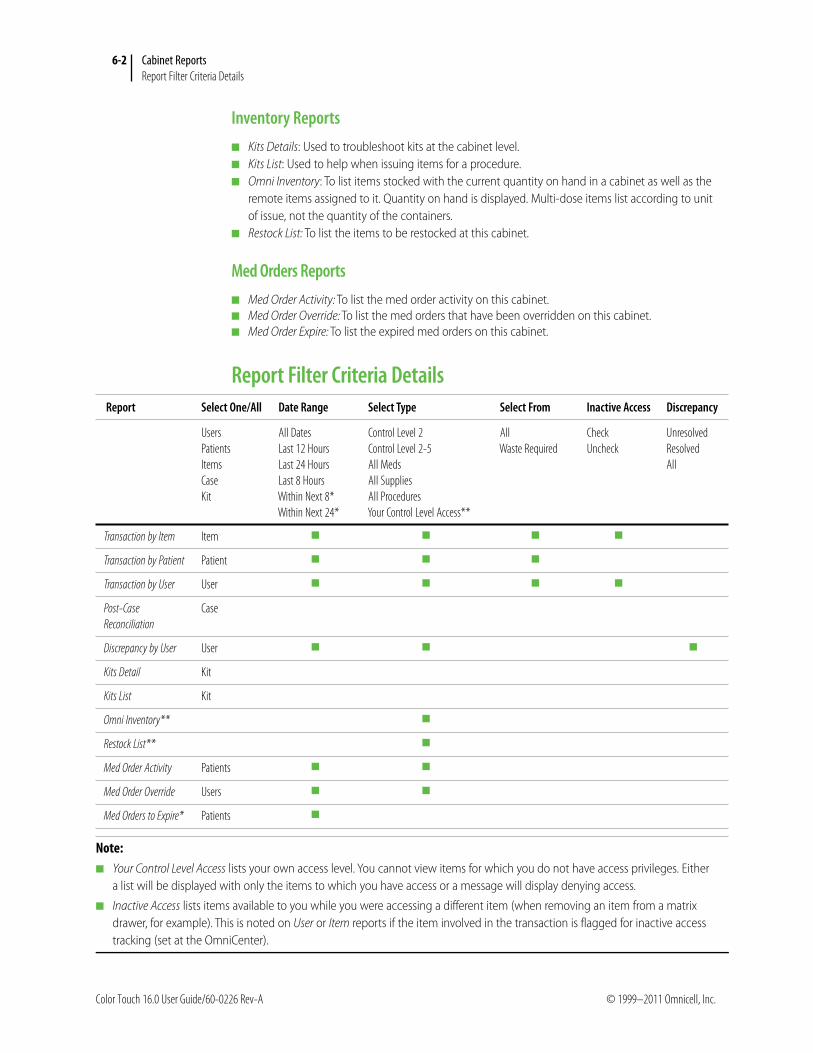
6-2 Cabinet Reports
Report Filter Criteria Details
Inventory Reports
■ Kits Details: Used to troubleshoot kits at the cabinet level.■ Kits List: Used to help when issuing items for a procedure.■ Omni Inventory: To list items stocked with the current quantity on hand in a cabinet as well as the
remote items assigned to it. Quantity on hand is displayed. Multi-dose items list according to unit of issue, not the quantity of the containers.
■ Restock List: To list the items to be restocked at this cabinet.
Med Orders Reports
■ Med Order Activity: To list the med order activity on this cabinet.■ Med Order Override: To list the med orders that have been overridden on this cabinet.■ Med Order Expire: To list the expired med orders on this cabinet.
Report Filter Criteria Details Report Select One/All Date Range Select Type Select From Inactive Access Discrepancy
UsersPatientsItemsCaseKit
All DatesLast 12 HoursLast 24 HoursLast 8 HoursWithin Next 8*Within Next 24*
Control Level 2Control Level 2-5All MedsAll SuppliesAll ProceduresYour Control Level Access**
AllWaste Required
CheckUncheck
UnresolvedResolvedAll
Transaction by Item Item ■ ■ ■ ■
Transaction by Patient Patient ■ ■ ■
Transaction by User User ■ ■ ■ ■
Post-Case Reconciliation
Case
Discrepancy by User User ■ ■ ■
Kits Detail Kit
Kits List Kit
Omni Inventory** ■
Restock List** ■
Med Order Activity Patients ■ ■
Med Order Override Users ■ ■
Med Orders to Expire* Patients ■
Note: ■ Your Control Level Access lists your own access level. You cannot view items for which you do not have access privileges. Either
a list will be displayed with only the items to which you have access or a message will display denying access.
■ Inactive Access lists items available to you while you were accessing a different item (when removing an item from a matrix drawer, for example). This is noted on User or Item reports if the item involved in the transaction is flagged for inactive access tracking (set at the OmniCenter).
Color Touch 16.0 User Guide/60-0226 Rev-A © 1999–2011 Omnicell, Inc.
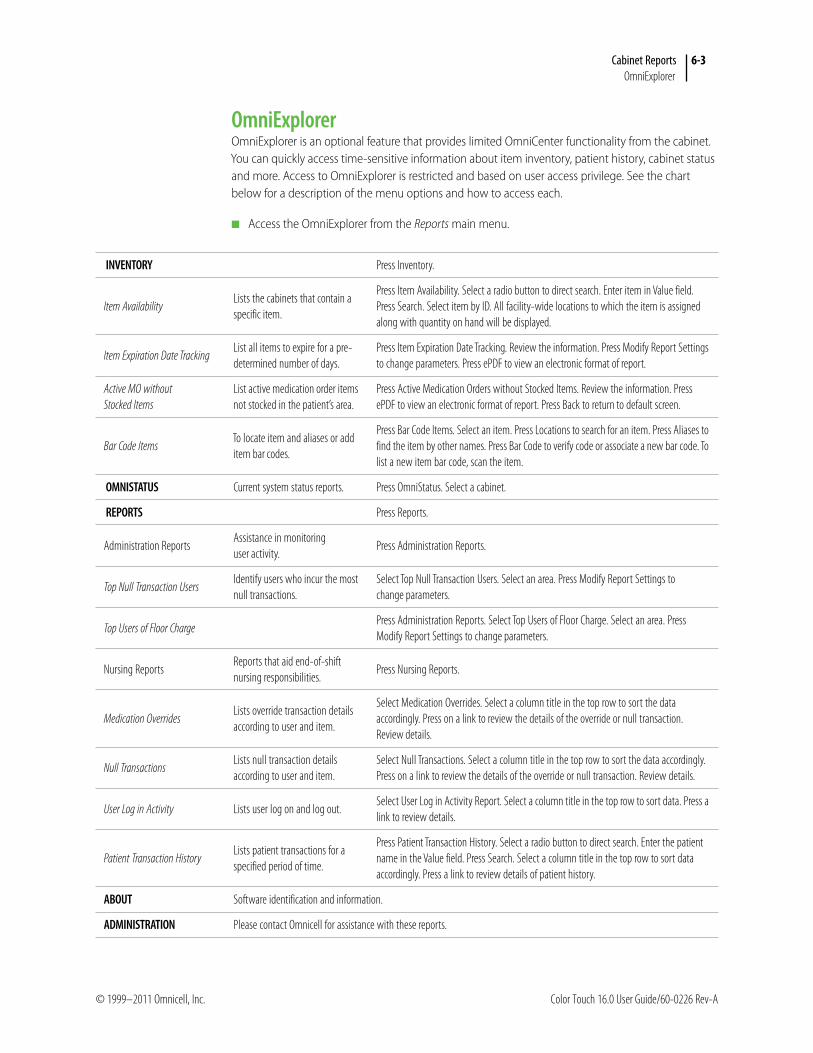
Cabinet Reports 6-3OmniExplorer
OmniExplorerOmniExplorer is an optional feature that provides limited OmniCenter functionality from the cabinet. You can quickly access time-sensitive information about item inventory, patient history, cabinet status and more. Access to OmniExplorer is restricted and based on user access privilege. See the chart below for a description of the menu options and how to access each.
■ Access the OmniExplorer from the Reports main menu.
INVENTORY Press Inventory.
Item AvailabilityLists the cabinets that contain a specific item.
Press Item Availability. Select a radio button to direct search. Enter item in Value field. Press Search. Select item by ID. All facility-wide locations to which the item is assigned along with quantity on hand will be displayed.
Item Expiration Date TrackingList all items to expire for a pre-determined number of days.
Press Item Expiration Date Tracking. Review the information. Press Modify Report Settings to change parameters. Press ePDF to view an electronic format of report.
Active MO without Stocked Items
List active medication order items not stocked in the patient’s area.
Press Active Medication Orders without Stocked Items. Review the information. Press ePDF to view an electronic format of report. Press Back to return to default screen.
Bar Code ItemsTo locate item and aliases or add item bar codes.
Press Bar Code Items. Select an item. Press Locations to search for an item. Press Aliases to find the item by other names. Press Bar Code to verify code or associate a new bar code. To list a new item bar code, scan the item.
OMNISTATUS Current system status reports. Press OmniStatus. Select a cabinet.
REPORTS Press Reports.
Administration ReportsAssistance in monitoring user activity.
Press Administration Reports.
Top Null Transaction UsersIdentify users who incur the most null transactions.
Select Top Null Transaction Users. Select an area. Press Modify Report Settings to change parameters.
Top Users of Floor ChargePress Administration Reports. Select Top Users of Floor Charge. Select an area. Press Modify Report Settings to change parameters.
Nursing ReportsReports that aid end-of-shift nursing responsibilities.
Press Nursing Reports.
Medication OverridesLists override transaction details according to user and item.
Select Medication Overrides. Select a column title in the top row to sort the data accordingly. Press on a link to review the details of the override or null transaction. Review details.
Null TransactionsLists null transaction details according to user and item.
Select Null Transactions. Select a column title in the top row to sort the data accordingly. Press on a link to review the details of the override or null transaction. Review details.
User Log in Activity Lists user log on and log out.Select User Log in Activity Report. Select a column title in the top row to sort data. Press a link to review details.
Patient Transaction HistoryLists patient transactions for a specified period of time.
Press Patient Transaction History. Select a radio button to direct search. Enter the patient name in the Value field. Press Search. Select a column title in the top row to sort data accordingly. Press a link to review details of patient history.
ABOUT Software identification and information.
ADMINISTRATION Please contact Omnicell for assistance with these reports.
© 1999–2011 Omnicell, Inc. Color Touch 16.0 User Guide/60-0226 Rev-A

6-4 Cabinet Reports
OmniExplorer
Color Touch 16.0 User Guide/60-0226 Rev-A © 1999–2011 Omnicell, Inc.
7-1
Administration
Change Your PasswordYour facility may require you to change your password periodically. You may be prompted by an audible alert at the cabinet when your password is about to expire or when it is time to change your password. You can change your password at any time regardless of the prompts.
If you do not see the Change Your Password button, this could mean that your password is set to remain active for a minimum number of days. During this time, you will not be able to change your password.
1. From the Main Menu, press User Menus.
2. Press Change Your Password.
3. Enter your old password, which is your current password.
4. Enter the new password, noting the password length requirement. Enter the new password again to confirm.
Avoid using a password you have used in the past. The system keeps track of old passwords to prevent you from using them again.
If a strong password is expected and you did not enter one, you will see a prompt screen that indicates required characters. See Strong Password Requirements on page 7-1.
5. Press Change Your Password or Enter on the keyboard.
Strong Password RequirementsStrong passwords enforce strict security on the cabinets. If you are prompted for a strong password, then follow these requirements:
■ Passwords must be between 6 characters minimum and 18 characters maximum.
■ Passwords should not contain letters that are part of your own name and should not contain common words.
■ Case-sensitivity may be enforced.
■ Spaces are not allowed as the first or last character.
■ Passwords must contain three of the four elements:
lowercase letter
UPPERCASE LETTER
numeral: 0123456789
Special characters: “~!@#$%^&*()_-+={}[]|\:;”’<>,.?/
Note: Passwords are case sensitive. If you are having difficulty entering your password, make sure Caps Lock is off. When Caps Lock is on, a message is displayed on the log-on screen, lower right.
© 1999–2011 Omnicell, Inc. Color Touch 16.0 User Guide/60-0226 Rev-A

7-2 Administration
Re-enroll Your Fingerprint
Re-enroll Your FingerprintYou can only re-enroll your fingerprint if you can log on by scanning your currently enrolled fingerprint(s). If you have never been enrolled or if you are enrolled but cannot scan your fingerprint(s), then contact your designated fingerprint registrar to help you.
General Tips for Enrolling Your FingerprintFollow these tips to successfully enroll your fingerprint.
Re-enroll Your Fingerprint on Touch & Go G4Touch & Go G4 systems support both primary and alternate fingerprint enrollments.
1. Start with a clean scanner. If necessary, clean the scanner before you re-enroll your fingerprint. See Clean Cabinet on page 8-2.
2. Scan your fingerprint to log on. You must log on with a fingerprint scan to complete re-enrollment. If you log on with your User ID and password, then you will not be able to complete the procedure.
3. From the Main Menu, press User Menus.
4. Press Re-enroll Your Fingerprint. This button is will only be available if you logged on by scanning your fingerprint only or by entering your User ID and scanning your fingerprint.
Note: Re-enrollment varies depending on your cabinet’s version of Touch & Go—Touch & Go G3 or Touch & Go G4. Touch & Go G4 supports a primary and an alternate finger. Touch & Go G3 supports a primary finger only. Follow the procedure that corresponds to your version. If you are unsure what version of Touch & Go you have, take note of the log-on screen. Touch & Go G4 systems will display this symbol indicating support for two fingers. Touch & Go G3 systems do not have this symbol.
■ Look at your finger to identify the core feature or swirl pattern.
■ Center the core feature on the scanner.
■ Fill the entire scanner with your fingerprint, particularly the center swirl pattern.
■ Place your finger flat on the sensor for at least two seconds, then lift. Do not roll your finger.
■ If your hands are dry, then use a fingerprint enhancer or try using water to moisten the finger and try again.
Color Touch 16.0 User Guide/60-0226 Rev-A © 1999–2011 Omnicell, Inc.
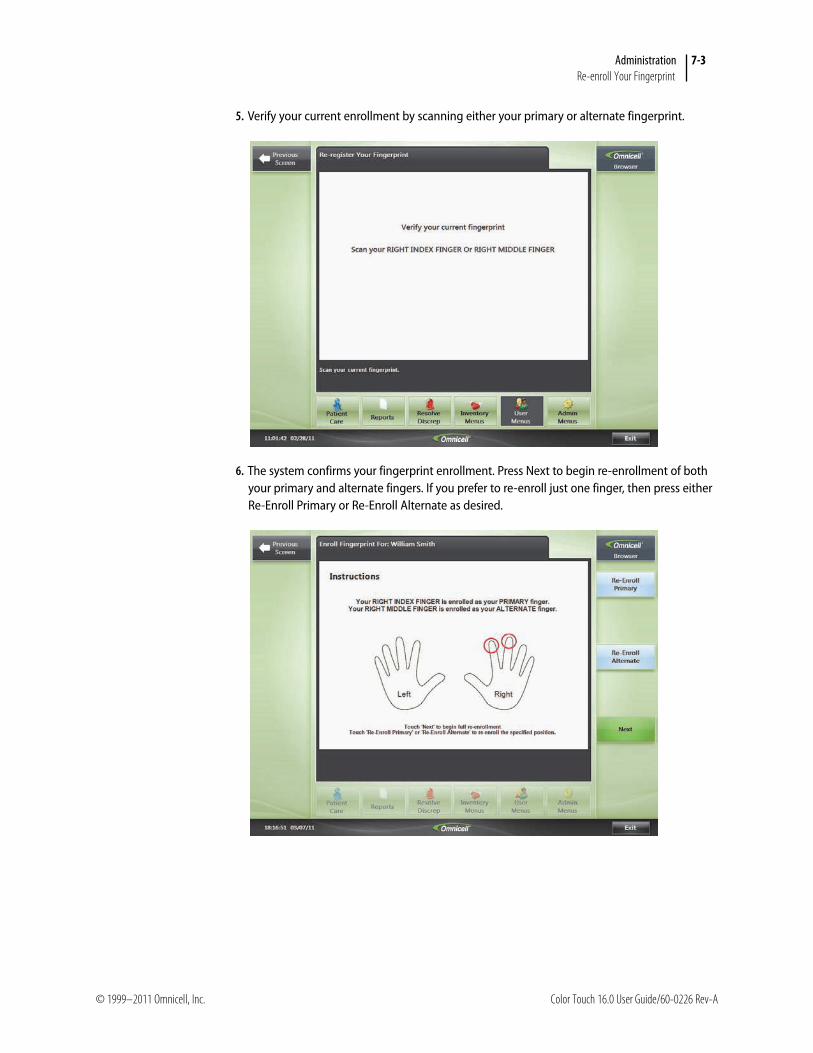
Administration 7-3Re-enroll Your Fingerprint
5. Verify your current enrollment by scanning either your primary or alternate fingerprint.
6. The system confirms your fingerprint enrollment. Press Next to begin re-enrollment of both your primary and alternate fingers. If you prefer to re-enroll just one finger, then press either Re-Enroll Primary or Re-Enroll Alternate as desired.
© 1999–2011 Omnicell, Inc. Color Touch 16.0 User Guide/60-0226 Rev-A

7-4 Administration
Re-enroll Your Fingerprint
7. Place the requested finger on the sensor and follow the prompts. You must provide two quality scans before you can advance to the enrollment screen.
The system always follows the same finger order regardless of what fingers you have enrolled: right index, right middle, right thumb, left index, left middle, left thumb. If you are already enrolled with your right index finger as your primary, then you can stay on this screen to re-enroll it to improve the scan quality. If you prefer to change fingers, then press Change Finger.
8. Place the requested finger on the sensor and follow the on-screen prompts.
The system prompts you for the finger that you practiced with on the previous screen. You must scan your finger at least four times. As the scans are accepted, the windows fill with the scanned images. Enrollment is complete when all four windows are filled.
Color Touch 16.0 User Guide/60-0226 Rev-A © 1999–2011 Omnicell, Inc.

Administration 7-5Re-enroll Your Fingerprint
Options available on this screen:
Press Return to Practice to return to the previous screen. Any scans that were saved on this screen will be lost; you will begin the enrollment process for a different finger. The system assumes that you are having difficulty enrolling the selected finger if you need to return to practice and automatically prompts you to try a different finger.
Press Select Finger to select a different finger to enroll. This time, you will be allowed to select any finger that the systems supports. Index, Middle, and Thumb fingers on either hand.
Press Help if you are having difficulty with finger placement or pressure.
© 1999–2011 Omnicell, Inc. Color Touch 16.0 User Guide/60-0226 Rev-A
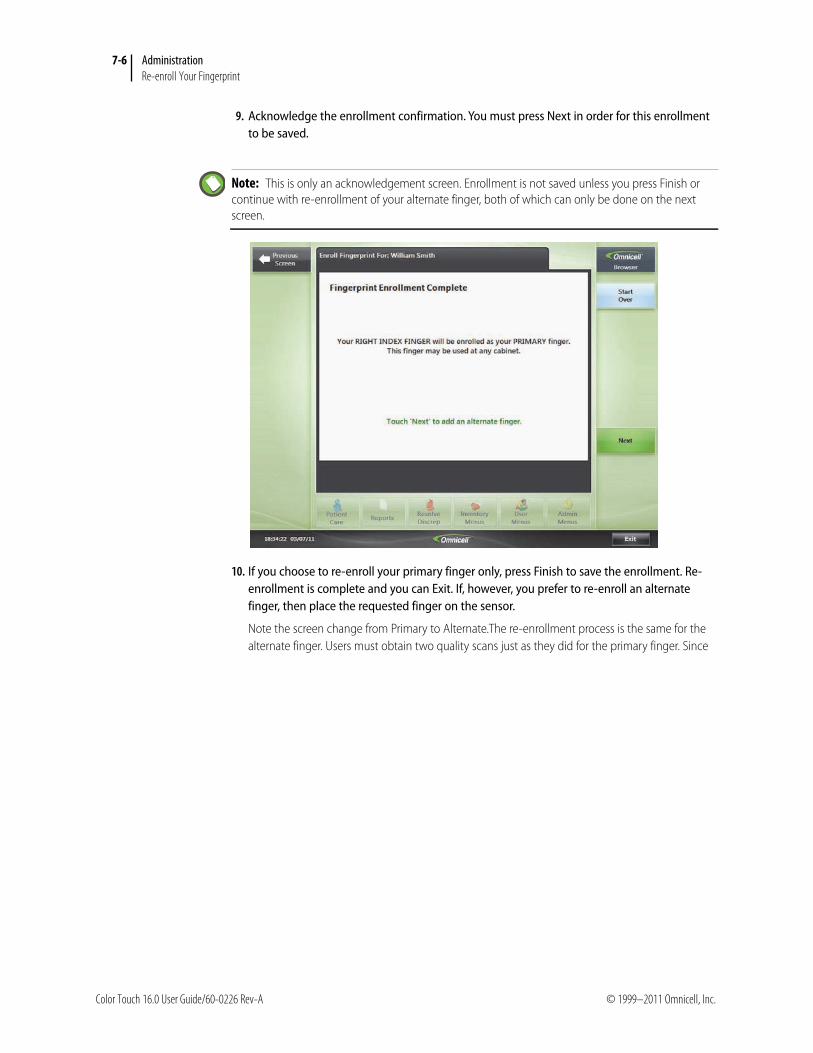
7-6 Administration
Re-enroll Your Fingerprint
9. Acknowledge the enrollment confirmation. You must press Next in order for this enrollment to be saved.
10. If you choose to re-enroll your primary finger only, press Finish to save the enrollment. Re-enrollment is complete and you can Exit. If, however, you prefer to re-enroll an alternate finger, then place the requested finger on the sensor.
Note the screen change from Primary to Alternate.The re-enrollment process is the same for the alternate finger. Users must obtain two quality scans just as they did for the primary finger. Since
Note: This is only an acknowledgement screen. Enrollment is not saved unless you press Finish or continue with re-enrollment of your alternate finger, both of which can only be done on the next screen.
Color Touch 16.0 User Guide/60-0226 Rev-A © 1999–2011 Omnicell, Inc.
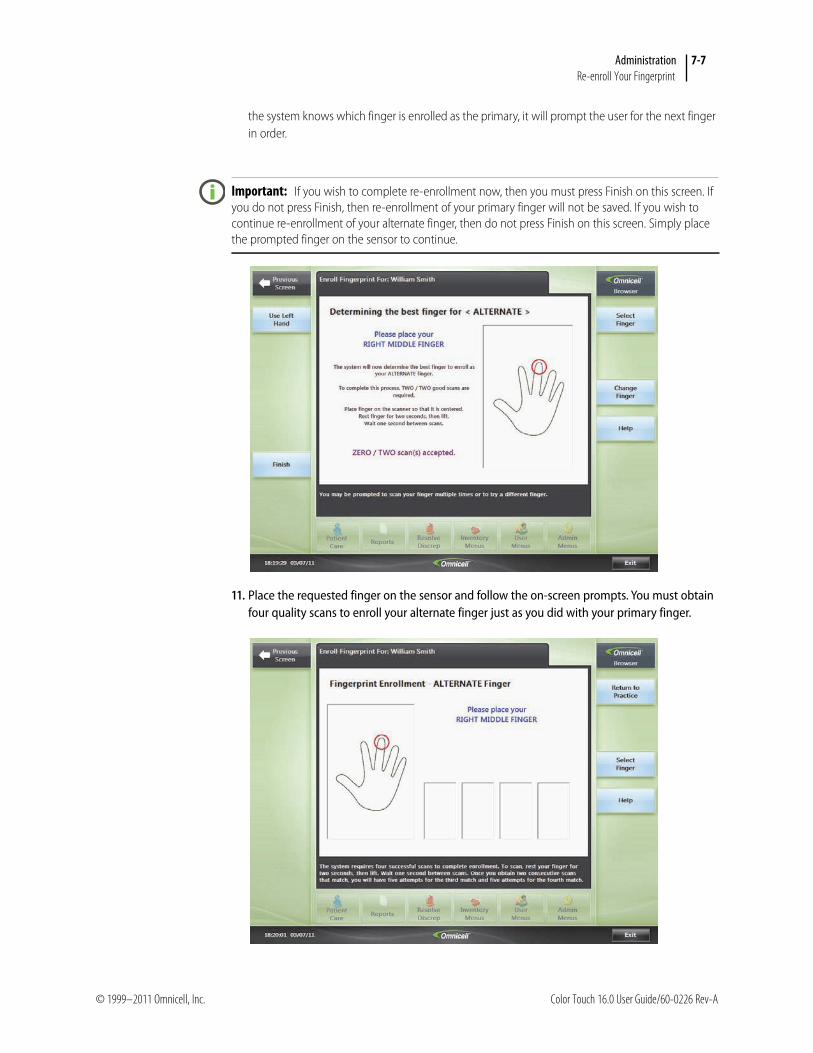
Administration 7-7Re-enroll Your Fingerprint
the system knows which finger is enrolled as the primary, it will prompt the user for the next finger in order.
11. Place the requested finger on the sensor and follow the on-screen prompts. You must obtain four quality scans to enroll your alternate finger just as you did with your primary finger.
Important: If you wish to complete re-enrollment now, then you must press Finish on this screen. If you do not press Finish, then re-enrollment of your primary finger will not be saved. If you wish to continue re-enrollment of your alternate finger, then do not press Finish on this screen. Simply place the prompted finger on the sensor to continue.
© 1999–2011 Omnicell, Inc. Color Touch 16.0 User Guide/60-0226 Rev-A
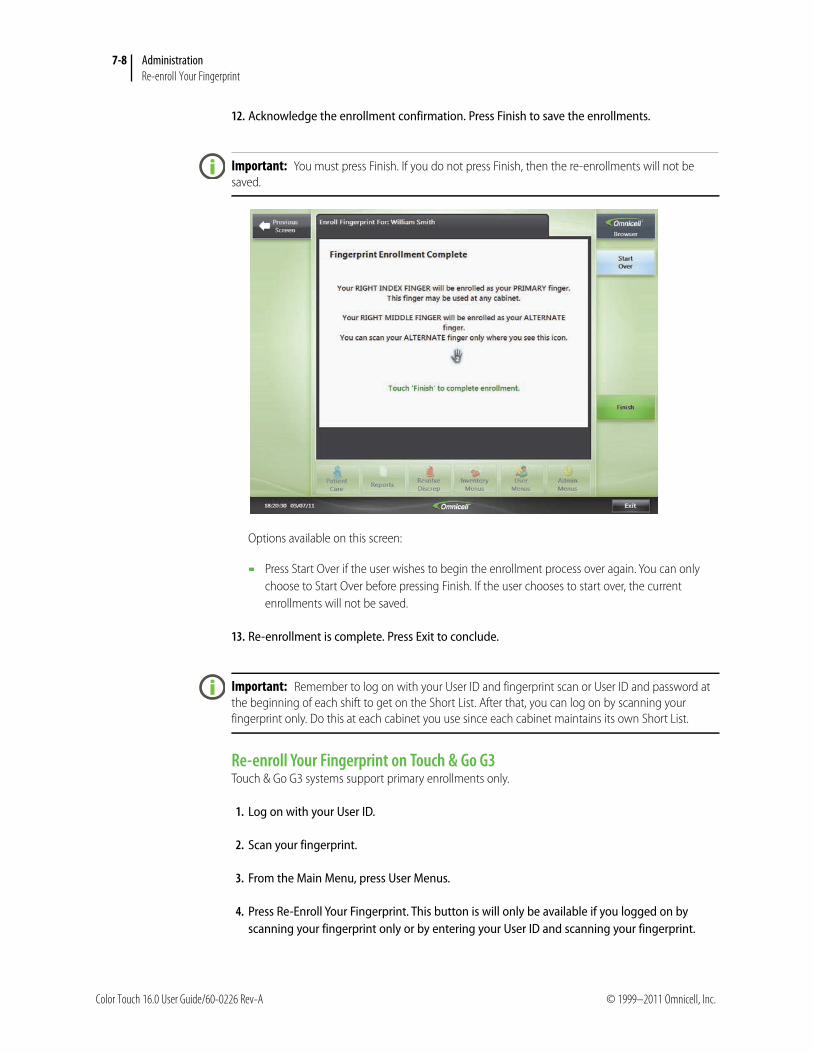
7-8 Administration
Re-enroll Your Fingerprint
12. Acknowledge the enrollment confirmation. Press Finish to save the enrollments.
Options available on this screen:
Press Start Over if the user wishes to begin the enrollment process over again. You can only choose to Start Over before pressing Finish. If the user chooses to start over, the current enrollments will not be saved.
13. Re-enrollment is complete. Press Exit to conclude.
Re-enroll Your Fingerprint on Touch & Go G3Touch & Go G3 systems support primary enrollments only.
1. Log on with your User ID.
2. Scan your fingerprint.
3. From the Main Menu, press User Menus.
4. Press Re-Enroll Your Fingerprint. This button is will only be available if you logged on by scanning your fingerprint only or by entering your User ID and scanning your fingerprint.
Important: You must press Finish. If you do not press Finish, then the re-enrollments will not be saved.
Important: Remember to log on with your User ID and fingerprint scan or User ID and password at the beginning of each shift to get on the Short List. After that, you can log on by scanning your fingerprint only. Do this at each cabinet you use since each cabinet maintains its own Short List.
Color Touch 16.0 User Guide/60-0226 Rev-A © 1999–2011 Omnicell, Inc.
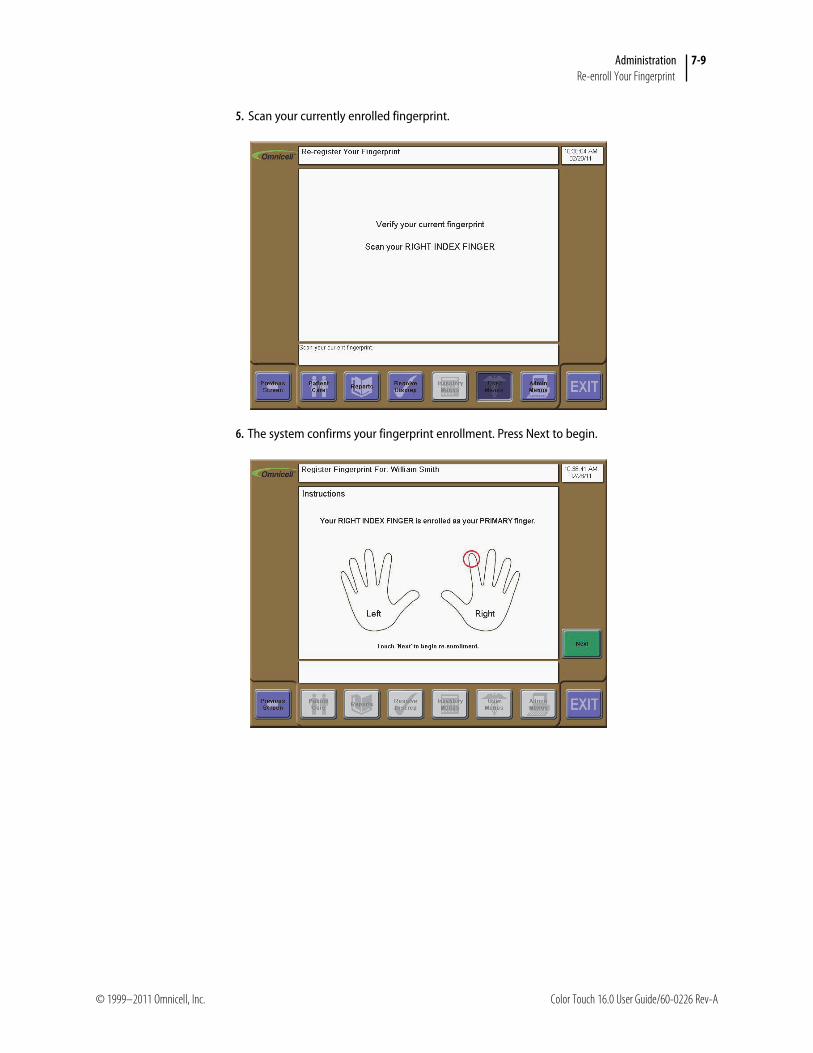
Administration 7-9Re-enroll Your Fingerprint
5. Scan your currently enrolled fingerprint.
6. The system confirms your fingerprint enrollment. Press Next to begin.
© 1999–2011 Omnicell, Inc. Color Touch 16.0 User Guide/60-0226 Rev-A

7-10 Administration
Re-enroll Your Fingerprint
7. Place the requested finger on the sensor and follow the prompts. You must provide two quality scans before you can advance to the enrollment screen.
The system always follows the same finger order regardless of what fingers you have enrolled: right index, right middle, right thumb, left index, left middle, left thumb. If you are already enrolled with your right index finger as your primary, then you can stay on this screen to re-enroll it to improve the scan quality. If you prefer to change fingers, then press Change Finger.
8. Place the requested finger on the sensor and follow the on-screen prompts.
The system prompts you for the finger that you practiced with on the previous screen. You must scan your finger at least four times. As the scans are accepted, the windows fill with the scanned images. Enrollment is complete when all four windows are filled. In most cases, this process takes seconds to complete.
Color Touch 16.0 User Guide/60-0226 Rev-A © 1999–2011 Omnicell, Inc.

Administration 7-11Re-enroll Your Fingerprint
Options available on this screen:
Press Return to Practice to return to the previous screen. Any scans that were saved on this screen will be lost; you will begin the enrollment process for a different finger. The system assumes that you are having difficulty enrolling the selected finger if you need to return to practice and automatically prompts you to try a different finger.
Press Help if you are having difficulty with finger placement or pressure.
9. Acknowledge the enrollment confirmation. Press Finish to save enrollment.
Options available on this screen:
Press Start Over if you wish to begin the enrollment process over again. You can only choose to Start Over before pressing Finish. If you choose to start over, the current enrollments will not be saved.
10. Re-enrollment is complete. Press Exit to conclude.
Important: You must press Finish. If you do not press Finish, then the re-enrollment will not be saved.
Important: Remember to log on with your User ID and fingerprint scan or User ID and password at the beginning of each shift to get on the Short List. After that, you can log on by scanning your fingerprint only. Do this at each cabinet you use since each cabinet maintains its own Short List.
© 1999–2011 Omnicell, Inc. Color Touch 16.0 User Guide/60-0226 Rev-A
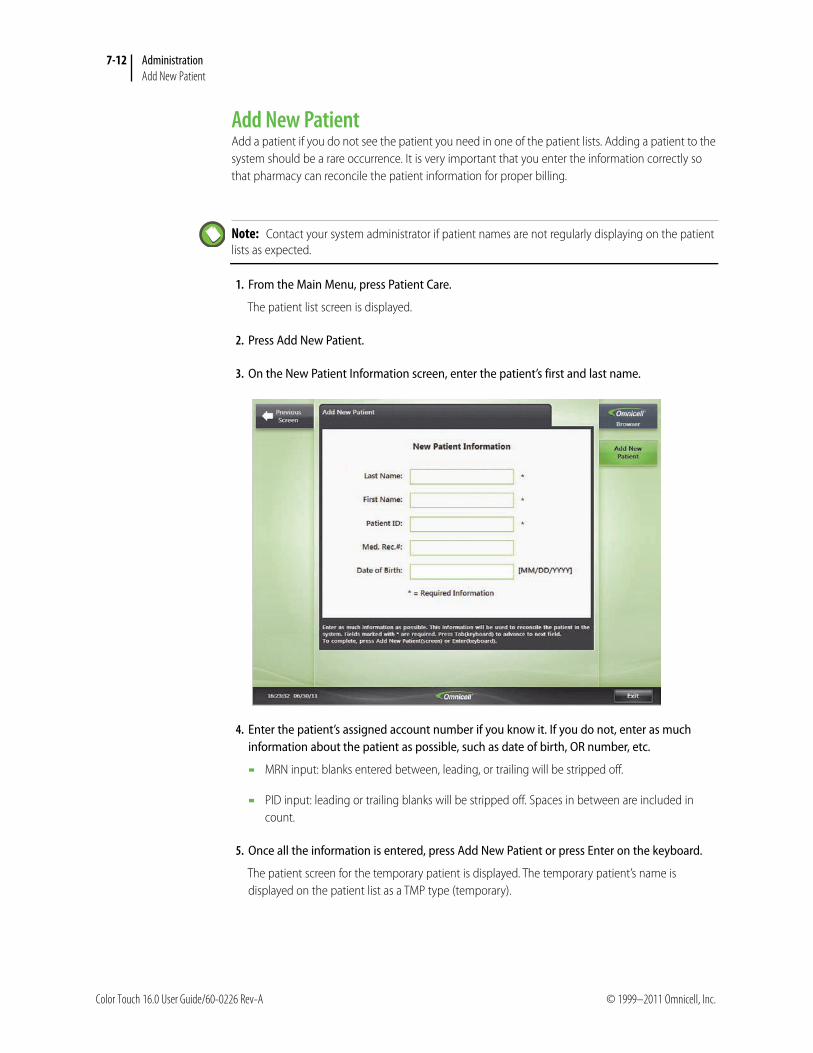
7-12 Administration
Add New Patient
Add New PatientAdd a patient if you do not see the patient you need in one of the patient lists. Adding a patient to the system should be a rare occurrence. It is very important that you enter the information correctly so that pharmacy can reconcile the patient information for proper billing.
1. From the Main Menu, press Patient Care.
The patient list screen is displayed.
2. Press Add New Patient.
3. On the New Patient Information screen, enter the patient’s first and last name.
4. Enter the patient’s assigned account number if you know it. If you do not, enter as much information about the patient as possible, such as date of birth, OR number, etc.
MRN input: blanks entered between, leading, or trailing will be stripped off.
PID input: leading or trailing blanks will be stripped off. Spaces in between are included in count.
5. Once all the information is entered, press Add New Patient or press Enter on the keyboard.
The patient screen for the temporary patient is displayed. The temporary patient’s name is displayed on the patient list as a TMP type (temporary).
Note: Contact your system administrator if patient names are not regularly displaying on the patient lists as expected.
Color Touch 16.0 User Guide/60-0226 Rev-A © 1999–2011 Omnicell, Inc.
8-1
Maintenance
Change Printer PaperDetailed instructions for how to change the printer paper is provided inside the printer bay. Open the printer door to access instructions specific to your cabinet type. Instructions are available for both the receipt printer and the medication label printer (if applicable).
Change Receipt Paper Roll
1. Open the printer door.
2. Unlock release lever. See the diagram inside the printer bay for details on your specific cabinet type.
3. Insert the paper roll into the cradle. The paper rolls over the top.
4. Fold one side of paper to a point and feed paper through the slot. Make sure the paper is centered within slot.
5. Lock release lever.
6. Close printer door.
7. Test the receipt printer.
Test Receipt Printer
1. Go to Admin Menus; press Test Printer.
If the receipt printer is the only printer installed on the cabinet, then a test print will print immediately after pressing Test Printer. If not, continue to next step.
2. Press Receipt Printer.
3. If nothing prints, let your system administrator know.
Change Label Paper Roll
1. Open the printer door.
2. Make sure the release lever is in the locked position. See the diagram inside the printer bay for details on your specific cabinet type.
3. Insert the paper roll into the cradle. The paper rolls over the top.
4. Feed the paper through the slot. Allow paper to auto-advance.
© 1999–2011 Omnicell, Inc. Color Touch 16.0 User Guide/60-0226 Rev-A
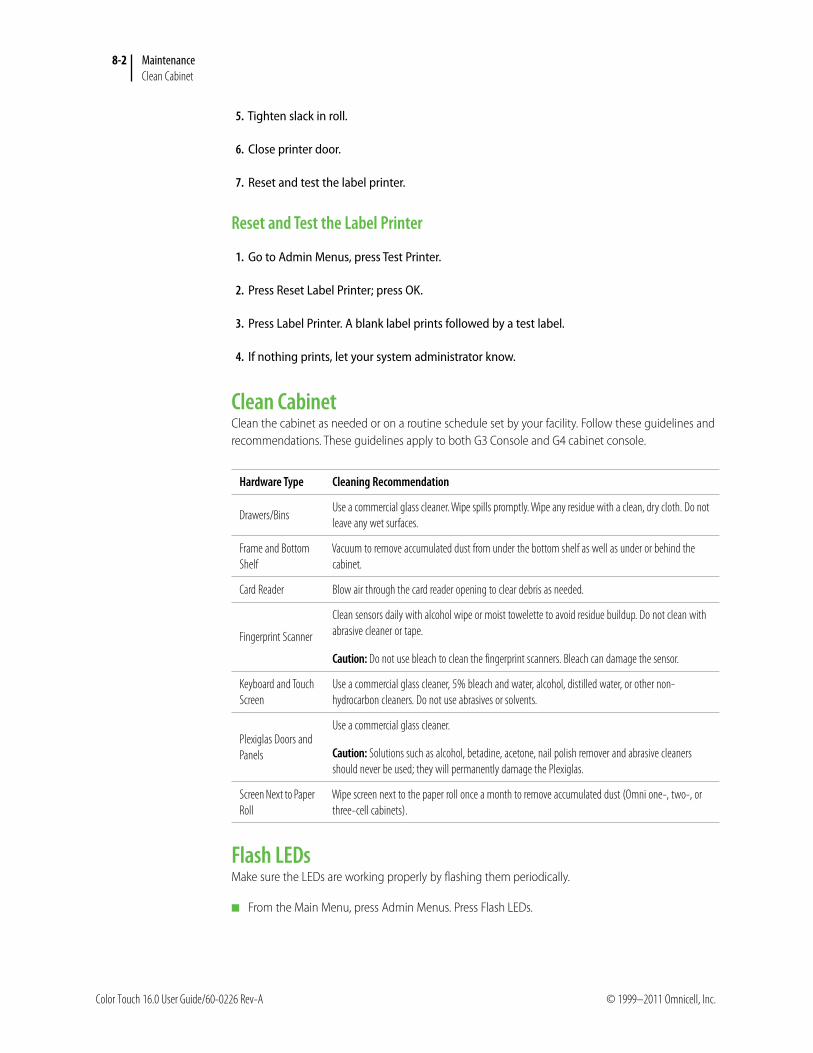
8-2 Maintenance
Clean Cabinet
5. Tighten slack in roll.
6. Close printer door.
7. Reset and test the label printer.
Reset and Test the Label Printer
1. Go to Admin Menus, press Test Printer.
2. Press Reset Label Printer; press OK.
3. Press Label Printer. A blank label prints followed by a test label.
4. If nothing prints, let your system administrator know.
Clean CabinetClean the cabinet as needed or on a routine schedule set by your facility. Follow these guidelines and recommendations. These guidelines apply to both G3 Console and G4 cabinet console.
Flash LEDs Make sure the LEDs are working properly by flashing them periodically.
■ From the Main Menu, press Admin Menus. Press Flash LEDs.
Hardware Type Cleaning Recommendation
Drawers/BinsUse a commercial glass cleaner. Wipe spills promptly. Wipe any residue with a clean, dry cloth. Do not leave any wet surfaces.
Frame and Bottom Shelf
Vacuum to remove accumulated dust from under the bottom shelf as well as under or behind the cabinet.
Card Reader Blow air through the card reader opening to clear debris as needed.
Fingerprint Scanner
Clean sensors daily with alcohol wipe or moist towelette to avoid residue buildup. Do not clean with abrasive cleaner or tape.
Caution: Do not use bleach to clean the fingerprint scanners. Bleach can damage the sensor.
Keyboard and Touch Screen
Use a commercial glass cleaner, 5% bleach and water, alcohol, distilled water, or other non-hydrocarbon cleaners. Do not use abrasives or solvents.
Plexiglas Doors and Panels
Use a commercial glass cleaner.
Caution: Solutions such as alcohol, betadine, acetone, nail polish remover and abrasive cleaners should never be used; they will permanently damage the Plexiglas.
Screen Next to Paper Roll
Wipe screen next to the paper roll once a month to remove accumulated dust (Omni one-, two-, or three-cell cabinets).
Color Touch 16.0 User Guide/60-0226 Rev-A © 1999–2011 Omnicell, Inc.

Maintenance 8-3Test Printer
Test PrinterTest the printer periodically or when you see a printer-related system message.
1. From the Main Menu, press Admin Menus.
2. Press Test Printer.
3. Press Label Printer. If the printer is functioning properly, a test label will print.
4. Press Receipt Printer. If the printer is functioning properly, a test receipt will print.
5. Contact your system administrator if the printer does not respond.
Note: If you have just one printer installed on your cabinet, pressing Test Printer will produce the test print.
© 1999–2011 Omnicell, Inc. Color Touch 16.0 User Guide/60-0226 Rev-A

8-4 Maintenance
Troubleshoot the Medication Label Printer
Troubleshoot the Medication Label PrinterIf you are experiencing issues with the medication label printer, try the following. Contact your system administrator if the issue persists.
Unload and Reload Label Roll/Unlock and Relock Release LeverDetailed instructions are provided inside the printer bay for each cabinet type.
1. Open the printer door to access the printer bay.
2. Remove the label paper roll and reload the paper.
3. Unlock the release lever, then lock it again.
Perform a Test Print
1. From the Main Menu, press Admin Menus.
2. Press Test Printer.
3. Press Label Printer. If the printer is functioning properly, a test label will print.
Reset Label PrinterIf the label printer did not produce a test print, then try resetting the label printer to see if this clears the issue. If there is a known error with the label printer, then the System Message button will appear on the log-on screen.
■ Press the System Message button, then press Reset Label Printer.
If you do not see the System Message button on the log-on screen, then the reset button can also be accessed from the Admin Menus screen.
1. From the Admin Menus, press Test Printer.
2. Press Test Printer.
3. Press Reset Label Printer. There is no interaction on screen during the resetting process.
4. Once the printer has reset, a confirmation is displayed on screen; press OK to acknowledge the message.
Note: Resetting the printer is available for the label printer only.
Color Touch 16.0 User Guide/60-0226 Rev-A © 1999–2011 Omnicell, Inc.
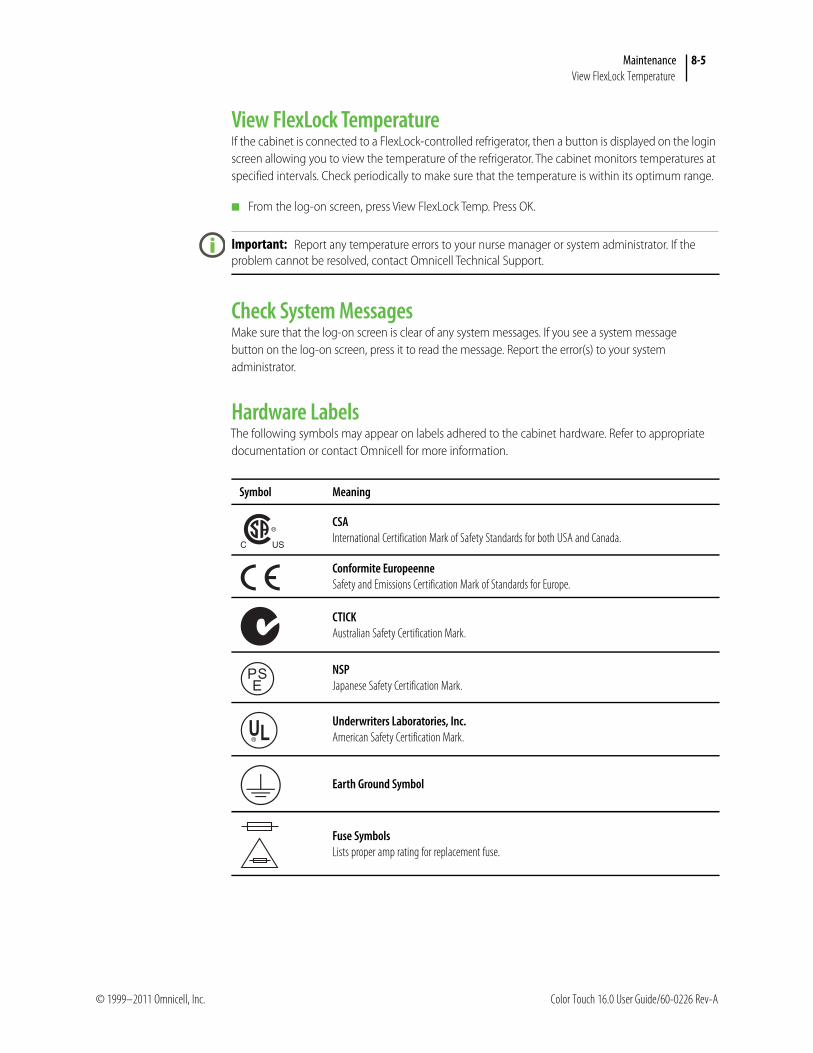
Maintenance 8-5View FlexLock Temperature
View FlexLock TemperatureIf the cabinet is connected to a FlexLock-controlled refrigerator, then a button is displayed on the login screen allowing you to view the temperature of the refrigerator. The cabinet monitors temperatures at specified intervals. Check periodically to make sure that the temperature is within its optimum range.
■ From the log-on screen, press View FlexLock Temp. Press OK.
Check System MessagesMake sure that the log-on screen is clear of any system messages. If you see a system message button on the log-on screen, press it to read the message. Report the error(s) to your system administrator.
Hardware LabelsThe following symbols may appear on labels adhered to the cabinet hardware. Refer to appropriate documentation or contact Omnicell for more information.
Important: Report any temperature errors to your nurse manager or system administrator. If the problem cannot be resolved, contact Omnicell Technical Support.
Symbol Meaning
CSAInternational Certification Mark of Safety Standards for both USA and Canada.
Conformite EuropeenneSafety and Emissions Certification Mark of Standards for Europe.
CTICKAustralian Safety Certification Mark.
NSP Japanese Safety Certification Mark.
Underwriters Laboratories, Inc.American Safety Certification Mark.
Earth Ground Symbol
Fuse SymbolsLists proper amp rating for replacement fuse.
© 1999–2011 Omnicell, Inc. Color Touch 16.0 User Guide/60-0226 Rev-A

8-6 Maintenance
Hardware Labels
Network CommunicationsEthernet port.
Scanner PortBar code scanner plugs into this port.
Symbol Meaning
Color Touch 16.0 User Guide/60-0226 Rev-A © 1999–2011 Omnicell, Inc.

Index 9-1
Index
AAccessing an Item 2.3Accessing the Main Menu 1.3Add Patient 7.12Allergy Info 3.16
BBrowse Drug Info 2.5Browse Transactions 3.19
CCabinet Reports
Available Reports 6.1Generate 6.1Report Filter Criteria 6.2
Change Password 7.1Change Printer Paper 8.1Change Unit of Issue 2.7Change Unit of Stock 2.7Check Item Availability 2.6Check System Messages 8.5Clean Cabinet 8.2Conclude Tasks 2.4Customer web site 1.1Cycle Count 4.1
DDiscrepancy
Research 5.3Resolve 5.3
Discrepancy Report, Sample 5.1Dispense Errors 5.4Drug Info 2.5
EExpiration Date Warning 2.4
FFingerprint Scan Guidelines 2.3Flash LEDs 8.2Floor Charge Items 3.14
GGenerate Reports 6.1Gray Boxes, Labels 3.37
Guiding Light Technology 2.4
HHardware Labels 8.5
IImplant Items 3.14Issue 3.1
Items of Equivalent Dose 3.7Kits 3.8Procedures 3.8Waste Partial Dose 3.12
Issue Confirmation 2.11Item Lists 3.20
KKits
Issue 3.8
LLabels 3.31
Gray Boxes 3.37Print Automatically 3.31Print Labels After Issue 3.35Print On Demand 3.33Scanning Bar Codes 3.37
Last Issued Details 3.16Log Off 2.5Login
Fingerprint Scan Guidelines 2.3Log in with Fingerprint Scan 2.2Log in with Magnetic Card or Bar
Code Card Reader 2.1Log in with User ID and Password 2.1Short List 2.2
Login SettingsChange Your Password 7.1Re-Register Your Fingerprint 7.2Strong Password Requirements 7.1
MMain Menu 1.3Med Orders
Override 3.6Medication Labels 3.31
And Gray Boxes 3.37And Multiple Bins 3.37And Nurse-prepared MOs 3.37And Scanning Bar Codes 3.37Automatic Printing 3.31Print Medication Labels After
Issue 3.35Print On Demand 3.33Unusable 3.37
Medication Orders 3.18Browse Transactions 3.19Icons for 3.20OmniLinkRx Order Status 3.19View Med Order Info 3.18
Multi-dose Items 3.14Multi-use Items 3.23
NNotice of Incomplete Items 3.21
OOmniExplorer 6.3OmniLinkRx Order Status 3.19Online Quick Reference 1.1Outstanding Waste Prompts 2.10Override Med Order 3.6
PPatient Bar Codes 2.8Patient Info, View 3.15Patient Lists 3.16Patient Management 3.15Patient Medication Accounts 2.9
PMA Details 2.9Show Account Detail 3.11
Patient’s Own Medications 3.23Removing 3.29
Patient’s Own MedsRemoving 3.29
Pending Patient Transfers 3.27POMs 3.23Print Labels After Issue 3.35Print Labels Automatically 3.31Print Labels On Demand 3.33PSBs 3.23
© 1999–2011 Omnicell, Inc. Color Touch 16.0 User Guide/60-0226 Rev-A
9-2 Index
QQuick Reference Guide 1.1
RRemote Requests 3.21
Completing 3.22Notice of Incomplete Items 3.21
Report Dispense Errors 5.4Report Filter Criteria Details 6.2Re-Register Your Fingerprint 7.2
Tips 7.2Research Discrepancy 5.3Resolve Discrepancy 5.3Return 3.9
Multi-use item 3.23Patient’s Own Medications 3.23
Return Confirmation 2.11
SSafetyStock 2.11Scan a Bar Code 2.7Select Patient 2.8Short List 2.2Show Account Detail 3.11Single Witness 2.10SinglePointe 3.23Stock Transferred Meds 3.28Strong Password Requirements 7.1System Messages 8.5
TTechnical Support 1.1Test Printer 8.3Transaction Info, View 3.15Transfer Patient Meds 3.28Transfer Patient to this Cabinet 3.29
UUnit of Issue 2.7Unit of Stock 2.7
VVerify Item by Bar Code Scan 2.7View FlexLock Temperature 8.5View Pending Patient Transfers 3.27Volume Converter 3.12
WWaste 3.11
Waste Partial Dose 3.12Witness Requirements 2.10
Single Witness 2.10
Color Touch 16.0 User Guide/60-0226 Rev-A © 1999–2011 Omnicell, Inc.