Colleague Users Manual - Baldwin Wallace University … Advising Reports Menu ... you can move...
80
Colleague Users Manual ~Student System~ August 4, 2017 Latest version available at help.bw.edu
Transcript of Colleague Users Manual - Baldwin Wallace University … Advising Reports Menu ... you can move...

Colleague Users Manual
~Student System~
August 4, 2017
Latest version available at help.bw.edu

2
Table of Contents
Colleague User Interface (UI) .......................................................... 4
Login Box ................................................................................................... 4
Logout ........................................................................................................ 5
Settings Menu ............................................................................................ 6
Preferences: Fonts, Colors .................................................................... 7
Field Sequence ...................................................................................... 8
Set Form Scale Default ......................................................................... 9
Favorites ................................................................................................... 10
Person Search ........................................................................................... 11
Context Area ............................................................................................ 14
Form Search ............................................................................................. 16
Types of Buttons ...................................................................................... 19
Report Browser ........................................................................................ 20
Help Menu ................................................................................................ 27
Keyboard Shortcuts ................................................................................... 27
Date/Time/Login Stamp ............................................................................ 29
Student Profile – SPRO .................................................................. 30
Name Resolution ....................................................................................... 31
Student Terms Summary – STRS ............................................................. 33
Student Academic Transcript – STAT ...................................................... 35
Locator – LOCR ............................................................................ 37
Student Academic Program – SACP ........................................................ 39
Student Academic Program Additions – STPA ........................................ 41
Student Advisor Listing – STAD .............................................................. 42

3
Course Availability – XCOI .......................................................... 43
Course Seating Inventory – XCSI ................................................. 48
Registration – RGN ........................................................................ 52
Student Schedule – STSC ............................................................. 57
Student Schedule – SCHD Office Mangers Only ..................... 59
Faculty Advisees – FADV ............................................................ 60
Academic Roster Inquiry – RSTR ................................................. 61
Section Roster Inquiry - SRSI ........................................................ 63
Evaluate Student Program – EVAL ............................................... 64
Batch Academic Evaluation – BEVL Office Managers Only ...... 68
Proposed Student Program - PSPR ................................................ 69
Transcript Course Listing – TRCL ............................................... 72
Transfer Evaluation Summary – TEVS ........................................ 74
Transfer Equivalency Report – TRER ........................................ 76
Transfer Course Equivalencies – TCEQ ....................................... 77
Custom Advising Reports Menu – XAVR ................................. 79
Advisee Information Report - XADE ..................................................... 80

4
Colleague User Interface (UI)
Log into the browser like Internet Explorer, Firefox, Safari, etc. and type colleague.bw.edu.
Be sure you have disabled pop-up blockers for this url address in your browser settings.
If you would like to create a shortcut, just right click in the background area,
and left click on “Create Shortcut”. The next time you want to log into Colleague
UI you can just click on this shortcut.
Click on the words Launch Colleague to open a login box.
Enter your user Colleague ID and password and click OK.

5
Colleague User Interface (UI) Continued…
When you first log into Colleague, you have the option to do a “Person Search” or a “Form Search”.
Click on the correct button to access your current request.
Logout
When you are finished working in Colleague, be sure you click on the button located at the
top right of the screen, to close your connection to the server. Do not just close the window on the desktop
until after you have logged out.

6
SETTINGS MENU
The Settings Menu (gear icon) allows you to set your Preferences,
Reload Colleague Session, Show Field Sequence, Disable Custom Field Sequence,
Customize Field Sequence & Properties, Set Form Scale Default, Clear All Form
Scale Values, Clear All Form Scale Values, and Record Delete. It is located at the
top right of the screen.

7
PREFERENCES
For the creative folks, you can modify some of your Display and Operation Preferences.
You can modify colors for various screens. Click on the primary color you prefer, then click on OK.
You can also change the number of result records you will see in Card View and Grid View.
Viewing the person’s photo is defaulted to Yes.
You have the option to change the darkness of the Form Background.

8
FIELD SEQUENCE
You can create your own Field Sequence for a screen. This is defined for each screen, for
your username only. You need to be in the screen you want to modify, then choose Customize
Field Sequence & Properties.
The first number is the field number. Then second number is the sequence the cursor will use
when pressing Enter or Tab. Fields that have been modified are displayed in Red. Clear This
Field will remove a customization; Clear All Fields removes all customizations for this screen
and this user. You do not need to click Save after changing each field, only when you are
finished with all your customizations.
To have screens modified for all users, or for multiple users, contact the I.T. Helpdesk.
You can show the current field sequence by going to Show Field Sequence. To enable or
disable the custom sequence, choose Disable Custom Field Sequence. This setting is for the
current session only.

9
SET FORM SCALE DEFAULT
To reset the Form Scale Default click on the (gear icon) then the “Clear All Form Scale Values”.
Resize Your Screen Slide the dot to the size you prefer. It will remember this formatting.

10
FAVORITES
Access your Favorites by clicking on the star icon in the upper left corner.
To add People to your “People Favorites” go to Page 14. To add Forms to your
“Form Favorites” see page 18.
Click on the Star to view your Favorites
Click on the Star to view your Favorites
Click on this to remove a Person from your Favorites. Then click on “Remove Selected People”
Click on this icon to remove a Form from your Form Favorites. Then click on “Remove Selected Forms”

11
PERSON SEARCH
To Lookup a Person, enter the Colleague ID# of the person, or enter firstname lastname
(John Smith), or lastname, firstname (Smith, John). If you have just looked at information about
this person on a previous screen, you can use the shortcut Shift 2, which is the @ symbol to bring
up the same student again.
Click on the Person Search Icon
Type the ID # or Name
Click Search or press the Enter Key
( Stu ID )

12
PERSON SEARCH (Continued)
The screen will look like this if you type a common name like “john smith”.
If you don’t find the person/student you are looking for, move the scroll bar down to see
records not visible, then you can click on the next button at the bottom of the screen to
see more possible records.
Either double click anywhere on the row, or click on the row and then click on , or
type the number of the person in the “Input” field at the top of this screen and hit Enter.
If you do not find the name or you need to leave the screen you can hit the Close icon .
NOTE: The default view of the context area is “Card View”.
Card View

13
Grid View
Below your Search Results are in Grid View. This resembles a row in an Excel spreadsheet.
NOTE: You can click on any column header to sort the results by that column,
If you need to go to the next page of person records, you can click on the next page arrow or if you
want to go to the end you can click on the last page arrow. The reverse is also true. Click on the first
page arrow to go first page arrow and click on the previous page arrow to go to the previous page.
If you need to download the list of names, just click on the Excel Icon and then select where
you would like to save your spreadsheet, H: drive, Desktop, or Shared drive, etc. This download
feature is available anywhere in UI 5 you see the Excel icon.
First Page Previous Page Last Page Next Page Excel Download

14
CONTEXT AREA
Once you select a person/student the information is displayed in the Context Area.
The Context Area includes the name, phone numbers, and other various fields for this
person/student. As you do lookups for individuals, they are added to your context area, so
multiple individuals can be available. When you bring up a form, it will automatically load the
current person showing in your context area, and you can cycle through your list if desired.
There are various buttons available to you and they are shown on either side of the Context Area.
A brief description of each button is listed below:
Context Open or Closed -This option allows Colleague to keep or close each record
when you are saving or canceling out of a form.
Help – To access the Context Area help information.
Context Area – To view all records in the Context Area.
Close – To close a person record or clear all records from the context area.
Favorites – Add one or more students to your Favorite list.
Person History - If you have more than one context card loaded, you can click the
down arrow to go to the various records.
0237631

15
PERSON SEARCH HISTORY
To see all the people in your person history just click on the arrow in the
“Search for a Person…” box located at the right.
You can clear your Person Search History one person at a time by clicking on the X to
the left of the name or you can clear all Persons by clicking of the “Clear All” button.

16
FORM SEARCH
To search for forms and processes, click on the Form Search button. This is the starting point for
accessing processes, reports or screens. You can type a mnemonic like SPRO to directly access a
form/screen, or a type a word like Student in the “Search for a form...” field, and any Form/Screen
with the word Student in it will be listed.
Click on the Navigate button. You will now see the Main Navigation Screen.
Click on “ST” button for Student Processes.
Now you can click on any form/screen list and go directly to it.

17
FORM SEARCH HISTORY
To see all the Forms in your form history just click on the arrow in the
“Search for a Form…” box located at the right.
Clear History Menu
You can clear your Form Search History one form at a time by clicking on the X to
the left of the form or you can clear all Forms by clicking of the “Clear All” button.
Exit the Screen

18
PARTS OF THE FORM
Once The Form is displayed on the screen, you can move around using standard Windows
functionality – mouse clicks, tabs, etc.
The parts of a form are:
Menu Bar
You will see the Menu Bar once you are in a Form/Report/Screen, the menu bar offers the following options.
Form Favorties - Add the current Form to your Form Favorites.
SAVE - Save changes and return to previous screen.
SAVE ALL - Save changes on this screen and all previous screens displayed and return to the Main Menu.
CANCEL - Stop looking at the screen and/or abort changes and return to previous screen.
CANCEL ALL - Stop looking at the screen and/or abort changes on this screen all previous screens
displayed and return to the Main Menu.
Form Mnemonic and Name
Add Form to Favorites
Data Area

19
There are several Types of Buttons that perform various functions.
Window Operation Button - A Window Operation button enables you to insert or delete
a row of data. When you click the Window Operation button, the Select Window Operation
dialog box is displayed.
Click Insert to insert a new row above the current row.
Click Delete to delete the current row.
Click Cancel to leave the row unchanged and return to editing.
Detail - Goes to another screen showing more details on that item.
Date/Calendar This brings up a calendar for you to use to select a specific date.
Drop-Down Table This allows you to pick from a selection of correct items per field.

20
REPORT BROWSER
The Report Browser allows you to view reports easily in a Windows environment. The report
browser is accessed whenever you choose Hold/Browse output for a report. During viewing, the
browser imports the document one page at a time as requested, so that lengthy download times
are avoided.
Title Bar Tool Bar Exit the Report Browser
Using the Report Browser Toolbar
Save As Create PDF / Exit
First Page Last Page Text Print Print Remote Report Browser
Previous Page Next Page Help
Scroll Bar
( Stu ID )
21
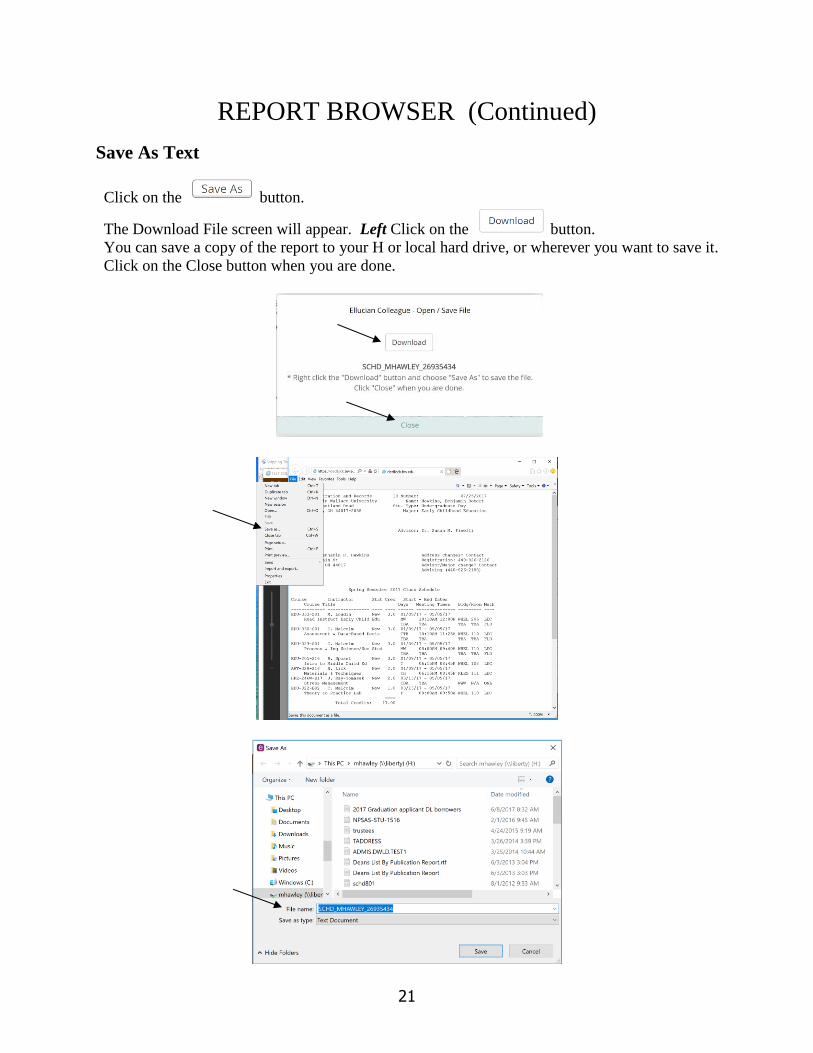
REPORT BROWSER (Continued)
Save As Text
Click on the button.
The Download File screen will appear. Left Click on the button.
You can save a copy of the report to your H or local hard drive, or wherever you want to save it.
Click on the Close button when you are done.

22
REPORT BROWSER (Continued)
Create PDF / Print the Report – (Export PDF)
To create a PDF or print the report to a Local Printer, click on the Save All icon
from your report process screen.
If you get sort criteria, click on the Save All icon to go to the next screen.

23
REPORT BROWSER (Continued)
At this screen make sure it has “H” in the “Output Device” field, then click on Save All .
At this screen make sure it has “N” in the “Execute in Background Mode” field, then click on
Save All .
24
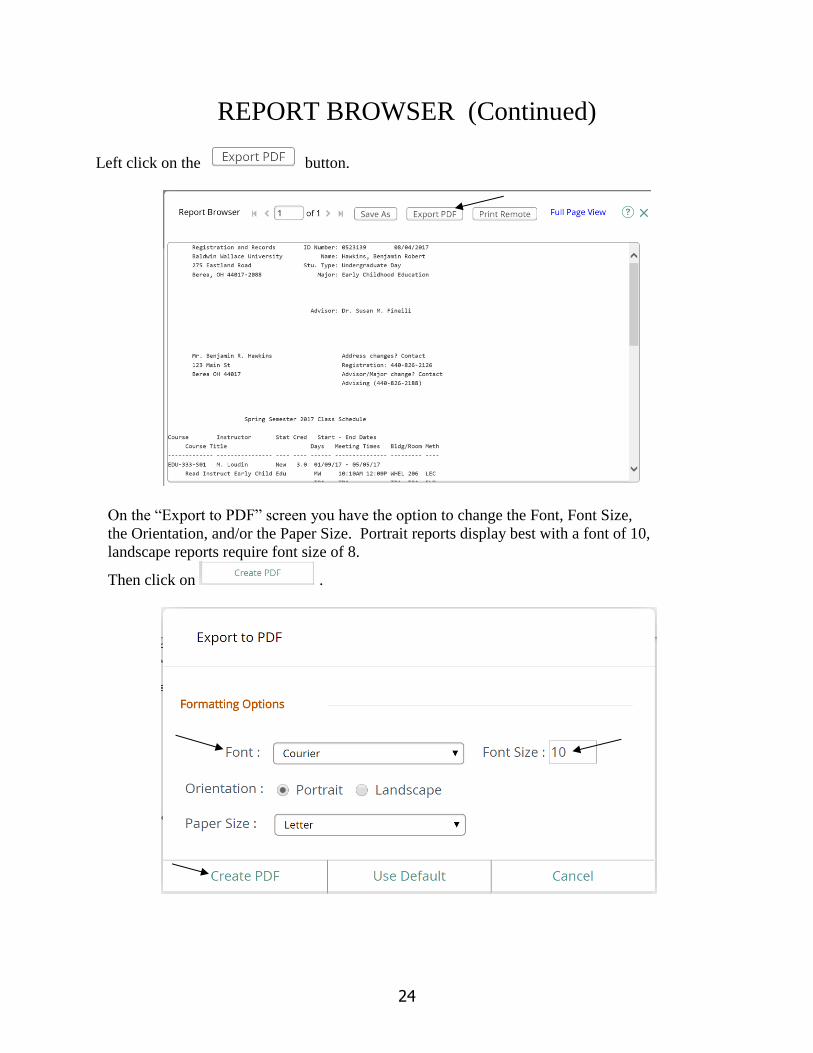
REPORT BROWSER (Continued)
Left click on the button.
On the “Export to PDF” screen you have the option to change the Font, Font Size,
the Orientation, and/or the Paper Size. Portrait reports display best with a font of 10,
landscape reports require font size of 8.
Then click on .

25
REPORT BROWSER (Continued)
The Download File screen will appear. Left Click on the button.
Click on the Close button when you are done.
To print, click on the Printer Icon located at the bottom of the screen.
26
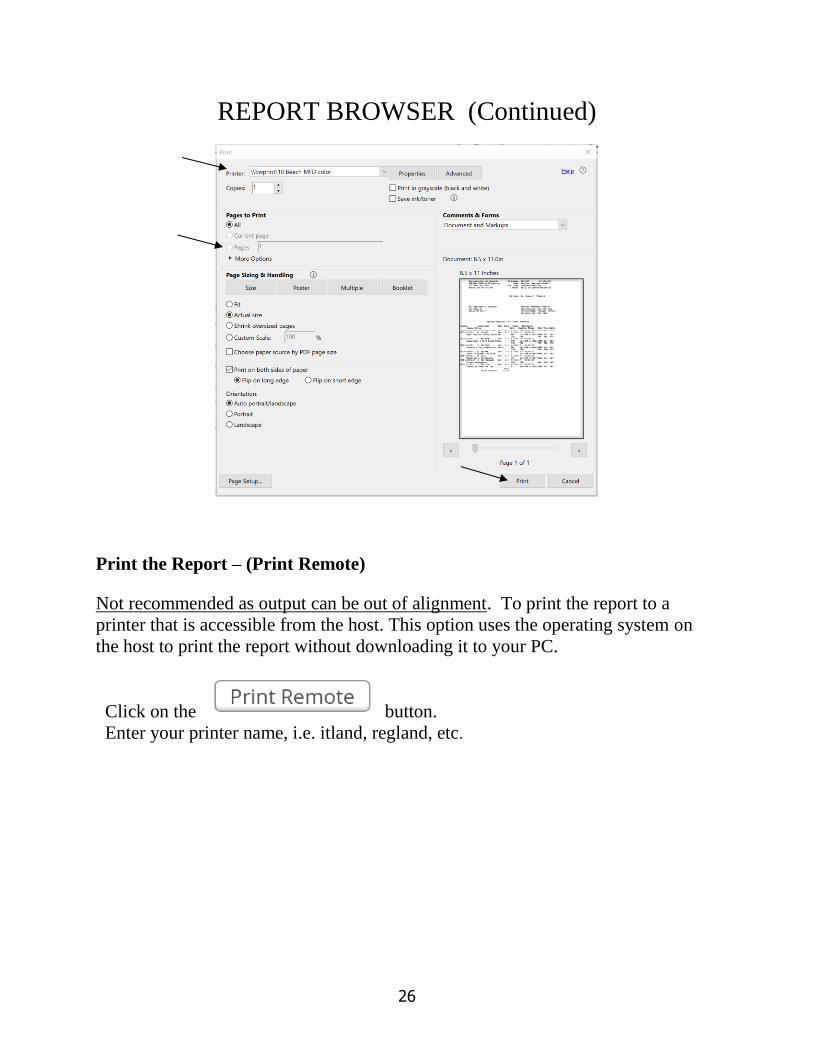
REPORT BROWSER (Continued)
Print the Report – (Print Remote)
Not recommended as output can be out of alignment. To print the report to a
printer that is accessible from the host. This option uses the operating system on
the host to print the report without downloading it to your PC.
Click on the button.
Enter your printer name, i.e. itland, regland, etc.

27
HELP MENU
Help for UI Keyboard Shortcuts
Help Menu Field Help Allows you to click in a field and then click on Field Help. Quick Tour Provides a 7 ½ min video regarding Colleague

28
HELP MENU (Continued)
Field Help To access Field help while working in a form, click in the field for which you would like help:
Click on the Help icon then click on Field Help.
Process Help Process help provides you with an overall description of the purpose of the selected form. It does not
provide detailed information about specific fields on a form. To access Process help from any location
within a form,
Click the Help icon then click on Process Help on the drop down menu.
Application Help Application help provides a document of the overall help for the Colleague User Interface.
You can access it by clicking on the Help icon then click on About.
Context Help Context help provides information on the Context area.
Help Menu Context Help

29
Date / Time / Login Stamp
On comment screens, you can enter a Date/Time/Login Stamp.
Example: Go to the “SPRO” screen. Click on “Add’l Profile Data” detail button.
Click on the “Comment/Remarks” detail button. Click on the Timestamp button and
type your notes regarding your meeting with the student. Then click on Save button.

30
STUDENT PROFILE
SPRO
Choose SPRO from the Navigation menu or type SPRO in the Form box.
The Student Lookup Box will now appear. Enter the student’s ID number or their name in the
“Student LookUp” field and hit Enter or click on OK.

31
STUDENT PROFILE
Name Resolution
If more than one person matches the name you enter, you will get a Name Resolution screen.
You have three options to select your person:
1) Type the number of the person you want and hit the ENTER or
2) Double Click anywhere on that row or
3) Click once anywhere on that row and then click on the Open button
4) If you do not find the name or you need to leave the screen you can hit the exit icon .

32
STUDENT PROFILE
SPRO
The Student Profile – SPRO screen provides a lot of student information, i.e.
addresses, Academic Programs, Student Types, Advisors, etc. It also has a lot of
links to other screens that are very helpful to many users.
Links

33
STUDENT PROFILE
Student Terms Summary - STRS
You can Detail on any Field that has a Detail Icon to the right of it by clicking on the icon.
Click on the Detail icon to the right of the field ‘Terms” to go to the STRS - Term Summary
Information screen.
34
STUDENT PROFILE
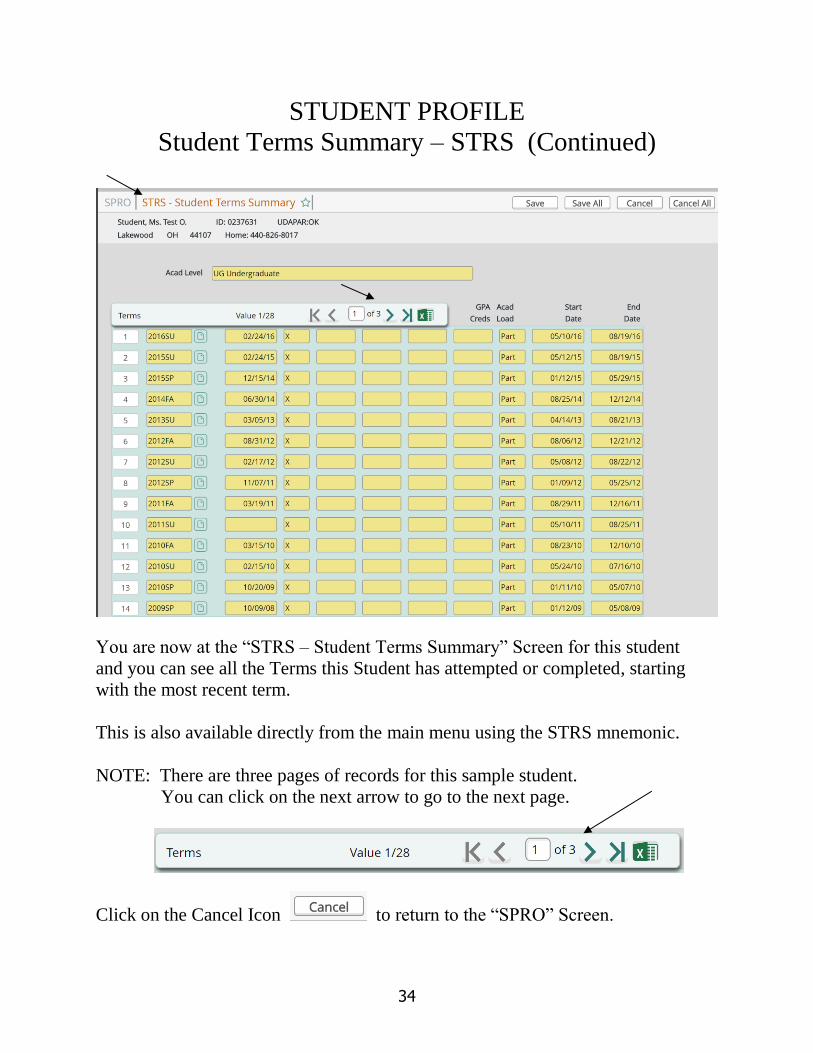
Student Terms Summary – STRS (Continued)
You are now at the “STRS – Student Terms Summary” Screen for this student
and you can see all the Terms this Student has attempted or completed, starting
with the most recent term.
This is also available directly from the main menu using the STRS mnemonic.
NOTE: There are three pages of records for this sample student.
You can click on the next arrow to go to the next page.
Click on the Cancel Icon to return to the “SPRO” Screen.
35
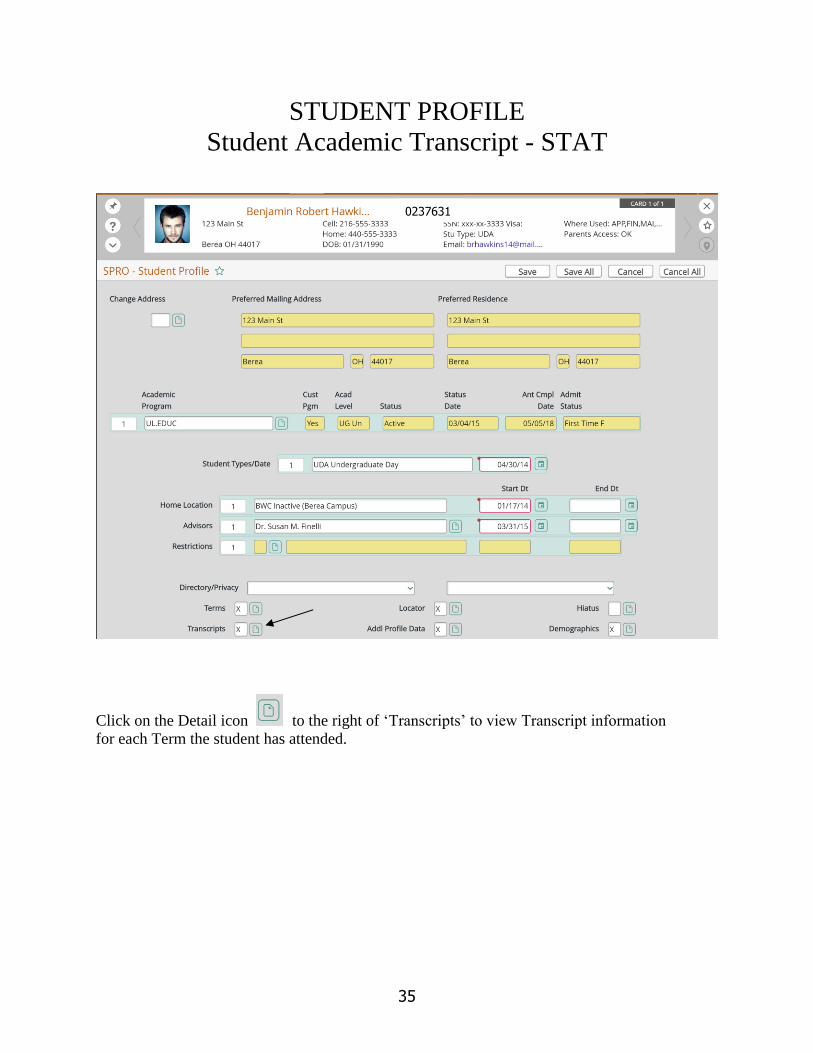
STUDENT PROFILE
Student Academic Transcript - STAT
Click on the Detail icon to the right of ‘Transcripts’ to view Transcript information
for each Term the student has attended.
0237631

36
STUDENT PROFILE
Student Academic Transcript – STAT (Continued)
Enter UG for Undergraduate or GR for Graduate and hit Enter or click “OK”.
Once this student completes a term, there will be GPA information on this screen.
Detail on a Term or Credit Type to see related courses and grades on the ACTD screen.
This is also available directly from the main menu using the STAT mnemonic.
Click on the Cancel Icon to return to the “SPRO” Screen.
ID 0237631

37
LOCATOR – LOCR
Use Locator –LOCR to find a student for an emergency or for any reason. Click on the Detail
icon to go to the Locator Screen.
NOTE: Some users have the ability to access LOCR from the Main Menu.
Colleague will default to today’s date, but you can change the date, then click OK or hit Enter.
0237631

38
LOCATOR – LOCR (Continued)
NOTE: The listed courses are not in any order. Carefully find the correct course.
Click on the Emergency Contact/Health Info Detail Button. At the Menu Click .
If something were to happen to the student, you have an Emergency contact name and phone
number to call on the “EMER – Emergency Information” Screen.
216 555-3456

39
STUDENT PROFILE
Student Academic Program - SACP
Once you are back at the “SPRO” screen, you can view the Academic Program Information
by clicking on the Detail Icon to the right of the “Academic Program” field.
0237631

40
STUDENT PROFILE
Student Academic Program – SACP (Continued)
You are now at the “SACP-Student Academic Program” screen showing the
Academic Program details.
Only the primary Major information will show on this screen.
Click on the Detail icon to the right of ‘Program Additions’ to look at the student’s
additional academic information.
ID 0237631

41
STUDENT PROFILE
Student Academic Program Additions - STPA
You are now at the “STPA-Student Academic Program Additions” screen showing
additional Majors, Minors, and Specializations.
Click on the Cancel Icon to return to the “SACP” Screen.
0237631

42
STUDENT PROFILE
Student Advisor Listing – STAD
You can detail in on the Student’s Advisors(s) by clicking on the
Detail icon to the right of the “Advisors” Field.
To go back to the Main Menu, you can click on the Cancel All Icon
ID 0237631

43
COURSE AVAILABILITY
XCOI
SELECT A SPECIFIC COURSE
Choose XCOI from the Navigation menu or type XCOI in the Form box.
Notice that the Term field has a RED border. This indicates a required field.
Enter the term and hit Enter.
Move to the Courses field and type in the Course number you want to review.
Then click on the Save All icon .

44
COURSE AVAILABILITY -XCOI
Review the selected Course
At the Course Detail Screen, you can review the details of this Course. You can see how many
seats are remaining, you can see the breakdown of the Student Type, Classes, and Levels. You
can see if there are any “Core Requirements” and/or “Pre-requisites”.
Click on the Cancel Icon to go back to the XCOI Screen and run another Course.
45
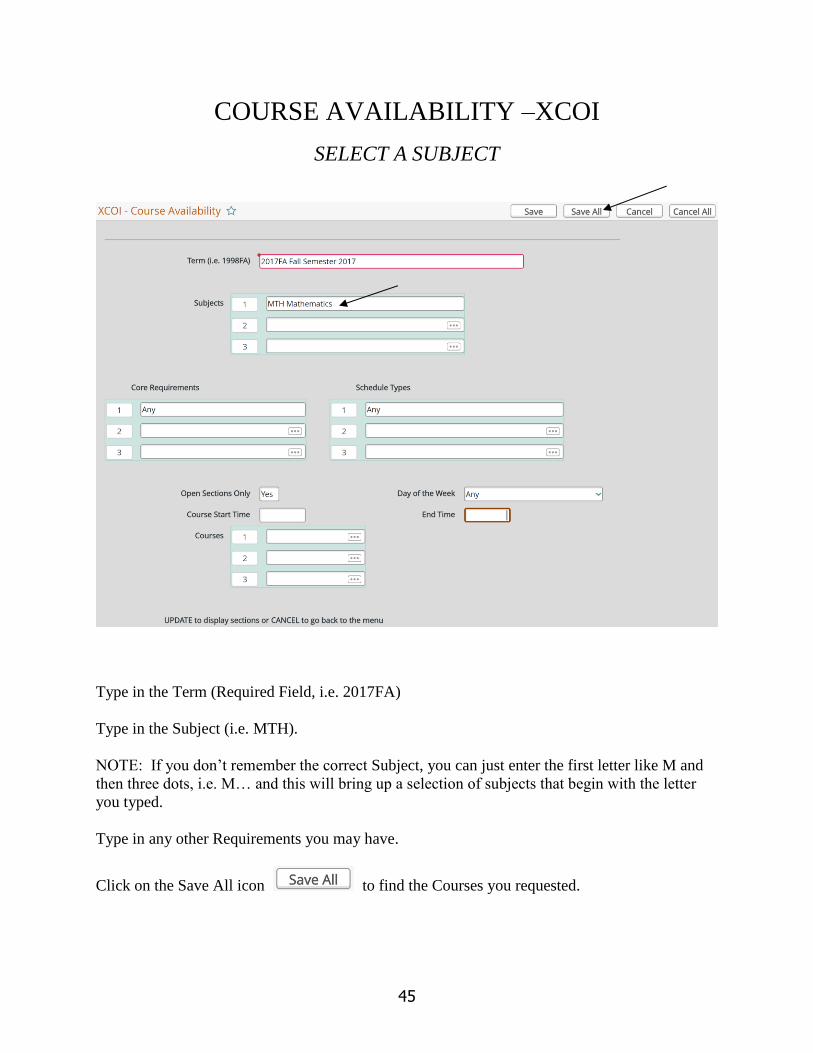
COURSE AVAILABILITY –XCOI
SELECT A SUBJECT
Type in the Term (Required Field, i.e. 2017FA)
Type in the Subject (i.e. MTH).
NOTE: If you don’t remember the correct Subject, you can just enter the first letter like M and
then three dots, i.e. M… and this will bring up a selection of subjects that begin with the letter
you typed.
Type in any other Requirements you may have.
Click on the Save All icon to find the Courses you requested.

46
COURSE AVAILABILITY -XCOI SELECT A SUBJECT
Select a Specific Course
You can click on the Detail Icon to the right of a Course to see more information about the
course.
To see additional Courses, click in one of the Course fields. A field will appear that allows you
to move between pages.

47
COURSE AVAILABILITY –XCOI SELECT A SUBJECT
Review the Selected Course
At the Course Detail Screen, you can review the details of this Course. You can see how many
seats are remaining, you can see the breakdown of the Student Type, Classes, and Levels. You
can see if there are any “Core Requirements” and/or “Pre-requisites”.
To go back just one Screen, click on the Cancel Icon .
To go back to the XCOI Screen, click on the Cancel All Icon .

48
COURSE SEATING INVENTORY
XCSI
Type XCSI in the Form box or choose XCSI from the Navigation menu.
The Term field has RED border and this means that it is a required field. Type in the term
needed by typing the year the then the first two letters of the Term.
i.e., SP = Spring, SU = Summer, and FA = Fall.
Hit the Enter Key or Tab Key to move to the next field.
The Start Date and End Date will automatically populate.

49
COURSE SEATING INVENTORY
XCSI
Options:
1) Leave the “Subjects to Include” and the “Sections to Include” blank if you want to run
all the courses that are being offered for the term you entered.
2) Select one or more “Subjects” at one time by typing in the 3-Letter subject of by clicking
on the drop down arrow and selecting the subject you need.
3) Select one “Subject” and the specific “Section(s)” you need. (See above example)
4) You can choose to get a printed report or a download of the data.
Make sure the first time you run the Course Seating Inventory that “No” is in the
“Additional Selection Criteria” field located at the bottom of the screen.
Click on the Save All icon to run the report.

50
COURSE SEATING INVENTORY - XCSI
Change the output device from P – Printer Spooler to H – Hold/Browse File Output.
Then click on Save All icon .
Do not change anything on this screen, just click on Save All icon .

51
COURSE SEATING INVENTORY
XCSI
When the report completes, click to continue.
1) You can either review the report,
2) You can Print the report and send it to your printer by clicking on ,
3) When you have completed what you need to do, click on the “Close” icon and
return to the Main Menu.
4) See Page 20 for more information regarding the Report Browser.

52
REGISTRATION
RGN
Select RGN from the Navigation menu or type RGN in the Form box.
Select the correct Term.
The Student Look Up Box will now appear.
Type in the Student’s Colleague ID Number or Name.
Then Hit the ENTER Key or click on “OK”.
If more than one person matches the name you enter, you will get a name resolution screen.
Select the correct student.

53
REGISTRATION
ADD A COURSE
To go to the last Courses, click in one of the Course fields. A field will appear that allows you to
move between pages.
Go to the last page. Click into the first blank course field and type in the Course the student
needs to take.
Hit the ENTER key.

54
REGISTRATION
Now click in the box to the left of the Course you want to select,
then click on the Open icon to make your selection.
OR
Type the number listed to the left of the Course you want to select and hit Enter.
OR
If you do not find a course you want you can hit the Close icon .
This new course will be added into the blank row, unless there is a conflict with their schedule or
if there is some reason they cannot take the course, like there is a prerequisite, etc.

55
REGISTRATION
To approve or modify the newly added course, click on the Detail button in the STAT Column.
You may type in the appropriate code for this student, or
You may click on the drop-down arrow and select the appropriate code
Then click on the Save Icon to save your updates. Then click on “Update”.

56
REGISTRATION
A copy of the student’s schedule will now pop up in a browser window where you can either
view or print it as necessary.
Once you are done, it will take you back to the start of RGN and it will ask you for another
Student Name or ID.

57
STUDENT SCHEDULE SCREEN
STSC
Choose STSC from the main menu.
Type in the Student’s ID or Name.
NOTE: If you already have a student record up, you will just need to type in the Term, i.e. 2017FA,
then hit Enter or click on “OK”.
If more than one person matches the name you enter, you will get a name resolution screen.
Select the proper student (see page 31).
Type the Term and then Hit Enter or click on “OK”

58
STUDENT SCHEDULE
STSC ( Continued)
This will display the Courses for which this Student has registered for the specified Term.
NOTE: This student has 18 classes that they have registered for Fall 2017 so to see all of his
classes you will have to click into a course field and then click on the right arrow.
. See above.
Click on the Cancel Icon to Cancel out of this Screen.
59
STUDENT SCHEDULE
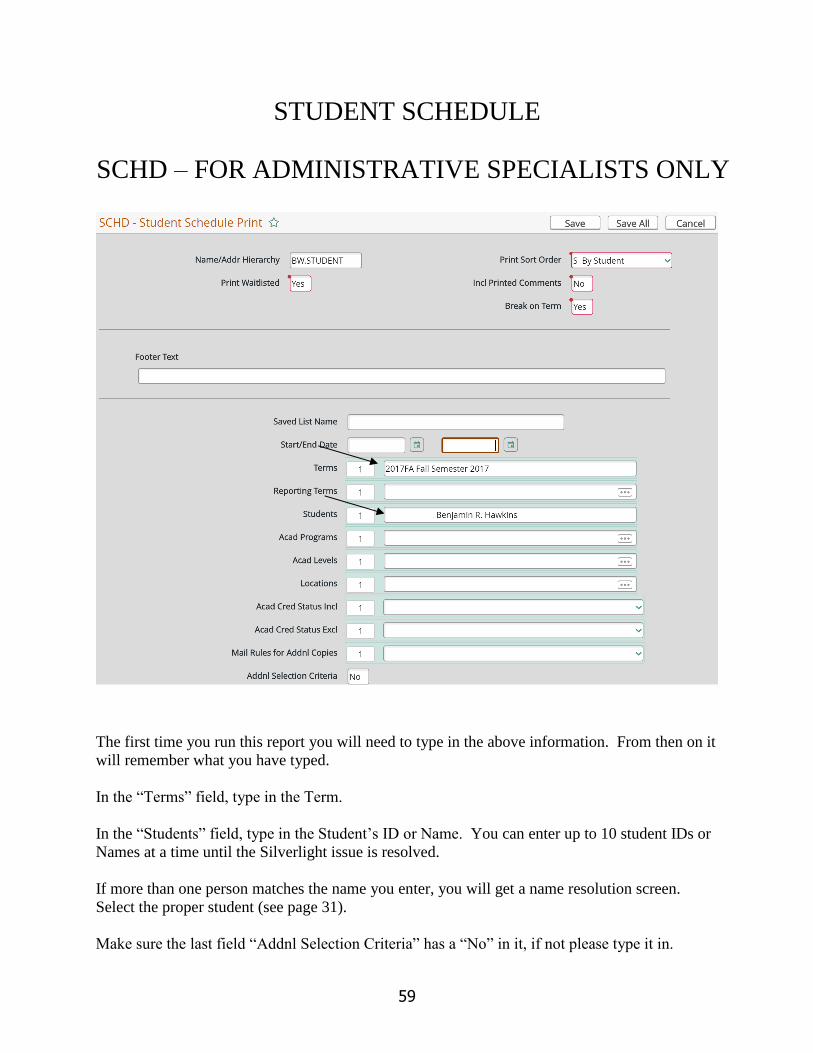
SCHD – FOR ADMINISTRATIVE SPECIALISTS ONLY
The first time you run this report you will need to type in the above information. From then on it
will remember what you have typed.
In the “Terms” field, type in the Term.
In the “Students” field, type in the Student’s ID or Name. You can enter up to 10 student IDs or
Names at a time until the Silverlight issue is resolved.
If more than one person matches the name you enter, you will get a name resolution screen.
Select the proper student (see page 31).
Make sure the last field “Addnl Selection Criteria” has a “No” in it, if not please type it in.

60
FACULTY ADVISEES
FADV
Select FADV from the Main menu.
The Faculty Look up box will now appear.
Enter the Faculty Person’s Name or Colleague ID number.
Click “OK” or just Hit ENTER.
If more than one person matches the name you enter, you will get a name resolution screen.
Select the proper person (see page 31).
All of the advisees for this faculty member will now appear. This Faculty Advisor has 34 Advises.
To go back to the Main Menu Screen, click on the Cancel All Icon.
0237631

61
ACADEMIC ROSTER INQUIRY
RSTR
Choose RSTR from the main menu.
Type in the Term and Course Number for which you need a Roster and hit Enter or
click “OK”.
If more than one course matches what you entered, you will get a course resolution
screen.
NOTE: For a printed copy of the roster you can run SROS.

62
ACADEMIC ROSTER INQUIRY (Cont…)
This is a good report to use to look at the students in a specific class. But we suggest that you
use Informer to run a report of these students.
NOTE: There are 26 students in this class so to see all of the students you will have to click into
a student field and then click on the right arrow.
. See above.

63
SECTION ROSTER INQUIRY
SRSI
Choose SRSI from the Main menu.
Type the Term and then the Course that you want to request. If more than one course matches
what you entered, you will get a course resolution screen. (See page 31) Select the proper
course.
NOTE: There are 26 students in this class. To see the remaining students, click in a student’s
field and then click on the right arrow. See Above

64
EVALUATE STUDENT PROGRAM
EVAL
Choose EVAL from the Main menu.
The Student Lookup box will now appear.
Type in the Student’s ID or Name then hit Enter or click on “OK”
If more than one person matches the name you enter, you will get a name resolution screen.
Select the proper person (see page 31).
If the student has changed their Academic Program this screen will appear. Select the Academic
Program that is still active, in other words, the one that does not have an “End Date”.
Type number of the Academic Program you want in the Select box and Hit the Enter Key
Or click on the box to the left of the Academic Program and then click on the Open Icon .

65
EVALUATE STUDENT PROGRAM
EVAL
You have the option to print the Student Evaluation Report with a single column text, double-
column text, or HTML (same as WebExpress). Double-column is the default.
Now you may click on the Save All icon.

66
EVALUATE STUDENT PROGRAM
SAMPLE OF A HTML
Click on the Download button.
(0237631)

67
EVALUATE STUDENT PROGRAM
EVAL
This is Page 1 of this Student’s EVAL Report.
Use the scroll bars to view other parts of this page.
To see the next page of this Student’s EVAL Report you can hit the “Page Down” button on your
keyboard
You can click on the black “Next Page” Button at the top of this Screen.
To print this EVAL Report just click on the “Export PDF” Button.
To Exit click on the “Exit Browser” Button at the top right of your Screen.
See Page 20 for more information regarding the Report Browser.
( Stu ID )

68
EVALUATE STUDENT PROGRAM
BATCH EVAL – BEVL
For Office Managers and Secretaries ONLY
Choose BEVL from the Main menu.
Note: The top of the screen is identical to the EVAL screen. The difference is that
you have the ability to print many students at one time.
See the previous page for instructions on how to view and/or print the EVALs.

69
PROPOSED STUDENT PROGRAM
PSPR
Choose PSPR from the Main menu.
Enter the Student’s Colleague ID or Name, then hit Enter or click on “OK”.
If more than one person matches the name you enter, you will get a name
resolution screen. Select the proper person (see page 31).
Enter the student’s Proposed Academic Program, then hit Enter or click on “OK”.

70
PROPOSED STUDENT PROGRAM
PSPR
Double click on the row of the correct catalog year, or
Enter the number shown to the left of the Catalog you want to review and then hit
the Enter Key or
Click on the row of the Catalog you want and then click on the Open Icon.

71
PROPOSED STUDENT PROGRAM
PSPR
Detail on “Evaluate” to run a Program Evaluation for this academic program (see page 56).
Be sure to answer ‘No’ to “Save Current Program” when you are finished
(this is the default, just do not change it).
NOTE: Any permanent program changes must be handled through the normal change
procedures and processes with the Registrar.

72
TRANSCRIPT COURSE LISTING
TRCL
Enter the student’s Colleague ID or name and then hit Enter or click on “OK”.
If more than one person matches the name you enter, you will get a name
resolution screen. Select the proper person (see page 31).
Enter UG for Undergraduate or GR for Graduate, then hit Enter or click on OK.
The TRCL Screen will show all the grades for each course taken at BW.

73
TRANSCRIPT COURSE LISTING
TRCL
NOTE: There are 45 courses that this student took, so to see the other courses you
will have to click into a Course Name field and then click on the right arrow
.
See above.
Click on the Cancel All icon to Cancel out of this Screen and go back
to the Main menu.

74
TRANSFER EVALUATION SUMMARY
TEVS
Type TEVS at the Main menu or select it from the Navigation tab.
It is under ECT – External Courses & Transfers.
Enter the student’s Colleague ID or Name, then hit Enter or click “OK”.
If more than one person matches the name you enter, you will get a name resolution screen.
Select the proper person (see page 31).
Type the number of the Institution you would like to review in the Select # field and hit Enter or
Click in the row of the Institution and then click on the Open icon. .

75
TRANSFER EVALUATION SUMMARY
TEVS
You can detail into an individual Course for further information.
You can click on the next arrow to look at the next page of courses.
See above.
When you have gotten the information you need, just click on the Cancel All button
to go back to the Main Menu.

76
TRANSFER EQUIVALENCY REPORT
TRER
Type TRER at the Main menu or select it from the Navigation tab.
It is under ECT – External Courses & Transfers.
Enter the student’s Colleague ID or Name, then hit Enter or click “OK”.
If you need to get transfer information on more than one student, you can enter the next student’s
ID or Name on line 2.
If more than one person matches the name you enter, you will get a name resolution screen.
Select the proper person (see page 31).
Click on the Save All icon to run this request.
See Page 20 for more information regarding using the Report Browser.
Mr. Benjamin R. Hawkins

77
TRANSFER COURSE EQUIVALENCIES
TCEQ
Type TRER at the Main menu or select it from the Navigation tab.
It is under ECT – External Courses & Transfers.
Enter the Name of the Institution (Cuyahoga Community College) or its’ Colleague ID Number,
(7512) then hit Enter or click “OK”.
If more than one institution matches the name you enter, you will get a name resolution screen.
Select the proper institution (see page 31).
Enter the Course name (ENG 101) from the other institution, or … (3 dots) to list all courses for
this institution.
Then hit Enter or click on “OK”.

78
TRANSFER COURSE EQUIVALENCIES
TCEQ
The BW equivalency information will display.
If you need to look at more than one course, you can click in the Transfer Course field and then
click on the right arrow.
Once you are done, click on the Cancel All icon to back to the Main Menu.

79
CUSTOM ADVISING REPORTS
XAVR
The reports on this menu have been developed by BW
to extract specific data for faculty and advisors.
Click on the Navigation tab and click on “BW Custom Menus – XBW”, then click on
“XAV BW Advisors Menu (ST) – XAV, then click on
“Custom Advising Reports Menu – XAVR.
You will see a list of custom reports that you can run.

80
ADVISEE INFORMATION REPORT
XADE
Type XADE at the Main menu or click on XADE under XAVR in the Navigation Tab.
Enter at least one faculty ID or name in the Faculty ID field.
In the Report or Download field, enter “R” for a printed Report, or “D” for a downloaded file.
Make sure there is a “N” in the Additional Criteria field then click the Save All icon .
XADE DOWNLOAD If you decide to create a downloaded file for this report, the last line of the screen indicates that
will find the file ADVDOWNLOAD.csv on your H:\ or network drive.