Cognito Motorsports Inc. Transmission pinion shaft and ...
8
Instruction set 7099 Cognito Motorsports Inc. Transmission pinion shaft and cover upgrade, 2009-2017 Polaris RZR170 Part # 360-90074 Introduction - Load on the transmission from the chain pulling on it under power, is the main reason this area of the transmission fails. Under this load, the stock upper motor mount can flex and also fail, along with causing the stock pinion shaft to deflect and break the transmission housing. Along with this pinion upgrade kit, the upper motor mount right next to the transmission also needs to be reinforced. This pinion shaft upgrade kit will replace the stock pinion shaft, which does not have a wide bearing spread. This upgraded shaft and cover, widens the bearing spread drastically to help keep the pinion shaft from deflecting like it does stock. - This replaces the rear transmission pinion cover and the pinion gear shaft. The rear cover has a bearing added, the shaft has a long nose to connect with the added bearing to support the pinion gear and shaft to help strengthen the transmission case and help prevent it from cracking. A new gasket may be required if it is damaged while removing the main transmission cover for installation. Can be done without removing the engine from the car. - Installation requires a qualified mechanic. - Read instructions carefully and study the pictures before attempting installation. - Check the parts and hardware packages against the parts list to assure that your kit is complete. - Always wear safety glasses when using power tools. - This instruction set available in color on www.cognitomotorsports.com Requirements - This upgrade is not a fix all for the transmission breakage problems. The upper engine mount must be re-enforced also. Cognito may offer an upgrade, check website or call. If we do not have an upgrade for the engine mount at the time, it is highly recommended that you re-enforce the stock mount. - If the transmission housing gasket is torn during dis-assembly, a new OEM gasket will be needed, it is not included in this kit. - The stock o-ring from the stock pinion cover must be moved over to the Cognito pinion cover. - Green Loctite will be required, not included. Parts List - (1) 5831, Pinion shaft - (1) 90081, pinion cover assembly • (1) pinion cover • (1) bearing
Transcript of Cognito Motorsports Inc. Transmission pinion shaft and ...
Instruction set 7099
Cognito Motorsports Inc. Transmission pinion shaft and cover upgrade, 2009-2017 Polaris RZR170
Part # 360-90074 Introduction - Load on the transmission from the chain pulling on it under power, is the main reason this area of
the transmission fails. Under this load, the stock upper motor mount can flex and also fail, along with causing the stock pinion shaft to deflect and break the transmission housing. Along with this pinion upgrade kit, the upper motor mount right next to the transmission also needs to be reinforced. This pinion shaft upgrade kit will replace the stock pinion shaft, which does not have a wide bearing spread. This upgraded shaft and cover, widens the bearing spread drastically to help keep the pinion shaft from deflecting like it does stock.
- This replaces the rear transmission pinion cover and the pinion gear shaft. The rear cover has a bearing added, the shaft has a long nose to connect with the added bearing to support the pinion gear and shaft to help strengthen the transmission case and help prevent it from cracking. A new gasket may be required if it is damaged while removing the main transmission cover for installation. Can be done without removing the engine from the car.
- Installation requires a qualified mechanic. - Read instructions carefully and study the pictures before attempting installation. - Check the parts and hardware packages against the parts list to assure that your kit is complete. - Always wear safety glasses when using power tools. - This instruction set available in color on www.cognitomotorsports.com Requirements - This upgrade is not a fix all for the transmission breakage problems. The upper engine mount must
be re-enforced also. Cognito may offer an upgrade, check website or call. If we do not have an upgrade for the engine mount at the time, it is highly recommended that you re-enforce the stock mount.
- If the transmission housing gasket is torn during dis-assembly, a new OEM gasket will be needed, it is not included in this kit.
- The stock o-ring from the stock pinion cover must be moved over to the Cognito pinion cover. - Green Loctite will be required, not included. Parts List
- (1) 5831, Pinion shaft - (1) 90081, pinion cover assembly
• (1) pinion cover • (1) bearing
Instruction set 7099
• (1) retaining clip • (1) oil fill plug with O-ring
Installation
1. The installation can be done in the car, although it is more difficult. If installing with the engine in the car, remove the rear tires and the left rear shock, shift cables and bracket from the housing. Mark the adjustment of the cables so they can go back together in same spot, or take a picture.
2. Drain the oil from the transmission.
3. It is easiest to remove the cover from the housing first, before the transmission housing from the engine case, simply because the cover is tight in the housing. Our instructions are written that way although the pictures show the housing already removed from the engine before the cover is removed. It can be done either way.
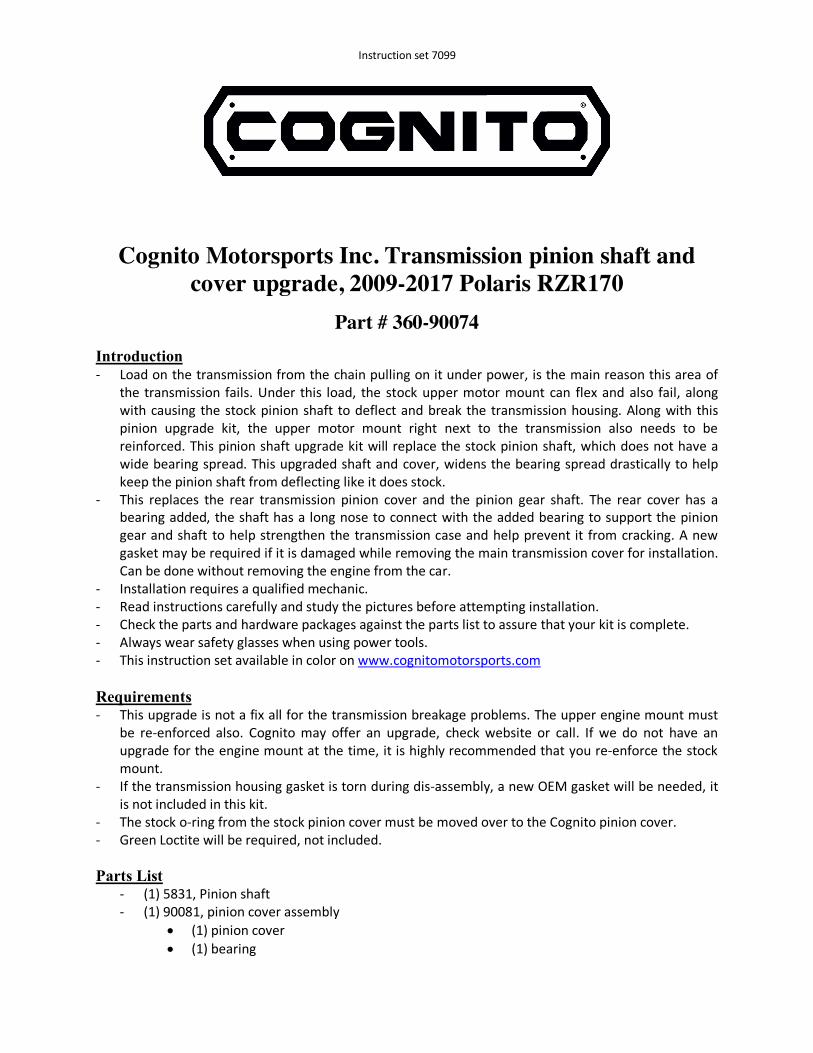
4. Remove the 3 bolts holding the stock pinion cover onto the transmission housing. See Figure 1
Figure 1: removing pinion cover
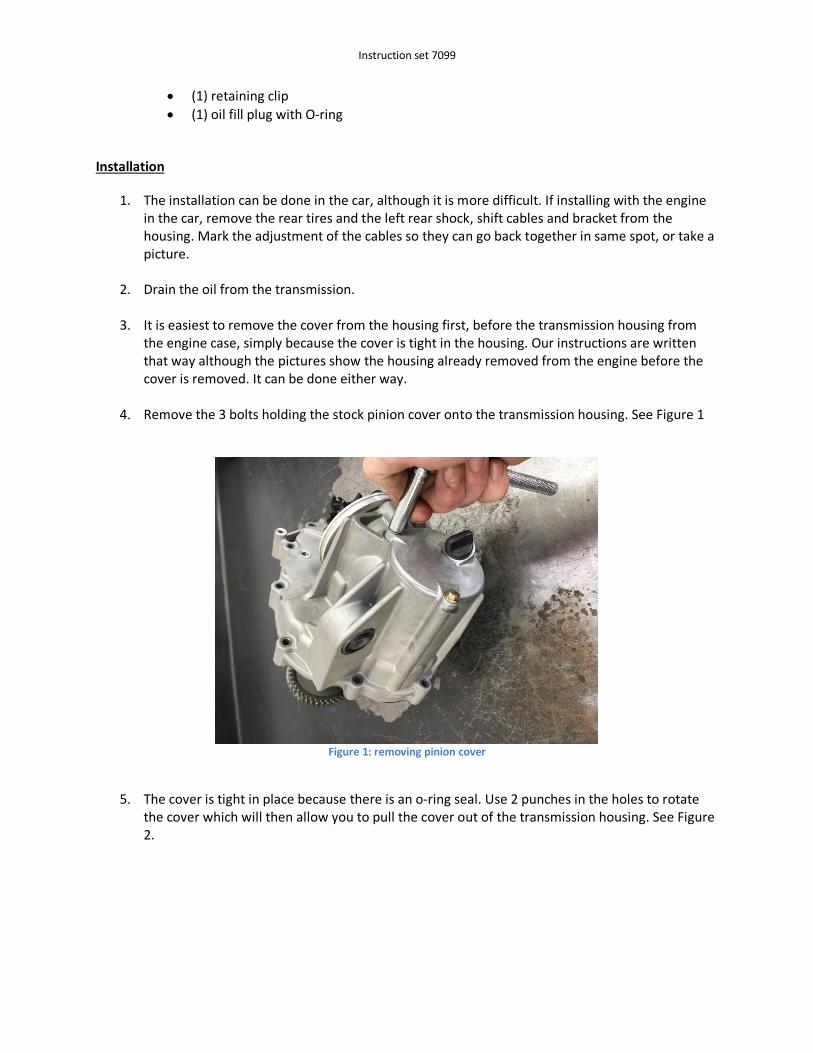
5. The cover is tight in place because there is an o-ring seal. Use 2 punches in the holes to rotate
the cover which will then allow you to pull the cover out of the transmission housing. See Figure 2.
Instruction set 7099
Figure 2: removing pinion cover
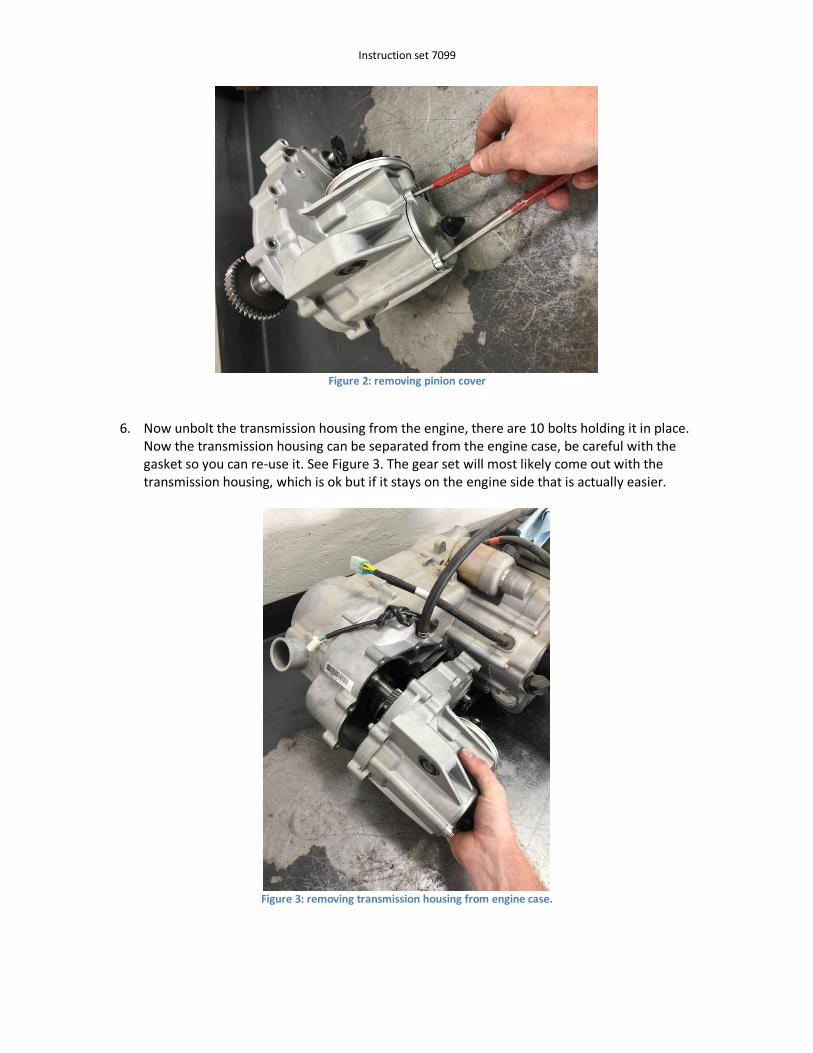
6. Now unbolt the transmission housing from the engine, there are 10 bolts holding it in place.
Now the transmission housing can be separated from the engine case, be careful with the gasket so you can re-use it. See Figure 3. The gear set will most likely come out with the transmission housing, which is ok but if it stays on the engine side that is actually easier.
Figure 3: removing transmission housing from engine case.
Instruction set 7099
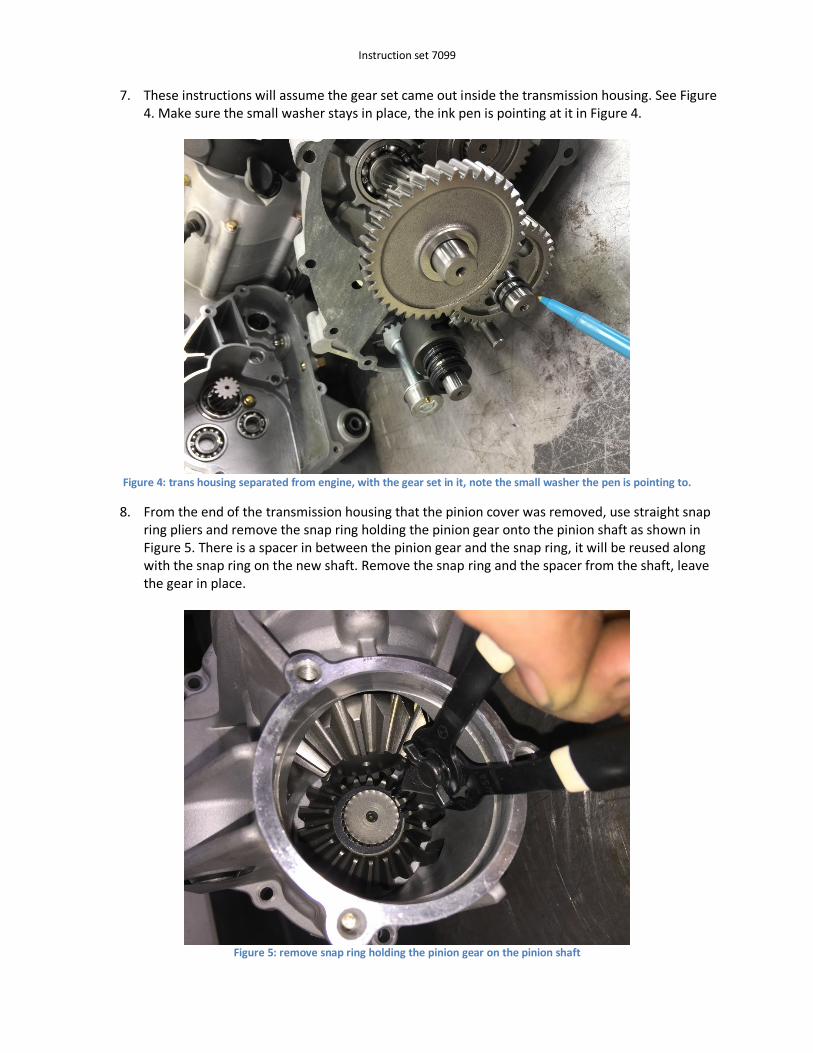
7. These instructions will assume the gear set came out inside the transmission housing. See Figure 4. Make sure the small washer stays in place, the ink pen is pointing at it in Figure 4.
Figure 4: trans housing separated from engine, with the gear set in it, note the small washer the pen is pointing to.
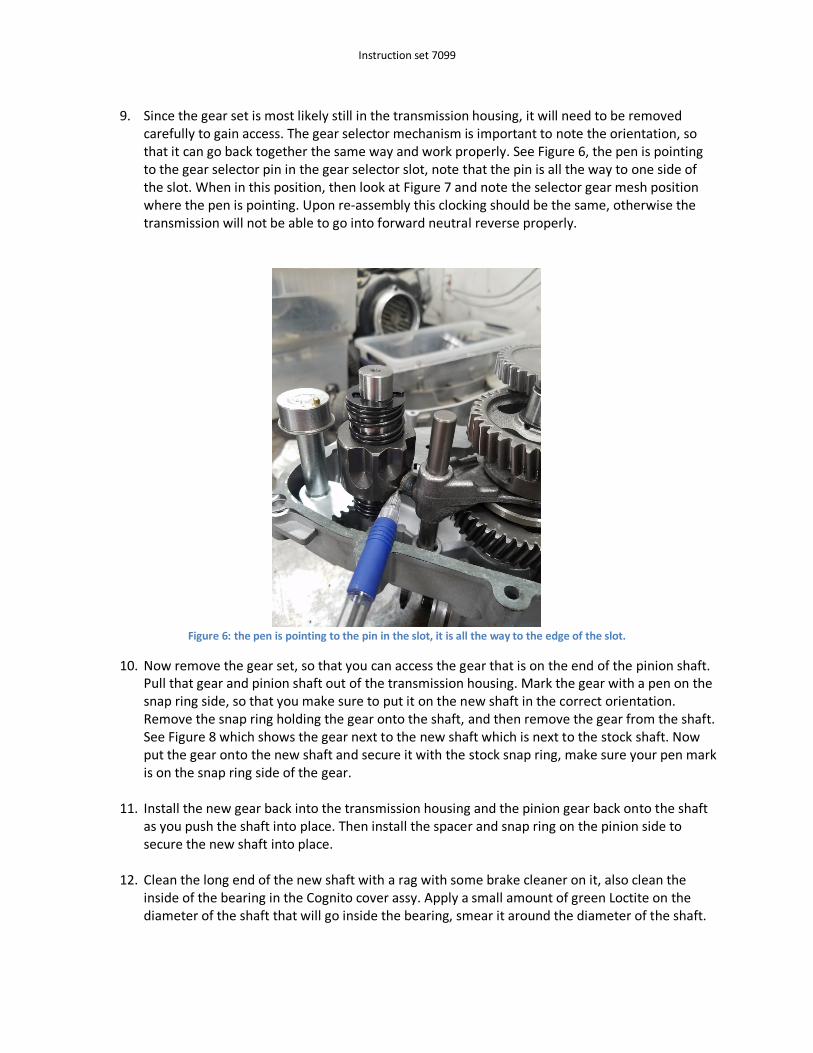
8. From the end of the transmission housing that the pinion cover was removed, use straight snap ring pliers and remove the snap ring holding the pinion gear onto the pinion shaft as shown in Figure 5. There is a spacer in between the pinion gear and the snap ring, it will be reused along with the snap ring on the new shaft. Remove the snap ring and the spacer from the shaft, leave the gear in place.
Figure 5: remove snap ring holding the pinion gear on the pinion shaft
Instruction set 7099
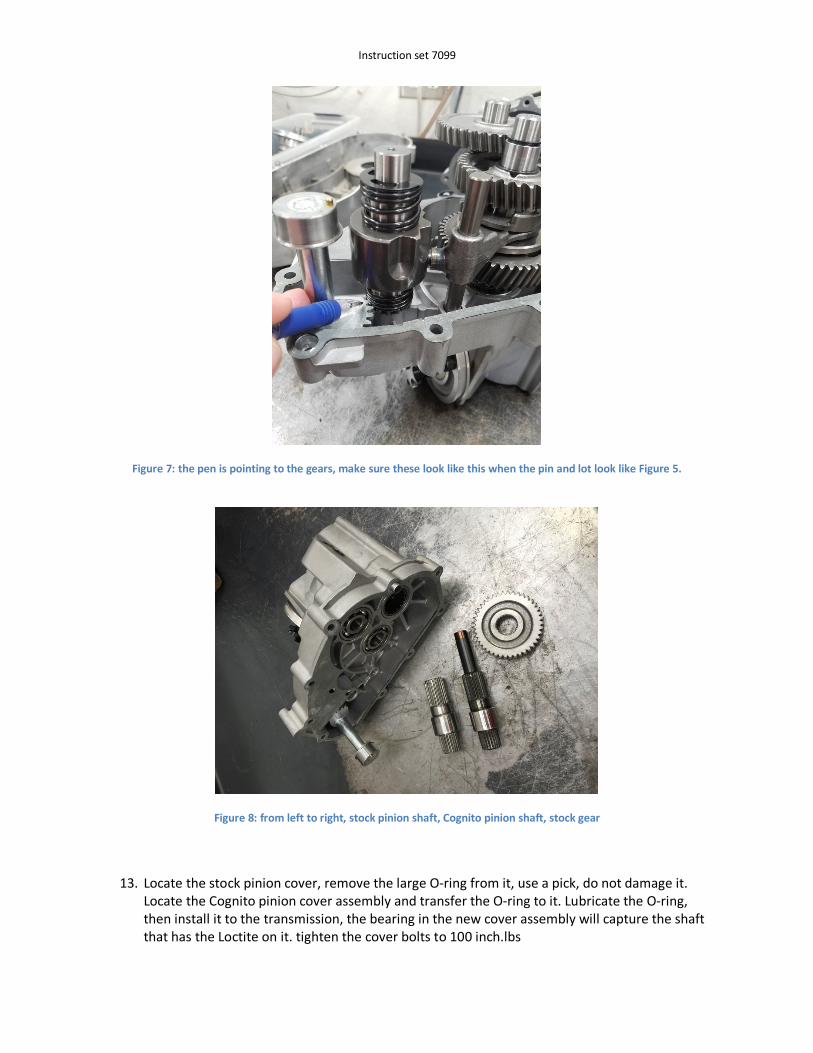
9. Since the gear set is most likely still in the transmission housing, it will need to be removed
carefully to gain access. The gear selector mechanism is important to note the orientation, so that it can go back together the same way and work properly. See Figure 6, the pen is pointing to the gear selector pin in the gear selector slot, note that the pin is all the way to one side of the slot. When in this position, then look at Figure 7 and note the selector gear mesh position where the pen is pointing. Upon re-assembly this clocking should be the same, otherwise the transmission will not be able to go into forward neutral reverse properly.
Figure 6: the pen is pointing to the pin in the slot, it is all the way to the edge of the slot.
10. Now remove the gear set, so that you can access the gear that is on the end of the pinion shaft. Pull that gear and pinion shaft out of the transmission housing. Mark the gear with a pen on the snap ring side, so that you make sure to put it on the new shaft in the correct orientation. Remove the snap ring holding the gear onto the shaft, and then remove the gear from the shaft. See Figure 8 which shows the gear next to the new shaft which is next to the stock shaft. Now put the gear onto the new shaft and secure it with the stock snap ring, make sure your pen mark is on the snap ring side of the gear.
11. Install the new gear back into the transmission housing and the pinion gear back onto the shaft
as you push the shaft into place. Then install the spacer and snap ring on the pinion side to secure the new shaft into place.
12. Clean the long end of the new shaft with a rag with some brake cleaner on it, also clean the
inside of the bearing in the Cognito cover assy. Apply a small amount of green Loctite on the diameter of the shaft that will go inside the bearing, smear it around the diameter of the shaft.
Instruction set 7099
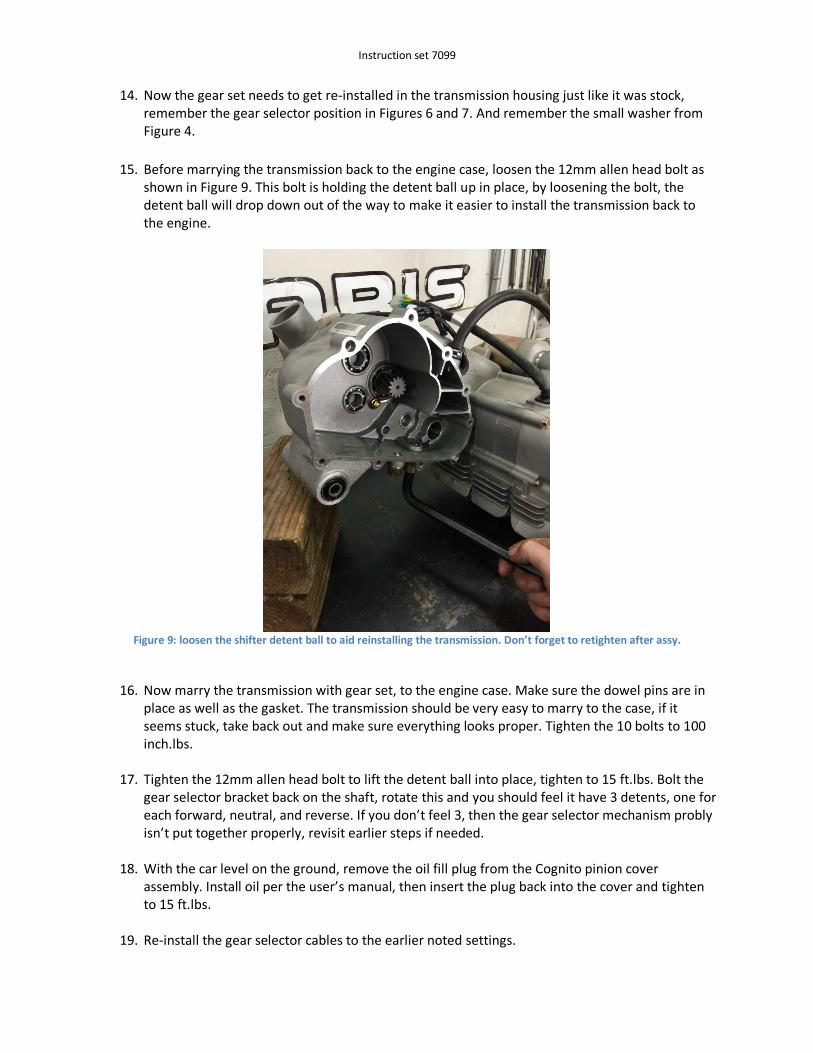
Figure 7: the pen is pointing to the gears, make sure these look like this when the pin and lot look like Figure 5.
Figure 8: from left to right, stock pinion shaft, Cognito pinion shaft, stock gear
13. Locate the stock pinion cover, remove the large O-ring from it, use a pick, do not damage it. Locate the Cognito pinion cover assembly and transfer the O-ring to it. Lubricate the O-ring, then install it to the transmission, the bearing in the new cover assembly will capture the shaft that has the Loctite on it. tighten the cover bolts to 100 inch.lbs
Instruction set 7099
14. Now the gear set needs to get re-installed in the transmission housing just like it was stock, remember the gear selector position in Figures 6 and 7. And remember the small washer from Figure 4.
15. Before marrying the transmission back to the engine case, loosen the 12mm allen head bolt as shown in Figure 9. This bolt is holding the detent ball up in place, by loosening the bolt, the detent ball will drop down out of the way to make it easier to install the transmission back to the engine.
Figure 9: loosen the shifter detent ball to aid reinstalling the transmission. Don’t forget to retighten after assy.
16. Now marry the transmission with gear set, to the engine case. Make sure the dowel pins are in
place as well as the gasket. The transmission should be very easy to marry to the case, if it seems stuck, take back out and make sure everything looks proper. Tighten the 10 bolts to 100 inch.lbs.
17. Tighten the 12mm allen head bolt to lift the detent ball into place, tighten to 15 ft.lbs. Bolt the
gear selector bracket back on the shaft, rotate this and you should feel it have 3 detents, one for each forward, neutral, and reverse. If you don’t feel 3, then the gear selector mechanism probly isn’t put together properly, revisit earlier steps if needed.
18. With the car level on the ground, remove the oil fill plug from the Cognito pinion cover
assembly. Install oil per the user’s manual, then insert the plug back into the cover and tighten to 15 ft.lbs.
19. Re-install the gear selector cables to the earlier noted settings.
Instruction set 7099
Cognito Motorsports Limited Lifetime Warranty Cognito Motorsports warrants, to the original retail purchaser, that its suspension products are free from defects in workmanship and material for as long as the purchaser owns the vehicle on which the product was originally installed. Cognito Motorsports does not warrant the product for finish, alterations, modifications, and/or original installation contrary to specifications of Cognito Motorsports. Cognito Motorsports suspension products are not designed nor intended to be installed on vehicles used in race applications or for racing purposes or for similar activities involving abnormal abuse other than the vehicle was originally designed to handle or endure. (A “RACE” is defined as any contest between two or more vehicles, and/or contest of one or more vehicle against the clock, whether or not such contest is for a prize.)
This warranty is for a one-time replacement of each Cognito Motorsports product and does not cover any part that Cognito Motorsports has previously replaced under this warranty. This warranty does not include coverage for police or taxi vehicles, race vehicles, or vehicles used for government or commercial purposes. Also excluded from this warrant are sales outside of the United States of America. Alterations to the finish of the parts including but not limited to painting, powder coating, plating, and/or welding will void all warranties. Cognito Motorsports obligation under this warranty is limited to the repair or replacement, at Cognito Motorsports option of the defective product. Any and all costs of removal, installation or re-installation, freight charges, incidental or consequential damages are expressly excluded from this warranty.
This warranty excludes the following items: bushings, bumpstops, tie-rod ends, limiting straps, and hiem joints. These parts are subject to wear and are not considered defective when worn. They are warranted for 60 days of purchase for defects in workmanship. Cognito Motorsports suspension components must be installed as a complete system. Any substitutions or exemptions of required components will immediately void the warranty. Some finish damage may happen to parts during shipping and is not covered under warranty. This warranty shall not apply to any product that had been subject to accident, negligence, alteration, abuse, or misuse. Cognito Motorsports does not warrant products not manufactured by Cognito Motorsports. Cognito Motorsports reserves the right to supersede, discontinue, or change the design, finish, part number and/or application of parts when deemed necessary by Cognito Motorsports without written notice, and in the sole and absolute discretion of Cognito Motorsports. Warranty Claims All warranty claims must be submitted through the original company of purchase. All claims must be shipped back to the original company of purchase with an approved RMA number listed as a reference on the shipping label and clearly printed on two opposing sides of the package(s); product in question must be inspected by Cognito Motorsports before replacement parts are shipped out. Return Policy Cognito Motorsports has a no refund return policy. Under special circumstances, returns might be accepted with prior written approval. All returned product will be shipped freight prepaid. Product returned is subject to a 25% restocking fee. No returns will be accepted after 30 days upon receipt of product. Product Consumer Safety and Warning The installation of this kit will modify the suspension of your vehicle and may cause it to handle significantly different than a factory equipped vehicle. Installing larger tires with modified suspension and increased ground clearance will significantly alter the handling characteristics of the vehicle, and may result in increased braking distances as well as changes in vehicle maneuverability and handling compared to the factory equipped vehicle. As with any vehicle, extreme caution and care must be used to prevent loss of control or roll-over during sharp turns or abrupt maneuvers. Always wear seat belts and drive safely, recognizing the reduced speeds and specialized driving techniques is required.
This suspension system will not strengthen nor reinforce the stock frame of the vehicle, nor will it increase rollover protection. It is necessary to periodically inspect all suspension and drive train components for tightness of fit or any damage. Installation of these parts will modify the height of the vehicle and will raise the center of gravity. Altered height modifications and off-road operation may increase your vehicle’s susceptibility to roll over conditions and may cause serious injury or death. Many states regulate the height modification to each vehicle. Check the laws in your state for exact specifications. Height modifications may affect the reaction, ride, handling, and wear factor of your vehicle’s components.
Failure to drive this vehicle safely may result in injury or death! Do not drive this vehicle unless you are familiar with its unique handling characteristics and are confident of your ability to maintain control under all driving conditions. Some modifications and combinations of modifications are not recommended, unsafe, and may not be permitted in your state. Consult your vehicle owner’s manual, the instructions accompanying this product, and your state laws before undertaking these modifications. The owner of the modified vehicle and the qualified mechanic required to install this product are responsible for the legality and safety of the vehicle being modified.