CMCE 1110 – CONSTRUCTION DRAWINGS I Instructor: Prof. …
6
1 CMCE 1110 – CONSTRUCTION DRAWINGS I Instructor: Prof. Anderson Drawing #2: Line Work On an 18” x 24” (1 ½ ft x 2 ft) piece of drafting vellum, format the drafting sheet with the proper borders and title block. Once the drafting sheet is properly formatted, construct: (12) 4”x4” equal squares with 1” between each square. Top left-side square: 1 ¾ ” from left & ¼” from top of border-lines. Refer to all handouts for layout, line-type, line thickness, spacing, & proper formatting/ title block specification. (12) 4”x4” Squares 1 Vertical object lines ¼” apart 2 Horizontal object lines ¼” apart 3 60-degree dimension lines ¼” apart (to the right) 4 30-degree dimension lines ¼” apart (to the left) 5 15-degree object lines ¼” apart (to the right) 6 75-degree lines ¼” apart (to the left) 7 45-degree lines ¼” apart (to the right) 8 Horizontal hidden lines ¼” apart (to the right) 9 Design pattern object line 10 Design pattern object line 11 Vertical center lines ¼” apart 12 Horizontal sectional lines ¼” apart Object line: Thick line / HB type lead Use for major elements (walls, structure) Detail line: Medium line / F type lead Hidden line: Medium thickness / F type lead; Short 1/8” dashes, evenly spaced 1/16” apart. Center line: Thin lines / H type lead; Alternate long (3/4”) and short (1/8”) dashes, evenly spaced 1/16” apart. Dimension line: Thin line / H type lead Cutting /Sectional line: Thick line / B type lead One (3/4”) long and two (1/8”) short dashes, evenly spaced 1/16” apart. Break line: Thin line / H type lead Do not wait until the last minute; this assignment will take time! Assignment Due Date: Sept 23, 2011
Transcript of CMCE 1110 – CONSTRUCTION DRAWINGS I Instructor: Prof. …

1
CMCE 1110 – CONSTRUCTION DRAWINGS I
Instructor: Prof. Anderson
Drawing #2: Line Work
On an 18” x 24” (1 ½ ft x 2 ft) piece of drafting vellum, format the drafting sheet with the proper borders and title block. Once the drafting sheet is properly formatted, construct: (12) 4”x4” equal squares with 1” between each square. Top left-side square: 1 ¾ ” from left & ¼” from top of border-lines. Refer to all handouts for layout, line-type, line thickness, spacing, & proper formatting/ title block specification.
(12) 4”x4” Squares 1 Vertical object lines ¼” apart
2 Horizontal object lines ¼” apart
3 60-degree dimension lines ¼” apart (to the right)
4 30-degree dimension lines ¼” apart (to the left)
5 15-degree object lines ¼” apart (to the right)
6 75-degree lines ¼” apart (to the left)
7 45-degree lines ¼” apart (to the right)
8 Horizontal hidden lines ¼” apart (to the right)
9 Design pattern object line
10 Design pattern object line
11 Vertical center lines ¼” apart
12 Horizontal sectional lines ¼” apart
Object line: Thick line / HB type lead Use for major elements (walls, structure) Detail line: Medium line / F type lead Hidden line: Medium thickness / F type lead; Short 1/8” dashes, evenly spaced 1/16” apart. Center line: Thin lines / H type lead; Alternate long (3/4”) and short (1/8”) dashes, evenly spaced 1/16” apart. Dimension line: Thin line / H type lead Cutting /Sectional line: Thick line / B type leadOne (3/4”) long and two (1/8”) short dashes, evenly spaced 1/16” apart. Break line: Thin line / H type lead
Do not wait until the last minute; this assignment will take time!
Assignment Due Date: Sept 23, 2011
nicole
Highlight
nicole
Stamp

2
3

4
LINEWORK ASSIGNMENT INSTRUCTIONS
After formatting the drafting sheet with the proper borders and title block the SAME WAY WE DID THE LETTERING BORDER AND TITLE BLOCK (Border: 1” from left ½” from top, bottom and right side.), mark title block as drawing #2: LINEWORK. See below for specifications for linework 4x4 squares: 4”x4” Squares:
1 Vertical object lines ¼” apart (thick/heavy-line HB type lead) 2 Horizontal object lines ¼” apart (thick/heavy-line HB type lead) 3 60-degree dimension lines ¼” apart. Direction to the right (thin/light-line H
type lead) 4 30-degree dimension lines ¼” apart. Direction to the left (thin/light-line H
type lead) 5 15-degree object lines ¼” apart. Direction to the right (thick/heavy-line HB type
lead) Use the 30/60 and 45-degree triangles to achieve 15-degree angles. 6 75-degree object lines ¼” apart. Direction to the left (thick/heavy-line HB type
lead) 7 45-degree construction lines ¼” apart. Direction to the right (medium-line F
type lead) 8 Horizontal Hidden lines ¼” apart. (medium-line F type lead) 9 Design Pattern (thick/heavy-line HB type lead) Divide the 4”x4” square into seven
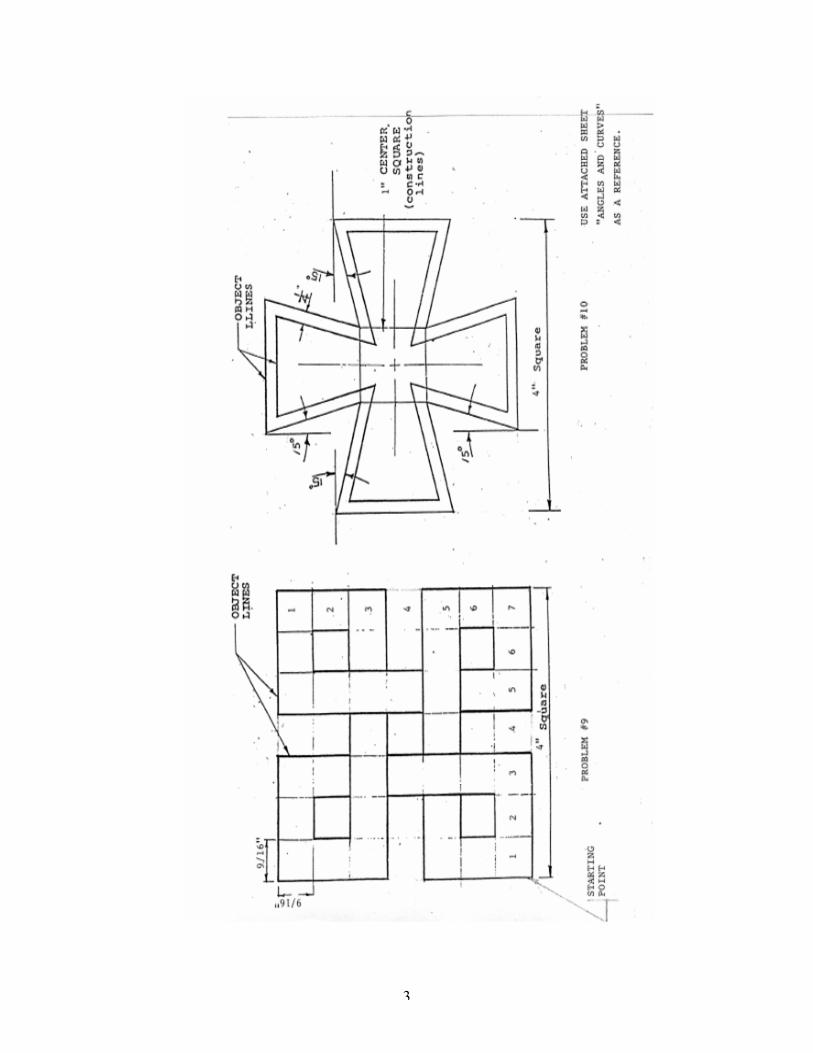
9/16”equal squares (use the 3/16 scale 3 divisions) draw light guide-lines and then using a thick line-type out-line the border of the pattern. (SEE LAYOUT)
10 Design Pattern (thick/heavy-line HB type lead) First step: Draw an 1”x1” (1 inch by 1 inch guide-line ) square in the center of the 4”x4” square (1.5”+1”+1.5” = 4”) Next step: from the 4 corners of the 1”x1” inner-square draw a 15-degree line to the outside 4”x4” (use the 30/60 and 45-degree triangles to achieve 15-degree angles - 30+45=75 / 90-75=15). Final step: Draw the inner ¼” (quarter of an inch) outline of the cross /pattern. (SEE LAYOUT)
11 Vertical Center lines ¼” apart. (thin/light-line H type lead) 12 Horizontal Sectional lines ¼” apart. (thick/heavy-line B type lead) layout
Please refer to all handouts for layout, line-type, and line thickness, spacing, &
proper formatting/title block specification.

5
Using Your 30-60-90 and 45-45-90 Triangles to Create 15o and 75o Angles

6