Cloud Oracle Applications · Oracle Applications Cloud Securing Applications Preface i Preface This...
140
Oracle Applications Cloud Securing Applications 20A
Transcript of Cloud Oracle Applications · Oracle Applications Cloud Securing Applications Preface i Preface This...
Oracle ApplicationsCloud
Securing Applications
20A

Oracle Applications CloudSecuring Applications
20APart Number F24363-02Copyright © 2011, 2020, Oracle and/or its aliates. All rights reserved.
Author: Sekhar Pappu
This software and related documentation are provided under a license agreement containing restrictions on use and disclosure and are protected byintellectual property laws. Except as expressly permied in your license agreement or allowed by law, you may not use, copy, reproduce, translate,broadcast, modify, license, transmit, distribute, exhibit, perform, publish, or display any part, in any form, or by any means. Reverse engineering,disassembly, or decompilation of this software, unless required by law for interoperability, is prohibited.
The information contained herein is subject to change without notice and is not warranted to be error-free. If you nd any errors, please reportthem to us in writing.
If this is software or related documentation that is delivered to the U.S. Government or anyone licensing it on behalf of the U.S. Government, thenthe following notice is applicable:
U.S. GOVERNMENT END USERS: Oracle programs, including any operating system, integrated software, any programs installed on the hardware,and/or documentation, delivered to U.S. Government end users are "commercial computer software" pursuant to the applicable Federal AcquisitionRegulation and agency-specic supplemental regulations. As such, use, duplication, disclosure, modication, and adaptation of the programs,including any operating system, integrated software, any programs installed on the hardware, and/or documentation, shall be subject to licenseterms and license restrictions applicable to the programs. No other rights are granted to the U.S. Government.
This software or hardware is developed for general use in a variety of information management applications. It is not developed or intended for usein any inherently dangerous applications, including applications that may create a risk of personal injury. If you use this software or hardware indangerous applications, then you shall be responsible to take all appropriate fail-safe, backup, redundancy, and other measures to ensure its safeuse. Oracle Corporation and its aliates disclaim any liability for any damages caused by use of this software or hardware in dangerous applications.
Oracle and Java are registered trademarks of Oracle and/or its aliates. Other names may be trademarks of their respective owners.
Intel and Intel Xeon are trademarks or registered trademarks of Intel Corporation. All SPARC trademarks are used under license and are trademarks orregistered trademarks of SPARC International, Inc. AMD, Opteron, the AMD logo, and the AMD Opteron logo are trademarks or registered trademarksof Advanced Micro Devices. UNIX is a registered trademark of The Open Group.
This software or hardware and documentation may provide access to or information about content, products, and services from third parties. OracleCorporation and its aliates are not responsible for and expressly disclaim all warranties of any kind with respect to third-party content, products, andservices unless otherwise set forth in an applicable agreement between you and Oracle. Oracle Corporation and its aliates will not be responsiblefor any loss, costs, or damages incurred due to your access to or use of third-party content, products, or services, except as set forth in an applicableagreement between you and Oracle.
The business names used in this documentation are ctitious, and are not intended to identify any real companies currently or previously in existence.
Oracle Applications CloudSecuring Applications
Contents
Preface i
1 Introduction 1About This Guide ........................................................................................................................................................................... 1
Role Types ....................................................................................................................................................................................... 1
Role Inheritance ............................................................................................................................................................................. 2
Duty Role Components ................................................................................................................................................................ 2
Aggregate Privileges ..................................................................................................................................................................... 3
Guidelines for Conguring Security in Oracle Applications Cloud ..................................................................................... 4
2 Security Console 5Overview .......................................................................................................................................................................................... 5
Administrate the Security Console ........................................................................................................................................... 6
Run Retrieve Latest LDAP Changes .......................................................................................................................................... 7
Security Visualizations ................................................................................................................................................................. 8
Options for Viewing a Visualization Graph ............................................................................................................................. 8
Visualization Table Display Options ........................................................................................................................................ 10
Generate a Visualization ............................................................................................................................................................. 11
Simulate Navigator Menus in the Security Console ............................................................................................................. 11
Analytics for Roles ....................................................................................................................................................................... 12
Analytics for Database Resources ........................................................................................................................................... 13
FAQs for Security Console ........................................................................................................................................................ 14
3 Bridge for Microsoft Active Directory 17Overview ........................................................................................................................................................................................ 17
Active Directory Synchronization ............................................................................................................................................. 17
User Account Aribute Mapping ............................................................................................................................................. 19
Microsoft Active Directory Bridge Setup ............................................................................................................................... 20
FAQs for Microsoft Active Directory Bridge Setup .............................................................................................................. 26
Oracle Applications CloudSecuring Applications
4 Implementation Users 29Overview ....................................................................................................................................................................................... 29
User Accounts .............................................................................................................................................................................. 29
User Account Details ................................................................................................................................................................. 30
Add User Accounts .................................................................................................................................................................... 30
Assign Roles to an Existing User ............................................................................................................................................. 31
Reset Passwords .......................................................................................................................................................................... 32
Lock and Unlock User Accounts .............................................................................................................................................. 32
Delete User Accounts ................................................................................................................................................................. 33
Create Notication Templates ................................................................................................................................................. 33
Synchronize User and Role Information ............................................................................................................................... 36
Reset the Cloud Service Administrator Sign-In Details ...................................................................................................... 36
User Categories ........................................................................................................................................................................... 37
5 Application Users 41Overview ........................................................................................................................................................................................ 41
User and Role-Provisioning Setup Options ........................................................................................................................... 41
User Account Creation Option ................................................................................................................................................. 42
User Account Role Provisioning Option ................................................................................................................................ 43
User Account Maintenance Option ........................................................................................................................................ 44
Set the User and Role Provisioning Options ........................................................................................................................ 44
Provision Abstract Roles to Users Automatically ................................................................................................................ 45
6 Application Users Management 49Users .............................................................................................................................................................................................. 49
User Accounts ............................................................................................................................................................................. 54
FAQs for Application Users Management ............................................................................................................................ 63
Oracle Applications CloudSecuring Applications
7 Role Provisioning 67Role Mappings ............................................................................................................................................................................. 67
Create a Role Mapping .............................................................................................................................................................. 68
Role Provisioning and Deprovisioning ................................................................................................................................... 70
Autoprovisioning ......................................................................................................................................................................... 72
User and Role Access Audit Report ........................................................................................................................................ 73
Data Access .................................................................................................................................................................................. 75
Assign Data Access to Users .................................................................................................................................................... 77
View Role Information Using Security Dashboard .............................................................................................................. 78
FAQs for Role Provisioning ...................................................................................................................................................... 79
8 Location-Based Access 81Overview ........................................................................................................................................................................................ 81
How Location-Based Access Works ........................................................................................................................................ 81
Enable and Disable Location-Based Access ......................................................................................................................... 82
FAQs for Location-Based Access ............................................................................................................................................ 83
9 Single Sign-On 87Oracle Applications Cloud as the Single Sign-On Service Provider ................................................................................. 87
Congure Single Sign-On ......................................................................................................................................................... 87
FAQs for Single Sign-On .......................................................................................................................................................... 89
10 Export and Import of Security Setup Data 93Export and Import of Security Console Data ........................................................................................................................ 93
Export and Import of Custom Roles ...................................................................................................................................... 94
11 Security Conguration 97Data Security Policies ................................................................................................................................................................ 97
FAQs for Security Conguration ............................................................................................................................................ 101
12 Roles and Role Assignments 103Review Role Assignments ....................................................................................................................................................... 103
Review Role Hierarchies .......................................................................................................................................................... 103
Compare Roles .......................................................................................................................................................................... 104
Oracle Applications CloudSecuring Applications
13 Role Conguration Using the Security Console 107Custom Roles ............................................................................................................................................................................. 107
Role Optimization ...................................................................................................................................................................... 118
FAQs for Role Conguration Using the Security Console ................................................................................................ 122
14 Security Certicates 123Overview ...................................................................................................................................................................................... 123
Types of Certicates ................................................................................................................................................................. 123
Sign a X.509 Certicate ........................................................................................................................................................... 124
Import and Export X.509 Certicates ................................................................................................................................... 124
Import and Export PGP Certicates ...................................................................................................................................... 125
Delete Certicates ...................................................................................................................................................................... 125
Oracle Applications CloudSecuring Applications
Preface
i
PrefaceThis preface introduces information sources that can help you use the application.
Using Oracle Applications
HelpUse help icons to access help in the application. If you don't see any help icons on your page, click your user imageor name in the global header and select Show Help Icons. Not all pages have help icons. You can also access the OracleHelp Center to nd guides and videos.
Watch: This video tutorial shows you how to nd and use help.
You can also read about it instead.
Additional Resources
• Community: Use Oracle Cloud Customer Connect to get information from experts at Oracle, the partnercommunity, and other users.
• Training: Take courses on Oracle Cloud from Oracle University.
ConventionsThe following table explains the text conventions used in this guide.
Convention Meaning
boldface Boldface type indicates user interface elements, navigation paths, or values you enter or select.
monospace Monospace type indicates le, folder, and directory names, code examples, commands, and URLs.
> Greater than symbol separates elements in a navigation path.
Oracle Applications CloudSecuring Applications
Preface
ii
Documentation AccessibilityFor information about Oracle's commitment to accessibility, visit the Oracle Accessibility Program website.
Videos included in this guide are provided as a media alternative for text-based help topics also available in this guide.
Contacting Oracle
Access to Oracle SupportOracle customers that have purchased support have access to electronic support through My Oracle Support. Forinformation, visit My Oracle Support or visit Accessible Oracle Support if you are hearing impaired.
Comments and SuggestionsPlease give us feedback about Oracle Applications Help and guides! You can send an e-mail to:[email protected].
Oracle Applications CloudSecuring Applications
Chapter 1Introduction
1
1 Introduction
About This GuideIf you are a security manager or administrator, then this guide is for you. You can use this guide to learn about taskssuch as seing up users, roles, and privileges, managing passwords, and dening access control. The conceptualand procedural information in the guide is generic and applies to many or all product families. For product-specicinformation refer to the corresponding product-specic guides if available. You must have access to the SecurityConsole to perform the tasks covered in this guide.
Role TypesOracle Enterprise Resource Planning (Oracle ERP) Cloud denes these types of roles:
• Job roles
• Abstract roles
• Duty roles
• Aggregate privileges
Let's look at the role types in detail.
Job RolesJob roles represent the jobs that users perform in an organization. You can also create job roles.
Examples: General Accountant and Accounts Receivables Manager
Abstract RolesAbstract roles represent users in the enterprise independent of the jobs they perform. You can also create abstract roles.
All users are likely to have at least one abstract role that provides access to a set of standard functions. You may assignabstract roles directly to users.
Examples: Employee and Transactional Business Intelligence Worker
Duty RolesDuty roles represent a logical collection of privileges that grant access to tasks that someone performs as part of a job.You can also create duty roles. Here are some duty role characteristics:
• They group multiple function security privileges.
• They can inherit aggregate privileges and other duty roles.
• You can copy and edit them.
Oracle Applications CloudSecuring Applications
Chapter 1Introduction
2
Job and abstract roles may inherit duty roles either directly or indirectly. You don't assign duty roles directly to users.
Examples: Budget Review and Account Balance Review
Aggregate PrivilegesAggregate privileges are roles that combine the functional privilege for an individual task or duty with the relevant datasecurity policies. Functions that aggregate privileges might grant access to include task ows, application pages, workareas, dashboards, reports, batch programs, and so on.
Aggregate privileges dier from duty roles in these ways:
• All aggregate privileges are predened. You can't create, modify, or copy them.
• They don't inherit any type of roles.
You can include the predened aggregate privileges in your job and abstract roles. You assign aggregate privileges tothese roles directly. You don't assign aggregate privileges directly to users.
Role InheritanceAlmost every role is a hierarchy or collection of other roles.
• Job and abstract roles inherit aggregate privileges. They may also inherit duty roles.
Note: In addition to aggregate privileges and duty roles, job and abstract roles are granted manyfunction security privileges and data security policies directly. You can explore the completestructure of a job or abstract role in the Security Console.
• Duty roles can inherit other duty roles and aggregate privileges.
When you assign roles, users inherit all of the data and function security associated with those roles.
Duty Role ComponentsA typical duty role consists of function security privileges and data security policies. Duty roles may also inheritaggregate privileges and other duty roles.
Data Security PoliciesFor a given duty role, you may create any number of data security policies. Each policy selects a set of data required forthe duty to be completed and actions that may be performed on that data. The duty role may also acquire data securitypolicies indirectly from its aggregate privileges.
These are the components of a data security policy:
• A duty role, for example Expense Entry Duty.
• A business object that's being accessed, for example Expense Reports.
Oracle Applications CloudSecuring Applications
Chapter 1Introduction
3
• The condition, if any, that controls access to specic instances of the business object. For example, a conditionmay allow access to data applying to users for whom a manager is responsible.
• A data security privilege, which denes what may be done with the specied data, for example ManageExpense Report.
Function Security PrivilegesMany function security privileges are granted directly to a duty role. It also acquires function security privilegesindirectly from its aggregate privileges.
Each function security privilege secures the code resources that make up the relevant pages, such as the ManageGrades and Manage Locations pages.
Tip: The predened duty roles represent logical groupings of privileges that you may want to manage as agroup. They also represent real-world groups of tasks. For example, the predened General Accountant jobrole inherits the General Ledger Reporting duty role. You can create a General Accountant job role with noaccess to reporting structures. To create such a job role, copy the job role and remove the General LedgerReporting duty role from the role hierarchy.
Aggregate PrivilegesAggregate privileges are a type of role. Each aggregate privilege combines one function security privilege with relateddata security policies. All aggregate privileges are predened. This topic describes how to name and use aggregateprivileges.
Aggregate Privilege NamesAn aggregate privilege takes its name from the function security privilege that it includes. For example, the PromoteWorker aggregate privilege includes the Promote Worker function security privilege.
Aggregate Privileges in the Role HierarchyJob roles and abstract roles inherit aggregate privileges directly. Duty roles may also inherit aggregate privileges.However, aggregate privileges can't inherit other roles of any type. As most function and data security in job andabstract roles is provided by aggregate privileges, the role hierarchy has few levels. This at hierarchy is easy tomanage.
Aggregate Privileges in Custom RolesYou can include aggregate privileges in the role hierarchy of a custom role. Treat aggregate privileges as role buildingblocks.
Create, Edit, or Copy Aggregate PrivilegesYou can't create, edit, or copy aggregate privileges, nor can you grant the privileges from an aggregate privilege toanother role. The purpose of an aggregate privilege is to grant a function security privilege only in combination with aspecic data security policy. Therefore, you must use the aggregate privilege as a single entity.
Oracle Applications CloudSecuring Applications
Chapter 1Introduction
4
If you copy a job or abstract role, then the source role's aggregate privileges are never copied. Instead, role membershipis added automatically to the aggregate privilege for the copied role.
Guidelines for Conguring Security in OracleApplications CloudIf the predened security reference implementation doesn't fully represent your enterprise, then you can make changes.
For example, the predened Line Manager abstract role includes compensation management privileges. If some of yourline managers don't handle compensation, then you can create a line manager role without those privileges. To create arole, you can either copy an existing role or create a role from scratch.
During implementation, you evaluate the predened roles and decide whether changes are needed. You can identifypredened application roles easily by their role codes, which all have the prex ORA_. For example, the role code of thePayroll Manager application job role is ORA_PAY_PAYROLL_MANAGER_JOB. All predened roles are granted manyfunction security privileges and data security policies. They also inherit aggregate privileges and duty roles. To makeminor changes to a role, copying and editing the predened role is the more ecient approach. Creating roles fromscratch is most successful when the role has very few privileges and you can identify them easily.
Missing Enterprise JobsIf jobs exist in your enterprise that aren't represented in the security reference implementation, then you can createyour own job roles. Add privileges, aggregate privileges, or duty roles to custom job roles, as appropriate.
Predened Roles with Dierent PrivilegesIf the privileges for a predened job role don't match the corresponding job in your enterprise, then you can create yourown version of the role. You can copy the predened role and edit it to add or remove aggregate privileges, duty roles,function security privileges, and data security policies, as appropriate.
Predened Roles with Missing PrivilegesIf the privileges for a job aren't dened in the security reference implementation, then you can create your own dutyroles. However, a typical implementation doesn't use custom duty roles. You can't create aggregate privileges.
Related Topics
• Options for Reviewing Predened Roles
Oracle Applications CloudSecuring Applications
Chapter 2Security Console
5
2 Security Console
OverviewUse the Security Console to manage application security in your Oracle Applications Cloud service. You can do tasksrelated to role management, role analysis, user-account management, and certicate management.
Security Console AccessYou must have the IT Security Manager role to use the Security Console. This role inherits the Security Managementand Security Reporting duty roles.
Security Console Tasks
You can do these tasks on the Security Console:
• Roles
◦ Create job, abstract, and duty roles.
◦ Edit custom roles.
◦ Copy roles.
◦ Compare roles.
◦ Visualize role hierarchies and assignments to users.
◦ Review Navigator menu items available to roles or users.
◦ Identify roles that grant access to Navigator menu items and privileges required for that access.
• Users
◦ Create user accounts.
◦ Review, edit, lock, or delete existing user accounts.
◦ Assign roles to user accounts.
◦ Reset users' passwords.
• Analytics
◦ Review statistics of role categories, the roles belonging to each category, and the components of eachrole.
◦ View the data security policies, roles, and users associated with each database resource.
Oracle Applications CloudSecuring Applications
Chapter 2Security Console
6
• Certicates
◦ Generate, export, or import PGP or X.509 certicates, which establish encryption keys for data exchangedbetween Oracle Cloud applications and other applications.
◦ Generate signing requests for X.509 certicates.
• Administration
◦ Establish rules for the generation of user names.
◦ Set password policies.
◦ Create standards for role denition, copying, and visualization.
◦ Review the status of role-copy operations.
◦ Dene templates for notications of user-account events, such as password expiration.
Administrate the Security ConsoleBefore you start using the Security Console, ensure that you run the background processes that refresh security data.You can use the Security Console Administration pages to select the general options, role-oriented options, and trackthe status of role-copy jobs. You can also select, edit, or add notication templates.
Run the Background ProcessesHere are the background processes you must run:
• Retrieve Latest LDAP Changes - This process copies data from the LDAP directory to the Oracle CloudApplications Security tables. Run this process once, before you start the implementation.
• Import User and Role Application Security Data - This process imports users, roles, privileges, and datasecurity policies from the identity store, policy store, and Oracle Cloud Applications Security tables. Schedule itto run regularly to update those tables.
To run the Retrieve Latest LDAP Changes process:
1. In the Setup and Maintenance work area, go to the Run User and Roles Synchronization Process task in theInitial Users functional area.
2. If you want to be notied when this process ends select the corresponding option.3. Click Submit.4. Review the conrmation message and click OK.
To run the Import User and Role Application Security Data process:
1. In the Tools work area, select Scheduled Processes.2. Click Schedule New Process.3. Search for the Import User and Role Application Security Data process and select it.4. Click OK.5. Click Submit.6. Review the conrmation message and click OK.
Oracle Applications CloudSecuring Applications
Chapter 2Security Console
7
Congure the General Administration Options
1. On the Security Console, click Administration.2. In the Certicate Preferences section, set the default number of days for which a certicate remains valid.
Certicates establish keys for the encryption and decryption of data that Oracle Cloud applications exchangewith other applications.
3. In the Synchronization Process Preferences section, specify the number of hours since the last run of theImport User and Role Application Security Data process. When you select the Roles tab, a warning messageappears if the process hasn't been run in this period.
Congure the Role Administration Options
1. On the Security Console, click Administration.2. On the Roles tab, specify the prex and sux that you want to add to the name and code of role copies. Each
role has a Role Name (a display name) and a Role Code (an internal name). A role copy takes up the name andcode of the source role, with this prex or sux (or both) added. The addition distinguishes the copy from itssource. By default, there is no prex, the sux for a role name is "Custom," and the sux for a role code is"_CUSTOM."
3. In the Graph Node Limit eld, set the maximum number of nodes a visualization graph can display. When avisualization graph contains a greater number of nodes, the visualizer recommends the table view.
4. Deselect Enable default table view, if you want the visualizations generated from the Roles tab to have theradial graph view.
5. Enable edit of data security policies: Determine whether users can enter data on the Data Security Policies pageof the role-creation and role-edit trains available from the Roles tab.
6. Enable edit of user role membership: Determine whether users can enter data on the Users page of the role-creation and role-edit trains available from the Roles tab.
View the Role Copy Status
1. On the Security Console, click Administration.2. On the Role Copy Status tab, you can view records of jobs to copy roles. These jobs are initiated on the Roles
page. Job status is updated automatically until a nal status, typically Completed, is reached.3. Click the Delete icon to delete the row representing a copy job.
Run Retrieve Latest LDAP ChangesInformation about users and roles in your LDAP directory is available automatically to Oracle Cloud Applications.However, in specic circumstances you're recommended to run the Retrieve Latest LDAP Changes process. This topicdescribes when and how to run Retrieve Latest LDAP Changes.
You run Retrieve Latest LDAP Changes if you believe data-integrity or synchronization issues may have occurredbetween Oracle Cloud Applications and your LDAP directory server. For example, you may notice dierences betweenroles on the Security Console and roles on the Create Role Mapping page. You're also recommended to run this processafter any release update.
Oracle Applications CloudSecuring Applications
Chapter 2Security Console
8
Run the ProcessSign in with the IT Security Manager job role and follow these steps:
1. Open the Scheduled Processes work area.2. Click Schedule New Process in the Search Results section of the Overview page.
The Schedule New Process dialog box opens.3. In the Name eld, search for and select the Retrieve Latest LDAP Changes process.4. Click OK to close the Schedule New Process dialog box.5. In the Process Details dialog box, click Submit.6. Click OK, then Close.7. On the Scheduled Processes page, click the Refresh icon.
Repeat this step periodically until the process completes.
Note: Only one instance of Retrieve Latest LDAP Changes can run at a time.
Security VisualizationsA Security Console visualization graph consists of nodes that represent security items. These may be users, roles,privileges, or aggregate privileges. Arrows connect the nodes to dene relationships among them. You can trace pathsfrom any item in a role hierarchy either toward users who are granted access or toward the privileges roles can grant.
You can select one of the following two views:
• Radial: Nodes form circular (or arc) paerns. The nodes in each circular paern relate directly to a node at thecenter. That focal node represents the item you select to generate a visualization, or one you expand in thevisualization.
• Layers: Nodes form a series of horizontal lines. The nodes in each line relate to one node in the previous line.This is the item you select to generate a visualization, or the one you expand in the visualization.
For example, a job role might consist of several duty roles. You might select the job role as the focus of a visualization(and set the Security Console to display paths leading toward privileges):
• The Radial view initially show nodes representing the duty roles encircling a node representing the job role.
• The Layers view initially show the duty-role nodes in a line after the job-role node.
You can then manipulate the image, for example, by expanding a node to display the items it consists of.
Alternatively, you can generate a visualization table that lists items related to an item you select. For example, a tablemay list the roles that descend from a role you select, or the privileges inherited by the selected role. You can exporttabular data to an Excel le.

Oracle Applications CloudSecuring Applications
Chapter 2Security Console
9
Options for Viewing a Visualization GraphWithin a visualization graph, you can select the Radial or Layers view. In either view, you can zoom in or out of theimage. You can expand or collapse nodes, magnify them, or search for them. You can also highlight nodes thatrepresent types of security items.
1. To select a view, click Switch Layout in the Control Panel, which is a set of buons on the visualization.2. Select Radial or Layers.
Node LabelsYou can enlarge or reduce a visualization, either by expanding or collapsing nodes or by zooming in or out of the image.As you do, the labels identifying nodes change:
• If the image is large, each node displays the name of the item it represents.
• If the image is small, symbols replace the names: U for user, R for role, S for predened role, P for privilege, andA for aggregate privilege.
• If the image is smaller, the nodes are unlabeled.
Regardless of labeling, you can hover over a node to display the name and description of the user, role, or privilege itrepresents.
Nodes for each type of item are visually depicted such that item types are easily distinguished.
Expand or Collapse NodesTo expand a node is to reveal roles, privileges, or users to which it connects. To collapse a node is to hide those items.To expand or collapse a node, select a node and right-click or just double-click on the node.
Using Control Panel ToolsApart from the option to select the Radial or Layers view, the Control Panel contains these tools:
• Zoom In: Enlarge the image. You can also use the mouse wheel to zoom in.
• Zoom Out: Reduce the image. You can also use the mouse wheel to zoom out.
• Zoom to Fit: Center the image and size it so that it's as large as it can be while ing entirely in its displaywindow. (Nodes that you have expanded remain expanded.)
• Magnify: Activate a magnifying glass, then position it over nodes to enlarge them temporarily. You can use themouse wheel to zoom in or out of the area covered by the magnifying glass. Click Magnify a second time todeactivate the magnifying glass.
• Search: Enter text to locate nodes whose names contain matching text. You can search only for nodes that theimage is currently expanded to reveal.
• Control Panel: Hide or expose the Control Panel.
Oracle Applications CloudSecuring Applications
Chapter 2Security Console
10
Using the LegendA Legend lists the types of items currently on display. You can take the following actions:
• Hover over the entry for a particular item type to locate items of that type in the image. Items of all other typesare grayed out.
• Click the entry for an item type to disable items of that type in the image. If an item of that type has child nodes,it's grayed out. If not, it disappears from the image. Click the entry a second time to restore disabled items.
• Hide or expose the Legend by clicking its buon.
Using the OverviewOn the image, click the plus sign to open the Overview, a thumbnail sketch of the visualization. Click any area of thethumbnail to focus the actual visualization on that area.
Alternatively, you can click the background of the visualization and move the entire image in any direction.
Refocusing the ImageYou can select any node in a visualization as the focal point for a new visualization: Right-click a node, then select Set asFocus.
Note: You can review role hierarchies using either a tabular or a graphical view. The default view depends onthe seing of the Enable default table view option on the Administration tab.
Visualization Table Display OptionsA visualization table contains records of roles, privileges, or users related to a security item you select. The table displaysrecords for only one type of item at a time:
• If you select a privilege as the focus of your visualization, select the Expand Toward Users option. Otherwisethe table shows no results. Then use the Show option to list records of either roles or users who inherit theprivilege.
• If you select a user as the focus of your visualization, select the Expand Toward Privileges option. Otherwisethe table shows no results. Then use the Show option to list records of either roles or privileges assigned to theuser.
• If you select any type of role or an aggregate privilege as the focus of your visualization, you can expand ineither direction.
◦ If you expand toward privileges, use the Show option to list records of either roles lower in hierarchy, orprivileges related to your focus role.
◦ If you expand toward users, use the Show option to list records of either roles higher in hierarchy, orusers related to your focus role.
Tables are all-inclusive:
Oracle Applications CloudSecuring Applications
Chapter 2Security Console
11
Table Name What it displays
Roles
Records for all roles related directly or indirectly to your focus item. For each role, inheritancecolumns specify the name and code of a directly related role.
Privileges
Records for all privileges related directly or indirectly to your focus item. For each privilege,inheritance columns display the name and code of a role that directly owns the privilege.
Users
Records for all user assigned roles related directly or indirectly to your focus item. For eachuser, Assigned columns display the name and code of a role assigned directly to the user.
The table columns are search-enabled. Enter the search text in a column eld to get the records matching your searchtext. You can export a table to Excel.
Generate a VisualizationHere's how you can generate a visualization:
1. On the Security Console, click Roles.2. Search for the security item on which you want to base the visualization.
◦ In a Search eld, select any combination of item types, for example, job role, duty role, privilege, or user.
◦ In the adjacent eld, enter at least three characters. The search returns the matching records.
◦ Select a record.
Alternatively, click Search to load all the items in a Search Results column, and then select a record.3. Select either Show Graph or View as Table buon.
Note: On the Administration page, you can determine the default view for a role.
4. In the Expand Toward list, select Privileges to trace paths from your selected item toward items lower in itsrole hierarchy. Or select Users to trace paths from your selected item toward items higher in its hierarchy.
5. If the Table view is active, select an item type in the Show list: Roles, Privileges, or Users. (The options availableto you depend on your Expand Toward selection.) The table displays records of the item type you select. Notethat an aggregate privilege is considered to be a role.
Simulate Navigator Menus in the Security ConsoleYou can simulate Navigator menus available to roles or users. From a simulation, you can review the access inherent ina role or granted to a user. You can also determine how to alter that access to create roles.

Oracle Applications CloudSecuring Applications
Chapter 2Security Console
12
Opening a SimulationTo open a simulated menu:
1. Select the Roles tab in the Security Console.2. Create a visualization graph, or populate the Search Results column with a selection of roles or users.3. In the visualization graph, right-click a role or user. Or, in the Search Results column, select a user or role and
click its menu icon.4. Select Simulate Navigator.
Working with the SimulationIn a Simulate Navigator page:
• Select Show All to view all the menu and task entries that may be included in a Navigator menu.
• Select Show Access Granted to view the menu and task entries actually assigned to the selected role or user.
In either view:
• A padlock icon indicates that a menu or task entry can be, but isn't currently, authorized for a role or user.
• An exclamation icon indicates an item that may be hidden from a user or role with the privilege for it, because ithas been modied.
To plan how this authorization may be altered:
1. Click any menu item on the Simulate Navigator page.2. Select either of the two options:
◦ View Roles That Grant Access: Lists roles that grant access to the menu item.
◦ View Privileges Required for Menu: Lists privileges required for access to the menu item.
Analytics for RolesYou can review statistics about the roles that exist in your Oracle Cloud instance.
On the Analytics page, click the Roles tab. Then view these analyses:
• Role Categories. Each role belongs to a category that denes some common purpose. Typically, a categorycontains a type of role congured for an application, for example, "Financials - Duty Roles."
For each category, a Roles Category grid displays the number of:
◦ Roles
◦ Role memberships (roles belonging to other roles within the category)
◦ Security policies created for those roles
In addition, a Roles by Category pie chart compares the number of roles in each category with those in othercategories.
Oracle Applications CloudSecuring Applications
Chapter 2Security Console
13
• Roles in Category. Click a category in the Role Categories grid to list roles belonging to that category. For eachrole, the Roles in Category grid also shows the number of:
◦ Role memberships
◦ Security policies
◦ Users assigned to the role
• Individual role statistics. Click the name of a role in the Roles in Category grid to list the security policies andusers associated with the role. The page also presents collapsible diagrams of hierarchies to which the rolebelongs.
Click Export to export data from this page to a spreadsheet.
Analytics for Database ResourcesYou can review information about data security policies that grant access to a database resource, or about roles andusers granted access to that resource.
1. On the Analytics page, click the Database Resources tab.2. Select the resource you want to review in the Database Resource eld.3. Click Go.
Results are presented in three tables.
Data Security PoliciesThe Data Security Policies table documents policies that grant access to the selected database resource.
Each row documents a policy, specifying by default:
• The data privileges it grants.
• The condition that denes how data is selected from the database resource.
• The policy name and description.
• A role that includes the policy.
For any given policy, this table may include multiple rows, one for each role in which the policy is used.
Authorized RolesThe Authorized Roles table documents roles with direct or indirect access to the selected database resource. Any givenrole may comprise the following:
• Include one or more data security policies that grant access to the database resource. The Authorized Rolestable includes one row for each policy belonging to the role.
• Inherit access to the database resource from one or more roles in its hierarchy. The Authorized Roles tableincludes one row for each inheritance.
By default, each row species the following:
• The name of the role it documents.
Oracle Applications CloudSecuring Applications
Chapter 2Security Console
14
• The name of a subordinate role from which access is inherited, if any. (If the row documents access provided bya data security policy assigned directly to the subject role, this cell is blank.)
• The data privileges granted to the role.
• The condition that denes how data is selected from the database resource.
Note: A role's data security policies and hierarchy may grant access to any number of database resources.However, the Authorized Roles table displays records only of access to the database resource you selected.
Authorized UsersThe Authorized Users table documents users who are assigned roles with access to the selected database resource.
By default, each row species a user name, a role the user is assigned, the data privileges granted to the user, andthe condition that denes how data is selected from the database resource. For any given user, this table may includemultiple rows, one for each grant of access by a data security policy belonging to, or inherited by, a role assigned to theuser.
Manipulating the ResultsIn any of these three tables, you can do the following actions:
• Add or remove columns. Select View - Columns.
• Search among the results. Select View - Query by Example to add a search eld on each column in a table.
• Export results to a spreadsheet. Select the Export to Excel option available for each table.
FAQs for Security Console
What's the dierence between private, personally identiable, andsensitive information?Private information is condential in some contexts.Personally identiable information (PII) identies or can be used to identify, contact, or locate the person to whom theinformation pertains.
Some PII information is sensitive.
A person's name isn't private. It's PII but not sensitive in most contexts. The names and work phone numbers ofemployees may be public knowledge within an enterprise, so not sensitive but PII. In some circumstances it's reasonableto protect such information.
Some data isn't PII but is sensitive, such as medical data, or information about a person's race, religion or sexualorientation. This information can't generally be used to identify a person, but is considered sensitive.
Some data isn't private or personal, but is sensitive. Salary ranges for grades or jobs may need to be protected fromview by users in those ranges and only available to senior management.
Oracle Applications CloudSecuring Applications
Chapter 2Security Console
15
Some data isn't private or sensitive except when associated with other data the isn't private or sensitive. For example,date or place of birth isn't a PII aribute because by itself it can't be used to uniquely identify an individual, but it'scondential and sensitive in conjunction with a person's name.
Oracle Applications CloudSecuring Applications
Chapter 2Security Console
16
Oracle Applications CloudSecuring Applications
Chapter 3Bridge for Microsoft Active Directory
17
3 Bridge for Microsoft Active Directory
OverviewThe bridge for Microsoft Active Directory synchronizes user account information between Oracle Applications Cloudand Microsoft Active Directory. Using the bridge, you can copy user or role details from Oracle Applications Cloud(as the source) to Active Directory (as the target), or the other way around. Depending on the direction in which datasynchronization is planned, you can specify one of them as the source and the other one as the target.
The current conguration of the bridge supports single Active Directory Forest with a single domain controller topology.The bridge uses REST API (Representational State Transfer) over HTTPS to communicate with the Oracle ApplicationsCloud and the LDAP (Lightweight Directory Access Protocol) to communicate with the Active Directory server. TheMicrosoft Active Directory server may not be reachable outside the corporate rewall but must be reachable from thecomputer hosting the bridge.
PrerequisitesBefore seing up the bridge between Active Directory and Oracle Applications Cloud, you must:
• Install Java Runtime environment (JRE). The bridge is compatible with JRE versions 6, 7, and 8.
• Install the bridge on a computer that can connect to your Active Directory server.
• Enable Single Sign-On (SSO) between Oracle Applications Cloud and your Active Directory instance.
System Requirements for the Bridge:
• Windows Server Version: 2008 and 2012
• RAM and CPU: As per the OS requirements
• Disk Space: Minimum 10 GB of free space
Seing Up the Bridge for Microsoft Active DirectoryTo use the bridge for Active Directory and synchronize information between Oracle Applications Cloud and ActiveDirectory, perform the following steps:
1. Set the relevant options on the Administration tab in the Security Console to complete the conguration.2. Download and install the bridge for Active Directory.3. Map aributes between source and target applications for synchronization.4. Perform initial synchronization of users.5. Perform manual or automatic synchronization regularly to maintain consistency of data on the source and
target applications.
Related Topics
• Running Bridge for Active Directory with Oracle Applications Cloud as the source
• Running Bridge for Active Directory with Active Directory as the source
Oracle Applications CloudSecuring Applications
Chapter 3Bridge for Microsoft Active Directory
18
Active Directory SynchronizationThe bridge for Active Directory synchronizes user account information between Oracle Applications Cloud andMicrosoft Active Directory.
After you provide the bridge conguration details, install and run the bridge for Active Directory. Save the credentials toaccess Active Directory and Oracle Fusion Application, then return to Security Console AD Bridge setup to complete theuser account mapping conguration. When mapping is complete, return to the bridge application and initiate the initialsynchronization of users between the source and target applications.
During synchronization, the bridge extracts data from the source and target applications, compares the data, andidenties the task that must be performed on the target application for consistency.
When synchronization completes, the bridge performs the required tasks on the target application. Any errorsencountered during synchronization are recorded in the log les for review and correction.
After the initial synchronization is complete, you can congure the bridge to synchronize any changes between thesource and target at regular intervals or on-demand.
The bridge for active directory can perform:
• Full synchronization
• Incremental synchronization
Full SynchronizationThe bridge starts full synchronization or full reconciliation when any of the following conditions are true:
• The source and target applications are synchronized for the rst time.
• The bridge conguration for the active directory has changed.
• The Run Full Synchronization buon is clicked.
To manually perform a full synchronization:
1. Click the Bridge for Active Directory tab on the Administration page in the Security Console.2. Click User Aribute Mappings.3. Expand the On Demand Synchronization section and click Run Full Synchronization.
Note: To disable Forced Full synchronization, click Cancel Full Synchronization.
Incremental SynchronizationThe bridge starts incremental synchronization when: any of the following conditions are true:
• The source and target were previously synchronized.
• The bridge conguration for the active directory hasn't changed.
• The Run Full Synchronization buon isn't clicked.
Incremental synchronization can be either on-demand (manually) or at regular intervals (automatically).
Oracle Applications CloudSecuring Applications
Chapter 3Bridge for Microsoft Active Directory
19
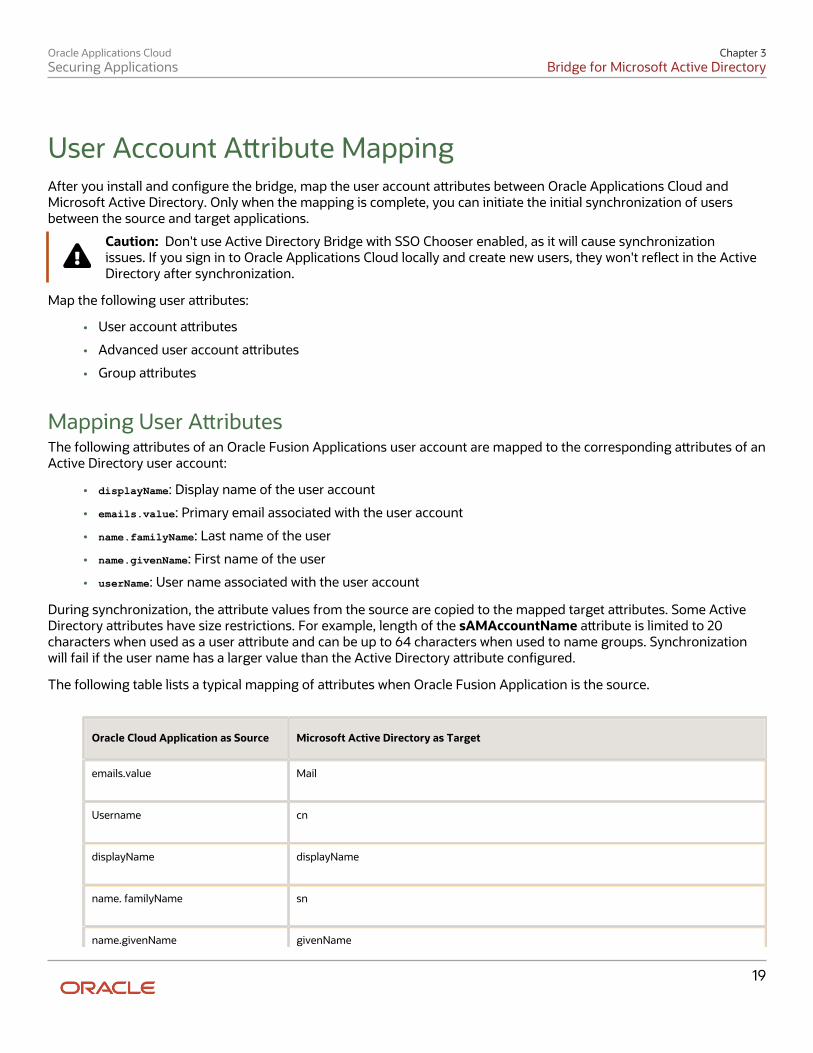
User Account Aribute MappingAfter you install and congure the bridge, map the user account aributes between Oracle Applications Cloud andMicrosoft Active Directory. Only when the mapping is complete, you can initiate the initial synchronization of usersbetween the source and target applications.
Caution: Don't use Active Directory Bridge with SSO Chooser enabled, as it will cause synchronizationissues. If you sign in to Oracle Applications Cloud locally and create new users, they won't reect in the ActiveDirectory after synchronization.
Map the following user aributes:
• User account aributes
• Advanced user account aributes
• Group aributes
Mapping User AributesThe following aributes of an Oracle Fusion Applications user account are mapped to the corresponding aributes of anActive Directory user account:
• displayName: Display name of the user account
• emails.value: Primary email associated with the user account
• name.familyName: Last name of the user
• name.givenName: First name of the user
• userName: User name associated with the user account
During synchronization, the aribute values from the source are copied to the mapped target aributes. Some ActiveDirectory aributes have size restrictions. For example, length of the sAMAccountName aribute is limited to 20characters when used as a user aribute and can be up to 64 characters when used to name groups. Synchronizationwill fail if the user name has a larger value than the Active Directory aribute congured.
The following table lists a typical mapping of aributes when Oracle Fusion Application is the source.
Oracle Cloud Application as Source Microsoft Active Directory as Target
emails.value
Username
cn
displayName
displayName
name. familyName
sn
name.givenName givenName
Oracle Applications CloudSecuring Applications
Chapter 3Bridge for Microsoft Active Directory
20
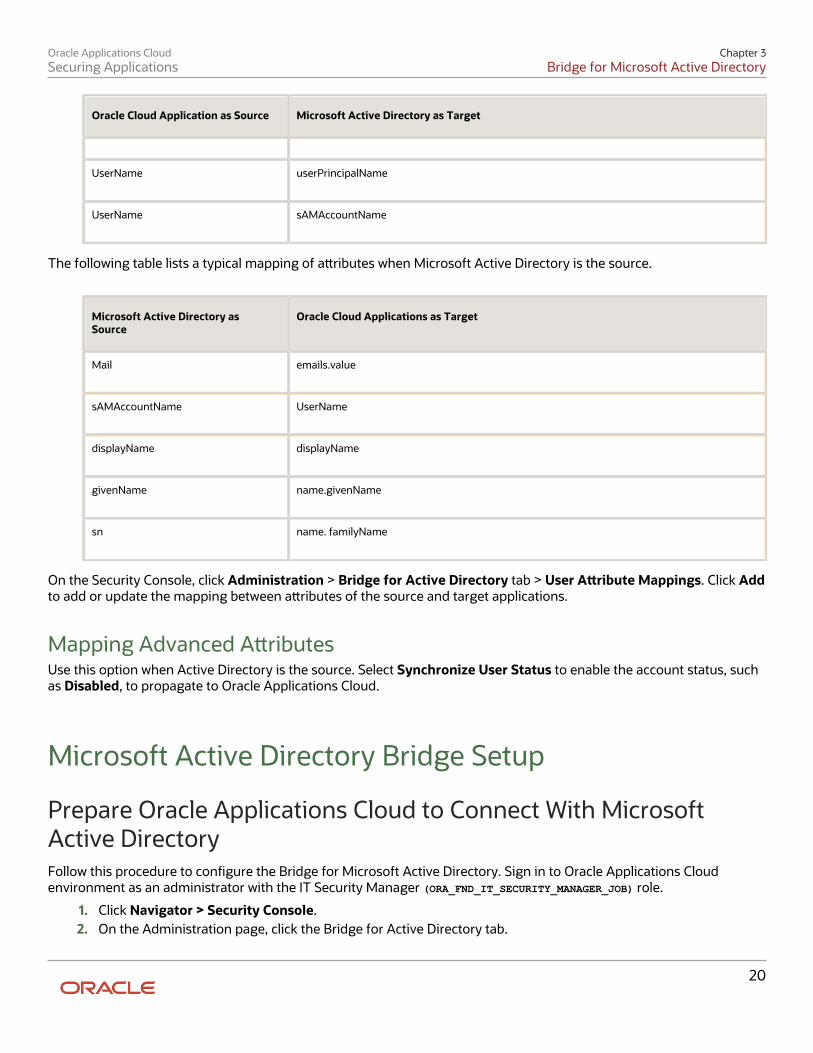
Oracle Cloud Application as Source Microsoft Active Directory as Target
UserName
userPrincipalName
UserName
sAMAccountName
The following table lists a typical mapping of aributes when Microsoft Active Directory is the source.
Microsoft Active Directory asSource
Oracle Cloud Applications as Target
emails.value
sAMAccountName
UserName
displayName
displayName
givenName
name.givenName
sn
name. familyName
On the Security Console, click Administration > Bridge for Active Directory tab > User Aribute Mappings. Click Addto add or update the mapping between aributes of the source and target applications.
Mapping Advanced AributesUse this option when Active Directory is the source. Select Synchronize User Status to enable the account status, suchas Disabled, to propagate to Oracle Applications Cloud.
Microsoft Active Directory Bridge Setup
Prepare Oracle Applications Cloud to Connect With MicrosoftActive DirectoryFollow this procedure to congure the Bridge for Microsoft Active Directory. Sign in to Oracle Applications Cloudenvironment as an administrator with the IT Security Manager (ORA_FND_IT_SECURITY_MANAGER_JOB) role.
1. Click Navigator > Security Console.2. On the Administration page, click the Bridge for Active Directory tab.
Oracle Applications CloudSecuring Applications
Chapter 3Bridge for Microsoft Active Directory
21
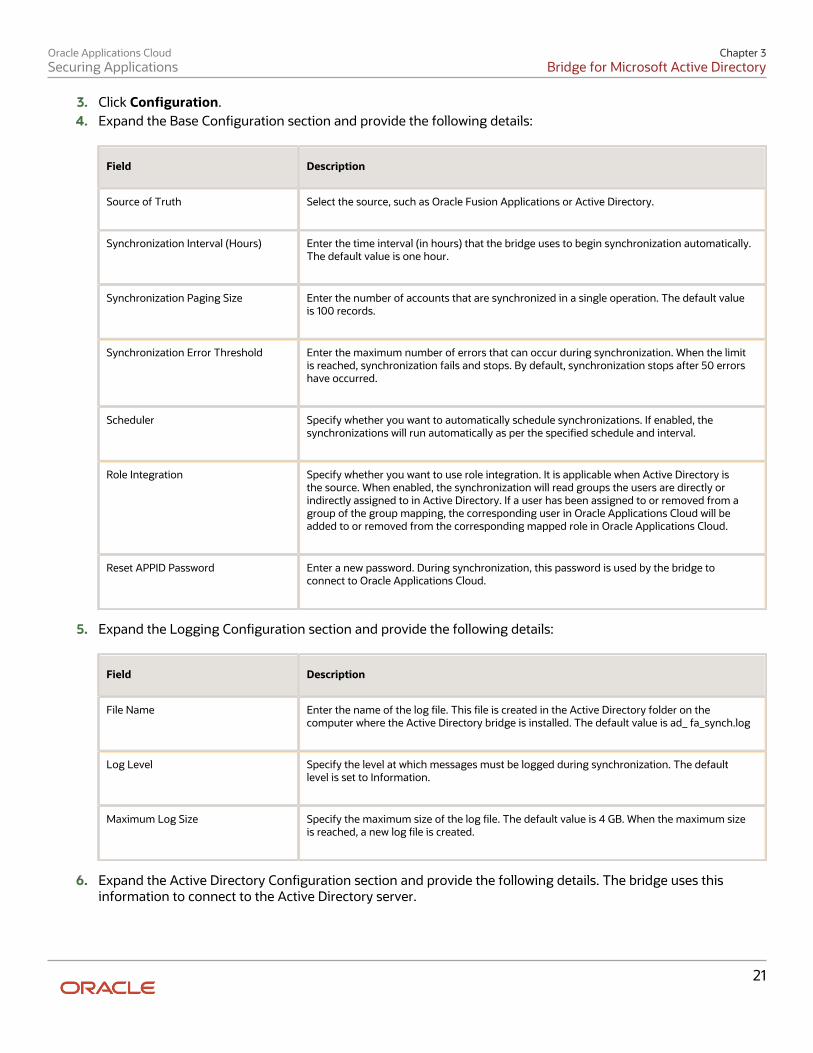
3. Click Conguration.4. Expand the Base Conguration section and provide the following details:
Field Description
Source of Truth
Select the source, such as Oracle Fusion Applications or Active Directory.
Synchronization Interval (Hours)
Enter the time interval (in hours) that the bridge uses to begin synchronization automatically.The default value is one hour.
Synchronization Paging Size
Enter the number of accounts that are synchronized in a single operation. The default valueis 100 records.
Synchronization Error Threshold
Enter the maximum number of errors that can occur during synchronization. When the limitis reached, synchronization fails and stops. By default, synchronization stops after 50 errorshave occurred.
Scheduler
Specify whether you want to automatically schedule synchronizations. If enabled, thesynchronizations will run automatically as per the specied schedule and interval.
Role Integration
Specify whether you want to use role integration. It is applicable when Active Directory isthe source. When enabled, the synchronization will read groups the users are directly orindirectly assigned to in Active Directory. If a user has been assigned to or removed from agroup of the group mapping, the corresponding user in Oracle Applications Cloud will beadded to or removed from the corresponding mapped role in Oracle Applications Cloud.
Reset APPID Password
Enter a new password. During synchronization, this password is used by the bridge toconnect to Oracle Applications Cloud.
5. Expand the Logging Conguration section and provide the following details:
Field Description
File Name
Enter the name of the log le. This le is created in the Active Directory folder on thecomputer where the Active Directory bridge is installed. The default value is ad_ fa_synch.log
Log Level
Specify the level at which messages must be logged during synchronization. The defaultlevel is set to Information.
Maximum Log Size
Specify the maximum size of the log le. The default value is 4 GB. When the maximum sizeis reached, a new log le is created.
6. Expand the Active Directory Conguration section and provide the following details. The bridge uses thisinformation to connect to the Active Directory server.
Oracle Applications CloudSecuring Applications
Chapter 3Bridge for Microsoft Active Directory
22
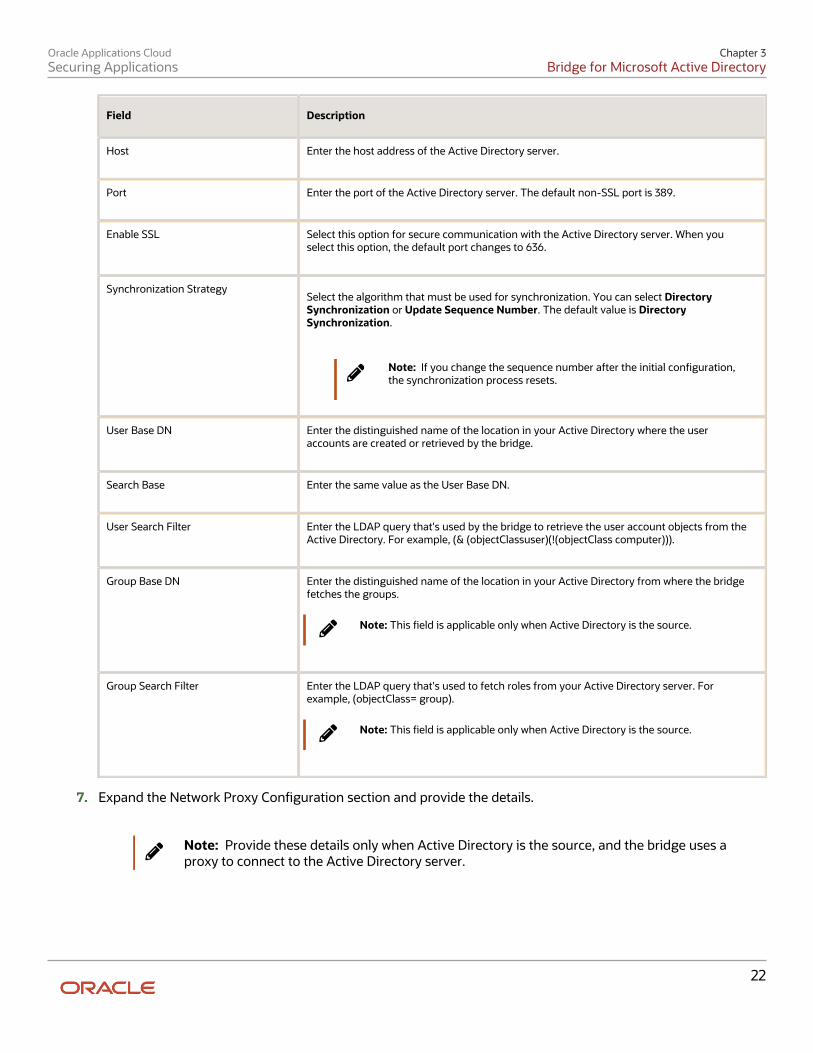
Field Description
Host
Enter the host address of the Active Directory server.
Port
Enter the port of the Active Directory server. The default non-SSL port is 389.
Enable SSL
Select this option for secure communication with the Active Directory server. When youselect this option, the default port changes to 636.
Synchronization Strategy Select the algorithm that must be used for synchronization. You can select Directory
Synchronization or Update Sequence Number. The default value is DirectorySynchronization.
Note: If you change the sequence number after the initial conguration,the synchronization process resets.
User Base DN
Enter the distinguished name of the location in your Active Directory where the useraccounts are created or retrieved by the bridge.
Search Base
Enter the same value as the User Base DN.
User Search Filter
Enter the LDAP query that's used by the bridge to retrieve the user account objects from theActive Directory. For example, (& (objectClassuser)(!(objectClass computer))).
Group Base DN
Enter the distinguished name of the location in your Active Directory from where the bridgefetches the groups.
Note: This eld is applicable only when Active Directory is the source.
Group Search Filter
Enter the LDAP query that's used to fetch roles from your Active Directory server. Forexample, (objectClass= group).
Note: This eld is applicable only when Active Directory is the source.
7. Expand the Network Proxy Conguration section and provide the details.
Note: Provide these details only when Active Directory is the source, and the bridge uses aproxy to connect to the Active Directory server.
Oracle Applications CloudSecuring Applications
Chapter 3Bridge for Microsoft Active Directory
23
Field Description
Enable Proxy Seings
Select this option to enable communication through a proxy between Oracle ApplicationsCloud and your Active Directory bridge. Use this option when you need to connect from anisolated network host.
Host
Enter a host name and address for the proxy.
Port
Enter a port for the proxy.
Enable SSL
Select this option for secure communication with the proxy.
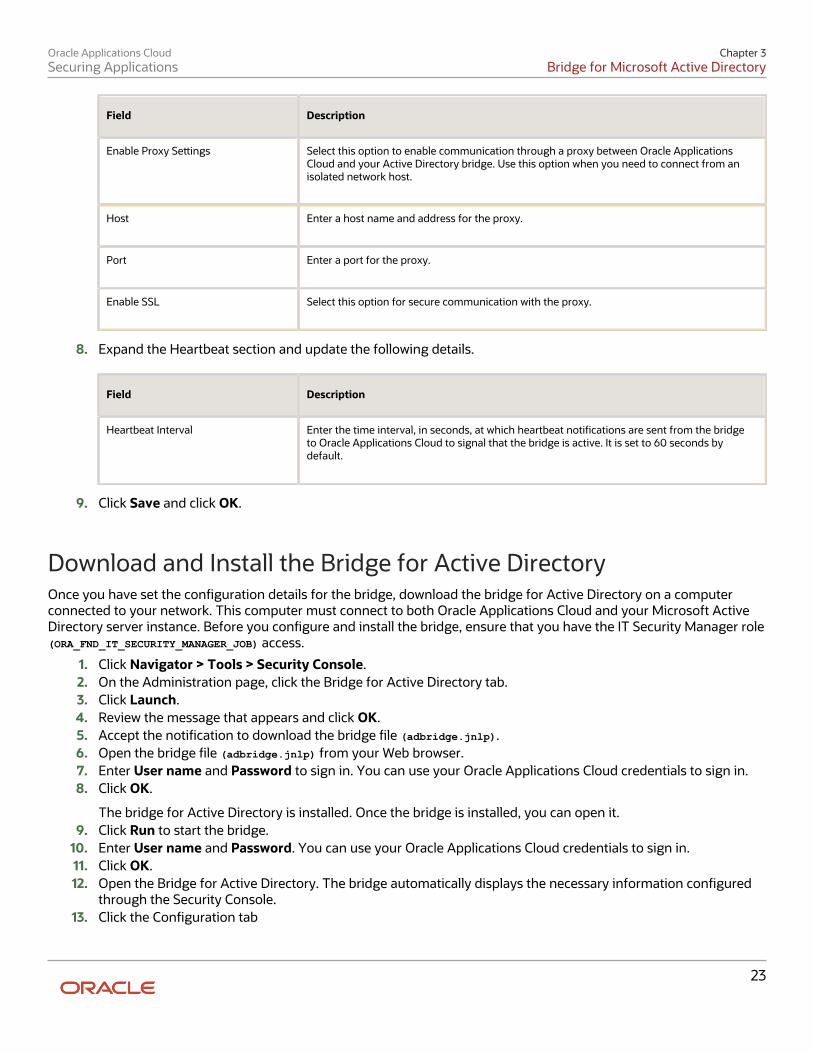
8. Expand the Heartbeat section and update the following details.
Field Description
Heartbeat Interval
Enter the time interval, in seconds, at which heartbeat notications are sent from the bridgeto Oracle Applications Cloud to signal that the bridge is active. It is set to 60 seconds bydefault.
9. Click Save and click OK.
Download and Install the Bridge for Active DirectoryOnce you have set the conguration details for the bridge, download the bridge for Active Directory on a computerconnected to your network. This computer must connect to both Oracle Applications Cloud and your Microsoft ActiveDirectory server instance. Before you congure and install the bridge, ensure that you have the IT Security Manager role(ORA_FND_IT_SECURITY_MANAGER_JOB) access.
1. Click Navigator > Tools > Security Console.2. On the Administration page, click the Bridge for Active Directory tab.3. Click Launch.4. Review the message that appears and click OK.5. Accept the notication to download the bridge le (adbridge.jnlp).6. Open the bridge le (adbridge.jnlp) from your Web browser.7. Enter User name and Password to sign in. You can use your Oracle Applications Cloud credentials to sign in.8. Click OK.
The bridge for Active Directory is installed. Once the bridge is installed, you can open it.9. Click Run to start the bridge.
10. Enter User name and Password. You can use your Oracle Applications Cloud credentials to sign in.11. Click OK.12. Open the Bridge for Active Directory. The bridge automatically displays the necessary information congured
through the Security Console.13. Click the Conguration tab
Oracle Applications CloudSecuring Applications
Chapter 3Bridge for Microsoft Active Directory
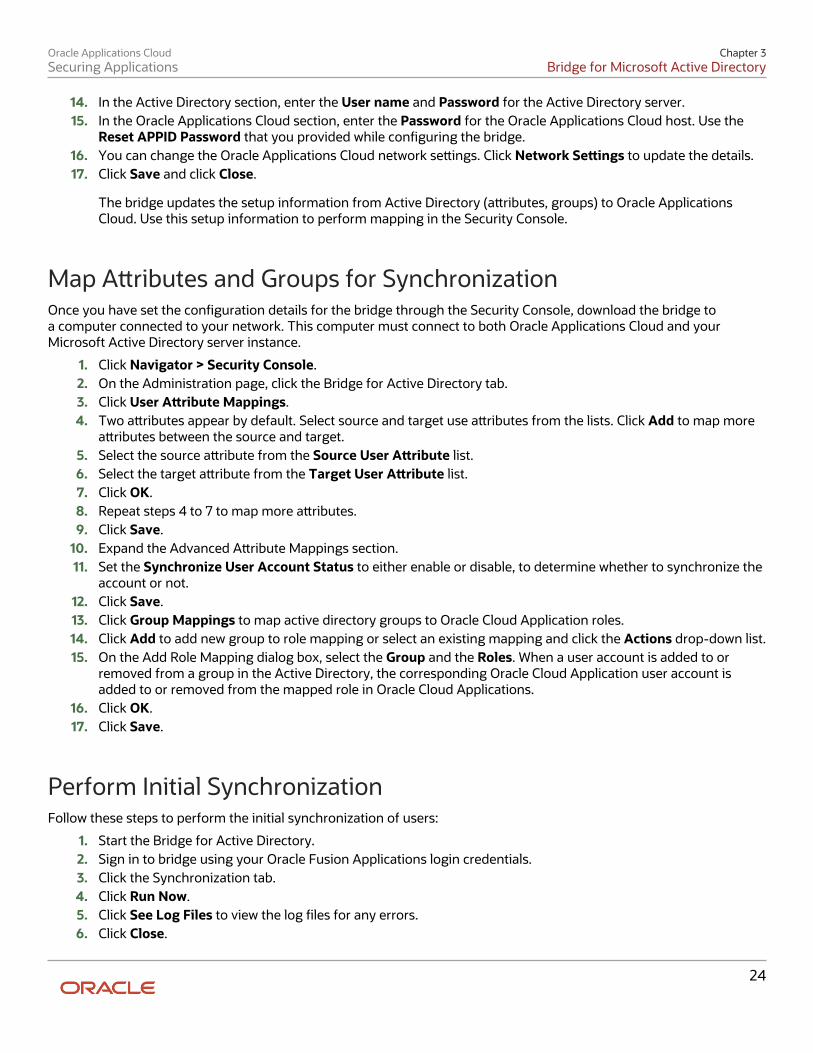
24
14. In the Active Directory section, enter the User name and Password for the Active Directory server.15. In the Oracle Applications Cloud section, enter the Password for the Oracle Applications Cloud host. Use the
Reset APPID Password that you provided while conguring the bridge.16. You can change the Oracle Applications Cloud network seings. Click Network Seings to update the details.17. Click Save and click Close.
The bridge updates the setup information from Active Directory (aributes, groups) to Oracle ApplicationsCloud. Use this setup information to perform mapping in the Security Console.
Map Aributes and Groups for SynchronizationOnce you have set the conguration details for the bridge through the Security Console, download the bridge toa computer connected to your network. This computer must connect to both Oracle Applications Cloud and yourMicrosoft Active Directory server instance.
1. Click Navigator > Security Console.2. On the Administration page, click the Bridge for Active Directory tab.3. Click User Aribute Mappings.4. Two aributes appear by default. Select source and target use aributes from the lists. Click Add to map more
aributes between the source and target.5. Select the source aribute from the Source User Aribute list.6. Select the target aribute from the Target User Aribute list.7. Click OK.8. Repeat steps 4 to 7 to map more aributes.9. Click Save.
10. Expand the Advanced Aribute Mappings section.11. Set the Synchronize User Account Status to either enable or disable, to determine whether to synchronize the
account or not.12. Click Save.13. Click Group Mappings to map active directory groups to Oracle Cloud Application roles.14. Click Add to add new group to role mapping or select an existing mapping and click the Actions drop-down list.15. On the Add Role Mapping dialog box, select the Group and the Roles. When a user account is added to or
removed from a group in the Active Directory, the corresponding Oracle Cloud Application user account isadded to or removed from the mapped role in Oracle Cloud Applications.
16. Click OK.17. Click Save.
Perform Initial SynchronizationFollow these steps to perform the initial synchronization of users:
1. Start the Bridge for Active Directory.2. Sign in to bridge using your Oracle Fusion Applications login credentials.3. Click the Synchronization tab.4. Click Run Now.5. Click See Log Files to view the log les for any errors.6. Click Close.
Oracle Applications CloudSecuring Applications
Chapter 3Bridge for Microsoft Active Directory
25
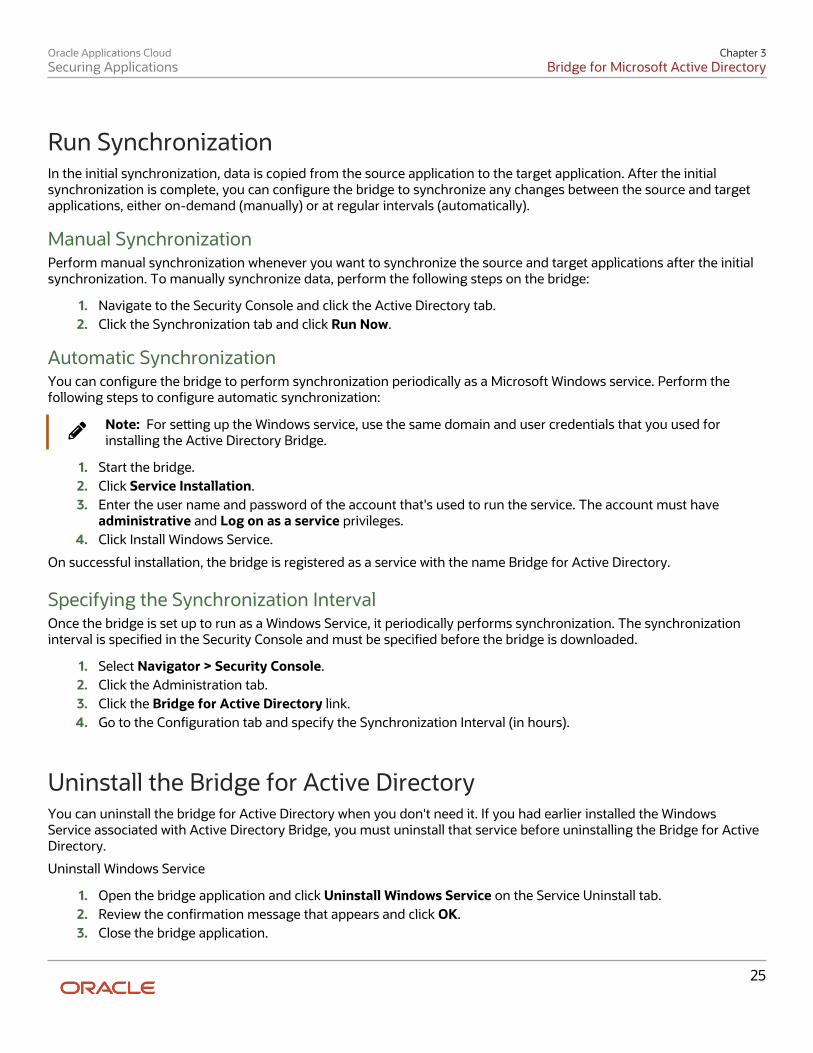
Run SynchronizationIn the initial synchronization, data is copied from the source application to the target application. After the initialsynchronization is complete, you can congure the bridge to synchronize any changes between the source and targetapplications, either on-demand (manually) or at regular intervals (automatically).
Manual SynchronizationPerform manual synchronization whenever you want to synchronize the source and target applications after the initialsynchronization. To manually synchronize data, perform the following steps on the bridge:
1. Navigate to the Security Console and click the Active Directory tab.2. Click the Synchronization tab and click Run Now.
Automatic SynchronizationYou can congure the bridge to perform synchronization periodically as a Microsoft Windows service. Perform thefollowing steps to congure automatic synchronization:
Note: For seing up the Windows service, use the same domain and user credentials that you used forinstalling the Active Directory Bridge.
1. Start the bridge.2. Click Service Installation.3. Enter the user name and password of the account that's used to run the service. The account must have
administrative and Log on as a service privileges.4. Click Install Windows Service.
On successful installation, the bridge is registered as a service with the name Bridge for Active Directory.
Specifying the Synchronization IntervalOnce the bridge is set up to run as a Windows Service, it periodically performs synchronization. The synchronizationinterval is specied in the Security Console and must be specied before the bridge is downloaded.
1. Select Navigator > Security Console.2. Click the Administration tab.3. Click the Bridge for Active Directory link.4. Go to the Conguration tab and specify the Synchronization Interval (in hours).
Uninstall the Bridge for Active DirectoryYou can uninstall the bridge for Active Directory when you don't need it. If you had earlier installed the WindowsService associated with Active Directory Bridge, you must uninstall that service before uninstalling the Bridge for ActiveDirectory.
Uninstall Windows Service
1. Open the bridge application and click Uninstall Windows Service on the Service Uninstall tab.2. Review the conrmation message that appears and click OK.3. Close the bridge application.
Oracle Applications CloudSecuring Applications
Chapter 3Bridge for Microsoft Active Directory
26
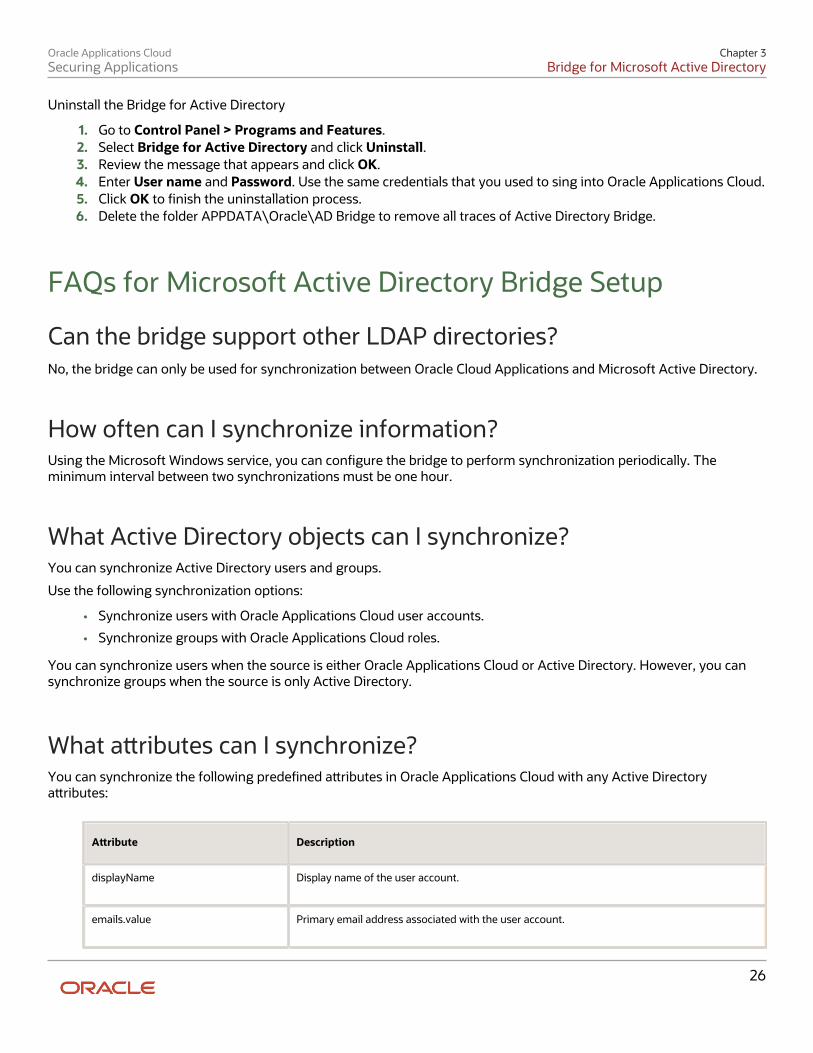
Uninstall the Bridge for Active Directory
1. Go to Control Panel > Programs and Features.2. Select Bridge for Active Directory and click Uninstall.3. Review the message that appears and click OK.4. Enter User name and Password. Use the same credentials that you used to sing into Oracle Applications Cloud.5. Click OK to nish the uninstallation process.6. Delete the folder APPDATA\Oracle\AD Bridge to remove all traces of Active Directory Bridge.
FAQs for Microsoft Active Directory Bridge Setup
Can the bridge support other LDAP directories?No, the bridge can only be used for synchronization between Oracle Cloud Applications and Microsoft Active Directory.
How often can I synchronize information?Using the Microsoft Windows service, you can congure the bridge to perform synchronization periodically. Theminimum interval between two synchronizations must be one hour.
What Active Directory objects can I synchronize?You can synchronize Active Directory users and groups.
Use the following synchronization options:
• Synchronize users with Oracle Applications Cloud user accounts.
• Synchronize groups with Oracle Applications Cloud roles.
You can synchronize users when the source is either Oracle Applications Cloud or Active Directory. However, you cansynchronize groups when the source is only Active Directory.
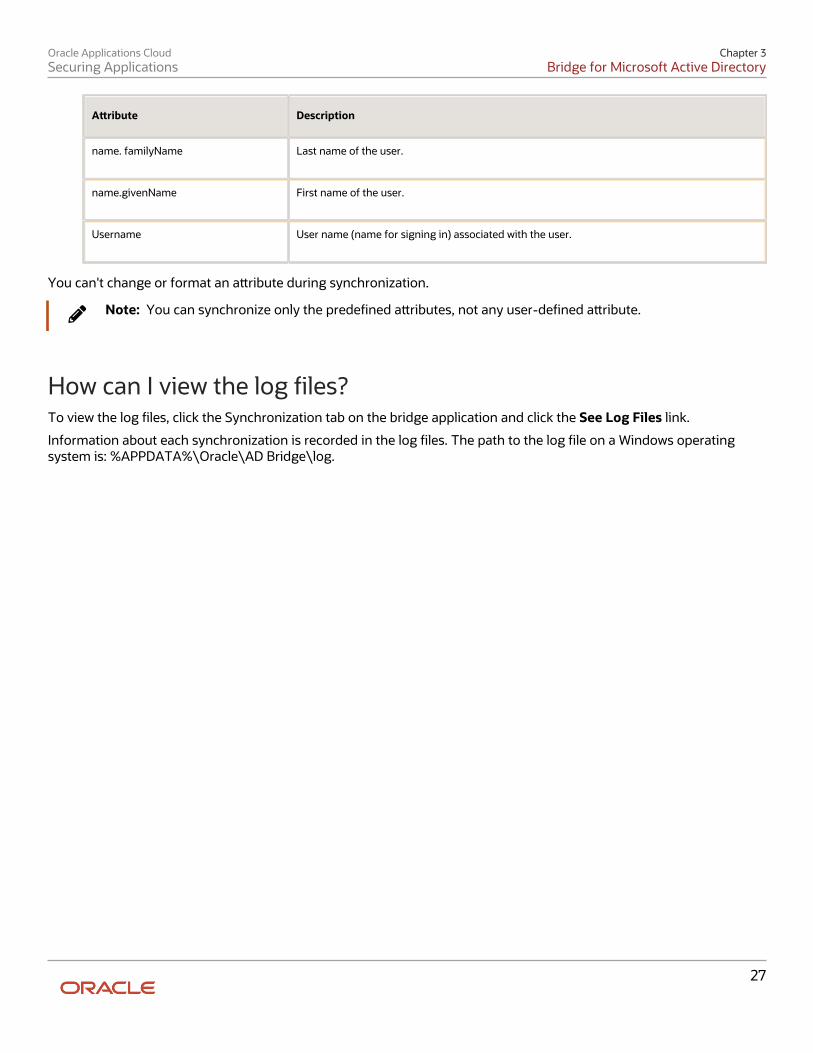
What aributes can I synchronize?You can synchronize the following predened aributes in Oracle Applications Cloud with any Active Directoryaributes:
Aribute Description
displayName
Display name of the user account.
emails.value
Primary email address associated with the user account.
Oracle Applications CloudSecuring Applications
Chapter 3Bridge for Microsoft Active Directory
27
Aribute Description
name. familyName
Last name of the user.
name.givenName
First name of the user.
Username
User name (name for signing in) associated with the user.
You can't change or format an aribute during synchronization.
Note: You can synchronize only the predened aributes, not any user-dened aribute.
How can I view the log les?To view the log les, click the Synchronization tab on the bridge application and click the See Log Files link.
Information about each synchronization is recorded in the log les. The path to the log le on a Windows operatingsystem is: %APPDATA%\Oracle\AD Bridge\log.
Oracle Applications CloudSecuring Applications
Chapter 3Bridge for Microsoft Active Directory
28
Oracle Applications CloudSecuring Applications
Chapter 4Implementation Users
29
4 Implementation Users
OverviewThe implementation or setup users are typically dierent from the Oracle Applications Cloud application users. They areusually not part of Oracle Applications Cloud organization. So, you don't assign them any product-specic task or letthem view product-specic data. But, you must assign them the required privileges to complete the application setup.You can assign these privileges through role assignment.
The initial user can do all the setup tasks and security tasks such as, reseing passwords and granting additionalprivileges to self and to others. After you sign in for the rst time, create additional implementation users with the samesetup privileges as that of the initial user. You can also restrict the privileges of these implementation users based onyour setup needs.
You can assign job roles and abstract roles to users using the Security Console. Here are the roles that you can assign tothe setup users:
• Application Diagnostic Administrator
• Application Implementation Consultant
• Employee
• IT Security Manager
Note: The Application Implementation Consultant abstract role has unrestricted access to a large amount ofdata. So, assign this role to only those implementation users who do a wide range of implementation tasksand handle the setup data across environments. For users who must do specic implementation tasks, youcan assign other administrator roles, such as the Financial Applications Administrator role.
If required, you can provide the same setup permissions to users that are part of your organization. You can also createadministrative users with limited permissions. These users can congure product-specic seings and perform otherrelated setup tasks.
User AccountsThe User Accounts page of the Security Console provides summaries of user accounts that you select to review. Foreach account, it always provides:
• The user's login, rst name, and last name, in a User column.
• Whether the account is active, whether it's locked, and the user's password-expiration date, in a Status column.
It may also provide:
• Associated worker information, if the user account was created in conjunction with a worker record in HumanCapital Management. This may include person number, manager, job title, and business unit.
• Party information, if the user account was created in conjunction with a party record created in CRM. This mayinclude party number and party usage.

Oracle Applications CloudSecuring Applications
Chapter 4Implementation Users
30
The User Accounts page also serves as a gateway to account-management actions you can complete. These include:
• Reviewing details of, editing, or deleting existing accounts.
• Adding new accounts.
• Locking accounts.
• Reseing users' passwords.
To begin working with user accounts:
1. Select the Users tab in the Security Console.2. In a Search eld, select any combination of user states and enter at least three characters.
The search returns user accounts at the states you selected, whose login, rst name, or last name begins withthe characters you entered.
User Account DetailsTo review full details for an existing account, search for it in the User Accounts page and click its user login in the Usercolumn. This opens a User Account Details page.
These details always include:
• User information, which consists of user, rst, and last name values, and an email.
• Account information, which includes the user's password-expiration date, whether the account is active, andwhether it's locked.
• A table listing the roles assigned to the user, including whether they're autoprovisioned or assignable. A role isassignable if it can be delegated to another user.
The page may also include an Associated Worker Information region or an Associated Party Information region. Theformer appears only if the user account is related to a worker record in Human Capital Management, and the laer if theuser account is related to a party record in CRM.
To edit these details, click Edit in the User Account Details page. Be aware, however:
• You can edit values only in the User Information, Account Information, and Roles regions.
• Even in those regions, you can edit some elds only if the user isn't associated with a worker or a party. If not,for example, you can modify the First Name and Last Name values in the User Information region. But if theuser is associated with a worker, you would manage these values in Human Capital Management. They wouldbe grayed out in this Edit User Details page.
• In the Roles table, Autoprovisioned check boxes are set automatically, and you can't modify the seings. Thebox is checked if the user obtained the role through autoprovisioning, and cleared if the role was manuallyassigned. You can modify the Assignable seing for existing roles.
Note: You can edit the User Name in the Edit User Account Details page.
Click Add Autoprovisioned Roles to add any roles for which the user is eligible. Or, to add roles manually, click Add Role.Search for roles you want to add, select them, and click Add Role Membership.
You can also delete roles. Click the x icon in the row for the role, and then respond to the conrmation message.
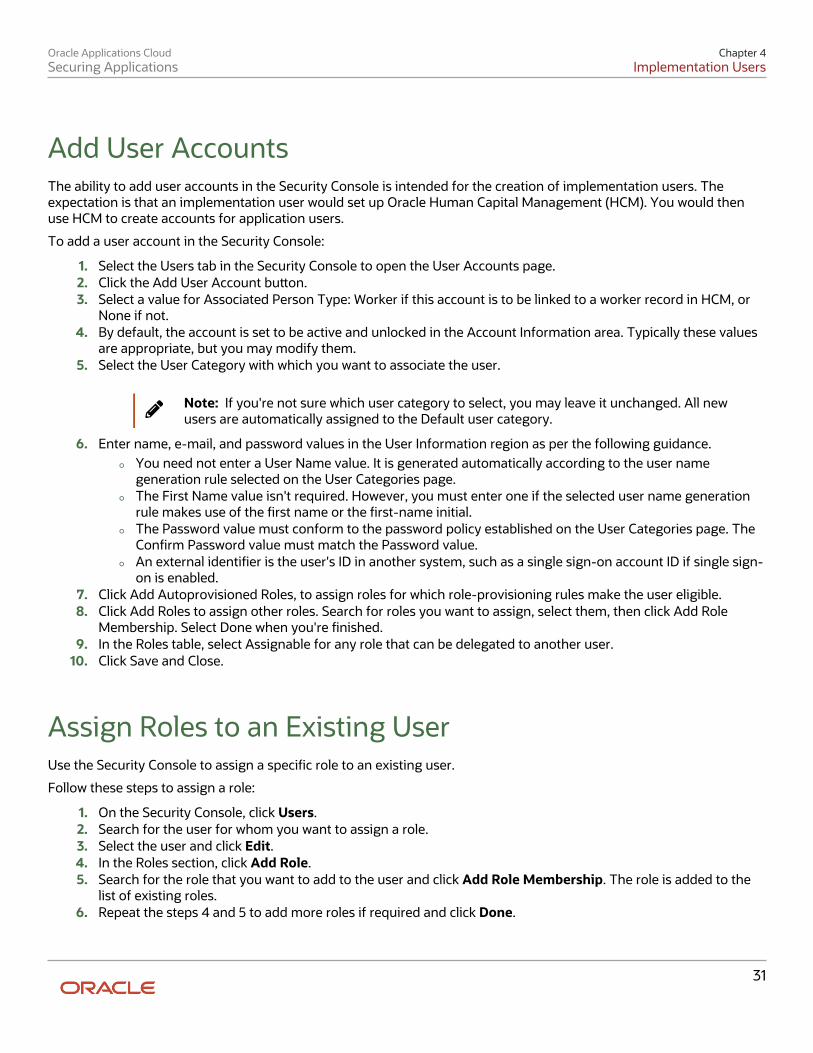
Oracle Applications CloudSecuring Applications
Chapter 4Implementation Users
31
Add User AccountsThe ability to add user accounts in the Security Console is intended for the creation of implementation users. Theexpectation is that an implementation user would set up Oracle Human Capital Management (HCM). You would thenuse HCM to create accounts for application users.
To add a user account in the Security Console:
1. Select the Users tab in the Security Console to open the User Accounts page.2. Click the Add User Account buon.3. Select a value for Associated Person Type: Worker if this account is to be linked to a worker record in HCM, or
None if not.4. By default, the account is set to be active and unlocked in the Account Information area. Typically these values
are appropriate, but you may modify them.5. Select the User Category with which you want to associate the user.
Note: If you're not sure which user category to select, you may leave it unchanged. All newusers are automatically assigned to the Default user category.
6. Enter name, e-mail, and password values in the User Information region as per the following guidance.
◦ You need not enter a User Name value. It is generated automatically according to the user namegeneration rule selected on the User Categories page.
◦ The First Name value isn't required. However, you must enter one if the selected user name generationrule makes use of the rst name or the rst-name initial.
◦ The Password value must conform to the password policy established on the User Categories page. TheConrm Password value must match the Password value.
◦ An external identier is the user's ID in another system, such as a single sign-on account ID if single sign-on is enabled.
7. Click Add Autoprovisioned Roles, to assign roles for which role-provisioning rules make the user eligible.8. Click Add Roles to assign other roles. Search for roles you want to assign, select them, then click Add Role
Membership. Select Done when you're nished.9. In the Roles table, select Assignable for any role that can be delegated to another user.
10. Click Save and Close.
Assign Roles to an Existing UserUse the Security Console to assign a specic role to an existing user.
Follow these steps to assign a role:
1. On the Security Console, click Users.2. Search for the user for whom you want to assign a role.3. Select the user and click Edit.4. In the Roles section, click Add Role.5. Search for the role that you want to add to the user and click Add Role Membership. The role is added to the
list of existing roles.6. Repeat the steps 4 and 5 to add more roles if required and click Done.
Oracle Applications CloudSecuring Applications
Chapter 4Implementation Users
32
7. Click Save and Close. You have assigned the role to the selected user.
Reset PasswordsAn administrator may use the Security Console to reset other users' passwords. That action triggers an e-mailnotication to each user, informing him or her of the new password.
A new password must conform to your password policy. You establish this policy on the User Categories page. The pageon which you reset the password displays the policy.
To reset a password:
1. On the User Accounts page, search for the user whose password you want to change.2. For the selected user, click Action > Reset Password.
As an alternative, open the user's account for editing: click the User Login value in the User Accounts page,then Edit in a User Account Details page. On that page, select Reset Password.
3. On the Reset Password dialog box, select whether to generate the password automatically or change itmanually. For a manual change, also enter a new password value and a conrmation value, which must matchthe new value.
Note: The option to reset a password to an automatically generated value is always available.For the manual reset option to be available, you must select the Administrator can manuallyreset password option on the User Categories page.
4. Click Reset Password.
Related Topics
• Administrate the Security Console
Lock and Unlock User AccountsAn administrator may use the Security Console to lock users' accounts. When an account is locked, its user can't sign in.He or she must either use the "forgot password" ow to reset the password or contact the help desk to have the accountunlocked.
You can lock a user account in either of two ways. In either case, open the User Accounts page and search for the userwhose account you want to lock.
To complete the rst procedure:
1. In the user's row, click the Action icon, then Lock Account.2. Respond Yes to a conrmation message.
To complete the second procedure:
1. Open the user's account for editing: click the User Login value in the User Accounts page, then Edit in a UserAccount Details page.
2. In the Edit User Account page, select the Locked check box in the Account Information region.3. Select Save and Close.
Oracle Applications CloudSecuring Applications
Chapter 4Implementation Users
33
You can unlock the account only from the Edit User Account page, by clearing the Locked check box.
Delete User AccountsAn administrator may use the Security Console to delete users' accounts.
1. Open the User Accounts page and search for the user whose account you want to delete.2. In the user's row, click the Action icon, then Delete.3. Respond Yes to a conrmation message.
Create Notication TemplatesUsers may receive Email notications of user-account events, such as account creation or password expiration. Thesenotications are generated from a set of templates, each of which species an event. A template generates a messageto a user when that user is involved in the event tied to the template.
You can enable or disable templates, edit templates, or create templates to replace existing ones. There are 16 events,and a predened template exists for each event. You can enable only one template linked to a given event at a time.
Here's how you can create a template:
1. Click the User Categories tab in the Security Console.2. Select a user category and on the User Category Information page, click the Notications tab.3. Click the Edit buon to make changes.
Ensure that the Enable Notications check box is selected.4. Click Add Template.5. Specify a name and description for the template.6. Select Enabled to use the template immediately. If selected, template that had been enabled for the event
which you select, is automatically disabled.7. Select an Event from the corresponding drop-down list.
The values for Message Subject and Message are copied from an already-congured template for which thesame event is selected.
8. Update the Message Subject and Message as required.
Note: The message text includes tokens which are replaced in runtime by literal valuesappropriate for a given user or account.
9. Click Save and Close.
To edit a template, select it from the templates listed in the Notication Templates table. Then follow the same processas you would to create a template. You can't modify the event selected for a template that has been saved. You camonly enable or disable an individual template when you edit it.
Note: You can't edit or delete predened templates that begin with the prex name ORA. You also can'tmodify the message subject or the message. However, you can only enable or disable the predenedtemplates.
You can delete the templates you created. Select the template row in the table and click Delete.

Oracle Applications CloudSecuring Applications
Chapter 4Implementation Users
34
Here's the table that lists the tokens that you can use in the message text for a template:
Token Meaning Events
${userLoginId}
The user name of the person whoseaccount is being created or modied.
• Forgot user name• Password expired• Password reset conrmation
${rstName}
The given name of the person whoseaccount is being created or modied.
• Administration activity locationbased access disabled conrmation
• Administration activity requested• Administration activity single sign-
on disabled conrmation• Expiring external IDP signing
certicate• Expiring service provider
encryption certicate• Expiring service provider signing
certicate• Forgot user name• New account created - manager• New user created• Password expired• Password expiry warning• Password generated• Password reset• Password reset - manager• Password reset conrmation• Password reset conrmation -
manager
${lastName}
The surname of the person whose accountis being created or modied.
• Administration activity locationbased access disabled conrmation
• Administration activity requested• Administration activity single sign-
on disabled conrmation• Expiring external IDP signing
certicate• Expiring service provider
encryption certicate• Expiring service provider signing
certicate• Forgot user name• New account created - manager• New user created• Password expired• Password expiry warning• Password generated• Password reset• Password reset - manager• Password reset conrmation
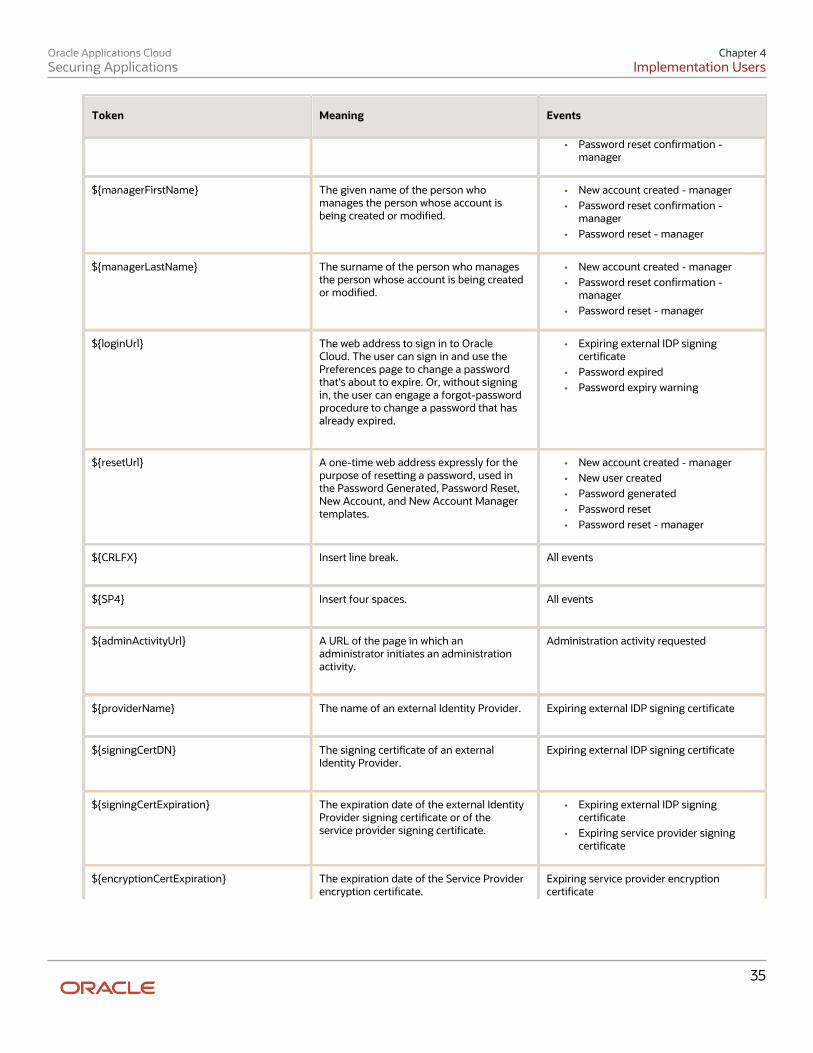
Oracle Applications CloudSecuring Applications
Chapter 4Implementation Users
35
Token Meaning Events
• Password reset conrmation -manager
${managerFirstName}
The given name of the person whomanages the person whose account isbeing created or modied.
• New account created - manager• Password reset conrmation -
manager• Password reset - manager
${managerLastName}
The surname of the person who managesthe person whose account is being createdor modied.
• New account created - manager• Password reset conrmation -
manager• Password reset - manager
${loginUrl}
The web address to sign in to OracleCloud. The user can sign in and use thePreferences page to change a passwordthat's about to expire. Or, without signingin, the user can engage a forgot-passwordprocedure to change a password that hasalready expired.
• Expiring external IDP signingcerticate
• Password expired• Password expiry warning
${resetUrl}
A one-time web address expressly for thepurpose of reseing a password, used inthe Password Generated, Password Reset,New Account, and New Account Managertemplates.
• New account created - manager• New user created• Password generated• Password reset• Password reset - manager
${CRLFX}
Insert line break.
All events
${SP4}
Insert four spaces.
All events
${adminActivityUrl}
A URL of the page in which anadministrator initiates an administrationactivity.
Administration activity requested
${providerName}
The name of an external Identity Provider.
Expiring external IDP signing certicate
${signingCertDN}
The signing certicate of an externalIdentity Provider.
Expiring external IDP signing certicate
${signingCertExpiration}
The expiration date of the external IdentityProvider signing certicate or of theservice provider signing certicate.
• Expiring external IDP signingcerticate
• Expiring service provider signingcerticate
${encryptionCertExpiration}
The expiration date of the Service Providerencryption certicate.
Expiring service provider encryptioncerticate
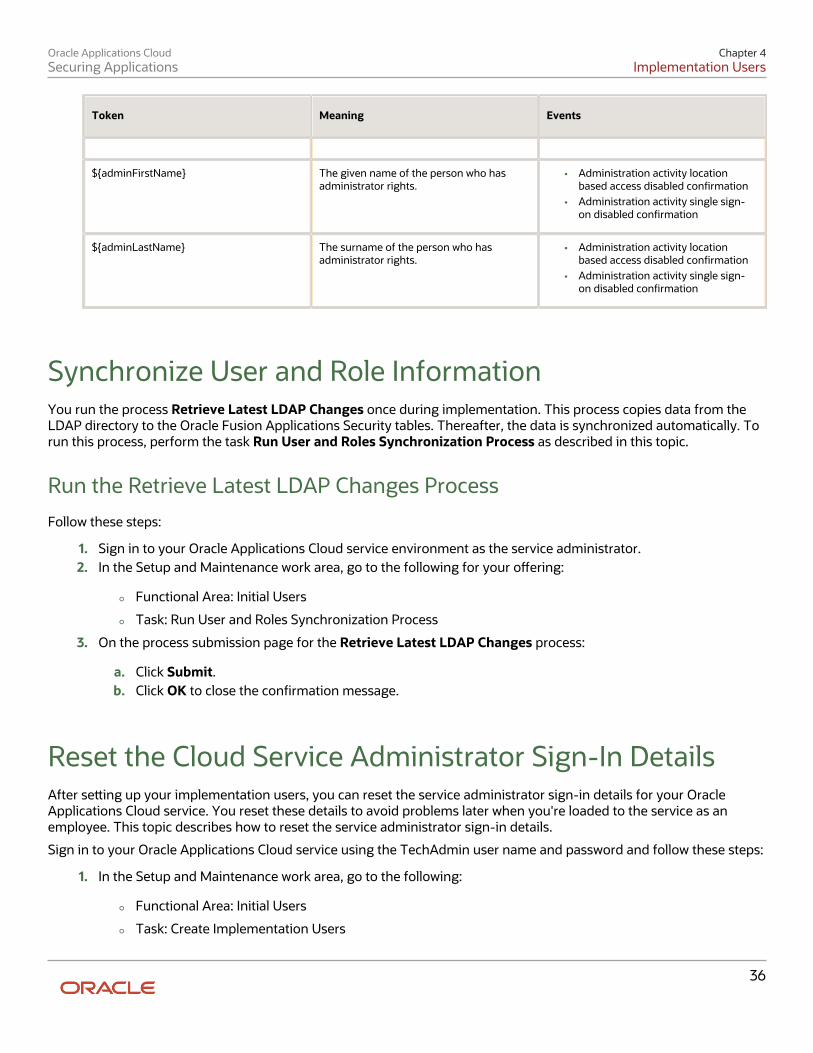
Oracle Applications CloudSecuring Applications
Chapter 4Implementation Users
36
Token Meaning Events
${adminFirstName}
The given name of the person who hasadministrator rights.
• Administration activity locationbased access disabled conrmation
• Administration activity single sign-on disabled conrmation
${adminLastName}
The surname of the person who hasadministrator rights.
• Administration activity locationbased access disabled conrmation
• Administration activity single sign-on disabled conrmation
Synchronize User and Role InformationYou run the process Retrieve Latest LDAP Changes once during implementation. This process copies data from theLDAP directory to the Oracle Fusion Applications Security tables. Thereafter, the data is synchronized automatically. Torun this process, perform the task Run User and Roles Synchronization Process as described in this topic.
Run the Retrieve Latest LDAP Changes Process
Follow these steps:
1. Sign in to your Oracle Applications Cloud service environment as the service administrator.2. In the Setup and Maintenance work area, go to the following for your oering:
◦ Functional Area: Initial Users
◦ Task: Run User and Roles Synchronization Process
3. On the process submission page for the Retrieve Latest LDAP Changes process:
a. Click Submit.b. Click OK to close the conrmation message.
Reset the Cloud Service Administrator Sign-In DetailsAfter seing up your implementation users, you can reset the service administrator sign-in details for your OracleApplications Cloud service. You reset these details to avoid problems later when you're loaded to the service as anemployee. This topic describes how to reset the service administrator sign-in details.
Sign in to your Oracle Applications Cloud service using the TechAdmin user name and password and follow these steps:
1. In the Setup and Maintenance work area, go to the following:
◦ Functional Area: Initial Users
◦ Task: Create Implementation Users
Oracle Applications CloudSecuring Applications
Chapter 4Implementation Users
37
2. On the User Accounts page of the Security Console, search for your service administrator user name, which istypically your email. Your service activation mail contains this value.
3. In the search results, click your service administrator user name to open the User Account Details page.4. Click Edit.5. Change the User Name value to ServiceAdmin.6. Delete any value in the First Name eld.7. Change the value in the Last Name eld to ServiceAdmin.8. Delete the value in the Email eld.9. Click Save and Close.
10. Sign out of your Oracle Applications Cloud service.
After making these changes, you use the user name ServiceAdmin when signing in as the service administrator.
User Categories
OverviewYou can categorize and segregate users based on the various functional and operational requirements. A user categoryprovides you with an option to group a set of users such that the specied seings apply to everyone in that group.Typical scenarios in which you may want to group users are:
• Users have dierent preferences in receiving automated notications from the Security Console. For example,employees of your organization using the organization's single sign-on don't require notications from theSecurity Console about creating new users, password expiry, or password reset. However, the suppliers ofyour organization who aren't using the organization's single sign-on, must receive such notications from theSecurity Console.
• You have built an external application for a group of users using the REST APIs of Oracle Fusion Applications.You intend to redirect this user group to the external application when using the Security Console to resetpasswords or create new users.
On the Security Console page, click the User Category tab. You can perform the following tasks:
• Segregate users into categories
• Specify Next URL
• Set user preferences
• Dene password policy
• Enable notications
Segregate Users into CategoriesCreate user categories and add existing users to them. All existing users are automatically assigned to the Default usercategory unless otherwise specied. You may create more categories depending upon your requirement and assignusers to those categories.
Note: You can assign a user to only one category.

Oracle Applications CloudSecuring Applications
Chapter 4Implementation Users
38
Specify Next URLSpecify a URL to redirect your users to a website or an application instead of going back to the Sign In page, wheneverthey reset their password. For example, a user places a password reset request and receives an Email for reseing thepassword. After the new password is authenticated, the user can be directed to a website or application. If nothingis specied, the user is directed to Oracle Applications Cloud Sign In page. You can specify only one URL per usercategory.
Set User PreferencesSelect the format of the User Name, the value that identies a user when signed in. It is generated automatically in theformat you select. Options include rst and last name delimited by a period, email address, rst-name initial and full lastname, and person or party number. Select the check box Generate system user name when generation rule fails toenable the automatic generation of User Name values if the selected generation rule can't be implemented.
Dene Password PolicyDetermine the number of days a password remains valid. Set the number of days before expiration that a user receivesa warning to reset the password. You can dene the period in which a user must respond to a notication to reset thepassword (Hours Before Password Reset Token Expiration). Select a password format and determine whether aprevious password may be reused. You may decide whether to permit an administrator to manually modify passwordsin the Reset Password dialog box, available from a given user's record on the Users tab. This option applies only to themanual-reset capability. An administrator can always use the Reset Password dialog box to initiate the automatic resetof a user's password.
Enable NoticationsNotications are enabled by default, but you can disable them if required. You can also enable or disable noticationsseparately for each user category. If users belonging to a specic category don't want to receive any notication, youcan disable notications for all life cycle events. Alternatively, if users want to receive notications only for some events,you can selectively enable the functionality for those events.
Notications are sent for a set of predened events. To trigger a notication, you must create a notication templateand map it to the required event. Depending on the requirement, you can add or delete a template that's mapped to aparticular event.
Note: You can't edit or delete predened notication templates that begin with the prex ORA. You can onlyenable or disable them. However, you can update or delete the user-dened templates.
User Category feature supports both SCIM protocol and HCM Data Loader for performing any bulk updates.
Related Topics
• Using REST API to Add Users to a User Category
Add Users to a User CategoryUsing the Security Console, you can add existing users to an existing user category or create a new category and addthem. When you create new users, they're automatically assigned to the default category. At a later point, you can editthe user account and update the user category. You can assign a user to only one category.
Note: If you're creating new users using Security Console, you can also assign a user category at the time ofcreation.
Oracle Applications CloudSecuring Applications
Chapter 4Implementation Users
39
You can add users to a user category in three dierent ways:
• Create a user category and add users to it
• Add users to an existing user category
• Specify the user category for an existing user
Note: You can create and delete a user category only using the Security Console. Once the required usercategories are available in the application, you can use them in SCIM REST APIs and data loaders. You can'trename a user category.
Adding Users to a New User CategoryTo create a user category and add users:
1. On the Security Console, click User Categories > Create.2. Click Edit, specify the user category details, and click Save and Close.3. Click the Users tab and click Edit.4. On the Users Category: Users page, click Add.5. In the Add Users dialog box, search for and select the user, and click Add.6. Repeat adding users until you have added the required users and click Done.7. Click Done on each page until you return to the User Categories page.
Adding Users to an Existing User CategoryTo add users to an existing user category:
1. On the Security Console, click User Categories and click an existing user category to open it.2. Click the Users tab and click Edit.3. On the Users Category: Users page, click Add.4. On the Add Users dialog box, search for and select the user, and click Add.5. Repeat adding users until you have added the required users and click Done.6. Click Done on each page until you return to the User Categories page.
Specifying the User Category for an Existing UserTo add an existing user to a user category:
1. On the Security Console, click Users.2. Search for and select the user for whom you want to specify the user category.3. On the User Account Details page, click Edit.4. In the User Information section, select the User Category. The Default user category remains set for a user until
you change it.5. Click Save and Close.6. On the User Account Details page, click Done.
You can delete user categories if you don't require them. However, you must ensure that no user is associated with thatuser category. Otherwise, you can't proceed with the delete task. On the User Categories page, click the X icon in therow to delete the user category.
Oracle Applications CloudSecuring Applications
Chapter 4Implementation Users
40
How can I direct users to a specic application or website afterpassword reset?Use this task if you want to direct your users to another application or a website instead of the Oracle Applications Cloudsign in page, after they reset the password. Using the Security Console, you can specify the URL of the application or thewebsite to which the users can be directed.
1. On the Security Console, click User Category.2. Select the user category and on the User Category: Details page, click Edit.3. Specify the URL in the Next URL eld and click Save and Close.
When users of that user category successfully reset their password, they're automatically redirected to the speciedapplication or the web page instead of the Oracle Applications Cloud sign in page.
How can I enable or disable notications for users?Using the Security Console, you can determine whether to turn notications on or o for the users.
1. On the Security Console, click User Categories and from the list, select the specic user category.2. Click the Notications tab and click Edit.3. Select the Enable Notications check box to enable notications for all users of that user category. To disable
notications, deselect the check box.4. Click Done.
To determine which notications to send, you have to enable the notication template for each required event.
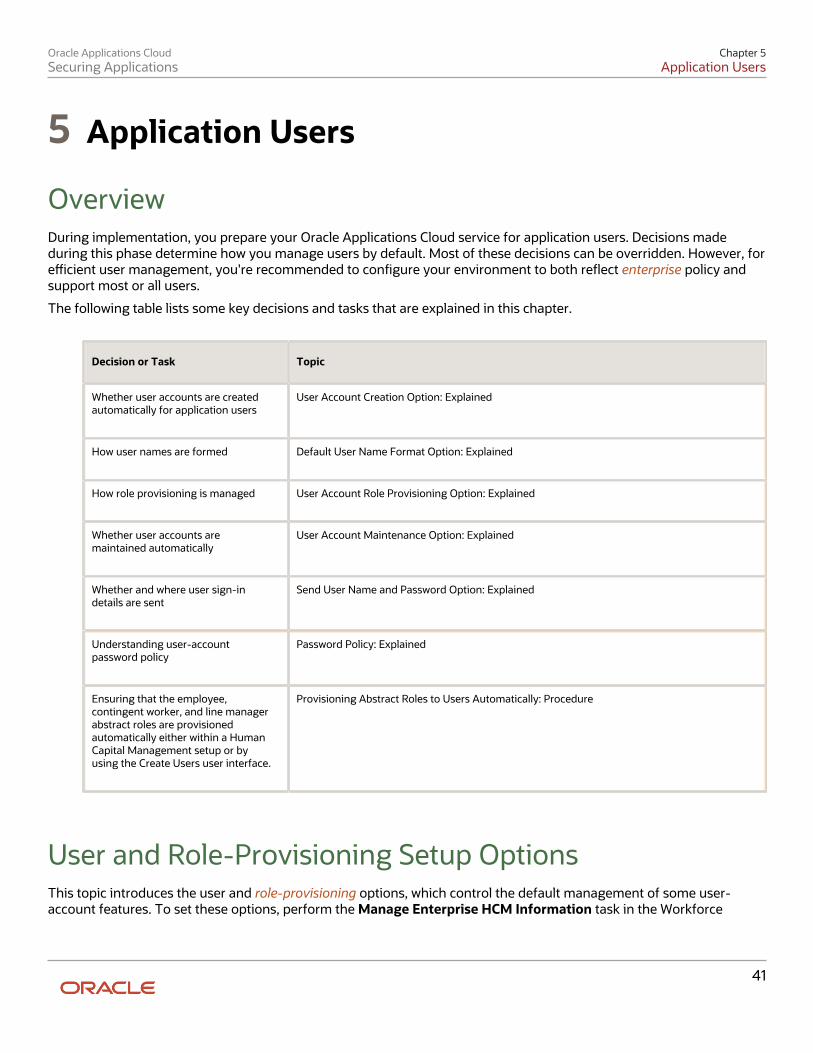
Oracle Applications CloudSecuring Applications
Chapter 5Application Users
41
5 Application Users
OverviewDuring implementation, you prepare your Oracle Applications Cloud service for application users. Decisions madeduring this phase determine how you manage users by default. Most of these decisions can be overridden. However, forecient user management, you're recommended to congure your environment to both reect enterprise policy andsupport most or all users.
The following table lists some key decisions and tasks that are explained in this chapter.
Decision or Task Topic
Whether user accounts are createdautomatically for application users
User Account Creation Option: Explained
How user names are formed
Default User Name Format Option: Explained
How role provisioning is managed
User Account Role Provisioning Option: Explained
Whether user accounts aremaintained automatically
User Account Maintenance Option: Explained
Whether and where user sign-indetails are sent
Send User Name and Password Option: Explained
Understanding user-accountpassword policy
Password Policy: Explained
Ensuring that the employee,contingent worker, and line managerabstract roles are provisionedautomatically either within a HumanCapital Management setup or byusing the Create Users user interface.
Provisioning Abstract Roles to Users Automatically: Procedure
User and Role-Provisioning Setup OptionsThis topic introduces the user and role-provisioning options, which control the default management of some user-account features. To set these options, perform the Manage Enterprise HCM Information task in the Workforce
Oracle Applications CloudSecuring Applications
Chapter 5Application Users
42
Structures functional area for your oering. You can edit these values as necessary and specify an eective start datefor changed values.
User Account CreationThe User Account Creation option controls:
• Whether user accounts are created automatically when you create a person, user, or party record
• The automatic provisioning of roles to users at account creation
Note: User accounts without roles are suspended automatically. Therefore, roles are provisionedautomatically at account creation to avoid this automatic suspension.
The User Account Creation option may be of interest if:
• Some workers don't need access to Oracle Applications Cloud.
• Your existing provisioning infrastructure creates user accounts, and you plan to integrate it with OracleApplications Cloud.
User Account Role ProvisioningAfter a user account exists, users both acquire and lose roles as specied by current role-provisioning rules. Forexample, managers may provision roles to users manually, and the termination process may remove roles from usersautomatically. You can control role provisioning by seing the User Account Role Provisioning option.
Note: Roles that you provision to users directly on the Security Console aren't aected by this option.
User Account MaintenanceThe User Account Maintenance option controls whether user accounts are suspended and reactivated automatically.By default, a user's account is suspended automatically when the user is terminated and reactivated automatically if theuser is rehired.
User Account Creation for Terminated WorkersThe User Account Creation for Terminated Workers option controls whether user-account requests for terminatedworkers are processed or suppressed. This option takes eect when you run the Send Pending LDAP Requestsprocess.
Related Topics
• User Account Creation for Terminated Workers Option
User Account Creation OptionThe User Account Creation option controls whether user accounts are created automatically when you create a personor party record. Use the Manage Enterprise HCM Information task to set this option.
This table describes the User Account Creation option values.
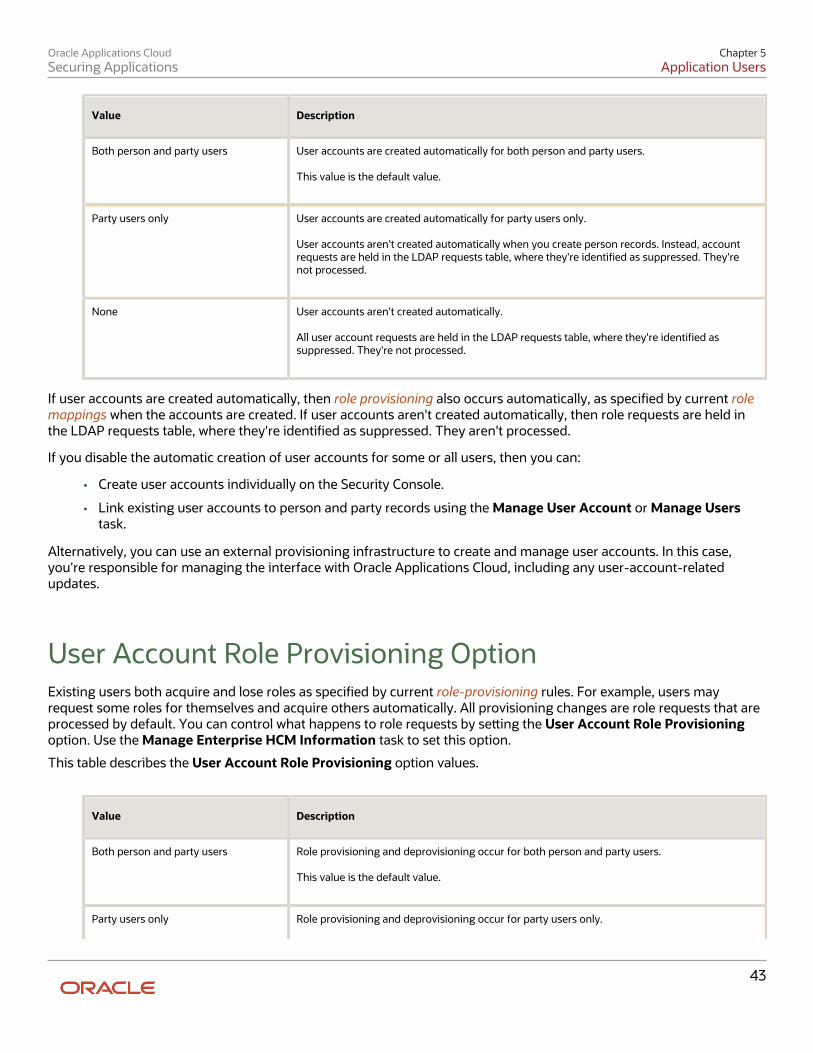
Oracle Applications CloudSecuring Applications
Chapter 5Application Users
43
Value Description
Both person and party users
User accounts are created automatically for both person and party users. This value is the default value.
Party users only
User accounts are created automatically for party users only. User accounts aren't created automatically when you create person records. Instead, accountrequests are held in the LDAP requests table, where they're identied as suppressed. They'renot processed.
None
User accounts aren't created automatically. All user account requests are held in the LDAP requests table, where they're identied assuppressed. They're not processed.
If user accounts are created automatically, then role provisioning also occurs automatically, as specied by current rolemappings when the accounts are created. If user accounts aren't created automatically, then role requests are held inthe LDAP requests table, where they're identied as suppressed. They aren't processed.
If you disable the automatic creation of user accounts for some or all users, then you can:
• Create user accounts individually on the Security Console.
• Link existing user accounts to person and party records using the Manage User Account or Manage Userstask.
Alternatively, you can use an external provisioning infrastructure to create and manage user accounts. In this case,you're responsible for managing the interface with Oracle Applications Cloud, including any user-account-relatedupdates.
User Account Role Provisioning OptionExisting users both acquire and lose roles as specied by current role-provisioning rules. For example, users mayrequest some roles for themselves and acquire others automatically. All provisioning changes are role requests that areprocessed by default. You can control what happens to role requests by seing the User Account Role Provisioningoption. Use the Manage Enterprise HCM Information task to set this option.
This table describes the User Account Role Provisioning option values.
Value Description
Both person and party users
Role provisioning and deprovisioning occur for both person and party users. This value is the default value.
Party users only
Role provisioning and deprovisioning occur for party users only.
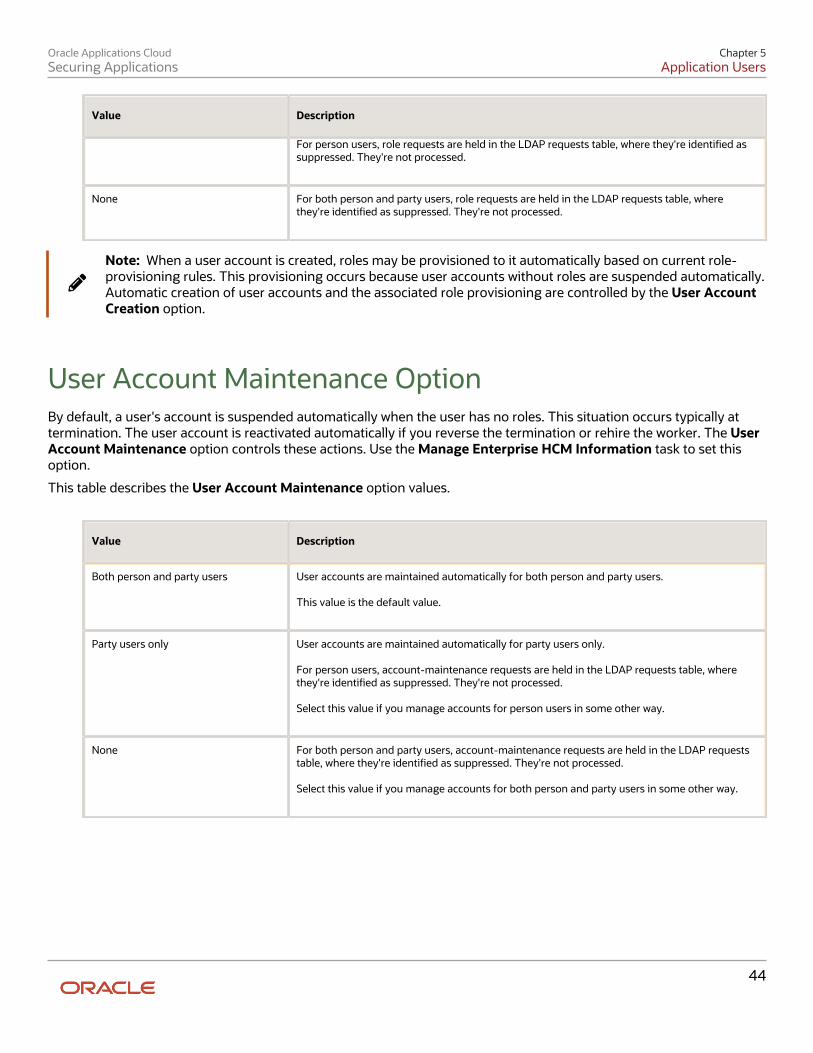
Oracle Applications CloudSecuring Applications
Chapter 5Application Users
44
Value Description
For person users, role requests are held in the LDAP requests table, where they're identied assuppressed. They're not processed.
None
For both person and party users, role requests are held in the LDAP requests table, wherethey're identied as suppressed. They're not processed.
Note: When a user account is created, roles may be provisioned to it automatically based on current role-provisioning rules. This provisioning occurs because user accounts without roles are suspended automatically.Automatic creation of user accounts and the associated role provisioning are controlled by the User AccountCreation option.
User Account Maintenance OptionBy default, a user's account is suspended automatically when the user has no roles. This situation occurs typically attermination. The user account is reactivated automatically if you reverse the termination or rehire the worker. The UserAccount Maintenance option controls these actions. Use the Manage Enterprise HCM Information task to set thisoption.
This table describes the User Account Maintenance option values.
Value Description
Both person and party users
User accounts are maintained automatically for both person and party users. This value is the default value.
Party users only
User accounts are maintained automatically for party users only. For person users, account-maintenance requests are held in the LDAP requests table, wherethey're identied as suppressed. They're not processed. Select this value if you manage accounts for person users in some other way.
None
For both person and party users, account-maintenance requests are held in the LDAP requeststable, where they're identied as suppressed. They're not processed. Select this value if you manage accounts for both person and party users in some other way.

Oracle Applications CloudSecuring Applications
Chapter 5Application Users
45
Set the User and Role Provisioning OptionsThe user and role provisioning options control the creation and maintenance of user accounts for the enterprise.This procedure explains how to set these options. To create and maintain Oracle Applications Cloud user accountsautomatically for all users, you can use the default seings.
Follow these steps:
1. In the Setup and Maintenance work area, go to the following for your oering:
◦ Functional Area: Workforce Structures
◦ Task: Manage Enterprise HCM Information
2. On the Enterprise page, select Edit > Update.3. In the Update Enterprise dialog box, enter the eective date of any changes and click OK. The Edit Enterprise
page opens.4. Scroll down to the User and Role Provisioning Information section.5. Set the User Account Options, as appropriate. The User Account Options are:
◦ User Account Creation
◦ User Account Role Provisioning
◦ User Account Maintenance
◦ User Account Creation for Terminated Workers
These options are independent of each other. For example, you can set User Account Creation to None andUser Account Role Provisioning to Yes.
6. Click Submit to save your changes.7. Click OK to close the Conrmation dialog box.
Provision Abstract Roles to Users AutomaticallyProvisioning the Employee, Contingent Worker, and Line Manager abstract roles automatically to users is ecient, asmost users have at least one of these roles. It also ensures that users have basic access to functions and data when theyrst sign in. This topic explains how to set up automatic role provisioning during implementation using the ManageRole Provisioning Rules task.
Provision the Employee Role Automatically to EmployeesFollow these steps:
1. Sign in as the TechAdmin user or another user with the IT Security Manager job role or privileges.2. In the Setup and Maintenance work area, go to the following for your oering:
◦ Functional Area: Users and Security
◦ Task: Manage Role Provisioning Rules
3. In the Search Results section of the Manage Role Mappings page, click the Create icon. The Create RoleMapping page opens.
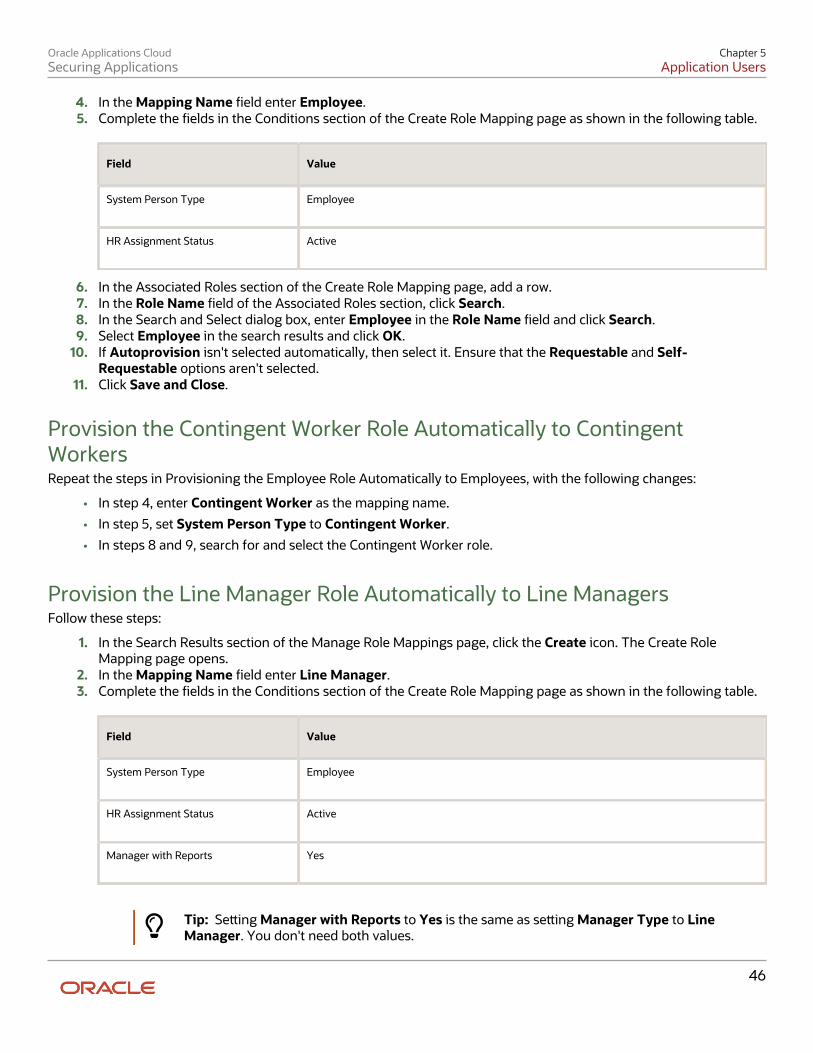
Oracle Applications CloudSecuring Applications
Chapter 5Application Users
46
4. In the Mapping Name eld enter Employee.5. Complete the elds in the Conditions section of the Create Role Mapping page as shown in the following table.
Field Value
System Person Type
Employee
HR Assignment Status
Active
6. In the Associated Roles section of the Create Role Mapping page, add a row.7. In the Role Name eld of the Associated Roles section, click Search.8. In the Search and Select dialog box, enter Employee in the Role Name eld and click Search.9. Select Employee in the search results and click OK.
10. If Autoprovision isn't selected automatically, then select it. Ensure that the Requestable and Self-Requestable options aren't selected.
11. Click Save and Close.
Provision the Contingent Worker Role Automatically to ContingentWorkersRepeat the steps in Provisioning the Employee Role Automatically to Employees, with the following changes:
• In step 4, enter Contingent Worker as the mapping name.
• In step 5, set System Person Type to Contingent Worker.
• In steps 8 and 9, search for and select the Contingent Worker role.
Provision the Line Manager Role Automatically to Line ManagersFollow these steps:
1. In the Search Results section of the Manage Role Mappings page, click the Create icon. The Create RoleMapping page opens.
2. In the Mapping Name eld enter Line Manager.3. Complete the elds in the Conditions section of the Create Role Mapping page as shown in the following table.
Field Value
System Person Type
Employee
HR Assignment Status
Active
Manager with Reports
Yes
Tip: Seing Manager with Reports to Yes is the same as seing Manager Type to LineManager. You don't need both values.
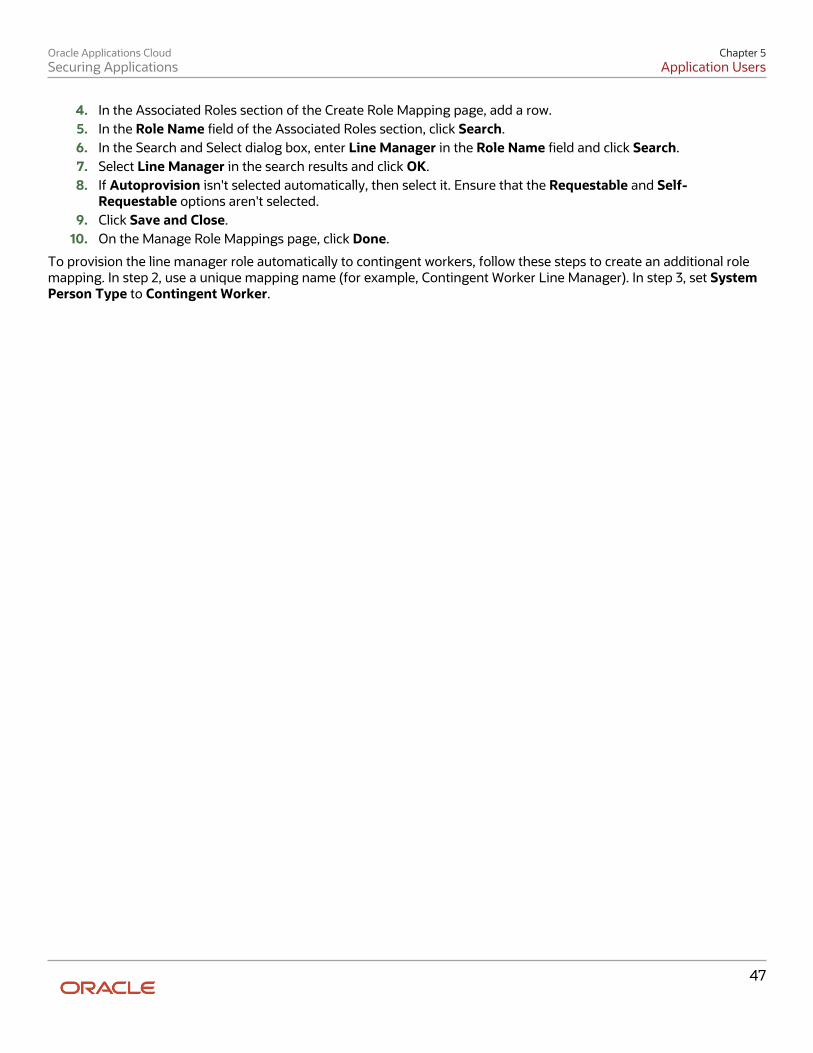
Oracle Applications CloudSecuring Applications
Chapter 5Application Users
47
4. In the Associated Roles section of the Create Role Mapping page, add a row.5. In the Role Name eld of the Associated Roles section, click Search.6. In the Search and Select dialog box, enter Line Manager in the Role Name eld and click Search.7. Select Line Manager in the search results and click OK.8. If Autoprovision isn't selected automatically, then select it. Ensure that the Requestable and Self-
Requestable options aren't selected.9. Click Save and Close.
10. On the Manage Role Mappings page, click Done.
To provision the line manager role automatically to contingent workers, follow these steps to create an additional rolemapping. In step 2, use a unique mapping name (for example, Contingent Worker Line Manager). In step 3, set SystemPerson Type to Contingent Worker.

Oracle Applications CloudSecuring Applications
Chapter 5Application Users
48
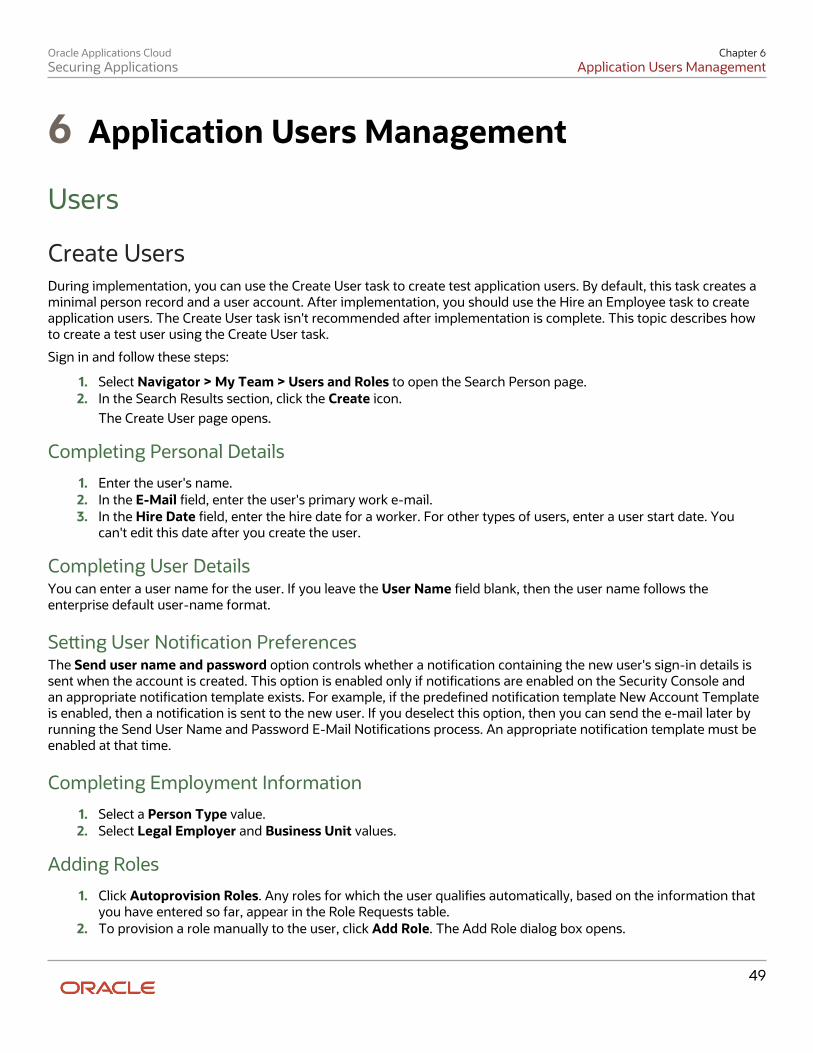
Oracle Applications CloudSecuring Applications
Chapter 6Application Users Management
49
6 Application Users Management
Users
Create UsersDuring implementation, you can use the Create User task to create test application users. By default, this task creates aminimal person record and a user account. After implementation, you should use the Hire an Employee task to createapplication users. The Create User task isn't recommended after implementation is complete. This topic describes howto create a test user using the Create User task.
Sign in and follow these steps:
1. Select Navigator > My Team > Users and Roles to open the Search Person page.2. In the Search Results section, click the Create icon.
The Create User page opens.
Completing Personal Details
1. Enter the user's name.2. In the E-Mail eld, enter the user's primary work e-mail.3. In the Hire Date eld, enter the hire date for a worker. For other types of users, enter a user start date. You
can't edit this date after you create the user.
Completing User DetailsYou can enter a user name for the user. If you leave the User Name eld blank, then the user name follows theenterprise default user-name format.
Seing User Notication PreferencesThe Send user name and password option controls whether a notication containing the new user's sign-in details issent when the account is created. This option is enabled only if notications are enabled on the Security Console andan appropriate notication template exists. For example, if the predened notication template New Account Templateis enabled, then a notication is sent to the new user. If you deselect this option, then you can send the e-mail later byrunning the Send User Name and Password E-Mail Notications process. An appropriate notication template must beenabled at that time.
Completing Employment Information
1. Select a Person Type value.2. Select Legal Employer and Business Unit values.
Adding Roles
1. Click Autoprovision Roles. Any roles for which the user qualies automatically, based on the information thatyou have entered so far, appear in the Role Requests table.
2. To provision a role manually to the user, click Add Role. The Add Role dialog box opens.

Oracle Applications CloudSecuring Applications
Chapter 6Application Users Management
50
3. Search for and select the role. The role must appear in a role mapping for which you satisfy the role-mappingconditions and where the Requestable option is selected for the role.
The role appears in the Role Requests region with the status Add requested. The role request is created whenyou click Save and Close.
Repeat steps 2 and 3 for additional roles.4. Click Save and Close.5. Click Done.
User Data Import from Legacy ApplicationsYou can import workers from legacy applications to Oracle Fusion Applications using the Import Worker Users task .You can access this task from the Setup and Maintenance work area. By enabling you to bulk-load existing data, thistask is an ecient way of creating and enabling users of Oracle Fusion Applications.
The Import Worker Users ProcessImporting worker users is a two-stage process:
1. When you perform the Import Worker Users task, the Initiate Spreadsheet Load page opens. On the InitiateSpreadsheet Load page, you generate and complete the Create Worker spreadsheet. You must map your datato the spreadsheet columns and provide all required aributes. Once the spreadsheet is complete, you clickUpload in the spreadsheet to import the data to the Load Batch Data stage tables.
2. As the upload process imports valid data rows to the Load Batch Data stage tables, the Load Batch Dataprocess runs automatically. Load Batch Data is a generic utility for loading data to Oracle Fusion Human CapitalManagement from external sources. This process loads data from the Load Batch Data stage tables to theOracle Fusion application tables.
User-Account CreationThe application creates Oracle Fusion user accounts automatically for imported workers.
By default, user account names and passwords are sent automatically to users when their accounts are created. Thisdefault action may have been changed at enterprise level, as follows:
• You can disable notications for all user life cycle events.
• You can disable notications for the New User Created and New Account Create Manager events.
Role ProvisioningOnce user accounts exist, roles are provisioned to users automatically in accordance with current role-provisioningrules. For example, current rules could provision the employee abstract role to every worker. Role provisioning occursautomatically and can't be disabled for the enterprise.
Related Topics
• How Data Is Uploaded Using HCM Spreadsheet Data Loader
• Upload Data Using HCM Spreadsheet Data Loader
• User and Role-Provisioning Setup Options
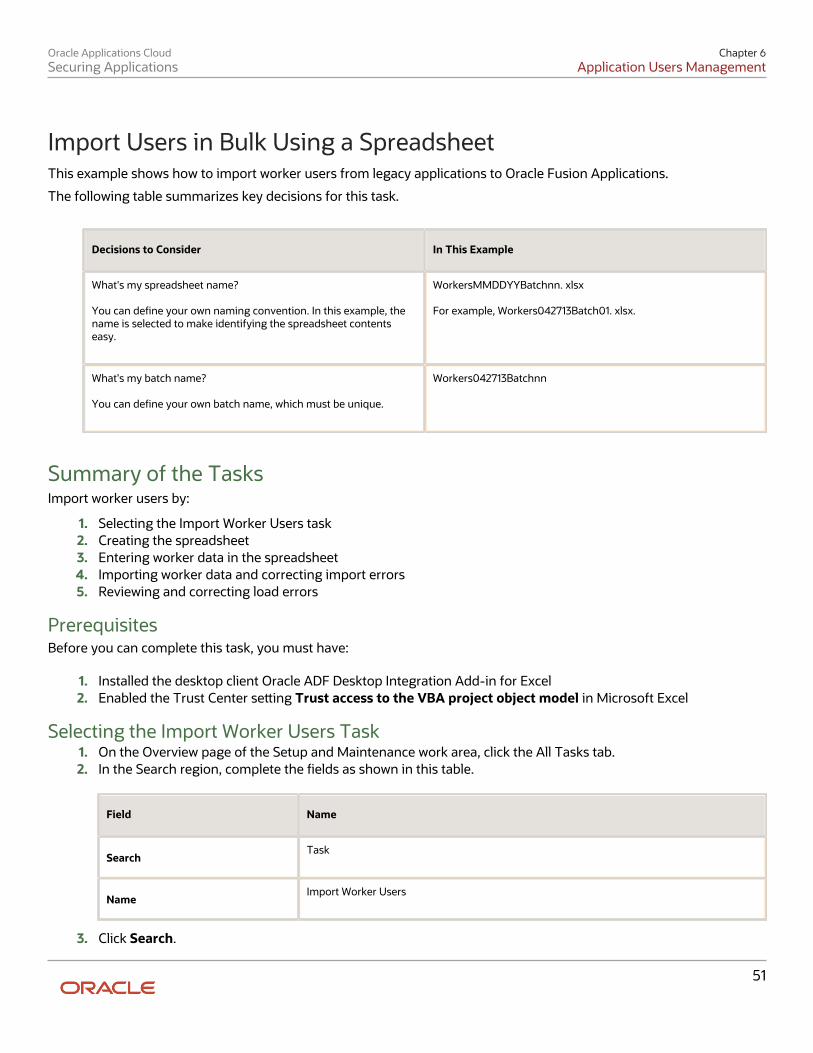
Oracle Applications CloudSecuring Applications
Chapter 6Application Users Management
51
Import Users in Bulk Using a SpreadsheetThis example shows how to import worker users from legacy applications to Oracle Fusion Applications.
The following table summarizes key decisions for this task.
Decisions to Consider In This Example
What's my spreadsheet name? You can dene your own naming convention. In this example, thename is selected to make identifying the spreadsheet contentseasy.
WorkersMMDDYYBatchnn. xlsx For example, Workers042713Batch01. xlsx.
What's my batch name? You can dene your own batch name, which must be unique.
Workers042713Batchnn
Summary of the TasksImport worker users by:
1. Selecting the Import Worker Users task2. Creating the spreadsheet3. Entering worker data in the spreadsheet4. Importing worker data and correcting import errors5. Reviewing and correcting load errors
PrerequisitesBefore you can complete this task, you must have:
1. Installed the desktop client Oracle ADF Desktop Integration Add-in for Excel2. Enabled the Trust Center seing Trust access to the VBA project object model in Microsoft Excel
Selecting the Import Worker Users Task1. On the Overview page of the Setup and Maintenance work area, click the All Tasks tab.2. In the Search region, complete the elds as shown in this table.
Field Name
SearchTask
NameImport Worker Users
3. Click Search.
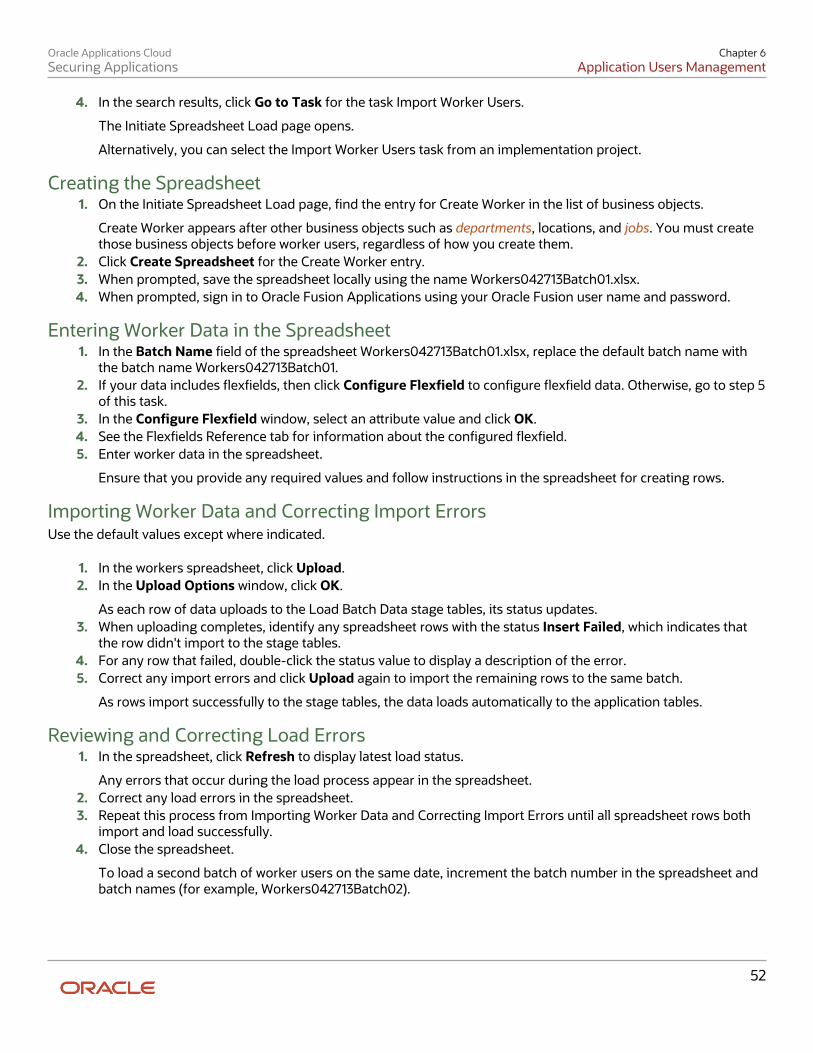
Oracle Applications CloudSecuring Applications
Chapter 6Application Users Management
52
4. In the search results, click Go to Task for the task Import Worker Users.
The Initiate Spreadsheet Load page opens.
Alternatively, you can select the Import Worker Users task from an implementation project.
Creating the Spreadsheet1. On the Initiate Spreadsheet Load page, nd the entry for Create Worker in the list of business objects.
Create Worker appears after other business objects such as departments, locations, and jobs. You must createthose business objects before worker users, regardless of how you create them.
2. Click Create Spreadsheet for the Create Worker entry.3. When prompted, save the spreadsheet locally using the name Workers042713Batch01.xlsx.4. When prompted, sign in to Oracle Fusion Applications using your Oracle Fusion user name and password.
Entering Worker Data in the Spreadsheet1. In the Batch Name eld of the spreadsheet Workers042713Batch01.xlsx, replace the default batch name with
the batch name Workers042713Batch01.2. If your data includes exelds, then click Congure Flexeld to congure exeld data. Otherwise, go to step 5
of this task.3. In the Congure Flexeld window, select an aribute value and click OK.4. See the Flexelds Reference tab for information about the congured exeld.5. Enter worker data in the spreadsheet.
Ensure that you provide any required values and follow instructions in the spreadsheet for creating rows.
Importing Worker Data and Correcting Import ErrorsUse the default values except where indicated.
1. In the workers spreadsheet, click Upload.2. In the Upload Options window, click OK.
As each row of data uploads to the Load Batch Data stage tables, its status updates.3. When uploading completes, identify any spreadsheet rows with the status Insert Failed, which indicates that
the row didn't import to the stage tables.4. For any row that failed, double-click the status value to display a description of the error.5. Correct any import errors and click Upload again to import the remaining rows to the same batch.
As rows import successfully to the stage tables, the data loads automatically to the application tables.
Reviewing and Correcting Load Errors1. In the spreadsheet, click Refresh to display latest load status.
Any errors that occur during the load process appear in the spreadsheet.2. Correct any load errors in the spreadsheet.3. Repeat this process from Importing Worker Data and Correcting Import Errors until all spreadsheet rows both
import and load successfully.4. Close the spreadsheet.
To load a second batch of worker users on the same date, increment the batch number in the spreadsheet andbatch names (for example, Workers042713Batch02).
Oracle Applications CloudSecuring Applications
Chapter 6Application Users Management
53
Inactive Users ReportRun the Inactive Users Report process to identify users who haven't signed in for a specied period.
To run the report:
1. In the Scheduled Processes work area, click Schedule New Process.2. Search for and select the Import User Login History process.
Note: Whenever you run the Inactive Users Report process, you must rst run the ImportUser Login History process. This process imports information that the Inactive UsersReport process uses to identify inactive users. You're recommended to schedule ImportUser Login History to run daily.
3. When the Import User Login History process completes, search for and select the Inactive Users Reportprocess.
4. In the Process Details dialog box, set parameters to identify one or more users.5. Click Submit.
Inactive Users Report ParametersAll parameters except Days Since Last Activity are optional.
User Name Begins With
Enter one or more characters.
First Name Begins With
Enter one or more characters.
Last Name Begins With
Enter one or more characters.
Department
Enter the department from the user's primary assignment.
Location
Enter the location from the user's primary assignment.
Days Since Last Activity
Enter the number of days since the user last signed in. Use this parameter to specify the meaning of the term inactiveuser in your enterprise. Use other parameters to lter the results.
This value is required and is 30 by default. This value identies users who haven't signed in during the last 30 or moredays.
Last Activity Start Date
Oracle Applications CloudSecuring Applications
Chapter 6Application Users Management
54
Specify the start date of a period in which the last activity must fall.
Last Activity End Date
Specify the end date of a period in which the last activity must fall.
Viewing the ReportThe process produces an Inactive_Users_List_processID.xml le and a Diagnostics_processID.zip le.
The report includes the following details for each user who satises the report parameters:
• Number of days since the user was last active
• Date of last activity
• User name
• First and last names
• Assignment department
• Assignment location
• City and country
• Report time stamp
Note: The information in the report relating to the user's latest activity isn't based solely on actionsperformed by the user in the UI. Actions performed on behalf of the user, which create user sessions, alsoaect these values. For example, running processes, making web service requests, and running batchprocesses are interpreted as user activity.
Related Topics• Schedule the Import User Login History Process
User Accounts
Manage User AccountsHuman resource specialists (HR specialists) can manage user accounts for users whose records they can access. Thistopic describes how to update a user account.
To access the user account page for a person:
1. Open the Person Management work area.2. On the Search Person page, search for the person whose account you're updating.3. In the search results, select the person and select Actions > Personal and Employment > Manage User
Account. The Manage User Account page opens.
Manage User RolesTo add a role:
1. Click Add Role.
Oracle Applications CloudSecuring Applications
Chapter 6Application Users Management
55
The Add Role dialog box opens.2. In the Role Name eld, search for the role that you want to add.3. In the search results, select the role and click OK.
The role appears in the Role Requests region with the status Add Requested.4. Click Save.
To remove a role from any section of this page:
1. Select the role and click Remove.2. In the Warning dialog box, click Yes to continue.3. Click Save.
Clicking Save sends requests to add or remove roles to your LDAP directory server. Requests appear in the RoleRequests in the Last 30 Days section. Once provisioned, roles appear in the Current Roles section.
To update a user's roles automatically, select Actions > Autoprovision Roles. This action applies to roles for which theAutoprovision option is selected in all current role mappings. The user immediately:
• Acquires any role for which he or she qualies but doesn't currently have
• Loses any role for which he or she no longer qualies
You're recommended to autoprovision roles for individual users if you know that additional or updated role mappingsexist that aect those users.
Copy Personal Data to LDAPBy default, changes to personal data, such as person name and phone, are copied to your LDAP directory periodically.To copy any changes immediately:
1. Select Actions > Copy Personal Data to LDAP.2. In the Copy Personal Data to LDAP dialog box, click Overwrite LDAP.
Reset PasswordsTo reset a user's password:
1. Select Actions > Reset Password.2. In the Warning dialog box, click Yes to continue.
This action sends a notication containing a reset-password link to the user's work email.
Note: A notication template for the password-reset event must exist and be enabled for the user'suser category. Otherwise, no notication is sent.
Edit User NamesTo edit a user name:
1. Select Actions > Edit User Name.2. In the Update User Name dialog box, enter the user name and click OK. The maximum length of the user name
is 80 characters.3. Click Save.
This action sends the updated user name to your LDAP directory. Once the request is processed, the user can sign inusing the updated name. As the user receives no automatic notication of the change, you're recommended to send thedetails to the user.
Oracle Applications CloudSecuring Applications
Chapter 6Application Users Management
56
Tip: Users can add roles, autoprovision roles, and copy their personal data to LDAP by selecting Navigator> Me > Roles and Delegations. Line managers can add, remove, and autoprovision roles and copy personaldata to LDAP for their reports from the Directory or by selecting Navigator > My Team > Users and Roles.
User NamesBy default, user names are generated automatically in the format specied for the default user category when youcreate a person record. Users who have the human resource specialist (HR specialist) role can change user names forexisting HCM users whose records they can access. This topic describes the automatic generation of user names andexplains how to change an existing user name.
User Names When Creating UsersYou create an HCM user by selecting a task, such as Hire an Employee, in the New Person work area. The user name isgenerated automatically in the format specied for the default user category. This table summarizes the eects of theavailable formats for Oracle HCM Cloud users.
User-Name Format Description
The worker's work email is the user name. If you don't enter the work email when hiring theworker, then it can be entered later on the Security Console. This format is used by default. Adierent default format can be selected on the Security Console.
FirstName. LastName
The user name is the worker's rst and last names separated by a single period.
FLastName
The user name is the worker's last name prexed with the initial of the worker's rst name.
Person number
If your enterprise uses manual numbering, then any number that you enter becomes theuser name. Otherwise, the number is generated automatically and you can't edit it. Theautomatically generated number becomes the user name.
Note: If the default user-name rule fails, then a system user name can be generated. The option to generate asystem user name is enabled by default but can be disabled on the Security Console.
Existing User NamesHR specialists can change an existing user name on the Manage User Account page.
To change a worker's user name:
1. Search for and select the worker in the Person Management work area.2. For the selected worker, select Actions > Personal and Employment > Manage User Account.3. On the Manage User Account page, select Actions > Edit User Name.
The updated name, which can be in any format, is sent automatically to your LDAP directory server. The maximumlength of the user name is 80 characters.
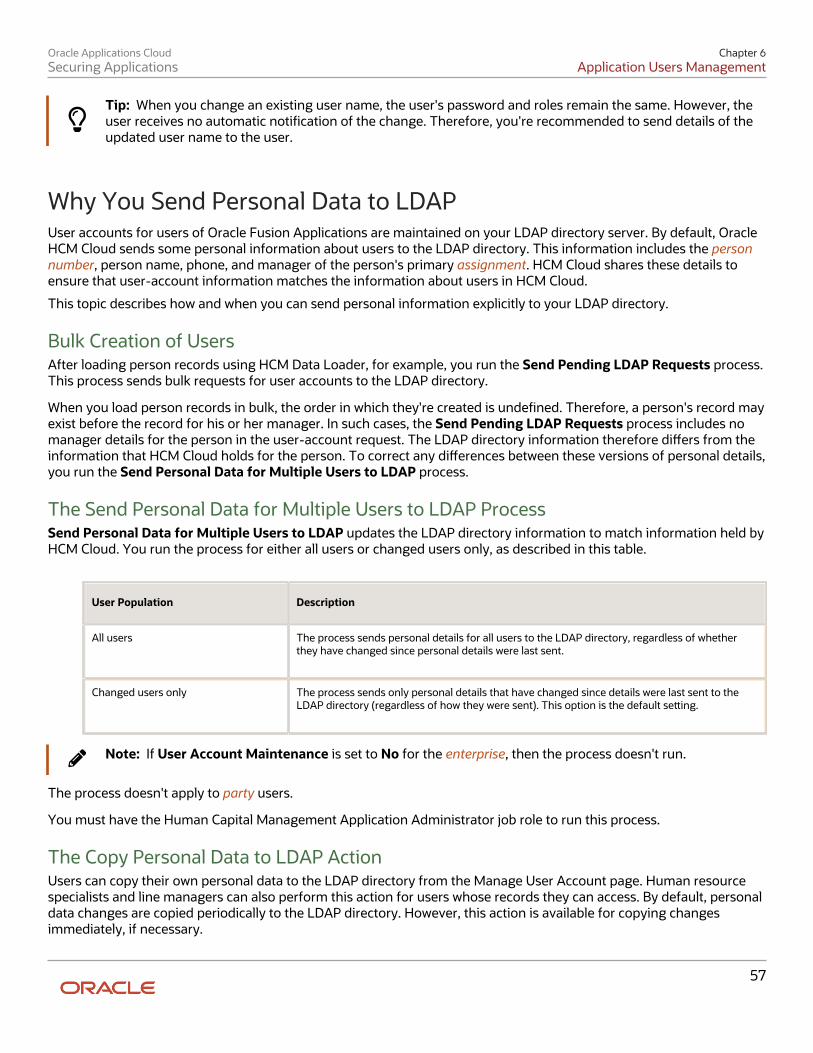
Oracle Applications CloudSecuring Applications
Chapter 6Application Users Management
57
Tip: When you change an existing user name, the user's password and roles remain the same. However, theuser receives no automatic notication of the change. Therefore, you're recommended to send details of theupdated user name to the user.
Why You Send Personal Data to LDAPUser accounts for users of Oracle Fusion Applications are maintained on your LDAP directory server. By default, OracleHCM Cloud sends some personal information about users to the LDAP directory. This information includes the personnumber, person name, phone, and manager of the person's primary assignment. HCM Cloud shares these details toensure that user-account information matches the information about users in HCM Cloud.
This topic describes how and when you can send personal information explicitly to your LDAP directory.
Bulk Creation of UsersAfter loading person records using HCM Data Loader, for example, you run the Send Pending LDAP Requests process.This process sends bulk requests for user accounts to the LDAP directory.
When you load person records in bulk, the order in which they're created is undened. Therefore, a person's record mayexist before the record for his or her manager. In such cases, the Send Pending LDAP Requests process includes nomanager details for the person in the user-account request. The LDAP directory information therefore diers from theinformation that HCM Cloud holds for the person. To correct any dierences between these versions of personal details,you run the Send Personal Data for Multiple Users to LDAP process.
The Send Personal Data for Multiple Users to LDAP ProcessSend Personal Data for Multiple Users to LDAP updates the LDAP directory information to match information held byHCM Cloud. You run the process for either all users or changed users only, as described in this table.
User Population Description
All users
The process sends personal details for all users to the LDAP directory, regardless of whetherthey have changed since personal details were last sent.
Changed users only
The process sends only personal details that have changed since details were last sent to theLDAP directory (regardless of how they were sent). This option is the default seing.
Note: If User Account Maintenance is set to No for the enterprise, then the process doesn't run.
The process doesn't apply to party users.
You must have the Human Capital Management Application Administrator job role to run this process.
The Copy Personal Data to LDAP ActionUsers can copy their own personal data to the LDAP directory from the Manage User Account page. Human resourcespecialists and line managers can also perform this action for users whose records they can access. By default, personaldata changes are copied periodically to the LDAP directory. However, this action is available for copying changesimmediately, if necessary.
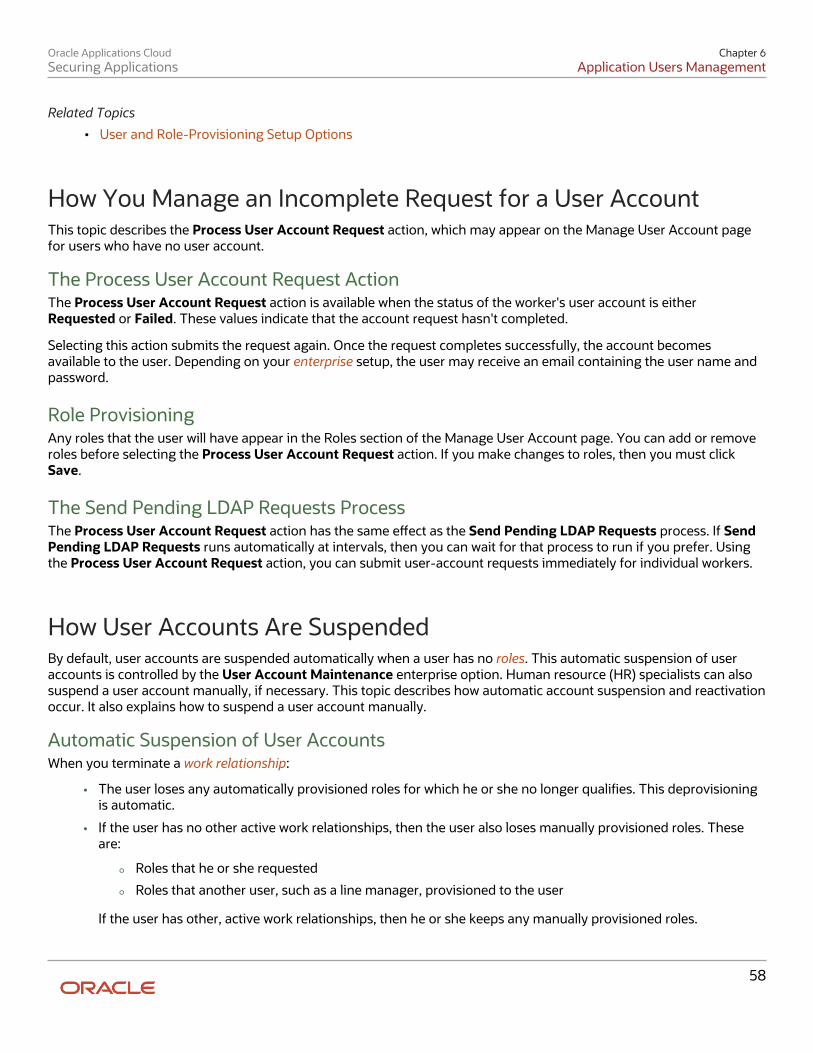
Oracle Applications CloudSecuring Applications
Chapter 6Application Users Management
58
Related Topics
• User and Role-Provisioning Setup Options
How You Manage an Incomplete Request for a User AccountThis topic describes the Process User Account Request action, which may appear on the Manage User Account pagefor users who have no user account.
The Process User Account Request ActionThe Process User Account Request action is available when the status of the worker's user account is eitherRequested or Failed. These values indicate that the account request hasn't completed.
Selecting this action submits the request again. Once the request completes successfully, the account becomesavailable to the user. Depending on your enterprise setup, the user may receive an email containing the user name andpassword.
Role ProvisioningAny roles that the user will have appear in the Roles section of the Manage User Account page. You can add or removeroles before selecting the Process User Account Request action. If you make changes to roles, then you must clickSave.
The Send Pending LDAP Requests ProcessThe Process User Account Request action has the same eect as the Send Pending LDAP Requests process. If SendPending LDAP Requests runs automatically at intervals, then you can wait for that process to run if you prefer. Usingthe Process User Account Request action, you can submit user-account requests immediately for individual workers.
How User Accounts Are SuspendedBy default, user accounts are suspended automatically when a user has no roles. This automatic suspension of useraccounts is controlled by the User Account Maintenance enterprise option. Human resource (HR) specialists can alsosuspend a user account manually, if necessary. This topic describes how automatic account suspension and reactivationoccur. It also explains how to suspend a user account manually.
Automatic Suspension of User AccountsWhen you terminate a work relationship:
• The user loses any automatically provisioned roles for which he or she no longer qualies. This deprovisioningis automatic.
• If the user has no other active work relationships, then the user also loses manually provisioned roles. Theseare:
◦ Roles that he or she requested
◦ Roles that another user, such as a line manager, provisioned to the user
If the user has other, active work relationships, then he or she keeps any manually provisioned roles.
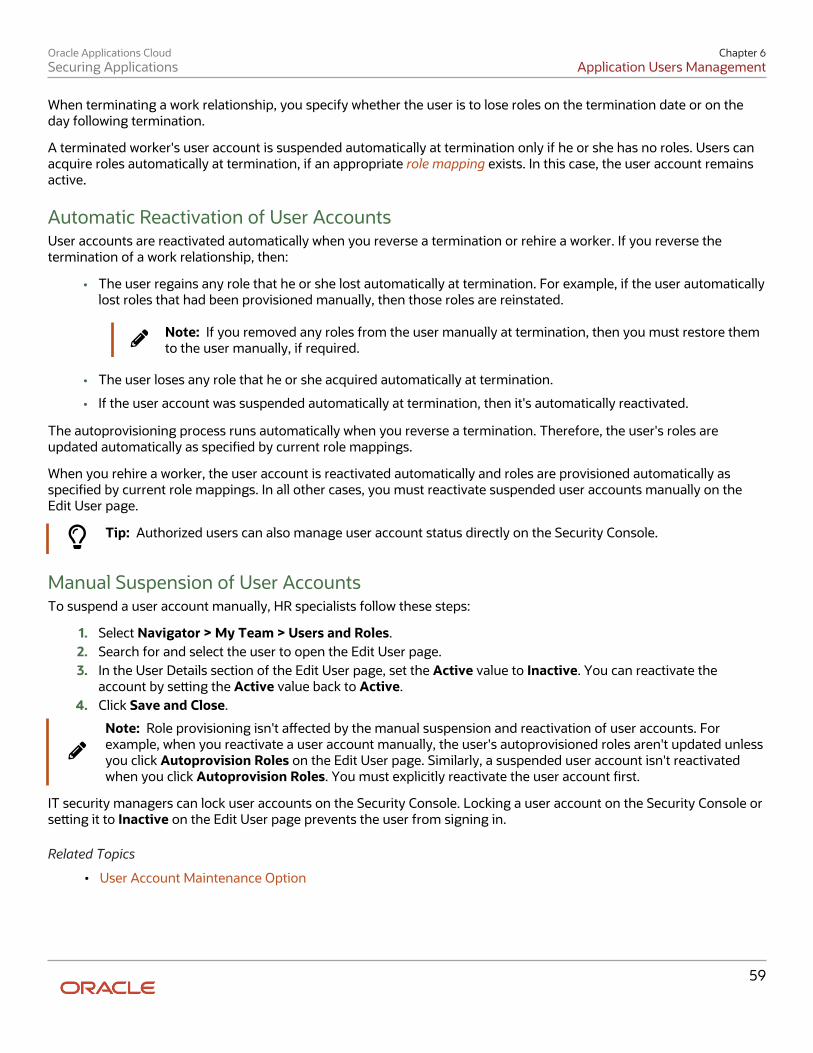
Oracle Applications CloudSecuring Applications
Chapter 6Application Users Management
59
When terminating a work relationship, you specify whether the user is to lose roles on the termination date or on theday following termination.
A terminated worker's user account is suspended automatically at termination only if he or she has no roles. Users canacquire roles automatically at termination, if an appropriate role mapping exists. In this case, the user account remainsactive.
Automatic Reactivation of User AccountsUser accounts are reactivated automatically when you reverse a termination or rehire a worker. If you reverse thetermination of a work relationship, then:
• The user regains any role that he or she lost automatically at termination. For example, if the user automaticallylost roles that had been provisioned manually, then those roles are reinstated.
Note: If you removed any roles from the user manually at termination, then you must restore themto the user manually, if required.
• The user loses any role that he or she acquired automatically at termination.
• If the user account was suspended automatically at termination, then it's automatically reactivated.
The autoprovisioning process runs automatically when you reverse a termination. Therefore, the user's roles areupdated automatically as specied by current role mappings.
When you rehire a worker, the user account is reactivated automatically and roles are provisioned automatically asspecied by current role mappings. In all other cases, you must reactivate suspended user accounts manually on theEdit User page.
Tip: Authorized users can also manage user account status directly on the Security Console.
Manual Suspension of User AccountsTo suspend a user account manually, HR specialists follow these steps:
1. Select Navigator > My Team > Users and Roles.2. Search for and select the user to open the Edit User page.3. In the User Details section of the Edit User page, set the Active value to Inactive. You can reactivate the
account by seing the Active value back to Active.4. Click Save and Close.
Note: Role provisioning isn't aected by the manual suspension and reactivation of user accounts. Forexample, when you reactivate a user account manually, the user's autoprovisioned roles aren't updated unlessyou click Autoprovision Roles on the Edit User page. Similarly, a suspended user account isn't reactivatedwhen you click Autoprovision Roles. You must explicitly reactivate the user account rst.
IT security managers can lock user accounts on the Security Console. Locking a user account on the Security Console orseing it to Inactive on the Edit User page prevents the user from signing in.
Related Topics
• User Account Maintenance Option
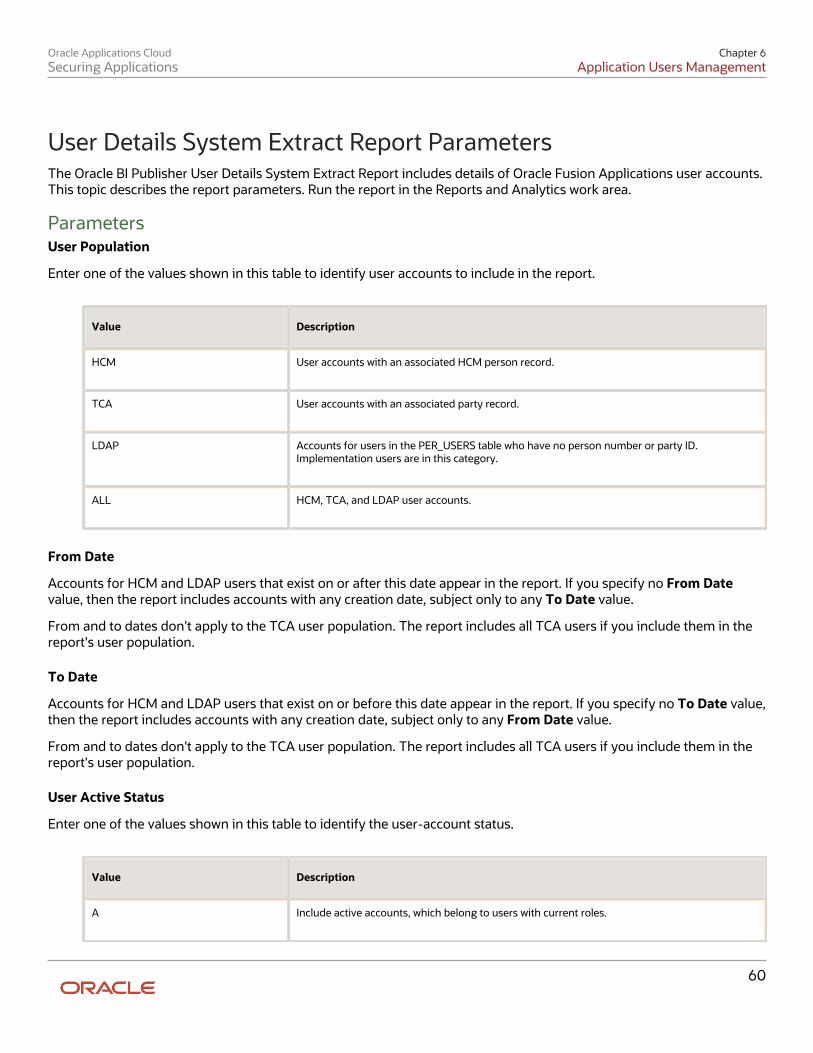
Oracle Applications CloudSecuring Applications
Chapter 6Application Users Management
60
User Details System Extract Report ParametersThe Oracle BI Publisher User Details System Extract Report includes details of Oracle Fusion Applications user accounts.This topic describes the report parameters. Run the report in the Reports and Analytics work area.
ParametersUser Population
Enter one of the values shown in this table to identify user accounts to include in the report.
Value Description
HCM
User accounts with an associated HCM person record.
TCA
User accounts with an associated party record.
LDAP
Accounts for users in the PER_USERS table who have no person number or party ID.Implementation users are in this category.
ALL
HCM, TCA, and LDAP user accounts.
From Date
Accounts for HCM and LDAP users that exist on or after this date appear in the report. If you specify no From Datevalue, then the report includes accounts with any creation date, subject only to any To Date value.
From and to dates don't apply to the TCA user population. The report includes all TCA users if you include them in thereport's user population.
To Date
Accounts for HCM and LDAP users that exist on or before this date appear in the report. If you specify no To Date value,then the report includes accounts with any creation date, subject only to any From Date value.
From and to dates don't apply to the TCA user population. The report includes all TCA users if you include them in thereport's user population.
User Active Status
Enter one of the values shown in this table to identify the user-account status.
Value Description
A
Include active accounts, which belong to users with current roles.
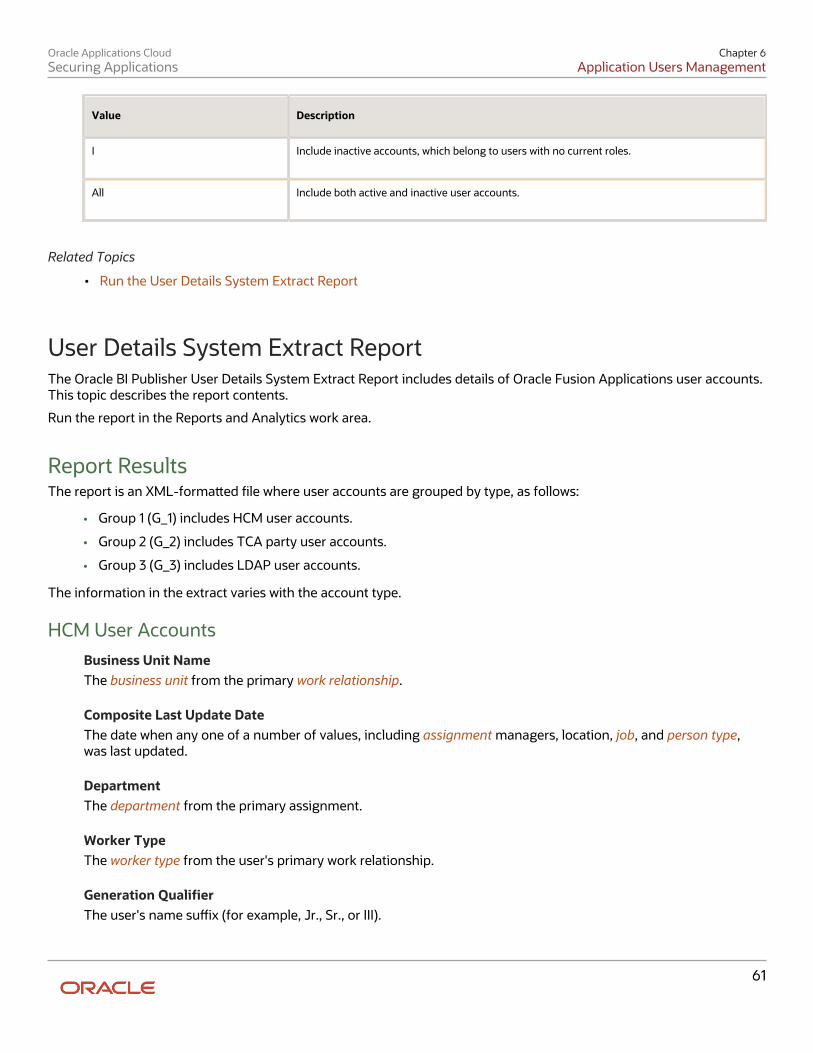
Oracle Applications CloudSecuring Applications
Chapter 6Application Users Management
61
Value Description
I
Include inactive accounts, which belong to users with no current roles.
All
Include both active and inactive user accounts.
Related Topics
• Run the User Details System Extract Report
User Details System Extract ReportThe Oracle BI Publisher User Details System Extract Report includes details of Oracle Fusion Applications user accounts.This topic describes the report contents.
Run the report in the Reports and Analytics work area.
Report ResultsThe report is an XML-formaed le where user accounts are grouped by type, as follows:
• Group 1 (G_1) includes HCM user accounts.
• Group 2 (G_2) includes TCA party user accounts.
• Group 3 (G_3) includes LDAP user accounts.
The information in the extract varies with the account type.
HCM User AccountsBusiness Unit NameThe business unit from the primary work relationship.
Composite Last Update DateThe date when any one of a number of values, including assignment managers, location, job, and person type,was last updated.
DepartmentThe department from the primary assignment.
Worker TypeThe worker type from the user's primary work relationship.
Generation QualierThe user's name sux (for example, Jr., Sr., or III).
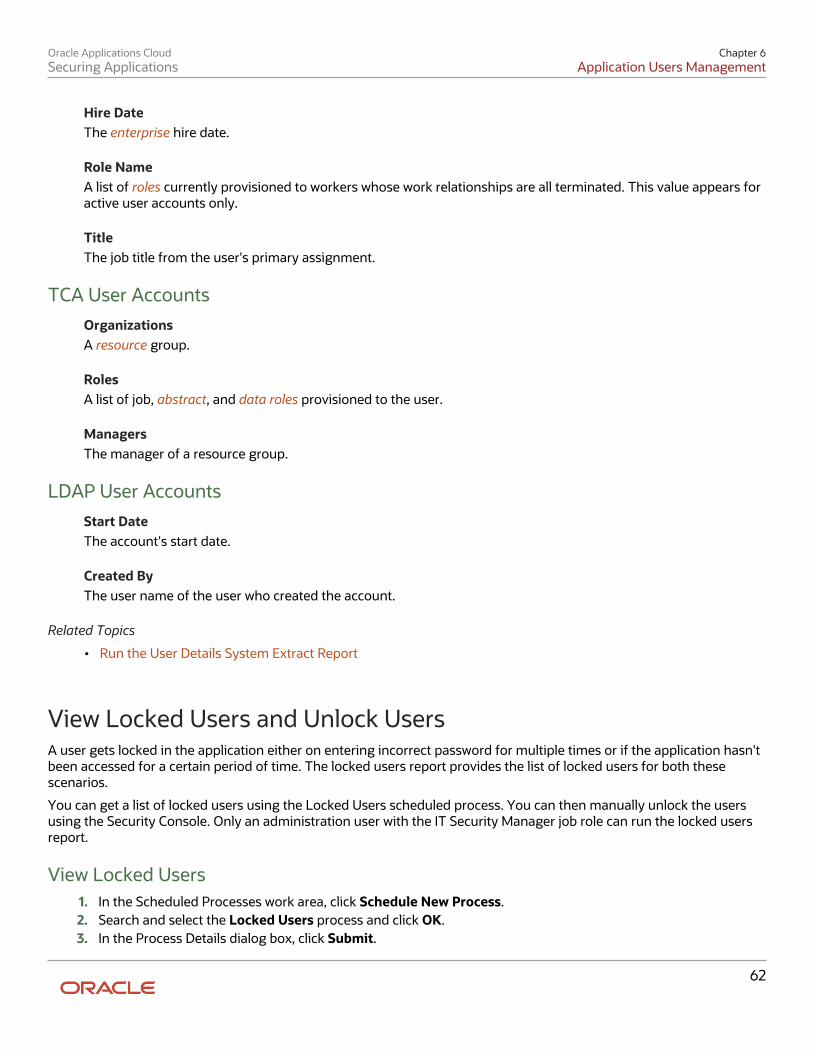
Oracle Applications CloudSecuring Applications
Chapter 6Application Users Management
62
Hire DateThe enterprise hire date.
Role NameA list of roles currently provisioned to workers whose work relationships are all terminated. This value appears foractive user accounts only.
TitleThe job title from the user's primary assignment.
TCA User AccountsOrganizationsA resource group.
RolesA list of job, abstract, and data roles provisioned to the user.
ManagersThe manager of a resource group.
LDAP User AccountsStart DateThe account's start date.
Created ByThe user name of the user who created the account.
Related Topics
• Run the User Details System Extract Report
View Locked Users and Unlock UsersA user gets locked in the application either on entering incorrect password for multiple times or if the application hasn'tbeen accessed for a certain period of time. The locked users report provides the list of locked users for both thesescenarios.
You can get a list of locked users using the Locked Users scheduled process. You can then manually unlock the usersusing the Security Console. Only an administration user with the IT Security Manager job role can run the locked usersreport.
View Locked Users1. In the Scheduled Processes work area, click Schedule New Process.2. Search and select the Locked Users process and click OK.3. In the Process Details dialog box, click Submit.
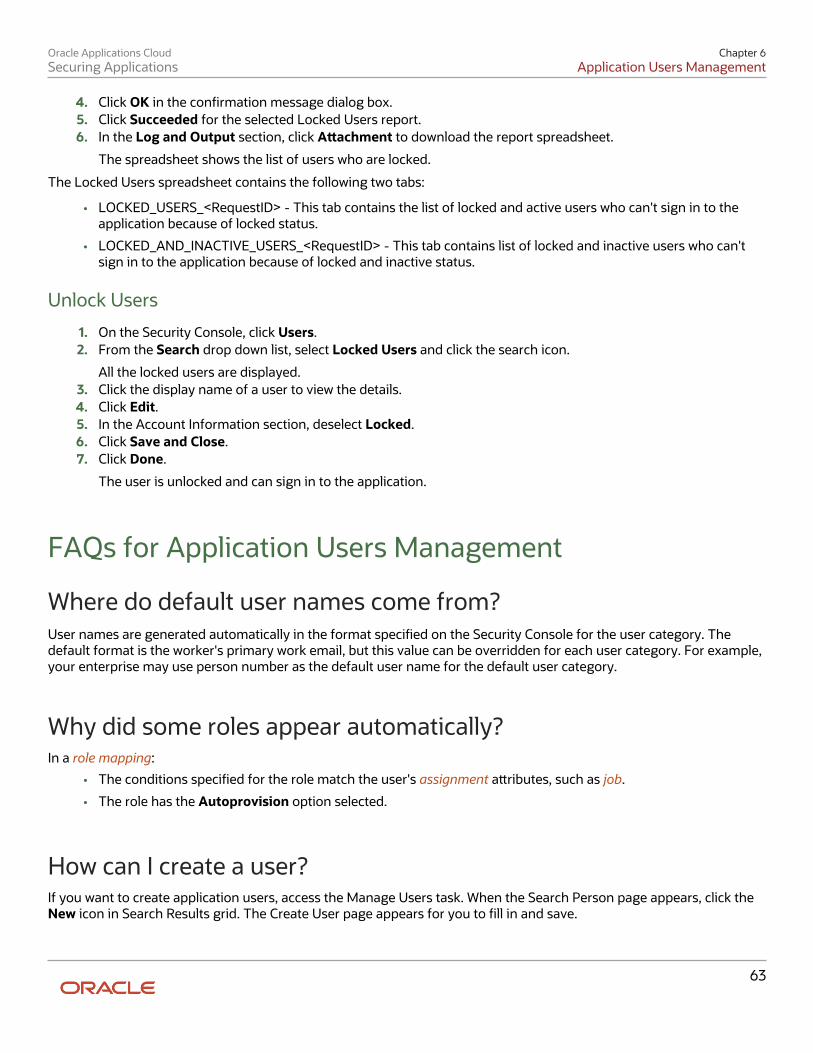
Oracle Applications CloudSecuring Applications
Chapter 6Application Users Management
63
4. Click OK in the conrmation message dialog box.5. Click Succeeded for the selected Locked Users report.6. In the Log and Output section, click Aachment to download the report spreadsheet.
The spreadsheet shows the list of users who are locked.
The Locked Users spreadsheet contains the following two tabs:
• LOCKED_USERS_<RequestID> - This tab contains the list of locked and active users who can't sign in to theapplication because of locked status.
• LOCKED_AND_INACTIVE_USERS_<RequestID> - This tab contains list of locked and inactive users who can'tsign in to the application because of locked and inactive status.
Unlock Users
1. On the Security Console, click Users.2. From the Search drop down list, select Locked Users and click the search icon.
All the locked users are displayed.3. Click the display name of a user to view the details.4. Click Edit.5. In the Account Information section, deselect Locked.6. Click Save and Close.7. Click Done.
The user is unlocked and can sign in to the application.
FAQs for Application Users Management
Where do default user names come from?User names are generated automatically in the format specied on the Security Console for the user category. Thedefault format is the worker's primary work email, but this value can be overridden for each user category. For example,your enterprise may use person number as the default user name for the default user category.
Why did some roles appear automatically?In a role mapping:
• The conditions specied for the role match the user's assignment aributes, such as job.
• The role has the Autoprovision option selected.
How can I create a user?If you want to create application users, access the Manage Users task. When the Search Person page appears, click theNew icon in Search Results grid. The Create User page appears for you to ll in and save.
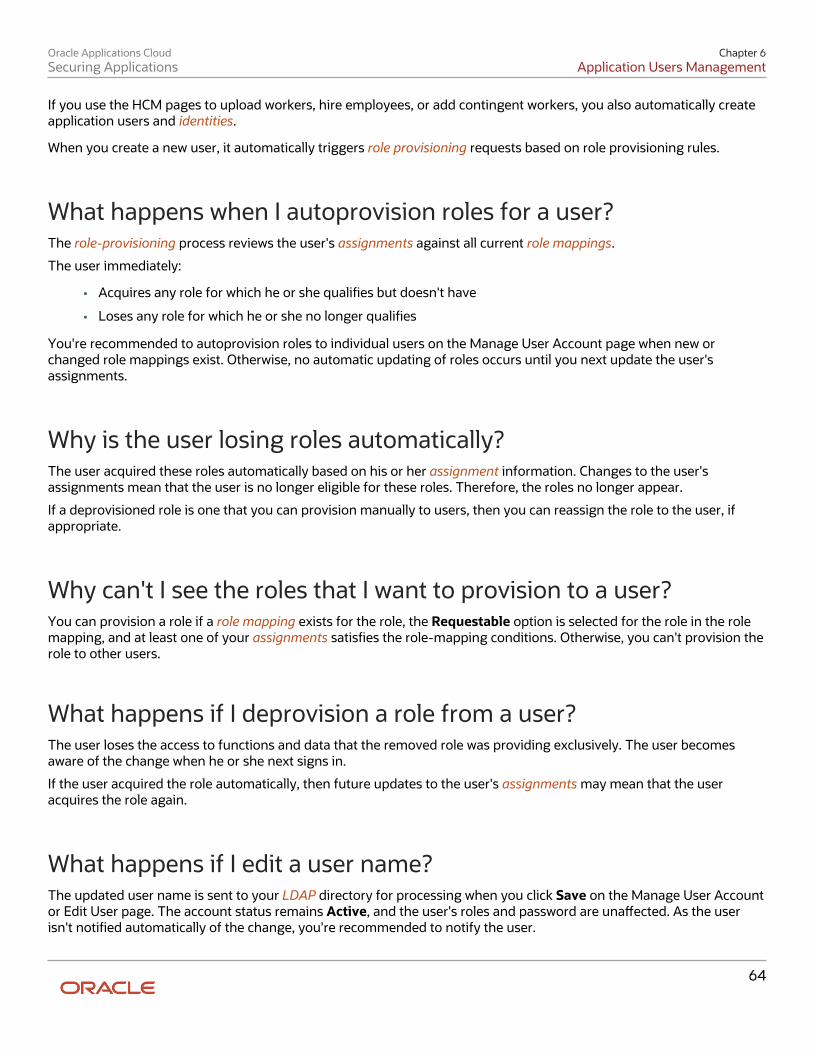
Oracle Applications CloudSecuring Applications
Chapter 6Application Users Management
64
If you use the HCM pages to upload workers, hire employees, or add contingent workers, you also automatically createapplication users and identities.
When you create a new user, it automatically triggers role provisioning requests based on role provisioning rules.
What happens when I autoprovision roles for a user?The role-provisioning process reviews the user's assignments against all current role mappings.
The user immediately:
• Acquires any role for which he or she qualies but doesn't have
• Loses any role for which he or she no longer qualies
You're recommended to autoprovision roles to individual users on the Manage User Account page when new orchanged role mappings exist. Otherwise, no automatic updating of roles occurs until you next update the user'sassignments.
Why is the user losing roles automatically?The user acquired these roles automatically based on his or her assignment information. Changes to the user'sassignments mean that the user is no longer eligible for these roles. Therefore, the roles no longer appear.
If a deprovisioned role is one that you can provision manually to users, then you can reassign the role to the user, ifappropriate.
Why can't I see the roles that I want to provision to a user?You can provision a role if a role mapping exists for the role, the Requestable option is selected for the role in the rolemapping, and at least one of your assignments satises the role-mapping conditions. Otherwise, you can't provision therole to other users.
What happens if I deprovision a role from a user?The user loses the access to functions and data that the removed role was providing exclusively. The user becomesaware of the change when he or she next signs in.
If the user acquired the role automatically, then future updates to the user's assignments may mean that the useracquires the role again.
What happens if I edit a user name?The updated user name is sent to your LDAP directory for processing when you click Save on the Manage User Accountor Edit User page. The account status remains Active, and the user's roles and password are unaected. As the userisn't notied automatically of the change, you're recommended to notify the user.

Oracle Applications CloudSecuring Applications
Chapter 6Application Users Management
65
Only human resource specialists can edit user names.
What happens if I send the user name and password?The user name and password go to the work email of the user or user's line manager, if any. Notication templates forthis event must exist and be enabled.
You can send these details once only for any user. If you deselect this option on the Manage User Account or CreateUser page, then you can send the details later. To do this, run the Send User Name and Password Email Noticationsprocess.
What happens if I reset a user's password?A notication containing a reset-password link is sent to the user's work email. If the user has no work email, then thenotication is sent to the user's line manager. Notication templates for this event must exist and be enabled.
How can I notify users of their user names and passwords?You can run the Send User Name and Password Email Notications process in the Scheduled Processes work area.For users for whom you haven't so far requested an email, this process sends out user names and reset-password links.The email goes to the work email of the user or the user's line manager. You can send the user name and passwordonce only to any user. A notication template for this event must exist and be enabled.

Oracle Applications CloudSecuring Applications
Chapter 6Application Users Management
66
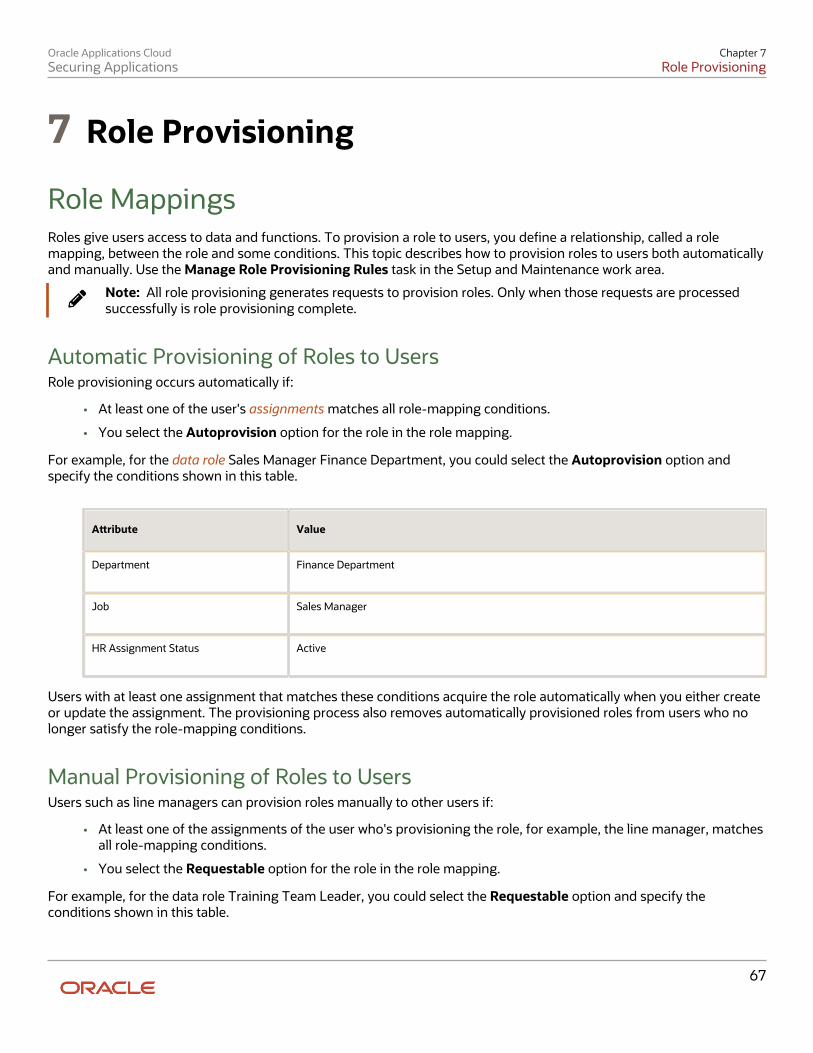
Oracle Applications CloudSecuring Applications
Chapter 7Role Provisioning
67
7 Role Provisioning
Role MappingsRoles give users access to data and functions. To provision a role to users, you dene a relationship, called a rolemapping, between the role and some conditions. This topic describes how to provision roles to users both automaticallyand manually. Use the Manage Role Provisioning Rules task in the Setup and Maintenance work area.
Note: All role provisioning generates requests to provision roles. Only when those requests are processedsuccessfully is role provisioning complete.
Automatic Provisioning of Roles to UsersRole provisioning occurs automatically if:
• At least one of the user's assignments matches all role-mapping conditions.
• You select the Autoprovision option for the role in the role mapping.
For example, for the data role Sales Manager Finance Department, you could select the Autoprovision option andspecify the conditions shown in this table.
Aribute Value
Department
Finance Department
Job
Sales Manager
HR Assignment Status
Active
Users with at least one assignment that matches these conditions acquire the role automatically when you either createor update the assignment. The provisioning process also removes automatically provisioned roles from users who nolonger satisfy the role-mapping conditions.
Manual Provisioning of Roles to UsersUsers such as line managers can provision roles manually to other users if:
• At least one of the assignments of the user who's provisioning the role, for example, the line manager, matchesall role-mapping conditions.
• You select the Requestable option for the role in the role mapping.
For example, for the data role Training Team Leader, you could select the Requestable option and specify theconditions shown in this table.
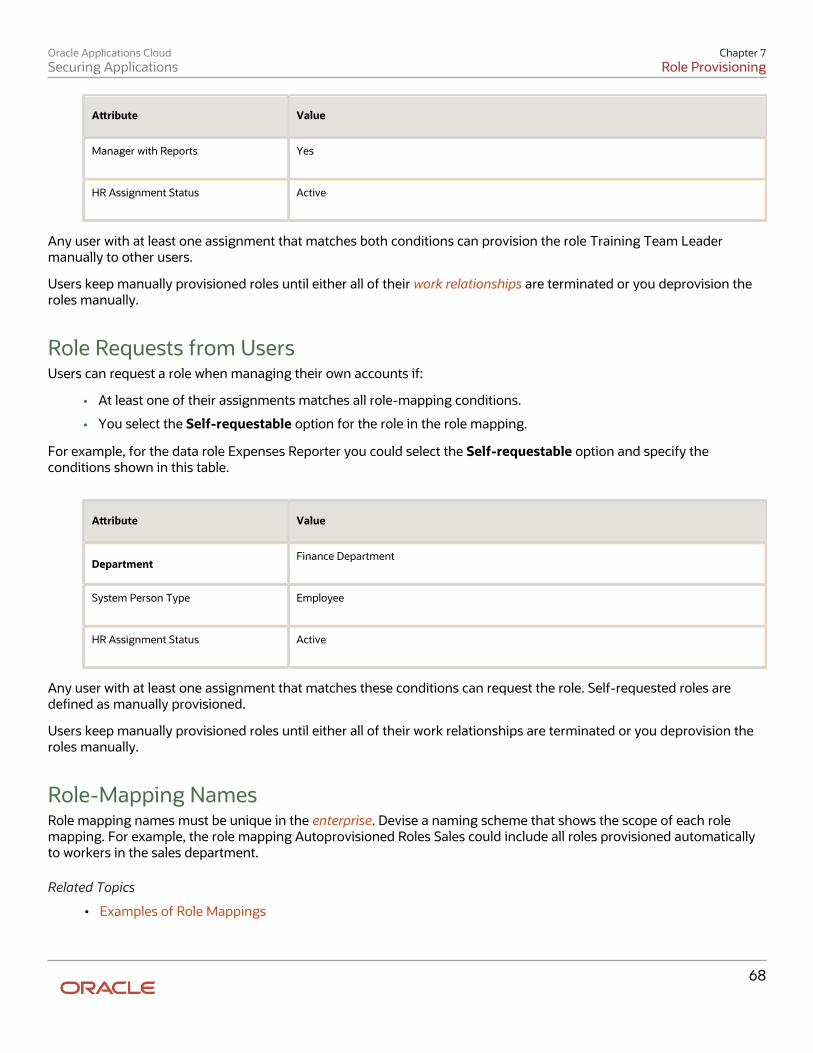
Oracle Applications CloudSecuring Applications
Chapter 7Role Provisioning
68
Aribute Value
Manager with Reports
Yes
HR Assignment Status
Active
Any user with at least one assignment that matches both conditions can provision the role Training Team Leadermanually to other users.
Users keep manually provisioned roles until either all of their work relationships are terminated or you deprovision theroles manually.
Role Requests from UsersUsers can request a role when managing their own accounts if:
• At least one of their assignments matches all role-mapping conditions.
• You select the Self-requestable option for the role in the role mapping.
For example, for the data role Expenses Reporter you could select the Self-requestable option and specify theconditions shown in this table.
Aribute Value
DepartmentFinance Department
System Person Type
Employee
HR Assignment Status
Active
Any user with at least one assignment that matches these conditions can request the role. Self-requested roles aredened as manually provisioned.
Users keep manually provisioned roles until either all of their work relationships are terminated or you deprovision theroles manually.
Role-Mapping NamesRole mapping names must be unique in the enterprise. Devise a naming scheme that shows the scope of each rolemapping. For example, the role mapping Autoprovisioned Roles Sales could include all roles provisioned automaticallyto workers in the sales department.
Related Topics
• Examples of Role Mappings

Oracle Applications CloudSecuring Applications
Chapter 7Role Provisioning
69
Create a Role MappingTo provision roles to users, you create role mappings. This topic explains how to create a role mapping.
Sign in as IT Security Manager and follow these steps:
1. In the Setup and Maintenance work area, go to the following:
◦ Functional Area: Users and Security
◦ Task: Manage Role Provisioning Rules
2. In the Search Results section of the Manage Role Mappings page, click Create.
The Create Role Mapping page opens.
Dening the Role-Mapping ConditionsSet values in the Conditions section to specify when the role mapping applies. For example, use the values given in thefollowing table to limit the role mapping to current employees of the Finance Department in Redwood Shores whose jobis Accounts Payable Supervisor.
Field Value
DepartmentFinance Department
JobAccounts Payable Supervisor
LocationRedwood Shores
System Person TypeEmployee
HR Assignment StatusActive
Users must have at least one assignment that meets all these conditions.
Identifying the Roles
1. In the Associated Roles section, click Add Row.2. In the Role Name eld, search for and select the role that you're provisioning.3. Select one or more of the role-provisioning options as listed in the following table:
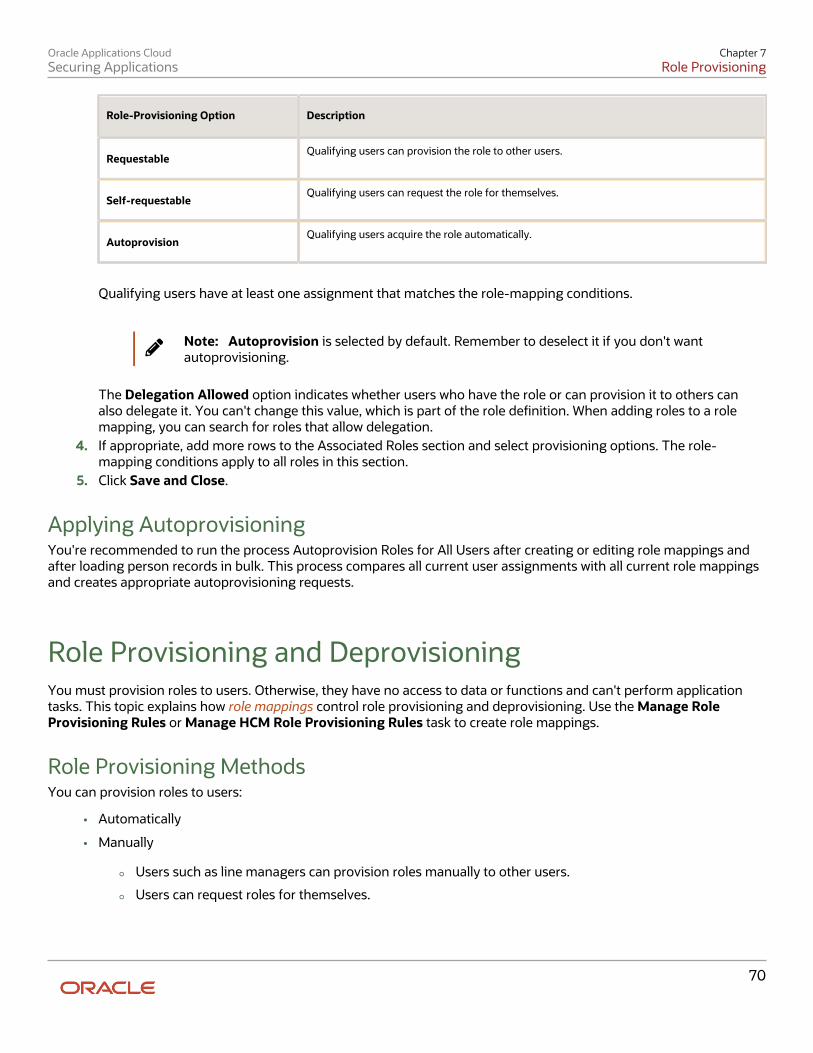
Oracle Applications CloudSecuring Applications
Chapter 7Role Provisioning
70
Role-Provisioning Option Description
RequestableQualifying users can provision the role to other users.
Self-requestableQualifying users can request the role for themselves.
AutoprovisionQualifying users acquire the role automatically.
Qualifying users have at least one assignment that matches the role-mapping conditions.
Note: Autoprovision is selected by default. Remember to deselect it if you don't wantautoprovisioning.
The Delegation Allowed option indicates whether users who have the role or can provision it to others canalso delegate it. You can't change this value, which is part of the role denition. When adding roles to a rolemapping, you can search for roles that allow delegation.
4. If appropriate, add more rows to the Associated Roles section and select provisioning options. The role-mapping conditions apply to all roles in this section.
5. Click Save and Close.
Applying AutoprovisioningYou're recommended to run the process Autoprovision Roles for All Users after creating or editing role mappings andafter loading person records in bulk. This process compares all current user assignments with all current role mappingsand creates appropriate autoprovisioning requests.
Role Provisioning and DeprovisioningYou must provision roles to users. Otherwise, they have no access to data or functions and can't perform applicationtasks. This topic explains how role mappings control role provisioning and deprovisioning. Use the Manage RoleProvisioning Rules or Manage HCM Role Provisioning Rules task to create role mappings.
Role Provisioning MethodsYou can provision roles to users:
• Automatically
• Manually
◦ Users such as line managers can provision roles manually to other users.
◦ Users can request roles for themselves.
Oracle Applications CloudSecuring Applications
Chapter 7Role Provisioning
71
For both automatic and manual role provisioning, you create a role mapping to specify when a user becomes eligible fora role.
Role TypesYou can provision data roles, abstract roles, and job roles to users. However, for Oracle HCM Cloud users, you typicallyinclude job roles in HCM data roles and provision those data roles.
Automatic Role ProvisioningUsers acquire a role automatically when at least one of their assignments satises the conditions in the relevant rolemapping. Provisioning occurs when you create or update worker assignments. For example, when you promote aworker to a management position, the worker acquires the line manager role automatically if an appropriate rolemapping exists. All changes to assignments cause review and update of a worker's automatically provisioned roles.
Role DeprovisioningUsers lose automatically provisioned roles when they no longer satisfy the role-mapping conditions. For example, a linemanager loses an automatically provisioned line manager role when he or she stops being a line manager. You can alsomanually deprovision automatically provisioned roles at any time.
Users lose manually provisioned roles automatically only when all of their work relationships are terminated. Otherwise,users keep manually provisioned roles until you deprovision them manually.
Roles at TerminationWhen you terminate a work relationship, the user automatically loses all automatically provisioned roles for which heor she no longer qualies. The user loses manually provisioned roles only if he or she has no other work relationships.Otherwise, the user keeps manually provisioned roles until you remove them manually.
The user who's terminating a work relationship species when the user loses roles. Deprovisioning can occur:
• On the termination date
• On the day after the termination date
If you enter a future termination date, then role deprovisioning doesn't occur until that date or the day after. The RoleRequests in the Last 30 Days section on the Manage User Account page is updated only when the deprovisioningrequest is created. Entries remain in that section until they're processed.
Role mappings can provision roles to users automatically at termination. For example, a terminated worker couldacquire the custom role Retiree at termination based on assignment status and person type values.
Reversal of TerminationReversing a termination removes any roles that the user acquired automatically at termination. It also provisions rolesto the user as follows:
• Any manually provisioned roles that were lost automatically at termination are reinstated.
• As the autoprovisioning process runs automatically when a termination is reversed, roles are provisionedautomatically as specied by current role-provisioning rules.

Oracle Applications CloudSecuring Applications
Chapter 7Role Provisioning
72
You must reinstate manually any roles that you removed manually, if appropriate.
Date-Eective Changes to AssignmentsAutomatic role provisioning and deprovisioning are based on current data. For a future-dated transaction, such as afuture promotion, role provisioning occurs on the day the changes take eect. The Send Pending LDAP Requestsprocess identies future-dated transactions and manages role provisioning and deprovisioning at the appropriate time.These role-provisioning changes take eect on the system date. Therefore, a delay of up to 24 hours may occur beforeusers in other time zones acquire their roles.
AutoprovisioningAutoprovisioning is the automatic allocation or removal of user roles. It occurs for individual users when you create orupdate assignments. You can also apply autoprovisioning explicitly for the enterprise using the Autoprovision Rolesfor All Users process. This topic explains the eects of applying autoprovisioning for the enterprise.
Roles That Autoprovisioning AectsAutoprovisioning applies only to roles that have the Autoprovision option enabled in a role mapping.
It doesn't apply to roles without the Autoprovision option enabled.
The Autoprovision Roles for All Users ProcessThe Autoprovision Roles for All Users process compares all current user assignments with all current role mappings.
• Users with at least one assignment that matches the conditions in a role mapping and who don't currently havethe associated roles acquire those roles.
• Users who currently have the roles but no longer satisfy the associated role-mapping conditions lose thoseroles.
When a user has no roles, his or her user account is also suspended automatically by default.
The process creates requests immediately to add or remove roles. These requests are processed by the Send PendingLDAP Requests process. When running Autoprovision Roles for All Users, you can specify when role requests are tobe processed. You can either process them immediately or defer them as a batch to the next run of the Send PendingLDAP Requests process. Deferring the processing is beer for performance, especially when thousands of role requestsmay be generated. Set the Process Generated Role Requests parameter to No to defer the processing. If you processthe requests immediately, then Autoprovision Roles for All Users produces a report identifying the LDAP requestranges that were generated. Requests are processed on their eective dates.
When to Run the ProcessYou're recommended to run Autoprovision Roles for All Users after creating or editing role mappings. You may alsohave to run it after loading person records in bulk if you request user accounts for those records. If an appropriate rolemapping exists before the load, then this process isn't necessary. Otherwise, you must run it to provision roles to newusers loaded in bulk. Avoid running the process more than once in any day. Otherwise, the number of role requests thatthe process generates may slow the provisioning process.
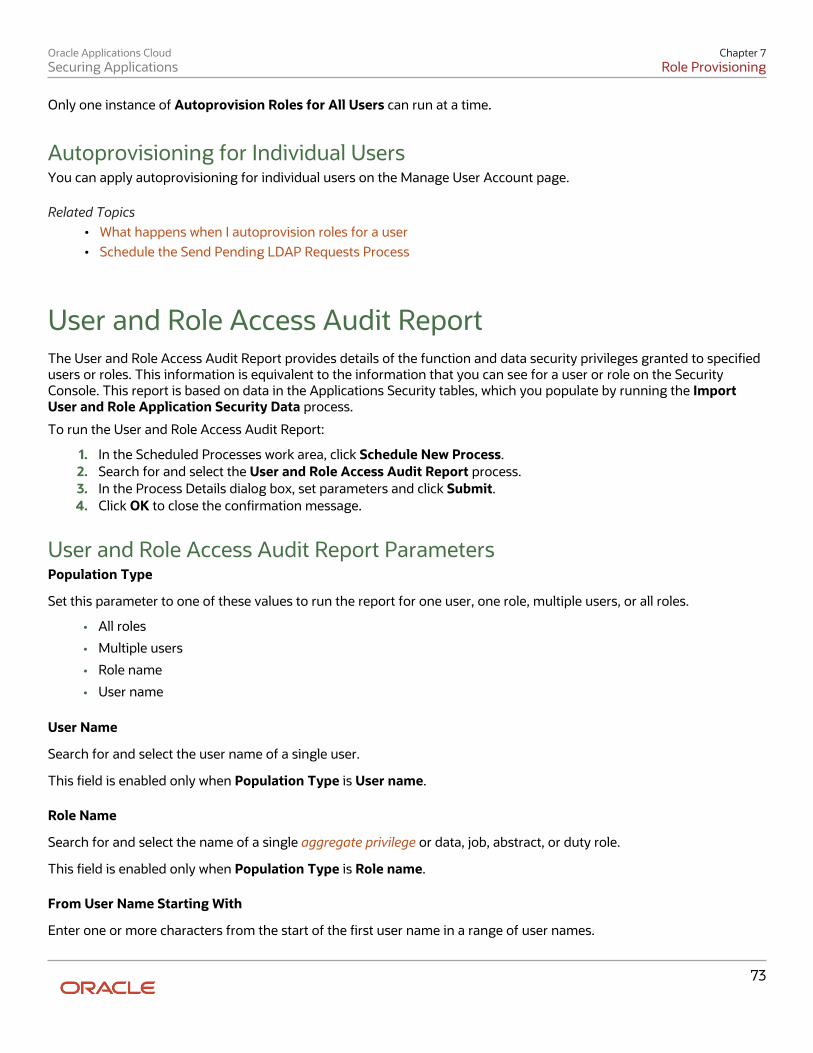
Oracle Applications CloudSecuring Applications
Chapter 7Role Provisioning
73
Only one instance of Autoprovision Roles for All Users can run at a time.
Autoprovisioning for Individual UsersYou can apply autoprovisioning for individual users on the Manage User Account page.
Related Topics• What happens when I autoprovision roles for a user• Schedule the Send Pending LDAP Requests Process
User and Role Access Audit ReportThe User and Role Access Audit Report provides details of the function and data security privileges granted to speciedusers or roles. This information is equivalent to the information that you can see for a user or role on the SecurityConsole. This report is based on data in the Applications Security tables, which you populate by running the ImportUser and Role Application Security Data process.
To run the User and Role Access Audit Report:
1. In the Scheduled Processes work area, click Schedule New Process.2. Search for and select the User and Role Access Audit Report process.3. In the Process Details dialog box, set parameters and click Submit.4. Click OK to close the conrmation message.
User and Role Access Audit Report ParametersPopulation Type
Set this parameter to one of these values to run the report for one user, one role, multiple users, or all roles.
• All roles
• Multiple users
• Role name
• User name
User Name
Search for and select the user name of a single user.
This eld is enabled only when Population Type is User name.
Role Name
Search for and select the name of a single aggregate privilege or data, job, abstract, or duty role.
This eld is enabled only when Population Type is Role name.
From User Name Starting With
Enter one or more characters from the start of the rst user name in a range of user names.
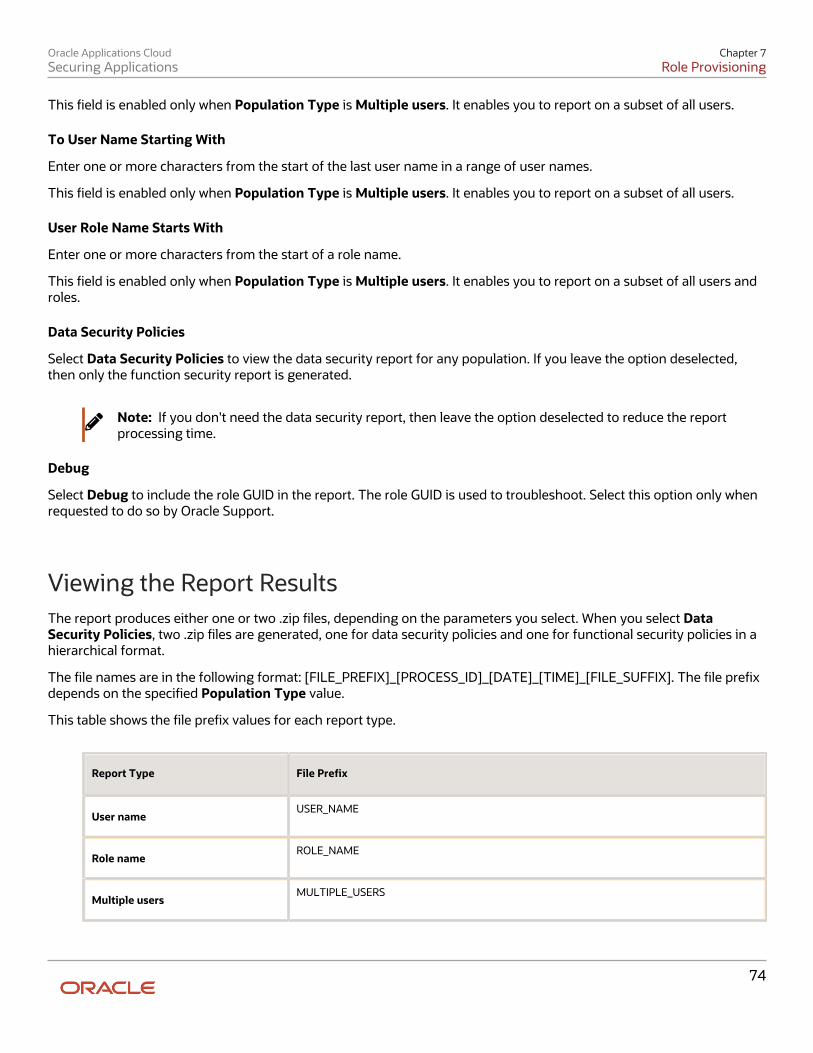
Oracle Applications CloudSecuring Applications
Chapter 7Role Provisioning
74
This eld is enabled only when Population Type is Multiple users. It enables you to report on a subset of all users.
To User Name Starting With
Enter one or more characters from the start of the last user name in a range of user names.
This eld is enabled only when Population Type is Multiple users. It enables you to report on a subset of all users.
User Role Name Starts With
Enter one or more characters from the start of a role name.
This eld is enabled only when Population Type is Multiple users. It enables you to report on a subset of all users androles.
Data Security Policies
Select Data Security Policies to view the data security report for any population. If you leave the option deselected,then only the function security report is generated.
Note: If you don't need the data security report, then leave the option deselected to reduce the reportprocessing time.
Debug
Select Debug to include the role GUID in the report. The role GUID is used to troubleshoot. Select this option only whenrequested to do so by Oracle Support.
Viewing the Report ResultsThe report produces either one or two .zip les, depending on the parameters you select. When you select DataSecurity Policies, two .zip les are generated, one for data security policies and one for functional security policies in ahierarchical format.
The le names are in the following format: [FILE_PREFIX]_[PROCESS_ID]_[DATE]_[TIME]_[FILE_SUFFIX]. The le prexdepends on the specied Population Type value.
This table shows the le prex values for each report type.
Report Type File Prex
User nameUSER_NAME
Role nameROLE_NAME
Multiple usersMULTIPLE_USERS
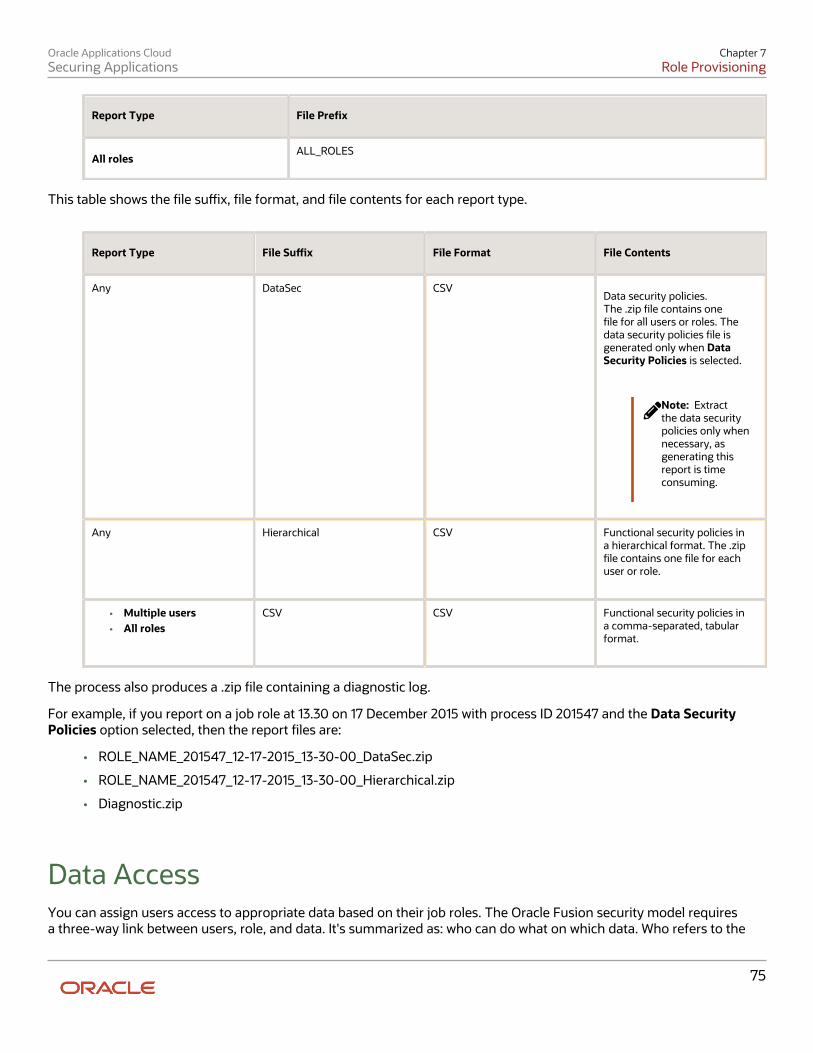
Oracle Applications CloudSecuring Applications
Chapter 7Role Provisioning
75
Report Type File Prex
All rolesALL_ROLES
This table shows the le sux, le format, and le contents for each report type.
Report Type File Sux File Format File Contents
Any
DataSec
CSV Data security policies.
The .zip le contains onele for all users or roles. Thedata security policies le isgenerated only when DataSecurity Policies is selected.
Note: Extractthe data securitypolicies only whennecessary, asgenerating thisreport is timeconsuming.
Any
Hierarchical
CSV
Functional security policies ina hierarchical format. The .ziple contains one le for eachuser or role.
• Multiple users• All roles
CSV
CSV
Functional security policies ina comma-separated, tabularformat.
The process also produces a .zip le containing a diagnostic log.
For example, if you report on a job role at 13.30 on 17 December 2015 with process ID 201547 and the Data SecurityPolicies option selected, then the report les are:
• ROLE_NAME_201547_12-17-2015_13-30-00_DataSec.zip
• ROLE_NAME_201547_12-17-2015_13-30-00_Hierarchical.zip
• Diagnostic.zip
Data AccessYou can assign users access to appropriate data based on their job roles. The Oracle Fusion security model requiresa three-way link between users, role, and data. It's summarized as: who can do what on which data. Who refers to the
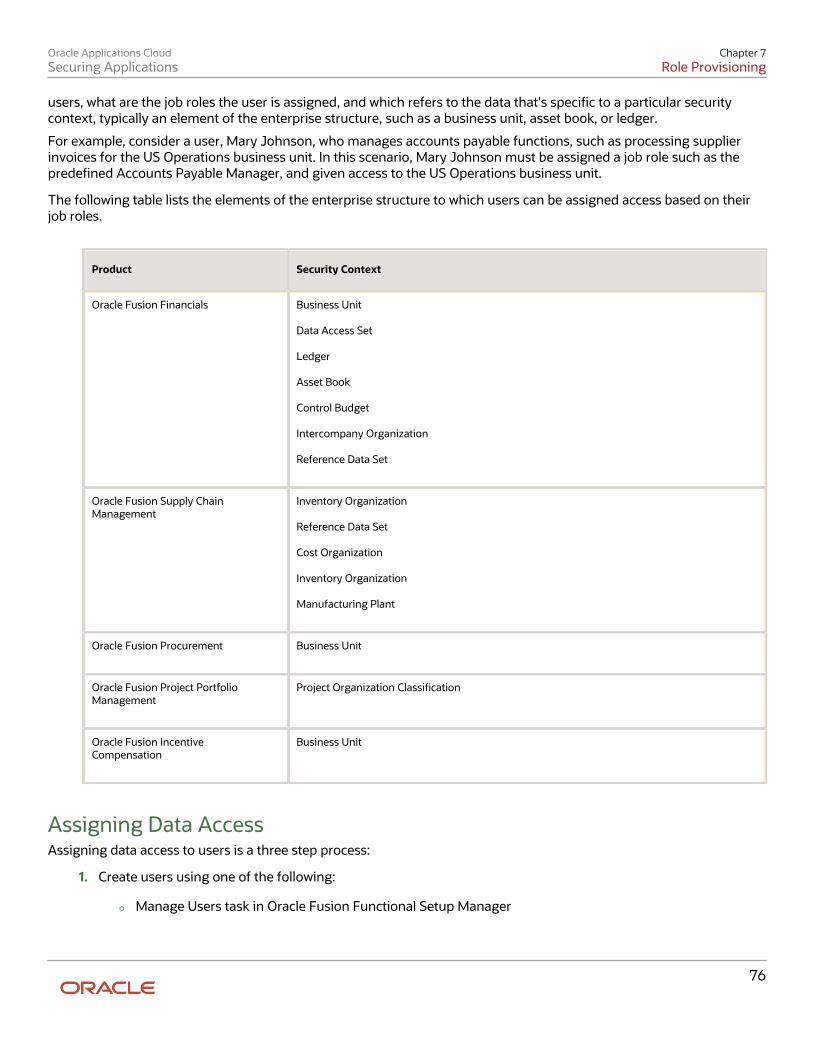
Oracle Applications CloudSecuring Applications
Chapter 7Role Provisioning
76
users, what are the job roles the user is assigned, and which refers to the data that's specic to a particular securitycontext, typically an element of the enterprise structure, such as a business unit, asset book, or ledger.
For example, consider a user, Mary Johnson, who manages accounts payable functions, such as processing supplierinvoices for the US Operations business unit. In this scenario, Mary Johnson must be assigned a job role such as thepredened Accounts Payable Manager, and given access to the US Operations business unit.
The following table lists the elements of the enterprise structure to which users can be assigned access based on theirjob roles.
Product Security Context
Oracle Fusion Financials
Business Unit Data Access Set Ledger Asset Book Control Budget Intercompany Organization Reference Data Set
Oracle Fusion Supply ChainManagement
Inventory Organization Reference Data Set Cost Organization Inventory Organization Manufacturing Plant
Oracle Fusion Procurement
Business Unit
Oracle Fusion Project PortfolioManagement
Project Organization Classication
Oracle Fusion IncentiveCompensation
Business Unit
Assigning Data AccessAssigning data access to users is a three step process:
1. Create users using one of the following:
◦ Manage Users task in Oracle Fusion Functional Setup Manager
Oracle Applications CloudSecuring Applications
Chapter 7Role Provisioning
77
Specify user aributes such as user name, assigned business unit, legal employer, department, job,position, grade, and location.
◦ Security Console
2. Assign at least one job role to users. Use Oracle Fusion Human Capital Management or the Security Consoleto assign job roles. Alternatively, dene Role Provisioning Rules to auto-provision roles to users based on theusers' work assignments.
3. Assign data access to users for each applicable job role. Use the Manage Data Access for Users task in theFunctional Setup Manager. For General Ledger users, you can also use the Manage Data Access Set DataAccess for Users task to assign data access. Alternatively, dene Data Provisioning Rules to auto-provision dataaccess to users based on the users' work assignments.
Assign Data Access to UsersUse the Manage Data Access for Users page to assign data access to users based on their job roles. You can assign dataaccess to only one user at a time:
The following table lists the questions you can consider before assigning data access to users.
Decision to Consider In This Example
Which user role is being given dataaccess?
Accounts Payable Manager
What is the security context to whichaccess is being given?
Business Unit
PrerequisitesBefore you can complete this task, you must:
1. Create users and specify the user aributes such as a user name, assigned business unit, legal employer,department, job, position, grade and location, and so on. To create users, use the Manage Users task in theFunctional Setup Manager or the Create User page. If you're implementing Oracle Fusion HCM, you can alsouse the Hire an Employee page. You can also use the Security Console to create the implementation users whocreate the setups, such as legal entities, business units, and so on, that are required to create the users in theManage Users or Hire an Employee page.
2. Assign users their job roles. You can either use Oracle Fusion Human Capital Management or the SecurityConsole to assign job roles.
3. Run the Retrieve Latest LDAP Changes process.
Oracle Applications CloudSecuring Applications
Chapter 7Role Provisioning
78
Assigning Data Access to Users Using a Spreadsheet1. Sign in to the Functional Setup Manager as an IT Security Manager or Application Implementation Consultant
and navigate to the Setup and Maintenance page.2. Search for and select the Manage Data Access for Users task. Alternatively, you can perform this task through
the product-specic task list.3. Click Users without Data Access to view users who don't have data access. Alternatively, to assign additional
data access to users, use the Users with Data Access option.4. Select the Security Context, for our example, select Business Unit.5. Search for users with no data access. For our example, enter Accounts Payable Specialist in the Role eld.
Note: The search elds are related to the user aributes.
6. Click Search. The Search Results region displays users who don't have any data access.7. Click the Authorize Data Access buon to export the search results to a Microsoft Excel spreadsheet. You can
provide data access to a group of users through the spreadsheet.8. Click OK to open the spreadsheet using Microsoft Excel.9. Select the Security Context from the list for each user.
10. Enter the Security Context Value.
◦ To provide additional data access to the user, add a new row and enter the user name, role, securitycontext, and security context value.
◦ You can click the View Data Access buon to see what other data access the user already has even ifthis is outside the parameters of the search. This may help to identify users you want to grant access tobecause of existing access.
11. Click the Upload buon on the spreadsheet when you have assigned data access.12. Select the upload options on the Upload Options window and click OK.13. Note the status of your upload in the Upload column.
◦ If the status of the upload is Successful and there are no validation errors in the log le, you can view thedata access assignment to the users using the search criteria on the Manage Data Access for Users page.
◦ If the upload status is Failed, check the details in your upload le, correct any errors, and upload the leagain.
View Role Information Using Security DashboardAs an IT Security Manager, you can use the Security Dashboard to get a snapshot of the security roles and how thoseroles are provisioned in the Oracle Cloud Applications. The information is sorted by role category and you can viewdetails such as data security policy, function security policy, and users associated with a role. You can also perform areverse search on a data security policy or a function security policy and view the associated roles.
You can search for roles using the Role Overview page. You can view the count of the roles which includes the inheritedroles, data security policies, and function security policies on this page. Clicking the number in a tile on this page takesyou to the corresponding page in the Role Dashboard. You can view role details either on the Role Overview page of theSecurity Dashboard or the Role Dashboard.
You can view role information such as the directly assigned function security policies and data security policies, rolesassigned to users, directly assigned roles, and inherited roles list using the Role Dashboard. Clicking any role-relatedlink on a page of the Security Dashboard takes you to the relevant page in the Role Dashboard. You can export the role
Oracle Applications CloudSecuring Applications
Chapter 7Role Provisioning
79
information to a spreadsheet. The information on each tab is exported to a sheet in the spreadsheet. This dashboardsupports a print-friendly view for a single role.
Here are the steps to view the Security Dashboard:
1. In the Reports and Analytics work area, click Browse Catalog.2. On the Oracle BI page, open Shared Folders > Security > Transaction Analysis Samples > Security
Dashboard.
All pages of the dashboard are listed.3. To view the Role Category Overview page, click Open.
The page displays the number of roles in each role category in both tabular and graphical formats.4. In the Number of Roles column, click the numeral value to view the role-related details.5. Click View Role to view the role-specic information in the Role Dashboard.
FAQs for Role Provisioning
What's a role-mapping condition?Most are assignment aributes, such as job or department. At least one of a user's assignments must match allassignment values in the role mapping for the user to qualify for the associated roles.
What's an associated role in a role mapping?Any role that you want to provision to users. You can provision data roles, abstract roles, and job roles to users. Theroles can be either predened or custom.
What's the provisioning method?The provisioning method identies how the user acquired the role. This table describes its values.
Provisioning Method Meaning
Automatic
The user qualies for the role automatically based on his or her assignment aribute values.
Manual
Either another user assigned the role to the user, or the user requested the role.
External
The user acquired the role outside Oracle Applications Cloud.
Oracle Applications CloudSecuring Applications
Chapter 7Role Provisioning
80
How do I provision roles to users?Use the following tasks to provision roles to users.
• Manage Users
• Provision Roles to Implementation Users
The Manage Users task is available in Oracle HCM Cloud, Oracle CX Sales, Oracle ERP Cloud, Oracle SCM Cloud, andOracle Fusion Suppliers.
Human Resources (HR) transaction ows such as Hire and Promote also provision roles.
How do I view the privileges or policies for a job role?The most ecient way is to use the Security Console to search for and select the job role. When it appears in thevisualizer, you can see all inherited roles, aggregate privileges, and privileges. If you edit the role from the visualizer, youcan see the policies on the function policies and data policies pages.
How can I tell which roles are provisioned to a user?Use the Security Console to search for the user. When you select the user, the user and any roles assigned to the userappear in the visualizer. Navigate the nodes to see the role hierarchies and privileges. You must be assigned the ITSecurity Manager role to access the Security Console.
Why can't a user access a task?If a task doesn't appear in a user's task list, you may need to provision roles to the user.
A position or job and its included duties determine the tasks that users can perform. Provisioned roles provide access totasks through the inherited duty roles.
The duty roles in a role hierarchy carry privileges to access functions and data. You don't assign duty roles directly tousers. Instead, duty roles are assigned to job or abstract roles in a role hierarchy. If the duties assigned to a predenedjob role don't match the corresponding job in your enterprise, you can create copies of job roles and add duties to orremove duties from the copy.
Note: You can't change predened roles to add or remove duties. In the Security Console, you can identifypredened roles by the ORA_ prex in the Role Code eld. Create copies and update the copies instead.
Users are generally provisioned with roles based on role provisioning rules. If a user requests a role to access a task,always review the security reference implementation to determine the most appropriate role.
Oracle Applications CloudSecuring Applications
Chapter 8Location-Based Access
81
8 Location-Based Access
OverviewYou can use location based access to control user access to tasks and data based on their roles and computer IPaddresses.
Let's take an example to understand how location based access is useful. You want your users to have complete accessto tasks or features when they're signed into the application from your oce network. But you want to restrict theaccess if the users are signing in from a home computer or an internet kiosk. To control the user access, you need toenable location based access and register the IP addresses of your oce computers on the Security Console. Users havecomplete access to the tasks or features if they sign in from oce computers. If they sign into the application from anunregistered computer, they can view and access only the generic tasks that aren't tied to any particular role. From anunregistered computer, they can't access the role-based tasks, which they could access from oce.
Who Can Enable Location-Based AccessYou must have the IT Security Manager role to enable location based access and make a role public. You can makea role public only when location based access is enabled. To enable location based access, you must register the IPaddresses of computers from which the users usually sign in to the application.
What Happens When You Enable Location-Based AccessWhen you enable location based access, users signing into the application from registered IP addresses have completeaccess to all tasks. On the other hand, users signing in from unregistered IP addresses have no access to their role-based tasks and data. However, you can grant complete access to these users too, when required. You can also grantpublic access (access from all IP addresses) to certain roles. The users associated with those roles can access all tasks,no maer which IP address they sign in from.
How Location-Based Access WorksLocation-based access combines the registered IP addresses of the computers and public roles to control access to theapplication.
ScenariosTo understand how location-based access works, consider the following scenarios and their eect on user access.
To avoid any access-related issue, carefully examine the given scenarios and plan well before you enable location-basedaccess.
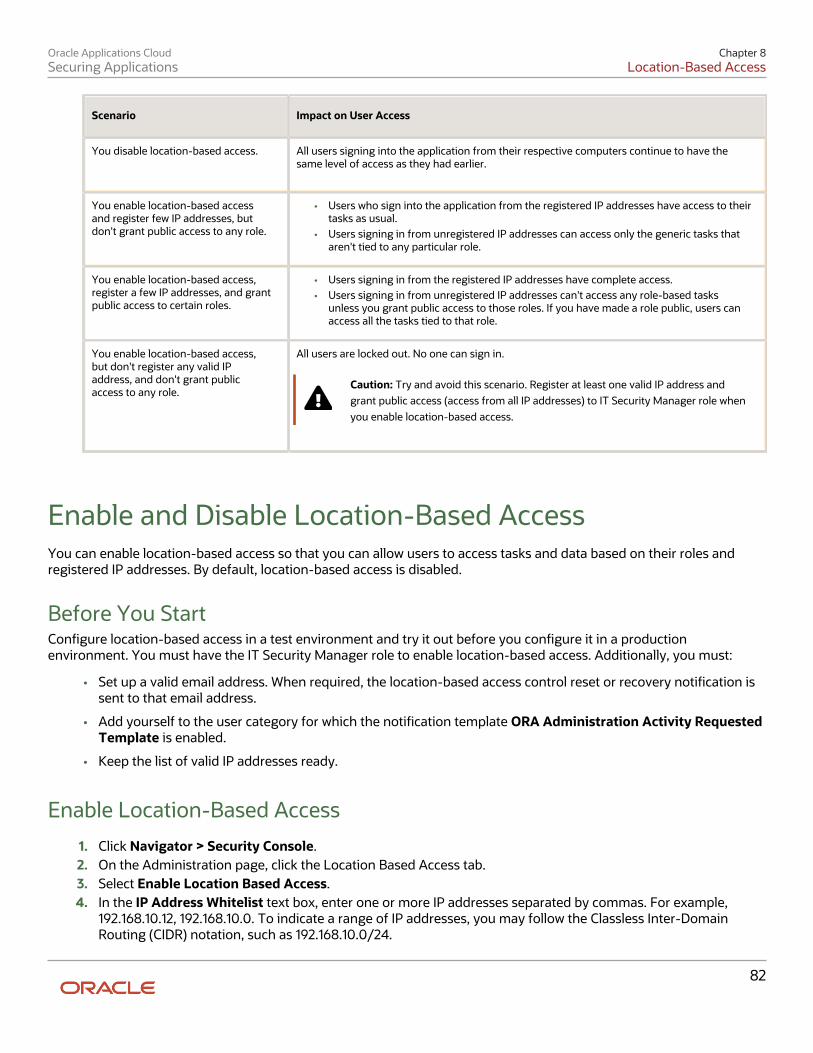
Oracle Applications CloudSecuring Applications
Chapter 8Location-Based Access
82
Scenario Impact on User Access
You disable location-based access.
All users signing into the application from their respective computers continue to have thesame level of access as they had earlier.
You enable location-based accessand register few IP addresses, butdon't grant public access to any role.
• Users who sign into the application from the registered IP addresses have access to theirtasks as usual.
• Users signing in from unregistered IP addresses can access only the generic tasks thataren't tied to any particular role.
You enable location-based access,register a few IP addresses, and grantpublic access to certain roles.
• Users signing in from the registered IP addresses have complete access.• Users signing in from unregistered IP addresses can't access any role-based tasks
unless you grant public access to those roles. If you have made a role public, users canaccess all the tasks tied to that role.
You enable location-based access,but don't register any valid IPaddress, and don't grant publicaccess to any role.
All users are locked out. No one can sign in.
Caution: Try and avoid this scenario. Register at least one valid IP address andgrant public access (access from all IP addresses) to IT Security Manager role whenyou enable location-based access.
Enable and Disable Location-Based AccessYou can enable location-based access so that you can allow users to access tasks and data based on their roles andregistered IP addresses. By default, location-based access is disabled.
Before You StartCongure location-based access in a test environment and try it out before you congure it in a productionenvironment. You must have the IT Security Manager role to enable location-based access. Additionally, you must:
• Set up a valid email address. When required, the location-based access control reset or recovery notication issent to that email address.
• Add yourself to the user category for which the notication template ORA Administration Activity RequestedTemplate is enabled.
• Keep the list of valid IP addresses ready.
Enable Location-Based Access
1. Click Navigator > Security Console.2. On the Administration page, click the Location Based Access tab.3. Select Enable Location Based Access.4. In the IP Address Whitelist text box, enter one or more IP addresses separated by commas. For example,
192.168.10.12, 192.168.10.0. To indicate a range of IP addresses, you may follow the Classless Inter-DomainRouting (CIDR) notation, such as 192.168.10.0/24.
Oracle Applications CloudSecuring Applications
Chapter 8Location-Based Access
83
Note: You can enter only up to 32 IP addresses of version IPv4 in the IP Address Whitelisttext box.
Tip: Your computer's IP address appears on the page. Add that IP address to the list so thatyour access to the application remains unaected when you sign in from that computer.
5. Click Save.6. Review the conrmation message and click OK.
After you enable location-based access, make the IT Security Manager's role public to access Security Console evenfrom an unregistered IP address.
Disable Location-Based AccessTo disable location-based access, deselect the Enable Location Based Access check box. The existing IP addressesremain in a read-only state so that you can reuse the same information when you enable the functionality again. At thatpoint, you can add or remove IP addresses based on your need.
FAQs for Location-Based Access
What is whitelisting?Whitelisting is the process of granting trusted entities access to data or applications. When you enable location basedaccess and register the IP addresses of computers, you're storing those IP addresses as trusted points of access. Inother words, you're whitelisting those IP addresses. Users signing in from those computers will be considered as trustedusers and have unrestricted access to the application.
Why can't I see the Location Based Access tab on theAdministration page?To prevent any incorrect conguration, the prole option Enable Access to Location Based Access Control associatedwith the Location Based Access tab is perhaps disabled. As a result, the tab isn't visible. Contact your ApplicationImplementation Consultant or Administrator to enable the prole option so that the Location Based Access tab appearson the Administration page.
How can I make a role public?On the Security Console, identify the role that you want to make public. Except duty roles, you can make all roles public.On the Edit Role page, select the option Enable Role for Access from All IP Addresses and save the changes. All usersassociated with that role will have access to the role-based tasks, no maer which computer they're using to sign intothe application.
Oracle Applications CloudSecuring Applications
Chapter 8Location-Based Access
84
Note: You can make a role public only if location based access is enabled.
How can I ensure that I always have access to the SecurityConsole?If location based access is enabled, you must add your computer's IP address to the whitelist. Also ensure that the ITSecurity Manager role is granted public access. Even if you have to sign in from an unregistered computer, you can stillaccess the Security Console and other tasks associated with the IT Security Manager role.
How can I disable Location-based Access when I am not signed into the application?You want to disable location-based access but you're locked out of the application and can't sign in to the SecurityConsole. You must request access to the Administration Activity page using the URL provided to the administrators.
Make sure you have the following privileges:
• ASE_ADMINISTER_SSO_PRIV
• ASE_ADMINSTER_SECURITY_PRIV
After you request access to the Administration Activity page, you get an email at your registered email ID containing aURL with the following format:
https://<FA POD>/hcmUI/faces/AdminActivity
Click the URL and you're directed to a secure Administrator Activity page. Select the Disable Location Based Accessoption and click Submit. You receive a conrmation that location-based access is disabled. Immediately, you'reredirected to the Oracle Applications Cloud login page where you can sign in using your registered user name andpassword, and gain access to tasks and data as earlier.
How can I disable Location-based Access when I am locked out ofthe application?If you're locked out of the application for some reason, use the following Administration Activity URL to disablelocation-based access:https://<FA POD>/hcmUI/faces/AdminActivity
Only an administration user with the IT Security Manager job role can perform this unlock operation.
Ensure that the following email notication templates are enabled:
• ORA Administration Activity Requested Template
• ORA Location Based Access Disabled Conrmation Template
Oracle Applications CloudSecuring Applications
Chapter 8Location-Based Access
85
How many IP Addresses can I enter in the IP Address Whitelist textbox?Ensure that the number of characters of the IP Address list that you enter in the IP Addresses Whitelist text box doesn'texceed 1000 characters.
Oracle Applications CloudSecuring Applications
Chapter 8Location-Based Access
86
Oracle Applications CloudSecuring Applications
Chapter 9Single Sign-On
87
9 Single Sign-On
Oracle Applications Cloud as the Single Sign-On ServiceProviderYour users are likely to access dierent internal and external applications to perform their tasks. They may requireaccess to dierent applications hosted by partners, vendors, and suppliers. Certainly, users won't like authenticatingthemselves each time they access a dierent application. This is where you as the IT Manager can make a dierence.You can provide your users with a seamless single sign-on experience, when you set up Oracle Applications Cloud as asingle sign-on service provider.
Your users are registered with identity providers who store and manage their identity and credentials. In SecurityConsole, you can add those identity providers so that you can verify those users without having to store thatinformation.
Initial LoginOn a typical working day, when users sign in for the rst time, they request access to an application or a web page.Oracle Applications Cloud, which is set up as a service provider, sends a verication request to the user's identityprovider who's already added to the Security Console. The identity provider veries the user credentials and sendsthe authorization and authentication response back to the service provider. After successful authentication, users aregranted access to the required application or web page. Because the authentication is valid across your enterprisenetwork, users don't have to sign in again when accessing dierent applications available on the same network. Thisentire trust chain between the service provider and the various identity providers is established using the SecurityAssertion Markup Language (SAML) 2.0 standards.
Final Sign-outSingle sign-on also applies to signing out of the enterprise network. When users sign out from one application, they'reautomatically signed out from all applications on the network. This is to prevent unauthorized access and to ensure thatdata remains secure all the time.
Congure Single Sign-OnTo congure Oracle Applications Cloud as the service provider, you must do the following:
• Add an identity provider
• Review the service provider details
• Test the identity provider
• Enable the identity provider
On the Security Console, go to the Single Sign-On tab and click Create Identity Provider.
Oracle Applications CloudSecuring Applications
Chapter 9Single Sign-On
88
Note: Oracle Cloud Applications support all SAML 2.0 compatible federation servers.
Add an Identity ProviderYou can add as many identity providers as required to facilitate single sign-on for all your users. However, one of themmust be the default identity provider.
Caution: Saving the second Identity Provider disables the Chooser Login Page option if it was enabledalready. Since the Chooser Login Page option is disabled, your company's sign-in page doesn't appear whilelogging in giving the impression that single sign-on is also disabled. So, to enable Chooser Login Page, makesure that you enable the corresponding option while creating an Identity Provider.
Before you begin:
One of the important steps in adding an identity provider is to import the metadata content of the identity provider.The metadata le contains the authentication information and also the signed and encrypted certicates of the identityprovider. Make sure you have the metadata XML le or the URL readily available. Without the le, the setup isn'tcomplete.
Note: Including encryption certicate in the metadata le is optional.
1. On the Security Console, click Single Sign-On > Create Identity Provider.2. On the Identity Provider Details page, click Edit and enter the identity provider details:
◦ Provide a Name and Description for the identity provider.
◦ Select the relevant Name ID Format. If you have an email as the name of the identity provider, selectEmail. Otherwise, leave it as Unspecied.
◦ Enter the Sign Out URL. This is the URL that the users are redirected to once they sign out from theapplication.
Note: The Sign Out URL that you specify here's the same for all the Identity Providersthat you congure.
◦ Enter the Relay State URL. This is the URL to which users are directed to sign and authenticateirrespective of which application they want to access.
◦ Select the Default Identity Provider check box to make this identity provider the default one.
◦ Select the Enable Chooser Login Page check box to display the service provider's single sign-on pagealong with your company's sign-in page.
3. Import the identity provider metadata:
◦ If it's an XML le, click Browse and select it.
◦ If it's available on a web page, select the External URL check box and enter the URL.
Note: The metadata XML le must be Base64 encoded.
4. Click Save and Close.
Oracle Applications CloudSecuring Applications
Chapter 9Single Sign-On
89
Review Service Provider DetailsThe Service Provider Details and the Diagnostics and Activation tabs are enabled only if the identity provider details areentered. Click the Service Provider Details tab and review the following information available on the page:
• ID of the service provider. In this case, it's the ID of Oracle Applications Cloud.
• Service provider metadata. The URL references to an XML le that you can download and view.
• Service provider signing certicate.
• Service provider encryption certicate.
You must share these details with the identity providers so that they can use them to congure your application as theassociated service provider.
Test the Identity ProviderClick the Diagnostics and Activation tab to verify if the identity provider that you added works as expected.
1. Click the Test buon to run the diagnostics. The Initiate Federation SSO page appears.2. Click the Start SSO buon. You're prompted to enter the user credentials of any user registered with the
identity provider. The test validates whether the federation single sign-on is successful or not. The resultsummary includes the following details:
◦ Status of authentication: success or failure
◦ The aributes passed in the assertion
◦ The assertion message in XML
You can review the log messages that appear in the Federation Logs section to identify if there are any congurationissues with the identity provider.
Note: You must run the test whenever there's a change in the identity provider conguration.
Enable the Identity ProviderIf everything looks ne, you can go ahead and enable the identity provider. While you're on the Diagnostics andActivation page, click Edit and select the Enable Identity Provider check box. The identity provider is now active.
FAQs for Single Sign-On
Does the service provider store user passwords?No. Passwords are stored with the identity providers. When a user signs in, the identity provider authenticates thepassword, authorizes the request to access an application, and sends that conrmation back to the service provider. Theservice provider then allows users to access the application or web page.
Oracle Applications CloudSecuring Applications
Chapter 9Single Sign-On
90
Can I set up an identity provider without enabling it?Yes, you can set up an identity provider and test it thoroughly before enabling it. By default, an identity providerremains disabled. You can disable an identity provider at any time.
How can I allow my users to sign in using their company'scredentials?On the Security Console, go to Single Sign-On > Identity Provider Details page and make sure that the EnableChooser Login Page check box is selected.
When your users access the main portal page, they can sign in using one of the following options:
• The single sign-on credentials registered with the identity provider
• The single sign-on credentials registered with their company
What should I do to extend the validity of certicates provided bythe identity provider?Pay aention to the notications you receive about certicate expiry. Request your identity provider to share with youthe updated metadata le containing renewed certicate validity details. Once you upload the metadata le, the validityof the certicate is automatically renewed. You will have to monitor this information at intervals to ensure that thecerticates remain valid at all times.
How can the identity provider obtain renewed certicates from theservice provider?The identity provider can submit a service request to the service provider asking for the renewed signing andencryption certicates.
How can I disable Single Sign-On when I am not signed in to theapplication?You must request access to the Administration Activity page using the URL provided to the administrators. Make sureyou have the following privileges:
• ASE_ADMINISTER_SSO_PRIV
• ASE_ADMINSTER_SECURITY_PRIV
After you request access to the Administration Activity page, you get an email at your registered email ID containing aURL with the following format:
Oracle Applications CloudSecuring Applications
Chapter 9Single Sign-On
91
https://<FA POD>/hcmUI/faces/AdminActivity
Click the URL and you're directed to a secure Administrator Activity page. Select the Disable Single Sign On option andclick Submit. You receive a conrmation that single sign-on is disabled. Immediately, you're redirected to the OracleApplications Cloud login page where you can sign in using your registered user name and password.
How can I disable Single Sign-On when I am locked out of theapplication?If you're locked out of the application for some reason, use the following Administration Activity URL to disable singlesign-on:https://<FA POD>/hcmUI/faces/AdminActivity
Only an administrator user with the IT Security Manager job role can perform this unlock operation.
Ensure that the following email notication templates are enabled:
• ORA Administration Activity Requested Template
• ORA Single Sign-On Disabled Conrmation Template
What are the dierent events and notications associated with theSingle Sign-On functionality?Automatic notications are sent for the following events associated with single sign-on:
• When an administrator requests access to the Administration Activity page to disable single sign-on
• When the single sign-on functionality is disabled
• When the external identity provider's signing certicate is about to expire
• When the service provider's signing certicate is about to expire
• When the service provider's encryption certicate is about to expire
Note: Notications are sent to users who are assigned the Manage SSO privilege, as per the followingschedule:
• First notication - 60 days before the expiry date• Second notication - 30 days before the expiry date• Last notication - 10 days before the expiry date.
How do I reimport Identity Provider metadata?Whenever you get an updated metadata le from the Identity Provider you must reimport the le into the application tocontinue using SSO conguration
1. On the Identity Provider Details page, click Edit.2. Import the identity provider metadata:
◦ If it's an XML le, click Browse and select it.
Oracle Applications CloudSecuring Applications
Chapter 9Single Sign-On
92
◦ If it's available on a web page, select the External URL check box and enter the URL.
Note: The metadata XML le must be Base64 encoded.
3. Click Save and Close.
Note: Remember to test the Identity Provider after reimport.
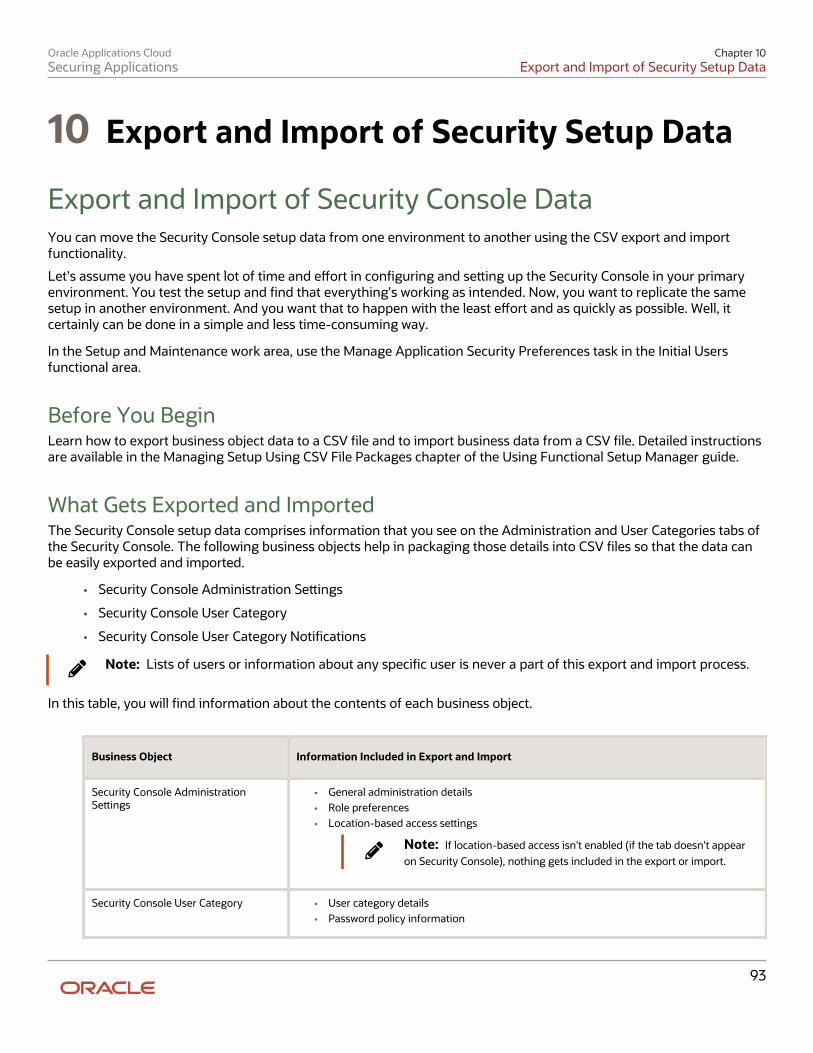
Oracle Applications CloudSecuring Applications
Chapter 10Export and Import of Security Setup Data
93
10 Export and Import of Security Setup Data
Export and Import of Security Console DataYou can move the Security Console setup data from one environment to another using the CSV export and importfunctionality.
Let's assume you have spent lot of time and eort in conguring and seing up the Security Console in your primaryenvironment. You test the setup and nd that everything's working as intended. Now, you want to replicate the samesetup in another environment. And you want that to happen with the least eort and as quickly as possible. Well, itcertainly can be done in a simple and less time-consuming way.
In the Setup and Maintenance work area, use the Manage Application Security Preferences task in the Initial Usersfunctional area.
Before You BeginLearn how to export business object data to a CSV le and to import business data from a CSV le. Detailed instructionsare available in the Managing Setup Using CSV File Packages chapter of the Using Functional Setup Manager guide.
What Gets Exported and ImportedThe Security Console setup data comprises information that you see on the Administration and User Categories tabs ofthe Security Console. The following business objects help in packaging those details into CSV les so that the data canbe easily exported and imported.
• Security Console Administration Seings
• Security Console User Category
• Security Console User Category Notications
Note: Lists of users or information about any specic user is never a part of this export and import process.
In this table, you will nd information about the contents of each business object.
Business Object Information Included in Export and Import
Security Console AdministrationSeings
• General administration details• Role preferences• Location-based access seings
Note: If location-based access isn't enabled (if the tab doesn't appearon Security Console), nothing gets included in the export or import.
Security Console User Category
• User category details• Password policy information
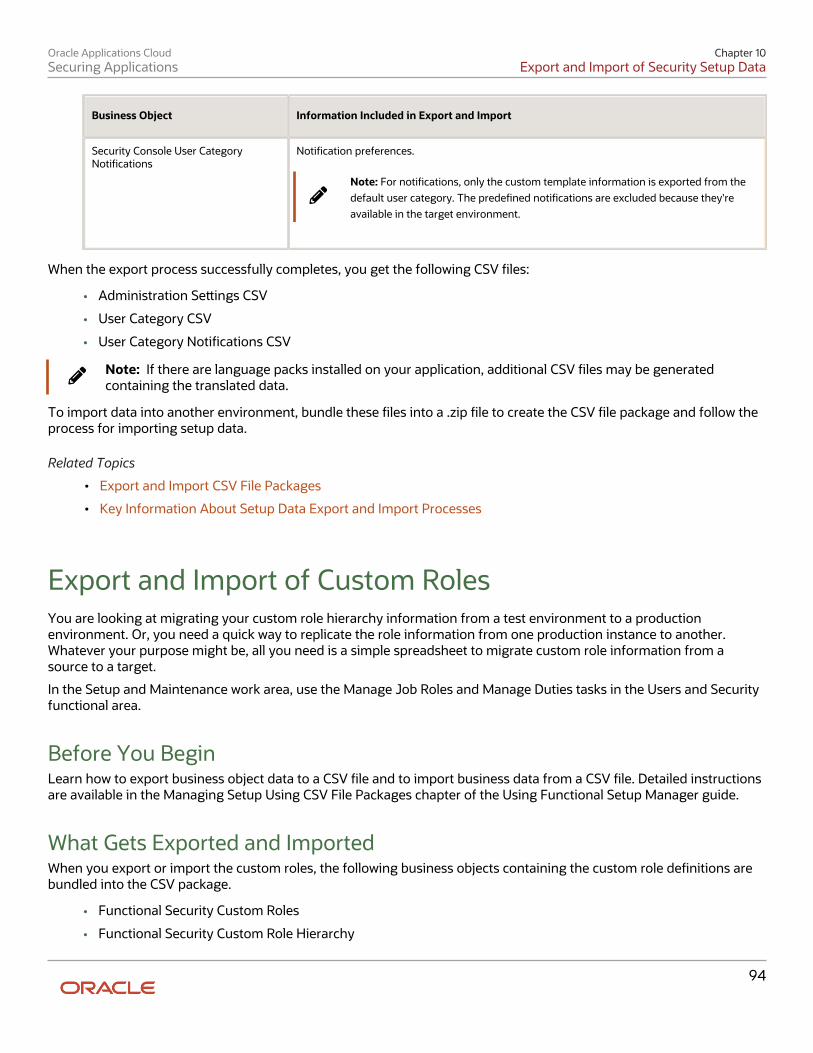
Oracle Applications CloudSecuring Applications
Chapter 10Export and Import of Security Setup Data
94
Business Object Information Included in Export and Import
Security Console User CategoryNotications
Notication preferences.
Note: For notications, only the custom template information is exported from thedefault user category. The predened notications are excluded because they'reavailable in the target environment.
When the export process successfully completes, you get the following CSV les:
• Administration Seings CSV
• User Category CSV
• User Category Notications CSV
Note: If there are language packs installed on your application, additional CSV les may be generatedcontaining the translated data.
To import data into another environment, bundle these les into a .zip le to create the CSV le package and follow theprocess for importing setup data.
Related Topics
• Export and Import CSV File Packages
• Key Information About Setup Data Export and Import Processes
Export and Import of Custom RolesYou are looking at migrating your custom role hierarchy information from a test environment to a productionenvironment. Or, you need a quick way to replicate the role information from one production instance to another.Whatever your purpose might be, all you need is a simple spreadsheet to migrate custom role information from asource to a target.
In the Setup and Maintenance work area, use the Manage Job Roles and Manage Duties tasks in the Users and Securityfunctional area.
Before You BeginLearn how to export business object data to a CSV le and to import business data from a CSV le. Detailed instructionsare available in the Managing Setup Using CSV File Packages chapter of the Using Functional Setup Manager guide.
What Gets Exported and ImportedWhen you export or import the custom roles, the following business objects containing the custom role denitions arebundled into the CSV package.
• Functional Security Custom Roles
• Functional Security Custom Role Hierarchy
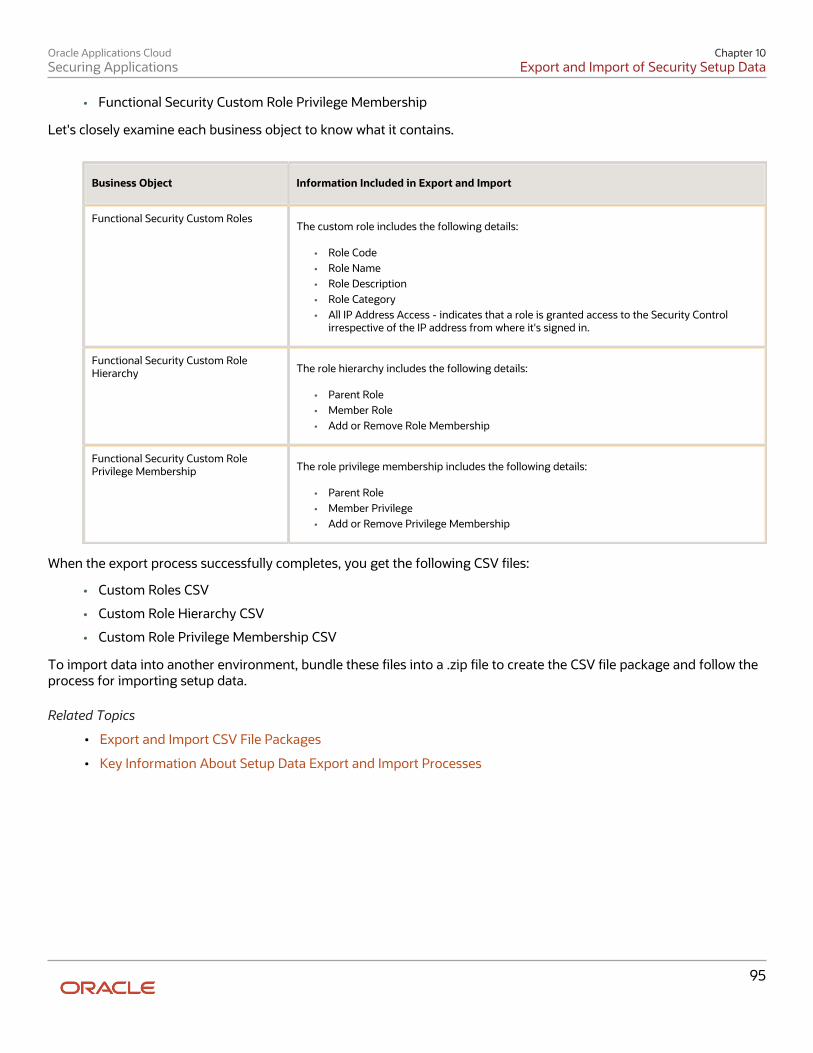
Oracle Applications CloudSecuring Applications
Chapter 10Export and Import of Security Setup Data
95
• Functional Security Custom Role Privilege Membership
Let's closely examine each business object to know what it contains.
Business Object Information Included in Export and Import
Functional Security Custom Roles The custom role includes the following details:
• Role Code• Role Name• Role Description• Role Category• All IP Address Access - indicates that a role is granted access to the Security Control
irrespective of the IP address from where it's signed in.
Functional Security Custom RoleHierarchy
The role hierarchy includes the following details:
• Parent Role• Member Role• Add or Remove Role Membership
Functional Security Custom RolePrivilege Membership
The role privilege membership includes the following details:
• Parent Role• Member Privilege• Add or Remove Privilege Membership
When the export process successfully completes, you get the following CSV les:
• Custom Roles CSV
• Custom Role Hierarchy CSV
• Custom Role Privilege Membership CSV
To import data into another environment, bundle these les into a .zip le to create the CSV le package and follow theprocess for importing setup data.
Related Topics
• Export and Import CSV File Packages
• Key Information About Setup Data Export and Import Processes
Oracle Applications CloudSecuring Applications
Chapter 10Export and Import of Security Setup Data
96
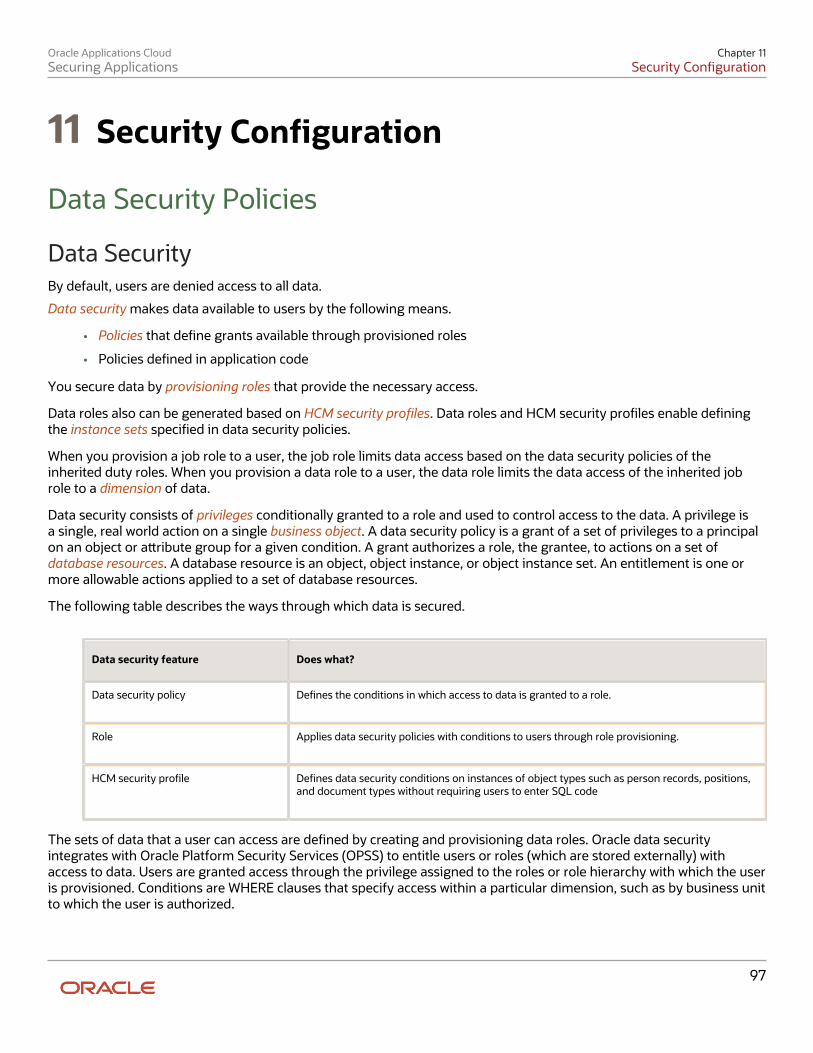
Oracle Applications CloudSecuring Applications
Chapter 11Security Conguration
97
11 Security Conguration
Data Security Policies
Data SecurityBy default, users are denied access to all data.
Data security makes data available to users by the following means.
• Policies that dene grants available through provisioned roles
• Policies dened in application code
You secure data by provisioning roles that provide the necessary access.
Data roles also can be generated based on HCM security proles. Data roles and HCM security proles enable deningthe instance sets specied in data security policies.
When you provision a job role to a user, the job role limits data access based on the data security policies of theinherited duty roles. When you provision a data role to a user, the data role limits the data access of the inherited jobrole to a dimension of data.
Data security consists of privileges conditionally granted to a role and used to control access to the data. A privilege isa single, real world action on a single business object. A data security policy is a grant of a set of privileges to a principalon an object or aribute group for a given condition. A grant authorizes a role, the grantee, to actions on a set ofdatabase resources. A database resource is an object, object instance, or object instance set. An entitlement is one ormore allowable actions applied to a set of database resources.
The following table describes the ways through which data is secured.
Data security feature Does what?
Data security policy
Denes the conditions in which access to data is granted to a role.
Role
Applies data security policies with conditions to users through role provisioning.
HCM security prole
Denes data security conditions on instances of object types such as person records, positions,and document types without requiring users to enter SQL code
The sets of data that a user can access are dened by creating and provisioning data roles. Oracle data securityintegrates with Oracle Platform Security Services (OPSS) to entitle users or roles (which are stored externally) withaccess to data. Users are granted access through the privilege assigned to the roles or role hierarchy with which the useris provisioned. Conditions are WHERE clauses that specify access within a particular dimension, such as by business unitto which the user is authorized.
Oracle Applications CloudSecuring Applications
Chapter 11Security Conguration
98
Data Security PoliciesData security policies articulate the security requirement "Who can do what on which set of data."
The following table provides an example, accounts payable managers can view AP disbursements for their businessunit.
Who can do what on which set of data
Accounts payable managers
view
AP disbursements
for their business unit
A data security policy is a statement in a natural language, such as English, that typically denes the grant by which arole secures business objects. The grant records the following.
• Table or view
• Entitlement (actions expressed by privileges)
• Instance set (data identied by the condition)
For example, disbursement is a business object that an accounts payable manager can manage by payment function forany employee expenses in the payment process.
Note: Some data security policies aren't dened as grants but directly in applications code. The securityreference manuals for Oracle Fusion Applications oerings dierentiate between data security policies thatdene a grant and data security policies dened in Oracle Fusion applications code.
A data security policy identies the entitlement (the actions that can be made on logical business objects ordashboards), the roles that can perform those actions, and the conditions that limit access. Conditions are readableWHERE clauses. The WHERE clause is dened in the data as an instance set and this is then referenced on a grant thatalso records the table name and required entitlement.
HCM Security ProlesHCM security proles are used to secure HCM data, such as people and departments. Data authorization for some roles,such as the Manager role, is managed in HCM, even in ERP and SCM applications. You can use HCM security proles togenerate grants for a job role such as Manager. The resulting data role with its role hierarchy and grants operates in thesame way as any other data role.
For example, an HCM security prole identies all employees in the Finance division.
Applications outside of HCM can use the HCM Data Roles UI pages to give roles access to HR people.
Advanced Data SecurityAdvanced Data Security oers two types of added data protection. Database Vault protects data from access by highlyprivileged users and Transparent Data Encryption encrypts data at rest. Advanced Data Security is available for OracleApplications Cloud by subscription to Break-Glass service.
Oracle Applications CloudSecuring Applications
Chapter 11Security Conguration
99
Oracle Database VaultDatabase Vault reduces the risk of highly privileged users such as database and system administrators accessing andviewing your application data. This feature restricts access to specic database objects, such as the application tablesand SOA objects.
Administrators can perform regular database maintenance activities, but can't select from the application tables. If aDBA requires access to the application tables, request temporary access to the Oracle Fusion schema at which pointkeystroke auditing is enabled.
Transparent Data EncryptionTransparent Data Encryption (TDE) protects Oracle Fusion Applications data which is at rest on the le system frombeing read or used. Data in the database les (DBF) is protected because DBF les are encrypted. Data in backups and intemporary les is protected. All data from an encrypted tablespace is automatically encrypted when wrien to the undotablespace, to the redo logs, and to any temporary tablespace.
Advanced security enables encryption at the tablespace level on all tablespaces which contain applications data. Thisincludes SOA tablespaces which might contain dehydrated payloads with applications data.
Encryption keys are stored in the Oracle Wallet. The Oracle Wallet is an encrypted container outside the database thatstores authentication and signing credentials, including passwords, the TDE master key, PKI private keys, certicates,and trusted certicates needed by secure sockets layer (SSL). Tablespace keys are stored in the header of the tablespaceand in the header of each operating system (OS) le that makes up the tablespace. These keys are encrypted with themaster key which is stored in the Oracle Wallet. Tablespace keys are AES128-bit encryption while the TDE master key isalways an AES256-bit encryption.
How Database Resources and Data Security Policies WorkTogetherA data security policy applies a condition and allowable actions to a database resource for a role. When that role isprovisioned to a user, the user has access to data dened by the policy. In the case of the predened security referenceimplementation, this role is always a duty role.
The database resource denes an instance of a data object. The data object is a table, view, or exeld.
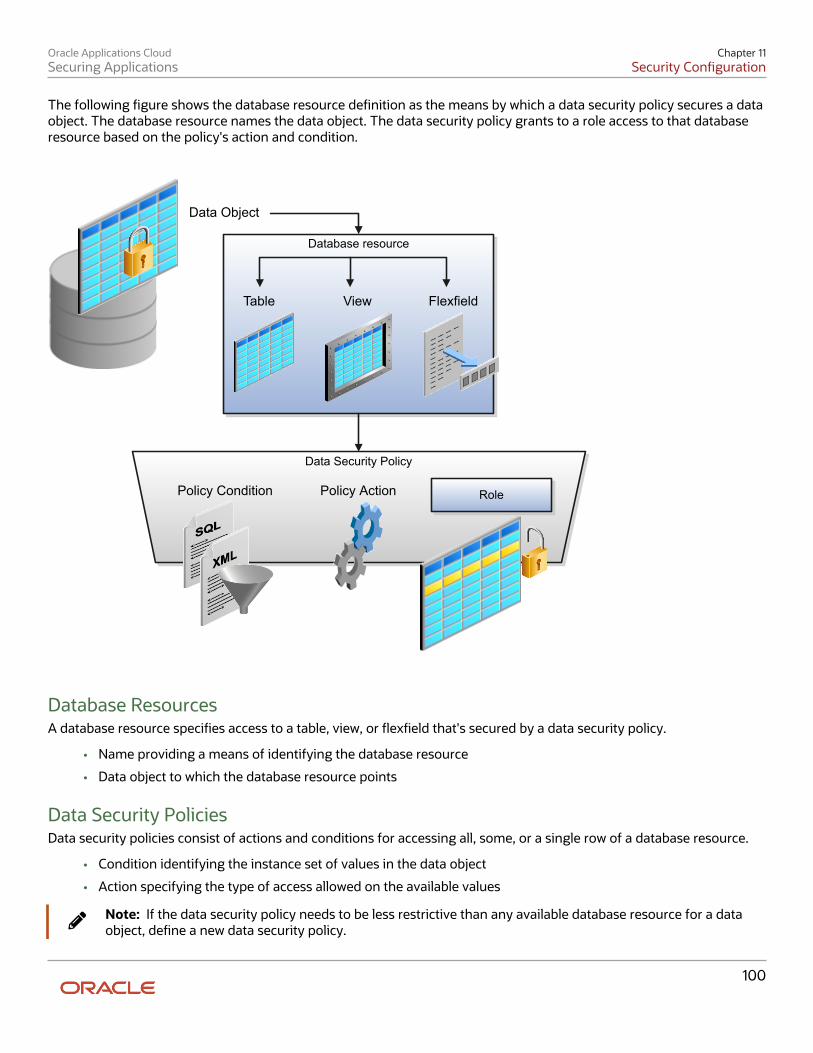
Oracle Applications CloudSecuring Applications
Chapter 11Security Conguration
100
The following gure shows the database resource denition as the means by which a data security policy secures a dataobject. The database resource names the data object. The data security policy grants to a role access to that databaseresource based on the policy's action and condition.
Database resource
Data Security Policy
Data Object
RolePolicy Condition Policy Action
Table FlexfieldView
Database ResourcesA database resource species access to a table, view, or exeld that's secured by a data security policy.
• Name providing a means of identifying the database resource
• Data object to which the database resource points
Data Security PoliciesData security policies consist of actions and conditions for accessing all, some, or a single row of a database resource.
• Condition identifying the instance set of values in the data object
• Action specifying the type of access allowed on the available values
Note: If the data security policy needs to be less restrictive than any available database resource for a dataobject, dene a new data security policy.
Oracle Applications CloudSecuring Applications
Chapter 11Security Conguration
101
ActionsActions correspond to privileges that entitle kinds of access to objects, such as view, edit, or delete. The actions allowedby a data security policy include all or a subset of the actions that exist for the database resource.
ConditionsA condition is either a SQL predicate or an XML lter. A condition expresses the values in the data object by a searchoperator or a relationship in a tree hierarchy. A SQL predicate, unlike an XML lter, is entered in a text eld in the datasecurity user interface pages and supports more complex ltering than an XML lter, such as nesting of conditions orsub queries. An XML lter, unlike a SQL predicate, is assembled from choices in the UI pages as an AND statement.
Note: An XML lter can be eective in downstream processes such as business intelligence metrics. A SQLpredicate can't be used in downstream metrics.
FAQs for Security Conguration
What's the dierence between function security and data security?Function security is a statement of what actions you can perform in which user interface pages.Data security is a statement of what action can be taken against which data.
Function security controls access to user interfaces and actions needed to perform the tasks of a job. For example, anaccounts payable manager can view invoices. The Accounts Payable Manager role provisioned to the accounts payablemanager authorizes access the functions required to view invoices.
Data security controls access to data. In this example, the accounts payable manager for the North AmericanCommercial Operation can view invoices in the North American Business Unit. Since invoices are secured objects, and adata role template exists for limiting the Accounts Payable Manager role to the business unit for which the provisioneduser is authorized, a data role inherits the job role to limit access to those invoices that are in the North AmericanBusiness Unit. Objects not secured explicitly with a data role are secured implicitly by the data security policies of the jobrole.
Both function and data are secured through role-based access control.
How can I design roles?You can simulate menus that existing roles present to users to determine how the access they provide may beexpanded. Create a visualization, or populate the Search Results column with a selection of roles or users. Select theuser or role and click the Actions menu. A menu appears, click Simulate Navigator.
A simulated Navigator menu appears, listing menu and task entries. If the menu item appears without a lock, the menuisn't authorized for the role or user. If the menu item appears with a lock, the menu is authorized for the role or user.Click any menu item and select either of two options. One lists roles that grant access to the menu item. The other listsprivileges required for access to the menu item.
Oracle Applications CloudSecuring Applications
Chapter 11Security Conguration
102
How can I mask data in an environment?To have an environment created with the data masked, create a service request using the Production to Test (P2T)template. Before you submit the request, be sure you select the Data Mask check box.
To have the data in an existing nonproduction environment masked, create a standard service request. Enter thefollowing as the service request title: Data Mask for Environment: Name_of_The_Environment_To_Mask
How do I create a role hierarchy?The most ecient way to create role hierarchies is to use the Security Console. You use the Edit Role action to navigatethrough the steps and add roles and privileges in the visualizer or table view.
Why would I need to remove duty roles from a role hierarchy?If your custom duty roles enable actions and user interface features that your enterprise doesn't want users to performin your application.
Note: Don't remove duty roles from predened job or abstract roles in the reference implementation. In theSecurity Console, you can identify predened application roles by the ORA_ prex in the Role Code eld. Youmust copy any role that doesn't match your needs, and then edit the copy.
How do I create a new job role?Click the Create Role buon in the Security Console to create job roles. Enter a job role category in the Create Rolespage and then navigate to each subsequent page that you see in the page header. You can add functional and datasecurity policies, roles, and privileges to create the job role.
Oracle Applications CloudSecuring Applications
Chapter 12Roles and Role Assignments
103
12 Roles and Role Assignments
Review Role AssignmentsYou can use the Security Console to:
• View the roles assigned to a user.
• Identify users who have a specic role.
You must have the IT Security Manager job role to perform these tasks.
View the Roles Assigned to a UserFollow these steps:
1. Open the Security Console.2. On the Roles tab, search for and select the user.
Depending on the enterprise seing, either a table or a graphical representation of the user's role hierarchyappears. Switch to the graphical representation if necessary to see the user and any roles that the user inheritsdirectly. User and role names appear on hover. To expand an inherited role:
a. Select the role and right-click.b. Select Expand. Repeat these steps as required to move down the hierarchy.
Tip: Switch to the table to see the complete role hierarchy at once. You can export the details to MicrosoftExcel from this view.
Identify Users Who Have a Specic RoleFollow these steps:
1. On the Roles tab of the Security Console, search for and select the role.2. Depending on the enterprise seing, either a table or a graphical representation of the role hierarchy appears.
Switch to the graphical representation if it doesn't appear by default.3. Set Expand Toward to Users.
Tip: Set the Expand Toward option to control the direction of the graph. You can moveeither up the hierarchy from the selected role (toward users) or down the hierarchy from theselected role (toward privileges).
In the refreshed graph, user names appear on hover. Users may inherit roles either directly or indirectly fromother roles. Expand a role to view its hierarchy.
4. In the Legend, click the Tabular View icon for the User icon. The table lists all users who have the role. You canexport this information to Microsoft Excel.
Oracle Applications CloudSecuring Applications
Chapter 12Roles and Role Assignments
104
Review Role HierarchiesOn the Security Console you can review the role hierarchy of a job role, an abstract role, a duty role, or an HCM data role.You must have the IT Security Manager job role to perform this task.
Note: Although you can review HCM data roles on the Security Console, you must manage them on theManage HCM Data Role and Security Proles page. Don't aempt to edit them on the Security Console.
Follow these steps:
1. On the Roles tab of the Security Console, ensure that Expand Toward is set to Privileges.2. Search for and select the role. Depending on the enterprise seing, either a table or a graphical representation
of the role appears.3. If the table doesn't appear by default, click the View as Table icon. The table lists every role inherited either
directly or indirectly by the selected role. Set Show to Privileges to switch from roles to privileges.
Tip: Enter text in a column search eld and press Enter to show only those roles or privilegesthat contain the specied text.
Click Export to Excel to export the current table data to Microsoft Excel.
Compare RolesYou can compare any two roles to see the structural dierences between them. As you compare roles, you can alsoadd function and data security policies existing in the rst role to the second role, providing that the second role isn't apredened role.
For example, assume you have copied a role and edited the copy. You then upgrade to a new release. You can compareyour edited role from the earlier release with the role as shipped in the later release. You may then decide whether toincorporate upgrade changes into your edited role. If the changes consist of new function or data security policies, youcan upgrade your edited role by adding the new policies to it.
Selecting Roles for Comparison
1. Select the Roles tab in the Security Console.2. Do any of the following:
◦ Click the Compare Roles buon.
◦ Create a visualization graph, right-click one of its roles, and select the Compare Roles option.
◦ Generate a list of roles in the Search Results column of the Roles page. Select one of them, and click itsmenu icon. In the menu, select Compare Roles.
3. Select roles for comparison:
◦ If you began by clicking the Compare Roles buon, select roles in both First Role and Second Roleelds.
Oracle Applications CloudSecuring Applications
Chapter 12Roles and Role Assignments
105
◦ If you began by selecting a role in a visualization graph or the Search Results column, the First Role elddisplays the name of the role you selected. Select another role in the Second Role eld.
For either eld, click the search icon, enter text, and select from a list of roles whose names contain that text.
Comparing Roles
1. Select two roles for comparison.2. Use the Filter Criteria eld to lter for any combination of these artifacts in the two roles:
◦ Function security policies
◦ Data security policies
◦ Inherited roles
3. Use the Show eld to determine whether the comparison returns:
◦ All artifacts existing in each role
◦ Those that exist only in one role, or only in the other role
◦ Those that exist only in both roles
4. Click the Compare buon.
You can export the results of a comparison to a spreadsheet. Select the Export to Excel option.
After you create the initial comparison, you can change the lter and show options. When you do, a new comparison isgenerated automatically.
Adding Policies to a Role
1. Select two roles for comparison.
◦ As the First Role, select a role in which policies already exist.
◦ As the Second Role, select the role to which you're adding the policies. This must be a custom role. Youcan't modify a predened role.
2. Ensure that your selection in the Filter Criteria eld excludes the Inherited roles option. You may select Datasecurity policies, Function security policies, or both.
3. As a Show value, select Only in rst role.4. Click the Compare buon.5. Among the artifacts returned by the comparison, select those you want to copy.6. An Add to Second Role option becomes active. Select it.

Oracle Applications CloudSecuring Applications
Chapter 12Roles and Role Assignments
106
Oracle Applications CloudSecuring Applications
Chapter 13Role Conguration Using the Security Console
107
13 Role Conguration Using the SecurityConsole
Custom Roles
Create Roles in the Security ConsoleYou can use the Security Console to create duty, job, or abstract roles.
In many cases, an ecient method of creating a role is to copy an existing role, then edit the copy to meet yourrequirements. Typically, you would create a role from scratch if no existing role is similar to the role you want to create.
To create a role from scratch, select the Roles tab in the Security Console, then click the Create Role buon. Enter valuesin a series of role-creation pages, selecting Next or Back to navigate among them.
Providing Basic InformationOn a Basic Information page:
1. In the Role Name eld, create a display name, for example North America Accounts Receivable Specialist.2. In the Role Code eld, create an internal name for the role, such as
AR_NA_ACCOUNTS_RECEIVABLE_SPECIALIST_JOB.
Note: Do not use "ORA_" as the beginning of a role code. This prex is reserved for roles predenedby Oracle. You can't edit a role with the ORA_ prex.
3. In the Role Category eld, select a tag that identies a purpose the role serves in common with other roles.Typically, a tag species a role type and an application to which the role applies, such as Financials - Job Roles.If you select a duty-role category, you can't assign the role you're creating directly to users. To assign it, youwould include it in the hierarchy of a job or abstract role, then assign that role to users.
4. Optionally, describe the role in the Description eld.
Adding Function Security PoliciesA function security policy selects a set of functional privileges, each of which permits use of a eld or other user-interface feature. On a Function Security Policies page, you may dene a policy for:
• A duty role. In this case, the policy selects functional privileges that may be inherited by duty, job, or abstractroles to which the duty is to belong.
• A job or abstract role. In this case, the policy selects functional privileges specic to that role.
As you dene a policy, you can either add an individual privilege or copy all the privileges that belong to an existing role:
1. Select Add Function Security Policy.2. In the Search eld, select the value Privileges or types of role in any combination and enter at least three
characters. The search returns values including items of the type you selected, whose names contain thecharacters you entered.
3. Select a privilege or role. If you select a privilege, click Add Privilege to Role. If you select a role, click AddSelected Privileges.
Oracle Applications CloudSecuring Applications
Chapter 13Role Conguration Using the Security Console
108
Note: The search results display all roles, whether they contain privileges or not. If a role doesn'tcontain privileges, there's nothing to add here. To add roles that don't contain privileges, go to theRole Hierarchy page.
The Function Security Policies page lists all selected privileges. When appropriate, it also lists the role from which aprivilege is inherited. You can:
• Click a privilege to view details of the code resource it secures.
• Delete a privilege. You may, for example, have added the privileges associated with a role. If you want to useonly some of them, you must delete the rest. To delete a privilege, click its x icon.
Adding Data Security PoliciesA data security policy may be explicit or implicit.
• An explicit policy grants access to a particular set of data, such as that pertaining to a particular business unit.This type of policy isn't used in predened roles in Oracle ERP Cloud.
• An implicit policy applies a data privilege (such as read) to a set of data from a specied data resource. Createthis type of policy for a duty, job, or abstract role. For each implicit policy, you must grant at least the read andview privileges.
You can use a Data Security Policies page to manage implicit policies.
Note: For the Data Security Policies page to be active, you must select an "Enable edit of data securitypolicies" option. To locate it, select the Administration tab, and then the Roles tab on the Administration page.If this option isn't selected, the Data Security Policies page is read-only.
To create a data security policy, click the Create Data Security Policy buon, then enter values that dene the policy. Astart date is required; a name, an end date, and a description are optional. Values that dene the data access include:
• Database Resource: A database table.
• Data Set: A denition that selects a subset of the data made available by the database resource.
◦ Select by key. Choose a primary key value, to limit the data set to a record in the data resource whoseprimary key matches the value you select.
◦ Select by instance set. Choose a condition that denes a subset of the data in the data resource.Conditions vary by resource.
◦ All values: Include all data from the data resource in your data set.
• Actions: Select one or more data privileges to apply to the data set you have dened.
The Data Security Polices page lists all policies dened for the role. You can edit or delete a policy: click the Actionsbuon, and select the Edit or Remove option.
Conguring the Role HierarchyA Role Hierarchy page displays either a visualization graph, with the role you're creating as its focus, or a visualizationtable. Select the Show Graph buon or View as Table buon to select between them. In either case, link the role you'recreating to other roles from which it's to inherit function and data security privileges.
• If you're creating a duty role, you can add duty roles or aggregate privileges to it. In eect, you're creating anexpanded set of duties for incorporation into a job or abstract role.
• If you're creating a job or abstract role, you can add aggregate privileges, duty roles, or other job or abstractroles to it.
Oracle Applications CloudSecuring Applications
Chapter 13Role Conguration Using the Security Console
109
To add a role:
1. Select Add Role.2. In a Search eld, select a combination of role types and enter at least three characters. The search returns
values including items of the type you selected, whose names contain the characters you entered.3. Select the role you want, and click Add Role Membership. You add not only the role you have selected, but also
its entire hierarchy.
In the graph view, you can use the visualization Control Panel, Legend, and Overview tools to manipulate the nodes thatdene your role hierarchy.
Adding UsersOn a Users page, you can select users to whom you want to assign a job or abstract role you're creating. (You can'tassign a duty role directly to users.)
Note: For the Users page to be active, you must select an "Enable edit of user role membership" option. Tolocate it, select the Administration tab, and then the Roles tab on the Administration page. If this option isn'tselected, the Users page is read-only.
To add a user:
1. Select Add User.2. In a Search eld, select the value Users or types of role in any combination and enter at least three characters.
The search returns values including items of the type you selected, whose names contain the characters youentered.
3. Select a user or role. If you select a user, click Add User to Role. If you select a role, click Add Selected Users; thisadds all its assigned users to the role you're creating.
The Users page lists all selected users. You can delete a user. You may, for example, have added all the users associatedwith a role. If you want to assign your new role only to some of them, you must delete the rest. To delete a user, click itsx icon.
Completing the RoleOn a Summary and Impact Report page, review the selections you have made. Summary listings show the numbers offunction security policies, data security policies, roles, and users you have added and removed. An Impact listing showsthe number of roles and users aected by your changes. Expand any of these listings to see names of policies, roles, orusers included in its counts.
If you determine you must make changes, navigate back to the appropriate page and do so. If you're satised with therole, select Save and Close.
Related Topics
• Options for Viewing a Visualization Graph
Role Copying or EditingRather than create a role from scratch, you can copy a role, then edit the copy to create a new role. Or you can editexisting roles.
Initiate a copy or an edit from the Roles tab in the Security Console. Do either of the following:
• Create a visualization graph and select any role in it. Right-click and select Copy Role or Edit Role.
Oracle Applications CloudSecuring Applications
Chapter 13Role Conguration Using the Security Console
110
• Generate a list of roles in the Search Results column of the Roles page. Select one of them, and click its menuicon. In the menu, select Copy Role or Edit Role.
If you're copying a role, select one of two options in a Copy Option dialog:
• Copy top role: You copy only the role you have selected. The source role has links to roles in its hierarchy, andthe copy inherits links to the original versions of those roles. If you select this option, subsequent changes tothe inherited roles aect not only the source highest role, but also your copy.
• Copy top role and inherited roles: You copy not only the role you have selected, but also all of the roles in itshierarchy. Your copy of the highest role is connected to the new copies of subordinate roles. If you select thisoption, you insulate the copied role from changes to the original versions of the inherited roles.
Next, an editing train opens. Essentially, you follow the same process in editing a role as you would to create one.However, note the following:
• In the Basic Information page, a Predened role box is checked if you selected the Edit Role option for a roleshipped by Oracle. In that case, you can:
◦ Add custom data security policies. Modify or remove those custom data security policies.
◦ Add or remove users if the role is a job, abstract, or discretionary role.
You can't:
◦ Modify, add, or remove function security policies.
◦ Modify or remove data security policies provided by Oracle.
◦ Modify the role hierarchy.
The Predened role check box is cleared if you're editing a custom role or if you have copied a role. In thatcase, you can make any changes to role components.
• By default, the name and code of a copied role match the source role's, except a prex, sux, or both areappended. In the Roles Administration page, you can congure the default prex and sux for each value.
• A copied role can't inherit users from a source job or abstract role. You must select users for the copied role.(They may include users who belong to the source role.)
• When you copy a role, the Role Hierarchy page displays all roles subordinate to it. However, you can add rolesonly to, or remove them from, the highest role you copied.
To monitor the status of a role-copy job, select the Administration tab, and then the Role Copy Status tab of theAdministration page.
Related Topics• Generate a Visualization
Security Console Role-Copy OptionsWhen you copy a role on the Security Console, you select one of the following options:
• Copy top role
• Copy top role and inherited roles
This topic explains the eects of each of these options.
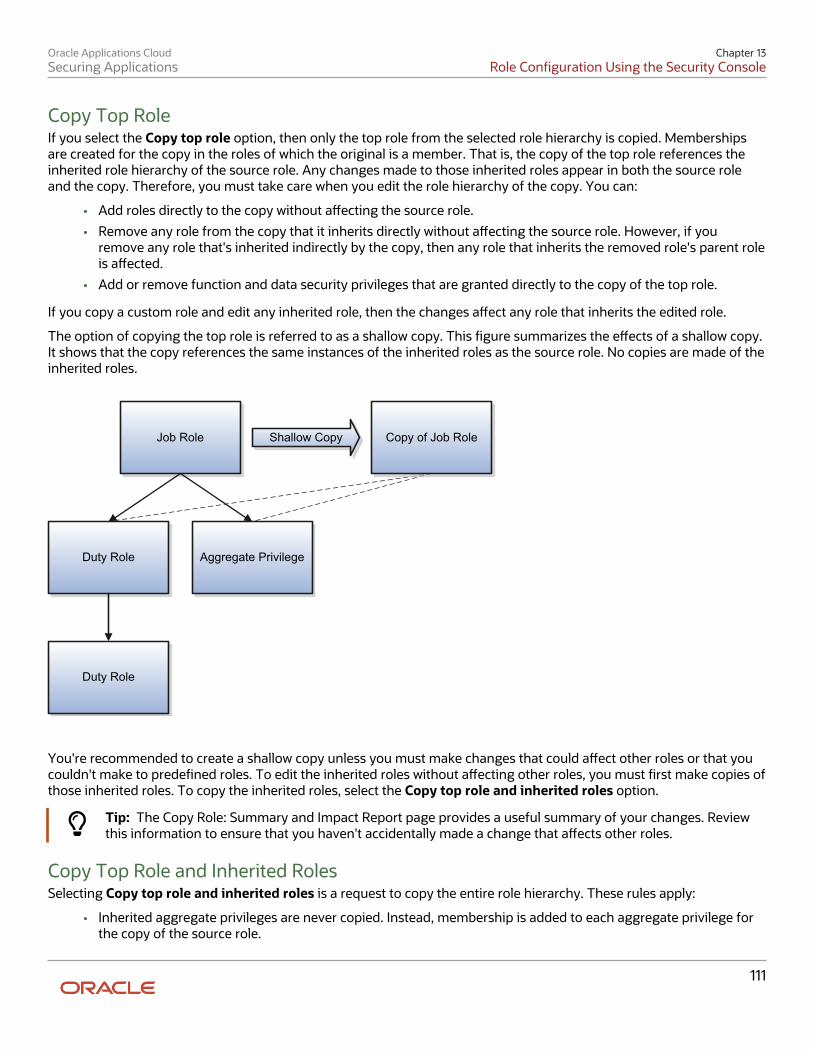
Oracle Applications CloudSecuring Applications
Chapter 13Role Conguration Using the Security Console
111
Copy Top RoleIf you select the Copy top role option, then only the top role from the selected role hierarchy is copied. Membershipsare created for the copy in the roles of which the original is a member. That is, the copy of the top role references theinherited role hierarchy of the source role. Any changes made to those inherited roles appear in both the source roleand the copy. Therefore, you must take care when you edit the role hierarchy of the copy. You can:
• Add roles directly to the copy without aecting the source role.
• Remove any role from the copy that it inherits directly without aecting the source role. However, if youremove any role that's inherited indirectly by the copy, then any role that inherits the removed role's parent roleis aected.
• Add or remove function and data security privileges that are granted directly to the copy of the top role.
If you copy a custom role and edit any inherited role, then the changes aect any role that inherits the edited role.
The option of copying the top role is referred to as a shallow copy. This gure summarizes the eects of a shallow copy.It shows that the copy references the same instances of the inherited roles as the source role. No copies are made of theinherited roles.
Job Role
Aggregate PrivilegeDuty Role
Duty Role
Shallow Copy Copy of Job Role
You're recommended to create a shallow copy unless you must make changes that could aect other roles or that youcouldn't make to predened roles. To edit the inherited roles without aecting other roles, you must rst make copies ofthose inherited roles. To copy the inherited roles, select the Copy top role and inherited roles option.
Tip: The Copy Role: Summary and Impact Report page provides a useful summary of your changes. Reviewthis information to ensure that you haven't accidentally made a change that aects other roles.
Copy Top Role and Inherited RolesSelecting Copy top role and inherited roles is a request to copy the entire role hierarchy. These rules apply:
• Inherited aggregate privileges are never copied. Instead, membership is added to each aggregate privilege forthe copy of the source role.
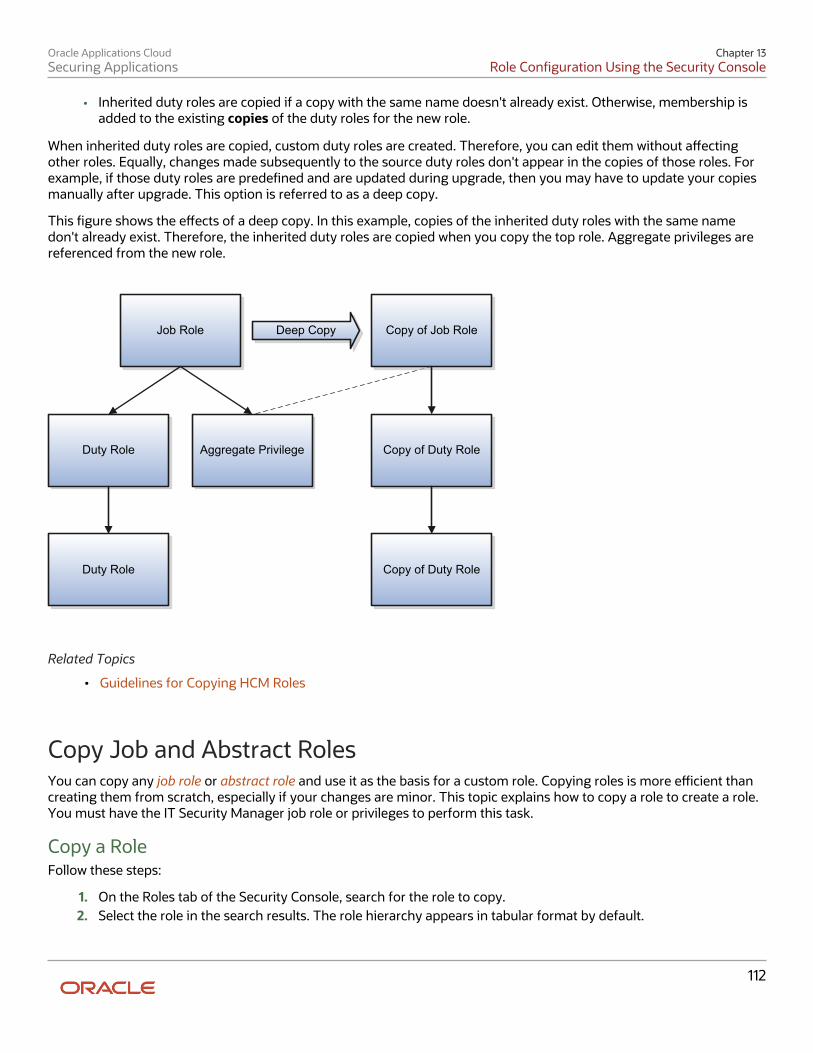
Oracle Applications CloudSecuring Applications
Chapter 13Role Conguration Using the Security Console
112
• Inherited duty roles are copied if a copy with the same name doesn't already exist. Otherwise, membership isadded to the existing copies of the duty roles for the new role.
When inherited duty roles are copied, custom duty roles are created. Therefore, you can edit them without aectingother roles. Equally, changes made subsequently to the source duty roles don't appear in the copies of those roles. Forexample, if those duty roles are predened and are updated during upgrade, then you may have to update your copiesmanually after upgrade. This option is referred to as a deep copy.
This gure shows the eects of a deep copy. In this example, copies of the inherited duty roles with the same namedon't already exist. Therefore, the inherited duty roles are copied when you copy the top role. Aggregate privileges arereferenced from the new role.
Job Role
Duty Role Aggregate Privilege
Duty Role
Deep Copy Copy of Job Role
Copy of Duty Role
Copy of Duty Role
Related Topics
• Guidelines for Copying HCM Roles
Copy Job and Abstract RolesYou can copy any job role or abstract role and use it as the basis for a custom role. Copying roles is more ecient thancreating them from scratch, especially if your changes are minor. This topic explains how to copy a role to create a role.You must have the IT Security Manager job role or privileges to perform this task.
Copy a RoleFollow these steps:
1. On the Roles tab of the Security Console, search for the role to copy.2. Select the role in the search results. The role hierarchy appears in tabular format by default.
Oracle Applications CloudSecuring Applications
Chapter 13Role Conguration Using the Security Console
113
Tip: If you prefer, click the Show Graph icon to show the hierarchy in graphical format.
3. In the search results, click the down arrow for the selected role and select Copy Role.4. In the Copy Options dialog box, select a copy option.5. Click Copy Role.6. On the Copy Role: Basic Information page, review and edit the Role Name, Role Code, Description, and Enable
Role for Access from All IP Addresses values, as appropriate. Enable Role for Access from All IP Addressesappears only if location-based access is enabled.
Tip: The role name and code have the default prex and sux for copied roles specied on theRoles subtab of the Security Console Administration tab. You can overwrite these values for the rolethat you're copying. However, any roles inherited by the copied role are unaected by any namechanges that you make on the Copy Role: Basic Information page.
7. Click the Summary and Impact Report train stop.8. Click Submit and Close, then OK to close the conrmation message.9. Review the progress of your copy on the Role Copy Status subtab of the Security Console Administration tab.
When the status is Complete, you can edit the copied role.If you prefer, you can visit the intermediate train stops after the Copy Role: Basic Information page and edityour copy of the role before you save it.
Related Topics• Guidelines for Copying HCM Roles
Edit Job and Abstract RolesYou can create a role by copying a predened job role or abstract role and editing the copy. This topic describes how toedit a role on the Security Console. You must have the IT Security Manager job role or privileges to perform this task.
Edit the RoleFollow these steps:
1. On the Roles tab of the Security Console, search for and select your custom role.2. In the search results, click the down arrow for the selected role and select Edit Role.3. On the Edit Role: Basic Information page, you can edit the role name and description, but not the role code.
If location-based access is enabled, then you can also manage the Enable Role for Access from All IPAddresses option.
4. Click Next.
Manage Functional Security PrivilegesOn the Edit Role: Functional Security Policies page, any function security privileges granted to the copied role appearon the Privileges tab. Select a privilege to view details of the code resources that it secures in the Details section of thepage.
To remove a privilege from the role, select the privilege and click the Delete icon. To add a privilege to the role:
1. Click Add Function Security Policy.2. In the Add Function Security Policy dialog box, search for and select a privilege or role.3. If you select a role, then click Add Selected Privileges to add all function security privileges from the selected
role to your custom role.
Oracle Applications CloudSecuring Applications
Chapter 13Role Conguration Using the Security Console
114
Tip: If the role has no function security privileges, then you see an error message. You can add therole to the role hierarchy on the Edit Role: Role Hierarchy page, if appropriate.
If you select a single privilege, then click Add Privilege to Role.4. Click OK to close the conrmation message.5. Repeat from step 2 for additional privileges.6. Close the Add Function Security Policy dialog box.7. Click Next.
Note: If a function security privilege forms part of an aggregate privilege, then add the aggregate privilegeto the role hierarchy. Don't grant the function security privilege directly to the role. The Security Consoleenforces this approach.
The Resources tab, which is read-only, lists any resources granted to the role directly rather than through functionsecurity privileges. As you can't grant resources directly to roles on the Security Console, only resource grants createdbefore Release 12 could appear on this tab. You can't edit these values.
Manage Data Security PoliciesMake no changes on the Copy Role: Data Security Policies page.
Add and Remove Inherited RolesThe Edit Role: Role Hierarchy page shows the copied role and its inherited aggregate privileges and duty roles. Thehierarchy is in tabular format by default. You can add or remove roles.
To remove a role:
1. Select the role in the table.2. Click the Delete icon.3. Click OK to close the conrmation message.
Note: The role that you're removing must be inherited directly by the role that you're editing. If the role isinherited indirectly, then you must edit its parent role.
To add a role:
1. Click the Add Role icon.2. In the Add Role Membership dialog box, search for and select the role to add.3. Click Add Role Membership.4. Click OK to close the conrmation message.5. Repeat from step 2 for additional roles.6. Close the Add Role Membership dialog box.
The Edit Role: Role Hierarchy page shows the updated role hierarchy.7. Click Next.
Provision the Role to UsersTo provision the role to users, you must create a role mapping. Don't provision the role to users on the Security Console.
Oracle Applications CloudSecuring Applications
Chapter 13Role Conguration Using the Security Console
115
Review the RoleOn the Edit Role: Summary and Impact Report page, review the summary of changes. Click Back to make corrections.Otherwise:
1. Click Save and Close to save the role.2. Click OK to close the conrmation message.
The role is available immediately.
Create Job and Abstract Roles from ScratchIf the predened roles aren't suitable or you need a role with few privileges, then you can create a role from scratch. Thistopic explains how to create a job role or abstract role. To perform this task, you must have the IT Security Manager jobrole or privileges.
Enter Basic InformationFollow these steps:
1. On the Roles tab of the Security Console, click Create Role.2. On the Create Role: Basic Information page, enter the role's display name in the Role Name eld. For example,
enter Sales Department Administration Job Role.3. Complete the Role Code eld. For example, enter SALES_DEPT_ADMIN_JOB.
Abstract roles have the sux _ABSTRACT, and job roles have the sux _JOB.4. In the Role Category eld, select either HCM - Abstract Roles or HCM - Job Roles, as appropriate.
Note: Be sure to select the HCM - Job Roles category when creating job roles. Otherwise, your jobroles don't appear in the list of available job roles when you create an HCM data role.
5. If you're using location-based access, then you see the Enable Role for Access from All IP Addresses option.If you select this option, then users who have the role can access the tasks that the role secures from any IPaddress.
6. Click Next.
Add Functional Security PoliciesWhen you create a role from scratch, you're most likely to add one or more aggregate privileges or duty roles to yourrole. You're less likely to grant function security privileges directly to the role.
If you aren't granting function security privileges, then click Next. Otherwise, to grant function security privileges to therole:
1. On the Privileges tab of the Create Role: Functional Security Policies page, click Add Function Security Policy.2. In the Add Function Security Policy dialog box, search for and select a privilege or role.3. If you select a role, then click Add Selected Privileges to add all function security privileges from a selected
role to your custom role.
Tip: If the role has no function security privileges, then you see an error message. You can add therole to the role hierarchy on the Create Role: Role Hierarchy page, if appropriate.
If you select a single privilege, then click Add Privilege to Role.4. Click OK to close the conrmation message.
Oracle Applications CloudSecuring Applications
Chapter 13Role Conguration Using the Security Console
116
5. Repeat from step 2 for additional privileges.6. Close the Add Function Security Policy dialog box.7. Click Next.
Note: If a function security privilege forms part of an aggregate privilege, then add the aggregate privilegeto the role hierarchy. Don't grant the function security privilege directly to the role. The Security Consoleenforces this approach.
Create Data Security PoliciesMake no entries on the Create Role: Data Security Policies page.
Build the Role HierarchyThe Create Role: Role Hierarchy page shows the hierarchy of your custom role in tabular format by default. You can addone or more aggregate privileges, job roles, abstract roles, and duty roles to the role. Typically, when creating a job orabstract role you add aggregate privileges. Roles are always added directly to the role that you're creating.
To add a role:
1. Click the Add Role icon.2. In the Add Role Membership dialog box, search for and select the role to add.3. Click Add Role Membership.4. Click OK to close the conrmation message.5. Repeat from step 2 for additional roles.6. When you nish adding roles, close the Add Role Membership dialog box.7. Click Next.
Provision the RoleTo provision the role to users, you must create a role mapping when the role exists. Don't provision the role to users onthe Security Console.
Review the RoleOn the Create Role: Summary and Impact Report page, review the summary of the changes. Click Back to makecorrections. Otherwise:
1. Click Save and Close to save the role.2. Click OK to close the conrmation message.
Your custom role is available immediately.
Copy and Edit Duty RolesYou can copy a duty role and edit the copy to create a duty role. Copying duty roles is the recommended way of creatingduty roles. This topic explains how to copy a duty role and edit the copy. You must have the IT Security Manager jobrole or privileges to perform these tasks.
Copy a Duty RoleFollow these steps:
1. On the Roles tab of the Security Console, search for the duty role to copy.2. Select the role in the search results. The role hierarchy appears in tabular format by default.

Oracle Applications CloudSecuring Applications
Chapter 13Role Conguration Using the Security Console
117
Tip: If you prefer, click the Show Graph icon to show the hierarchy in graphical format.
3. In the search results, click the down arrow for the selected role and select Copy Role.4. In the Copy Options dialog box, select a copy option.5. Click Copy Role.6. On the Copy Role: Basic Information page, edit the Role Name, Role Code, and Description values, as
appropriate.
Tip: The role name and code have the default prex and sux for copied roles specied on theRoles subtab of the Security Console Administration tab. You can overwrite these values for the rolethat you're copying. However, any roles inherited by the copied role are unaected by any namechanges that you make on the Copy Role: Basic Information page.
7. Click the Summary and Impact Report train stop.8. Click Submit and Close, then OK to close the conrmation message.9. Review the progress of your copy on the Role Copy Status subtab of the Security Console Administration tab.
Once the status is Complete, you can edit the copied role.
Edit the Copied Duty RoleFollow these steps:
1. On the Roles tab of the Security Console, search for and select your copy of the duty role.2. In the search results, click the down arrow for the selected role and select Edit Role.3. On the Edit Role: Basic Information page, you can edit the role name and description, but not the role code.4. Click Next.
Manage Functional Security PoliciesOn the Edit Role: Functional Security Policies page, any function security privileges granted to the copied role appear onthe Privileges tab. Select a privilege to view details of the code resources that it secures.
To remove a privilege from the role, select the privilege and click the Delete icon. To add a privilege to the role:
1. Click Add Function Security Policy.2. In the Add Function Security Policy dialog box, search for and select a privilege or role.3. If you select a role, then click Add Selected Privileges to grant all function security privileges from the selected
role to your custom role. If you select a single privilege, then click Add Privilege to Role.
Tip: If the role has no function security privileges, then you see an error message. You can add therole to the role hierarchy on the Edit Role: Role Hierarchy page, if appropriate.
4. Click OK to close the conrmation message.5. Repeat from step 2 for additional privileges.6. Close the Add Functional Security Policies dialog box.7. Click Next.
Note: If a function security privilege forms part of an aggregate privilege, then add the aggregate privilegeto the role hierarchy. Don't grant the function security privilege directly to the role. The Security Consoleenforces this approach.
The Resources tab, which is read-only, lists any resources granted to the role directly rather than through functionsecurity privileges. As you can't grant resources directly to roles on the Security Console, only resource grants createdbefore Release 12 could appear on this tab. You can't edit these values.
Oracle Applications CloudSecuring Applications
Chapter 13Role Conguration Using the Security Console
118
Manage Data Security PoliciesMake no changes on the Edit Role: Data Security Policies page.
Add and Remove Inherited RolesThe Edit Role: Role Hierarchy page shows the copied duty role and any duty roles and aggregate privileges that itinherits. The hierarchy is in tabular format by default. You can add or remove roles.
To remove a role:
1. Select the role in the table.2. Click the Delete icon.3. Click OK to close the information message.
To add a role:
1. Click Add Role.2. In the Add Role Membership dialog box, search for and select the role to add.3. Click Add Role Membership.4. Click OK to close the conrmation message.5. Repeat from step 2 for additional roles.6. Close the Add Role Membership dialog box.
The Edit Role: Role Hierarchy page shows the updated role hierarchy.7. Click Next.
Review the RoleOn the Edit Role: Summary and Impact Report page, review the summary of changes. Click Back to make corrections.Otherwise:
1. Click Save and Close to save the role.2. Click OK to close the conrmation message.
The role is available immediately.
Related Topics
• Guidelines for Copying HCM Roles
Role Optimization
Role OptimizerRole optimization is the process used to analyze the existing role hierarchy for redundancies or other ineciencies. Roleoptimization enables you to create a role hierarchy that minimizes the number of roles necessary to authorize every jobrole to its currently authorized privileges. The role optimizer feature automates the analysis process and generates areport you can use to optimize your job hierarchies.
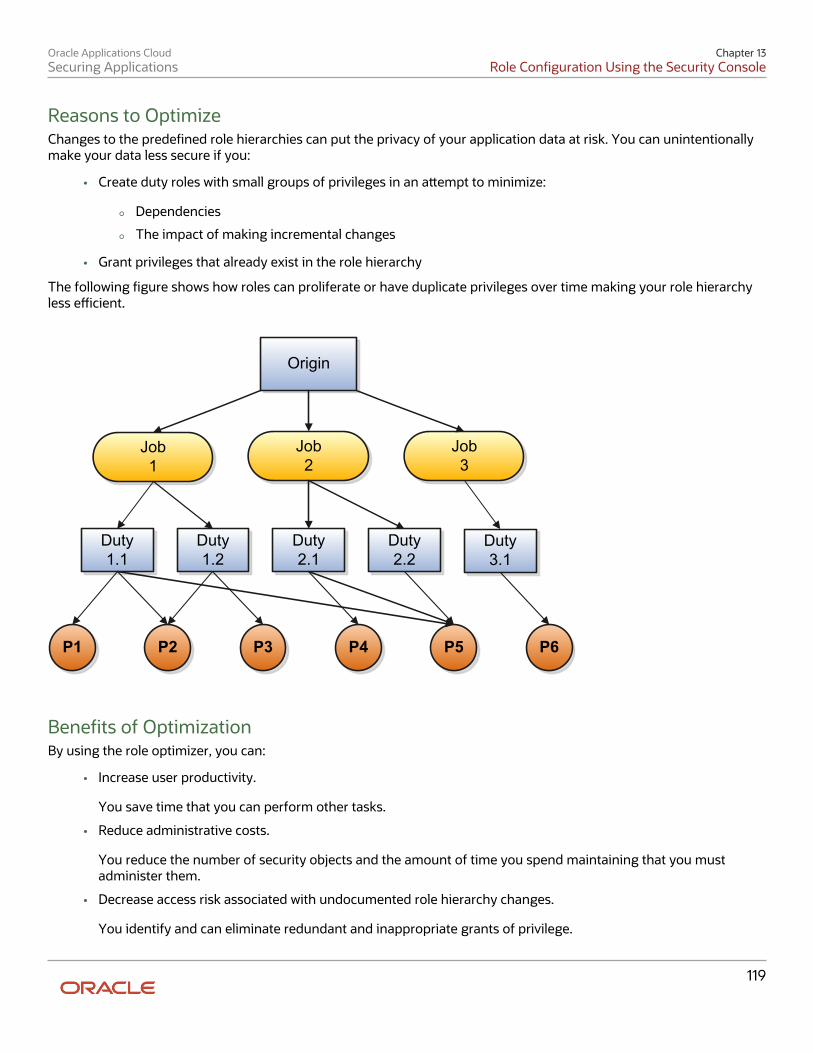
Oracle Applications CloudSecuring Applications
Chapter 13Role Conguration Using the Security Console
119
Reasons to OptimizeChanges to the predened role hierarchies can put the privacy of your application data at risk. You can unintentionallymake your data less secure if you:
• Create duty roles with small groups of privileges in an aempt to minimize:
◦ Dependencies
◦ The impact of making incremental changes
• Grant privileges that already exist in the role hierarchy
The following gure shows how roles can proliferate or have duplicate privileges over time making your role hierarchyless ecient.
Origin
Job1
Job2
Job3
Duty1.1
Duty1.2
Duty2.1
Duty2.2
Duty3.1
P1 P2 P3 P4 P5 P6
Benets of OptimizationBy using the role optimizer, you can:
• Increase user productivity.
You save time that you can perform other tasks.
• Reduce administrative costs.
You reduce the number of security objects and the amount of time you spend maintaining that you mustadminister them.
• Decrease access risk associated with undocumented role hierarchy changes.
You identify and can eliminate redundant and inappropriate grants of privilege.

Oracle Applications CloudSecuring Applications
Chapter 13Role Conguration Using the Security Console
120
The following gure shows how the role optimizer can suggest more ecient role hierarchies.
Origin
Job1
Job2
Job3
Cluster1
Cluster2
Duty3.1
P1 P2 P3 P4 P5 P6
Role Optimizer AccessThe role optimizer feature is available as a predened report. Schedule and submit the Role Optimization Report on theOverview page of the Scheduled Processes work area. The process:
1. Analyzes your existing job role hierarchies.2. Generates the optimized job role hierarchy and stores the data for each job role in a separate CSV le.3. Archives and aaches the CSV les as the process output.4. Generates a log and archives it as a ZIP le. The log le includes technical details of the analysis for
troubleshooting.
Note: The role optimization process makes no changes to your security structures. You use the report to mapprivileges to roles and update the role hierarchies.
Role Optimization ReportUse the Role Optimization Report to create the most ecient role hierarchy for your organization. Use the report resultsto evaluate and, if necessary, update your role hierarchy. The report results enable you to create a role hierarchy withthe minimum number of roles necessary to authorize every job role to every privilege it’s currently authorized to.
Users with the IT Security Manager role can run the Role Optimization Report, which is available from the securityconsole.
You should run this report if you:
• Make changes to the predened role hierarchy.
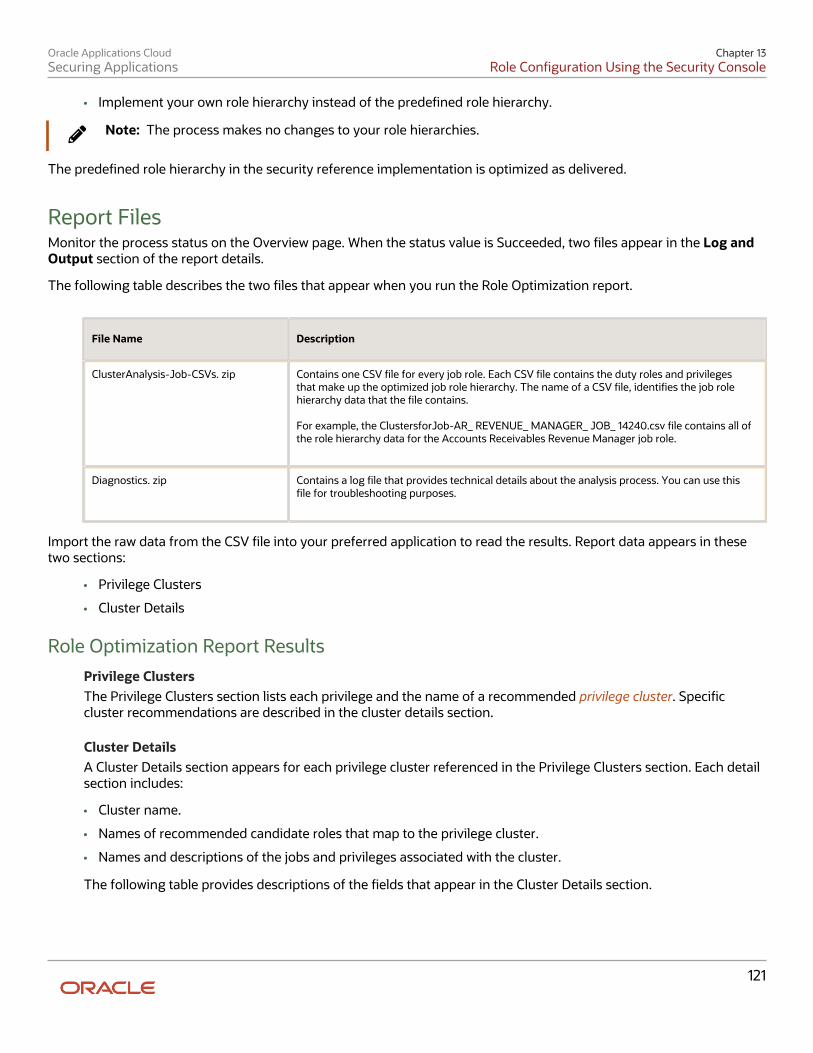
Oracle Applications CloudSecuring Applications
Chapter 13Role Conguration Using the Security Console
121
• Implement your own role hierarchy instead of the predened role hierarchy.
Note: The process makes no changes to your role hierarchies.
The predened role hierarchy in the security reference implementation is optimized as delivered.
Report FilesMonitor the process status on the Overview page. When the status value is Succeeded, two les appear in the Log andOutput section of the report details.
The following table describes the two les that appear when you run the Role Optimization report.
File Name Description
ClusterAnalysis-Job-CSVs. zip
Contains one CSV le for every job role. Each CSV le contains the duty roles and privilegesthat make up the optimized job role hierarchy. The name of a CSV le, identies the job rolehierarchy data that the le contains. For example, the ClustersforJob-AR_ REVENUE_ MANAGER_ JOB_ 14240.csv le contains all ofthe role hierarchy data for the Accounts Receivables Revenue Manager job role.
Diagnostics. zip
Contains a log le that provides technical details about the analysis process. You can use thisle for troubleshooting purposes.
Import the raw data from the CSV le into your preferred application to read the results. Report data appears in thesetwo sections:
• Privilege Clusters
• Cluster Details
Role Optimization Report ResultsPrivilege ClustersThe Privilege Clusters section lists each privilege and the name of a recommended privilege cluster. Speciccluster recommendations are described in the cluster details section.
Cluster DetailsA Cluster Details section appears for each privilege cluster referenced in the Privilege Clusters section. Each detailsection includes:
• Cluster name.
• Names of recommended candidate roles that map to the privilege cluster.
• Names and descriptions of the jobs and privileges associated with the cluster.
The following table provides descriptions of the elds that appear in the Cluster Details section.
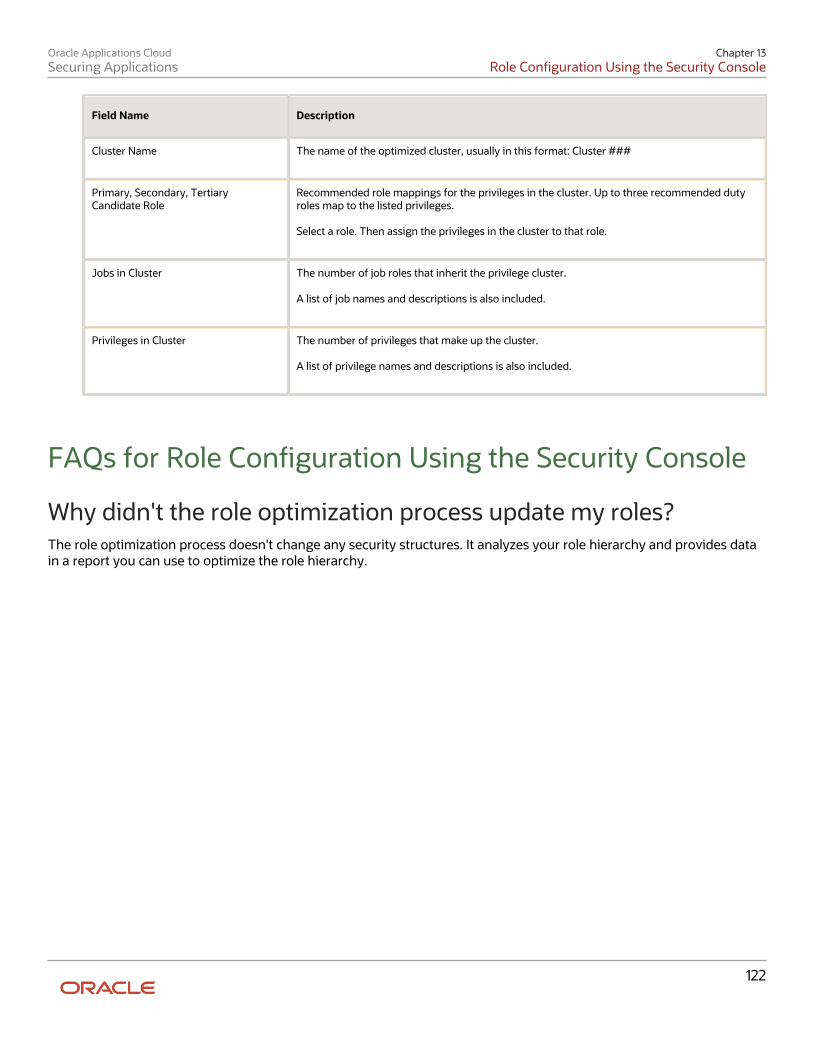
Oracle Applications CloudSecuring Applications
Chapter 13Role Conguration Using the Security Console
122
Field Name Description
Cluster Name
The name of the optimized cluster, usually in this format: Cluster ###
Primary, Secondary, TertiaryCandidate Role
Recommended role mappings for the privileges in the cluster. Up to three recommended dutyroles map to the listed privileges. Select a role. Then assign the privileges in the cluster to that role.
Jobs in Cluster
The number of job roles that inherit the privilege cluster. A list of job names and descriptions is also included.
Privileges in Cluster
The number of privileges that make up the cluster. A list of privilege names and descriptions is also included.
FAQs for Role Conguration Using the Security Console
Why didn't the role optimization process update my roles?The role optimization process doesn't change any security structures. It analyzes your role hierarchy and provides datain a report you can use to optimize the role hierarchy.
Oracle Applications CloudSecuring Applications
Chapter 14Security Certicates
123
14 Security Certicates
OverviewCerticates establish keys for the encryption and decryption of data that Oracle Cloud applications exchange with otherapplications. Use the Certicates page in the Security Console functional area to work with certicates in either of twoformats, PGP and X.509.
For each format, a certicate consists of a public key and a private key. The Certicates page displays one record foreach certicate. Each record reports these values:
• Type: For a PGP certicate, "Public Key" is the only type. For an X.509 certicate, the type is either "Self-SignedCerticate" or "Trusted Certicate" (one signed by a certicate authority).
• Private Key: A check mark indicates that the certicate's private key is present. For either certicate format, theprivate key is present for your own certicates (those you generate in the Security Console). The private key isabsent when a certicate belongs to an external source and you import it through the Security Console.
• Status: For a PGP certicate, the only value is "Not Applicable." (A PGP certicate has no status.) For an X.509certicate, the status is derived from the certicate.
Click the Actions menu to take an appropriate action for a certicate. Actions include:
• Generate PGP or X.509 certicates.
• Generate signing requests to transform X.509 certicates from self-signed to trusted.
• Export or import PGP or X.509 certicates.
• Delete certicates.
Types of CerticatesFor a PGP or X.509 certicate, one operation creates both the public and private keys. From the Certicates page, selectthe Generate option. In a Generate page, select the certicate format, then enter values appropriate for the format.
For a PGP certicate, these values include:
• An alias (name) and passphrase to identify the certicate uniquely.
• The type of generated key: DSA or RSA.
• Key length: 512, 1024, or 2048.
• Encryption algorithm option for key generation: AES128, AES256
For an X.509 certicate, these values include:
• An alias (name) and private key password to identify the certicate uniquely.
• A common name, which is an element of the "distinguished name" for the certicate. The common nameidenties the entity for which the certicate is being created, in its communications with other web entities. Itmust match the name of the entity presenting the certicate. The maximum length is 64 characters.
Oracle Applications CloudSecuring Applications
Chapter 14Security Certicates
124
• Optionally, other identifying values: Organization, Organization Unit, Locality, State/Province, and Country.These are also elements of the distinguished name for the certicate, although the Security Console doesn'tperform any validation on these values.
• An algorithm by which keys are generated, MD5 or SHA1.
• A key length.
• A validity period, in days. This period is preset to a value established on the General Administration page. Youcan enter a new value to override the preset value.
Sign a X.509 CerticateYou can generate a request for a certicate authority (CA) to sign a self-signed X.509 certicate, to make it a trustedcerticate. (This process doesn't apply to PGP certicates.)
1. Select Generate Certicate Signing Request. This option is available in either of two menus:
◦ One menu opens in the Certicates page, from the row for a self-signed X.509 certicate.
◦ The other menu is the Actions menu in the details page for that certicate.
2. Provide the private key password for the certicate, then select a le location.3. Save the request le. Its default name is [alias]_CSR.csr.
You are expected to follow a process established by your organization to forward the le to a CA. You would import thetrusted certicate returned in response.
Import and Export X.509 CerticatesFor an X.509 certicate, you import or export a complete certicate in a single operation.
To export:
1. From the Certicates page, select the menu available in the row for the certicate you want to export. Or openthe details page for that certicate and select its Actions menu.
2. In either menu, select Export, then Certicate.3. Select a location for the export le. By default, this le is called [alias].cer.
To import, use either of two procedures. Select the one appropriate for what you want to do:
• The rst procedure replaces a self-signed certicate with a trusted version (one signed by a CA) of the samecerticate. (A prerequisite is that you have received a response to a signing request.)
a. In the Certicates page, locate the row for the self-signed certicate, and open its menu. Or, open thedetails page for the certicate, and select its Actions menu. In either menu, select Import.
b. Enter the private key password for the certicate.c. Browse for and select the le returned by a CA in response to a signing request, and click the Import
buon.
In the Certicates page, the type value for the certicate changes from self-signed to trusted.
Oracle Applications CloudSecuring Applications
Chapter 14Security Certicates
125
• The second procedure imports a new X.509 certicate. You can import a .cer le, or you can import a keystorethat contains one or more certicates.
a. In the Certicates page, click the Import buon. An Import page opens.b. Select X.509, then choose whether you're importing a certicate or a keystore.c. Enter identifying values, which depend on what you have chosen to import. In either case, enter an alias
(which, if you're importing a .cer le, need not match its alias). For a keystore, you must also provide akeystore password and a private key password.
d. Browse for and select the import le.e. Select Import and Close.
Import and Export PGP CerticatesFor a PGP certicate, you export the public and private keys for a certicate in separate operations. You can import onlypublic keys. (The assumption is that you will import keys from external sources, who wouldn't provide their private keysto you.)
To export:
1. From the Certicates page, select the menu available in the row for the certicate you want to export. Or openthe details page for that certicate and select its Actions menu.
2. In either menu, select Export, then Public Key or Private Key.3. If you selected Private Key, provide its passphrase. (The public key doesn't require one.)4. Select a location for the export le. By default, this le is called [alias]_pub.asc or [alias]_priv.asc.
To import a new PGP public key:
1. On the Certicates page, select the Import buon.2. In the Import page, select PGP and specify an alias (which need not match the alias of the le you're importing).3. Browse for the public-key le, then select Import and Close.
The Certicates page displays a record for the imported certicate, with the Private Key cell unchecked.
Use a distinct import procedure if you need to replace the public key for a certicate you have already imported, anddon't want to change the name of the certicate:
1. In the Certicates page, locate the row for the certicate whose public key you have imported, and open itsmenu. Or, open the details page for the certicate, and select its Actions menu. In either menu, select Import.
2. Browse for the public-key le, then select Import.
Delete CerticatesYou can delete both PGP and X.509 certicates:
1. In the Certicates page, select the menu available in the row for the certicate you want to delete. Or, in thedetails page for that certicate, select the Actions menu.
2. In either menu, select Delete.3. Respond to a warning message. If the certicate's private key is present, you must enter the passphrase (for a
PGP certicate) or private key password (for an X.509 certicate) as you respond to the warning. Either valuewould have been created as your organization generated the certicate.

Oracle Applications CloudSecuring Applications
Chapter 14Security Certicates
126
Oracle Applications CloudSecuring Applications
Glossary
127
Glossary
abstract role
A description of a person's function in the enterprise that's unrelated to the person's job (position), such as employee,contingent worker, or line manager.
action
The kind of access, such as view or edit, named in a security policy.
aggregate privilege
A predefined role that combines one function security privilege with related data security policies.
assignment
A set of information, including job, position, pay, compensation, managers, working hours, and work location, thatdefines a worker's or nonworker's role in a legal employer.
business object
A resource in an enterprise database, such as an invoice or purchase order.
business unit
A unit of an enterprise that performs one or many business functions that can be rolled up in a management hierarchy.
condition
The part of a data security policy that specifies what portions of a database resource are secured.
contingent worker
A self-employed or agency-supplied worker. Contingent worker work relationships with legal employers are typically ofa specified duration. Any person who has a contingent worker work relationship with a legal employer is a contingentworker.
dashboard
A collection of analyses and other content that gives in-depth insight to help with business decisions.
data dimension
A stripe of data accessible by a user. Sometimes referred to as data security context.
data instance set
The set of HCM data, such as one or more persons, organizations, or payrolls, identified by an HCM security profile.
Oracle Applications CloudSecuring Applications
Glossary
128
data role
A role for a defined set of data describing the job a user does within that defined set of data. A data role inherits job orabstract roles and grants entitlement to access data within a specific dimension of data based on data security policies.A type of enterprise role.
data security
The control of access and action a user can take against which data.
data security policy
A grant of entitlement to a role on an object or attribute group for a given condition.
database resource
An applications data object at the instance, instance set, or global level, which is secured by data security policies.
department
A division of a business enterprise dealing with a particular area of activity.
duty role
A group of function and data privileges representing one duty of a job. Duty roles are specific to applications, stored inthe policy store, and shared within an application instance.
effective start date
For a date-effective object, the start date of a physical record in the object's history. A physical record is available totransactions between its effective start and end dates.
enterprise
An organization having common control over one or more legal entities.
entitlement
Grant of access to functions and data. Oracle Fusion Middleware term for privilege.
flexfield
A flexible data field that you can configure such that it contains one or more segments or stores additional information.Each segment has a value and a meaning.
flexfield segment
An extensible data field that represents an attribute and captures a value corresponding to a predefined, singleextension column in the database. A segment appears globally or based on a context of other captured information.
Oracle Applications CloudSecuring Applications
Glossary
129
function security
The control of access to a page or a specific use of a page. Function security controls what a user can do.
HCM data role
A job role, such as benefits administrator, associated with instances of HCM data, such as all employees in adepartment.
identity
A person representing a worker, supplier, or customer.
job
A generic role that's independent of any single department or location. For example, the jobs Manager and Consultantcan occur in many departments.
job role
A role, such as an accounts payable manager or application implementation consultant, that usually identifies andaggregates the duties or responsibilities that make up the job.
LDAP
Abbreviation for Lightweight Directory Access Protocol.
party
A physical entity, such as a person, organization or group, that the deploying company has an interest in tracking.
person number
A person ID that is unique in the enterprise, allocated automatically or manually, and valid throughout the enterprise forall of a person's work and person-to-person relationships.
person type
A subcategory of a system person type, which the enterprise can define. Person type is specified for a person at theassignment level.
personally identifiable information
Any piece of information that can be used to uniquely identify, contact, or locate a single person. Within the context ofan enterprise, some PII data, such as a person's name, can be considered public, while other PII data, such as nationalidentifier or passport number is confidential.
Oracle Applications CloudSecuring Applications
Glossary
130
privilege
A grant of access to functions and data; a single, real world action on a single business object.
privilege cluster
In the output of the Role Optimization Report, a group of privileges that you can map to a duty role.
resource
People designated as able to be assigned to work objects, for example, service agents, sales managers, or partnercontacts. A sales manager and partner contact can be assigned to work on a lead or opportunity. A service agent can beassigned to a service request.
role
Controls access to application functions and data.
role hierarchy
Structure of roles to reflect an organization's lines of authority and responsibility. In a role hierarchy, a parent roleinherits all the entitlement of one or more child roles.
role mapping
A relationship between one or more roles and one or more assignment conditions. Users with at least one assignmentthat matches the conditions qualify for the associated roles.
role provisioning
The automatic or manual allocation of a role to a user.
security profile
A set of criteria that identifies HCM objects of a single type for the purposes of securing access to those objects. Therelevant HCM objects are persons, organizations, positions, countries, LDGs, document types, payrolls, and payrollflows.
security reference implementation
Predefined function and data security that includes role based access control, and policies that protect functions, anddata. The reference implementation supports identity management, access provisioning, and security enforcementacross the tools, data transformations, access methods, and the information life cycle of an enterprise.
SQL predicate
A type of condition using SQL to constrain the data secured by a data security policy.
transaction
A logical unit of work such as a promotion or an assignment change. A transaction may consist of several components,such as changes to salary, locations, and grade, but all the components are handled as a unit to be either approved orrejected.
Oracle Applications CloudSecuring Applications
Glossary
131
work area
A set of pages containing the tasks, searches, and other content you need to accomplish a business goal.
work relationship
An association between a person and a legal employer, where the worker type determines whether the relationship is anonworker, contingent worker, or employee work relationship.
worker type
A classification selected on a person's work relationship, which can be employee, contingent worker, pending worker, ornonworker.
XML filter
A type of condition using XML to constrain the data secured by a data security policy.
Oracle Applications CloudSecuring Applications
Glossary
132