
Close-up and Macro - EOS Training Academy
21
Close-up and Macro with your Canon EOS How to shoot By Nina Bailey
Transcript of Close-up and Macro - EOS Training Academy

Close-up and Macrowith your Canon EOSHow to shoot
By Nina Bailey
22
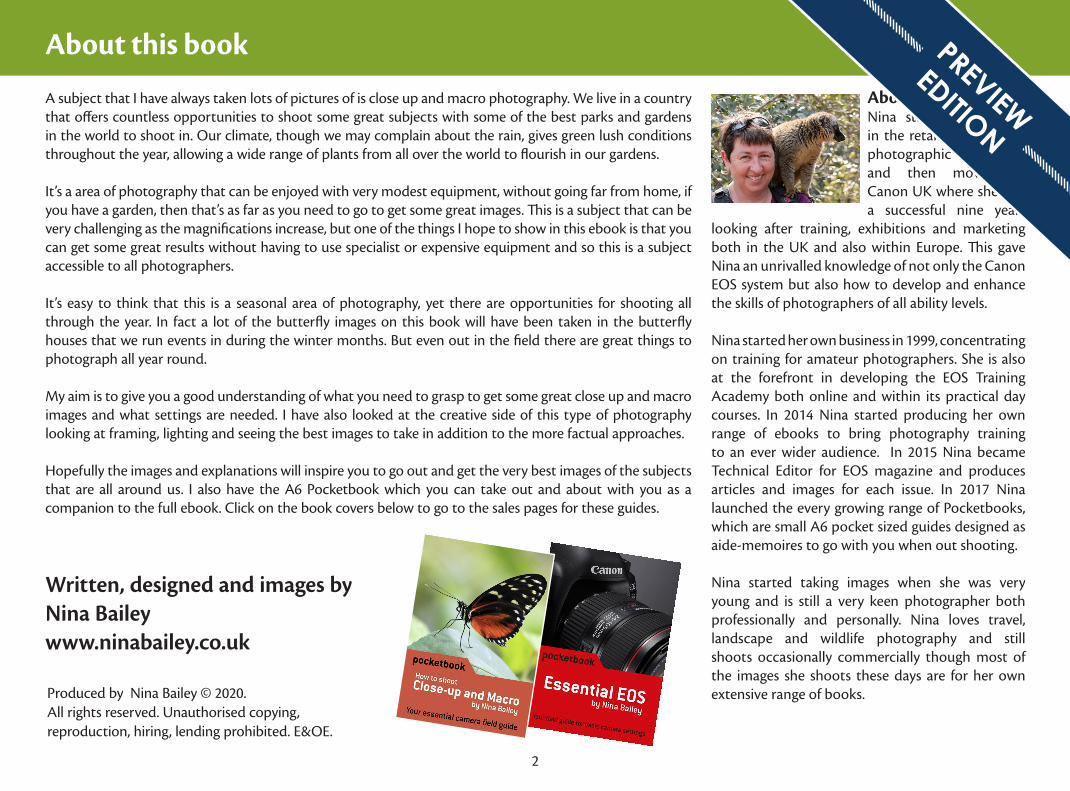
Written, designed and images by Nina Baileywww.ninabailey.co.uk
Produced by Nina Bailey © 2020. All rights reserved. Unauthorised copying, reproduction, hiring, lending prohibited. E&OE.
A subject that I have always taken lots of pictures of is close up and macro photography. We live in a country that offers countless opportunities to shoot some great subjects with some of the best parks and gardens in the world to shoot in. Our climate, though we may complain about the rain, gives green lush conditions throughout the year, allowing a wide range of plants from all over the world to flourish in our gardens.
It’s a area of photography that can be enjoyed with very modest equipment, without going far from home, if you have a garden, then that’s as far as you need to go to get some great images. This is a subject that can be very challenging as the magnifications increase, but one of the things I hope to show in this ebook is that you can get some great results without having to use specialist or expensive equipment and so this is a subject accessible to all photographers.
It’s easy to think that this is a seasonal area of photography, yet there are opportunities for shooting all through the year. In fact a lot of the butterfly images on this book will have been taken in the butterfly houses that we run events in during the winter months. But even out in the field there are great things to photograph all year round.
My aim is to give you a good understanding of what you need to grasp to get some great close up and macro images and what settings are needed. I have also looked at the creative side of this type of photography looking at framing, lighting and seeing the best images to take in addition to the more factual approaches.
Hopefully the images and explanations will inspire you to go out and get the very best images of the subjects that are all around us. I also have the A6 Pocketbook which you can take out and about with you as a companion to the full ebook. Click on the book covers below to go to the sales pages for these guides.
Introduction About the author
About the authorNina started her career in the retail sector of the photographic industry and then moved to Canon UK where she had a successful nine years
looking after training, exhibitions and marketing both in the UK and also within Europe. This gave Nina an unrivalled knowledge of not only the Canon EOS system but also how to develop and enhance the skills of photographers of all ability levels.
Nina started her own business in 1999, concentrating on training for amateur photographers. She is also at the forefront in developing the EOS Training Academy both online and within its practical day courses. In 2014 Nina started producing her own range of ebooks to bring photography training to an ever wider audience. In 2015 Nina became Technical Editor for EOS magazine and produces articles and images for each issue. In 2017 Nina launched the every growing range of Pocketbooks, which are small A6 pocket sized guides designed as aide-memoires to go with you when out shooting.
Nina started taking images when she was very young and is still a very keen photographer both professionally and personally. Nina loves travel, landscape and wildlife photography and still shoots occasionally commercially though most of the images she shoots these days are for her own extensive range of books.
About this book PREVIEW
EDITION

33
Introduction Why a new book?
I wrote my original close up and macro book back in 2014, since that time photography has changed considerably. Mirrorless models, both APS-C and full frame have appeared and are becoming much more prominent within the market. We have also seen new macro lenses appearing with much shorter focal lengths than we have seen before. The image to the right was taken on the new RF 35mm f1.8 Macro IS STM designed for the EOS R range of cameras, though there are also M and EF-S versions of this lens available. Within the equipment section I will take a look at the changes that the mirrorless models are making to this type of shooting and a few useful options that they offer.
For those used to 100mm and 60mm macro lenses this may sound a strange development but they reflect changing trends and expectations. A lot of new photographers have come via the mobile phone route and these give excellent results when shooting close up images, but with the need to get very close to the subject. Of course if shooting flowers or static subjects this is not such a problem as with butterflies and other insects. The key benefit offered is the extra depth of field available at fairly modest apertures. So I am expanding the equipment sections to explain these new developments.
I am also adding a reference section so you can brush up on the “basics”. Unfortunately this is one area of photography where your understanding of light levels and the settings achievable at these light levels is essential to getting good results. There are also now some interesting camera options that make getting the settings you need a lot easier which I have also added into the relevant sections. I have also included in this some of the key camera features you need to understand how to use to understand the rest of the book.
Another new feature on the mirrorless models is the addition of Focus Bracketing on the EOS RP though it’s rapidly spreading onto other models including some of the Powershot range , the M series, on the M6 Mark II and the new EOS 90D. This allows a technique called focus stacking to be achieved with a degree of automation. However, if your camera does not feature it I have also added a section showing how to manually shoot images to use with this technique. I am including a lot more in this book that explains the camera features in relation to this type of photography, as I am finding it is setting some of the features that causes photographers the most problems. Obviously everything has to be as generalised as possible, remember that I also do ebooks on almost all the current and some older models that will explain the features in more depth and specifically to your model.
Taken with an RF 35mm f1.8 Macro IS STM lens on an EOS R. 1/160th f11 100 ISO
PREVIEW
EDITION

44
Introduction Chapter index
Taken with an RF 35mm f1.8 Macro IS STM lens on an EOS R. 1/160th f11 125 ISO
Chapter 01 - Introduction
Chapter 02 - Reference
Chapter 03 - Equipment selection
Chapter 04 - Camera modes and basic overrides
Chapter 07 - Other camera settings
Chapter 06 - Metering for close up and macro
Chapter 05 - Focusing for close up and macro
Chapter 09 - Analysing the image
Chapter 08 - Focus stacking / Bracketing
Chapter 10 - Framing for close up and macro
Chapter 12 - Using additional lighting
Chapter 11 - Lighting for close up and macro
To make the book easier to navigate I am including links to each of the main chapters in additional to the normal hyper linked contents. There are also links at the bottom of each page to take you back to this chapter menu or the main index for ease of looking things up.
Contents
PREVIEW
EDITION

55
Chapter 01 Introduction 7 Introduction to close up and macro photography 8 About the basics 9Chapter 02 Reference 10 About the reference chapter 11 Camera choices for macro and close up 12 Camera launch dates 13 Viewing differences DSL-R vs Mirrorless 14 DSLR - Optical viewfinder 15 Mirrorless viewing options 16 Sensor sizes 17 ISO 19 ISO and tripod shooting 21 High ISO settings and noise reduction 22 Shutter speeds 24 Shutter speeds for macro 25 Aperture 26 Depth of field 27 Depth of field - Focal length effect - Close up 28 Depth of field - Focal length effect - Macro 29 Sensor size effect on depth of field 30 Depth of field - getting background blur 31 Depth of field - Apertures and their effect 32 The exposure triangle 35 Exposure value charts - Daytime 36 Focus lock 37 Viewfinder information 38 Q screen 39 Q button functions 40 Mirrorless Q button functions 42Chapter 03 Equipment selection 43 Magnifications 44 Magnification factors 45 Magnifications needed 46 Minimum shooting distances 47
Getting the highest magnifications from your lenses 48 The lenses you need for close ups 50 Background differences 51 Getting in closer 53 Close up lenses 54 Extension tubes 56 Lenses - Extenders 60 Focus limiters 62 Macro lenses 63 Why wide angle macro lenses? 64 Minimum shooting distance 65 RF 35mm f1.8 Macro IS STM 66 EF-S 35mm f2.8 Macro IS STM 67 EF-M 28mm f3.5 IS STM 68 EF 50mm f2.5 Macro 69 EF-S 60mm f2.8 Macro IS STM 70 EF 100mm f2.8 USM Macro 71 EF 100mm f2.8L IS USM Macro 72 EF 180mm f3.5L USM Macro 73 MP-E 65mm f3.5 Macro photo lens 74 Lens summary 75 Handheld or tripod? 76 Tripods for macro 78 Tripod heads for macro 79 Focusing stages 80 Chapter 04 Camera modes and basic overrides 81 Camera settings for close up and macro photography 82 Using close up / SCN/Pic mode 84 Using program mode 85 Using program shift 86 Using AV mode 87 Using Auto ISO settings 88 ISO speed setting options - Control over Auto ISO 89 Using TV mode 92 Exposure problems 93
Introduction Contents
Taken with an EF 70-300mm f4-5.6 IS II USM at 300mm on an EOS 5D Mark IV. 1/500th f11 1600 ISO
Chapter index
PREVIEW
EDITION

66
Exposure compensation 94 Using M mode 95 Using M mode with Auto ISO 96 FV Mode 97 FV mode settings 98 Using FV mode - Like P mode 99 Using FV mode - like TV mode 100 Using FV model - like AV mode 101 Using FV mode - like M mode with Auto ISO 102 Using FV mode - Exposure compensation settings 103 Using FV mode - like M mode 104 Mode summary 105Chapter 05 Focusing for close up and macro 106 Focusing for close up and macro subjects 107 Focusing areas to avoid 112 Focusing on mirrorless models 113 The difference where you focus can make 115 Macro and manual focusing 116 Mirrorless/Live view focusing aids 117 Focus guide - R series only 119 Depth of field preview 120 Moving macro subjects 121 Coping on windy days 123 Focusing summary 124Chapter 06 Metering for close up and macro 125 Metering for close up and macro photography 126 Evaluative metering 127 Other metering modes 129Chapter 07 Other camera settings 131 Other camera settings 132 White balance 133 Picture Style - controlling how the image looks 135 Other camera settings 137 Auto lighting optimizer 137
Available light shooting 179 Lighting directions 181 Intensity of light 182 Chapter 12 Using additional lighting 183 Additional lighting 184 About LED lights 186 Practical exposures using LED lights 189 Colour temperatures and LED lights 190 Lighting angles with LED lights 191 Positioning LED lights 192 Comparing LED lights to flash 193 Flash options for close up and macro 194 Why use flash for macro? 195 Built in flash 196 External flash units 197 Macro flash - MR 14 EX II 198 Macro flash units MT24 EX / MT 26 EX II 199 Taking flash off camera 200 Wireless flash options 201 Basic wireless flash set up 202 Camera settings for off camera flash 203 Where to position off camera flash 205 Mode usage for flash 207 How to get black backgrounds 211 Other products and services 212
Introduction Contents
Custom controls 137 Drive mode 137Chapter 08 Focus stacking / Bracketing 138 About focus stacking 139 Manually shooting images to focus stack 140 Merging manually shot images in Photoshop 141 Focus bracketing in camera option 143 Focus bracketing lens compatibility 145 Focus bracketing settings 146 Focus bracketing shooting techniques 148 Merging focus bracketed images in DPP 149 The depth compositing editing tool 153 Focus Bracketing and Stacking summary 154Chapter 9 Analysing the image 155 Analysing close up and macro images 156 The evaluation process 158 Evaluating light - Brightness 159 Evaluating light - Intensity 160 Evaluating light - Direction 161 Evaluating light - Colour 162 Evaluating - Lens selection - close up 163 Evaluating - lens selection - macro 164 Evaluating - Shooting angle 165 Specific shutter speed or aperture requirements 166 Accessories that maybe needed 169Chapter 10 Framing for close up and macro 170 Framing for close up and macro 171 Positioning within the frame 172 Leave space in the right place 173 Clean backgrounds 174 Colour interaction 175 Number of subjects within an image 176Chapter 11 Lighting for close up and macro 177 Lighting for close up and macro 178
Chapter index
PREVIEW
EDITION

77
Chapter 01
Introduction
Contents Chapter index
PREVIEW
EDITION

88
Close up photography covers a very wide range of subject types and techniques. The equipment that you need varies a lot according to the magnifications that you want to work at.
In this ebook we are going to look at three distinctly different areas. Close up, Macro and Micro. Each of these has their own shooting techniques and their own specific problems that need to be overcome, to get good results.
This can be one of the most challenging areas of photography, as the distances that we are working at between the camera and our subject, makes the required depth of field challenging to get. Yet in spite of these challenges, it can also be a very rewarding area, and one that provides the opportunity to photograph on days that would not give good results in other areas of photography.
As the magnifications that you tackle increase, you start to see into a hidden world, beyond the scope of the things that we normally see. Things we can hardy see turn into objects of beauty and provide fascinating things to photograph.
It is an area that you can do close to home, and any garden or park will provide a wealth of subjects for you to practice on. The equipment is affordable, especially at the lower magnifications and easy to carry, as it is all relatively small and light.
This makes it an area of photography that can be enjoyed by all photographers and regardless of the seasons, there is always something of interest to take.
Taken with an RF 35mm f1.8 Macro IS STM lens on an EOS R. 1/160th f9 320 ISO
Introduction Introduction to macro and close up
Contents Chapter index
PREVIEW
EDITION

99
What I consider to be the basics of photography that all photographers should be fully familiar with and what a lot of photographers actually understand seems to be getting further apart as the years go by.
I spend a lot of my time out and about doing practical training with photographers who consider themselves either an intermediate or advanced level. Yet so often I see people struggling with basic thing such as what ISO to use for a specific light level, or why they are getting blurred images when all it takes is setting the correct shutter speed for the lens that they are using. Knowing what the ISO, shutter speed or aperture is and vaguely what it does, is not enough, especially for this very technical area of photography. You need to understand the relationship between those three key settings and what is achievable in different light levels. You also need to know the increments that they work in and how to work out what to do to get the settings you need.
Understanding the focusing options and things such as metering modes is also important. I keep finding people working on spot metering as they think its the same as setting a single AF point. Mode wise you should be able to chose the exposure mode that works best, not the only one you know what it does. I am seeing so many newcomers shooting on manual when they would get so much better results on Av or TV mode. It’s seems to be largely as the “photographer” who taught them only ever learnt to use manual. I shoot macro images mostly on AV mode as you can control the depth of field and on Auto ISO I can get the camera to provide the right light level for the image. If the images are coming out a little light or dark I can use the exposure compensation on the camera to correct the exposure, this is not a new feature as it has been on cameras since the 70’s and on every EOS models that has been produced, yet every week I come across photographers that are by no means novices, who do not know it exists.
The image to the right was shot on a very overcast day. It’s a good example of why understanding the basics are so important. On an overcast day the basic light level is know as EV 10 - it all relates to the weather. So at 100 ISO we can get 1/30th at f5.6, so to get the light level we need taking the ISO up to 1600 ISO will give us the same amount of light on the sensor at the smaller aperture and higher shutter speed that we need to shoot at. Advanced photographers should be able to work that out by themselves yet every week, more of the people I see, fail to understand these basics, than actually know them. Hence the addition of the reference section.
Taken with an RF 35mm f1.8 Macro IS STM lens on an EOS R. 1/125th f11 1600 ISO
Introduction About the basics
Contents Chapter index
PREVIEW
EDITION

1010
Chapter 02
Reference
Contents Chapter index
PREVIEW
EDITION

1111
About the reference chapter
This chapter is designed to act as a reference section for the more experienced and to top up the knowledge for those that are new to photography or self taught where there may be gaps that need to be filled in. Macro photography is a technical topic and so it will use a number of specific photographic terms which not all photographers will be familiar with. I have aimed this book at intermediate to advanced level photographers who should be fairly familiar with most of these topics. This chapter is to help you understand some of the terms that you may not be familiar with.
Macro also has some deviations within the normal rules of photography which you need to be aware of even if you are an experienced photographer.
I lead a lot of training events and one thing that over 20 years of training photographers has taught me, is that the grasp of these basics can vary a lot. So although there will be some photographers who are fully conversant with these topics there will be many that will need this reference section to brush up the basic understanding to make the most out of the techniques explained within this book. I recommend that you take at least a glance through it, if nothing else look at the pictures and their captions as some may well challenge what you believe you know. As photography is evolving all the imaging techniques which were used 20 or more years ago may have far better ways of working today.
A case in point is the ISO settings. Today we get to choose the settings we want to shoot and use the ISO to give us the light levels we need. However, many photographers cling on to mistaken beliefs that digital works like film and the lowest possible setting needs to be used. I am always baffled as to why that is, after all one is a chemical process and one is electronic and the two processes cannot be compared in anyway.
Coming from a technical specialist background, I have always looked at every new advancement and tested it to see how well it works. I would never believe what someone else tells me, unless they were another technical specialist who is training me on the product. By experimenting with new features and understanding new technology it allows me to get good results in a much wider range of situations than ever before.
Reference Index
Camera choices for macro and close up 12 Camera launch dates 13 Viewing differences DSL-R vs Mirrorless 14 DSLR - Optical viewfinder 15 Mirrorless viewing options 16 Sensor sizes 17 ISO 19 ISO and tripod shooting 21 High ISO settings and noise reduction 22 Shutter speeds 24 Shutter speeds for macro 25 Aperture 26 Depth of field 27 Depth of field - Focal length effect - Close up 28 Depth of field - Focal length effect - Close up 29 Sensor size effect on depth of field 30 Depth of field - getting background blur 31 Depth of field - Apertures and their effect 32 The exposure triangle 35 Exposure value charts - Daytime 36 Focus lock 37 Viewfinder information 38 Q screen 39 Q button functions 40 Mirrorless Q button functions 42
Contents Chapter index
PREVIEW
EDITION

1212
Camera choices for macro and close up
This is an area of photography that can be tackled with any EOS model no matter how basic the specifications. Macro photography is all about understanding the techniques and so does not rely on the camera model having specific features or controls.
The EOS range now contains a wide range of models featuring different sensor sizes, called APS-C or occasionally 1.6x crop models and the other type being the 1x or full frame sensor models. Both sensor sizes can have advantages for this type of photography. The smaller sensors make it easier to fill the frame with small subjects, I will look at why shortly. As such it makes the techniques such as getting everything sharp - or depth of field as it is correctly known easier. The full frame models on the other hand offer better scope and quality when working in lower light levels and so can make it easier to get the settings that you need whilst retaining a good quality.
The listings to the right show the range of models that have at some time been available in the EOS range up to the time of going to print (Jan 2020) split into the various camera groups. Mirrorless models allow you a better preview of the image that you are taking and can make this type of photography a bit easier as you quite literally are seeing the finished image before taking it. Over the next couple of pages I will explain where the differences in the various models in the market today exist and how it can affect the viewing and the focusing on the camera.
The brightness of the viewfinder can also be important as if using the depth of field preview feature that I will look at in depth later on, the mirrorless models that feature it allow you to preview at full brightness, whereas the DSLR models which have a pentaprism use the more traditional system where the brightness of the image dims, when the depth of field preview is being used. DSLR models can work just like mirrorless models, if the rear (Live view) screen is used when viewing, though this is really only practical when shooting on a tripod.
APS-C OR 1.6 SENSOR - DSLR MODELS
1000D, 1100D, 1200D, 1300D, 4000D and 2000D100D, 200D, 250D, 300D, 350D, 400D, 450D, 500D, 550D, 600D, 650D, 700D, 750D, 760D, 800D, 77DD30, D60, 10D, 20D, 30D, 40D, 50D, 60D, 70D, 80D,90D 7D and 7D Mark II
MIRRORLESS MODELS APS-C OR 1.6 SENSORM100, M200 and M6 M1, M2, M3 and M10, M5, M50. M6 Mark II
FULL FRAME MODELS - DSLR
6D, 6D Mark II5D, 5D Mark II, 5D Mark III, 5D Mark IV1DS, 1DS Mark II, 1Ds Mark III, 1DX, 1 DX Mark II1.3 sensor models (older professional models)1D, 1D Mark II, 1D Mark II N, 1D Mark III, 1DS Mark IV
FULL FRAME MODELS - MIRRORLESSEOS RP, EOS R
Contents Chapter index
PREVIEW
EDITION

1313
Production dates DIGIC VersionEOS-1D 2001 - 2004 -EOS-1D Mark II 2004 - 2005 IIEOS-1D Mark II N 2005 - 2007 IIEOS-1D Mark III 2007 - 2010 dual IIIEOS-1D Mark IV 2009 - 2012 4EOS-1D X 2012 - 2016 dual 5+EOS-1D X Mark II 2016 - 2020 dual 6+EOS-1D X Mark II 2016 - Current 8 and XEOS-1Ds 2002 - 2004 -EOS-1Ds Mark II 2004 - 2007 IIEOS-1Ds Mark III 2007 - 2012 dual IIIEOS 5D 2005 - 2008 IIIEOS 5D Mark II 2008 - 2012 4EOS 5D Mark III 2012 - 2016 5+EOS 5D Mark IV 2016 - Current 6+EOS 5DS 2015 - Current dual 6EOS 5DS R 2015 - Current dual 6EOS 6D 2012 - 2017 5+EOS 6D Mark II 2017 - Current 7EOS 7D 2009 - 2014 dual 4EOS 7D Mark II 2014 - Current dual 6EOS 10D 2003 - 2004 IEOS 20D 2004 - 2006 IIEOS 30D 2006 - 2007 IIEOS 40D 2007 - 2009 IIIEOS 50D 2008 - 2010 4EOS 60D 2010 - 2015 4EOS 70D 2013 - 2016 5+EOS 77D 2017 - Current 7EOS 80D 2016 -2019 6EOS 90D 2019 - Current 9EOS 100D/Rebel SL1 2013 - 2017 5EOS 200D/Rebel SL2 2017 - 2019 7
EOS 250D/Rebel SL3 2019 - Current 8EOS 300D/Rebel 2003 - 2005 IEOS 350D/Rebel XT 2005 - 2006 IIEOS 400D/Rebel XTi 2006 - 2008 IIEOS 450D/Rebel XSi 2008 - 2010 IIIEOS 500D/Rebel T1i 2009 - 2011 4EOS 550D/Rebel T2i 2010 - 2012 4EOS 600D/Rebel T3i 2011 - 2015 4EOS 650D/Rebel T4i 2012 - 2013 5EOS 700D/Rebel T5i 2013 - 2015 5EOS 750D/Rebel T6i 2015 - 2019 6EOS 760D/Rebel T6s 2015 - 2019 6EOS 800D/Rebel T7i 2017 - 2019 7EOS 1000D/Rebel XS 2008 - 2011 IIIEOS 1100D/Rebel T3 2011 - 2014 4EOS 1200D/Rebel T5 2014 - 2016 4EOS 1300D/Rebel T6 2016 - 2019 4+EOS 2000D/Rebel T7 2018 - Current 4+EOS 4000D/Rebel T100 2018 - Current 4+EOS D30 2000 - 2002 -EOS D60 2002 - 2003 -EOS M 2012 - 2015 5EOS M2 2013 - 2015 5EOS M3 2015 - 2018 6EOS M5 2016 - Current 7EOS M6 2017 - 2019 7EOS M10 2015 - 2017 6EOS M50 2018 - Current 8EOS M100 2017 - 2019 7EOS M200 2019 - Current 8EOS M6 Mark II 2019 - Current 8EOS R 2018 - Current 8EOS RP 2019 - Current 8
Camera launch dates
This may seem to be a strange thing to put in the reference section, however, it is useful to know when the model that you use came out as to avoid repeating lists of cameras many times within the book it is easier to say that the feature appeared in a specific year and has been on almost everything since.
The exception to this rule tends to be the very basic models such as the 2000D and 4000D in the current ranges. To keep the price very low on these models Canon uses older processing chips within these models and that means that some of the very latest features may not be available, as it comes in with a specific processor on the models which Canon refers to as DIGIC processors. So it is worth looking at the processing number as well, as some of the 2015 onwards features rely on having at least a DIGIC 6 processor and models such as the 2000D and 4000D are still using the 4+ processor version.
The latest processor version is DIGIC 9 though most current models are using either the 7 or 8 versions. Its only the 90D at the time of writing that has the latest 9 series processor.
The higher level cameras shoot at faster frames per second rates and have more sophisticated focusing systems and so it is normal for them to have a dual processor, which is two processors being run together to give additional processing power.
Contents Chapter index
PREVIEW
EDITION

1414
DSLR – LOOKING THROUGH VIEWFINDER DSLR – TAKING AN IMAGE OR USING LIVE VIEW MIRRORLESS - ALL OPERATIONS
It is important to understand how Mirrorless cameras differ from the more traditional DSLR models that we are used to, as this does affect how they are used to a degree.
A DSLR model has a reflex mirror. When viewing, this mirror is down, allowing light to be reflected up into the camera’s pentaprism and then up into the camera’s optical viewfinder. This is shown on the image above. By utilising a reflex mirror we are able to see through the lens. This allows us to see the image being captured through the lens.
Of course the mirror is actually blocking where the image is going to be taken and so when the shutter
is fired, the mirror lifts up and the picture is then taken through onto the image sensor. Although this allows us to see both framing and focusing, it does not allow us to preview exposure or white balance.
Later DSLR models are fitted with a feature called Live View. This allows the camera to be used with the mirror raised, utilising a direct feed from the imaging sensor. This allowed exposure, white balance and other image processing options to be previewed in real-time before the image was taken.
On mirrorless models both the reflex mirror and the pentaprism have been removed. On R series mirrorless the pentaprism is being replaced by an
electronic viewfinder. In addition the image can also be viewed on the rear screen just like when using Live View on the DSLR models.
However, not all mirrorless models have electronic viewfinders, relying instead on the rear screen LCD screen for viewing the image.
Regardless of viewing in an electronic viewfinder or on the rear screen, mirrorless models allow you to preview exactly how the image is going to look when taken, when shooting with ambient light. If shooting with flash this changes as you cannot preview flash light until the image is actually taken.
Viewing difference DSLR vs Mirrorless
Contents Chapter index
PREVIEW
EDITION

1515
DSLR - Optical viewfinder
What most photographers do not realise is that as we go up through the Canon range the optical viewfinder that we normally look through to take the picture actually changes in its construction.
The image immediately to the right is a cut through image of the Canon 450D. I know that’s quite an old camera but sadly Canon longer produces these lovely cut through diagrams. If you compare the pentaprism area which I’ve circled with the camera on the far right which is a EOS 40D you may notice a difference. The EOS 40D features a glass pentaprism, which the light is reflected through to allow us to view the image. The EOS 450D utilises a mirror box type pentaprism which is a hollow box with an interior mirrored surface that reflects the light in the same way as a glass pentaprism does.
This is why there’s quite a significant weight difference between the entry level, compact and introductory models in the range and the enthusiast and higher level models. Nearly all the additional weight on the higher level models is being created by the glass pentaprism. Of course the larger batteries also add a little bit of weight along with slightly more robust body construction.
A logical question therefore to ask is why not use the smaller and lighter mirror boxes on all models. Although the mirror box works well the actual amount of light that it transmits is significantly lower than the glass pentaprisms. Therefore the view that you see through the viewfinder is darker than the viewfinder would be on the higher-level models.The glass mirror box also has an effect on the size of
the viewfinder at the rear of the camera and generally the high-level models have bigger viewfinders which are significantly brighter. This is even more noticeable on the full frame models where viewfinders are once again larger and brighter.
The focusing on the DSLR models is actually located in the base of the camera and so for focusing some light passes through the main mirror onto the secondary mirror and down onto the focusing sensors. This is why the focusing system is different when using live view to when shooting with the optical viewfinder as when the mirror is raised for live view shooting the normal focusing system is unable to operate. The basics of the normal focusing system is shown in the image above. In the cut
through diagrams above you can see the secondary mirror and some of the AF components.
Contents Chapter index
PREVIEW
EDITION
1616
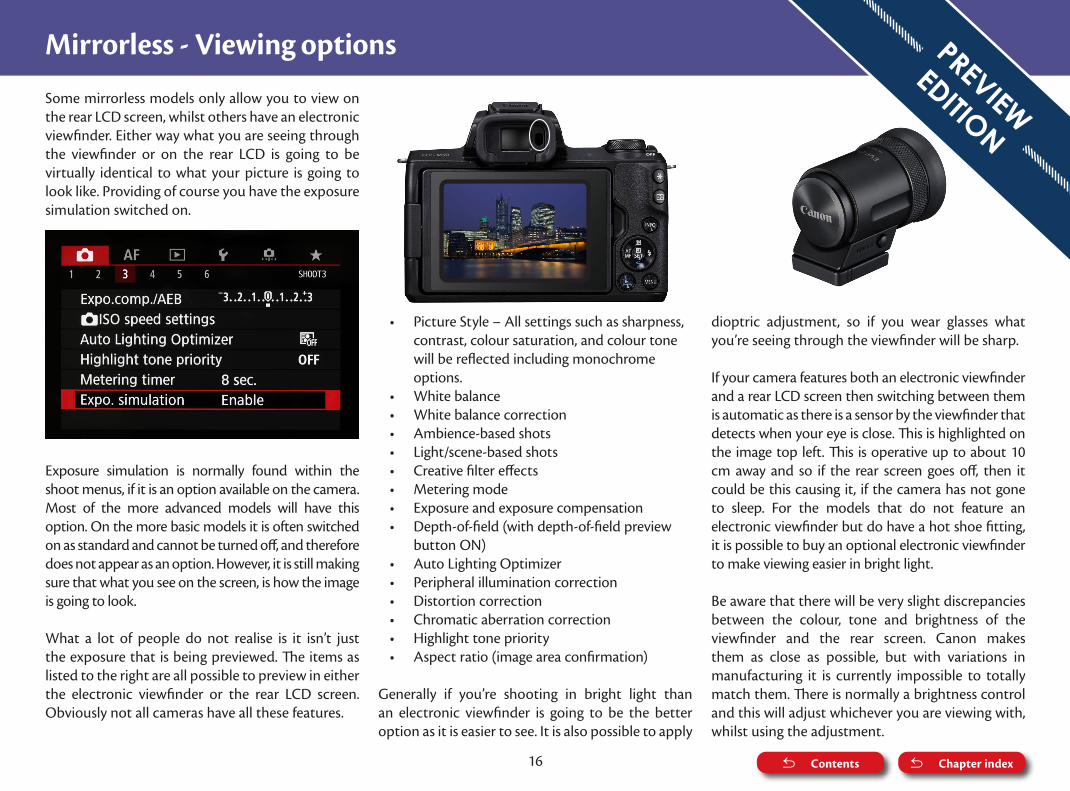
Mirrorless - Viewing options
Some mirrorless models only allow you to view on the rear LCD screen, whilst others have an electronic viewfinder. Either way what you are seeing through the viewfinder or on the rear LCD is going to be virtually identical to what your picture is going to look like. Providing of course you have the exposure simulation switched on.
• Picture Style – All settings such as sharpness, contrast, colour saturation, and colour tone will be reflected including monochrome options.
• White balance• White balance correction• Ambience-based shots• Light/scene-based shots• Creative filter effects• Metering mode• Exposure and exposure compensation• Depth-of-field (with depth-of-field preview
button ON)• Auto Lighting Optimizer• Peripheral illumination correction• Distortion correction• Chromatic aberration correction• Highlight tone priority• Aspect ratio (image area confirmation)
Generally if you’re shooting in bright light than an electronic viewfinder is going to be the better option as it is easier to see. It is also possible to apply
dioptric adjustment, so if you wear glasses what you’re seeing through the viewfinder will be sharp.
If your camera features both an electronic viewfinder and a rear LCD screen then switching between them is automatic as there is a sensor by the viewfinder that detects when your eye is close. This is highlighted on the image top left. This is operative up to about 10 cm away and so if the rear screen goes off, then it could be this causing it, if the camera has not gone to sleep. For the models that do not feature an electronic viewfinder but do have a hot shoe fitting, it is possible to buy an optional electronic viewfinder to make viewing easier in bright light.
Be aware that there will be very slight discrepancies between the colour, tone and brightness of the viewfinder and the rear screen. Canon makes them as close as possible, but with variations in manufacturing it is currently impossible to totally match them. There is normally a brightness control and this will adjust whichever you are viewing with, whilst using the adjustment.
Exposure simulation is normally found within the shoot menus, if it is an option available on the camera. Most of the more advanced models will have this option. On the more basic models it is often switched on as standard and cannot be turned off, and therefore does not appear as an option. However, it is still making sure that what you see on the screen, is how the image is going to look.
What a lot of people do not realise is it isn’t just the exposure that is being previewed. The items as listed to the right are all possible to preview in either the electronic viewfinder or the rear LCD screen. Obviously not all cameras have all these features.
Contents Chapter index
PREVIEW
EDITION

1717
Sensor sizes
EOS models have two different sizes of imaging sensor today. It used to be three with the professional models offering a 1.3x sensor as well but this vanished when the EOS-1D X appeared as a full frame model and has not been on any models since then.
This is an area that some photographers get very confused about so I thought it was worth including in the reference section to understand the differences made by the sensor size.
Full frame or 1.0x sensors are found on the high end models (EOS-1D X series, EOS 5D, EOS 6D series and EOS R series only). The sensor is 36mm x 24mm in size.
APS-C or 1.6x crop sensors are found on the more affordable models and have a sensor size of approximately 22.4mm x 15mm.
This difference in size changes what a specific focal length of lens will capture. The smaller sensor effectively crops the image compared to the full frame models. The crop factor is often called a magnification factor, though a 100mm lens is always a 100mm lens regardless of the body that you use it on. But the smaller sensor effectively crops the area that is being captured by the lens, so it looks like the lens magnifies more.
The crop can be a good thing if you mostly shoot with telephoto or macro lenses as it makes filling the frame a lot easier. However, it will mean that you need to buy significantly wider lenses to give a good
wide angle than you would need on the full frame models.
This is why Canon make the EF-S range of lenses for the DSLR APS-C models and the EF-M lenses for the M series mirrorless models featuring the smaller sensor – to give a range of wide angle lenses especially designed for these models at a more affordable price point.
The image above shows the benefit of using a APS-C
1.6x crop or APS-C sensor area
1x or full frame sensor area
or 1.6x model compared to on a 1.0x or full frame model as it is much easier to fill the frame.
However, when shooting subjects that need wide angle lenses, the benefit with the 1.0x or full frame models is that a subject fits in the frame nicely with a 24mm lens. On an APS-C or 1.6x model it will need a 15mm lens to achieve the same. This is why we have listed focal lengths from both in the table below, as with wide angle lenses it does change how the lens is described – the lenses for the smaller
Contents Chapter index
PREVIEW
EDITION

1818
Sensor sizes
sensor cameras need to be a much wider focal length to give a good field of view.
1.0x / Full frame APS-C / 1.6xWide angle 24mm - 35mm 15mm - 35mmStandard 36mm - 60mm 36mm - 60mmTelephoto 70mm - 300mm 70mm - 300mm
I have given a chart below that shows the focal length that is used on the 1.0x or full frame models and shown to the right of it the lens that would be needed on the 1.6x or APS-C models to give exactly the same amount in the frame. I have covered the main focal lengths that may be used for close up or macro photography. This is why when you look at specific macro lenses for the different systems they offer different focal lengths. However, the lens also controls how close you have to be to get the maximum magnification of the lens and for macro work that can be an important factor, especially if shooting insects.
1.0x or Full frame 1.6x or APS -C sensor
24mm 15mm35mm 21mm60mm 37mm100mm 62mm105mm 66mm180mm 112mm200mm 125 mm300mm 188 mm
The images above were shot at the same distance to the subject using focal lengths that matched each other, but on bodies with the two different sensor sizes. They were shot at the minimum focusing distance on a 24-105mm zoom lens showing the very different areas being captured. Much of the time when working with the APS-C models you will find yourself shooting at lower magnifications and often working further away. This can result in greater depth of field as depth of field increases as you shoot at greater distances from your subject.
However, though you might think that the smaller sensors must be better for macro work due to this, there is another consideration and that is the much wider ISO range offered by the full frame models and the higher quality given at the higher ISO settings on full frame which also needs to be considered.
24mm lens min focus on 1.0x sensor, f11
105mm lens min focus on 1.0x sensor, f11
Contents Chapter index
24mm lens min focus on 1.6x sensor, f11
105mm lens min focus on 1.6x sensor, f11
PREVIEW
EDITION

1919
ISO
The ISO controls the sensitivity of the imaging sensor to light. In the days when we shot film we were limited to the ISO setting of the film. Now with digital models the ISO can be changed frame by frame, making it easier to shoot in a wide range of lighting conditions.
The other key advantage with digital models is that the quality achievable at the higher ISO settings is much better than we were used to when shooting with film. With settings up to 3200 ISO on the 1.6x sensor models and as high as 12,800 ISO on the full frame models giving excellent quality. Therefore what we think of as low, mid and high ISO have been redefined.
LOW ISO 100-400These ISOs are used when the light is bright or if shooting on a tripod. These will give the best quality, but a lot of light is needed to successfully use these ISO settings handheld.
MID ISO 800-3200These are the ISO settings that will need to be used when the weather is overcast and the light levels are poor. The light on an overcast day can be up to 4 or 5 stops lower than on a bright sunny day. On modern day EOS cameras the quality is still very good at these settings.
HIGH ISO 6400-51200Used when handholding in low light levels. Although the image will have more noise, it’s preferable than getting blurred images through camera shake. Make sure that the High ISO noise reduction feature is switched on when using these settings. EOS R, 6400 ISO 1/800th second at f11 with a 300mm lens, handheld
Contents Chapter index
PREVIEW
EDITION

2020
ISO
A key problem that I see when training on macro photography on less than ideal days, is a lack of understanding as to how low the light levels can be.
The key exposures you need to know for different weather conditions are:
Bright sunshine 1/125 f11 100 ISOLight cloud 1/125 f5.6 100 ISOOvercast 1/125 f4 100 ISOHeavy overcast 1/125 f2.8 100 ISO
The problem is that the settings above do not work for macro photography as 1/125 is too slow for use with a lot of macro lenses (more about that shortly) and even for close up shooting you really want to shoot at about f11 whilst for macro f22 is more appropriate for many subjects. However we can increase the ISO to get much more realistic settings with the same amount of light falling on the sensor as above.
Bright sunshine 1/250 f11 200 ISO1/250 f22 800 ISO
Light cloud 1/250 f11 800 ISO1/250 f22 3200 ISO
Overcast 1/250 f11 1600 ISO1/250 f22 6400 ISO
Heavy overcast 1/250 f11 3200 ISO1/250 f22 12800 ISO
You can see that as the weather gets worse we have to go to higher ISO settings to achieve the settings that we really need. I would normally avoid shooting on a very overcast day as it can be almost
impossible to get the settings that you really need without either compromising on the settings or working at a very high ISO.
I will look in more depth at how we get the settings that I have shown to the left a little later in this chapter when I look at how the ISO, shutter speed and aperture always work together and indeed always give the same options dependent on the weather prevailing at the time of shooting.
Taken with an RF 35mm f1.8 Macro IS STM lens on an EOS R. 1/125th f22 500 ISO
Even on a sunny day you will find that if you want the narrower apertures, as in the image above, you will need to be well above the 100 ISO that many photographers try and work at, as it is what they used in the days of film.
The result of using such a low ISO is normally blur caused by either camera movement or subject movement.
Contents Chapter index
PREVIEW
EDITION

visit: www.eos-magazine.com/ebooks
eBooks for your EOS photography
You’ve just read a free 20-page preview of this eBook, part of a comprehensive series of Canon EOS camera eBooks that I’ve produced, based on years of experience training Canon EOS photographers like you. Thanks for downloading it.
There’s much, much more – most of my eBooks are around 150 pages long, so you’ve had just a small taste of what you can learn about your camera. And it won’t cost you the earth – prices start from just £4.95.
So get the COMPLETE picture – buy the full version of this eBook and, in minutes, you’ll have the key to unlocking your EOS camera and your potential as a photographer.
10% offquote
FULL10
Nina
UNLOCK
THE FULL
VERSION