
Clockwise Manual - Starinstarin.info/Product Info/Advanced Network Devices/Manuals/Clockwise... ·...
60
[2013] 2013 ADVANCED NETWORK DEVICES 3820 NORTH VENTURA DR. ARLINGTON HEIGHTS, IL 60004 U.S.A ALL RIGHTS RESERVED Clockwise Manual
Transcript of Clockwise Manual - Starinstarin.info/Product Info/Advanced Network Devices/Manuals/Clockwise... ·...
[2013]
2013 ADVANCED NETWORK DEVICES
3820 NORTH VENTURA DR.
ARLINGTON HEIGHTS, IL 60004
U.S.A
ALL RIGHTS RESERVED
Clockwise Manual
Clockwise Manual
For support, visit www.anetdsupport.com Version 2.1
TABLE OF CONTENTS
INTRODUCTION ......................................................................................................................................................................... 4
Header................................................................................................................................................................................................ 4
Footer ................................................................................................................................................................................................. 5
Settings .............................................................................................................................................................................................. 6
Priority Level .................................................................................................................................................................................... 11
Device List ........................................................................................................................................................................................ 11
DEVICES TAB ............................................................................................................................................................................ 12
Grouping Devices ............................................................................................................................................................................. 13
Accessing Devices ............................................................................................................................................................................. 14
Graphics Builder ............................................................................................................................................................................... 16
CHIMES TAB ............................................................................................................................................................................. 18
Sound Libraries and Programs ......................................................................................................................................................... 18
Scheduling Options .......................................................................................................................................................................... 18
Abbreviated Scheduling Tool ............................................................................................................................................................ 19
Full Scheduling Tool ......................................................................................................................................................................... 20
EVENTS TAB ............................................................................................................................................................................. 21
Adding and Editing Events ............................................................................................................................................................... 22
Event Actions and Settings ............................................................................................................................................................... 23
Event Frequency ............................................................................................................................................................................... 27
Events and Alerts Context Menu ...................................................................................................................................................... 30
Importing Events and Alerts ............................................................................................................................................................. 31
ALERTS TAB ............................................................................................................................................................................. 32
Adding and Editing Alerts................................................................................................................................................................. 33
Alert Actions and Settings ................................................................................................................................................................ 34
RSS/TWITTER FEED TAB ........................................................................................................................................................... 40
Clockwise Manual
For support, visit www.anetdsupport.com Version 2.1
Setting Up a Feed ............................................................................................................................................................................. 40
Testing a Feed .................................................................................................................................................................................. 41
Creating Custom Feeds .................................................................................................................................................................... 41
STOPWATCH TAB ..................................................................................................................................................................... 42
TIMER TAB ............................................................................................................................................................................... 44
SCOREBOARD TAB ................................................................................................................................................................... 46
LIVE SOUND TAB ...................................................................................................................................................................... 48
Paging .............................................................................................................................................................................................. 49
Two Way Intercom ........................................................................................................................................................................... 50
Monitor ............................................................................................................................................................................................ 51
Call Waiting ...................................................................................................................................................................................... 51
PC AUDIO TAB ......................................................................................................................................................................... 52
SOUND LIBRARY TAB ............................................................................................................................................................... 53
Previewing Sounds ........................................................................................................................................................................... 53
Adding New Sound Files to Clockwise .............................................................................................................................................. 54
SWITCHBOARD ........................................................................................................................................................................ 55
APPENDIX ................................................................................................................................................................................ 57
RSS Editor ......................................................................................................................................................................................... 57

Clockwise Manual
For support, visit www.anetdsupport.com Version 2.1
INTRODUCTION
Clockwise is a Windows-based software application that allows full control of all Advanced Network Devices (AND) devices. This
manual is arranged per the sections (tabs) present in the main interface window. When the Clockwise application is opened, the
Devices tab will display by default.
Note: Confirm Internet connectivity prior to opening Clockwise to ensure the application is able to communicate with the AND
endpoints on your network and auto-populate the Devices tab.
HEADER
The header is accessible from all tabs of the Clockwise application and offers a view of the system time, as well as the current
audio file playback and the next scheduled chime.
a. The buttons in the upper left corner indicate the enabled/running functions: Clock, Events, Stopwatch, and Timer.
In order from left to right: 1. Green if Clockwise is not muted. This will allow Clock Chimes to operate, if selected. 2. Red if any Events are enabled. 3. Yellow if the Stopwatch is running. 4. Yellow if the Timer is running.
b. Displays the current local system time. Clockwise will report the Greenwich Mean Time (GMT) equivalent of this time to
devices registering with Clockwise via their server settings or using Clockwise as their Network Time Protocol (NTP) server.
c. Clock chime that is scheduled to play next.
d. File name and time of the last played sound.
e. Mutes all sounds generated by Clockwise when checked. Devices can still play sounds from other sources.
f. Last played sound waveform. Click the waveform to play the sound again.
Note, when the scheduled sound begins to play the image brightens and a
red bar scrolls across the image.
Clockwise Manual
For support, visit www.anetdsupport.com Version 2.1
g. Sync Time, when checked, forces the PC clock to update itself with a time server every hour. Note that this feature requires
that Clockwise is run with elevated credentials on Windows Vista and later operating systems. This option is also available in the
Settings, Behavior tab (see Settings).
h. Skin: Sets the color of fonts and backgrounds in Clockwise based on the themes available, per user preference. This selection is
also available in the Settings, Appearance tab (see Settings).
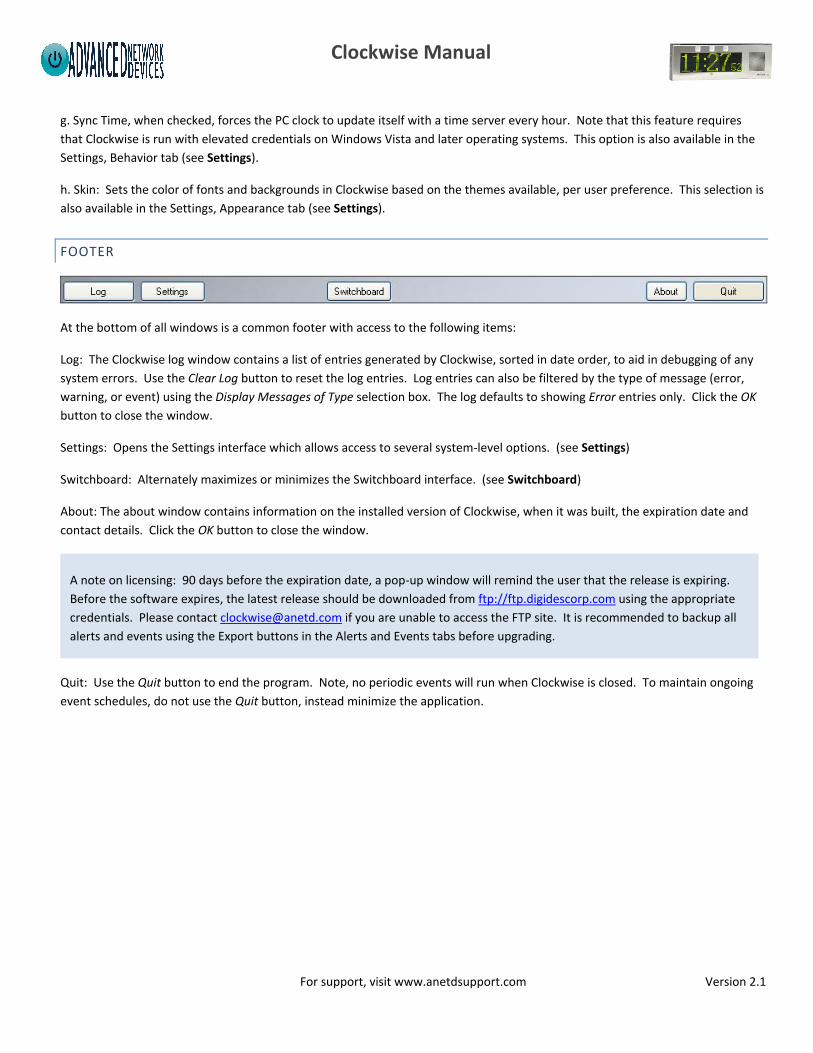
FOOTER
At the bottom of all windows is a common footer with access to the following items:
Log: The Clockwise log window contains a list of entries generated by Clockwise, sorted in date order, to aid in debugging of any
system errors. Use the Clear Log button to reset the log entries. Log entries can also be filtered by the type of message (error,
warning, or event) using the Display Messages of Type selection box. The log defaults to showing Error entries only. Click the OK
button to close the window.
Settings: Opens the Settings interface which allows access to several system-level options. (see Settings)
Switchboard: Alternately maximizes or minimizes the Switchboard interface. (see Switchboard)
About: The about window contains information on the installed version of Clockwise, when it was built, the expiration date and
contact details. Click the OK button to close the window.
Quit: Use the Quit button to end the program. Note, no periodic events will run when Clockwise is closed. To maintain ongoing
event schedules, do not use the Quit button, instead minimize the application.
A note on licensing: 90 days before the expiration date, a pop-up window will remind the user that the release is expiring.
Before the software expires, the latest release should be downloaded from ftp://ftp.digidescorp.com using the appropriate
credentials. Please contact [email protected] if you are unable to access the FTP site. It is recommended to backup all
alerts and events using the Export buttons in the Alerts and Events tabs before upgrading.
Clockwise Manual
For support, visit www.anetdsupport.com Version 2.1
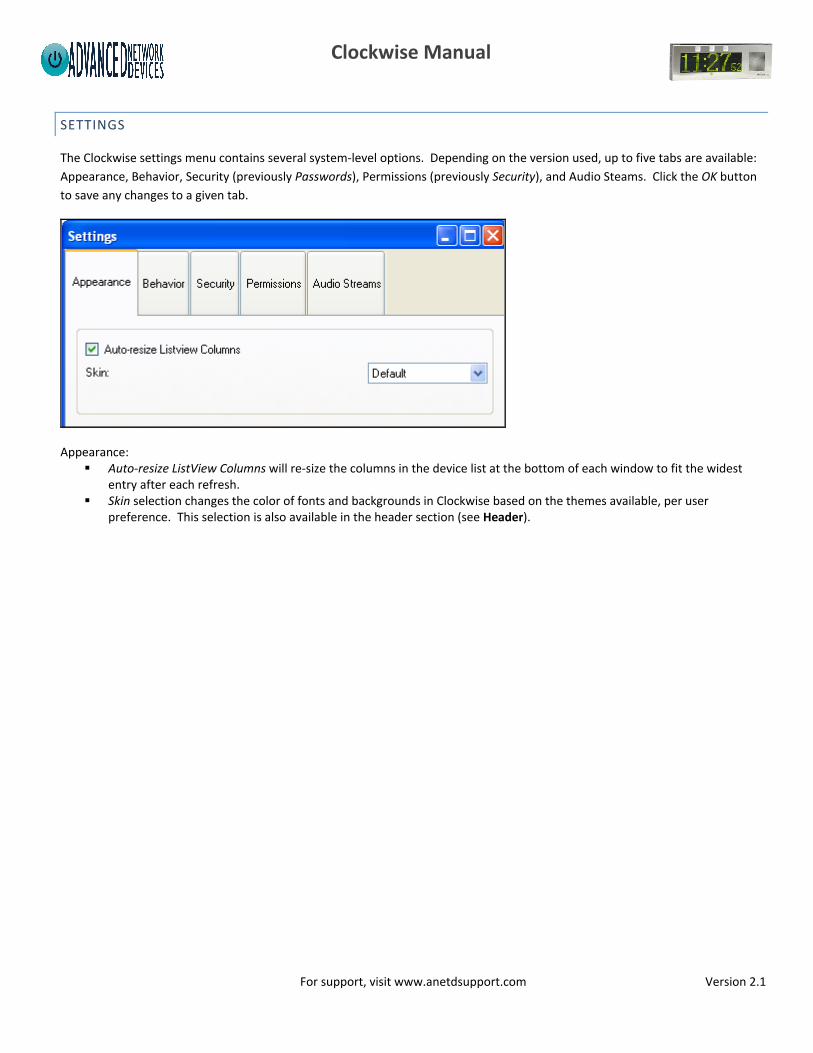
SETTINGS
The Clockwise settings menu contains several system-level options. Depending on the version used, up to five tabs are available:
Appearance, Behavior, Security (previously Passwords), Permissions (previously Security), and Audio Steams. Click the OK button
to save any changes to a given tab.
Appearance: Auto-resize ListView Columns will re-size the columns in the device list at the bottom of each window to fit the widest
entry after each refresh. Skin selection changes the color of fonts and backgrounds in Clockwise based on the themes available, per user
preference. This selection is also available in the header section (see Header).
Clockwise Manual
For support, visit www.anetdsupport.com Version 2.1
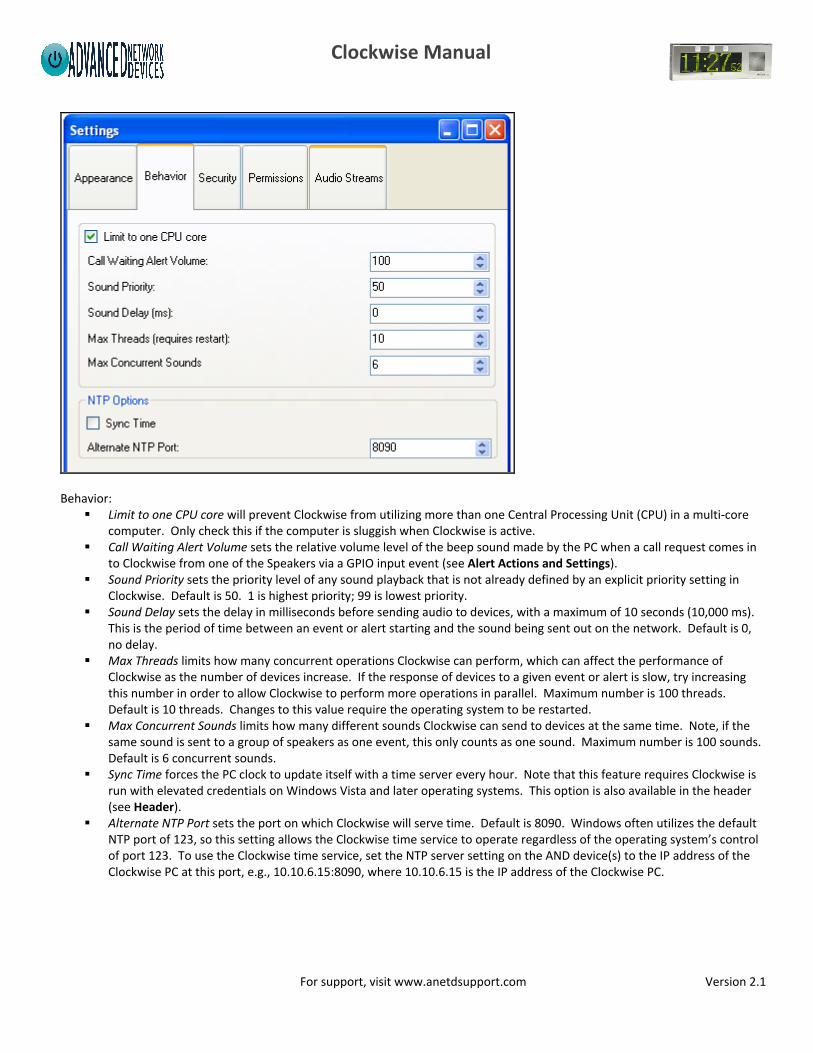
Behavior:
Limit to one CPU core will prevent Clockwise from utilizing more than one Central Processing Unit (CPU) in a multi-core computer. Only check this if the computer is sluggish when Clockwise is active.
Call Waiting Alert Volume sets the relative volume level of the beep sound made by the PC when a call request comes in to Clockwise from one of the Speakers via a GPIO input event (see Alert Actions and Settings).
Sound Priority sets the priority level of any sound playback that is not already defined by an explicit priority setting in Clockwise. Default is 50. 1 is highest priority; 99 is lowest priority.
Sound Delay sets the delay in milliseconds before sending audio to devices, with a maximum of 10 seconds (10,000 ms). This is the period of time between an event or alert starting and the sound being sent out on the network. Default is 0, no delay.
Max Threads limits how many concurrent operations Clockwise can perform, which can affect the performance of Clockwise as the number of devices increase. If the response of devices to a given event or alert is slow, try increasing this number in order to allow Clockwise to perform more operations in parallel. Maximum number is 100 threads. Default is 10 threads. Changes to this value require the operating system to be restarted.
Max Concurrent Sounds limits how many different sounds Clockwise can send to devices at the same time. Note, if the same sound is sent to a group of speakers as one event, this only counts as one sound. Maximum number is 100 sounds. Default is 6 concurrent sounds.
Sync Time forces the PC clock to update itself with a time server every hour. Note that this feature requires Clockwise is run with elevated credentials on Windows Vista and later operating systems. This option is also available in the header (see Header).
Alternate NTP Port sets the port on which Clockwise will serve time. Default is 8090. Windows often utilizes the default NTP port of 123, so this setting allows the Clockwise time service to operate regardless of the operating system’s control of port 123. To use the Clockwise time service, set the NTP server setting on the AND device(s) to the IP address of the Clockwise PC at this port, e.g., 10.10.6.15:8090, where 10.10.6.15 is the IP address of the Clockwise PC.
Clockwise Manual
For support, visit www.anetdsupport.com Version 2.1
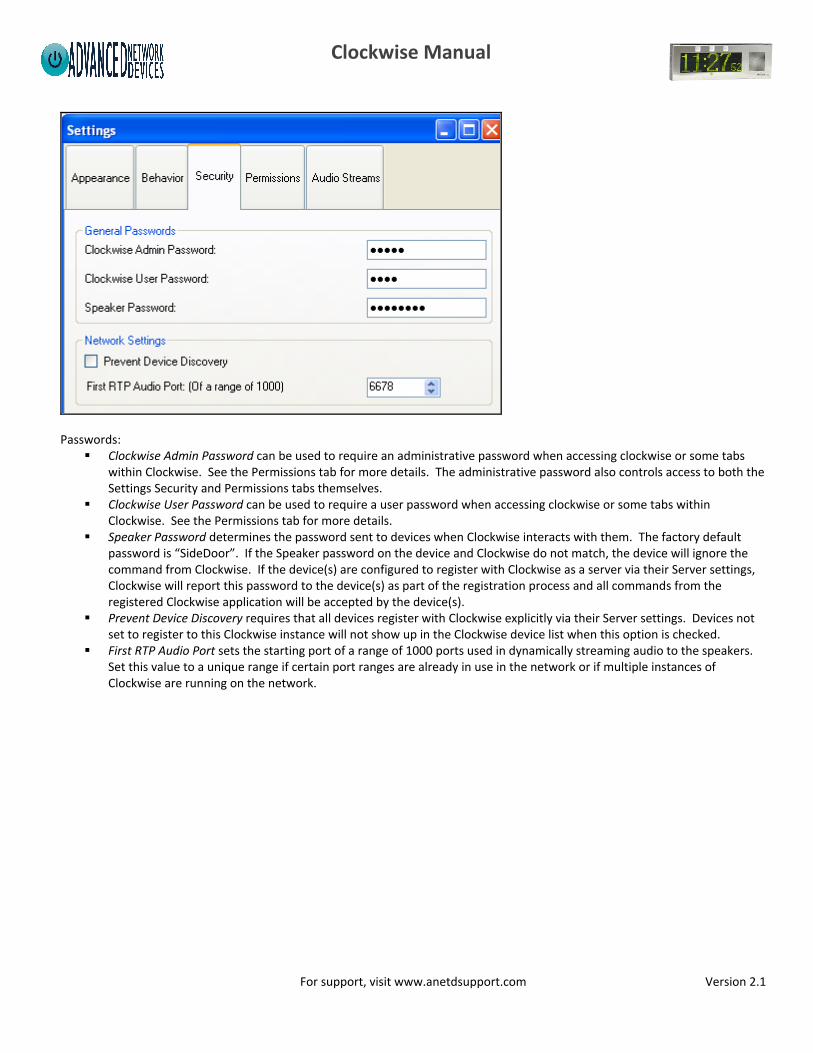
Passwords:
Clockwise Admin Password can be used to require an administrative password when accessing clockwise or some tabs within Clockwise. See the Permissions tab for more details. The administrative password also controls access to both the Settings Security and Permissions tabs themselves.
Clockwise User Password can be used to require a user password when accessing clockwise or some tabs within Clockwise. See the Permissions tab for more details.
Speaker Password determines the password sent to devices when Clockwise interacts with them. The factory default password is “SideDoor”. If the Speaker password on the device and Clockwise do not match, the device will ignore the command from Clockwise. If the device(s) are configured to register with Clockwise as a server via their Server settings, Clockwise will report this password to the device(s) as part of the registration process and all commands from the registered Clockwise application will be accepted by the device(s).
Prevent Device Discovery requires that all devices register with Clockwise explicitly via their Server settings. Devices not set to register to this Clockwise instance will not show up in the Clockwise device list when this option is checked.
First RTP Audio Port sets the starting port of a range of 1000 ports used in dynamically streaming audio to the speakers. Set this value to a unique range if certain port ranges are already in use in the network or if multiple instances of Clockwise are running on the network.
Clockwise Manual
For support, visit www.anetdsupport.com Version 2.1
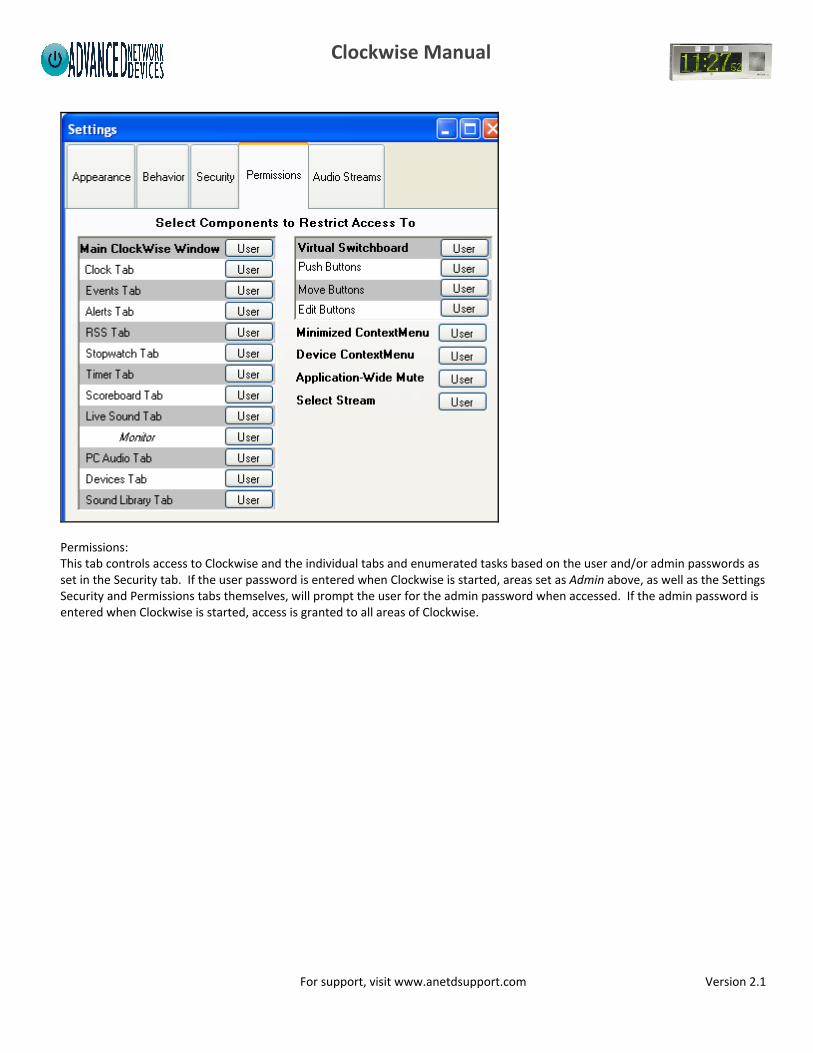
Permissions: This tab controls access to Clockwise and the individual tabs and enumerated tasks based on the user and/or admin passwords as set in the Security tab. If the user password is entered when Clockwise is started, areas set as Admin above, as well as the Settings Security and Permissions tabs themselves, will prompt the user for the admin password when accessed. If the admin password is entered when Clockwise is started, access is granted to all areas of Clockwise.
Clockwise Manual
For support, visit www.anetdsupport.com Version 2.1
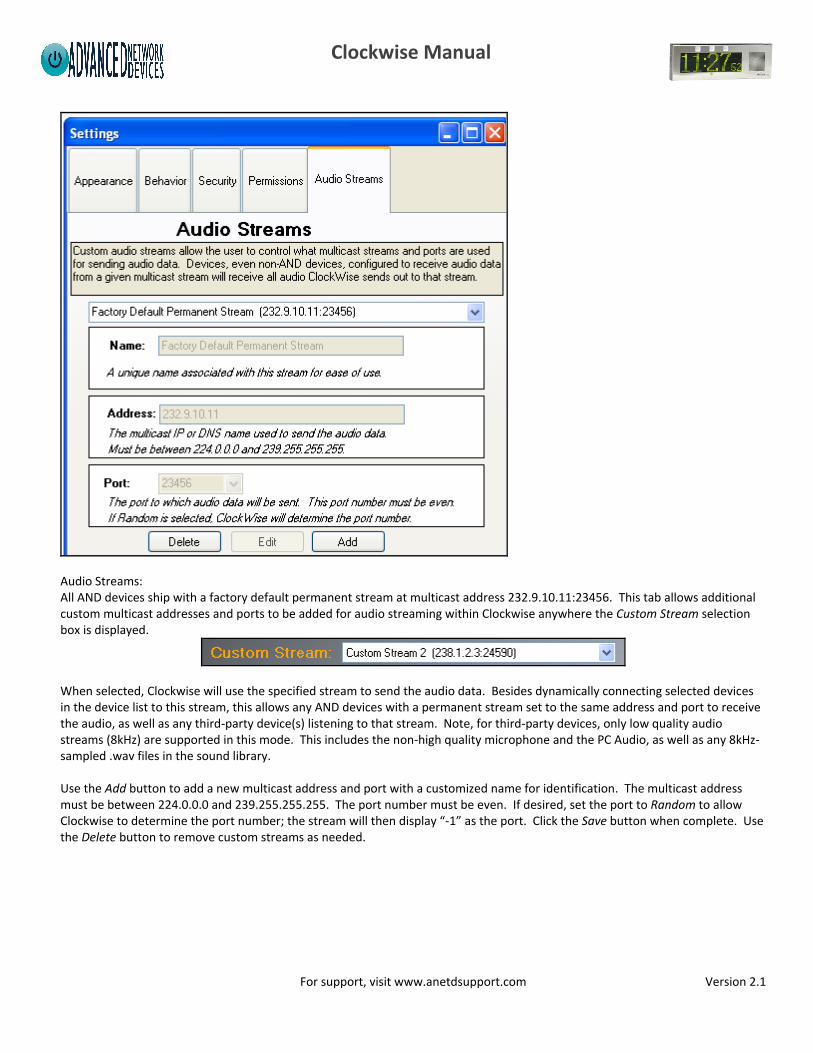
Audio Streams: All AND devices ship with a factory default permanent stream at multicast address 232.9.10.11:23456. This tab allows additional custom multicast addresses and ports to be added for audio streaming within Clockwise anywhere the Custom Stream selection box is displayed.
When selected, Clockwise will use the specified stream to send the audio data. Besides dynamically connecting selected devices in the device list to this stream, this allows any AND devices with a permanent stream set to the same address and port to receive the audio, as well as any third-party device(s) listening to that stream. Note, for third-party devices, only low quality audio streams (8kHz) are supported in this mode. This includes the non-high quality microphone and the PC Audio, as well as any 8kHz-sampled .wav files in the sound library. Use the Add button to add a new multicast address and port with a customized name for identification. The multicast address must be between 224.0.0.0 and 239.255.255.255. The port number must be even. If desired, set the port to Random to allow Clockwise to determine the port number; the stream will then display “-1” as the port. Click the Save button when complete. Use the Delete button to remove custom streams as needed.
Clockwise Manual
For support, visit www.anetdsupport.com Version 2.1
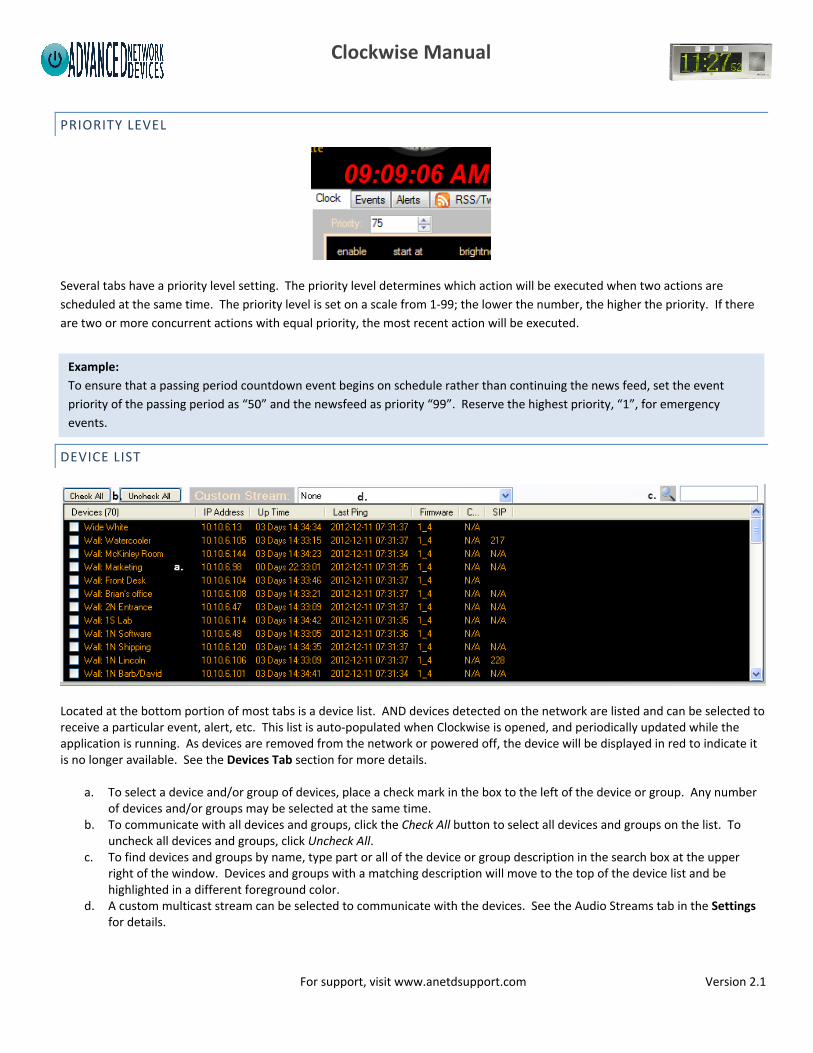
PRIORITY LEVEL
Several tabs have a priority level setting. The priority level determines which action will be executed when two actions are
scheduled at the same time. The priority level is set on a scale from 1-99; the lower the number, the higher the priority. If there
are two or more concurrent actions with equal priority, the most recent action will be executed.
DEVICE LIST
Located at the bottom portion of most tabs is a device list. AND devices detected on the network are listed and can be selected to receive a particular event, alert, etc. This list is auto-populated when Clockwise is opened, and periodically updated while the application is running. As devices are removed from the network or powered off, the device will be displayed in red to indicate it is no longer available. See the Devices Tab section for more details.
a. To select a device and/or group of devices, place a check mark in the box to the left of the device or group. Any number of devices and/or groups may be selected at the same time.
b. To communicate with all devices and groups, click the Check All button to select all devices and groups on the list. To uncheck all devices and groups, click Uncheck All.
c. To find devices and groups by name, type part or all of the device or group description in the search box at the upper right of the window. Devices and groups with a matching description will move to the top of the device list and be highlighted in a different foreground color.
d. A custom multicast stream can be selected to communicate with the devices. See the Audio Streams tab in the Settings for details.
Example:
To ensure that a passing period countdown event begins on schedule rather than continuing the news feed, set the event
priority of the passing period as “50” and the newsfeed as priority “99”. Reserve the highest priority, “1”, for emergency
events.
Clockwise Manual
For support, visit www.anetdsupport.com Version 2.1
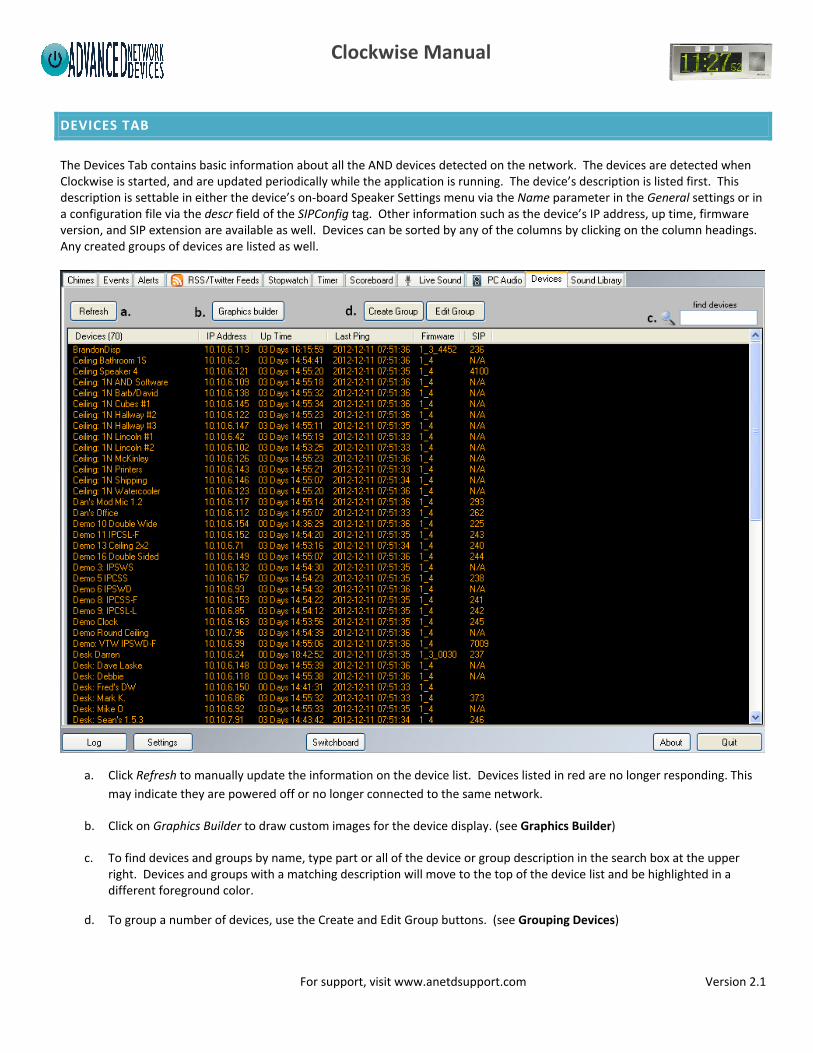
DEVICES TAB
The Devices Tab contains basic information about all the AND devices detected on the network. The devices are detected when Clockwise is started, and are updated periodically while the application is running. The device’s description is listed first. This description is settable in either the device’s on-board Speaker Settings menu via the Name parameter in the General settings or in a configuration file via the descr field of the SIPConfig tag. Other information such as the device’s IP address, up time, firmware version, and SIP extension are available as well. Devices can be sorted by any of the columns by clicking on the column headings. Any created groups of devices are listed as well.
a. Click Refresh to manually update the information on the device list. Devices listed in red are no longer responding. This
may indicate they are powered off or no longer connected to the same network.
b. Click on Graphics Builder to draw custom images for the device display. (see Graphics Builder)
c. To find devices and groups by name, type part or all of the device or group description in the search box at the upper right. Devices and groups with a matching description will move to the top of the device list and be highlighted in a different foreground color.
d. To group a number of devices, use the Create and Edit Group buttons. (see Grouping Devices)
Clockwise Manual
For support, visit www.anetdsupport.com Version 2.1
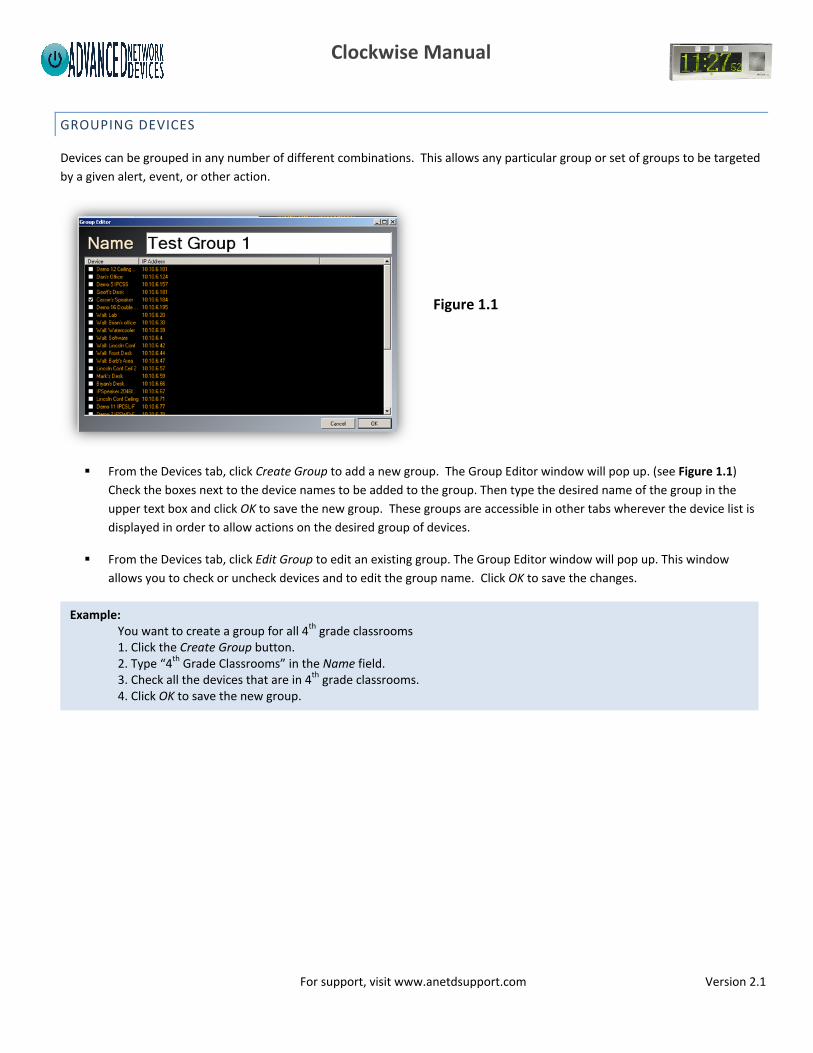
GROUPING DEVICES
Devices can be grouped in any number of different combinations. This allows any particular group or set of groups to be targeted
by a given alert, event, or other action.
From the Devices tab, click Create Group to add a new group. The Group Editor window will pop up. (see Figure 1.1)
Check the boxes next to the device names to be added to the group. Then type the desired name of the group in the
upper text box and click OK to save the new group. These groups are accessible in other tabs wherever the device list is
displayed in order to allow actions on the desired group of devices.
From the Devices tab, click Edit Group to edit an existing group. The Group Editor window will pop up. This window
allows you to check or uncheck devices and to edit the group name. Click OK to save the changes.
Example: You want to create a group for all 4th grade classrooms 1. Click the Create Group button. 2. Type “4th Grade Classrooms” in the Name field. 3. Check all the devices that are in 4th grade classrooms. 4. Click OK to save the new group.
Figure 1.1
Clockwise Manual
For support, visit www.anetdsupport.com Version 2.1
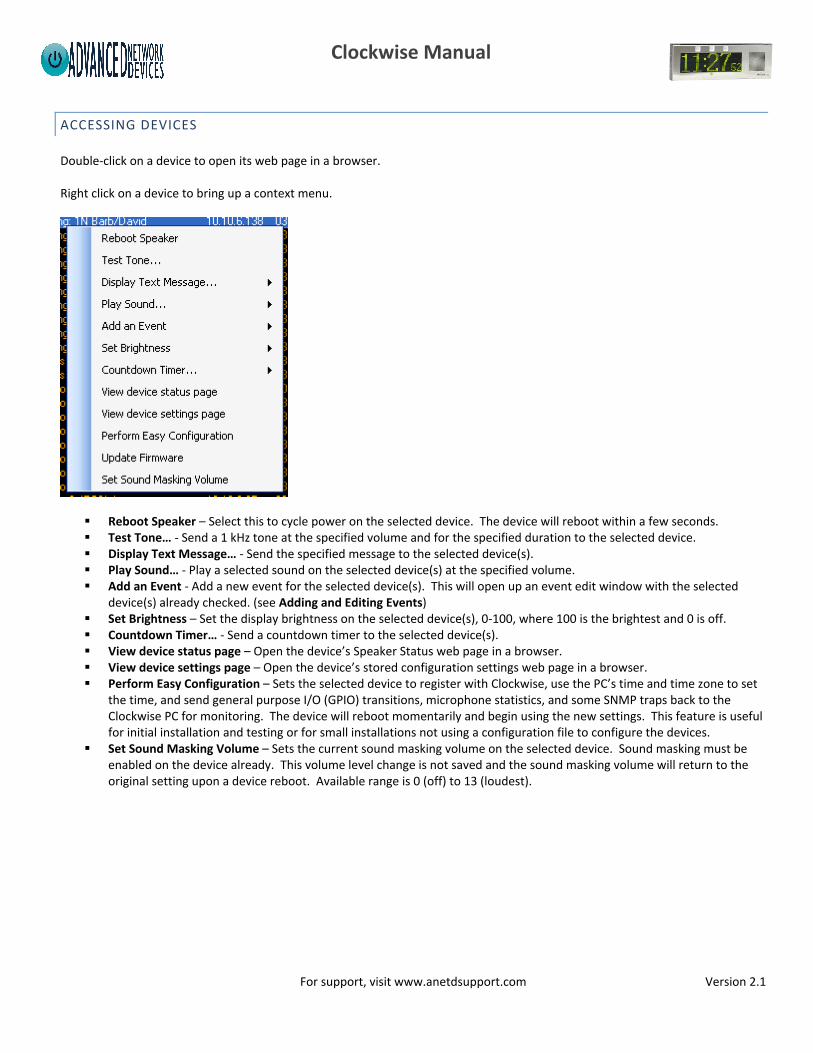
ACCESSING DEVICES
Double-click on a device to open its web page in a browser. Right click on a device to bring up a context menu.
Reboot Speaker – Select this to cycle power on the selected device. The device will reboot within a few seconds. Test Tone… - Send a 1 kHz tone at the specified volume and for the specified duration to the selected device. Display Text Message… - Send the specified message to the selected device(s). Play Sound… - Play a selected sound on the selected device(s) at the specified volume. Add an Event - Add a new event for the selected device(s). This will open up an event edit window with the selected
device(s) already checked. (see Adding and Editing Events) Set Brightness – Set the display brightness on the selected device(s), 0-100, where 100 is the brightest and 0 is off. Countdown Timer… - Send a countdown timer to the selected device(s). View device status page – Open the device’s Speaker Status web page in a browser. View device settings page – Open the device’s stored configuration settings web page in a browser. Perform Easy Configuration – Sets the selected device to register with Clockwise, use the PC’s time and time zone to set
the time, and send general purpose I/O (GPIO) transitions, microphone statistics, and some SNMP traps back to the Clockwise PC for monitoring. The device will reboot momentarily and begin using the new settings. This feature is useful for initial installation and testing or for small installations not using a configuration file to configure the devices.
Set Sound Masking Volume – Sets the current sound masking volume on the selected device. Sound masking must be enabled on the device already. This volume level change is not saved and the sound masking volume will return to the original setting upon a device reboot. Available range is 0 (off) to 13 (loudest).

Clockwise Manual
For support, visit www.anetdsupport.com Version 2.1
Update Firmware
This option allows the firmware to be updated on one or more devices. Note that this will not work for devices getting their
settings from a configuration file. In the pop up window, select the location of the firmware update using the radio buttons:
1) If AND Website is selected, the version number must be entered by hand, e.g., 1_3_0038 or 1.3.0038. Reference the
support website in order to find the version number of the latest release: http://www.anetdsupport.com/firmware-
versions. Note, Internet access is required for this update method to work.
2) If Local Computer is selected, the firmware files can be served from the Clockwise computer using the
“\ClockWise\IPSpeaker\” directory. The most recent firmware file found in the directory will be automatically selected.
Click the Explore button to open the directory in order to easily copy in new firmware files. After adding new files, click
the Re-Scan button to add the new files to the drop-down list.
Once the desired file is selected, click the Update button in order to push the new firmware to the devices. Once the update
firmware command has been sent, the window will update with a confirmation message and the Close button can be used to close
the window. The device will reboot and attempt to update its firmware, then reboot a second time. Do not interrupt the
firmware update process.
Clockwise Manual
For support, visit www.anetdsupport.com Version 2.1
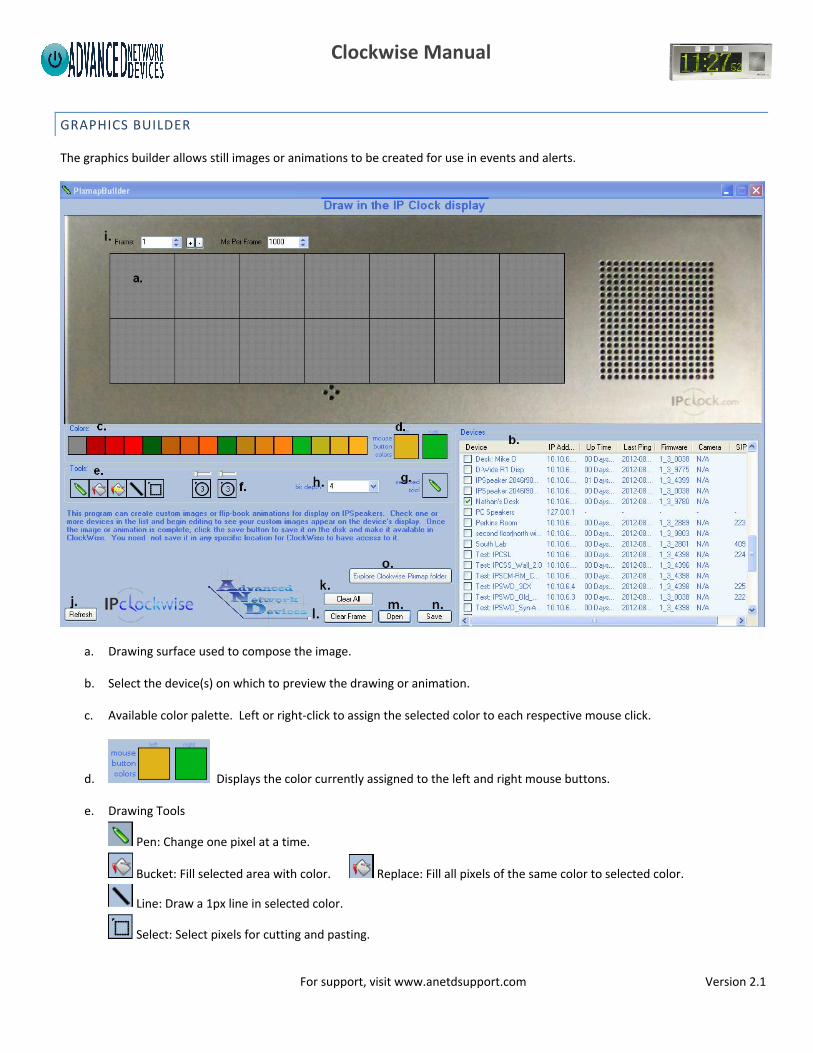
GRAPHICS BUILDER
The graphics builder allows still images or animations to be created for use in events and alerts.
a. Drawing surface used to compose the image.
b. Select the device(s) on which to preview the drawing or animation.
c. Available color palette. Left or right-click to assign the selected color to each respective mouse click.
d. Displays the color currently assigned to the left and right mouse buttons.
e. Drawing Tools
Pen: Change one pixel at a time.
Bucket: Fill selected area with color. Replace: Fill all pixels of the same color to selected color.
Line: Draw a 1px line in selected color.
Select: Select pixels for cutting and pasting.
Clockwise Manual
For support, visit www.anetdsupport.com Version 2.1
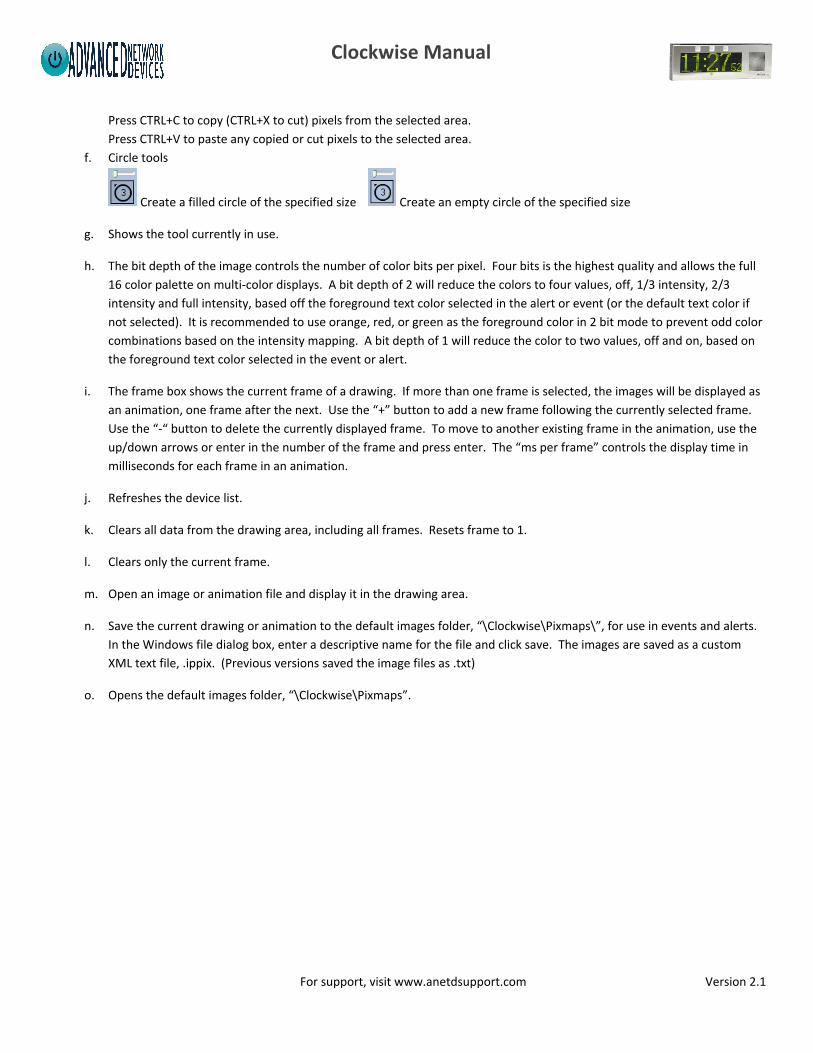
Press CTRL+C to copy (CTRL+X to cut) pixels from the selected area.
Press CTRL+V to paste any copied or cut pixels to the selected area.
f. Circle tools
Create a filled circle of the specified size Create an empty circle of the specified size
g. Shows the tool currently in use.
h. The bit depth of the image controls the number of color bits per pixel. Four bits is the highest quality and allows the full
16 color palette on multi-color displays. A bit depth of 2 will reduce the colors to four values, off, 1/3 intensity, 2/3
intensity and full intensity, based off the foreground text color selected in the alert or event (or the default text color if
not selected). It is recommended to use orange, red, or green as the foreground color in 2 bit mode to prevent odd color
combinations based on the intensity mapping. A bit depth of 1 will reduce the color to two values, off and on, based on
the foreground text color selected in the event or alert.
i. The frame box shows the current frame of a drawing. If more than one frame is selected, the images will be displayed as
an animation, one frame after the next. Use the “+” button to add a new frame following the currently selected frame.
Use the “-“ button to delete the currently displayed frame. To move to another existing frame in the animation, use the
up/down arrows or enter in the number of the frame and press enter. The “ms per frame” controls the display time in
milliseconds for each frame in an animation.
j. Refreshes the device list.
k. Clears all data from the drawing area, including all frames. Resets frame to 1.
l. Clears only the current frame.
m. Open an image or animation file and display it in the drawing area.
n. Save the current drawing or animation to the default images folder, “\Clockwise\Pixmaps\”, for use in events and alerts.
In the Windows file dialog box, enter a descriptive name for the file and click save. The images are saved as a custom
XML text file, .ippix. (Previous versions saved the image files as .txt)
o. Opens the default images folder, “\Clockwise\Pixmaps”.
Clockwise Manual
For support, visit www.anetdsupport.com Version 2.1
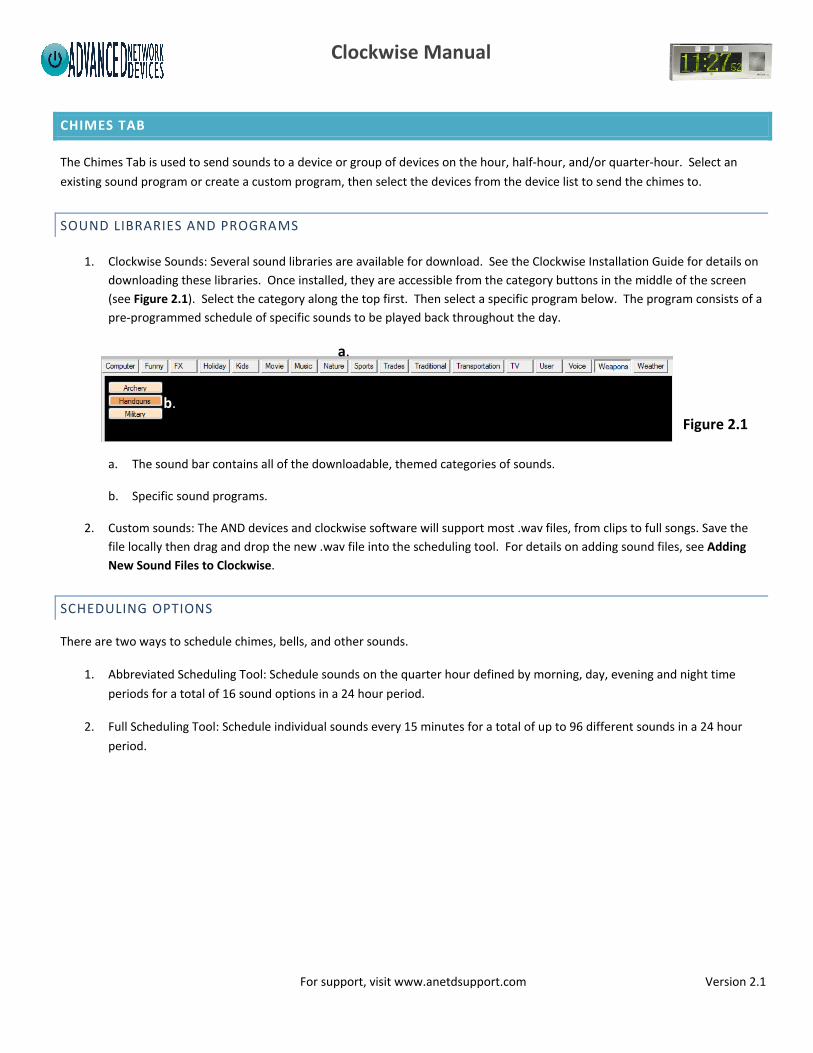
CHIMES TAB
The Chimes Tab is used to send sounds to a device or group of devices on the hour, half-hour, and/or quarter-hour. Select an
existing sound program or create a custom program, then select the devices from the device list to send the chimes to.
SOUND LIBRARIES AND PROGRAMS
1. Clockwise Sounds: Several sound libraries are available for download. See the Clockwise Installation Guide for details on
downloading these libraries. Once installed, they are accessible from the category buttons in the middle of the screen
(see Figure 2.1). Select the category along the top first. Then select a specific program below. The program consists of a
pre-programmed schedule of specific sounds to be played back throughout the day.
a. The sound bar contains all of the downloadable, themed categories of sounds.
b. Specific sound programs.
2. Custom sounds: The AND devices and clockwise software will support most .wav files, from clips to full songs. Save the
file locally then drag and drop the new .wav file into the scheduling tool. For details on adding sound files, see Adding
New Sound Files to Clockwise.
SCHEDULING OPTIONS
There are two ways to schedule chimes, bells, and other sounds.
1. Abbreviated Scheduling Tool: Schedule sounds on the quarter hour defined by morning, day, evening and night time
periods for a total of 16 sound options in a 24 hour period.
2. Full Scheduling Tool: Schedule individual sounds every 15 minutes for a total of up to 96 different sounds in a 24 hour
period.
Figure 2.1
b.
a.

Clockwise Manual
For support, visit www.anetdsupport.com Version 2.1
ABBREVIATED SCHEDULING TOOL
Provides uniform sounds throughout a standard 24 hour time period.
1. Define “morning”, “day”, “evening” and “night” start times based on when the sounds or other settings should change.
Use the checkbox at left to enable or disable the respective time period.
2. Set the desired brightness and volume for each time period.
3. Add sounds to the schedule by one of three methods:
a. Choose a pre-made schedule from the categories and programs loaded from the provided sound libraries.
b. Double click on a time slot, or drag and drop a file from Windows Explorer, to add a .wav file from the computer.
c. Hold CTRL and drag and drop an existing sound from one time slot box to another (useful when using the same
sound for multiple time slots)
4. If desired, the Volume Override option can be checked and the slider used to control the volume of the chimes, overriding
the four time period volume settings.
5. Preview sounds by right-clicking on the respective time slot. Be sure at least one device is selected from the device list
first.
Example:
To play a traditional Westminster chimes before the school day starts (8am) and after the school day
ends (3pm), but traditional school bells during the school day, set the schedule as follows:
Morning: 6am (Westminster / full brightness)
Day: 8am (traditional school bells / full brightness)
Evening: 3:15pm (Westminster/ full brightness)
Nights: 8pm (Westminster / LEDs Dimmed)
Tips & Tricks:
To conserve energy dim the LED display and/or lower the volume once the building is empty using the evening
and/or night time periods.
Clockwise Manual
For support, visit www.anetdsupport.com Version 2.1
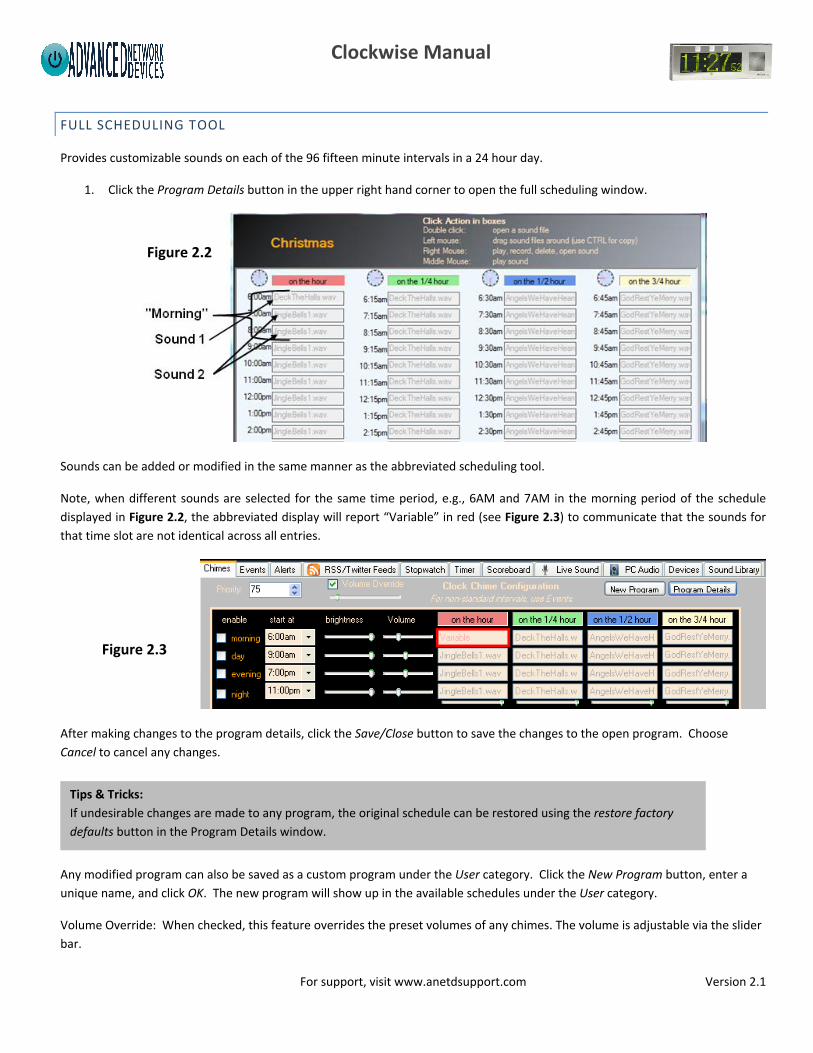
FULL SCHEDULING TOOL
Provides customizable sounds on each of the 96 fifteen minute intervals in a 24 hour day.
1. Click the Program Details button in the upper right hand corner to open the full scheduling window.
Sounds can be added or modified in the same manner as the abbreviated scheduling tool.
Note, when different sounds are selected for the same time period, e.g., 6AM and 7AM in the morning period of the schedule
displayed in Figure 2.2, the abbreviated display will report “Variable” in red (see Figure 2.3) to communicate that the sounds for
that time slot are not identical across all entries.
After making changes to the program details, click the Save/Close button to save the changes to the open program. Choose
Cancel to cancel any changes.
Any modified program can also be saved as a custom program under the User category. Click the New Program button, enter a
unique name, and click OK. The new program will show up in the available schedules under the User category.
Volume Override: When checked, this feature overrides the preset volumes of any chimes. The volume is adjustable via the slider
bar.
Tips & Tricks:
If undesirable changes are made to any program, the original schedule can be restored using the restore factory
defaults button in the Program Details window.
Figure 2.3
Figure 2.2
Clockwise Manual
For support, visit www.anetdsupport.com Version 2.1
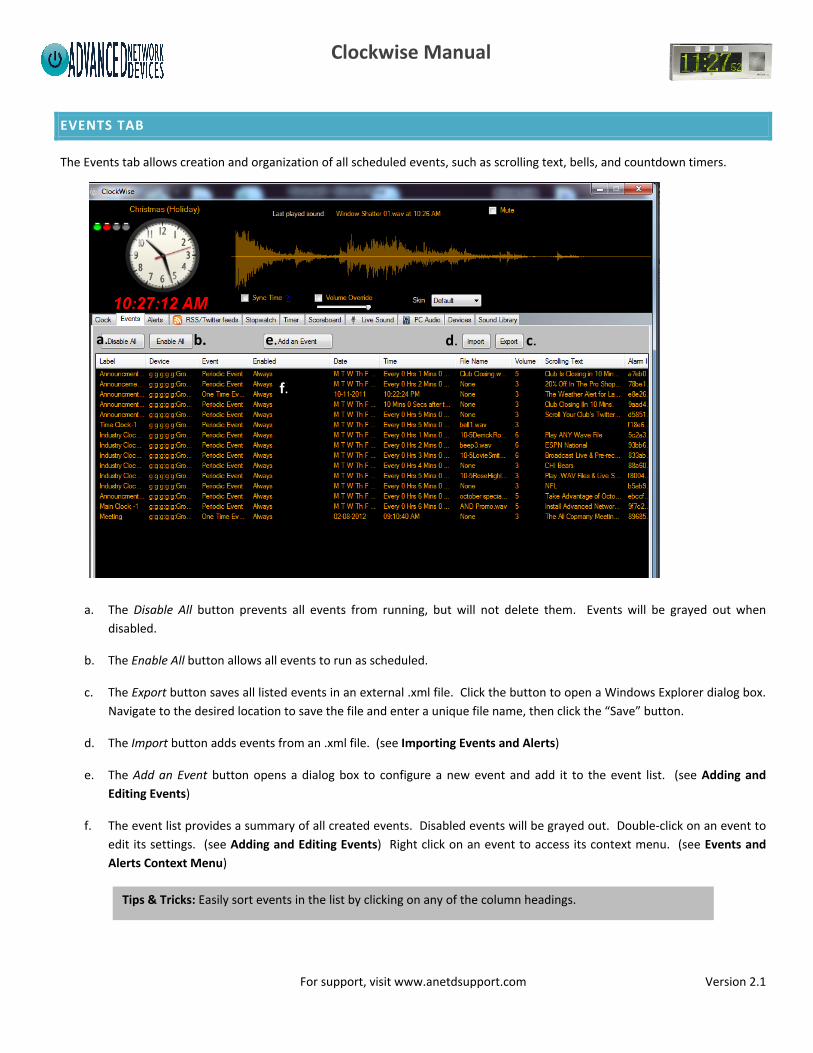
EVENTS TAB
The Events tab allows creation and organization of all scheduled events, such as scrolling text, bells, and countdown timers.
a. The Disable All button prevents all events from running, but will not delete them. Events will be grayed out when
disabled.
b. The Enable All button allows all events to run as scheduled.
c. The Export button saves all listed events in an external .xml file. Click the button to open a Windows Explorer dialog box.
Navigate to the desired location to save the file and enter a unique file name, then click the “Save” button.
d. The Import button adds events from an .xml file. (see Importing Events and Alerts)
e. The Add an Event button opens a dialog box to configure a new event and add it to the event list. (see Adding and
Editing Events)
f. The event list provides a summary of all created events. Disabled events will be grayed out. Double-click on an event to
edit its settings. (see Adding and Editing Events) Right click on an event to access its context menu. (see Events and
Alerts Context Menu)
Tips & Tricks: Easily sort events in the list by clicking on any of the column headings.
a. b. e. d. c.
f.
Clockwise Manual
For support, visit www.anetdsupport.com Version 2.1
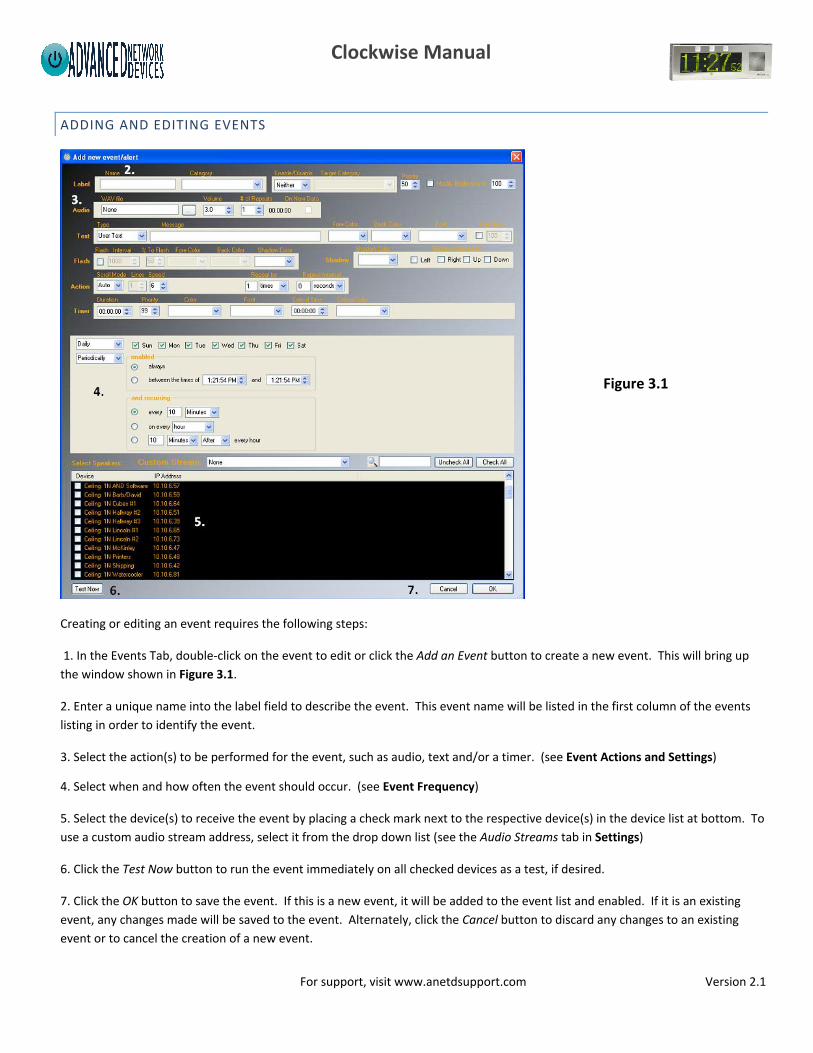
ADDING AND EDITING EVENTS
Creating or editing an event requires the following steps:
1. In the Events Tab, double-click on the event to edit or click the Add an Event button to create a new event. This will bring up
the window shown in Figure 3.1.
2. Enter a unique name into the label field to describe the event. This event name will be listed in the first column of the events
listing in order to identify the event.
3. Select the action(s) to be performed for the event, such as audio, text and/or a timer. (see Event Actions and Settings)
4. Select when and how often the event should occur. (see Event Frequency)
5. Select the device(s) to receive the event by placing a check mark next to the respective device(s) in the device list at bottom. To
use a custom audio stream address, select it from the drop down list (see the Audio Streams tab in Settings)
6. Click the Test Now button to run the event immediately on all checked devices as a test, if desired.
7. Click the OK button to save the event. If this is a new event, it will be added to the event list and enabled. If it is an existing
event, any changes made will be saved to the event. Alternately, click the Cancel button to discard any changes to an existing
event or to cancel the creation of a new event.
Figure 3.1
Clockwise Manual
For support, visit www.anetdsupport.com Version 2.1
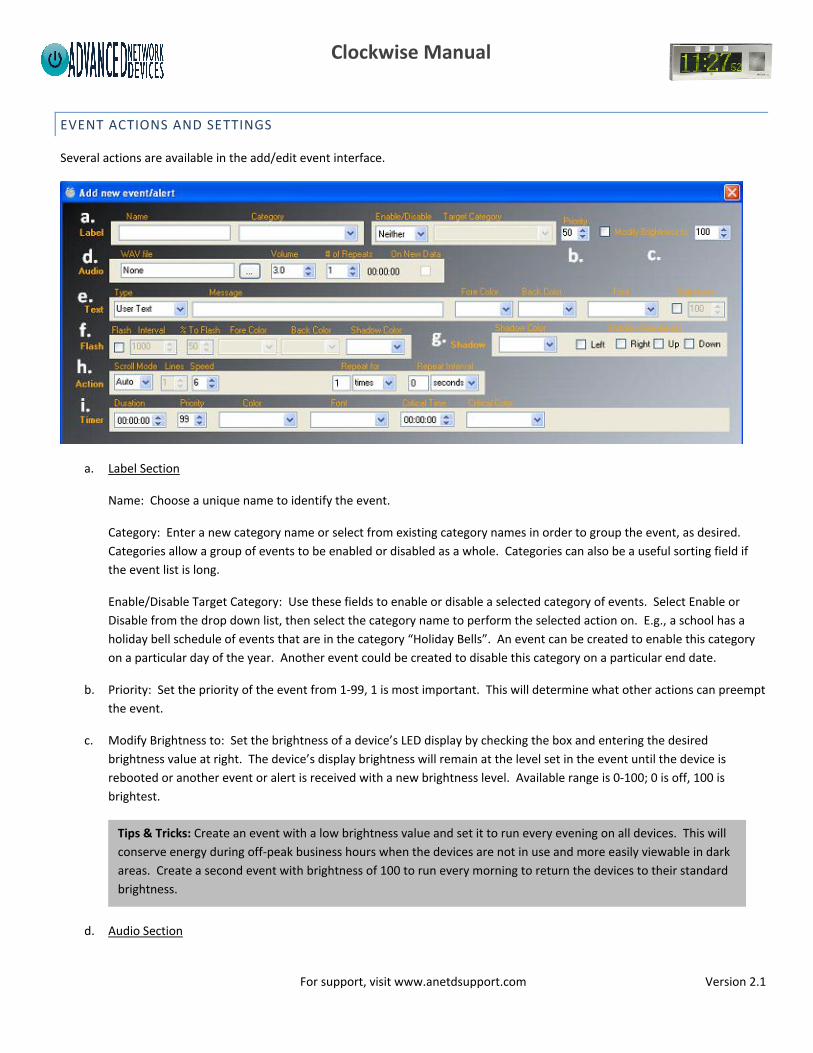
EVENT ACTIONS AND SETTINGS
Several actions are available in the add/edit event interface.
a. Label Section
Name: Choose a unique name to identify the event.
Category: Enter a new category name or select from existing category names in order to group the event, as desired.
Categories allow a group of events to be enabled or disabled as a whole. Categories can also be a useful sorting field if
the event list is long.
Enable/Disable Target Category: Use these fields to enable or disable a selected category of events. Select Enable or
Disable from the drop down list, then select the category name to perform the selected action on. E.g., a school has a
holiday bell schedule of events that are in the category “Holiday Bells”. An event can be created to enable this category
on a particular day of the year. Another event could be created to disable this category on a particular end date.
b. Priority: Set the priority of the event from 1-99, 1 is most important. This will determine what other actions can preempt
the event.
c. Modify Brightness to: Set the brightness of a device’s LED display by checking the box and entering the desired
brightness value at right. The device’s display brightness will remain at the level set in the event until the device is
rebooted or another event or alert is received with a new brightness level. Available range is 0-100; 0 is off, 100 is
brightest.
d. Audio Section
Tips & Tricks: Create an event with a low brightness value and set it to run every evening on all devices. This will
conserve energy during off-peak business hours when the devices are not in use and more easily viewable in dark
areas. Create a second event with brightness of 100 to run every morning to return the devices to their standard
brightness.
h. a.
i.
k.
Clockwise Manual
For support, visit www.anetdsupport.com Version 2.1
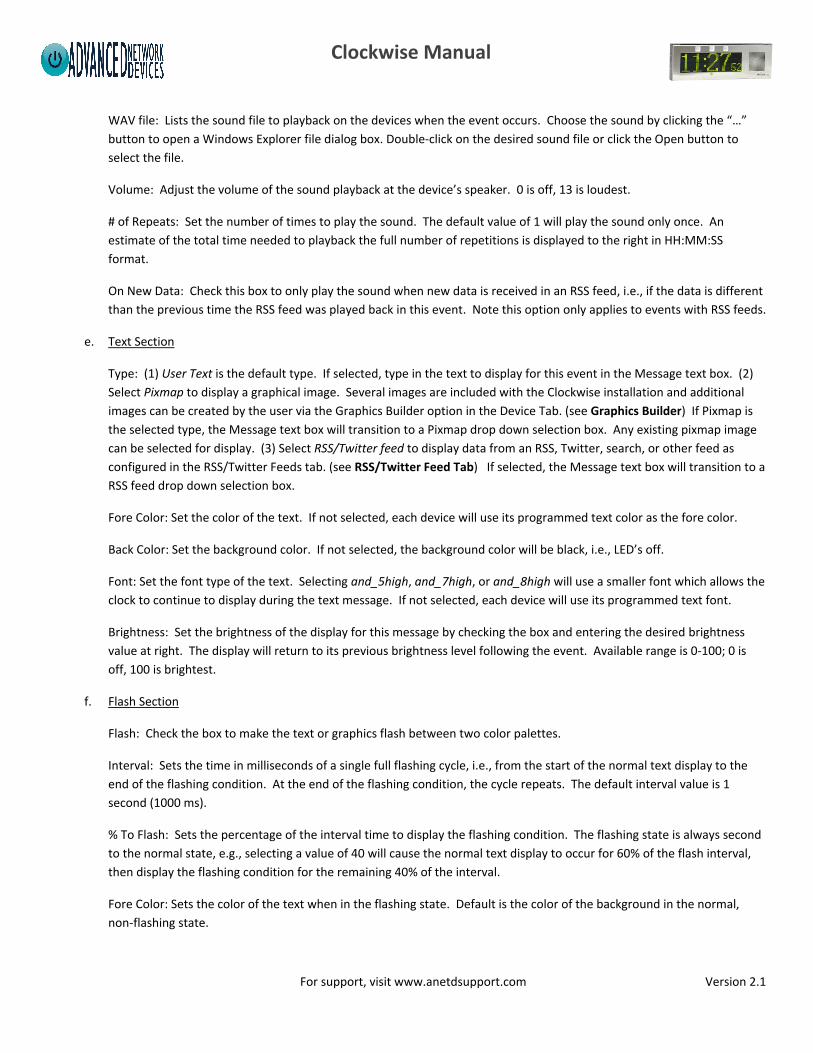
WAV file: Lists the sound file to playback on the devices when the event occurs. Choose the sound by clicking the “…”
button to open a Windows Explorer file dialog box. Double-click on the desired sound file or click the Open button to
select the file.
Volume: Adjust the volume of the sound playback at the device’s speaker. 0 is off, 13 is loudest.
# of Repeats: Set the number of times to play the sound. The default value of 1 will play the sound only once. An
estimate of the total time needed to playback the full number of repetitions is displayed to the right in HH:MM:SS
format.
On New Data: Check this box to only play the sound when new data is received in an RSS feed, i.e., if the data is different
than the previous time the RSS feed was played back in this event. Note this option only applies to events with RSS feeds.
e. Text Section
Type: (1) User Text is the default type. If selected, type in the text to display for this event in the Message text box. (2)
Select Pixmap to display a graphical image. Several images are included with the Clockwise installation and additional
images can be created by the user via the Graphics Builder option in the Device Tab. (see Graphics Builder) If Pixmap is
the selected type, the Message text box will transition to a Pixmap drop down selection box. Any existing pixmap image
can be selected for display. (3) Select RSS/Twitter feed to display data from an RSS, Twitter, search, or other feed as
configured in the RSS/Twitter Feeds tab. (see RSS/Twitter Feed Tab) If selected, the Message text box will transition to a
RSS feed drop down selection box.
Fore Color: Set the color of the text. If not selected, each device will use its programmed text color as the fore color.
Back Color: Set the background color. If not selected, the background color will be black, i.e., LED’s off.
Font: Set the font type of the text. Selecting and_5high, and_7high, or and_8high will use a smaller font which allows the
clock to continue to display during the text message. If not selected, each device will use its programmed text font.
Brightness: Set the brightness of the display for this message by checking the box and entering the desired brightness
value at right. The display will return to its previous brightness level following the event. Available range is 0-100; 0 is
off, 100 is brightest.
f. Flash Section
Flash: Check the box to make the text or graphics flash between two color palettes.
Interval: Sets the time in milliseconds of a single full flashing cycle, i.e., from the start of the normal text display to the
end of the flashing condition. At the end of the flashing condition, the cycle repeats. The default interval value is 1
second (1000 ms).
% To Flash: Sets the percentage of the interval time to display the flashing condition. The flashing state is always second
to the normal state, e.g., selecting a value of 40 will cause the normal text display to occur for 60% of the flash interval,
then display the flashing condition for the remaining 40% of the interval.
Fore Color: Sets the color of the text when in the flashing state. Default is the color of the background in the normal,
non-flashing state.
Clockwise Manual
For support, visit www.anetdsupport.com Version 2.1
Back Color: Sets the color of the background when in the flashing state. Default is the color of the background in the non-
flashing state.
Shadow Color: Sets the color of the drop shadow when in the flashing state. Default is the color of the background in the
non-flashing state, or the color of the background in the flashing state, if specified.
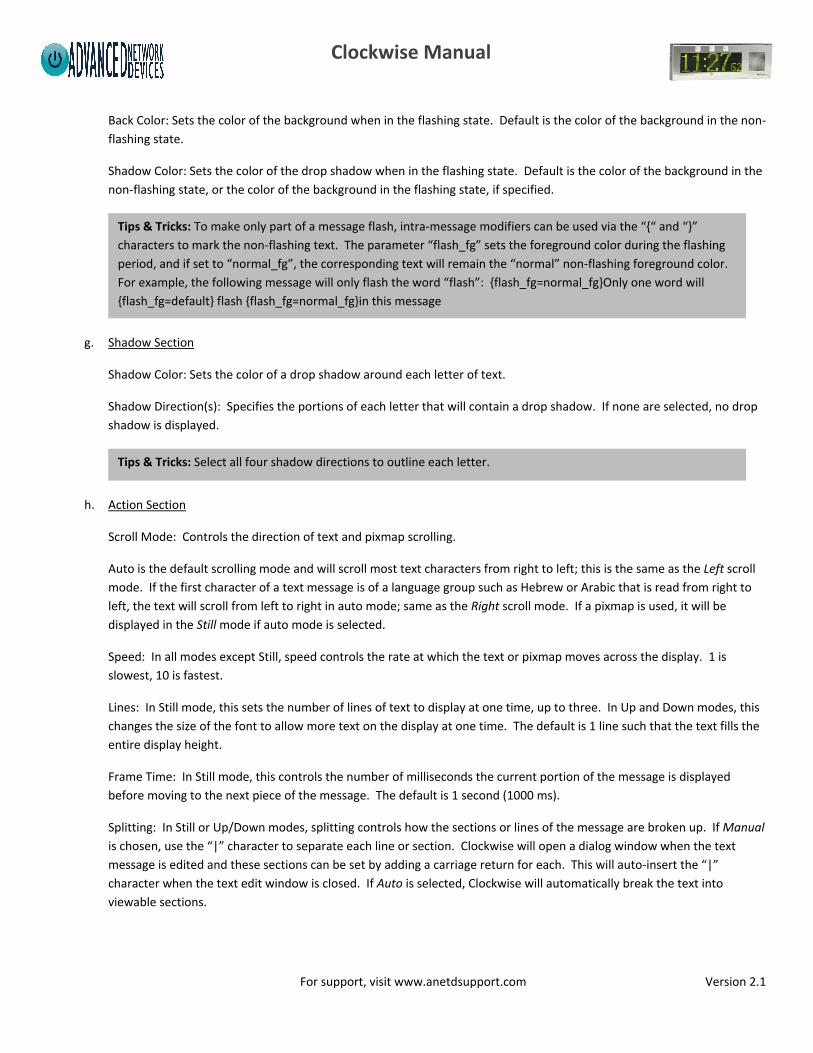
g. Shadow Section
Shadow Color: Sets the color of a drop shadow around each letter of text.
Shadow Direction(s): Specifies the portions of each letter that will contain a drop shadow. If none are selected, no drop
shadow is displayed.
h. Action Section
Scroll Mode: Controls the direction of text and pixmap scrolling.
Auto is the default scrolling mode and will scroll most text characters from right to left; this is the same as the Left scroll
mode. If the first character of a text message is of a language group such as Hebrew or Arabic that is read from right to
left, the text will scroll from left to right in auto mode; same as the Right scroll mode. If a pixmap is used, it will be
displayed in the Still mode if auto mode is selected.
Speed: In all modes except Still, speed controls the rate at which the text or pixmap moves across the display. 1 is
slowest, 10 is fastest.
Lines: In Still mode, this sets the number of lines of text to display at one time, up to three. In Up and Down modes, this
changes the size of the font to allow more text on the display at one time. The default is 1 line such that the text fills the
entire display height.
Frame Time: In Still mode, this controls the number of milliseconds the current portion of the message is displayed
before moving to the next piece of the message. The default is 1 second (1000 ms).
Splitting: In Still or Up/Down modes, splitting controls how the sections or lines of the message are broken up. If Manual
is chosen, use the “|” character to separate each line or section. Clockwise will open a dialog window when the text
message is edited and these sections can be set by adding a carriage return for each. This will auto-insert the “|”
character when the text edit window is closed. If Auto is selected, Clockwise will automatically break the text into
viewable sections.
Tips & Tricks: To make only part of a message flash, intra-message modifiers can be used via the “{“ and “}”
characters to mark the non-flashing text. The parameter “flash_fg” sets the foreground color during the flashing
period, and if set to “normal_fg”, the corresponding text will remain the “normal” non-flashing foreground color.
For example, the following message will only flash the word “flash”: {flash_fg=normal_fg}Only one word will
{flash_fg=default} flash {flash_fg=normal_fg}in this message
Tips & Tricks: Select all four shadow directions to outline each letter.
Clockwise Manual
For support, visit www.anetdsupport.com Version 2.1
Repeat for: Controls how many times the message is displayed. If a time frame is chosen, i.e., days, hours, minutes, or
seconds, the message will repeat until the specified amount of time has elapsed.
Repeat Interval: Controls how much time to pause between message repeats. During this pause time, the time will be
displayed.
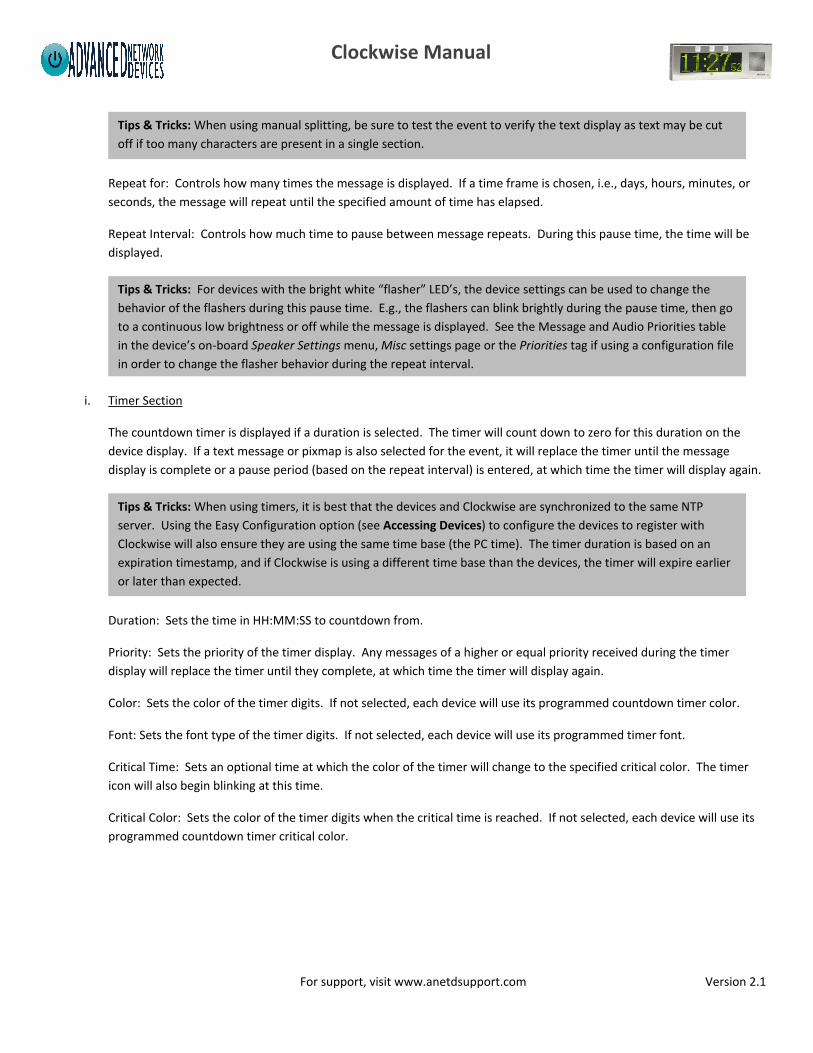
i. Timer Section
The countdown timer is displayed if a duration is selected. The timer will count down to zero for this duration on the
device display. If a text message or pixmap is also selected for the event, it will replace the timer until the message
display is complete or a pause period (based on the repeat interval) is entered, at which time the timer will display again.
Duration: Sets the time in HH:MM:SS to countdown from.
Priority: Sets the priority of the timer display. Any messages of a higher or equal priority received during the timer
display will replace the timer until they complete, at which time the timer will display again.
Color: Sets the color of the timer digits. If not selected, each device will use its programmed countdown timer color.
Font: Sets the font type of the timer digits. If not selected, each device will use its programmed timer font.
Critical Time: Sets an optional time at which the color of the timer will change to the specified critical color. The timer
icon will also begin blinking at this time.
Critical Color: Sets the color of the timer digits when the critical time is reached. If not selected, each device will use its
programmed countdown timer critical color.
Tips & Tricks: For devices with the bright white “flasher” LED’s, the device settings can be used to change the
behavior of the flashers during this pause time. E.g., the flashers can blink brightly during the pause time, then go
to a continuous low brightness or off while the message is displayed. See the Message and Audio Priorities table
in the device’s on-board Speaker Settings menu, Misc settings page or the Priorities tag if using a configuration file
in order to change the flasher behavior during the repeat interval.
Tips & Tricks: When using timers, it is best that the devices and Clockwise are synchronized to the same NTP
server. Using the Easy Configuration option (see Accessing Devices) to configure the devices to register with
Clockwise will also ensure they are using the same time base (the PC time). The timer duration is based on an
expiration timestamp, and if Clockwise is using a different time base than the devices, the timer will expire earlier
or later than expected.
Tips & Tricks: When using manual splitting, be sure to test the event to verify the text display as text may be cut
off if too many characters are present in a single section.
Clockwise Manual
For support, visit www.anetdsupport.com Version 2.1
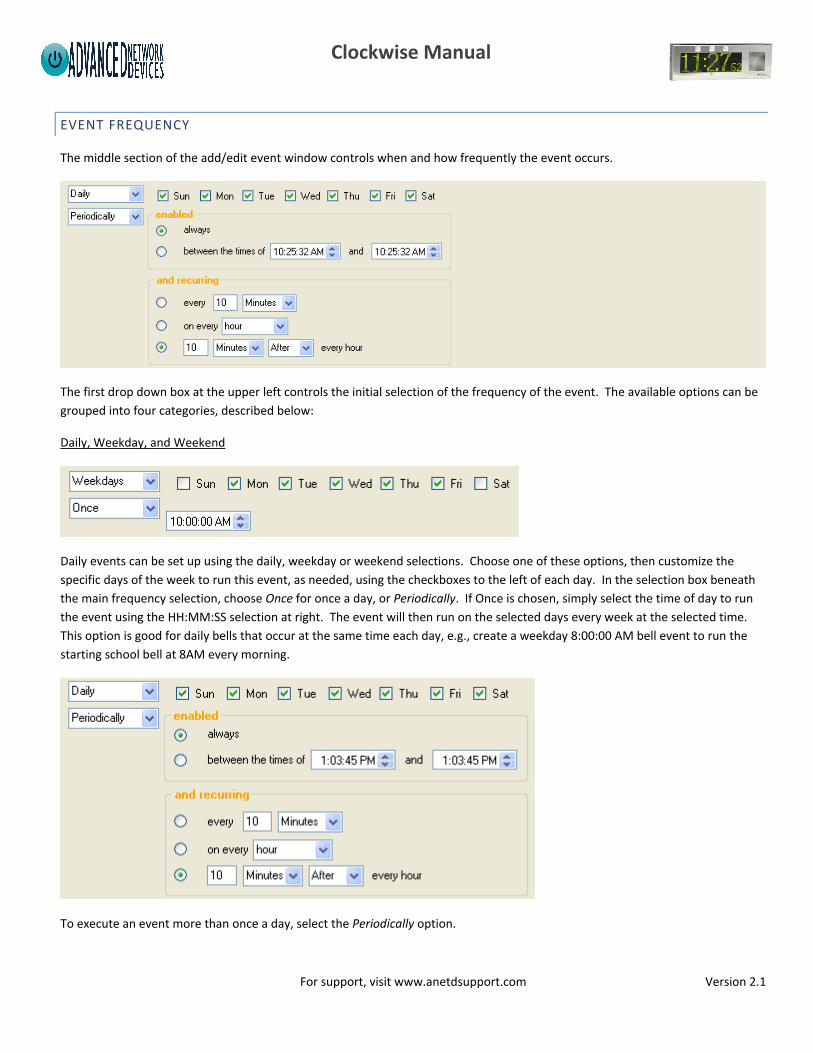
EVENT FREQUENCY
The middle section of the add/edit event window controls when and how frequently the event occurs.
The first drop down box at the upper left controls the initial selection of the frequency of the event. The available options can be
grouped into four categories, described below:
Daily, Weekday, and Weekend
Daily events can be set up using the daily, weekday or weekend selections. Choose one of these options, then customize the
specific days of the week to run this event, as needed, using the checkboxes to the left of each day. In the selection box beneath
the main frequency selection, choose Once for once a day, or Periodically. If Once is chosen, simply select the time of day to run
the event using the HH:MM:SS selection at right. The event will then run on the selected days every week at the selected time.
This option is good for daily bells that occur at the same time each day, e.g., create a weekday 8:00:00 AM bell event to run the
starting school bell at 8AM every morning.
To execute an event more than once a day, select the Periodically option.
Clockwise Manual
For support, visit www.anetdsupport.com Version 2.1
The enabled section can be used to prevent the periodic event from running during certain times of the day. Both the start and
end times will automatically fill with the current timestamp; adjust both of these times to the desired period of the day to enable
the event for that limited period.
The recurring section is used to designate the frequency of the event repetition. The first option causes the event to repeat every
specified number of minutes, hours or seconds. The starting time of this period will be based on the time the event was created,
or by the time indicated by the start of the enabled period. If using the start time in the enabled period, be sure to set the end
time; to run the event always, but with a set start time reference, set the end time to be one second before the start time. This
option is good for events such as news feeds, weather feeds, stock tickers or other such announcements that are useful to display
frequently. The second option is used to repeat the event on every hour, quarter hour, or half hour. This option is good for hourly
clock chimes. The third option allows the time of the event to be specified at a number of minutes or seconds after or before
every hour.
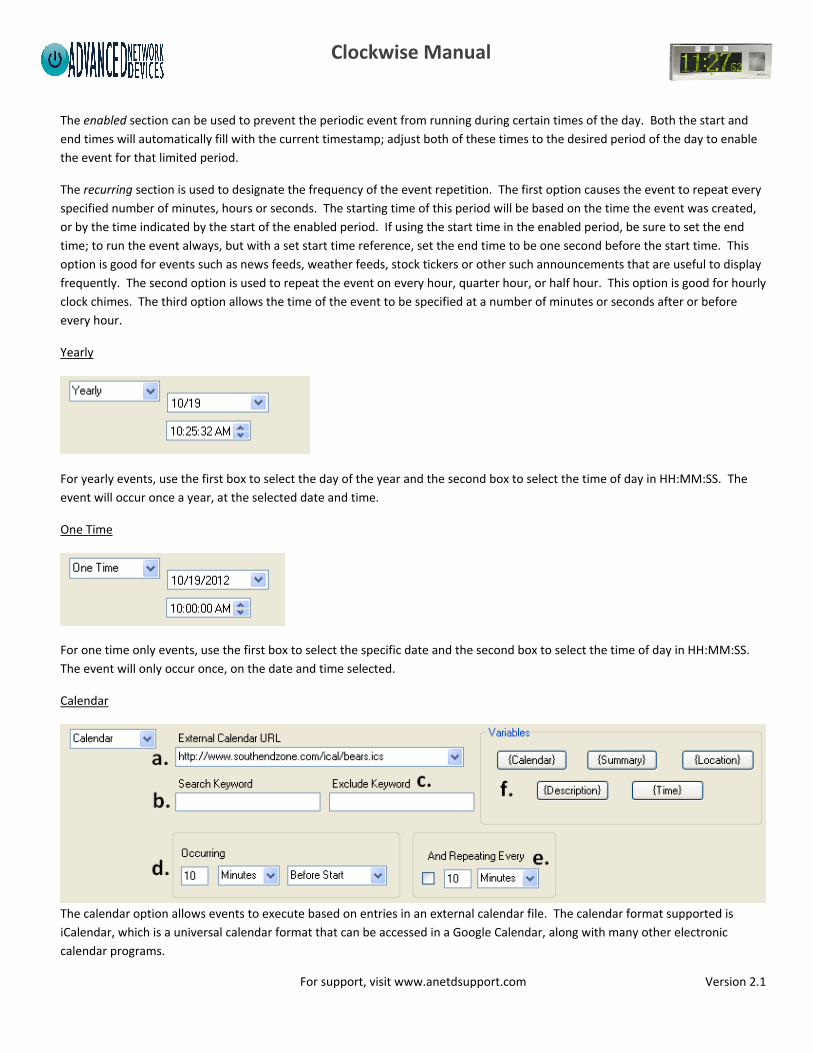
Yearly
For yearly events, use the first box to select the day of the year and the second box to select the time of day in HH:MM:SS. The
event will occur once a year, at the selected date and time.
One Time
For one time only events, use the first box to select the specific date and the second box to select the time of day in HH:MM:SS.
The event will only occur once, on the date and time selected.
Calendar
The calendar option allows events to execute based on entries in an external calendar file. The calendar format supported is
iCalendar, which is a universal calendar format that can be accessed in a Google Calendar, along with many other electronic
calendar programs.
Clockwise Manual
For support, visit www.anetdsupport.com Version 2.1
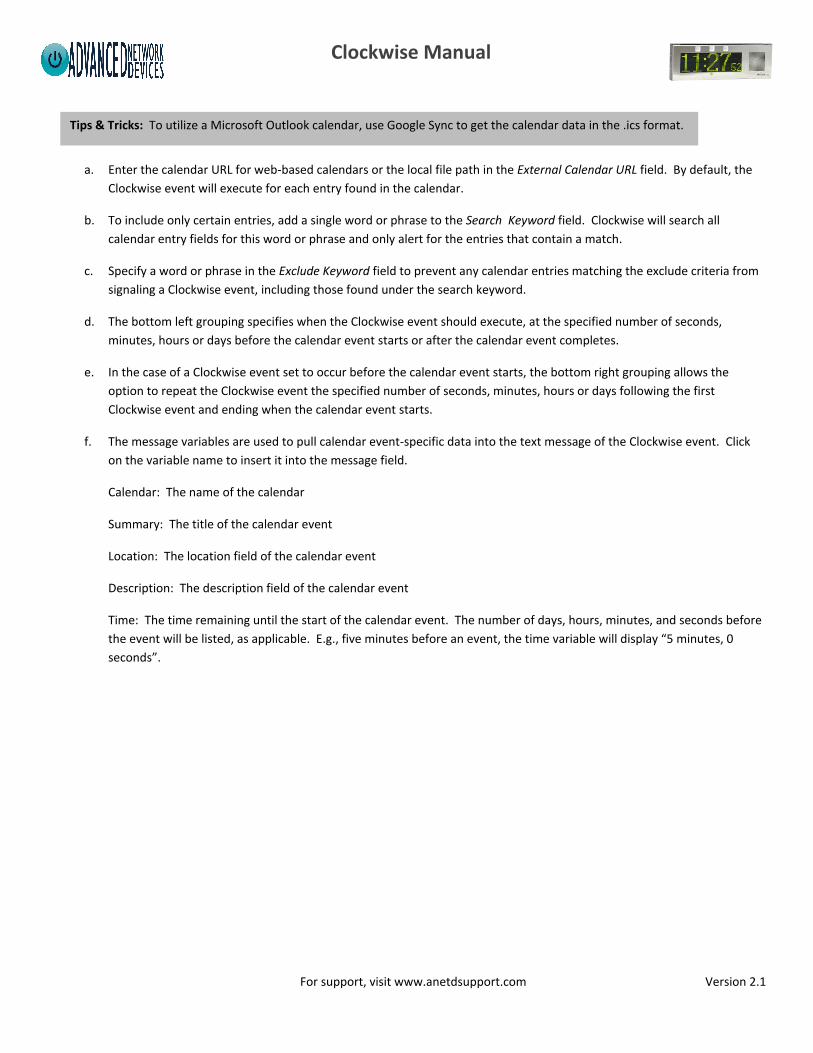
a. Enter the calendar URL for web-based calendars or the local file path in the External Calendar URL field. By default, the
Clockwise event will execute for each entry found in the calendar.
b. To include only certain entries, add a single word or phrase to the Search Keyword field. Clockwise will search all
calendar entry fields for this word or phrase and only alert for the entries that contain a match.
c. Specify a word or phrase in the Exclude Keyword field to prevent any calendar entries matching the exclude criteria from
signaling a Clockwise event, including those found under the search keyword.
d. The bottom left grouping specifies when the Clockwise event should execute, at the specified number of seconds,
minutes, hours or days before the calendar event starts or after the calendar event completes.
e. In the case of a Clockwise event set to occur before the calendar event starts, the bottom right grouping allows the
option to repeat the Clockwise event the specified number of seconds, minutes, hours or days following the first
Clockwise event and ending when the calendar event starts.
f. The message variables are used to pull calendar event-specific data into the text message of the Clockwise event. Click
on the variable name to insert it into the message field.
Calendar: The name of the calendar
Summary: The title of the calendar event
Location: The location field of the calendar event
Description: The description field of the calendar event
Time: The time remaining until the start of the calendar event. The number of days, hours, minutes, and seconds before
the event will be listed, as applicable. E.g., five minutes before an event, the time variable will display “5 minutes, 0
seconds”.
Tips & Tricks: To utilize a Microsoft Outlook calendar, use Google Sync to get the calendar data in the .ics format.
Clockwise Manual
For support, visit www.anetdsupport.com Version 2.1
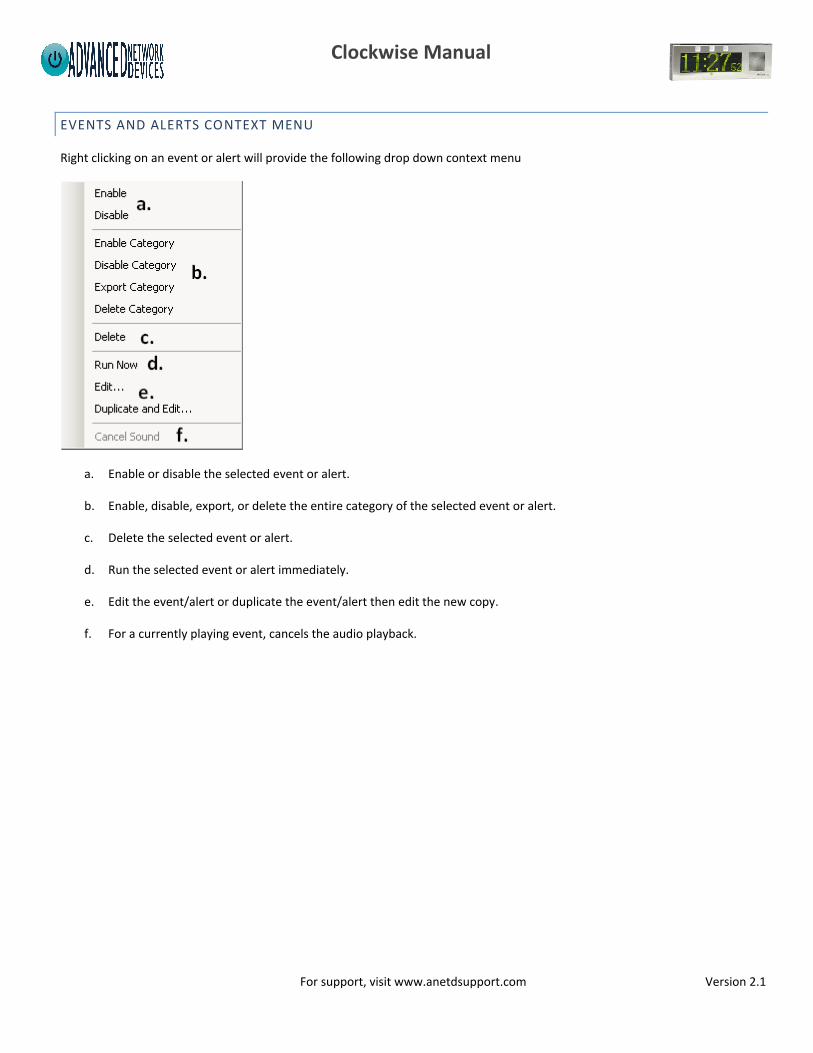
EVENTS AND ALERTS CONTEXT MENU
Right clicking on an event or alert will provide the following drop down context menu
a. Enable or disable the selected event or alert.
b. Enable, disable, export, or delete the entire category of the selected event or alert.
c. Delete the selected event or alert.
d. Run the selected event or alert immediately.
e. Edit the event/alert or duplicate the event/alert then edit the new copy.
f. For a currently playing event, cancels the audio playback.
Clockwise Manual
For support, visit www.anetdsupport.com Version 2.1
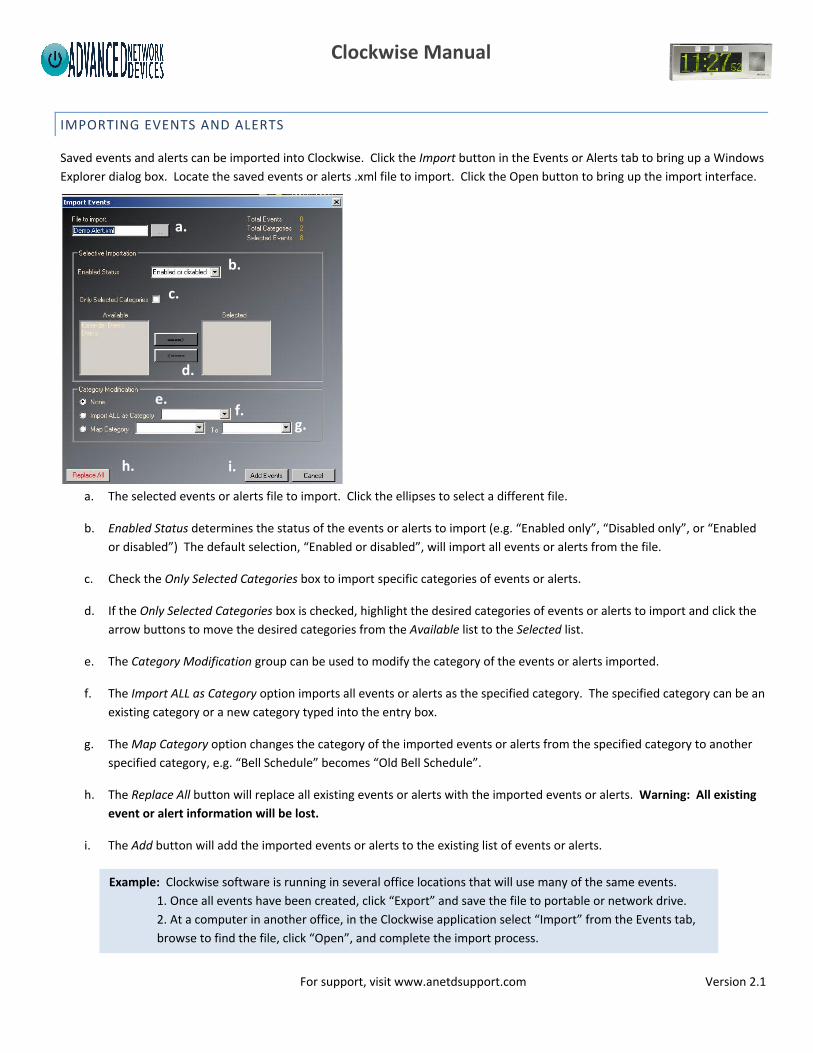
IMPORTING EVENTS AND ALERTS
Saved events and alerts can be imported into Clockwise. Click the Import button in the Events or Alerts tab to bring up a Windows
Explorer dialog box. Locate the saved events or alerts .xml file to import. Click the Open button to bring up the import interface.
a. The selected events or alerts file to import. Click the ellipses to select a different file.
b. Enabled Status determines the status of the events or alerts to import (e.g. “Enabled only”, “Disabled only”, or “Enabled
or disabled”) The default selection, “Enabled or disabled”, will import all events or alerts from the file.
c. Check the Only Selected Categories box to import specific categories of events or alerts.
d. If the Only Selected Categories box is checked, highlight the desired categories of events or alerts to import and click the
arrow buttons to move the desired categories from the Available list to the Selected list.
e. The Category Modification group can be used to modify the category of the events or alerts imported.
f. The Import ALL as Category option imports all events or alerts as the specified category. The specified category can be an
existing category or a new category typed into the entry box.
g. The Map Category option changes the category of the imported events or alerts from the specified category to another
specified category, e.g. “Bell Schedule” becomes “Old Bell Schedule”.
h. The Replace All button will replace all existing events or alerts with the imported events or alerts. Warning: All existing
event or alert information will be lost.
i. The Add button will add the imported events or alerts to the existing list of events or alerts.
Example: Clockwise software is running in several office locations that will use many of the same events.
1. Once all events have been created, click “Export” and save the file to portable or network drive.
2. At a computer in another office, in the Clockwise application select “Import” from the Events tab,
browse to find the file, click “Open”, and complete the import process.
a.
b.
c.
d.
e.
h. i.
f. g.

Clockwise Manual
For support, visit www.anetdsupport.com Version 2.1
ALERTS TAB
The Alerts tab allows creation and organization of non-scheduled alerts. Alerts can be triggered manually or by external stimuli,
e.g., call buttons, motion sensors, etc.
a. The Export button saves all listed alerts in an external .xml file. Click the button to open a Windows Explorer dialog
box. Navigate to the desired location to save the file and enter a unique file name, then click the “Save” button.
b. The Import button adds alerts from an .xml file. (see Importing Events)
c. The Add an Alert button opens a dialog box to configure a new alert and add it to the alert list. (see Adding and
Editing Alerts)
d. Click the Run Alert button to run the highlighted alert.
e. The alert list provides a summary of all created alerts. Double-click on an alert to edit its settings. (see Adding and
Editing Alerts) Right click on an alert to access its context menu. (see Events and Alerts Context Menu)
Tips & Tricks:
Easily sort alerts in the list by clicking on any of the column headings.
a. b. c. d.
e.
Clockwise Manual
For support, visit www.anetdsupport.com Version 2.1
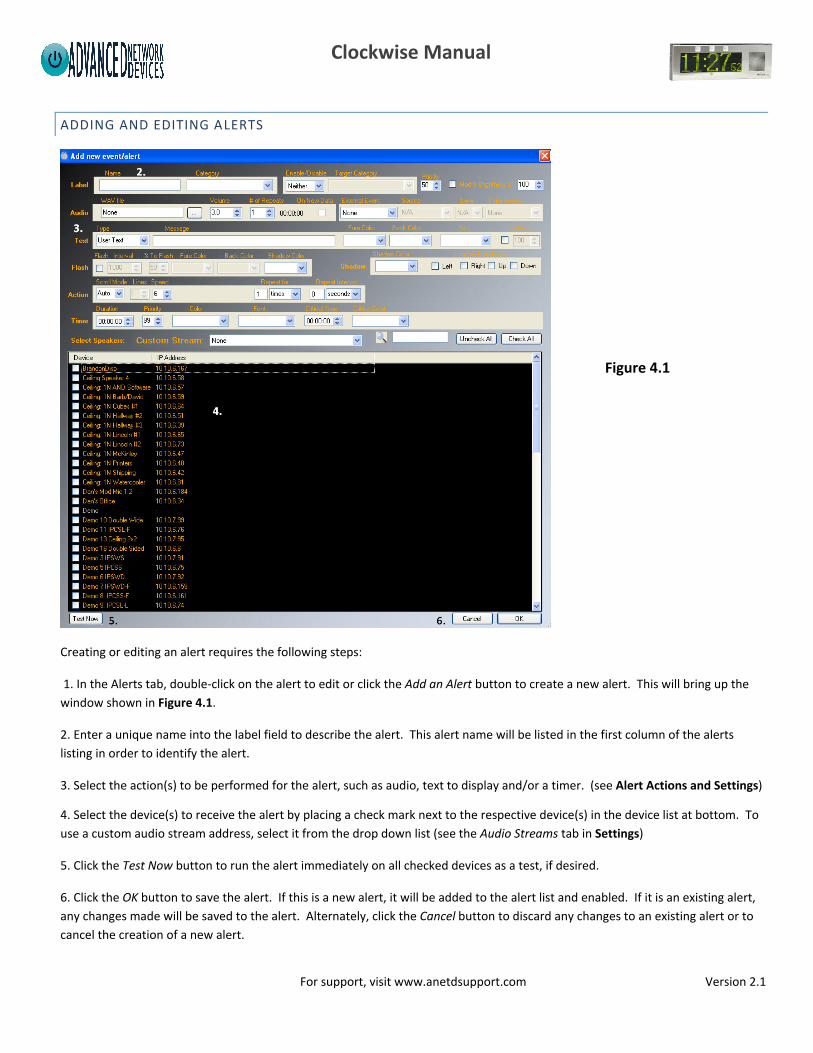
ADDING AND EDITING ALERTS
Creating or editing an alert requires the following steps:
1. In the Alerts tab, double-click on the alert to edit or click the Add an Alert button to create a new alert. This will bring up the
window shown in Figure 4.1.
2. Enter a unique name into the label field to describe the alert. This alert name will be listed in the first column of the alerts
listing in order to identify the alert.
3. Select the action(s) to be performed for the alert, such as audio, text to display and/or a timer. (see Alert Actions and Settings)
4. Select the device(s) to receive the alert by placing a check mark next to the respective device(s) in the device list at bottom. To
use a custom audio stream address, select it from the drop down list (see the Audio Streams tab in Settings)
5. Click the Test Now button to run the alert immediately on all checked devices as a test, if desired.
6. Click the OK button to save the alert. If this is a new alert, it will be added to the alert list and enabled. If it is an existing alert,
any changes made will be saved to the alert. Alternately, click the Cancel button to discard any changes to an existing alert or to
cancel the creation of a new alert.
Figure 4.1
Clockwise Manual
For support, visit www.anetdsupport.com Version 2.1
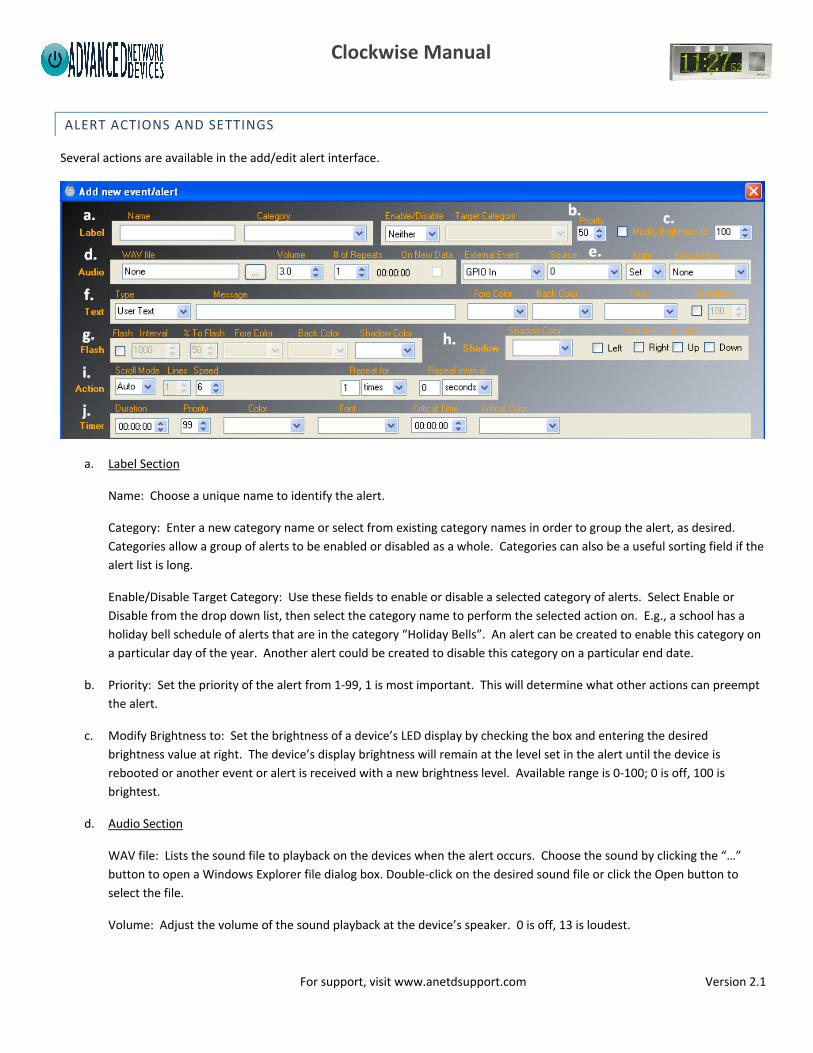
ALERT ACTIONS AND SETTINGS
Several actions are available in the add/edit alert interface.
a. Label Section
Name: Choose a unique name to identify the alert.
Category: Enter a new category name or select from existing category names in order to group the alert, as desired.
Categories allow a group of alerts to be enabled or disabled as a whole. Categories can also be a useful sorting field if the
alert list is long.
Enable/Disable Target Category: Use these fields to enable or disable a selected category of alerts. Select Enable or
Disable from the drop down list, then select the category name to perform the selected action on. E.g., a school has a
holiday bell schedule of alerts that are in the category “Holiday Bells”. An alert can be created to enable this category on
a particular day of the year. Another alert could be created to disable this category on a particular end date.
b. Priority: Set the priority of the alert from 1-99, 1 is most important. This will determine what other actions can preempt
the alert.
c. Modify Brightness to: Set the brightness of a device’s LED display by checking the box and entering the desired
brightness value at right. The device’s display brightness will remain at the level set in the alert until the device is
rebooted or another event or alert is received with a new brightness level. Available range is 0-100; 0 is off, 100 is
brightest.
d. Audio Section
WAV file: Lists the sound file to playback on the devices when the alert occurs. Choose the sound by clicking the “…”
button to open a Windows Explorer file dialog box. Double-click on the desired sound file or click the Open button to
select the file.
Volume: Adjust the volume of the sound playback at the device’s speaker. 0 is off, 13 is loudest.
h. a.
i.
k.
Clockwise Manual
For support, visit www.anetdsupport.com Version 2.1
# of Repeats: Set the number of times to play the sound. The default value of 1 will play the sound only once. An
estimate of the total time needed to playback the full number of repetitions is displayed to the right in HH:MM:SS
format.
On New Data: Check this box to only play the sound when new data is received in an RSS feed, i.e., if the data is different
than the previous time the RSS feed was played back in this alert. Note this option only applies to alerts with RSS feeds.
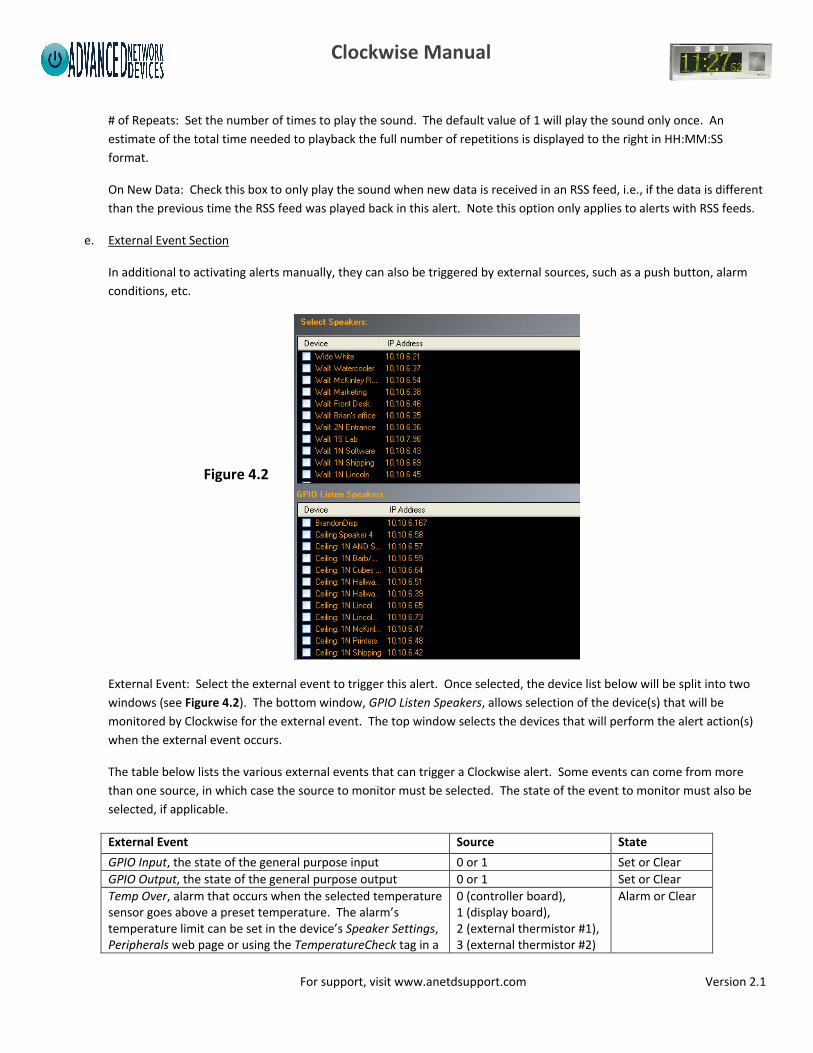
e. External Event Section
In additional to activating alerts manually, they can also be triggered by external sources, such as a push button, alarm
conditions, etc.
External Event: Select the external event to trigger this alert. Once selected, the device list below will be split into two
windows (see Figure 4.2). The bottom window, GPIO Listen Speakers, allows selection of the device(s) that will be
monitored by Clockwise for the external event. The top window selects the devices that will perform the alert action(s)
when the external event occurs.
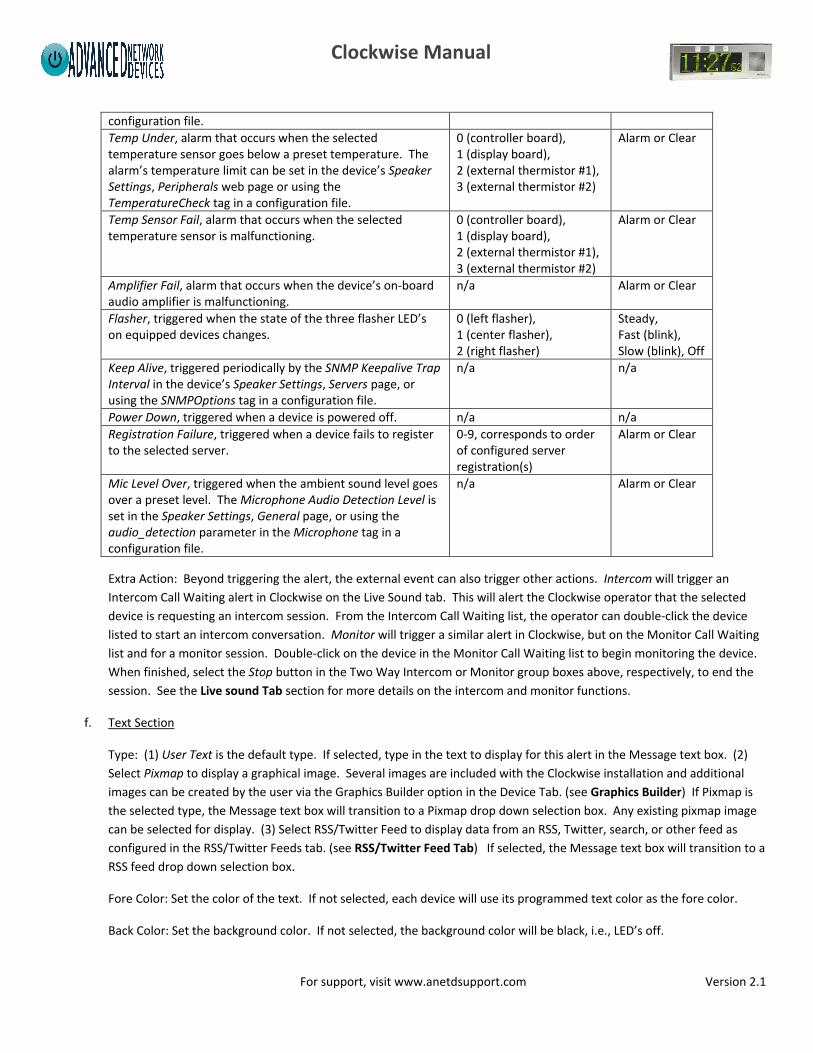
The table below lists the various external events that can trigger a Clockwise alert. Some events can come from more
than one source, in which case the source to monitor must be selected. The state of the event to monitor must also be
selected, if applicable.
External Event Source State
GPIO Input, the state of the general purpose input 0 or 1 Set or Clear
GPIO Output, the state of the general purpose output 0 or 1 Set or Clear
Temp Over, alarm that occurs when the selected temperature sensor goes above a preset temperature. The alarm’s temperature limit can be set in the device’s Speaker Settings, Peripherals web page or using the TemperatureCheck tag in a
0 (controller board), 1 (display board), 2 (external thermistor #1), 3 (external thermistor #2)
Alarm or Clear
Figure 4.2
Clockwise Manual
For support, visit www.anetdsupport.com Version 2.1
configuration file.
Temp Under, alarm that occurs when the selected temperature sensor goes below a preset temperature. The alarm’s temperature limit can be set in the device’s Speaker Settings, Peripherals web page or using the TemperatureCheck tag in a configuration file.
0 (controller board), 1 (display board), 2 (external thermistor #1), 3 (external thermistor #2)
Alarm or Clear
Temp Sensor Fail, alarm that occurs when the selected temperature sensor is malfunctioning.
0 (controller board), 1 (display board), 2 (external thermistor #1), 3 (external thermistor #2)
Alarm or Clear
Amplifier Fail, alarm that occurs when the device’s on-board audio amplifier is malfunctioning.
n/a Alarm or Clear
Flasher, triggered when the state of the three flasher LED’s on equipped devices changes.
0 (left flasher), 1 (center flasher), 2 (right flasher)
Steady, Fast (blink), Slow (blink), Off
Keep Alive, triggered periodically by the SNMP Keepalive Trap Interval in the device’s Speaker Settings, Servers page, or using the SNMPOptions tag in a configuration file.
n/a n/a
Power Down, triggered when a device is powered off. n/a n/a
Registration Failure, triggered when a device fails to register to the selected server.
0-9, corresponds to order of configured server registration(s)
Alarm or Clear
Mic Level Over, triggered when the ambient sound level goes over a preset level. The Microphone Audio Detection Level is set in the Speaker Settings, General page, or using the audio_detection parameter in the Microphone tag in a configuration file.
n/a Alarm or Clear
Extra Action: Beyond triggering the alert, the external event can also trigger other actions. Intercom will trigger an
Intercom Call Waiting alert in Clockwise on the Live Sound tab. This will alert the Clockwise operator that the selected
device is requesting an intercom session. From the Intercom Call Waiting list, the operator can double-click the device
listed to start an intercom conversation. Monitor will trigger a similar alert in Clockwise, but on the Monitor Call Waiting
list and for a monitor session. Double-click on the device in the Monitor Call Waiting list to begin monitoring the device.
When finished, select the Stop button in the Two Way Intercom or Monitor group boxes above, respectively, to end the
session. See the Live sound Tab section for more details on the intercom and monitor functions.
f. Text Section
Type: (1) User Text is the default type. If selected, type in the text to display for this alert in the Message text box. (2)
Select Pixmap to display a graphical image. Several images are included with the Clockwise installation and additional
images can be created by the user via the Graphics Builder option in the Device Tab. (see Graphics Builder) If Pixmap is
the selected type, the Message text box will transition to a Pixmap drop down selection box. Any existing pixmap image
can be selected for display. (3) Select RSS/Twitter Feed to display data from an RSS, Twitter, search, or other feed as
configured in the RSS/Twitter Feeds tab. (see RSS/Twitter Feed Tab) If selected, the Message text box will transition to a
RSS feed drop down selection box.
Fore Color: Set the color of the text. If not selected, each device will use its programmed text color as the fore color.
Back Color: Set the background color. If not selected, the background color will be black, i.e., LED’s off.
Clockwise Manual
For support, visit www.anetdsupport.com Version 2.1
Font: Set the font type of the text. Selecting and_5high, and_7high, or and_8high will use a smaller font which allows the
clock to continue to display during the text message. If not selected, each device will use its programmed text font.
Brightness: Set the brightness of the display for this message by checking the box and entering the desired brightness
value at right. The display will return to its previous brightness level following the event. Available range is 0-100; 0 is
off, 100 is brightest.
g. Flash Section
Flash: Check the box to make the text or graphics flash between two color palettes.
Interval: Sets the time in milliseconds of a single full flashing cycle, i.e., from the start of the normal text display to the
end of the flashing condition. At the end of the flashing condition, the cycle repeats. The default interval value is 1
second (1000 ms).
% To Flash: Sets the percentage of the interval time to display the flashing condition. The flashing state is always second
to the normal state, e.g., selecting a value of 40 will cause the normal text display to occur for 60% of the flash interval,
then display the flashing condition for the remaining 40% of the interval.
Fore Color: Sets the color of the text when in the flashing state. Default is the color of the background in the normal,
non-flashing state.
Back Color: Sets the color of the background when in the flashing state. Default is the color of the background in the non-
flashing state.
Shadow Color: Sets the color of the drop shadow when in the flashing state. Default is the color of the background in the
non-flashing state, or the color of the background in the flashing state, if specified.
h. Shadow Section
Shadow Color: Sets the color of a drop shadow around each letter of text.
Shadow Direction(s): Specifies the portions of each letter that will contain a drop shadow. If none are selected, no drop
shadow is displayed.
i. Action Section
Scroll Mode: Controls the direction of text and pixmap scrolling.
Tips & Tricks: To make only part of a message flash, intra-message modifiers can be used via the “{“ and “}”
characters to mark the non-flashing text. The parameter “flash_fg” sets the foreground color during the flashing
period, and if set to “normal_fg”, the corresponding text will remain the “normal” non-flashing foreground color.
For example, the following message will only flash the word “flash”: {flash_fg=normal_fg}Only one word will
{flash_fg=default} flash {flash_fg=normal_fg}in this message
Tips & Tricks: Select all four shadow directions to outline each letter.
Clockwise Manual
For support, visit www.anetdsupport.com Version 2.1
Auto is the default scrolling mode and will scroll most text characters from right to left; this is the same as the Left scroll
mode. If the first character of a text message is of a language group such as Hebrew or Arabic that is read from right to
left, the text will scroll from left to right in auto mode; same as the Right scroll mode. If a pixmap is used, it will be
displayed in the Still mode if auto mode is selected.
Speed: In all modes except Still, speed controls the rate at which the text or pixmap moves across the display. 1 is
slowest, 10 is fastest.
Lines: In Still mode, this sets the number of lines of text to display at one time, up to three. In Up and Down modes, this
changes the size of the font to allow more text on the display at one time. The default is 1 line such that the text fills the
entire display height.
Frame Time: In Still mode, this controls the number of milliseconds the current portion of the message is displayed
before moving to the next piece of the message. The default is 1 second (1000 ms).
Splitting: In Still or Up/Down modes, splitting controls how the sections or lines of the message are broken up. If Manual
is chosen, use the “|” character to separate each line or section. Clockwise will open a dialog window when the text
message is edited and these sections can be set by adding a carriage return for each. This will auto-insert the “|”
character when the text edit window is closed. If Auto is selected, Clockwise will automatically break the text into
viewable sections.
Repeat for: Controls how many times the message is displayed. If a time frame is chosen, i.e., days, hours, minutes, or
seconds, the message will repeat until the specified amount of time has elapsed.
Repeat Interval: Controls how much time to pause between message repeats. During this pause time, the time will be
displayed.
j. Timer Section
The countdown timer is displayed if a duration is entered. The timer will count down to zero for this duration on the
device display. If a text message or pixmap is also selected for the alert, it will replace the timer until the message display
is complete or a pause period is entered, at which time the timer will display again.
Tips & Tricks: For devices with the bright white “flasher” LED’s, the device settings can be used to change the
behavior of the flashers during this pause time. E.g., the flashers can blink brightly during the pause time, then go
to a continuous low brightness or off while the message is displayed. See the Message and Audio Priorities table
in the device’s on-board Speaker Settings menu, Misc settings page or the Priorities tag if using a configuration file
in order to change the flasher behavior during the repeat interval.
Tips & Tricks: When using timers, it is best that the devices and Clockwise are synchronized to the same NTP
server. Using the Easy Configuration option (see Accessing Devices) to configure the devices to register with
Clockwise will also ensure they are using the same time base (the PC time). The timer duration is based on an
expiration timestamp, and if Clockwise is using a different time base than the devices, the timer will expire earlier
or later than expected.
Tips & Tricks: When using manual splitting, be sure to test the event to verify the text display as text may be cut
off if too many characters are present in a single section.
Clockwise Manual
For support, visit www.anetdsupport.com Version 2.1
Duration: Sets the time in HH:MM:SS to countdown from.
Priority: Sets the priority of the timer display. Any messages of a higher or equal priority received during the timer
display will replace the timer until they complete, at which time the timer will display again.
Color: Sets the color of the timer digits. If not selected, each device will use its programmed countdown timer color.
Font: Sets the font type of the timer digits. If not selected, each device will use its programmed timer font.
Critical Time: Sets an optional time at which the color of the timer will change to the specified critical color. The timer
icon will also begin blinking at this time.
Critical Color: Sets the color of the timer digits when the critical time is reached. If not selected, each device will use its
programmed countdown timer critical color.
Clockwise Manual
For support, visit www.anetdsupport.com Version 2.1
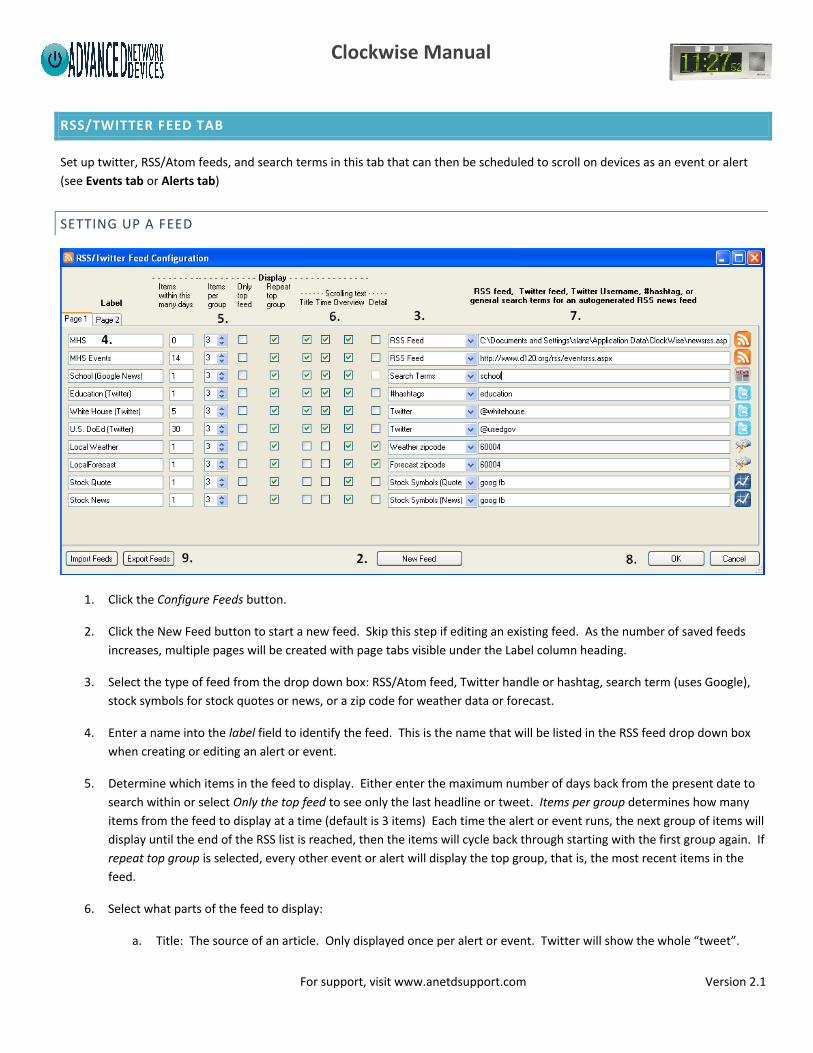
RSS/TWITTER FEED TAB
Set up twitter, RSS/Atom feeds, and search terms in this tab that can then be scheduled to scroll on devices as an event or alert
(see Events tab or Alerts tab)
SETTING UP A FEED
1. Click the Configure Feeds button.
2. Click the New Feed button to start a new feed. Skip this step if editing an existing feed. As the number of saved feeds
increases, multiple pages will be created with page tabs visible under the Label column heading.
3. Select the type of feed from the drop down box: RSS/Atom feed, Twitter handle or hashtag, search term (uses Google),
stock symbols for stock quotes or news, or a zip code for weather data or forecast.
4. Enter a name into the label field to identify the feed. This is the name that will be listed in the RSS feed drop down box
when creating or editing an alert or event.
5. Determine which items in the feed to display. Either enter the maximum number of days back from the present date to
search within or select Only the top feed to see only the last headline or tweet. Items per group determines how many
items from the feed to display at a time (default is 3 items) Each time the alert or event runs, the next group of items will
display until the end of the RSS list is reached, then the items will cycle back through starting with the first group again. If
repeat top group is selected, every other event or alert will display the top group, that is, the most recent items in the
feed.
6. Select what parts of the feed to display:
a. Title: The source of an article. Only displayed once per alert or event. Twitter will show the whole “tweet”.
Clockwise Manual
For support, visit www.anetdsupport.com Version 2.1
b. Time: Date and time of the article publication. Only displayed once per alert of event.
c. Overview: The headline of an article, usually a single phrase or sentence.
d. Detail: The entire article.
7. Enter a RSS/Atom feed URL or local filename path, a twitter handle or hashtags, search keywords, stock symbols, or a zip
code for weather information. To create a custom RSS feed, a third-party RSS editor can be used. (see RSS Editor in the
Appendix)
8. Click the OK button to save changes to the feed(s).
9. Use the Export Feeds button to save all existing feeds to a .xml file. Use the Import Feeds button to restore feeds from a
saved export file. Warning: all existing feeds will be replaced with the imported feeds.
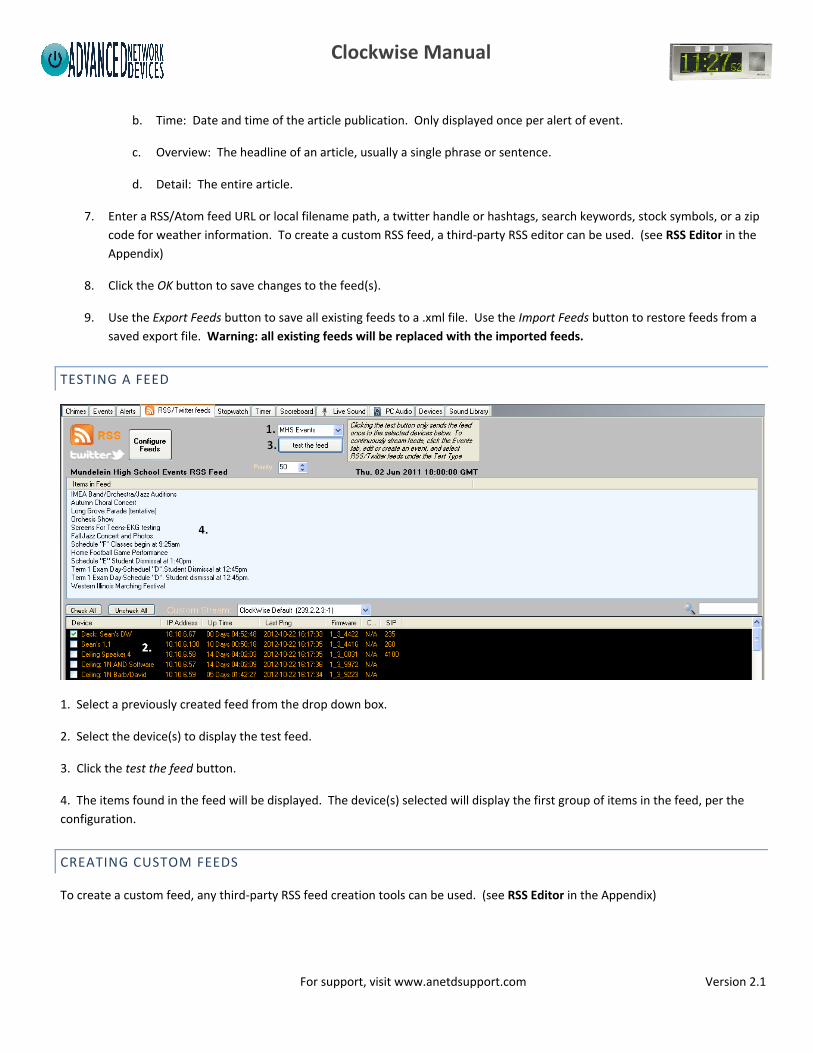
TESTING A FEED
1. Select a previously created feed from the drop down box.
2. Select the device(s) to display the test feed.
3. Click the test the feed button.
4. The items found in the feed will be displayed. The device(s) selected will display the first group of items in the feed, per the
configuration.
CREATING CUSTOM FEEDS
To create a custom feed, any third-party RSS feed creation tools can be used. (see RSS Editor in the Appendix)
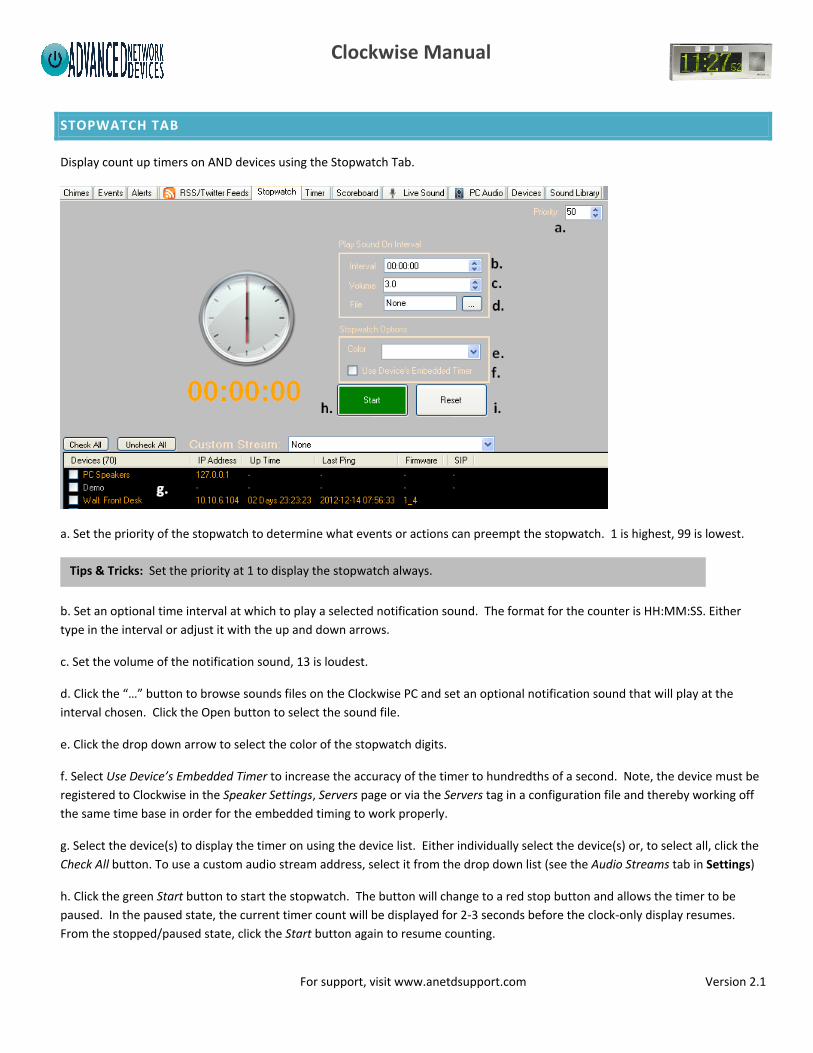
Clockwise Manual
For support, visit www.anetdsupport.com Version 2.1
STOPWATCH TAB
Display count up timers on AND devices using the Stopwatch Tab.
a. Set the priority of the stopwatch to determine what events or actions can preempt the stopwatch. 1 is highest, 99 is lowest.
b. Set an optional time interval at which to play a selected notification sound. The format for the counter is HH:MM:SS. Either
type in the interval or adjust it with the up and down arrows.
c. Set the volume of the notification sound, 13 is loudest.
d. Click the “…” button to browse sounds files on the Clockwise PC and set an optional notification sound that will play at the
interval chosen. Click the Open button to select the sound file.
e. Click the drop down arrow to select the color of the stopwatch digits.
f. Select Use Device’s Embedded Timer to increase the accuracy of the timer to hundredths of a second. Note, the device must be
registered to Clockwise in the Speaker Settings, Servers page or via the Servers tag in a configuration file and thereby working off
the same time base in order for the embedded timing to work properly.
g. Select the device(s) to display the timer on using the device list. Either individually select the device(s) or, to select all, click the
Check All button. To use a custom audio stream address, select it from the drop down list (see the Audio Streams tab in Settings)
h. Click the green Start button to start the stopwatch. The button will change to a red stop button and allows the timer to be
paused. In the paused state, the current timer count will be displayed for 2-3 seconds before the clock-only display resumes.
From the stopped/paused state, click the Start button again to resume counting.
Tips & Tricks: Set the priority at 1 to display the stopwatch always. g.
Clockwise Manual
For support, visit www.anetdsupport.com Version 2.1
i. Click the Reset button to set the timer back to 0.
Example: Setting up a lap clock for a pool in a sports complex
1. Check the device(s) you want to run the program on.
2. Enter 40 seconds in the “Play Sound On Interval” box.
3. Adjust volume to 9.
4. Change Color to Cherry.
5. Click the “…” button and double-click the alarms folder, beeps sub-folder, and open beep2.
6. Press Start. The beep2 sound will play every 40 seconds until the timer is stopped.
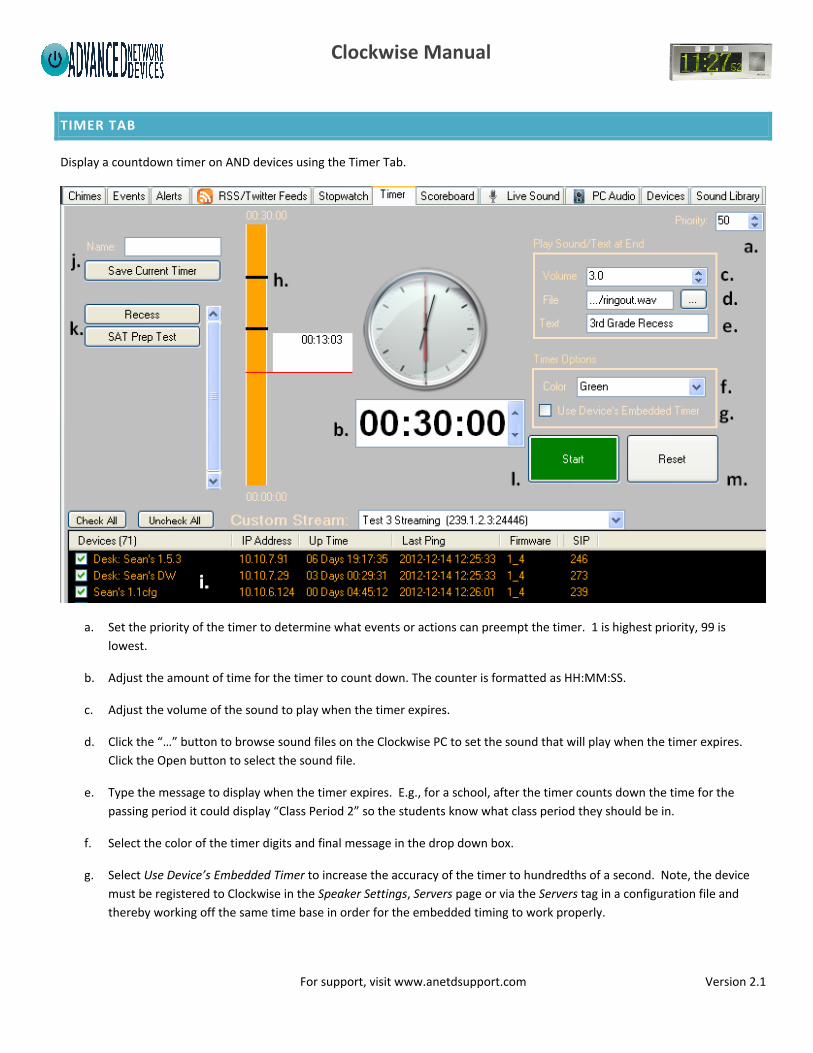
Clockwise Manual
For support, visit www.anetdsupport.com Version 2.1
TIMER TAB
Display a countdown timer on AND devices using the Timer Tab.
a. Set the priority of the timer to determine what events or actions can preempt the timer. 1 is highest priority, 99 is
lowest.
b. Adjust the amount of time for the timer to count down. The counter is formatted as HH:MM:SS.
c. Adjust the volume of the sound to play when the timer expires.
d. Click the “…” button to browse sound files on the Clockwise PC to set the sound that will play when the timer expires.
Click the Open button to select the sound file.
e. Type the message to display when the timer expires. E.g., for a school, after the timer counts down the time for the
passing period it could display “Class Period 2” so the students know what class period they should be in.
f. Select the color of the timer digits and final message in the drop down box.
g. Select Use Device’s Embedded Timer to increase the accuracy of the timer to hundredths of a second. Note, the device
must be registered to Clockwise in the Speaker Settings, Servers page or via the Servers tag in a configuration file and
thereby working off the same time base in order for the embedded timing to work properly.
Clockwise Manual
For support, visit www.anetdsupport.com Version 2.1
h. Additional notification sounds can be played back at specific times before the timer expires using the vertical orange
notification timeline at left. Scroll over the timeline to show the currently highlighted time. Left click at the desired time
to add a notification sound; a Windows file selection box will appear. Select the preferred sound file and click Open.
Once a notification is set, there will be a black horizontal line on the timeline at that point in time. Right click an existing
notification to remove it from the timeline. Note, the notification sounds will playback at the same volume level as the
timer expiration sound.
i. Select the device(s) to display the timer using the device list at the bottom of the screen. Either individually select the
device(s) or, to select all, click the Check All button. To use a custom audio stream address, select it from the drop down
list (see the Audio Streams tab in Settings)
j. Save the current timer as a preset timer by naming it in the textbox and then clicking the Save Current Timer button.
k. The list of saved timers. Select a saved timer to load its settings. Edit and save changes or click the Start button to run
the timer.
l. Click the green Start button to begin the countdown timer. The orange vertical bar at left will empty out as time passes.
Click the red Pause button at any time to pause the timer.
m. Click Reset at any time to stop the timer and reset it to the initial time.
Example: The students have a test that they are allocated one hour to finish.
1. Check the device(s) you want to run the program on.
2. Set the time to one hour.
3. Set the color to green and the volume to 6.
4. Click the “…” button. Then double click notifications, school bells, and then school bell 1.
5. Click on the 15 minute mark and insert a sound to tell the students that they have 15 minutes left.
6. Type ‘Test is complete, please put down your pencils’ in the text field.
7. Save the current timer as “Test”
8. Click Start when students begin the test.
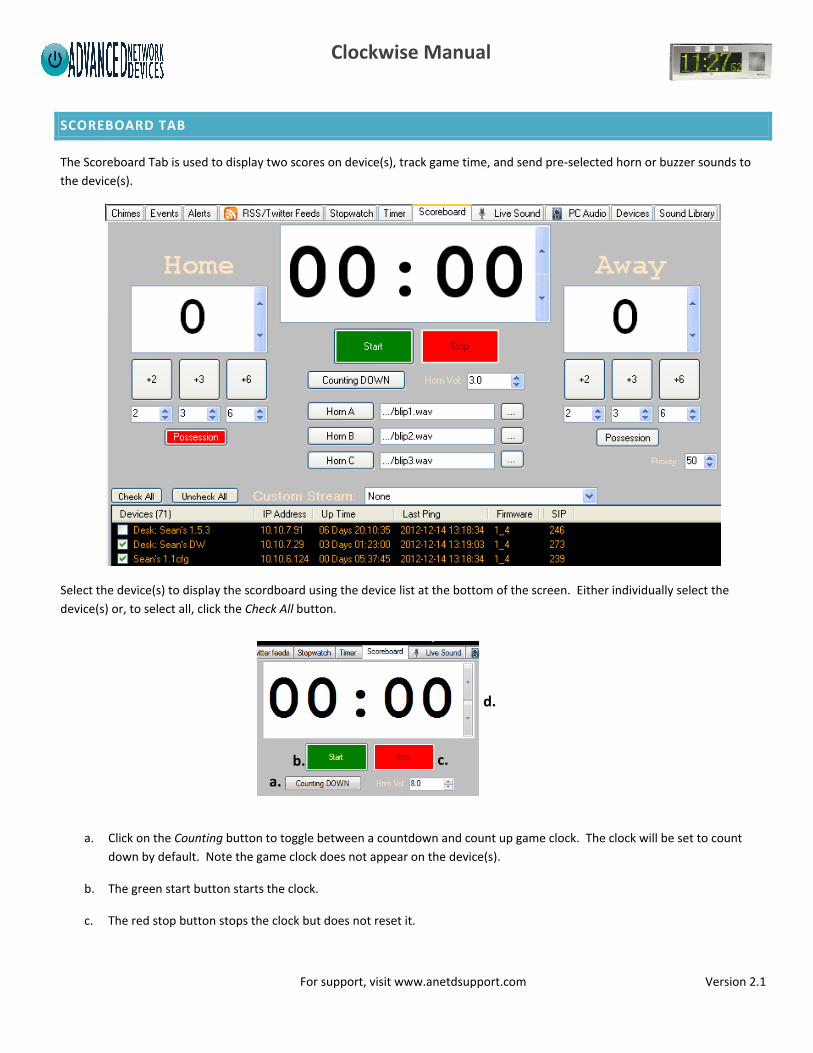
Clockwise Manual
For support, visit www.anetdsupport.com Version 2.1
SCOREBOARD TAB
The Scoreboard Tab is used to display two scores on device(s), track game time, and send pre-selected horn or buzzer sounds to
the device(s).
Select the device(s) to display the scordboard using the device list at the bottom of the screen. Either individually select the
device(s) or, to select all, click the Check All button.
a. Click on the Counting button to toggle between a countdown and count up game clock. The clock will be set to count
down by default. Note the game clock does not appear on the device(s).
b. The green start button starts the clock.
c. The red stop button stops the clock but does not reset it.
a.
b. c.
d.
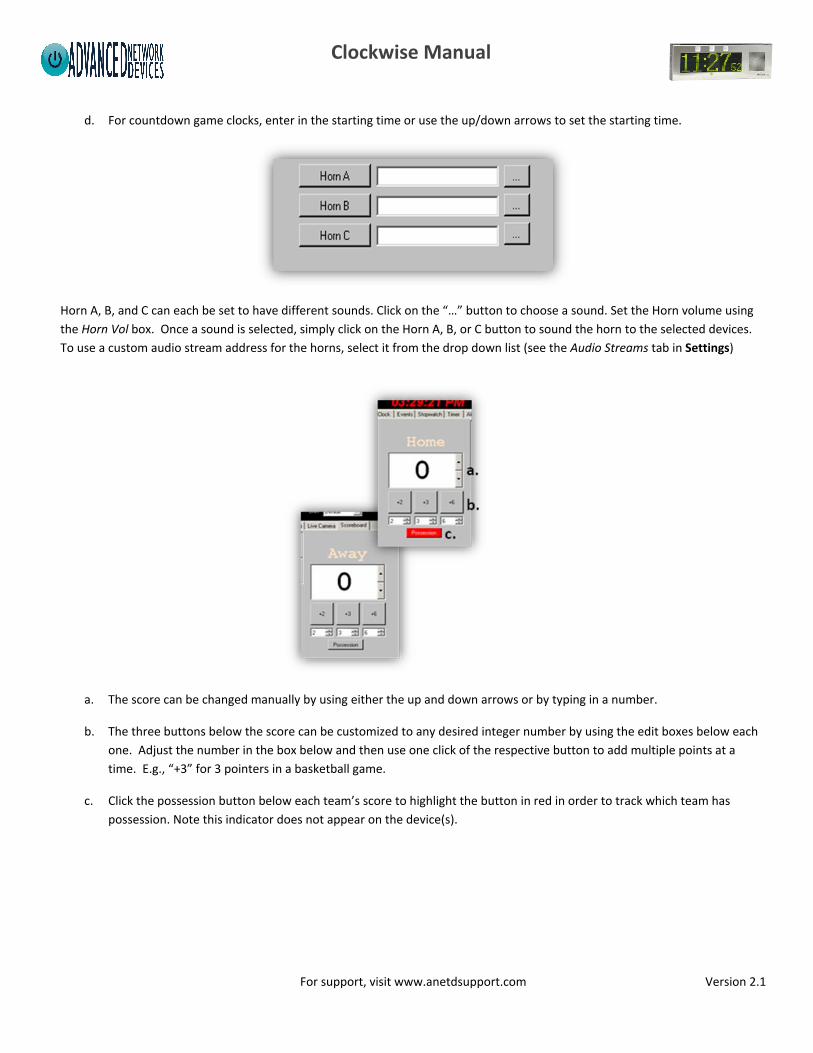
Clockwise Manual
For support, visit www.anetdsupport.com Version 2.1
d. For countdown game clocks, enter in the starting time or use the up/down arrows to set the starting time.
Horn A, B, and C can each be set to have different sounds. Click on the “…” button to choose a sound. Set the Horn volume using
the Horn Vol box. Once a sound is selected, simply click on the Horn A, B, or C button to sound the horn to the selected devices.
To use a custom audio stream address for the horns, select it from the drop down list (see the Audio Streams tab in Settings)
a. The score can be changed manually by using either the up and down arrows or by typing in a number.
b. The three buttons below the score can be customized to any desired integer number by using the edit boxes below each
one. Adjust the number in the box below and then use one click of the respective button to add multiple points at a
time. E.g., “+3” for 3 pointers in a basketball game.
c. Click the possession button below each team’s score to highlight the button in red in order to track which team has
possession. Note this indicator does not appear on the device(s).

Clockwise Manual
For support, visit www.anetdsupport.com Version 2.1
LIVE SOUND TAB
The live sound tab provides three ways to communicate with AND devices using the microphone and/or speaker on the device(s).
a. Set the priority of the live sound to determine what events or actions can preempt it. 1 is highest priority, 99 is lowest.
b. Uses a higher quality audio stream for the PC microphone data in the paging and intercom modes. This mode will use
more network bandwidth and should not be used if sending audio to third-party devices via the custom stream.
c. Low microphone latency will ensure that the audio stream at devices receiving a page will be as closely synchronized with
each other as possible. Avoid this setting if there are larger than normal network delays, which could result in dropped
audio packets.
d. Displays what device is being listened to in the case of Intercom or Monitor modes.
e. The Speak LED turns green when PC microphone is sending audio in the Paging and Intercom modes.
f. These level bars report the live audio levels detected at the PC microphone, in the case of Paging and Intercom modes,
and the device microphone, in the case of Intercom and Monitor modes.
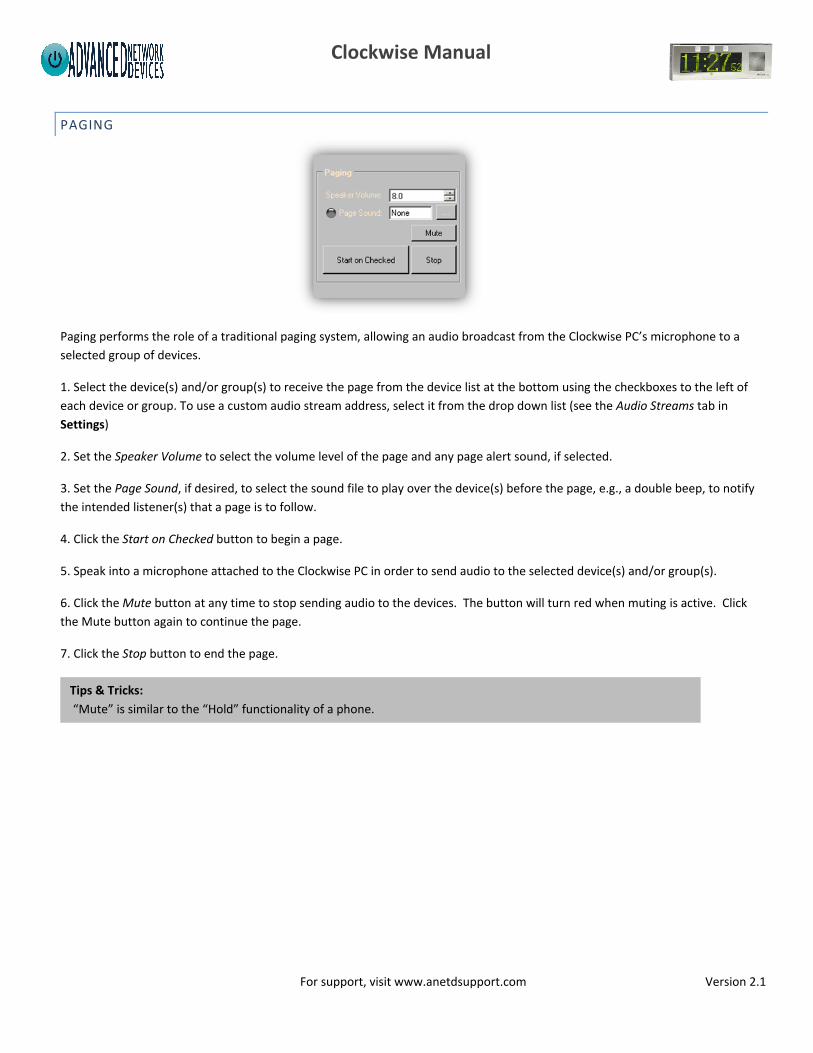
Clockwise Manual
For support, visit www.anetdsupport.com Version 2.1
PAGING
Paging performs the role of a traditional paging system, allowing an audio broadcast from the Clockwise PC’s microphone to a
selected group of devices.
1. Select the device(s) and/or group(s) to receive the page from the device list at the bottom using the checkboxes to the left of
each device or group. To use a custom audio stream address, select it from the drop down list (see the Audio Streams tab in
Settings)
2. Set the Speaker Volume to select the volume level of the page and any page alert sound, if selected.
3. Set the Page Sound, if desired, to select the sound file to play over the device(s) before the page, e.g., a double beep, to notify
the intended listener(s) that a page is to follow.
4. Click the Start on Checked button to begin a page.
5. Speak into a microphone attached to the Clockwise PC in order to send audio to the selected device(s) and/or group(s).
6. Click the Mute button at any time to stop sending audio to the devices. The button will turn red when muting is active. Click
the Mute button again to continue the page.
7. Click the Stop button to end the page.
Tips & Tricks:
“Mute” is similar to the “Hold” functionality of a phone.
Figure 7.1
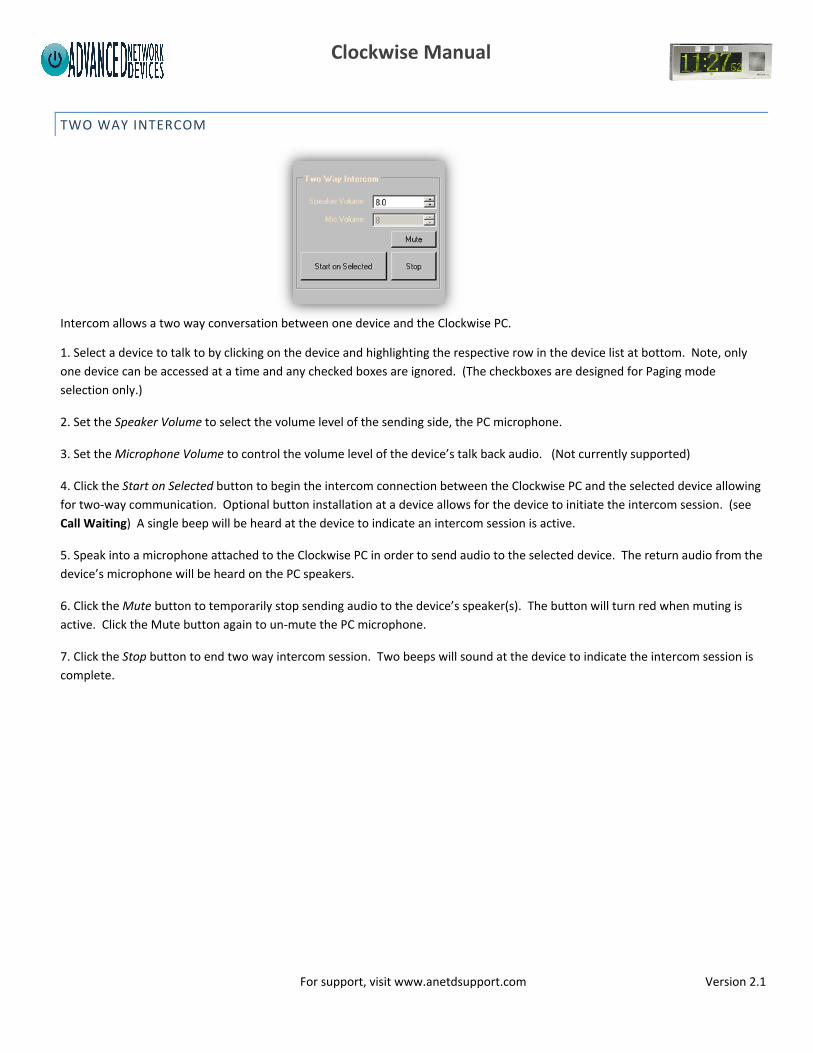
Clockwise Manual
For support, visit www.anetdsupport.com Version 2.1
TWO WAY INTERCOM
Intercom allows a two way conversation between one device and the Clockwise PC.
1. Select a device to talk to by clicking on the device and highlighting the respective row in the device list at bottom. Note, only
one device can be accessed at a time and any checked boxes are ignored. (The checkboxes are designed for Paging mode
selection only.)
2. Set the Speaker Volume to select the volume level of the sending side, the PC microphone.
3. Set the Microphone Volume to control the volume level of the device’s talk back audio. (Not currently supported)
4. Click the Start on Selected button to begin the intercom connection between the Clockwise PC and the selected device allowing
for two-way communication. Optional button installation at a device allows for the device to initiate the intercom session. (see
Call Waiting) A single beep will be heard at the device to indicate an intercom session is active.
5. Speak into a microphone attached to the Clockwise PC in order to send audio to the selected device. The return audio from the
device’s microphone will be heard on the PC speakers.
6. Click the Mute button to temporarily stop sending audio to the device’s speaker(s). The button will turn red when muting is
active. Click the Mute button again to un-mute the PC microphone.
7. Click the Stop button to end two way intercom session. Two beeps will sound at the device to indicate the intercom session is
complete.
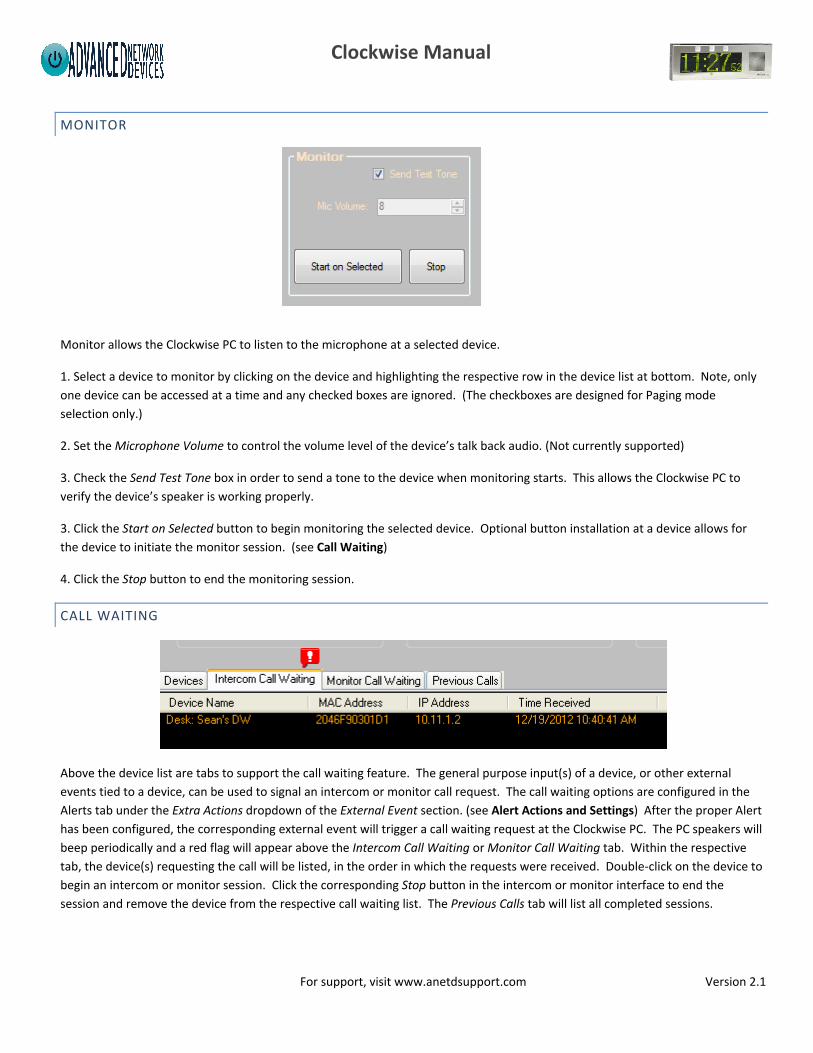
Clockwise Manual
For support, visit www.anetdsupport.com Version 2.1
MONITOR
Monitor allows the Clockwise PC to listen to the microphone at a selected device.
1. Select a device to monitor by clicking on the device and highlighting the respective row in the device list at bottom. Note, only
one device can be accessed at a time and any checked boxes are ignored. (The checkboxes are designed for Paging mode
selection only.)
2. Set the Microphone Volume to control the volume level of the device’s talk back audio. (Not currently supported)
3. Check the Send Test Tone box in order to send a tone to the device when monitoring starts. This allows the Clockwise PC to
verify the device’s speaker is working properly.
3. Click the Start on Selected button to begin monitoring the selected device. Optional button installation at a device allows for
the device to initiate the monitor session. (see Call Waiting)
4. Click the Stop button to end the monitoring session.
CALL WAITING
Above the device list are tabs to support the call waiting feature. The general purpose input(s) of a device, or other external
events tied to a device, can be used to signal an intercom or monitor call request. The call waiting options are configured in the
Alerts tab under the Extra Actions dropdown of the External Event section. (see Alert Actions and Settings) After the proper Alert
has been configured, the corresponding external event will trigger a call waiting request at the Clockwise PC. The PC speakers will
beep periodically and a red flag will appear above the Intercom Call Waiting or Monitor Call Waiting tab. Within the respective
tab, the device(s) requesting the call will be listed, in the order in which the requests were received. Double-click on the device to
begin an intercom or monitor session. Click the corresponding Stop button in the intercom or monitor interface to end the
session and remove the device from the respective call waiting list. The Previous Calls tab will list all completed sessions.
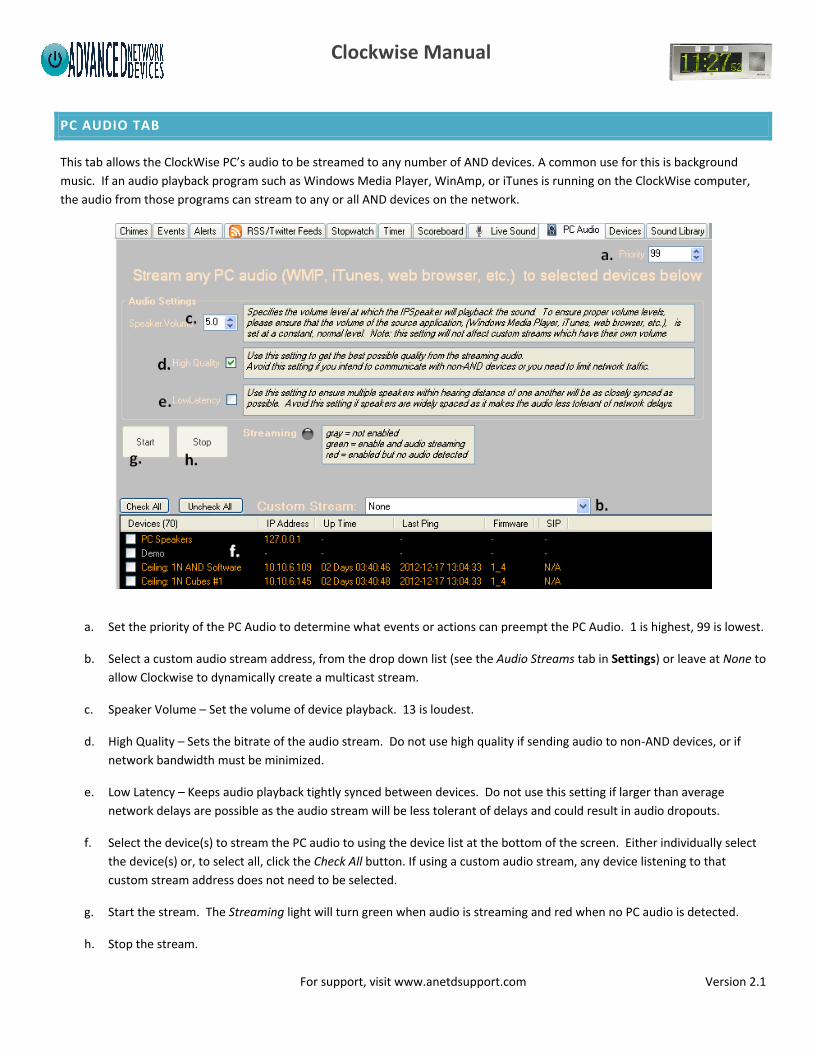
Clockwise Manual
For support, visit www.anetdsupport.com Version 2.1
PC AUDIO TAB
This tab allows the ClockWise PC’s audio to be streamed to any number of AND devices. A common use for this is background
music. If an audio playback program such as Windows Media Player, WinAmp, or iTunes is running on the ClockWise computer,
the audio from those programs can stream to any or all AND devices on the network.
a. Set the priority of the PC Audio to determine what events or actions can preempt the PC Audio. 1 is highest, 99 is lowest.
b. Select a custom audio stream address, from the drop down list (see the Audio Streams tab in Settings) or leave at None to
allow Clockwise to dynamically create a multicast stream.
c. Speaker Volume – Set the volume of device playback. 13 is loudest.
d. High Quality – Sets the bitrate of the audio stream. Do not use high quality if sending audio to non-AND devices, or if
network bandwidth must be minimized.
e. Low Latency – Keeps audio playback tightly synced between devices. Do not use this setting if larger than average
network delays are possible as the audio stream will be less tolerant of delays and could result in audio dropouts.
f. Select the device(s) to stream the PC audio to using the device list at the bottom of the screen. Either individually select
the device(s) or, to select all, click the Check All button. If using a custom audio stream, any device listening to that
custom stream address does not need to be selected.
g. Start the stream. The Streaming light will turn green when audio is streaming and red when no PC audio is detected.
h. Stop the stream.
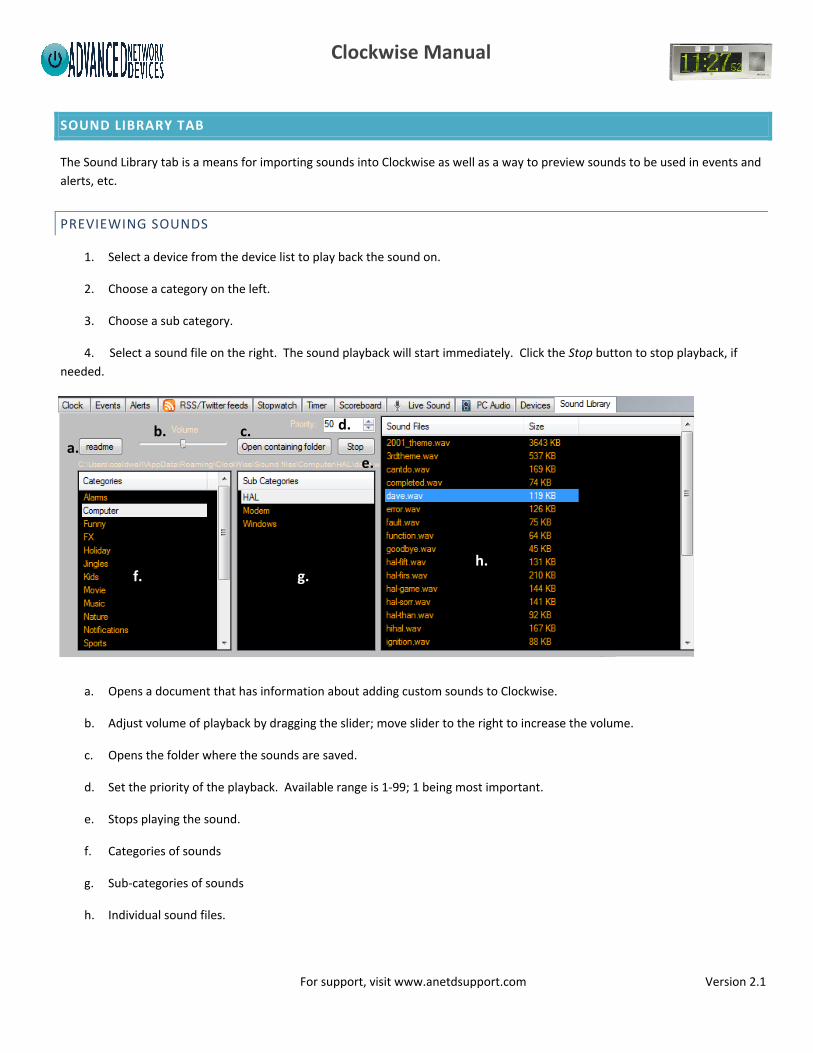
Clockwise Manual
For support, visit www.anetdsupport.com Version 2.1
SOUND LIBRARY TAB
The Sound Library tab is a means for importing sounds into Clockwise as well as a way to preview sounds to be used in events and
alerts, etc.
PREVIEWING SOUNDS
1. Select a device from the device list to play back the sound on.
2. Choose a category on the left.
3. Choose a sub category.
4. Select a sound file on the right. The sound playback will start immediately. Click the Stop button to stop playback, if
needed.
a. Opens a document that has information about adding custom sounds to Clockwise.
b. Adjust volume of playback by dragging the slider; move slider to the right to increase the volume.
c. Opens the folder where the sounds are saved.
d. Set the priority of the playback. Available range is 1-99; 1 being most important.
e. Stops playing the sound.
f. Categories of sounds
g. Sub-categories of sounds
h. Individual sound files.
a. b. c. d.
e.
f. g. h.
Clockwise Manual
For support, visit www.anetdsupport.com Version 2.1
ADDING NEW SOUND FILES TO CLOCKWISE
1. Open the sound files directory by clicking the Open containing folder button in the Sound Library tab.
In XP, the top directory is : C:\Documents and Settings\<username>\Application Data\ClockWise\Sound files\ In Vista or Windows 7: C:\Users\<username>\AppData\Roaming\ClockWise\Sound files\
2. Add a new directory or add sounds to an existing directory. Adding a new directory creates a new category in the Chimes and
Sound Library tabs.
3. In the new or existing directory, select or add another directory. Adding a directory here creates a new sub-category in the
Chimes and Sound Library tabs. In the case of Chimes, this directory will define sounds available for a corresponding “sound
program” (see Sound Libraries and Programs)
4. Add sound files to the new sub-category directory, or to an existing sub-category directory. The files should be .wav files,
mono, 16 bit at a 44.1 or 22.05kHz sampling rate, or 8-bit 8kHz u-law. If using custom audio streams (see Settings) to send audio
to non-AND devices, use 8kHz u-law.
5. Close and re-open Clockwise. This refreshes the directories in the Sound Library and Chimes tabs. The new sounds are now
available in the Sound Library tab and for use in alerts, events, chimes, etc.
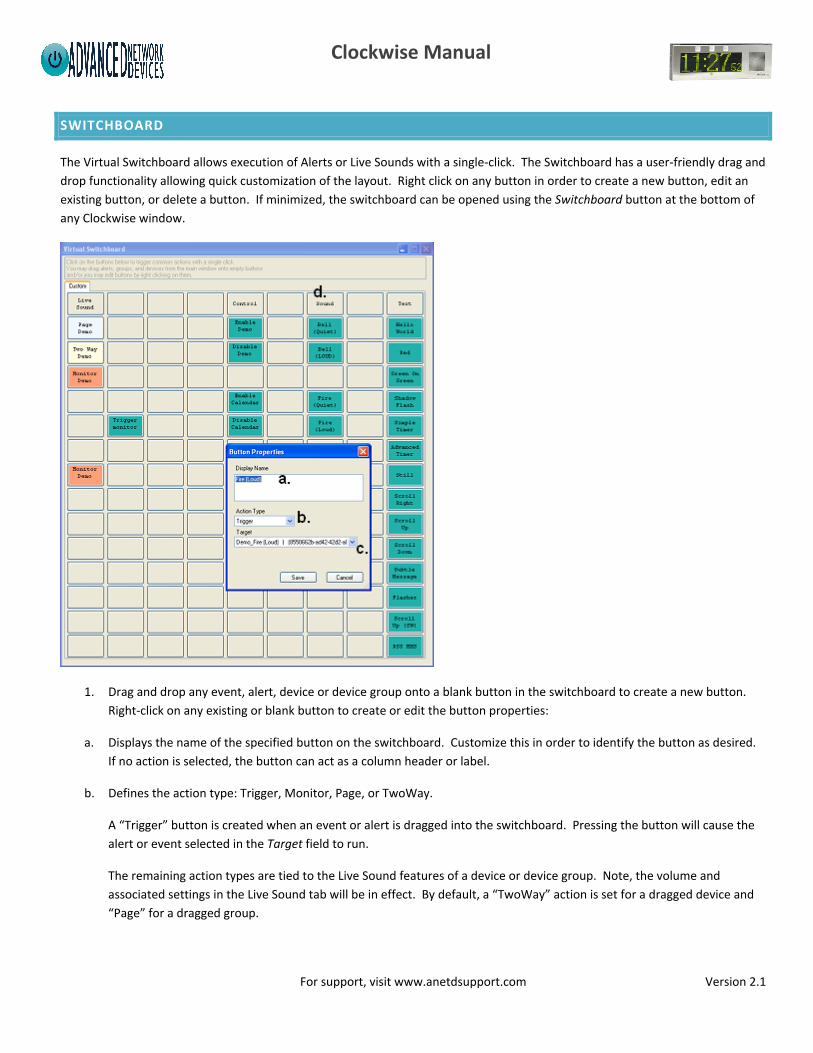
Clockwise Manual
For support, visit www.anetdsupport.com Version 2.1
SWITCHBOARD
The Virtual Switchboard allows execution of Alerts or Live Sounds with a single-click. The Switchboard has a user-friendly drag and
drop functionality allowing quick customization of the layout. Right click on any button in order to create a new button, edit an
existing button, or delete a button. If minimized, the switchboard can be opened using the Switchboard button at the bottom of
any Clockwise window.
1. Drag and drop any event, alert, device or device group onto a blank button in the switchboard to create a new button.
Right-click on any existing or blank button to create or edit the button properties:
a. Displays the name of the specified button on the switchboard. Customize this in order to identify the button as desired.
If no action is selected, the button can act as a column header or label.
b. Defines the action type: Trigger, Monitor, Page, or TwoWay.
A “Trigger” button is created when an event or alert is dragged into the switchboard. Pressing the button will cause the
alert or event selected in the Target field to run.
The remaining action types are tied to the Live Sound features of a device or device group. Note, the volume and
associated settings in the Live Sound tab will be in effect. By default, a “TwoWay” action is set for a dragged device and
“Page” for a dragged group.
Clockwise Manual
For support, visit www.anetdsupport.com Version 2.1
A “TwoWay” button will initiate a two way intercom session with the selected device when clicked. Click the button a
second time to stop the intercom session.
A “Page” button will initiate a one-way page to the device or group when clicked. Click the button a second time to stop
the page.
A “Monitor” button will monitor the microphone input of the selected device when clicked. Click the button a second
time to stop the monitoring.
c. The Target field selects the device or group to be used if the Action Type is Monitor, Page, or TwoWay. If the Action Type
is Trigger, then it selects a specific alert or event.
d. Buttons can be given a name with no action type in order to be used as a column header.
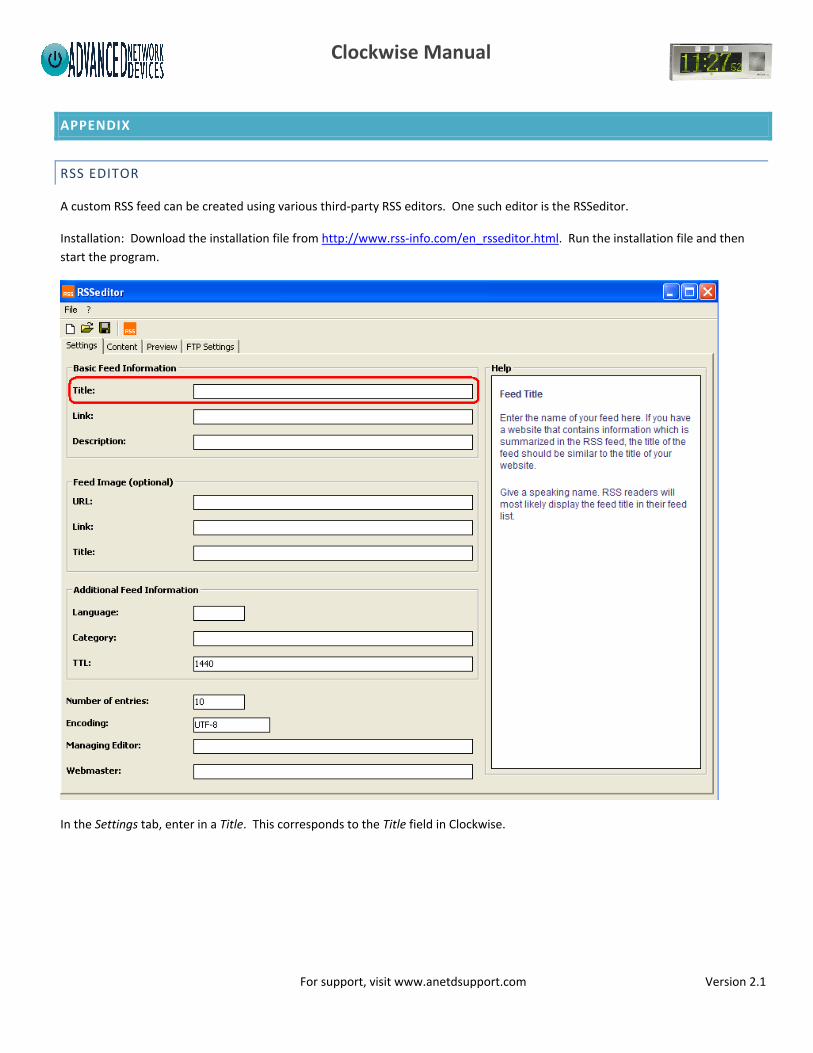
Clockwise Manual
For support, visit www.anetdsupport.com Version 2.1
APPENDIX
RSS EDITOR
A custom RSS feed can be created using various third-party RSS editors. One such editor is the RSSeditor.
Installation: Download the installation file from http://www.rss-info.com/en_rsseditor.html. Run the installation file and then
start the program.
In the Settings tab, enter in a Title. This corresponds to the Title field in Clockwise.
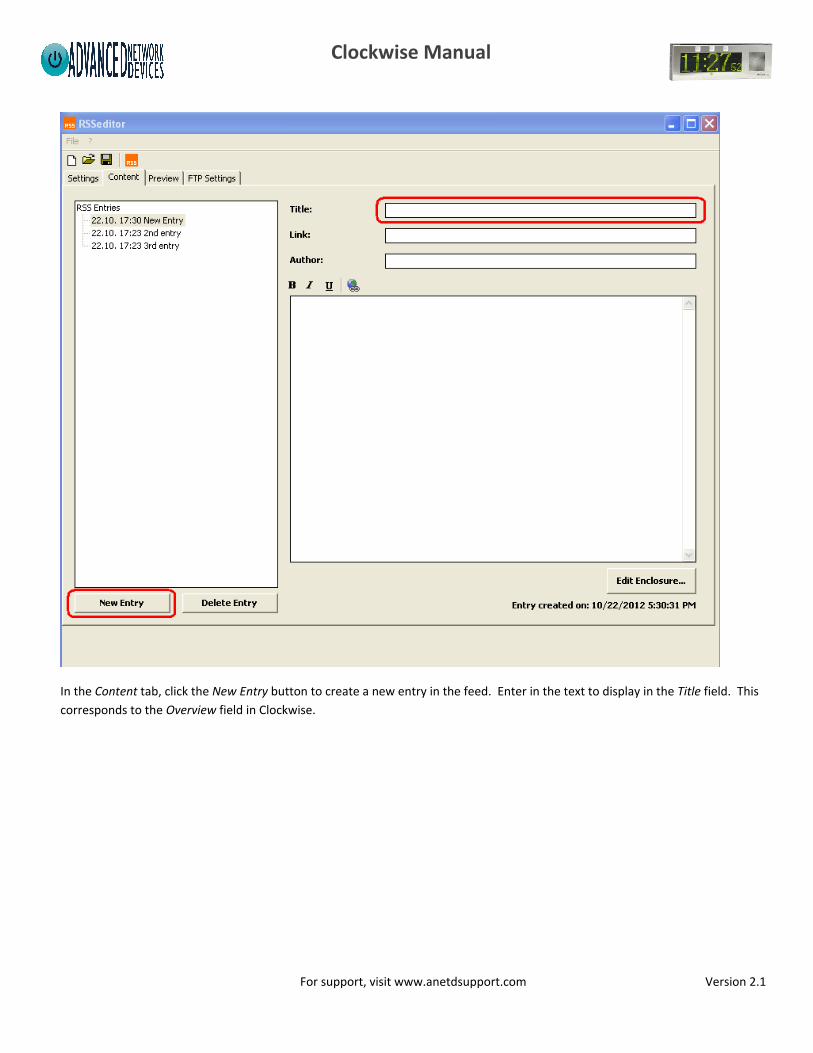
Clockwise Manual
For support, visit www.anetdsupport.com Version 2.1
In the Content tab, click the New Entry button to create a new entry in the feed. Enter in the text to display in the Title field. This
corresponds to the Overview field in Clockwise.
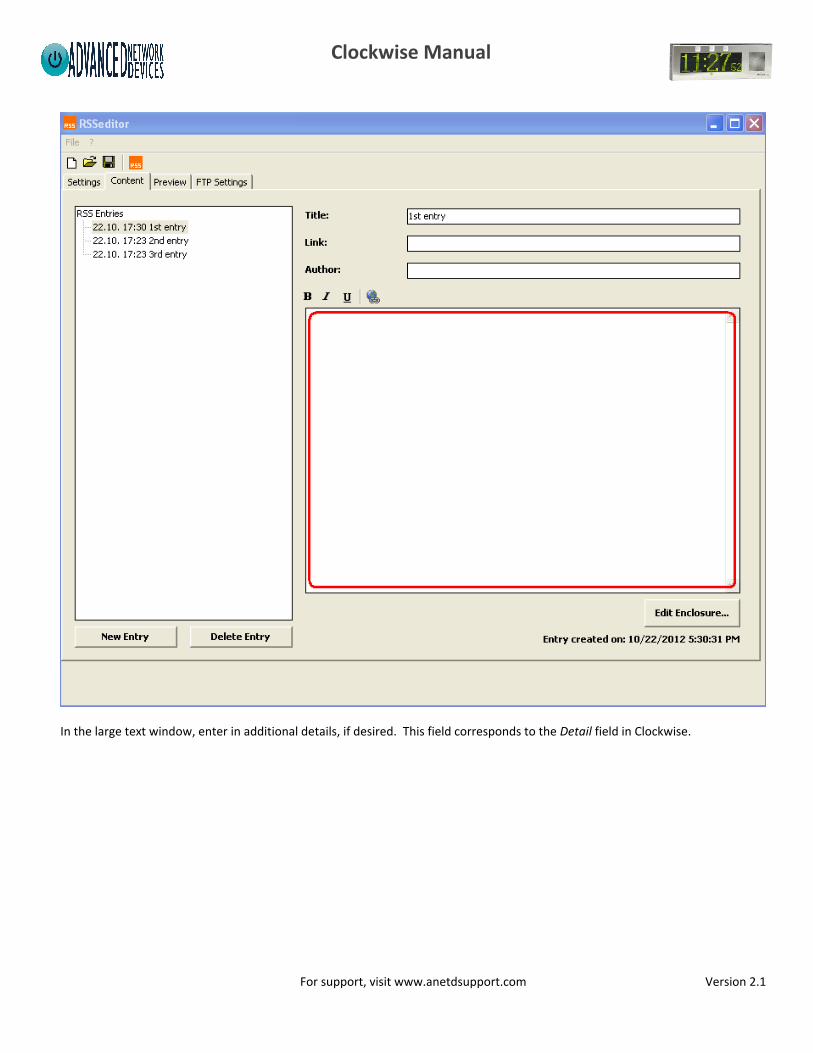
Clockwise Manual
For support, visit www.anetdsupport.com Version 2.1
In the large text window, enter in additional details, if desired. This field corresponds to the Detail field in Clockwise.
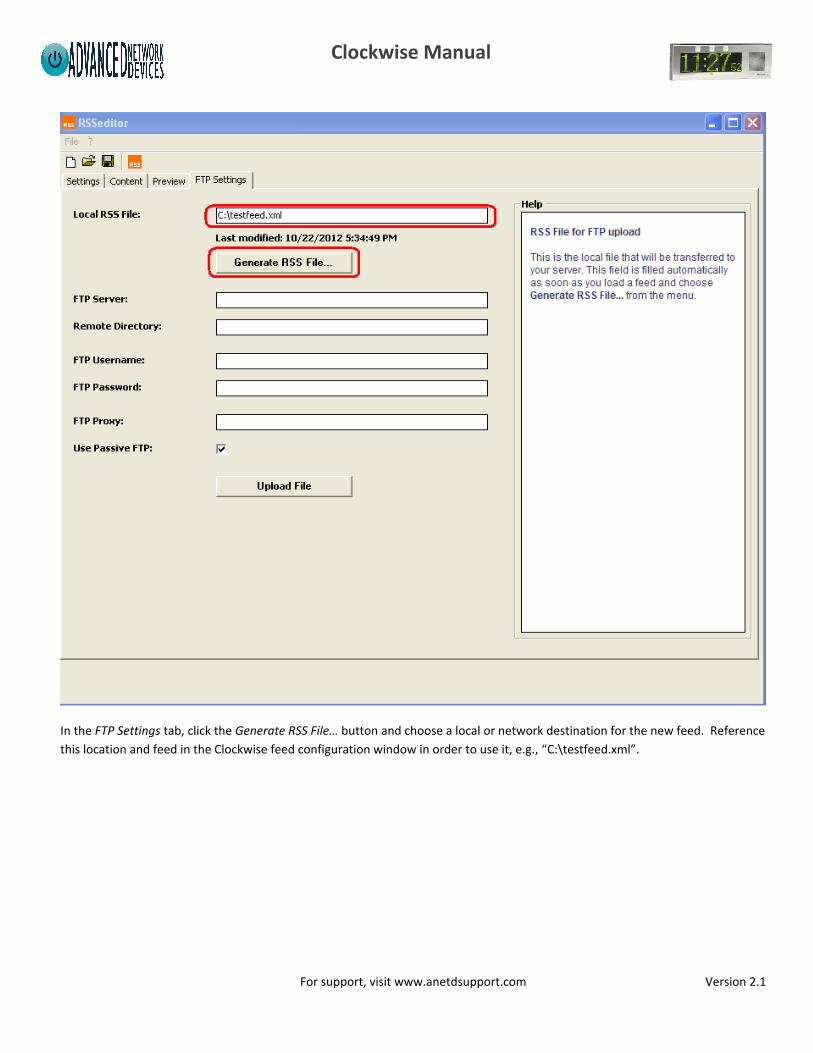
Clockwise Manual
For support, visit www.anetdsupport.com Version 2.1
In the FTP Settings tab, click the Generate RSS File… button and choose a local or network destination for the new feed. Reference
this location and feed in the Clockwise feed configuration window in order to use it, e.g., “C:\testfeed.xml”.