
Click HERE for Online Help (must be a registered user) Click HERE
15
Servant Keeper Background Checks Quick Reference Guide Click HERE for Online Help (must be a registered user). Click HERE for an online consultation for the correct background check(s) for your state. Click HERE for access to online documents. Open and log in to the Administration Manager. Step 1 : Click on the [User Security] icon. (See Figure 1) Step 2 : Find the user that you would like to give access to the Background Check feature. Click once on their name to highlight it and then click the [Edit] button on the right. (See Figure 2) Step 3 : Figure 1: 1 IMPORTANT: Make sure to check the USER SECURITY in the Administration Manager before registering. Each user that requires access to the Background Check button will need to have this option checked. The Background check option is located in the Membership Manager tab at the bottom of the screen. It is unchecked by default. Setting User Security Figure 2: After selecting the User ID, click the [Edit] button.
Transcript of Click HERE for Online Help (must be a registered user) Click HERE

Servant Keeper Background ChecksQuick Reference Guide
Click HERE for Online Help (must be a registered user).Click HERE for an online consultation for the correct background check(s) for
your state. Click HERE for access to online documents.
Open and log in to the Administration Manager.Step 1 :Click on the [User Security] icon. (See Figure 1)Step 2 :
Find the user that you would like to give access to the Background Check feature. Click once on their name to highlight it and then click the [Edit] button on the right. (See Figure 2)
Step 3 :
Figure 1:
1
IMPORTANT: Make sure to check the USER SECURITY in the Administration Manager before registering. Each user that requires access to the Background Check button will need to have this option checked. The Background check option is located in the Membership Manager tab at the bottom of the screen. It is unchecked by default.
Setting User Security
Figure 2:
After selecting the User ID, click the [Edit] button.

2
NOTE: Now that your user security has been set to allow your user(s) to do Background Checks, please follow the steps below on how to register for and submit your first Background Check.
You will now see the User Access Privileges window for the selected user. If you go to item 10.0 in the list, you will see the “Background Check” option. Click the box to put a check mark in the Access column. (See Figure 3)
Step 4 :
Figure 3:
Check the box to allow access to Background Checks.
Click the [Save] button to save your changes and return to the User Security win-dow. Click the [Close] button and then exit the Administration Manager.
Step 5 :

In the “Search for Item” line, type in the name of the individual you plan to do the background check on. (See Figure 2) Click the [Find] button and you will see a list of individuals who match your search.
Step 3 :
Figure 1:
3
Registering for Background Checks If this is your first time using the Background Check service, you will need to go through a regis-tration process to register with Protect My Ministry (the company who submits and processes the background checks). The registration process must only be completed once.
Open and log in to the Membership Manager.Step 1 :Click the [Find] button on the icon bar. (See Figure 1) The Find Record window will appear.
Step 2 :
Figure 2:
Double click on an individual to open their Individual Profile. (See Figure 3)Step 4 :Click once on the [Background Check] button. (See Figure 3)Step 5 :

Figure 3:
4
NOTE: Before beginning the registration process, make sure that you are connected to the Inter-net.
The Run Background Check window will appear. (See Figure 4) Click on the [Register] button to begin the registration process.
Step 6 :
Figure 4:
The Welcome window will be displayed. (See Figure 5) Click “Yes, I need to register”.
Step 7 :
Figure 5:
A Web browser will open you to the Background Check Account Registration page. (See Figure 6) Fill in all of the required information and click [Next] to con-tinue.
Step 8 :

5
Figure 6:
On the next screen, complete the payment information requested and click [Next]. (See Figure 7) There is a one-time fee of $39 to register with Protect My Ministry.
Step 9 :
Figure 7:
Within 24 – 48 hours of completing the form for Servant Keeper Background Check services you will receive an email that will include the Organization ID and Password. (See Figure 8) Once you complete the steps above and receive the email, please proceed to the next step.
Step 10 :
Figure 8:

6
NOTE: If you are unable to see the [Enter Information] button for any reason, it may mean that the DPI setting selected on your computer is too high for the window to display correctly. Try changing your DPI settings back to the “100%” option for the entire window to display. (DPI settings are found in your computer’s Control Panel. If you are unsure of how to change these settings, please contact your Network Administrator.)
After receiving the email from Protect My Ministry with your registration infor-mation, you will need to enter the settings into Servant Keeper. To begin, open and log in to the Membership Manager.
Step 11 :
In the “Search for Item” line, type in the name of the individual you plan to do the background check on. (See Figure 2) Click the [Find] button and you will see a list of individuals who match your search.
Step 13 :
Click the [Find] button on the icon bar. (See Figure 1) The Find Record window will appear.
Step 12 :
Double click on an individual to open into their Individual Profile. (See Figure 3)Step 14 :Click once on the [Background Check] button. (See Figure 3)Step 15 :The Run Background Check window will appear. (See Figure 9) Click on the [Enter Information] button.
Step 16 :
Figure 9:
The Servant Keeper Background Check Settings window will be displayed. (See Figure 10) Enter in your Servant Keeper Customer ID number and an email address. (The email address entered on this window will receive notifica-tions when a submitted background check has been completed.) You will also need to enter the Organization ID and Password found in the email you re-ceived from Protect My Ministry after registering (refer to Step 10 above). Click [Save].
Step 17 :

7
Figure 10:
A Web browser will open with a message that your email address has been updated. (See Figure 11)
Step 18 :
NOTE: Organization ID’s and Passwords are case-sensitive.
Figure 11:
You are now ready to complete background checks!
Please proceed to the “Submitting Background Checks” section on the next page as a guide for submitting your first background check.

Submitting Background Checks
8
In the “Search for Item” line, type in the name of the individual you plan to do the background check on. (See Figure 2) Click the [Find] button and you will see a list of individuals who match your search.
Step 3 :
Figure 1:
Open and log in to the Membership Manager.Step 1 :Click the [Find] button on the icon bar. (See Figure 1) The Find Record window will appear.
Step 2 :
Figure 2:
Double click on an individual to open their Individual Profile. (See Figure 3)Step 4 :Click once on the [Background Check] button. (See Figure 3)Step 5 :

The Run Background Check window will appear. (See Figure 4) Enter the re-quested information and click [Start Background Check].
Step 6 :
Figure 4:
9
Figure 3:
NOTE: Drivers License and SSN numbers are NOT required on this screen, but may be on a later screen depending on the type of background check you are ordering.
A “Start Background Check” confirmation window will appear. (See Figure 5) Click [Yes] to continue with the background check process.
Step 7 :
Figure 5:
You will now see the Confirm Details window. (See Figure 6) Some fields may be pre-filled with the information passed from Servant Keeper. Fill in all of the required fields and any additional information that you may have, then click the [Submit] button.
Step 8 :

Figure 6:
Figure 7:
10
NOTE: Do not use any punctuation in any fields other than the date and email fields. Extra punctuation in any other fields (such as the Drivers License field) will not allow you to submit the background check. If you click on the [Submit] button and nothing happens (i.e. you do not leave the Confirm Details screen), it may be because of punctuation on the form. Try removing any punctuation and re-submitting the form.
You will see an Entry Saved window. (See Figure 7) Click the [OK] button to proceed.
Step 9 :
An Order Background Check window will appear. (See Figure 8) Select the type(s) of background check(s) to be done on the individual from the list of available background check packages. You may also select the “A La Carte” option to check specific items to be researched. Click [Next] to continue.
Step 10 :
Figure 8:

11
NOTE: The “Billing Ref:” field can be used to subtotal your background checks to different de-partments. You must call Protect My Ministry to enable this feature.
At this point, the program will display a summary screen of all that has been requested. A variety of screens may appear depending on what type(s) of background check(s) you selected in the previous step.
Step 11 :
• If you choose the “A la Carte” option, continue to Step 12.• If you choose the “Basic” package, continue to Step 14.• If you choose the “Plus” package, continue to Step 16.
If you choose the “A la Carte” package, you will see the Summary window. (See Figure 9) Click the [Submit Background Check] button to complete the process.
Step 12 :
Figure 9:
A Background Checks Have Been Ordered window will appear, you may close this window. (See Figure 10) Continue to Page 13 below for more information.
Step 13 :
Figure 10:
If you chose the “Basic” package in Step 10, you will see the Summary win-dow. (See Figure 11) Click the [Submit Background Check] button to com-plete the process.
Step 14 :
Figure 11:
A Background Checks Have Been Ordered window will appear, you may close this window. (See Figure 10) Continue to Page 13 below for more information.
Step 15 :
If you chose the “Plus” package in Step 10, you will see the Criminal Search window. (See Figure 13) Choose either “Statewide” or “County”, then select the state where you would like to do the search.
Step 16 :
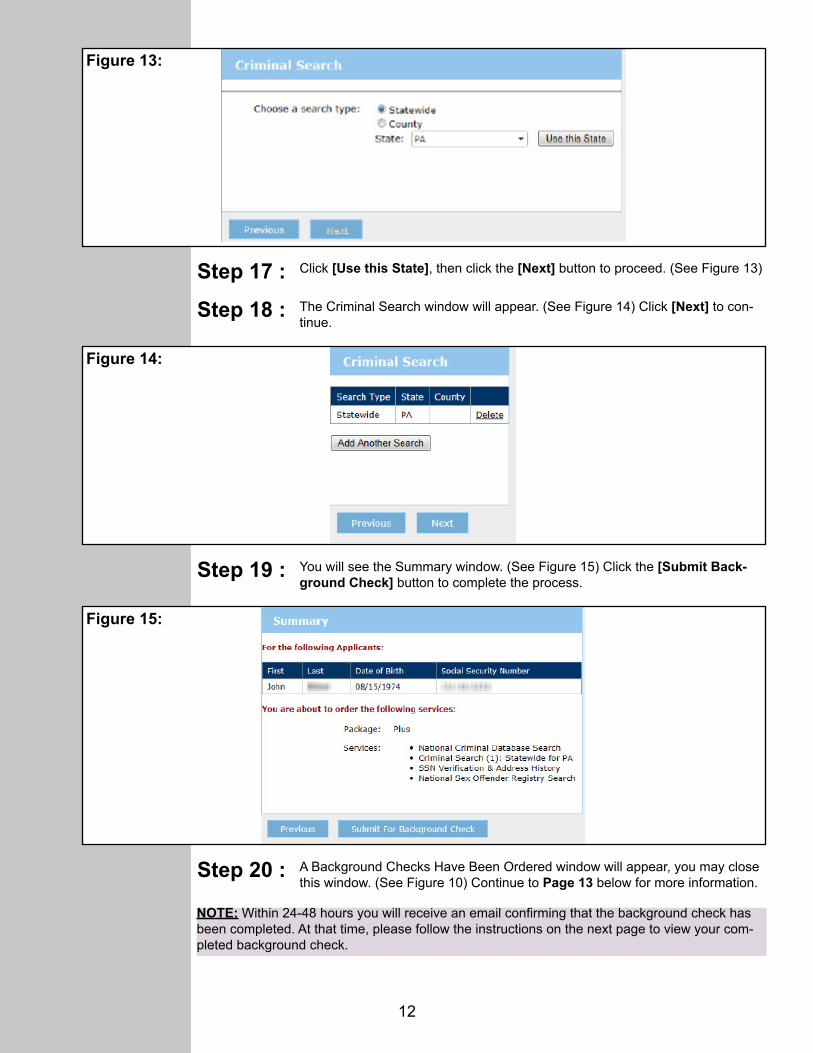
You will see the Summary window. (See Figure 15) Click the [Submit Back-ground Check] button to complete the process.
Step 19 :
Figure 13:
12
Click [Use this State], then click the [Next] button to proceed. (See Figure 13)Step 17 :The Criminal Search window will appear. (See Figure 14) Click [Next] to con-tinue.
Step 18 :
Figure 14:
Figure 15:
A Background Checks Have Been Ordered window will appear, you may close this window. (See Figure 10) Continue to Page 13 below for more information.
Step 20 :
NOTE: Within 24-48 hours you will receive an email confirming that the background check has been completed. At that time, please follow the instructions on the next page to view your com-pleted background check.

13
Viewing your Completed Background Check
In the “Search for Item” line, type in the name of the individual you plan to do the background check on. (See Figure 2) Click the [Find] button and you will see a list of individuals who match your search.
Step 3 :
Figure 1:
Open and log in to the Membership Manager.Step 1 :Click the [Find] button on the icon bar. (See Figure 1) The Find Record window will appear.
Step 2 :
Figure 2:
Double click on an individual to open their Individual Profile. (See Figure 3)Step 4 :Click once on the [Background Check] button. (See Figure 3)Step 5 :

You will see the Run Background Check window. (See Figure 4) Click the [View Background Check Results] button to obtain the report from the background check that you submitted. (See Figure 5)
Step 6 :
14
Figure 3:
Figure 4:
Figure 5:
Sample back-ground check.

How much will the background check cost?
15
FAQ
Cost depends on your state and county (additional mandatory fees may apply). The difference depends on the reliability of the information for that state and county in the national database. Many states and coun-ties do not report all of their criminal records to the national database; in those states and counties, it may be necessary to run both a national search and a local county or statewide criminal search to get accurate data. Based on the reliability of the data, Protect My Ministry has come up with a minimum recommen-dation depending on what state and county you and the prospective volunteer are located in. For some locations where the states do provide reliable data to the national database, the minimum recommendation is a BASIC Package. For other locations, the minimum recommendation is a PLUS (county or statewide) Package. Cost information is available by email ([email protected]) or by calling (800) 319-5581.
Protect My Ministry offers cost-friendly packages to meet minimum recommendations through an intuitive Online Consultation System for volunteer background checks. Recommendations are based on the qual-ity of data available in each state and industry best practices. At the very minimum the background check should cover Social Security Number Verification, National Criminal Search and Sexual Predator/Offender Registries Search.
How will the information be kept that is obtained from the background screening?
How to manage the data will be up to each local church. It is our strong recommendation that the infor-mation received in the background screening be held confidential by the church or ministry and not be released to anyone other than those necessary to review the information, such as the leaders and church pastors.
Will individuals receive a copy of the background check run on them?
This will be up to the local church that conducts the background check. If adverse information does show up that would disqualify an individual from volunteering, we strongly recommend that you share that infor-mation with the individual and give him/her an opportunity to contest the accuracy of that information. Pro-tect My Ministry provides an opportunity for churches to request further review of records when someone contests the accuracy of the results.
Is the background check for volunteers similar to those done for paid employees, such as teachers and other care givers?
Yes. In fact, all staff and employees of the church or ministry, including its Senior Pastor, must pass an even more rigorous criminal background check, including employment and education verifications, driving history and credit history searches.


![[ CLICK HERE ]](https://static.fdocuments.net/doc/165x107/555a9114d8b42a3e268b4658/-click-here-.jpg)


![[Click Here]](https://static.fdocuments.net/doc/165x107/559f59701a28abbd5d8b45bd/click-here-55a1467d50e25.jpg)