CLICHÉ SELECTION FOR PAD PRINTING CHOOSING …...CLICHÉ SELECTION FOR PAD PRINTING CHOOSING THE...
15
CLICHÉ SELECTION FOR PAD PRINTING CHOOSING THE RIGHT PLATE FOR YOUR NEEDS PAGE Page 1 Technically speaking, pad printing is an indirect offset gravure process. This means that instead of relying on a stencil to carry the image as in screen printing, the image to be printed is formed into a flat (sometimes cylindrical) plate as in gravure printing. But the integrity of this plate (or Cliché) is just as important in pad printing as stencil definition is in screen printing. As with all printing processes, the quality of this image is absolutely critical and determines the success you will have at the press. In recent years, several new cliché options have become available that have made choosing the right cliché for a job more important than ever. These different cliché types have somewhat varied requirements for preparation and storage that must be followed for best results. By understanding what cliché options are available and learning how to use these plates properly, you’ll go a long way towards improving the quality of your pad printed products. If you aren’t familiar with the theories and fundamentals of pad printing, read “Controlling Ambient Conditions for Better Quality”. ORIGINS OF PAD PRINTING PLATES Several theories have been proposed about the origin of pad printing and the materials we currently use. The standard industrial machines of today are based on equipment used in Switzerland, where pad printing was developed for printing clock and watch faces. Very fine lines were required, and screen printing could not resolve the fine detail. The printing pad in these machines was made of gelatin, and the cliché was made from copper, which was engraved by hand. The ceramics industry centred in Stoke-on-Trent in England has been using the pad- printing process for 30 years on much larger items such as dinner plates. At first, hand- engraved clichés were used. This form of engraving was developed from the production of water-slide decals as far back as the 18 th century. Some highly skilled craftsmen still practice this craft, engraving copper plates using specialised tools. The depth of the engraving is varied to give different colour densities. Clichés area tested on the machine and modified by a skilled engraver until the desired result is achieved. They are then hard-chromium-plated and used for the duration of the run. If a long run is involved, the cliché is rechromed as it wears. Sometimes, the cliché must be reengraved before rechroming. The classic “Wedgewood Blue” (Figure 1) is a well-known example produced with this technique. But for the vast majority of industrial and decorative work, such specialised clichés aren’t appropriate. Choices for clichés include etched steel, thin gauge etched steel, water- washout photopolymer, and alcohol/water-washout photopolymer. © All Rights Reserved. Copyright of PDS Consulting – reproduced by Mascoprint with permission PDS Consulting, Innovation Way, Barnsley, S75 1JL, Tel 01226 249590, Website www.pdsconsulting.co.uk
Transcript of CLICHÉ SELECTION FOR PAD PRINTING CHOOSING …...CLICHÉ SELECTION FOR PAD PRINTING CHOOSING THE...
CLICHÉ SELECTION FOR PAD PRINTING CHOOSING THE RIGHT PLATE FOR YOUR NEEDS PAGE Page 1 Technically speaking, pad printing is an indirect offset gravure process. This means that instead of relying on a stencil to carry the image as in screen printing, the image to be printed is formed into a flat (sometimes cylindrical) plate as in gravure printing. But the integrity of this plate (or Cliché) is just as important in pad printing as stencil definition is in screen printing. As with all printing processes, the quality of this image is absolutely critical and determines the success you will have at the press. In recent years, several new cliché options have become available that have made choosing the right cliché for a job more important than ever. These different cliché types have somewhat varied requirements for preparation and storage that must be followed for best results. By understanding what cliché options are available and learning how to use these plates properly, you’ll go a long way towards improving the quality of your pad printed products. If you aren’t familiar with the theories and fundamentals of pad printing, read “Controlling Ambient Conditions for Better Quality”.
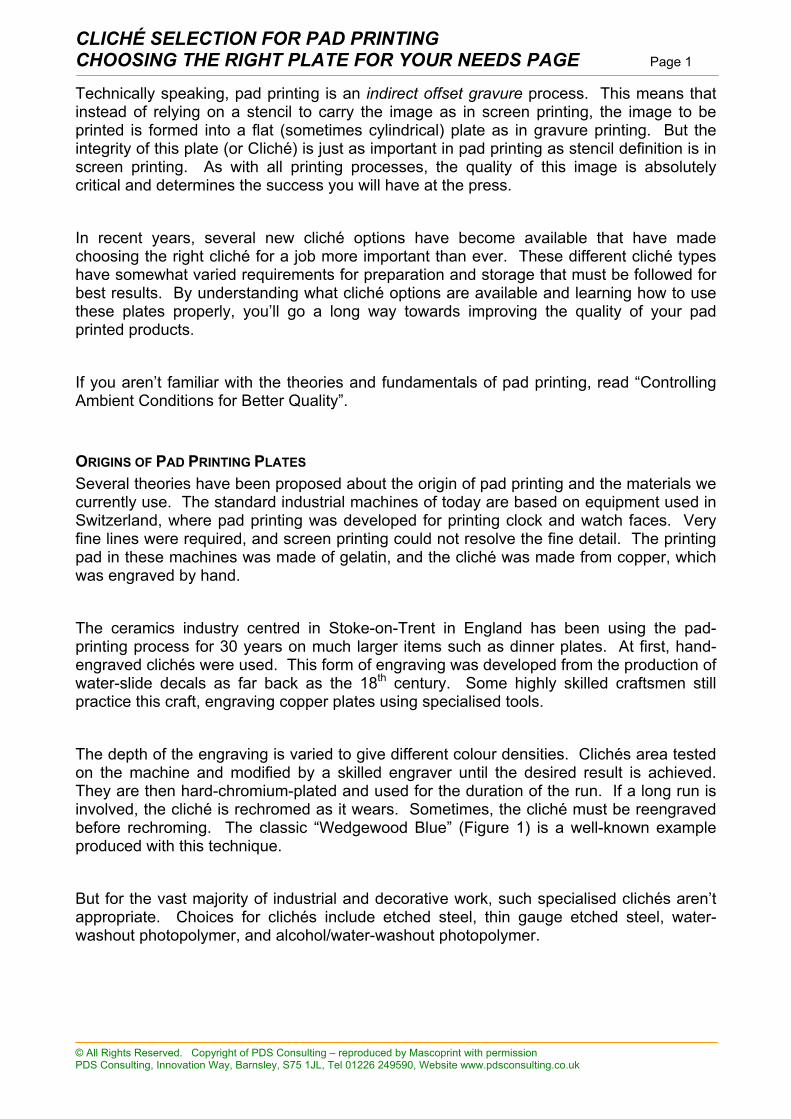
ORIGINS OF PAD PRINTING PLATES Several theories have been proposed about the origin of pad printing and the materials we currently use. The standard industrial machines of today are based on equipment used in Switzerland, where pad printing was developed for printing clock and watch faces. Very fine lines were required, and screen printing could not resolve the fine detail. The printing pad in these machines was made of gelatin, and the cliché was made from copper, which was engraved by hand. The ceramics industry centred in Stoke-on-Trent in England has been using the pad-printing process for 30 years on much larger items such as dinner plates. At first, hand-engraved clichés were used. This form of engraving was developed from the production of water-slide decals as far back as the 18th century. Some highly skilled craftsmen still practice this craft, engraving copper plates using specialised tools. The depth of the engraving is varied to give different colour densities. Clichés area tested on the machine and modified by a skilled engraver until the desired result is achieved. They are then hard-chromium-plated and used for the duration of the run. If a long run is involved, the cliché is rechromed as it wears. Sometimes, the cliché must be reengraved before rechroming. The classic “Wedgewood Blue” (Figure 1) is a well-known example produced with this technique. But for the vast majority of industrial and decorative work, such specialised clichés aren’t appropriate. Choices for clichés include etched steel, thin gauge etched steel, water-washout photopolymer, and alcohol/water-washout photopolymer.
© All Rights Reserved. Copyright of PDS Consulting – reproduced by Mascoprint with permission PDS Consulting, Innovation Way, Barnsley, S75 1JL, Tel 01226 249590, Website www.pdsconsulting.co.uk
CLICHÉ SELECTION FOR PAD PRINTING CHOOSING THE RIGHT PLATE FOR YOUR NEEDS PAGE Page 2
FIGURE 1
STEEL CLICHÉS For the best long-term results in pad printing, an etched steel cliché is recommended. These chemically etched plates offer extreme long-term performance, making them the best options for very long runs or jobs that will be frequently rerun. The main criteria for these clichés is that they must be hard and flat, with a consistent crystalline composition. The material used to create them is top-grade tooling steel that has been hardened and lapped. The etching process is normally carried out in trade houses, although some high-volume users produce their own steel clichés. The equipment, health and safety, and environmental requirements make it impractical for all but the highest-volume pad printing shops to produce their own etched steel clichés. However, to get the high quality clichés you expect, you need to know some of the basics of how these plates are made and what information you must furnish your cliché supplier. Regarding the steel used for these clichés, the optimum hardness is 62-64 Rockwell on the C scale (Rc). Surface finish in microinches should be 6 CLA (centre line average, meaning the tolerance in surface flatness is 6 mircoinches - .0006 mil – in terms of band-width variation). The etch depth will normally be 25 microns (0.001 inch), though this will vary for special applications such as printing on ceramics (up to 65 microns) or when using a tint screen (up to 30 microns). I will expand on this later in the article. Clichés can be produced in all sizes to suit the vast range of equipment available. The smallest I have used is 2 x 80 x 8 mm (0.08 x 3.15 x 0.315 inch) to print a 2 x 80 mm image. This tiny image was a section of a composite plate – not recommended for most of you. The largest plate I’ve used was 1000 x 500 x 15 mm (39.4 x 19.7 x 0.6 inch). Again, this was a specialised composite plate used to print multiple images, not a single image, with one pad. My point is the clichés can be ordered to suit the most specialised machine or image size.
© All Rights Reserved. Copyright of PDS Consulting – reproduced by Mascoprint with permission PDS Consulting, Innovation Way, Barnsley, S75 1JL, Tel 01226 249590, Website www.pdsconsulting.co.uk
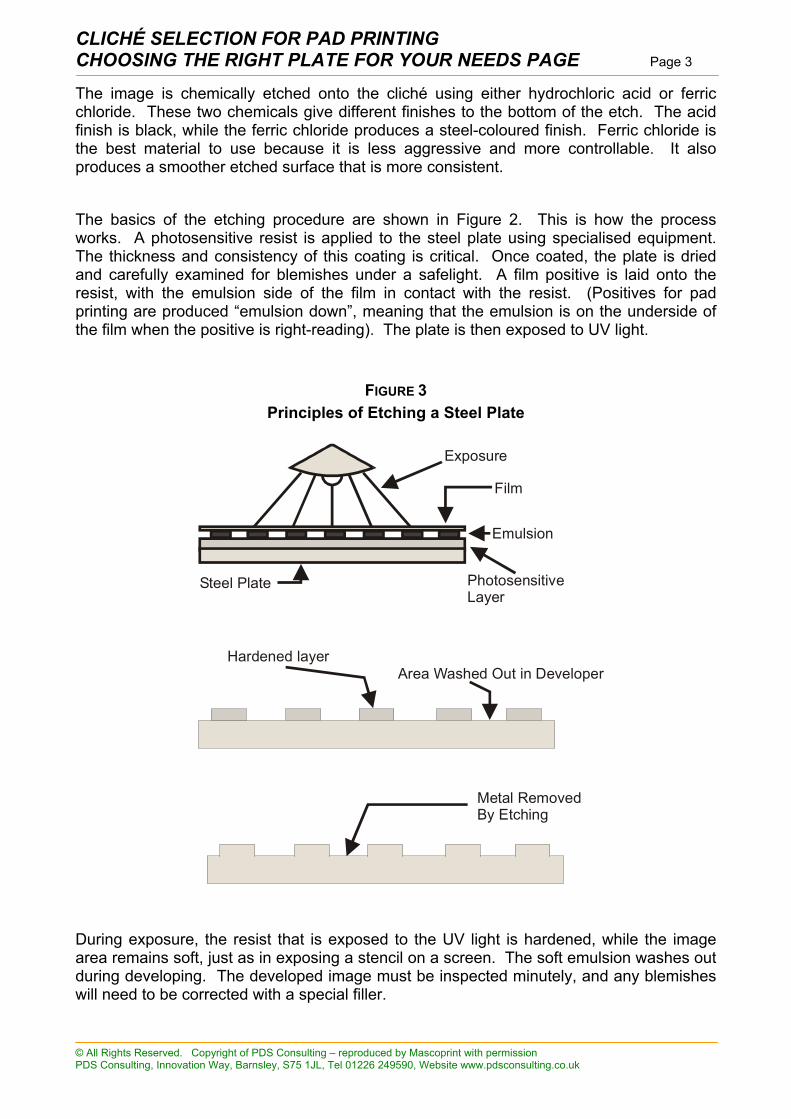
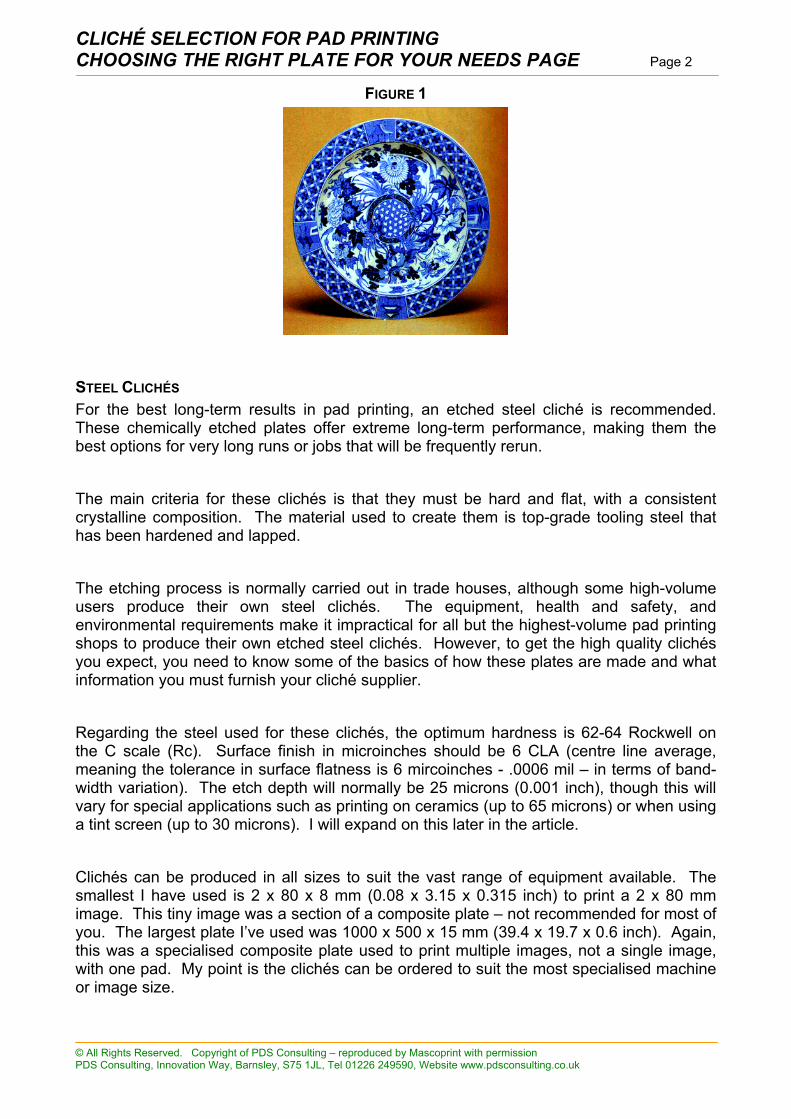
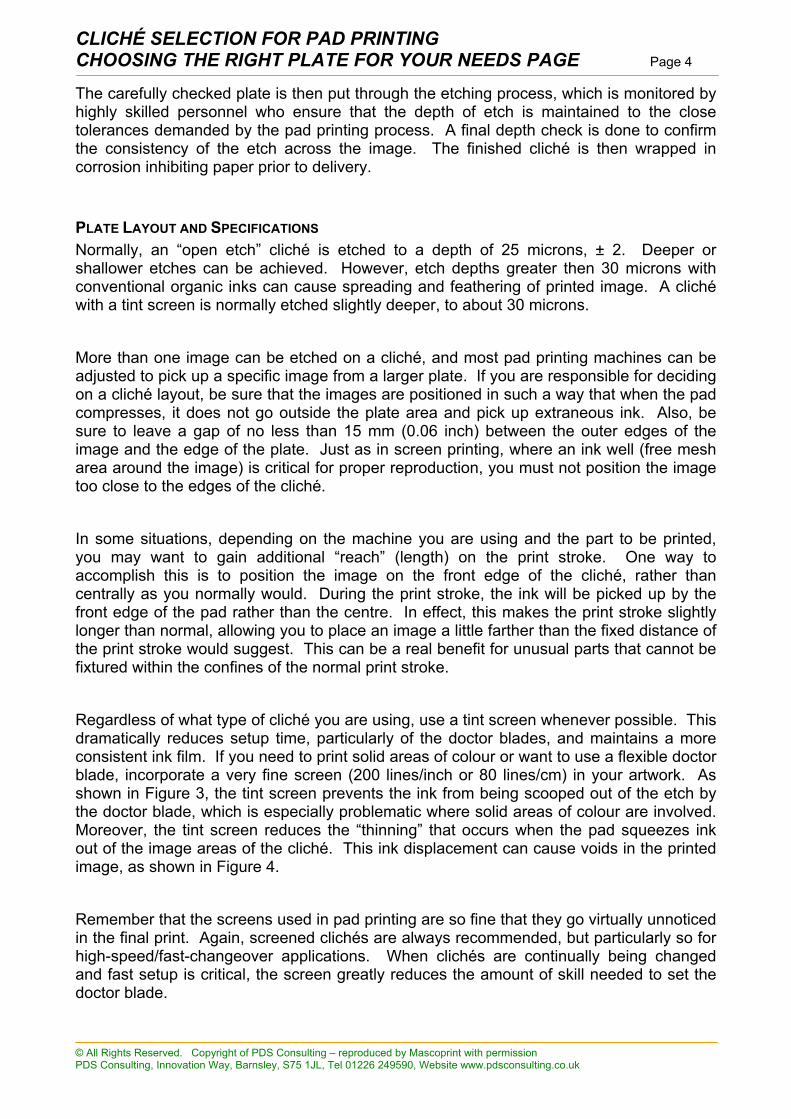
CLICHÉ SELECTION FOR PAD PRINTING CHOOSING THE RIGHT PLATE FOR YOUR NEEDS PAGE Page 3 The image is chemically etched onto the cliché using either hydrochloric acid or ferric chloride. These two chemicals give different finishes to the bottom of the etch. The acid finish is black, while the ferric chloride produces a steel-coloured finish. Ferric chloride is the best material to use because it is less aggressive and more controllable. It also produces a smoother etched surface that is more consistent. The basics of the etching procedure are shown in Figure 2. This is how the process works. A photosensitive resist is applied to the steel plate using specialised equipment. The thickness and consistency of this coating is critical. Once coated, the plate is dried and carefully examined for blemishes under a safelight. A film positive is laid onto the resist, with the emulsion side of the film in contact with the resist. (Positives for pad printing are produced “emulsion down”, meaning that the emulsion is on the underside of the film when the positive is right-reading). The plate is then exposed to UV light.
FIGURE 3 Principles of Etching a Steel Plate
Hardened layerArea Washed Out in Developer
Metal RemovedBy Etching
Exposure
Film
PhotosensitiveLayer
Steel Plate
Emulsion
During exposure, the resist that is exposed to the UV light is hardened, while the image area remains soft, just as in exposing a stencil on a screen. The soft emulsion washes out during developing. The developed image must be inspected minutely, and any blemishes will need to be corrected with a special filler.
© All Rights Reserved. Copyright of PDS Consulting – reproduced by Mascoprint with permission PDS Consulting, Innovation Way, Barnsley, S75 1JL, Tel 01226 249590, Website www.pdsconsulting.co.uk
CLICHÉ SELECTION FOR PAD PRINTING CHOOSING THE RIGHT PLATE FOR YOUR NEEDS PAGE Page 4 The carefully checked plate is then put through the etching process, which is monitored by highly skilled personnel who ensure that the depth of etch is maintained to the close tolerances demanded by the pad printing process. A final depth check is done to confirm the consistency of the etch across the image. The finished cliché is then wrapped in corrosion inhibiting paper prior to delivery.
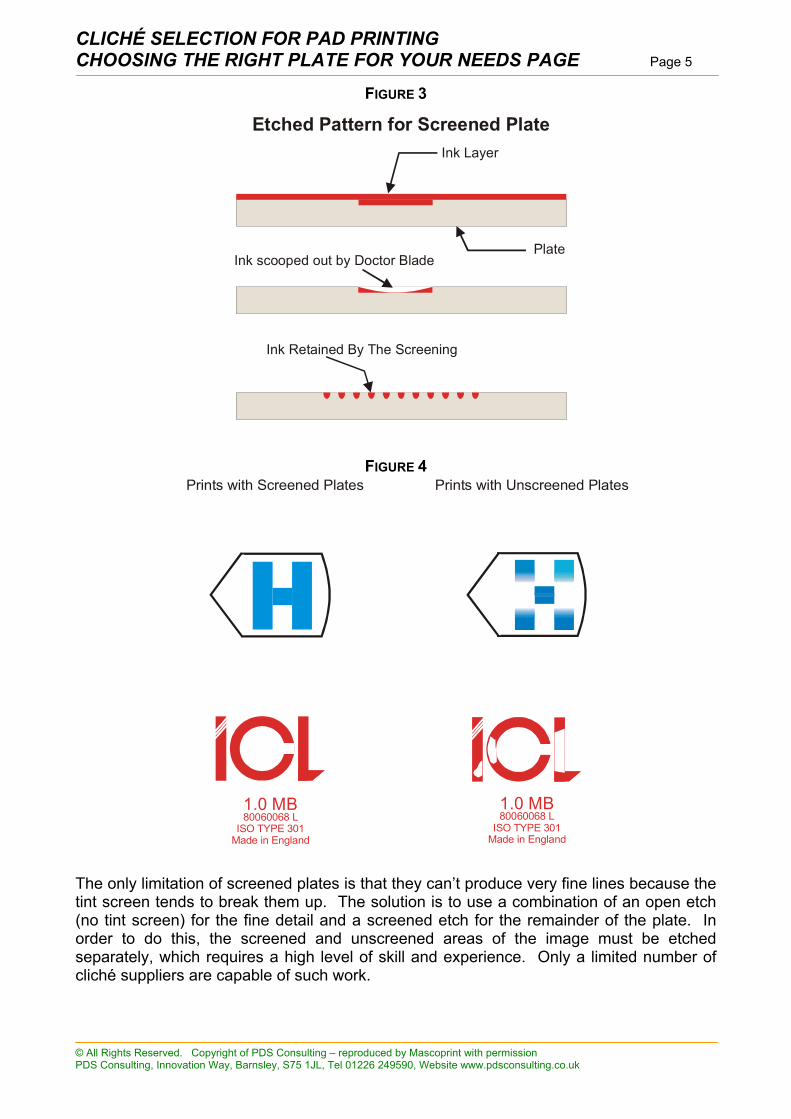
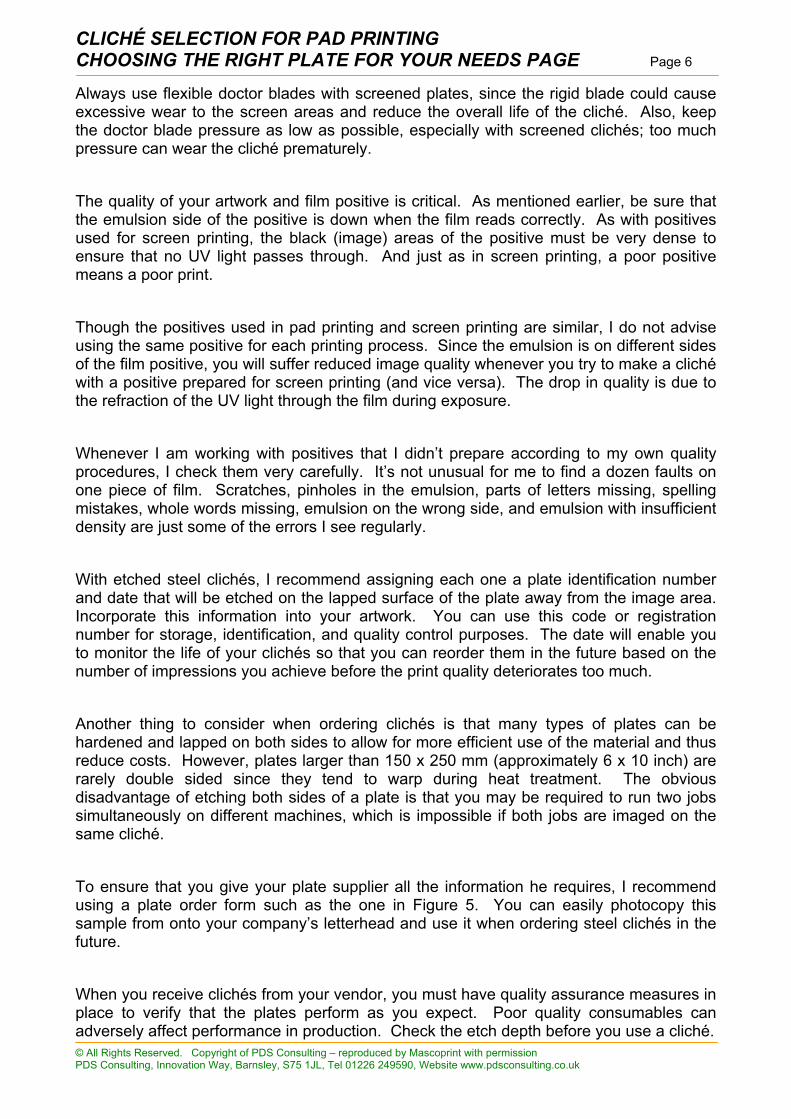
PLATE LAYOUT AND SPECIFICATIONS Normally, an “open etch” cliché is etched to a depth of 25 microns, ± 2. Deeper or shallower etches can be achieved. However, etch depths greater then 30 microns with conventional organic inks can cause spreading and feathering of printed image. A cliché with a tint screen is normally etched slightly deeper, to about 30 microns. More than one image can be etched on a cliché, and most pad printing machines can be adjusted to pick up a specific image from a larger plate. If you are responsible for deciding on a cliché layout, be sure that the images are positioned in such a way that when the pad compresses, it does not go outside the plate area and pick up extraneous ink. Also, be sure to leave a gap of no less than 15 mm (0.06 inch) between the outer edges of the image and the edge of the plate. Just as in screen printing, where an ink well (free mesh area around the image) is critical for proper reproduction, you must not position the image too close to the edges of the cliché. In some situations, depending on the machine you are using and the part to be printed, you may want to gain additional “reach” (length) on the print stroke. One way to accomplish this is to position the image on the front edge of the cliché, rather than centrally as you normally would. During the print stroke, the ink will be picked up by the front edge of the pad rather than the centre. In effect, this makes the print stroke slightly longer than normal, allowing you to place an image a little farther than the fixed distance of the print stroke would suggest. This can be a real benefit for unusual parts that cannot be fixtured within the confines of the normal print stroke. Regardless of what type of cliché you are using, use a tint screen whenever possible. This dramatically reduces setup time, particularly of the doctor blades, and maintains a more consistent ink film. If you need to print solid areas of colour or want to use a flexible doctor blade, incorporate a very fine screen (200 lines/inch or 80 lines/cm) in your artwork. As shown in Figure 3, the tint screen prevents the ink from being scooped out of the etch by the doctor blade, which is especially problematic where solid areas of colour are involved. Moreover, the tint screen reduces the “thinning” that occurs when the pad squeezes ink out of the image areas of the cliché. This ink displacement can cause voids in the printed image, as shown in Figure 4. Remember that the screens used in pad printing are so fine that they go virtually unnoticed in the final print. Again, screened clichés are always recommended, but particularly so for high-speed/fast-changeover applications. When clichés are continually being changed and fast setup is critical, the screen greatly reduces the amount of skill needed to set the doctor blade.
© All Rights Reserved. Copyright of PDS Consulting – reproduced by Mascoprint with permission PDS Consulting, Innovation Way, Barnsley, S75 1JL, Tel 01226 249590, Website www.pdsconsulting.co.uk
CLICHÉ SELECTION FOR PAD PRINTING CHOOSING THE RIGHT PLATE FOR YOUR NEEDS PAGE Page 5
FIGURE 3
Ink Layer
Plate
Ink Retained By The Screening
Ink scooped out by Doctor Blade
Etched Pattern for Screened Plate
FIGURE 4
1.0 MB80060068 L
ISO TYPE 301Made in England
Prints with Screened Plates Prints with Unscreened Plates
1.0 MB80060068 L
ISO TYPE 301Made in England
The only limitation of screened plates is that they can’t produce very fine lines because the tint screen tends to break them up. The solution is to use a combination of an open etch (no tint screen) for the fine detail and a screened etch for the remainder of the plate. In order to do this, the screened and unscreened areas of the image must be etched separately, which requires a high level of skill and experience. Only a limited number of cliché suppliers are capable of such work.
© All Rights Reserved. Copyright of PDS Consulting – reproduced by Mascoprint with permission PDS Consulting, Innovation Way, Barnsley, S75 1JL, Tel 01226 249590, Website www.pdsconsulting.co.uk
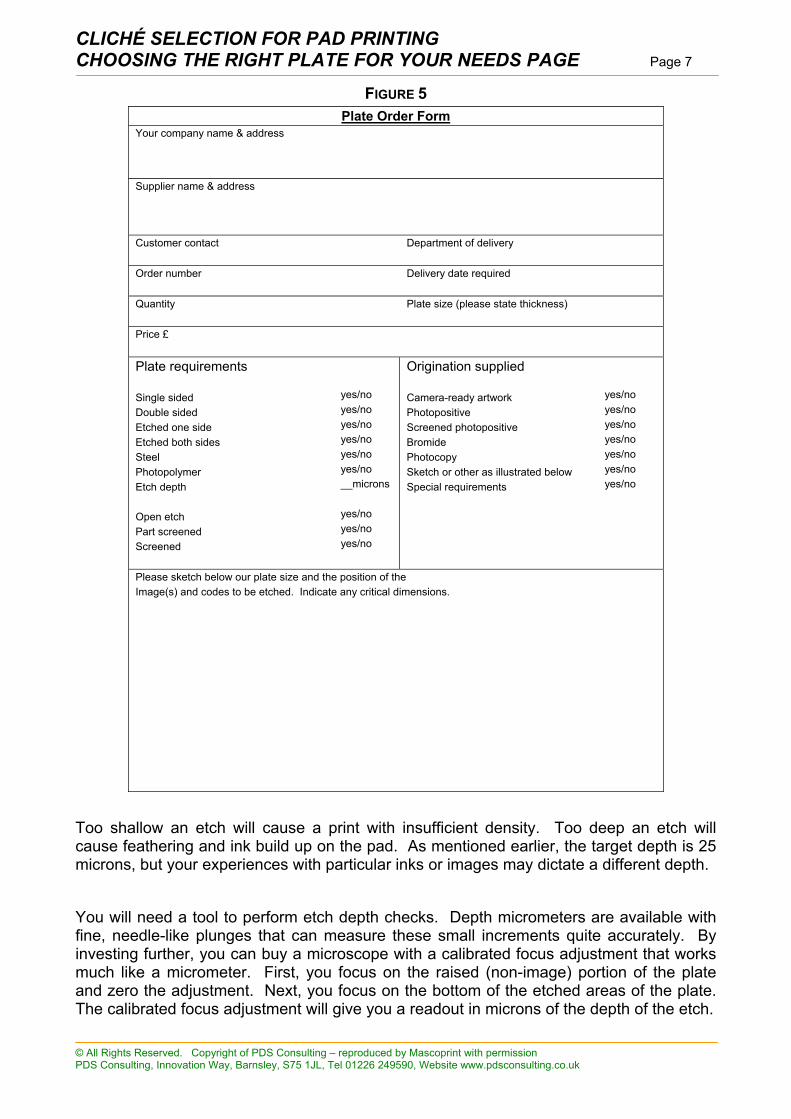
CLICHÉ SELECTION FOR PAD PRINTING CHOOSING THE RIGHT PLATE FOR YOUR NEEDS PAGE Page 6 Always use flexible doctor blades with screened plates, since the rigid blade could cause excessive wear to the screen areas and reduce the overall life of the cliché. Also, keep the doctor blade pressure as low as possible, especially with screened clichés; too much pressure can wear the cliché prematurely. The quality of your artwork and film positive is critical. As mentioned earlier, be sure that the emulsion side of the positive is down when the film reads correctly. As with positives used for screen printing, the black (image) areas of the positive must be very dense to ensure that no UV light passes through. And just as in screen printing, a poor positive means a poor print. Though the positives used in pad printing and screen printing are similar, I do not advise using the same positive for each printing process. Since the emulsion is on different sides of the film positive, you will suffer reduced image quality whenever you try to make a cliché with a positive prepared for screen printing (and vice versa). The drop in quality is due to the refraction of the UV light through the film during exposure. Whenever I am working with positives that I didn’t prepare according to my own quality procedures, I check them very carefully. It’s not unusual for me to find a dozen faults on one piece of film. Scratches, pinholes in the emulsion, parts of letters missing, spelling mistakes, whole words missing, emulsion on the wrong side, and emulsion with insufficient density are just some of the errors I see regularly. With etched steel clichés, I recommend assigning each one a plate identification number and date that will be etched on the lapped surface of the plate away from the image area. Incorporate this information into your artwork. You can use this code or registration number for storage, identification, and quality control purposes. The date will enable you to monitor the life of your clichés so that you can reorder them in the future based on the number of impressions you achieve before the print quality deteriorates too much. Another thing to consider when ordering clichés is that many types of plates can be hardened and lapped on both sides to allow for more efficient use of the material and thus reduce costs. However, plates larger than 150 x 250 mm (approximately 6 x 10 inch) are rarely double sided since they tend to warp during heat treatment. The obvious disadvantage of etching both sides of a plate is that you may be required to run two jobs simultaneously on different machines, which is impossible if both jobs are imaged on the same cliché. To ensure that you give your plate supplier all the information he requires, I recommend using a plate order form such as the one in Figure 5. You can easily photocopy this sample from onto your company’s letterhead and use it when ordering steel clichés in the future. When you receive clichés from your vendor, you must have quality assurance measures in place to verify that the plates perform as you expect. Poor quality consumables can adversely affect performance in production. Check the etch depth before you use a cliché. © All Rights Reserved. Copyright of PDS Consulting – reproduced by Mascoprint with permission PDS Consulting, Innovation Way, Barnsley, S75 1JL, Tel 01226 249590, Website www.pdsconsulting.co.uk
CLICHÉ SELECTION FOR PAD PRINTING CHOOSING THE RIGHT PLATE FOR YOUR NEEDS PAGE Page 7
FIGURE 5 Plate Order Form
Your company name & address
Supplier name & address
Customer contact
Department of delivery
Order number
Delivery date required
Quantity
Plate size (please state thickness)
Price £ Plate requirements Single sided Double sided Etched one side Etched both sides Steel Photopolymer Etch depth Open etch Part screened Screened
yes/no yes/no yes/no yes/no yes/no yes/no __microns yes/no yes/no yes/no
Origination supplied Camera-ready artwork Photopositive Screened photopositive Bromide Photocopy Sketch or other as illustrated below Special requirements
yes/no yes/no yes/no yes/no yes/no yes/no yes/no
Please sketch below our plate size and the position of the Image(s) and codes to be etched. Indicate any critical dimensions.
Too shallow an etch will cause a print with insufficient density. Too deep an etch will cause feathering and ink build up on the pad. As mentioned earlier, the target depth is 25 microns, but your experiences with particular inks or images may dictate a different depth. You will need a tool to perform etch depth checks. Depth micrometers are available with fine, needle-like plunges that can measure these small increments quite accurately. By investing further, you can buy a microscope with a calibrated focus adjustment that works much like a micrometer. First, you focus on the raised (non-image) portion of the plate and zero the adjustment. Next, you focus on the bottom of the etched areas of the plate. The calibrated focus adjustment will give you a readout in microns of the depth of the etch.
© All Rights Reserved. Copyright of PDS Consulting – reproduced by Mascoprint with permission PDS Consulting, Innovation Way, Barnsley, S75 1JL, Tel 01226 249590, Website www.pdsconsulting.co.uk
CLICHÉ SELECTION FOR PAD PRINTING CHOOSING THE RIGHT PLATE FOR YOUR NEEDS PAGE Page 8 Beyond its accuracy, the microscope is the better option because it makes it easier to check the cliché for flaws such as high points in the etch or areas where the etching isn’t consistent. Moreover, the microscope can be used on screened clichés, which can’t be measured with a conventional depth micrometer. If you can’t justify the purchase of a microscope, then you can include an open etched test “patch” in your positives and measure the patch with a depth micrometer. This won’t give you a definitive reading for the screened areas of the cliché, but you can use it as a guide. If you test a cliché and the etch depth varies by more than 3 microns from your specification, send it back to the platemaker. Most platemakers will state a tolerance of ±2 microns. If the cliché is screened, check for high spots between the dots. This usually means that the consistency of the metal wasn’t perfect, giving different etching characteristics to different points in the cliché. Although the external dimensions of the cliché are normally fairly constant, be aware that plates are sometimes relapped and etched again. The thickness of such clichés will vary. With some presses, plate thickness is critical because the clichés may clamp securely into the press if they are outside of the correct tolerance. Use your depth micrometer to verify that your clichés have a consistent thickness. If you lack a microscope or a depth micrometer, here is one final measure you can take to verify the quality of your clichés prior to production. Run a test print manually by putting a small amount of ink on the cliché, running a doctor blade over the top to remove ink from the non-image areas, picking up the image on a pad, and printing it onto scrap paper. Obviously, you will see some distortion. Also for larger print areas, you may need to repeat this procedure several times to transfer the complete image. This test certainly isn’t 100% foolproof, but with practice, you’ll learn to spot problems before you use the cliché for production. These tests take time to perform, but they are absolutely vital. Any faults you miss now will show up very quickly when you set up the cliché on the press and run your first prints.
SPECIAL METAL CLICHÉS Multicolour Many presses allow more than one colour to be printed from a single cliché using multiple pads. Registration is critical for such clichés. Computer generation of the artwork will ensure that the pitch of the images is extremely accurate. Other presses use separate clichés that can be individually adjusted to position the colours. With both of these systems, producing he correct etch depth consistently is crucial, particularly with process colour work. Production encoding In certain applications, such as electronics, it may be necessary to print the date, batch, product number, or similar information. In cases where date, batch, or product coding are required, conventional clichés configured with a range of different codes on a fixed plate may be impractical. You would have to adjust the press to pick off each individual code, which would lead to multiple time consuming setups.
© All Rights Reserved. Copyright of PDS Consulting – reproduced by Mascoprint with permission PDS Consulting, Innovation Way, Barnsley, S75 1JL, Tel 01226 249590, Website www.pdsconsulting.co.uk
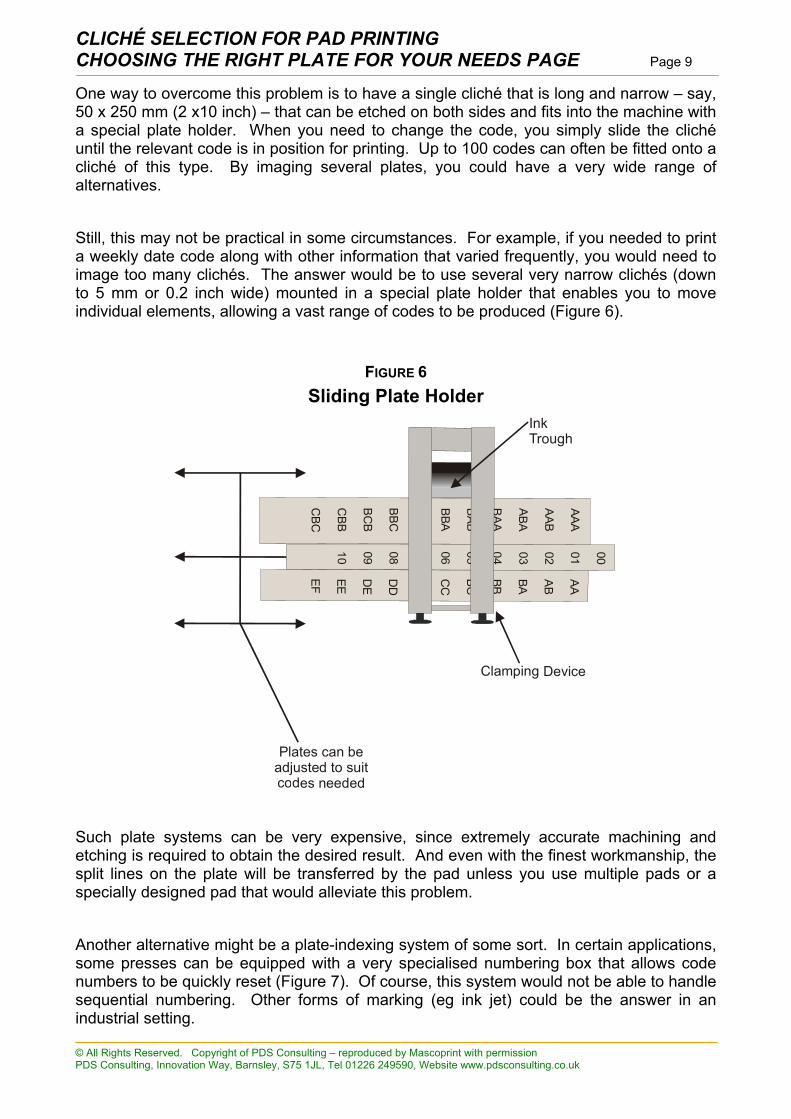
CLICHÉ SELECTION FOR PAD PRINTING CHOOSING THE RIGHT PLATE FOR YOUR NEEDS PAGE Page 9 One way to overcome this problem is to have a single cliché that is long and narrow – say, 50 x 250 mm (2 x10 inch) – that can be etched on both sides and fits into the machine with a special plate holder. When you need to change the code, you simply slide the cliché until the relevant code is in position for printing. Up to 100 codes can often be fitted onto a cliché of this type. By imaging several plates, you could have a very wide range of alternatives. Still, this may not be practical in some circumstances. For example, if you needed to print a weekly date code along with other information that varied frequently, you would need to image too many clichés. The answer would be to use several very narrow clichés (down to 5 mm or 0.2 inch wide) mounted in a special plate holder that enables you to move individual elements, allowing a vast range of codes to be produced (Figure 6).
FIGURE 6 Sliding Plate Holder
0001020304050607080910
AAABBABBBCCC
CD
DD
DE
EEEF
AAA
AAB
ABA
BAA
BAB
BBA
BBB
BBC
BCB
CBB
CBC
Plates can beadjusted to suitcodes needed
InkTrough
Clamping Device
Such plate systems can be very expensive, since extremely accurate machining and etching is required to obtain the desired result. And even with the finest workmanship, the split lines on the plate will be transferred by the pad unless you use multiple pads or a specially designed pad that would alleviate this problem. Another alternative might be a plate-indexing system of some sort. In certain applications, some presses can be equipped with a very specialised numbering box that allows code numbers to be quickly reset (Figure 7). Of course, this system would not be able to handle sequential numbering. Other forms of marking (eg ink jet) could be the answer in an industrial setting.
© All Rights Reserved. Copyright of PDS Consulting – reproduced by Mascoprint with permission PDS Consulting, Innovation Way, Barnsley, S75 1JL, Tel 01226 249590, Website www.pdsconsulting.co.uk
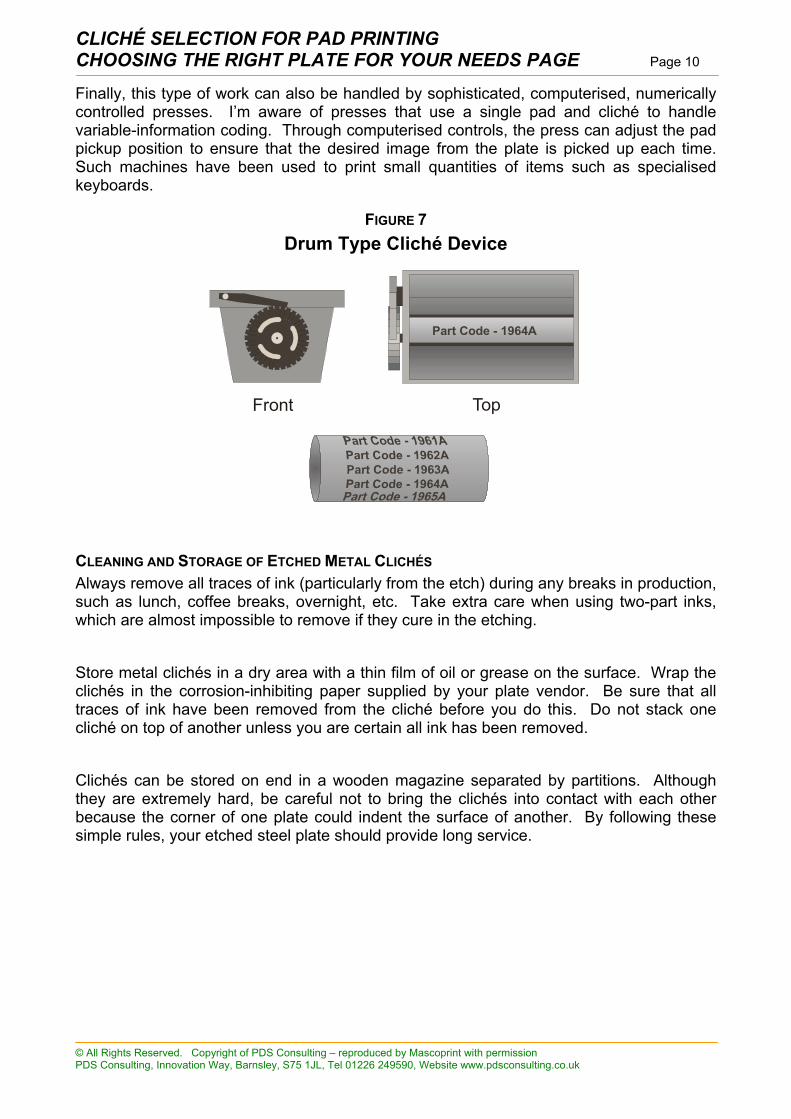
CLICHÉ SELECTION FOR PAD PRINTING CHOOSING THE RIGHT PLATE FOR YOUR NEEDS PAGE Page 10 Finally, this type of work can also be handled by sophisticated, computerised, numerically controlled presses. I’m aware of presses that use a single pad and cliché to handle variable-information coding. Through computerised controls, the press can adjust the pad pickup position to ensure that the desired image from the plate is picked up each time. Such machines have been used to print small quantities of items such as specialised keyboards.
FIGURE 7 Drum Type Cliché Device
Part Code - 1964A
Front Top
CLEANING AND STORAGE OF ETCHED METAL CLICHÉS Always remove all traces of ink (particularly from the etch) during any breaks in production, such as lunch, coffee breaks, overnight, etc. Take extra care when using two-part inks, which are almost impossible to remove if they cure in the etching. Store metal clichés in a dry area with a thin film of oil or grease on the surface. Wrap the clichés in the corrosion-inhibiting paper supplied by your plate vendor. Be sure that all traces of ink have been removed from the cliché before you do this. Do not stack one cliché on top of another unless you are certain all ink has been removed. Clichés can be stored on end in a wooden magazine separated by partitions. Although they are extremely hard, be careful not to bring the clichés into contact with each other because the corner of one plate could indent the surface of another. By following these simple rules, your etched steel plate should provide long service.
© All Rights Reserved. Copyright of PDS Consulting – reproduced by Mascoprint with permission PDS Consulting, Innovation Way, Barnsley, S75 1JL, Tel 01226 249590, Website www.pdsconsulting.co.uk
CLICHÉ SELECTION FOR PAD PRINTING CHOOSING THE RIGHT PLATE FOR YOUR NEEDS PAGE Page 11
THIN STEEL CLICHÉS In an effort to reduce the cost of etched steel plates, suppliers have developed thinner steel plates (2 mm or 0.8 inch thick) that are precoated with a photosensitive layer. These are very flat, but not as hard as conventional steel plates (55 Rc compared to 62/64 Rc). The crystalline structure of the material allows screens of 80 lines/cm (200 lines/inch) to be etched satisfactorily. With a carefully set doctor blade, these clichés may last up to several hundred thousand prints. However, thin steel clichés must still be etched with hydrochloric acid or ferric chloride. Unless you have the specialised equipment and facilities, do not consider producing them in house. Your cliché supplier may well be able to provide them, but as one supplier commented to me, “The majority of the cost is in the photography and the etching, not the material.” But thin steel clichés are still worth considering and should be stored and cared for as conventional steel plates.
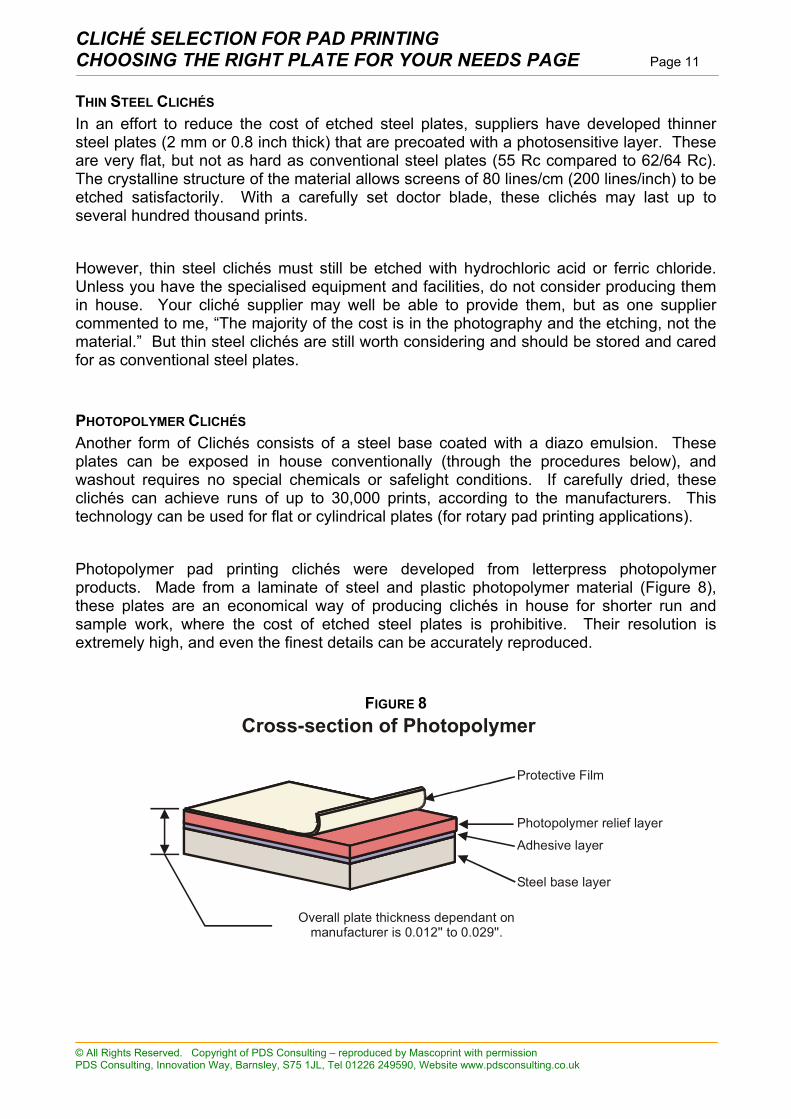
PHOTOPOLYMER CLICHÉS Another form of Clichés consists of a steel base coated with a diazo emulsion. These plates can be exposed in house conventionally (through the procedures below), and washout requires no special chemicals or safelight conditions. If carefully dried, these clichés can achieve runs of up to 30,000 prints, according to the manufacturers. This technology can be used for flat or cylindrical plates (for rotary pad printing applications). Photopolymer pad printing clichés were developed from letterpress photopolymer products. Made from a laminate of steel and plastic photopolymer material (Figure 8), these plates are an economical way of producing clichés in house for shorter run and sample work, where the cost of etched steel plates is prohibitive. Their resolution is extremely high, and even the finest details can be accurately reproduced.
FIGURE 8
Protective Film
Photopolymer relief layerAdhesive layer
Steel base layer
Overall plate thickness dependant onmanufacturer is 0.012'' to 0.029''.
Cross-section of Photopolymer
© All Rights Reserved. Copyright of PDS Consulting – reproduced by Mascoprint with permission PDS Consulting, Innovation Way, Barnsley, S75 1JL, Tel 01226 249590, Website www.pdsconsulting.co.uk
CLICHÉ SELECTION FOR PAD PRINTING CHOOSING THE RIGHT PLATE FOR YOUR NEEDS PAGE Page 12 An example of where photopolymer clichés have been beneficial is the compact disc industry. Admittedly, screen printing has taken a large section of this market, but pad printing of picture discs is still common. Here, runs up to 50,000 four colour designs are not uncommon. To achieve such long print runs with photopolymer clichés, very careful processing and quality control is necessary. Each batch of photopolymer material must be checked and washout rates established. Variations in etch depth will completely alter the colour balance of the printed image. Unexposed plates are stored in humidity regulated environments to prevent them from losing their resolution capabilities. Compact disc printing and similar higher volume work are the specialised end of the photopolymer cliché market. Normal production settings require good process control, but not to this extent. By following the manufacturer’s instructions, you should get excellent results. (The familiar rule applies: Read the data sheet!) On the downside, the life expectancy of photopolymer plates can be inconsistent, and they are easily damaged by the doctor blade. In addition, some inks are not compatible with them. With two component inks, for example, the ink may sometimes have difficulty clearing the plate after the doctor blade stroke (the ink leaves a ghost effect). When you use photopolymer plates to produce samples, you must be aware that line thickness in the printed image may increase if you use the same positives to create steel plates for the production run. There are two types of photopolymer plates: water washout and alcohol/water washout. With water washout plates, after exposure, you develop the image using tap water without any additives. These plates are environmentally friendly since the unexposed polymer that washes out during development is biodegradable. The alcohol/water photopolymer plate is still widely used because the cured polymer is less susceptible to attack by the many solvents contained in pad printing inks and is mechanically more robust then the water washout polymer. But when using the alcohol/water washout fluid, proper ventilation is necessary to protect workers from the potentially harmful fumes. Furthermore, the washout effluent must not be discharged into the drainage system. As with etched steel clichés, tint screens are strongly recommended. One difference you’ll notice with photopolymer clichés is the way that they are mounted on the machine. Usually, photopolymer plates are held in place through a magnetic plate holder rather than bolts. This enables them to be easily removed for future use without damage. You must handle and use these clichés carefully to avoid scratching or otherwise damaging them. Flexible doctor blades are a must to minimise wear on the cliché.
© All Rights Reserved. Copyright of PDS Consulting – reproduced by Mascoprint with permission PDS Consulting, Innovation Way, Barnsley, S75 1JL, Tel 01226 249590, Website www.pdsconsulting.co.uk
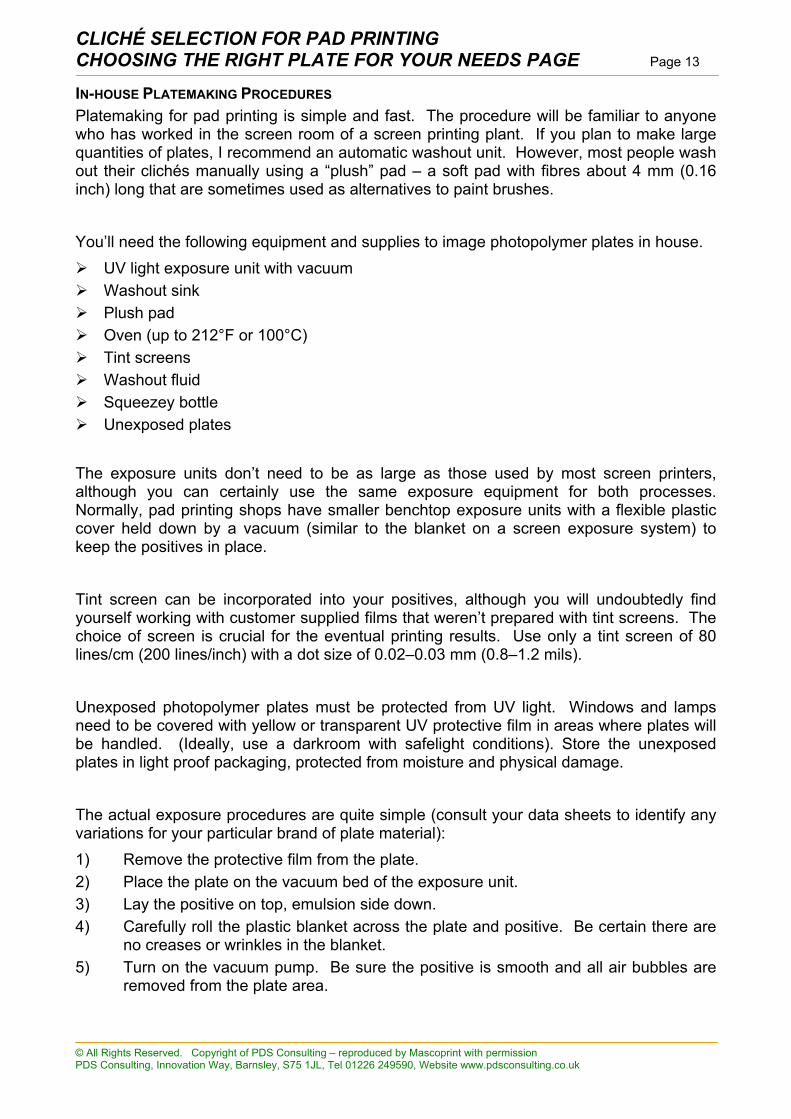
CLICHÉ SELECTION FOR PAD PRINTING CHOOSING THE RIGHT PLATE FOR YOUR NEEDS PAGE Page 13 IN-HOUSE PLATEMAKING PROCEDURES Platemaking for pad printing is simple and fast. The procedure will be familiar to anyone who has worked in the screen room of a screen printing plant. If you plan to make large quantities of plates, I recommend an automatic washout unit. However, most people wash out their clichés manually using a “plush” pad – a soft pad with fibres about 4 mm (0.16 inch) long that are sometimes used as alternatives to paint brushes. You’ll need the following equipment and supplies to image photopolymer plates in house. UV light exposure unit with vacuum Washout sink Plush pad Oven (up to 212°F or 100°C) Tint screens Washout fluid Squeezey bottle Unexposed plates
The exposure units don’t need to be as large as those used by most screen printers, although you can certainly use the same exposure equipment for both processes. Normally, pad printing shops have smaller benchtop exposure units with a flexible plastic cover held down by a vacuum (similar to the blanket on a screen exposure system) to keep the positives in place. Tint screen can be incorporated into your positives, although you will undoubtedly find yourself working with customer supplied films that weren’t prepared with tint screens. The choice of screen is crucial for the eventual printing results. Use only a tint screen of 80 lines/cm (200 lines/inch) with a dot size of 0.02–0.03 mm (0.8–1.2 mils). Unexposed photopolymer plates must be protected from UV light. Windows and lamps need to be covered with yellow or transparent UV protective film in areas where plates will be handled. (Ideally, use a darkroom with safelight conditions). Store the unexposed plates in light proof packaging, protected from moisture and physical damage. The actual exposure procedures are quite simple (consult your data sheets to identify any variations for your particular brand of plate material): 1) Remove the protective film from the plate. 2) Place the plate on the vacuum bed of the exposure unit. 3) Lay the positive on top, emulsion side down. 4) Carefully roll the plastic blanket across the plate and positive. Be certain there are
no creases or wrinkles in the blanket. 5) Turn on the vacuum pump. Be sure the positive is smooth and all air bubbles are
removed from the plate area.
© All Rights Reserved. Copyright of PDS Consulting – reproduced by Mascoprint with permission PDS Consulting, Innovation Way, Barnsley, S75 1JL, Tel 01226 249590, Website www.pdsconsulting.co.uk
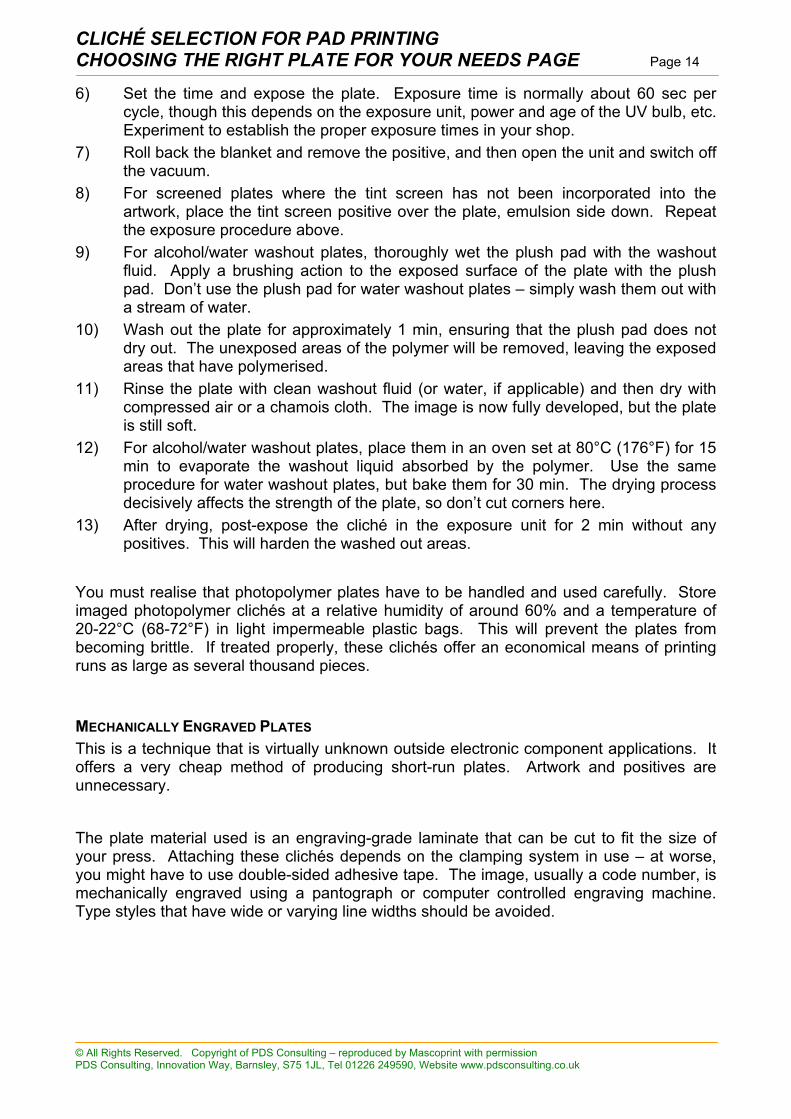
CLICHÉ SELECTION FOR PAD PRINTING CHOOSING THE RIGHT PLATE FOR YOUR NEEDS PAGE Page 14 6) Set the time and expose the plate. Exposure time is normally about 60 sec per
cycle, though this depends on the exposure unit, power and age of the UV bulb, etc. Experiment to establish the proper exposure times in your shop.
7) Roll back the blanket and remove the positive, and then open the unit and switch off the vacuum.
8) For screened plates where the tint screen has not been incorporated into the artwork, place the tint screen positive over the plate, emulsion side down. Repeat the exposure procedure above.
9) For alcohol/water washout plates, thoroughly wet the plush pad with the washout fluid. Apply a brushing action to the exposed surface of the plate with the plush pad. Don’t use the plush pad for water washout plates – simply wash them out with a stream of water.
10) Wash out the plate for approximately 1 min, ensuring that the plush pad does not dry out. The unexposed areas of the polymer will be removed, leaving the exposed areas that have polymerised.
11) Rinse the plate with clean washout fluid (or water, if applicable) and then dry with compressed air or a chamois cloth. The image is now fully developed, but the plate is still soft.
12) For alcohol/water washout plates, place them in an oven set at 80°C (176°F) for 15 min to evaporate the washout liquid absorbed by the polymer. Use the same procedure for water washout plates, but bake them for 30 min. The drying process decisively affects the strength of the plate, so don’t cut corners here.
13) After drying, post-expose the cliché in the exposure unit for 2 min without any positives. This will harden the washed out areas.
You must realise that photopolymer plates have to be handled and used carefully. Store imaged photopolymer clichés at a relative humidity of around 60% and a temperature of 20-22°C (68-72°F) in light impermeable plastic bags. This will prevent the plates from becoming brittle. If treated properly, these clichés offer an economical means of printing runs as large as several thousand pieces.
MECHANICALLY ENGRAVED PLATES This is a technique that is virtually unknown outside electronic component applications. It offers a very cheap method of producing short-run plates. Artwork and positives are unnecessary. The plate material used is an engraving-grade laminate that can be cut to fit the size of your press. Attaching these clichés depends on the clamping system in use – at worse, you might have to use double-sided adhesive tape. The image, usually a code number, is mechanically engraved using a pantograph or computer controlled engraving machine. Type styles that have wide or varying line widths should be avoided.
© All Rights Reserved. Copyright of PDS Consulting – reproduced by Mascoprint with permission PDS Consulting, Innovation Way, Barnsley, S75 1JL, Tel 01226 249590, Website www.pdsconsulting.co.uk
CLICHÉ SELECTION FOR PAD PRINTING CHOOSING THE RIGHT PLATE FOR YOUR NEEDS PAGE Page 15 The depth of the engraving is critical. Most engraving machines have cutter supports that can restrict the depth of cut to the 25 microns you desire. With careful doctor blade setup, many thousands of prints can be achieved by this method, and the material cost of the plate is only a few pence. You should not expect etched plate quality, but the results can be surprisingly good for coding and non-critical designs.
CONCLUSION Remember the four key elements of getting quality results from your clichés: 1) Be sure the positives are correct. 2) Verify that the etch depth is correct and consistent, with no faults in the image. 3) Use as little pressure on the doctor blade as possible. 4) Clean the cliché before storage and keep it away from moisture. Effective quality control of your clichés is essential. It really is a case of “what you see is what you get”. Many a pad printer has wasted hours of production trying to correct printing flaws that turned out to be the errors in the cliché or positive.
© All Rights Reserved. Copyright of PDS Consulting – reproduced by Mascoprint with permission PDS Consulting, Innovation Way, Barnsley, S75 1JL, Tel 01226 249590, Website www.pdsconsulting.co.uk