Clear Rex Bubbler® - Technical O&M Manual · Technical Manual for Clear Rex Bubbler® CRB1 SBR...
23
Technical Manual Control panel CRB1 For Certified Installers Only Last Updated: 15 June, 2011 © Copyright 2011 PekaSys, Inc
Transcript of Clear Rex Bubbler® - Technical O&M Manual · Technical Manual for Clear Rex Bubbler® CRB1 SBR...

Technical ManualControl panel CRB1
For Certified Installers Only
Last Updated: 15 June, 2011© Copyright 2011 PekaSys, Inc

Technical Manual for Clear Rex Bubbler® CRB1 SBR wastewater treatment plant
Table of Contents Page:
1. Welcome and Precautions 03 2. Clear Rex Bubbler® Introduction
a) Package Contents 03b) Warranty / Replacement Instructions 04c) Whom to Contact 05d) Certifications 05
3. Clarification Processa) SBR Overview 05b) Sewage Treatment Cycle 05
4. Installation of The Clear Rex Bubbler®a) Pre-installation Preparation 06b) System Installation 07c) Control Panel Installation 09d) Post-installation Checklist 11
5. Control Panel Operationa) How to Operate 12b) Selectable Menu Items 13c) Alarms and Possible Causes 16
6. Start upa) Tank Filling 16b) Powering On / Start Pump Test 16c) Seeding 17d) Instructing the Owner 17
7. Maintenancea) Clean or Replace a Pump 17b) Replacing a Hose 18c) Sludge Management 18d) Owner's Checklist 19
8. Troubleshooting 19 9. Homeowner FAQs 20 10. Installer FAQs 20 11. Compliance information 21 12. Technical data, sketch of plant, and Contact Information 22 13. Back Page of Manual
a) What NOT to Flush 23b) What to do when Alarm goes off 23
PekaSys Inc, 877-735-2797 [email protected] Page 2

Technical Manual for Clear Rex Bubbler® CRB1 SBR wastewater treatment plant
1. Welcome and Precautions:
Welcome to the Clear Rex Bubbler® Technical Manual. All maintenance should be performed by a trained professional. Before we jump into how to maintain your on-site wastewater treatment plant, there are some important safety items to cover:
Electrical – When servicing the Clear Rex Bubbler®, ALWAYS make sure to turn off power at the main electrical panel to prevent exposure to electrical shock. Secure circuit breaker so that no one can accidentally turn it on while in service. The control panel will sound an alarm when the power is turned off so make sure to press the SET key one time to silence the alarm.
Septic Tank – Before entering the tank for service, follow all local safety regulations for servicing septic tanks. The gases can become explosive if not properly vented. In addition, servicing a tank alone presents unique dangers should a problem arise so ensure safety precautions are met.
PekaSys Inc, Fluegeln LLC, and Wissmann Elektronik, GmbH are not responsible for improper actions taken by service persons. Service persons take liability into their hands when agreeing to service a septic tank and wastewater treatment system.
2. Clear Rex Bubbler® Introduction
2.a Package Contents
The standard Clear Rex Bubbler® Wastewater Treatment Plant is delivered in 2 cardboard boxes:
The rectangular cardboard box includes:
• One (1) Stainless Steel dividing wall clamp – a “J” shaped metal piece with an attached black star-shaped knob used to clamp down on a septic tank baffle (middle wall)
PekaSys Inc, 877-735-2797 [email protected] Page 3
L: 42.3 inches(107.5 cm)
W: 16.9 inches(43 cm)
H: 5.9 inches(15 cm)
W: 18.1 inches(46 cm)
H: 16.9 inches(43 cm)
L: 18.3 inches(46.5 cm)

Technical Manual for Clear Rex Bubbler® CRB1 SBR wastewater treatment plant
• One (1) Motion Bar - 43.3 inches (1.10 m) – a square shaped stainless steel bar with preset drilled holes used to prevent the system from floating around the tank
• One (1) Cross Bar - 23.6 inches (0.60 m) – a short, square shaped stainless steel bar with preset drilled holes and attached plastic mounting bracket used to secure motion bar and aerator hose
• One (1) Control Panel – a large plastic, rectangular box with a viewing window that houses the circuitry, cables, and main processing unit used to start and stop the treatment process
• Three (3) Measured Lengths of Hose – round, flexible, plastic air hoses of varying diameters used to pump water and air into and out of the septic tank chambers
• Four (4) Hose Clamps – circular metal strips with a tightening screw used to secure hoses to pipes
• One (1) Owner's Manual – paper booklet accompanying the Clear Rex Bubbler® explaining how to maintain, and operate the system
• One (1) Installation Manual – paper booklet accompanying the Clear Rex Bubbler® explaining how to install the system
The square cardboard box includes:
• One (1) Blue Floating Unit - a circular, blue, foam-like disk used to keep system floating on the water to ensure proper air pressure
• One (1) Clear Water Pump (CWP) – a heavy, plastic pump used to discharge cleaned water from a septic tank
• One (1) Combined Pump for filling and sludge removal – a heavy, plastic pump used to fill the reactor with wastewater and return excess sludge to the pretreatment chamber
• One (1) Aerator pump – a heavy, plastic pump with a high-speed propeller used to draw air into the septic tank for aeration
• One (1) Float Switch NIV1 – an orange, sausage-shaped plastic tube with a ball on the inside and an attached metal weight above used to determine when to start and stop the pumps
• One (1) Control box – a small, plastic, rectangular box containing all the necessary cables going to and from the pumps and switch(es)
• All necessary cabling, clamps and ties – included are any hose clamps, screws, hooks, zip-ties, etc that go into setting up the system.
Tools, conduit for underground cable, and consideration for fixing the Control Panel should befurnished by the Installer.
2.b Warranty / Replacement Instructions
All parts are fully covered under manufacturer's standard limited warranty of two (2) years from the date of receipt. Warranty stays with the tank of installation, regardless of owner. To
PekaSys Inc, 877-735-2797 [email protected] Page 4
Technical Manual for Clear Rex Bubbler® CRB1 SBR wastewater treatment plant
maintain this limited warranty, the product must be operated, calibrated, and maintained in accordance with the Owner's Manual supplied with the product. Abuse, mechanical damage, alteration, or repairs not made in accordance with the Owner's Manual void the Clear Rex Bubbler® Standard Limited Warranty.
Prior to installation, inspect all parts for possible defects or damage in transit. All hoses that are used in installation should be without tears or holes. Pumps should not have any cracks and the impeller of the aerator should spin freely. Do not strike the impeller or rest the weight of the aerator on anything so as to protect the bearings on which the impeller spins. If any pumps are damaged, mark the damage and contact your product point-of-sale provider.
2.c Whom to contact
For any issues, please contact your product provider. Emergency and non-emergency phone numbers for your product provider are located on the right side of the control panel. In the event you are having trouble with your product provider, please go to www.pekasys.com/inform to voice any issues you may have.
2.d Certifications
The Clear Rex Bubbler® is certified in the USA and Canada under NSF/ANSI Standards 40 and 245 as a Class 1 Wastewater Treatment Plant when paired with an appropriate tank for daily flows ranging from 400 US gallons to 1400 US gallons per day. Treatment systems outside this range perform to the same levels, but are not officially recognized by NSF and therefore cannot showcase the NSF logo. The Clear Rex Bubbler® is CSA recognized when coupled with a CSA appropriate tank as well as certified in the European Union under the EN 12566-3, where is holds five certification classes: C (standard), D (higher quality effluent), D+P (treatment + phosphorus reduction), N (nitrogen reduction), and D+H (treatment + disinfection).
3. Clarification Process
3.a SBR Overview
A Sequencing Batch Reactor (SBR) is an advanced process for the treatment of wastewater. SBR reactors treat wastewater such as sewage in batches as opposed to a traditional septic tank which relies predominantly on sedimentation and decanting. In a SBR, oxygen is bubbled through the wastewater at predetermined times to reduce biochemical oxygen demand (BOD) and total suspended solids (TSS), producing a clear, non-potable effluent.
3.b Clear Rex Bubbler® Sewage Treatment Cycle
1. Filling - Incoming raw sewage is stored in the primary settling tank and fed into the reactor throughout the processing cycle. If you have a system without a dedicated filling pump, the combined sludge and filling pump presses air out of the siphon and creates a siphon connection to fill the reactor. The filling is stopped by the water levels reaching equilibrium in both tanks or by a hole placed in the siphon at the settling tank’s minimum. If the plant has a dedicated filling pump, the filling is stopped after its filling time or a special float switch (NIV2/3).
2. Reaction - According to the Control Panel’s program, the reactor tank is intermittently aerated. This oxygen is necessary for the micro-organisms to build up in the tank and decompose the solids. The aeration times vary according to the flow of wastewater. To
PekaSys Inc, 877-735-2797 [email protected] Page 5

Technical Manual for Clear Rex Bubbler® CRB1 SBR wastewater treatment plant
ensure optimal performance, the aeration times can be changed when the influent demand changes. In between aeration, there are short impulses to stir or mix the sewage up and not let the activated sludge settle down to the bottom of the reactor. This mixing also creates an anaerobic process that is vital to Nitrogen removal.
3. Sedimentation - By stopping the aeration and the stirring of the water, the solids and the active sludge can settle down during this time of sedimentation. Three (3) different zones develop:
a) Zone with clear water on top. b) Transition zone with some sludge parts. c) Sludge zone with thickened active sludge at the bottom.
4. Clear water discharging - After the sedimentation phase, the clear water, which stays at the top of the reactor tank, is pumped out of the tank. The discharge is stopped by the opening of the float switch NIV1 or by the adjusted time. Effluent exceeds 50% total nitrogen reduction as required by NSF/ANSI 245.
5. Sludge removal - Once a cycle, the surplus sludge is pumped back to the primary settling tank. This keeps the optimal amount of active sludge in the reactor tank.
4. Installation of The Clear Rex Bubbler®
4.a Pre-installation Tank(s) Preparation
• Tank(s) must be clean and in new condition before installation can begin. Rocks and other hard pieces of debris can get caught in the pumps and break them. Old sludge in the tank will affect the performance of the system – new sludge is recommended.
• If there are openings in the tank separation walls they must be closed. It is important to insure no hydraulic connection between the primary settling tank and the reactor tank. If
PekaSys Inc, 877-735-2797 [email protected] Page 6
1. Filling
2. Reaction5. Sludge Removal
3. Sedimentation
4. Clear Water Discharging

Technical Manual for Clear Rex Bubbler® CRB1 SBR wastewater treatment plant
there are any leaks in the tank(s) they have to be repaired and sealed. The tank also has to be sealed against incoming ground water.
• An appropriate drain field also must be identified and approved.• Every tank must be ventilated. Considerations for venting must be made on-site.
Ventilation and fresh air feed the bacteria that are crucial to wastewater treatment.• Access ports must be protected against unauthorized entry by weight, lock or special
locking fasteners. Please refer to your local regulations for more details.
4.b System Installation
Installation of the Clear Rex Bubbler® is generally the same with every tank, however some situations call for specific alterations in order to reach maximum treatment and ease installation. Below are the instructions for a basic installation, however some installations may vary with location - please refer to your training or supplemental material. Please contact your product provider with any questions.
1. Fix the cross bar and attach to middle wall (baffle)Fix the cross bar to the middle wall clamp with nut, bolt, and washers. If the system is to be attached to another part of the tank, an alternative cross bar will be provided. Next, use the star knob to tighten clamp to middle wall.
2. Attach the siphon and mark the hPa level Put the siphon into the clamps of the wall clamp (see left). Siphon should be located in the pretreatment side before the reactor tank. Then adjust the siphon pipe to the height of the buffer starting height (hPa) given to you. The top of the top hole in the siphon should match the hPa value (see right). The siphon can be moved up and down in the clamps. This indicates the lowest point the wastewater can go in the pretreatment side.
PekaSys Inc, 877-735-2797 [email protected] Page 7
Technical Manual for Clear Rex Bubbler® CRB1 SBR wastewater treatment plant
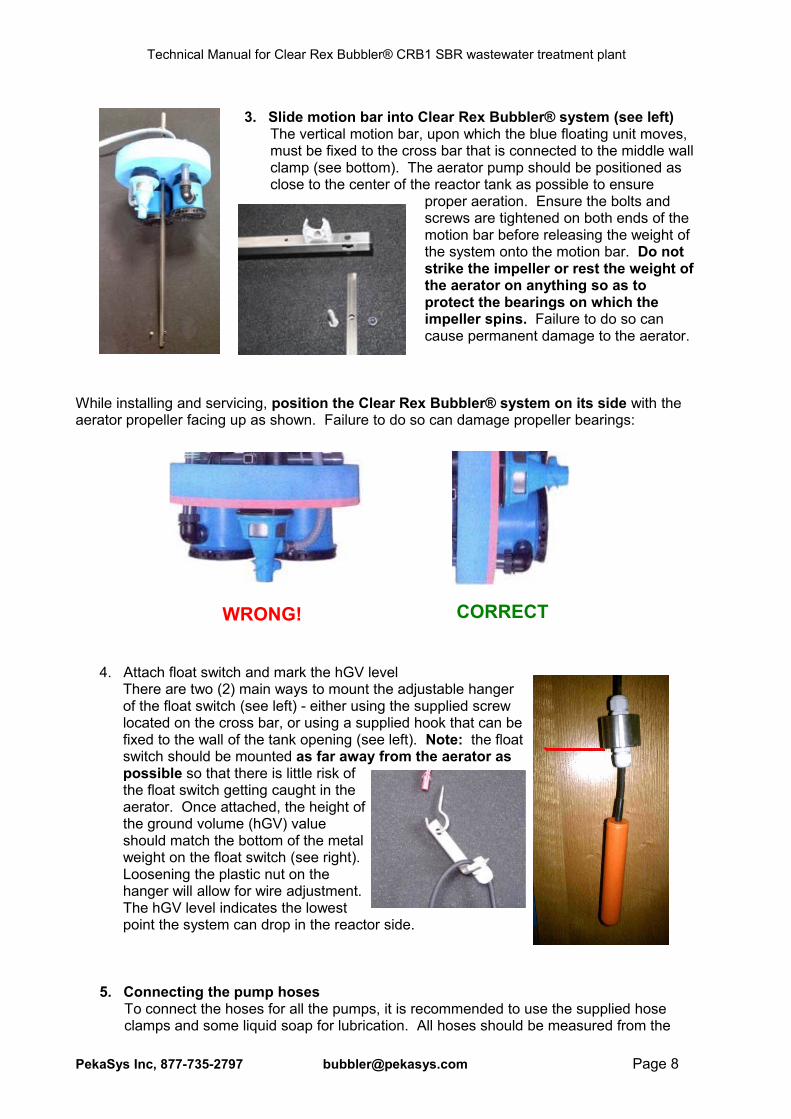
3. Slide motion bar into Clear Rex Bubbler® system (see left)The vertical motion bar, upon which the blue floating unit moves, must be fixed to the cross bar that is connected to the middle wall clamp (see bottom). The aerator pump should be positioned as close to the center of the reactor tank as possible to ensure
proper aeration. Ensure the bolts and screws are tightened on both ends of the motion bar before releasing the weight of the system onto the motion bar. Do not strike the impeller or rest the weight of the aerator on anything so as to protect the bearings on which the impeller spins. Failure to do so can cause permanent damage to the aerator.
While installing and servicing, position the Clear Rex Bubbler® system on its side with the aerator propeller facing up as shown. Failure to do so can damage propeller bearings:
4. Attach float switch and mark the hGV levelThere are two (2) main ways to mount the adjustable hanger of the float switch (see left) - either using the supplied screw located on the cross bar, or using a supplied hook that can be fixed to the wall of the tank opening (see left). Note: the float switch should be mounted as far away from the aerator as possible so that there is little risk of the float switch getting caught in the aerator. Once attached, the height of the ground volume (hGV) value should match the bottom of the metal weight on the float switch (see right). Loosening the plastic nut on the hanger will allow for wire adjustment. The hGV level indicates the lowest point the system can drop in the reactor side.
5. Connecting the pump hosesTo connect the hoses for all the pumps, it is recommended to use the supplied hose clamps and some liquid soap for lubrication. All hoses should be measured from the
PekaSys Inc, 877-735-2797 [email protected] Page 8
WRONG! CORRECT

Technical Manual for Clear Rex Bubbler® CRB1 SBR wastewater treatment plant
system's lowest point (hGV) and should have minimal slack to prevent any hose from wrapping around a pump and causing an alarm. Put hose on pipes a minimum of 1.25 inches (3.2 cm) so that hoses do not slide or wiggle loose.
(a) It is critical the siphon hose is air tight, otherwise the siphon can break prematurely and cause an alarm.
(b) The aerator pump hose should be as vertical as possible, with the end of the hose pointed to the side or down so as to prevent debris from falling into the open hose. Attach hose to the supplied clamp on the cross bar.
(c) The clear-water-pump hose will be placed in the tank's outlet pipe (see right). Place hose a few inches into the pipe, but not too far or else there can be the possibility of a siphoning of the discharge water back into the reactor. Use a zip tie or check valve to attach the hose to the pipe so it doesn't fall back into the reactor.
6. Mount the control boxThe best way to mount the control box is to hang it from a supplied hook that can be fixed to the wall of the tank opening (see left). The control box will need to be removable when servicing the Clear Rex Bubbler® so sliding it onto the hook is preferred. Because it contains all of the wires of the system, there is a risk of wires getting wrapped around the pump. Therefore, wires must have minimal slack (same as the hoses) and be zip-tied so that the remainder wires cannot fall down loose.
4.c Control Panel Installation
Installation of the control panel includes some electrical wiring and connecting to the main electrical panel and therefore should be done only by a certified professional. The dimensions are 9.5 inches (24 cm) wide x 7.3 inches (18.5 cm) high x 4.5 inches (11.5 cm) deep.
The best location for a control panel is a dry and covered place, like in a shed, a garage, abasement or any other weatherproof location. If the control panel shall be installed outside, a weatherproof enclosure is necessary. The control panel should be fixed hanging in an upright position onto a wall.
Drilling LocationFor correct installation of the control panel, three (3) holes have to be drilled into the wall as shown in the drillling template on the right (see red marks 1,2,3). At first the top screw [1] has to be screwed in and the panel has be to be hung on it. After that, loosen the screws of the gray lid of the terminal blocks and remove it. By fixing the screws [2] and [3] the control panel is now fixed onto the wall.
PekaSys Inc, 877-735-2797 [email protected] Page 9
1
23

Technical Manual for Clear Rex Bubbler® CRB1 SBR wastewater treatment plant
Electrical ConnectionsWhen handling electricity, ALWAYS make sure to turn off power at the main electrical panel to prevent exposure to electrical shock. Secure circuit breaker so that no one can accidentally turn it on while in service.
There are three (3) sets of wires that will need to be installed by a certified technician: power, pumps, and switch(es). All wires must be housed in approved conduit and extend beyond the control panel box as shown below. This prevents unauthorized people from accessing wires:
• Power – consists of a hot (black), neutral (white), and ground (green/yellow) wires capable of carrying 120 volts or 240 volts
• Pumps (outputs) – consists of 3 hot, neutral and ground wires capable of carrying 120 volts or 240 volts each. The violet wire powers the aerator, the black wire powers the filling/sludge pump, and the brown wire powers the clear-water-pump
• Switches (inputs) – consists of 1 or 2 hot and neutral wires, depending on the number of switches used. These wires carry 12 volts each
To attach wires, start by removing the lid on the control panel and exposing the circuit board shown above. Under the lid there will be an electrical connection plan like the one below:
PekaSys Inc, 877-735-2797 [email protected] Page 10
Power Pumps Switch(es)

Technical Manual for Clear Rex Bubbler® CRB1 SBR wastewater treatment plant
Important Note: High voltage wires (power and pumps) shall not lead through the same conduit as low voltage wires (switches). Switches must be put through a separate conduit.
After the proper connections are made, ensure wires fit snug and lid is closed tightly. Installation is now complete - do NOT turn on power until post-installation checklist is complete.
4.d Post-installation Checklist
Important: Power must be OFF when installing and maintaining the system. Risk of injury or death can occur, so only qualified technicians should install. Secure circuit breaker so that no one can accidentally turn it on while in service. The control panel will sound an alarm when the power is turned off so make sure to press the SET key one time to silence the alarm. Also, If going into the septic tank, make sure all local safety precautions are followed, as gases in tank could be dangerous.
Please make sure the following items have been checked and resolved before turning the system on. Depending on your particular installation, some items may not apply:
1. Circuit breaker is properly grounded and set up for the correct voltage2. All hoses should be free of kinks and not touching any concrete walls or lids when
moved up and down along the motion bar3. All hose clamps are tight4. Star knob on the middle wall clamp tight5. All cables should be straight, have minimal slack and be zip-tied so it doesn't get caught
in the aerator or pumps6. Do not fix any cables to the motion bar7. Cable box should be away from water and set horizontal with wires hanging down8. Reactor chamber cleared of debris9. Clear-water-pump (CWP) hose goes straight up, then to outlet to minimize bends10. Secure CWP hose to outlet pipe so it doesn't shake off – beware of siphoning11. Float switch should be same height or 1-2 inches (2.5-5.1 cm) higher than the lowest
part of the blue float to protect pumps from burning out from dry runs12. Float switch level (hGV) and top hole of siphon level (hPA) values need to be correct13. Float switch screw should be tight14. Float switch should be far from aerator to ensure cable does not get caught in propeller15. Aeration hose should be pointed up and secured to cross bar clamp16. Aerator should be as close to middle of reactor as possible17. Use air pressure test to ensure hose clamp to siphon is air tight – improper connection
might result in having to go into wastewater after installation to correct
PekaSys Inc, 877-735-2797 [email protected] Page 11

Technical Manual for Clear Rex Bubbler® CRB1 SBR wastewater treatment plant
5. Control Panel Operation:
The Clear Rex Bubbler® control panel automates the wastewater clarification process. The service provider can adjust the number of residents, such as when the number of occupants changes. The sewage treatment cycle begins with the filling of the reactor through the siphon and the concurrent aeration of the reactor. The control automatically differentiates between normal, economic and vacation operation, depending on influent flow, and automatically adjusts the aeration of the batch reaction. During the last 2 hours of the cycle, the sedimentation phase takes place followed by the clear water discharge. Sludge return may occur in the middle of the cycle or at the end depending on configuration. The control then starts a new clarifying cycle.
1. Warning label explaining the risk of shock if power is not disconnected2. Serial number of system goes here3. Emergency number of maintenance person/company – i.e. 24-hour cell phone number4. Directions if an alarm sounds5. General service contact information – non emergency6. System status light: Red indicates problem, green indicates no problems7. SET allows user to select menu items and confirm changes8. UP and DOWN arrows allow user to scroll through menus and change items
5.a How to Operate:
The control panel has 3 control keys (SET, UP, DOWN). With the SET key, the adjusted values can be displayed in the scroll menu. With the UP and DOWN keys, the adjusted values and the display text can be changed. By pressing UP and DOWN keys simultaneously, the main menu and all other adjustment menus are exited. The standard menu is then shown again on the display.
All program and inquiry modes are automatically canceled 5 minutes after the last pressed key. Manual switching is canceled 15 minutes after the last pressed key. When pressing any key, the backlight goes on. When no further key is pressed the backlight goes out after 30 seconds.
PekaSys Inc, 877-735-2797 [email protected] Page 12
7
2
6
5
4
3
1
8
Technical Manual for Clear Rex Bubbler® CRB1 SBR wastewater treatment plant
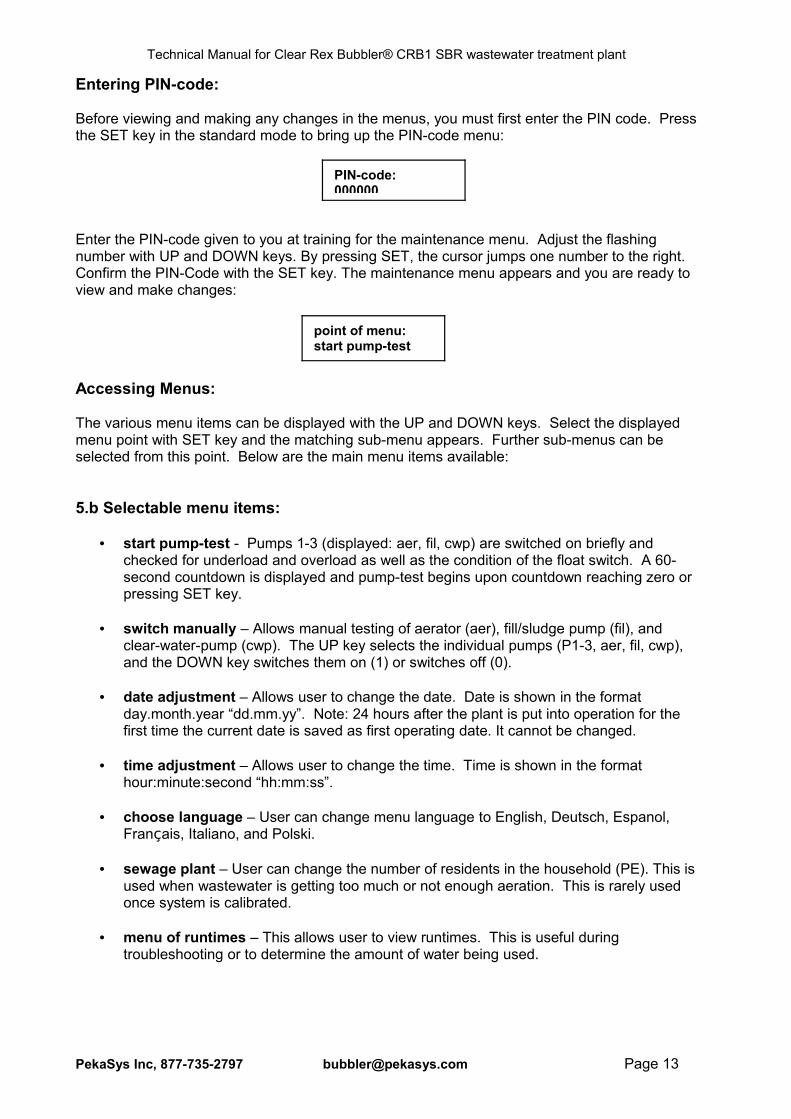
Entering PIN-code:
Before viewing and making any changes in the menus, you must first enter the PIN code. Press the SET key in the standard mode to bring up the PIN-code menu:
Enter the PIN-code given to you at training for the maintenance menu. Adjust the flashing number with UP and DOWN keys. By pressing SET, the cursor jumps one number to the right. Confirm the PIN-Code with the SET key. The maintenance menu appears and you are ready to view and make changes:
Accessing Menus:
The various menu items can be displayed with the UP and DOWN keys. Select the displayed menu point with SET key and the matching sub-menu appears. Further sub-menus can be selected from this point. Below are the main menu items available:
5.b Selectable menu items:
• start pump-test - Pumps 1-3 (displayed: aer, fil, cwp) are switched on briefly and checked for underload and overload as well as the condition of the float switch. A 60-second countdown is displayed and pump-test begins upon countdown reaching zero or pressing SET key.
• switch manually – Allows manual testing of aerator (aer), fill/sludge pump (fil), and clear-water-pump (cwp). The UP key selects the individual pumps (P1-3, aer, fil, cwp), and the DOWN key switches them on (1) or switches off (0).
• date adjustment – Allows user to change the date. Date is shown in the format day.month.year “dd.mm.yy”. Note: 24 hours after the plant is put into operation for the first time the current date is saved as first operating date. It cannot be changed.
• time adjustment – Allows user to change the time. Time is shown in the format hour:minute:second “hh:mm:ss”.
• choose language – User can change menu language to English, Deutsch, Espanol, Français, Italiano, and Polski.
• sewage plant – User can change the number of residents in the household (PE). This is used when wastewater is getting too much or not enough aeration. This is rarely used once system is calibrated.
• menu of runtimes – This allows user to view runtimes. This is useful during troubleshooting or to determine the amount of water being used.
PekaSys Inc, 877-735-2797 [email protected] Page 13
point of menu:start pump-test
PIN-code:000000

Technical Manual for Clear Rex Bubbler® CRB1 SBR wastewater treatment plant
• adjust currents – This allows user to view and adjust the minimum and maximum permitted current that can be allocated to each pump. An alarm will sound if this value either exceeds or falls below the saved values.
The first value shows the minimum current and the second value the maximum current. The current control for underload is disabled if the first value is adjusted to 0,0A and the current for overload is disabled if the second value is adjusted to 9,9A.
• lacks of power - Saves and displays the 10 last occurred lack of power (230 V) chronologically. 10 downtimes (from 0-9) can be shown one after another, starting with the last occurred supply error. The downtimes can be displayed by pressing the SET key. The last downtime and new start time appear alternately every 3 seconds on the display:
3 seconds later:
The display shows the number of the downtime (2), date and time of the supply error (5 April 2004 10:38 am) and the date and time of the new start (5 April 2004 12:30 pm). If any memory space is still free, the following text is displayed:
The memory is overwritten chronologically when more than 10 downtimes occur.
• failure record - The control saves and displays the 10 last occurred alarm malfunctions chronologically. 10 alarm malfunctions (from 0-9) can be shown one after another. The menu always starts with the last occurred failure:
The display shows the number of the failure (4), date (2 April 2004) and the time (11:42 am) of the occurrence and the type of error (fil: underload). If any memory space in the failure record is still free the following text is displayed:
The memory is overwritten chronologically when more than 10 malfunctions occur.
PekaSys Inc, 877-735-2797 [email protected] Page 14
2:05.04.04.-12:30new start
2:05.04.04.-10:38supply error
7:dd.mm.yy-hh:mmno entry!
4:02.04.04-11:42fil: underload
5:dd.mm.yy-hh:mmno entry!
adjust currentsaer: 2,1A 5,0AA

Technical Manual for Clear Rex Bubbler® CRB1 SBR wastewater treatment plant
• memory of events - Events such as float modification and pump switching are saved chronologically and are cyclically overwritten after 448 events.
The display above means: The third event is displayed, on 30 September at 12:59 pm all 3 floats (NIV1-3) were opened and the pumps P5-P2 were switched off and P1 was switched on.
• operation/week B1 (aer) - The current operation hours per week of the aerator pump are displayed. The hours of operation of the previous week are displayed by pressing the DOWN key. Next week's hours of operations are shown by pressing the UP key. The hours of operation can be displayed for the last 52 weeks.
• operation/week B2 (fil) - The current operation hours per week of the fill/sludge pump are displayed. The hours of operation of the previous week are displayed by pressing the DOWN key. Next week's hours of operations are shown by pressing the UP key. The hours of operation can be displayed for the last 52 weeks.
• operation/week B3 (cwp) - The current operation hours per week of the clear-water-pump are displayed. The hours of operation of the previous week are displayed by pressing the DOWN key. Next week's hours of operations are shown by pressing the UP key. The hours of operation can be displayed for the last 52 weeks.
• new PIN-Code – This allows user to change PIN-code. Once PIN-code is adjusted, it is automatically saved and the old PIN-code will not work anymore.
PekaSys Inc, 877-735-2797 [email protected] Page 15
003:30.09.-12:59NIV:000 P:00001
Technical Manual for Clear Rex Bubbler® CRB1 SBR wastewater treatment plant
5.c Alarms
There are 4 alarms that are programmed in the system. Every alarm appears in plain text alternately with the standard display in the second line on the display screen. A red light and an acoustical sound draw the attention of the operator to the alarm. The acoustical signal can be canceled by pressing the SET key once - the red light and the plain text indication will remain. The system will then continue on its normal cycle. When the disruption has been resolved, the red light and the plain text in the display can also be switched off completely by pressing the SET key for approximately 5 seconds. The system will then continue on its normal cycle. The 4 alarms are:
• Pump (aer, fil, cwp) overload – This indicates a pump has drawn too much current. Potential causes could be:◦Pump needs to be cleaned◦Pump has worn out◦Electrical problem
• Pump (aer, fil, cwp) underload – This indicates a pump has drawn too little current. Potential causes could be:◦Pump overheated◦Pump has worn out◦Electrical problem
• High water alarm – This indicates the float switch remained in a closed position for 2 full cycles. Potential causes of this could be:◦ Extremely high water flow◦ Float switch dropped below design level◦ Movement of flotation device along motion bar is blocked◦ Effluent is blocked or clear water hose is not properly connected◦ Mechanical failure of float switch◦ Infiltration of ground water
• Lack of Power – This indicates there is no power going to the control panel. Potential causes of this could be:◦Power outage◦Tripped circuit breaker◦Disconnected cable
6. Start Up
6.a Tank filling
Before turning the Clear Rex Bubbler® on, the height of the pretreatment chamber should be filled at buffer starting height (hPa) and the reactor chamber must be filled up to ground volume height (hGV). If there is not enough water in the reactor chamber upon start up, the pumps will run dry and overheat to premature failure, however if you fill it with more water the plant will become hydraulically overloaded - therefore, adjusting to the correct hPa and hGV levels are critical.
6.b Powering On / Start Pump Test
Put the plant into operation by connecting the power cable and making sure that the panel powers on. Enter the pin code to access the menu. Check the correct function of the outputs
PekaSys Inc, 877-735-2797 [email protected] Page 16
Technical Manual for Clear Rex Bubbler® CRB1 SBR wastewater treatment plant
(pumps) and inputs (float switches) by using the menu “start pump test” or “switch manually”. Check the following adjustments: “time and date”, “number of residents” (PE or plant type), and “number of cycles per day”. After the pump test has run successfully, adjust the date of the 1st sludge removal to a (recommended) date about 3 months after the installation. This allows the reactor to have time to accumulate enough bacteria to help clean the wastewater.
6.c. Seeding
Seeding involves speeding up the “start up” phase of biological treatment by putting sludge in the tank to encourage bacteria growth. If this is required of the installer, he/she can seed the reactor and fill the pretreatment with wastewater. This reduces the time from six (6) weeks to three (3) weeks.
6.d Instructing the Owner
Once the Clear Rex Bubbler® has been installed and all points have been checked, the last thing to do is talk with the owner about some key points. The below list is not exhaustive, so if there are missing items pertaining to your particular situation, please inform the customer:
• When the alarm sounds, owner should know how to deactivate an alarm (by pressing the SET key) and whom to call for service
• The power cable should never purposely be pulled to kill power – the system will know• Water softeners can NEVER drain into the treatment tank. This will kill the bacteria and
void the warranty.• A list of what can and cannot be put down the drain is located on the back of the
Owner's Manual
7. Maintenance
Maintenance is central to the correct operation of the Clear Rex Bubbler®. If ever an error occurs with the system, an alarm will sound and the light will change to red. Pressing the SET key can silence the alarm. A trained service specialist must handle any error. The owner must contact their service company in the event of an error. When the alarm sounds an error log is filed in the machine's memory to clarify the error as well as store the date and time of the error in case it goes unreported. Depending on your service agreement, maintenance scheduling can vary, but in every check of the system the following should be done:
• Record the operation hours of all the pumps through the diagnostic menu• Perform a pump test and listen for any unusual sounds or any visual changes• Check hoses for cracks or holes• Check for floating sludge and return it to primary tank if excessive• Check sludge level of both tanks (if sludge level of pretreatment tank is over 50%, it will
require pumping)• Water samples may need to be taken depending on the needs of the owner• Cleaning of the mechanical parts may be necessary
7.a Clean or Replace a Pump
The pumps should be cleaned every six (6) months. If an error exists with a pump , it will need to be replaced. In cleaning or replacing a pump, technician will need to:
PekaSys Inc, 877-735-2797 [email protected] Page 17

Technical Manual for Clear Rex Bubbler® CRB1 SBR wastewater treatment plant
1. Disable power and remove the screws that fix the cross bar in order to lift the floating unit out of the tank.
2. Cut the zip-ties holding the cables together and unthread the connection(s) in the control box for the offending pump to remove the cable.
3. To clean the pump, unscrew the small safety screws at the bottom of the plate. Open the bottom by turning clockwise to expose the filter cap. Use a flat iron clockwise to unfix the filter cap and expose the impeller to be cleaned.
4. To replace the pump, use a replacement on hand and wire it back to the cable box in the same manner. Use zip-ties to bundle cables together like before.
5. All other repairs must be cleared with the local Clear Rex Bubbler® contact, otherwise warranty is void.
7.b Replacing a Hose
All hoses should be replaced every six (6) years to prevent any failures. If, upon inspection, a hole or crack is noticed, the entire length of hose should be replaced. The replacement hose must be the same diameter. To replace a hose, technician will need to:
1. Disable power and remove the screws that fix the cross bar in order to lift the floating unit out of the tank.
2. Unscrew hose clamps and remove offending hose. 3. Cut new hose to same length as old one before attaching.4. Use liquid soap to attach new hose and tighten clamp5. Put system back and confirm that hose lengths have minimal slack and do not rub or
touch against side walls or lid when system is at it's lowest point.
7.c Sludge Management
Sludge management is an important step in maintaining the Clear Rex Bubbler® because its effectiveness relies on having the proper amount of sludge to clean the wastewater. Too little sludge and there is not enough bacteria to clean the water effectively – too much sludge and the bacteria go “septic” and die, resulting in unclean water.
Removal of fecal sludgeDetermining the sludge level is necessary to make an appointment for the next fecal sludge removal. The amount of fecal sludge depends on the load coming in. Because of the sequential batch reactor process, the introduced solids in the pretreatment tank sink down to the bottom (sediment) and raw sludge (primary sludge) forms prior to siphoning. This process also occurs in the reactor side, however a part of the activated sludge (secondary sludge) is pumped back into pretreatment. This pump-back phase keeps the reactor side from needing to be pumped. When 50% of the pretreatment tank is filled with fecal sludge and scum, the pretreatment chamber(s) must be emptied by an authorized company. DO NOT PUMP REACTOR unless specified by the service provider. Then all the chambers are filled with water again.
Measuring of the sludge blanket levelA level measurement should be performed during each maintenance. A long, 9.8 foot acrylic tube (3 m) with a lockable valve at the bottom (i.e. Sludge Judge) can be used. The tube is lowered down into the pretreatment with the valve open. When the tank base is reached the valve closes and the tube is pulled out of the chamber. This creates a side profile of the sludge layers, much like an archaeological site. Based on the amount of septic sludge in the tube, the volume can be accurately determined.
PekaSys Inc, 877-735-2797 [email protected] Page 18

Technical Manual for Clear Rex Bubbler® CRB1 SBR wastewater treatment plant
7.d Owner's Checklist
To ensure safe, effective, and long-lasting operation of an on-site sewage treatment plant such as the Clear Rex Bubbler®, it is very important that the owner do his or her part to check and maintain the plant at planned intervals. This is in addition to the six (6) month maintenance performed by the maintenance company.
Daily Check - To be performed by OwnerCheck the control panel. Did any failures occur? Failures will be displayed with plain text (alternating with the standard mode), a red light and an acoustical sound. Pressing the “SET” key stops the acoustic sound and the owner should call the service number for maintenance. The red light and the text stay there until the maintenance company has repaired the failure. Also check if there are any strong or lingering smells around the septic tank area. If there is, call the service number for maintenance.
Monthly Check - To be performed by OwnerDo a visual and smell check of the discharged water. Does it look clean with minimal solids? Does it smell “earthy” like dirt or raw like sewage? It should smell earthy. If water has drastically changed look or smell over the past few months, contact your service technician.
8. Troubleshooting
After a proper installation, most of the issues that might occur happen for only a few reasons:
Problem Possible Cause RemedyNo display No power Check power and connectionsProgram version is displayed
Controller is resetting Control panel failure – call service number
Panel is beeping, alarm text
Control has detected a failure
Press SET key to stop beeping – check pumps
Panel is beeping, control is off
Main power failure Press SET key to stop beeping – check power
Display “do maintenance” Adjustable maintenance date is reached
Call maintenance company and set new maintenance date
Display underload alarm Electrical current is low Pump could have overheated or electrical problem
Display overload alarm Electrical current is high Check electrical systemHighwater alarm Float switch (NIV1) is
closed too longCheck operation of NIV1
Reactor tank not filling Siphon is failing Check hose is airtightControl only shows Economical/Holiday mode
Float switch is always open Check performance of switch, adjust height
No regular clear water pump discharge, no regular filling of reactor
Pump(s) clogged with dirt, impeller blocked
Call service number
PekaSys Inc, 877-735-2797 [email protected] Page 19
Technical Manual for Clear Rex Bubbler® CRB1 SBR wastewater treatment plant
9. Homeowner FAQ
Q: Do I have to pump my tank?A: Yes, you will need to pump the pretreatment side the same way that you pump a normal tank. However, the reactor side where the Clear Rex Bubbler® sits should never need to be pumped because of the built in sludge regulator. Only when a technician advises pumping should it be pumped.
Q: Do I need to adjust the control panel when I go on vacation or have a party?A: No, there is no reason for you to touch the control panel other than to silence an alarm . The Clear Rex Bubbler® has a built in system for handing vacations and parties.
Q: I use a water softener, how does that affect the system?A: Water softeners should not be used with the Clear Rex Bubbler® system. The softener will kill the bacteria necessary for cleaning the wastewater. Evidence of softener in the treatment system will void the Clear Rex Bubbler® warranty.
Q: Can I hook my washing machine line to my tank?A: Yes, your washing machine can be hooked up to your tank. The Clear Rex Bubbler® can handle this incoming load, however as mentioned above, use of water softeners can have a detrimental impact on the Clear Rex Bubbler® performance and might void the warranty.
Q: How do antibiotics affect the system?A: Antibiotics are harmful to the Clear Rex Bubbler® system in large amounts. Infrequent use, such as a short term infection, should not affect the effectiveness of the Clear Rex Bubbler®. However, long term antibiotic use, such as with cancer treatments, will affect the bacteria and subsequent cleaning effectiveness. Antibiotics are understandably unavoidable so if you anticipate using them for long periods of time, please inform your service technician during service.
10. Installer FAQ
Q: Can I use heavier duty hoses?A: No. Because the Clear Rex Bubbler® moves up and down the motion bar all the time, flexible hoses that can withstand constant bending are required. The hoses that come with the system have been found to be the best at moving around constantly without kinking or crimping. Gray hoses have a lifespan of six (6) years and green hoses have a lifespan of twenty-five (25) years.
Q: Should I use a 120 volt connection instead of the standard 220 volt connection?A: Depends. The Clear Rex Bubbler® uses high quality, 220 volt pumps to operate. This voltage ensures a long pump life. Using 110 volts on a 220 volt pump will shorten the lifespan and so is not recommended. If 110 volts is absolutely needed, PekaSys can supply a specific 110 volt pump.
PekaSys Inc, 877-735-2797 [email protected] Page 20

Technical Manual for Clear Rex Bubbler® CRB1 SBR wastewater treatment plant
11. Compliance Information
Confirmation of conformity:
Manufacturer confirmation for the sewage treatment plant control: CR4063 / 5P3S
Compliance with the EC Directivesfor CE marking is certified as follows:
Device type: Clear Rex CR4063 / 5P3S
Directives: 1.) EMC directives 89/336/EEC2.) low voltage directives 73/23/EEC
applied norms: to 1: VDE 0839 part 1.1 / 81.2 / 82.2 / 83.2EN 50081-1, EN 50081-2EN 50082-1, EN 50082-2
to 2: EN 60204-1___________________________________________________________________WISSMANN ELEKTRONIK GMBH Date: 27 April 2004Hainekamp 17 – D-31711 LuhdenPhone: +49 5722 9054960, Fax: +49 5722 9054969
Plan for connecting of the control and confirmation of conformity of the manufacturer
PekaSys Inc, 877-735-2797 [email protected] Page 21
Electromagnetic Compatibility
Name and type of product: Sewage Treatment Control Panel CR4063 / 5P3S
Normative references:Limits equivalent: FCC, Part 15 and CISPR22Measuring methods ANSI C63.4
This device (Clear Rex Cr4063 / 5P3S) has been tested and found to comply with the limits for a class B digital device, pursuant to the part 15 of the FCC rules. The limits are designed to provide reasonable protection against harmful interference in a residential installation.
Approved by Intertek Deutschland, Kaufbeuren Date of issue: 2009-02-25

Technical Manual for Clear Rex Bubbler® CRB1 SBR wastewater treatment plant
12. Technical data and sketch of The Clear Rex Bubbler® treatment plant
PekaSys Inc is the exclusive North American distributor of The Clear Rex Bubbler®. Please address all questions, comments, and concerns to: PekaSys, Inc P.O. Box 3230, Philadelphia, PA 19130, USA1-877-Peka-Sys (735-2797). [email protected], www.pekasys.com
Wissmann Elektronik, GmbH is the manufacturer of The Clear Rex Bubbler®. Headquarters are Heinekamp 17 – D-31711 Luhden, Germany. +49 5722 9054960. www.wissmann-elektronik.de
PekaSys Inc, 877-735-2797 [email protected] Page 22
Technical data
Device type: Clear Rex Bubbler® CRB1 Mains power: Alternating current 220-240 V / 50-60 HzMaximum fuse in house: B 16 AIntegrated fuses: 4 x 5 A, 250V, 0.79 in x 0.20 in (20 x 5 mm)Ambient temperature: 32°F (0°C) up to + 140°F (60°C)Inputs: 1-3 float switch(es) (2pins, max. 20 mA ,12 V) Outputs: 3 x pump output 230 V / 5A (optional up to 5 outputs)
1 x potential free Output (2-pin) 230V / 16 ABuzzer (Piezo): 85 dB(A)Operating keys: 3 keys (SET UP, DOWN)Display: LCDisplay (2x16 chars) – yel-gr. backlightCable diameter (recommended): 0.3 in² (1.5 mm²)Housing material: Polycarbonate, GFK
1) Lexan 500 R2) Lexan 940 A
Protection class: IP 65Housing dimensions (control panel): 9.5 x 7.3 x 4.5 in (24 x 18.5 x 11.5cm) [WxHxD]Weight (control panel): 3.3 lbs (1.5 kg)

Technical Manual for Clear Rex Bubbler® CRB1 SBR wastewater treatment plant
What to Flush, What NOT to Flush
#1 Rule – only bodily fluids, fecal matter, and toilet paper should go down the drains.
Everything else should be disposed of in the garbage or recycled. The Clear Rex Bubbler® can handle small amounts of organic waste, antibiotics, and cleaning fluids, but large amounts will kill the bacteria necessary to clean the wastewater. Example of what is forbidden in the septic tank and will void the warranty if found during maintenance:
DO NOT PUT DOWN DRAIN:
Cooking oil and Grease – hurts bacteria
Condoms – clogs pumps
Drain Solvents – poisons sewage and subsequently, your backyard
Medicines – poisons sewage and subsequently, your backyard
Cigarette butts – clogs pumps
Cat Litter – does NOT decompose
Bleach – kills bacteria
Paint, chemicals, varnishes – poisons sewage and subsequently, your backyard
Uneaten food – clogs pumps
Diapers – clogs pumps
Towels and other clothing – clogs pumps
Ash – does not decompose
Pesticides – poisons sewage and subsequently, your backyard
Is the alarm going off?
If alarm is going off, press the SET key one time to silence it. Take note of what text is displayed on the screen and contact your service technician as soon as possible. If the alarm is sounding frequently, talk with your service technician about your usage and habits. The system may need to be reprogrammed to accommodate different usage.
PekaSys Inc, 877-735-2797 [email protected] Page 23