Clarissa doll - zhaya.de · As I said before: I shaped the nose after pictures from the web. Since...
20
Clarissa doll Feel free to sell Your finished items. Mass production is - of course - not permitted. Do not copy, alter, share, publish or sell pattern, pictures or images. Copies be made for owner’s personal use only. * * * ATTENTION: Please be aware that I only share my patterns via www.zhaya.de/www.zhaya.eu. If you have downloaded this FREE pattern from anywhere else, please delete it immediately - as there are sites where anonymous hackers upload pattern files containing viruses, allowing them to access your computer and steal your personal and financial details. Materials: When using the suggested materials, it will be about 40 cm tall. The instructions for the eyes shown are not included, because I embroidered them from a video on YouTube. The eyes can also be crocheted or replaced by safety eyes or something like that. • Wool sport weight, e. g. Schachenmayr Catania / Scheepjes Catona, for the body: No. 255 oder 263 (about 2 balls), skirt: No. 411, top and sandals: No. 393, 254, 106, backpack: Fb. 503, jacket: Catania / Catona Denim No. 152 • Wool for the hair (thread weight, e. g.: Scheepjes Maxi Sugar Rush oder Puppet Puppets Eldorado No. 10), you can also use acrylic wool (e. g. Schachenmayr Bravo) or which wool you like • Crochet hook in suitable sizes (for me: 2.0 mm, 1.25 mm, 3.5 mm) • Embroidery yarn for the face (pink, black, white and desired eye color) • pink pastel chalk for the cheeks - if you like • optional if you crochet the eyes: some thread weight yarn (black, white and desired eye color) or safety eyes or eyes to sew on etc., just what you like • Stuffing • optional: some wire as „skeleton“ • little buttons (about 1 cm in diameter) The listed wool and hook sizes are only suggestions. It is, of course, entirely your personal choice, which yarn you use. Please keep in mind that different yarn may result in a bigger or smaller piece. Make sure to adapt your hook size according to your yarn and personal tension. Clarissa is crocheted top down, almost in one piece (at least very little sewing is required). If you like, you can include wire while crocheting, e.g. if the doll is used for decorative purposes. It's a great way to put her in the scene. However, I will not explain this in in the pattern. First published: 08.10.2015
Transcript of Clarissa doll - zhaya.de · As I said before: I shaped the nose after pictures from the web. Since...

Clarissa doll Feel free to sell Your finished items. Mass production is - of course - not permitted. Do not copy, alter, share, publish or sell pattern, pictures or images. Copies be made for owner’s personal use only.
* * * ATTENTION: Please be aware that I only share my patterns via www.zhaya.de/www.zhaya.eu. If you have downloaded this FREE pattern from anywhere else, please delete it immediately - as there are sites where anonymous hackers upload pattern files containing viruses, allowing them to access your computer and steal your personal and financial details.
Materials: When using the suggested materials, it will be about 40 cm tall. The instructions for the eyes shown are not included, because I embroidered them from a video on YouTube. The eyes can also be crocheted or replaced by safety eyes or something like that. • Wool sport weight, e. g. Schachenmayr Catania / Scheepjes
Catona, for the body: No. 255 oder 263 (about 2 balls), skirt: No. 411, top and sandals: No. 393, 254, 106, backpack: Fb. 503, jacket: Catania / Catona Denim No. 152
• Wool for the hair (thread weight, e. g.: Scheepjes Maxi Sugar Rush oder Puppet Puppets Eldorado No. 10), you can also use acrylic wool (e. g. Schachenmayr Bravo) or which wool you like
• Crochet hook in suitable sizes (for me: 2.0 mm, 1.25 mm, 3.5 mm) • Embroidery yarn for the face (pink, black, white and desired eye color) • pink pastel chalk for the cheeks - if you like • optional if you crochet the eyes: some thread weight yarn (black, white and
desired eye color) or safety eyes or eyes to sew on etc., just what you like • Stuffing • optional: some wire as „skeleton“ • little buttons (about 1 cm in diameter)
The listed wool and hook sizes are only suggestions. It is, of course, entirely your personal choice, which yarn you use. Please keep in mind that different yarn may result in a bigger or smaller piece. Make sure to adapt your hook size according to your yarn and personal tension.
Clarissa is crocheted top down, almost in one piece (at least very little sewing is required). If you like, you can include wire while crocheting, e.g. if the doll is used for decorative purposes. It's a great way to put her in the scene. However, I will not explain this in in the pattern.
First published: 08.10.2015

Crochet in continuous rounds (spirals), unless otherwise stated.
For help with invisible color changes, increases and decreases, please visit the „Tipps, Tricks and Tutorials“section on my website www.zhaya.de.
I hope, it's understandable and I'm really sorry if something sounds weird. !
Head / Body / Legs: Skin color All parts for the doll itself are crochet very tight, preferably with the smallest possible needle size (I use 2.0 mm). The doll is stuffed during crocheting. 1. sc 6 in MR (6)2. inc x6 (12)3. (sc 1, inc) x6 (18)4. (sc 2, inc) x6 (24)5. (sc 3, inc) x6 (30)6. (sc 4, inc) x6 (36)7. (sc 5, inc) x6 (42)8. (sc 6, inc) x6 (48)9.-24. (16 Rounds) sc in each st around (48)25. (sc 6, dec) x6 (42)26. (sc 5, dec) x6 (36)27. (sc 4, dec) x6 (30)28. (sc 3, dec) x6 (24)29. (sc 2, dec) x6 (18)30. slst in each st around (18)31. FLO: sc in each st around (18)32. (sc 4, dec) x3 (15)33.-34. (2 Rounds) sc in each st around (15)35. (sc 4, inc) x3 (18)36. (sc 2, inc) x6 (24)37. (sc 3, inc) x6 (30)38. (sc 4, inc) x6 (36)39. (sc 5, inc) x6 (42)40. (sc 6, inc) x6 (48)
Abbreviations (US Terms):
MR = magic ring inc = increase
sc = single crochet dec = decrease
ch = chain st = stitch
hdc = half double crochet BLO = back loop only
dc = double crochet FLO = front loop only
slst = slip stitch
(-) x = repeat inside of () for x nr of times
First published: 08.10.2015

41. (sc 7, inc) x6 (54)42. (sc 8, inc) x6 (60)43. (sc 9, inc) x6 (66)44. (sc 10, inc) x6 (72)45. (sc 11, inc) x6 (78)46. (sc 12, inc) x6 (84)47. (sc 13, inc) x6 (90)Finish stuffing the head.
At this point I sculpted eye sockets and nose, because you can insert invisibly from below into the neck opening. I used a long needle and white sewing thread for sculpting, because it is quite strong and because it is so thin, you don't actually see it as well. I guess you can work quite exactly with it, which is not unimportant for the nose. Of course, you can also just model the eyes and embroider your nose as usual or leave out modelling completely, just as you like. Mark the spots for the eyes with pins, in my case it was between round 16 and 17 with 8 to 9 stitches spacing. Then insert from below into the neck opening and come out one stitch next to one of the two eye markings, now insert again with a stitch distance on the other side of the mark and tighten back to the starting point. Repeat 2-3 times, tighten again and again so that the eye forms, knot well. Repeat for the other eye.
If the thread is long enough, don’t cut it, otherwise use a new thread. Now the nose is shaped. This is hard to explain. I’ve just worked after pictures I found on the web (Link is below). First mark the spots shown at the first picture below. There are two rounds between the pins, the middle pins are at the same height as the eye markings before. Then just follow the stitches on the following pictures - the nose then actually forms itself. I’ve made each stitch twice because it gives a better hold. As I said before: I shaped the nose after pictures from the web. Since I don't know if the site is permanently available, I made my own photos. Original pictures are here: link (click). Of course, the nose can also be embroidered simply by several horizontal stitches over 2-3 stitches of the face.
First published: 08.10.2015

The mouth later turned out to be prettier if you also model the corners of the mouth (I did this later, so the rest of the face is already finished in the photos). To do this, mark the corners of the mouth with pins, 1 round under the nose with approx. 8 stitches. Thread the yarn through a needle (e.g. white sewing thread) and insert it again from below in the neck opening and come out at the inner lower corner of one eye, insert it on the right side of the eye and come out at the marking of the corner of the mouth below this eye and insert a stitch offset again and return to the first place at the eye, tighten the thread and repeat this step 1-2 times, then back down and knot well. Repeat everything for the other corner of the mouth, knotting well again.
Now change to thin pink or red yarn (e. g. embroidery thread). Insert it again from below into the opening in the neck, come out at the left corner of the mouth, go into the right corner of the mouth and come out in the stitch 1 round below in the middle between both corners of the mouth, the thread should be below the needle, in this way the lower lip will already be formed. Now insert in the same spot but under the thread and come out in the left corner of the mouth. Now insert again in the right corner of the mouth. I used 2-3 threads for each lip, so they become fuller. To do this, simply make several more horizontal stitches, so that the threads then lie on top of each other properly (for the bottom, the step with the middle is no longer necessary, only for the first time). Finally, the lip threads are "wrapped" closely around. To do this, insert the needle underneath all the threads of a lip, go around and insert it again from below. Always make sure that all threads are wrapped.
First published: 08.10.2015
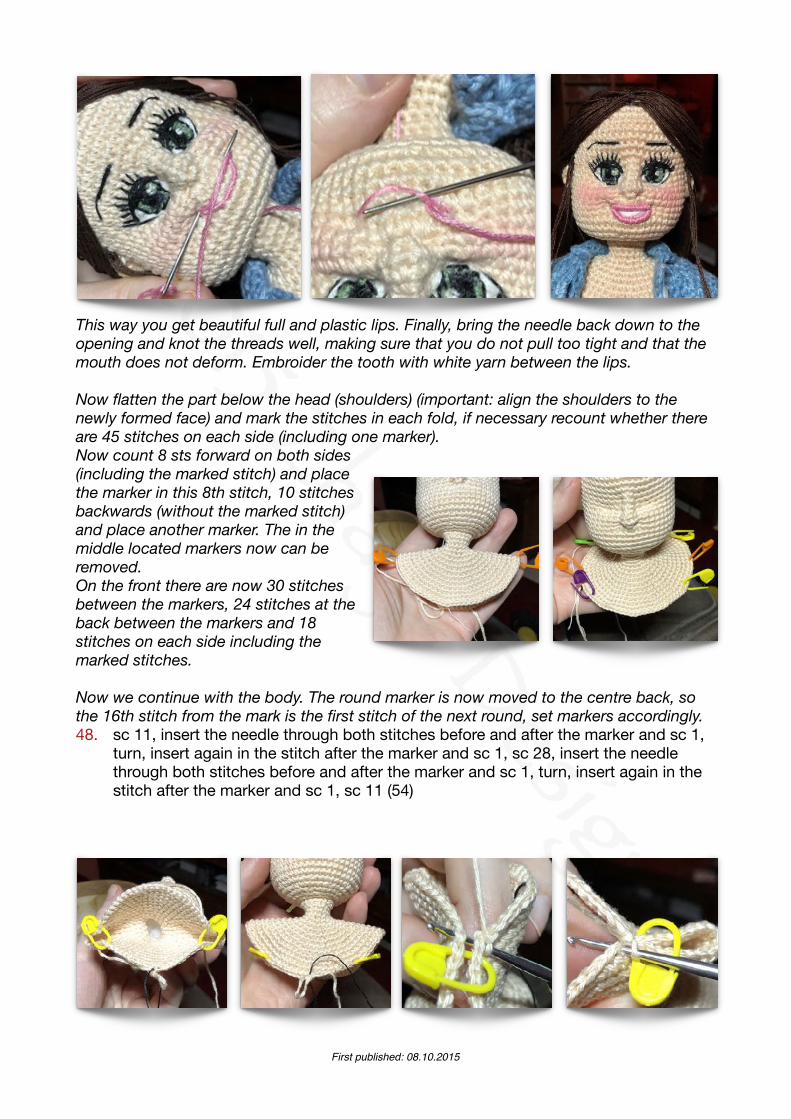
This way you get beautiful full and plastic lips. Finally, bring the needle back down to the opening and knot the threads well, making sure that you do not pull too tight and that the mouth does not deform. Embroider the tooth with white yarn between the lips.
Now flatten the part below the head (shoulders) (important: align the shoulders to the newly formed face) and mark the stitches in each fold, if necessary recount whether there are 45 stitches on each side (including one marker). Now count 8 sts forward on both sides (including the marked stitch) and place the marker in this 8th stitch, 10 stitches backwards (without the marked stitch) and place another marker. The in the middle located markers now can be removed. On the front there are now 30 stitches between the markers, 24 stitches at the back between the markers and 18 stitches on each side including the marked stitches.
Now we continue with the body. The round marker is now moved to the centre back, so the 16th stitch from the mark is the first stitch of the next round, set markers accordingly. 48. sc 11, insert the needle through both stitches before and after the marker and sc 1,
turn, insert again in the stitch after the marker and sc 1, sc 28, insert the needle through both stitches before and after the marker and sc 1, turn, insert again in the stitch after the marker and sc 1, sc 11 (54)
First published: 08.10.2015

You can remove the arm markers here. They are no longer necessary. 49.-51. (3 Rounds) sc in each st around (54)52. sc 15, (sc 1, dec) x8, sc 15 (46)53. sc 12, dec, sc 18, dec, sc 12 (44)54.-56. (3 Rounds) sc in each st around (44)57. sc 11, dec, sc 18, dec, sc 11 (42)58.-60. (3 Rounds) sc in each st around (42)61. sc 10, dec, sc 18, dec, sc 10 (40)62. sc in each st around (40)63. (sc 1, inc) x6, sc 16, sc 1, inc) x6 (52)64.-78. (15 Rounds) sc in each st around (52)Move round marker to the middle of the back. 79. sc 2, dec x4, sc 32, dec x4, sc 2 (44)80.-81. (2 Rounds) sc in each st around (44)Important: Move round marker again to the middle of the back if necessary. Count back 22 stitches and place a marker into the 22th stitch. Stuff and shape the body. 82. ch 2, sc 1 into the marked stitch, sc 21 (24) <- leave the remaining stitches
unworked
83. sc 2 along the little chain, sc 22 around the leg (don’t miss the very first stitch) (24) Stuff the leg while crocheting. 84.-96. (13 Rounds) sc in each st around (24)97. (sc 6, dec) x3 (21)98.-99. (2 Rounds) sc in each st around (21)100. (sc 5, dec) x3 (18)101.-102. (2 Rounds) sc in each st around (18)Now the knee is formed, it’s important that the marker is in the middle of the back. The decreases will be made at the back and the increases at the front side. Move the marker again if necessary. 103. dec, sc 4, inc, sc 1, inc, sc 1, inc, sc 3, dec x2 (18)104.-106. (3 Rounds) sc in each st around (18)Move the marker again to the middle of the back if necessary. 107. inc, sc 4, dec, sc 1, dec, sc 1, dec, sc 3, inc x2 (18)108. -117. (10 Rounds) sc in each st around (18)118. dec x2, sc 14 (16) <— decreases has to be at the back, adapt if necessary 119. sc in each st around (16)120. dec, sc 14 (15) <— decrease also has to be at the back, adapt if necessary 121.-124. (4 Rounds) sc in each st around (15)125. (sc 3, dec) x3 (12)
First published: 08.10.2015

Mark the stitch in the middle of the front and sc until you reach the marker, slst 1 into the marked stitch, ch 7 126. starting in 2nd chain from hook: sc 2 in the first 2 stitches, sc 4, sc 5 along the leg,
inc x2, sc 5, sc 4 along the chain, sc 2 in the last 2 stitches (30)127. inc x3, sc 24, inc x3 (36)128.-130. (3 Rounds) sc in each st around (36)Move the round marker back to the middle of the front. 131. dec x4, sc 6, dec x4, sc 6fM, dec x4 (24)132. dec, sc 8, dec x2, sc 8, dec (20) Slip stitch 2, fasten off, leave a long tail for closing.
To close the foot thread the end thread through a sewing or tapestry needle and back through the front loops of the last 4 stitches in a row (against the crochet direction), pull tight, then alternately pass through the outer (front) loops to the left and right of the opening, closing the opening until there are 6 loops left at the other end of the foot. Now thread the outer loops one after the other and pull them tight to close the hole, fix the thread and hide it inside.
For the second leg, join directly next to the first leg and then work exactly like this.
If you wish, you can now shape breasts, buttocks and belly button. For the breasts, insert the needle with skin-colored yarn into the back or neck from behind and come out underneath the breast, insert again above the breast and come out exactly at the starting point, tighten, if necessary repeat, knot well and hide the threads inside.
First published: 08.10.2015

For the buttocks insert the needle in the middle between the legs and come out approx. at the level of the waist in the middle of the back, run the thread around the outside and insert it again at the bottom in the first place, come out again at the same position as before, tighten, if necessary repeat, tighten and knot well, do not yet cut off. Then go back in at the bottom of the beginning point, this time come out in front at a suitable place for the belly button, insert one stitch offset and return to the starting point, tighten and knot well, hide the threads in the body.
Arm / Hand (right): For the right arm join at the appropriate opening (the opening should have 18 stitches). Stuff the arm while crocheting. 1.-16. (16 Rounds) sc in each st around (18)17. (sc 4, dec) x3 (15)18. sc in each st around (15)Move the round marker to the middle of the backside. The decreases of the following round are made at the front, the increases at the backside. That’ll be the elbow. 19. sc 2, dec x2, sc 4, inc, sc 1, inc, sc 2 (15)20.-21. (2 Rounds) sc in each st around (15)22. sc 2, inc x2, sc 4, dec, sc 1, dec, sc 2 (15)23.-34. (12 Rounds) sc in each st around (15)35. (sc 3, dec) x3 (12)36. sc in each st around (12)37. (sc 3, inc) x3 (15)38. (sc 2, inc) x5 (20)39.-41. (3 Rounds) sc in each st around (20)Flatten the hand (note direction - parallel to the body), move the round marker to the back fold. Now the fingers follow, each finger is crochet over 5 stitches of the hand.
Little Finger: 1. sc 1, insert in the 2nd and 18th stitch and sc 1, turn, insert
again in the 18th stitch and sc 1, sc 2 (5)2.-4. (3 Rounds) sc in each st around (5)Fasten off, don’t close yet.
First published: 08.10.2015

Ringfinger: 1. sc 1, insert in the 4th and 14th stitch and sc 1, turn, insert again in the 14th stitch and
sc 1, sc 2 (5)2.-5. (4 Rounds) sc in each st around (5)
Middle finger: 1. sc 1, insert in the 6th and 11th stitch and sc 1, turn, insert again in the 11th stitch and
sc 1, sc 2 (5)2.-6. (5 Rounds) sc in each st around (5)Fasten off, don’t close yet.
Index finger: 1.-5. (5 Rounds) sc in each st around (5)Fasten off, don’s close yet.
Stuff the finger or put some pipe cleaner in. Close the fingers now. Thread the end thread into a sewing or tapestry needle and go through the front loops in a row and pull tight, fix the yarn and hide it inside (see pictures below).
First published: 08.10.2015

Hand/Arm (left): For the left arm join at the appropriate opening (the opening should have 18 stitches). Stuff the arm while crocheting. 1.-16. (16 Rounds) sc in each stitch around (18)17. (sc 4, dec) x3 (15)18. sc in each st around (15)Move the round marker to the middle of the backside. The decreases of the following round are made at the front, the increases at the backside. That’ll be the elbow. 19. sc 2, inc, sc 1, inc, sc 4, dec x2, sc 2 (15)20.-21. (2 Rounds) sc in each st around (15)22. sc 2, dec, sc 1, dec, sc 4, inc x2, sc 2 (15)23.-34. (12 Rounds) sc in each st around (15)35. (sc 3, dec) x3 (12)36. sc in each st around (12)37. (sc 3, inc) x3 (15)38. (sc 2, inc) x5 (20)39.-41. (3 Rounds) sc in each st around (20)Flatten the hand (note direction - parallel to the body), move the round marker to the back fold. Now the fingers follow, each finger is crochet over 5 stitches of the hand.
Index finger: 1. sc 1, insert in the 2nd and 18th stitch and sc 1, turn, insert again in the 18th stitch and
sc 1, sc 2 (5)2.-5. (4 Rounds) sc in each st around (5)Fasten off, don’t close yet.
Middle finger: 1. sc 1, insert in the 4th and 14th stitch and sc 1, turn, insert again in the 14th stitch and
sc 1, sc 2 (5)2.-6. (5 Rounds) sc in each st around (5)Fasten off, don’t close yet.
Ringfinger: 1. sc 1, insert in the 6th and 11th stitch and sc 1, turn, insert again in the 11th stitch and
sc 1, sc 2 (5)2.-5. (4 Rounds) sc in each st around (5)Fasten off, don’t close yet.
Little Finger: 1.-4. (4 Rounds) sc in each st around (5)Fasten off, don’t close yet.
Stuff the finger or put some pipe cleaner in. Close the fingers now. Thread the end thread into a sewing or tapestry needle and go through the front loops in a row and pull tight, fix the yarn and hide it inside (see pictures below).
First published: 08.10.2015

Thumb (2x): 1. sc 6 in MR (6)2.-4. (3 Rounds) sc in each st around (6)3. dec, sc 1, inc x2, sc 1 (7)Fasten off, don’t close, stuff the thumb. Sew the thumbs to the hands in a suitable place.
The doll body is now ready. If not already done, you can now knot in the hair (see here) and embroider or attach the eyes. I embroidered my eyes this time by watching this video (I just followed the video stitch by stitch - the video is not in English, but I was working without sound anyway, so it doesn't matter). Basically the eyes are worked from the centre outwards, first the pupil is embroidered with black, then the iris is embroidered around the pupil, but not above the pupil, then follows the white part and finally the eye line and eyelashes. I had never done this before, it was my first try and it's easier than I thought.
Alternatively you can use bought eyes or crocheted eyes, e.g. the following:
Eye (make 2): Original pattern is here: http://www.mykrissiedolls.nl/a-40637408/gratis-patronen/ogen/, I’ve adapted it and used thread weight yarn (No. 10) and hook size 1.25 mm for the right size. Iris: Eye color of choice 1. sc 6 in MR (6) 2. inc x6 (12) Color change to white.3. a) (sc 2, inc) x3 Color change to black. 3. b) (sc 2, inc) x3 (24)Pupil: ch 2, hdc 9 in MR (9)Place the pupil on the eye and sew it to on, use the white thread ends to embroider 2 light spots. Place the eyes to the face and sew it on.
First published: 08.10.2015

For clothes:
The specifications of the wool and needle sizes are only examples/references. If You use other wool than specified, the clothes/figure will become taller or smaller. It’s your choice which wool you use. The needle size must be chosen to match the wool used. For clothes I usually use the size of the needle indicated on the label. When crocheting clothes, always try them on the doll, because different yarn, hook size and personal tension may alter the final product. Adapt if necessary.
Skirt: Color of choice, hook size 3.5 mm Crochet in rows. At the end of each row, chain 1 and turn. You have to crochet the slip stitches loosely because you have to insert your hook always in the next round. The number of chains may vary depending how long the skirt should be. Attention: don’t miss the very last stitch in each row - it is hard to see. verpass nicht die letzte Masche jeder Reihe, diese ist immer etwas schwer zu erkennen - it is best to count all the stitches in the row. 1. ch 19, starting in 2nd chain from hook: slst 8, sc 10, ch 1, turn (18)2. BLO: sc 10, slst 8, ch 1, turn (18)3. BLO: slst 8, sc 10, ch 1, turn (18)Repeat row 2 and 3 until the required circumference is reached. At the end the beginning thread and the current loop must be on the same side (the sc side), if not, undo one row or crochet 1 row more (depending on whether it is rather tight or loose - please note: this type of crochet makes the fabric flexible, so it should fit a little tighter than usual so that the skirt does not slip later, keep in mind: it follows one last row). Now fold the piece so that the active loop is at the back and the first row is at the front, always insert hook through the first stitch of the first row and through the back loop of the last row: sc 10, slst 8, finish, fasten off invisibly. Now turn the skirt from the inside to the outside, then the connection point of the last row is almost invisible (see also following photos). With me the transition is somewhat visible, since I started for the last rows a new ball, with which the color differs a little.
First published: 08.10.2015

Top dark grey, hook size 3.5 mm The top is crochet just like the skirt, only complete with slip stitches. Here, too, the length of the LM chain depends on how long the top should be. 1. ch 13, starting in 2nd chain from hook: slst 12, ch 1, turn (12)2. BLO: slst 12, ch 1, turn (12)Repeat row 2 until the top reaches around the upper body. The last round is crochet like on a skirt, only this one, of course, complete with slip stitches. Here too, the starting thread and active loop must be on the same side. When the first and the last row are connected, you can crochet one more round along the underside, ch 1, slst 1 alternately, then fasten off invisibly.
Jacket jeans, hook size 3.5 mm Crochet in rows. At the end of each row, chain 1 and turn. Crochet the jacket top down, starting with the neck opening. Attention: The raglan increases are in brackets ( ) and are always crochet into the chain space, always 4 times per row. If a number isn't correct, it is one of my notorious typing errors. Just correct accordingly or ignore my (possibly wrong) numbers. 1. ch 17, starting in 2nd chain from hook: sc 162. (sc 1, inc) x83. sc 3, ch 1, sc 6, ch 1, sc 6, ch 1, sc 6, ch 1, sc 34. sc 4, (sc, ch, sc), sc 7, (sc, ch, sc), sc 7, (sc, ch, sc), sc 7, (sc, ch, sc), sc 35. sc 4, (sc, ch, sc), sc 8, (sc, ch, sc), sc 8, (sc, ch, sc), sc 8, (sc, ch, sc), sc 56. sc 5, (sc, ch, sc), sc 9, (sc, ch, sc), sc 9, (sc, ch, sc), sc 9, (sc, ch, sc), sc 57. sc 5, (sc, ch, sc), sc 10, (sc, ch, sc), sc 10, (sc, ch, sc), sc 10, (sc, ch, sc), sc 6Continue crocheting in this way until the arms fit comfortably into the appropriate opening - simply try on and hold the corners together (see 2nd + 3rd photo).
First published: 08.10.2015

I had to do four more rounds. Now put the corner stitches for the arms on both sides together, e.g. with a stitch marker, because from this point on the body is worked. Crochet sc 1 in the 1st corner stitch (the marked one), sc 1 in the next corner stitch (the 2nd marked one), now work sc 1 until the next marker, sc 1 again in the 1st marked corner stitch, sc 1 in the 2nd marked corner stitch and sc until the end of row. The markers can of course be removed, they are no longer required. Turn 90 degrees, ch 1 for the corner and crochet sc 1 per row along the side, ch 1. Now you have to mark the places for the buttonholes. How many and where exactly depends on the size of your buttons. I used 4 little buttons (1 cm) and distributed them as evenly as possible along the side (see photo). Crochet chains over the marked places in the following row until the button fits through, and skip as many stitches of the previous round as chains have been made, sc between the chains. At the end ch 1 and turn. For me this row looked like this: • sc 2, ch 3 / skip 3, sc 3, ch 3 / skip 3, sc 3 , ch 3 / skip 3, slst 1 Crochet another row of single crochets, make as many sc into the chain spaces as you skipped before, these are crochet around the chain, then fasten off invisibly. Join on the opposite side of the jacket and make 3 rows of single crochets (sc 1 per row) as place for the buttons, fasten off invisibly. Sew on the buttons. Alternatively, snaps could also be used, just crochet a few rows of sc left and right - without buttonholes and then attach the snaps.
For the collar join in the upper row on the right of the neck (back loops only - inner side of the jacket facing you): • sc in each st, ch 1, turn • (2 Rows) sc in each st Fasten off invisibly.
The sleeves are still missing yet: Crochet in joined rounds (join each round with a slst and chain 1). To stay with pattern, turn after each round. Join in the middle of the bottom of the armhole and sc 1 in each st, make an additional sc between the 1st and last stitch of the armhole (only in round 1), sc in each stitch until you reach the desired length.
I have made two small pockets, simply make small squares or rectangles, in rows: 1. ch 5, starting in 2nd chain from hook: sc 4, ch 1, turn (4)2.-3. (2 Rows) sc 4, ch 1, turn4. sc 4, ch 1, don’t turnNow along the side sc 1 per row, ch 1 at the end for the corner, along the bottom sc 1 in each stitch, ch 1 at the end for the corner and again sc 1 per row along the other side, ch 1 and join round with a slst into the 1st stitch of the top row. Fasten off, leave a long tail for sewing. Crochet the second pocket in the same way and then sew one pocket on each front side of the jacket, the top side of the pockets will not be sewn up.
First published: 08.10.2015

Sandals (2x) Light brown, hook size 2.0 mm Can be worked in ether continuous or joined rounds (join each round with a slst and chain 1). I chose to do joined rounds because it makes them more even. You will start with an oval (see the diagram)1. ch 9, starting in 2nd chain from hook: sc 2 in the 1st
st, sc 6, sc 4 in the last st, rotate 180 degrees and crochet along the opposite side of the foundation chain: sc 6, sc 2 in the last st, slst into 1st st, ch 1 (20)
2. inc, sc 7, inc x4, sc 7, inc, slst into 1st st, ch 1 (26)3. sc 1, inc, sc 7, inc x2, sc 4, inc x2, sc 7, inc, sc 1, slst into 1st
st, ch 1 (32)Fasten off invisibly. Crochet a second sole in the same way, but do not fasten off. Place the soles exactly on top of each other, the front sides to the outside, the sole with the active loop is at the back. Insert hook through the first stitch of the front sole and pull the loop through. Now slst 1 in each stitch around, fasten off invisibly.
The side with the slip stitches is the top side, the other side the bottom side. Mark the spots where the cross strap of the sandal should go (e.g. with pins), this strap will be 4 stitches wide. I marked 5th and 8th stitch on both sides from the middle front (see also photo below left). The front side (the one with the slip stitches) is facing you, now join in the loop at the very back with the color of the sandal (dark grey for me - see middle photo below) and sc 4, ch 1, turn. Now crochet so many rows that you can sew the other side of this strap into the bottom loop of the sole and the foot of the doll fits in well. I had 14 rows with sc 4 each, fasten off, leave a long tail for sewing.
First published: 08.10.2015

Fold over the strap (watch the upper and lower side of the sole) and sew it on stitch per stitch through the lowest loop, each stitch is sewn from below through the loop of the sole and then from below through the stitch (see photos below right). Now mark 2 stitches to the left and 2 stitches to the right at the back of the heel from the middle and 2 stitches to the right again in sandal color, which side of the sole points to the front is different with the right and left sandal: • Right sandal: topside facing you - join in the back loop • Left sandal: bottom facing you - join in the front loop Crochet in rows again. 1. sc 4 fM, ch 1, turn (4)2. skip 1, sc 1, skip 1, sc 1, ch 1, turn (2)3.-5. (3 Rows) sc in each st, ch 1, turn (2)6. sc in each st (2)Now make a suitably long chain, which fits around the ankle of the doll (in my case ch 15) + as many ch as the button fits through (in my case ch 6) as a loop, skip the chains for the loop and then crochet back with slip stitches along the chain, join with a slip stitch on the strap, fasten off, leave a long tail for sewing. Use it to sew the button on the top of the strap (see also following photos).
Ballet flats (make 2) white, hook size 2.0 mm Can be worked in ether continuous or joined rounds (join each round with a slst and chain 1). I chose to do joined rounds because it makes them more even. You will start with an oval.The sole is (nearly) the same as for the sandals. If the shoes become too big or too small, simply try with 1 more or less chain at the beginning and keep the increases and decreases, then just crochet more or less single crochets on the sides. 1. ch 9, starting in 2nd chain from hook: sc 2 in the 1st st, sc 6, sc 4 in the last st, rotate
180 degrees and crochet along the opposite side of the foundation chain: sc 6, sc 2 in the last st, slst into 1st st, ch 1 (20)
2. inc, sc 7, inc x4, sc 7, inc, slst into 1st st, ch 1 (26)3. sc 1, inc, sc 7, inc x2, sc 4, inc x2, sc 7, inc, sc 1, slst into 1st st, ch 1 (32)4. sc 1, inc, sc 10, inc x2, sc 4, inc x2, sc 10, inc, sc 1, slst into 1st st, ch 1 (38)Fasten off invisibly. Crochet a second sole in the same way, but do not fasten off. Place the soles exactly on top of each other, the front sides to the outside, the sole with the active loop is at the back. Insert hook through the first stitch of the front sole and pull the loop through. Now slst 1 in each stitch around, fasten off invisibly.
First published: 08.10.2015

In contrast to the sandal, the side with the slip stitches is the bottom side, both shoes are worked identically. In the first stitch at the back of the heel (only outer / front loop) join with shoe color (for me: jeans), still in joined rounds: 1. FLO: sc in each st around, slst into 1st st, ch 1 (38)2.-3. (2 Rounds) sc in each st around, slst into 1st st, ch 1 (38)4. sc 11, dec x8, sc 11, slst into 1st st, ch 1 (30)5. slst in each st around (30)Fasten off invisibly.
Clarissa now has everything she needs, shoes of her choice and she is fully dressed. If you still feel like it, you can crochet a backpack for her, I'll show you how :o)
Backpack: Brown To give the backpack more stability I used a small hook size again (2.0 mm - same as vor the doll). An oval is crochet again and in joined rounds, continuous rounds are also possible, but you have to correct the round marker again and again, so that it runs upwards in a straight line, otherwise the holes for the ribbon will later be in the wrong place and the clasp will be crooked. 1. ch 13, starting in 2nd chain from hook: sc 12, sc 3 into last chain, rotate 180 degrees
and crochet along the opposite side of the foundation chain: sc 11, sc 2 into last chain, slst into 1st st, ch 1 (28)
2. inc, sc 11, inc x3, sc 11, inc x2, slst into 1st st, ch 1 (34)3. sc 1, inc, sc 11, (sc 1, inc) x3, sc 11, (sc 1, inc) x2, slst into 1st st, ch 1 (40)4. sc 2, inc, sc 11, (sc 2, inc) x3, sc 11, (sc 2, inc) x2, slst into 1st st, ch 1 (46)5. BLO: sc in each st around, slst into 1st st, ch 1 (46)6.-22. (17 Rounds) sc in each st around, slst into 1st st, ch 1 (46)23. sc in each st around, slst into 1st st (46)24. ch 3 (counts as dc),
ch 1 / skip 1, dc 3, ch 1 / skip 1, dc 3, ch 1 / skip 1, dc 1, ch 1 / skip 1, dc 3, ch 1 / skip 1, dc 3, ch 1 / skip 1, dc 4, ch 1 / skip 1, dc 3, ch 1 / skip 1, dc 3, ch 1 / skip 1, dc 1, ch 1 / skip 1, dc 3, ch 1 / skip 1, dc 3, ch 1 / skip 1, dc 3, join with slst in 3rd chain, ch 1 (46)
25. sc 1 in each st and sc 1 in each chain space too (46)Fasten off invisibly.
Flap: Brown Crochet in rows. At the end of each row, chain 1 and turn. 1. sc 3 in MR, ch 1, turn (3) - don’t close the ring 2. inc x3, ch 1, turn (6)3. (sc 1, inc) x3, ch 1, turn (9)4. (sc 2, inc) x3, ch 1, turn (12)5. (sc 3, inc) x3, ch 1, turn (15)6. (sc 4, inc) x3, ch 1, turn (18)7. (sc 5, inc) x3, ch 1, don’t turn (21)Now crochet along the straight side: • sc 1 per row, sc 1 in the center too, ch 1 at the end of the row,
slst into 1st st of the curved side, ch 1, turn• 4-5 Rows: sc in each st along the straight side
First published: 08.10.2015

Mark the middle stitch (11th) at the curved side. • ch 1, along the side of the straight rows sc 1 per row, along the curved side slst 1 per
stitch until you reach the marker, make a loop of chains for a little button, slst 1 per stitch until the end of the curved side, sc 1 per row along the side of the straight rows, at the end ch 1 and slst 1 in the 1st stitch of the top side.
Fasten off, leave a long tail vor sewing.
Crochet a long chain for the ribbon to close the backpack (in my case ch 70). Thread them through the holes as shown in the pictures. The starting points of the rounds should be at the back.
Start in the right hole of the 2 middle holes at the front, come out at the next hole to the left, fold the backpack as shown at the right picture above and thread through all 4 holes, turn, go through the first (right) middle hole and come out at the second, fold this side same way as before and thread the ribbon through all 4 holes, finally go again through the 2 holes at the front.
First published: 08.10.2015

Sew the flap to the back. I used the two closest loops and sewed them together.
Mark the spot for the button and sew it on.
Now the back straps are missing. Make 2 long chains (for me: ch 51) and sc 50 along the chain, starting in 2nd chain from hook.
Sew the straps to the back side of the backpack, left and right at the bottom and above the row with the holes both in the middle.
You did it! Your Clarissa with clothes and backpack is ready :o)
First published: 08.10.2015

The pattern for the little Chihuahua can also be downloaded from my page: https://zhaya.de/animals.html
The Birkenstock sandals on the left picture are not my idea and therefore not included in this pattern.
First published: 08.10.2015