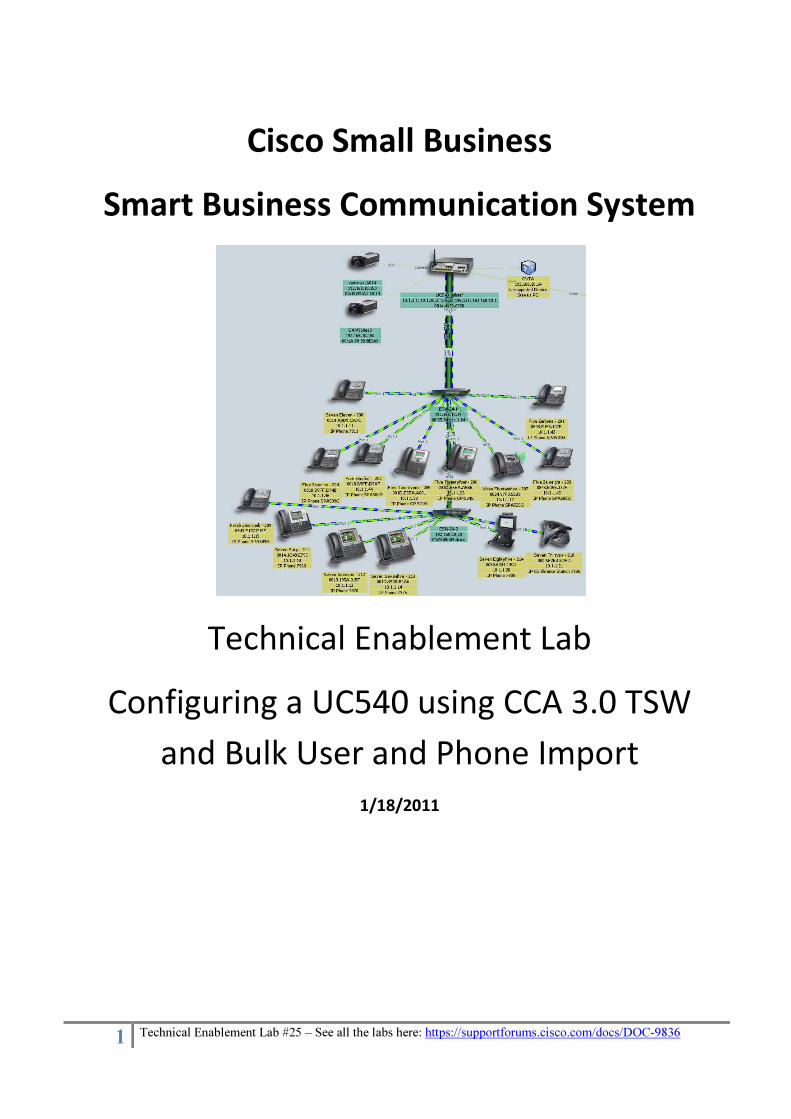
Cisco Small Business Smart Business … Small Business Smart Business Communication System Technical...
24
1 Technical Enablement Lab #25 – See all the labs here: https://supportforums.cisco.com/docs/DOC-9836 Cisco Small Business Smart Business Communication System Technical Enablement Lab Configuring a UC540 using CCA 3.0 TSW and Bulk User and Phone Import 1/18/2011
Transcript of Cisco Small Business Smart Business … Small Business Smart Business Communication System Technical...
1 Technical Enablement Lab #25 – See all the labs here: https://supportforums.cisco.com/docs/DOC-9836
Cisco Small Business Smart Business Communication System
Technical Enablement Lab
Configuring a UC540 using CCA 3.0 TSW and Bulk User and Phone Import
1/18/2011

2 Technical Enablement Lab #25 – See all the labs here: https://supportforums.cisco.com/docs/DOC-9836
Contents Introduction ......................................................................................................................................................... 4 Site Survey ........................................................................................................................................................... 4 HW Equipment Required ..................................................................................................................................... 4 Software Pack Upgrade ........................................................................................................................................ 4
CCA 3.0 ............................................................................................................................................................ 4 Telephony Setup Wizard (TSW) ............................................................................................................................ 5
Welcome ......................................................................................................................................................... 5 Phone Assignment ........................................................................................................................................... 5 Software Settings ........................................................................................................................................... 10 System Access ................................................................................................................................................ 11 Choose Locale ................................................................................................................................................ 11 WAN .............................................................................................................................................................. 12 Local LAN ....................................................................................................................................................... 12 User Extensions .............................................................................................................................................. 13
Internal Dialing ........................................................................................................................................... 13 FXS Phones ................................................................................................................................................. 13 Add Users ................................................................................................................................................... 14 Assign Phones ............................................................................................................................................ 14 Hunt Groups ............................................................................................................................................... 15 Summary .................................................................................................................................................... 16
Auto Attendant .............................................................................................................................................. 16 Business Hours ........................................................................................................................................... 17 Holidays ..................................................................................................................................................... 18 Action management ................................................................................................................................... 19 Prompt Management ................................................................................................................................. 20 Summary .................................................................................................................................................... 20

3 Technical Enablement Lab #25 – See all the labs here: https://supportforums.cisco.com/docs/DOC-9836
Trunks (FXO Ports) ......................................................................................................................................... 21 Routing .......................................................................................................................................................... 21 APPLY and Save .............................................................................................................................................. 22

4 Technical Enablement Lab #25 – See all the labs here: https://supportforums.cisco.com/docs/DOC-9836
Introduction Building a demo system in your own partner headquarters can be used as a reference architecture for what can be configured on a UC 500 using CCA 3.0. We now configure UC540/UC560 systems completely using CCA 3.0 which brings it up to date with UC 500 SWP 8.1.0
Site Survey A Site Survey document must be completed for any UC500 installation, in advance of partner configuration. To be successful, we would expect that most configurations based on this survey can be staged, in the partner offices prior to going on site with all the phones where some customer tweaking should be expected to occur during the familiarization and training delivered as part of the deployment. Follow this model to configure your demo system. You can configure your system without a single phone being plugged in, a few being plugged in, or none at all ever being plugged into the system. This process will help you become familiar with what you need to do for real deployments. Simple things like collecting the MAC addresses of your devices (found on the outside of the box or on the phone itself) and the correlation/association of the phone model and MAC to a user name and extension number as you determined is required from your site survey.
HW Equipment Required You should build a lab using all the phone models you plan to deploy, the switches you plan to use, and the applications you will utilize so that your demo system reflects what is possible to configure (most of it anyway; there will always be adjustments in each deployment) so you can use it as your lab for demos and validation of operation. Recommended equipment required listed .
UC540 (8 User SKU base system or higher) Phones as you prefer (include analog for FXS as well) xVC2300 IP Cameras ESW Switches (any model or a few models) CUVA-V2 or V3 Web Camera and a PC.
Software Pack Upgrade The system needs to be factory reset to run the TSW. Follow these instructions to upgrade and check the option for factory Restart system. Even if your system is factory reset from the factory, as the default configuration file in the latest SW Pack should be used. https://supportforums.cisco.com/docs/DOC-14562
CCA 3.0 Download the latest CCA and install it on your PC. Check the CCA data sheet for supported operating SW.

5 Technical Enablement Lab #25 – See all the labs here: https://supportforums.cisco.com/docs/DOC-9836
http://www.cisco.com/go/configassist
Telephony Setup Wizard (TSW) In the HOME drawer of CCA is the Telephony Setup Wizard (TSW). CCA will recognize your system is factory reset and should launch it automatically. Let it discover the underlying network elements until 100% complete (about 60 seconds). Do not interrupt this and do not have your PC wireless NIC enabled during this procedure. Running the TSW will take about 10 minutes to insert the data and about 30 more minutes to APPLY the final config, but a time estimate will be given before APPLY is selected.
Welcome
Phone Assignment In this case, and this is new for SWP 8.1.0, the system now registers all connected phones, but doesn’t auto assign an ephone-dn. After clicking next above, you have some options
1) If the phones plugged in are the complete set of phones to be staged and match the exact phones to be deployed, you can assign them to users and extensions in the listed phone types displayed.
2) If the registered (plugged in) phones are only a partial list of the phones to be deployed, you can assign the ones registered using the TSW phone listing, and then add the remaining phones using Add Unregistered Phones (this will accept flat text file input).
3) If the registered (plugged in) phones are only a partial list of the phones to be deployed, you can ignore the registered phones, and use the Bulk Import of Phone and User Data.
So in this lab and reference, I have two switches planned for site deployment. ESW-24-1 and ESW-24-2.

6 Technical Enablement Lab #25 – See all the labs here: https://supportforums.cisco.com/docs/DOC-9836
I maintain an EXCEL file of the devices and the planned assignments:
I also have 2 PVC2300 cameras on the UC 540 and for this demonstration, I only plug in ESW-24-1. Notice in my topology shows the unreachable ESW-24-2 (that’s only there because it is created in this site already).
Notice SWP 8.1.0 with CCA 3.0 is different that prior releases. See the phones are registered, but not automatically assigned anything (see ‘unassigned’ in topology view). So now you have the options described above (1,2,3).

7 Technical Enablement Lab #25 – See all the labs here: https://supportforums.cisco.com/docs/DOC-9836
If you used option #2 to add phones that aren’t already showing up, of if you didn’t plug any phones in, you can click Add Unregistered Phones, there will be a PASTE function. Having your data in a NOTEPAD file ready to go will speed up the process. Simply paste it into the input box using the following format: Model[space]MAC[comma/return] You use YOUR specific MACs found on phone or phone box. If using CIPC, it will be the PC Ethernet MAC address (ipconfig /all in a dos window) or one you manually specify and can adjust within CIPC Preferences tab later on. In my case I am showing the whole file, but since half of them are registered already, I would only need the phones attached to ESW-24-2 (second notepad), if I used that option.
If using “Importing user and phone data”, you must create the data and export it to XML. A sample Microsoft Excel file named BulkUserImport.xls is provided for this purpose. This file is located in the CCA installation directory on your PC in the appdata folder C:\Program Files\Cisco Systems\CiscoSMB\Cisco Configuration Assistant\appdata. The .xls file contains macros and a Generate XML button that must be used to export the data to an XML file in the format expected by the wizard. To import the data, click Import User and Phone Data, browse to the location of the generated XML file, and click Open. Review the data and click OK. I am going to use it for all the phones actually, so I will import phones that are plugged in and those that are not.

8 Technical Enablement Lab #25 – See all the labs here: https://supportforums.cisco.com/docs/DOC-9836
To click the generate XML button, you must enable MACROS to run in EXCEL Security settings. Now back to TSW and import the xml file:

9 Technical Enablement Lab #25 – See all the labs here: https://supportforums.cisco.com/docs/DOC-9836
Add sidecars where applicable:

10 Technical Enablement Lab #25 – See all the labs here: https://supportforums.cisco.com/docs/DOC-9836
Software Settings After confirming the correct information above and clicking NEXT, you come to Localization, SW and License management page (for world market, you may have to localize here (not shown)).
11 Technical Enablement Lab #25 – See all the labs here: https://supportforums.cisco.com/docs/DOC-9836
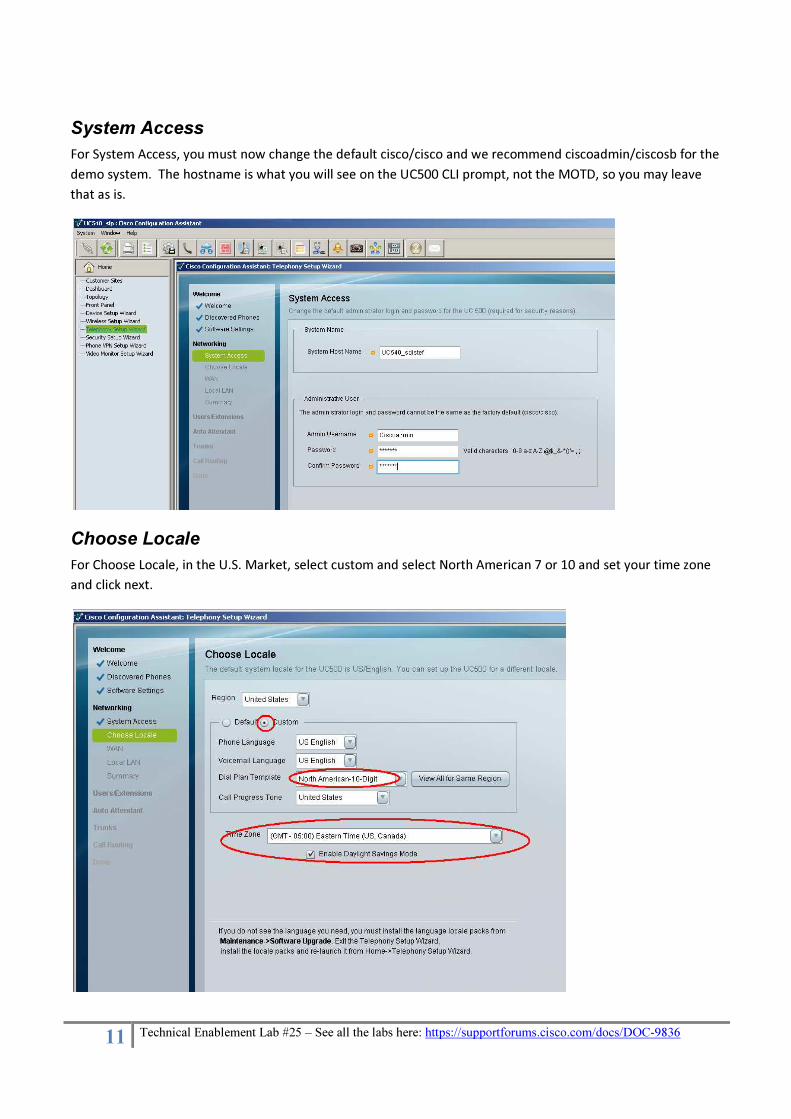
System Access For System Access, you must now change the default cisco/cisco and we recommend ciscoadmin/ciscosb for the demo system. The hostname is what you will see on the UC500 CLI prompt, not the MOTD, so you may leave that as is.
Choose Locale For Choose Locale, in the U.S. Market, select custom and select North American 7 or 10 and set your time zone and click next.

12 Technical Enablement Lab #25 – See all the labs here: https://supportforums.cisco.com/docs/DOC-9836
WAN The WAN IP is not required for the DEMO System, but you can see your options. Set it if you have WAN connectivity. I have set mine for Cisco LAB access (shown as example only):
Local LAN Configure the Local LAN may be left at default values, but you can see this is where you would change it if you needed to in case this was the second system of a multisite, or if you are integrating into an existing data VLAN.
This will bring you to a summary page where you confirm your entries and click NEXT.

13 Technical Enablement Lab #25 – See all the labs here: https://supportforums.cisco.com/docs/DOC-9836
User Extensions Internal Dialing Click CUSTOM, and confirm 399 for Voice Mail extension, 9 for Prefix digit, then check the AA box and enter 401 for AA extension and 450 for Prompt Management extension.
FXS Phones We will configure a single analog station with a voice mail box and some feature capability (Feature Access Codes). Use FXS port 0/0/3 to ‘user mode phone’ (uses an SCCP feature license). This corresponds to the FXS port that connects to FXO port 0 when there is a power failure so a good choice if you have just one analog phone.
14 Technical Enablement Lab #25 – See all the labs here: https://supportforums.cisco.com/docs/DOC-9836
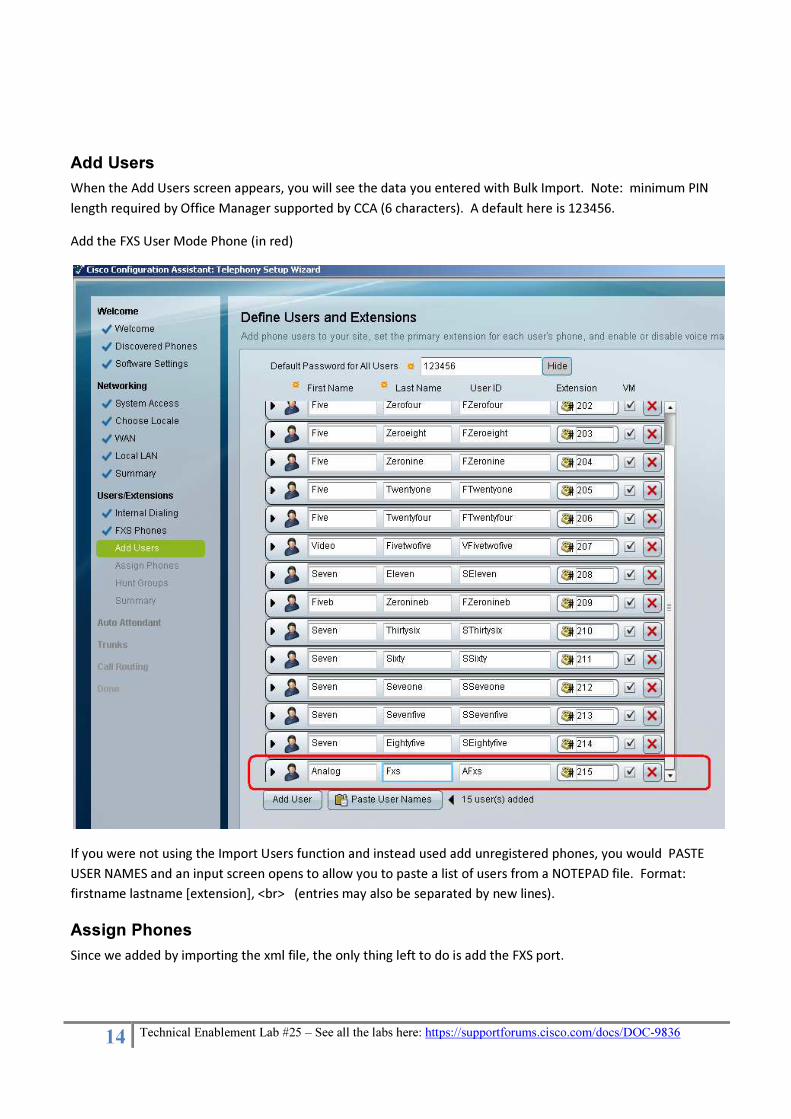
Add Users When the Add Users screen appears, you will see the data you entered with Bulk Import. Note: minimum PIN length required by Office Manager supported by CCA (6 characters). A default here is 123456. Add the FXS User Mode Phone (in red)
If you were not using the Import Users function and instead used add unregistered phones, you would PASTE USER NAMES and an input screen opens to allow you to paste a list of users from a NOTEPAD file. Format: firstname lastname [extension], <br> (entries may also be separated by new lines).
Assign Phones Since we added by importing the xml file, the only thing left to do is add the FXS port.

15 Technical Enablement Lab #25 – See all the labs here: https://supportforums.cisco.com/docs/DOC-9836
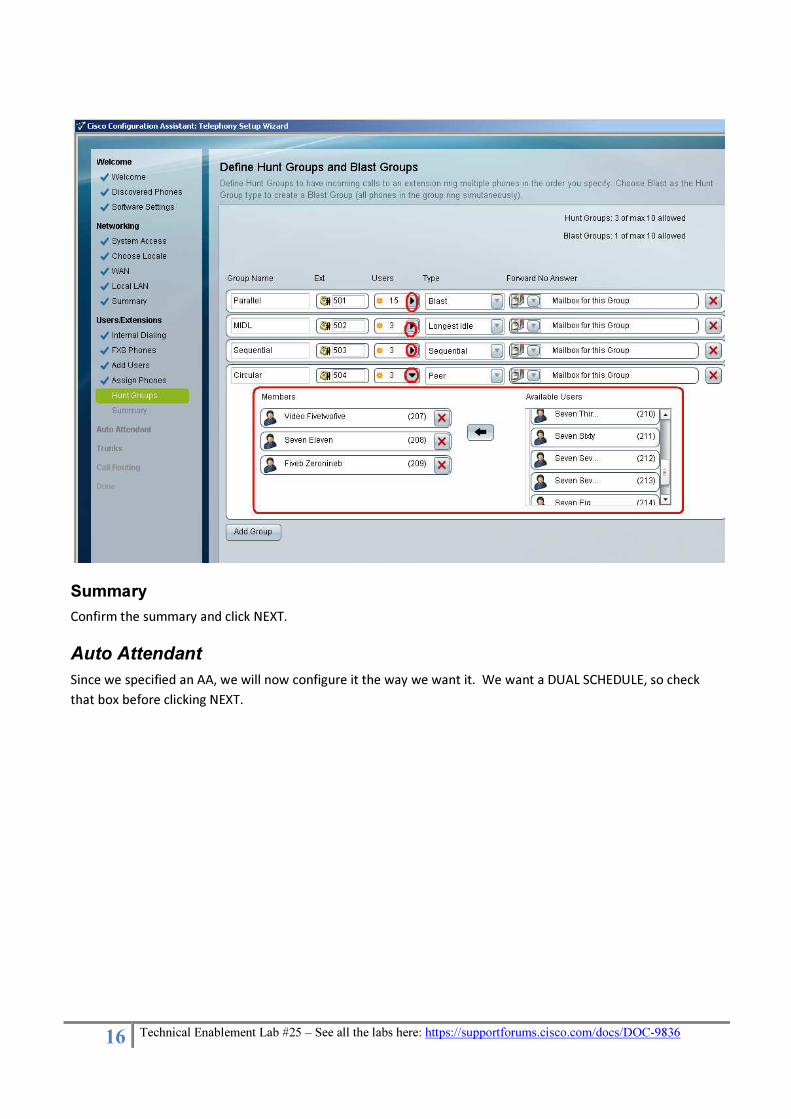
Hunt Groups We will add:
• A Voice Hunt Group (Parallel or ‘Blast Group’) with extension 501 with all members of the team • A Longest Idle Hunt Group with extension 502 including 3 members (201-3) • A Sequential Hung Group 503 with members (204-6) • A Circular Hint Group 504 with members (207-9)
Select users and adding them using the center arrow button. In order to display the second hunt group, collapse the member list of the first created group(red circles):
16 Technical Enablement Lab #25 – See all the labs here: https://supportforums.cisco.com/docs/DOC-9836
Summary Confirm the summary and click NEXT.
Auto Attendant Since we specified an AA, we will now configure it the way we want it. We want a DUAL SCHEDULE, so check that box before clicking NEXT.

17 Technical Enablement Lab #25 – See all the labs here: https://supportforums.cisco.com/docs/DOC-9836
Business Hours Considering you want this to operate as if you were open most of the time, slide the hours so the Green appears with multiple Open/Closed hours for Monday, then use the copy paste buttons to copy that schedule for T-F, and click APPLY, and then NEXT.

18 Technical Enablement Lab #25 – See all the labs here: https://supportforums.cisco.com/docs/DOC-9836
Holidays Set some relevant Holidays for the coming year. Add as many as you like to that for 2010 and 2011.

19 Technical Enablement Lab #25 – See all the labs here: https://supportforums.cisco.com/docs/DOC-9836
Action management We will be using the Latest AA script for UC500 which now includes the ‘no action transfer’. CCA comes loaded with this since CCA 2.2.5 so all we have to do is specify the actions we want inserted. As you can see, we will have two greetings for OPEN and CLOSED (you type these in the fields provided). For this demo, the actions are different for Open versus clodes for the menu actions differentiated with Sun and Moon. No Action Transfer to Pam (202)

20 Technical Enablement Lab #25 – See all the labs here: https://supportforums.cisco.com/docs/DOC-9836
Prompt Management When you click NEXT above, you will now have an opportunity to record the prompts and greetings, using your PC Microphone. Do that to satisfy the GUI and populate the CUE with placeholders, which are much easier to rerecord, since they are already assigned in the AA script. You will rerecord later with an IP phone. There are three prompts; Open, Closed, and Directions.
Summary Confirm the Summary and click NEXT

21 Technical Enablement Lab #25 – See all the labs here: https://supportforums.cisco.com/docs/DOC-9836
Trunks (FXO Ports) Leave the defaults (PBX) mode. Notice I have a FXS VWIC added.
Confirm the summary and click NEXT.
Routing This is the last input for the FXO and leaving them mapped to the AA is fine as an incoming dial plan:

22 Technical Enablement Lab #25 – See all the labs here: https://supportforums.cisco.com/docs/DOC-9836
APPLY and Save At this point, you click apply and let CCA configure the system. Do not plug in any phones yet. Let the system complete this. Takes about 25 minutes, but depending on what’s entered, could be as high as 45 minutes. CCA will save this for you as well when done.

23 Technical Enablement Lab #25 – See all the labs here: https://supportforums.cisco.com/docs/DOC-9836

24 Technical Enablement Lab #25 – See all the labs here: https://supportforums.cisco.com/docs/DOC-9836
CLICK SAVE CONFIG and EXIT WIZARD You don’t have to at this point, but if you wanted to, you could connect the second switch to see everything comes up correctly. It is configured at this point, so you could continue with Expert Mode to configure the rest of the system in staging, without the actual phones plugged in.