Cisco IP Phone 6800 Series Multiplatform Phones User Guide
102
CONTENTS Your Phone 1 CHAPTER 1 The Cisco IP Phone 6800 Series Multiplatform Phones 1 New and Changed Features 2 New and Changed for Firmware Release 11.2(3) 2 New and Changed for Firmware Release 11.2(2) 3 New and Changed for Firmware Release 11.2(1) 3 New and Changed for Firmware Release 11.1(2) 4 New and Changed for Firmware Release 11.1(1) 5 Phone Setup 5 Adjust the Handset Rest 5 Connect to the Network 6 Set a Password on Initial Phone Boot Up 6 Sign into Your Extension from Another Phone (Extension Mobility) 6 Sign out of Your Extension from Another Phone 7 Sign in to a Phone as a Guest 7 Sign Out of a Phone as a Guest 7 Set the Profile Rule on the Phone 8 Coworker Line Status 8 Activate or Deactivate Monitoring of the BLF List 9 Configure Monitoring of an Individual Line 10 Remove the Feature Configured on a Line Key 11 Phone Web Page 12 Speed-Dial Numbers 12 Cisco IP Phone 6821 Multiplatform Phones Buttons and Hardware 13 Cisco IP Phone 6841 and 6851 Multiplatform Phones Buttons and Hardware 15 Navigation 16 Cisco IP Phone 6800 Series Multiplatform Phones User Guide iii Cisco IP Phone 6800 Series Multiplatform Phones User Guide
Transcript of Cisco IP Phone 6800 Series Multiplatform Phones User Guide

C O N T E N T S
Your Phone 1C H A P T E R 1
The Cisco IP Phone 6800 Series Multiplatform Phones 1
New and Changed Features 2
New and Changed for Firmware Release 11.2(3) 2
New and Changed for Firmware Release 11.2(2) 3
New and Changed for Firmware Release 11.2(1) 3
New and Changed for Firmware Release 11.1(2) 4
New and Changed for Firmware Release 11.1(1) 5
Phone Setup 5
Adjust the Handset Rest 5
Connect to the Network 6
Set a Password on Initial Phone Boot Up 6
Sign into Your Extension from Another Phone (Extension Mobility) 6
Sign out of Your Extension from Another Phone 7
Sign in to a Phone as a Guest 7
Sign Out of a Phone as a Guest 7
Set the Profile Rule on the Phone 8
Coworker Line Status 8
Activate or Deactivate Monitoring of the BLF List 9
Configure Monitoring of an Individual Line 10
Remove the Feature Configured on a Line Key 11
Phone Web Page 12
Speed-Dial Numbers 12
Cisco IP Phone 6821 Multiplatform Phones Buttons and Hardware 13
Cisco IP Phone 6841 and 6851 Multiplatform Phones Buttons and Hardware 15
Navigation 16
Cisco IP Phone 6800 Series Multiplatform Phones User Guideiii
Cisco�IP�Phone�6800�Series�Multiplatform�Phones�User�Guide

Softkey, Line, and Feature Buttons 16
Phone Screen Features 17
Clean the Phone Screen 18
Differences Between Phone Calls and Lines 18
Energy Savings 18
Additional Help and Information 19
Accessibility Features 19
Cisco IP Phone 6821 Multiplatform Phones Hearing-Impaired Accessibility Features 19
Cisco IP Phone 6841 and 6851 Hearing-Impaired Accessibility Features 21
Cisco IP Phone 6821 Multiplatform Phones Vision-Impaired and Blind Accessibility Features23
Cisco IP Phone 6841 and 6851 Vision-Impaired and Blind Accessibility Features 25
Cisco IP Phone 6821 Multiplatform Phones Mobility-Impaired Accessibility Features 28
Cisco IP Phone 6841 and 6851 Mobility-Impaired Accessibility Features 29
Third-Party Accessibility Applications 31
Troubleshooting 31
Find Information About Your Phone 31
View the Customization State on the Phone 32
View the Network Status 32
View the Phone Status 33
View the Status Messages on the Phone 33
View the Line Status 34
View 802.1X Transaction Status 34
View the Reboot History 34
Report All Phone Issues 34
Factory Reset the Phone from Phone Web Page 35
Identify Phone Issues with a URL in the Phone Web Page 35
Lost Phone Connectivity 36
Cisco One-Year Limited Hardware Warranty Terms 36
Calls 37C H A P T E R 2
Make Calls 37
Make a Call 37
Make a Call with the Speakerphone 38
Cisco IP Phone 6800 Series Multiplatform Phones User Guideiv
Contents

Make a Call with a Headset 38
Redial a Number 38
Make an Emergency Call 38
Speed Dial 39
Assign a Speed-Dial Code from the Phone Screen 39
Make a Call with a Speed-Dial Code 40
Configure a Speed Dial on a Line Key 40
Remove a Speed Dial from a Line Key 40
Use the Line in Focus for Speed-Dial Calls 41
Use the Line in Focus to Check Speed-Dial Calls 41
Dial an International Number 41
Secure Calls 42
Answer Calls 42
Answer a Call 42
Answer Call Waiting 42
Decline a Call 42
Silence an Incoming Call 42
Turn On Do Not Disturb 43
Turn On or Turn Off DND Using a Star Code 43
Answer a Coworker's Phone (Call Pickup) 44
Answer a Call Within Your Group (Pickup) 44
Mute Your Call 44
Hold Calls 44
Put a Call on Hold 44
Answer a Call Left on Hold for Too Long 45
Swap Between Active and Held Calls 45
Call Park 45
Place a Call on Hold with Call Park 46
Retrieve a Call on Hold with Call Park 46
Forward Calls 46
Forward a Call in Specific Situations with the Phone Web Page 47
Transfer Calls 48
Transfer a Call to Another Person 48
Consult Before You Complete a Transfer 48
Cisco IP Phone 6800 Series Multiplatform Phones User Guidev
Contents

Conference Calls and Meetings 49
Add Another Person to a Call 49
Conference with a Star Code 49
Page a Group of Phones (Multicast Paging) 50
Multiple Lines 50
Answer the Oldest Call First 50
View All Calls on Your Phone 50
Shared Lines 50
Add Yourself to a Call on a Shared Line 51
Record a Call 51
Call Center Features 52
Sign In as a Call Center Agent 52
Sign Out as a Call Center Agent 52
Change Your Status as a Call Center Agent 52
Accept a Call Center Call 53
Hold an Agent Call 53
Set a Disposition Code While on a Call Center Call 53
Trace a Call 54
Escalate a Call to a Supervisor 54
Contacts 55C H A P T E R 3
Search for a Contact in Multiple Directories 55
Corporate Directory 56
Dial a Contact in the Corporate Directory 56
Broadsoft Directory 57
Search for a Contact in Your BroadSoft Directory 57
LDAP Directory 57
Search for a Contact in Your LDAP Directory 57
Instant Message and Presence Contacts 58
Presence 58
Make a Call to an IM and Presence Contact 58
Change Your Presence State 59
Personal Address Book 59
Add a New Contact to Your Personal Address Book 59
Cisco IP Phone 6800 Series Multiplatform Phones User Guidevi
Contents

Add a New Contact to Your Personal Address Book with Phone Web Page 60
Search for a Contact in Your Personal Address Book 60
Call a Contact in Your Personal Address Book 60
Edit a Contact in Your Personal Address Book 61
Remove a Contact from Your Personal Address Book 61
Reverse Name Lookup for Incoming and Outgoing Calls 61
Recent Calls 63C H A P T E R 4
Recent Calls List 63
View Your Recent Calls 63
View Calls Logs from BroadWorks XSI Server 64
Return a Recent Call 64
Clear the Recent Calls List 65
Create a Contact from a Recents Record 65
Delete a Call Record 66
Delete All Call Records 66
Voicemail 67C H A P T E R 5
Your Voicemail Account 67
Set up Voicemail on Your Phone 67
Check for New Voice Messages 68
Access Voicemail 68
Access Audio Voicemail 68
Settings 69C H A P T E R 6
Settings Overview 69
User Preferences Menu 69
Call Preferences 69
Forward Calls in Specific Situations from Your Phone 69
Set up Voicemail on Your Phone 70
Block Caller ID 70
Block an Anonymous Call 71
Turn on Do Not Disturb for a Specific Line 71
Control the Call Waiting Tone 72
Cisco IP Phone 6800 Series Multiplatform Phones User Guidevii
Contents

Secure a Call 72
Set Up an Auto Answer Page 72
Enable the Missed Call Shortcut 73
Add Multiple Locations for a BroadWorks XSI User 73
Audio Preferences 73
Specify an Audio Device for a Call 74
Change the Ringtone 74
Screen Preferences 74
Change the Screen Saver 74
Set the Backlight Timer 75
Adjust the Phone Screen Contrast 76
Set the Phone Wallpaper 76
Attendant Console Preferences 76
Change the Display Mode 76
Device Administration Settings 77
Change the Time Format 77
Change the Date Format 77
Set Language 77
Set up Power Save 78
Set Password 78
Set up the Profile Account 79
Phone Web Page Preferences 79
Assign a Ring Tone with the Phone Web Page 79
Turn on DND from the Phone Web Page 80
Configure the Screen Saver with the Phone Web Page 80
Adjust the Backlight Timer from Phone Web Page 81
Add a Logo as a Phone Background 81
Restart Your Phone 82
Accessories 83C H A P T E R 7
Supported Accessories 83
Headsets 83
Standard Headsets 84
Connect a Standard Headset 84
Cisco IP Phone 6800 Series Multiplatform Phones User Guideviii
Contents

E-Hookswitch Headset 84
Cisco 6800 Series Key Expansion Module Setup Overview 84
Key Expansion Module Buttons and Hardware 85
Find Information about the Key Expansion Module of Your Phone 85
Adjust the Contrast of the Key Expansion Module 86
Change the Display Mode of the Key Expansion Module from the Phone 87
Product Safety and Security 89C H A P T E R 8
Safety and Performance Information 89
Power Outage 89
External Devices 89
Ways to Provide Power to Your Phone 90
Phone Behavior During Times of Network Congestion 90
UL Warning 90
Compliance Statements 90
Compliance Statements for the European Union 90
CE Marking 90
Compliance Statements for Canada 91
Compliance Statements for New Zealand 91
Permit to Connect (PTC) General Warning 91
Compliance Information for Japan 91
FCC Compliance Statements 91
FCC Part 15.19 Statement 92
FCC Part 15.21 Statement 92
FCC RF Radiation Exposure Statement 92
FCC Receivers and Class B Digital Statement 92
Cisco Product Security Overview 92
Important Online Information 93
Cisco IP Phone 6800 Series Multiplatform Phones User Guideix
Contents

Cisco IP Phone 6800 Series Multiplatform Phones User Guidex
Contents
C H A P T E R 1Your Phone
• The Cisco IP Phone 6800 Series Multiplatform Phones, on page 1• New and Changed Features, on page 2• Phone Setup, on page 5• Sign into Your Extension from Another Phone (Extension Mobility), on page 6• Sign in to a Phone as a Guest, on page 7• Set the Profile Rule on the Phone, on page 8• Coworker Line Status, on page 8• Phone Web Page, on page 12• Cisco IP Phone 6821 Multiplatform Phones Buttons and Hardware, on page 13• Cisco IP Phone 6841 and 6851 Multiplatform Phones Buttons and Hardware, on page 15• Energy Savings, on page 18• Additional Help and Information, on page 19
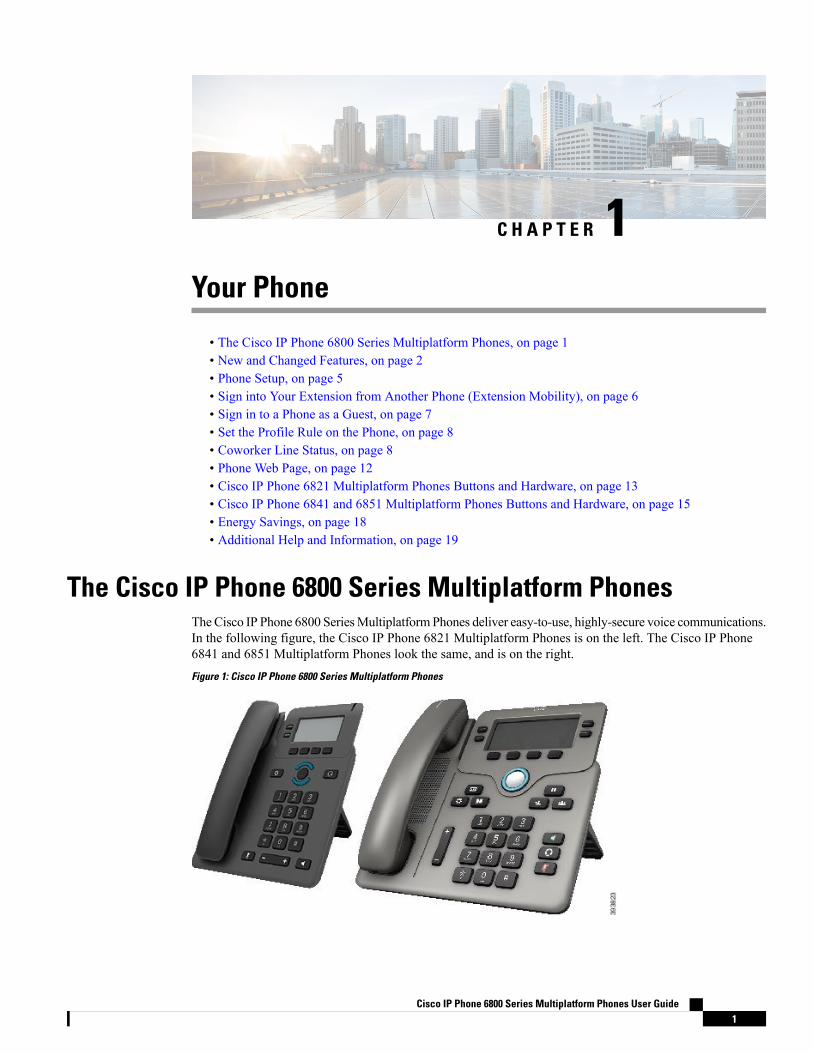
The Cisco IP Phone 6800 Series Multiplatform PhonesTheCisco IP Phone 6800 SeriesMultiplatformPhones deliver easy-to-use, highly-secure voice communications.In the following figure, the Cisco IP Phone 6821 Multiplatform Phones is on the left. The Cisco IP Phone6841 and 6851 Multiplatform Phones look the same, and is on the right.Figure 1: Cisco IP Phone 6800 Series Multiplatform Phones
Cisco IP Phone 6800 Series Multiplatform Phones User Guide1

Table 1: Cisco IP Phone 6800 Series Multiplatform Phones Major Features
685168416821Features
Grayscale, with backlightGrayscale, with backlightGrayscale, with backlightScreen
442Lines
994
(See note below)
Fixed feature keys
SupportedNot supportedSupportedPower over Ethernet(PoE)
SupportedNot supportedNot supportedElectronic HookswitchHeadset support
The Cisco IP Phone 6821 Multiplatform Phones presents many features on the softkeys instead of hard keys.Note
Your phone must be connected to a network and configured to connect to a call control system. The phonessupport many functions and features, depending on the call control system. Your phone might not have allfunctions available, based on the way your administrator has set it up.
When you add features to your phone, some features require a line button. But each line button on your phonecan support only one function (a line, a speed dial, or a feature). If your phone's line buttons are already inuse, your phone won't display any additional features.
Related TopicsFind Information About Your Phone, on page 31
New and Changed Features
New and Changed for Firmware Release 11.2(3)New or Changed SectionsRevisions
Coworker Line Status, on page 8Added a new topic replacing theMonitor Coworker'sLine topic.
Activate or Deactivate Monitoring of the BLF List,on page 9
Added a new task on how to hide or show the BLFlist.
Configure Monitoring of an Individual Line, on page10
Added a new task on how to monitor an individualline.
Remove the Feature Configured on a Line Key, onpage 11
Added a new task on how to remove the configuredfeature from a line key.
Cisco IP Phone 6800 Series Multiplatform Phones User Guide2
Your PhoneNew and Changed Features

New or Changed SectionsRevisions
Search for a Contact in Multiple Directories, on page55
Added a new task on contact search in multipledirectories.
Set up the Profile Account, on page 79Updated the topic on profile account setup to supportresync profile with the SIP credentials or the logincredentials.
New and Changed for Firmware Release 11.2(2)New and Changed SectionsRevisions
Cisco IP Phone 6821 Multiplatform Phones Buttonsand Hardware, on page 13
Added a new topic to introduce the phone buttons andharware of Cisco IP Phone 6821MultiplatformPhones
Cisco IP Phone 6821 Multiplatform PhonesHearing-Impaired Accessibility Features, on page 19
Added a new topic for the hearing-impairedaccessibility features of Cisco IP Phone 6821Multiplatform Phones
Cisco IP Phone 6821 Multiplatform PhonesVision-Impaired and Blind Accessibility Features, onpage 23
Added a new topic for the vision-impaired and blindaccessibility features of Cisco IP Phone 6821Multiplatform Phones
Cisco IP Phone 6821 Multiplatform PhonesMobility-Impaired Accessibility Features, on page28
Added a new topic for the mobility-impairedaccessibility features of Cisco IP Phone 6821Multiplatform Phones
The Cisco IP Phone 6800 Series MultiplatformPhones, on page 1
Updated the topic with the information of Cisco IPPhone 6821 Multiplatform Phones
Softkey, Line, and Feature Buttons, on page 16Updated the topic with the softkeys, line, and featurebuttons of Cisco IP Phone 6821Multiplatform Phones
Navigation, on page 16Updated the topic with the navigation information ofCisco IP Phone 6821 Multiplatform Phones
New and Changed for Firmware Release 11.2(1)New or Changed SectionsRevisions
AddMultiple Locations for a BroadWorks XSI User,on page 73
Added a new topic to support multiple locations(anywhere) for a BroadWorks XSI user
View Your Recent Calls, on page 63Updated the topic with the newDisplay recents fromoption to support XSI call logs improvement
View Calls Logs from BroadWorks XSI Server, onpage 64
Added a new topic to support XSI call logsimprovement
Cisco IP Phone 6800 Series Multiplatform Phones User Guide3
Your PhoneNew and Changed for Firmware Release 11.2(2)

New or Changed SectionsRevisions
Return a Recent Call, on page 64Updated the topic with the newMissed softkey tosupport XSI call logs improvement.
Silence an Incoming Call, on page 42Added a new topic to support DND and call forwardindication for a non-selected line
Forward Calls, on page 46
Turn On Do Not Disturb, on page 43
Updated the topic with icons for call forwarding andDND to support DND and call forward indication fora non-selected line
Block Caller ID , on page 70Updated the topic to support XSI caller ID blocking
Set up the Profile Account, on page 79Added a new topic to support username and passwordcollection on HTTP authentication challenge
Change the Ringtone, on page 74Updated the menu navigation for ringtone setting tosupport audio equalizers to customize audio forhandset and headset (acoustic audio)
Specify an Audio Device for a Call, on page 74Added a new topic to support audio equalizers tocustomize audio for handset and headset (acousticaudio)
Change the Screen Saver, on page 74Updated the topic to support screen saver type lockremoval
New and Changed for Firmware Release 11.1(2)Updated SectionsRevision
Make an Emergency Call, on page 38Emergency Call Support
Reverse Name Lookup for Incoming and OutgoingCalls, on page 61
Reverse Name Lookup
Cisco 6800 Series Key Expansion Module SetupOverview, on page 84
Find Information about the Key Expansion Moduleof Your Phone, on page 85
Configure a Speed Dial on a Line Key, on page 40
Add support for key expansion module
Adjust the Contrast of the Key Expansion Module ,on page 86
Change the Display Mode of the Key ExpansionModule from the Phone, on page 87
Added how to change display mode of key expansionmodule, contrast of key expansion module LCD
Cisco IP Phone 6800 Series Multiplatform Phones User Guide4
Your PhoneNew and Changed for Firmware Release 11.1(2)

New and Changed for Firmware Release 11.1(1)New or Changed SectionsFeature
Call Center Features, on page 52Call Center Support
Record a Call, on page 51Call Recording
Adjust the Phone Screen Contrast, on page 76Contrast Adjustment Enhancement
Set up Power Save, on page 78Power Save Support
Instant Message and Presence Contacts, on page 58
Change Your Presence State, on page 59
Make a Call to an IM and Presence Contact, on page58
Presence
Phone SetupTypically, your administrator sets up your phone and connects it to the network. If your phone is not set upand connected, contact your administrator for instructions.
Adjust the Handset RestIf your phone is wall-mounted or if the handset slips out of the cradle too easily, you may need to adjust thehandset rest to ensure that the receiver does not slip out of the cradle.Figure 2: Adjust the Handset Rest
Cisco IP Phone 6800 Series Multiplatform Phones User Guide5
Your PhoneNew and Changed for Firmware Release 11.1(1)

Procedure
Step 1 Remove the handset from the cradle and pull the plastic tab from the handset rest.Step 2 Rotate the tab 180 degrees.Step 3 Hold the tab between two fingers, with the corner notches facing you.Step 4 Line up the tab with the slot in the cradle and press the tab evenly into the slot. An extension protrudes from
the top of the rotated tab.Step 5 Return the handset to the handset rest.
Connect to the NetworkYou need to connect the phone to the telephone network.
• Wired connection—The phone is plugged into the network using an Ethernet cable.
Set a Password on Initial Phone Boot UpThe first time your phone boots up, you may be prompted to set a password. If you are not prompted, youradministrator has created a password for you.
Procedure
Step 1 Enter your password in the New password and Reenter new password fields.Step 2 Press Save.
Sign into Your Extension from Another Phone (ExtensionMobility)
If extension mobility is configured, you can sign into a different phone in your network and have it act thesame as your phone. After you sign in, the phone adopts your personal directory number.
Before you begin
Your administrator configures provisioning authority.
Procedure
Step 1 Press Sign in.Step 2 Enter your username and password, then press Sign in.
Cisco IP Phone 6800 Series Multiplatform Phones User Guide6
Your PhoneConnect to the Network
The password field allows two input methods: alphanumeric and numeric. While you type in the password,you see theOptions softkey on the phone. Use this softkey to change the current password input type. SelectInput all for alphanumeric input and select Input num for numeric entry. Your administrator configures thepassword input method on the phone web page.
Sign out of Your Extension from Another Phone
Procedure
Press Sign out.
Sign in to a Phone as a GuestYour phone has a guest account when your administrator enables hoteling on your phone. You can then signin to a different phone in your network as a guest.
Procedure
Step 1 Press Sign in.Step 2 Enter your user ID and password.
The password field uses two types of input methods; alphanumeric and numeric. While you type in thepassword, you see Options softkey on the phone. You can use this softkey to change the current passwordinput type. Select Input all for alphanumeric input and select Input num for numeric entry.
Step 3 Press Save.
An administrator can set up a phone to make emergency calls. Whenever you sign in as a guest to a registeredphone, the phone transfers a request to obtain the location of the phone. The location is sent to the emergencyservices when you make an emergency call.
Note
Sign Out of a Phone as a Guest
Procedure
Step 1 Press Guest Out.
Cisco IP Phone 6800 Series Multiplatform Phones User Guide7
Your PhoneSign out of Your Extension from Another Phone

Step 2 Press Sign Out.
Set the Profile Rule on the PhoneProcedure
Step 1 Press Applications .Step 2 Select Device administration > Profile rule.Step 3 Press Resync.
Coworker Line StatusYou can set up line keys on your phone to monitor coworkers' lines. This feature is useful if you routinelyhandle calls for colleagues and need to see if they are available to answer calls. The monitoring line keysfunction as Busy Lamp Field (BLF) keys. A BLF is an LED that changes color to indicate the status of themonitored line.
The following table describes the LED status:
Table 2: BLF Key LED Status
MeaningLED Color
The monitored line is available.Green
The monitored line is busy.Red
The monitored line is ringing.Blinking red
Error in BLF key configuration.Amber
Your administrator performs the necessary setup on the server and for the phone to allow you to monitor thedesired lines.
You can configure monitoring on your phone in two ways:
• You can configure monitoring of an individual user's line.
• If your administrator has set up a BLF list for you, you can activate or deactivate monitoring of the entirelist. The BLF list is the list of users whose lines you can monitor. The phone monitors each user on aseparate line key. The phone assigns available line keys for monitoring, automatically.
With the appropriate configuration, you can use the BLF keys to call the monitored line (speed dial), and toanswer incoming calls to the monitored line (call pickup).
Cisco IP Phone 6800 Series Multiplatform Phones User Guide8
Your PhoneSet the Profile Rule on the Phone

When the configuration is complete, the icon in the BLF key label indicates the combination of featuresconfigured on the key:
Table 3: Busy Lamp Field Icons
BLF, Speed Dial,Call Pickup, and
Call Park
BLF, CallPickup, and Call
Park
BLF, SpeedDial, andCall Park
BLF, Speed Dial,and Call Pickup
BLF and CallPickup
BLF andCallPark
BLF andSpeed Dial
BLF
Idle
Alerting
In use
----Callparked
Error
Activate or Deactivate Monitoring of the BLF ListIf your administrator has configured a Busy Lamp Field (BLF) list for you, you can activate or deactivatemonitoring of the entire BLF list. The phone monitors each user on a separate line key. When you activatemonitoring, the phone assigns available line keys in sequence to monitor the BLF list entries.
The phone may use line keys both on the phone and any Key Expansion Module attached to the phone, oronly the Key Expansion Module. This is controlled by your administrator.
The BLF list keys function in the same way as individual BLF keys. See Coworker Line Status, on page 8for details. When you activate monitoring, the phone starts showing the status of the monitored lines on theBLF list keys. You can use each BLF list key to call the monitored line (speed dial), and to answer incomingcalls to the monitored line (call pickup).
The sequential order of the users in the BLF list is set by your administrator. The corresponding BLF list keysalways maintain this sequential order. You can choose to configure another feature such as speed dial on aBLF list key at any time. However, it renders the line key unavailable for the BLF list.
Whenever you make any change to line key configurations, the phone redoes the BLF list key assignmenttaking the change into account. The phone only assigns available line keys, and in the same sequential order,every time. This can result in changes in the positions of BLF list keys.
The phone monitors as many users as possible with the available line keys. You can make more line keysavailable for monitoring the list by removing features configured on line keys. See Remove the FeatureConfigured on a Line Key, on page 11 for details.
Note
Cisco IP Phone 6800 Series Multiplatform Phones User Guide9
Your PhoneActivate or Deactivate Monitoring of the BLF List

Before you begin
Your administrator configures the BLF list.
Procedure
Step 1 Press Applications .Step 2 Select User preferences > Attendant console preferences > BLF list.
• When BLF list is set to Show, monitoring is activated. The phone shows the status of the monitoredlines on the BLF list keys.
• When BLF list is set to Hide, monitoring is deactivated.
Step 3 Press Set.
Configure Monitoring of an Individual LineYou can configure a line key to monitor a coworker's line status. When you add speed dial to the configuration,you can use the line key to call the monitored line. When you add call pickup to the configuration, you canuse the line key to answer incoming calls to the monitored line. The line key functions as a Busy Lamp Field(BLF) key. See Coworker Line Status, on page 8 for details.
You can select any available line key to configure this feature. You can also select any line key that isfunctioning as a speed-dial key or as a BLF key. Your configuration will override any existing configurationfor the key.
If your administrator has configured a BLF list for you, you can only monitor the lines of people who are inthe list.
Your phone may already be monitoring the entire list. See Activate or Deactivate Monitoring of the BLF List,on page 9 for details. You can still configure an individual key to monitor a line. However, the phone willthen no longer monitor the line automatically as part of the list. If you remove the individual BLF keyconfiguration, the phone resumes monitoring the line automatically as part of the list. Note that the phoneadjusts the BLF list key assignment every time it has to add or remove a line for automatic monitoring. Thisresults in changes in the positions of BLF list keys.
Before you begin
• Your administrator performs the necessary setup to allow you to monitor the concerned line.
• Your administrator allows configuring the BLF feature options on line keys.
• The line key on which you want to configure this feature is not configured as an extension.
Procedure
Step 1 Press and hold down the line key for two seconds.Step 2 On the Select feature screen, select one of these options:
Cisco IP Phone 6800 Series Multiplatform Phones User Guide10
Your PhoneConfigure Monitoring of an Individual Line

• If you just want to use the key to monitor a line, select BLF presence.• If you want to use the key to monitor a line and also speed-dial the monitored line, select BLF + Speeddial.
• If you want to use the key to monitor a line and also answer incoming calls to the monitored line, selectBLF + Call pickup.
• If you want to use the key for all the three functions, select BLF + Speed dial + Call pickup.
Step 3 Enter the user ID of the person whose line you want to monitor, in the User ID field.
You must enter the user ID. The user ID may not be the person's name or extension. Consult youradministrator if you need assistance.
Note
If your administrator has configured a BLF list for you, you can select the user whose line you want to monitorfrom the list:
a) Select Search BLF list.
Users whose names appear in grey in the list are ones that your phone is alreadymonitoring on individuallyconfigured BLF keys.
b) Select the user whose line you want to monitor.
The user ID appears in the User ID field.
If you select a user who is already monitored on an individually configured key, the new configurationoverrides the previous configuration to monitor the user.
Step 4 Press Save.
Remove the Feature Configured on a Line KeyYou can remove the feature configured on a line key.
If your phone is monitoring a Busy Lamp Field (BLF) list, removing the feature configured on a line keymakes the line key available for monitoring the BLF list. This can change the positions of BLF list keys. SeeActivate or Deactivate Monitoring of the BLF List, on page 9 for details.
You cannot remove some features configured by your administrator.Note
Procedure
Step 1 Press and hold down the line key for two seconds.Step 2 On the Select feature screen, select None.Step 3 When prompted to confirm, press OK.
Cisco IP Phone 6800 Series Multiplatform Phones User Guide11
Your PhoneRemove the Feature Configured on a Line Key

Phone Web PageYou can customize some phone settings with the phone web page, which you access from your computer.Your administrator gives you the page URL, your user ID, and password.
In the phone web page, you can control features, line settings, and phone services for your phone.
• Phone features include speed dial, do not disturb, and your personal address book.
• Line settings affect a specific phone line (directory number) on your phone. Line settings can includecall forwarding, visual and audio message indicators, ring patterns, and other line-specific settings.
The following table describes some specific features that you configure using the phone web page.
DescriptionFeatures
You specify the number that will receive calls when call forward is enabled on thephone. Use the phone web page to set up more complicated call forward functions, forexample, when your line is busy.
Call forward
You assign phone numbers to speed-dial numbers so that you can quickly call thatperson.
Speed dial
You assign a ringtone to a specific line.Ringtone
You add a contact to your personal directory with phone web page.Personal directorycontact
Related TopicsSpeed Dial, on page 39Forward Calls, on page 46
Speed-Dial NumbersWhen you dial a number on your phone, you enter a series of digits. When you set up a speed-dial number,the speed-dial number must contain all the digits you need to make the call. For example, if you need to dial9 to get an outside line, you enter the number 9 and then the number you want to dial.
You can also add other dialed digits to the number. Examples of additional digits include a meeting accesscode, an extension, a voicemail password, an authorization code, and a billing code.
The dial string can contain the following characters:
• 0 to 9
• Pound (#)
• Asterisk (*)
• Comma (,)—This is the pause character, and gives a 2- second delay in the dialing. You can have severalcommas in a row. For example, two commas (,,) represent a pause of 4 seconds.
The rules for dial strings are:
Cisco IP Phone 6800 Series Multiplatform Phones User Guide12
Your PhonePhone Web Page

• Use the comma to separate the parts of the dial string.
• An authorization code must always precede a billing code in the speed-dial string.
• A single comma is required between the authorization code and the billing code in the string.
• A speed-dial label is required for speed dials with authorization codes and additional digits.
Before you configure the speed dial, try to dial the digits manually at least once to ensure that the digit sequenceis correct.
Your phone does not save the authorization code, billing code, or extra digits from the speed dial in the callhistory. If you press Redial after you connect to a speed-dial destination, the phone prompts you to enter anyrequired authorization code, billing code, or additional digits manually.
Example
To set up a speed-dial number to call a person at a specific extension, and if you need an authorization codeand billing code, consider the following requirements:
• You need to dial 9 for an outside line.
• You want to call 5556543.
• You need to input the authorization code 1234.
• You need to input the billing code 9876.
• You must wait for 4 seconds.
• After the call connects, you must dial the extension 56789#.
In this scenario, the speed-dial number is 95556543,1234,9876,,56789#.
Cisco IP Phone 6821 Multiplatform Phones Buttons andHardware
The following figure shows the Cisco IP Phone 6821 Multiplatform Phones.
Cisco IP Phone 6800 Series Multiplatform Phones User Guide13
Your PhoneCisco IP Phone 6821 Multiplatform Phones Buttons and Hardware

Figure 3: Cisco IP Phone 6821 Multiplatform Phones
Indicates whether you have an incoming call (flashing red)or a new voice message (steady red).
Light strip1
Access your phone lines, features, and call sessions.
For more information, see Softkey, Line, and FeatureButtons, on page 16.
Programmable feature buttons and linebuttons
2
Access functions and services such as Conference andTransfer.
For more information, see Softkey, Line, and FeatureButtons, on page 16.
Softkey buttons3
Navigation ring and Select button. Scroll throughmenus, highlight items, and select the highlighted item.
Navigation cluster4
Applications Access call history, user preferences,phone settings, and phone model information.
Headset Toggle the headset on or off.When a headsetis active, a headset icon is displayed in the header.
Applications and Headset5
Mute Toggle the microphone on or off. When themicrophone is muted, a mute icon flashes on the screen.
Speakerphone Toggle the speakerphone on or off.
Mute and Speakerphone6
Cisco IP Phone 6800 Series Multiplatform Phones User Guide14
Your PhoneCisco IP Phone 6821 Multiplatform Phones Buttons and Hardware
Adjust the handset, headset, and speakerphone volume (offhook) and the ringer volume (on hook).
Volume button7
Cisco IP Phone 6841 and 6851 Multiplatform Phones Buttonsand Hardware
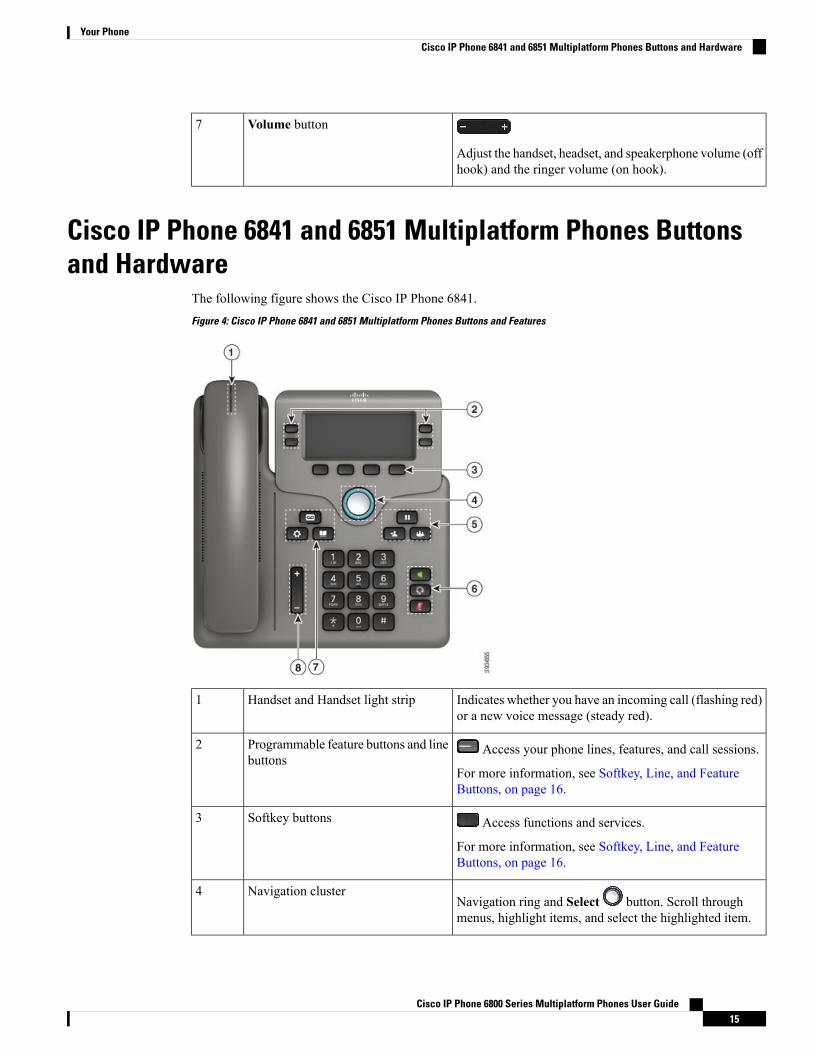
The following figure shows the Cisco IP Phone 6841.Figure 4: Cisco IP Phone 6841 and 6851 Multiplatform Phones Buttons and Features
Indicates whether you have an incoming call (flashing red)or a new voice message (steady red).
Handset and Handset light strip1
Access your phone lines, features, and call sessions.
For more information, see Softkey, Line, and FeatureButtons, on page 16.
Programmable feature buttons and linebuttons
2
Access functions and services.
For more information, see Softkey, Line, and FeatureButtons, on page 16.
Softkey buttons3
Navigation ring and Select button. Scroll throughmenus, highlight items, and select the highlighted item.
Navigation cluster4
Cisco IP Phone 6800 Series Multiplatform Phones User Guide15
Your PhoneCisco IP Phone 6841 and 6851 Multiplatform Phones Buttons and Hardware
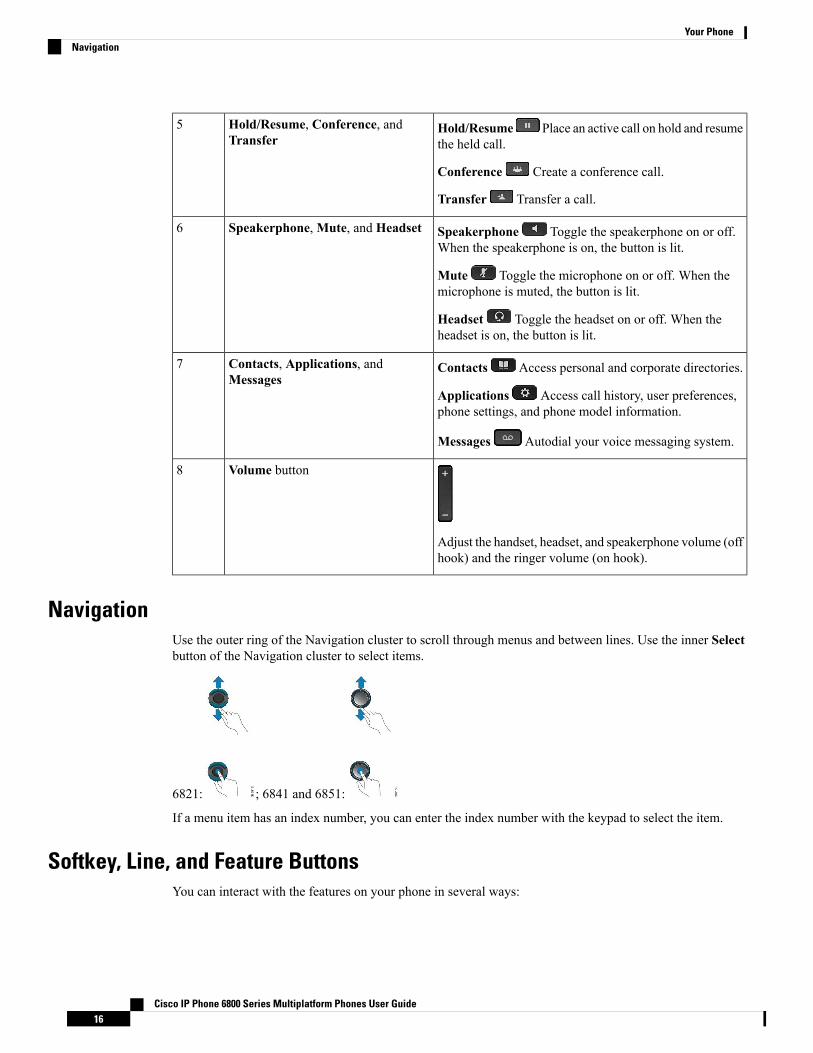
Hold/Resume Place an active call on hold and resumethe held call.
Conference Create a conference call.
Transfer Transfer a call.
Hold/Resume, Conference, andTransfer
5
Speakerphone Toggle the speakerphone on or off.When the speakerphone is on, the button is lit.
Mute Toggle the microphone on or off. When themicrophone is muted, the button is lit.
Headset Toggle the headset on or off. When theheadset is on, the button is lit.
Speakerphone,Mute, and Headset6
Contacts Access personal and corporate directories.
Applications Access call history, user preferences,phone settings, and phone model information.
Messages Autodial your voice messaging system.
Contacts, Applications, andMessages
7
Adjust the handset, headset, and speakerphone volume (offhook) and the ringer volume (on hook).
Volume button8
NavigationUse the outer ring of the Navigation cluster to scroll through menus and between lines. Use the inner Selectbutton of the Navigation cluster to select items.
6821: ; 6841 and 6851:
If a menu item has an index number, you can enter the index number with the keypad to select the item.
Softkey, Line, and Feature ButtonsYou can interact with the features on your phone in several ways:
Cisco IP Phone 6800 Series Multiplatform Phones User Guide16
Your PhoneNavigation

• Softkeys, located below the screen, give you access to the function displayed on the screen above thesoftkey. The softkeys change depending on what you are doing at the time. TheMore ... softkey showsyou that more functions are available.
• Feature and line buttons give you access to phone features and phone lines. On the Cisco IP Phone 6821,these are the buttons on the left side of the screen. On the Cisco IP Phone 6841 and 6851, these are thebuttons on either side of the screen.
• Feature buttons—Used for features such as Speed dial or Call pickup, and to view your status onanother line.
• Line buttons—Used to initiate or answer a call or resume a held call. You can also use a line keyto open and close the call session window, and to navigate through the call session window. Openthe call session window to see the calls on the line.
Feature and line buttons illuminate to indicate status:
• or Green—Line is idle.
• or Red, steady—Line is active or in use.
• or Red, flashing—Line is on hold or there is an inbound call.
• or Amber, steady—Line is unregistered (cannot be used).
Some functions can be set up as softkeys or as feature buttons. You can also access some functions withsoftkeys or the associated hard button.
The Cisco IP Phone 6821 has a limited number of hard buttons. You use the softkeys to access most callfeatures.
Phone Screen FeaturesThe phone screen shows information about your phone such as directory number, active call and line status,softkeys, speed dials, placed calls, and phone menu listings. The screen is made up of three sections: theheader row, the middle section, and the footer row.Figure 5: Cisco IP Phone 6841 and 6851 Screen
The Cisco IP Phone 6821 has a similar layout but in a more compact format.
At the top of the screen is the header row. The header row displays the phone number, currentdate and time, as well a number of icons. The icons display when features are active.
1
Cisco IP Phone 6800 Series Multiplatform Phones User Guide17
Your PhonePhone Screen Features

The middle of the phone screen displays the information associated with the line and featurebuttons on the phone.
When you select a line which has more than two registered lines, a black box highlight aroundthe selected line is displayed. There will be no highlight for an active call.
Active and incoming call screen supports more than 21 characters. The Cisco IP Phone can display15 digits on the phone screen when line is inactive.
2
The bottom row of the screen contains the softkey labels. Each label indicates the action for thesoftkey button below the screen.
3
Clean the Phone Screen
Procedure
If your phone screen gets dirty, wipe it with a soft, dry cloth.
Do not use any liquids or powders on the phone because they can contaminate the phone componentsand cause failures.
Caution
Differences Between Phone Calls and LinesWe use the terms lines and calls in very specific ways to explain how to use your phone.
• Lines—Each line corresponds to a directory number or intercom number that others can use to call you.You have as many lines as you have directory numbers and phone line icons.
• Calls—Each line can support multiple calls. By default, your phone supports two connected calls perline, but your administrator can adjust this number according to your needs.
Only one call can be active at any time; other calls are automatically placed on hold.
Here is an example: If you have two lines and each line supports four calls, then you could have up toeight connected calls at one time. Only one of those calls is active and the other seven are held calls.
Energy SavingsYour administrator can reduce the amount of power that the phone screen uses when you're not using yourphone. Level of energy-saving that your administrator can set up:
• Power Save—The backlight or screen turns off when the phone has been inactive for a period of time.
The Cisco IP Phone 6821 Multiplatform Phones does not support Power Save.Note
Cisco IP Phone 6800 Series Multiplatform Phones User Guide18
Your PhoneClean the Phone Screen

Additional Help and InformationIf you have questions about the functions available on your phone, contact your administrator.
The Cisco website (https://www.cisco.com) contains more information about the phones and call controlsystems.
• For quick start guides and end-user guides in English, follow this link:
https://www.cisco.com/c/en/us/support/collaboration-endpoints/ip-phone-6800-series-multiplatform-firmware/products-user-guide-list.html
• For guides in languages other than English, follow this link:
https://www.cisco.com/c/en/us/support/collaboration-endpoints/ip-phone-6800-series-multiplatform-firmware/tsd-products-support-translated-end-user-guides-list.html
• For licensing information, follow this link:
https://www.cisco.com/c/en/us/support/collaboration-endpoints/ip-phone-6800-series-multiplatform-firmware/products-licensing-information-listing.html
Accessibility FeaturesThe Cisco IP Phone 6800 Series Multiplatform Phones provide accessibility features for the blind, and thevisually, hearing, and mobility impaired. Because many of these features are standard, they can be used byusers with disabilities without requiring any special configuration.
In this document, the term phone support pages refers to the web pages that users can access to set up certainfeatures.
Cisco is committed to designing and delivering accessible products and technologies to meet the needs ofyour organization. You can find more information about Cisco and its commitment to accessibility at thisURL: http://www.cisco.com/go/accessibility
Cisco IP Phone 6821 Multiplatform Phones Hearing-Impaired Accessibility FeaturesYour phone comes with standard accessibility features that require little or no setup.
Cisco IP Phone 6800 Series Multiplatform Phones User Guide19
Your PhoneAdditional Help and Information

Figure 6: Cisco IP Phone 6821 Multiplatform Phones Hearing-Impaired Accessibility Features
Table 4: Hearing-Impaired Accessibility Features
DescriptionAccessibility FeatureItem
This lighted strip is visible from all angles. Your phonealso provides an audible message-waiting indicator.
Visual message-waiting indicator1
Use theMute button to toggle the microphone on or off.When the microphone is muted, the mute icon flashes onthe screen
Visual notification of the phone state2
Cisco IP Phone handsets support third-party inlineamplifiers. You attach an amplifier to the handset andcord and it sits between the handset and the IP phone.
Inline-amplifier support (handset)3
• Select Applications > User preferences.
• Adjust the volume level for the phone ring. Whilethe handset is in the cradle and the headset andspeakerphone buttons are off, pressVolume to raiseor lower the volume.
Your administrator can also change your settings.
Adjustable ringtone, pitch, and volume4
Cisco IP Phone 6800 Series Multiplatform Phones User Guide20
Your PhoneCisco IP Phone 6821 Multiplatform Phones Hearing-Impaired Accessibility Features

DescriptionAccessibility FeatureItem
Supports these accessibility features:
• Hearing-aid compatible.
• Magnetic coupling of the hearing aid.
• Federal Communications Commission (FCC)loudness requirements for the Americans withDisabilities Act (ADA).
• Section 508 loudness requirements, which are metby using industry-standard inline handset amplifiers.
Hearing aid compatible (HAC) handset5
Cisco IP Phones support these TTY and TDD features:
• Acoustic or direct connect TTYs fromindustry-leading manufacturers.
• Real-time text transmission over phone lines.
• Hearing and voice carry over phones (HCO/VCO).
• VoIP network operating at G.711.
For information about setting up TTY, contact youradministrator.
Acoustic coupled TTY and TDDsupport (handset)
6
Cisco IP Phone 6841 and 6851 Hearing-Impaired Accessibility FeaturesYour phone comes with standard accessibility features that require little or no setup.
To check which phone model you have, press Applications and select Status > Product information.The Product name field shows your phone model.
Cisco IP Phone 6800 Series Multiplatform Phones User Guide21
Your PhoneCisco IP Phone 6841 and 6851 Hearing-Impaired Accessibility Features

Figure 7: Hearing-Impaired Accessibility Features—Cisco IP Phone 6841 Multiplatform Phones Shown
Table 5: Hearing-Impaired Accessibility Features
DescriptionAccessibility FeatureItem
This lighted strip is visible from all angles. Your phonealso provides an audible message-waiting indicator.
Visual message-waiting indicator(handset)
1
• Toggle theMute and Speakerphone buttons on andoff to indicate the phone state.
• Use theMute button to toggle the microphone onor off. When the microphone is muted, the buttonis lit.
• Use the Speakerphone button to toggle thespeakerphone on or off. When the speakerphone ison, the button is lit.
Visual notification of the phone state2
Cisco IP Phone handsets support third-party inlineamplifiers. You attach an amplifier to the handset andcord and it sits between the handset and the IP phone.
Inline-amplifier support (handset)3
• Select Applications > User preferences.
• Adjust the volume level for the phone ring. Whilethe handset is in the cradle and the headset andspeakerphone buttons are off, pressVolume to raiseor lower the volume.
Your administrator can also change your settings.
Adjustable ringtone, pitch, and volume4
Cisco IP Phone 6800 Series Multiplatform Phones User Guide22
Your PhoneCisco IP Phone 6841 and 6851 Hearing-Impaired Accessibility Features

DescriptionAccessibility FeatureItem
Supports these accessibility features:
• Hearing-aid compatible.
• Magnetic coupling of the hearing aid.
• Federal Communications Commission (FCC)loudness requirements for the Americans withDisabilities Act (ADA).
• Section 508 loudness requirements, which are metby using industry-standard inline handset amplifiers.
Hearing aid compatible (HAC) handset5
Cisco IP Phones support these TTY and TDD features:
• Acoustic or direct connect TTYs fromindustry-leading manufacturers.
• Real-time text transmission over phone lines.
• Hearing and voice carry over phones (HCO/VCO).
• VoIP network operating at G.711.
For information about setting up TTY, contact youradministrator.
Acoustic coupled TTY and TDDsupport (handset)
6
Cisco IP Phone 6821 Multiplatform Phones Vision-Impaired and Blind Accessibility FeaturesYour phone comes with standard accessibility features that require little or no setup.Figure 8: Cisco IP Phone 6821 Multiplatform Phones
Cisco IP Phone 6800 Series Multiplatform Phones User Guide23
Your PhoneCisco IP Phone 6821 Multiplatform Phones Vision-Impaired and Blind Accessibility Features

Table 6: Vision-Impaired and Blind Accessibility Features
DescriptionAccessibility FeatureItem
Alerts you to an incoming call. The lightstrip flashes during incoming calls andstays lit when a voicemail message isreceived.
High-contrast visual and audible alert of anincoming call
1
Use line buttons to start, answer, or switchto a call on a particular line.
Features, such as speed dial, line status,privacy, do not disturb (DND), and serviceURLs, can be assigned to feature buttons.
Your administrator sets up programmablefeature buttons on your phone.
Colors indicate your phone's status:
• Green—Line is idle.
• Red, steady—Line is active or inuse.
• Red, flashing—Line is on holdor there is an inbound call.
• Amber, steady—Line isunregistered (cannot be used).
Line and feature buttons
The line and feature buttons are on the left of thescreen.
2
Allows you to adjust your phone screen'scontrast.
Back-lit grayscale LCD screen with adjustablecontrast
3
Provide access to special functions. Thefunctions are displayed on the LCD.
Softkeys
These are large buttons just below the LCD.
4
Use the Navigation up and down buttonsto move up and down in the phone LCD.The Select button is in the center of theNavigation cluster.
Navigation Cluster (includes the Navigationbuttons and the Select button)
The Navigation cluster is located in the center ofthe phone below the softkeys.
5
Use the Applications to access functionson your phone.
Use the Headset button to toggle theheadset on or off.
Applications and Headset button
• These two large buttons are located on eitherside of the Navigation cluster.
• The Applications button is on the left.
• The Headset button is on the right.
6
Allows you to use existing or familiar keypositions. Key 5 has a nib.
Standard 12-key layout7
Cisco IP Phone 6800 Series Multiplatform Phones User Guide24
Your PhoneCisco IP Phone 6821 Multiplatform Phones Vision-Impaired and Blind Accessibility Features

DescriptionAccessibility FeatureItem
Provide audible notification of the phonestate:
• Toggle theMute, and Speakerphonebuttons on and off to indicate thephone state.
• Use theMute button to toggle themicrophone on or off. When themicrophone is muted, the mute iconflashes on the screen. When you turnon Mute, your phone beeps once;when you turn off Mute, your phonebeeps twice.
• Use the Speakerphone button totoggle the speakerphone on or off.
• TheMute and Speakerphone buttons arelocated on either side of the volume button.
• TheMute button is on the left and theSpeakerphone button is on the right.
8
Allows you to increase or decrease the ringvolume or the sound through the handset,headset, or speakerphone.
Press right on the rocker key to increasethe volume. Press left on the rocker key todecrease the volume.
Volume key
This key is located below the keypad.
9
Cisco IP Phone 6841 and 6851 Vision-Impaired and Blind Accessibility FeaturesYour phone comes with standard accessibility features that require little or no setup.
To check which phone model you have, press Applications and select Status > Product information.The Product name field shows your phone model.
Cisco IP Phone 6800 Series Multiplatform Phones User Guide25
Your PhoneCisco IP Phone 6841 and 6851 Vision-Impaired and Blind Accessibility Features

Figure 9: Vision-Impaired and Blind Accessibility Features—Cisco IP Phone 6841 Multiplatform Phones Shown
Table 7: Vision-Impaired and Blind Accessibility Features
DescriptionAccessibility FeatureItem
Alerts you to an incoming call. The handsetlight strip flashes during incoming callsand stays lit when a voicemail message isreceived.
High-contrast visual and audible alert of anincoming call
1
Use line buttons to start, answer, or switchto a call on a particular line.
Features, such as speed dial, line status,privacy, do not disturb (DND), and serviceURLs, can be assigned to feature buttons.
Your administrator sets up programmablefeature buttons on your phone.
Colors indicate your phone's status:
• Green—Line is idle.
• Red, steady—Line is active or inuse.
• Red, flashing—Line is on holdor there is an inbound call.
• Amber, steady—Line isunregistered (cannot be used).
Line and feature buttons
The line and feature buttons are on the left andright sides of the screen.
2
Cisco IP Phone 6800 Series Multiplatform Phones User Guide26
Your PhoneCisco IP Phone 6841 and 6851 Vision-Impaired and Blind Accessibility Features

DescriptionAccessibility FeatureItem
Allows you to adjust your phone screen'scontrast.
Back-lit grayscale LCD screen with adjustablecontrast
3
Provide access to special functions. Thefunctions are displayed on the LCD.
Softkeys
• These are large buttons just below the LCD.
4
Use the Navigation ring to move up anddown in the phone LCD. The Select buttonis in the center of the Navigation cluster.
Navigation Cluster (includes the Navigation ringand the Select button)
• The Navigation cluster is located in the centerof the phone.
5
Allow you to use these functions on yourphone.
Hold button, Transfer button, and Conferencebutton
• These three large buttons are located to theright of Navigation cluster.
• In this group of buttons, the Hold button isthe single button in the top row. Below theHold button, the Transfer button is on theleft, and theConference button is on the right.
6
Allow you to easily access your messages,applications, and contacts.
Messages button, Applications button, andContacts button
• These three large buttons are located to theleft of the Navigation cluster.
• In this group of buttons, theMessages buttonis the single button in the top row. Below theMessages button, the Applications button ison the left, and the Contacts button is on theright.
7
Allows you to increase or decrease the ringvolume or the sound through the handset,headset, or speakerphone.
Press up on the rocker key to increase thevolume. Press down on the rocker key todecrease the volume.
Volume key
• This key is located to the left of the keypad.
8
Allows you to use existing or familiar keypositions. Key 5 has a nib.
Standard 12-key layout9
Cisco IP Phone 6800 Series Multiplatform Phones User Guide27
Your PhoneCisco IP Phone 6841 and 6851 Vision-Impaired and Blind Accessibility Features

DescriptionAccessibility FeatureItem
Provide audible notification of the phonestate:
• Toggle the Headset,Mute, andSpeakerphone buttons on and off toindicate the phone state.
• Use the Headset button to toggle theheadset on or off. When the headsetis on, the button is lit.
• Use theMute button to toggle themicrophone on or off. When themicrophone is muted, the button is lit.When you turn on Mute, your phonebeeps once; when you turn off Mute,your phone beeps twice.
• Use the Speakerphone button totoggle the speakerphone on or off.When the speakerphone is on, thebutton is lit.
• Headset, Speakerphone, andMute buttonslocated to the right of the keypad.
• The Speakerphone button is on the top, theHeadset button is in themiddle, and theMutebutton is on the bottom.
10
Cisco IP Phone 6821 Multiplatform Phones Mobility-Impaired Accessibility FeaturesYour phone comes with standard accessibility features that require little or no setup.Figure 10: Cisco IP Phone 6821 Multiplatform Phones Mobility-Impaired Accessibility Features
Cisco IP Phone 6800 Series Multiplatform Phones User Guide28
Your PhoneCisco IP Phone 6821 Multiplatform Phones Mobility-Impaired Accessibility Features

Table 8: Mobility-Impaired Accessibility Features
DescriptionAccessibility FeatureItem
Allow you to access the following features:
• Phone lines and intercom lines (line buttons)
• Speed-dial numbers (speed-dial buttons, includingthe speed-dial line status feature)
• Web-based services, such as a personal addressbook
• Phone features, such as privacy
Indicate your phone's status:
• Green—Line is idle.
• Red, steady—Line is active or in use.
• Red, flashing—Line is on hold or there is aninbound call.
• Amber, steady—Line is unregistered (cannotbe used).
Lighted buttons1
Allow you to easily access your phone applications.Additional features are available with the softkeys.
Large button to access Applications2
Press the button to turn speakerphone on or off.Built-in speakerphone3
Allow you to easily locate your phone's keys. Forexample, Key 5 has a nib, which you can use to locateother key positions.
Tactile-discernible buttons andfunctions, including a nib on Key 5
4
Cisco IP Phone 6841 and 6851 Mobility-Impaired Accessibility FeaturesYour phone comes with standard accessibility features that require little or no setup.
To check which phone model you have, press Applications and select Status > Product information.The Product name field shows your phone model.
Cisco IP Phone 6800 Series Multiplatform Phones User Guide29
Your PhoneCisco IP Phone 6841 and 6851 Mobility-Impaired Accessibility Features

Figure 11: Mobility-Impaired Accessibility Features—Cisco IP Phone 6841 Multiplatform Phones Shown
Table 9: Mobility-Impaired Accessibility Features
DescriptionAccessibility FeatureItem
Allow you to access the following features:
• Phone lines and intercom lines (line buttons)
• Speed-dial numbers (speed-dial buttons, includingthe speed-dial line status feature)
• Web-based services, such as a personal addressbook
• Phone features, such as privacy
Indicate your phone's status:
• Green—Line is idle.
• Red, steady—Line is active or in use.
• Red, flashing—Line is on hold or there is aninbound call.
• Amber, steady—Line is unregistered (cannotbe used).
Lighted buttons1
Allow you to easily access your phone applications,voice messages, corporate and personal directories, andcalling features.
Large buttons to access Applications,Messages,Contacts,Hold,Transfer,and Conference
2
Indicates whether the speakerphone is on or off. Whenthe speakerphone is on, the button is lit.
Built-in speakerphone3
Cisco IP Phone 6800 Series Multiplatform Phones User Guide30
Your PhoneCisco IP Phone 6841 and 6851 Mobility-Impaired Accessibility Features

DescriptionAccessibility FeatureItem
Allow you to easily locate your phone's keys. Forexample, Key 5 has a nib, which you can use to locateother key positions.
Tactile-discernible buttons andfunctions, including a nib on Key 5
4
Third-Party Accessibility ApplicationsCisco works closely with partners to provide solutions that complement the accessibility and usability of Ciscoproducts and solutions. There are third-party applications such as real-time captioning on Cisco IP Phones,Text Telephones for the Deaf (TDD/TTY), Real Time Text (RTT), hearing/voice carry over (HCO/VCO),audible caller ID, inline amplifiers for handsets for louder call sound, “busy lights”, audio/visual emergencynotifications through Cisco IP Phones (supporting users with disabilities), etc.
Here's a link to a presentation about all the accessibility features of Cisco Unified Communications products,and some third party assistive technology which works with it:
http://www.cisco.com/c/dam/en_us/about/responsibility/accessibility/products/Accessibility_Innovation_Cisco_Unified_Communications.pdf
For more information about third-party applications, contact your administrator.
TroubleshootingYou may experience issues related to the following scenarios:
• Your phone cannot communicate with the call control system.
• The call control system has communication or internal problems.
• Your phone has internal problems.
If you experience problems, your administrator can help troubleshoot the root cause of the problem.
Find Information About Your PhoneYour administrator may ask for information about your phone. This information uniquely identifies the phonefor troubleshooting purposes.
Procedure
Step 1 Press Applications .Step 2 Select Status > Product Information.
You can view the following information:
Product name—Model number of the Cisco IP Phone.
Serial number— Serial number of the Cisco IP Phone.
MAC address—Hardware address of the Cisco IP Phone.
Software version—Version number of the Cisco IP Phone firmware.
Cisco IP Phone 6800 Series Multiplatform Phones User Guide31
Your PhoneThird-Party Accessibility Applications

Hardware version—Version number of the Cisco IP Phone hardware.
Certificate—Status of the client certificate, which authenticates the Cisco IP Phone for use in the ITSPnetwork. This field indicates if the client certificate is properly installed in the phone.
Customization—For an RC unit, this field indicates whether the unit has been customized or not. Pendingindicates a new RC unit that is ready for provisioning. If the unit has already retrieved its customized profile,this field displays the Customization state as Acquired.
Step 3 Press Back to return to the Applications screen.
View the Customization State on the PhoneAfter the RC download from the EDOS server completes, you can view the customization state of a phoneon the screen.
Here are the descriptions of the remote customization states:
• Open—The phone has booted for the first time and is not configured.
• Aborted—Remote Customization is aborted due to other provisioning, for example, DHCP options.
• Pending—The phone can not download the profile from the EDOS server.
• Custom-Pending—The phone has downloaded a redirect URL from the EDOS server.
• Acquired—In the profile downloaded from the EDOS server, there is a redirect URL for provisionconfiguration. If the redirect URL download from the provisioning server is successful, this state isdisplayed.
• Unavailable—Remote customization has stopped because the EDOS server responded with an emptyprovisioning file and the HTTP response was 200 OK.
Procedure
Step 1 Press Applications .Step 2 Select Status > Product information > Customization.Step 3 Press Back.
View the Network Status
Procedure
Step 1 Press Applications .Step 2 Select Status > Network Status.
You can view the following information:
• Network type—Indicates the type of Local Area Netwrok (LAN) connection that the phone uses.
Cisco IP Phone 6800 Series Multiplatform Phones User Guide32
Your PhoneView the Customization State on the Phone

• Network status—Indicates if the phone is connected to a network.
• IPv4—IP address of the phone. You can see information on IP address, VLAN ID, Addressing type, IPstatus, Subnet mask, Default router, Domain Name Server (DNS) 1, DNS 2 of the phone.
• IPv6—IP address of the phone. You can see information on IP address, VLAN ID, Addressing type, IPstatus, Subnet mask, Default router, Domain Name Server (DNS) 1, DNS 2 of the phone.
• MAC address—Unique Media Access Control (MAC) address of the phone.
• Host name—Displays the current host name assigned to the phone.
• Domain—Displays the network domain name of the phone. Default: cisco.com
• Switch port link—Status of the switch port.
• Switch port config—Indicates speed and duplex of the network port.
• PC port config—Indicates speed and duplex of the PC port.
• PC port link—Indicates speed and duplex of the PC port.
View the Phone Status
Procedure
Step 1 Press Applications .Step 2 Select Status > Phone Status > Phone Status.
You can view the following information:
• Elapsed time—Total time elapsed since the last reboot of the system
• Tx (Packets)—Transmitted packets from the phone.
• Rx (Packets)—Received packets from the phone.
View the Status Messages on the Phone
Procedure
Step 1 Press Applications .Step 2 Select Status > Status messages.
You can view a log of the various phone statuses since provisioning was last done.
Status messages reflect UTC time and are not affected by the timezone settings on the phone.Note
Cisco IP Phone 6800 Series Multiplatform Phones User Guide33
Your PhoneView the Phone Status

Step 3 Press Back.
View the Line Status
Procedure
Step 1 Press Applications .Step 2 Select Status > Phone status > Line status.
You can view the status of each line on the phone.
View 802.1X Transaction Status
Procedure
Step 1 Press Applications .Step 2 Select Network configuration > Ethernet configuration > 802.1X authentication > Transaction status.
You can view the following information:
• Transaction status
• Protocol
View the Reboot History
Procedure
Step 1 Press Applications .Step 2 Select Status > Reboot history.
You can view the details of the date and time whenever the phone has rebooted, no matter why the phonerebooted.
Report All Phone IssuesYou can use the Problem Reporting Tool (PRT) to collect and send phone logs, and to report problems toyour administrator.
Cisco IP Phone 6800 Series Multiplatform Phones User Guide34
Your PhoneView the Line Status

Procedure
Step 1 Press Applications .Step 2 Select Status > Report problem.Step 3 Enter the date that you experienced the problem in the Date of problem field. The current date appears in
this field by default.Step 4 Enter the time that you experienced the problem in the Time of problem field. The current time appears in
this field by default.Step 5 Select Problem description.Step 6 Select a description from the displayed list.Step 7 Press Submit.
Factory Reset the Phone from Phone Web PageYou can restore your phone to its original manufacturer settings from the phone web page. After you resetthe phone, you can reconfigure it.
Procedure
Enter the URL in a supported web browser and click Confirm Factory Reset
Identify Phone Issues with a URL in the Phone Web PageWhen the phone doesn't work or doesn't register, a network error or any misconfiguration might be the cause.To identify the cause, add a specific IP address or a domain name to the phone admin page. Then, try to accessso that the phone can ping the destination and display the cause.
Procedure
In a supported web browser, enter a URL that consists of your phone IP address and the destination IP thatyou want to ping. Enter the URL using the format:
http:/<Phone IP>/admin/ping?<ping destination>, where:
<Phone IP> = actual IP address of your phone.
/admin = path to the access admin page of your phone.
<ping destination> = any IP address or domain name that you want to ping.
The ping destination allows only alphanumeric characters, ‘-’, and “_” (underscores). Otherwise the phoneshows an error on the web page. If the <ping destination> includes spaces, the phone uses only the first partof the address as the pinging destination.
For example, to ping the 192.168.1.1 address:
Cisco IP Phone 6800 Series Multiplatform Phones User Guide35
Your PhoneFactory Reset the Phone from Phone Web Page

http://<Phone IP>/admin/ping?192.168.1.1
Lost Phone ConnectivitySometimes your phone can lose its connection to the call control system. When this connection is lost, yourphone displays a message.
If you are on an active call when the connection is lost, the call continues. However, you do not have accessto all normal phone functions because some functions require information from the call control system. Yoursoftkeys might not work as you expect.
When the phone reconnects to the call control system, you'll be able to use your phone normally again.
Cisco One-Year Limited Hardware Warranty TermsSpecial terms apply to your hardware warranty and services that you can use during the warranty period.
Your formalWarranty Statement, including the warranties and license agreements applicable to Cisco software,is available on Cisco.com at this URL: https://www.cisco.com/go/hwwarranty.
Cisco IP Phone 6800 Series Multiplatform Phones User Guide36
Your PhoneLost Phone Connectivity

C H A P T E R 2Calls
• Make Calls, on page 37• Answer Calls, on page 42• Mute Your Call, on page 44• Hold Calls, on page 44• Forward Calls, on page 46• Forward a Call in Specific Situations with the Phone Web Page, on page 47• Transfer Calls, on page 48• Conference Calls and Meetings, on page 49• Page a Group of Phones (Multicast Paging), on page 50• Multiple Lines, on page 50• Record a Call, on page 51• Call Center Features, on page 52
Make CallsYour phone works just like a regular phone. But we make it easier for you to make calls.
Related TopicsMake a Call to an IM and Presence Contact, on page 58
Make a CallUse your phone just like any other phone to make a call.
Procedure
Enter a number and pick up the handset.
Cisco IP Phone 6800 Series Multiplatform Phones User Guide37

Make a Call with the SpeakerphoneUse your speakerphone for hands-free calling. Keep in mind that your coworkers might be able to hear yourcall too.
Procedure
Step 1 Enter a number using the keypad.
Step 2 Press Speakerphone .
Make a Call with a HeadsetUse your headset for hands-free calling that won't disturb your coworker and gives you some privacy.
Procedure
Step 1 Plug in a headset.Step 2 Enter a number using the keypad.
Step 3 Press Headset .
Redial a NumberYou can call the most recently dialed phone number.
Procedure
Step 1 (Optional) Select a line.Step 2 Press Redial.Step 3 Select the call record from the Placed calls list and press Call.
You can also access the Placed calls list from Settings > Recents > Placed calls.
Make an Emergency CallUse your phone to make an emergency call, similar to any other call. When you dial the emergency number,your emergency services get your phone number and location so that they can assist you.
Cisco IP Phone 6800 Series Multiplatform Phones User Guide38
CallsMake a Call with the Speakerphone

If your call disconnects, the emergency services can call you back.Note
Before you begin
Your phone must be set up to obtain your physical location. Emergency services personnel need your locationto find you when you make an emergency call.
Procedure
Enter the emergency number and lift the handset.
Speed DialSpeed Dial allows you to press a button, enter a preset code, or select a phone screen item to place a call. Youcan configure the speed dial from the phone screen and also from the phone web page.
You can edit, delete, and validate a speed-dial code.
Related TopicsPhone Web Page, on page 12Speed-Dial Numbers, on page 12
Assign a Speed-Dial Code from the Phone ScreenYou can configure a speed-dial index from your phone screen. You can also assign a speed-dial code fromthe phone web page.
Procedure
Step 1 Press Applications .Step 2 Select Speed dials.Step 3 Scroll to an unassigned speed-dial index.Step 4 Press Edit and do one of the following:
• Enter the name and number.• Select Option > Select from contact to select a contact from the address book.
Step 5 Press Save.
Cisco IP Phone 6800 Series Multiplatform Phones User Guide39
CallsSpeed Dial

Make a Call with a Speed-Dial Code
Before you begin
Set up speed-dial codes on the phone web page or from your phone screen.
Procedure
Enter the speed-dial code and press Call.
Configure a Speed Dial on a Line KeyYou can press any idle line key on your phone and set up speed dial on it. The speed-dial icon, the name, andthe extension number are displayed on your phone screen next to the line key. You can also verify this changeby checking the Extended Function field on the web page. After you configure the speed dial on a line key,you can press the line key to modify the speed-dial information and assign a new phone number and name.You can press the line key that has speed-dial configured to speed dial a number.
You can configure your key expansion module line key as a speed dial key and you can press that line key tospeed dial a number.Your administrator configures the key expansion module line key as a speed dial keyfrom the phone web page.
Before you begin
Go to the web page and disable the line key that will become the speed dial key.
Procedure
Step 1 Press any idle line key on your phone for at least two seconds.Step 2 In the Speed-Dial window, add the speed-dial name and phone number to call when you press this line key.Step 3 Click Save.
Remove a Speed Dial from a Line KeyYou can press a line key on your phone and delete speed dial assigned to it. The speed dial on the line key isremoved. Check the phone web page to confirm that the speed dial is removed.
Procedure
Step 1 Press a line key that has a speed dial configured for at least two seconds.Step 2 Press Option > Delete in the Speed-Dial window on the phone screen.
Cisco IP Phone 6800 Series Multiplatform Phones User Guide40
CallsMake a Call with a Speed-Dial Code

Use the Line in Focus for Speed-Dial CallsYou can configure a line key to perform a speed dial either with a Voice Profile ID (VID) or without a VID.When both are configured, VID has a higher priority. The call is routed to that line.
If a line key is configured without VID, you can configure a speed-dial key to use the line in focus.
Procedure
Step 1 Configure a speed-dial key without using VID.Step 2 Change the focus to the line that you prefer.Step 3 Press the speed-dial key to make a call.
The call is made with the line in focus.
If the existing number of calls on the line in focus is equal to the value set in the Call Appearances Per Linefield in the phone web page, the speed-dial call is made from the next available line.
Use the Line in Focus to Check Speed-Dial CallsIf a line key is configured without VID, you can perform a check to confirm whether the call is made withthe line in focus.
Procedure
Step 1 Configure a speed-dial key without using VID.Step 2 Change the focus to the line that you prefer.Step 3 Press the speed-dial key to make a call.
The call is made with the line in focus.
Dial an International NumberYou can dial international calls when you prefix the phone number with a plus (+) sign.
Procedure
Step 1 Press and hold star (*) for at least 1 second.
The plus (+) sign is displayed as the first digit in the phone number.
Step 2 Enter the phone number.Step 3 Press Call or wait 10 seconds after the last key press to automatically place the call.
Cisco IP Phone 6800 Series Multiplatform Phones User Guide41
CallsUse the Line in Focus for Speed-Dial Calls

Secure CallsYour administrator can take steps to protect your calls from tampering by people outside your company.Whena lock icon is displayed on your phone during a call, your phone call is secure. Depending upon how yourphone is configured, you may have to sign on before you make a call or before a security tone plays over yourhandset.
Answer CallsYour Cisco IP Phone works just like a regular phone. But we make it easier for you to answer calls.
Answer a Call
Answer Call Waiting
Procedure
Step 1 (Optional) If you have more than one call waiting, select an incoming call.Step 2 Press the line button.
Decline a CallYou can send an active or ringing call to your voicemail system or to a preset phone number.
Procedure
Decline a call by performing one of the following actions:
• Press Decline.• If you have multiple incoming calls, highlight the incoming call and press Decline.
Silence an Incoming CallYou can silence an incoming call when you are busy and don't want to be disturbed. The phone stops ringing,but you get a visual alert, and, can answer the phone call.
Before you begin
Your administrator configures the Ignore softkey on your phone.
Cisco IP Phone 6800 Series Multiplatform Phones User Guide42
CallsSecure Calls
Procedure
Silence the incoming call by any of the methods:
• Press the Ignore softkey. When you press this softkey, the softkey disappears from the phone screen,and is restored again during the next incoming call.
• Press the Volume button down. If you press this button again, the ringer volume decreases.
The ringer volume is restored during the next incoming call.
Turn On Do Not DisturbUse Do Not Disturb (DND) to silence your phone and ignore incoming call notifications when you need toavoid distractions. However, you will always receive paging and emergency calls, even when DND is turnedon.
When you enable DND, your incoming calls forward to another number, such as your voicemail, if it is setup.
When DND is turned on, Do not disturb is displayed in the top bar of the phone screen.
When you enable DND, by default, it affects all lines on your phone. You can also enable DND on a specificline from the Preferences menu.
When a line key has both feature key sync and DND enabled, the DND icon is displayed next to the linekey label.
Procedure
Step 1 Press DND to turn on DND.
If the DND softkey is grayed on the phone screen, contact your administrator.
Step 2 Press Clr DND to turn off DND.
Related TopicsPhone Web Page, on page 12Turn on Do Not Disturb for a Specific Line, on page 71
Turn On or Turn Off DND Using a Star CodeYou can turn on or turn off the do not disturb feature by dialing the respective star codes that are configuredfor your phone. The administrator enters the star codes in the DND Act Code and DND Deact Code fieldsrespectively on the phone web page.
Cisco IP Phone 6800 Series Multiplatform Phones User Guide43
CallsTurn On Do Not Disturb
Procedure
Step 1 To turn on DND, dial the star code provided by your administrator.Step 2 To turn off DND, dial the star code provided by your administrator.
Answer a Coworker's Phone (Call Pickup)If you share call handling tasks with your coworkers, you can answer a call that is ringing on a coworker’sphone. First, your administrator has to assign you to at least one call pickup group.
Answer a Call Within Your Group (Pickup)You can answer a call that rings on another phone within your call pickup group. If multiple calls are availablefor pickup, you'll answer the call that has been ringing for the longest time.
Procedure
Step 1 (Optional) Press the line button.Step 2 Press PickUp to transfer an incoming call within your pickup group to your phone.
Mute Your CallWhile you are on a call, you can mute the audio so that you can hear the other person, but they cannot hearyou.
When you mute the Cisco IP Phone 6821 Multiplatform Phones, a mute icon flashes on the screen. When youmute the Cisco IP Phone 6841 and 6851 Multiplatform Phones, theMute button lights red.
Procedure
Step 1 PressMute .Step 2 PressMute again to turn mute off.
Hold Calls
Put a Call on HoldYou can put an active call on hold and then resume the call when you're ready.
Cisco IP Phone 6800 Series Multiplatform Phones User Guide44
CallsAnswer a Coworker's Phone (Call Pickup)

Procedure
Step 1 Press Hold or Hold.
Step 2 To resume a call from hold, press Hold or Resume.
Answer a Call Left on Hold for Too LongUse the:
• Flashing red line button
• Flashing message indicator on the handset
• Visual notification on the phone screen
• Ringing notification on the phone if a hold reminder is configured with phone web page
Procedure
Press Hold or Resume to resume the held call.
Swap Between Active and Held CallsYou can easily switch between active and held calls.
Procedure
Press the line button for the held call, then press Resume to resume that call and place the other call on holdautomatically.
Call ParkYou can use your phone to park a call. You can then retrieve the call either from your phone or another phone,such as a phone at a coworker’s desk or in a conference room.
A parked call is monitored by your network so you won't forget about it. If the call remains parked for toolong, you hear an alert. You can then answer, decline to answer, or ignore the call on your original phone.You can also continue retrieving it from another phone.
If you don't answer the call within a certain length of time, it's routed to voicemail or another destination, asset by your administrator.
Cisco IP Phone 6800 Series Multiplatform Phones User Guide45
CallsAnswer a Call Left on Hold for Too Long

Place a Call on Hold with Call ParkYou can park an active call that you answered on your phone and then use another phone in the call controlsystem to retrieve the call.
You can also park a call on your own phone. If so then you may not hear a recording.
You can park only one call at the call park number.
Before you begin
Your call must be active.
Procedure
Step 1 Press Park.Your phone plays a recorded message that asks for the number of the parked call.
Step 2 (Optional) If you have call park configured on a key expansion module, press the call park line key.Step 3 Enter the number and press Pound (#).Step 4 (Optional) Communicate the parked number to the person retrieving the call.
Retrieve a Call on Hold with Call ParkYou can pick up a parked call from anywhere in your network.
Before you begin
You need the number that was used to park the call.
Procedure
Step 1 Press Unpark.Step 2 (Optional) Press the line key that has busy lamp field with call pickup configured to retrieve a call on hold.Step 3 (Optional) If you have call park configured on a key expansion module, press the call park line key.Step 4 Enter the number where the call is parked followed by Pound (#).
You can also enter Pound (#) to retrieve the parked call. If you retrieve a call parked on your own phone, youmay not need to enter a number.
Forward CallsYou can forward calls from any line on your phone to another number. Call forward is phone-line specific.If a call reaches you on a line where call forwarding is not enabled, the call rings as usual.
If a line is enabled with feature key sync and call forward on it, the call forward icon is displayed next tothe line key label.
Cisco IP Phone 6800 Series Multiplatform Phones User Guide46
CallsPlace a Call on Hold with Call Park

There are two ways of forwarding your calls:
• Forward all calls
• Forward calls in special situations, such as when the phone is busy or there is no answer.
Verify that your calls are forwarded by looking for the call forwarding icon in the line label or on themiddle top of the phone screen.
Procedure
Step 1 Press Forward all or Forward.
If the Forward all softkey is grayed or doesn't display on the screen, contact your administrator.
Step 2 Do any of the following: Enter the target number exactly as you would dial it from your phone, or select anentry from your list of recent calls or contacts.
• Enter the target number, to which you want to forward incoming calls from this phone line.• Press the Contacts softkey and select a contact from your contact directories.• Press Redial and select an entry from the Placed calls list.
Step 3 Press Call to forward all calls to the specified number.
Related TopicsForward a Call in Specific Situations with the Phone Web Page, on page 47Phone Web Page, on page 12
Forward a Call in Specific Situations with the Phone Web PageUse the phone web page to set up your phone to forward all calls during specific situations, such as whenyour phone is busy.
You can also set up call forward from your user preferences.
Procedure
Step 1 On the phone web page, click User Login > Voice > User.Step 2 Under Call Forward section, set the Cfwd Settings to Yes and enter a phone number for each of the call
forwarding services that you want to enable:
• Cfwd All Dest—Forwards all calls.
• Cfwd Busy Dest—Forwards calls only if the line is busy.
• Cfwd No Ans Dest—Forwards calls only if the line is not answered.
• Cfwd No Ans Delay—Assigns a response delay time.
If your administrator disables the feature key synchronization (FKS) on your phone, you can enter thevalue as number of seconds after which call needs to be forwarded.
Cisco IP Phone 6800 Series Multiplatform Phones User Guide47
CallsForward a Call in Specific Situations with the Phone Web Page

If your administrator enables feature key synchronization (FKS) on your phone, you can enter the valueas number of rings after which call needs to be forwarded.
Step 3 Click Submit All Changes.
Related TopicsPhone Web Page Preferences, on page 79Phone Web Page, on page 12
Transfer CallsYou can transfer an active call to another person.
Transfer a Call to Another PersonWhen you transfer a call, you can stay on the original call until the other person answers. This gives you anopportunity to talk privately with the other person before you remove yourself from the call. If you don't wantto talk, transfer the call before the other person answers.
You can also swap between both callers to consult with them individually before you remove yourself fromthe call.
Procedure
Step 1 From a call that is not on hold, press Transfer or Transfer.Step 2 Enter the other person's phone number and press Call.Step 3 (Optional) Wait until you hear the line ring or until the other person answers the call.
Step 4 Press Transfer or Transfer again.
Consult Before You Complete a TransferBefore you transfer a call, you can talk to the person that you're transferring the call to.
Before you begin
You have an active call that needs to be transferred.
Procedure
Step 1 From a call that is not on hold, press Transfer or Transfer.Step 2 Enter the phone number for the party you want to call and press Call.Step 3 When the other person answers, you can talk to them.
Cisco IP Phone 6800 Series Multiplatform Phones User Guide48
CallsTransfer Calls

Step 4 (Optional) Press the line key to return to the held call.Step 5 (Optional) Press the line key to return to the transfer target phone number.
Step 6 Press Transfer or Transfer again.
Conference Calls and MeetingsYou can talk with several people in a single call. You can dial another person and add them to the call. If youhave multiple phone lines, you can join two calls across two lines. The conference ends when all participantshang up.
Add Another Person to a Call
Procedure
Step 1 From an active call, press Conference or Conf.Step 2 Enter the phone number for the party you want to add and press Call.Step 3 Press Conference or Conf.
Conference with a Star CodePress Conference or Conf only once to combine many active calls into a conference and talk to severalpeople in a single call.
Before you begin
Your administrator has added a star code to the Conference or Conf from the phone web page.
Procedure
Step 1 Make a call from a line and wait for an answer.Step 2 Use the same line to call another number and wait for an answer. You can use the same line to call other
numbers.
Step 3 Press Conference or Conf only once.
All numbers are added to the conference call and you see the star code that represents the conference bridgeURL with one of the active calls.
Cisco IP Phone 6800 Series Multiplatform Phones User Guide49
CallsConference Calls and Meetings

Page a Group of Phones (Multicast Paging)Your administrator can configure your phone as a part of a paging group. In a paging group, your phone canautomatically answer pages from other Multiplatform phones in the phone system. Each paging group has aunique number associated with it. Your administrator gives you the configured paging group numbers. Whenyour phone is paged, you hear three short beeps. The phone establishes one-way audio between you and thephone that called you. You do not have to accept the page.
Procedure
Dial the number of the paging group.
Multiple LinesIf you share phone numbers with other people, you could have multiple lines on your phone. When you havemultiple lines, you have more calling features available to you.
Answer the Oldest Call FirstYou can answer the oldest call available on all your phone lines, including Hold Reversion and Park Reversioncalls that are in an alerting state. Incoming calls always have priority over Held or Park Reversion calls.
When working with multiple lines, you typically press the line button for the incoming call you want to answer.If you just want to answer the oldest call regardless of line, press Answer.
View All Calls on Your PhoneYou can view a list of all your active calls—from all your phone lines—sorted in chronological order, oldestto newest.
The list of all calls is useful if you have multiple lines or if you share lines with other users. The list displaysall your calls together.
Shared LinesYou can share a single phone number with one or more of your coworkers. For example, as an administrativeassistant, you might be responsible for screening calls for the person that you support.
When you share a phone number, you can use that phone line just like you would any other line, but youshould be aware of these special characteristics about shared lines:
• The shared phone number appears on all phones that share the number.
• If your coworker answers the call, the shared line button and the session button are solid red on yourphone.
Cisco IP Phone 6800 Series Multiplatform Phones User Guide50
CallsPage a Group of Phones (Multicast Paging)

• If you put a call on hold, your line button is solid red and the session button pulses red. Your coworker'sline button is also solid red and the session button pulses red.
Add Yourself to a Call on a Shared LineYou or your coworker can join a call on the shared line. Your administrator needs to enable the feature onyour phone.
If a user with whom you share a line has privacy turned on, you can't see their line settings and you can't addyourself to their call.
Procedure
Step 1 Press the line button for the shared line.Step 2 Press Barge, BargeSilent, or BargeSlnt.
Record a CallWhen you're on an active call, you can record it. You might hear a notification tone as you record the call.
During a recording, you see different icons in different recording state. You see the icons on the Calls screenand also on the line key on which you are recording a call.
Table 10: Recording Icons
MeaningIcon
Recording in progress
Recording paused
Before you begin
Your administrator enables your phone with call recording.
Procedure
Step 1 Press Record while on an active call.Step 2 (Optional) While recording is in progress, you can press PauseRec or Pause to pause the recording.Step 3 (Optional) Press ResumeRec or Resume to resume the recording.Step 4 (Optional) Press StopRec or Stop to stop the recording.Step 5 Press End Call to end the call.
Cisco IP Phone 6800 Series Multiplatform Phones User Guide51
CallsAdd Yourself to a Call on a Shared Line

Call Center FeaturesYour administrator configures your phone as a call center phone.
Sign In as a Call Center AgentWhen you're ready to start your work as a call center agent, you sign into the phone and set your status.
Procedure
Step 1 Press AgtSgnIn or AgtIn.Step 2 Press Agt status.Step 3 Highlight the Available status.Step 4 Press Select.
Sign Out as a Call Center AgentWhen you're ready to end your work as a call center agent, change your status and sign out of the phone. Afteryou sign out, you won't receive more call center calls.
If you're on a call and know that you will sign off as soon as the call completes, change your status toWrap-up.
Procedure
Press AgtSgnOut or AgtOut.
Change Your Status as a Call Center AgentFrom time to time, you may need to take a brief break. To do that, change your status so that calls will notring on your phone.
Procedure
Step 1 Press Agt status.Step 2 Highlight the Unavailable status.Step 3 Press Select.Step 4 Press Agt status.Step 5 Highlight the Available status.Step 6 Press Select.
Cisco IP Phone 6800 Series Multiplatform Phones User Guide52
CallsCall Center Features

Step 7 Highlight theWrap-up status.Step 8 Press Select.
Accept a Call Center CallWhen you sign into the phone as a call center agent and your phone status is set to available, your phone areready to accept call center calls. Before you answer a call, you see information about the call.
Procedure
Step 1 When you receive a call, you will see the call information page, press Back to exit and then press Answer toaccept it.
Step 2 Press Call Info to see the call details.Step 3 At the end of the call, press End call.
Hold an Agent CallWhen you are on a call center call, you can put the caller on hold and return to the call. While the call is heldfor a long time, you will hear a reminder tone and a ring splash on the phone screen.
Procedure
Step 1 Press Hold.Step 2 When you are ready to return, select the held call and press Resume.
Set a Disposition Code While on a Call Center CallYou can assign a disposition code to an active customer call or after you set your status to Wrap-up after acall. Disposition codes are quick labels that you apply to call records to describe a call. It is an easy way tolabel calls and keep track of customer contact history so that no details about the call are missed.
Before you begin
Your administrator enables your phone to add a disposition code.
Procedure
Step 1 Press Disp code.Step 2 Press Ok.
Cisco IP Phone 6800 Series Multiplatform Phones User Guide53
CallsAccept a Call Center Call

Trace a CallYou can trace an active call and the last incoming call in any agent status.
Before you begin
Your administrator enables your phone to trace a call.
Procedure
From an active call or after a call, press Trace.
Escalate a Call to a SupervisorWhen you need to escalate a call, you can add your supervisor to a conference call with you and your caller.
Before you begin
Your administrator enables emergency escalation on your phone.
Procedure
Step 1 From an active call, press Emergency.Step 2 In the Emergency Escalation window, click OK.
You can enter preferred emergency escalation number, or you can leave it empty if you do not have anysupervisor preference. You will not see any emergency escalation number.
Cisco IP Phone 6800 Series Multiplatform Phones User Guide54
CallsTrace a Call
C H A P T E R 3Contacts
• Search for a Contact in Multiple Directories, on page 55• Corporate Directory, on page 56• Broadsoft Directory, on page 57• LDAP Directory, on page 57• Instant Message and Presence Contacts, on page 58• Personal Address Book, on page 59• Reverse Name Lookup for Incoming and Outgoing Calls, on page 61
Search for a Contact in Multiple DirectoriesYou can search for a contact in multiple directories simultaneously. The phone searches for the contact in thefollowing locations if Broadsoft directories are configured:
• All Broadsoft directories
• Enterprise directory
• Group directory (included in the Enterprise directory)
• Enterprise Common directory
• Group Common directory
• Personal directory
• The LDAP directory, if it is configured
• Your personal address book
From the search results, you can view the contact's details, add the contact to your personal address book, andcall the contact. You can also edit the number before making the call.
Procedure
Step 1 Do one of the following actions:
• 6821: Press Applications , and select Directories.
Cisco IP Phone 6800 Series Multiplatform Phones User Guide55

• 6841 and 6851: Press Contacts .
Step 2 Select All.Step 3 Enter the name of the contact that you want to find.
The phone searches for first or last names that include your search string anywhere in the name.
Step 4 Press Search.
The search results show both full and partial name matches.
Step 5 (Optional) To view a contact's details, highlight the contact in the search results, and press Details.Step 6 (Optional) To add a contact to the personal address book on the phone, follow these steps:
a) While viewing the contact details, press Option.b) Select Add Contact.c) Enter the contact details and press Save.
Step 7 (Optional) To call a contact, highlight the contact in the search results, and press Call.Step 8 (Optional) To change the number to be dialed and then make a call to a contact, follow these steps:
a) Highlight the contact in the search results, and press Edit call.b) Edit the number as necessary.c) Press Call.
Corporate DirectoryYou can look up a coworker's number from your phone, which makes it easier to give them a call. Youradministrator sets up and maintains the directory.
Your phone supports three types of corporate directories—Lightweight Directory Access Protocol (LDAP)Directory, Broadsoft Directory, and a Cisco XML Directory.
Dial a Contact in the Corporate Directory
Procedure
Step 1 Do one of the following actions.
• 6821: Press Applications , and select Directories.• 6841 and 6851: Press Contacts .
Step 2 Select the directory name that you have defined.Step 3 Select a search criteria.Step 4 Enter your search criteria and press Submit.Step 5 Select the contact and press Call.
Cisco IP Phone 6800 Series Multiplatform Phones User Guide56
ContactsCorporate Directory

Broadsoft DirectoryYou can search and view your personal, group, and enterprise contacts in your Broadsoft Directory, whichmakes it easier to give them a call. Your administrator configures the Broadsoft Directory in your phone. Thisapplication feature uses BroadSoft's Extended Services Interface (XSI).
Search for a Contact in Your BroadSoft Directory
Before you begin
Your administrator set the Directory Type as Enterprise, Group, or Personal on the phone administrationweb page.
Procedure
Step 1 Do one of the following actions.
• 6821: Press Applications , and select Directories.• 6841 and 6851: Press Contacts .
Step 2 Select BroadSoft directory.Step 3 Select a search criteria.
• In BroadSoft Enterprise or Group directory, you can search a contact by Last Name, First Name, UserID, Number, Extension, Department, or Email address.
• In BroadSoft Personal directory, you can search a contact by Name or Number.
Step 4 Enter your search criteria, and press Submit.
LDAP DirectoryThe Cisco IP Phone supports Lightweight Directory Access Protocol (LDAP) v3. You can search for a specifiedLDAP directory for a name, phone number, or both. LDAP-based directories, such as Microsoft ActiveDirectory 2003 and OpenLDAP-based databases, are supported.
Search for a Contact in Your LDAP Directory
Procedure
Step 1 Do one of the following actions.
• 6821: Press Applications , and select Directories.
Cisco IP Phone 6800 Series Multiplatform Phones User Guide57
ContactsBroadsoft Directory

• 6841 and 6851: Press Contacts .
Step 2 Select LDAP directory.Step 3 Enter your search criteria.
You can search by first name and last name of a contact.Step 4 Press Submit.
Instant Message and Presence ContactsInstant message and presence (IM&P) contacts display their presence information. You can see if the personis available, busy, or unavailable, or if the person does not want to be disturbed.
You use the UC-One Communicator to manage your lists of contacts. Your phone gets your lists of contactsfrom the UC-One Communicator server.
When you use the phone, the phone sends status information to the UC-One Communicator.
PresenceYour company may use the “UC-One Communicator” service and integrate it with the phone. You can usethis service to display the status of your contacts.
On the phone, your status is displayed on the status line of the phone. You see one of the following:
• Available
• Away
• Do Not Disturb
• Offline
For more information on the “UC-One Communicator” service, see the Broadsoft documentation.
Make a Call to an IM and Presence ContactWhen you call someone on your IM&P contacts, their presence state is displayed in your call history.
Procedure
Step 1 Do one of the following actions.
• 6821: Press Applications , and select Directories.• 6841 and 6851: Press Contacts .
Step 2 Select IM&P.Step 3 Select a directory.Step 4 Select an entry.
Cisco IP Phone 6800 Series Multiplatform Phones User Guide58
ContactsInstant Message and Presence Contacts

The entry shows the status of your contact.
Step 5 (Optional) Press Detail to view the contact details and press Back to return to the contacts list.Step 6 Press Call.
Change Your Presence StateBecause the phone is always available, you need to set your presence manually on the phone.
Procedure
Step 1 Do one of the following actions.
• 6821: Press Applications , and select Directories.• 6841 and 6851: Press Contacts .
Step 2 Press Presence.Step 3 Select your presence from the list.
• Available—You can take a call.• Away—You have stepped away from the phone for a short time.• Do not disturb—You don't want to take a call.• Offline—You are not available to take calls. Typically, you use this presence when you leave the phonefor long periods of time.
Personal Address Book
Add a New Contact to Your Personal Address Book
Procedure
Step 1 Do one of the following actions.
• 6821: Press Applications , and select Directories.• 6841 and 6851: Press Contacts .
Step 2 Select Personal address book.Step 3 Press Add or you can press the Select button.Step 4 Enter a name and at least one phone number.Step 5 Select a custom ringtone for the contact.
Cisco IP Phone 6800 Series Multiplatform Phones User Guide59
ContactsChange Your Presence State

Step 6 Press Save to add the entry to your personal directory.
Add a New Contact to Your Personal Address Book with Phone Web Page
Procedure
Step 1 On the phone web page, select User Login > Personal Directory.Step 2 Click Add to Personal Directory.Step 3 Add last name, first name, and number.Step 4 Click Submit All Changes.
Search for a Contact in Your Personal Address Book
Procedure
Step 1 Do one of the following actions.
• 6821: Press Applications , and select Directories.• 6841 and 6851: Press Contacts .
Step 2 Select Personal address book.Step 3 Select Option > Search.Step 4 Enter the address entry to search for, and press Submit.
You can only search by name (case insensitive). Search by number is not supported.
Call a Contact in Your Personal Address Book
Procedure
Step 1 Do one of the following actions.
• 6821: Press Applications , and select Directories.• 6841 and 6851: Press Contacts .
Step 2 Select Personal address book and search for an entry.Step 3 Select the personal address book entry that you want to dial.
Cisco IP Phone 6800 Series Multiplatform Phones User Guide60
ContactsAdd a New Contact to Your Personal Address Book with Phone Web Page

Step 4 Press Call.
Edit a Contact in Your Personal Address Book
Procedure
Step 1 Do one of the following actions.
• 6821: Press Applications , and select Directories.• 6841 and 6851: Press Contacts .
Step 2 Select Personal address book and search for an entry.Step 3 Select the entry you want to change.Step 4 Modify the entry information.Step 5 Press Save to modify a phone number.
Remove a Contact from Your Personal Address Book
Procedure
Step 1 Do one of the following actions.
• 6821: Press Applications , and select Directories.• 6841 and 6851: Press Contacts .
Step 2 Select Personal address book.Step 3 Select Search address entry.Step 4 Select the address entry and press Option > Delete to delete the entry.
Reverse Name Lookup for Incoming and Outgoing CallsReverse name lookup searches for the name of a number in an incoming, outgoing, conference, or transfercall. The reverse name lookup acts when the phone cannot find a name using the service provider directory,Call History, or your contacts. Reverse name lookup needs a valid LDAP Directory or XML Directoryconfiguration.
The reverse name lookup searches the phone's external directories. When a search succeeds, the name isplaced in the call session and in the call history. For simultaneous, multiple phone calls, reverse name lookupsearches for a name to match the first call number. When the second call connects or is placed on hold, reversename lookup searches for a name to match the second call.
Cisco IP Phone 6800 Series Multiplatform Phones User Guide61
ContactsEdit a Contact in Your Personal Address Book
Reverse name lookup is enabled by default.
Reverse name lookup searches the directories in the following order:
1. Phone contacts
2. Call History
3. LDAP Directory
4. XML Directory
Cisco IP Phone 6800 Series Multiplatform Phones User Guide62
ContactsReverse Name Lookup for Incoming and Outgoing Calls

C H A P T E R 4Recent Calls
• Recent Calls List, on page 63• View Your Recent Calls, on page 63• View Calls Logs from BroadWorks XSI Server, on page 64• Return a Recent Call, on page 64• Clear the Recent Calls List, on page 65• Create a Contact from a Recents Record, on page 65• Delete a Call Record, on page 66• Delete All Call Records, on page 66
Recent Calls ListUse the Recents list to see the 180 most recent individual calls and call groups.
If your Recents list reaches the maximum size, the next new entry overwrites the oldest entry in the list.
View Your Recent CallsCheck to see who's called you recently.
Each line has missed call badging. You can view the number of missed calls per line on the phone screen.The maximum missed call badge is 99. When you view either the All calls or Missed calls list on the phonescreen for a particular line, the missed call badge for the selected line gets cleared.
The missed call badge and the actual number of missed calls may be different due to a display limit of 180calls for the Recents list. This limit consists of outgoing calls, missed calls, and incoming calls. Also, therecan be some old missed calls that get added to the count for the missed call badge. This can get overwrittenin the Recents list.
Note
Procedure
Step 1 Select a line to view.
Cisco IP Phone 6800 Series Multiplatform Phones User Guide63

Step 2 Press Applications .Step 3 Select Recents.Step 4 Choose to view all recent calls, or to view a certain kind of recent call.
• All Calls• Missed Calls• Received Calls• Placed Calls• Display recents from
To view calls in the Display recents from option, see View Calls Logs from BroadWorks XSI Server, onpage 64.
View Calls Logs from BroadWorks XSI ServerYou can view a separate list for the BroadWorks XSI server call logs and for the local call logs, dependingon your selection.
Before you begin
Your administrator adds the Display recents from menu on your phone.
Procedure
Step 1 Select a line to view.
Step 2 Press Applications .Step 3 Select Recents.Step 4 Select Display recents from and choose one of the options.
• Server: Displays call logs stored on and transferred from the server.• Phone: Displays call logs stored on the phone.
Step 5 Click Set.
You can view all calls, missed calls, received calls, and placed calls list.
Return a Recent CallProcedure
Step 1 Press Recents.
Cisco IP Phone 6800 Series Multiplatform Phones User Guide64
Recent CallsView Calls Logs from BroadWorks XSI Server

Step 2 Select the call record that you want to dial.Step 3 (Optional) Press Edit call to edit the call record.Step 4 Press the required line button or press Call to place the call.
Clear the Recent Calls ListProcedure
Step 1 Select a line to view.
Step 2 Press Applications .Step 3 Select Recents.Step 4 Select a list that you want to delete.
• All Calls• Missed Calls• Received Calls• Placed Calls• Display recents from
Step 5 Press Option and select Delete all.Step 6 Press OK.
Create a Contact from a Recents RecordProcedure
Step 1 Display a Recents record.Step 2 Press Option.Step 3 Press Add contact.
Cisco IP Phone 6800 Series Multiplatform Phones User Guide65
Recent CallsClear the Recent Calls List

Delete a Call RecordProcedure
Step 1 Press Applications .Step 2 Select Recents.Step 3 Choose to view all recent calls, or to view a certain kind of recent call.
• All Calls• Missed Calls• Received Calls• Placed Calls• Display recents from
Step 4 Highlight the individual record or call group that you want to delete.Step 5 Press Option.Step 6 Select Delete entry.Step 7 Press OK.
Delete All Call RecordsYou can delete all call history records on your phone.
Procedure
Step 1 Press Applications .Step 2 Select Recents.Step 3 Select All calls.Step 4 Press Option and select Delete all.Step 5 Press OK.
Cisco IP Phone 6800 Series Multiplatform Phones User Guide66
Recent CallsDelete a Call Record

C H A P T E R 5Voicemail
• Your Voicemail Account, on page 67• Check for New Voice Messages, on page 68• Access Voicemail, on page 68• Access Audio Voicemail, on page 68
Your Voicemail AccountYou can access your voice messages directly from your phone. But your administrator must set up yourvoicemail account, and may also set up your phone to access the voicemail system.
TheMessages button or theMessages softkey on your phone acts as a speed dial into the voicemailsystem.
When you aren’t at your desk, you can call your voicemail system to access your voicemail. Your administratorcan give you the voicemail system phone number.
Because each voicemail system is different, we can't tell you how to use your voicemail system. For informationabout your voicemail commands, see the voicemail system user documentation or contact your administrator.
Set up Voicemail on Your PhoneIf your administrator has not set up your voicemail phone number on your phone, you can set it up yourself.
Procedure
Step 1 Press Applications .Step 2 Select User preferences > Call preferences.Step 3 Enter your voicemail phone number in Voice mail.Step 4 Press Set.
Cisco IP Phone 6800 Series Multiplatform Phones User Guide67

Check for New Voice MessagesTo find out if you have new voicemail messages, look for one of these signs:
• The light strip on your handset is solid red.
• The number of missed calls and voicemail messages is displayed on your screen. If you have more than99 new messages, a plus (+) sign is displayed.
• An exclamation mark (!) indicates urgent voicemail messages.
You will also hear a stutter tone played from your handset, headset, or speakerphone when you use a phoneline. This stutter tone is line-specific. You only hear it when you use a line that has voice messages.
Access VoicemailProcedure
Step 1 PressMessages orMessages.Step 2 Follow the voice prompts.
Access Audio VoicemailDepending upon how your administrator has set up your phone, you can retrieve your voicemail withoutviewing a list of messages. This option is useful if you prefer a list of voicemail messages, but you occasionallyaccess your messages without the visual prompts.
Procedure
Step 1 In the screen, press the Audio softkey.Step 2 When prompted, enter your voicemail credentials.
Cisco IP Phone 6800 Series Multiplatform Phones User Guide68
VoicemailCheck for New Voice Messages

C H A P T E R 6Settings
• Settings Overview, on page 69• User Preferences Menu, on page 69• Device Administration Settings, on page 77• Phone Web Page Preferences, on page 79• Restart Your Phone, on page 82
Settings OverviewYou can customize your phone in a number of ways:
• From themenus on the phone, accessed from theApplications button. The common settings menusare:
• User preferences
• Device administration
• From the phone web page.
User Preferences MenuYou can customize many settings for your phone from theUser preferencesmenu. The menu groups settingsaccording to functions.
Call PreferencesThe User preferences > Call preferences menu allows you to set the way your phone handles calls.
Forward Calls in Specific Situations from Your PhoneYou can set up your phone so that calls are forwarded during specific situations, such as when your phone isbusy.
Cisco IP Phone 6800 Series Multiplatform Phones User Guide69

Before you begin
Call forwarding must be enabled on your phone before you can forward your calls in specific situations.
Procedure
Step 1 Press Applications .Step 2 Select User preferences > Call preferences.Step 3 Select On for Call forwarding to enable call forwarding.Step 4 Enter a phone number for each of the call forwarding services that you want to enable:
• Forward all number—Forwards all incoming calls to a target phone number.• (6821)Forward busy—Forwards all incoming calls to a target phone number when the primary line isactive.
• (6841 and 6851)Forward busy number—Forwards all incoming calls to a target phone number whenthe primary line is active.
• (6821)Forward no answer—Forwards an incoming call that is not answered.• (6841 and 6851)Forward no answer number—Forwards an incoming call that is not answered.• Fwd no answer delay—Assigns a response delay time.
If your administrator disables the feature key synchronization (FKS) on your phone, you can enter thevalue as number of seconds after which call needs to be forwarded.
If your administrator enables feature key synchronization (FKS) on your phone, you can enter the valueas number of rings after which call needs to be forwarded.
Step 5 Press Set.
Set up Voicemail on Your PhoneIf your administrator has not set up your voicemail phone number on your phone, you can set it up yourself.
Procedure
Step 1 Press Applications .Step 2 Select User preferences > Call preferences.Step 3 Enter your voicemail phone number in Voice mail.Step 4 Press Set.
Block Caller IDYou can block your caller identification to prevent your name and phone number from being displayed onthe receiver's screen when you make a call. This feature helps you to maintain privacy.
Cisco IP Phone 6800 Series Multiplatform Phones User Guide70
SettingsSet up Voicemail on Your Phone

Before you begin
Your administrator enables Block CID feature on your phone.
Your administrator enables Block CID feature on the XSI BroadWorks server.
Procedure
Step 1 Press Applications .Step 2 Select User preferences > Call preferences.Step 3 Select Block caller ID.Step 4 Press Select to toggle caller ID blocking on or off.
If your administrator enables the block caller ID feature on the XSI Broadwords server, your phone retrievesthe value from the server and you see the value that your administrator sets on the server. You can then modifythe value from the Block caller ID menu on the phone.
Step 5 Press Set to save the change.
Block an Anonymous CallYou can block an incoming call that does not have caller information.
Procedure
Step 1 Press Applications .Step 2 Select User preferences > Call preferences > Block anonymous call.Step 3 Select On if you want to block the call that does not have caller information, or select Off to allow the call.Step 4 Press Set to save the setting.
Turn on Do Not Disturb for a Specific LineSet do not disturb (DND) to silence your phone and suppress incoming call notifications when you need toavoid distractions. You can suppress all incoming call notifications or you can suppress a specific callernotification.
Procedure
Step 1 Select a phone line using the Navigation cluster.
Step 2 Press Applications .Step 3 Select User preferences > Call preferences > Do not disturb.
If the Do not disturb menu doesn't display on the screen, contact your administrator.Note
Cisco IP Phone 6800 Series Multiplatform Phones User Guide71
SettingsBlock an Anonymous Call

Step 4 Select On to turn on DND or select Off to turn off DND.Step 5 Press Set to save the setting.
Control the Call Waiting ToneWhen you are talking with someone and get another call, you can set the phone to give a call waiting tone.
Procedure
Step 1 Press Applications .Step 2 Select User preferences > Call preferences > Call waiting.Step 3 Press On you want the call waiting tone, or press Off if you don't want the call waiting tone.Step 4 Select Set to apply the changes.
Secure a CallYou can encrypt calls to protect them from eavesdroppers. You can set up the secure call feature on alloutbound calls or for a specific call.
Procedure
Step 1 Press Applications .Step 2 Select User preferences > Call preferences > Secure call.Step 3 Select On to enable secure call feature or select Off to disable the secure call feature.Step 4 Press Set to save the setting.
Set Up an Auto Answer Page
Procedure
Step 1 Press Applications .Step 2 Select User preferences > Call preferences > Auto answer page.Step 3 Select On to enable the Auto answer page or select Off to disable Auto answer page.Step 4 Press Set to save the changes.
Cisco IP Phone 6800 Series Multiplatform Phones User Guide72
SettingsControl the Call Waiting Tone

Enable the Missed Call ShortcutWhen you turn on the Missed call shortcut, you can use Call rtn softkey to call the person whose call youmissed.
Procedure
Step 1 Press Applications .Step 2 Select User preferences > Call preferences >Missed call shortcut.Step 3 Press On if you want to the shortcut, or press Off if you don't want the shortcut.Step 4 Select Set to apply the changes.
Add Multiple Locations for a BroadWorks XSI UserYou can add multiple locations to your phone extension. This allows an incoming call to seamlessly be movedfrom your phone to other mobile phones or desk phones that are added to your extension.
Before you begin
Your administrator has enabled the Anywhere feature on the extension.
Procedure
Step 1 Press Applications .Step 2 Select User preferences > Call preferences.Step 3 Select Anywhere.Step 4 (Optional) Select a line if BroadWorks Anywhere is configured on multiple lines.Step 5 Add contact number and name in the Locations screen.
Maximum length of a name that you can enter is 25. You can also keep the Name field empty.
Maximum length of a number that you can enter is 20.
Step 6 Enable or disable the location.Step 7 Press Save to add the locations to the Locations list.
Audio PreferencesThe User preferences > Audio preferences menu allows you to customize ringtones and how you prefer toanswer calls.
Cisco IP Phone 6800 Series Multiplatform Phones User Guide73
SettingsEnable the Missed Call Shortcut

Specify an Audio Device for a CallYou can connect an analog headset, a Bluetooth headset, and a USB headset simultaneously to your phone.However, you can use only one headset at time.
When you connect multiple headsets to the phone, you can choose the audio device to use for a call. Yourchoice applies when you place or answer a call with a line key or the corresponding softkey.
Procedure
Step 1 Press Applications .Step 2 Select User preferences > Audio preferences > Preferred audio device.Step 3 Press Select to choose one of the options:
• None—Selects the last used audio device.• Speaker—Selects the speakerphone as the audio device.• Headset—Selects a headset as the audio device.
Step 4 Press Set to save the selection.
Change the RingtoneYou can set a ringtone for an incoming call.
Procedure
Step 1 Press Applications .Step 2 Select User preferences > Ringtone > Ext (n) - Ring tone, where n= extension number.Step 3 Scroll through the list of ringtones and press Play to hear a sample.Step 4 Press Select and then Set to save a selection.
Screen PreferencesThe User preferences > Screen preferences menu allows you to set your phone screen display options.
Change the Screen SaverYou can enable your phone screen saver, and specify its appearance and the amount of time for the phone tobe idle before the screen saver appears.
Procedure
Step 1 Press Applications .
Cisco IP Phone 6800 Series Multiplatform Phones User Guide74
SettingsSpecify an Audio Device for a Call

Step 2 Select User preferences > Screen preferences > Screen saver.Step 3 Select On to turn on screen saver and select Off to turn it off.Step 4 Select Screen saver settings to choose the settings:
• Screen saver type—Choose one of the following options:
• Clock—Displays a rounded clock with the wallpaper in the background.
• Download Picture—Displays a picture pushed from the phone web page.
• Logo: Displays a logo as the phone screensaver. This image is added in the Logo URL field of thepone web page.
• Trigger interval—Enter the number of seconds that the phone remains idle before the screen saver turnson.
• Refresh interval—Enter the number of seconds before the screen saver should refresh (if, for example,you chose a rotation of pictures).
Step 5 Press Set.
Set the Backlight TimerYou can adjust the length of time that the phone screen is bright before it automatically dims.
Procedure
Step 1 Press Applications .Step 2 Select User preferences > Screen preferences > Backlight timer.Step 3 Press Select to scroll through the list and select a duration for which the backlight remains on:
• 10 seconds
• 20 seconds
• 30 seconds
• Always On
• Off
Step 4 Press Set to apply the selection.
Cisco IP Phone 6800 Series Multiplatform Phones User Guide75
SettingsSet the Backlight Timer

Adjust the Phone Screen Contrast
Procedure
Step 1 Press Applications .Step 2 Select User preferences > Screen preferences > Contrast level.Step 3 Press the Navigation cluster up or down to increase or decrease the brightness.Step 4 Press Save.
Set the Phone WallpaperYou can select the wallpaper (background) for the phone screen.
Procedure
Step 1 Press Applications .Step 2 Select User preferences > Screen preferences >Wallpaper.Step 3 Press Select to scroll through the list and select a wallpaper.Step 4 Press Set to apply the selection.
Attendant Console PreferencesThe User preferences > Attendant console preferences menu allows you to customize how calls display.
Change the Display Mode
Procedure
Step 1 Press Applications .Step 2 Select User preferences > Attendant console preferences > Display mode.
The following options are available:
• Name
• Ext
• Both
Step 3 Choose the display mode and press Set.
Cisco IP Phone 6800 Series Multiplatform Phones User Guide76
SettingsAdjust the Phone Screen Contrast

Device Administration SettingsYou can set some other preferences from the phone in the Device administration menu.
Change the Time FormatYou can change the current time format that the phone screen displays.
Procedure
Step 1 Press Applications .Step 2 Select Device administration > Date/Time > Time format.
To set daylight savings, select Device administration > Date/Time > Daylight savings. Select On to turnon the daylight savings and select Off to turn it off.
Step 3 (Optional) Select Device administration > Date/Time > Time zone.Step 4 Select a time format and press Set to apply the changes.
Change the Date FormatYou can change the date format that you want to see on your phone screen.
Procedure
Step 1 Press Applications .Step 2 Select Device administration > Date/Time > Date format.Step 3 Select a date format and press Set to apply the changes.
Set LanguageDepending upon how your phone is configured, you may be able to change the language used by your phone.
Procedure
Step 1 Press Applications .Step 2 Select Device administration > Language.Step 3 Select a language from the list of available languages.
Cisco IP Phone 6800 Series Multiplatform Phones User Guide77
SettingsDevice Administration Settings
Step 4 Select Save.
Set up Power SaveYou can put your phone into power save mode when your phone is idle. If your phone is not idle, you can'tturn power save on and you see a message on the screen.
The Cisco IP Phone 6821 Multiplatform Phones does not support power save.Note
When your phone is in power save mode, the screen is not lit and the Select button is lit. You press the Selectbutton to wake up the phone.
Procedure
Step 1 Press Applications .Step 2 Select Device administration > Power save.Step 3 Select OK.
Set PasswordReset your phone password regularly to maintain network security. Keep all passwords in a safe place to avoidtheft.
Before you begin
You must have your existing password.
Procedure
Step 1 Press Applications .Step 2 Select Device administration > Set password.Step 3 Enter your current password in the Old password field.Step 4 Enter your new password in the New password and the Reenter new password fields.Step 5 Select Save.
Cisco IP Phone 6800 Series Multiplatform Phones User Guide78
SettingsSet up Power Save

Set up the Profile AccountYou need to enter the authentication credentials to resynchronize your phone with the provisioning profilewhen prompted with the Profile account setup screen.
If you missed the Profile account setup screen, you can also access it from the phone menu or the Setupsoftkey if available.
If the phone fails to sign in, contact your administrator.
Before you begin
Your administrator specifies the profile authentication type on your phone and provides you with theauthentication credentials.
Procedure
Step 1 Press Applications .Step 2 Select Device administration > Profile account setup.
Your username and password are automatically filled. These fields are blank if your username and passwordwere not added before.
Step 3 Press Sign in to save your username and password.
If any of the Username field or the Password field is empty, the phone displays a grey Sign insoftkey and you can't press the softkey.
Note
Step 4 (Optional) Enter a new username and password if you want to login with another set of credentials.
Phone Web Page PreferencesYou can customize some settings from the phone web pages.
Related TopicsPhone Web Page, on page 12Forward a Call in Specific Situations with the Phone Web Page, on page 47
Assign a Ring Tone with the Phone Web Page
Procedure
Step 1 On the phone web page, select User Login > Voice > Ext(n), where (n) is the number of an extension.Step 2 In Call Feature Settings area, choose a ringtone from the Default Ring drop-down list.
If you don't want to specify a ringtone for the phone line, choose No ring. Your phone doesn't ring whenreceiving an incoming call.
Cisco IP Phone 6800 Series Multiplatform Phones User Guide79
SettingsSet up the Profile Account

Step 3 Click Submit All Changes.
Turn on DND from the Phone Web Page
Procedure
Step 1 On the phone web page, select User Login > Voice > User.Step 2 Under Supplementary Services, set DND Settings to Yes.
You can turn on DND on for all lines if your administrator hasn't enabled feature key sync (FKS).
Step 3 Click Submit All Changes.
Configure the Screen Saver with the Phone Web PageYou can configure a screen saver for the phone. When the phone is idle for a specified time, it enters screensaver mode.
Any button press returns the phone to normal mode.
Procedure
Step 1 On the phone web page, select Voice > User.Step 2 In the Screen section, set up the fields as described in the following table.
DescriptionParameter
Select Yes to enable a screen saver on the phone.When the phone is idle for a specified time, it entersscreen saver mode.
Default: No
Screen Saver Enable
Types of screen saver. Options you can choose:
• Clock—Displays a digital clock on a plainbackground.
• Download Picture—Displays a picture pushedfrom the phone webpage.
• Logo: Displays a logo on the phone screen. Adda logo image in the Logo URL field.
Screen Saver Type
Cisco IP Phone 6800 Series Multiplatform Phones User Guide80
SettingsTurn on DND from the Phone Web Page
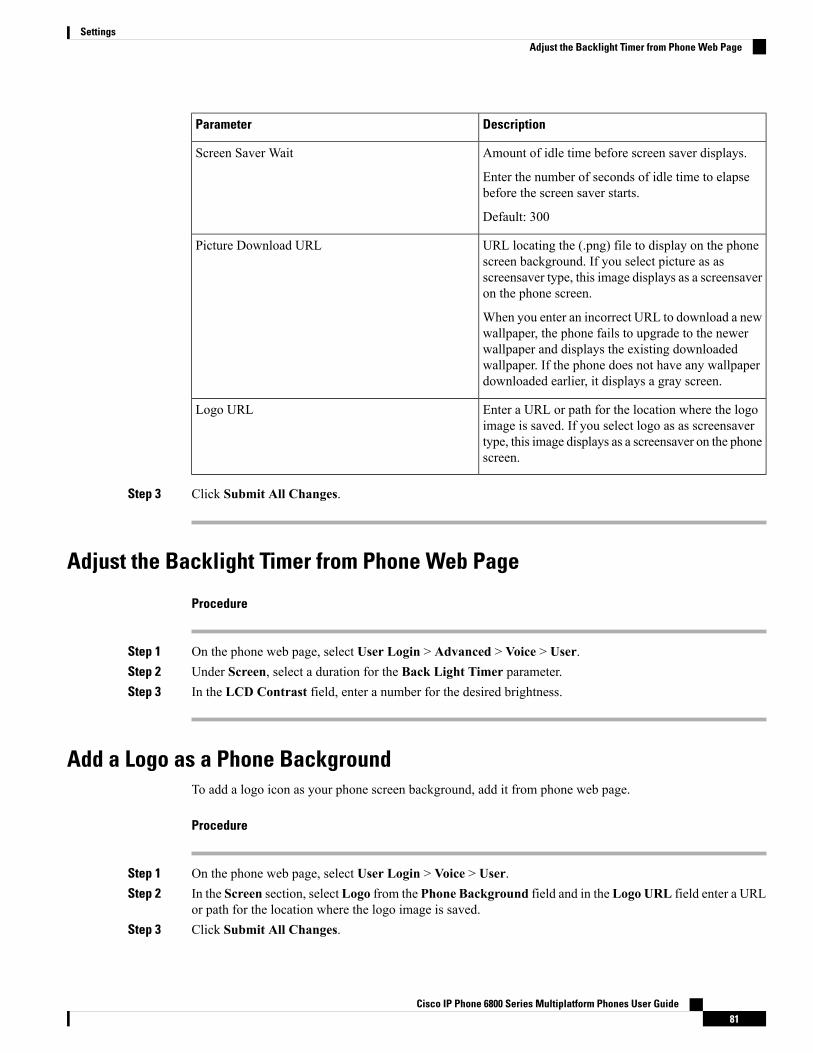
DescriptionParameter
Amount of idle time before screen saver displays.
Enter the number of seconds of idle time to elapsebefore the screen saver starts.
Default: 300
Screen Saver Wait
URL locating the (.png) file to display on the phonescreen background. If you select picture as asscreensaver type, this image displays as a screensaveron the phone screen.
When you enter an incorrect URL to download a newwallpaper, the phone fails to upgrade to the newerwallpaper and displays the existing downloadedwallpaper. If the phone does not have any wallpaperdownloaded earlier, it displays a gray screen.
Picture Download URL
Enter a URL or path for the location where the logoimage is saved. If you select logo as as screensavertype, this image displays as a screensaver on the phonescreen.
Logo URL
Step 3 Click Submit All Changes.
Adjust the Backlight Timer from Phone Web Page
Procedure
Step 1 On the phone web page, select User Login > Advanced > Voice > User.Step 2 Under Screen, select a duration for the Back Light Timer parameter.Step 3 In the LCD Contrast field, enter a number for the desired brightness.
Add a Logo as a Phone BackgroundTo add a logo icon as your phone screen background, add it from phone web page.
Procedure
Step 1 On the phone web page, select User Login > Voice > User.Step 2 In the Screen section, selectLogo from the Phone Background field and in the Logo URL field enter a URL
or path for the location where the logo image is saved.Step 3 Click Submit All Changes.
Cisco IP Phone 6800 Series Multiplatform Phones User Guide81
SettingsAdjust the Backlight Timer from Phone Web Page

After the logo is added in the phone background, if you select Default from the Phone Background list andsave the changes, the logo icon on the phone screen will disappear.
Restart Your PhoneYou may have to reboot your phone for a software upgrade or other changes to take effect. Your settings orother customizations do not change.
Procedure
Step 1 Press Applications .Step 2 Select Device administration > Restart.Step 3 Select OK to confirm that you want to reboot your phone.
Cisco IP Phone 6800 Series Multiplatform Phones User Guide82
SettingsRestart Your Phone

C H A P T E R 7Accessories
• Supported Accessories, on page 83• Headsets, on page 83• Cisco 6800 Series Key Expansion Module Setup Overview, on page 84
Supported AccessoriesThe Cisco IP Phone 6800 Series Multiplatform Phones supports both Cisco and third-party accessories.
Table 11: Accessory Support for the Cisco IP Phone 6800 Series Multiplatform Phones
685168416821TypeAccessory
Cisco Accessories
Supported
Supports one keyexpansion module
Not supportedNot supportedAdd-on moduleCisco IP Phone 6800Key ExpansionModule
SupportedSupportedNot supportedAdd-on moduleCisco IP Phone 6800Wall Mount Kit
Third-Party Accessories
SupportedSupportedSupportedAnalogHeadsets
SupportedSupportedSupportedAnalog Wideband
Not supportedNot supportedNot supportedExternalMicrophone
Not supportedNot supportedNot supportedExternalSpeakers
HeadsetsCheck with the headset manufacturer to confirm whether you can use it with your Cisco phone.
If you plug a headset into the phone during an active call, the audio path automatically changes to the headset.
Cisco IP Phone 6800 Series Multiplatform Phones User Guide83

Standard HeadsetsYou can use a standard headset with your desk phone. Standard headsets plug into the back of the phone withan RJ-type connecter.
Connect a Standard Headset
Procedure
Plug the headset into the headset jack on the back of the phone and press the cable into the cable channel.
The headset jack is beside the handset jack.
E-Hookswitch HeadsetElectronic Hookswitch headsets use a base station and a wireless headset. The base station plugs into yourphone headset jack. After installing the headset, your administrator enables it on the phone web page.
The Cisco IP Phone 6851Multiplatform Phones supports Electronic Hookswitch headsets. The Cisco IP Phone6821 and 6841 Multiplatform Phones do not support these headsets.
Cisco 6800 Series Key Expansion Module Setup OverviewThe Cisco IP Phone 6800 Key Expansion Module add extra programmable buttons to the phone. Theprogrammable buttons can be set up as speed-dial buttons, or phone feature buttons.
The Cisco IP Phone 6851 Multiplatform Phone supports only one key expansion module. The key expansionmodule provides 14 lines or programmable buttons, and two pages. Each page contains 14 lines or buttons.
Cisco IP Phone 6800 Series Multiplatform Phones User Guide84
AccessoriesStandard Headsets

Key Expansion Module Buttons and Hardware
The following table describes the features of the key expansion module.
LCD screens—Displays the phone number, name, and icon. Icons indicate the line status andthe phone service assigned on that line.
1
Lighted buttons—14 buttons. Each button corresponds to one line (same as on the phone). Thelights beneath each button indicate the state of the corresponding line as follows:
• light off—Button is not configured.
• green steady—Line is configured correctly, registered successfully, and is in idle state.
• red steady—Line is in use and has an active call on it or has one parked call.
• amber steady/blinking—A configuration error occurred when this feature was beingset up.
2
Page buttons—2 buttons. The button for page 1 is labeled as 1 and the button for page 2 is labeledas 2. The lights in each button indicate the state of the page as follows:
• green steady—Page is in view.
• light off—Page is not in view.
• amber steady—Page is not in view but has one or more alerting calls on the page.
3
Find Information about the Key Expansion Module of Your PhoneYour administrator may ask for information about the key expansion module that is added to your phone.This information uniquely identifies the key expansion module for troubleshooting purposes.
Cisco IP Phone 6800 Series Multiplatform Phones User Guide85
AccessoriesKey Expansion Module Buttons and Hardware

Procedure
Step 1 Press Applications .Step 2 Select Status > Accessories.Step 3 Select Attendant Console Unit1 .Step 4 Press Detail.
In the Accessories details screen you see the details:
• Name: Displays the name assigned to the key expansion module.
• Unit enabled: Displays Yes or No if the connected key expansion module is enabled or disabledrespectively.
• Unit online: Displays Yes or No if the connected key expansion module is online or offline respectively.
• Hardware version: Displays the hardware version of the key expansion module.
• Software version: Displays the software version installed in the key expansion module.
• VID: Indicates the extension on the calling phone from which the outbound call is sent.
• Serial number: Displays the serial number of the key expansion module.
• Product name: Displays the name that you assigned to the key expansion module.
• Description: Displays a description for the key expansion module. For example, Cisco IP Phone 6800Key Expansion Module.
Adjust the Contrast of the Key Expansion ModuleYou can adjust the key expansion module screen contrast to make the screen easier to read.
Procedure
Step 1 Press Applications .Step 2 Select User Preferences > Attendant console preferences.Step 3 Select Contrast level.Step 4 Press the Navigation cluster up to increase the contrast, or down to reduce the contrast.Step 5 Press Save to save the contrast level.
Cisco IP Phone 6800 Series Multiplatform Phones User Guide86
AccessoriesAdjust the Contrast of the Key Expansion Module

Change the Display Mode of the Key Expansion Module from the Phone
Procedure
Step 1 Press Applications .Step 2 Select User Preferences > Attendant console preferences.Step 3 Select Display mode.Step 4 Press the Select button of the Navigation cluster to choose a display mode.
The options are:
• Both• Name• Ext
Step 5 Press Save to save the display mode.
Cisco IP Phone 6800 Series Multiplatform Phones User Guide87
AccessoriesChange the Display Mode of the Key Expansion Module from the Phone

Cisco IP Phone 6800 Series Multiplatform Phones User Guide88
AccessoriesChange the Display Mode of the Key Expansion Module from the Phone

C H A P T E R 8Product Safety and Security
• Safety and Performance Information, on page 89• Compliance Statements, on page 90• Cisco Product Security Overview, on page 92• Important Online Information, on page 93
Safety and Performance Information
Power OutageYour access to emergency service through the phone requires that the phone receive power. If a powerinterruption occurs, service or emergency calling service dialing does not function until power is restored. Ifa power failure or disruption occurs, you may need to reset or reconfigure the equipment before you can useservice or emergency calling service dialing.
External DevicesWe recommend that you use good-quality external devices that are shielded against unwanted radio frequency(RF) and audio frequency (AF) signals. External devices include headsets, cables, and connectors.
Depending on the quality of these devices and their proximity to other devices, such as mobile phones ortwo-way radios, some audio noise may still occur. In these cases, we recommend that you take one or moreof these actions:
• Move the external device away from the source of the RF or AF signals.
• Route the external device cables away from the source of the RF or AF signals.
• Use shielded cables for the external device, or use cables with a better shield and connector.
• Shorten the length of the external device cable.
• Apply ferrites or other such devices on the cables for the external device.
Cisco cannot guarantee the performance of external devices, cables, and connectors.
Cisco IP Phone 6800 Series Multiplatform Phones User Guide89

In European Union countries, use only external speakers, microphones, and headsets that are fully compliantwith the EMC Directive [89/336/EC].
Caution
Ways to Provide Power to Your PhoneYou can provide power to your desk phone in one of two ways:
• Use the power adapter that comes with your phone.
• If your network supports Power over Ethernet (PoE), you can plug your phone into the network. Plugan Ethernet cable into the Ethernet phone port and into the network.
If you are not sure whether your network supports PoE, check with your administrator.
Phone Behavior During Times of Network CongestionAnything that degrades network performance can affect phone voice and in some cases can cause a call todrop. Sources of network degradation can include, but are not limited to, the following activities:
• Administrative tasks, such as an internal port scan or security scan
• Attacks that occur on your network, such as a Denial of Service attack
UL WarningThe LAN/Ethernet cable or other cables attached to the device should not be extended outside of the building.
Compliance Statements
Compliance Statements for the European Union
CE MarkingThe following CE mark is affixed to the equipment and packaging.
Cisco IP Phone 6800 Series Multiplatform Phones User Guide90
Product Safety and SecurityWays to Provide Power to Your Phone

Compliance Statements for CanadaThis device complies with Industry Canada license-exempt RSS standard(s). Operation is subject to thefollowing two conditions: (1) this device may not cause interference, and (2) this device must accept anyinterference, including interference that may cause undesired operation of the device.
This product meets the applicable Innovation, Science and Economic Development Canada technicalspecifications.
Avis de Conformité Canadien
Ce dispositif est conforme aux normes CNR exemptes de licence d’Industrie Canada. Le fonctionnement dece dispositif est autorisé sous réserve des deux conditions suivantes : (1) il ne doit pas produire de brouillageet (2) l’utilisateur du dispositif doit être prêt à accepter tout brouillage radioélectrique reçumême si ce brouillageest susceptible de compromettre le fonctionnement du dispositif.
Le présent produit est conforme aux spécifications techniques applicables d'Innovation, Sciences etDéveloppement économique Canada.
Compliance Statements for New Zealand
Permit to Connect (PTC) General WarningThe grant of a Telepermit for any item of terminal equipment indicates only that Telecom has accepted thatthe item complies with minimum conditions for connection to its network. It indicates no endorsement of theproduct by Telecom, nor does it provide any sort of warranty. Above all, it provides no assurance that anyitem will work correctly in all respects with another item of Telepermitted equipment of a different make ormodel, nor does it imply that any product is compatible with all of Telecom's network services.
Compliance Information for Japan
VCCI Compliance for Class B Equipment
Japan JATE Compliance CP-6821, CP-6841, CP-6851
“5.2/5.3GHz is limited to indoor use only in Japan”
FCC Compliance StatementsThe Federal Communications Commission requires compliance statements for the following:
Cisco IP Phone 6800 Series Multiplatform Phones User Guide91
Product Safety and SecurityCompliance Statements for Canada

FCC Part 15.19 StatementThis device complies with part 15 of the FCC Rules. Operation is subject to the following two conditions: (1)This device may not cause harmful interference, and (2) this device must accept any interference received,including interference that may cause undesired operation.
FCC Part 15.21 StatementChanges or modifications not expressly approved by the party responsible for compliance could void theuser’s authority to operate the equipment.
FCC RF Radiation Exposure StatementThis equipment complies with FCC radiation exposure limits set forth for an uncontrolled environment. Endusers must follow the specific operating instructions for satisfying RF exposure compliance. This transmittermust be at least 20 cm from the user and must not be collocated or operating in conjunction with any otherantenna or transmitter.
FCC Receivers and Class B Digital StatementThis product has been tested and complies with the specifications for a Class B digital device, pursuant toPart 15 of the FCC Rules. These limits are designed to provide reasonable protection against harmfulinterference in a residential installation. This equipment generates, uses, and can radiate radio frequencyenergy and, if not installed and used according to the instructions, may cause harmful interference to radiocommunications. However, there is no guarantee that interference will not occur in a particular installation.
If this equipment does cause harmful interference to radio or television reception, which is found by turningthe equipment off and on, the user is encouraged to try to correct the interference by one or more of thefollowing measures:
• Reorient or relocate the receiving antenna
• Increase the separation between the equipment or devices
• Connect the equipment to an outlet other than the receiver's
• Consult a dealer or an experienced radio/TV technician for assistance
Cisco Product Security OverviewThis product contains cryptographic features and is subject to U.S. and local country laws that govern import,export, transfer, and use. Delivery of Cisco cryptographic products does not imply third-party authority toimport, export, distribute, or use encryption. Importers, exporters, distributors, and users are responsible forcompliance with U.S. and local country laws. By using this product, you agree to comply with applicablelaws and regulations. If you are unable to comply with U.S. and local laws, return this product immediately.
Further information regarding U.S. export regulations can be found at https://www.bis.doc.gov/policiesandregulations/ear/index.htm.
Cisco IP Phone 6800 Series Multiplatform Phones User Guide92
Product Safety and SecurityFCC Part 15.19 Statement

Important Online InformationEnd User License Agreement
The End User License Agreement (EULA) is located here: https://www.cisco.com/go/eula
Regulatory Compliance and Safety Information
Regulatory Compliance and Safety Information (RCSI) is located here:
https://www.cisco.com/c/dam/en/us/td/docs/voice_ip_comm/cuipph/6800-series/RCSI/RCSI-0338-book.pdf
Cisco IP Phone 6800 Series Multiplatform Phones User Guide93
Product Safety and SecurityImportant Online Information

Cisco IP Phone 6800 Series Multiplatform Phones User Guide94
Product Safety and SecurityImportant Online Information