2Ring HISTORICAL & REAL-TIME REPORTING (Cisco UCCX, UCCE) - slide deck

Americas HeadquartersCisco Systems, Inc.170 West Tasman DriveSan Jose, CA 95134-1706USAhttp://www.cisco.comTel: 408 526-4000
800 553-NETS (6387)Fax: 408 527-0883
Cisco Email Reporting Plug-in 1.0.1 Administrator GuideAugust 2, 2017

THE SPECIFICATIONS AND INFORMATION REGARDING THE PRODUCTS IN THIS MANUAL ARE SUBJECT TO CHANGE WITHOUT NOTICE. ALL STATEMENTS, INFORMATION, AND RECOMMENDATIONS IN THIS MANUAL ARE BELIEVED TO BE ACCURATE BUT ARE PRESENTED WITHOUT WARRANTY OF ANY KIND, EXPRESS OR IMPLIED. USERS MUST TAKE FULL RESPONSIBILITY FOR THEIR APPLICATION OF ANY PRODUCTS.
THE SOFTWARE LICENSE AND LIMITED WARRANTY FOR THE ACCOMPANYING PRODUCT ARE SET FORTH IN THE INFORMATION PACKET THAT SHIPPED WITH THE PRODUCT AND ARE INCORPORATED HEREIN BY THIS REFERENCE. IF YOU ARE UNABLE TO LOCATE THE SOFTWARE LICENSE OR LIMITED WARRANTY, CONTACT YOUR CISCO REPRESENTATIVE FOR A COPY.
The Cisco implementation of TCP header compression is an adaptation of a program developed by the University of California, Berkeley (UCB) as part of DUB’s public domain version of the UNIX operating system. All rights reserved. Copyright © 1981, Regents of the University of California.
NOTWITHSTANDING ANY OTHER WARRANTY HEREIN, ALL DOCUMENT FILES AND SOFTWARE OF THESE SUPPLIERS ARE PROVIDED “AS IS” WITH ALL FAULTS. CISCO AND THE ABOVE-NAMED SUPPLIERS DISCLAIM ALL WARRANTIES, EXPRESSED OR IMPLIED, INCLUDING, WITHOUT LIMITATION, THOSE OF MERCHANTABILITY, FITNESS FOR A PARTICULAR PURPOSE AND NONINFRINGEMENT OR ARISING FROM A COURSE OF DEALING, USAGE, OR TRADE PRACTICE.
IN NO EVENT SHALL CISCO OR ITS SUPPLIERS BE LIABLE FOR ANY INDIRECT, SPECIAL, CONSEQUENTIAL, OR INCIDENTAL DAMAGES, INCLUDING, WITHOUT LIMITATION, LOST PROFITS OR LOSS OR DAMAGE TO DATA ARISING OUT OF THE USE OR INABILITY TO USE THIS MANUAL, EVEN IF CISCO OR ITS SUPPLIERS HAVE BEEN ADVISED OF THE POSSIBILITY OF SUCH DAMAGES.
Cisco and the Cisco logo are trademarks or registered trademarks of Cisco and/or its affiliates in the U.S. and other countries. To view a list of Cisco trademarks, go to this URL: www.cisco.com/go/trademarks. Third-party trademarks mentioned are the property of their respective owners. The use of the word partner does not imply a partnership relationship between Cisco and any other company. (1110R)
Any Internet Protocol (IP) addresses and phone numbers used in this document are not intended to be actual addresses and phone numbers. Any examples, command display output, network topology diagrams, and other figures included in the document are shown for illustrative purposes only. Any use of actual IP addresses or phone numbers in illustrative content is unintentional and coincidental.
Cisco Email Reporting Plug-in 1.0.1 Administrator Guide© 2011—2017 Cisco Systems, Inc. and/or its affiliates. All rights reserved.
OL-22158-05
C O N T E N T S
Getting Started with the Cisco Email Reporting Plug-in 1-1
Supported Configurations 1-2
Compliance With Security Configuration Guidelines 1-2
How to Use This Guide 1-2
Where to Find More Information 1-3
Cisco Content Security Welcomes Your Comments 1-4
Deploying the Cisco Email Reporting Plug-in 2-1
The Cisco Email Reporting Plug-in 2-2
Installing the Cisco Email Reporting Plug-in 2-2
Configuring Settings for the Cisco Email Reporting Plug-in 2-3
System Processes Required for the Cisco Email Reporting Plug-in 2-3
TCP Services Required for the Cisco Email Reporting Plug-in 2-3
Performing a Mass Installation 3-1
Installation Prerequisites 3-1
Performing the Installation 3-2
Using Custom Configuration Files 3-16
Overview 3-17
Editing the XML Configuration Files 3-18
Deploying the Custom Configuration Files 3-20
Configuring and Using the Cisco Email Reporting Plug-in for Outlook 4-1
Enabling the Cisco Email Reporting Plug-in 4-2
i Cisco Email Reporting Plug-in 1.0.1 Administrator Guide
Contents
Configuring the Sending of Usage Data 4-2
General Information 4-3
Account-Specific Information 4-3
Cisco Email Reporting Plug-in For Outlook General Settings 4-3
Enable or Disable 4-3
Configuring Basic Settings for the Outlook Plug-in 4-4
Configuring the Outlook Plug-in to Check for Updates 4-6
Update Notifications 4-6
Configuring Common Options Using the Config File 4-7
Reporting Unwanted Emails-Spam, Marketing, Virus, and Phishing Attacks 4-8
Reporting Options 4-9
Using the Reporting Plug-in for Outlook 4-12
Configuring the Encryption of Spam Reports 4-15
Configuring the Tracking of Spam Reports 4-15
Changing Additional Settings 4-15
Logging Tab 4-17
Sending Usage Data Tab 4-18
Privacy Tab 4-18
Errors and Troubleshooting 4-18
Outlook Startup Errors 4-19
Message Reporting Errors 4-20
Repairing Cisco Email Reporting Plug-in for Outlook Files 4-21
Troubleshooting Using the Diagnostic Tool 4-21
Data Collected by the Cisco Email Reporting Diagnostic Tool 4-22
Running the Cisco Email Reporting Diagnostic Tool 4-22
Uninstalling the Cisco Email Reporting Plug-in 4-24
Cisco End User License Agreement A-1
ii Cisco Email Reporting Plug-in 1.0.1 Administrator Guide
OL-22158-05
Cisco Email Reporting P
OL-22158-05
C H A P T E R 1
Getting Started with the Cisco Email Reporting Plug-inThis chapter contains the following sections:
• Supported Configurations, page 1-2
• Compliance With Security Configuration Guidelines, page 1-2
• How to Use This Guide, page 1-3
1-1lug-in 1.0.1 Administrator Guide
Chapter 1 Getting Started with the Cisco Email Reporting Plug-in
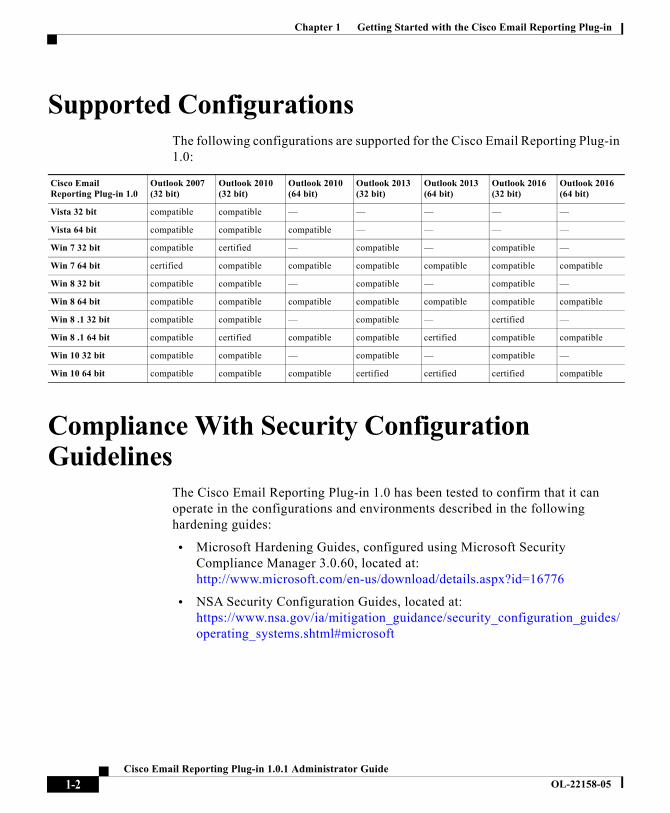
Supported Configurations The following configurations are supported for the Cisco Email Reporting Plug-in 1.0:
Compliance With Security Configuration Guidelines
The Cisco Email Reporting Plug-in 1.0 has been tested to confirm that it can operate in the configurations and environments described in the following hardening guides:
• Microsoft Hardening Guides, configured using Microsoft Security Compliance Manager 3.0.60, located at: http://www.microsoft.com/en-us/download/details.aspx?id=16776
• NSA Security Configuration Guides, located at: https://www.nsa.gov/ia/mitigation_guidance/security_configuration_guides/operating_systems.shtml#microsoft
Cisco Email Reporting Plug-in 1.0
Outlook 2007 (32 bit)
Outlook 2010 (32 bit)
Outlook 2010(64 bit)
Outlook 2013(32 bit)
Outlook 2013(64 bit)
Outlook 2016 (32 bit)
Outlook 2016 (64 bit)
Vista 32 bit compatible compatible — — — — —
Vista 64 bit compatible compatible compatible — — — —
Win 7 32 bit compatible certified — compatible — compatible —
Win 7 64 bit certified compatible compatible compatible compatible compatible compatible
Win 8 32 bit compatible compatible — compatible — compatible —
Win 8 64 bit compatible compatible compatible compatible compatible compatible compatible
Win 8 .1 32 bit compatible compatible — compatible — certified —
Win 8 .1 64 bit compatible certified compatible compatible certified compatible compatible
Win 10 32 bit compatible compatible — compatible — compatible —
Win 10 64 bit compatible compatible compatible certified certified certified compatible
1-2 Cisco Email Reporting Plug-in 1.0.1 Administrator Guide
OL-22158-05
Chapter 1 Getting Started with the Cisco Email Reporting Plug-in
How to Use This GuideUse this guide as a resource to learn about the features in your Cisco Email Reporting Plug-in. The topics are organized in a logical order, but you might not need to read every chapter in the book. Review the Table of Contents to determine which chapters are relevant to your particular configuration.
This guide is distributed electronically as a PDF. The electronic versions of the guide are available on the Cisco Customer Support Portal. You can also access an HTML online help tool in the appliance GUI:
• In Outlook 2010/2013/2016, click the Plug-in Options button on the ribbon or go to File > Options > Add-in Options > Cisco Email Reporting.
• In Outlook 2007, click the Plug-in Options button on the toolbar or go to Tools > Options > Cisco Email Reporting> Help.
Where to Find More Information
Cisco offers the following resources to learn more about the Cisco Email Reporting Plug-in.
Security Training Services & Certification
Cisco Security Training Services deliver exceptional education and training for Cisco security products and solutions. Through a targeted curriculum of technical training courses, the program provides up-to-date knowledge and skills transfer to different audiences.
Use one of the following methods to contact Cisco Security Training Services:
Training. For question relating to registration, general training, certificates, and certification exams:
• http://www.cisco.com/web/learning/le31/email_sec/index.html
1-3 Cisco Email Reporting Plug-in 1.0.1 Administrator Guide
OL-22158-05
Chapter 1 Getting Started with the Cisco Email Reporting Plug-in
Cisco Support Community
Cisco Support Community is an online forum for Cisco customers, partners, and employees. It provides a place to discuss general email and web security issues, as well as technical information about specific Cisco products. You can post topics to the forum to ask questions and share information with other Cisco users.
You can access the Cisco Support Community from the following URL:
https://supportforums.cisco.com
Cisco Customer Support
Note The level of support available to you depends upon your service level agreement. Cisco Customer Support service level agreement details are available on the Support Portal. Check this page for details about your level of support.
You can request support by phone, email, or online 24 hours a day, 7 days a week. You can contact Cisco Customer Support using one of the following ways:
• Cisco Support Portal: http://www.cisco.com/support
• Phone support: Contact Cisco Technical Assistance Center (TAC) within U.S. /Canada at 800-553-2447 and at Worldwide Phone Numbers.
• Email: [email protected]
If you purchased support through a reseller or another supplier, please contact that supplier directly with your product support issues.
Cisco Content Security Welcomes Your Comments
The Cisco Content Security Technical Publications team is interested in improving the product documentation. Your comments and suggestions are always welcome. You can send comments to the following email address:
1-4 Cisco Email Reporting Plug-in 1.0.1 Administrator Guide
OL-22158-05
Cisco Email Reporting P
OL-22158-05
C H A P T E R 2
Deploying the Cisco Email Reporting Plug-inThis chapter contains the following sections:
• The Cisco Email Reporting Plug-in, page 2-2
• Installing the Cisco Email Reporting Plug-in, page 2-2
• Configuring Settings for the Cisco Email Reporting Plug-in, page 2-3
• System Processes Required for the Cisco Email Reporting Plug-in, page 2-3
• TCP Services Required for the Cisco Email Reporting Plug-in, page 2-3
2-1lug-in 1.0.1 Administrator Guide
Chapter 2 Deploying the Cisco Email Reporting Plug-in
The Cisco Email Reporting Plug-inThe Cisco Email Reporting Plug-in enables Outlook users to submit feedback to Cisco about unsolicited and unwanted email messages, such as spam, viruses, phishing, and marketing messages. Cisco uses this feedback to update its filters to stop unwanted messages from being delivered to your inbox.
You can also report false positives, which are legitimate email messages that are marked as spam, to Cisco by using the Not Spam button. Legitimate email messages are often referred to as “ham”. Cisco uses reports about false positives to adjust its spam filters to avoid misclassifying legitimate email in the future. Any valid email can be reported as Not Spam and will help to increase filter efficacy.
This plug-in provides a convenient interface that enables you to submit feedback by using toolbar buttons and right-click context menus. When you report a message, a dialog box appears indicating that the message was submitted. The message data that you submit is used by automated systems to improve the Cisco filters. By submitting message data, you help to reduce the volume of unsolicited email in your inbox.
Installing the Cisco Email Reporting Plug-inTo install the Cisco Email Reporting Plug-in for groups of users, you will likely want to perform a silent installation. A silent installation allows you to perform an installation without prompting the end user for input. For instructions on performing the silent installation, see Chapter 3, “Performing a Mass Installation.”
2-2 Cisco Email Reporting Plug-in 1.0.1 Administrator Guide
OL-22158-05
Chapter 2 Deploying the Cisco Email Reporting Plug-in
Configuring Settings for the Cisco Email Reporting Plug-in
After you install the Cisco Email Reporting Plug-in, you can make configuration changes from the Cisco Email Reporting tab in Outlook.
• In Outlook 2010/2013/2016, click the Plug-in Options button on the ribbon or go to File > Options > Add-ins > Add-in Options > Cisco Email Reporting.
• In Outlook 2007, click the Plug-in Options button on the toolbar or go to Tools > Options > Cisco Email Reporting.
You can make changes to the Reporting plug-in installation. For example, you can enable or disable logging for the Cisco Email Reporting Plug-in.
To make configuration changes on an Outlook installation, see Chapter 4, “Configuring and Using the Cisco Email Reporting Plug-in for Outlook.”
System Processes Required for the Cisco Email Reporting Plug-in
The Cisco Email Reporting Plug-in requires only essential system processes, such as TCP/IP DNS, DHCP, and etc, which cannot be disabled. However, any nonessential system processes, such as database managers, HTTP servers, and hardware configuration daemons can be disabled without affecting the functionality of the Cisco Email Reporting Plug-in.
TCP Services Required for the Cisco Email Reporting Plug-in
The Cisco Email Reporting Plug-in requires the use of the following TCP/IP services and their associated ports. These ports must be left available for the TCP/IP services to use.
2-3 Cisco Email Reporting Plug-in 1.0.1 Administrator Guide
OL-22158-05
Chapter 2 Deploying the Cisco Email Reporting Plug-in
• DNS (Domain Name System).
The DNS service translates Internet domain and host names to IP addresses. DNS automatically converts the names we type in our Web browser address bar to the IP addresses of Web servers hosting those sites.
Port number: 53 (TCP/UDP)
For more information, see: http://en.wikipedia.org/wiki/Domain_Name_System
Impact: High
Resolution: This service must be accessible to all end users.
• SMTP (Simple Mail Transfer Protocol)
Simple Mail Transfer Protocol (SMTP) is an Internet standard for electronic mail (e-mail) transmission across Internet Protocol (IP) networks.
Port number: 25, 587, 465, 475, 2525 (TCP)
For more information, see: http://en.wikipedia.org/wiki/Simple_Mail_Transfer_Protocol
Impact: High
Resolution: This service must be accessible to all end users.
• DHCP (Dynamic Host Configuration Protocol)
DHCP is a network protocol used to configure devices that are connected to a network (known as hosts) so they can communicate on that network using the Internet Protocol (IP)
Port number: 67, 68 (TCP/UDP)
For more information, see: http://en.wikipedia.org/wiki/Dynamic_Host_Configuration_Protocol
Impact: High
Resolution: This service must be accessible to all end users which obtain IP addresses automatically from DHCP server.
• Net BIOS over TCP/IP
NetBIOS over TCP/IP (NBT, or sometimes NetBT) is a networking protocol that allows legacy computer applications relying on the NetBIOS API to be used on modern TCP/IP networks.
2-4 Cisco Email Reporting Plug-in 1.0.1 Administrator Guide
OL-22158-05
Chapter 2 Deploying the Cisco Email Reporting Plug-in
Port number: 137(UDP) (name services), 138(UDP) (datagram services), 139(TCP) (session services)
For more information, see: http://en.wikipedia.org/wiki/NetBIOS_over_TCP/IP
Impact: High
Resolution: This service must be accessible to all end users.
• HTTP (Hypertext Transfer Protocol)
The Hypertext Transfer Protocol (HTTP) is an application protocol for distributed, collaborative, hypermedia information systems.
Port number: 80, 8080 (TCP)
For more information, see: http://en.wikipedia.org/wiki/Hypertext_Transfer_Protocol
Impact: High
Resolution: This service must be accessible to all end users.
• HTTPS (Hypertext Transfer Protocol Secure)
HTTPS is a communications protocol for secure communication over a computer network, with especially wide deployment on the Internet.
Port number: 443 (TCP)
For more information, see: http://en.wikipedia.org/wiki/HTTP_Secure
Impact: High
Resolution: This service must be accessible to all end users.
• IMAP (Internet message access protocol)
Internet message access protocol allows an e-mail client to access e-mail on a remote mail server.
Port number: 143, 993 (TCP)
For more information, see: http://en.wikipedia.org/wiki/Internet_Message_Access_Protocol
Impact: High
Resolution: This service must be accessible to all end users.
• POP3 (Post Office Protocol)
2-5 Cisco Email Reporting Plug-in 1.0.1 Administrator Guide
OL-22158-05
Chapter 2 Deploying the Cisco Email Reporting Plug-in
Post Office Protocol is used by local e-mail clients to retrieve e-mail from a remote server over a TCP/IP connection.
Port number: 110, 995 (TCP)
For more information, see: http://en.wikipedia.org/wiki/Post_Office_Protocol
Impact: High
Resolution: This service must be accessible to all end users.
2-6 Cisco Email Reporting Plug-in 1.0.1 Administrator Guide
OL-22158-05
Cisco Email Reporting P
OL-22158-05
C H A P T E R 3
Performing a Mass InstallationThis chapter describes how to perform a mass installation on multiple desktops and contains the following sections:
• Installation Prerequisites, page 3-1
• Performing the Installation, page 3-2
• Using Custom Configuration Files, page 3-16
Installation PrerequisitesBefore you can install the Cisco Email Reporting Plug-in application, ensure that you meet the following requirements:
• Microsoft .NET Framework 4.5.1
• Microsoft Office Primary Interop Assemblies
In case you do not have these items installed, you will be prompted to install all software from prerequisites list by the Plug-in installer.
3-1lug-in 1.0.1 Administrator Guide
Chapter 3 Performing a Mass Installation
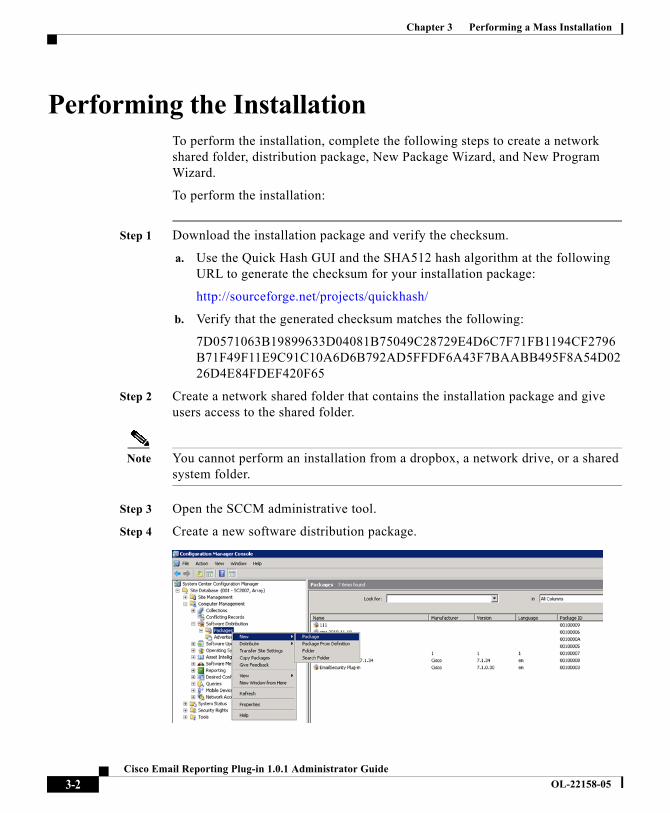
Performing the InstallationTo perform the installation, complete the following steps to create a network shared folder, distribution package, New Package Wizard, and New Program Wizard.
To perform the installation:
Step 1 Download the installation package and verify the checksum.
a. Use the Quick Hash GUI and the SHA512 hash algorithm at the following URL to generate the checksum for your installation package:
http://sourceforge.net/projects/quickhash/
b. Verify that the generated checksum matches the following:
7D0571063B19899633D04081B75049C28729E4D6C7F71FB1194CF2796B71F49F11E9C91C10A6D6B792AD5FFDF6A43F7BAABB495F8A54D0226D4E84FDEF420F65
Step 2 Create a network shared folder that contains the installation package and give users access to the shared folder.
Note You cannot perform an installation from a dropbox, a network drive, or a shared system folder.
Step 3 Open the SCCM administrative tool.
Step 4 Create a new software distribution package.
3-2 Cisco Email Reporting Plug-in 1.0.1 Administrator Guide
OL-22158-05
Chapter 3 Performing a Mass Installation
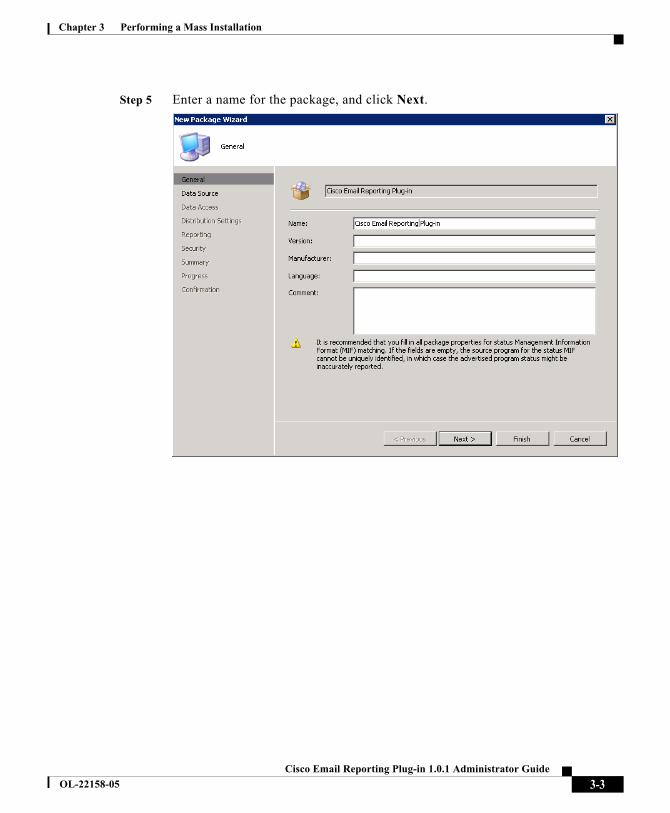
Step 5 Enter a name for the package, and click Next.
3-3 Cisco Email Reporting Plug-in 1.0.1 Administrator Guide
OL-22158-05
Chapter 3 Performing a Mass Installation
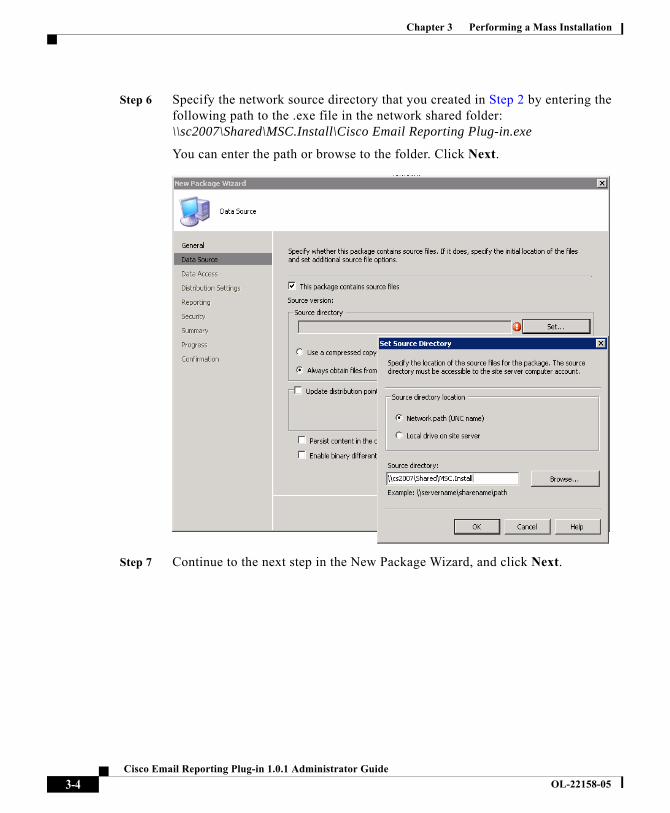
Step 6 Specify the network source directory that you created in Step 2 by entering the following path to the .exe file in the network shared folder: \\sc2007\Shared\MSC.Install\Cisco Email Reporting Plug-in.exe
You can enter the path or browse to the folder. Click Next.
Step 7 Continue to the next step in the New Package Wizard, and click Next.
3-4 Cisco Email Reporting Plug-in 1.0.1 Administrator Guide
OL-22158-05
Chapter 3 Performing a Mass Installation
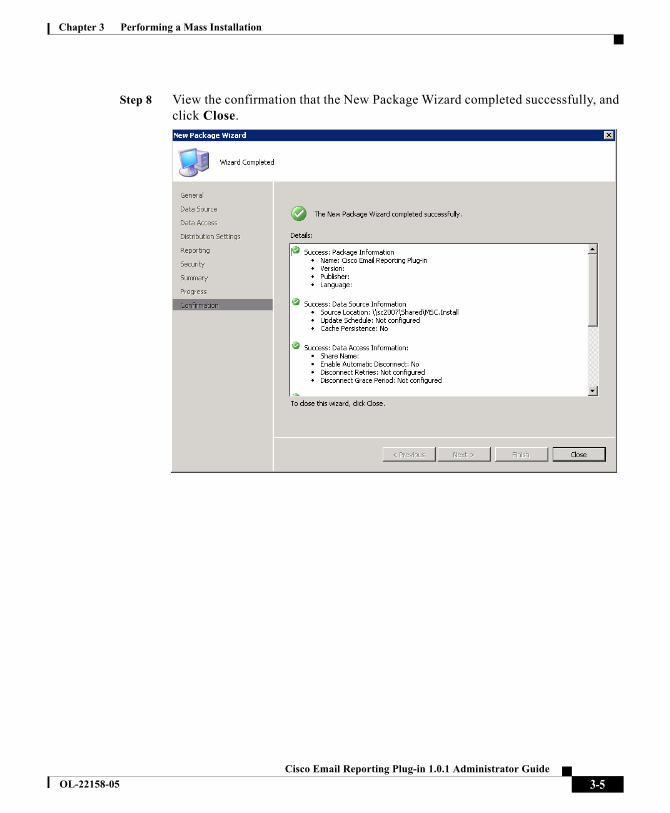
Step 8 View the confirmation that the New Package Wizard completed successfully, and click Close.
3-5 Cisco Email Reporting Plug-in 1.0.1 Administrator Guide
OL-22158-05
Chapter 3 Performing a Mass Installation
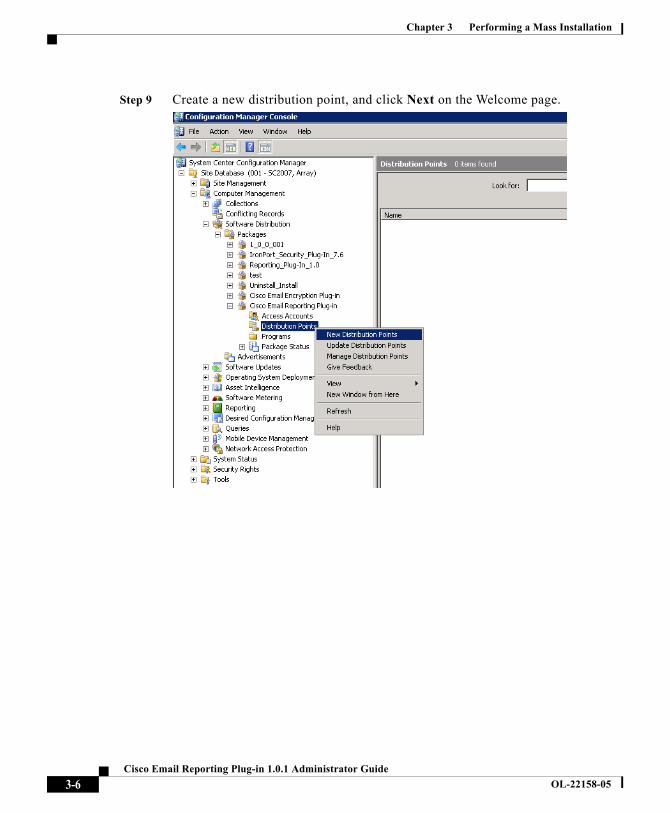
Step 9 Create a new distribution point, and click Next on the Welcome page.
3-6 Cisco Email Reporting Plug-in 1.0.1 Administrator Guide
OL-22158-05
Chapter 3 Performing a Mass Installation
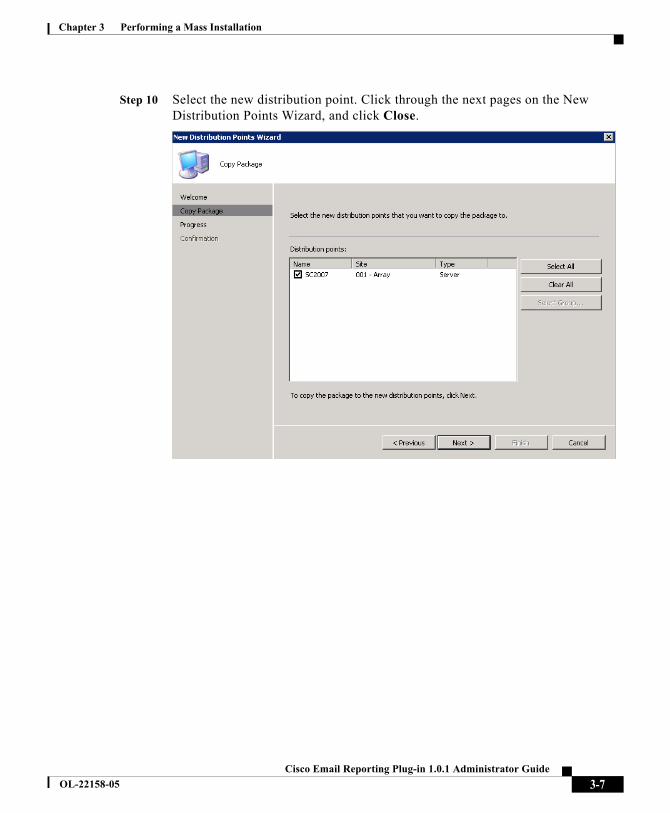
Step 10 Select the new distribution point. Click through the next pages on the New Distribution Points Wizard, and click Close.
3-7 Cisco Email Reporting Plug-in 1.0.1 Administrator Guide
OL-22158-05
Chapter 3 Performing a Mass Installation
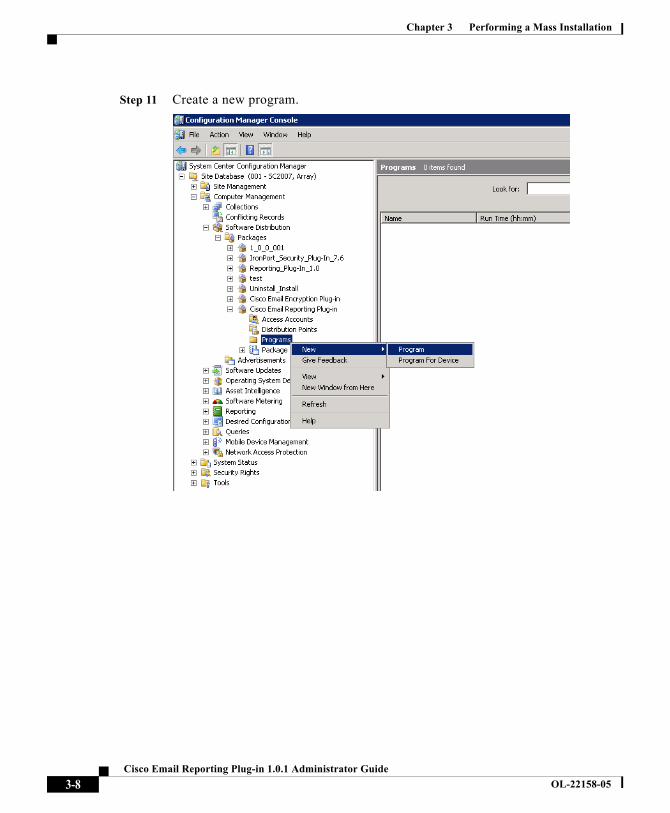
Step 11 Create a new program.
3-8 Cisco Email Reporting Plug-in 1.0.1 Administrator Guide
OL-22158-05
Chapter 3 Performing a Mass Installation
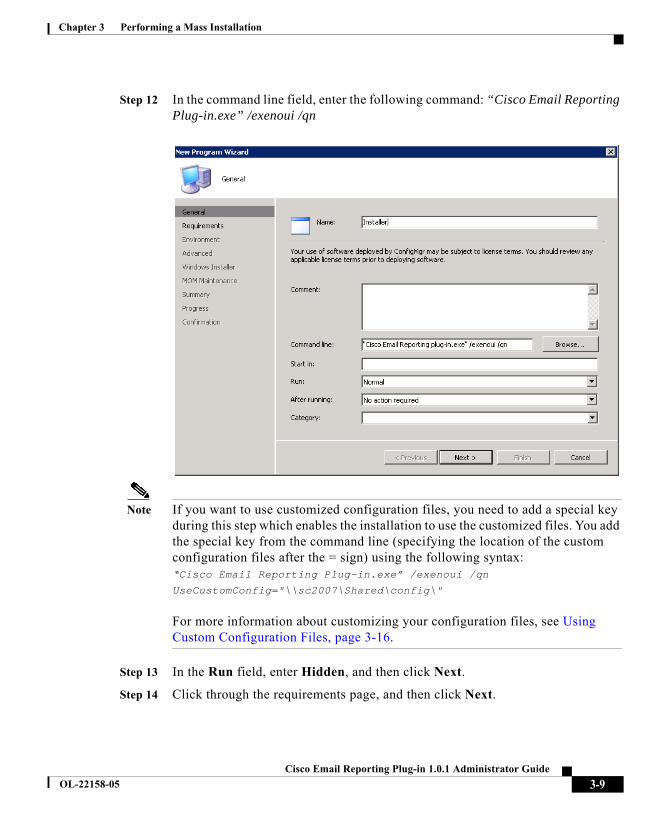
Step 12 In the command line field, enter the following command: “Cisco Email Reporting Plug-in.exe” /exenoui /qn
Note If you want to use customized configuration files, you need to add a special key during this step which enables the installation to use the customized files. You add the special key from the command line (specifying the location of the custom configuration files after the = sign) using the following syntax: “Cisco Email Reporting Plug-in.exe” /exenoui /qn
UseCustomConfig="\\sc2007\Shared\config\"
For more information about customizing your configuration files, see Using Custom Configuration Files, page 3-16.
Step 13 In the Run field, enter Hidden, and then click Next.
Step 14 Click through the requirements page, and then click Next.
3-9 Cisco Email Reporting Plug-in 1.0.1 Administrator Guide
OL-22158-05
Chapter 3 Performing a Mass Installation
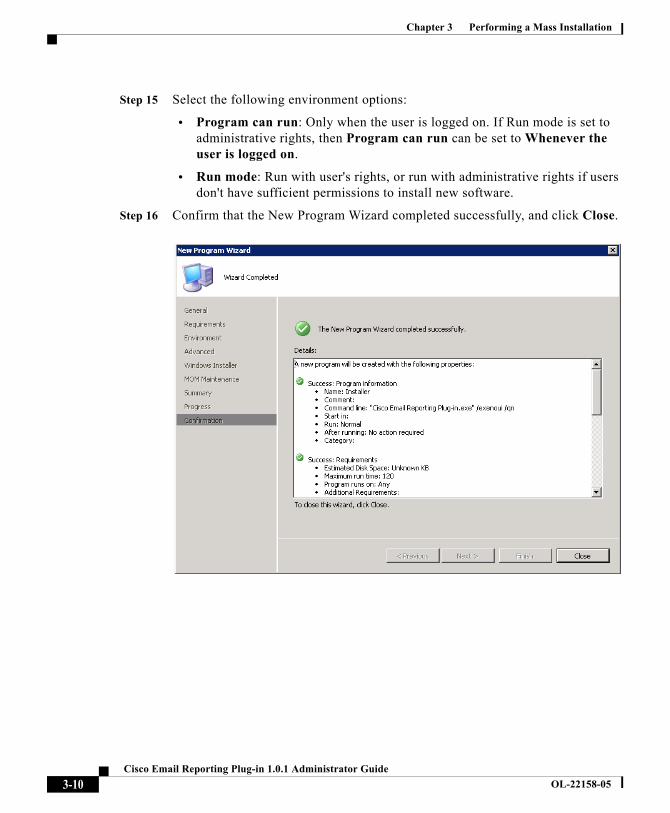
Step 15 Select the following environment options:
• Program can run: Only when the user is logged on. If Run mode is set to administrative rights, then Program can run can be set to Whenever the user is logged on.
• Run mode: Run with user's rights, or run with administrative rights if users don't have sufficient permissions to install new software.
Step 16 Confirm that the New Program Wizard completed successfully, and click Close.
3-10 Cisco Email Reporting Plug-in 1.0.1 Administrator Guide
OL-22158-05
Chapter 3 Performing a Mass Installation
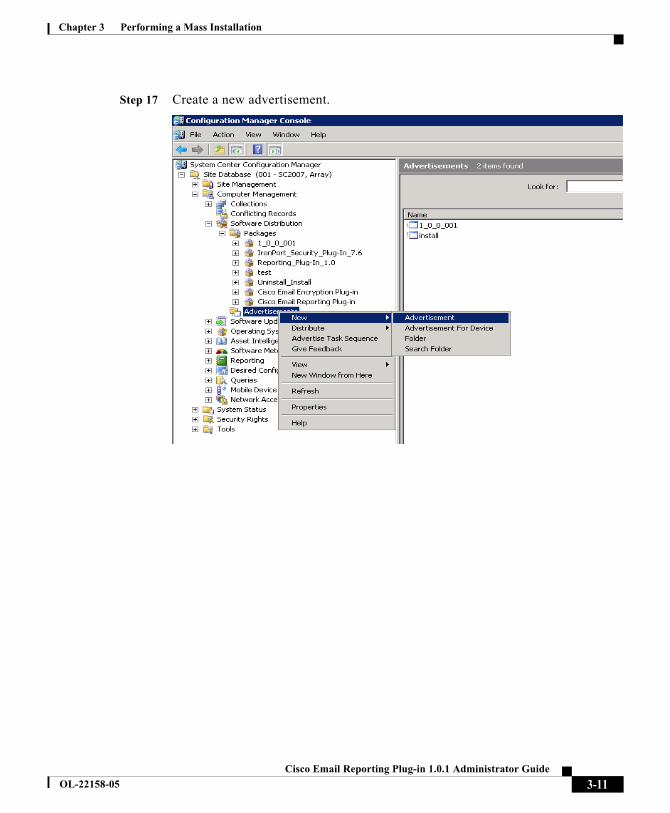
Step 17 Create a new advertisement.
3-11 Cisco Email Reporting Plug-in 1.0.1 Administrator Guide
OL-22158-05
Chapter 3 Performing a Mass Installation
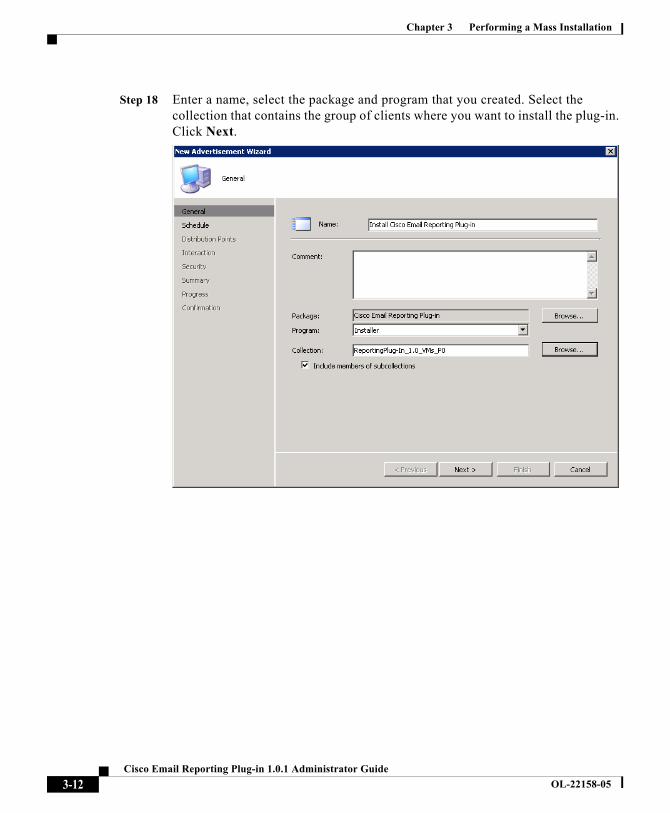
Step 18 Enter a name, select the package and program that you created. Select the collection that contains the group of clients where you want to install the plug-in. Click Next.
3-12 Cisco Email Reporting Plug-in 1.0.1 Administrator Guide
OL-22158-05
Chapter 3 Performing a Mass Installation
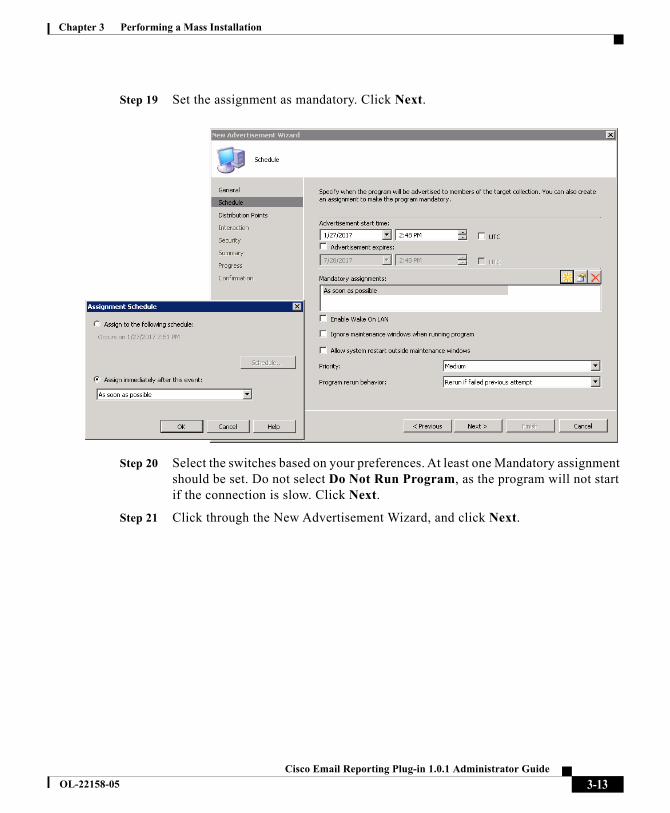
Step 19 Set the assignment as mandatory. Click Next.
Step 20 Select the switches based on your preferences. At least one Mandatory assignment should be set. Do not select Do Not Run Program, as the program will not start if the connection is slow. Click Next.
Step 21 Click through the New Advertisement Wizard, and click Next.
3-13 Cisco Email Reporting Plug-in 1.0.1 Administrator Guide
OL-22158-05

Chapter 3 Performing a Mass Installation
Step 22 View the confirmation that the New Advertisement Wizard completed successfully, and click Close.
3-14 Cisco Email Reporting Plug-in 1.0.1 Administrator Guide
OL-22158-05
Chapter 3 Performing a Mass Installation
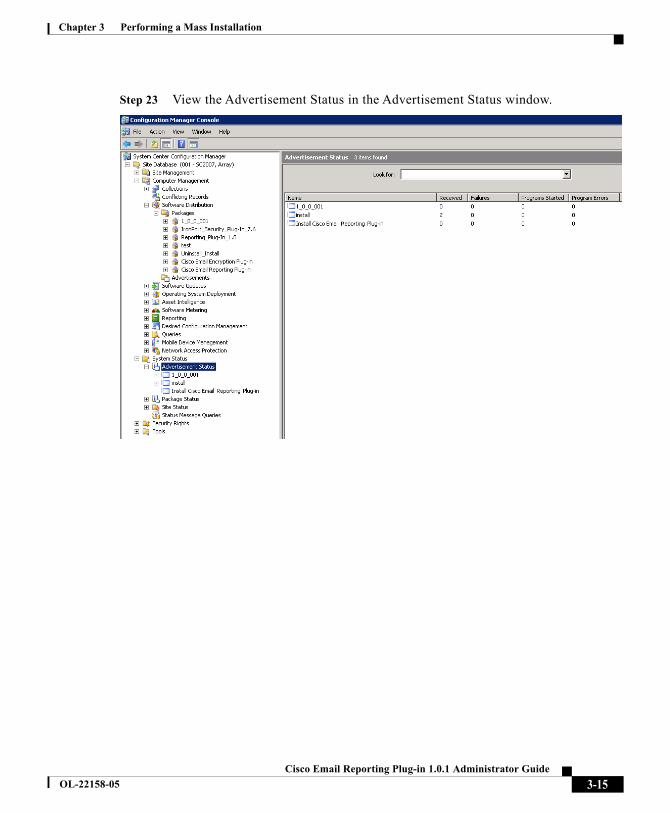
Step 23 View the Advertisement Status in the Advertisement Status window.
3-15 Cisco Email Reporting Plug-in 1.0.1 Administrator Guide
OL-22158-05
Chapter 3 Performing a Mass Installation
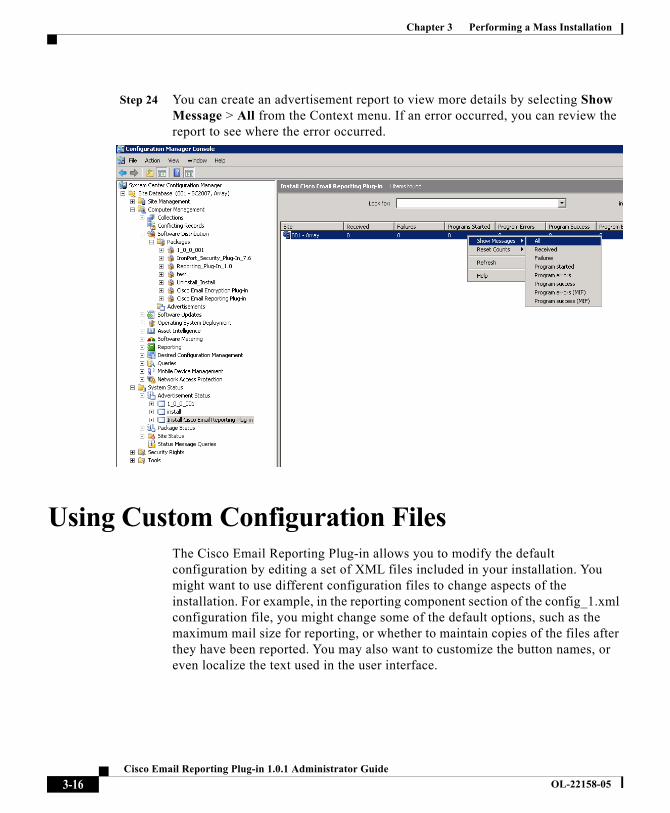
Step 24 You can create an advertisement report to view more details by selecting Show Message > All from the Context menu. If an error occurred, you can review the report to see where the error occurred.
Using Custom Configuration FilesThe Cisco Email Reporting Plug-in allows you to modify the default configuration by editing a set of XML files included in your installation. You might want to use different configuration files to change aspects of the installation. For example, in the reporting component section of the config_1.xml configuration file, you might change some of the default options, such as the maximum mail size for reporting, or whether to maintain copies of the files after they have been reported. You may also want to customize the button names, or even localize the text used in the user interface.
3-16 Cisco Email Reporting Plug-in 1.0.1 Administrator Guide
OL-22158-05
Chapter 3 Performing a Mass Installation
Overview
To modify and deploy custom configuration files, complete the following steps:
Step 1 Make a copy of the \\%allusersprofile%\Cisco\Cisco Email Reporting Plug-In\Common directory.
Note You must maintain the directory structure of the original files to maintain validity. Make sure that you maintain the structure starting at the Cisco Email Reporting Plug-in directory and include all files with configuration files.
Step 2 Edit the XML configuration files. Rather than creating new files, Cisco recommends you modify the XML files included in the installation file. For instructions on modifying these files, see Editing the XML Configuration Files, page 3-18.
Step 3 Navigate to the \\%allusersprofile%\Cisco\Cisco Email Reporting Plug-In\Common\CommonComponentsConfig.xml file.
Step 4 Verify that the CommonComponentsConfig.xml file includes these tags:
<accountFileNames> <accountFileName filePath="config_1.xml" emailAddress="*" /> </accountFileNames>
Tip Make sure that the accountFileName tag does not include the profileName attribute. If this attribute is present, remove it.
Note To configure only selected users in a specific domain, you need to modify the CommonComponentsConfig.xml file by specifying the domain as an email address.
For example, to apply the config file to only Cisco users, change the:
<accountFileName filePath="config_1.xml"
emailAddress="*" />
to:
<accountFileName filePath="config_1.xml" emailAddress="@cisco.com" />
3-17 Cisco Email Reporting Plug-in 1.0.1 Administrator Guide
OL-22158-05
Chapter 3 Performing a Mass Installation
If there is more than one accountFileName tag then the filePath will be config_2.xml, config_3.xml, etc.
For example:
<accountFileName filePath="config_2.xml" emailAddress="@cisco.com" />
Step 5 Run the mass installation as described in Installation Prerequisites, page 3-1, and deploy the customized XML files as described in Deploying the Custom Configuration Files, page 3-20.
Note The \\%allusersprofile%\Cisco\Cisco Email Reporting Plug-In\Common directory content must be copied to \\{SHARED_DIR}\{CONFIG_FOLDER}\Common. The UseCustomConfig command parameter enables the installation to use the custom configuration file that you modified.
Editing the XML Configuration Files
When you install the Cisco Email Reporting Plug-in, configuration data is created and saved in XML files. You can edit the string values to customize the parameter values. However, Cisco does not recommend you remove values or modify the structure of the files.
By default, the plug-in installs configuration files in the %AllUsersProfile% directory in the following locations for Outlook:
%allusersprofile%\Cisco\Cisco Email Reporting Plug In
The XML files are located in the following default locations:
• \\%allusersprofile%\Cisco\Cisco Email Reporting Plug-In\{username}\config_1.xml, config_{N}.xml. These numbers are dependent on the count of user accounts. Contains configuration data related to the Reporting plug-in, such as the maximum mail size that can be reported. Cisco does not recommend you to modify the Reporting settings.
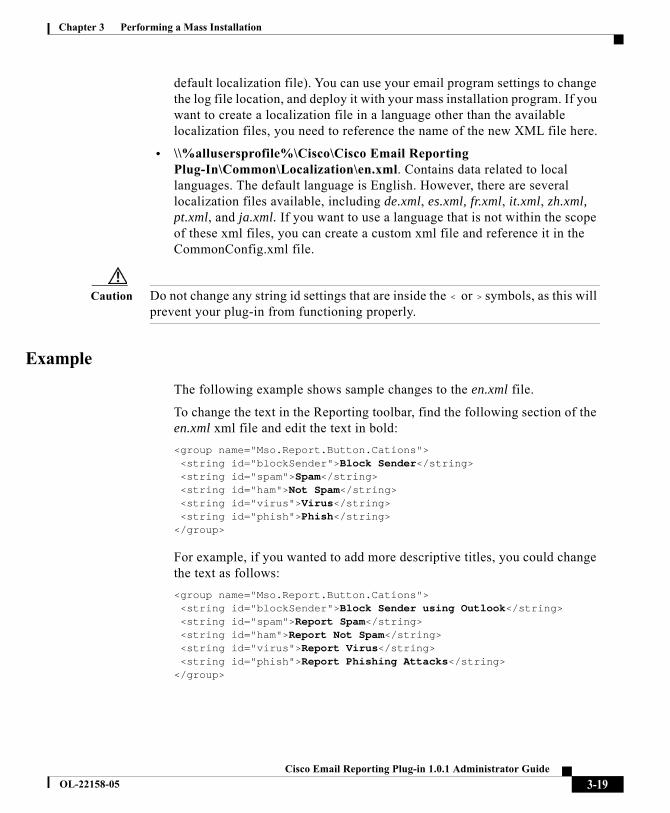
• \\%allusersprofile%\Cisco\Cisco Email Reporting Plug-In\Common\CommonComponentsConfig.xml. Contains basic configuration data that is common to the Reporting plug-in, such as the location of the log files and the name of the localization file (en.xml is the
3-18 Cisco Email Reporting Plug-in 1.0.1 Administrator Guide
OL-22158-05
Chapter 3 Performing a Mass Installation
default localization file). You can use your email program settings to change the log file location, and deploy it with your mass installation program. If you want to create a localization file in a language other than the available localization files, you need to reference the name of the new XML file here.
• \\%allusersprofile%\Cisco\Cisco Email Reporting Plug-In\Common\Localization\en.xml. Contains data related to local languages. The default language is English. However, there are several localization files available, including de.xml, es.xml, fr.xml, it.xml, zh.xml, pt.xml, and ja.xml. If you want to use a language that is not within the scope of these xml files, you can create a custom xml file and reference it in the CommonConfig.xml file.
Caution Do not change any string id settings that are inside the < or > symbols, as this will prevent your plug-in from functioning properly.
Example
The following example shows sample changes to the en.xml file.
To change the text in the Reporting toolbar, find the following section of the en.xml xml file and edit the text in bold:
<group name="Mso.Report.Button.Cations"> <string id="blockSender">Block Sender</string> <string id="spam">Spam</string> <string id="ham">Not Spam</string> <string id="virus">Virus</string> <string id="phish">Phish</string> </group>
For example, if you wanted to add more descriptive titles, you could change the text as follows:
<group name="Mso.Report.Button.Cations"> <string id="blockSender">Block Sender using Outlook</string> <string id="spam">Report Spam</string> <string id="ham">Report Not Spam</string> <string id="virus">Report Virus</string> <string id="phish">Report Phishing Attacks</string> </group>
3-19 Cisco Email Reporting Plug-in 1.0.1 Administrator Guide
OL-22158-05
Chapter 3 Performing a Mass Installation
Deploying the Custom Configuration Files
Once you have completed editing the configuration files, you will need to add a special key during deployment to ensure that the installer uses the custom configuration files you modified. The UseCustomConfig command line parameter enables the installation to use custom configuration files and specifies the path to the folder containing configuration files which should be used during the installation.
You add the UseCustomConfig key from the command line during Step 12 of the mass installation (see Installation Prerequisites, page 3-1) using the following syntax:
“Cisco Email Reporting Plugin.exe” /exenoui /qnUseCustomConfig="\\{SHARED_DIR}\{CONFIG_FOLDER}”
where the path after the = specifies the path to the customized configuration files.
3-20 Cisco Email Reporting Plug-in 1.0.1 Administrator Guide
OL-22158-05
Cisco Email Reporting
OL-22158-05
C H A P T E R 4
Configuring and Using the Cisco Email Reporting Plug-in for OutlookThis chapter introduces the features available in the Cisco Email Reporting Plug-in for Outlook. This chapter contains the following sections:
• Enabling the Cisco Email Reporting Plug-in, page 4-2
• Configuring the Sending of Usage Data, page 4-2
• Configuring Basic Settings for the Outlook Plug-in, page 4-4
• Configuring the Outlook Plug-in to Check for Updates, page 4-6
• Reporting Unwanted Emails-Spam, Marketing, Virus, and Phishing Attacks, page 4-8
• Changing Additional Settings, page 4-15
• Errors and Troubleshooting, page 4-18
• Troubleshooting Using the Diagnostic Tool, page 4-21
• Uninstalling the Cisco Email Reporting Plug-in, page 4-24
4-1 Plug-in 1.0 Administrator Guide
Chapter 4 Configuring and Using the Cisco Email Reporting Plug-in for Outlook
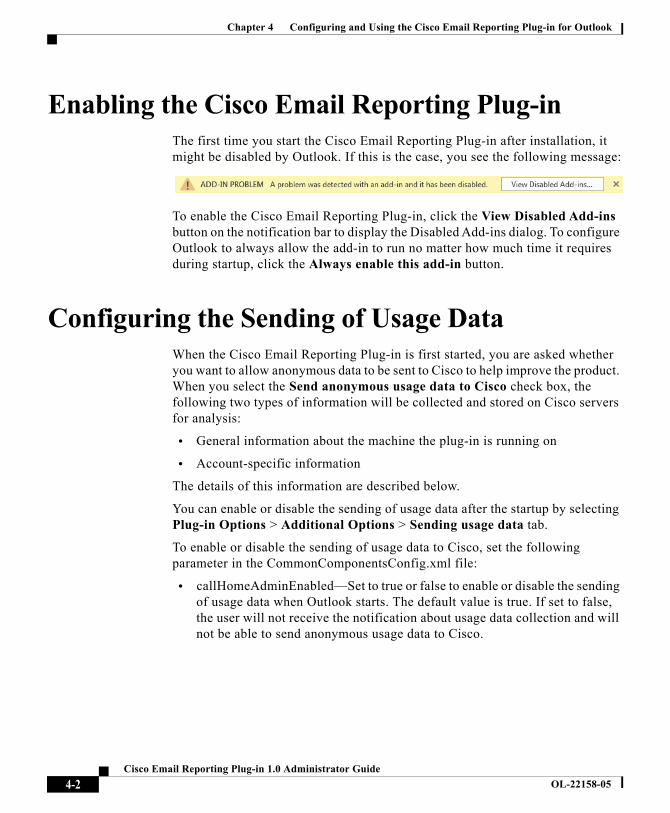
Enabling the Cisco Email Reporting Plug-inThe first time you start the Cisco Email Reporting Plug-in after installation, it might be disabled by Outlook. If this is the case, you see the following message:
To enable the Cisco Email Reporting Plug-in, click the View Disabled Add-ins button on the notification bar to display the Disabled Add-ins dialog. To configure Outlook to always allow the add-in to run no matter how much time it requires during startup, click the Always enable this add-in button.
Configuring the Sending of Usage DataWhen the Cisco Email Reporting Plug-in is first started, you are asked whether you want to allow anonymous data to be sent to Cisco to help improve the product. When you select the Send anonymous usage data to Cisco check box, the following two types of information will be collected and stored on Cisco servers for analysis:
• General information about the machine the plug-in is running on
• Account-specific information
The details of this information are described below.
You can enable or disable the sending of usage data after the startup by selecting Plug-in Options > Additional Options > Sending usage data tab.
To enable or disable the sending of usage data to Cisco, set the following parameter in the CommonComponentsConfig.xml file:
• callHomeAdminEnabled—Set to true or false to enable or disable the sending of usage data when Outlook starts. The default value is true. If set to false, the user will not receive the notification about usage data collection and will not be able to send anonymous usage data to Cisco.
4-2 Cisco Email Reporting Plug-in 1.0 Administrator Guide
OL-22158-05
Chapter 4 Configuring and Using the Cisco Email Reporting Plug-in for Outlook
General Information
The following information is collected:
• Identifer (UUID) - A non-permanent identifier that is generated when the plug-in is first installed. It is used solely to correlate the usage reports so that the usage data can be tracked over time. You can reset the identifier by selecting Plug-in Options > Additional Options > Privacy tab.
• Version of the Operating System
• Version of Microsoft Outlook
• Version of the Cisco Outlook Plug-in
• Language used for the Operating System
• Names of all of the installed Outlook plug-ins
Account-Specific Information
The information whether non-standard reporting addresses are being used is collected.
Cisco Email Reporting Plug-in For Outlook General Settings
General settings for the Reporting plug-in can be configured from the Options page.
Enable or Disable
By default, the Cisco Email Reporting Plug-in is enabled upon installation. The Cisco Email Reporting Plug-in can be disabled from the following places:
• In Outlook 2010/2013/2016, go to File > Options and select Add-ins from the left navigation bar. Then, select COM Add-ins from the Manage drop-down menu at the bottom of the page, and click Go...
4-3 Cisco Email Reporting Plug-in 1.0 Administrator Guide
OL-22158-05
Chapter 4 Configuring and Using the Cisco Email Reporting Plug-in for Outlook
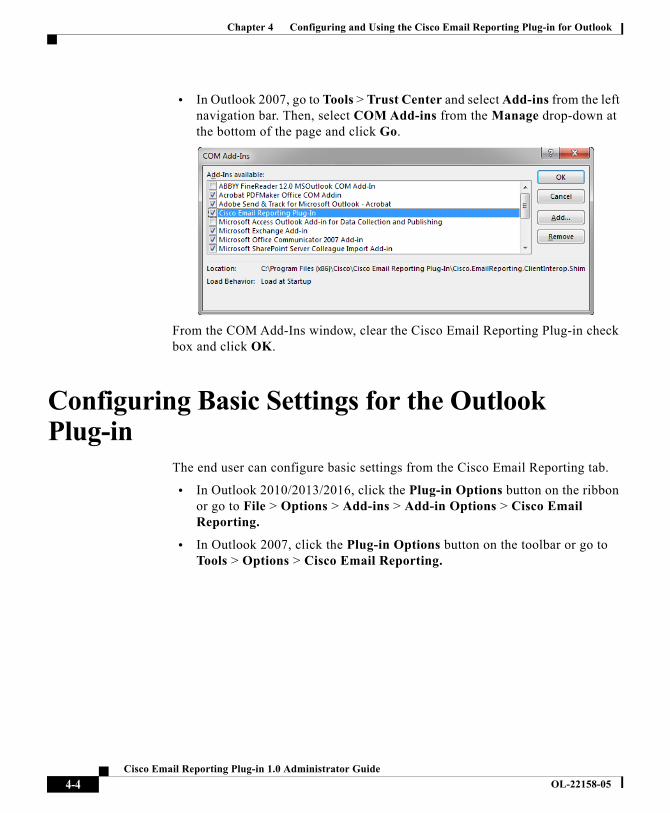
• In Outlook 2007, go to Tools > Trust Center and select Add-ins from the left navigation bar. Then, select COM Add-ins from the Manage drop-down at the bottom of the page and click Go.
From the COM Add-Ins window, clear the Cisco Email Reporting Plug-in check box and click OK.
Configuring Basic Settings for the Outlook Plug-in
The end user can configure basic settings from the Cisco Email Reporting tab.
• In Outlook 2010/2013/2016, click the Plug-in Options button on the ribbon or go to File > Options > Add-ins > Add-in Options > Cisco Email Reporting.
• In Outlook 2007, click the Plug-in Options button on the toolbar or go to Tools > Options > Cisco Email Reporting.
4-4 Cisco Email Reporting Plug-in 1.0 Administrator Guide
OL-22158-05

Chapter 4 Configuring and Using the Cisco Email Reporting Plug-in for Outlook
The Cisco Email Reporting tab:
From this tab, the end user can enable reporting options by selecting the appropriate Enable check box. The end user can also enable additional options by selecting the Additional Options... button. To further configure the settings, click the Reporting Options button. The end user can also use the Diagnostic tool to run a report on the Cisco Email Reporting Plug-in to send to Cisco Support when problem-solving. You can also configure the Plug-in to send anonymous usage information (general information about the Plug-in’s usage) to the server when Outlook is started.
4-5 Cisco Email Reporting Plug-in 1.0 Administrator Guide
OL-22158-05
Chapter 4 Configuring and Using the Cisco Email Reporting Plug-in for Outlook
Configuring the Outlook Plug-in to Check for Updates
To configure the plug-in to automatically check for updates, set the following parameters in the checkForUpdates section of the CommonComponentsConfig.xml file:
• checkAutomatically—Set to true or false to enable or disable the automatic checking of updates when Outlook starts. The default value is false.
• serverURL—Set to the URL that the plug-in will use to check whether a new version is available.
• ignoredVersion—Set to the version number that you want the plug-in to ignore when it looks for updates.
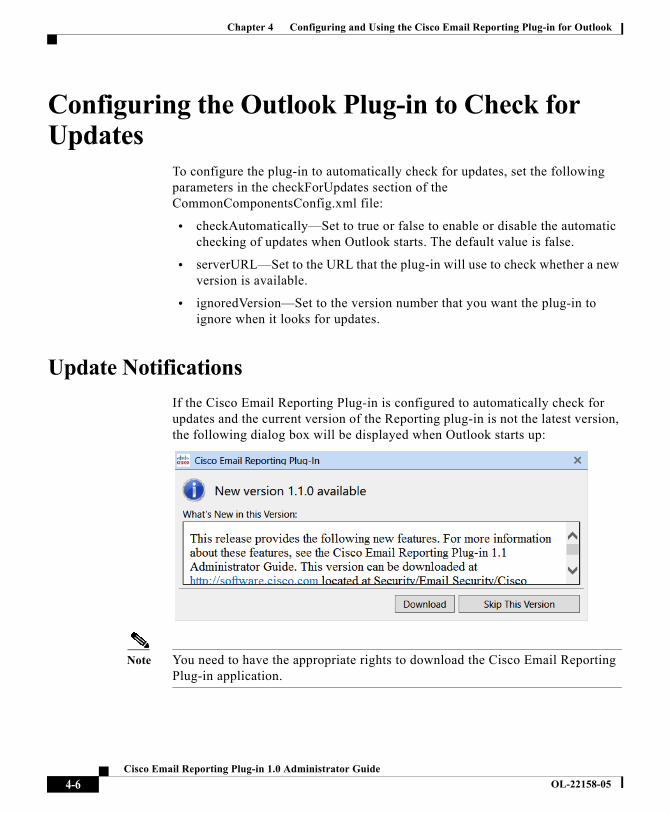
Update Notifications
If the Cisco Email Reporting Plug-in is configured to automatically check for updates and the current version of the Reporting plug-in is not the latest version, the following dialog box will be displayed when Outlook starts up:
Note You need to have the appropriate rights to download the Cisco Email Reporting Plug-in application.
4-6 Cisco Email Reporting Plug-in 1.0 Administrator Guide
OL-22158-05
Chapter 4 Configuring and Using the Cisco Email Reporting Plug-in for Outlook
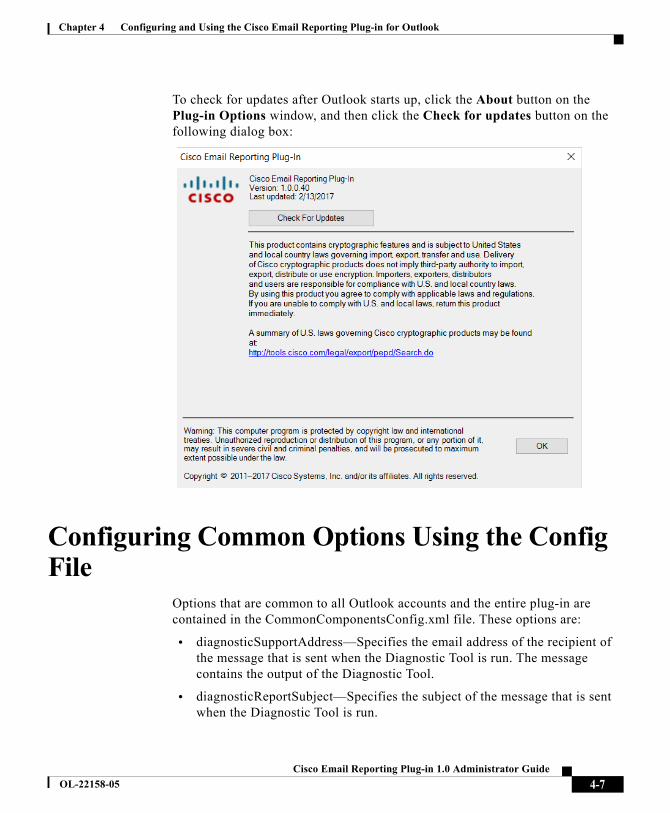
To check for updates after Outlook starts up, click the About button on the Plug-in Options window, and then click the Check for updates button on the following dialog box:
Configuring Common Options Using the Config File
Options that are common to all Outlook accounts and the entire plug-in are contained in the CommonComponentsConfig.xml file. These options are:
• diagnosticSupportAddress—Specifies the email address of the recipient of the message that is sent when the Diagnostic Tool is run. The message contains the output of the Diagnostic Tool.
• diagnosticReportSubject—Specifies the subject of the message that is sent when the Diagnostic Tool is run.
4-7 Cisco Email Reporting Plug-in 1.0 Administrator Guide
OL-22158-05
Chapter 4 Configuring and Using the Cisco Email Reporting Plug-in for Outlook
• showPluginOptions—Set to true or false to enable or disable the Plug-in Options button that opens the Plug-in Options dialog box where you can use the reporting, diagnostic, and additional options. If set to false, the Plug-in Options button will be hidden.
• checkAutomatically—Set to true or false to enable or disable the automatic checking of updates when Outlook starts. The default value is true. For more information, see the “Configuring the Outlook Plug-in to Check for Updates” section on page 4-6.
• serverURL—Set to the URL that the plug-in will use to check whether a new version is available.
• callHomeAdminEnabled—Set to true or false to enable or disable the sending of usage data when Outlook starts. The default value is true. If set to false, the user will not receive the notification about usage data collection and will not be able to send anonymous usage data to Cisco. For more information, see the “Configuring the Sending of Usage Data” section on page 4-2.
• callHomeEnabled—Set to true or false to enable or disable the sending of usage data when Outlook starts. The default value is true. If set to false, the user will not be able to send anonymous usage data to Cisco. For more information, see the “Configuring the Sending of Usage Data” section on page 4-2.
If these options are configured in the CommonComponentsConfig.xml file. To modify these options in a user environment, you must perform a mass installation with the UseCustomConfig option. For more information, see the “Using Custom Configuration Files” section on page 3-16.
Reporting Unwanted Emails-Spam, Marketing, Virus, and Phishing Attacks
The reporting plug-in allows the end user to report to Cisco that an email received is spam, a marketing email, a phishing attack, or a virus. The end user can also report mail that is misclassified as spam, also sometimes called “ham.”
The end user can enable the Cisco Email Reporting Plug-in for Outlook via the Options page in Outlook. To enable Reporting:
4-8 Cisco Email Reporting Plug-in 1.0 Administrator Guide
OL-22158-05
Chapter 4 Configuring and Using the Cisco Email Reporting Plug-in for Outlook
• In Outlook 2010/2013/2016, click the Plug-in Options button on the ribbon or go to File > Options > Add-ins > Add-in Options > Cisco Email Reporting. Select the Enable check box in the Reporting field of the Cisco Email Reporting tab.
• In Outlook 2007, click the Plug-in Options button on the toolbar or go to Tools > Options > Cisco Email Reporting tab. Select the Enable check box in the Reporting field of the Cisco Email Reporting tab.
Reporting Options
The Reporting settings are located on the Cisco Email Reporting page. To modify the Reporting settings:
• In Outlook 2010/2013/2016, click the Plug-in Options button on the ribbon or go to File > Options > Add-ins > Add-in Options > Cisco Email Reporting and click the Reporting Options button.
• In Outlook 2007, click the Plug-in Options button on the toolbar or go to Tools > Options > Cisco Email Reporting tab and click the Reporting Options button.
There are also some reporting options that must be configured in the account config_{N} file. For more information, see the “Configuring the Encryption of Spam Reports” section on page 4-15.
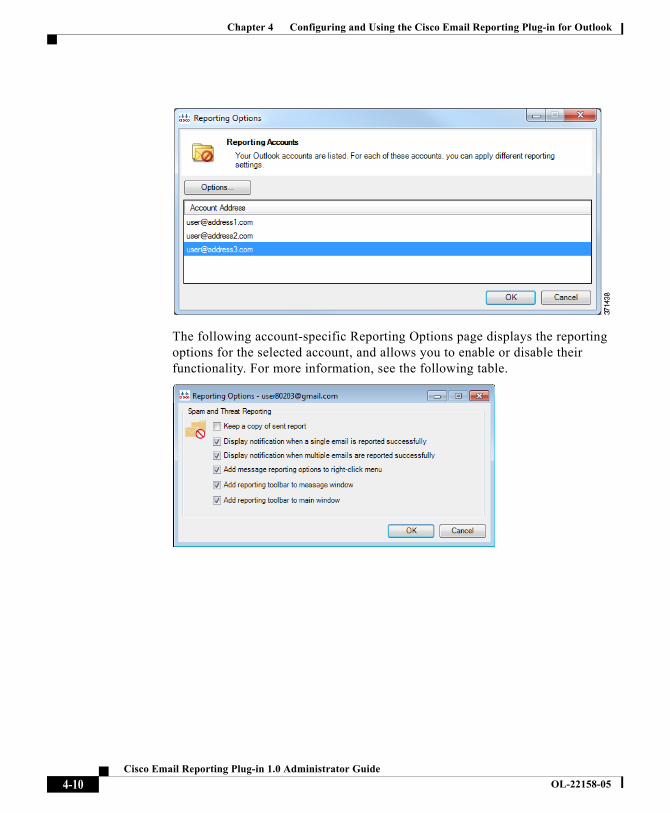
The following Reporting Accounts page displays all accounts configured in Outlook. To configure the reporting options for an account, select the appropriate account and the click the Options button. The reporting options for that account will then be displayed.
4-9 Cisco Email Reporting Plug-in 1.0 Administrator Guide
OL-22158-05
Chapter 4 Configuring and Using the Cisco Email Reporting Plug-in for Outlook
The following account-specific Reporting Options page displays the reporting options for the selected account, and allows you to enable or disable their functionality. For more information, see the following table.
4-10 Cisco Email Reporting Plug-in 1.0 Administrator Guide
OL-22158-05
Chapter 4 Configuring and Using the Cisco Email Reporting Plug-in for Outlook
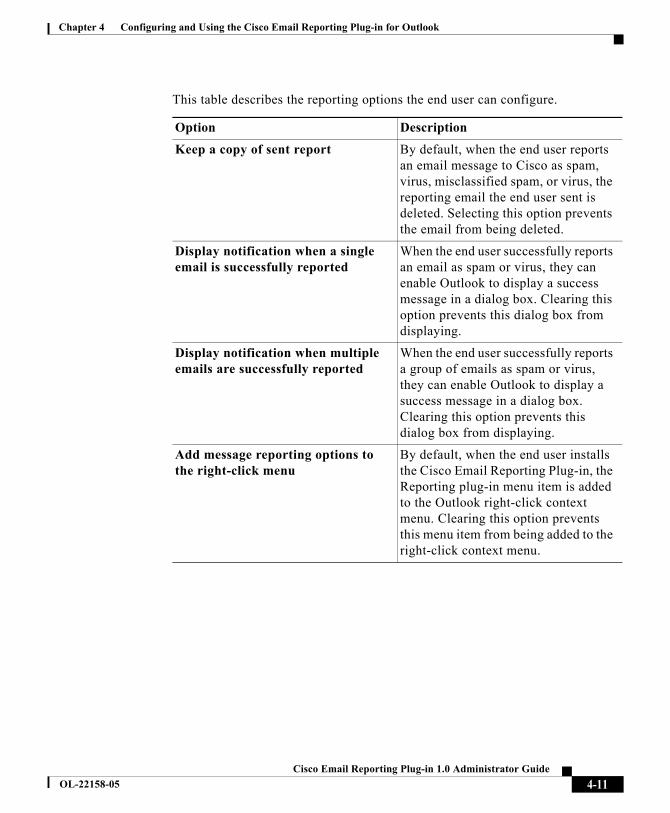
This table describes the reporting options the end user can configure.
Option Description
Keep a copy of sent report By default, when the end user reports an email message to Cisco as spam, virus, misclassified spam, or virus, the reporting email the end user sent is deleted. Selecting this option prevents the email from being deleted.
Display notification when a single email is successfully reported
When the end user successfully reports an email as spam or virus, they can enable Outlook to display a success message in a dialog box. Clearing this option prevents this dialog box from displaying.
Display notification when multiple emails are successfully reported
When the end user successfully reports a group of emails as spam or virus, they can enable Outlook to display a success message in a dialog box. Clearing this option prevents this dialog box from displaying.
Add message reporting options to the right-click menu
By default, when the end user installs the Cisco Email Reporting Plug-in, the Reporting plug-in menu item is added to the Outlook right-click context menu. Clearing this option prevents this menu item from being added to the right-click context menu.
4-11 Cisco Email Reporting Plug-in 1.0 Administrator Guide
OL-22158-05
Chapter 4 Configuring and Using the Cisco Email Reporting Plug-in for Outlook
Using the Reporting Plug-in for Outlook
Overview
The Cisco Email Reporting Plug-in for Outlook allows the end user to submit feedback to Cisco about spam, virus, phishing, or marketing emails that are received in their inbox. The end user can let Cisco know if an email message is misclassified or if it should be treated as spam, for example. Cisco uses this feedback to update the email filters that prevent unwanted messages from being delivered to their inbox.
The Plug-in provides a convenient interface through Outlook’s menu bar and the right-click message menu to report spam, virus, phishing, marketing, and misclassified emails. After reporting an email, a message appears indicating that the report has been submitted. The messages the end user reports are used to improve Cisco's email filters, helping to reduce the overall volume of unsolicited mail to their inbox.
Add reporting toolbar to the message window
By default, when the end user installs the Cisco Email Reporting Plug-in, the plug-in toolbar is added to the email message window. Clearing this option prevents this toolbar from being added to the email message window.
Add reporting toolbar to the main window
By default, when the end user installs the Cisco Email Reporting Plug-in, the plug-in toolbar is added to main Outlook window. Clearing this option prevents this toolbar from being added to main Outlook window.
Option Description
4-12 Cisco Email Reporting Plug-in 1.0 Administrator Guide
OL-22158-05
Chapter 4 Configuring and Using the Cisco Email Reporting Plug-in for Outlook
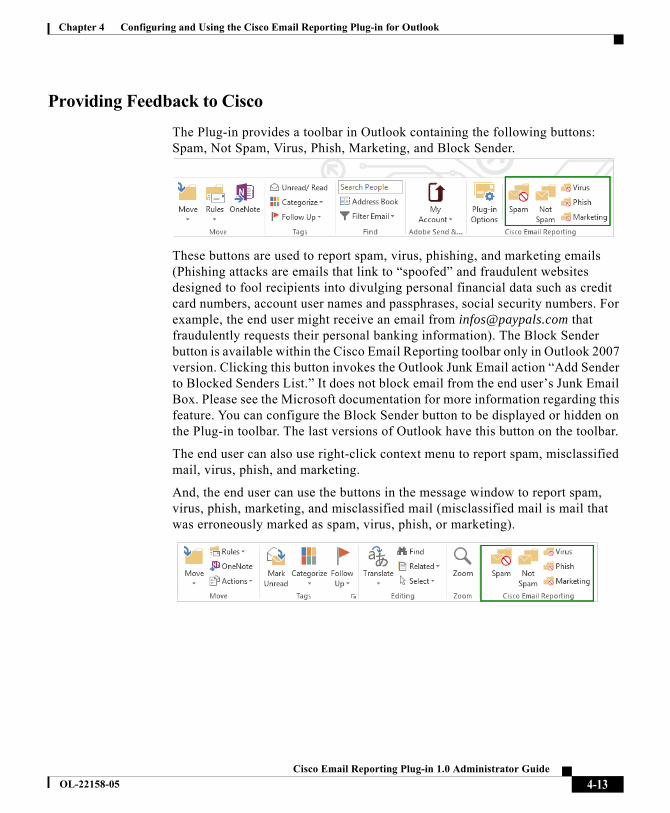
Providing Feedback to Cisco
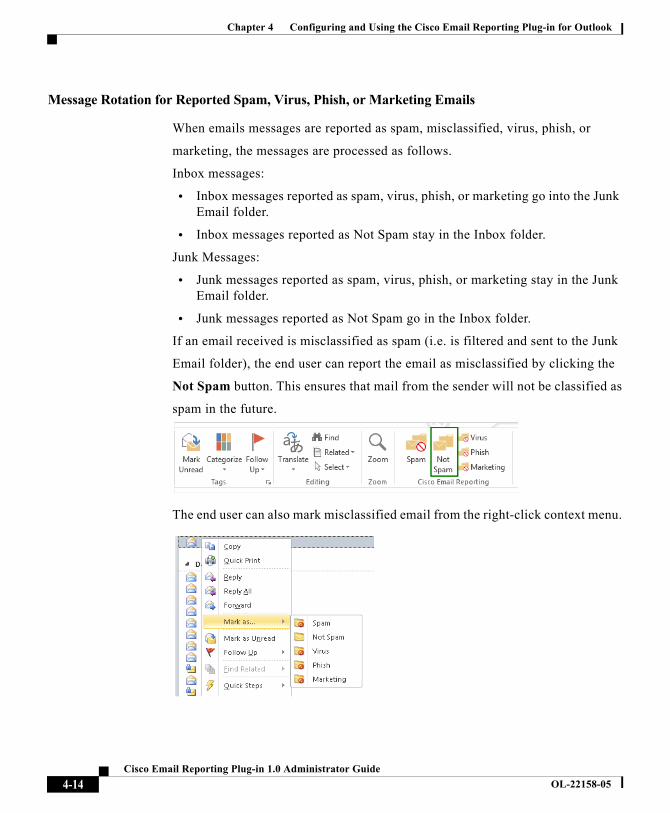
The Plug-in provides a toolbar in Outlook containing the following buttons: Spam, Not Spam, Virus, Phish, Marketing, and Block Sender.
These buttons are used to report spam, virus, phishing, and marketing emails (Phishing attacks are emails that link to “spoofed” and fraudulent websites designed to fool recipients into divulging personal financial data such as credit card numbers, account user names and passphrases, social security numbers. For example, the end user might receive an email from [email protected] that fraudulently requests their personal banking information). The Block Sender button is available within the Cisco Email Reporting toolbar only in Outlook 2007 version. Clicking this button invokes the Outlook Junk Email action “Add Sender to Blocked Senders List.” It does not block email from the end user’s Junk Email Box. Please see the Microsoft documentation for more information regarding this feature. You can configure the Block Sender button to be displayed or hidden on the Plug-in toolbar. The last versions of Outlook have this button on the toolbar.
The end user can also use right-click context menu to report spam, misclassified mail, virus, phish, and marketing.
And, the end user can use the buttons in the message window to report spam, virus, phish, marketing, and misclassified mail (misclassified mail is mail that was erroneously marked as spam, virus, phish, or marketing).
4-13 Cisco Email Reporting Plug-in 1.0 Administrator Guide
OL-22158-05
Chapter 4 Configuring and Using the Cisco Email Reporting Plug-in for Outlook
Message Rotation for Reported Spam, Virus, Phish, or Marketing Emails
When emails messages are reported as spam, misclassified, virus, phish, or
marketing, the messages are processed as follows.
Inbox messages:
• Inbox messages reported as spam, virus, phish, or marketing go into the Junk Email folder.
• Inbox messages reported as Not Spam stay in the Inbox folder.
Junk Messages:
• Junk messages reported as spam, virus, phish, or marketing stay in the Junk Email folder.
• Junk messages reported as Not Spam go in the Inbox folder.
If an email received is misclassified as spam (i.e. is filtered and sent to the Junk
Email folder), the end user can report the email as misclassified by clicking the
Not Spam button. This ensures that mail from the sender will not be classified as
spam in the future.
The end user can also mark misclassified email from the right-click context menu.
4-14 Cisco Email Reporting Plug-in 1.0 Administrator Guide
OL-22158-05
Chapter 4 Configuring and Using the Cisco Email Reporting Plug-in for Outlook
Configuring the Encryption of Spam Reports
To enable or disable the encryption of spam reports, configure the following two options in the “reporting” section of the account config_{N} file:
• format - Defines the format of the report. Supported values are:
– encrypted—Specifies that the report will be encrypted before sending.
– plain—Specifies that the report will be sent without encryption.
The default value is encrypted.
• subject - Defines the subject of the report. You can include the report type (Spam, Ham, Virus, Phish, Marketing) in the subject by including the string “${reportType}.”
Configuring the Tracking of Spam Reports
To enable tracking the reported messages marked as spam, virus, phish, or marketing, set the following parameter in the account config_{N} file:
• copyAddressInPlainFormat—Specifies that a copy of the spam report will be sent in plain (.raw) format to custom email address.
Changing Additional SettingsA log file writes and lists all actions that have occurred.
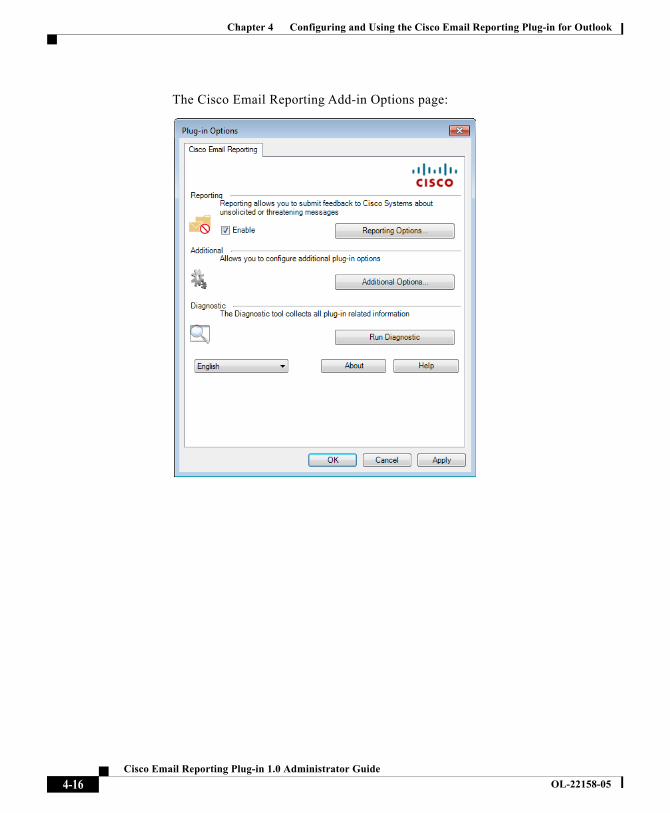
The Additional Options are located on the Cisco Email Reporting page. To modify the Additional Options:
• In Outlook 2010/2013/2016, click the Plug-in Options button on the ribbon or go to File > Options > Add-Ins > Add-in Options > Cisco Email Reporting > Additional Options.
• In Outlook 2007, click the Plug-in Options button on the toolbar or go to Tools > Options > Cisco Email Reporting > Additional Options.
4-15 Cisco Email Reporting Plug-in 1.0 Administrator Guide
OL-22158-05
Chapter 4 Configuring and Using the Cisco Email Reporting Plug-in for Outlook
The Cisco Email Reporting Add-in Options page:
4-16 Cisco Email Reporting Plug-in 1.0 Administrator Guide
OL-22158-05
Chapter 4 Configuring and Using the Cisco Email Reporting Plug-in for Outlook
Logging Tab
The end user can configure the following options from the Logging tab.
Option Description
Enable Logging Select to enable logging for the Cisco Email Reporting plug-in.
Log file name Specify the name of the log file that will be stored in %ALLUSERSPROFILE%\Cisco\Cisco Email Reporting Plug-in\<username>. The log file name should end with a .log extension.
Log level Select one of the following:
• Normal - By default, this option is enabled. Normal logging includes fatal, recoverable errors, and warnings.
• Extended - Enables useful information and debugging log messages in addition to the Normal logging messages.
You may want to change logging levels based on the level of troubleshooting you need for a given situation. For example, if you experience issues with the Cisco Email Reporting Plug-in, you might set the logging level to Extended to provide developers with the maximum amount of information allowing to reproduce issues and run diagnostics
4-17 Cisco Email Reporting Plug-in 1.0 Administrator Guide
OL-22158-05
Chapter 4 Configuring and Using the Cisco Email Reporting Plug-in for Outlook
Sending Usage Data Tab
The end user can configure the following option from the Sending Usage Data tab.
Privacy Tab
The end user can configure the following options from the Privacy tab.
Errors and TroubleshootingThis section lists some of the common errors that can occur when using the Cisco Email Reporting Plug-in for Outlook, and it provides troubleshooting tips for fixing these errors.
Note If the end user receives the same error message several times and the error disrupts the Cisco Email Reporting Plug-in for Outlook functionality, they can try running the repair process. See Repairing Cisco Email Reporting Plug-in for Outlook Files, page 4-21. If the end user encounters the same error after running the repair process, follow the steps to provide Cisco feedback with the Diagnostic tool. See Running the Cisco Email Reporting Diagnostic Tool, page 4-22.
Option Description
Send anonymous usage data to Cisco
Enables the Cisco Email Reporting Plug-in to collect data that will be used to improve the product. The following two types of information will be collected and stored on Cisco servers for analysis:
• General information about the machine the plug-in is running on
• Account-specific information
Option Description
Resets Identifier Resets the identifier used to correlate usage reports.
4-18 Cisco Email Reporting Plug-in 1.0 Administrator Guide
OL-22158-05

Chapter 4 Configuring and Using the Cisco Email Reporting Plug-in for Outlook
Outlook Startup Errors
Error occurred during configuration file initialization
The following messages may appear while Outlook is starting:
• An error occurred during <file_name> configuration file initialization. Some settings have been set to the default values.
• Config validation for account <account_address> has failed. Please set the correct configuration values or contact your administrator.
These error messages occur if some configuration values are invalid or some configuration files are corrupted in the %ALLUSERSPROFILE%\Cisco\Cisco Email Reporting Plug-In\<username> folder.
Solution
The Cisco Email Reporting Plug-in will not restore default values of some reporting options in corrupted configuration files but will turn off some reporting features instead. If the end user receives an error message repeatedly, run the repair process to fix the configuration files. See Repairing Cisco Email Reporting Plug-in for Outlook Files, page 4-21.
Configuration file not found
The following error message may display when Outlook is starting:
• <file_name> configuration file was not found. Settings have been set to the default values.
Solution
The Cisco Email Reporting Plug-in will not restore default values of some reporting options in corrupted configuration files but will set the corrupted values or tags to default ones. If the end user receives an error message repeatedly, run the repair process to fix the configuration files. See Repairing Cisco Email Reporting Plug-in for Outlook Files, page 4-21.
4-19 Cisco Email Reporting Plug-in 1.0 Administrator Guide
OL-22158-05

Chapter 4 Configuring and Using the Cisco Email Reporting Plug-in for Outlook
Message Reporting Errors
Outlook does not recognize one or more names
The following message may appear when the end user clicks the Spam, Virus, Phish, Marketing, or Not Spam buttons in Outlook:
• There was error during email reporting. Description: Outlook does not recognize one or more names.
This error occurs if the end user is using the Reporting plug-in and Outlook cannot recognize the format of the email message they are attempting to report. The end user will need to repair the Reporting plug-in file to ensure that they can report spam and phishing emails (as well as reporting legitimate mail as "Not Spam").
Solution
Run the repair process. See Repairing Cisco Email Reporting Plug-in for Outlook Files, page 4-21.
The connection to the server is unavailable
The following message may appear when the end user clicks Spam, Virus, Phish, Marketing, or Not Spam buttons plug-in buttons in Outlook and use IMAP protocol or "headers only" Outlook property:
• Error: The connection to the server is unavailable. Outlook must be online or connected to complete this action.
This error occurs if the end user is trying to report message that downloaded partially (headers only) and the connection to the mail server is off. The Reporting plug-in cannot report a partially downloaded message, and it will attempt to connect to the mail server until it can download a full copy of the message to report.
Solution
Ensure that Outlook has a connection with the mail server before reporting emails with headers only.
4-20 Cisco Email Reporting Plug-in 1.0 Administrator Guide
OL-22158-05
Chapter 4 Configuring and Using the Cisco Email Reporting Plug-in for Outlook
Repairing Cisco Email Reporting Plug-in for Outlook Files
To repair Cisco Email Reporting Plug-in:
Step 1 Make sure Outlook is closed.
Step 2 Go to Control Panel > Add or Remove Programs.
Step 3 Find Cisco Email Reporting Plug-in in the list of programs and click Uninstall/Change.
Step 4 Click Repair. The installer repair process runs.
Step 5 Perform the action that caused the error. If the same error occurs after running the repair process, follow the steps to provide Cisco feedback with the Diagnostic tool. See Running the Cisco Email Reporting Diagnostic Tool, page 4-22.
Troubleshooting Using the Diagnostic ToolThe Cisco Email Reporting Plug-in includes a diagnostic tool to help Cisco Support in troubleshooting problems. The Diagnostic tool collects important data from the Plug-in tool that can then be sent to Cisco Support to aid them in problem-solving.
The end user may want to use the diagnostic tool if they are receiving errors or if they have issues with the Cisco Email Reporting Plug-in that the repair procedure does not resolve. You can also use the diagnostic tool to share critical information with Cisco engineers when reporting a bug.
See Repairing Cisco Email Reporting Plug-in for Outlook Files, page 4-21 or Running the Cisco Email Reporting Diagnostic Tool, page 4-22.
Note If you experience errors, review Errors and Troubleshooting, page 4-18 for troubleshooting tips.
4-21 Cisco Email Reporting Plug-in 1.0 Administrator Guide
OL-22158-05
Chapter 4 Configuring and Using the Cisco Email Reporting Plug-in for Outlook
Data Collected by the Cisco Email Reporting Diagnostic Tool
The Diagnostic tool collects the following information from your computer:
• Registration information about some COM components
• Environment variables
• Cisco Email Reporting Plug-in output files
• Information about Windows and Outlook
• Your system user name and PC name
• Information about other Outlook plug-ins
• Outlook related Windows Event Log entries
Running the Cisco Email Reporting Diagnostic Tool
The Cisco Email Reporting Diagnostic tool can be run from one of the following places:
• From the Cisco Email Reporting options tab. Typically, you run the diagnostic tool from the Cisco Email Reporting options tab.
• From the “Program Files\ Cisco Email Reporting Plug-in” folder (typically C:\Program Files\Cisco\Cisco Email Reporting Plug-in). This is the folder where your Cisco Email Reporting Plug-in is installed.
• From the Start Menu> All Programs > Cisco Email Reporting Plug-in > Cisco Email Reporting Plug-in Diagnostic.
Running the Diagnostic Tool from the Outlook Options Page
Step 1 Go to the following to run the Diagnostic tool:
• In Outlook 2010/2013/2016, click the Plug-in Options button on the ribbon or go to File > Options > Add-Ins > Add-in Options > Cisco Email Reporting > Run Diagnostic.
• In Outlook 2007, click the Plug-in Options button on the toolbar or go to Tools > Options > Cisco Email Reporting> Run Diagnostic.
4-22 Cisco Email Reporting Plug-in 1.0 Administrator Guide
OL-22158-05
Chapter 4 Configuring and Using the Cisco Email Reporting Plug-in for Outlook
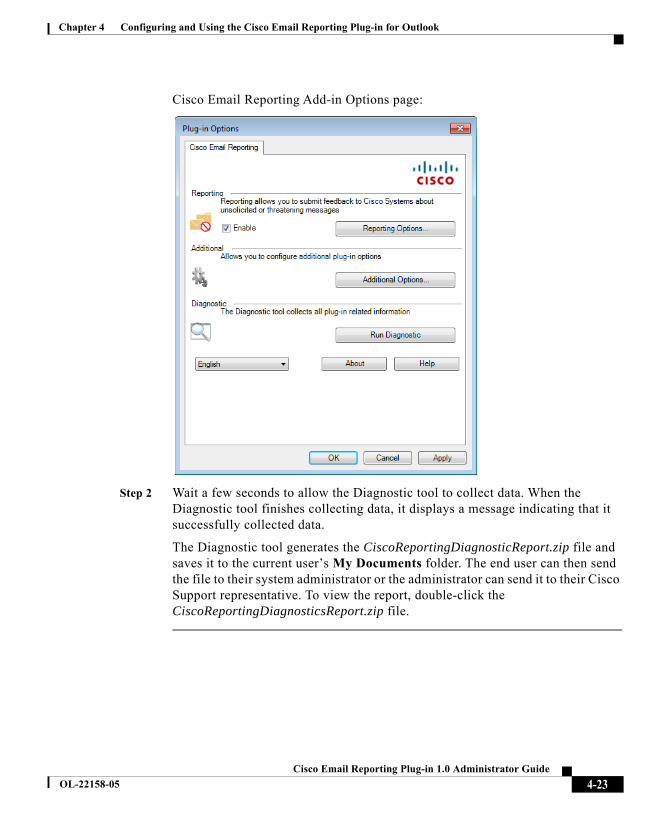
Cisco Email Reporting Add-in Options page:
Step 2 Wait a few seconds to allow the Diagnostic tool to collect data. When the Diagnostic tool finishes collecting data, it displays a message indicating that it successfully collected data.
The Diagnostic tool generates the CiscoReportingDiagnosticReport.zip file and saves it to the current user’s My Documents folder. The end user can then send the file to their system administrator or the administrator can send it to their Cisco Support representative. To view the report, double-click the CiscoReportingDiagnosticsReport.zip file.
4-23 Cisco Email Reporting Plug-in 1.0 Administrator Guide
OL-22158-05
Chapter 4 Configuring and Using the Cisco Email Reporting Plug-in for Outlook
Running the Diagnostic Tool from the Program Files
There are two ways to run the diagnostic tool from the Program files.
• Run the Diagnostic tool from Start > Programs > Cisco Email Reporting Plug-in > Cisco Email Reporting Plug-in Diagnostic.
-OR-
• Go to the folder where Cisco Email Reporting Plug-in was installed (typically C:\Program Files\Cisco\Cisco Email Reporting Plug-in) and double-click the Cisco.EmailReporting.Framework.Diagnostic.exe file.
Uninstalling the Cisco Email Reporting Plug-inYou can uninstall the Cisco Email Reporting Plug-in via the Control Panel > Add/Remove Program option or by running the setup.exe program.
During the uninstall, the following items are removed:
• All registry entries made by the plug-in.
• Entry for the plug-in from the Add/Remove programs listing.
• Some of the files related to the plug-in. Note that not all of the files are removed.
• The plug-in toolbar (removed from Outlook).
Note Uninstalling the plug-in does not affect Outlook performance. Outlook must be closed during the uninstall.
To uninstall the Cisco Email Reporting Plug-in for Outlook:
There are two possible ways to uninstall the Cisco Email Reporting Plug-in for Outlook:
Step 1 Click Start > Control Panel > Add/Remove Programs.
Step 2 Select Cisco Email Reporting Plug-In and click Uninstall/Change > Next > Remove.
The second option to uninstall is
• Double-click the plug-in setup file (the file used to install the plug-in) and select the Remove option to uninstall the Cisco Email Reporting Plug-in.
4-24 Cisco Email Reporting Plug-in 1.0 Administrator Guide
OL-22158-05
Cisco Email Reporting
OL-22158-04
A P P E N D I X A
Cisco End User License AgreementFor information about the Cisco End User License Agreement, see http://www.cisco.com/web/products/software_licensing_center.html.
A-1Plug-in 1.0.1 Administrator Guide