· 4€Ł€INTRODUCCIÓN A CINEMA€4D€ Ł€CAP˝TULO 1 1 Introducción a CINEMA€4D

Cinema 4D Beginner's Guide
Jen Rizzo
Chapter No. 1 "Getting to Know Cinema 4D"

In this package, you will find: A Biography of the author of the book
A preview chapter from the book, Chapter NO.1 "Getting to Know Cinema 4D"
A synopsis of the book’s content
Information on where to buy this book
About the Author Jen Rizzo is a Motion Graphics Designer in San Francisco, CA. Her career began at Skidmore, Owings and Merrill (New York) as a 3D Architectural Visualizer, then continued in a similar capacity at FRCH Design Worldwide (Cincinnati) before relocating to San Francisco in 2008. She has worked with over thirty companies in the last four years, jumping in at every stage of the design process. She is overly excited by almost everything.
In her personal life, she strives to become a stronger cyclist and hopes to someday beat someone at a board game. She has a near-unhealthy obsession with cured meat, cheese, chocolate and coffee, and will wax poetically on the city of San Francisco until someone distracts her. She would like to thank malt, hops, and yeast for existing in perfect liquid triumvirance.
For More Information: www.packtpub.com/cinema-4d-beginners-guide/book

Cinema 4D Beginner's Guide With Cinema 4D, you can quickly and easily bring your visions to life. This beginner's guide will walk you through creating and animating a 3D scene, with tips and techniques for everything from photorealistic rendering to motion graphics.
What This Book Covers Chapter 1, Getting to Know Cinema 4D, provides an introduction to 3D space and how to navigate the Cinema 4D interface.
Chapter 2, Modeling Part 1: Edges, Faces, and Points, provides a foundation in polygonal modeling.
Chapter 3, Modeling Part 2: Splines, NURBS, Deformers, and Boole, takes modeling to a new direction by using parametric objects.
Chapter 4, Materials and Shaders, will bring character to your models by adding surface properties.
Chapter 5, Lighting and Rendering, will introduce lighting to add additional realism and dimension to your objects, as well as explore global visual settings.
Chapter 6, Animation, provides an overview of the linear animation process as we animate a camera and lighting in our 3D environment.
Chapter 7, MoGraph, provides a brief overview of many common MoGraph objects such as cloner and tracer, as well as how to work with Cinema 4D's built-in Dynamics system.
Chapter 8, XPresso, provides an introduction to node-based programming showing the usage of Math to connect properties of objects to one another.
Chapter 9, An Overview of Additional Tools, shows how to use Hair, Sketch and Toon, and Cloth.
Chapter 10, Optimizing Your Workflow, brings everything we've learned together through exporting multi pass renders and spatial data as we composite our final animation in Adobe After Effects.
Appendix: Pop Quiz Answers, contains answers to the Pop Quiz sections at the end of Chapter 2 and Chapter 5.
For More Information: www.packtpub.com/cinema-4d-beginners-guide/book

1Getting to Know Cinema 4D
Cinema 4D is a popular tool for hobbyists, students, and professionals, due to its user-friendly interface and ease of integration into additional pieces of software. Users of other instances of design software such as Adobe Photoshop or Adobe Illustrator will notice strong similarities in the default layout. This chapter will serve as an introduction to Cinema's interface so that the tools we refer to later on will be easier to find.
In this chapter we will cover the following topics:
Understanding how 3D space is emulated on a 2D screen
Exploring Cinema's main interface elements
Exploring the viewport and our display op ons
Crea ng basic primi ves and discussing the diff erence between parametric and polygonal objects
Introducing our project for this book—an animated fl ythrough of an offi ce
Before we beginIn order to install Cinema, you'll need a computer that fi ts the following requirements:
Windows XP, Vista, or 7 running on an Intel or AMD CPU with SSE2-Support
Mac OS X 10.5.8 or higher running on an Intel-based Mac
For More Information: www.packtpub.com/cinema-4d-beginners-guide/book
Ge ng to Know Cinema 4D
[ 8 ]
1024 MB of free RAM
DVD ROM drive
Standard DVD installa on can take up to 7 GB of disk space
Addi onal informa on can be found on MAXON 's website at the following link:
http://www.maxon.net/products/general-information/general-information/system-requirements.html
There are four diff erent packages of Cinema available for purchase, as follows:
Prime
Broadcast
Visualize
Studio
Prime is MAXON's basic off ering, which off ers a toolset for anyone looking for basic 3D anima on func onality. This version should be suffi cient for students and will contain most of the features men oned in this book (MoGraph, which will be discussed in Chapter 7, MoGraph, is available in Broadcast and Studio only). Broadcast targets mo on graphics professionals, while Visualize is directed at architects and designers. Studio contains all of the features from the other three versions. The diff erent versions are designed to off er necessary func onality at a lower cost for specifi c industries. A full product comparison can be found on MAXON's website (http://www.maxon.net/products/general-information/general-information/product-comparison.html).
MAXON has always done an excellent job of ensuring that its so ware supports a wide range of computers da ng back mul ple years. R12 was the fi rst version that did not support PPC Macintosh computers, almost fi ve years a er Intel-based Macs became standard and well a er most major anima on and design so ware applica ons had discon nued support. While Cinema can be installed on many older machines, 3D so ware is notorious for being a processor hog. A mul processor machine with ample RAM is recommended, and render speeds will be much improved on more powerful machines.
For More Information: www.packtpub.com/cinema-4d-beginners-guide/book

Chapter 1
[ 9 ]
It isn't a requirement for installa on, but a standard three-bu on mouse is highly recommended. Many shortcuts can be accessed by le -, right-, and center-clicking with a mouse. It's not impossible to use Cinema without one, but you'll fi nd it much easier.
A note for users of previous versions is that R13 represents a major shi in Cinema's core architecture. While many of the principles in this book will apply to R11.5 and R12, we will be focusing specifi cally on R13. If you are unable to fi nd a tool in the loca on specifi ed here, start by searching in the so ware's Help sec on. If you are s ll unable to fi nd it, it may be a feature specifi c to R13 . A full list of new features can be found on MAXON's website at: http://www.maxon.net/products/general-information/general-information/all-new-r13-features.html.
Understanding 3D spaceUp un l now, it's very likely that all of the work you've ever done on a computer has been in 2D space. Text documents, e-mails, videos are all there on a fl at surface. When we draw a box, we click and hold on the screen, draw the box to the dimensions we need, and release. We're le with a rectangle—a shape with an X and Y dimension.
Pick up a nearby object and examine it. If you took a photo of it and put it on your computer, it might be 500 x 300, but you'd only be seeing part of the object; an image, rather than an object. Who knows what might be on the bo om or the back; you've only got part of the informa on! By holding it in your hand, you can turn it around, see where it bulges out and where it contracts, where its edges are sharp, and where they gently curve.
If you've ever had to create a perspec ve drawing, you know that it takes a li le prac ce to wrap your mind around how objects and environments look from a certain angle. Imagine a photo of a long road stretching ahead of you—the road closest to you appears much wider than the road far off in the distance, but we know that the road is actually of a consistent width and our eye, or the camera's eye in this case, is forcing a certain perspec ve. So if we sit down with a pencil and paper, or open Photoshop to try and create a rendering of what we see, we have to fi gure out how to visually force that perspec ve in our composi on as well.
For More Information: www.packtpub.com/cinema-4d-beginners-guide/book

Ge ng to Know Cinema 4D
[ 10 ]
In 3D so ware, you're crea ng the object in the same way you'd create it in real life. A cube is made up of six perfectly equal squares that come together at 90 degree angles. The perspec ve you see in 3D renderings is en rely dependent on the camera angle, which means once we've created an object, we can create a rendering from infi nite angles with li le addi onal eff ort, as shown in the following screenshot:
As we move on to exploring Cinema's interface, it's important to establish our coordinate system – how 3D space and direc on are represented on our 2D screen. When we modify an object, we'll o en have to specify if we're modifying it in one, two, or three dimensions, as well as which dimensions we're choosing to modify. When you open Cinema 4D, you'll see a perspec ve grid. The center point represents (0,0,0). The red arrow represents the X axis, the blue arrow represents the Z axis, and the upward dimension (which will be colored green when we begin crea ng objects) is the Y axis.
For More Information: www.packtpub.com/cinema-4d-beginners-guide/book

Chapter 1
[ 11 ]
The xyz coordinate system is what we'll use for both posi on and scale, but rota on is represented by the Heading, Pitch, Bank (HPB) coordinate system . H rotates on the x-z plane, P rotates on the y-z plane, and B rotates on the x-y plane. Let's begin exploring the menus so all of those le ers make a li le more sense!
Main Menu and Command PalettesThe Main Menu is located at the top of the screen. Commands in Cinema can o en be accessed in a variety of ways—it's common to have a keyboard shortcut, a loca on in a drop-down menu, and an icon to accomplish the same task. As you progress through this book, you'll most certainly develop your own preferred method. When we introduce a new tool, we'll explore mul ple op ons to access it, but will default to the Command Pale e when we call on that tool again. For example, we can create a cube by naviga ng to Create | Objects | Cube, but we can also click on the cube icon in our Command Pale e. Certain func ons can only be accessed via the Main Menu, so we'll refer this area for less common commands. The following is a screenshot of the Main Menu:
The row of icons located underneath the Main Menu, as well as the icons on the le -hand side of the screen, represent Cinema's most common func ons and are referred to as the Command Pale e. This is shown in the following screenshot:
These icons are broken into Command Groups , which represent related commands. These Command Groups are as follows:
Undo/Redo
Select/Move/Scale/Rotate
Axis selec on
Render controls
Object crea on
For More Information: www.packtpub.com/cinema-4d-beginners-guide/book

Ge ng to Know Cinema 4D
[ 12 ]
To access an expanded menu, click and hold on any icon with a black arrow on the bo om-right corner. Clicking and holding on the Primi ves icon (cube) gives you access to Cinema's built-in objects. Releasing the mouse on one of these objects will add it to your scene; releasing the mouse without selec ng an object will leave the submenu expanded and allow you to click again to select an object, as shown in the following screenshot:
Let's select the Cube icon to place a cube in our scene. When you create a cube, you'll no ce three arrows appear. Our Move tool is selected as the default op on, as shown in the following screenshot:
For More Information: www.packtpub.com/cinema-4d-beginners-guide/book

Chapter 1
[ 13 ]
If you click-and-drag anywhere on the window, it will move your cube in the direc on of your mouse in all three direc ons. This is because we haven't locked ourselves into an axis yet. No ce in the top bar that the X, Y, and Z icons are all selected. Deselect the X axis, then click-and-drag; the cube now only moves in two direc ons. If you want your cube to move only in one direc on, you can either deselect two of the three icons, or simply select the specifi c arrow on your cube and drag it to the desired posi on, locking yourself in to the selected axis. You'll also no ce red, blue, and green triangles just to the outside of our cube—these represent axis bands, which confi ne movement to just two axes:
The icons on the le -hand side of the screen represent methods of interac ng with objects. Depending on the task at hand, all these steps may not be necessary, but the basic order of opera ons is to select an icon on the le (allowing you to control an en re object, point, edge, or face), then select a command from the top (move, scale, rotate) and then select an axis (X, Y, Z). So if we want to move an object on the Y axis, we'd select the object icon, then the move icon, and deselect the X and Z axes.
ViewportThe center sec on of Cinema's interface is called the Viewport. This is where you'll be able to view all the objects in your scene. Let's create a cube so that we have an object to orient ourselves.
At the top- le corner of the Viewport, you'll see six menu op ons: View, Cameras, Display, Op ons, Filter and Panel. If you click and hold on the small 4x4 grid to the le of View, you'll no ce the icon changes to blue. If you move the window around, you'll no ce a bar aligning on the edges of neighboring windows. This allows you to customize your layout by moving individual panels anywhere you choose in order to tailor your so ware to your workfl ow. Addi onal pre-defi ned layouts can be found in the Layout drop-down menu at the top-right corner of your screen. For consistency, we'll use the Standard layout for this book.
For More Information: www.packtpub.com/cinema-4d-beginners-guide/book

Ge ng to Know Cinema 4D
[ 14 ]
The viewport allows you to view and move around the objects in your scene. At the top right of the viewport, you'll see four icons, which represent common commands for the viewport. This is shown in the following screenshot:
Clicking and holding on the fi rst three icons allows you to pan, zoom, and rotate the viewport. These camera adjustments can also be accessed via your keyboard by holding down 1 (Pan), 2 (Zoom), or 3 (Rotate) as you click-and-drag with the mouse. If holding down 2 or 3 to zoom or rotate, you'll no ce that the previous posi on of the mouse cursor is replaced with a crosshair. This represents the anchor point for your camera movement. If we hover over the top-right corner of our cube, press 2 on the keyboard and move the mouse, we'll zoom in to that corner. If the mouse is not hovering over an object, the anchor point defaults to our background, enabling faster, world-oriented camera movement. You can also navigate using the le , middle, and right mouse bu ons while holding down the Alt (Windows) or Op on (Mac) key.
Clicking on the fourth icon shows you addi onal views—Top, Right, and Front, as shown in the preceding screenshot. These are orthographic cameras and do not show perspec ve. When working in 3D, it's important to remember that what looks correct in one viewport may not be accurate in another.
For More Information: www.packtpub.com/cinema-4d-beginners-guide/book

Chapter 1
[ 15 ]
If you're exclusively working in a perspec ve camera, you may arrange objects in a way that looks correct for your current view, but when you move the camera, you'll see that you've accidentally intersected objects or moved them in an incorrect direc on. Working with mul ple angles open at once is an easy way to ensure that you're making the intended adjustments to your model. In our new four-camera view, you'll no ce each window has its own individual menu bar. Clicking the fourth icon in any of these cameras will expand that view to fi ll the available viewport area. You can also switch between views by clicking with your center mouse bu on. While in single-camera mode, clicking on the center mouse bu on will expand all four views. To expand an individual view from four-camera mode, hover your mouse over your chosen view and click on the center mouse bu on, as shown in the following screenshot:
Naviga ng to Panel | Arrangement will give you alterna ves to the standard four-camera view. If, for example, you're working on detailing just the top of an object, you might not be as interested in the Right and Front views, and want to see the Perspec ve and Top views at the same me; you could select 2 Views Stacked to gain more screen space for each view.
Let's explore addi onal viewport op ons. The Cameras menu gives you an addi onal way to view your object through diff erent cameras and brings up more op ons than the Top/Right/Front from our four-camera view. While in four-camera mode, if you select an alternate camera from this menu that is changing Le to Bo om, Cinema will remember your choice when you switch between views.
For More Information: www.packtpub.com/cinema-4d-beginners-guide/book

Ge ng to Know Cinema 4D
[ 16 ]
You can also create a perspec ve camera by naviga ng to Create | Camera | Camera, or by clicking on the Camera icon in the Command Pale e. New cameras are created by default from your current view, so it's easiest to begin by establishing a view that's close to your end goal using our pan/zoom/rotate tools before crea ng a camera. You can create an endless number of cameras in your scene.
The Display menu gives you mul ple shading op ons. This will allow you to see your model as a single smooth object, or as a wireframe, or a combina on of both. Let's delete our cube and add a sphere instead (Create | Object | Sphere). As we switch between display modes, you will want to deselect the sphere in order to see the most accurate representa on, as shown in the following screenshot:
Our default display—Gouraud, is set to give us a rela vely accurate rendering of the textures and geometry of our object:
For More Information: www.packtpub.com/cinema-4d-beginners-guide/book

Chapter 1
[ 17 ]
If we change to Gouraud Shading (Lines), you'll see an outline of each of the individual polygons in our object:
Switching to Lines gives us a transparent view of our object only showing edges. Note that these display op ons have no eff ect on our fi nal rendered output and changing them will only aff ect how the object is displayed in the viewport as we work on our scene. If you're working on a more complex fi le, you may fi nd it helpful to switch to a diff erent mode in order to save processor power.
Render optionsThe process of turning the on-screen model into an image is called Rendering . Rendering takes your scene that looks blocky and segmented during edi ng and turns it into a smooth, beau ful image. There are many third-party rendering plugins for Cinema, but we'll be using the built-in Advanced Render module. The render engine for R13 has been greatly improved by the addi on of Physical Rendering, which we'll explore in Chapter 5, Materials and Shaders. A rendered model looks very diff erent from the on-screen preview, so we'll want to check our progress every once in a while along the way. The following is a screenshot of Render icons in the Command Pale e:
For More Information: www.packtpub.com/cinema-4d-beginners-guide/book

Ge ng to Know Cinema 4D
[ 18 ]
The three icons in the center of the Command Pale e with the clapboard in the bo om-le are the Render icons. Clicking the icon on the le renders the current Viewport window. You can also press command + R on a Mac, or Ctrl + R on a Windows system. This will not save an external image and only renders a preview in the Viewport. Clicking on Viewport while it is rendering will cancel the process. The center icon will render to Picture Viewer according to the se ngs you have entered in the window represented by the third icon, Render Se ngs.
Objects and Attributes ManagerWhen we create a new object, the object name will pop up in a window at the top-right corner of the screen. The following is a screenshot of our Objects Manager:
Here, we can rename objects, select groups of objects, create parent-child rela onships, and control many other func ons. Objects can be selected by clicking on them in the viewport, but o en in more complex scenes where one object is obscured from the camera by another, it becomes valuable to be able to select it from a list. It is therefore a good prac ce to name your objects as you go along, otherwise, we could end up with hundreds of objects named Sphere and Cube and never fi nd anything! At the top-right corner of the window you'll see a magnifying glass icon, which represents the Search tool. If your objects are named correctly, it can come in handy as you create more complex scenes. The following is a screenshot of the list of proper es of an object (cube) in the A ributes Manager:
For More Information: www.packtpub.com/cinema-4d-beginners-guide/book

Chapter 1
[ 19 ]
Clicking on an object in the Objects Manager will open a list of proper es in the A ributes Manager. The informa on available in the A ributes Manager varies depending on the type of object. For example, if we create a sphere, we are able to control its radius and segments. For a cube, you can control the size of each of its three dimensions, the number of segments per side, and the radius of the fi llet if you've created a cube with rounded edges. As we create addi onal objects, lights, cameras, and materials, we will regularly access their informa on in this panel.
Points, edges, faces, and editable objectsObjects in 3D space may look solid, but they are actually hollow—a combina on of dots and lines that the so ware connects to look like real objects. A cardboard box may be hollow, but the cardboard perhaps has thickness of one-eighth of an inch, s ll giving it some visibility, no ma er how thin. A 3D cube, by default, has no thickness whatsoever. The six sides, referred to as faces or polygons (polys for short), are created by connec ng four individual points in space by lines called edges. A cube has eight points, and when all of them are connected to one another, these six 2D shapes come together to make a perfectly hollow cube.
It would be easy to manually create a cube (it's only eight points) but certain objects, such as spheres, are much more complicated. Most standard 3D so ware isn't set to naturally understand curves, so any roundness to an object is created by mul ple points in space, connected by straight lines. When enough of those ny straight lines are put in a row, our eye is tricked into thinking we're looking at a curve. Imagine building a brick archway. If you build your archway using 10 bricks, it will look segmented and choppy. But if you build your archway using 100 bricks, the shape appears much smoother. Objects such as spheres and cylinders can have hundreds of individual polys, so Cinema has built in a number of primi ves to save me and eff ort. They can be found in our Create | Objects menu that we visited when we began exploring our viewport, or by clicking and holding on the primi ves icon.
For More Information: www.packtpub.com/cinema-4d-beginners-guide/book
Ge ng to Know Cinema 4D
[ 20 ]
Primi ves and other objects in Cinema have two states: Parametric and Polygonal. The process of conver ng an object to a polygon is referred to as "making it editable".
Let's create a cube and examine how we can modify it. When the cube is selected, we can modify it via the A ributes Manager. By default, our cube is 200 cm on all sides. If we want a taller cube, we can enter a new value into the appropriate fi eld in the A ributes Manager. Let's change the Y value to 300.
Another way to modify the object is by using the Scale command. Let's select the Scale icon in our Command Manager. We've previously discussed that selec ng a single axis locks our transforma on to that axis, so let's select just the Z axis and a empt to scale. The cube scales all direc ons propor onally! This is because our cube is parametric and not polygonal. When primi ves are s ll in their parametric state, many of our controls are disabled. If you select the Polygon icon in the le -hand Command Pale e and a empt to select just one face of the cube, you'll be unable to click on anything.
With our cube selected, click on the icon at the top-le corner that looks like two spheres with arrows on both sides, as shown in the following screenshot:
This icon converts our object to polygon (this command can also be accessed by pressing C on your keyboard). Now, if we select the Scale tool and click-and-drag just on the Y axis, our object will scale in the correct direc on.
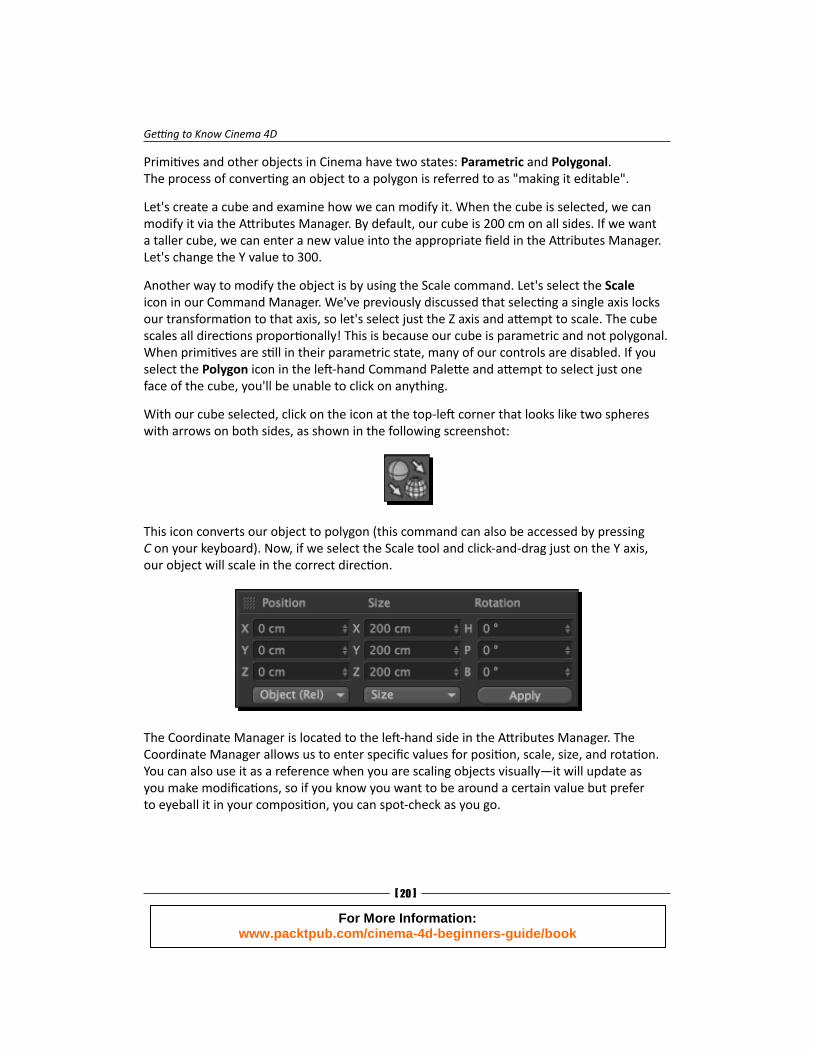
The Coordinate Manager is located to the le -hand side in the A ributes Manager. The Coordinate Manager allows us to enter specifi c values for posi on, scale, size, and rota on. You can also use it as a reference when you are scaling objects visually—it will update as you make modifi ca ons, so if you know you want to be around a certain value but prefer to eyeball it in your composi on, you can spot-check as you go.
For More Information: www.packtpub.com/cinema-4d-beginners-guide/book

Chapter 1
[ 21 ]
Now, we also have access to the Point, Edge, and Polygon modes. Let's select the Polygon tool, then move the mouse over our cube. If we click on a highlighted face, note that our axis moves from the center of the cube to the center of the selected face, as follows:
Now if we move the axis, it only aff ects our selected side. Selec ng Point mode or Edge mode will have a similar eff ect. However, note that our controls in the A ributes Manager have been replaced with the Basic Proper es menu instead of our previous op ons. It is standard prac ce to leave primi ves as parametric op ons un l we specifi cally need to modify an object. Once the object is converted to polygonal, there is no way to return it to parametric—meaning commands such as fi lle ng (rounding edges), number of faces, and so on will become much more diffi cult.
Materials ManagerThe fi nal piece of the puzzle is the Materials Manager , located to the le of the A ributes Manager, as shown in the following screenshot:
For More Information: www.packtpub.com/cinema-4d-beginners-guide/book

Ge ng to Know Cinema 4D
[ 22 ]
The Materials Manager allows you to see and edit all of the textures you've created in your scene—wood for fl oors, brick for walls, green leafy textures for outdoor scenes, and so on. Since we have not yet created any materials in our scene, it is currently empty. Double-click in this window (or, in the Materials Manager, select Create | New Material) to create a new material. When a material is selected, its proper es appear in the A ributes Manager, as follows:
You can also double-click on the material to open it in a new window.
Time for action – customizing the interfaceIt was men oned earlier that we'd be staying in Cinema's default layout for the rest of this book for consistency. As you learn how to model, texture, and light your scenes, however, you may fi nd that your workfl ow is best suited to a diff erent confi gura on. Thankfully, Cinema's interface is en rely customizable, so you can experiment with what op ons are most useful to you. Let's dig in and move things around!
For More Information: www.packtpub.com/cinema-4d-beginners-guide/book

Chapter 1
[ 23 ]
1. Perhaps you're working on a desktop computer or using mul ple monitors. Let's imagine you're working on a laptop, or in a situa on where screen space is at a premium. The main issue is that you may want a li le extra room for your viewport, since that's where most of our work will take place. Let's move and minimize in order to get us some more space.
2. While holding down the Ctrl key, click on the gray dots to the le of your meline (underneath the viewport). Since we're not anima ng just yet, we can get it out of our way and gain a few extra pixels.
3. Let's take the same ac on for our anima on controls underneath. We can always click on the gray bar to expand our controls later.
4. Early on, par cularly when we're focusing on modeling, we may not have a major need for our Materials Manager. It's good to keep this one around, though, since we may want to assign preliminary materials as we go along just so we're ready when it's me to actually texture our objects. Instead of pressing Ctrl along with clicking on the corner of the manager, click-and-drag. Release the window above the A ributes Manager. You may also want to change the size of this new window, as all three panels on the right side of the screen will take up equal space by default. Giving more room to the A ributes Manager will s ll allow us to see a set of materials without compromising too much of our important informa on below.
For More Information: www.packtpub.com/cinema-4d-beginners-guide/book

Ge ng to Know Cinema 4D
[ 24 ]
5. Repeat the process for the Coordinates Manager. Let's move it on top of the Materials window. Again, you may want to adjust the propor ons of the windows in order to maximize space where it's needed and take space away from areas we're not accessing as frequently, as shown in the following screenshot:
What just happened?There are a number of reasons to customize your work area. What we've created here is something that func ons well on a small screen, is op mized for modeling, but retains all our necessary tools. There are a number of pre-made layouts that are set up for diff erent purposes, which can be accessed via the Layout drop-down menu at the top-right corner of your screen. It may be useful to use some of these layouts as a star ng point, but once you've found a confi gura on that works for you, you may want to save it by naviga ng to Window | Customiza on | Save Layout As..., as Cinema will reset the layout when it closes. You can also save a layout as your default at startup, which is par cularly helpful if you're working with mul ple monitors.
Hidden menus – M and VTwo addi onal menus can be accessed by pressing M or V on the keyboard. The V menu is shown in the following screenshot:
For More Information: www.packtpub.com/cinema-4d-beginners-guide/book

Chapter 1
[ 25 ]
The V menu provides a useful shortcut to quickly switch between view and selec on op ons. The M menu is shown in the following screenshot:
The M menu accesses tools for polygonal modeling. You can select a tool from the list using your mouse, but it also serves as a keyboard shortcut guide, for example, pressing M + K in order will turn on the Knife tool.
For More Information: www.packtpub.com/cinema-4d-beginners-guide/book

Ge ng to Know Cinema 4D
[ 26 ]
Putting it all together – our projectThe best way to learn how to create a 3D anima on is to get your hands dirty and make one! In the chapters to come, we'll explore the tools and learn some tricks in Cinema 4D as we create an animated fl ythrough of an offi ce. We'll learn how to model by exploring various techniques for crea ng a desk, chairs, and cabinets; we'll create textures to set our pieces apart from one another and add style to our environment; we'll add depth and shine with our ligh ng, and we'll bring everything to life through anima on and rendering.
SummaryAt this point, we've started to dig into Cinema and learned a li le about all of our main areas. We learned about Viewport and Cameras, which form the main area of our screen where you can move around and modify your models. We also learned about Command Pale es, which provide shortcuts to your main toolset. Finally we saw Objects and A ributes Managers, which help you in selec ng and modifying proper es of your objects.
Now that we've taken a look at where everything is, let's learn how to use it! Over the next two chapters, we'll learn the ins and outs of modeling as we begin crea ng our anima on. Since we've done some interface exploring in this chapter, there won't be quite as many detailed instruc ons on where things are located as we go along. If you forget where you le something, you'll always have this chapter as a reference!
For More Information: www.packtpub.com/cinema-4d-beginners-guide/book

Where to buy this book You can buy Cinema 4D Beginner's Guide from the Packt Publishing website: http://www.packtpub.com/cinema-4d-beginners-guide/book. Free shipping to the US, UK, Europe and selected Asian countries. For more information, please read our shipping policy.
Alternatively, you can buy the book from Amazon, BN.com, Computer Manuals and most internet book retailers.
www.PacktPub.com
For More Information: www.packtpub.com/cinema-4d-beginners-guide/book