
Chess 2014 Round 6 Highlights... · Web viewof thumb of Steinitz Elements of Chess. This rule says...
18
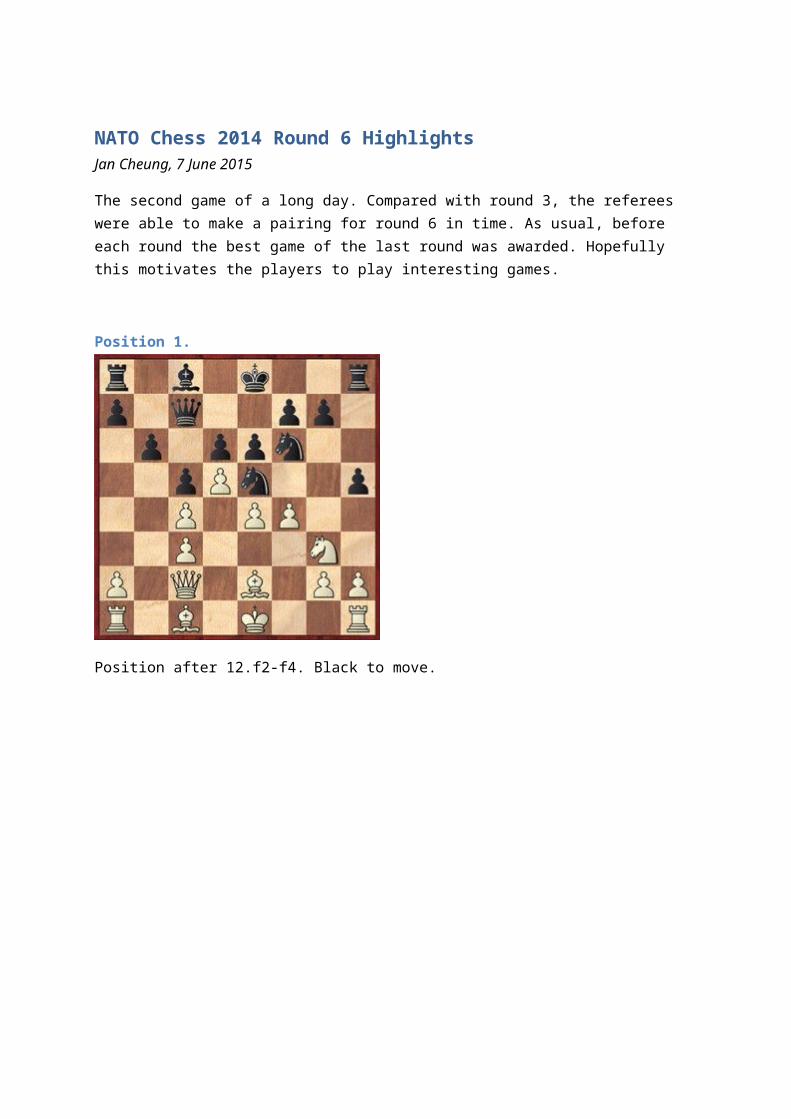
NATO Chess 2014 Round 6 Highlights Jan Cheung, 7 June 2015 The second game of a long day. Compared with round 3, the referees were able to make a pairing for round 6 in time. As usual, before each round the best game of the last round was awarded. Hopefully this motivates the players to play interesting games. Position 1. Position after 12.f2-f4. Black to move.
Transcript of Chess 2014 Round 6 Highlights... · Web viewof thumb of Steinitz Elements of Chess. This rule says...
NATO Chess 2014 Round 6 HighlightsJan Cheung, 7 June 2015
The second game of a long day. Compared with round 3, the referees were able to make a pairing for round 6 in time. As usual, before each round the best game of the last round was awarded. Hopefully this motivates the players to play interesting games.
Position 1.
Position after 12.f2-f4. Black to move.
Position 2.

Position after 16.0-0-0. Black to move. Choose between A) 16…Nxd3+, B)16…g5 C)16…Bd7 and D) 16…Qb6.
Position 3.
Position after 26...h7-h6. White to move.
Position 4.
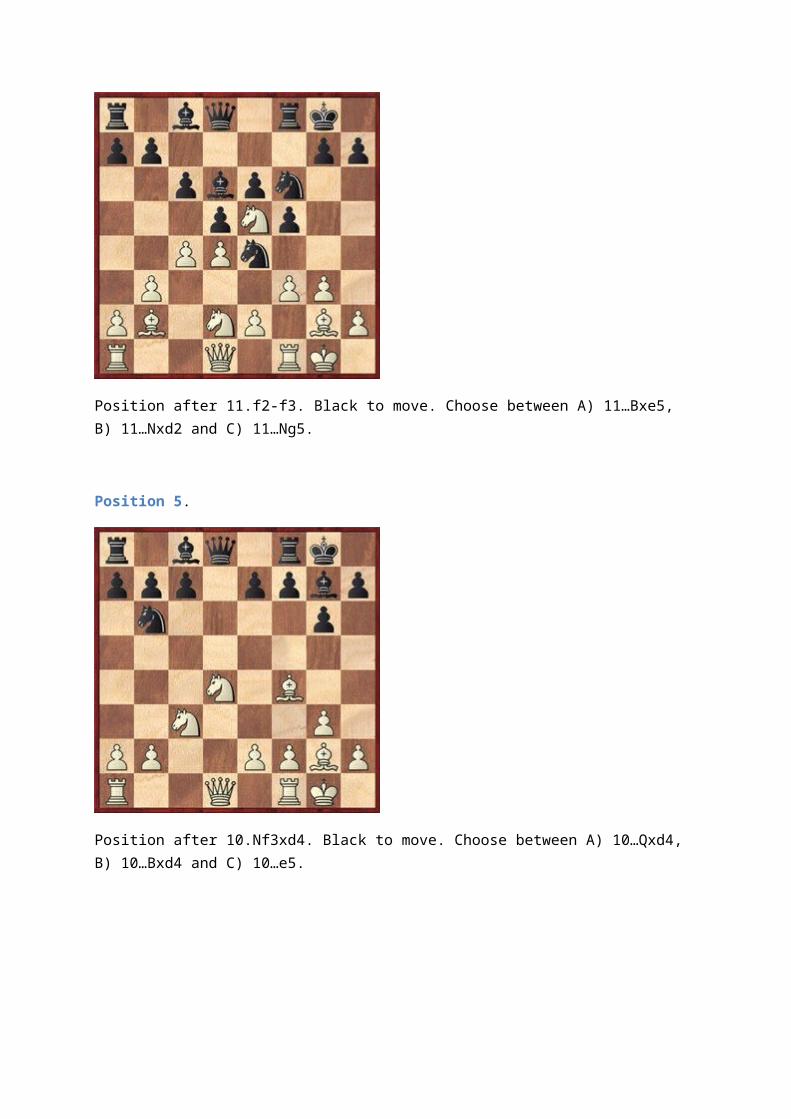
Position after 11.f2-f3. Black to move. Choose between A) 11…Bxe5, B) 11…Nxd2 and C) 11…Ng5.
Position 5.
Position after 10.Nf3xd4. Black to move. Choose between A) 10…Qxd4, B) 10…Bxd4 and C) 10…e5.
Position 6.
Position after 12.d4xe5. Black to move. Choose between A) 12…Nd5 and B) 12…Nd7.
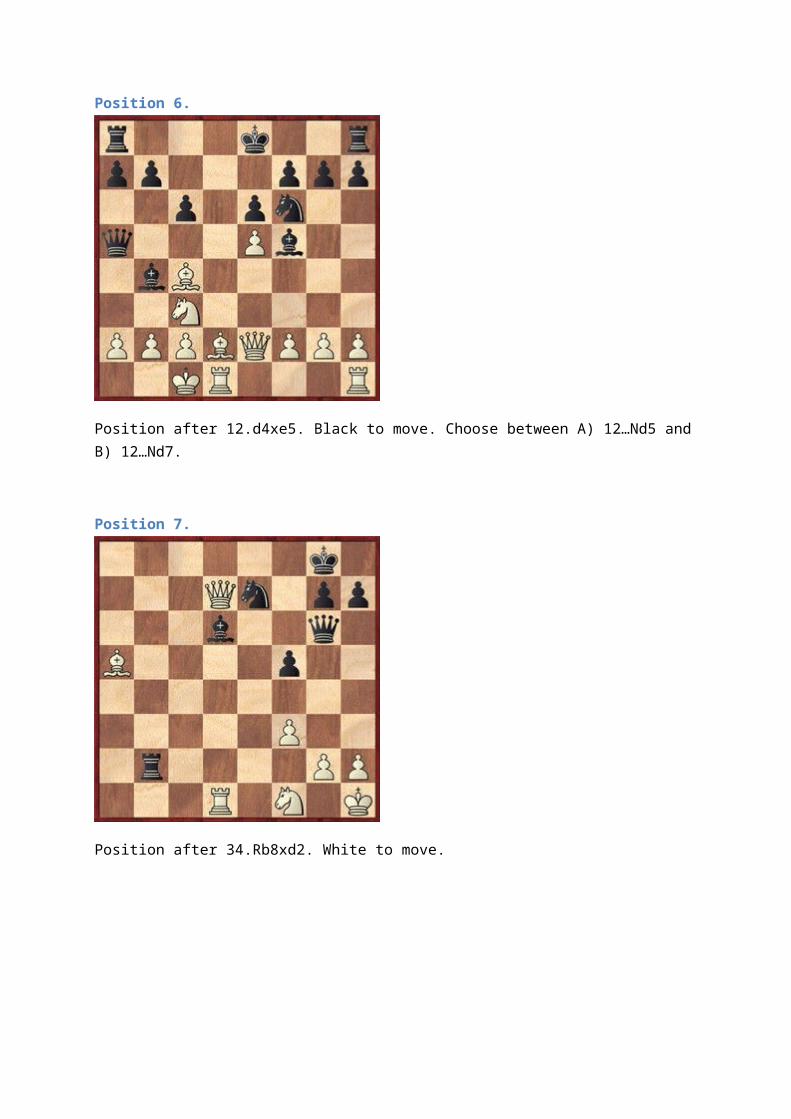
Position 7.
Position after 34.Rb8xd2. White to move.
Position 8.
Position after 24.Ne2-f4. Black to move.
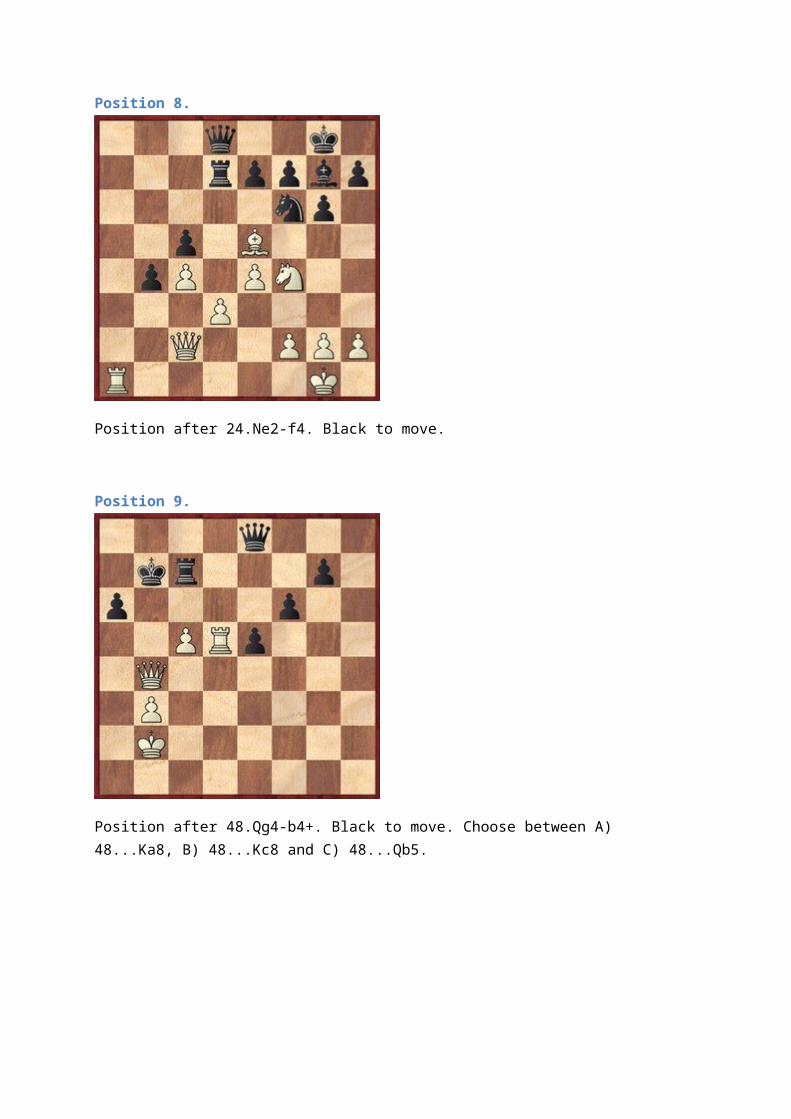
Position 9.
Position after 48.Qg4-b4+. Black to move. Choose between A) 48...Ka8, B) 48...Kc8 and C) 48...Qb5.
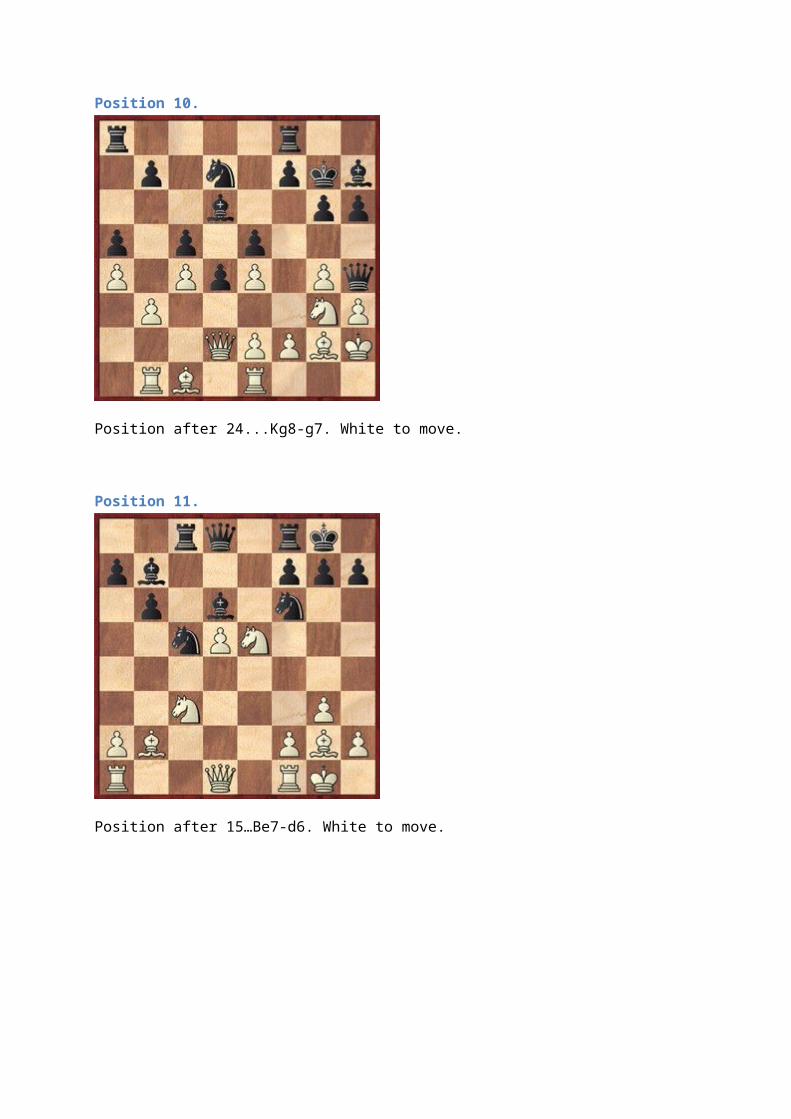
Position 10.
Position after 24...Kg8-g7. White to move.
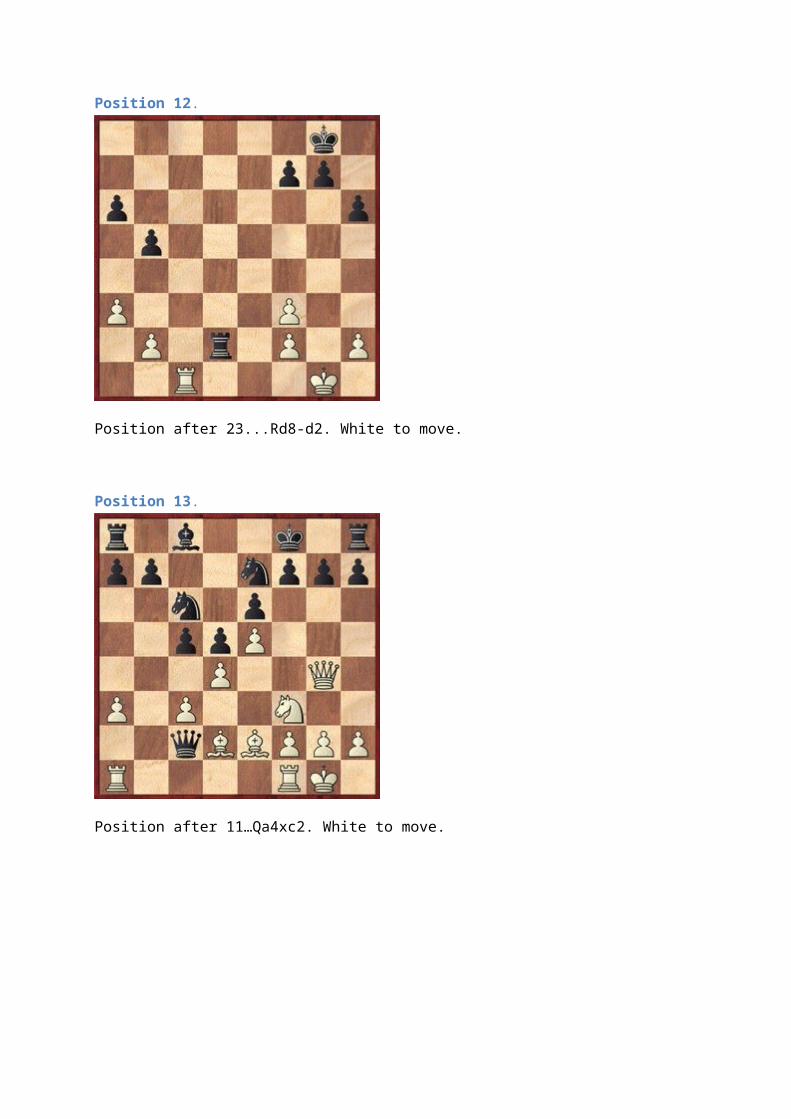
Position 11.
Position after 15…Be7-d6. White to move.
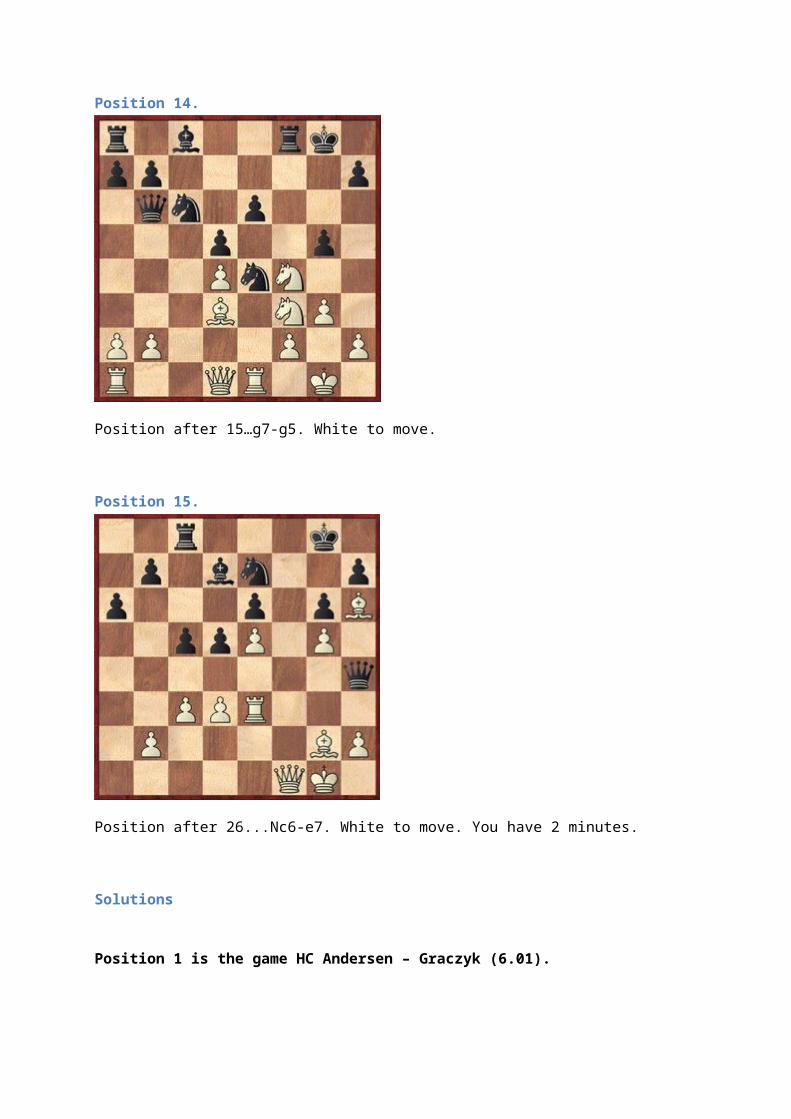
Position 12.
Position after 23...Rd8-d2. White to move.
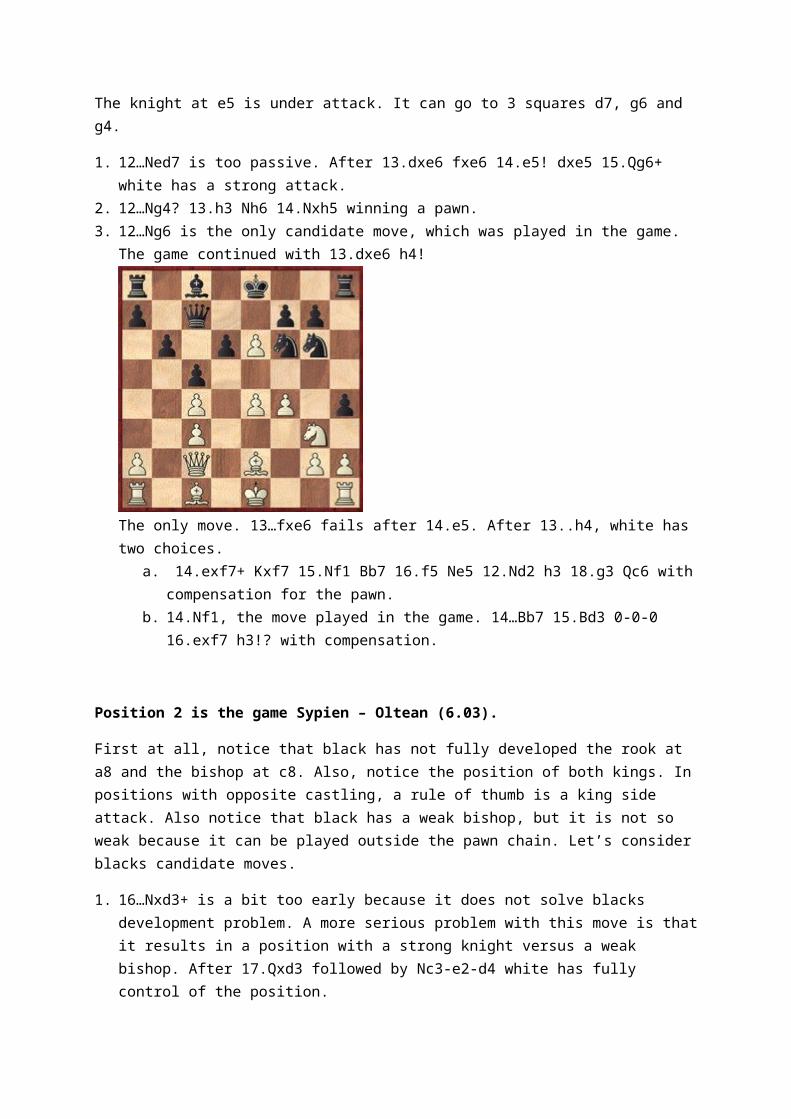
Position 13.
Position after 11…Qa4xc2. White to move.
Position 14.
Position after 15…g7-g5. White to move.
Position 15.
Position after 26...Nc6-e7. White to move. You have 2 minutes.
Solutions
Position 1 is the game HC Andersen – Graczyk (6.01).
The knight at e5 is under attack. It can go to 3 squares d7, g6 and g4.
1. 12…Ned7 is too passive. After 13.dxe6 fxe6 14.e5! dxe5 15.Qg6+ white has a strong attack.2. 12…Ng4? 13.h3 Nh6 14.Nxh5 winning a pawn. 3. 12…Ng6 is the only candidate move, which was played in the game. The game continued with
13.dxe6 h4!
The only move. 13…fxe6 fails after 14.e5. After 13..h4, white has two choices.a. 14.exf7+ Kxf7 15.Nf1 Bb7 16.f5 Ne5 12.Nd2 h3 18.g3 Qc6 with compensation for the
pawn.
b. 14.Nf1, the move played in the game. 14…Bb7 15.Bd3 0-0-0 16.exf7 h3!? with compensation.
Position 2 is the game Sypien – Oltean (6.03).
First at all, notice that black has not fully developed the rook at a8 and the bishop at c8. Also, notice the position of both kings. In positions with opposite castling, a rule of thumb is a king side attack. Also notice that black has a weak bishop, but it is not so weak because it can be played outside the pawn chain. Let’s consider blacks candidate moves.
1. 16…Nxd3+ is a bit too early because it does not solve blacks development problem. A more serious problem with this move is that it results in a position with a strong knight versus a weak bishop. After 17.Qxd3 followed by Nc3-e2-d4 white has fully control of the position.
2. 16….g5 was the move played in the game. Such move, common in some closed positions of the French Defence, has a positional foundation that is based on creating a weakness at the white pawn at e5. At the moment, it is a bit too early because black has not fully developed and that black has not put adequate pieces at the king side. First, it looks like this move is justified because after 17.fxg5 Qxg5 18.Kb1 Bd7 black has control of the king side. Also after 17.Qg3 h6 18.Nb5 Kh7 19.Nd6 Rg8 black has no problems. The reason that 16…g5 is a bit too early is the strong reply 17.Qh6! gxf4
18.g4! opening files for the rooks. Blacks strategy of opening the king side himself, has backfired. Here is an example of a possible continuation: 18…fxg3 19.b4! Nxd3+ 20.Rxd3 Kh8 21.Rxg3 Rf7 22.Rhg1 Qf8 23.Rg8+ Qxg8 24.Rxg8+ Kxg8 25.Qg5+ Kh8 26.Qd8+ Kg7 27.Ne2 heading to f4, with totally controlling the position. Notice that white fully dictates the game. Notice that nothing has happened at the queen side, which was blacks area of operation.
3. 16…Bd7 is a developing move, making room for the rook at a8 to square c8, and defending square b5. Here is an example of a possible continuation: 17.g4 Qe7 18.Rhg1 Rac8 19.gxf5 Nxd3+ 20.Rxd3 Rxf5 21.Rdg3 g6 with an equal position.
4. 16…Qb6 is a developing move, enabling Nc5-e4 to restrict the activity bishop. Here is an example of a possible continuation: 17.g4 Ne4!? (17…Nxd3+ leads to a kind of same positions after 16…Bd7) 18.Bxe4 fxe4 19.Rhf1 a5 20.f5 Qc7 21.Qg3 Bd7 22.Rf2 Rac8 23.Kb1 Rf7
Black is now ready for b7-b5-b4. To counter this threat, white has a continuation 24.Nxd5 to clarify the situation: 24.Nxd5!? exd5 25.e6 Re7 26.exd7 Rxd7 27.Qxc7 Rcxc7 with an equal ending.
Conclusion: Only 16…Bd7 and 16…Qb6 are accurate moves.
Position 3 is the same game Sypien – Oltean (6.03).
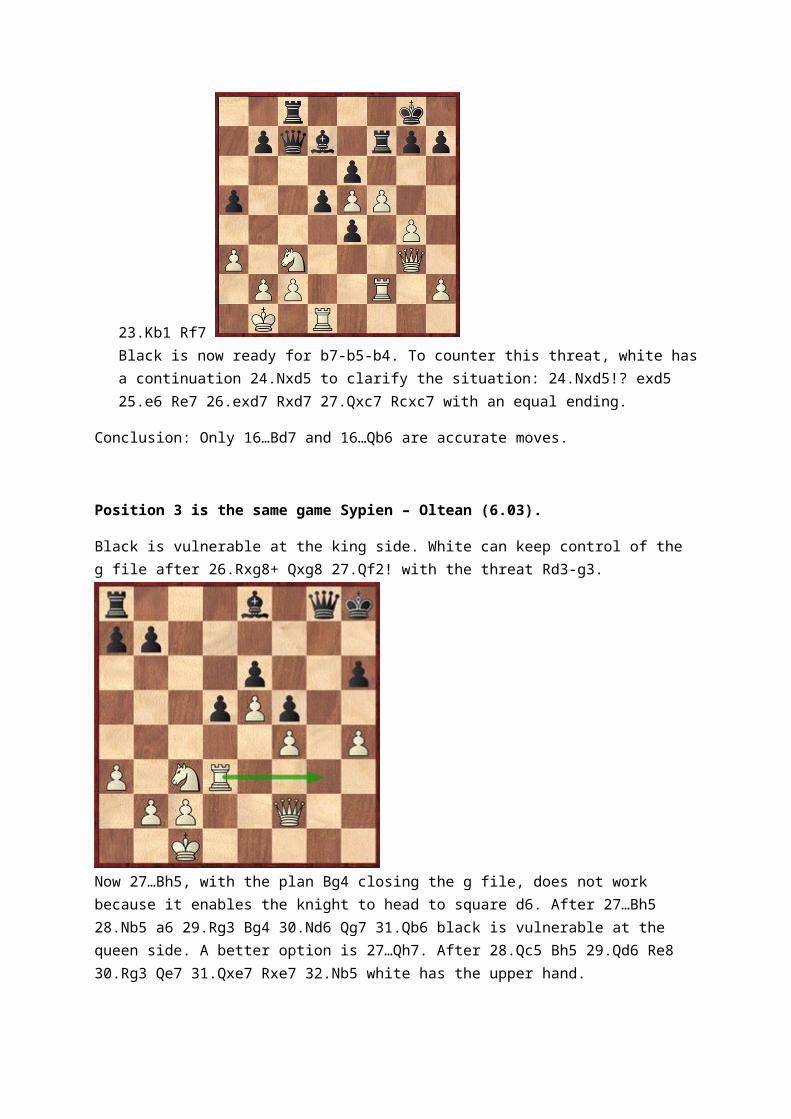
Black is vulnerable at the king side. White can keep control of the g file after 26.Rxg8+ Qxg8 27.Qf2! with the threat Rd3-g3.
Now 27…Bh5, with the plan Bg4 closing the g file, does not work because it enables the knight to head to square d6. After 27…Bh5 28.Nb5 a6 29.Rg3 Bg4 30.Nd6 Qg7 31.Qb6 black is vulnerable at the queen side. A better option is 27…Qh7. After 28.Qc5 Bh5 29.Qd6 Re8 30.Rg3 Qe7 31.Qxe7 Rxe7 32.Nb5 white has the upper hand.
Position 4 is the game Sycz – Mestek (6.04).
In this typical Stonewall variation of the Dutch Defence, black was faced with a difficult choice whether to exchange a piece or keeping the pieces at the board. A guideline of helping in your decision making is to assess the activity of the resulting pieces. The black bishop at d6 should only be traded by the bishop at b2, otherwise black is vulnerable at the black squares. After 11…Bxe5? 12.dxe5 Nxd2 13.Qxd2 Nd7 14.cxd5 cxd5 15.Rad1 blacks position has too many weaknesses. Now we arrive at the difference between 11…Nxd2 and 11…Ng5. Notice that white has one piece in abundance. If the knight at d2 is removed from the board, white can speed up the e2-e4 break with Qd1-d2 and Ra1-e1. That means that 11..Ng5 is better than 11…Nxd2. The following analyses confirms this statement.
1. 11…Nxd2 12.Qxd2 Bd7 13.Qe3 Be8 14.Rad1 Qe7 15.c5 (15.Nd3 dxc4 16.bxc4 b5! 17.Qc1 bxc4 18.Qxc4 Nd5 with counter play) Bc7 16.Nd3 with better chances for white.
2. 11…Ng5!? 12.Qc2 Bd7 13.Rae1 Rc8 14.c5 Bc7 15.b4 Be8 16.Nb3 Bh5 17.Nd3 Qe7 18.Na5 Bb8 19.e3 with slightly better chances for white, because black has prevented the break e3-e4 for a while.
Position 5 is the game Helbig – Michalski (6.05).
Blacks pawns at b7 and c7 are vulnerable. Taking back at d4 costs time, enabling white to attack them. After 10…Qxd4 11.Qxd4 Bxd4 12.Bxc7! Nc4 13.Rac1 Nxb2 14.Nd5 black has problems to develop the queen side. The alternative 10…Bxd4 fails after 11.Qc1! with threat Rd1. Also after 11…Bg7 12.Rd1 Nd7 13.a4 a5 14.Nd5 c6 15.Bc7 Qe8 16.Ne3 black has problems developing the queen side. Finally, there is another method to win back the piece, 11…e5! This move has the advantage that it protects pawn c7. After 12.Nc6 Qxd1 12.Ne7+ Kh8 13.Rfxd1 exf4 14.Nxc8 Raxc8 15.Bxb7 Rb8 16.Ba6 fxg3 17.hxg3 Bxc3 18.bxc3 Rfd8 the position is equal.
Position 6 is the game Papista – Wagenaar (6.06).
Black has less space. Let’s look at the difference between 12…Nd7 and 12…Nd5. At square d7 the knight can attack pawn e5, but this pawn can be easily defended. At square d7, the knight can go to b6 or c5 for an attack, but this costs time. At square d5, the knight joins the attack at c3. Furthermore, the knight at d5 has more influence in the centre than at square d7.
Conclusion: 12…Nd5 is better than 12…Nd7.
Position 7 is the game Marquardt – Van Rijn (6.11).
Square g2 is attacked. Notice that blacks pieces Rb2, Bd6 and Ne7 are vulnerable. Also blacks back row is vulnerable. After 35.g4! Bc5 36.Qa4! black cannot defend against multiple threats. Rd1-d8+, Qa4-c4+ and Qa4-e8#.
For completeness, the game ended in a draw after 35.Bd2.
Position 8 is the game Musselman –Bohn (6.13).
24.Ne2-f4 enables black to win material with a double attack starting with 24…Nh5! After 25.Bxg7 Nxf4 26.Bh6 Nxd3 black is a pawn up.
Position 9 is the game Onley – Aagaard (6.14).
White has one pawn less than black, but in this end game with heavy pieces, having the initiative is more important. Blacks king is vulnerable and a piece exchange generally works in blacks favor. Let’s start with 48…Qb5, which was played in the game. At square b5, the queen becomes vulnerable because it allows the subtraction move 49.c6+, winning the queen.Let’s analyze the alternative moves 48…Ka8 and 48…Kc8.
1. 48…Ka8 49.Qa5! The most accurate move. This move allows the rook to attack pawn a6 and square d8. 48…Qc8 50.Rd6 Ka7
It look like black is in trouble, but in close inspection white cannot improve this position without exchanging rooks with 51.Rxa6+ Qxa6 52.Qxc7+ Qb7 53.Qa5+, resulting in perpetual check.
2. 48…Kc8 This move prevents the attack with Qb4-a5 and Rd5-d8, but it allows combinations beginning with Qg4+. White move accurate move is now 49.Rd6!, allowing the rook to b6.
This move prevents 49…Qb5: After 49…Qb5? 50.Qg4+ Kb7 51.Rb6+Qxb6 52.cxb6 Kxb6 white will win this end game. After 49.Rd6 black has several options.
2.1. 49…Rc6 50.Qg4+ Kb8 51.Qxg7 Rxd6 52.cxd6 Qd8 the safest option. 53.Qe7 Kc8 54.Qe6+ Kb8 with an equal position.
2.2. 49…e4!? Black is complicating the game, but white also can do the same with 50.Ka2!? preventing a check from square e5. The position is unclear.
Conclusion: 48…Qb5 (option C) is the worst option, enabling white to win material. 48…Ka8 (option B) results in a position in which white can force a draw. 48…Kc8 (option A) gives black the chance to continue play in an unclear position.
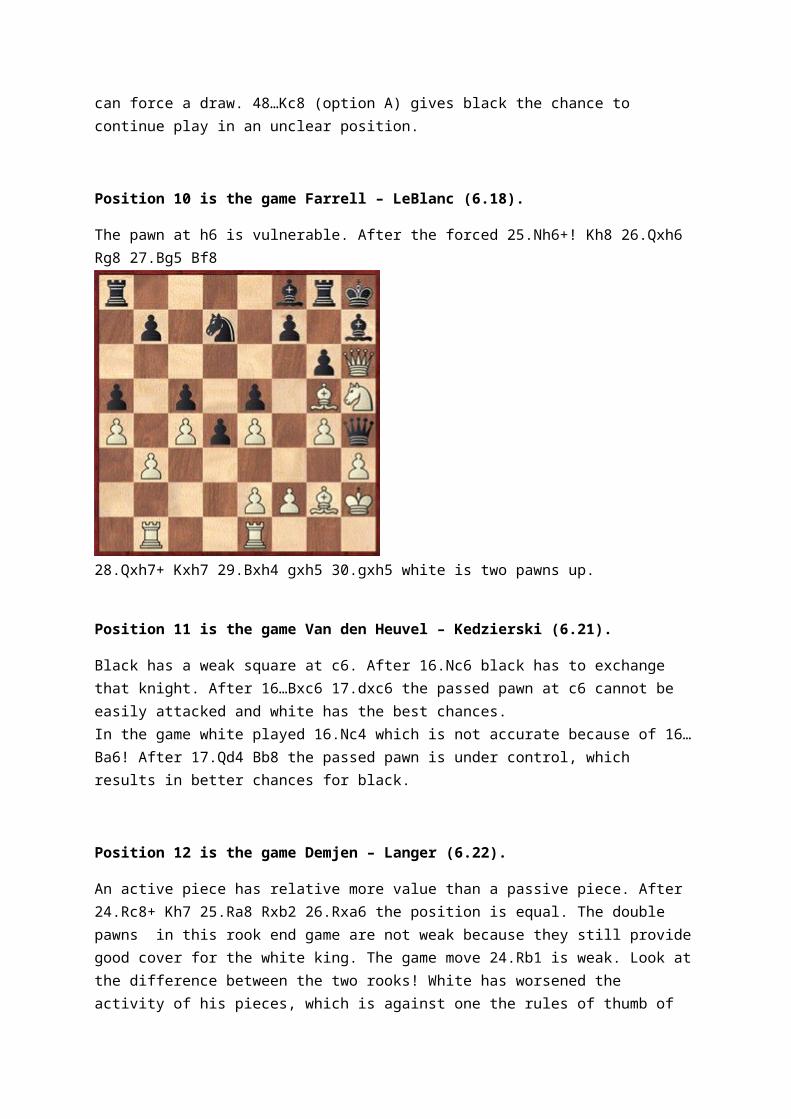
Position 10 is the game Farrell – LeBlanc (6.18).
The pawn at h6 is vulnerable. After the forced 25.Nh6+! Kh8 26.Qxh6 Rg8 27.Bg5 Bf8
28.Qxh7+ Kxh7 29.Bxh4 gxh5 30.gxh5 white is two pawns up.
Position 11 is the game Van den Heuvel – Kedzierski (6.21).
Black has a weak square at c6. After 16.Nc6 black has to exchange that knight. After 16…Bxc6 17.dxc6 the passed pawn at c6 cannot be easily attacked and white has the best chances.In the game white played 16.Nc4 which is not accurate because of 16…Ba6! After 17.Qd4 Bb8 the passed pawn is under control, which results in better chances for black.
Position 12 is the game Demjen – Langer (6.22).
An active piece has relative more value than a passive piece. After 24.Rc8+ Kh7 25.Ra8 Rxb2 26.Rxa6 the position is equal. The double pawns in this rook end game are not weak because they still provide good cover for the white king. The game move 24.Rb1 is weak. Look at the difference between the two rooks! White has worsened the activity of his pieces, which is against one the rules

of thumb of Steinitz Elements of Chess. This rule says that in each move, you have to improve your position or restrict the activity of the enemy.
Position 13 is the game Bigras – Karbowiak (6.23).
White has a pawn less, but has a better development. So we can say that white has temporary advantage. To keep his advantage, white should not play quiet, otherwise black will consolidate his position with a move such as Qc2-g6 or c5-c4. White has the bishop pair. To activate them, white can open the position with 12.dxc5. After 12…Nxe5 13.Nxe5 Qxd2 14.Qf3 f6 15.Nc4! Qg5 16.Nd6 white has kept his development advantage.
Position 14 Is the game Tucker – Rosseel (6.24).
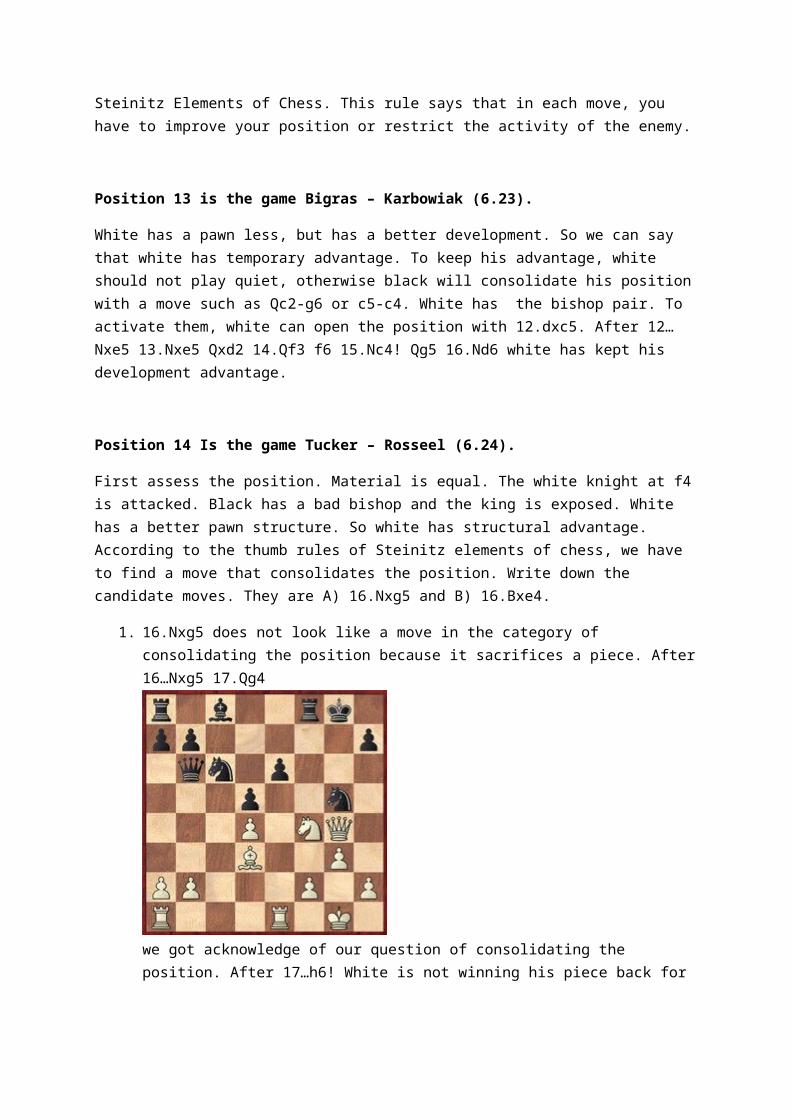
First assess the position. Material is equal. The white knight at f4 is attacked. Black has a bad bishop and the king is exposed. White has a better pawn structure. So white has structural advantage. According to the thumb rules of Steinitz elements of chess, we have to find a move that consolidates the position. Write down the candidate moves. They are A) 16.Nxg5 and B) 16.Bxe4.
1. 16.Nxg5 does not look like a move in the category of consolidating the position because it sacrifices a piece. After 16…Nxg5 17.Qg4
we got acknowledge of our question of consolidating the position. After 17…h6! White is not winning his piece back for a while and the position is a mess. Perhaps there is a better alternative?
2. After 16.Bxe4 black has only one move 16…gxf4 because after 16…dxe4 17.Nxg5 Qxd4 18.Qh5 the white pieces are all stronger than blacks pieces. Let’s look at the position after 16…gxf4.
After the consolidating move 17.Bc2 white has successfully defended against blacks aggressive move 15…g5. White now has a better pawn structure while blacks king is vulnerable.
Conclusion: 16.Bxe4! is the best choice.
Position 15 is the game Ross – Coulon (6.33).
The goal of this exercise is to train you to find a strong move quickly if you have a good position. Black has two weaknesses, the king and the queen. First, find some candidate moves to exploit these weaknesses. These are 27.Qf6 and 27.Rf3.
1. After 27.Qf6 Nf5 28.Bh3 Nxh6 29.Bxe6+ Bxe6 30.Qxe6+ Nf7 31.Qxc8+ Kg7
white has won the exchange and has a very good position, but the game is not over yet. Now white has to solve the problem with his exposed king.
2. After the forced sequence of moves 27.Rf3 Nf5 28.Rf4 Qh5 29.Bf3 Ne3
white can win a piece with 30.Qe1. After 30…Qh3 31.Qxe3 black has no counter chances. The conclusion is that 27.Rf3 is better than 27.Qf6.


![Wilhelm Steinitz - The Modern Chess Instructor [1889]](https://static.fdocuments.net/doc/165x107/552e74ad4a795955648b48c3/wilhelm-steinitz-the-modern-chess-instructor-1889.jpg)
![A QUANTITATIVE STEINITZ THEOREM FOR PLANE … · arXiv:1311.0558v1 [math.CO] 4 Nov 2013 A QUANTITATIVE STEINITZ THEOREM FOR PLANE TRIANGULATIONS IGOR PAK∗ AND STEDMAN WILSON†](https://static.fdocuments.net/doc/165x107/5b440e647f8b9a38048ba29e/a-quantitative-steinitz-theorem-for-plane-arxiv13110558v1-mathco-4-nov.jpg)