Cherokee Archer II Pilot’s Operating Handbook · PDF fileCherokee Archer II...
56
Cherokee Archer II Pilot’s Operating Handbook Cherokee Archer II PA-28-181 Handbook Part No. 761 624
Transcript of Cherokee Archer II Pilot’s Operating Handbook · PDF fileCherokee Archer II...

Cherokee Archer II Pilot’s Operating Handbook
Cherokee Archer II PA-28-181
Handbook Part No. 761 624

Piper Aircraft Corporation PA-28-181, Cherokee Archer II
2
New Piper Aircraft And
The Notre Dame Pilot Initiative
Partners in Aviation Education
Not to be used for flight planning purposes. Data may be inaccurate or out of date. Not an actual Pilot’s Operating Handbook or Airplane Flight Manual. Copyedited by Miss Elizabeth O’Shaughnessy August 2003 Minor typographical corrections (Revision C) by Brian K. Wade, April 2004 Published exclusively for the Notre Dame Pilot Initiative August 2003 Copyrighted by Piper Aircraft Corporation April 1979

Piper Aircraft Corporation PA-28-181, Cherokee Archer II
3
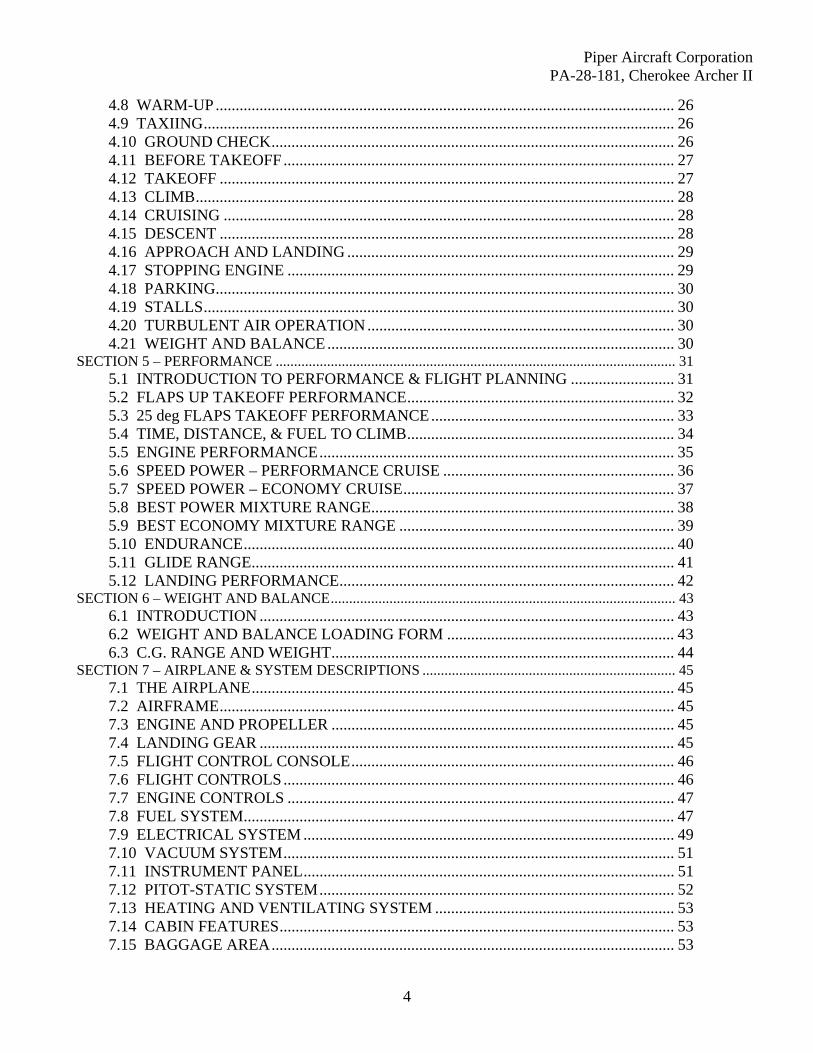
Table of Contents SECTION 1 – GENERAL .......................................................................................................................... 5
1.1 INTRODUCTION .......................................................................................................... 5 1.2 ENGINES ....................................................................................................................... 7 1.3 PROPELLERS................................................................................................................ 7 1.4 FUEL .............................................................................................................................. 7 1.5 OIL.................................................................................................................................. 7 1.6 MAXIMUM WEIGHTS................................................................................................. 8 1.7 STANDARD AIRPLANE WEIGHTS........................................................................... 8 1.8 BAGGAGE SPACE ....................................................................................................... 8 1.9 SPECIFIC LOADINGS.................................................................................................. 8
SECTION 2 – LIMITATIONS ................................................................................................................... 9 2.1 INTRODUCTION .......................................................................................................... 9 2.2 AIRSPEED LIMITATIONS .......................................................................................... 9 2.3 AIRSPEED INDICATOR MARKINGS........................................................................ 9 2.4 POWER PLANT LIMITATIONS................................................................................ 10 2.5 CENTER OF GRAVITY LIMITS ............................................................................... 10 2.6 MANEUVER LIMITS ................................................................................................. 11 2.7 FLIGHT LOAD FACTORS......................................................................................... 11 2.8 TYPES OF OPERATION ............................................................................................ 11 2.9 FUEL LIMITATIONS.................................................................................................. 11
SECTION 3 – EMERGENCY PROCEDURES ....................................................................................... 12 3.1 INTRODUCTION ........................................................................................................ 12 3.2 EMERGENCY CHECKLISTS .................................................................................... 12 3.3 AMPLIFIED EMERGENCY PROCEDURES (GENERAL)...................................... 14 3.4 ENGINE FIRE DURING START................................................................................ 14 3.5 ENGINE POWER LOSS DURING TAKEOFF .......................................................... 14 3.6 ENGINE POWER LOSS IN FLIGHT ......................................................................... 15 3.7 POWER OFF LANDING............................................................................................. 15 3.8 FIRE IN FLIGHT ......................................................................................................... 16 3.9 LOSS OF OIL PRESSURE.......................................................................................... 16 3.10 LOSS OF FUEL PRESSURE..................................................................................... 17 3.11 HIGH OIL TEMPERATURE..................................................................................... 17 3.12 ALTERNATOR FAILURE........................................................................................ 17 3.13 SPIN RECOVERY ..................................................................................................... 17 3.14 OPEN DOOR.............................................................................................................. 18 3.15 CARBURETOR ICING ............................................................................................. 18 3.16 ENGINE ROUGHNESS ............................................................................................ 18
SECTION 4 – NORMAL PROCEDURES............................................................................................... 19 4.1 INTRODUCTION ........................................................................................................ 19 4.2 AIRSPEEDS FOR SAFE OPERATIONS.................................................................... 19 4.3 NORMAL PROCEDURES CHECK LIST .................................................................. 20 4.4 AMPLIFIED NORMAL PROCEDURES (GENERAL) ............................................. 23 4.5 PREFLIGHT CHECK .................................................................................................. 23 4.6 BEFORE STARTING ENGINE .................................................................................. 24 4.7 STARTING ENGINE................................................................................................... 25
Piper Aircraft Corporation PA-28-181, Cherokee Archer II
4
4.8 WARM-UP................................................................................................................... 26 4.9 TAXIING...................................................................................................................... 26 4.10 GROUND CHECK..................................................................................................... 26 4.11 BEFORE TAKEOFF.................................................................................................. 27 4.12 TAKEOFF .................................................................................................................. 27 4.13 CLIMB........................................................................................................................ 28 4.14 CRUISING ................................................................................................................. 28 4.15 DESCENT .................................................................................................................. 28 4.16 APPROACH AND LANDING .................................................................................. 29 4.17 STOPPING ENGINE ................................................................................................. 29 4.18 PARKING................................................................................................................... 30 4.19 STALLS...................................................................................................................... 30 4.20 TURBULENT AIR OPERATION............................................................................. 30 4.21 WEIGHT AND BALANCE....................................................................................... 30
SECTION 5 – PERFORMANCE ............................................................................................................. 31 5.1 INTRODUCTION TO PERFORMANCE & FLIGHT PLANNING .......................... 31 5.2 FLAPS UP TAKEOFF PERFORMANCE................................................................... 32 5.3 25 deg FLAPS TAKEOFF PERFORMANCE............................................................. 33 5.4 TIME, DISTANCE, & FUEL TO CLIMB................................................................... 34 5.5 ENGINE PERFORMANCE......................................................................................... 35 5.6 SPEED POWER – PERFORMANCE CRUISE .......................................................... 36 5.7 SPEED POWER – ECONOMY CRUISE.................................................................... 37 5.8 BEST POWER MIXTURE RANGE............................................................................ 38 5.9 BEST ECONOMY MIXTURE RANGE ..................................................................... 39 5.10 ENDURANCE............................................................................................................ 40 5.11 GLIDE RANGE.......................................................................................................... 41 5.12 LANDING PERFORMANCE.................................................................................... 42
SECTION 6 – WEIGHT AND BALANCE.............................................................................................. 43 6.1 INTRODUCTION ........................................................................................................ 43 6.2 WEIGHT AND BALANCE LOADING FORM ......................................................... 43 6.3 C.G. RANGE AND WEIGHT...................................................................................... 44
SECTION 7 – AIRPLANE & SYSTEM DESCRIPTIONS ..................................................................... 45 7.1 THE AIRPLANE.......................................................................................................... 45 7.2 AIRFRAME.................................................................................................................. 45 7.3 ENGINE AND PROPELLER ...................................................................................... 45 7.4 LANDING GEAR ........................................................................................................ 45 7.5 FLIGHT CONTROL CONSOLE................................................................................. 46 7.6 FLIGHT CONTROLS.................................................................................................. 46 7.7 ENGINE CONTROLS ................................................................................................. 47 7.8 FUEL SYSTEM............................................................................................................ 47 7.9 ELECTRICAL SYSTEM ............................................................................................. 49 7.10 VACUUM SYSTEM.................................................................................................. 51 7.11 INSTRUMENT PANEL............................................................................................. 51 7.12 PITOT-STATIC SYSTEM......................................................................................... 52 7.13 HEATING AND VENTILATING SYSTEM ............................................................ 53 7.14 CABIN FEATURES................................................................................................... 53 7.15 BAGGAGE AREA..................................................................................................... 53

Piper Aircraft Corporation PA-28-181, Cherokee Archer II
5
7.16 STALL WARNING.................................................................................................... 54 7.17 FINISH ....................................................................................................................... 54 7.18 PIPER EXTERNAL POWER .................................................................................... 54 7.19 EMERGENCY LOCATOR TRANSMITTER........................................................... 54
SECTION 8 – HANDLING, SERVICE, & MAINTENANCE................................................................ 56 SECTION 9 – SUPPLEMENTS............................................................................................................... 56
SECTION 1 – GENERAL 1.1 INTRODUCTION This Pilot’s Operating Handbook is designed for maximum utilization as an operating guide for the pilot. It includes the material required to be furnished to the pilot by C.A.R. 3 and FAR Part 21, Subpart J. It also contains supplemental data supplied by the airplane manufacturer. This handbook is not designed as a substitute for adequate and competent flight instruction, knowledge of current airworthiness directives, applicable federal air regulations or advisory circulars. It is not intended to be a guide for basic flight instruction or a training manual and should not be used for operational purposes unless kept in a current status. Assurance that the airplane is in an airworthy condition is the responsibility of the owner. The pilot in command is responsible for determining that the airplane is safe for flight. The pilot is also responsible for remaining within the operating limitations as outlined by instrument markings, placards, and this handbook. Although the arrangement of this handbook is intended to increase its in-flight capabilities, it should not be used solely as an occasional operating reference. The pilot should study the entire handbook to familiarize himself with the limitations, performance, procedures, and operational handling characteristics of the airplane before flight. The handbook has been divided into numbered (Arabic) sections, each provided with a “finger-tip” tab divider for quick reference. The limitations and emergency procedures have been placed ahead of the normal procedures, performance, and other sections to provide easier access to information that may be required in flight. The “Emergency Procedures” section has been furnished with a red tab divider to present an instant reference to the section. Provisions for expansion of the handbook have been made by the deliberate omission of certain paragraph numbers, figure numbers, item numbers, and pages noted as being left blank intentionally.
Piper Aircraft Corporation PA-28-181, Cherokee Archer II
6
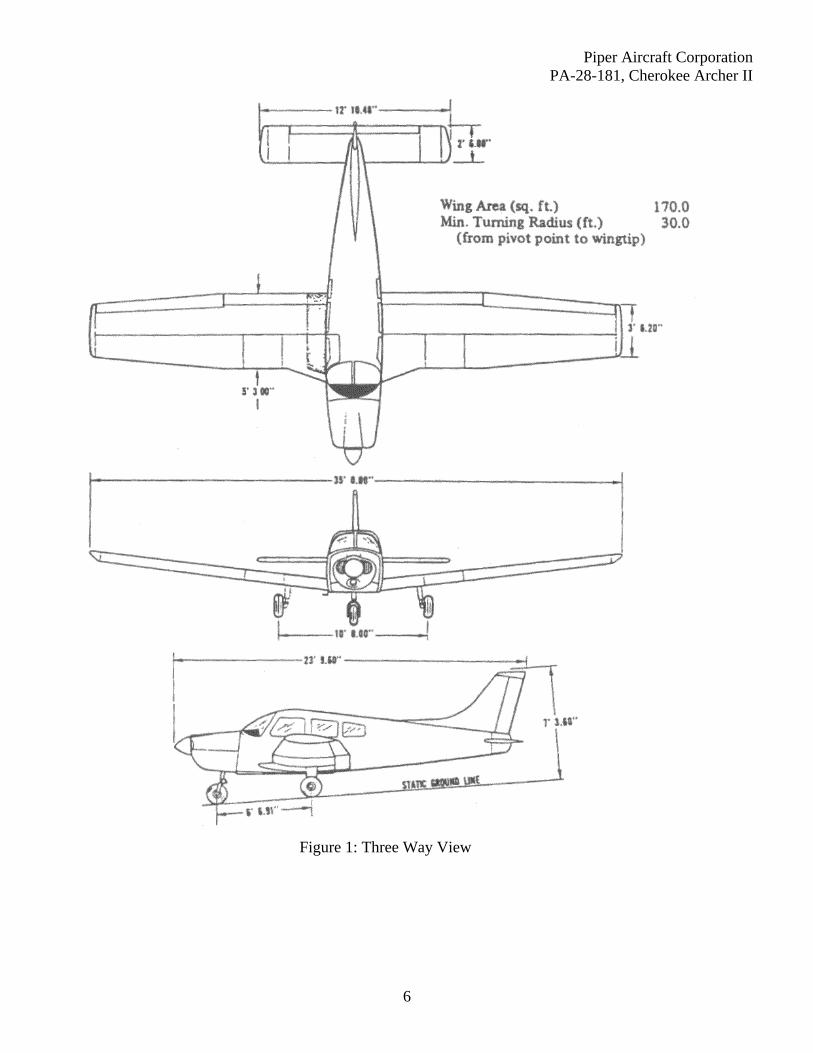
Figure 1: Three Way View

Piper Aircraft Corporation PA-28-181, Cherokee Archer II
7
1.2 ENGINES (a) Number of Engines 1 (b) Engine Manufacturer Lycoming (c) Engine Model Number O-360-
A4A (d) Rated Horsepower 180 (e) Rated Speed (rpm) 2700 (f) Bore (inches) 5.125 (g) Stroke (inches) 4.375 (h) Displacement (cubic inches) 361 (i) Compression Ratio 8.5:1 (j) Engine Type 4 Cylinder, Horizontally
Opposed, Direct Drive, Air Cooled
1.3 PROPELLERS (a) Number of Propellers 1 (b) Propeller Manufacturer Sensenich (c) Model
76EM8S5-0-60 (d) Number of Blades 2 (e) Propeller Diameter (inches) 76 (f) Propeller Type Fixed Pitch
1.4 FUEL (a) Fuel Capacity (U.S. gal.) 50 (b) Usable Fuel, Total 48 (c) Fuel Grade, Aviation
(1) Minimum Octane 100/130 (2) Specified Octane 100LL
1.5 OIL (a) Oil Capacity (U.S. Quarts) 8 (b) Oil Specification 15W-50 (c) Oil Viscosity per Average Ambient Temp. for Starting
MIL-L-6082B MIL-L-22851 Mineral Ashless Dispersant SAE Grade SAE Grades
(1) All Temperatures -- 15W-50 OR 20W-50 (2) Above 80 degress F 60 60 (3) Above 60 degrees F 50 40 or 50 (4) 30 degrees to 90 degrees F 40 40 (5) 0 degrees to 70 degrees F 30 30. 40, or 20W-40 (6) 0 degrees to 90 degrees F 20W-50 20W-50 or 15W-50 (7) Below 10 degrees F 20 30 or 20W-30
When operating temperatures overlap indicated ranges, use the lighter grade oil.

Piper Aircraft Corporation PA-28-181, Cherokee Archer II
8
1.6 MAXIMUM WEIGHTS NORMAL UTILITY
(a) Maximum Takeoff Weight (lbs) 2550 2130 (b) Maximum Landing Weight (lbs) 2550 2130 (c) Maximum Weights in Baggage Compartment 200 0
1.7 STANDARD AIRPLANE WEIGHTS (a) Standard Empty Weight (lbs): Weight of a standard airplane including unusable fuel, full operating fluids and full oil 1416 (b) Maximum Useful Load (lbs): The difference between the Maximum Takeoff Weight and the Standard Empty Weight 1134
1.8 BAGGAGE SPACE (a) Compartment Volume (cubic feet) 24 (b) Entry Width (inches) 22 (c) Entry Height (inches) 20
1.9 SPECIFIC LOADINGS (a) Wing Loading (lbs per sq ft) 15.0 (b) Power Loading (lbs per hp) 14.2
Piper Aircraft Corporation PA-28-181, Cherokee Archer II
9
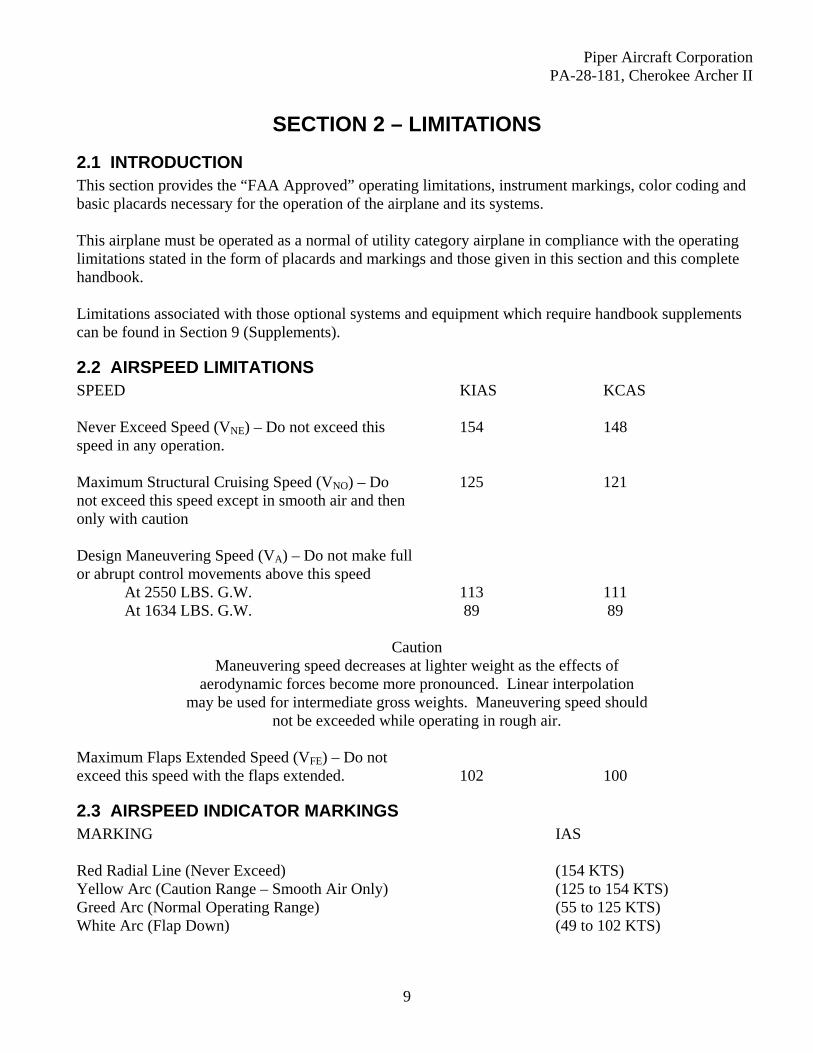
SECTION 2 – LIMITATIONS 2.1 INTRODUCTION This section provides the “FAA Approved” operating limitations, instrument markings, color coding and basic placards necessary for the operation of the airplane and its systems.
This airplane must be operated as a normal of utility category airplane in compliance with the operating limitations stated in the form of placards and markings and those given in this section and this complete handbook.
Limitations associated with those optional systems and equipment which require handbook supplements can be found in Section 9 (Supplements).
2.2 AIRSPEED LIMITATIONS SPEED KIAS KCAS Never Exceed Speed (VNE) – Do not exceed this 154 148 speed in any operation. Maximum Structural Cruising Speed (VNO) – Do 125 121 not exceed this speed except in smooth air and then only with caution Design Maneuvering Speed (VA) – Do not make full or abrupt control movements above this speed At 2550 LBS. G.W. 113 111 At 1634 LBS. G.W. 89 89
Caution Maneuvering speed decreases at lighter weight as the effects of
aerodynamic forces become more pronounced. Linear interpolation may be used for intermediate gross weights. Maneuvering speed should
not be exceeded while operating in rough air.
Maximum Flaps Extended Speed (VFE) – Do not exceed this speed with the flaps extended. 102 100
2.3 AIRSPEED INDICATOR MARKINGS MARKING IAS Red Radial Line (Never Exceed) (154 KTS) Yellow Arc (Caution Range – Smooth Air Only) (125 to 154 KTS) Greed Arc (Normal Operating Range) (55 to 125 KTS) White Arc (Flap Down) (49 to 102 KTS)

Piper Aircraft Corporation PA-28-181, Cherokee Archer II
10
2.4 POWER PLANT LIMITATIONS (a) Number of Engines 1 (b) Engine Manufacturer Lycoming (c) Engine Model No. 0360-A4A (d) Engine Operating Limits
(1) Maximum Horsepower 180 (2) Maximum Rotation Speed (RPM) 2700 (3) Maximum Oil Temperature 245 deg F (e) Oil Pressure Minimum (red line) 25 PSI Maximum (red line) 90 PSI (f) Fuel Pressure Minimum (red line) .5 PSI Maximum (red line) 8 PSI (g) Fuel Grade (AVGAS ONLY) (minimum octane) 100/130 - Green (h) Number of Propellers 1 (i) Propeller Manufacturer Sensenich (j) Propeller Model 76EM8S5-0-60
(k) Propeller Diameter Minimum 76 inches Maximum 76 inches
(l) Propeller Tolerance (static RPM at maximum Not below 2325 RPM Permissible throttle setting) Not above 2425 RPM
2.5 CENTER OF GRAVITY LIMITS (a) Normal Category
Weight Forward Limit Rearward Limit Pounds Inches Aft of Datum Inches Aft of Datum
2550 88.6 93.0 2050 82.0 93.0
(b) Utility Category
Weight Forward Limit Rearward Limit Pounds Inches Aft of Datum Inches Aft of Datum
2050 82.0 93.0 2130 83.0 93.0
NOTES
Straight line variation between points given. The datum used is 78.4 inches ahead of the wing leading edge at the inboard intersection of the straight and tapered section. It is the responsibility of the airplane owner and the pilot to ensure that the airplane is properly loaded. See Section 6 (Weight and Balance) for proper loading instructions.

Piper Aircraft Corporation PA-28-181, Cherokee Archer II
11
2.6 MANEUVER LIMITS (a) Normal Category – All acrobatic maneuvers including spins prohibited. (b) Utility Category – Approved maneuvers for bank angles exceeding 60 degrees.
Entry Speed
Steep Turns 113 KIAS Lazy Eights 113 KIAS Chandelles 113 KIAS
2.7 FLIGHT LOAD FACTORS NORMAL UTILITY
(a) Positive Load Factor (Maximum) 3.8 G 4.4 G (b) Negative Load Factor (Maximum) No inverted maneuvers approved
2.8 TYPES OF OPERATION The airplane is approved for the following operations when equipped in accordance with FAR 91 or FAR 135.
(a) Day V.F.R. (b) Night V.F.R. (c) Day I.F.R. (d) Night I.F.R. (e) Non Icing
2.9 FUEL LIMITATIONS (a) Total Capacity 50 U.S. GAL (b) Unusable Fuel 2 U.S. GAL
The unusable fuel for this airplane has been determined as 1.0 gallon in each wing in critical flight attitudes.
(c) Usable Fuel 48 U.S. GAL The usable fuel in this airplane has been determined as 24.0 gallons in each wing.

Piper Aircraft Corporation PA-28-181, Cherokee Archer II
12
SECTION 3 – EMERGENCY PROCEDURES 3.1 INTRODUCTION This section contains procedures that are recommended if an emergency condition should occur during ground operation, takeoff, or in flight. These procedures are suggested as the best course of action for coping with the particular condition described, but are not a substitute for sound judgment and common sense. Since emergencies rarely happen in modern aircraft, their occurrence is usually unexpected, and the best corrective action may not always be obvious. Pilots should familiarize themselves with the procedures given in this section and be prepared to take appropriate action should an emergency arise. Most basic emergency procedures, such as power off landings, are a normal part of pilot training. Although these emergencies are discussed here, this information is not intended to replace such training, but only to provide a source of reference and review, and to provide information on procedures that are not the same for all aircraft. It is suggested that the pilot review standard emergency procedures periodically to remain proficient in them.
3.2 EMERGENCY CHECKLISTS ENGINE FIRE DURING START Starter………………………..crank engine Mixture………………………idle cut-off Throttle………………………open Electric fuel pump…………...OFF Fuel selector………………….OFF Abandon if fire continues ENGINE POWER LOSS DURING TAKEOFF If sufficient runaway remains for a
normal landing, land straight ahead. If insufficient runaway remains:
Maintain safe airspeed Make shallow turns to avoid obstructions Flaps as situation requires
If sufficient altitude to attempt a restart:
Maintain safe airspeed Fuel selector………….tank containing fuel Electric fuel pump……check ON Mixture………………check RICH Carburetor heat………ON Primer………………...locked If still no power, plan power off landing
ENGINE POWER LOSS IN FLIGHT Fuel selector……………….tank containing fuel Electric fuel pump………...ON Mixture…………………….check RICH Carburetor heat…………...ON Engine gauges………………..check for indication
of cause of pwr loss Primer………………………...check locked If no fuel pressure is indicated, check tank selector
position is on a tank containing fuel. When power is restored: Carburetor heat…..………….OFF Electric fuel pump…..………OFF If power is not restored, prepare power off landing. Trim for 76 KIAS

Piper Aircraft Corporation PA-28-181, Cherokee Archer II
13
POWER OFF LANDING Locate suitable field. Establish spiral pattern 1000 ft. above field at downwind position
for normal landing approach. When field can easily be reached,
slow to 66 KIAS for shortest landing. Touchdowns should normally be made at
lowest possible airspeed with full flaps. When committed to landing: Ignition……………………OFF Master switch……………..OFF Fuel selector………………OFF Mixture……………………idle cut-off Seat belt and harness………tight FIRE IN FLIGHT Source of fire……………….check Electrical fire (smoke in cabin): Master switch………………OFF Vents……………………….open Cabin heat………………….OFF Land as soon as practicable. Engine fire: Fuel selector……………….OFF Throttle…………………….Closed Mixture…………………….idle cut-off Electric fuel pump…………check OFF Heater and defroster………..OFF Proceed with power off landing procedure. HIGH OIL TEMPERATURE Land at nearest airport and investigate the problem. Prepare for a power off landing. LOSS OF OIL PRESSURE Land as soon as possible and investigate cause. Prepare for power off landing. LOSS OF FUEL PRESSURE Electric fuel pump………….ON Fuel selector………………..check on full tank
ALTERNATOR FAILURE Verify failure Reduce electrical load as much as possible. Alternator circuit breakers….check Alt switch…………….......OFF 1 second then on If no output: Alt switch……………….…OFF Reduce electrical load and land as practical. SPIN RECOVERY Throttle……………………..idle Ailerons…………………….neutral Rudder……………………full opposite to
direction of rotation Control wheel……………….full forward Rudder………………………neutral when
rotation stops Control wheel……………….smoothly regain
level flight altitude OPEN DOOR Slow airplane to 87 KIAS Cabin vents…………………close Storm window………………open If upper latch is open……….latch If side latch is open…………pull on armrest while
moving latch handle to latched position If both latches are open……..side latch, then top CARBURETOR ICING Carburetor Heat…………….ON Mixture……………………..max. smoothness ENGINE ROUGHNESS Carburetor heat……………ON If roughness continues after one min: Carburetor heat………….….OFF Mixture………………….….max smoothness Electric fuel pump………….ON Fuel selector………………...switch tanks Engine gauges………………check Magneto switch………….....”L”&“R” then BOTH If operation is satisfactory on either one, continue on that magneto at reduced power and full “RICH” mixture to first airport. Prepare for power off landing

Piper Aircraft Corporation PA-28-181, Cherokee Archer II
14
3.3 AMPLIFIED EMERGENCY PROCEDURES (GENERAL) The following paragraphs are presented to supply additional information for the purpose of providing the pilot with a more complete understanding of the recommended course of action and probable cause of an emergency situation.
3.4 ENGINE FIRE DURING START Engine fires during start are usually the result of overpriming. The first attempt to extinguish the fire is to try to start the engine and draw the excess fuel back into the induction system. If a fire is present before the engine has started, move the mixture control to idle cut-off, open the throttle and crank the engine. This is an attempt to draw the fire back into the engine. If the engine has started, continue operating to try to pull the fire into the engine. In either case (above), if fire continues more than a few seconds, the fire should be extinguished by the best available external means. The fuel selector valves should be “OFF” and the mixture at idle cut-off if an external fire extinguishing method is to be used.
3.5 ENGINE POWER LOSS DURING TAKEOFF The proper action to be taken if loss of power occurs during takeoff will depend on the circumstances of the particular situation. If sufficient runway remains to complete a normal landing, land straight ahead. If insufficient runway remains, maintain a safe airspeed and make only a shallow turn if necessary to avoid obstructions. Use of flaps depends on the circumstances. Normally, flaps should be fully extended for touchdown. If sufficient altitude has been gained to attempt a restart, maintain a safe airspeed and switch the fuel selector to another tank containing fuel. Check the electric fuel pump to ensure that it is “ON” and that the mixture is “RICH.” The carburetor heat should be “ON” and the primer checked to ensure that it is locked. If engine failure was caused by fuel exhaustion, power will not be regained after switching fuel tanks until the empty fuel lines are filled. This may require up to ten seconds. If power is not regained, proceed with the Power Off Landing procedure (refer to the emergency check list and paragraph 3.7).

Piper Aircraft Corporation PA-28-181, Cherokee Archer II
15
3.6 ENGINE POWER LOSS IN FLIGHT Complete engine power loss is usually caused by fuel flow interruption and power will be restored shortly after fuel flow is restored. If power loss occurs at a low altitude, the first step is to prepare for an emergency landing (refer to paragraph 3.13). An airspeed of at least 76 KIAS should be maintained. If altitude permits, switch the fuel selector to another tank containing fuel and turn the electric fuel pump “ON.” Move the mixture control to “RICH” and the carburetor heat to “ON.” Check the engine gauges for an indication of the cause of power loss. Check the engine gauges for an indication of the cause of the power loss. Check to ensure the primer is locked. If no fuel pressure is indicated, check the tank selector position to be sure it is on a tank containing fuel. When power is restored move the carburetor heat to the “OFF” position and turn “OFF” the electric fuel pump. If the preceding steps do not restore power, prepare for an emergency landing. If time permits, turn the ignition switch to “L” then to “R” then back to “BOTH.” Move the throttle and mixture control levers to different settings. This may restore power if the problem is too rich or too lean a mixture or if there is a partial fuel system restriction. Try other fuel tanks. Water in the fuel could take some time to be used up, and allowing the engine to windmill may restore power. If power is due to water, fuel pressure indications will be normal. If engine failure was caused by fuel exhaustion power will not be restored after switching fuel tanks until the empty fuel lines are filled. This may require up to ten seconds. If power is not regained, proceed with the Power Off Landing procedure (refer to the emergency check list and paragraph 3.13).
3.7 POWER OFF LANDING If loss of power occurs at altitude, trim the aircraft for best gliding angle 76 KIAS (Air Cond. Off) and look for a suitable field. If measures taken to restore power are not effective, and if time permits, check your charts for airports in the immediate vicinity: it may be possible to land at one if you have sufficient altitude. If possible, notify the FAA by radio of your difficulty and intentions. If another pilot or passenger is aboard, let him help. When you have located a suitable field, establish a spiral pattern around this field. Try to be at 1000 feet above the field at the downwind position, to make a normal landing approach. When the field can easily be reached, slow to 66 KIAS with flaps down for the shortest landing. Excess altitude may be lost by widening your pattern, using flaps or slipping, or a combination of these. Touchdown should normally be made at the lowest possible airspeed. When committed to a landing, close the throttle control and shut “OFF” the master and ignition switches. Flaps may be used as desired. Turn the fuel selector valve to “OFF” and move the mixture to idle cut-off. The seat belts and shoulder harness (if installed) should be tightened. Touchdown should be normally made at the lowest possible airspeed.

Piper Aircraft Corporation PA-28-181, Cherokee Archer II
16
3.8 FIRE IN FLIGHT The presence of fire is noted through smoke, smell, and heat in the cabin. It is essential that the source of the fire be promptly identified through instrument readings, character of the smoke, or other indications since the action to be taken differs somewhat in each case. Check for the source of the fire first. If an electrical fire is indicated (smoke in the cabin), the master switch should be turned “OFF.” The cabin vents should be opened and the cabin heat turned “OFF.” A landing should be made as soon as possible. If an engine fire is present, switch the fuel selector to “OFF” and close the throttle. The mixture should be at idle cut-off. Turn the electric fuel pump “OFF.” In all cases, the heater and defroster should be “OFF.” If radio communication is not required, select master switch “OFF.” Proceed with power off landing procedure.
NOTE The possibility of an engine fire in flight is extremely remote. The procedure given is general and pilot
judgment should be the determining factor for action in such an emergency.
3.9 LOSS OF OIL PRESSURE Loss of oil pressure may be either partial or complete. A partial loss of oil pressure usually indicates a malfunction in the oil pressure regulating system, and a landing should be made as soon as possible to investigate the cause and prevent engine damage. A complete loss of oil pressure indication may signify oil exhaustion or may be the result of a faulty gauge. In either case, proceed toward the nearest airport, and be prepared for a forced landing. If the problem is not a pressure gauge malfunction, the engine may stop suddenly. Maintain altitude until such time as a dead stick landing can be accomplished. Don’t change power settings unnecessarily, as this may hasten complete power loss. Depending on the circumstances, it may be advisable to make an off airport landing while power is still available, particularly if other indications of actual oil pressure loss, such as sudden increases in temperatures, or oil smoke, are apparent, and an airport is not close. If engine stoppage occurs, proceed with Power Off Landing.
Piper Aircraft Corporation PA-28-181, Cherokee Archer II
17
3.10 LOSS OF FUEL PRESSURE If loss of fuel pressure occurs, turn “ON” the electric fuel pump and check that the fuel selector is on a full tank. If the problem is not an empty tank, land as soon as practical and have the engine-driven fuel pump and fuel system checked.
3.11 HIGH OIL TEMPERATURE An abnormally high oil temperature indication may be caused by a low oil level, an obstruction in the oil cooler, damaged or improper baffle seals, a defective gauge, or other causes. Land as soon as practical at an appropriate airport and have the cause investigated. A steady, rapid rise in oil temperature is a sign of trouble. Land at the nearest airport and let a mechanic investigate the problem. Watch the oil pressure gauge for an accompanying loss of pressure.
3.12 ALTERNATOR FAILURE Loss of alternator output is detected through zero reading on the ammeter. Before executing the following procedure, ensure that the reading is zero and not merely low by actuating an electrically powered device, such as the landing light. If no increase in the ammeter reading is noted, alternator failure can be assumed. The electrical load should be reduced as much has possible. Check the alternator circuit breakers for a popped circuit. The next step is to attempt to reset the overvoltage relay. This is accomplished by moving the “ALT” switch to “OFF” for one second and then to “ON.” If the trouble was caused by a momentary overvoltage condition (16.5 volts and up) this procedure should return the ammeter to a normal reading. If the ammeter continues to indicate (0) output, or if the alternator will not remain reset, turn off the “ALT” switch, maintain minimum electrical load and land as soon as practical. All electrical load is being supplied by the battery.
3.13 SPIN RECOVERY Intentional spins are prohibited in this airplane. If a spin is inadvertently entered, immediately move the throttle to idle and the ailerons to neutral. Full rudder should then be applied opposite to the direction of rotation followed by control wheel full forward. When the rotation stops, neutralize the rudder and ease back on the control wheel as required to smoothly regain a level flight attitude.

Piper Aircraft Corporation PA-28-181, Cherokee Archer II
18
3.14 OPEN DOOR The cabin door on the Cherokee is double latched, so the chances of its springing open in flight at both the top and side are remote. However, should you forget the upper latch, or not fully engage the side latch, the door may spring partially open. This will usually happen at takeoff or soon afterward. A partially open door will not affect normal flight characteristics, and a normal landing can be made with the door open. If both upper and side latches are open, the door will trail slightly open, and airspeed will be reduced slightly. To close the door in flight, slow the airplane to 87 KIAS, close the cabin vents and open the storm window. If the top latch is open, latch it. If the side latch is open, pull on the armrest while moving the latch handle to the latched position. If both latches are open, close the side latch then the top latch.
3.15 CARBURETOR ICING Under certain moist atmospheric conditions at temperatures of -5 to 20 degrees C, it is possible for ice to form in the induction system, even in summer weather. This is due to the high air velocity through the carburetor venture and the absorption of heat from this air by vaporization of the fuel. To avoid this, carburetor preheat is provided to replace the heat lost by vaporization. Carburetor heat should be full on when carburetor ice is encountered. Adjust mixture for maximum smoothness.
3.16 ENGINE ROUGHNESS Engine roughness is usually due to carburetor icing which is indicated by a drop in RPM, and may be accompanied by a slight loss of airspeed or altitude. If too much ice is allowed to accumulate, restoration of full power may not be possible; therefore, prompt action is required. Turn carburetor heat on (See Note). RPM will decrease slightly and roughness will increase. Wait for a decrease in engine roughness or an increase in RPM, indicating ice removal. If no change in approximately one minute, return the carburetor heat to “OFF.” If the engine is still rough, adjust the mixture for maximum smoothness. The engine will run rough if too rich or too lean. The electric fuel pump should be switched to “ON” and the fuel selector switched to the other tank to see if fuel contamination is the problem. Check the engine gauges for abnormal readings. If any gauge readings are abnormal, proceed accordingly. Move the magneto switch to “L” then to “R,” then back the “BOTH.” If operation is satisfactory on either magneto, proceed on that magneto at reduced power, with mixture full “RICH,” to a landing at the first available airport. If roughness persists, prepare for a precautionary landing at pilot’s discretion.
NOTE Partial carburetor heat may be worse than no heat at all, since it may melt part of the ice, which will
refreeze in the intake system. When using carburetor heat, therefore, always use full heat, and when ice is removed return the control to the full cold position.

Piper Aircraft Corporation PA-28-181, Cherokee Archer II
19
SECTION 4 – NORMAL PROCEDURES 4.1 INTRODUCTION This section clearly describes the recommended procedures for the conduct of normal operations for the Cherokee Archer II. All of the required (FAA regulations) procedures and those necessary for the safe operation of the airplane as determined by the operating and design features of the airplane are presented. Normal procedures associated with those optional systems and equipment which require handbook supplements are provided by Section 9 (Supplements). These procedures are provided to present a source of reference and review and to supply information on procedures which are not the same for all aircraft. Pilots should familiarize themselves with the procedures given in this section in order to become proficient in the normal operations of the airplane. The first portion of this section consists of a short form check list which supplies an action sequence for normal operations with little emphasis on the operation of the systems. The remainder of the section is devoted to amplified normal procedures which provide detailed information and explanations of the procedures and how to perform them. This portion of the section is not intended for use as an in-flight reference due to the lengthy explanations. The short form check list should be used for this purpose.
4.2 AIRSPEEDS FOR SAFE OPERATIONS The following airspeeds are those which are significant to the safe operation of the airplane. These figures are for standard airplanes flown at gross weight under standard conditions at sea level. Performance for a specific airplane may vary from published figures depending upon the equipment installed, the condition of the engine, airplane and equipment, atmospheric conditions and piloting technique. (a) Best Rate of Climb Speed 76 KIAS (b) Best Angle of Climb Speed 64 KIAS (c) Turbulent Air Operating Speed (See Subsection 2.3) 113 KIAS (d) Maximum Flap Speed 102 KIAS (e) Landing Final Approach Speed (Flaps 40 degrees) 66 KIAS (f) Maximum Demonstrated Crosswind Velocity 17 KIAS

Piper Aircraft Corporation PA-28-181, Cherokee Archer II
20
FIGURE 4-1 “WALK-AROUND” ON TOP HALF OF PAGE
4.3 NORMAL PROCEDURES CHECK LIST PREFLIGHT Control wheel………….release belts Master switch………….ON Fuel quantity gauges…...check Master switch…………..OFF Ignition…………………OFF Exterior…………………check for damage Control Surfaces………..check for interference
free of ice, snow, frost Hinges…………………..check for interference Wings…………………..free of ice, snow, frost Stall warning…………...check Navigation lights……… check Fuel tanks……………....check supply visually
secure caps Fuel tank sumps…….….drain and check for water,
sediment and proper fuel Fuel vents………………open Main gear struts………..proper inflation (4.50 in.) Tires……………………check Brake blocks……………check Pitot head……………….remove cover – holes clear Windshield……………. .clean Propeller and spinner…...check Fuel and oil…………..…check for leaks Oil………………………check level Dipstick………………...properly seated Cowling…………………secure Inspection covers………secure Nose wheel tire…………check Nose gear strut………….proper inflation (3.25 in.) Air inlets………………..clear Alternator belt…………..check tension Tow bar and control locks.…stow Baggage…………………stowed properly – secure Baggage door……………close and secure Fuel strainer………..……drain Primary flight controls.…proper operation Cabin door……………....close and secure Required papers…………on board Seat belts and harness…...fastened/adjust
BEFORE STARTING ENGINE Brakes……………………………set Carburetor heat…………………..full COLD Fuel selector……………………..desired tank STARTING ENGINE WHEN COLD Throttle…………………………..1/4” open Master switch…………………….ON Electric fuel pump………………..ON Mixture…………………………...full RICH Starter…………………………….engage Throttle…………………………...adjust Oil pressure………………………check STARTING ENGINE WHEN HOT Throttle……………………………1/2” open Master switch……………………..ON Electric fuel pump………………...ON Mixture……………………………full RICH Starter……………………………..engage Throttle……………………………adjust Oil pressure……………………….check STARTING ENGINE WHEN FLOODED Throttle……………………………open full Master switch……………………..ON Electric fuel pump…………………OFF Mixture……………………………idle cut-off Starter……………………………..engage Mixture……………………………advance Throttle……………………………retard Oil pressure……………………….check STARTING WITH EXTERNAL POWER SOURCE Master switch………………..OFF All electrical equipment……..OFF Terminals…………………….connect External power plug…………insert in fuselage Proceed with normal start Throttle………………lowest possible RPM External power plug....disconnect from fuselage Master switch………..ON – check ammeter Oil pressure…………..check
Piper Aircraft Corporation PA-28-181, Cherokee Archer II
21
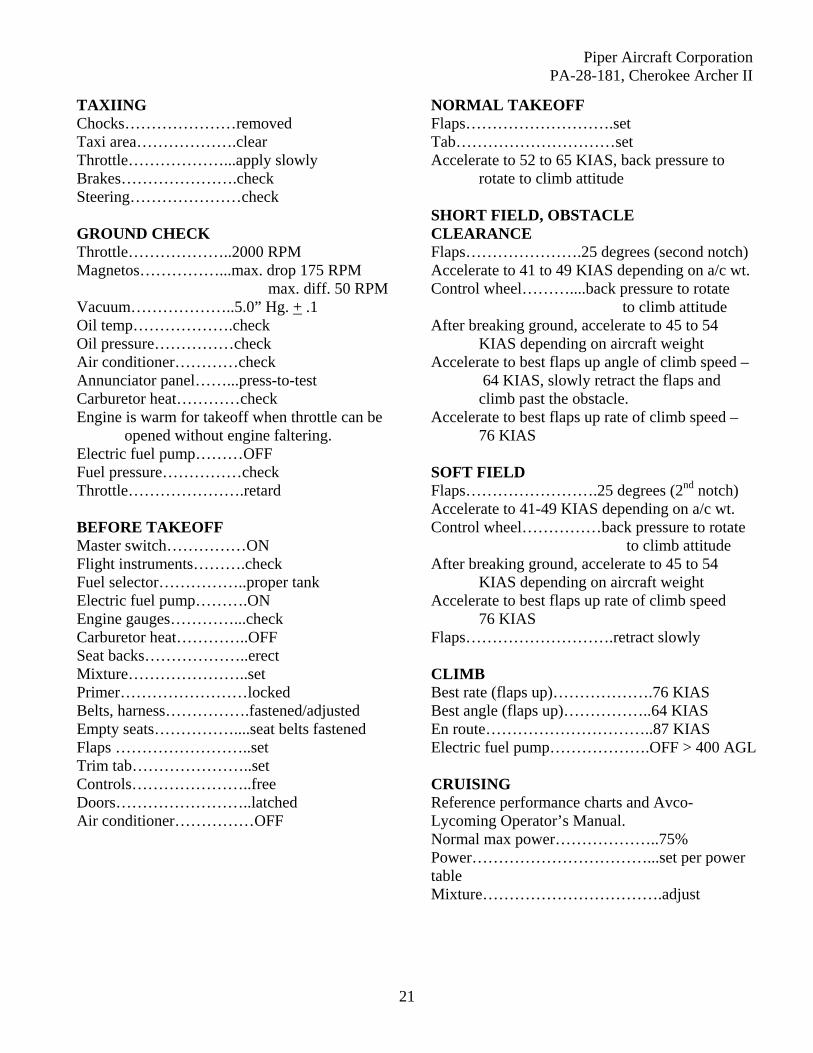
TAXIING Chocks…………………removed Taxi area……………….clear Throttle………………...apply slowly Brakes………………….check Steering…………………check GROUND CHECK Throttle………………..2000 RPM Magnetos……………...max. drop 175 RPM
max. diff. 50 RPM Vacuum………………..5.0” Hg. + .1 Oil temp……………….check Oil pressure……………check Air conditioner…………check Annunciator panel……...press-to-test Carburetor heat…………check Engine is warm for takeoff when throttle can be
opened without engine faltering. Electric fuel pump………OFF Fuel pressure……………check Throttle………………….retard BEFORE TAKEOFF Master switch……………ON Flight instruments……….check Fuel selector……………..proper tank Electric fuel pump……….ON Engine gauges…………...check Carburetor heat…………..OFF Seat backs………………..erect Mixture…………………..set Primer……………………locked Belts, harness…………….fastened/adjusted Empty seats……………....seat belts fastened Flaps ……………………..set Trim tab…………………..set Controls…………………..free Doors……………………..latched Air conditioner……………OFF
NORMAL TAKEOFF Flaps……………………….set Tab…………………………set Accelerate to 52 to 65 KIAS, back pressure to
rotate to climb attitude
SHORT FIELD, OBSTACLE CLEARANCE Flaps………………….25 degrees (second notch) Accelerate to 41 to 49 KIAS depending on a/c wt. Control wheel………....back pressure to rotate
to climb attitude After breaking ground, accelerate to 45 to 54
KIAS depending on aircraft weight Accelerate to best flaps up angle of climb speed –
64 KIAS, slowly retract the flaps and climb past the obstacle.
Accelerate to best flaps up rate of climb speed – 76 KIAS
SOFT FIELD Flaps…………………….25 degrees (2nd notch) Accelerate to 41-49 KIAS depending on a/c wt. Control wheel……………back pressure to rotate
to climb attitude After breaking ground, accelerate to 45 to 54
KIAS depending on aircraft weight Accelerate to best flaps up rate of climb speed
76 KIAS Flaps……………………….retract slowly CLIMB Best rate (flaps up)……………….76 KIAS Best angle (flaps up)……………..64 KIAS En route…………………………..87 KIAS Electric fuel pump……………….OFF > 400 AGL CRUISING Reference performance charts and Avco-Lycoming Operator’s Manual. Normal max power………………..75% Power……………………………...set per power table Mixture…………………………….adjust

Piper Aircraft Corporation PA-28-181, Cherokee Archer II
22
NORMAL DESCENT Throttle……………………………..2500 rpm Airspeed…………………………….126 KIAS Mixture……………………………..Rich Carburetor Heat…………………….On if required POWER OFF DESCENT Carburetor Heat……………………..On if required Throttle………………………………Closed Airspeed……………………………..As required Mixture………………………………As required Power………………………………..Verify with throttle every 30 seconds APPROACH AND LANDING Fuel selector………………………..proper tank Seat backs………………………….erect Belts/harness……………………….fasten/adjust Electric fuel pump………………….ON Mixture……………………………..set Flaps………………………………..set – 102 KIAS max Air conditioner……………………..OFF Trim to 75 KIAS Final approach speed (flaps 40 degrees)……66 KIAS
STOPPING ENGINE Flaps………………………………..retract Electric fuel pump………………….OFF Air conditioner……………………..OFF Radios………………………………OFF Throttle……………………………..full aft Mixture……………………………..idle cut-off Magnetos……………………………OFF Master switch……………………….OFF PARKING Parking brake………………………..set Control wheel………………………..secured with belts Flaps…………………………………full up Wheel chocks………………………..in place Tie downs……………………………secure

Piper Aircraft Corporation PA-28-181, Cherokee Archer II
23
4.4 AMPLIFIED NORMAL PROCEDURES (GENERAL) The following paragraphs are provided to supply detailed information and explanations of the normal procedures necessary for the safe operation of the airplane.
4.5 PREFLIGHT CHECK The airplane should be given a thorough preflight and walk-around check. The preflight should include a check of the airplane’s operational status, computation of weight and C.G. limits, takeoff distance and in-flight performance. A weather briefing should be obtained for the intended flight path, and any other factors relating to a safe flight should be checked before takeoff.
CAUTION The flap position should be noted before boarding the aircraft. The flaps must be placed in the “UP”
position before they will lock and support weight on the step.
Upon entering the cockpit, release the seat belts securing the control wheel. Turn “ON” the master switch and check the fuel quantity gauges for sufficient fuel. After the fuel quantity check is made turn the master switch “OFF” and check that the ignition switch is “OFF.” To begin the exterior walk-around, check for external damage and operational interference of the control surfaces or hinges. Ensure that the wings and control surfaces are free of snow, ice, frost or any other foreign materials. An operational check of the stall warning system and navigation lights should now be made. Turn the master switch “ON.” Lift the detector while checking to determine if the horn is actuated and check that the navigation lights are illuminated. The master switch should be returned to the “OFF” position after the checks are complete. A visual check of the fuel tank quantity should be performed. Remove the filler cap from each tank and visually check the supply and color. Be sure to secure the caps properly after the check is complete. The fuel system sumps and strainer should be drained daily prior to the first flight and after refueling to avoid the accumulation of contaminants such as water or sediment. Each fuel tank is equipped with an individual quick drain located at the lower inboard rear corner of the tank. The fuel strainer is equipped with a quick drain located on the front lower corner of the fire wall. Each of the fuel tank sumps should be drained first. Then the fuel strainer should be drained twice, once with the fuel selector valve on each tank. Each time fuel is drained, sufficient fuel should be allowed to flow to ensure removal of contaminants. This fuel should be collected in a suitable container, examined for contaminants, and then discarded.
CAUTION When draining any amount of fuel, care should be taken to ensure that no fire hazard exists before starting
the engine. Each quick drain should be checked after closing it to make sure it has closed completely and is not
leaking.

Piper Aircraft Corporation PA-28-181, Cherokee Archer II
24
Check all of the fuel tank vents to make sure they are open. Next, complete a check of the landing gear. Check the main gear shock struts for proper inflation. There should be 4.50 inches of strut exposure under a normal static load. The nose gear should be checked for 3.25 inches of strut exposure. Check all tires for cuts and wear and ensure proper inflation. Make a visual check of the brake blocks for wear or damage. Remove the cover from the pitot head on the underside of the left wing. Check the pitot head to make sure the holes are open and clear of obstructions. Don’t forget to clean and check the windshield. The propeller and spinner should be checked for defects or nicks. Lift the cowling and check for any obvious fuel or oil leaks. Check the oil level. Make sure that the dipstick has properly seated after checking. Secure the cowling and check the inspection covers. Check the air inlets for foreign matter and the alternator belt for proper tension. Stow the tow bar and check the baggage for proper storage and security. The baggage compartment doors should be closed and secure. Upon entering the aircraft, ascertain that all primary flight controls operate properly. Close and secure the cabin door and check that all the required papers are in order and in the airplane. Fasten and adjust the seat belts and shoulder harness and check the function of the inertia reel by pulling sharply on the strap. Fasten seat belts on empty seats.
NOTE If the fixed shoulder harness (non-inertia reel type) is installed, it must be connected to the seat belt and
adjusted to allow proper accessibility to all controls, including fuel selector flaps, trim, etc., while maintaining adequate restraint for the occupant.
If the inertia reel type shoulder harness is installed, a pull test of its locking restraint feature should be performed.
4.6 BEFORE STARTING ENGINE Before starting the engine the brakes should be set “ON” and the carburetor heat lever moved to the full COLD position. The fuel selector should then be moved to the desired tank.

Piper Aircraft Corporation PA-28-181, Cherokee Archer II
25
4.7 STARTING ENGINE (a) Starting Engine When Cold Open the throttle lever approximately ¼ inch. Turn “ON” the master switch and the electric fuel pump. Move the mixture control to full “RICH” and engage the starter by rotating the magneto switch clockwise. When the engine fires, release the magneto switch, and move the throttle to the desired setting. If the engine does not fire within five to ten seconds, disengage the starter, prime the engine and repeat the starting procedure. (b) Starting Engine When Hot Open the throttle approximately ½ inch. Turn “ON” the master switch and the electric fuel pump. Move the mixture control lever to full RICH and engage the starter by rotating the magneto switch clockwise. When the engine fires, release the magneto switch and move the throttle to the desired setting. (c) Starting Engine When Flooded The throttle lever should be full “OPEN.” Turn “ON” the master switch and turn “OFF” the electric fuel pump. Move the mixture control lever to idle cut-off and engage the starter by rotating the magneto switch clockwise. When the engine fires, release the magneto switch, advance the mixture and retard the throttle. (d) Starting Engine With External Power Source An optional feature called the Piper External Power (PEP) allows the operator to use an external battery to crank the engine without having to gain access to the airplane’s battery. Turn the master switch OFF and turn all electrical equipment OFF. Connect the RED lead of the PEP kit jumper cable to the POSITIVE (+) terminal of an external 12-volt battery and the BLACK lead to the NEGATIVE (-) terminal. Insert the plug of the jumper cable into the socket located on the fuselage. Note that when the plug is inserted, the electrical system is ON. Proceed with the normal starting technique. After the engine has started, reduce power to the lowest possible RPM, to reduce sparking, and disconnect the jumper cable from the aircraft. Turn the master switch ON and check the alternator ammeter for an indication of output. DO NOT ATTEMPT FLIGHT IF THERE IS NO INDICATION OF ALTERNATOR OUTPUT.
NOTE For all normal operations using the PEP jumper cables, the master switch should be OFF, but it is possible
to use the ship’s battery in parallel by turning the master switch ON. This will give longer cranking capabilities, but will not increase the amperage.

Piper Aircraft Corporation PA-28-181, Cherokee Archer II
26
4.8 WARM-UP Warm-up the engine at 800 to 1200 RPM for not more than two minutes in warm weather and four minutes in cold. Avoid prolonged idling at low RPM, as this practice may result in fouled spark plugs. Takeoff may be made as soon as the ground check is completed, provided that the throttle may be opened fully without backfiring or skipping, and without a reduction in engine oil pressure. Do not operate the engine at high RPM when running up or taxiing over ground containing loose stones, gravel or any loose material that may cause damage to the propeller blades.
4.9 TAXIING Before attempting to taxi the airplane, ground personnel should be instructed and approved by a qualified person authorized by the owner. Ascertain that the propeller back blast and taxi areas are clear. Power should be applied slowly to start the taxi roll. Taxi a few feet forward and apply the brakes to determine their effectiveness. While taxiing, make slight turns to ascertain the effectiveness of the steering. Observe wing clearances when taxiing near buildings or other stationary objects. If possible, station an observer outside the airplane. Avoid holes and ruts when taxiing over uneven ground. Do not operate the engine at high RPM when running up or taxiing over ground containing loose stones, gravel or any loose material that may cause damage to the propeller blades.
4.10 GROUND CHECK The magnetos should be checked at 2000 RPM. Drop off on either magneto should not exceed 175 rpm AND THE DIFFERENCE BETWEEN THE MAGNETOS SHOULD NOT EXCEED 50 RPM. Operation on one magneto should not exceed 10 seconds. Check the vacuum gauge: the indicator should read 5.0: + 1” Hg at 2000 RPM. Check the annunciator panel lights with the press-to-test button. Also check the air conditioner. Carburetor heat should also be checked prior to takeoff to be sure the control is operating properly and to clear any ice which may have formed during taxiing. Avoid prolonged ground operation with carburetor heat “ON” as the air is unfiltered. The electric fuel pump should be turned “OFF” after starting or during warm-up to make sure that the engine driven pump is operating. Prior to takeoff the electric pump should be turned ON again to prevent loss of power during takeoff should the engine driven pump fail. Check both oil temperature and oil pressure. The temperature may be low for some time if the engine is being run for the first time of the day. The engine is warm enough for takeoff when the throttle can be opened without the engine faltering.

Piper Aircraft Corporation PA-28-181, Cherokee Archer II
27
4.11 BEFORE TAKEOFF All aspect of each particular takeoff should be considered prior to executing the takeoff procedure. Turn “ON” the master switch and check and set all of the flight instruments as required. Check the fuel selector to make sure it is on the proper tank (fullest). Turn “ON” the electric fuel pump and check the engine gauges. The carburetor heat should be in the “OFF” position. All seat backs should be erect. The mixture should be set and the primer checked to ensure that it is locked. The seat belts and shoulder harness should be fastened and adjusted. Fasten the seat belts snugly around the empty seats.
NOTE If the fixed shoulder harness (non-inertia reel type) is installed, it must be connected to the seat belt and
adjusted to allow proper accessibility to all controls, including fuel selector, flaps, trim, etc., while maintaining adequate restraint for the occupant.
If the inertia reel type shoulder harness is installed a pull test of its locking restraint feature should be performed.
Exercise and set the flaps and trim tab. Ensure proper flight control movement and response. All doors should be properly secured and latched. On air conditioned models, the air conditioner must be “OFF” to ensure normal takeoff performance.
4.12 TAKEOFF The normal takeoff technique is conventional for the Cherokee Archer II. The tab should be set slightly aft of neutral, with the exact setting determined by the loading of the airplane. Allow the airplane to accelerate to 48 to 53 KIAS depending on the weight of the aircraft and ease back on the control wheel to rotate to climb attitude. The procedure used for a short field takeoff with an obstacle clearance or a soft field takeoff differs slightly from the normal technique. The flaps should be lowered to 25 degrees (second notch). Allow the aircraft to accelerate to 41 to 49 KIAS depending on the aircraft weight and rotate the aircraft to climb attitude. After breaking ground, accelerate to 45 to 54 KIAS, depending on the aircraft weight. Continue to climb while accelerating to the flaps-up rate of climb speed, 76 KIAS if no obstacle is present or 64 KIAS if obstacle clearance is a consideration. Slowly retract the flaps while climbing out.

Piper Aircraft Corporation PA-28-181, Cherokee Archer II
28
4.13 CLIMB The best rate of climb at gross weight will be obtained at 76 KIAS. The best angle of climb may be obtained at 64 KIAS. At lighter than gross weight these speeds are reduced somewhat. For climbing en route, a speed of 87 KIAS is recommended. This will produce better forward speed and increased visibility over the nose during the climb. When reaching the desired altitude, the electric fuel pump may be turned off.
4.14 CRUISING The cruising speed of the Cherokee Archer II is determined by many factors, including power setting, altitude, temperature, loading and equipment installed in the airplane. The normal maximum cruising power is 75% of the rated horsepower of the engine. Airspeeds which may be obtained at various altitudes and power settings can be determined from the performance graphs provided by Section 5. Use of the mixture control in cruising flight reduces fuel consumption significantly, especially at higher altitudes. The mixture should be leaned during cruising operation above 5000 ft. altitude and at pilot’s discretion at lower altitudes when 75% power or less is being used. If any doubt exists as to the amount of power being used, the mixture should be in the full “RICH” position for all operations under 5000 feet. To lean the mixture, disengage the lock and pull the mixture control until the engine becomes rough, indicating that the lean mixture limit has been reached in the leaner cylinders. Then enrich the mixture by pushing the control towards the instrument panel until engine operation becomes smooth. If the airplane is equipped with the optional exhaust gas temperature (EGT) gauge, a more accurate means of leaning is available to the pilot. For this procedure, refer to the “Avco-Lycoming Operator’s Manual.” Always remember that the electric fuel pump should be turned “ON” before switching tanks, and should be left on for a short period thereafter. In order to keep the airplane in best lateral trim during cruising flight, the fuel should be used alternately from each tank. It is recommended that one tank be used for one hour after takeoff, then the other tank be used for two hours: then return to the first tank, which will have approximately one and one half hours of fuel remaining if the tanks were full at takeoff. The second tank will contain approximately one half hour of fuel. Do not run tanks completely dry in flight. The electric fuel pump should be normally “OFF” so that any malfunction of the engine driven fuel pump is immediately apparent. If the signs of fuel starvation should occur at any time during flight, fuel exhaustion should be suspected, at which time the fuel selector should be immediately positioned to the other tank and the electric fuel pump switched to the “ON” position.
4.15 DESCENT NORMAL To achieve the performance on Figure 5-29 the power on descent must be used. The throttle should be set for 2500 RPM, mixture full rich and maintain an airspeed of 122 KIAS. In case carburetor ice is encountered apply full carburetor heat.

Piper Aircraft Corporation PA-28-181, Cherokee Archer II
29
POWER OFF If a prolonged power off descent is to be made, apply full carburetor heat prior to power reduction if icing conditions are suspected. Throttle should be retarded and mixture control leaned as required. Power response should be verified approximately every 30 seconds by partially opening and then closing the throttle (clearing the engine). When leveling off enrichen mixture, set power as required and select carburetor heat off unless carburetor icing conditions are suspected.
4.16 APPROACH AND LANDING Check to ensure the fuel selector is on the proper (fullest) tank and that the seat backs are erect. The seat belts and shoulder harness should be fastened and adjusted and the inertia reel checked.
NOTE If the fixed shoulder harness (non-inertia reel type) is installed, it must be connected to the seat belt and
adjusted to allow proper accessibility to all controls, including fuel selector, flaps, trim, etc., while maintaining adequate restraint for the occupant.
If the inertia reel type shoulder harness is installed a pull test of its locking restraint featured should be performed.
Turn “ON” the electric fuel pump and turn “OFF” the air conditioner. The mixture should be set in the full “RICH” position. The airplane should be trimmed to an initial approach speed of about 75 KIAS with a final approach speed of 66 KIAS with flaps extended. The flaps can be lowered at speeds up to 102 KIAS if desired. The mixture control should be kept in full “RICH” position to ensure maximum acceleration if it should be necessary to open the throttle again. Carburetor heat should not be applied unless there is an indication of carburetor icing, since the use of carburetor heat causes a reduction in power which may be critical in case of a go-around. Full throttle operation with carburetor heat on can cause detonation. The amount of flap used during landings and the speed of the aircraft at contact with the runway should be varied according to the landing surface and conditions of wind and airplane loading. It is generally good practice to contact the ground at the minimum possible safe speed consistent with existing conditions. Normally, the best technique for short and slow landings is to use full flap and enough power to maintain the desired airspeed and approach flight path. Mixture should be full “RICH,” fuel on the fullest tank, and electric fuel pump “ON.” Reduce the speed during the flareout and contact the ground close to the stalling speed. After ground contact, hold the nose wheel off as long as possible. As the airplane slows down, gently lower the nose and apply the brakes. Braking is most effective when flaps are raised and back pressure is applied to the control wheel, putting most of the aircraft weight on the main wheels. In high wind conditions, particularly in strong crosswinds, it may be desirable to approach the ground at higher than normal speeds with partial or no flaps.
4.17 STOPPING ENGINE At the pilot’s discretion, the flaps should be raised and the electric fuel pump turned “OFF.”

Piper Aircraft Corporation PA-28-181, Cherokee Archer II
30
NOTE The flaps must be placed in the “UP” position for the flap step to support weight. Passengers should be
cautioned accordingly.
The air conditioner and radios should be turned “OFF,” and the engine stopped by disengaging the mixture control lock and pulling the mixture control back to idle cut-off. The throttle should be left full aft to avoid engine vibration while stopping. Then the magneto and master switches must be turned “OFF.”
4.18 PARKING If necessary, the airplane should be moved on the ground with the aid of the nose wheel tow bar provided with each airplane and secured behind the rear seats. The aileron and stabilator controls should be secured by looping the safety belt through the control wheel and pulling it snug. The flaps are locked when in the “UP” position and should be left retracted. Tie downs can be secured to rings provided under each wing and the tail skid. The rudder is held in position by its connections to the nose wheel steering and normally does not have to be secured.
4.19 STALLS The stall characteristics of the Cherokee Archer II are conventional. An approaching stall is indicated by a stall warning horn which is activated between five and ten miles per hour above stall speed. Mild airframe buffeting and gentle pitching may also precede the stall. The gross weight stalling speed of the Cherokee Archer II with power off and full flaps is 49 KIAS. With the flaps up this speed is increased 6 KTS. Loss of altitude during stalls varies from 100 to 350 feet, depending on configuration and power.
NOTE The stall warning system is inoperative with the master switch “OFF.”
During preflight, the stall warning system should be checked by turning the master switch “ON,” lifting the detector and checking to determine if the horn is actuated. The master switch should be returned to the “OFF” position after the check is complete.
4.20 TURBULENT AIR OPERATION In keeping with good operating practice used in all aircraft, it is recommended that when turbulent air is encountered or expected, the airspeed be reduced to maneuvering speed to reduce the structural loads caused by gusts and to allow for inadvertent speed build-ups which may occur as a result of the turbulence or of distractions caused by the conditions.
4.21 WEIGHT AND BALANCE It is the responsibility of the owner and pilot to determine that the airplane remains within the allowable weight vs. center of gravity envelope while in flight. For weight and balance data, refer to Section 6 (Weight and Balance).

Piper Aircraft Corporation PA-28-181, Cherokee Archer II
31
SECTION 5 – PERFORMANCE 5.1 INTRODUCTION TO PERFORMANCE & FLIGHT PLANNING The performance information presented in this section is based on measured Flight Test Data corrected to ICAO standard day conditions and analytically expanded for the various parameters of weights, altitude, temperature, etc. The performance charts are unfactored and do not make any allowance for varying degree of pilot proficiency or mechanical deterioration of the aircraft. The performance however can be duplicated by following the stated procedures in a properly maintained airplane.
Effects of conditions not considered on the charts must be evaluated by the pilot, such as the effect of soft or grass runway surface on takeoff and landing performance, or the effect of winds aloft on cruise and range performance. Endurance can be greatly affected by improper leaning procedures, and in-flight fuel flow and quantity checks are recommended.
Figure 2: Density Altitude Graph

Piper Aircraft Corporation PA-28-181, Cherokee Archer II
32
5.2 FLAPS UP TAKEOFF PERFORMANCE
Example: Departure Airport Pressure Altitude: 2000 ft. Temperature : 70 deg F Wind: 15 KT (headwind) Gross weight: 2400 lbs. Takeoff Distance: 1900 ft.

Piper Aircraft Corporation PA-28-181, Cherokee Archer II
33
5.3 25 deg FLAPS TAKEOFF PERFORMANCE
Example: Departure Airport Pressure Altitude: 2000 ft. Temperature : 70 deg F Wind: 8 KT (headwind) Gross weight: 2400 lbs. Takeoff Distance: 1860 ft.

Piper Aircraft Corporation PA-28-181, Cherokee Archer II
34
5.4 TIME, DISTANCE, & FUEL TO CLIMB
Example: Departure airport pressure altitude: 2000 ft. Temperature : 70 deg F Cruise pressure altitude: 6000 ft. Cruise OAT: 55 deg F
Time to climb: 11.5 mins – 3 mins = 8.5 mins Distance to climb: 16 miles minus 4.5 miles = 11.5 miles Fuel to climb: 2 gal minus 1 gal = 1 gal

Piper Aircraft Corporation PA-28-181, Cherokee Archer II
35
5.5 ENGINE PERFORMANCE
Example: Cruise pressure altitude: 5500 ft. Cruise OAT: 40 deg F Percent power: 65% Engine RPM: 2440 RPM

Piper Aircraft Corporation PA-28-181, Cherokee Archer II
36
5.6 SPEED POWER – PERFORMANCE CRUISE
Example: Cruise pressure altitude: 5500 ft. Cruise OAT: 30 degrees F Power setting: 55% True airspeed: 101 knots

Piper Aircraft Corporation PA-28-181, Cherokee Archer II
37
5.7 SPEED POWER – ECONOMY CRUISE
Example: Cruise pressure altitude 6000 ft. Cruise OAT: 55 degrees F Power setting: 65% True airspeed: 116 knots

Piper Aircraft Corporation PA-28-181, Cherokee Archer II
38
5.8 BEST POWER MIXTURE RANGE
Example: Cruise pressure altitude: 5500 ft. Cruise OAT: 35 degrees F Power setting 75% Range (with reserve): 505 nautical miles Range (no reserve): 560 nautical miles

Piper Aircraft Corporation PA-28-181, Cherokee Archer II
39
5.9 BEST ECONOMY MIXTURE RANGE
Example: Cruise pressure altitude: 3000 ft Cruise OAT: 35 degrees F Power setting 65% Range (with reserve): 600 nautical miles Range (no reserve): 670 nautical miles

Piper Aircraft Corporation PA-28-181, Cherokee Archer II
40
5.10 ENDURANCE Example: Cruise pressure altitude: 2000 ft. Power setting 65% Endurance (with reserve): 5.5 hrs. Endurance (no reserve): 6.1 hrs.

Piper Aircraft Corporation PA-28-181, Cherokee Archer II
41
5.11 GLIDE RANGE
Example: Cruise pressure altitude: 8000 ft. Terrain pressure altitude: 1500 ft. Glide Range: 13 miles minus 2.5 miles = 10.5 nautical miles

Piper Aircraft Corporation PA-28-181, Cherokee Archer II
42
5.12 LANDING PERFORMANCE
Example: Airport pressure altitude: 2300 ft. Gross Weight: 2264 Temperature: 70 deg F Wind: 5 knots (headwind) Landing Distance: 1290 ft.

Piper Aircraft Corporation PA-28-181, Cherokee Archer II
43
SECTION 6 – WEIGHT AND BALANCE 6.1 INTRODUCTION In order to achieve the performance and flying characteristics which are designed into the airplane, it must be flown with the weight and center of gravity (C.G.) positioned within the approved operating range (envelope). Although the airplane offers flexibility of loading, it cannot be flown with the maximum number of adult passengers, full fuel tanks, and maximum baggage. With the flexibility comes responsibility. The pilot must ensure that the airplane is loaded within the loading envelope before he makes a takeoff. Misloading carries consequences for any aircraft. An overloaded airplane will not take off, climb, or cruise as well as a properly loaded one. The heavier the airplane is loaded, the less climb performance it will have. Center of gravity is a determining factor in flight characteristics. If the C.G. is too far forward in any airplane, it may be difficult to rotate for takeoff or landing. If the C.G. is too far aft, the airplane may rotate prematurely on takeoff or tend to pitch up during climb. Longitudinal stability will be reduced. This can lead to inadvertent stalls and even spins, and spin recovery becomes more difficult as the center of gravity moves aft of the approved limit.
6.2 WEIGHT AND BALANCE LOADING FORM Weight (lbs.) Arm Aft
Datum (in.) Moment (in-lbs.)
Basic Empty Weight 1541.2 87.5 134,855 Front Seats 330 80.5 26565 Rear Seats* 0 118.1 0 Fuel (48 max) 288 95.0 27360
Total 2209.2 C.G. 88.6 Sample in Italics
BEW in Bold Totals must be within approved weight and C.G. limits. It is the responsibility of the airplane owner and the pilot to ensure that the airplane is loaded properly. The Basic Empty Weight C.G. is noted on the Weight and Balance Data Form (Figure 6-5). If the airplane has been altered, refer to the Weight and Balance Record for this information. *Utility Category Operation – No baggage or rear passengers allowed.

Piper Aircraft Corporation PA-28-181, Cherokee Archer II
44
6.3 C.G. RANGE AND WEIGHT

Piper Aircraft Corporation PA-28-181, Cherokee Archer II
45
SECTION 7 – AIRPLANE & SYSTEM DESCRIPTIONS 7.1 THE AIRPLANE The PA-28-181 Cherokee is a single-engine, low-wing monoplane of all metal construction. It has four-place seating, two hundred pound baggage capacity, and a 180 horsepower engine.
7.2 AIRFRAME The basic airframe, except for a tubular steel engine mount, steel landing gear struts, and other miscellaneous steel parts, is of aluminum alloy construction. The extremities – the wing tips, the cowling, the tail surfaces – are of fiberglass or ABS thermoplastic. Aerobatics are prohibited in this airplane since the structure is not designed for aerobatic loads. The semi-tapered wings have a laminar flow type NACA 652-415 airfoil. The wings are attached to each side of the fuselage by insertion of the butt ends of the respective main spars into a spar box carry-through which is an integral part of the fuselage structure, providing, in effect, a continuous main spar with splices at each side of the fuselage. There are also fore and aft attachments at the rear spar and at an auxiliary front spar.
7.3 ENGINE AND PROPELLER The Cherokee 181 is powered by a four cylinder, direct drive, horizontally opposed engine rated at 180 horsepower at 2700 rpm. It is furnished with a starter, a 60 ampere, 14 volt alternator, a shielded ignition, vacuum pump drive, a fuel pump, and a dry, automotive type carburetor air filter. The exhaust system is made entirely from stainless steel and is equipped with dual mufflers. A heater shroud around the mufflers is provided to supply heat for the cabin and windshield defrosting. The fixed-pitch propeller is made from a one-piece alloy forging.
7.4 LANDING GEAR The three landing gears use Cleveland 6.00 x 6 wheels, the main gear wheels (Figure 7-1) being provided with brake drums and Cleveland single disc hydraulic brake assemblies. All three wheels use 6.00 x 6, four-ply rating, Type III tires with tubes. The nose gear is steerable through a 30 degree arc either side of center by use of the rudder pedals and brakes. A spring device incorporated in the rudder pedal torque tube assembly aids in rudder centering and provides rudder trim. The nose gear steering mechanism also incorporates a bungee assembly to reduce steering effort and to dampen shocks and bumps during taxiing. A shimmy dampener is included in the nose gear. The three struts are of the air-oil type, with a normal extension of 3.25 inches for the nose gear and 4.50 inches for the main gear. The standard brake system for this Cherokee consists of dual toe brakes attached to the rudder pedals and a hand lever and master cylinder located below and behind the left center of the instrument sub-panel. The toe brakes and the hand brake have their own brake cylinders, but they share a common reservoir.

Piper Aircraft Corporation PA-28-181, Cherokee Archer II
46
The brake fluid reservoir is installed on the top left front face of the fire wall. The parking brake is incorporated in the master cylinder and is actuated by pulling back on the brake lever, depressing the knob attached to the left side of the handle, and releasing the brake lever. To release the parking brake, pull back on the brake lever to disengage the catch mechanism and allow the handle to swing forward.
7.5 FLIGHT CONTROL CONSOLE
7.6 FLIGHT CONTROLS Dual controls are provided as standard equipment, with a cable system used between the controls and the surfaces. The horizontal tail (stabilator) is of the all-movable slab type with a trim tab mounted on the trailing edge of the stabilator to reduce the control system forces. This tab is actuated by a control wheel on the floor between the front seats (see above figure). A rudder trim adjustment is mounted on the right side of the pedestal below the throttle quadrant and permits directional trim as needed in flight. The flaps are manually operated and spring-loaded to return to the up position. A past-center lock incorporated in the actuating linkage holds the flap when it is in the up position so that it may be used as a step on the right side. The slab will not support a step load except when in the full up position, so it must

Piper Aircraft Corporation PA-28-181, Cherokee Archer II
47
be completely retraced when used as a step. The flaps have three extended positions, 10, 25, and 40 degrees.
7.7 ENGINE CONTROLS Engine controls consist of a throttle control and a mixture control lever. These controls are located on the control quadrant on the lower center of the instrument panel (Figure 7-5) where they are accessible to both the pilot and the copilot. The controls utilize teflon-lined control cables to reduce friction and binding. The throttle lever is used to adjust engine RPM. The mixture control lever is used to adjust the air to fuel ratio. The engine is shut down by the placing of the mixture control lever in the full lean position. In addition, the mixture control has a lock to prevent inadvertent activation of the mixture control. For information on the leaning procedure, see the Avco-Lycoming Operator’s Manual. The friction adjustment lever on the right side of the control quadrant may be adjusted to increase or decrease the friction holding the throttle and mixture controls or to lock the controls in a selected position. The carburetor heat control lever is located to the right of the control quadrant on the instrument panel. The control is placarded with two positions: “ON” (down), “OFF” (up).
7.8 FUEL SYSTEM Fuel is stored in two twenty-five gallon (24 gallons usable) tanks, which are secured to the leading edge structure of each wing by screws and nut plates. The fuel selector control is located on the left side-panel, forward of the pilot’s seat. The button on the selector cover must be depressed and held while the handle is moved to the OFF position. The button releases automatically when the handle is moved back into the ON position.

Piper Aircraft Corporation PA-28-181, Cherokee Archer II
48
An auxiliary electric fuel pump is provided in case of failure of the engine driven pump. The electric pump should be on for all takeoffs and landings, and when switching tanks. The pump switch is located in the switch panel above the throttle quadrant. The fuel drains should be opened daily prior to first flight to check for water or sediment. Each tank has an individual drain at the bottom, inboard rear corner. A fuel strainer, located on the lower left front of the fire wall, has a drain which is accessible from outside the nose section. The strainer should also be drained before the first flight of the day. Refer to paragraph 8.21 for the complete fuel draining procedure. Fuel quantity and pressure are indicated on gauges located in a cluster on the left side of the instrument panel. An engine priming system is provided to facilitate starting. The primer pump is located to the immediate left of the throttle quadrant.

Piper Aircraft Corporation PA-28-181, Cherokee Archer II
49
7.9 ELECTRICAL SYSTEM The electrical system includes a 14-volt, 60 amp alternator, a 12-volt battery, a voltage regulator, an overvoltage relay and a master switch relay. The battery is mounted in a thermoplastic box immediately aft of the baggage compartment. The regulator and overvoltage relay are located on the forward left side of the fuselage behind the instrument panel. Electrical switches are located on the right center instrument panel, and the circuit breakers are located on the lower right instrument panel. A rheostat switch on the left side of the switch panel controls the navigational lights and the radio lights. The similar switch on the right side controls and dims the panel lights. Standard electrical accessories include a starter, electric fuel pump, stall warning indicator, cigar lighter, fuel gauge, ammeter, and annunciator panel. The annunciator panel includes alternator and low oil pressure indicator lights. When the optional gyro system is installed, the annunciator panel also includes a low vacuum indicator light. The annunciator panel lights are provided only as a warning to the pilot that a system may not be operating properly, and that he should check and monitor the applicable system gauge to determine when or if any necessary action is required. Optional electrical accessories include navigation lights, anti-collision light, landing light, instrument lighting, and cabin dome light. Circuits will handle the addition of communications and navigational equipment.
WARNING Strobe light should not be operating when flying through overcast and clouds since reflected light can
produce special disorientation. Do not operate strobe lights in close proximity to ground, during takeoff or landing.
The words “master switch” used hereafter in this manual indicate both sides of the switch; battery side “BAT” and alternator side “ALT” are to be depressed simultaneously to OFF or ON as directed. Unlike previous generator systems, the ammeter does not indicate battery discharge; rather it displays in amperes the load placed on the alternator. With all electrical equipment off (except master switch) the ammeter will be indicating the amount of charging current demanded by the battery. As each item of electrical equipment is turned on, the current will increase to a total appearing on the ammeter. This total includes the battery. The average continuous load for night flight, with radios on, is about 30 amperes. This 30 ampere value, plus approximately two amperes for a full charged battery, will appear continuously under these flight conditions. The amount of current shown on the ammeter will tell immediately if the alternator system is operating normally, as the amount of current shown should equal the total amperage drawn by the equipment which it is operating. If no output is indicated on the ammeter during flight, reduce the electrical load by turning off all unnecessary electrical equipment. Check both 5 ampere field breaker and 60 ampere output breaker and reset if open. If neither circuit breaker is open, turn off the “ALT” switch for 1 second to reset the
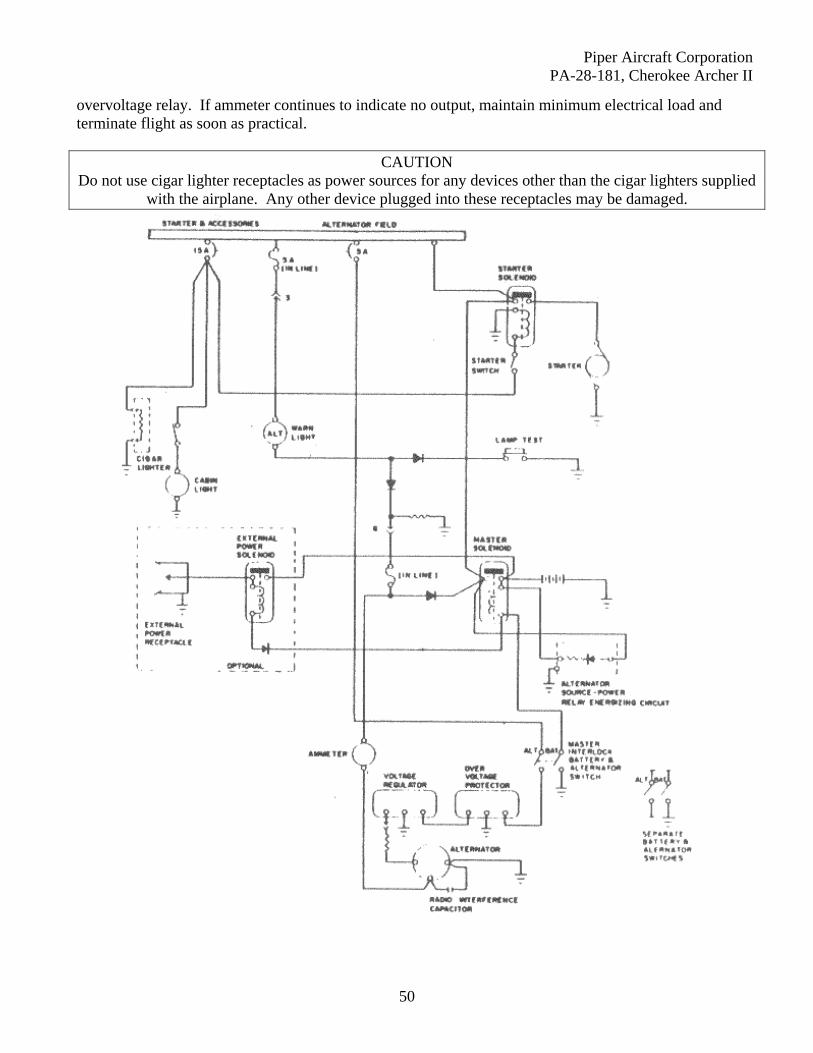
Piper Aircraft Corporation PA-28-181, Cherokee Archer II
50
overvoltage relay. If ammeter continues to indicate no output, maintain minimum electrical load and terminate flight as soon as practical.
CAUTION Do not use cigar lighter receptacles as power sources for any devices other than the cigar lighters supplied
with the airplane. Any other device plugged into these receptacles may be damaged.

Piper Aircraft Corporation PA-28-181, Cherokee Archer II
51
7.10 VACUUM SYSTEM The vacuum system is designed to operate the air driven gyro instruments. This includes the directional and attitude gyros when installed. The system consists of an engine driven vacuum pump, a vacuum regulator, a filter, and the necessary plumbing. The vacuum pump is a dry type pump which eliminates the need for an air-oil separator and its plumbing. A shear drive protects the pump from damage. If the drive shears, the gyros will become inoperative. The vacuum gauge, mounted on the right instrument panel to the right of the radios, provides valuable information to the pilot about the operation of the vacuum system. A decrease in pressure in a system that has remained constant over an extended period may indicate a dirty filter, dirty screens, possibly a sticking vacuum regulator or leak in system (a low vacuum indicator light is provided in the annunciator panel). Zero pressure would indicate a sheared pump drive, defective pump, possibly a defective gauge or collapsed line. In the event of any gauge variation from the norm, the pilot should have a mechanic check the system to prevent possible damage to the system components or eventual failure of the system. A vacuum regulator is provided in the system to protect the gyros. The valve is set so the normal vacuum reads 5.0 + .1 inches of mercury, a setting which provides sufficient vacuum to operate all the gyros at their rated RPM. Higher settings will damage the gyros and with a low setting the gyros will be unreliable. The regulator is located behind the instrument panel and is accessible from below the instrument panel.
7.11 INSTRUMENT PANEL The instrument panel of the Cherokee is designed to accommodate the customary advanced flight instruments and the normally required power plant instruments. The artificial horizon and directional gyro are vacuum operated through use of a vacuum pump installed on the engine, while the turn and bank instrument is electrically operated. A vacuum gauge is mounted on the far right side of the instrument panel. The radios and circuit breakers are on the right hand instrument panel. Extra circuits are provided for the addition of optional radio equipment. An annunciator panel is mounted in the upper instrument panel to warn the pilot of a possible malfunction in the alternator, oil pressure, or vacuum systems.

Piper Aircraft Corporation PA-28-181, Cherokee Archer II
52
7.12 PITOT-STATIC SYSTEM The system supplies both pitot and static pressure for the airspeed indicator, altimeter, and the optional vertical speed indicator. Pitot and static pressure are picked up by a pitot head installed on the bottom of the left wing and carried through pitot and static lines within the wing and fuselage to the gauges on the instrument panel. An alternate static source is available as optional equipment. The control valve is located below the left side of the instrument panel. When the valve is set in the alternate position, the altimeter, vertical speed indicator, and airspeed indicator will be using cabin air for static pressure. The storm window and cabin vents must be closed and the cabin heater and defroster must be on during alternate static source operation. The altimeter error is less than 50 feet unless otherwise placarded. Both the pitot and static lines can be drained through separate drain valves located on the left lower side of the fuselage interior. A heated pitot head, which alleviates problems with icing and heavy rain, is available as optional equipment. The switch for the heated pitot head is located on the electrical switch panel to the left of the right control wheel. To prevent bugs and water from entering the pitot and static pressure holes, a cover should be placed over the pitot head. A partially or completely blocked pitot head will give erratic or zero readings on the instruments.
NOTE During the preflight, check to make sure the pitot cover is removed.

Piper Aircraft Corporation PA-28-181, Cherokee Archer II
53
7.13 HEATING AND VENTILATING SYSTEM Heat for the cabin interior and the defroster system is provided by a heater muff attached to the exhaust system. The amount of heat desired can be regulated with the controls located on the far right side of the instrument panel. The airflow can be regulated between the front and rear seats by levers located on top of the heat ducts next to the console. Fresh air inlets are located in the leading edge of the wing near the fuselage. An adjustable outlet is located on the side of the cabin near the floor at each seat location; overhead air outlets are offered as optional equipment. Air is exhausted through an outlet under the rear seat. A cabin air blower, incorporated in the ventilating system, is also available as optional equipment. An optional overhead ventilating system with a cabin air blower is available on models without air conditioning. This blower is operated by a “FAN” switch with 4 positions – “OFF,” “LOW,” “MED,” or “HIGH.”
CAUTION When cabin heat is operated, heat duct surface becomes hot. This could result in burns if arms or legs are
placed too close to heat duct outlets or surface.
7.14 CABIN FEATURES For ease of entry and exit and pilot-passenger comfort, the front seats are adjustable fore and aft. The rear seats may be removed to provide room for bulky items. Rear seat installations incorporate leg retainers with latching mechanisms that must be released before the rear seats can be removed. Releasing the retainers is accomplished on earlier models by turning the latching mechanism 90 degrees with a coin or screwdriver. Releasing the retainers is accomplished on later models by depressing the plunger behind each rear leg. Armrests are also provided to the front seats. All seats are available with optional headrests and optional vertical adjustment may be added to the front seats. The cabin interior includes a pilot storm window, two sun visors, ashtrays, two map pockets, and pockets on the backs of each front seat. A single strap shoulder harness controlled by an inertia reel is standard equipment for the front seats, and is offered as an option for the rear seats. The shoulder strap is routed over the shoulder adjacent to the windows and attached to the lap belt in the general area of the person’s inboard hip. A check of the inertia reel mechanism is made by pulling sharply on the strap. The reel will lock in place under this test and prevent the strap from extending. Under normal movement the strap will extend and retract as required.
7.15 BAGGAGE AREA A 24 cubic foot baggage area, located behind the rear seats, is accessible either from the cabin or through an outside baggage door on the right side of the aircraft. Maximum capacity is 200 pounds. Tie-down straps are provided and should be used at all times.

Piper Aircraft Corporation PA-28-181, Cherokee Archer II
54
NOTE It is the pilot’s responsibility to be sure when the baggage is loaded that the aircraft C.G. falls within the
allowable C.G. Range (refer to Section 6 – Weight and Balance).
7.16 STALL WARNING An approaching stall is indicated by a stall warning horn which is activated between five and ten knots above stall speed. Mild airframe buffeting and gentle pitching may also precede the stall. Stall speeds are shown on graphs in the Performance Section. The stall warning horn emits a continuous sound and is activated by a lift detector installed on the leading edge of the left wing. During preflight, the stall warning system should be checked by turning the master switch “ON,” lifting the detector and checking to determine if the horn is actuated.
7.17 FINISH All exterior surfaces are primed with etching primer and finished with acrylic lacquer.
7.18 PIPER EXTERNAL POWER An optional starting installation known as Piper External Power (PEP) is accessible through a receptacle located on the right side of the fuselage aft of the wing. An external battery can be connected to the socket, thus allowing the operator to crank the engine without having to gain access to the airplane’s battery.
7.19 EMERGENCY LOCATOR TRANSMITTER The Emergency Locator Transmitter (ELT), when installed, is located in the aft portion of the fuselage just below the stabilator leading edge and is accessible through a plate on the right side of the fuselage. This plate is attached with slotted-head nylon screws for ease of removal; these screws may be readily removed with a variety of common items such as a dime, a key, a knife blade, etc. If there are no tools available in an emergency the screw heads may be broken off by any means. The ELT is an emergency locator transmitter which meets the requirements of FAR 91.52. A battery replacement date is marked on the transmitter. To comply with FAA regulations, the battery must be replaced on or before this date. The battery must also be replaced if the transmitter has been used in an emergency situation or if the accumulated test time exceeds one hour, or if the unit has been inadvertently activated for an undetermined time period.
NOTE If for any reason a test transmission is necessary, the test transmission should be conducted only in the first five minutes of any hour and limited to three audio sweeps. If the tests must be made at any other
time, the tests should be coordinated with the nearest FAA tower or flight service station.
NARCO ELT 10 OPERATION On the ELT unit itself is a three position switch placarded “ON,” “OFF,” and “ARM.” The ARM position sets the ELT so that it will transmit after impact and will continue to transmit until its battery is drained. The ARM position is selected when the ELT is installed in the airplane and it should remain in that position.

Piper Aircraft Corporation PA-28-181, Cherokee Archer II
55
To use the ELT as a portable unit in an emergency, remove the cover and unlatch the unit from its mounting base. The antenna cable is disconnected by a left quarter-turn of the knurled nut and a pull. A sharp tug on the two small wires will break them loose. Deploy the self-contained antenna by pulling the plastic tab marked “PULL FULLY TO EXTEND ANTENNA.” Move the switch to ON to activate the transmitter. In the event the transmitter is activated by an impact, it can only be turned off by moving the switch on the ELT unit to OFF. Normal operation can then be restored by pressing the small clear plastic reset button located on the top of the front face of the ELT and then moving the switch to ARM. A pilot’s remote switch optionally located on the left side panel is provided to allow the transmitter to be turned on from inside the cabin. The pilot’s remote switch is placarded “ON” and “ARMED.” The switch is normally in the ARMED position. Moving the switch to ON will activate the transmitter. Moving the switch back to the ARMED position will turn off the transmitter only if the impact switch has not been activated. The ELT should be checked to make certain the unit has not been activated during the ground check. Check by selecting 121.50 MHz on an operating receiver. If there is an oscillating chirping sound, the ELT may have been activated and should be turned off immediately. This requires removal of the access cover and moving the switch to OFF, then press the reset button and return the switch to ARM. Recheck with the receiver to ascertain the transmitter is silent. Select the OFF position when changing the battery, when rearming the unit if it has been activated for any reason or to discontinue transmission.
NOTE If the switch has been placed in the ON position for any reason, the OFF position has to be selected before selecting ARM. If ARM is selected directly from the ON position, the unit will continue to transmit in the
ARM position. A pilot’s remote switch, located on the left side panel, is provided to allow the transmitter to be controlled from inside the cabin. The pilot’s remote switch is placarded “ON,” “AUTO/ARM” and “OFF/RESET.” The switch is normally left in the AUTO/ARM position. To turn the transmitter off, move the switch momentarily to the OFF/RESET position. The aircraft master switch must be ON to turn the transmitter OFF. To actuate the transmitter for tests or other reasons, move the switch upward to the ON position and leave it in that position as long as transmission is desired. The unit is equipped with a portable antenna to allow the locator to be removed from the aircraft in case of an emergency and used as a portable signal transmitter. The locator should be checked during the ground check to make certain the unit has not been accidentally activated. Check by tuning a radio receiver to 121.50 MHz. If there is an oscillating sound, the locator may have been activated and should be turned off immediately. Reset to the ARM position and check again to ensure against outside interference.

Piper Aircraft Corporation PA-28-181, Cherokee Archer II
56
SECTION 8 – HANDLING, SERVICE, & MAINTENANCE Procedures not included in this copy of the POH.
SECTION 9 – SUPPLEMENTS Procedures not included in this copy of the POH.