Chapter 9 - Data Maintenance Street Index Lookup screen allows you to search for street addresses...
12
Qualified Voter File Reference Manual Ch. 9 Data Maintenance Updated 1.3.2017 1 Chapter 9 - Data Maintenance Street Index Lookup The Street Index Lookup screen allows you to search for street addresses and print your change request form to add new streets or modify existing street index items. You can also request to delete street segments that do not have voters attached. [Aliases] can also be created for streets that may be known locally by a different name. For each request submitted to the Bureau, Street Administrator staff verifies that the information meets U.S. Postal Service standards and they will contact you if any questions or concerns arise regarding your request. Once a request has been processed, you will receive an automated e-mail confirming the completion. Street Administrator staff will also notify the County Clerk’s Office of all street index changes. Buttons on the Street Index Lookup Screen Figure 9.1 [Request Change] - Allows you to create form requesting a change to an existing street or street segment. [Request New] - Allows you to create a form requesting the addition of a new street to the street index for your jurisdiction. [Request Delete] - Allows you to create a form to request the deletion of an existing street or street segment if there are no voter records attached. [Aliases] - Produces the Street Alias Lookup screen, allowing you to create, delete or edit street index aliases. [Close] - Returns you to the QVF Main Desktop. [Help] - Produces a screen with information on how to use the Street Index Lookup. [Search] - Searches for an existing street based on information entered in the Street field.
Transcript of Chapter 9 - Data Maintenance Street Index Lookup screen allows you to search for street addresses...

Qualified Voter File Reference Manual Ch. 9 Data Maintenance Updated 1.3.2017
1
Chapter 9 - Data Maintenance
Street Index Lookup The Street Index Lookup screen allows you to search for street addresses and print your
change request form to add new streets or modify existing street index items. You can
also request to delete street segments that do not have voters attached. [Aliases] can also
be created for streets that may be known locally by a different name. For each request
submitted to the Bureau, Street Administrator staff verifies that the information meets
U.S. Postal Service standards and they will contact you if any questions or concerns arise
regarding your request. Once a request has been processed, you will receive an automated
e-mail confirming the completion. Street Administrator staff will also notify the County
Clerk’s Office of all street index changes.
Buttons on the Street Index Lookup Screen
Figure 9.1
[Request Change] - Allows you to create form requesting a change to an existing street
or street segment.
[Request New] - Allows you to create a form requesting the addition of a new street to
the street index for your jurisdiction.
[Request Delete] - Allows you to create a form to request the deletion of an existing
street or street segment if there are no voter records attached.
[Aliases] - Produces the Street Alias Lookup screen, allowing you to create, delete or edit
street index aliases.
[Close] - Returns you to the QVF Main Desktop.
[Help] - Produces a screen with information on how to use the Street Index Lookup.
[Search] - Searches for an existing street based on information entered in the Street field.

Qualified Voter File Reference Manual Ch. 9 Data Maintenance Updated 1.3.2017
2
To add a new street to your street index
Action Result
From the Data Maint. Menu, select Street
Index Lookup.
The Street Index Lookup screen is
displayed.
Click on the [Request New] button at the
top of the screen.
The Street Index Information screen is
displayed.
In the Print Street Change Submission
Form screen, you will enter information in
the following fields: Prefix, Street Name,
Street Type, Street Suffix, Parity, Street
Number Range, and Zip Code. (Only enter
Extension Number Ranges if a district
divides an area like an apartment building.)
This information is entered on the Basic
Tab screen.
Figure 9.2
Click on the Precinct/District tab. Choose
information from the dropdown lists in
each of the various fields: Ward Precinct,
School, School Precinct, Intermediate
School, Congress, State House, State
Senate, County Commission. Also, you
MUST either select a Library and
Community College district, or indicate
that there is none before completing the
request. If available, enter a Village and
Village Precinct as well.
This information determines what precinct
and districts a person lives in.
Figure 9.3
You may click on the Comments tab and
add any information that you want the
street index data section to be aware of or
that would be helpful to them when
entering the new street. At the bottom of
the window, include an e-mail address
where you can be reached. To proceed with
the new street request, select Preview.
The Preview button will allow you to
view/print the street information that has
been entered. Once you are satisfied that
everything is correct, print and fax the
request form to 517-636-6133. Once the
street has been entered by the Bureau of
Elections, you may enter voter registration
information into the QVF for voters that
live on that street.
Click [Close]. You are returned to the Main Desktop.
Modifying an existing street index item
When conducting searches for existing street index records, keep in mind that only the
street name should be entered; do not enter a street type or street suffix (directional). Also
be aware that the software reads spaces as characters; if you inadvertently enter a space at
the end of a street name, the software will read the space as a character and the street will
not be found.
Action Result
From the Data Maint. menu select Street
Index Lookup.
The Street Index Lookup screen is
displayed.

Qualified Voter File Reference Manual Ch. 9 Data Maintenance Updated 1.3.2017
3
Choose your County and Jurisdiction from
the drop down lists. Enter the street name
in the Street field. Then click on the
[Search] button.
A list of streets that matches your search
criteria is displayed.
Highlight the street segment that needs to
be modified and click on the [Request
Change] Button.
The Print Street Change Submission
Form is displayed.
Figure 9.2
Change the information in the Basic Tab
(Figure 9.2) or the Precincts/Districts Tab
(Figure 9.3), as needed. You MUST either
select a Library and Community College
district, or indicate that there is none
included before your request can be
processed. At the bottom of the window,
include an e-mail address where you can be
reached.
The Preview button will allow you to
view/print the street information that has
been entered. One you are satisfied that
everything is correct, print and fax the
request form to 517-636-6133. Once the
street has been modified by the Bureau of
Elections, you may enter or change voter
registration information in the QVF for
voters that live on that street.
Click on [Close]. You are returned to the QVF Main
Desktop.
Figure 9.2

Qualified Voter File Reference Manual Ch. 9 Data Maintenance Updated 1.3.2017
4
Figure 9.3
Non- Traditional Housing (NTH) Addresses
The Non-Traditional Housing feature allows you to add voters to your file that do not
reside in traditional housing at an address that exists within your street index. This is the
ONLY permitted use of the NTH address. Do not use the NTH feature if it is possible to
use a street number and street name accepted by the United States Postal Service. The
Non- Traditional Housing feature allows you to enter a voter using a description of the
location at which the voter resides so that a precinct and political districts may be
assigned.
Action Result
From the Data Maint. Menu, select Street
Index Lookup.
The Street Index Lookup screen is
displayed.
Click on the [Request New] button at the
top of the screen.
The Street Index Information screen is
displayed.
Click on the Precinct/District tab. Choose
information from the dropdown lists in the
various district fields: Congress, State
House, State Senate, County Commission,
School, Ward Precinct, Community
College, Library District, Intermediate
This information determines what precinct
and districts a person lives in.
Figure 9.3
Qualified Voter File Reference Manual Ch. 9 Data Maintenance Updated 1.3.2017
5
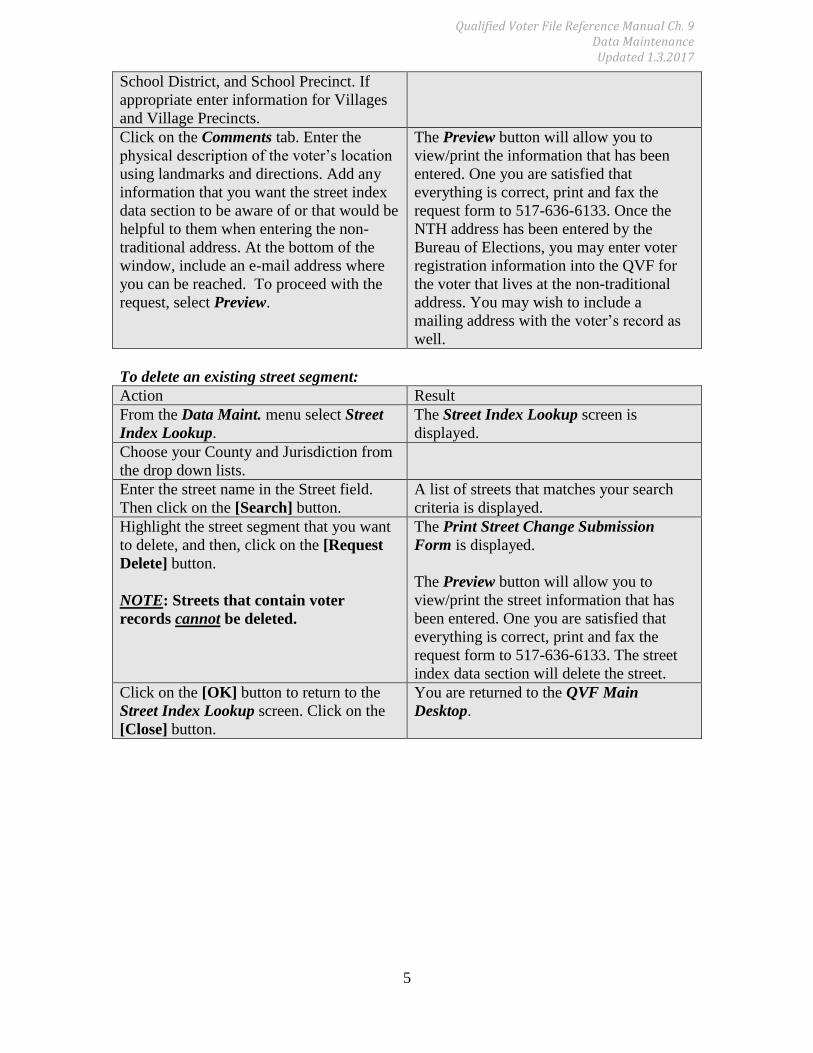
School District, and School Precinct. If
appropriate enter information for Villages
and Village Precincts.
Click on the Comments tab. Enter the
physical description of the voter’s location
using landmarks and directions. Add any
information that you want the street index
data section to be aware of or that would be
helpful to them when entering the non-
traditional address. At the bottom of the
window, include an e-mail address where
you can be reached. To proceed with the
request, select Preview.
The Preview button will allow you to
view/print the information that has been
entered. One you are satisfied that
everything is correct, print and fax the
request form to 517-636-6133. Once the
NTH address has been entered by the
Bureau of Elections, you may enter voter
registration information into the QVF for
the voter that lives at the non-traditional
address. You may wish to include a
mailing address with the voter’s record as
well.
To delete an existing street segment:
Action Result
From the Data Maint. menu select Street
Index Lookup.
The Street Index Lookup screen is
displayed.
Choose your County and Jurisdiction from
the drop down lists.
Enter the street name in the Street field.
Then click on the [Search] button.
A list of streets that matches your search
criteria is displayed.
Highlight the street segment that you want
to delete, and then, click on the [Request
Delete] button.
NOTE: Streets that contain voter
records cannot be deleted.
The Print Street Change Submission
Form is displayed.
The Preview button will allow you to
view/print the street information that has
been entered. One you are satisfied that
everything is correct, print and fax the
request form to 517-636-6133. The street
index data section will delete the street.
Click on the [OK] button to return to the
Street Index Lookup screen. Click on the
[Close] button.
You are returned to the QVF Main
Desktop.

Qualified Voter File Reference Manual Ch. 9 Data Maintenance Updated 1.3.2017
6
The Business Address Lookup Figure 9.4
The Business Address Lookup allows you to enter into the QVF Street Index addresses
that are in areas that are generally considered “non-residential” addresses. When you save
a voter’s record, the QVF will then check to see if the address is in a non-residential
range and will give you a warning if a person’s address falls into a non- residential area.
You will then be given the choice of saving the record or not, after you have investigated
the registration. To flag a street number range as a business addresses, follow the
instructions provided below.
Figure 9.5
Action Result
From the Data Maint. menu choose
Business Address Lookup.
The Business Address Lookup screen is
displayed. This screen contains a grid of all
previously entered business addresses.
Figure 9.4
Click on the [New] button. The Business Address screen appears.
Figure 9.5
Ensure that the County and Jurisdiction are Street names in the Business Address
Qualified Voter File Reference Manual Ch. 9 Data Maintenance Updated 1.3.2017
7
correct, then enter the necessary
information to include the Street Name,
Odd/Even Indicator and Zip Code.
Lookup must match exactly the
corresponding entry in the Street Index
Lookup.
Then click on the [OK] button Your non-residential addresses are
identified and you are returned to the
Business Address Lookup screen.
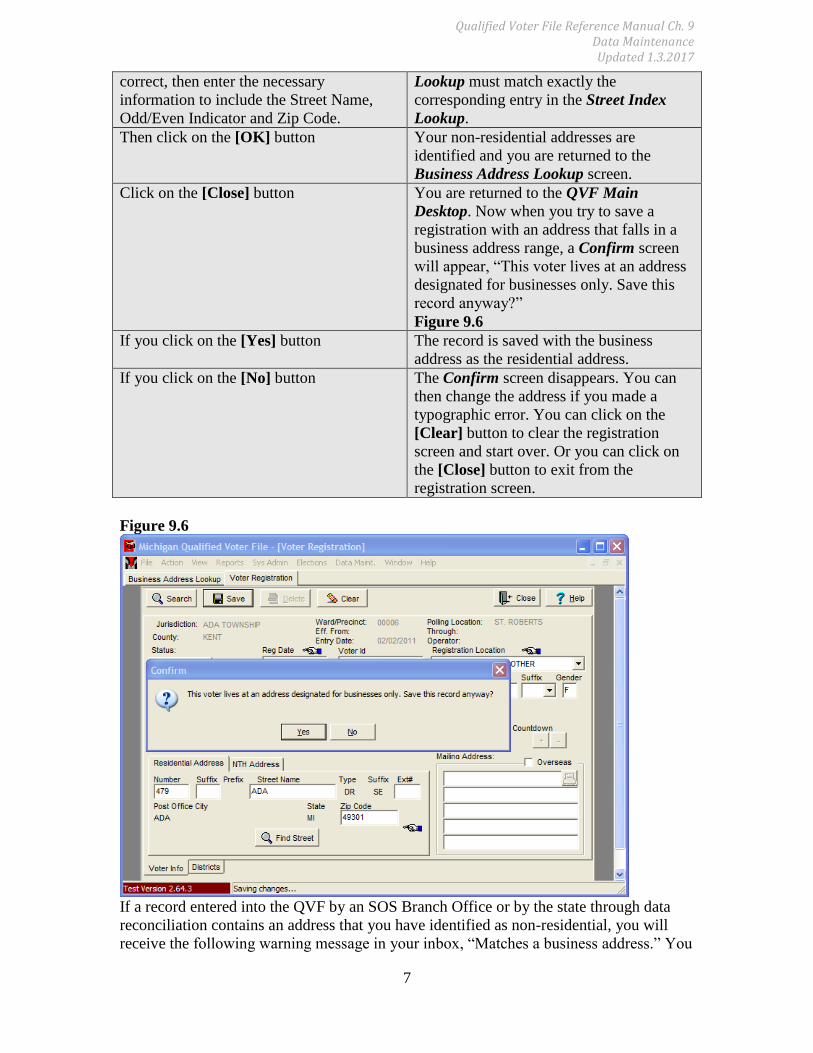
Click on the [Close] button You are returned to the QVF Main
Desktop. Now when you try to save a
registration with an address that falls in a
business address range, a Confirm screen
will appear, “This voter lives at an address
designated for businesses only. Save this
record anyway?”
Figure 9.6
If you click on the [Yes] button The record is saved with the business
address as the residential address.
If you click on the [No] button The Confirm screen disappears. You can
then change the address if you made a
typographic error. You can click on the
[Clear] button to clear the registration
screen and start over. Or you can click on
the [Close] button to exit from the
registration screen.
Figure 9.6
If a record entered into the QVF by an SOS Branch Office or by the state through data
reconciliation contains an address that you have identified as non-residential, you will
receive the following warning message in your inbox, “Matches a business address.” You
Qualified Voter File Reference Manual Ch. 9 Data Maintenance Updated 1.3.2017
8
will then want to contact the voter to confirm his or her address of residence within the
jurisdiction.
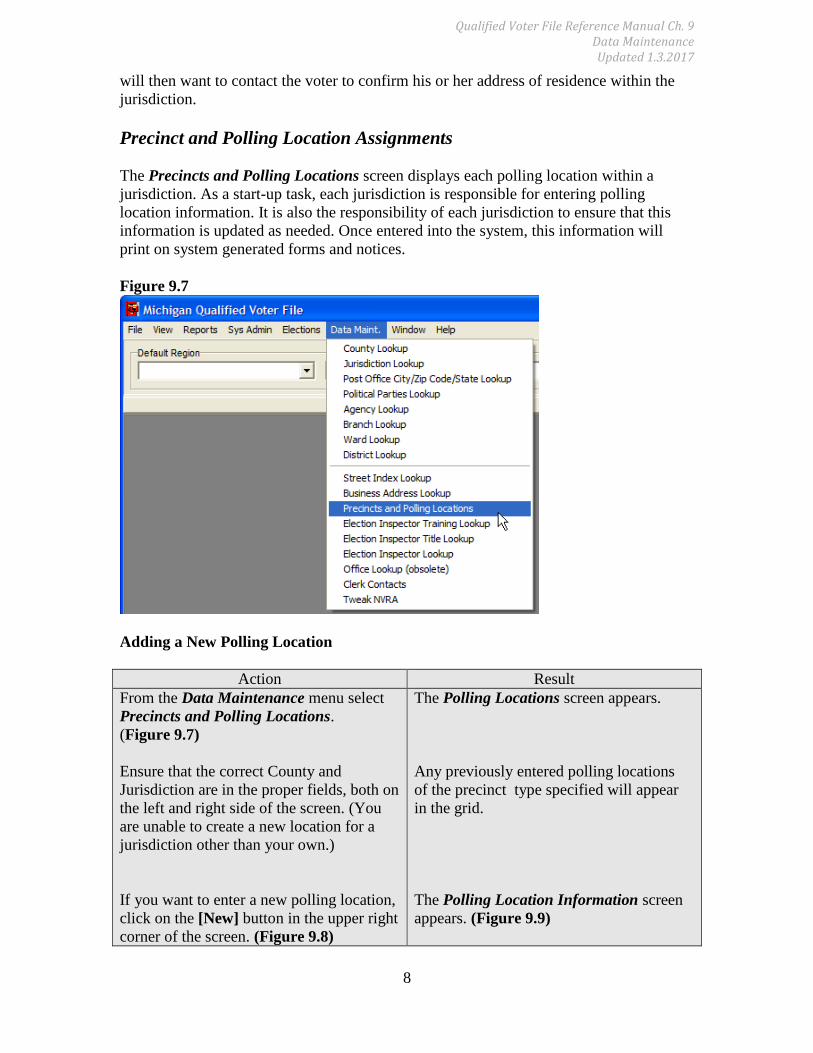
Precinct and Polling Location Assignments
The Precincts and Polling Locations screen displays each polling location within a
jurisdiction. As a start-up task, each jurisdiction is responsible for entering polling
location information. It is also the responsibility of each jurisdiction to ensure that this
information is updated as needed. Once entered into the system, this information will
print on system generated forms and notices.
Figure 9.7
Adding a New Polling Location
Action Result
From the Data Maintenance menu select
Precincts and Polling Locations.
(Figure 9.7)
Ensure that the correct County and
Jurisdiction are in the proper fields, both on
the left and right side of the screen. (You
are unable to create a new location for a
jurisdiction other than your own.)
If you want to enter a new polling location,
click on the [New] button in the upper right
corner of the screen. (Figure 9.8)
The Polling Locations screen appears.
Any previously entered polling locations
of the precinct type specified will appear
in the grid.
The Polling Location Information screen
appears. (Figure 9.9)

Qualified Voter File Reference Manual Ch. 9 Data Maintenance Updated 1.3.2017
9
Figure 9.8
Enter the information for your new polling
location in the appropriate fields. Location,
Address, City, State, and Zip are required
fields. You should indicate with a
checkmark if the location is Handicap
Accessible. Directions and the Contact
Person information are optional fields.
Click on the [OK] button. (Figure 9.9)
Note: Information from the Location and
Address Fields prints on ID cards.
Information from the Contact Person field
displays on the Michigan Voter
Information Center website.
You are taken back to the Precincts and
Polling Locations main screen. The record
you added will appear in the grid on the
right side of the screen and is available for
you to assign to a precinct (listed on the left
side of the screen). Please read the
following table for instructions on how to
assign a polling location to a precinct.

Qualified Voter File Reference Manual Ch. 9 Data Maintenance Updated 1.3.2017
10
Figure 9.9
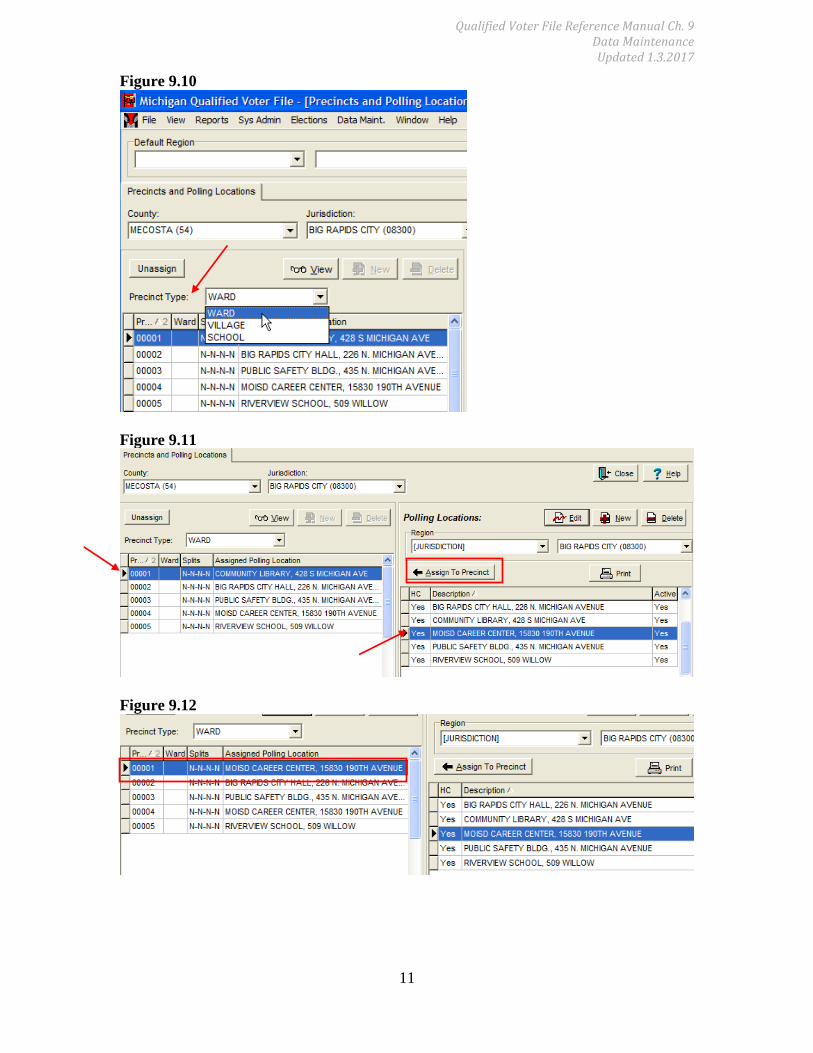
Assigning a Polling Location to a Precinct
Action Result
From the Data Maintenance menu select
Precincts and Polling Locations.
(Figure 9.7)
Ensure that the correct County and
Jurisdiction are in the proper fields on both
the left and the right side of the screen.
Then in the Precinct Type field choose the
polling location type (Ward, School, or
Village) you want to work with from the
drop down list. (Figure 9.10)
The Polling Locations screen appears.
Any previously entered polling locations
of the type specified will appear in the
grid.
From the grid on the left of the screen,
which shows current polling location
assignments, select the precinct you want
to change.
Then, from the grid showing available
locations on the right side of the screen,
select the location you want to assign to the
precinct you selected on the left.
Click the [Assign to Precinct] button.
(Figure 9.11)
After clicking [Assign to Precinct], the
polling location grid on the left of the
screen will show the new location you
assigned. (Figure 9.12)
Qualified Voter File Reference Manual Ch. 9 Data Maintenance Updated 1.3.2017
11
Figure 9.10
Figure 9.11
Figure 9.12

Qualified Voter File Reference Manual Ch. 9 Data Maintenance Updated 1.3.2017
12
Changing Polling Location Information
Note: Once a polling location is created and saved, it cannot be deleted from the QVF.
The only changes you can make are to the Location field (the short description of the
location) and the Contact Person fields. Even if you make street index changes that
remove all voters from a given precinct, the polling location itself will remain in the
Precinct and Polling Locations screen. Contact the Help Desk if a polling location needs
to be removed.
Action Result
If you want to change information for an
existing polling location, highlight the
location to be changed, then click on the
[Edit] button in the upper right corner of
the screen. (Figure 9.13)
The Polling Location Information screen
appears.
In the Polling Location Information
screen make the necessary changes to the
polling location. Then click on the [OK]
button.
You are then returned to the Polling
Locations screen.
Figure 9.13
Tweak NVRA Statistics For instructions on adjusting NVRA Statistics, please refer to EAC Survey Reporting
Requirements.