CHAPTER 7 Android, Where’s My Car? -...
16
CHAPTER 7 Android, Where’s My Car? You parked as close to the stadium as you possibly could, but when the concert ends, you don’t have a clue where your car is. Your friends are equally clueless. Fortunately, you haven’t lost your Android phone, which never forgets anything, and you remember you have the hot new app, Android, Where’s My Car? With this app, you click a button when you park your car, and the Android uses its location sensor to record the car’s GPS coordinates and address. Later, when you reopen the app, it gives you directions from where you currently are to the saved location—problem solved! What You’ll Learn This app covers the following concepts: • Determining the location of the Android device by using the LocationSensor component. • Persistently recording data in a database directly on the device by using TinyDB. • Using the WebViewer component to open Google Maps from your app and show directions from one location to another.
Transcript of CHAPTER 7 Android, Where’s My Car? -...
CHAPTER 7
Android, Where’s My Car?
You parked as close to the stadium as you possibly could, but when the concert ends, youdon’t have a clue where your car is. Your friends are equally clueless. Fortunately, youhaven’t lost your Android phone, which never forgets anything, and you remember youhave the hot new app, Android, Where’s My Car? With this app, you click a button whenyou park your car, and the Android uses its location sensor to record the car’s GPScoordinates and address. Later, when you reopen the app, it gives you directions fromwhere you currently are to the saved location—problem solved!
What You’ll LearnThis app covers the following concepts:
• Determining the location of the Android device by using the LocationSensorcomponent.
• Persistently recording data in a database directly on the device by using TinyDB.
• Using the WebViewer component to open Google Maps from your app and showdirections from one location to another.
Getting StartedConnect to the App Inventor website and start a new project. Since project namescan’t have spaces, name it “AndroidWhere”. Set the screen’s title to “Android, Where’sMy Car?” Connect your device or emulator for live testing.
Designing the ComponentsThe user interface for Android, Where’s My Car? consists of labels to show your currentand remembered locations, and buttons to record a location and show directions toit. You’ll need some labels that just show static text; for example, GPSLabel will providethe text “GPS:” that appears in the user interface. Other labels, such asCurrentLatLabel, will display data from the location sensor. For these labels, you’llprovide a default value, (0,0), which will change as the GPS acquires locationinformation.
You’ll also need three non-visible components: a LocationSensor for obtaining thecurrent location, a TinyDB for storing locations persistently, and a WebViewer fordisplaying Google Maps directions between the current and stored locations.
You can build the components from the snapshot of the Component Designer inFigure 7-1.
114 Chapter 7: Android, Where’s My Car?
Chapter 7, Android, Where’s My Car?
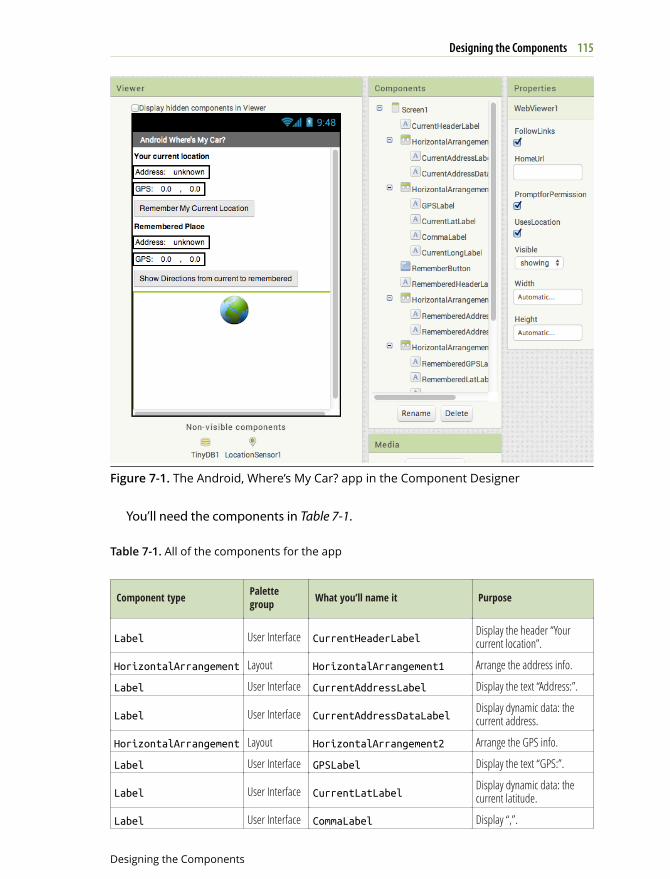
Figure 7-1. The Android, Where’s My Car? app in the Component Designer
You’ll need the components in Table 7-1.
Table 7-1. All of the components for the app
Component type Palettegroup What you’ll name it Purpose
Label User Interface CurrentHeaderLabelDisplay the header “Yourcurrent location”.
HorizontalArrangement Layout HorizontalArrangement1 Arrange the address info.
Label User Interface CurrentAddressLabel Display the text “Address:”.
Label User Interface CurrentAddressDataLabelDisplay dynamic data: thecurrent address.
HorizontalArrangement Layout HorizontalArrangement2 Arrange the GPS info.
Label User Interface GPSLabel Display the text “GPS:”.
Label User Interface CurrentLatLabelDisplay dynamic data: thecurrent latitude.
Label User Interface CommaLabel Display “,”.
115Designing the Components
Designing the Components
Component type Palettegroup What you’ll name it Purpose
Label User Interface CurrentLongLabelDisplay dynamic data: thecurrent longitude.
Button User Interface RememberButtonClick to record the currentlocation.
Label User Interface HorizontalArrangement2Arrange rememberedaddress info.
Label User Interface RememberedAddressLabelDisplay the text“Remembered Place”.
Label User Interface RememberedAddressDataLabelDisplay dynamic data: theremembered address.
Label User Interface RememberedGPSLabel Display the text “GPS”.
Label User Interface RememberedLatLabelDisplay dynamic data: theremembered latitude.
Label User Interface Comma2Label Display “,”.
Label User Interface RememberedLongLabelDisplay dynamic data: theremembered longitude.
Button User Interface DirectionsButton Click to show the map.
LocationSensor Sensors LocationSensor1 Sense GPS info.
TinyDB Storage TinyDB1Store the rememberedlocation persistently.
WebViewer User Interface WebViewer1 Show directions.
Set the properties of the components in the following way:
• Set the Text property for the labels with fixed text as specified in Table 7-1.
• Set the Text property of the labels for dynamic GPS data to “0.0”.
• Set the Text property of the labels for dynamic addresses to “unknown”.
• Uncheck the Enabled property of the RememberButton and DirectionsButton.
• Uncheck the Screen.Scrollable property so that the WebViewer will fit on thescreen.
Adding Behaviors to the ComponentsYou’ll need the following behaviors for this app:
116 Chapter 7: Android, Where’s My Car?
Chapter 7, Android, Where’s My Car?
• When the LocationSensor gets a reading, place the current location data intothe appropriate labels of the user interface. This will let the user know thesensor has read a location and is ready to remember it.
• When the user clicks the RememberButton, copy the current location data intothe labels for the remembered location. You’ll also need to store theremembered location data so that it will be there if the user closes andrelaunches the app.
• When the user clicks the DirectionsButton, launch Google Maps in theWebViewer so that it shows directions to the remembered location.
• When the app is relaunched, load the remembered location from the databaseinto the app.
DISPLAYING THE CURRENT LOCATION
The LocationSensor.LocationChanged event occurs not just when the device’slocation changes, but also when the sensor first gets a reading. Sometimes that firstreading will take a few seconds, and sometimes you won’t get a reading at all if thesight lines to GPS satellites are blocked (and depending on the device settings). Formore information about GPS and LocationSensor, see Chapter 23.
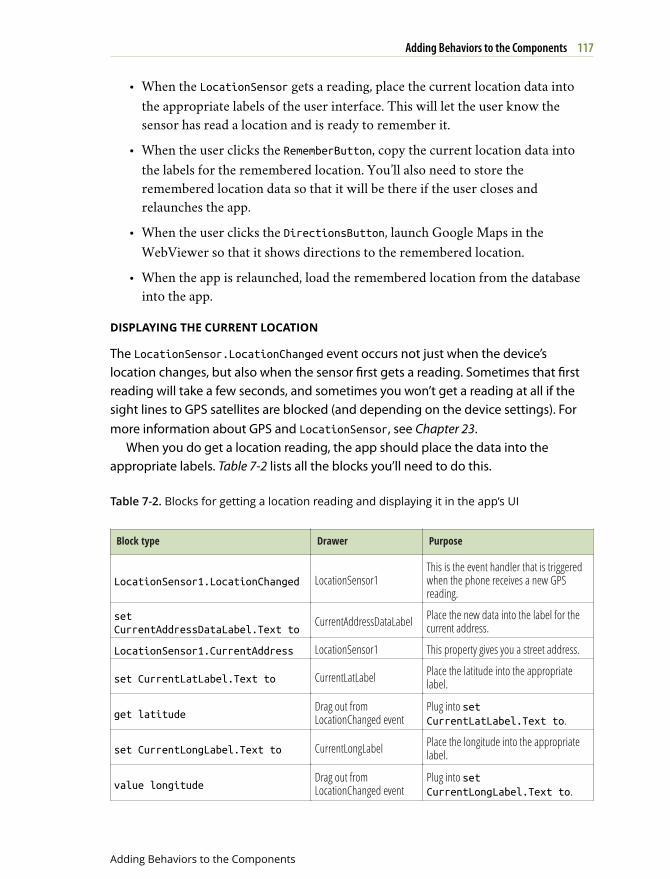
When you do get a location reading, the app should place the data into theappropriate labels. Table 7-2 lists all the blocks you’ll need to do this.
Table 7-2. Blocks for getting a location reading and displaying it in the app’s UI
Block type Drawer Purpose
LocationSensor1.LocationChanged LocationSensor1This is the event handler that is triggeredwhen the phone receives a new GPSreading.
set CurrentAddressDataLabel.Text to
CurrentAddressDataLabel Place the new data into the label for thecurrent address.
LocationSensor1.CurrentAddress LocationSensor1 This property gives you a street address.
set CurrentLatLabel.Text to CurrentLatLabel Place the latitude into the appropriatelabel.
get latitudeDrag out fromLocationChanged event
Plug into set CurrentLatLabel.Text to.
set CurrentLongLabel.Text to CurrentLongLabel Place the longitude into the appropriatelabel.
value longitudeDrag out fromLocationChanged event
Plug into set CurrentLongLabel.Text to.
117Adding Behaviors to the Components
Adding Behaviors to the Components
Block type Drawer Purpose
set RememberButton.Enabled to RememberButton Remember the reading for currentlocation.
true Logic Plug into set RememberButton.Enabled to.
How the blocks work
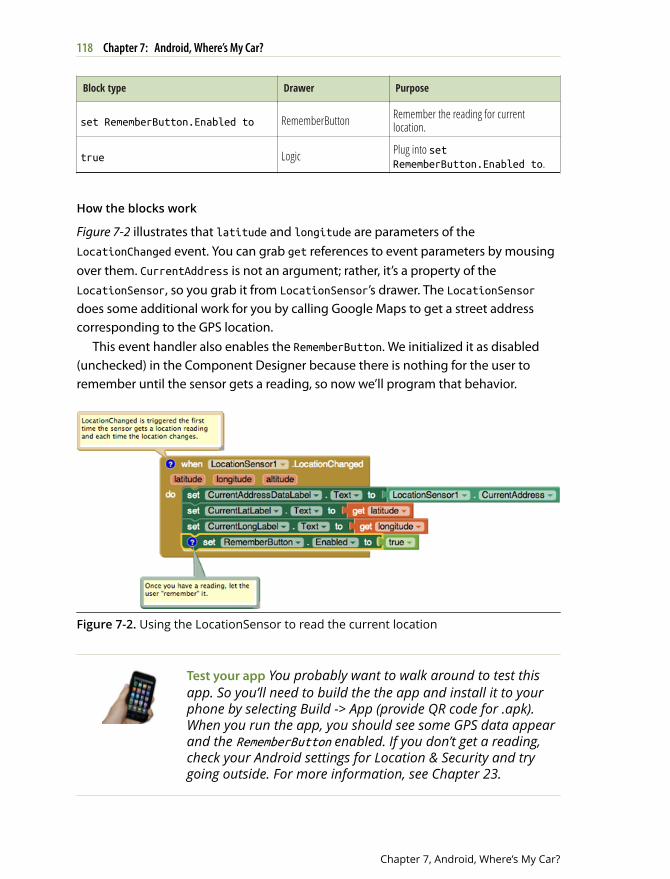
Figure 7-2 illustrates that latitude and longitude are parameters of theLocationChanged event. You can grab get references to event parameters by mousingover them. CurrentAddress is not an argument; rather, it’s a property of theLocationSensor, so you grab it from LocationSensor’s drawer. The LocationSensordoes some additional work for you by calling Google Maps to get a street addresscorresponding to the GPS location.
This event handler also enables the RememberButton. We initialized it as disabled(unchecked) in the Component Designer because there is nothing for the user toremember until the sensor gets a reading, so now we’ll program that behavior.
Figure 7-2. Using the LocationSensor to read the current location
Test your app You probably want to walk around to test thisapp. So you’ll need to build the the app and install it to yourphone by selecting Build -> App (provide QR code for .apk).When you run the app, you should see some GPS data appearand the RememberButton enabled. If you don’t get a reading,check your Android settings for Location & Security and trygoing outside. For more information, see Chapter 23.
118 Chapter 7: Android, Where’s My Car?
Chapter 7, Android, Where’s My Car?
RECORDING THE CURRENT LOCATION
When the user clicks the RememberButton, the most current location data should beplaced into the labels for displaying the remembered data. Table 7-3 shows you whichblocks you’ll need for this functionality.
Table 7-3. Blocks for recording and displaying the current location
Block type Drawer Purpose
RememberButton.Click RememberButton Triggered when the user clicks“Remember.”
set RememberedAddressDataLabel.Text to
RememberedAddressDataLabel Place the sensor’s address data intothe label for the remembered address.
LocationSensor1.CurrentAddress LocationSensor1 This property gives you a streetaddress.
set RememberedLatLabel.Text to RememberedLatLabel Place the latitude sensed into the“remembered” label.
LocationSensor.Latitude LocationSensor1Plug into set RememberedLatLabel.Text to.
set RememberedLongLabel.Text to RememberedLongLabel Place the longitude sensed into the“remembered” label.
LocationSensor.Longitude LocationSensor1Plug into set RememberedLongLabel.Text to.
set DirectionsButton.Enabled to DirectionsButton Map the remembered place.
true LogicPlug into set DirectionsButton.Enabled to.
How the blocks work
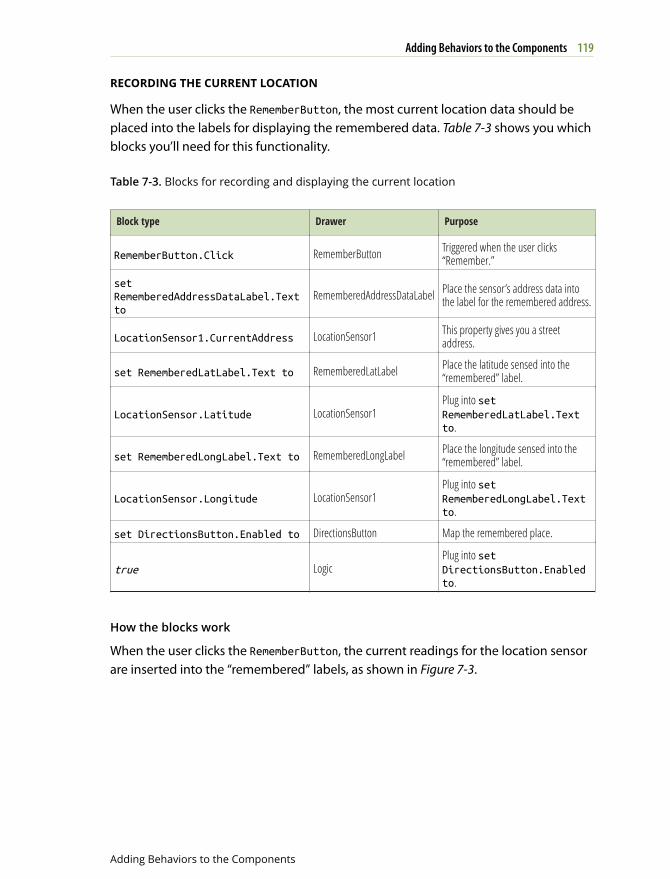
When the user clicks the RememberButton, the current readings for the location sensorare inserted into the “remembered” labels, as shown in Figure 7-3.
119Adding Behaviors to the Components
Adding Behaviors to the Components
Figure 7-3. Placing the current location information in the “remembered” labels
You’ll also notice that the DirectionsButton is enabled. This could become tricky,because if the user clicks the DirectionsButton immediately, the rememberedlocation will be the same as the current location, so the map that appears won’tprovide much in terms of directions. But that’s not something anyone is likely to do;after the user moves (e.g., walks to the concert), the current location and rememberedlocation will diverge.
Test your app Download the new version of the app to yourphone and test again. When you click the RememberButton, isthe data from the current settings copied into the rememberedsettings?
DISPLAYING DIRECTIONS TO THE REMEMBERED LOCATION
When the user clicks the DirectionsButton, you want the app to open Google Mapsand then display the directions from the user’s current location to the rememberedlocation (e.g., where the car is parked).
The WebViewer component can display any web page, including Google Maps.You’ll call WebViewer.GoToURL to open the map, but you want to open a URL that willshow directions from the current location to the remembered location.
One way to show directions in Maps is with a URL of the following form:http://maps.google.com/maps?
saddr=37.82557,-122.47898&daddr=37.81079,-122.47710Type that URL into a browser—can you tell which famous landmark it directs you
across?For this app, you need to build the URL and set its source address (saddr) and
destination address (daddr) parameters dynamically (in blocks). You’ve put texttogether before in earlier chapters using join; we’ll do that here, as well, plugging in
120 Chapter 7: Android, Where’s My Car?
Chapter 7, Android, Where’s My Car?
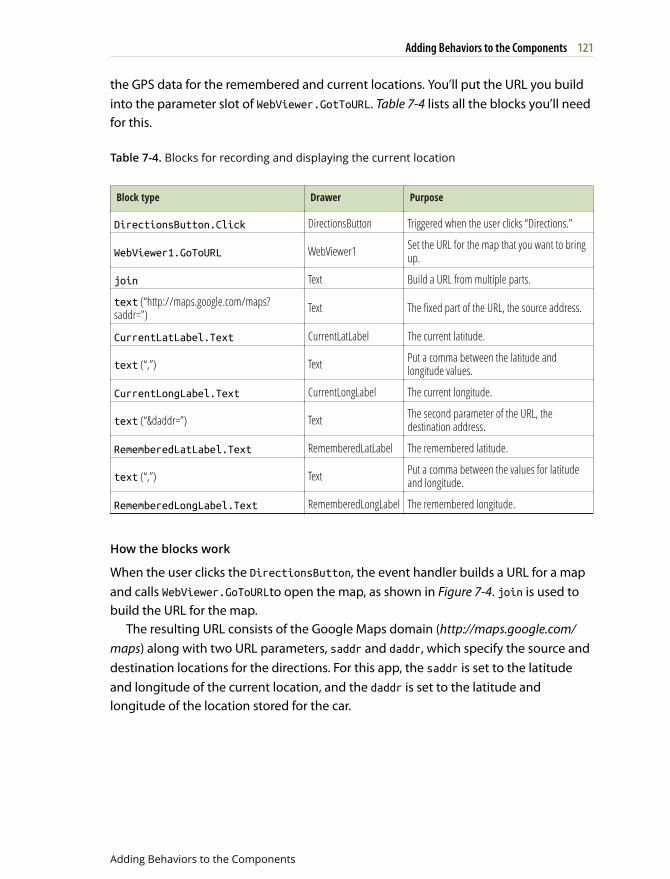
the GPS data for the remembered and current locations. You’ll put the URL you buildinto the parameter slot of WebViewer.GotToURL. Table 7-4 lists all the blocks you’ll needfor this.
Table 7-4. Blocks for recording and displaying the current location
Block type Drawer Purpose
DirectionsButton.Click DirectionsButton Triggered when the user clicks “Directions.”
WebViewer1.GoToURL WebViewer1 Set the URL for the map that you want to bringup.
join Text Build a URL from multiple parts.
text (“http://maps.google.com/maps?saddr=”) Text The fixed part of the URL, the source address.
CurrentLatLabel.Text CurrentLatLabel The current latitude.
text (“,”) Text Put a comma between the latitude andlongitude values.
CurrentLongLabel.Text CurrentLongLabel The current longitude.
text (“&daddr=”) Text The second parameter of the URL, thedestination address.
RememberedLatLabel.Text RememberedLatLabel The remembered latitude.
text (“,”) Text Put a comma between the values for latitudeand longitude.
RememberedLongLabel.Text RememberedLongLabel The remembered longitude.
How the blocks work
When the user clicks the DirectionsButton, the event handler builds a URL for a mapand calls WebViewer.GoToURLto open the map, as shown in Figure 7-4. join is used tobuild the URL for the map.
The resulting URL consists of the Google Maps domain (http://maps.google.com/maps) along with two URL parameters, saddr and daddr, which specify the source anddestination locations for the directions. For this app, the saddr is set to the latitudeand longitude of the current location, and the daddr is set to the latitude andlongitude of the location stored for the car.
121Adding Behaviors to the Components
Adding Behaviors to the Components
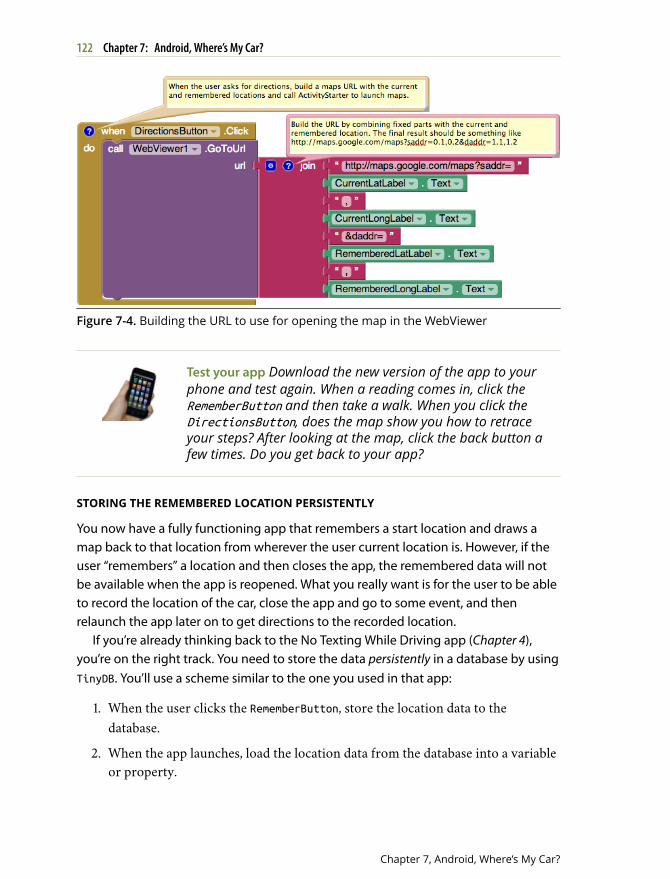
Figure 7-4. Building the URL to use for opening the map in the WebViewer
Test your app Download the new version of the app to yourphone and test again. When a reading comes in, click theRememberButton and then take a walk. When you click theDirectionsButton, does the map show you how to retraceyour steps? After looking at the map, click the back button afew times. Do you get back to your app?
STORING THE REMEMBERED LOCATION PERSISTENTLY
You now have a fully functioning app that remembers a start location and draws amap back to that location from wherever the user current location is. However, if theuser “remembers” a location and then closes the app, the remembered data will notbe available when the app is reopened. What you really want is for the user to be ableto record the location of the car, close the app and go to some event, and thenrelaunch the app later on to get directions to the recorded location.
If you’re already thinking back to the No Texting While Driving app (Chapter 4),you’re on the right track. You need to store the data persistently in a database by usingTinyDB. You’ll use a scheme similar to the one you used in that app:
1. When the user clicks the RememberButton, store the location data to thedatabase.
2. When the app launches, load the location data from the database into a variableor property.
122 Chapter 7: Android, Where’s My Car?
Chapter 7, Android, Where’s My Car?
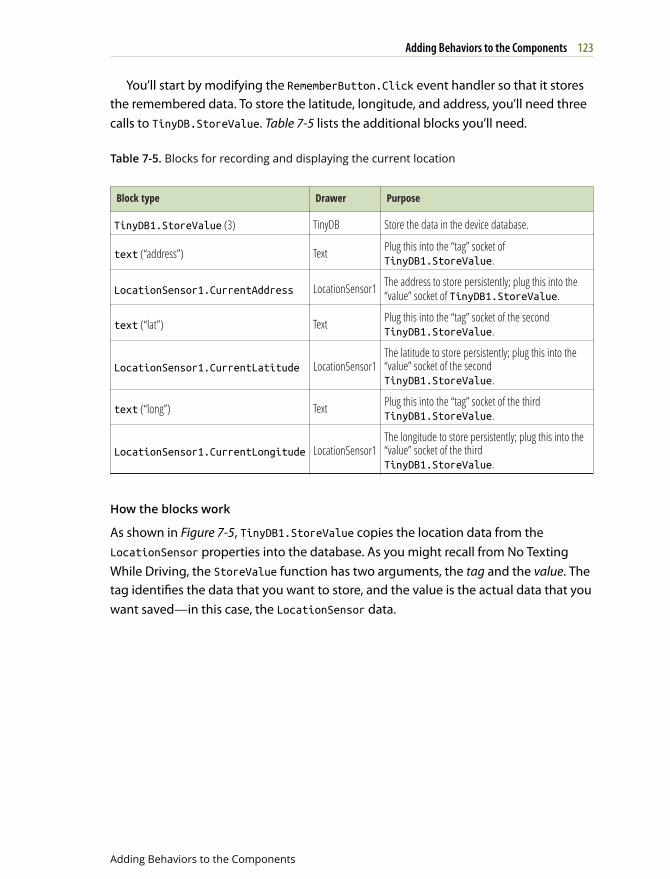
You’ll start by modifying the RememberButton.Click event handler so that it storesthe remembered data. To store the latitude, longitude, and address, you’ll need threecalls to TinyDB.StoreValue. Table 7-5 lists the additional blocks you’ll need.
Table 7-5. Blocks for recording and displaying the current location
Block type Drawer Purpose
TinyDB1.StoreValue (3) TinyDB Store the data in the device database.
text (“address”) Text Plug this into the “tag” socket ofTinyDB1.StoreValue.
LocationSensor1.CurrentAddress LocationSensor1 The address to store persistently; plug this into the“value” socket of TinyDB1.StoreValue.
text (“lat”) Text Plug this into the “tag” socket of the secondTinyDB1.StoreValue.
LocationSensor1.CurrentLatitude LocationSensor1The latitude to store persistently; plug this into the“value” socket of the secondTinyDB1.StoreValue.
text (“long”) Text Plug this into the “tag” socket of the thirdTinyDB1.StoreValue.
LocationSensor1.CurrentLongitude LocationSensor1The longitude to store persistently; plug this into the“value” socket of the thirdTinyDB1.StoreValue.
How the blocks work
As shown in Figure 7-5, TinyDB1.StoreValue copies the location data from theLocationSensor properties into the database. As you might recall from No TextingWhile Driving, the StoreValue function has two arguments, the tag and the value. Thetag identifies the data that you want to store, and the value is the actual data that youwant saved—in this case, the LocationSensor data.
123Adding Behaviors to the Components
Adding Behaviors to the Components
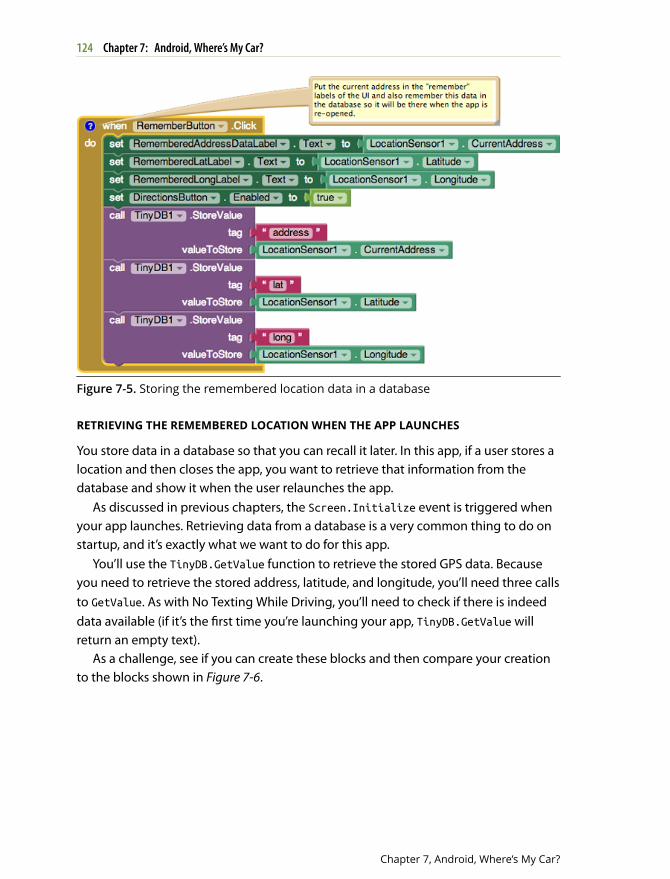
Figure 7-5. Storing the remembered location data in a database
RETRIEVING THE REMEMBERED LOCATION WHEN THE APP LAUNCHES
You store data in a database so that you can recall it later. In this app, if a user stores alocation and then closes the app, you want to retrieve that information from thedatabase and show it when the user relaunches the app.
As discussed in previous chapters, the Screen.Initialize event is triggered whenyour app launches. Retrieving data from a database is a very common thing to do onstartup, and it’s exactly what we want to do for this app.
You’ll use the TinyDB.GetValue function to retrieve the stored GPS data. Becauseyou need to retrieve the stored address, latitude, and longitude, you’ll need three callsto GetValue. As with No Texting While Driving, you’ll need to check if there is indeeddata available (if it’s the first time you’re launching your app, TinyDB.GetValue willreturn an empty text).
As a challenge, see if you can create these blocks and then compare your creationto the blocks shown in Figure 7-6.
124 Chapter 7: Android, Where’s My Car?
Chapter 7, Android, Where’s My Car?
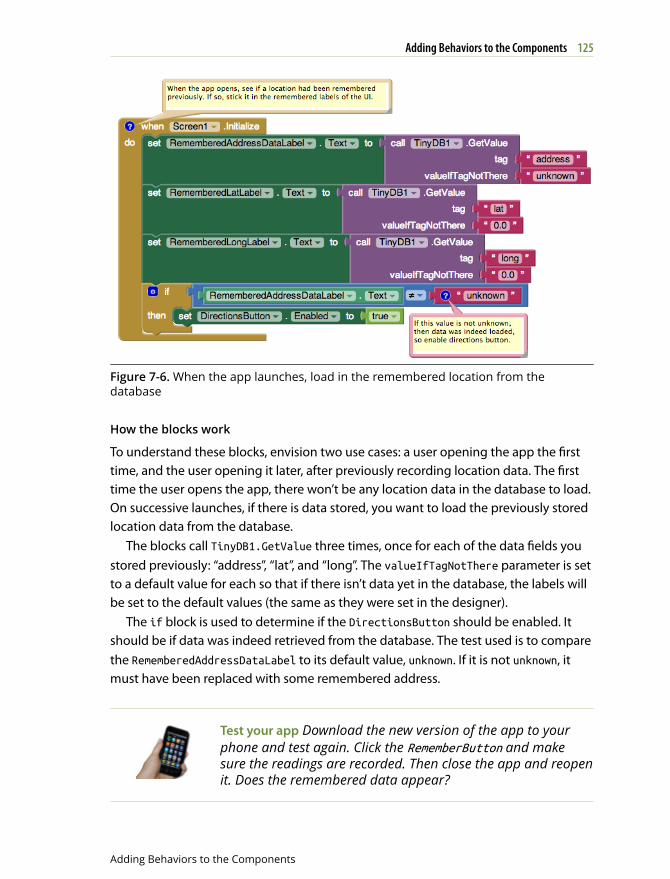
Figure 7-6. When the app launches, load in the remembered location from thedatabase
How the blocks work
To understand these blocks, envision two use cases: a user opening the app the firsttime, and the user opening it later, after previously recording location data. The firsttime the user opens the app, there won’t be any location data in the database to load.On successive launches, if there is data stored, you want to load the previously storedlocation data from the database.
The blocks call TinyDB1.GetValue three times, once for each of the data fields youstored previously: “address”, “lat”, and “long”. The valueIfTagNotThere parameter is setto a default value for each so that if there isn’t data yet in the database, the labels willbe set to the default values (the same as they were set in the designer).
The if block is used to determine if the DirectionsButton should be enabled. Itshould be if data was indeed retrieved from the database. The test used is to comparethe RememberedAddressDataLabel to its default value, unknown. If it is not unknown, itmust have been replaced with some remembered address.
Test your app Download the new version of the app to yourphone and test again. Click the RememberButton and makesure the readings are recorded. Then close the app and reopenit. Does the remembered data appear?
125Adding Behaviors to the Components
Adding Behaviors to the Components
The Complete App: Android, Where’s My Car?Figure 7-7 shows the final blocks for the complete Android, Where’s My Car? app.
126 Chapter 7: Android, Where’s My Car?
Chapter 7, Android, Where’s My Car?
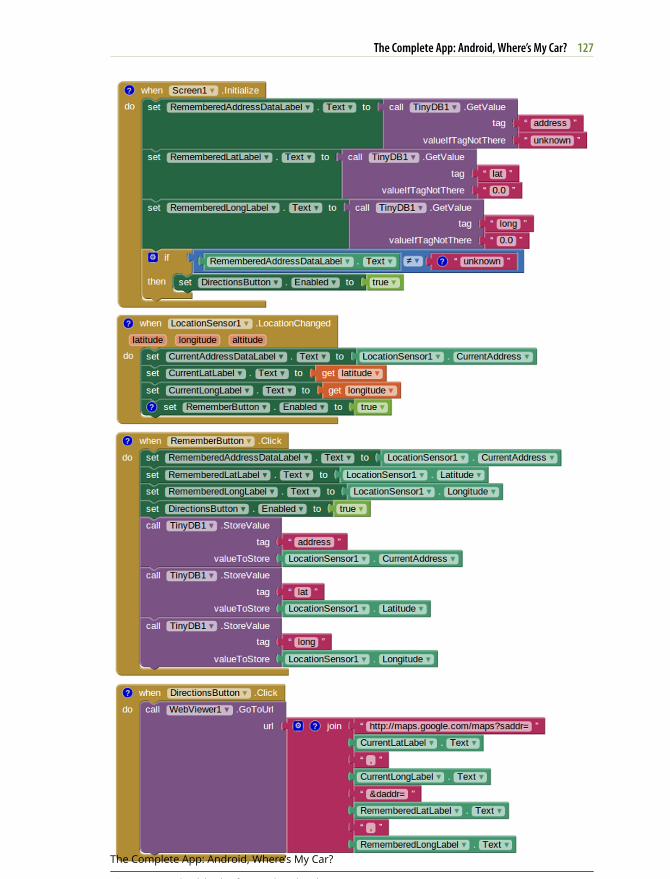
Figure 7-7. The blocks for Android, Where’s My Car?
127The Complete App: Android, Where’s My Car?
The Complete App: Android, Where’s My Car?

VariationsHere are some variations you can experiment with:
• Create Android, Where Is Everyone?, an app that lets a group of people trackone another’s whereabouts. Whether you’re hiking in the woods or becomeseparated at the park, this app could help save time and possibly even lives. Thedata for this app is shared, so you’ll need to use a web database and theTinyWebDB component instead of TinyDB. See Chapter 22 for more information.
• Create a Breadcrumb app that tracks your whereabouts by recording eachlocation change in a list. You should only record a new breadcrumb if thelocation has changed by a certain amount, or a certain amount of time haselapsed, because even slight movement can generate a new location reading.You’ll need to store the recorded locations in a list. See Chapter 19 for help.
SummaryHere are some of the ideas we covered in this tutorial:
• The LocationSensor component can report the user’s latitude, longitude, andcurrent street address. Its LocationChanged event is triggered when the sensorgets its first reading and when the reading changes (the device has moved). Formore information on the LocationSensor, see Chapter 23.
• The WebViewer component displays any web page, including Google Maps. Ifyou want to show directions between GPS coordinates, the URL will be in thefollowing format, but you’d replace the sample data shown here with actual GPScoordinates:
http://maps.google.com/maps/?saddr=0.1,0.1&daddr=0.2,0.2
• You use join to piece together (concatenate) separate text items into a singletext object. You can use it to concatenate dynamic data with static text. Withthe Maps URL, the GPS coordinates are the dynamic data.
• Using TinyDB, you can store data persistently in the phone’s database. Whereasthe data in a variable or property is lost when an app closes, data stored in thedatabase can be loaded each time the app is opened. For more information onTinyDB and databases, see Chapter 22.
128 Chapter 7: Android, Where’s My Car?
Chapter 7, Android, Where’s My Car?


![Unit 1 Where’s your pen pal from?. Where’s your pen pal from? [pæl ]](https://static.fdocuments.net/doc/165x107/56649dd95503460f94acec0b/unit-1-wheres-your-pen-pal-from-wheres-your-pen-pal-from-pael-.jpg)