CHAPTER 13: RADIO COMMUNICATIONS - … · Radio Communications Section 13.1 239 CHAPTER 13: RADIO...
6
Radio Communications Section 13.1 239 CHAPTER 13: RADIO COMMUNICATIONS The radio plays several different roles for the glider pilot. It enhances safety by letting you know of other aircraft near your location. It is a way of obtaining information about weather and airspace restrictions. In addition, it allows you to keep in touch with your ground crew when flying cross-country. Radios are not required in airplanes or gliders at uncontrolled airports, or in Class E or G airspace. However, using a radio can greatly increase your safety. In this chapter, you will learn about the different services available, how to access them, and the proper format to use when communicating on the radio. 13.1 Radio Technique The Radio There are many different types of radios used in gliders, from panel-mounted units to small, portable, handheld units. You should become familiar with the radio in the glider that you will be flying. This section will discuss features common to all radios. Tuning Aircraft radios use the frequencies between 118.000 and 136.975 MHz. (In the rest of this discussion, the designator “MHz” will be omitted.) Most modern panel- mounted radios display two frequencies at a time. One is the frequency in use; the other is the standby frequency. To switch frequencies, adjust the standby frequency, and then hit the “flip-flop” button (often labeled with a two-headed arrow). Some radios have storage capabilities, so you can enter frequencies and later select them using a knob or buttons. Once again, it is important that you become familiar with the particular model of radio that you are using. Squelch Random radio signals will be heard as noise or static on a radio. To keep you from having to listen to the constant roar of static, a circuit is built in to most radios that disables the receiver when the signal-to-noise ratio gets too low. You can adjust the level at which the squelch circuit kicks in by using the squelch adjustment. On some radios, there is no adjustment, so you can only have the squelch turned on or off. If you are having trouble receiving a weak signal on the radio, you might want to turn the squelch down or off. You may then be able to pick out the voice from among the static.
-
Upload
nguyendien -
Category
Documents
-
view
227 -
download
6
Transcript of CHAPTER 13: RADIO COMMUNICATIONS - … · Radio Communications Section 13.1 239 CHAPTER 13: RADIO...

Radio Communications Section 13.1239
CHAPTER 13: RADIO COMMUNICATIONS
The radio plays several different roles for the glider pilot. It enhances safety byletting you know of other aircraft near your location. It is a way of obtaininginformation about weather and airspace restrictions. In addition, it allows you tokeep in touch with your ground crew when flying cross-country.
Radios are not required in airplanes or gliders at uncontrolled airports, or inClass E or G airspace. However, using a radio can greatly increase your safety.
In this chapter, you will learn about the different services available, how toaccess them, and the proper format to use when communicating on the radio.
13.1 Radio Technique
The RadioThere are many different types of radios used in gliders, from panel-mountedunits to small, portable, handheld units. You should become familiar with theradio in the glider that you will be flying. This section will discuss featurescommon to all radios.
TuningAircraft radios use the frequencies between 118.000 and 136.975 MHz. (In the restof this discussion, the designator “MHz” will be omitted.) Most modern panel-mounted radios display two frequencies at a time. One is the frequency in use;the other is the standby frequency. To switch frequencies, adjust the standbyfrequency, and then hit the “flip-flop” button (often labeled with a two-headedarrow).
Some radios have storage capabilities, so you can enter frequencies and laterselect them using a knob or buttons. Once again, it is important that you becomefamiliar with the particular model of radio that you are using.
SquelchRandom radio signals will be heard as noise or static on a radio. To keep youfrom having to listen to the constant roar of static, a circuit is built in to mostradios that disables the receiver when the signal-to-noise ratio gets too low. Youcan adjust the level at which the squelch circuit kicks in by using the squelchadjustment. On some radios, there is no adjustment, so you can only have thesquelch turned on or off.
If you are having trouble receiving a weak signal on the radio, you might want toturn the squelch down or off. You may then be able to pick out the voice fromamong the static.
Section 13.1 Radio Communications240
The MicrophoneThe microphone turns your voice into an electrical signal that the radio cantransmit. The microphone will have a push-to-talk (PTT) switch that must bedepressed when you are speaking, and released when you are finished, so thatyou can listen for a response. The radio cannot transmit and receive at the sametime. Pause slightly after pressing the PTT switch to make sure that you don’t cutoff the first part of your transmission.
You should talk into a microphone at normal volume, neither too softly nor tooloudly. It is common for students who are shy about talking on the radio tolower their voice to a point where they are inaudible. On the other hand, if youtalk too loudly into the microphone, you may over-modulate it, so that yourvoice comes across distorted and hard to understand.
Speak directly into the microphone, not across it. Your lips should almost touchthe microphone while speaking.
When you first start using the radio, you may want to have someone on theground monitor your transmissions and let you know how you sound.
ProcedureTalking on the radio is more like speaking a foreign language than conversa-tional English. However, with practice you should be able to become fluent ataviation “radio speak”.
Listen, Then TalkListen before you transmit. Many times you will get the information you wantsimply by monitoring the frequency.
Right before you talk, make sure no one else is talking, or keying yourmicrophone will be futile. Neither your nor the other person’s transmissions willget through. If you have just changed frequencies, pause, listen, and make surethe frequency is clear.
Also, consider what has just been said. Does it require someone to respond? If so,wait for the response before you key your microphone. Otherwise, you are likelyto step on the response, so that neither one of you will be heard.
Think before you talk. Make sure you know what you are going to say and howyou are going to say it. You should strive to keep your transmission as short aspossible. Remember that you are sharing the frequency with many other pilots.

Radio Communications Section 13.1241
FormatIn general, the format you use when talking on the radio is to tell:
• Who you are talking to
• Who you are
• Where you are
• What you want
There are many exceptions to this basic format, but if you don’t remember theexact format for a specific type of radio call, this is a good starting point.Examples of radio calls will be given later in the chapter.
Phonetic AlphabetNumbers and letters should be communicated using the International CivilAviation Organization (ICAO) phonetic alphabet, shown in Figure 13.1. In thisalphabet, a word is used instead of a letter. Also, each individual digit is spoken,so that “23” is spoken as “two three.”
Figure 13.1 – ICAO phonetic alphabet
The phonetic alphabet helps to eliminate confusion between what is said andwhat is heard. For instance, the letters “C” and “D” can sound very similar on aradio, as could the numbers “thirty” and “forty”. When spoken as “charlie” and“delta”, or “three zero” and “four zero”, they are much more distinct.
PhraseologyFor clarity, altitudes should be stated in thousands and hundreds of feet. Forexample, 15,500 feet should be stated as “one five thousand, five hundred”.

Section 13.2 Radio Communications242
Headings and winds are assumed magnetic unless stated otherwise. Forinstance, “heading three two zero” indicates a magnetic heading of 320°.
Single-syllable words are easier to confuse than multi-syllable words. Therefore,you should use “affirmative” instead of “yes” and “negative” instead of “no”.
If you do not understand a radio transmission, use the phrase “say again”. Thisindicates that the person transmitting needs to repeat the last transmission.
You should use the word “glider” and your full registration number (omittingthe leading “N,” since that is common to all U.S. aircraft) to identify yourself. Forinstance, a glider with the registration number N336CF would be identified as“glider three three six charlie foxtrot.”
In glider-to-glider and glider-to-crew communications, a glider pilot often usesthe glider’s “contest number” issued by the Soaring Society of America (SSA)instead of the registration number. However, when communicating with anyofficial FAA service or other non-glider traffic, you should use your registrationnumber.
If an air traffic controller abbreviates your call sign, for instance, calling N336CF“glider charlie foxtrot,” you may then refer to yourself in the same way.
When communicating face-to-face, you can usually tell if the other person hasunderstood what you said by watching their facial expression. Clearly, on theradio this is not possible. Instead, when important information is conveyed onthe radio, it is standard procedure to repeat back the information for verification.
13.2 Who Are You Talking To?Now that we have covered how to talk, we need to figure out who we want totalk to. Of course, you may want to communicate with your crew or with otherglider pilots. You may also want to access services provided by the FAA. Thissection will introduce the different agencies that provide these services. The nextsection will explain when it is appropriate to use these facilities.
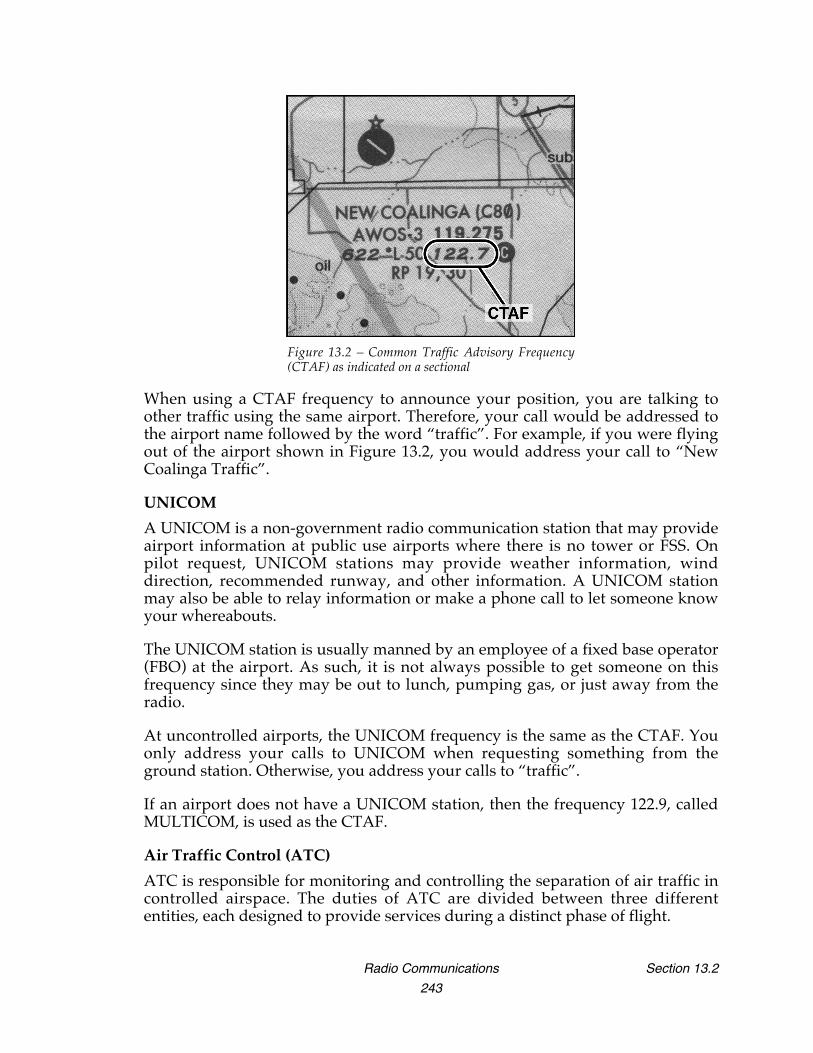
Common Traffic Advisory Frequency (CTAF)At uncontrolled airports, pilots self-announce their position to let other pilotsknow where they are and what they are doing. The frequency used for this is theCTAF. The CTAF is indicated in the airport information on a sectional by theletter “C” in a magenta circle next to the frequency. In the example shown inFigure 13.2, the CTAF frequency is 122.7.
Radio Communications Section 13.2243
Figure 13.2 – Common Traffic Advisory Frequency(CTAF) as indicated on a sectional
When using a CTAF frequency to announce your position, you are talking toother traffic using the same airport. Therefore, your call would be addressed tothe airport name followed by the word “traffic”. For example, if you were flyingout of the airport shown in Figure 13.2, you would address your call to “NewCoalinga Traffic”.
UNICOMA UNICOM is a non-government radio communication station that may provideairport information at public use airports where there is no tower or FSS. Onpilot request, UNICOM stations may provide weather information, winddirection, recommended runway, and other information. A UNICOM stationmay also be able to relay information or make a phone call to let someone knowyour whereabouts.
The UNICOM station is usually manned by an employee of a fixed base operator(FBO) at the airport. As such, it is not always possible to get someone on thisfrequency since they may be out to lunch, pumping gas, or just away from theradio.
At uncontrolled airports, the UNICOM frequency is the same as the CTAF. Youonly address your calls to UNICOM when requesting something from theground station. Otherwise, you address your calls to “traffic”.
If an airport does not have a UNICOM station, then the frequency 122.9, calledMULTICOM, is used as the CTAF.
Air Traffic Control (ATC)ATC is responsible for monitoring and controlling the separation of air traffic incontrolled airspace. The duties of ATC are divided between three differententities, each designed to provide services during a distinct phase of flight.

Section 13.2 Radio Communications244
Control TowerTowers provide for a safe, orderly, and expeditious flow of traffic on and in thevicinity of a controlled airport. Both in-flight and ground control are handledfrom the control tower using different frequencies. When you are on the ground,you address your calls to “ground”; when you are in the air, you address yourcalls to “tower”.
Tower frequencies are listed on sectionals. Ground frequencies are listed in theAirport/Facility Directory.
You must receive permission from ground control to taxi. You must receivepermission from the tower to enter a runway and takeoff, or to enter thecontrolled airspace surrounding the airport when in flight.
Air Route Traffic Control CentersAir Route Traffic Control Centers (ARTCCs) provide service primarily to aircraftoperating on IFR flight plans within controlled airspace, principally during theen route phase of flight. The centers can also provide traffic advisory services toVFR aircraft when requested. Air Route Traffic Control Centers are addressed as“center”.
Center frequencies are listed in the Airport/Facility Directory.
Approach/Departure ControlMost larger airports (Class B and C) have approach and departure control thatacts as an intermediary between the control tower and Air Route Traffic ControlCenters. Approach and Departure Control are addressed as “approach” or“departure”, as appropriate.
The appropriate agencies to contact for approach and departure control areshown on sectionals in a white box with a magenta outline located near theairport’s symbol.
Flight Service Station (FSS)Flight Service Stations provide pilot briefings, en route communications, andVFR search and rescue services; assist lost aircraft and aircraft in emergencysituations; relay ATC clearances; originate Notices to Airmen; broadcast aviationweather and National Airspace System (NAS) information; receive and processflight plans; and monitor navigational aids (NAVAIDs). In addition, at selectedlocations, FSSs provide En Route Flight Advisory Service (Flight Watch), takeweather observations, and issue airport advisories. You address an FSS as“radio”.
En Route Flight Advisory Service (EFAS or Flight Watch)Flight Watch is a part of an FSS that is responsible for handling weather inquiriesfrom pilots in flight. Flight Watch operates from 6:00 a.m. to 10:00 p.m. local timeon the frequency 122.00. You address Flight Watch as “Flight Watch”.