Chapter 10 material - Weber State Universityfaculty.weber.edu/btrask/Chapter_10_material.pdf ·...
44
Chapter 10 Analyzing Genes and Genomes Copyright © Garland Science 2010
Transcript of Chapter 10 material - Weber State Universityfaculty.weber.edu/btrask/Chapter_10_material.pdf ·...

Chapter 10
Analyzing Genes
and Genomes
Copyright © Garland Science 2010

These slides were made to provide direction when
reading Chapter 10 in Essential Cell Biology—please
read the sections corresponding to the figures in this ppt
so that you thoroughly understand the concepts. I would
like you to be very familiar with the techniques in this
ppt, particularly the techniques that are underlined.
We’ll spend time in class next week to answer any
questions you might have.
--Barb

Restriction Enzymes(Examples on next slide)
• Cut DNA at defined sites (recognition site has to be exact)
• Isolated from bacteria
� Restriction enzymes (REs) are named after the bacterium from which they were
isolated
� Ex: EcoRI is from E. coli, strain R, and the 1st enzyme isolated from that strain; Hind
III is from Haemophilus influenza, strain d, and the 3rd enzyme isolated from that strain
• Bacteria produce these as ‘innate immune’ molecules—to cut any DNA from
foreign invaders (note: bacteria that produce a given RE cannot have the
recognition site in their own genomes)
• We can buy isolated REs and use them to cut DNA of ANY species that has a
sequence that is recognized. We call this, “restriction digestion.”
• If a recognition sequence is 4 nts long, the likelihood of it appearing in any DNA
(assuming random sequence) is 4x4x4x4=256 nts, and a 6 nt long recognition
sequence is likely to occur once every 4x4x4x4x4x4= every 4096 nts

Figure 10-2 Essential Cell Biology (© Garland Science 2010)

Ligation
• After DNA is cut with an RE, it often has ‘overhanging’
ends—any DNA (from ANY species) cut with the same RE
will have the same overhanging ends.
• If the DNA is mixed, the overhanging ends will be
complementary and will hydrogen bond with any fragment of
DNA with a complementary end.
• If the enzyme DNA ligase is added to the mixture, the nicks in
the DNA backbone can be sealed. In this way, 2 fragments of
DNA, potentially from different species, can be ‘glued’
together to make a “recombinant DNA” molecule.
• See the example on the next slide.
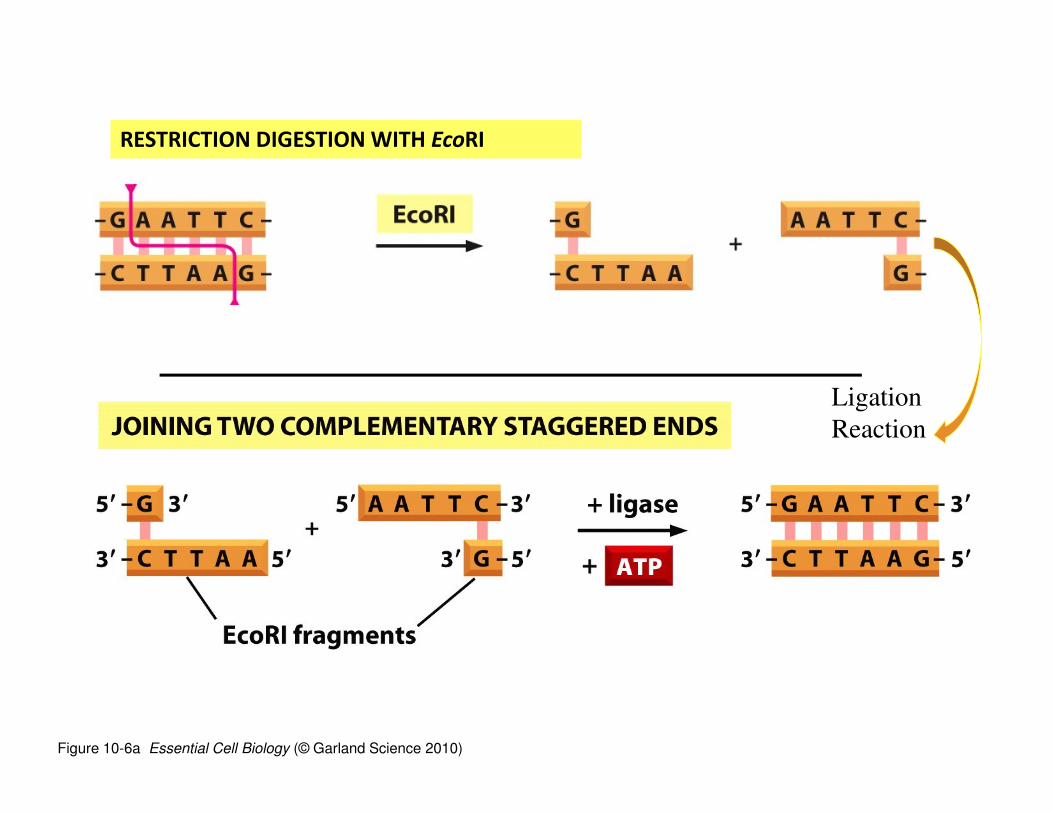
Figure 10-6a Essential Cell Biology (© Garland Science 2010)
RESTRICTION DIGESTION WITH EcoRI
Ligation
Reaction
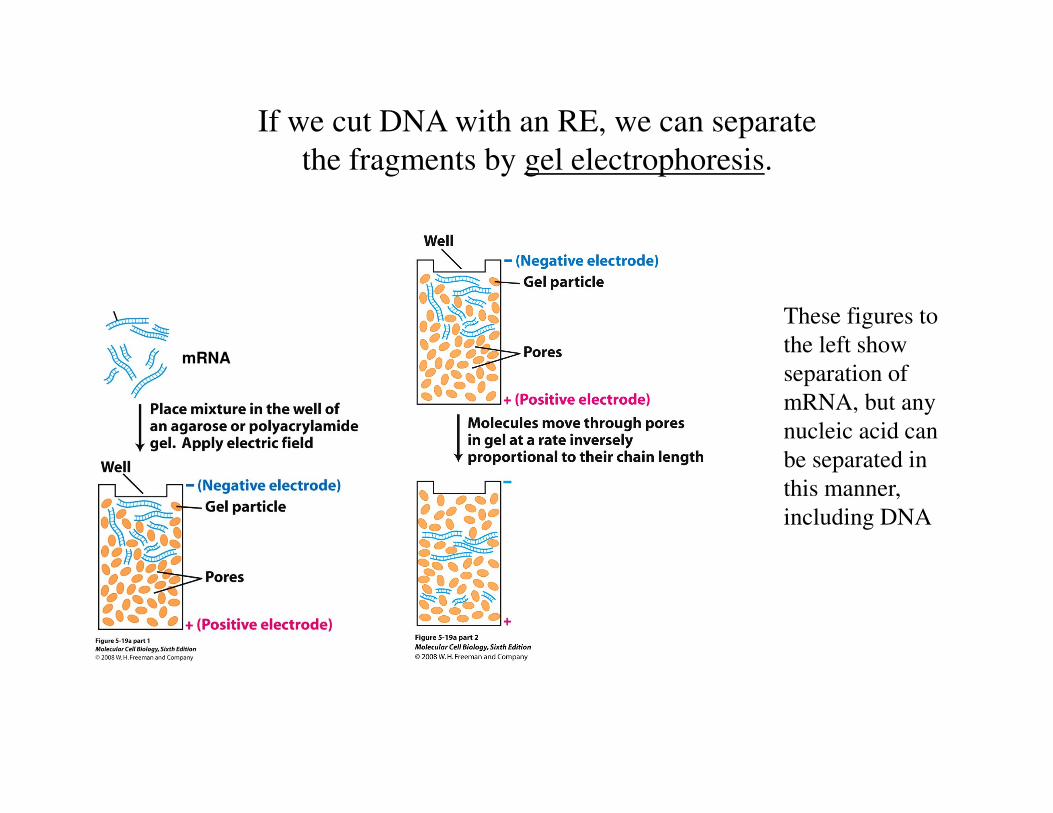
If we cut DNA with an RE, we can separate
the fragments by gel electrophoresis.
mRNA
These figures to
the left show
separation of
mRNA, but any
nucleic acid can
be separated in
this manner,
including DNA

Figure 10-3 Essential Cell Biology (© Garland Science 2010)

‘Northern blotting’ is a technique used to determine whether a
specific RNA sequence is present in a given sample (tissue, cell,
organ, etc.)
• RNAs are isolated, separated by electrophoresis (by size), and
transferred to a solid support (nitrocellulose)
• The nitrocellulose ‘copy’ of the gel is incubated with a labeled
(radioactive or color) “probe”; a “probe” is a DNA sequence that is
complementary to the RNA
• The labeled DNA probe binds to its complementary RNA (assuming
it’s there) and because it is labeled, identifies whether your RNA of
interest is present in the sample

Figure 10-5 (part 1 of 5) Essential Cell Biology (© Garland Science 2010)
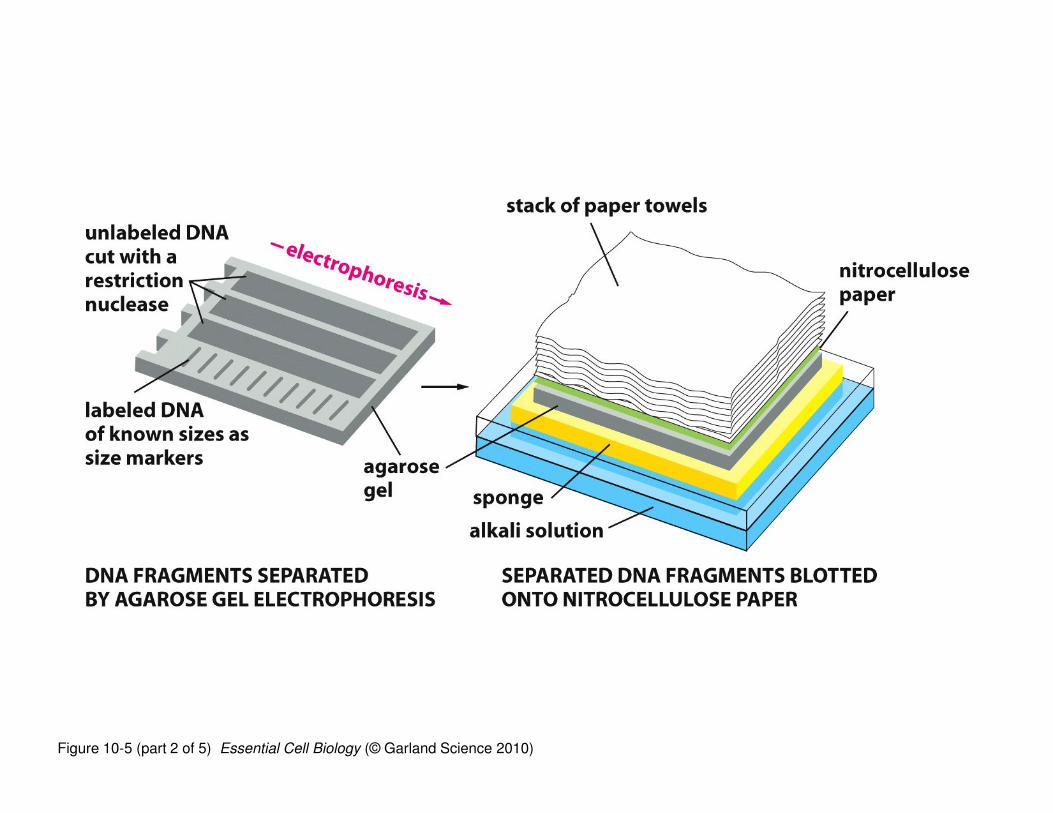
Figure 10-5 (part 2 of 5) Essential Cell Biology (© Garland Science 2010)

Figure 10-5 (part 3 of 5) Essential Cell Biology (© Garland Science 2010)
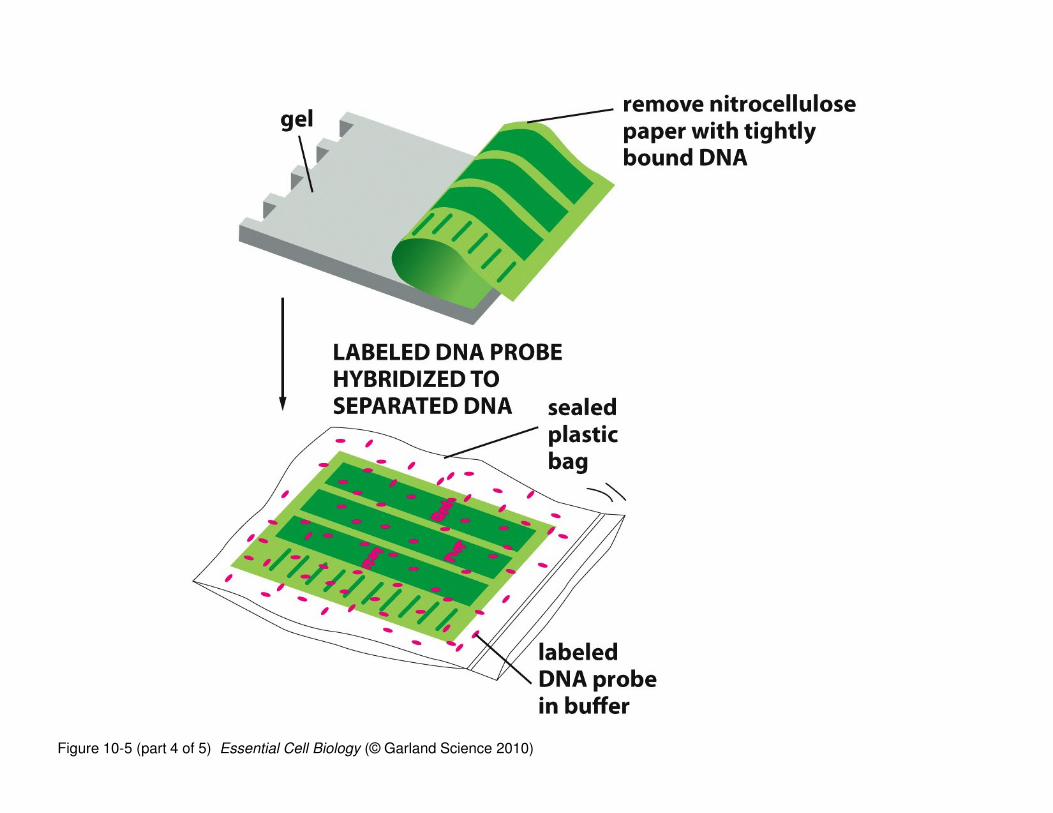
Figure 10-5 (part 4 of 5) Essential Cell Biology (© Garland Science 2010)
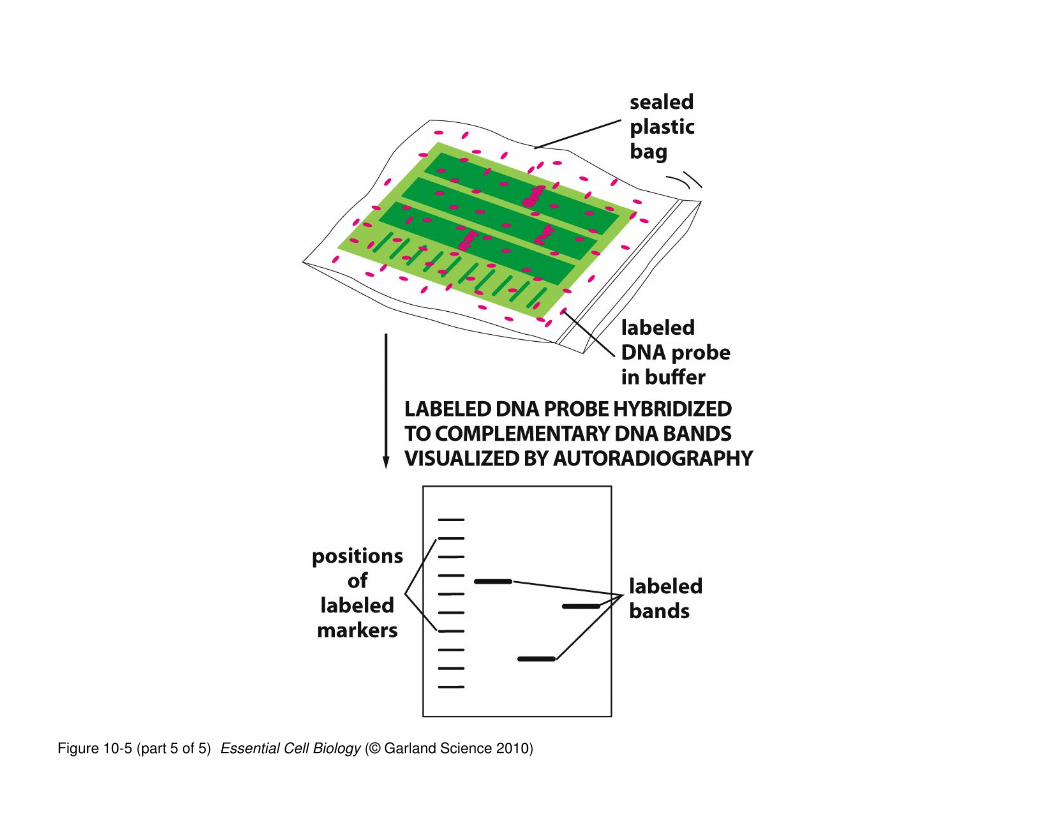
Figure 10-5 (part 5 of 5) Essential Cell Biology (© Garland Science 2010)

Recombinant DNA can be ‘Cloned’
• Molecular cloning occurs when a molecule of DNA is ‘amplified’ (make
many copies)
• If we make recombinant DNA by ligating a fragment of interest into a
bacterial plasmid (a non-chromosomal circular DNA that are isolated
from bacteria), we can re-insert the modified plasmid into bacteria.
� Once in the bacteria, the recombinant plasmid will amplify with the bacteria
as they live/grow, so we can obtain many copies of our DNA fragment of
interest (if we re-isolate it from the bacteria.
• See the next slides

Figure 10-9 Essential Cell Biology (© Garland Science 2010)

Figure 10-10 Essential Cell Biology (© Garland Science 2010)
Reverse Transcription
• This is something we (eukaryotic cells) don’t do—even
prokaryotes don’t do this. BUT, some viruses are able to
convert RNA � DNA via reverse transcription, using a
reverse transcriptase enzyme.
• We can use this enzyme in the lab to convert RNA back to
DNA.
� This is especially useful if we convert mRNA into DNA
because we can obtain a DNA copy (called ‘cDNA’) of the mRNA—
which represents only the exonic parts of a gene.
• See the next slide

Figure 10-13 Essential Cell Biology (© Garland Science 2010)

• After converting RNA � DNA via reverse transcription,
we can get billions of copies of the DNA by subjecting it
to polymerase chain reaction (PCR).
• The coupling of reverse transcription with polymerase
chain reaction is known as RT-PCR.
• The end result is billions of copies of a cDNA—DNA
copies of an mRNA.
• See the next slides
PCR and RT-PCR

Figure 10-15 Essential Cell Biology (© Garland Science 2010)
PCR
PCR is basically an in vitro DNA polymerase reaction. We have a template, a DNA
polymerase enzyme, buffers, nucleotides, and two primers and we simply let the
polymerase reaction proceed.
There are a few things that are different about PCR and a regular polymerase reaction.
Mostly, our in vitro tube does not have all of the other enzymes (e.g., helicase, initiator
proteins) that are in a cell, so we have to force the DNA apart by heating it. In addition,
we do the reaction multiple times in tandem.
PCR is a three-step process that is repeated multiple times in tandem. The three steps
are: 1.) heating the DNA to separate the two strands of the template, 2.) lowering the
temperature so primers can bind, 3.) allowing the polymerase to copy the template.
Note that we have to include primers because the polymerase enzyme can’t start
polymerizing but needs to add nucleotides onto a primer. The primers used in PCR are
DNA primers—not like the RNA primers that are used in vivo. And we nee to include
TWO primers because we want to copy both strands.
See the next slide.
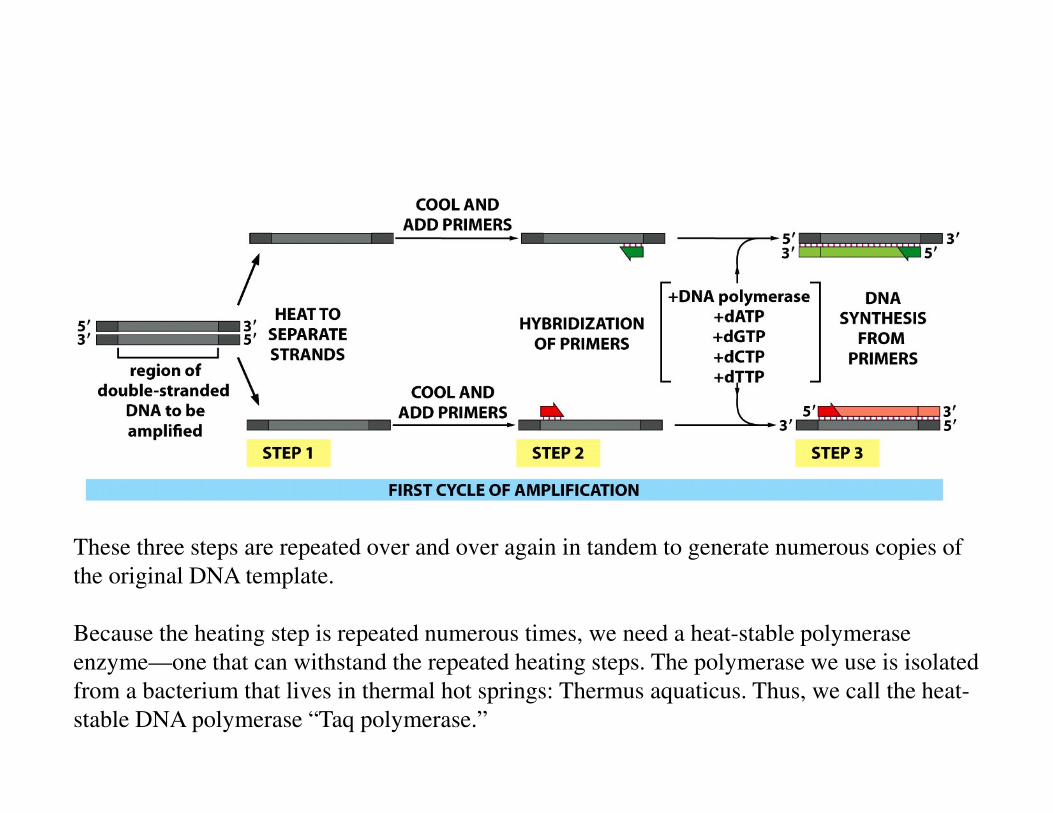
These three steps are repeated over and over again in tandem to generate numerous copies of
the original DNA template.
Because the heating step is repeated numerous times, we need a heat-stable polymerase
enzyme—one that can withstand the repeated heating steps. The polymerase we use is isolated
from a bacterium that lives in thermal hot springs: Thermus aquaticus. Thus, we call the heat-
stable DNA polymerase “Taq polymerase.”
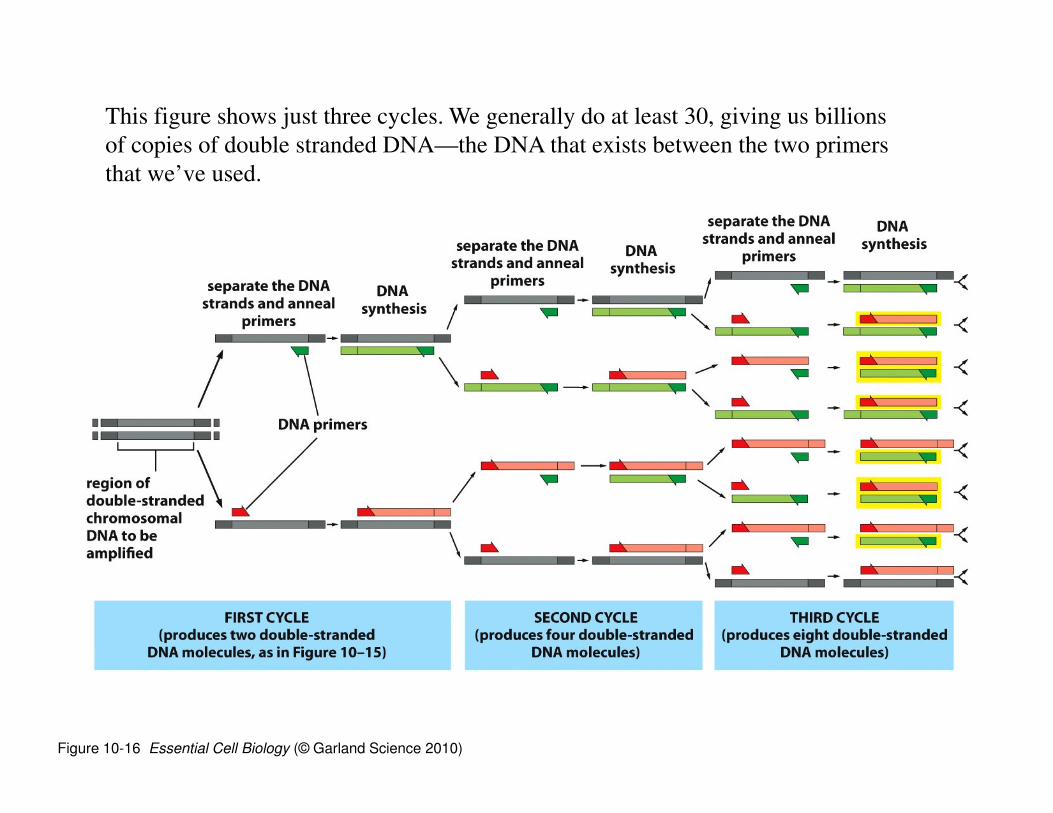
Figure 10-16 Essential Cell Biology (© Garland Science 2010)
This figure shows just three cycles. We generally do at least 30, giving us billions
of copies of double stranded DNA—the DNA that exists between the two primers
that we’ve used.

Figure 10-17 Essential Cell Biology (© Garland Science 2010)
Comparison of
PCR to RT-
PCR
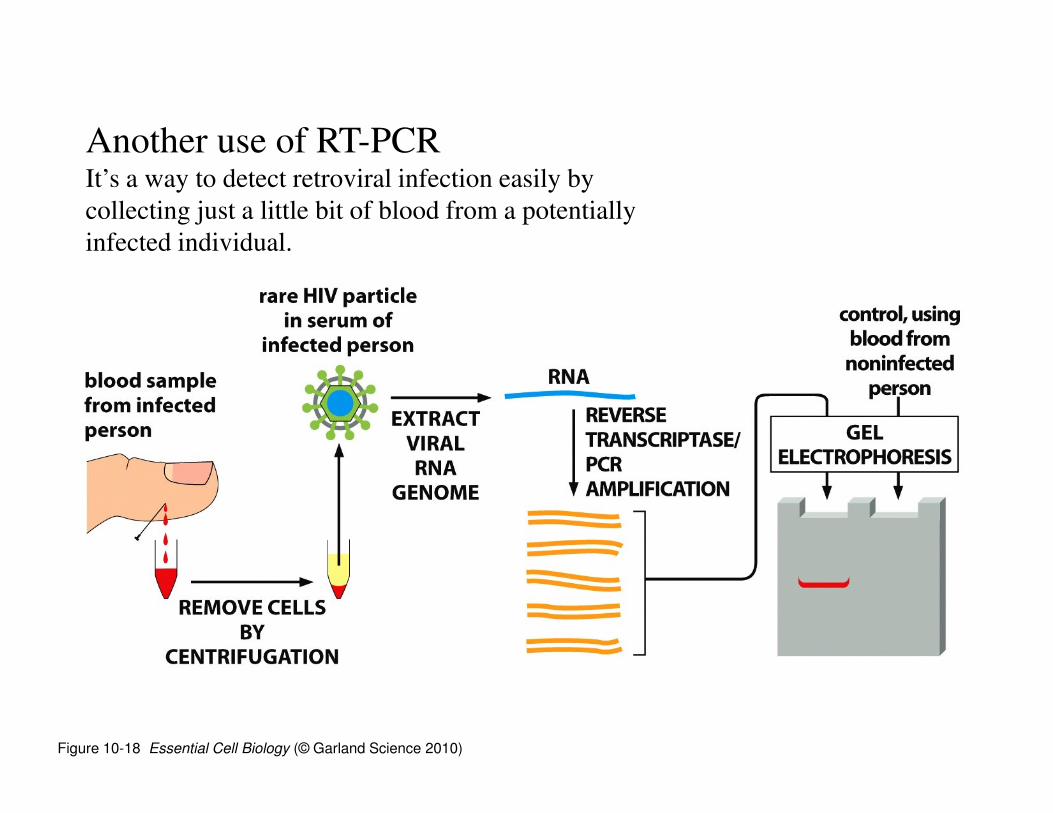
Figure 10-18 Essential Cell Biology (© Garland Science 2010)
Another use of RT-PCRIt’s a way to detect retroviral infection easily by
collecting just a little bit of blood from a potentially
infected individual.

Figure 10-19a Essential Cell Biology (© Garland Science 2010)
A use of PCRLook at the size of a specific DNA area (called a DNA
‘locus’; different individuals can have alternative
‘polymorphisms’ in their DNA

Figure 10-19b Essential Cell Biology (© Garland Science 2010)
Same thing as the previous
slide, but for several different
gene loci—if many loci are
included in a genetic
comparison, we can
potentially [if enough loci
are analyzed] whether two
DNA samples are from the
same individual (e.g., if the
blood at the crime matches
YOUR blood!)
DNA Sequencing
It’s often necessary to know a specific sequence of nucleotides—
for example, if we need to make probes for northern blotting or
primers for PCR, we need to know those sequences.
The method used to determine a DNA’s sequence is the same that
has been used for several decades; it was developed by a researcher
names Sanger, so it is often referred to as ‘Sanger sequencing’.
Because of the nucleotides that are used, it is also referred to as ‘di-
deoxy sequencing’.
This technique is basically just a modified DNA polymerase
reaction (like PCR), so we would perform an in vitro polymerase
reaction, with added di-deoxy nucleotides.
See the next several slides.

Figure 10-20 Essential Cell Biology (© Garland Science 2010)
No 3’ --OH

Figure 10-21 Essential Cell Biology (© Garland Science 2010)
If we include an
appropriate amount of
di-deoxy nucleotides
along with regular
deoxynucleotides, when
DNA polymerase is
‘reading’ a template
DNA, sometimes a di-
deoxy nucleotide will be
incorporated into the
growing strand, but most
often a regular
nucleotide will be
incorporated so the
polymerase keeps going.
If you have enough
template in a reaction
tube, you’ll end up with
polymerase products that
stop at each and every
place on the template.
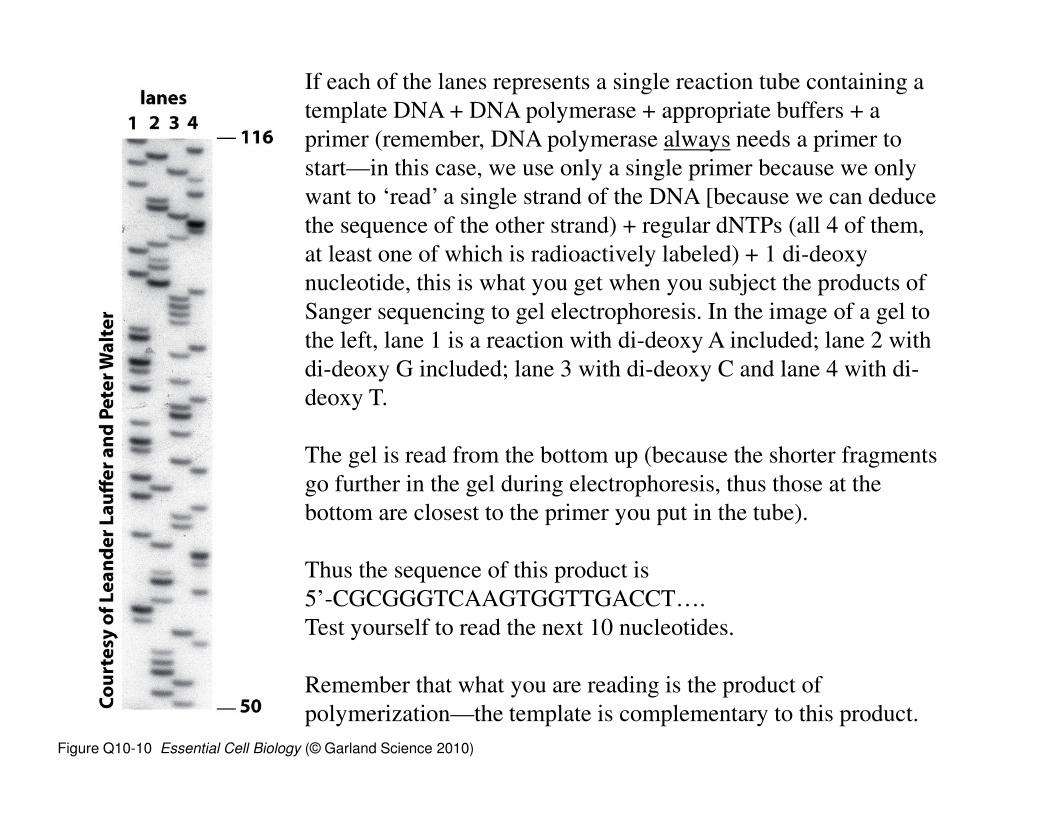
Figure Q10-10 Essential Cell Biology (© Garland Science 2010)
If each of the lanes represents a single reaction tube containing a
template DNA + DNA polymerase + appropriate buffers + a
primer (remember, DNA polymerase always needs a primer to
start—in this case, we use only a single primer because we only
want to ‘read’ a single strand of the DNA [because we can deduce
the sequence of the other strand) + regular dNTPs (all 4 of them,
at least one of which is radioactively labeled) + 1 di-deoxy
nucleotide, this is what you get when you subject the products of
Sanger sequencing to gel electrophoresis. In the image of a gel to
the left, lane 1 is a reaction with di-deoxy A included; lane 2 with
di-deoxy G included; lane 3 with di-deoxy C and lane 4 with di-
deoxy T.
The gel is read from the bottom up (because the shorter fragments
go further in the gel during electrophoresis, thus those at the
bottom are closest to the primer you put in the tube).
Thus the sequence of this product is
5’-CGCGGGTCAAGTGGTTGACCT….
Test yourself to read the next 10 nucleotides.
Remember that what you are reading is the product of
polymerization—the template is complementary to this product.
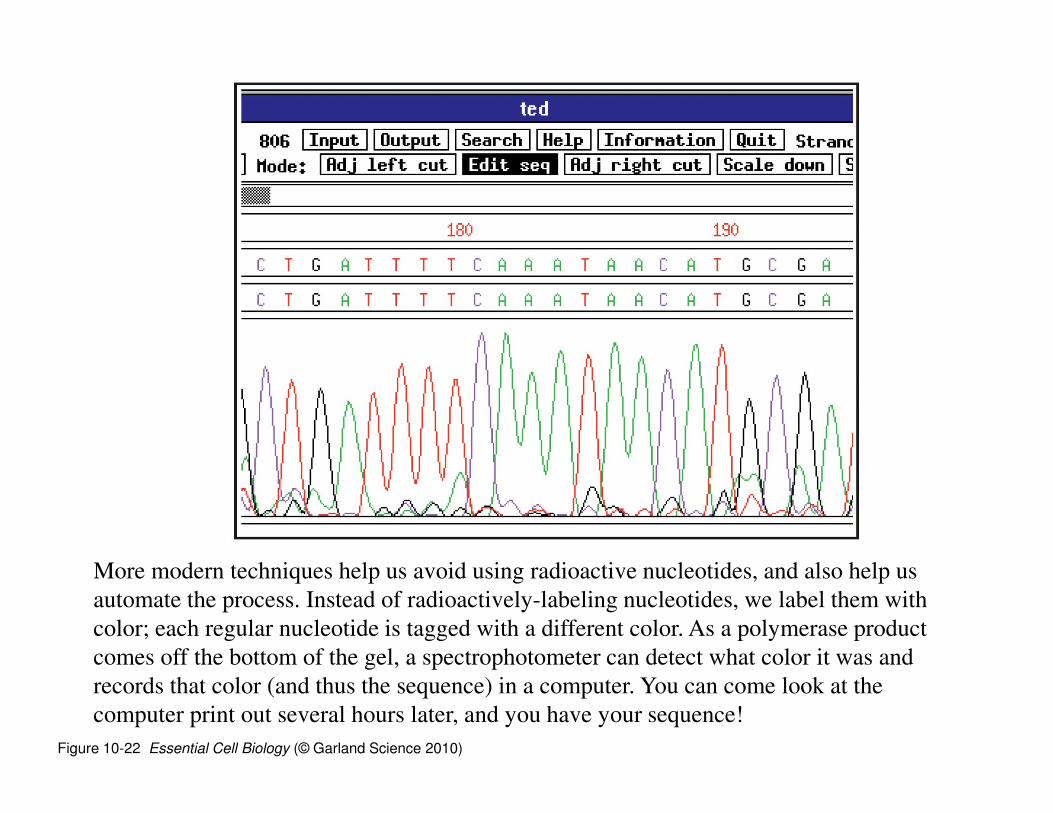
Figure 10-22 Essential Cell Biology (© Garland Science 2010)
More modern techniques help us avoid using radioactive nucleotides, and also help us
automate the process. Instead of radioactively-labeling nucleotides, we label them with
color; each regular nucleotide is tagged with a different color. As a polymerase product
comes off the bottom of the gel, a spectrophotometer can detect what color it was and
records that color (and thus the sequence) in a computer. You can come look at the
computer print out several hours later, and you have your sequence!

Expression cloning
This is the same thing as molecular cloning, except that the plasmid that you
will use is a bit different. It includes a promoter so that the fragment of DNA
you ligate into the plasmid can be transcribed and translated into protein.
Of course to do this, your recombinant DNA plasmid must be introduced into a
cell—either prokaryotic or eukaryotic (different introduction techniques can/are
used for different cell types).
The most difficult aspect of expression cloning is that the fragment of DNA you
ligate must be in the correct reading frame to produce your protein of interest.
See the next slide.

Figure 10-24 Essential Cell Biology (© Garland Science 2010)
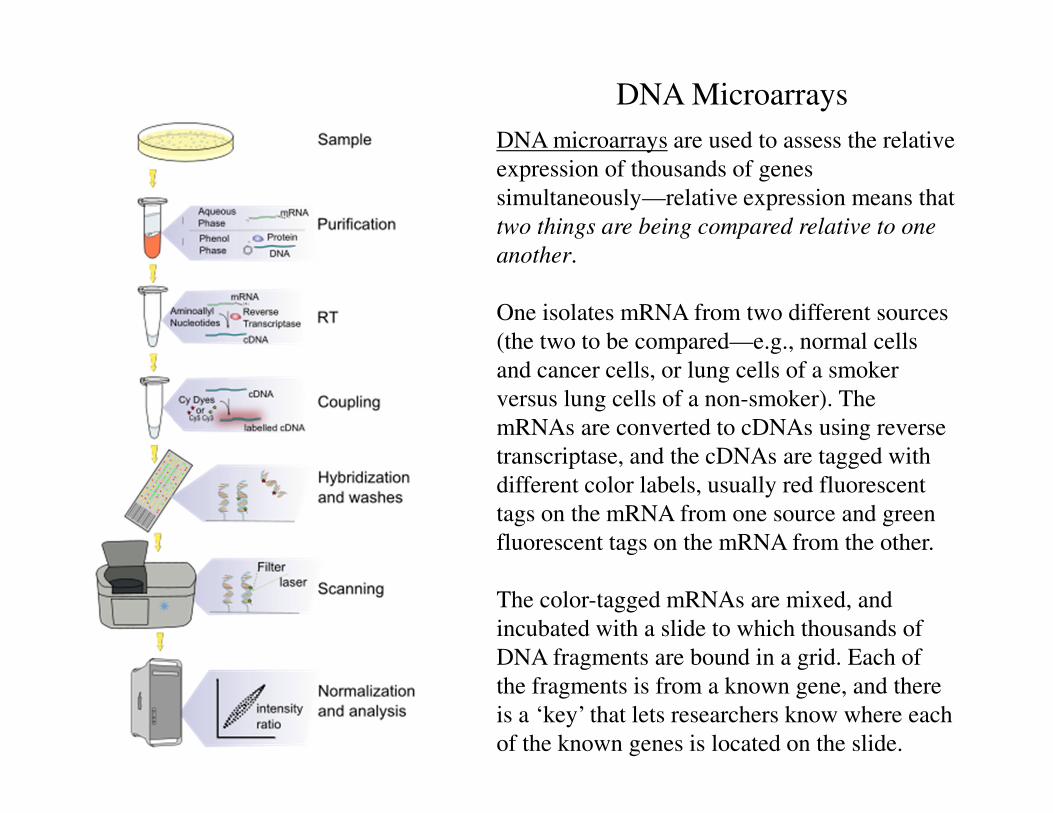
DNA Microarrays
DNA microarrays are used to assess the relative
expression of thousands of genes
simultaneously—relative expression means that
two things are being compared relative to one
another.
One isolates mRNA from two different sources
(the two to be compared—e.g., normal cells
and cancer cells, or lung cells of a smoker
versus lung cells of a non-smoker). The
mRNAs are converted to cDNAs using reverse
transcriptase, and the cDNAs are tagged with
different color labels, usually red fluorescent
tags on the mRNA from one source and green
fluorescent tags on the mRNA from the other.
The color-tagged mRNAs are mixed, and
incubated with a slide to which thousands of
DNA fragments are bound in a grid. Each of
the fragments is from a known gene, and there
is a ‘key’ that lets researchers know where each
of the known genes is located on the slide.
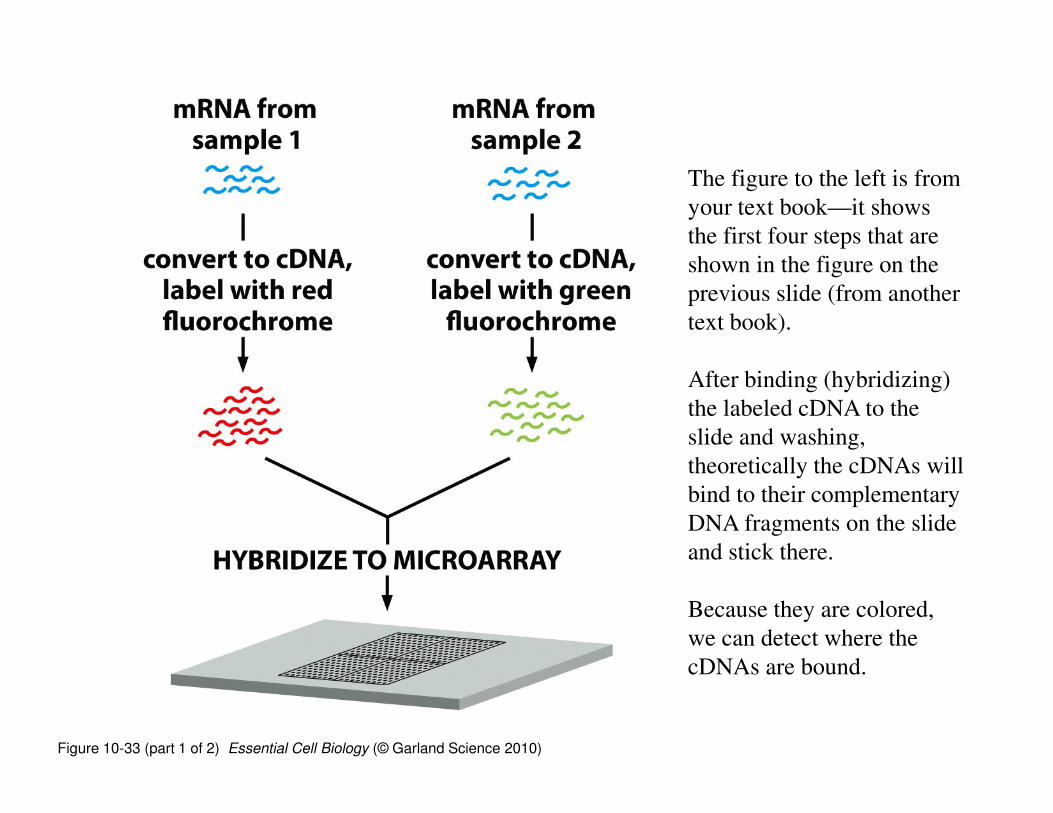
Figure 10-33 (part 1 of 2) Essential Cell Biology (© Garland Science 2010)
The figure to the left is from
your text book—it shows
the first four steps that are
shown in the figure on the
previous slide (from another
text book).
After binding (hybridizing)
the labeled cDNA to the
slide and washing,
theoretically the cDNAs will
bind to their complementary
DNA fragments on the slide
and stick there.
Because they are colored,
we can detect where the
cDNAs are bound.

The figure on the left is a ‘cartoon’ of the grid on the slide—each dot on the grid represents
a place where known DNA has been ‘dotted’. Again, presumably any labeled cDNA that is
complementary to one of those dots of DNA will bind there. The figure on the right shows
a grid to which the red and green-labeled cDNAs have been bound. A computer would
read this and be able to tell whether there was more red bound to a dot, more green bound
to a dot, or equal amounts of red and green (detected here as yellow). Thus, if there was
more ‘red’ cDNA, this meant that the source that gave rise to that cDNA was expressing
that gene (the one in the dot) more than the ‘green’ source; alternatively, if a dot is more
green than red, it means that the source of the green cDNA was expressing that DNA at a
higher level than the red source. If they are expressed in both sources equally, the dot will
be yellow.
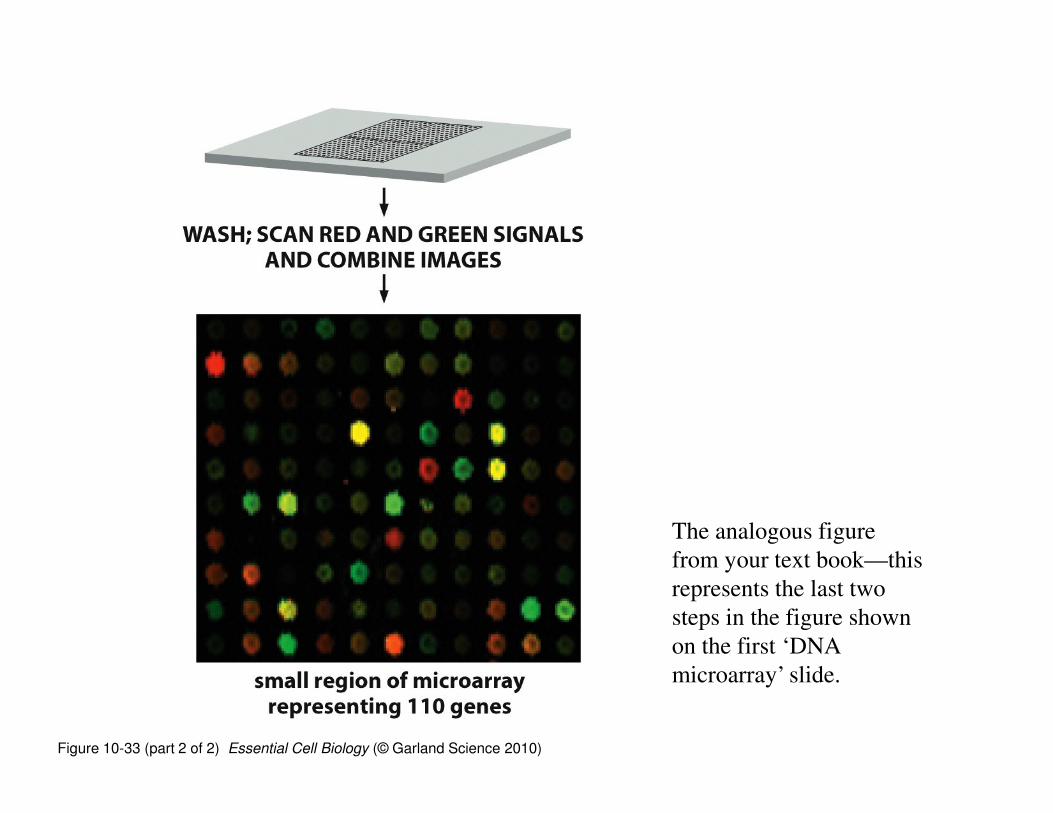
Figure 10-33 (part 2 of 2) Essential Cell Biology (© Garland Science 2010)
The analogous figure
from your text book—this
represents the last two
steps in the figure shown
on the first ‘DNA
microarray’ slide.

Generating
Transgenic
Animals
We might do this to produce a number of different transgenic organisms (shown on the
next slide—know them!). In either case, one typical use is to determine what effect a gene
has on a particular process (so you take it out and see what happens, or you over-produce
it and see what happens).
A similar process is done with plants to produce genetically modified foods. In that case,
a foreign gene might be introduced to have the plant produce some pesticide, or to be
resistant to some herbicide.
In the next slide, the red gene represents a gene that is modified from the normal, whereas
the green gene is normal. Thus, panel c is showing something that might be used to
determine whether expression of the mutant gene might ‘over-ride’ the normal gene in a
‘dominant-negative’ manner (this is analogous to a dominant mutation in an organism—
you may have learned this in genetics class.

Figure 10-35 Essential Cell Biology (© Garland Science 2010)

Generating Transgenic Animals
This is obviously a very complex process, and requires lots of steps , and hope that you can derive the
nuances of this process from reading your text book. I’m going to simply put the steps here to produce an
animal (mouse) that does not make your protein of interest. This is called a ‘knock out’ animal, and Dr.
Mario Cappechi from the University of Utah receive a Nobel Prize a few years ago for developing this
procedure.
1. Clone your gene of interest into an expression plasmid. The whole gene with introns.
2. Mutate your gene such that the transcription start site (and maybe another 1-2 exons) is deleted.
This mutated gene is still in the expression plasmid. Most people also add a ‘selectable marker’ into
the plasmid so they can tell whether or not the plasmid is present. An example of the ‘selectable
marker’ is a gene for antibiotic resistance.
3. Introduce the mutated/truncated gene into an embryonic stem (ES) cell from a brown mouse. If the
ES cells are cultured in the presence of antibiotic, then only the ES cells that contain the plasmid
will be able to grow.
4. You pick up these cells and make sure that they have your mutated gene in them. These are the steps
shown in panel A on the next slide.
5. After ensuring that you have stem cells with your mutant gene, you need to get an actual mouse
embryo. You do this by harvesting them from a white mouse. Because it’s an early embryo, we can
add in extra cells and the embryo will develop normally—this is because none of the cells in the
embryo yet ‘know’ what they’re meant to be.
6. The embryo of mixed white and brown mouse cells is now implanted into a ‘pseudopregant’ female
mouse. This just means that she’s ramped up on hormones and will ‘accept’ the implanted embryo.
This is mouse IVF.
7. The mouse delivers some baby mice. If you’re lucky, the mice will have some of their ‘parts’ that
carry the modified/mutant gene and therefore don’t’ express your gene of interest.
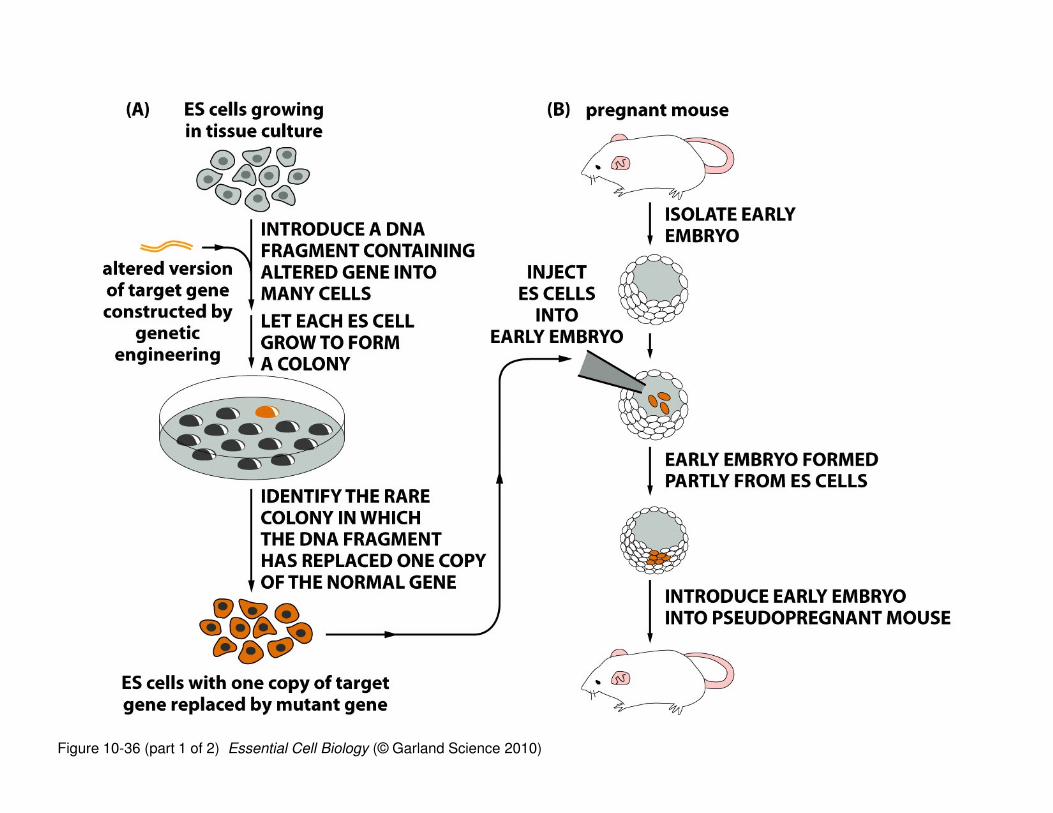
Figure 10-36 (part 1 of 2) Essential Cell Biology (© Garland Science 2010)
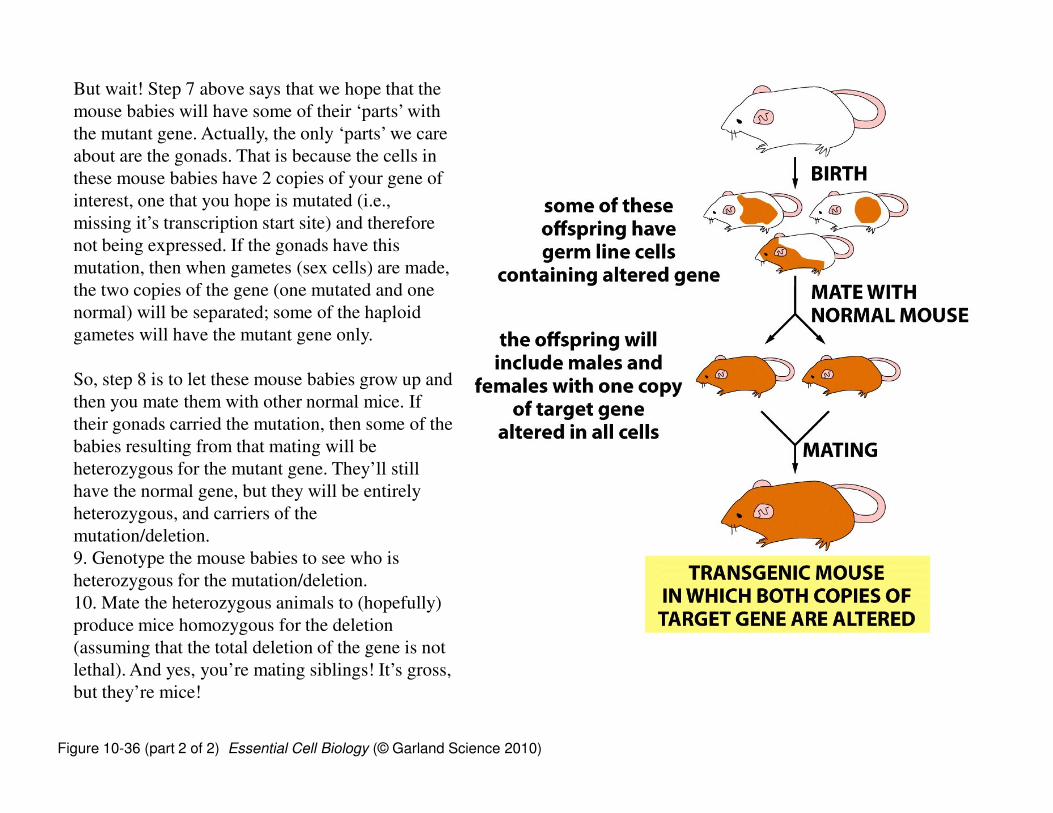
Figure 10-36 (part 2 of 2) Essential Cell Biology (© Garland Science 2010)
But wait! Step 7 above says that we hope that the
mouse babies will have some of their ‘parts’ with
the mutant gene. Actually, the only ‘parts’ we care
about are the gonads. That is because the cells in
these mouse babies have 2 copies of your gene of
interest, one that you hope is mutated (i.e.,
missing it’s transcription start site) and therefore
not being expressed. If the gonads have this
mutation, then when gametes (sex cells) are made,
the two copies of the gene (one mutated and one
normal) will be separated; some of the haploid
gametes will have the mutant gene only.
So, step 8 is to let these mouse babies grow up and
then you mate them with other normal mice. If
their gonads carried the mutation, then some of the
babies resulting from that mating will be
heterozygous for the mutant gene. They’ll still
have the normal gene, but they will be entirely
heterozygous, and carriers of the
mutation/deletion.
9. Genotype the mouse babies to see who is
heterozygous for the mutation/deletion.
10. Mate the heterozygous animals to (hopefully)
produce mice homozygous for the deletion
(assuming that the total deletion of the gene is not
lethal). And yes, you’re mating siblings! It’s gross,
but they’re mice!

That’s it. What do you think? Pretty
cool stuff, huh? I hope it all makes
sense. Again, we’ll revisit anything
you are unclear about when I return.
Till then, I hope your test went well,
don’t forget your writing
assignment/book report, and have a
great week! See you November 5th.