Tangram Twist Darri & Daniella Tangram Twist Darri & Daniella.

Oregon WIC TWIST Training Manual March 24, 2008
Ch 1, 200.1
Chapter 1: TWIST Overview Section 2: TWIST Basics Lesson: TWIST Screen and Data Entry
Objectives:
Upon completion of this lesson the user will be able to: • correctly identify and appropriately utilize the different parts of the
TWIST screens; • open, save and exit individual records; • enter and modify data; • follow policies regarding mandatory data; • work with more than one client record open at a time; and • move from one client record to another.
Oregon Policies:
640 Documentation
Overview:
Now that we have learned how to access TWIST and move around in the system let’s take a closer look at the screens and the tools available in TWIST.
Instruction: x
Reviewing the Toolbar
TWIST uses the Windows format and many of the same icons and menu text.
• Title Bar – Located in the top left corner of the screen, it shows the title of the window that is displayed.
• Minimize, Maximize and Exit Buttons – These are the buttons in the top right corner of screen.
• Menu Bar – Menu selections at the top of the screen. • Drop Down Menu – A drop down menu gives more selections
from the menu bar. • Hint Text – Move your cursor over an icon. The small box of text
that appears is called a hint text. The hint text tells you the function of the icon.
• Task Bar – Located at the bottom of the screen and includes the start button and time.

Oregon WIC TWIST Training Manual March 24, 2008
• Status Bar – Located at the top of the Task Bar. It shows system messages and the user name.
• Toolbar – The following are icons that are used on the toolbar in TWIST:
Icon Picture Icon Name Icon Description
“Close” icon The “Close” icon allows you to exit the current screen and return to the previous screen. Selecting “Close” on the menu, under “File,” gives the same result.
“Insert” icon The “Insert” icon is used when you want to add an additional row of information.
“Remove” icon
The “Remove” icon will remove information from a section or row.
“Open” icon By clicking on the “Open” icon, you will open a selection window that will allow you to do a search.
“Save” icon This is the standard Windows icon for saving your work. You should always save your work before you leave a screen. If you have entered new data, TWIST will ask you if you want to save as you exit a screen.
“Save As” icon
This icon is only seen on report files that can be exported to Excel.
“Refresh” icon The “Refresh” icon will restore the information on the screen back to the most current saved data.
“Fast Path” icon
This icon allows you to move quickly from window to window. Clicking on the icon will give you a list of the windows that you can fast path to.
Ch 1, 200.2

Oregon WIC TWIST Training Manual March 24, 2008
Icon Picture Icon Name Icon Description
“Cut” icon When clicked, this will allow you to move or “cut” highlighted information from the screen and hold it on a hidden clipboard until it is pasted where you want it to go.
“Copy” icon Highlighted information is copied to the hidden clipboard and can be pasted to another field.
“Run” icon This icon must be clicked on to run a report.
“Clear” icon This icon will clear all fields on the current screen.
“Paste” icon “Paste” is the second step to cutting or copying. Once information is on the clipboard, click in the field where you want the information to be and click the “Paste” icon. The information will appear in that field. These buttons can save you unnecessary typing.
“Print” icon The “Print” icon will send forms or reports associated with the screen to the printer for printing. Clicking on the “Print” icon will not print the screen.
“Help” icon When you click on this icon you will access information about the section of the system you are in.
TWIST Screen Review
The starting point for this section is: Client Processes Enrollment and Intake Applicant Prescreening
1. Data Fields
The first thing you may notice is that data fields are different colors.
Ch 1, 200.3

Oregon WIC TWIST Training Manual March 24, 2008
1.1 Fields that are Yellow are mandatory fields.
• Information must be entered in all of these fields to continue to the next screen.
• These fields have been selected as mandatory fields in compliance with federal guidelines or state policy.
• If you want more information, refer to Policy 640 in your Oregon WIC Policy and Procedure Manual (PPM).
• In certain screens, a checkmark will appear on a tab to indicate all mandatory fields have been completed. This does not mean that the client is income eligible, however, it just means the user has filled out all mandatory fields
1.2 Fields that are White are optional fields.
• If you have information you may enter it, but it is not required.
1.3 The Gray fields are system-generated fields.
• TWIST will enter the data into these fields. • You cannot change or delete this information. • These are referred to as “Display” fields.
2. Tabs
TWIST is designed to be easy and fast. To assist you, some windows are divided into sections and these sections are called tabs. • The tabs represent additional screens. • By clicking on a tab you move from one screen to another.
3. Drop Down Arrows
• Clicking on this arrow will give you a list of choices for the field. • You must select one of these choices. • No other answers will be accepted in this field.
♫ NOTE: You do not have to use the drop down arrow if you know the acceptable value and type in the first letter in the field.
4. Buttons
Buttons appear as raised gray boxes on the screen.
Ch 1, 200.4

Oregon WIC TWIST Training Manual March 24, 2008
Ch 1, 200.5
• Buttons can provide access to pop-up windows. • Pop-up windows may also have other buttons to activate additional
pop-up windows. • Buttons will allow you to perform some of the same functions you
would find on the toolbar while you are in a pop-up window. For example, you might see a “Remove” or an “Insert” button.
• Buttons can be used to perform other special functions. • If you click the “OK” button to exit a screen, any data you entered
will be saved. • If you click on the “Cancel” button to exit a screen, you will close
the window, but the information will not be saved.
5. System Messages
TWIST also displays messages on the screen when you perform certain actions. A variety of messages are generated throughout the system. Specific messages are discussed in the lessons on the screens where they appear.
Practice Activities:
Use the information from your Activity Sheet for this practice.
1. Log on to TWIST. 2. Select your assigned agency. 3. Double click on the “Operations Management” module. 4. Click on the drop down menu for “Operations.” 5. Select “Agency/Clinic Information.” 6. In the “Mail Category” field use the drop down arrow to choose “Shuttle.” 7. Click on the “Clinic Information” tab. 8. Click on the “Phones” button. 9. Click “Cancel” to close the pop-up window. 10. Close the “Agency/Clinic Information” screen. 11. Exit “Operations Management.”
You have been introduced to the parts of the TWIST screen, which is like learning about the parts of a car and how to use them before you start driving. Now it’s time to learn some basic driving skills.
Oregon WIC TWIST Training Manual March 24, 2008
Ch 1, 200.6
Entering Data
There are several places and ways to enter data.
1. Manually Entered Data
There are three ways to manually enter data.
1.1 Field
• Type answers directly into the space. • The acceptable answers can be a number or a word
depending on the field.
Example: “Number in Family” is a number answer and “Income Provider” is a word answer.
1.2 Drop Down Arrow
• Lets you select from a list of acceptable choices.
1.3 Pop-Up Window
• A window where you can enter specific information. • Use buttons to access pop-up windows. • You cannot use the toolbar when you are in a pop-up
window. • You must close the pop-up window before you can exit the
screen.
Example: “Averaging” button activates a pop-up window.
2. Automatically Entered Data
There are several ways the TWIST system will automatically enter information.
2.1 System Defaults
• Some fields will be automatically populated with an answer.
• Defaults are designed to save you time by populating the field with the most common response.
• You will only have to enter an answer into the field if the answer is different than the default.

Oregon WIC TWIST Training Manual March 24, 2008
Ch 1, 200.7
• Overriding a default is easily done by selecting the correct answer from the drop down list or by typing the answer into the field.
Example: You are enrolling a pregnant mom having twins and the “Unborn Counted” field defaults to 0. To change this to count the unborn twins, you would type a 2 into the field.
2.2 Automatic Calculations
• The system will do mathematical calculations automatically in some fields.
• It will take the data you have entered and complete the calculation.
• You cannot override or change these fields. They are gray fields and for display only.
• When you change the data that you had previously entered, the gray field(s) will change to reflect the new calculation.
Example: The monthly and annual income fields will be automatically calculated based on the data you enter in the interval and amount fields.
2.3 Auto-Fills
• The system will transfer information entered in one section to another section automatically.
Example: After enrolling a temporary newborn, the system will automatically update the mother’s record with selected information.
2.4 System Generated
• This refers to how the system is able to look at information from several screens and/or functional areas in order to create or select appropriate data to enter into another screen or functional area.
Example: The system will look at information entered in several different screens in the certification area such as medical, health history, and diet to select or generate appropriate risks to assign to that client.
3. Numerical Data
Here is information on how to enter numerical data.
3.1 Date
Oregon WIC TWIST Training Manual March 24, 2008
• mm/dd/yyyy is the correct format for a date. Month and day must be two digits, and years must be four digits.
• The system will add the back slashes for you. • The system will automatically zero out the field if the date
is entered in an incorrect format. If you tried to enter in 1/1/03 the field would read 00/00/0000.
Example: January 1, 2003, would be entered as 01012003.
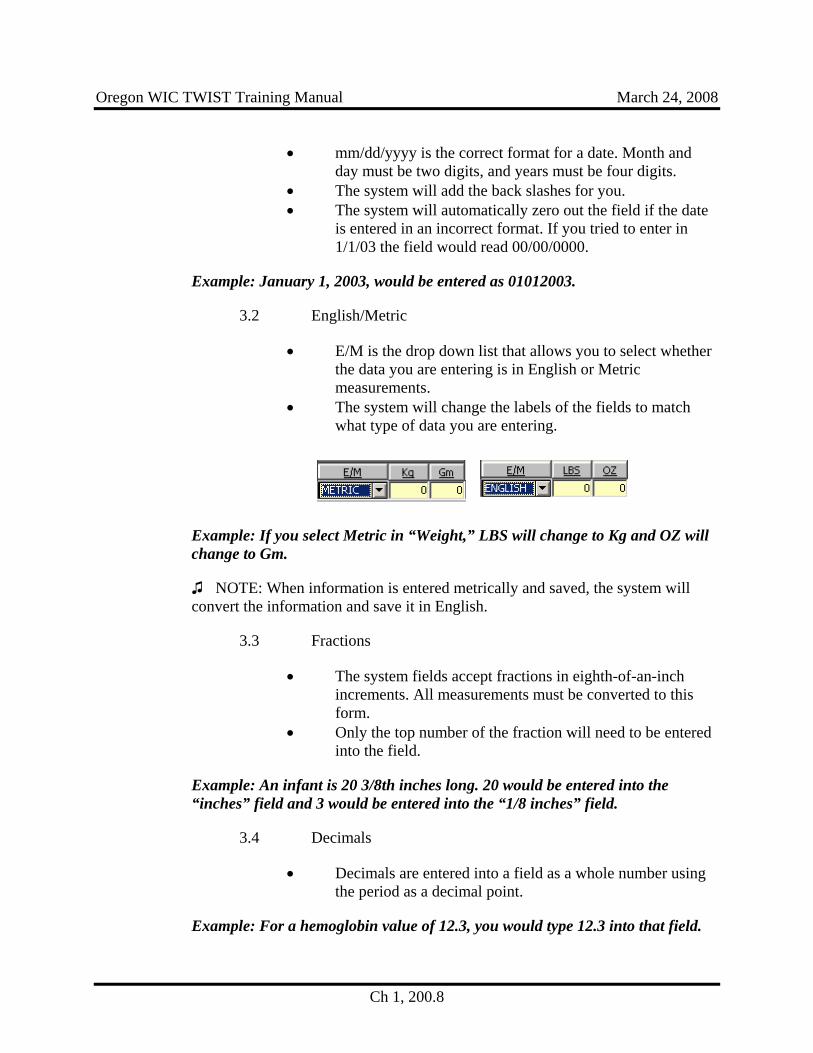
3.2 English/Metric
• E/M is the drop down list that allows you to select whether the data you are entering is in English or Metric measurements.
• The system will change the labels of the fields to match what type of data you are entering.
Example: If you select Metric in “Weight,” LBS will change to Kg and OZ will change to Gm.
♫ NOTE: When information is entered metrically and saved, the system will convert the information and save it in English.
3.3 Fractions
• The system fields accept fractions in eighth-of-an-inch increments. All measurements must be converted to this form.
• Only the top number of the fraction will need to be entered into the field.
Example: An infant is 20 3/8th inches long. 20 would be entered into the “inches” field and 3 would be entered into the “1/8 inches” field.
3.4 Decimals
• Decimals are entered into a field as a whole number using the period as a decimal point.
Example: For a hemoglobin value of 12.3, you would type 12.3 into that field.
Ch 1, 200.8

Oregon WIC TWIST Training Manual March 24, 2008
Ch 1, 200.9
3.5 Unknown Value
• You can indicate a value is unknown or waived by entering 9's in place of the missing value.
• If the missing value has two fields, such as pounds and ounces, the system will automatically fill in the second field with 9's once the first field contains 9's.
• A field with 9's will not be graphed and will not calculate percentiles or BMI.
• The number of nines entered into the first field will be dependent on the maximum number of digits allowed in the field.
• If you have an unknown value for a field that has a drop down, select “unknown value.”
Add, Delete, Change and Save Data
1. Adding Data
There are two ways to add information.
1.1 Type new information into an existing empty field.
1.2 Use the “Insert” icon or “Insert” button to add a new, blank field and then type in your new data.
2. Deleting Data
There are four ways to delete data.
2.1 Use the “Remove” icon located on the toolbar.
2.2 Click on the “Remove” button in a pop-up window.
2.3 Use the “Delete” function key on your keyboard to clear a field.
2.4 Backspace or use the space bar to remove data in a field.
• Some data cannot be deleted or changed after it has been saved. It becomes part of the client’s permanent record.
• Health history questions and medical data are examples of areas that cannot be deleted once they have been saved.
• The system will notify you with a system message if you try to delete inappropriate data.

Oregon WIC TWIST Training Manual March 24, 2008
Ch 1, 200.10
3. Changing Data
There are two ways to change data. In either case, the data will not change in the system until you move out of the field that has been changed.
3.1 Delete and type over existing data with new data.
3.2 Add new information to a new line.
• The system will recognize the data based on the date and time entered.
• This is how you would handle a situation where you have made a mistake in entering data and the data has already been saved.
Example: Let’s say you are enrolling a child and instead of entering 35 lbs for a weight you enter in 53 lbs. You do not realize the error until you have completed the other tabs in certification and the data has been automatically saved. You will be able to change medical information until the end of the workday. If information needs to be changed after “End Of Day,” you will have to enter the correct weight of 35 lbs on a new line with the same date. The system, even though it is the same date, will now recognize this last entry as the current weight based on the time of entry.
4. Saving Data
The system will automatically save your data as you work. It will save the data when you move from tab to tab.
♫ NOTE: If all mandatory fields have not been completed before you move to another tab, the system will display a message prompting you to complete the field.
When you try to exit a screen, a system message will prompt you to save. There are two manual ways to save:
4.1 Use the “Save” icon.
4.2 Use the Windows “Save” function in the “File” drop down menu.

Oregon WIC TWIST Training Manual March 24, 2008
Ch 1, 200.11
Practice Activities:
Use the information from your Activity Sheet for this practice.
1. Double click on “Client Processes.” 2. Click on “Enrollment & Intake.” 3. Open “Applicant Prescreening.” 4. Use the drop down arrow to select a category for the “Calculate Income
For field.” 5. Tab out of the “New Income Field” to save the change. 6. Move cursor to “Number in Family” field. 7. Type in the number of family members. 8. The “New Income Date” field is system generated and may not be
changed. 9. Move cursor to “Income Provider” row. 10. Type the name of the wage earner in the first row. 11. Tab to next field and select the appropriate“interval.” 12. Tab to next field and enter a dollar value for “amount.” 13. Tab to next field and type w in the field. Does “wages” auto fill as the
source? 14. Tab to the next field and select a proof of income from the drop down list. 15. What fields that are now automatically calculated. The correct answers are
“Monthly,” “Annual,” and “Totals.” 16. Insert a second row. Enter data in all mandatory fields. 17. Delete the second row of data. 18. Exit “Enrollment.” 19. Read the system message you get. 20. Click “No.” 21. Close the screen. 22. Exit “Client Processes.” One User, Multiple Clients
The system allows you to open a second client record while working with the first client. This situation may occur when you are processing a walk-in client and another is on the phone and needs information or if you are working with two people from the same family.
The starting point for this section is: Client Processes Enrollment and Intake Applicant Prescreening
1. Select the “Open Folder” icon and select a client.

Oregon WIC TWIST Training Manual March 24, 2008
Ch 1, 200.12
2. Minimize the current screen you are working in.
3. Click “Select Modules” on the status bar.
4. Double click on the module you need for the second client.
5. Access “Client Primary” and select the second client and return with the client.
6. Complete the activity for the second client and save.
♫ NOTE: You can “toggle” between the open client records. “Toggle” between client records by clicking on the buttons on the status bar. Be sure to save data before toggling to the second client.
7. Click on the first module on the status bar and complete activity for first client.
♫ NOTE: The hint text on the status bar will tell you the name of the client that box represents.
8. Save and exit.
Multiple Users, Same Client Record
The system allows multiple users to open the same client record at the same time. This situation may occur when two staff members are working with the same client.
1. Users working in different screens or tabs.
1.1 Multiple users may enter data in the same client record when they are on different tabs in the same screen or on different screens.
1.2 Both sets of data will be saved.
Example: The clerk enters income data when the client arrives but gets interrupted by a phone call before they can finish entering the change of address. The client proceeds to the lab technician who pulls up the same client record and enters medical data. The clerk and the lab technician save at the same time. All information has been saved and utilized by the system because they were in different areas of the same client record.

Oregon WIC TWIST Training Manual March 24, 2008
Ch 1, 200.13
2. Users working in same screen and tab.
2.1 The system does not allow multiple users to enter and save data at the same time within the same screen.
2.2 If both users enter data on the same screen, the information saved first will be utilized by the system.
2.3 When the second user tries to save the information, they will get a system error message. The user will have to refresh and re-enter data before the system will utilize the new information.
Example: A lab technician and a certifier have the “Medical Data” screen open for the same client and enter information. The certifier hits save after the lab technician. The information entered by the lab technician will be the most current and will be utilized by the system for risk assessment. The certifier will get an error message and need to refresh the screen before proceeding.
Tips and Shortcuts:
• When there are multiple values listed in a drop down list, continue to hit the first letter of your selection until the value is displayed.
• Hint text on the status bar will tell you the name of the client that box represents.
• Never open more than three client records at the same time. • Use it, save it and leave. • “Toggle” between client records by clicking on the buttons on the status
bar. • You can also use the refresh button when you have entered a number of
incorrect data and want to start the screen over again. • Refresh doesn’t update changes to base tables.
Example: You are working on scheduling an appointment and decide that a change must be made to the appointment type information. You go to the base table, fix it and then return to your screen only to find that the information is not there. You have to log out of TWIST and then log back in for the new base table information to show. This is because the system doesn’t check base tables after you have logged in to keep traffic down in the system and keep it running fast and smooth.
Skill Check:
Follow the instructions listed below. If you are asked for an answer, write or circle the answers in the space provided.

Oregon WIC TWIST Training Manual March 24, 2008
Road Trip Check List The starting point for this section is:
Client Processes Enrollment and Intake Applicant Prescreening Tom Tester: • The TWIST system mechanic has recommended that we check out our
system before we take it out on the road. • Below are two check lists that Tom wants you to complete. • You will need to complete each task and answer each question in the order
they are presented in Checklist 2. • You will match the icon or description in Check List 1 to the task or
answer in Check List 2. • Place the number from Checklist 2 in the space provided next to Check
List 1.
Answer Checklist 1 Checklist 2
1. Select “Client” in “Calculated Income For” field. What icon did you use?
2. The box next to “Number in Family” is called this.
3. What color is an optional field?
4. Click on the “Averaging” button. What type of window do you get?
5. Enter two rows of information under “Income Provider.” Enter the following information: Row1 – Ashley Albany Interval – Monthly Amount - $50 Source – Wages Proof of Income – Paystub
Ch 1, 200.14

Oregon WIC TWIST Training Manual March 24, 2008
Answer Checklist 1 Checklist 2 Create a second row. What icon did you use to insert the rows?
6. Copy Ashley Albany’s name. What icon do you use?
7. Paste Ashley’s name into the second row. What icon did you use? (Print a screen shot here.)
8. Delete the first row of information. What icon can you use to delete? (Print a screen shot here.)
9. What icon would you use to cut?
10. What icon would you use to run a report?
11. What icon do you use to find a Fast Path?
12. What icon would you use to get help?
13.What icon will open up a client record?
14. What should you do before you leave a screen to prevent any loss of data? What icon can you use?
Ch 1, 200.15

Oregon WIC TWIST Training Manual March 24, 2008
Answer Checklist 1 Checklist 2
Unknown Value 15. Which icon clears all fields on a report screen?
Yellow 16.What icon would you use to print?
White 17. What would you select if you wanted to enter medical data in as a Metric measurement?
18. What would you use 9's for?
Pop up 19. What color is a mandatory field?
Field 20. What color is a system generated field?
21. Exit “Applicant Prescreening.” What icon did you use?
Gray 22.What icon would you use to view the most current information.
Circle True (T) or False (F) for each of the following questions.
T or F When you change data in a field, you must move to another field before the TWIST system will recognize that new data has been entered.
T or F The amount field is automatically calculated by the system.
Notes:
Ch 1, 200.16

This page intentionally left blank.

This page intentionally left blank

Oregon WIC TWIST Training Manual August 31, 2003
Chapter 1: TWIST Overview Section 2: TWIST Basics Lesson: Fast Paths
Objectives:
Upon completion of this lesson the user will be able to: • identify and use the “Fast Path” icon.
Overview:
The “Fast Path” icon is found on the tool bar. Fast paths are short cuts found throughout TWIST and allow you to quickly move from one screens to another. Fast paths are available only on certain screens throughout the system.
In the following section you will learn how to use fast paths to help you move easily from one function to another by just clicking one button.
Instruction: x
Using Fast Paths
The following is an example of one “Fast Path,” but the process is the same through out TWIST, wherever you find the “Fast Path” icon.
1. Double click on the “Client Processes” icon.
2. Click on “Enrollment & Intake.”
3. Click on “Enrollment.”
4. Click on the “Fast Path” icon.
• The “running man” icon is an easy reminder that you are selecting a speedy path. This refers to how this function will allow you to go to other screens.
• The “Fast Path Options” pop-up will appear.
Ch 1, 201.1

Oregon WIC TWIST Training Manual August 31, 2003
Figure 1: “Fast Path Options” Pop-Up
• This pop-up will act as your road map and will list all of the possible function screens or fast paths you can select.
• The fast paths to which you can link are determined by which functions you logically need to go to from the current screen.
• When no “Fast Path” is available, the icon will be grayed out.
Example: Fast paths listed in “Enrollment” allow you to drive into several client-processing areas such as: certification screens, food package and food instrument screens, client history screens, and appointment screens.
5. Click to select the “Certification, Woman” screen.
6. Click “OK” to move to the “Certification, Woman” screen.
From this screen you have two options.
6.1 You may use the fast path from this screen to go to another screen.
6.2 You can exit this screen to return to the “Enrollment” screen. When you close a screen that you used a fast path to reach, you will always go back to the previous screen.
7. Click on the “Fast Path” icon.
8. Click on “WIC Intake” screen (Enrollment).
You have now returned to the “Enrollment” screen.
Ch 1, 201.2

Oregon WIC TWIST Training Manual August 31, 2003
Ch 1, 201.3
Practice Activities:
Let’s try driving on the fast paths a little more. 1. Click on “Enrollment.” 2. Click on the “Fast Path” icon. 3. Click on “Certification, Woman” 4. Click “OK.” 5. Click on the “Fast Path” icon. 6. Click on “Family Appointment Record.” 7. Click “OK.” 8. Click on the “Fast Path” icon. 9. Click on “Daily Clinic Schedule.” 10. Click “OK.” 11. Close the “Daily Clinic Schedule” screen. 12. Close the “Family Appointment Record” screen. 13. Close the “Certification, Woman” screen. 14. Close the “Enrollment” screen. 15. You should now be back the “Client Processes” screen.
Skill Check:
Go ahead and try it!
Notes:

This page intentionally left blank.