Chapter 1 Three-Dimensional Plant Anatomy Via Hand · PDF fileVia Hand Sectioning and...
15
Chapter 1 Three-Dimensional Plant Anatomy Via Hand Sectioning and Differential Staining Barrett N. Rock Department of Biology Alfred University Alfred, New York 14802 Barrett N. Rock is currently an Associate Professor of Biology at Alfred University in Alfred, New York. He is the resident botanist in a small biology department (6 full-time faculty) and is respon- sible for coursework in botany, biology and geology. Trained as a wood anatomist, he received an undergraduate degree in botany at the University of Vermont (1966) and a masters and doctorate in plant anatomy at the University of Maryland (1970, 1972). His teaching interests lie in the areas of plant anatomy and paleobotany. His current research interests center on an investigation of the vegetative anatomy (wood, leaves, and stem tips) of woody Com- posites (Asteraceae-specifically of the subtribe Espeletiinae). He is also interested in the study and physical characterization of vac- uolar crystals commonly occurring in plants. 1
Transcript of Chapter 1 Three-Dimensional Plant Anatomy Via Hand · PDF fileVia Hand Sectioning and...
Chapter 1 Three-Dimensional Plant Anatomy
Via Hand Sectioning and Differential Staining
Barrett N. Rock Department of Biology
Alfred University Alfred, New York 14802
Barrett N. Rock is currently an Associate Professor of Biology at Alfred University in Alfred, New York. He is the resident botanist in a small biology department (6 full-time faculty) and is respon- sible for coursework in botany, biology and geology. Trained as a wood anatomist, he received an undergraduate degree in botany at the University of Vermont (1966) and a masters and doctorate in plant anatomy at the University of Maryland (1970, 1972). His teaching interests lie in the areas of plant anatomy and paleobotany. His current research interests center on an investigation of the vegetative anatomy (wood, leaves, and stem tips) of woody Com- posites (Asteraceae-specifically of the subtribe Espeletiinae). He is also interested in the study and physical characterization of vac- uolar crystals commonly occurring in plants.
1
2 Three-Dimensional Plant Anatomy
Introduction This laboratory exercise has been developed to help the beginning student
bridge the gap between the three-dimensional whole plant and the two-di- mensional thin sections encountered on prepared miscroscope slide. The ex- ercise is somewhat open-ended but is best presented in two lab periods (each two hours in length). It is designed for use during the first few weeks of the semester. The laboratories feature a “hands-on” approach to lab work, ac- cepted with enthusiasm by students at Alfred University. The sequence in- corporates carry-over and retention of information previously presented, and each exercise builds on previous experience. Progress within the sequence is self-paced, allowing students to advance at their own rate so that time is available for individual investigation and study.
The learning expected is inductive (i.e., progression and reasoning is from a part to a whole, from particulars to the general-as compared with deductive learning), with emphasis placed on the student as investigator. They are told, “See what you can find” and, commonly, no two students will find exactly the same thing. Hand sections stained in toluidine blue are spectacular and have a great deal of appeal to the beginning student, especially because they made them themselves. Instead of hearing comments such as, “What am I supposed to see, Doc?”, you just may hear, “Holy cow! Look at this!” The sections and slides prepared in the laboratory are semi-permanent (may last for as long as a semester) and may be put aside for future study and/or photomicrography.
The first lab is a combination of introduction to the microscope (both dissecting and compound), hand sectioning and differential staining. Viewing sections unstained or lightly stained requires the student to very rapidly locate the substage iris diaphragm! The materials needed and the staining procedures are very simple. Within a short period of time, most students are able to make surprisingly good sections. They soon are competing with each other to see who turns out the best slides. During the second lab (continued study of plant anatomy via hand sections) I make a photomicrographic set-up available to the students in the evenings.
The exercise has been used with students of varying levels: high school juniors, freshman undergraduates, and upperclass students. All tend to find the investigative nature of the study and the ease of preparation both enjoyable and instructive. They are impressed with the amount of plant anatomy that can be studied without elaborate embedding techniques and expensive micro- tomes.
A wide variety of plants may be used with this exercise. At Alfred, depending on the course and time of year, the students may be given bean, pea and/or corn seedlings, local weeds (Solidago [goldenrod] and Ambrosia [ragweed] are excellent examples of dicots, while the inflorescence stalk of most grasses and sedges are fine for monocots), or greenhouse “weeds” such

Three-Dimensional Plant Anatomy 3
as Coleus. Plants with viscous sap such as Tradescantia or Asclepias (milk- weed) should be avoided, at least initially, due to the problems associated with sectioning such material. First-year woody twigs of most trees make good subjects, especially in the spring of the year. Twigs collected at other times may need to be softened in a solution of liquid detergent and water (1:l).
In summary then, nothing new is introduced here-in fact, the techniques are old, but new to the student. The emphasis is on doing and on some loosely guided “looking around”. A “keen eye” is encouraged, and that, coupled with a good textbook (both Raven, Evert & Curtis, and Weier, Stocking & Barbour have been used with this exercise) allows for a real investigation and the thrill of discovery (a phenomenon usually missing in an introductory laboratory exercise-especially one in plant anatomy). The thickness of the sections allows for a three-dimensional interpretation of the internal structure of a plant. Time is an important factor-do not rush through these exercises- allow two lab periods (2 or 3 hours each) if possible. Combine these with a “Cell types” lab, and you may just win a few converts!
Procedures In the following set of exercises, the students will be asked to make
handsections of various parts of living plants. The major take-home lessons derived from these exercises will be: the anatomical differences among various parts of the same plant, various planes of sectioning, arrangement of the various tissues in the sections, and the fact that vessel elements are not in- herently red! Although few students will produce great handsections, they will, hopefully, have a greater appreciation for the prepared slides that will be used during the remainder of the semester. Even though their attempts will not be perfect, many of the common mistakes made will help illustrate the three-dimensional aspect of the tissues studied. The following instructions may be presented either by the laboratory instructor or given in the form of a handout.
Materials Needed (see Appendix C) Razor blades (single-edge) Disposable petri dishes (or other
small containers) Forceps Section lifter Dissecting or teasing needles 50% EtOH (optional) Toluidine blue in dropping bottle
(see Appendix A) Distilled water in wash bottle
Glycerine-water (1 : 1) Dissecting microscope Compound microscope Clean microscope slides and cover
Towels Seedlings or other suitable plants for
slips
sectioning

4 Three-Dimensional Plant Anatomy
Staining Procedure 1.
2. 3.
4. 5.
6.
Section plant material into 50% EtOH in disposable petri dish. Keep covered when not in use. Treat for minimum of 5 minutes. (This part is optional due to the potential problems involved with keeping EtOH in the laboratory.) Study sections with dissecting microscope. Transfer better sections to toluidine blue-distilled water mixture (1: 1) in a second petri dish. Stain sections for a minimum of 5 minutes. Wash excess stain from sections in distilled water in third petri dish. Select best sections (with aid of a dissecting microscope) and mount in glycerine-water (1: 1) with microscope slide and cover slip. Study with compound microscope.
Making Handsections (Be certain that you have read and understand the following directions before you begin your study of the actual plants.) a. Select a plant specimen as indicated below. The part to be sectioned must
be held firmly between your thumb and index finger (see Figure 1.1). A piece of potato or carrot with a groove cut in it to accommodate the part in a sandwich-like fashion may be used if the part is too small to be held directly.
Figure 1.1. The proper way to hold a plant specimen when making a hand section.
Three-Dimensional Plant Anatomy 5
b. Make a preliminary cut at a right angle to the long axis of the part approximately 6 to 12 mm from the end of your thumb and finger. This and subsequent sections should be made by cutting toward you with a slicing motion (as opposed to a chopping motion) of the razor blade, making use of as much blade surface as possible [this is best demon- strated]. Dipping the razor blade into 50% EtOH (or water, if EtOH is not used) prior to making each section facilitates the slicing process.
c. Make a series of sections (slices), trying to make each as thin as possible. Place each section in a petri dish of 50% EtOH (EtOH is used to both kill and fix the cytoplasm of each cell. It also has a lower surface tension than does water, thus reducing the number of air bubbles in each section.) Although the ideal handsection should be of the entire part (an entire cross section), keep even those sections which are not entire-frequently they will offer the thinnest pieces of tissue. Make a total of 20-30 sections.
d. After 4 to 5 minutes in the EtOH, the sections may be studied with a dissecting microscope. The entire petri dish may be placed directly on the stage of a dissecting microscope, but care must be taken to avoid spilling any fluids on the stage in the process. It is important to place the initial sections into a clear fluid (50% EtOH or water) because the darkness of the staining fluid will prevent easy assessment of the better sections.
e. In a second petri dish, mix a 1:l toluidine blue and distilled water staining solution. Transfer the better sections in the first petri dish (as determined by study of sections with your dissecting microscope) to the toluidine blue stain solution using a section lifter and a dissection needle. Toluidine blue is a differential stain that stains lignified cell walls blue-green and non- lignified cells walls red to purple. The sections may be studied after they have been in contact with this stain for approximately 5 minutes by washing out the excess stain in a third petri dish of distilled water. Mount these on a slide in a drop of glycerine-water (1:1), add a cover slip, and study with your compound microscope. Does the addition of the stain make it easier to see cellular detail? Which parts of the cell are more easily seen? Do all tissues stain the same color? Does cell wall thickness seem to correlate with a specific color? Why is toluidine blue considered a differential stain? [These questions may be asked by the instructor as he checks the progress of the students and/or on a quiz or examination following the exercise.]
Plants to Be Studied (This portion or one similar to it is given directly to the student.)
Select a young dicot stem as indicated by your instructor and locate the shoot apex (apical meristem). Make a series of handsections of the stem just beneath the shoot apex and stain as described previously. Be certain that you are sectioning the stem and not one of the petioles (leaf stalks) near the apex.
6 Three-Dimensional Plant Anatomy
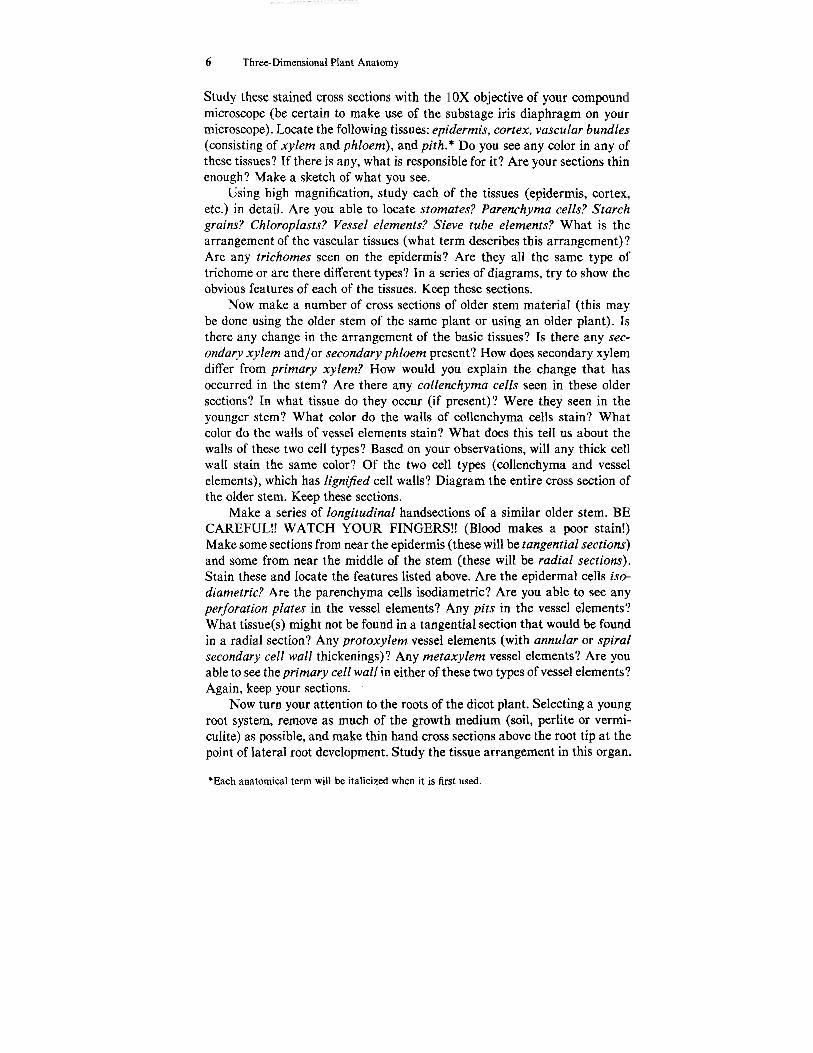
Study these stained cross sections with the OX objective of your compound microscope (be certain to make use of the substage iris diaphragm on your microscope). Locate the following tissues: epidermis, cortex, vascular bundles (consisting of xylem and phloem), and pith.* Do you see any color in any of these tissues? If there is any, what is responsible for it? Are your sections thin enough? Make a sketch of what you see.
Using high magnification, study each of the tissues (epidermis, cortex, etc.) in detail. Are you able to locate stomates? Parenchyma cells? Starch grains? Chloroplasts? Vessel elements? Sieve tube elements? What is the arrangement of the vascular tissues (what term describes this arrangement)? Are any trichomes seen on the epidermis? Are they all the same type of trichome or are there different types? In a series of diagrams, try to show the obvious features of each of the tissues. Keep these sections.
Now make a number of cross sections of older stem material (this may be done using the older stem of the same plant or using an older plant). Is there any change in the arrangement of the basic tissues? Is there any sec- ondary xylem and/or secondary phloem present? How does secondary xylem differ from primary xylem? How would you explain the change that has occurred in the stem? Are there any collenchyma cells seen in these older sections? In what tissue do they occur (if present)? Were they seen in the younger stem? What color do the walls of collenchyma cells stain? What color do the walls of vessel elements stain? What does this tell us about the walls of these two cell types? Based on your observations, will any thick cell wall stain the same color? Of the two cell types (collenchyma and vessel elements), which has lignified cell walls? Diagram the entire cross section of the older stem. Keep these sections.
Make a series of longitudinal handsections of a similar older stem. BE CAREFUL!! WATCH YOUR FINGERS!! (Blood makes a poor stain!) Make some sections from near the epidermis (these will be tangential sections) and some from near the middle of the stem (these will be radial sections). Stain these and locate the features listed above. Are the epidermal cells iso- diametric? Are the parenchyma cells isodiametric? Are you able to see any perforation plates in the vessel elements? Any pits in the vessel elements? What tissue(s) might not be found in a tangential section that would be found in a radial section? Any protoxylem vessel elements (with annular or spiral secondary cell wall thickenings) ? Any metaxylem vessel elements? Are you able to see the primary cell wall in either of these two types of vessel elements? Again, keep your sections.
Now turn your attention to the roots of the dicot plant. Selecting a young root system, remove as much of the growth medium (soil, perlite or vermi- culite) as possible, and make thin hand cross sections above the root tip at the point of lateral root development. Study the tissue arrangement in this organ.
*Each anatomical term will be italicized when it is first used.
Three-Dimensional Plant Anatomy 7
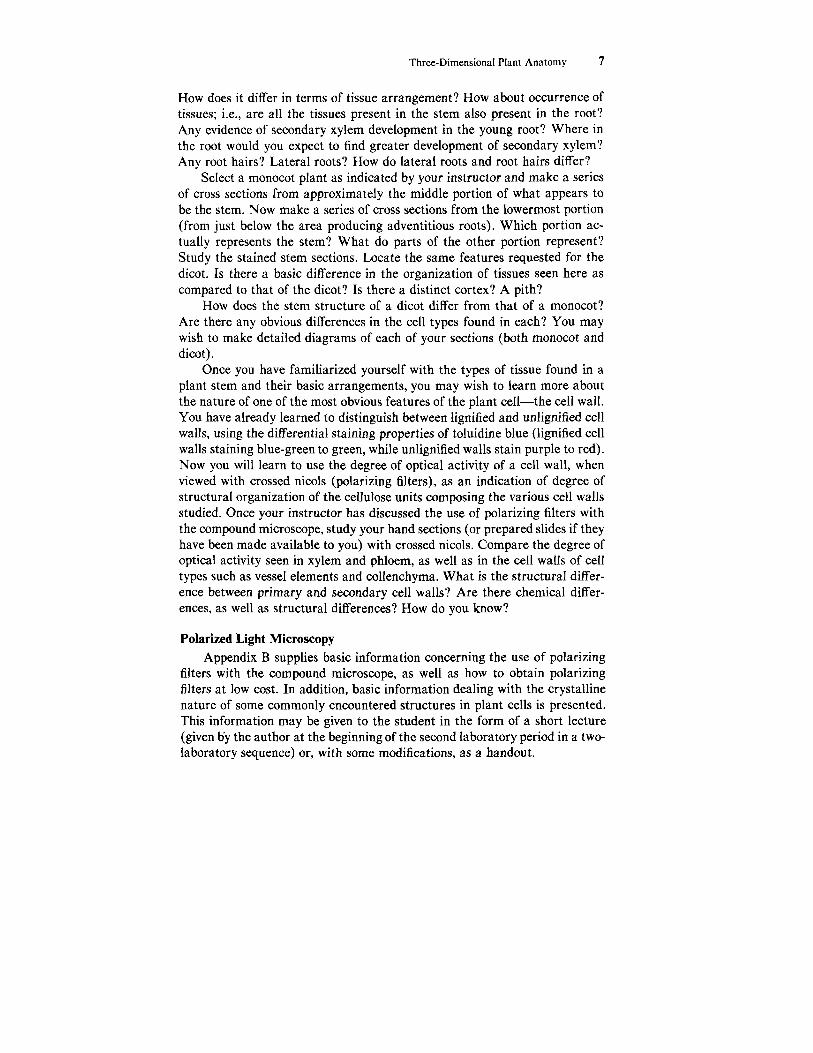
How does it differ in terms of tissue arrangement? How about occurrence of tissues; i.e., are all the tissues present in the stem also present in the root? Any evidence of secondary xylem development in the young root? Where in the root would you expect to find greater development of secondary xylem? Any root hairs? Lateral roots? How do lateral roots and root hairs differ?
Select a monocot plant as indicated by your instructor and make a series of cross sections from approximately the middle portion of what appears to be the stem. Now make a series of cross sections from the lowermost portion (from just below the area producing adventitious roots). Which portion ac- tually represents the stem? What do parts of the other portion represent? Study the stained stem sections. Locate the same features requested for the dicot. Is there a basic difference in the organization of tissues seen here as compared to that of the dicot? Is there a distinct cortex? A pith?
How does the stem structure of a dicot differ from that of a monocot? Are there any obvious differences in the cell types found in each? You may wish to make detailed diagrams of each of your sections (both monocot and dicot).
Once you have familiarized yourself with the types of tissue found in a plant stem and their basic arrangements, you may wish to learn more about the nature of one of the most obvious features of the plant cell-the cell wall. You have already learned to distinguish between lignified and unlignified cell walls, using the differential staining properties of toluidine blue (lignified cell walls staining blue-green to green, while unlignified walls stain purple to red). Now you will learn to use the degree of optical activity of a cell wall, when viewed with crossed nicols (polarizing filters), as an indication of degree of structural organization of the cellulose units composing the various cell walls studied. Once your instructor has discussed the use of polarizing filters with the compound microscope, study your hand sections (or prepared slides if they have been made available to you) with crossed nicols. Compare the degree of optical activity seen in xylem and phloem, as well as in the cell walls of cell types such as vessel elements and collenchyma. What is the structural differ- ence between primary and secondary cell walls? Are there chemical differ- ences, as well as structural differences? How do you know?
Polarized Light Microscopy Appendix B supplies basic information concerning the use of polarizing
filters with the compound microscope, as well as how to obtain polarizing filters at low cost. In addition, basic information dealing with the crystalline nature of some commonly encountered structures in plant cells is presented. This information may be given to the student in the form of a short lecture (given by the author at the beginning of the second laboratory period in a two- laboratory sequence) or, with some modifications, as a handout.
8 Three-Dimensional Plant Anatomy
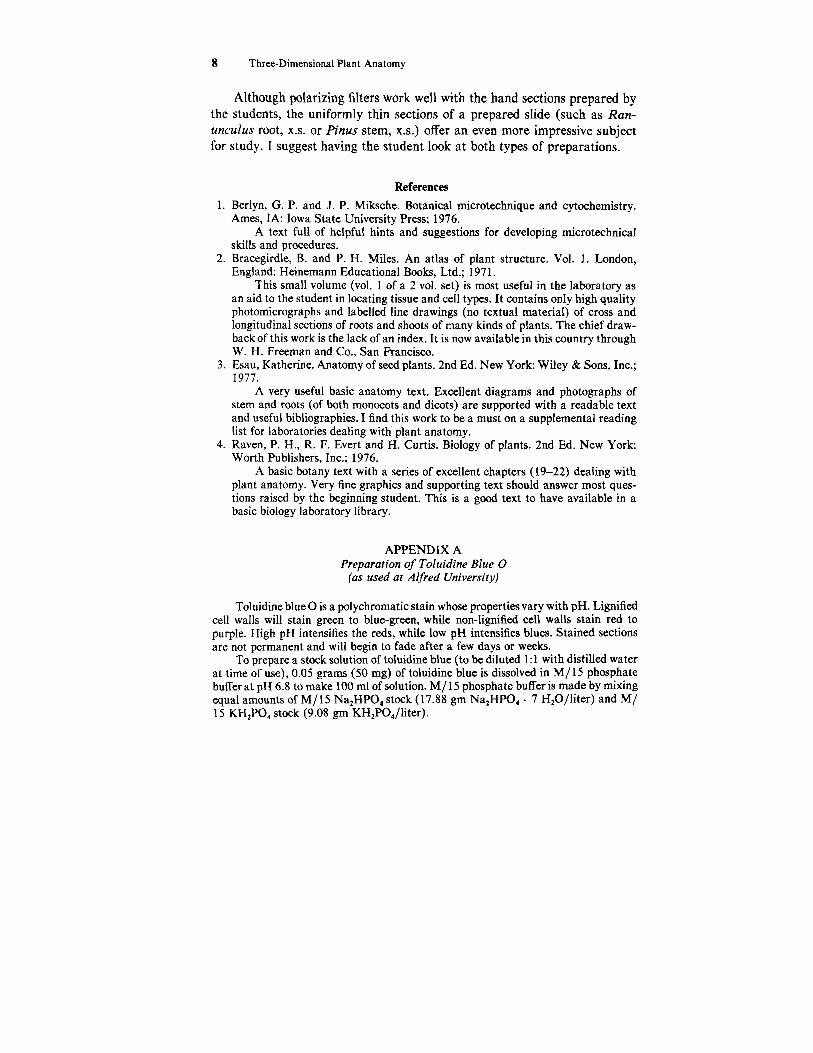
Although polarizing filters work well with the hand sections prepared by the students, the uniformly thin sections of a prepared slide (such as Ran- unculus root, X.S. or Pinus stem, x.s.) offer an even more impressive subject for study. I suggest having the student look at both types of preparations.
References 1 . Berlyn, G. P. and J. P. Miksche. Botanical microtechnique and cytochemistry.
Ames, IA: Iowa State University Press; 1976. A text full of helpful hints and suggestions for developing microtechnical
skills and procedures. 2. Bracegirdle, B. and P. H. Miles. An atlas of plant structure. Vol. 1. London,
England: Heinemann Educational Books, Ltd.; 197 1 . This small volume (vol. 1 of a 2 vol. set) is most useful in the laboratory as
an aid to the student in locating tissue and cell types. It contains only high quality photomicrographs and labelled line drawings (no textual material) of cross and longitudinal sections of roots and shoots of many kinds of plants. The chief draw- back of this work is the lack of an index. It is now available in this country through W. H. Freeman and Co., San Francisco.
3. Esau, Katherine. Anatomy of seed plants. 2nd Ed. New York Wiley & Sons, Inc.; 1977.
A very useful basic anatomy text. Excellent diagrams and photographs of stem and roots (of both monocots and dicots) are supported with a readable text and useful bibliographies. I find this work to be a must on a supplemental reading list for laboratories dealing with plant anatomy.
4. Raven, P. H., R. F. Evert and H. Curtis. Biology of plants. 2nd Ed. New York Worth Publishers, Inc.; 1976.
A basic botany text with a series of excellent chapters (19-22) dealing with plant anatomy. Very fine graphics and supporting text should answer most ques- tions raised by the beginning student. This is a good text to have available in a basic biology laboratory library.
APPENDIX A Preparation of Toluidine Blue 0
(as used at Alfred University)
Toluidine blue 0 is a polychromatic stain whose properties vary with pH. Lignified cell walls will stain green to blue-green, while non-lignified cell walls stain red to purple. High pH intensifies the reds, while low pH intensifies blues. Stained sections are not permanent and will begin to fade after a few days or weeks.
To prepare a stock solution of toluidine blue (to be diluted 1:l with distilled water at time of use), 0.05 grams (50 mg) of toluidine blue is dissolved in M/15 phosphate buffer at pH 6.8 to make 100 ml of solution. M/ 15 phosphate buffer is made by mixing equal amounts of M/ 15 Na2HPO4 stock (17.88 gm Na2HPO4 . 7 H2O/liter) and M/ 15 KH2PO4 stock (9.08 gm KH2PO4/liter).

Three-Dimensional Plant Anatomy 9
APPENDIX B Polarized Light Microscopy
The use of polarizing filters with a student-grade compound microscope can prove to be of great diagnostic value in the fields of biology (primarily determining the crystalline nature of cellular structures encountered in the study of plant anatomical materials), geology (determining the mineral composition of rock thin-sections), and physics. In addition to its value as an identification tool, crystalline structures viewed under polarized light with a microscope are spectacular to see, often turning a poten- tially boring laboratory topic, such as the study of microscopic plant structure, into an experience both fascinating and informative.
The purpose of this exercise is threefold: to explain how polarizing filters work, how they may be used with a compound microscope in the study of plant tissue, and how polarizing filters may be obtained at low cost.
A. How Polarizing Filters Work Plane Polarized Light A simplified way* of looking at a polarizing filter is to envision a microscopic grid
consisting of long strands of opaque material arranged in parallel rows with transparent spaces betweeneach opaque strand. A light beam entering the filter is seen as consisting of waves vibrating in all possible planes. Those light waves vibrating in a plane parallel with the rows of the opaque material in the grid will pass through unimpeded (an analogy using venetian blinds or a picket fence may be helpful). Those waves vibrating in planes that are not parallel with the grids will not pass through the filter, and thus be eliminated (see Figure 1.2). Light leaving the filter is said to be plane polarized and consists of light waves vibrating essentially in a single plane (all parallel to one another). The filter is referred to as the polarizer. Polaroid sunglasses are of value because they eliminate glare by plane polarizing the light entering the eye. Polarizing filters may consist of a wire grid, a defraction grid, or H-sheets.
Plane of Transparent space
Plane polarized light
Non-polarized light
Figure 1.2. The polarizing filter-a simplified view.
*Although incorrect, this simplified view is most easily understood. The more correct interpretation of how the polarizing filter works will be presented shortly.
10 Three-Dimensional Plant Anatomy
The H-sheet type (invented by E. H. Land in 1938) is the most common type of polarizing filter in use today and is made in an ingenious manner. A large transparent sheet of plastic such as polyvinyl alcohol (easily stretched and chemically reactive) is dipped into a liquid solution of molecular iodine. The iodine molecules quickly diffuse into the sheet and are included within the coiled polyvinyl alcohol polymer. At this point the polyvinyl alcohol polymers are random in their orientation. Heating and rapid stretching of the sheets, however, cause the polymers (polyvinyl alcohol with included iodine molecules, commonly referred to as a polyiodide inclusion compound) to orient themselves roughly parallel to the direction of stretch. Once. stretched, the sheet is cemented to a transparent rigid material such as cellulose acetate to prevent unstretching and to retain the parallel orientation of the polyiodide chains. The sheets are then washed, dried, and cut into convenient sizes and shapes. The long, thin chains of iodine molecules have strong light absorbing properties, and thus act as the opaque grid in the previous discussion.
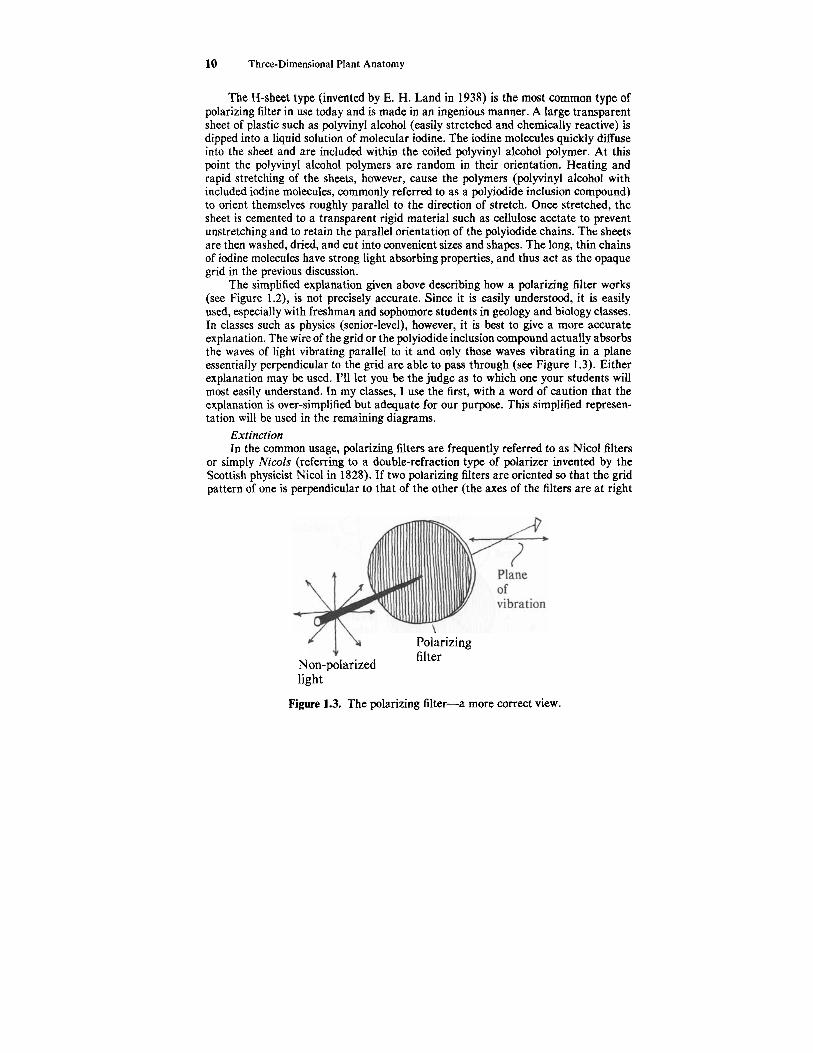
The simplified explanation given above describing how a polarizing filter works (see Figure 1.2), is not precisely accurate. Since it is easily understood, it is easily used, especially with freshman and sophomore students in geology and biology classes. In classes such as physics (senior-level), however, it is best to give a more accurate explanation. The wire of the grid or the polyiodide inclusion compound actually absorbs the waves of light vibrating parallel to it and only those waves vibrating in a plane essentially perpendicular to the grid are able to pass through (see Figure 1.3). Either explanation may be used. 1’11 let you be the judge as to which one your students will most easily understand. In my classes, I use the first, with a word of caution that the explanation is over-simplified but adequate for our purpose. This simplified represen- tation will be used in the remaining diagrams.
Extinction In the common usage, polarizing filters are frequently referred to as Nicol filters
or simply Nicols (referring to a double-refraction type of polarizer invented by the Scottish physicist Nicol in 1828). If two polarizing filters are oriented so that the grid pattern of one is perpendicular to that of the other (the axes of the filters are at right
Polarizing filter Non-polarized
light
Figure 1.3. The polarizing filter-a more correct view.
Three-Dimensional Plant Anatomy 11
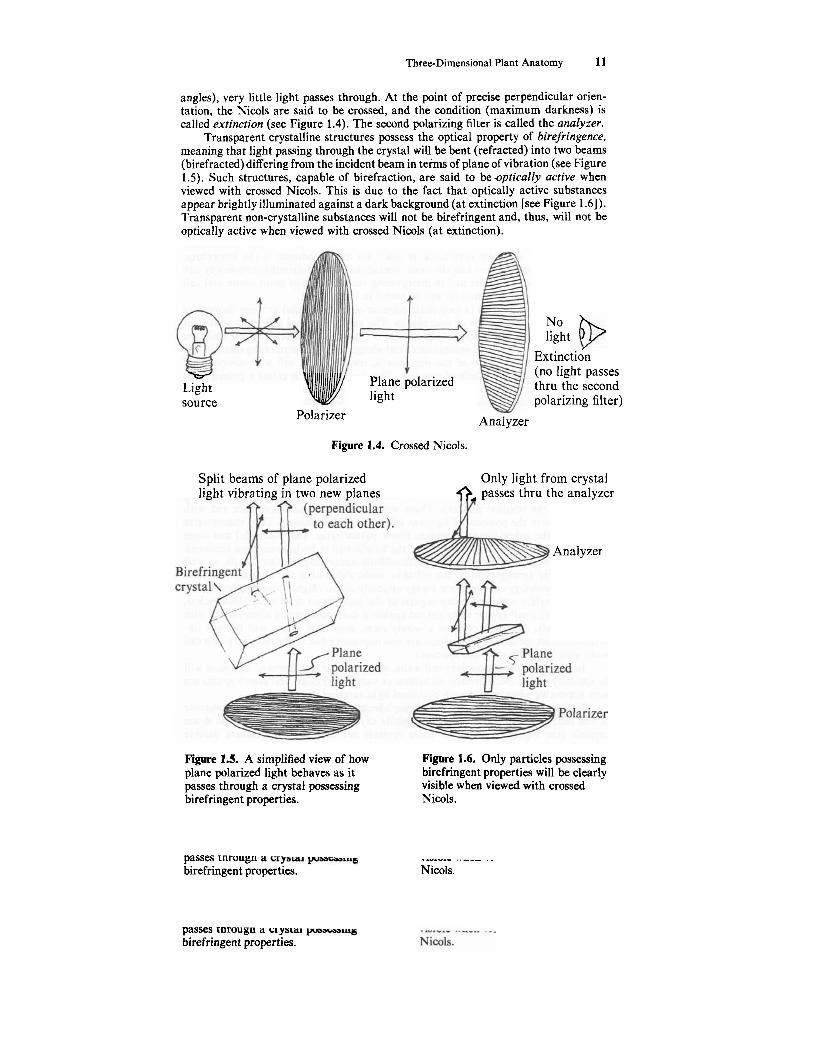
angles), very little light passes through. At the point of precise perpendicular orien- tation, the Nicols are said to be crossed, and the condition (maximum darkness) is called extinction (see Figure 1.4). The second polarizing filter is called the analyzer.
Transparent crystalline structures possess the optical property of birefringence, meaning that light passing through the crystal will be bent (refracted) into two beams (birefracted) differing from the incident beam in terms of plane of vibration (see Figure 1.5). Such structures, capable of birefraction, are said to be -optically active when viewed with crossed Nicols. This is due to the fact that optically active substances appear brightly illuminated against a dark background (at extinction [see Figure 1.61). Transparent non-crystalline substances will not be birefringent and, thus, will not be optically active when viewed with crossed Nicols (at extinction).
Plane polarized source Light light
Polarizer
Figure 1.4. Crossed Nicols.
Split beams of plane polarized light vibrating in two new planes
Analyzer
No light Extinction (no light passes thru the second polarizing filter)
Only light from crystal passes thru the analvzer
Analyzer
Figure 1.5. A simplified view of how plane polarized light behaves as it passes through a crystal possessing birefringent properties. Nicols.
Figure 1.6. Only particles possessing birefringent properties will be clearly visible when viewed with crossed
passes rnrougn a birefringent properties.
. .
Nicols.
passes rnrougn a birefringent properties.
12 Three-Dimensional Plant Anatomy
B. The Polarizing Microscope An ordinary compound microscope is easily converted into a polarizing microscope
by placing a polarizing filter (the polarizer) between the light source and the specimen on the slide (many scopes are equipped with a filter holder for holding a blue filter- a perfect place for the polarizer). The analyzer is then held in the hand between the eye and the ocular (eyepiece) and rotated until extinction is achieved (crossed Nicols). Any crystalline material found in the specimen will appear as a bright object against a dark blue or black background.
The polarizing microscope is particularly effective in the study of microscopic plant anatomy. This area of biology is frequently treated rather lightly due either to lack of interest on the students’ part or lack of background and/or interest on the teachers’ part. Plant structure viewed with crossed Nicols is literally spectacular! Comments such as “Holy scut! Look at this!” are not uncommon in the laboratory, with students competing to find the most spectacular slide. Polarizing microscopy can also be used as a diagnostic tool in interpreting various types of plant tissue and cell types. The following information will be useful in this pursuit.
Molecules of cellulose (a long chain polymer of glucose units) arrange themselves in organized strands known as microfibrils. The earliest formed cell walls consist of parallel strands of microfibrils. In the process of maturation, these early cell walls are stretched as a result of cell enlargement and elongation-this stretching disturbs the original parallel orientation of the microfibrils, resulting in a cell wall composed of randomly oriented microfibrils of cellulose. This first cell wall is called a primary cell wall, and it characterizes most thin-walled cells (parenchyma, sieve-tube elements, epidermal cells, etc.). These thin-walled cells will be essentially optically inactive (some slight degree of optical activity may be seen due to the crystalline arrangement of the cellulose molecules within individual microfibrils) when viewed with crossed Nicols. Such tissues as the epidermis, cortex, pith, and the conductive portion of the phloem will thus be optically inactive (dark against a dark background).
The secondary cell wall (that portion of the wall deposited after active cell elon- gation has stopped) also consists of parallel strands of cellulose microfibrils, but this wall retains the original parallel orientation of its microfibrils (there is no stretching to disorient the original pattern). These walls tend to be thick and stain red with safranin (due to the presence of lignin in addition to the cellulose). They characterize the cells of the xylem (vessel elements, fibers, parenchyma, and tracheids) and some of the phloem cells (notably the fibers of the bundle cap in herbaceous stem sections). Due to the parallel orientation of the microfibrils comprising the thick walls, as well as the orderly arrangement of the cellulose molecules within the microfibrils, these thickened secondary cell walls are highly optically active (highly birefringent). Thus, cells of the xylem and bundle cap regions of the herbaceous dicot stem (Helianthus, Medicago, etc.) will appear as bright red against a dark background when viewed with crossed Nicols. A cross section of a woody stem, especially Pinus, will be very im- pressive. Cross sections of Tilia stems are less impressive due to the relatively thin cell walls seen in the wood of this specimen.
In addition to the secondary cell walls, other cellular structures of the plant will be optically active. Such cellular inclusions as vacuolar crystals and starch grains are very noticeable when viewed with polarized light (crossed Nicols).
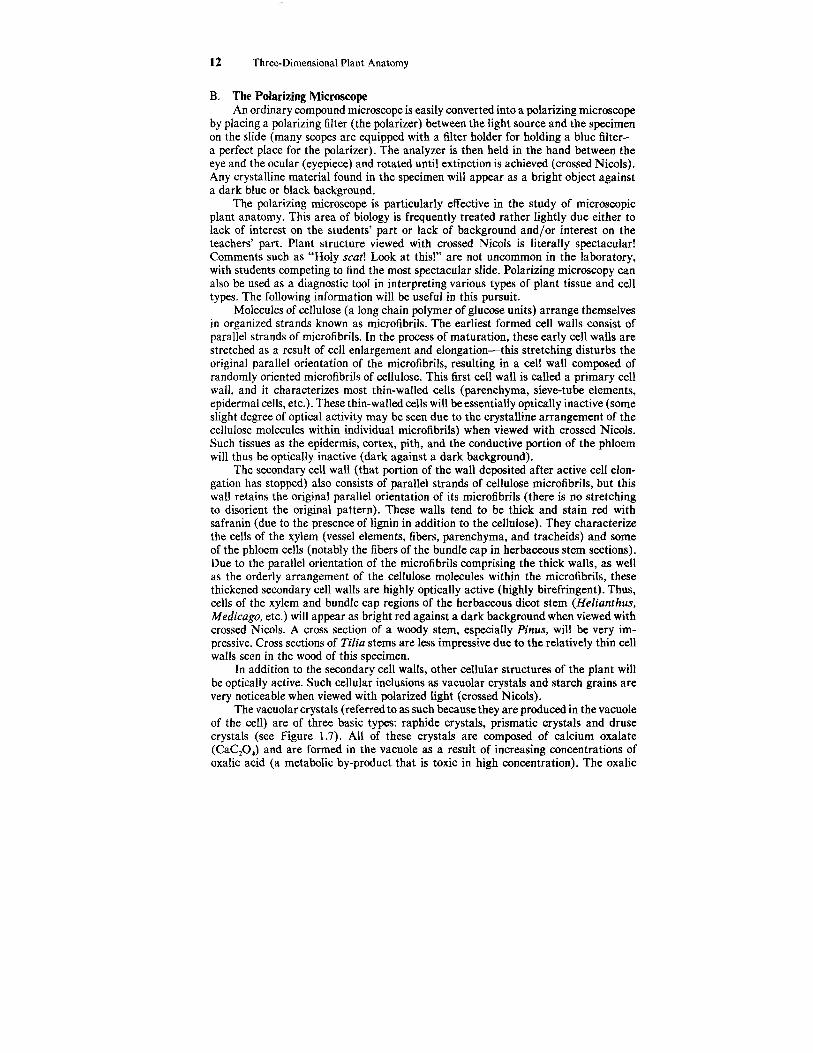
The vacuolar crystals (referred to as such because they are produced in the vacuole of the cell) are of three basic types: raphide crystals, prismatic crystals and druse crystals (see Figure 1.7). All of these crystals are composed of calcium oxalate (CaC2O4) and are formed in the vacuole as a result of increasing concentrations of oxalic acid (a metabolic by-product that is toxic in high concentration). The oxalic
Three-Dimensional Plant Anatomy 13
A
Raphide crystals Prismatic crystals Druse crystals
Figure 1.7. Various types of crystals.(Calcium oxalate) commonly found in plant tissues.
acid is made insoluble by complexing with calcium ions (Ca++)-an ingenious way in which the plant lowers the concentration of a toxic compound in its cytoplasm by storage in its vacuole. Since these are crystalline in nature, they are highly optically active when viewed with crossed Nicols.
Starch grains are also commonly occurring cellular components that are optically active when viewed with crossed Nicols. Starch, like cellulose, consists of long chains of glucose deposited in a crystalline fashion (starch and cellulose are both polymers of glucose, differing from one another only in the way in which the glucose molecules are bonded together-a-1,4 glycosidic bonding for starch and B-1,4 glycosidic bonding for cellulose). Due to this orderly arrangement, starch has the property of birefringence (actually a specific kind of birefringence called cruciform birefringence because of the appearance of a cross in the optically active starch grain). This cruciform birefringence is so characteristic for starch that it can be used in the identification of these inclusions.
C. How to Obtain Polarizing Filters Large sheets of H-type polarizing filter material are available from Edmund
Scientific (Edmund Scientific Co., 6876 Edscorp Building, Barrington, New Jersey 08007) at low cost. Sheets of thick, rigid filter material (order number 70,887. 0.030" thick, 6" X 24" sheets) are ideal for making microscope filter sets (this material is easily cut with scissors). Lenses from polaroid sunglasses may also be used. Polarizing filter discs may also be purchased from Edmund Scientific, but at a higher cost (Po- larizer, 47 mm diam.--order number 40,209; analyzer discs, 23 mm diam. package of 60-order number P-42,036). Complete polarizing sets of filters (cut to proper size for microscopes) are available at a cost of $12.00 per set from Fisher Scientific and other suppliers.
Since the plastic surfaces of these filters are easily scratched, you may prefer to mount them in a sandwich of glass discs (also available from Edmund Scientific). Storing the filters in small coin-type envelopes helps preserve them.
Good luck! I hope both you and your students enjoy working with polarizing light microscopy.
14 Three-Dimensional Plant Anatomy
Laboratory Exercises with the Polarizing Microscope 1. Zebrina or Tradescantia (Wandering Jew) stem juice. Squeeze a freshly cut
portion of the stem, placing some of the juice on a slide, and then add water and a cover slip. You do not need a slide of the stem, just the juice! Study the preparation, first under 10x, and then under high power. Locate small narrow, needle-like crystals called raphide crystals. Also note the small, spherical bodies. Some are green in color and are chloroplasts. Others are more or less clear, or transparent, and are starch grains. Using polarized light (crossed Nicols) study the preparation again. Are any of the objects optically active? Which ones? What does this tell you about the structure of those things that are optically active?
2. Solanum tuber pulp. Scrape a small amount of pulp from the surface of a white potato tuber, and dip this in a drop of water on a slide. Add a cover slip and study the preparation. Locate starch grains, noting a hilum and concentric rings in each (careful adjustment of the condenser iris diaphragm will greatly aid in locating these features). Now study with polarized light, noting especially the cruciform birefringence characteristic of starch grains. Once you have studied the prepara- tion under both normal and polarized light, add some IKI solution to the edge of the cover slip. What changes take place? Have you seen this happen before?
3. Pinus sp. stem X.S. prepared slide. Locate the “bark” region of the stem (actually the secondary phloem) and look for small prismatic crystals in some of the cells. Make use of your polarizing filters to aid in their identification. Are they optically active? Of what are they composed? How do they differ from the raphide crystals seen previously?
4. Ranunuculus sp. (buttercup) root, X.S. prepared slides. Locate the cortex and study the parenchyma cells seen there. Locate the following: cell walls, intercel- lular spaces, nuclei and cytoplasmic inclusions. With the aid of polarized light, identify the inclusions. Are you able to locate a vacuole? Now move in to view the stele. Locate the xylem and the phloem. Using polarized light, study these two tissues. What accounts for the difference seen between the cell walls of the xylem and those of the phloem?
References (General) Brown, J. F., Jr. Inclusion compounds. Scientific American (July) 207:82-92; 1962. Gray, P. Handbook of basic microtechnique. New York McGraw-Hill, Inc.: 1964. Shurcliff, W. A. and S. S. Ballard. Polarized light. New York: D. Van Nostrand, Inc.;
1964.
Cat. No. 62-6930 74-1348 62-4080 62-7510 62-7200 89-6640 86-5 5 30 63-3952 65-5164 88-4290 89-1340
Three-Dimensional Plant Anatomy 15
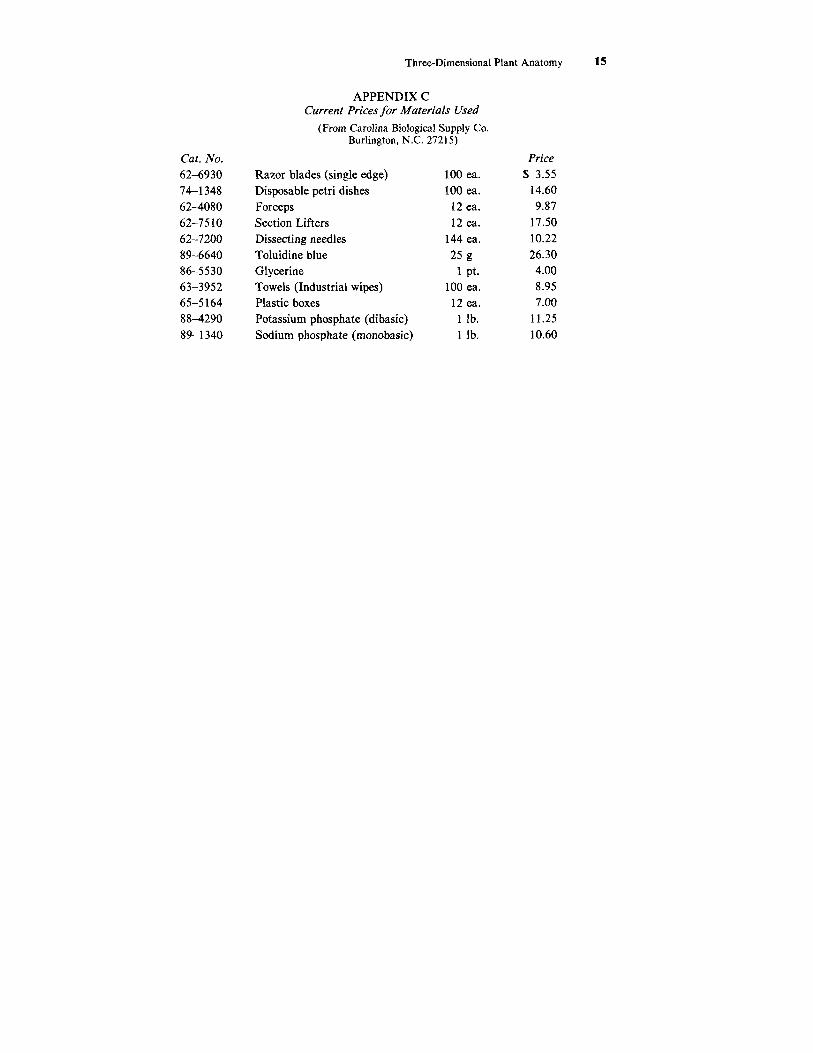
APPENDIX C Current Prices for Materials Used
(From Carolina Biological Supply Co. Burlington, N.C. 27215)
Razor blades (single edge) Disposable petri dishes Forceps Section Lifters Dissecting needles Toluidine blue Glycerine Towels (Industrial wipes) Plastic boxes Potassium phosphate (dibasic) Sodium phosphate (monobasic)
100 ea. 100 ea.
12 ea. 12 ea.
144 ea. 25 g 1 pt.
100 ea. 12 ea. 1 lb. 1 lb.
Price $ 3.55
14.60 9.87
17.50 10.22 26.30 4.00 8.95 7.00
11.25 10.60