Changi Travel Circle (CTC) Partner Portal User Guide
40
Changi Travel Circle (CTC) Partner Portal User Guide Published 20 Oct 2021 Version 1.3 1
Transcript of Changi Travel Circle (CTC) Partner Portal User Guide

Changi Travel Circle (CTC)Partner Portal User Guide
Published 20 Oct 2021Version 1.3
1

Upload products to our themes for an opportunity to be featured on our Homepage!• Featured Tour Products are displayed on Changi Travel Circle’s homepage, and Members
will be able to view them once they Sign In.
• This is aimed at giving our Partners and your products greater visibility.
• We will be featuring 6 tour products per month, based on the themes that will be announced in our monthly newsletters.
• Do also ensure that your company logo and profile on the Marketplace is up to date, so that Members can get all the information they need!
2

Partner Sign-up and Account Information
a. Signing up -------------------------------------------------------------------------------------------- 4
b. Logging in -------------------------------------------------------------------------------------------- 7
c. Site Navigation -------------------------------------------------------------------------------------- 8
d. Types of Partner Accounts ------------------------------------------------------------------------ 9
e. Adding Subvendor(s) ------------------------------------------------------------------------------- 10
Manage Your Store
a. Manage Store ----------------------------------------------------------------------------------------- 14
b. Manage Location ------------------------------------------------------------------------------------- 17
c. Add / Edit Products ---------------------------------------------------------------------------------- 19
d. Manage Inventory ------------------------------------------------------------------------------------ 24
e. View Store --------------------------------------------------------------------------------------------- 27
Respond to Quotes
a. Responding to Quotes ------------------------------------------------------------------------------- 29
FAQ
a. FAQ ------------------------------------------------------------------------------------------------------ 38
For more assistance, contact us: https://travelcircle.changiairport.com/contact
Table of Contents
3

Signing up
1. Create your Partner Account
A Partner Account allows you to:
a) access Partner Portal to create and manage your Marketplace store, add your tour products and respond to Members of CTC;
b) attend webinars; and
c) access Resource Hub to get latest information on Changi Airport and Jewel.
2. After submitting your request, you will be redirected to the “Webinars” page, where a green box will mention the team will be in touch within 5 working days. You will also receive an email at your registered business email.
This name will be displayed at your
Marketplace store.
Select all the categories which apply to your
agency.
4

4. Once a CAG administrator approves your sign-up request, you will be informed via email.
Click on the link to reset password on the
Partner Portal.
5. Enter your business email on the Partner Portal.
5

6. You will receive an email link to reset password. Change your password immediately as the link expires after 2 hours.
Password must contain: at least eight (8) characters in length with minimally one (1) upper and one (1) lower
case letter and one (1) number.
7. Reset password according to requirements.
6

Log in to Partner Portal using your registered business email and new password. You are now your company’s main Vendor on the portal.
Logging in
7
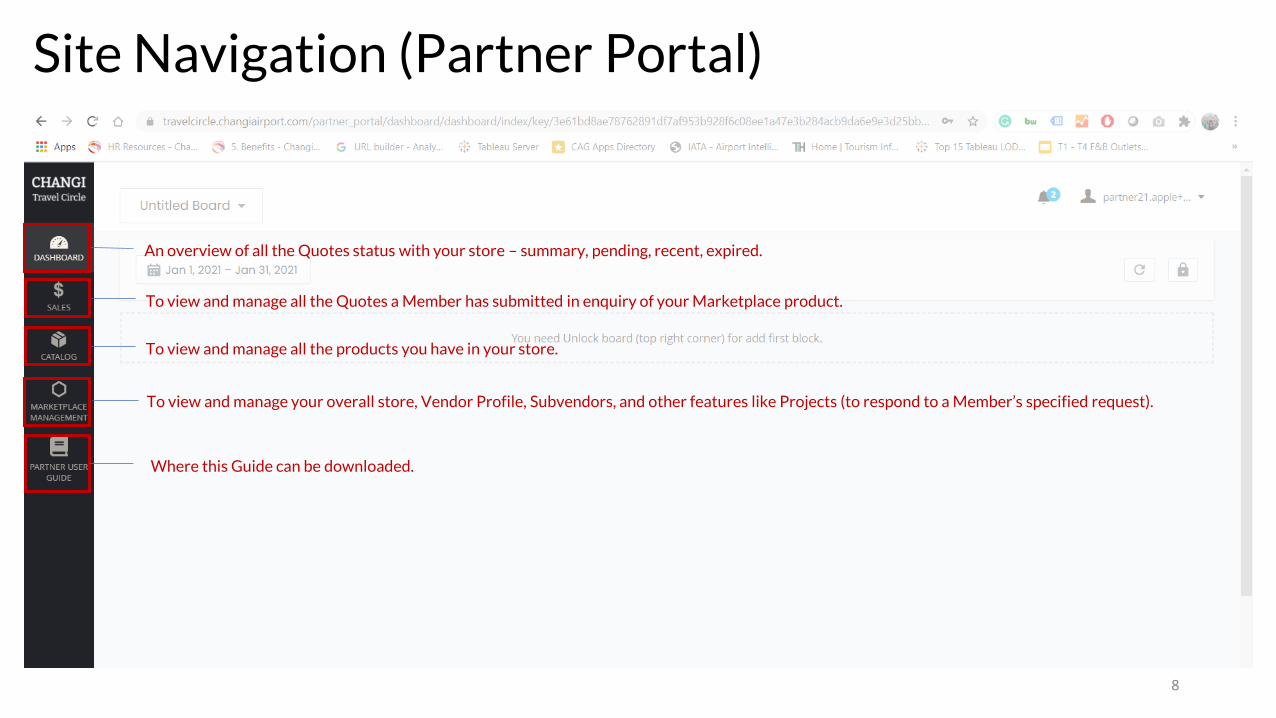
An overview of all the Quotes status with your store – summary, pending, recent, expired.
To view and manage all the Quotes a Member has submitted in enquiry of your Marketplace product.
To view and manage all the products you have in your store.
To view and manage your overall store, Vendor Profile, Subvendors, and other features like Projects (to respond to a Member’s specified request).
Where this Guide can be downloaded.
Site Navigation (Partner Portal)
8

1. Vendor: Each company can only have one (1) Vendor account. This is usually the main representative from your company.
2. Subvendor: Vendor can add as many Subvendor(s) from the same company as required. Subvendors are colleagues in the same company that can also help to manage the store.
Role Vendor Subvendor
Add Subvendor(s) √ ×
Manage Store √ √
Manage Location √ √
Add / Edit Products √ √
Manage Inventory √ √
View Store √ √
Respond to Quotes √ √
Respond to Projects √ √
Vendor and Subvendor(s) have identical functions, with the exception of adding Subvendors, a role which can only be done by the Vendor.
Types of Partner Accounts
9

1. Go to ‘Marketplace Management’ > ‘Vendor Subvendor’ > ‘Add New Subvendor’
Adding Subvendor(s)
10

User Name and Email to be filled with the same business email address of the Subvendor.
Subvendor’s password must contain:at least eight (8) characters in length with minimally one (1) upper and one
(1) lower case letter and one (1) number.
Vendor to key in own password for identification purposes.
Key in Subvendor’s first name and last name.
11

Select this field so CAG admin can identify user as a Subvendor.
Once user is saved, he can log in to Partner Portal using his email address and password.
12

13
2. Subvendor will receive an email for to accept the invitation and access the Partner Portal to re-set his password.
Password must contain: at least eight (8) characters in length with minimally one (1) upper and one (1) lower
case letter and one (1) number.

1. Go to ‘Marketplace Management’ > ‘Vendor Frontend Store View’
2. You will see your store listed. Click on ‘Select’ > ‘Edit’
Manage Store(Set up your company store on the Changi Travel Circle Marketplace.)
14

This should be your company’s
brand name.
These will be displayed for Members to contact you.
This will be displayed on your store. Please
include a short description of your
company.
15

This will determine the type of projects you will be eligible to bid
for. You may choose to select all for a start.
A stacked logo is recommended for optimum display.
Remember to click ‘Save’
16
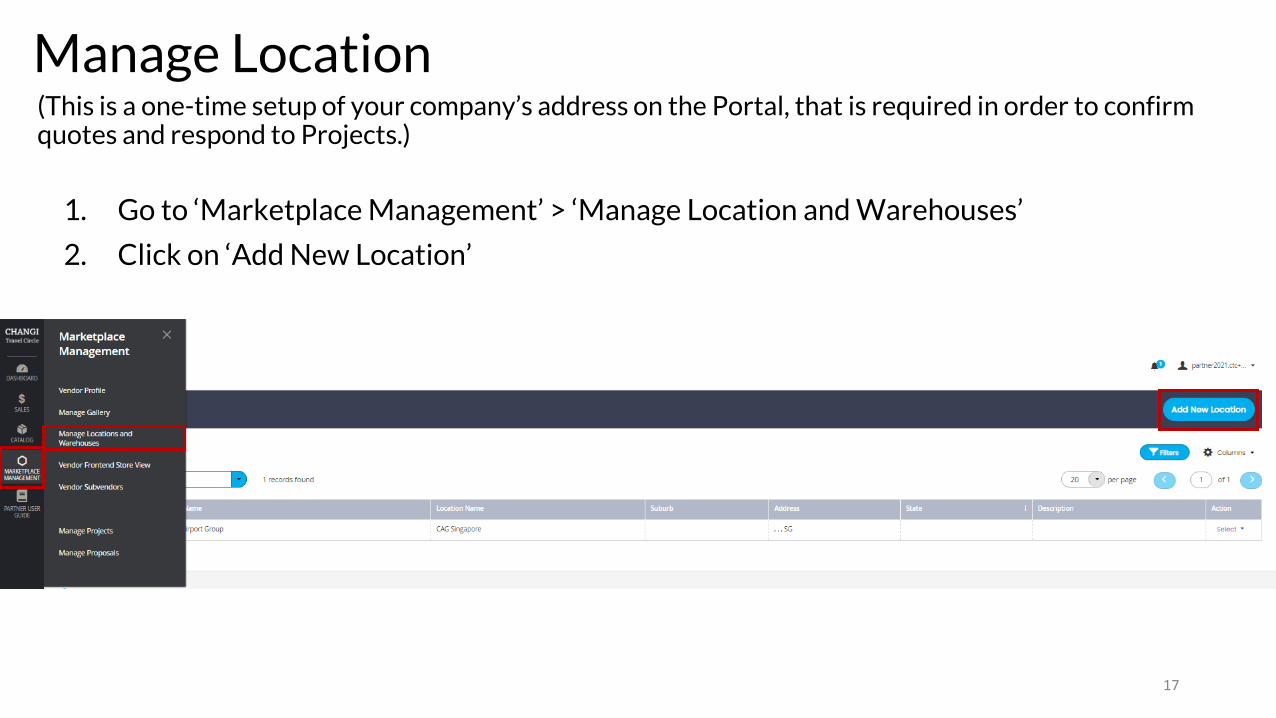
1. Go to ‘Marketplace Management’ > ‘Manage Location and Warehouses’
2. Click on ‘Add New Location’
Manage Location(This is a one-time setup of your company’s address on the Portal, that is required in order to confirm quotes and respond to Projects.)
17

Remember to click ‘Save’
Fill in your company’s office address. This information will only be made available to CAG admin and is not
displayed on your store.
Select ‘Changi Travel Circle Website’
Change status to ‘Active’
Select ‘No’
Manage Location
18

1. Go to ‘Catalog’ > ‘Products’ 2. Click on ‘Add Product’
Add / Edit Products(Add / Edit your company’s product offerings to make them visible on the Marketplace.)
19

Select ‘Yes’ so product can be displayed in the
Marketplace.
Key in your product SKU for easy reference.
Members will be able to filter your product based on these
categories.
This link will be displayed in your
product details. You may wish to link to
your product on your website.
20

This will be displayed in the pop-up box after Members click ‘QUICKVIEW’ of
your product listing. Also appears below Product Name when Members
click into your product listing.
This will be displayed under ‘Details’ when Members click
into your product listing.
21
Ensure this is set to “Yes” so that Members can request a quote for your
tour product on the Changi Travel Circle website.
ImportantSelect “General” so that the “Request A
Quote” button for your tour product can appear for all Members of Changi
Travel Circle.

Upload as many images as you need. For your main image featured on the
Marketplace, we recommend 1:1 (square)aspect ratio.
To make it the main image, click on the thumbnail of your chosen image and the
following screen will appear:
Insert your video using YouTube / Vimeo links.
If you would like to add videos relating to your product, click on ‘Add Video’. The following
screen will appear:
22
Ensure the first four roles are ticked -Base, Small, Swatch, Thumbnail – so it
will appear as the main image.
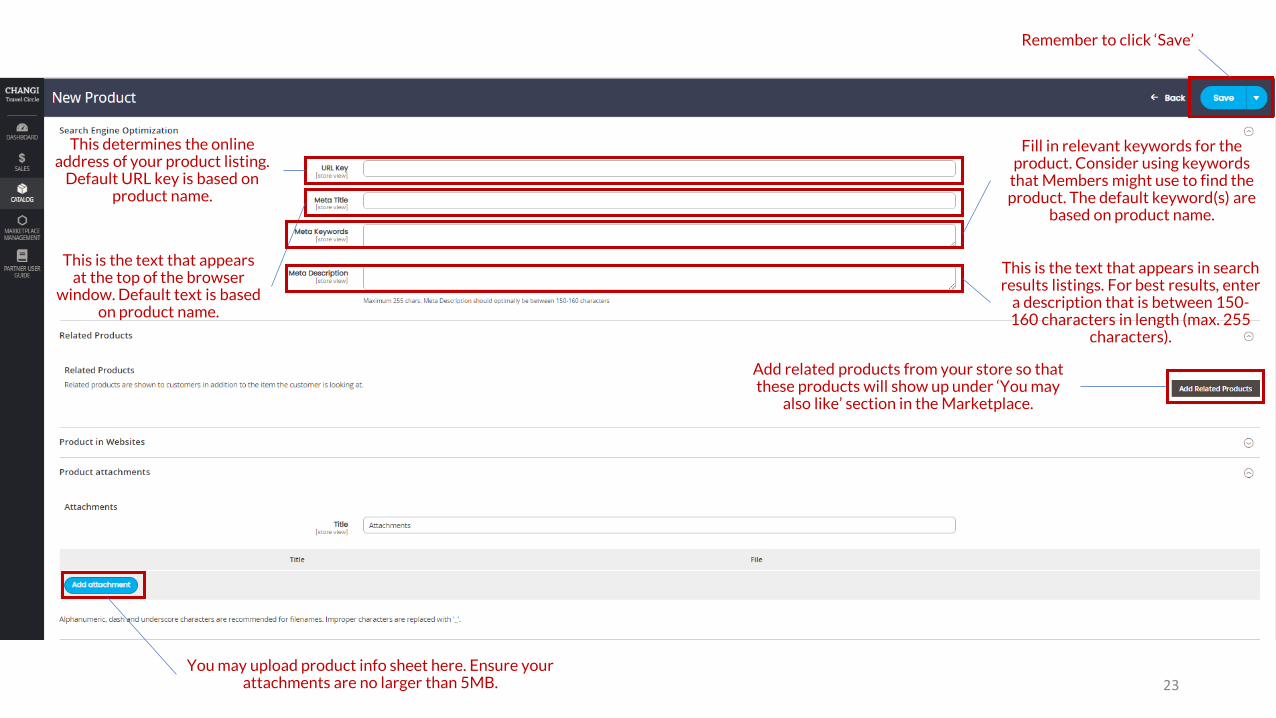
This determines the online address of your product listing.
Default URL key is based on product name.
This is the text that appears at the top of the browser
window. Default text is based on product name.
Fill in relevant keywords for the product. Consider using keywords
that Members might use to find the product. The default keyword(s) are
based on product name.
This is the text that appears in search results listings. For best results, enter
a description that is between 150-160 characters in length (max. 255
characters).
Add related products from your store so that these products will show up under ‘You may
also like’ section in the Marketplace.
You may upload product info sheet here. Ensure your attachments are no larger than 5MB.
Remember to click ‘Save’
23

1. Go to ‘Marketplace Management’ > ‘Manage Location and Warehouses’
2. Click on ‘Select’ > ‘Inventory’
Manage Inventory(This refers to the Inventory of your product offerings.)
24

25
3. Click on ‘Add Product’
4. Select the product and click on ‘Add Selected Products’

5. Click on the number under ‘Quantity’
6. Quantity refers to the total available inventory your company has set aside on the Marketplace for your product listing. If there is no limit, you may set it at ‘99,999’.
Click ‘Save’
Edit here
26

Note:
After making changes to your store or product, clear browser cache to view updates immediately. Else, changes may take up to 30 minutes to be displayed.
1. Go to ‘Marketplace Management’ > ‘Vendor Frontend Store View’
2. You will see your store listed. Click on ‘Select’ > ‘Preview’
View Store(Preview how your store looks like on the Marketplace, from Members’ perspective.)
27

View Store to Access Resource Hub and Webinars
28
Other than check the Products you’ve uploaded, you’ll also be able to access our upcoming topics of Webinars, and use the Resource Hub from here.
Access from here

Member requests a
Quote on your product
• Partner (you) receives an email notification when a new quote request is submitted for your attention.
• Log-in to Partner Portal to manage it accordingly.
You respond to the Quote
• You can engage the Member in a few rounds of clarifications, by leaving comments for each other.
• Change the status of the Quote to Open, Ordered, Declined or Expired accordingly.
Ready to transact?
• If you are ready to transact with the Member after agreeing on basic details of the Quote, take the fulfillment and payment of the product offline from CTC.
Workflow for Quotes: A Summary
29

1. Go to ‘Sales’ > ‘Quotations’
Responding to Quotes
30

2. You will see an overview of all requests for your Products.
3. Click ‘View’ to respond/manage a particular request.
31

32
4. You can also click ‘Export to CSV’ to download quote details.
5. The downloaded file will contain additional details such as:
- Quote status
- Product SKU
- Quote Qty
- Price
- Total Price

6. Check your mailbox regularly for notifications on a new Quote pending your response.
33

7. Things to note when responding to a Quote for the first time:
Change status to Openwhen replying
This is the expiry date of your updated quote.
Optional
Free text field to respond to Member’s questions under Details.
Save Quote & Update when you are ready.
Check this box if you want the comment to be shown to Members.
Leave this unchecked if you just want to make an internal note that can be viewed by you and other
Vendors / Subvendors in your store. 34

8. This is what Member sees after your first reply:
35
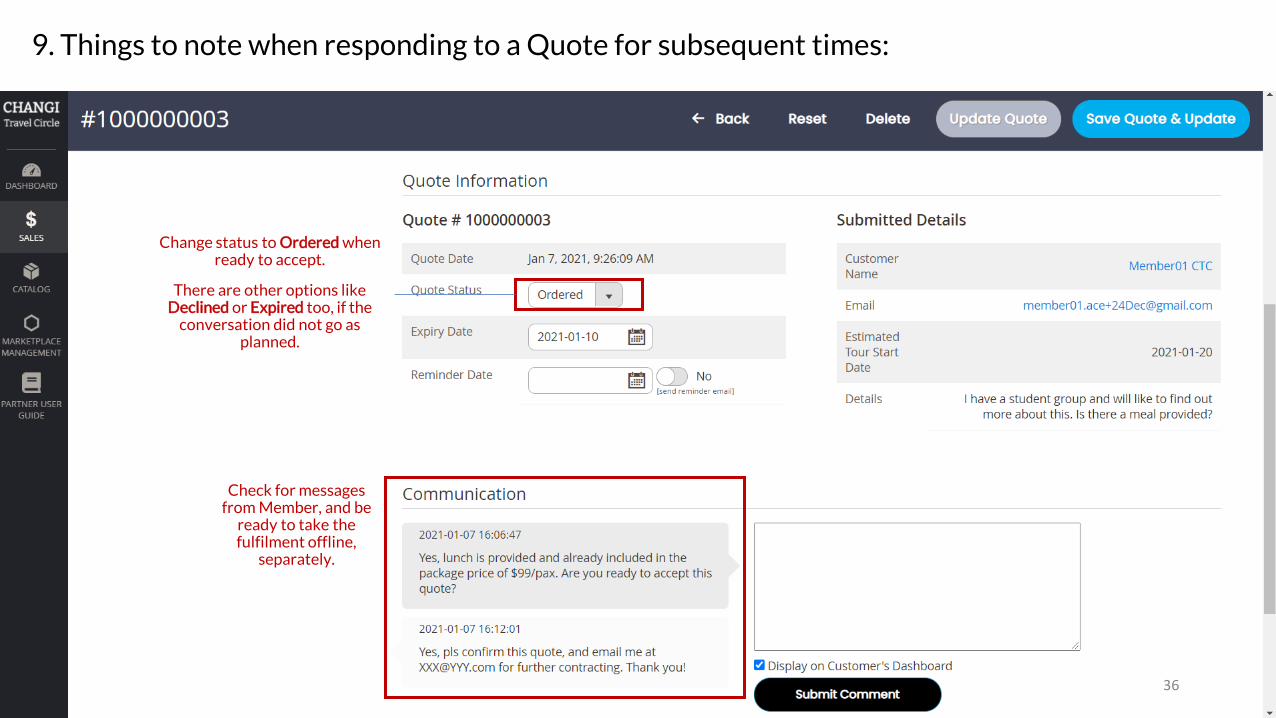
9. Things to note when responding to a Quote for subsequent times:
Change status to Ordered when ready to accept.
There are other options like Declined or Expired too, if the
conversation did not go as planned.
Check for messages from Member, and be
ready to take the fulfilment offline,
separately.
36

10. Vendors / Subvendors will receive a notification via email when a new quote request is submitted.
Note: There will not be any email notifications for subsequent actions in the quote. Please check the portal periodically for updates.
37
For informationMembers receive a notification via email when:a. You (i.e. Vendor / Subvendor) update quote detailsb. You leave a comment on the quotec. You update expiry date of the quoted. When a quote is expiring (you can choose to send it and select the reminder date)e. When a quote expires (Members can no longer accept your quote)f. You update quote status to ‘Ordered’ (i.e. you accepted the quote)g. You update quote status to ‘Declined’ (i.e. you rejected the quote)

Why has Changi Airport Group launched Changi Travel Circle?
Changi Airport Group has for some time, dreamed of building a digital community of like-minded travel
professional from around the globe, sharing a passion for all things Changi Airport and Jewel.
Do I need to pay any fees for joining Changi Travel Circle as a Partner?
Membership is free.
What do I get for being a Partner?
CTC Partners will receive monthly updates from Changi Airport Group to ensure that you are kept up to
date. Also, Partners will receive invites to event previews and other exclusive deals and discounts with
CAG’s other trade partners.
39
FAQs

Are Webinars for Members only, or can my colleagues and I also join?
Webinars are for both Members and Partners, please feel free to sign up. You will need to ensure that all
attendees from your Company are added as Subvendors so that they can attend the Webinars too.
40
FAQs
End of Partner Portal User Guide
41
Thank you!


![Managing Changi Airport - Eurocontrol · PDF fileManaging Changi Airport [date] Name of Presenter Designation Section/Unit Changi A-CDM: Aiming for Sustainable First Class Airside](https://static.fdocuments.net/doc/165x107/5ab74e0d7f8b9ad3038b7134/managing-changi-airport-eurocontrol-changi-airport-date-name-of-presenter-designation.jpg)