Chamilo Teacher Guide 1.8.8.4 En
152
Teacher guide Chamilo 1.8.8.4 1/152
Transcript of Chamilo Teacher Guide 1.8.8.4 En

Teacher guide
Chamilo 1.8.8.4
1/152

Table of contentsChapter 1 Introduction .......................................................................................................................... 8
1.1 Chamilo, what is it ? ................................................................................................................... 8 1.2 About this guide ......................................................................................................................... 8 1.3 Whom is this guide meant for? .................................................................................................. 8 1.4 How to read this guide? .............................................................................................................. 9 1.5 General usability ........................................................................................................................ 9
1.5.1 Terminology ...................................................................................................................... 11 Chapter 2 Why Chamilo? ................................................................................................................... 12 Chapter 3 The Chamilo homepage ..................................................................................................... 13 Chapter 4 Register on the platform ..................................................................................................... 14 Chapter 5 Finding one's way in Chamilo ............................................................................................ 15 Chapter 6 Course creation ................................................................................................................... 16 Chapter 7 Control course access ......................................................................................................... 18 Chapter 8 Courses organizing ............................................................................................................. 19
8.1 Courses management icons ...................................................................................................... 21 Chapter 9 Course administration ........................................................................................................ 22 Chapter 10 Course homepage ............................................................................................................. 23
10.1 Introduction text ..................................................................................................................... 23 10.2 Production tool ....................................................................................................................... 24
10.2.1 Course description .......................................................................................................... 24 10.2.2 Documents ...................................................................................................................... 24 10.2.3 Exercises ......................................................................................................................... 24 10.2.4 Learning path ................................................................................................................. 25 10.2.5 Assessments ................................................................................................................... 25 10.2.6 Attendances .................................................................................................................... 25 10.2.7 Links ............................................................................................................................... 25 10.2.8 Announcements .............................................................................................................. 25 10.2.9 Glossary .......................................................................................................................... 25 10.2.10 Course progress ............................................................................................................ 25 10.2.11 Blogs ............................................................................................................................. 25 10.2.12 Search ........................................................................................................................... 26
10.3 Interaction tools ...................................................................................................................... 27 10.3.1 Agenda ............................................................................................................................ 27 10.3.2 Dropbox .......................................................................................................................... 27 10.3.3 Groups ............................................................................................................................ 27 10.3.4 Assignments ................................................................................................................... 27 10.3.5 Wiki ................................................................................................................................ 27 10.3.6 Forum ............................................................................................................................. 27 10.3.7 Users ............................................................................................................................... 27 10.3.8 Chat ................................................................................................................................ 27 10.3.9 Surveys ........................................................................................................................... 28 10.3.10 Personal notes ............................................................................................................... 28
2/152

10.3.11 Videoconference ........................................................................................................... 28 10.4 Administration tools ............................................................................................................... 29
10.4.1 Blogs ............................................................................................................................... 29 10.4.2 Settings ........................................................................................................................... 29 10.4.3 Tracking .......................................................................................................................... 29 10.4.4 Maintenance ................................................................................................................... 30
Chapter 11 First Steps: Documents ..................................................................................................... 31 11.1 Create a directory .................................................................................................................... 32 11.2 Quickchange of directory ...................................................................................................... 32 11.3 Importing a document ............................................................................................................ 34 11.4 Creating a new document ....................................................................................................... 35 11.5 Saving documents ................................................................................................................... 37 11.6 Deleting a file or a directory ................................................................................................... 37 11.7 Watching course quotas .......................................................................................................... 38
Chapter 12 Interactivity: the exercises tool ......................................................................................... 39 12.1 Introduction ............................................................................................................................ 39 12.2 Feedback, score and correct answers ..................................................................................... 40
12.2.1 Feedback ......................................................................................................................... 40 12.2.2 Score ............................................................................................................................... 41 12.2.3 Correct answers .............................................................................................................. 41
12.3 Test types ................................................................................................................................ 41 12.4 Creating an exercise ............................................................................................................... 42 12.5 Creating a question ................................................................................................................. 44
12.5.1 Type 1 : Multiple choice – Single answer ....................................................................... 44 12.5.2 Type 2 : Multiple choice – multiple answer ................................................................... 45 12.5.3 Type 3 : Fill the blanks ................................................................................................... 45 12.5.4 Type 4 : Matching ........................................................................................................... 46 12.5.5 Type 5 : Open questions ................................................................................................. 47 12.5.6 Type 6 : Hotspot, or image area ...................................................................................... 48 12.5.7 Type 7 : Exact combination ............................................................................................ 49
12.6 Recycling existing questions .................................................................................................. 50 12.7 Update a question belonging to several tests .......................................................................... 52 12.8 HotPotatoes, IMS/QTI2 or Excel imports .............................................................................. 52 12.9 Exercises results ..................................................................................................................... 53
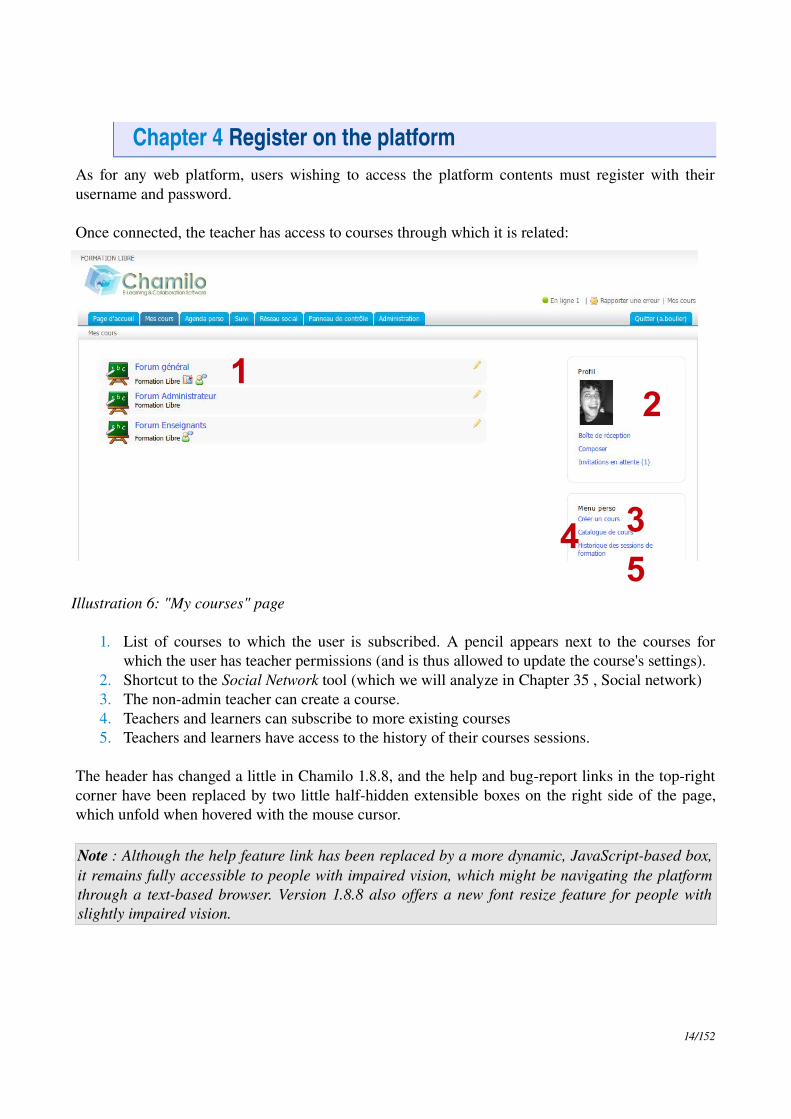
Chapter 13 Communication : Forum .................................................................................................. 54 13.1 Using forum views ................................................................................................................. 55 13.2 Add forum categories ............................................................................................................. 55 13.3 Add forum .............................................................................................................................. 55 13.4 Manage forum categories ....................................................................................................... 56 13.5 Manage forums ....................................................................................................................... 57 13.6 Start a new topic ..................................................................................................................... 57 13.7 Manage discussion threads ..................................................................................................... 58 13.8 Manage messages ................................................................................................................... 59 13.9 Score a learner ........................................................................................................................ 59 13.10 Give a score from a message ................................................................................................ 60 13.11 Add a message to a thread .................................................................................................... 60
3/152

13.12 Reply to a specific message .................................................................................................. 61 13.13 Quote a previous message ..................................................................................................... 61 13.14 Reply or Reply to this topic .................................................................................................. 61 13.15 Search a forum element ........................................................................................................ 61
Chapter 14 Structure: Learning paths ................................................................................................. 62 14.1 Introduction ............................................................................................................................ 62 14.2 Create a learning path ............................................................................................................ 62
14.2.1 Learning path's settings .................................................................................................. 63 14.2.2 Build ............................................................................................................................... 64
14.3 Add an activity / object / document ....................................................................................... 65 14.3.1 Create a new document ................................................................................................... 65 14.3.2 Use existing resources .................................................................................................... 66 14.3.3 Add a new section ........................................................................................................... 66 14.3.4 Show ............................................................................................................................... 67 14.3.5 Organize .......................................................................................................................... 67
14.4 Add audio ............................................................................................................................... 68 14.5 Import AICC and SCORM ................................................................................................... 68 14.6 Update a learning path ........................................................................................................... 69 14.7 Prerequisites ........................................................................................................................... 69
Chapter 15 Reporting .......................................................................................................................... 71 15.1 Tracking learners .................................................................................................................... 71 15.2 Show synthetic data for learner .............................................................................................. 71 15.3 Show learner's detailed reporting ........................................................................................... 71 15.4 Course reporting ..................................................................................................................... 72 15.5 Notify an inactive student ....................................................................................................... 73
Chapter 16 Assignments ..................................................................................................................... 74 16.1 Assignments creation .............................................................................................................. 74 16.2 Manage assignments folders ................................................................................................... 75 16.3 Setting up the assignment evaluation ..................................................................................... 75 16.4 Expiration dates ...................................................................................................................... 76
16.4.1 Expiration date ................................................................................................................ 76 16.4.2 End date .......................................................................................................................... 76 16.4.3 Sorting assignments ........................................................................................................ 76
16.5 Marking assignments ............................................................................................................. 77 16.6 Manage assignments .............................................................................................................. 77
Chapter 17 Users ................................................................................................................................. 78 17.1 Subscribe users ....................................................................................................................... 78
17.1.1 Add teachers .................................................................................................................... 78 17.1.2 Unsubscribe a user .......................................................................................................... 79 17.1.3 Add/update a user's description ....................................................................................... 79 17.1.4 Search a subscribed learner ............................................................................................. 79 17.1.5 Export the list of subscribed users .................................................................................. 79 17.1.6 Display learners reporting ............................................................................................... 79
Chapter 18 Assessments ...................................................................................................................... 81 18.1 Assessment preconfiguration ................................................................................................ 82
18.1.1 Total weight and minimum certification score ................................................................ 82
4/152

18.1.2 Weights ........................................................................................................................... 82 18.1.3 Skills ranking .................................................................................................................. 83 18.1.4 Certificate template ......................................................................................................... 84
18.2 Add classroom activity ........................................................................................................... 85 18.3 Add online activity ................................................................................................................. 86 18.4 List view ................................................................................................................................. 86 18.5 Manage activities .................................................................................................................... 87
Chapter 19 Wiki .................................................................................................................................. 88 19.1 Start the wiki .......................................................................................................................... 88 19.2 Add a new linked page ........................................................................................................... 88 19.3 Add a new orphan page .......................................................................................................... 89 19.4 Commenting a page ................................................................................................................ 89 19.5 Other wiki features ................................................................................................................. 90
Chapter 20 Links ................................................................................................................................. 91 20.1 Links categories ..................................................................................................................... 91 20.2 Links ...................................................................................................................................... 92 20.3 Manage links .......................................................................................................................... 92 20.4 Links checker ......................................................................................................................... 93
Chapter 21 Announcements ................................................................................................................ 94 21.1 Add an announcement ............................................................................................................ 94 21.2 Announcements management ................................................................................................. 95
Chapter 22 Glossary ........................................................................................................................... 97 22.1 New term ................................................................................................................................ 97 22.2 Glossary terms management .................................................................................................. 97
Chapter 23 Attendances ...................................................................................................................... 98 23.1 Create an attendance sheet ..................................................................................................... 98 23.2 Taking note of attendances ................................................................................................... 100
Chapter 24 Course progress .............................................................................................................. 102 24.1 Create a thematic section ...................................................................................................... 102 24.2 Define the thematic plan ...................................................................................................... 102 24.3 Create steps for the course progress ..................................................................................... 103
Chapter 25 Agenda ........................................................................................................................... 105 25.1 Add event to course agenda .................................................................................................. 105 25.2 Manage course agenda events .............................................................................................. 106 25.3 Personal agenda tab .............................................................................................................. 107
Chapter 26 Dropbox .......................................................................................................................... 108 26.1 Create folders ....................................................................................................................... 108 26.2 Send a file to specific users .................................................................................................. 108 26.3 Manage dropbox files ........................................................................................................... 109 26.4 Read and add comments attached to a file ........................................................................... 110
Chapter 27 Groups ............................................................................................................................ 111 27.1 Create group .......................................................................................................................... 111 27.2 Groups settings ..................................................................................................................... 111 27.3 Let learners subscribe ........................................................................................................... 112 27.4 Autofilling a group .............................................................................................................. 112 27.5 Manual filling ....................................................................................................................... 113
5/152

27.6 Getting into a group space .................................................................................................... 113 27.7 Overview / Export of group members .................................................................................. 114 27.8 Groups management ............................................................................................................. 114
27.8.1 Batch management ........................................................................................................ 114 Chapter 28 Chat ................................................................................................................................ 115
28.1 Send a message ..................................................................................................................... 115 28.2 Empty messages ................................................................................................................... 115
Chapter 29 Survey ............................................................................................................................. 117 29.1 Survey creation ..................................................................................................................... 117 29.2 Add survey questions ............................................................................................................ 118 29.3 Survey preview ..................................................................................................................... 118 29.4 Survey publication ................................................................................................................ 118 29.5 Results .................................................................................................................................. 119 29.6 Surveys management ............................................................................................................ 120
Chapter 30 Notebook ........................................................................................................................ 121 30.1 Notes creation ....................................................................................................................... 121 30.2 Sort notes .............................................................................................................................. 121
Chapter 31 Projects ........................................................................................................................... 122 31.1 Project creation ..................................................................................................................... 122 31.2 Subscribe learners to a project .............................................................................................. 123 31.3 New article/task .................................................................................................................... 123 31.4 Roles management ................................................................................................................ 123 31.5 Assign a role to a learner ...................................................................................................... 124 31.6 Indicate the execution of a task ............................................................................................ 125 31.7 Learners' task management report ........................................................................................ 126
Chapter 32 Course settings ............................................................................................................... 127 32.1 Update general course settings ............................................................................................. 127 32.2 Visibility and access ............................................................................................................. 128 32.3 Email notifications .............................................................................................................. 128 32.4 User rights ............................................................................................................................ 129 32.5 Chat settings ......................................................................................................................... 129 32.6 Learning path settings .......................................................................................................... 130 32.7 Thematic advance configuration .......................................................................................... 131
Chapter 33 Backup ........................................................................................................................... 132 33.1 Create backup ....................................................................................................................... 133 33.2 Import backup ...................................................................................................................... 133 33.3 Copy course .......................................................................................................................... 134 33.4 Empty this course ................................................................................................................. 134
33.4.1 Delete the course area ................................................................................................... 135 Chapter 34 Reporting ........................................................................................................................ 136
34.1 Own courses and sessions reporting .................................................................................... 136 Chapter 35 Social network ................................................................................................................ 137
35.1 Update profile information ................................................................................................... 137 35.2 Internal messaging ............................................................................................................... 138 35.3 “Friends” .............................................................................................................................. 139 35.4 Social groups ........................................................................................................................ 140
6/152

Chapter 36 Session view ................................................................................................................... 142 36.1 Courses tab ........................................................................................................................... 143 36.2 Learning paths tab ................................................................................................................ 143 36.3 My MCQ tab ........................................................................................................................ 143 36.4 My statistics tab ................................................................................................................... 144
Chapter 37 Appendix ........................................................................................................................ 146 37.1 Glossary ................................................................................................................................ 146 37.2 Frequently asked questions ................................................................................................... 146
37.2.1 How can I set a survey as a requirement to complete a course? ................................... 146 37.2.2 How can I create a crosswordstype question? .............................................................. 147
37.3 Document license .................................................................................................................. 147 37.4 Illustrations index ................................................................................................................. 148 37.5 Alphabetical index ................................................................................................................ 151 37.6 Document history ................................................................................................................. 152
7/152

Chapter 1 Introduction
1.1 Chamilo, what is it ?Chamilo is an elearning system (that is it manages learning) developed in a collaborative way by several companies, associations and people, through an open model called « free software » (as in freedom).
You can download and use Chamilo freely, given you accept its license (GNU/GPLv3) which gives you, in short, four essential freedoms, given your compromise to maintain those freedoms : the freedom to use, study, modify and distribute the software.
Chamilo is not only developed collaboratively by dozens of people in the world at large ; it is also supported by a nonprofit association with the objective of promoting the platform and ensure its continuity. In this sense, Chamilo is the only free software elearning platform that generates so many guarantees of open access.
You can contribute to Chamilo too, promoting its use, reporting errors, suggesting improvements, translating it (or its manuals) to your native language, or even developing extensions or fixes by yourself.
1.2 About this guideThis guide has been written through the collaborative action of several companies which contribute, their own way, to the improvement of education around the world. See the Erreur : source de laréférence non trouvée section on page Erreur : source de la référence non trouvée.
You can contribute to the writing and improving of this guide too. Just drop us an email at [email protected] and send us back the modified version. It's that easy!
1.3 Whom is this guide meant for?This guide has been written in particular with, in mind, the numerous teachers or teachingminded people who will have (by their own will or by necessity) to manage an elearning coursee. Entering the elearning world is a complex process, but we believe we've got a nice solution for you. By explaining to you how to use Chamilo, we'll actually sand you on a very easy road to gandting up and running with elearning.If you are already an elearningminded teacher, this guide will also be useful to you as it delves deeply into every Chamilo feature, and will allow you to extend the way you use the tool to develop your coursees further.Chamilo has two main goals : increasing the teacher's availability for his students in need, and improving the quality of your coursee contents by making them so easy to create and update that you'll just love to come back to edit them to improve elements you didn't think about at first.
8/152

1.4 How to read this guide?This guide has been written as a reference with a smooth learning path, gandting you through the most used tools first, and then into more and more complex or seldom used resources. You'll find that the social nandwork tool gands a bit out this definition (defined at the very end of this guide). We've placed it there to give you extra motivation for the 34 last chapters which are a little bit more complex than the others.Finally, you'll find a series of global or alternative coursees which will be useful in the distribution of your coursee to your students, and will ease your tracking work so that you can do what's most important: gand to a higher level of teaching without leaving anyone behind.We recommend you take a quick look at the glossary on page 146. It will give you an overview of the terms used within this guide and will probably avoid confusion in a certain number of sections of this guide.
If you already have a teacher account in a Chamilo portal, you can move directly to Chapter 5 on page 15, which will explain the interface of Chamilo. If you already know it, move to page 16 which explains how to create a coursee . If you are already coursee administrator (teacher of a coursee you create), you should go directly to Chapter 9 on page 22, which is the first chapter explaining the coursee tools. And if you already know the tools, there won't be much to learn from this guide, but maybe you'll find it useful to review its chapter Social network on page 137.
Additionally, you will find this guide can serve as a quic reference, thanks to its Alphabetical index on page 151.
If this guide doesn't answer your questions, you can use the Chamilo forum1, where numerous other users, teachers or administrators, but also developers of the software, will be able to help you find the answers.
Finally, in the eventuality of having greater needs, you might also use the services of our official providers2, a group of companies and institutions which provide professional services around Chamilo and have proven their involvement and seriousness in the project and are sustaining its collaborative model.
1.5 General usabilityIt is important to note that Chamilo has been designed so you can find help inside the application itself. As such, icons have been worked out to try and symbolize what they represent in a culturallyagnostic way. Furthermore, all icons have a description. If you hold your mouse over an icon for just one second (without clicking), you will see the icon's label appear, which will make it clear which feature it provides, as shown in .
1 h ttp://www.chamilo.org/forum 2 h ttp://www.chamilo.org/en/providers
9/152

Finally, there is (although its content is slightly old now, it is this useful) an online help on most pages, which appears as a folded swimming buoy on the topright side of your screen (see Illustration 2). It remains present when you scroll the screen so that you never loose your way, and it can open and close without affecting your current work. When you click the buoy, a small guide will appear explaining the tool you're in and how to use it (see Illustration 4).
10/152
Illustration 1: Icons label
Illustration 2: Folded help Illustration 3: Unfolded help
Illustration 4: Contextual help popup

1.5.1 Terminology
Chamilo is a tool used (at the time of writing) by almost a thousand organizations around the world, be them primary schools, colleges, higher education institutes, universities, SMEs, NGOs or large corporations.
Obviously, all of these have small language variations which makes it impossible to design a onefitsall elearning platform or even users guide, so we try to be neutral and provide the application with terms which will be OK for all our users as a base.
Of course, because we understand your organization has a specific terminology, we have equipped Chamilo with a way to redefine any interface term from inside the platform administration. Would you urgently require a customization, you can always ask one of our official providers3 for a customized language pack to be imported into your platform.
In this guide, we have tried to maintain neutrality of terms, so some terms like the common higher education term of “student” have been replaced by neutral terms like “learner” to also match the business world. When talking about all kinds of users together, we decided to use the term “users”.
This manual is available in several formats, so you can always download it in editable format from our website4 and do a quick search & replace operation to make it fit your needs. Don't hesitate to send us the updated version back for sharing with others at [email protected]. You'll be amazed on how this can benefit you in return.
The most conflictual term of Training which had been introduced in previous versions of the software has now been replaced by the more understandable term of Course and the previously replaced term of Learning path has been reinstated after a short and unsuccessful change to Course. You will find all these notions defined in the following guide. If you have any doubt, make sure you check our Glossary on page 146.
3 h ttp://www.chamilo.org/en/providers 4 http://www.chamilo.org/ , documentation tab
11/152

Chapter 2 Why Chamilo?Chamilo is an elearning and collaboration platform which comes bundled as an opensource software (or as purist will say, Free Software) which can be adapted to educational or professional projects. It is distributed under the GNU/ GPL v3 license, which you are bound to accept when using it.The teacher using Chamilo benefits from a series of tools which allow him to create an efficient learning environment. During a coursee creation, he can:– import or create documents (audio, video, images) and publish them,– build tests, exams and autoevaluations,– elaborate or import (SCORM and AICC) learning paths,– allow delivery of virtual assignments,– describe the components of the course through description sections,– communicate through forums or the chat,– publish announcements,– add links,– create work groups or laboratory groups,– participate to a virtual classroom (through the videoconference extension),– manage scores through the assessments tool,– create surveys,– add a wiki to create documents collaboratively,– use a glossary,– use an agenda,– manae a project,– follow tracking of the course by learner and save the courses,– register attendances,– elaborate a class diary (course progress).Chamilo is a flexible platform. All its tools can be customized depending on the needs of each course. This system offers a sober and intuitive control of tools and administration spaces, as it doesn't require any advanced technical skill.The three most generic buttons available on the platform are the following:
Icons Features
The pencil tool allows for the update of a specific piece of information or content
The cross tool allows for the removal of a specific piece of information or content
The eye tool allows for the change of visibility of a piece of information or content
The yellow star marker on any icon symbolizes the creation of a new resource
12/152

Chapter 3 The Chamilo homepageThe homepage is the first visible page. It contains the login form and a few other important elements:
1. Once the login and password have been registered, connecting is easy. The administrator gives permissions to the users (depending on the platform configuration).
2. It is possible to register on the platform using a simple form (Register).3. In case you loose your password, a new one can be generated easily.4. Access to the Chamilo community's forum is provided through a link.5. Distinct course categories can be shown for the unlogged user as well and, once loggedin,
the user can subscribe to them clicking on the desired course (depending on the platform administration and courses settings).
Note : To view the restricted access courses, one must be registered on the platform and subscribe through the courses users list.
13/152
Illustration 5: Homepage
1
23
4
5
Chapter 4 Register on the platformAs for any web platform, users wishing to access the platform contents must register with their username and password.
Once connected, the teacher has access to courses through which it is related:
1. List of courses to which the user is subscribed. A pencil appears next to the courses for which the user has teacher permissions (and is thus allowed to update the course's settings).
2. Shortcut to the Social Network tool (which we will analyze in Chapter 35 , Social network)3. The nonadmin teacher can create a course.4. Teachers and learners can subscribe to more existing courses5. Teachers and learners have access to the history of their courses sessions.
The header has changed a little in Chamilo 1.8.8, and the help and bugreport links in the topright corner have been replaced by two little halfhidden extensible boxes on the right side of the page, which unfold when hovered with the mouse cursor.
Note : Although the help feature link has been replaced by a more dynamic, JavaScriptbased box, it remains fully accessible to people with impaired vision, which might be navigating the platform through a textbased browser. Version 1.8.8 also offers a new font resize feature for people with slightly impaired vision.
14/152
Illustration 6: "My courses" page
12
345

Chapter 5 Finding one's way in ChamiloMost of the pages are made quickly available through the tabulations on top of the page:
The tabs allow access to the homepage, the courses list, the agenda, the tracking page, the social network and, if one is lucky enough to be a portal administrator, to the dashboard and the administration pages. The last tab shows the username and allows a user to log out simply by clicking it.
Browsing through a course offers the same kind of navigation one would find on any computer. In Chamilo, it is called the breadcrumb navigation, in reference to the tale of Hansel and Gretel. This type of navigation allows the user to find its way back to his starting point.
The first link, on the left, yields the name of the course, and allows the user to get back to the course homepage directly. The following link (or links) points directly to the elements of the course in which the user is located.
Within a course, the Student view allows the teacher to see the course as a learner. The link then changes to Teacher view. Just click the new link to get back to the normal view for the teacher:
15/152
Illustration 7: Chamilo header
Illustration 8: Breadcrumb Navigation
Illustration 9: Student view

Chapter 6 Course creationCreating a course is easy, quick, and can be done from the My courses page.
Note : on some portals, teachers might not have the permission to create new courses and are simply assigned courses precreated by the administrator.
Click on Create course. Fill the mandatory fields (see illustration below) and click the button. That's it.The course will be visible by the course creator and the people subscribed to it. By default, the person who creates the course is responsible for this course's administration.
To create the course, you'll need :– a clear and detailed title,– a category within the ones offered in the dropdown box5,
Additional options (totally optional) are available clicking on the Advanced settings link– a course code (pick a code that matches the course title associated with a numerical classification,
for example). Even if entered in lowercase, the course code will be automatically uppercased (, _ and spaces will be removed from the code),
– the course admin (this option is automatically filled with your name) and cannot be updated,– the language used to display the course environment (nothing prevents to choose French even if
the platform is installed in English). The language choice doesn't influence the course content,
5 Seul l'administrator peut redéfinir les catégories globales de course
16/152
Illustration 10: Personal menu blocks
Illustration 11: Creating a course – short version

only the course interface6,– the course can be filled with some example content to show the way to the new course
administrator as to what he can create inside the course (typically an exercise, forums and an introduction section) or left completely empty.
A confirmation page is shown, which suggests: – entering the newly created course directly (through a link on the course title), – getting back to the courses list.
This empty course structure created, the next step is to enrich this course through text and multimedia documents, audio excerpts, …).
6 A une exception près : si l'on active la création de content d'exemple, ce content est créé dans la langue du course. Modifier la langue du course à posteriori aura donc comme conséquence mineure d'avoir l'interface dans une langue and les contents dans une autre.
17/152
Illustration 12: Create a course – extended version

Chapter 7 Control course accessDuring the creation of the course, it is recommended not to let learners access the course until it is ready so they can't see an incomplete course.
In order to this, access has to be restricted by going to the course properties:
A series of choices are available to the teacher.
1. open to the world : means it is accessible to any user, registered to this portal or not. It could also be called Completely public.
2. open : means all users registered on the portal can access the course as long as they have previously subscribed to it. This is the default option.
3. Private : means the course is only available to students who have been subscribed to it by a teacher or administrator.
4. Closed : means the course is only available to its teacher or the administrator. Other users cannot access it, even if they have previously been subscribed to it. This last option is recommended during the course building.
18/152
Illustration 14: Course settings Visibility
Illustration 13: Course admin tools

Chapter 8 Courses organizingWith Chamilo, one can be brought to manage a large quantity of courses. Additionally to general course categories, common to all course creators, it is possible to create personal categories, only visible to the teacher who created them, so he can sort his courses.
Note : This feature is not supported by the platform developers anymore, and could be abandoned in the future. It can enter in conflict with the courses order on the My courses page when these are registered within sessions.
Go to My courses, Courses catalog to get to the courses sorting tools page. Click on the Create a course category, and fill the name of the new personal category to be created. Finally, click OK.
The personal category created appears in a list at the bottom of the page. It is possible to create several personal course categories.
The link Sort my courses allows the reorganization of the courses (through up and down arrows) and the assignment of a personal category to a specific course (click the pencil icon to select the category).
In the dropdown list, select the personal category to which the course will be associated, then click the confirmation button. With courses sorted and linked to personal categories, the courses homepage is more readable. Courses not affected to any personal category are shown on top of the page.
To remove a category, click the red cross Delete.
19/152
Illustration 15: Sort my courses

A teacher can subscribe to other courses than the ones he manages. In this case, the subscription works as a student subscription, and the teacher will thus not have access to the teacher tools inside this course.
Clicking on the Courses catalog link, then on Subscribe to a course. The general courses categories list appears. It is possible to find the course in the suggested categories, or to find it searching for the course title or one of its subparts through the search box on the topright part of the page.
Once the course has been found, click on icon to subscribe to it. The subscription give a learner status to the user subscribing. To be teacher in this course, a course administrator has to register this
20/152
Illustration 16: Personal courses categories
Illustration 17: Courses catalog

user as a teacher in the course.
8.1 Courses management icons
Icons Features
Update a course
Remove a course
Course description
Course registration
21/152

Chapter 9 Course administrationThe My courses icon allows the visualization of the courses which can be managed by the teacher (they display a pencil icon on the right side of the course's box).
One only needs clicking on the course name to access its homepage. Three tools categories appear– Production : allows for course content creation,– Interaction : allows for interaction teacherlearner or learnerlearner within the course,– Administration : allows for management of the course options.
The teacher can choose to select or show distinct tools thanks to the eye icon in from of each tool, so that the course doesn't intimidate the new learner with too many options.Note : depending on the case, the administrator can make tools unavailable to course teachers or can enable tools which depend on specific extensions (like the fulltext search or the videoconference).
Note : The course interface can be shown in a different way depending on the administrator's choice. He could, for example and since version 1.8.8, enable a view more suited to mobile devices, as in this illustration.
22/152
Illustration 18: Course tools – Classical option
Illustration 19: Production tools in ipad type view

Chapter 10 Course homepageIn this chapter, we will simply review briefly the distinct tools available. Note that each tool will be described more extensively in the following chapters.
10.1 Introduction textApart from any particular course tool, it is possible to set a welcome message to a course. Click on the Add introduction text, a text editor appears.
This feature, although very simple, is also very powerful: it is possible to redesign the complete course homepage by
– hiding all course tools– writing a large introduction text including icons with links to course tools' internal pages
To do this :– hide all tools (by clicking the eye, which must be closed and gray)– clickright on one tool to which the learners will be given access– select Copy link location– clickleft on Add an introduction text– place an introduction text (use the table tool or an external HTMLedition tool to place
elements more exactly) and a new icon symbolizing the tool to which to grant access– click an icon to select it then click the link creation tool (a chain icon with a globe image in
the background)– « paste » the link that was saved a few steps before (CTRLV should work just fine)– save the whole
You now have a personalized course homepage. The only remaining other visual elements are the header and the footer.
23/152
Illustration 20: Course homepage – Introduction text

10.2 Production tool
10.2.1 Course description
The course description is not at all mandatory, but allows for a synthetic and global way to describe the course and to give a previous taste of the course to future learners.
This description includes several sections of which none is particularly required. If the proposed sections do not matched the requirements, other sections can be created with specific titles:– « Course description »,– « Objectives »,– « Subjects »,– « Methodology » etc,At any time, a section can be removed clicking on the Delete icon, or to update it with the update icon (pencil).
The description is available to the learners inside the course, but also through the course catalog (as the Description button). This button opens a popup window showing the description previously registered by the teacher.
10.2.2 Documents
Add documents, create directories for the course.
10.2.3 Exercises
Create, update, import exercises, but also track and export the learners' results and score them.
24/152
Illustration 21: Production tools

10.2.4 Learning path
To generate or update the learning path:
10.2.5 Assessments
This tool is very useful when a score has to be assigned for the whole course. It allows for the creation of an evaluation in the classroom or online. It also allows for the generation of certificates (much more intuitive in version 1.8.8.4).
10.2.6 Attendances
Allows for the registration of attendances of learners and to take them into account in the scoring of the assessments.
10.2.7 Links
Add links in relation to the course contents.
10.2.8 Announcements
Add an announcement linked to the course. It is also possible to add attached documents.
10.2.9 Glossary
Add specific terms to the course.
10.2.10 Course progress
Allows to create thematic sections or a “course diary” with themes, plans and progress.
Note : The learning paths created inside the course can also be made visible in the « Production » section, which could generate redundancy. It is possible to show or hide them using the double square icon in the learning paths list (« Make visible to learners »)
10.2.11 Blogs
The « Projects » tool in the « Administration » section will show in the « Production » tool. It is
25/152
Illustration 22: Production tools – Learning paths

possible to hide them from the learners view.
10.2.12 Search
The search tool can be enabled on the platform by the administrator, but requires the installation of specific and advanced modules external to Chamilo itself. The tool allows for searching within the text of most documents on the whole platform, through texts imported or created inside Chamilo.
26/152

10.3 Interaction toolsThe objective of the interaction section is to group tools which allow communication between learners and learners as well as between learners and teachers. Contrarily to the production tools, the teacher is not the only one to build what can be found in the interaction section.
10.3.1 Agenda
Add events, choosing who it will be sent to.
10.3.2 Dropbox
Send documents to the platform users.
10.3.3 Groups
Create groups in the course and manage the course tools accesses.
10.3.4 Assignments
Group the assignments given to the learners and create assignment in the form of folders.
10.3.5 Wiki
Create a wiki for the course.
10.3.6 Forum
Create a new forum for the course in a few clicks.
10.3.7 Users
Manage course users: add/delete/export. Also links to the Groups tool.
10.3.8 Chat
Realtime chat rooms.
27/152
Illustration 23: Interaction tools

10.3.9 Surveys
Create surveys then send invitations to users of the platform. The tool also allows for results analysis, once collected.
10.3.10 Personal notes
This is a personal notebook. It is possible to create notes, then to order them through several criterias:– per title,– per update / creation time.These notes are personal. No user has access to the notes of another user.
10.3.11 Videoconference
Since version 1.8.8, it is relatively easy, given a local videoconference server, to instal la videoconference tool within a Chamilo course but it is, however, an external extension which is not frequently available in a classical portal.
28/152

10.4 Administration toolsThe administration section has the objective to group tools that the learner will not see (because it doesn't have any permission which allows him to see them).
10.4.1 Blogs
Create new blogs which are visible by learners in the Production section. A blog includes tasks and users management through a calendar within the Blogs tool.
10.4.2 Settings
Manage the course settings as a teacher. Settings are sorted in a few sections:
Course settings Allows teachers management, update of course's title, category, language, picture, etc.
Course accesses Allows course access updates (visibility and other permissions)
Email alerts Allows setting the behaviour for emails alerts
Users permissions Allows the configuration of the agenda, announcements or picture display inside the forum
Chat tool permissions Updated the opening method of the chat tool
Learning paths configuration
Allows enabling the graphical theme per learning path, as well as a series of other learning path settings
Course progress configuration
Choose course progress information to be shown on course homepage
10.4.3 Tracking
Reports the use of the learning paths, exercises and other tools by the learners, as well as the time spent on the course, the progress, score, assignments, number of messages and his last connection date.
29/152
Illustration 24: Administration tool

10.4.4 Maintenance
Allows for the execution of administrative tasks on the course, as its complete cleanup, its copy to another course, the import of previously exported course data or the (complete or partial) export itself.
30/152

Chapter 11 First Steps: DocumentsThe general first step of any teacher in the course content creation is to go to the documents tool and upload existing content (in the form of PDF, PowerPoint, etc).
Chamilo allows the import of all types of documents (HTML, MSWord®, MSPowerPoint® MSExcel®, PDF, Flash, Quicktime®, OpenOffice.org, LibreOffice, MP3, OGG, AVI, etc.) and can be used as a simple documents catalog during the first step of its adoption (a few weeks, depending on the context).
It is possible to rename the documents any time and to classify them in directories. The only constraint is that the user should posess, on his compluter, the software that allows him to read the files put at his disposal. So it is recommended to use standard and open formats (see note below) to avoid the obligation for the learner to download or buy costly software, specific (= with no other use) or difficult to maintain.
As for the hard drive, it is necessary to organize the Documents tool carefully to make it easy to find a document.
Note : The Chamilo community strives for a complete freedom in the diffusion of (distant) learning material. It is in this perspective that a high priority is given to the support of open formats and applications, like LibreOffice® and its OASIS format, rather than the Microsoft® office suite, OGG (and its variations) rather than MP3® or DivX®, etc. So we'd like to remind you that all features of Chamilo can be used with a simple, open specifications browser, to the only exception of the videoconference and the hotspot exercises, which require the Flash® plugin (free but not open).
This tool can be found in all courses, as it proves to be of a great popularity compared to other tools:
31/152
Illustration 25: Production tools

11.1 Create a directoryTo obtain a clearer structure, Chamilo lets you create directories and subdirectories.
To create a directory:– click on the Create folder button,– enter the directory name,– use the existing directories dropdown list to create a subdirectory ( « Root » represents the
highest directory level) ,– click on the Create the folder button.Done. The new directory has been created and can be used right away to store new documents.
11.2 Quickchange of directoryWhen creating a new course, the Documents tool contains several directories (audio, flash, images, etc) by default (this can vary depending on how course creation options have been picked).These directories are meant as an additional help organizing resources inside the course. Once passed the 20 first documents in the root directory, it becomes difficult to locate a document when needed.
These directories are initially created invisible to learners. It is up to the teacher to decide whether learners can see these directories' contents or not.
32/152
Illustration 26: Documents – Directories creation

For the requirements of the course, it is possible to create several other directories thanks to the folder creation icon. In order to navigate faster inside the directories tree, a dropdown list called Current directory is available on the left of the screen. Any level of course documents directory can be accessed simply by choosing it.
Once inside a directory, the (new) directory icon with a blue arrow pointing to the left lets the teacher get back up one directory level.
33/152
Illustration 27: Documents – List of default directories

11.3 Importing a documentImport a new document by getting into the desired folder and clicking the uppointing blue arrow icon (Upload documents).
The following screen appears:
Click on the green area to explore the files on your disk and select the one(s7) to upload. Inside the popup window, click the confirmation button. The documents upload starts. If you send several files at the same time, you will see their upload progress, live, as in the following illustration.
Once the upload is finished, the following validation list appears.
7 To select more than one file, use the CTRL key in combination with the mouse's left button.
34/152
Illustration 29: Documents – Documents upload
Illustration 30: Documents – Documents upload in progress
Illustration 28: Documents Icons Upload

Done. The documents have been sent to the course successfully. Now click on the blue arrow icon pointing left to get back to the documents list.
Note : A tab labelled Send (Simple) allows you to use the previous upload form. We called it Simple because users are generally more used to this one, but it is really a bit more complicated to use. Document indexing options can only be found in the previous form (in case your administrator would have enabled the search feature) as well as an option to unzip a complete files hierarchy.
11.4 Creating a new documentThe teacher can create new documents directly through the documents tool. No need to use a separate text processing system. Just click the creation icon inside the desired folder. A fullblown online editor appears.
Note all icons marked with a small yellow star represent creation features. We will review them a bit later.
After naming the document, it is possible to use all the options of th embedded editor to format them. You can also use a series of document templates, available inside the left column.
35/152
Illustration 31: Documents – Document upload finished
Illustration 32: Documents Icons – Creation

Once the document has been edited, save it clicking on the Create document. Other types of documents can be created depending on your browser and the portal configuration.
Icon Feature
The draw feature allows you to draw diagrams or schemas in a vectorial format8, which can be reedited or exported to the bitmap format.
The image edition feature is very similar to the Photoshop® tool and allows for the edition, cutting, coloring, the combination of pictures or other bitmap images.
The audio recording feature allows you to record audio tracks right from your browser, using your microphone (on a laptop, the microphone is generally embedded)
The textbased voice generation feature allows you to have the computer speak for you. Try it. You'll be surprised by the quality of the generated voices.
8 Dans tous les navigateurs récents sauf dans Internand Explorer 6, 7 and 8 ou candte fonctionnalité n'est pas implémentée.
36/152
Illustration 33: Documents – Creating a new document

11.5 Saving documentsSaving all the documents, or a specific directory, is made possible by Chamilo, clicking on the Save (ZIP) icon in the icons bar:
It is also possible to save only one file by clicking on the right of the filename, or to download a specific directory by clicking on the Save (ZIP) icon on the right of the directory line.
11.6 Deleting a file or a directoryTo delete, update, hide or show a file or directory, use the options in the right column:
As you can realize by yourself, the icons are different depending on the document type. HTML documents offer more possibilities.
The magic wand icon allows you to use the selected document as a template to create other documents. It then becomes very easy to follow the same visual style for all documents of the same course.
The PDF icon allows you to export the document in a PDF format. This can be particularly useful if you wish to read your course in the train or the plane, where you don't have access to your elearning platform.
37/152
Illustration 34: Documents – Download a copy
Illustration 35: Documents Options

11.7 Watching course quotasBy default, a course quota of 100Mo is set, but it is also possible to update it through the administration panel. To check the space usage, look at the indication at the bottom of your documents list. I will indicate the percentage of your course that is being used.
If you think you can reach the course limit in the following days, contact your administrator to ask him if it is possible to increase the available space. Only the platform administrator has the power to use this feature.
Note : the space available in a course is only limited, in Chamilo 1.8.8.4, to the use of the documents tool. Users will be allowed to send numerous assignments without worrying about the space limit.
38/152
Illustration 36: Documents Quota

Chapter 12 Interactivity: the exercises tool
12.1 IntroductionThe exercises tool is generally the second teacher's attempt into the elearning world.
The goal is clear : automatic correction of the learners' answers (resulting in time savings for the teacher who can then focus on the quality of the questions) represent a possibility for the learner to autoqualify himself repeatedly, without depending on the availability of the teacher (his results can be shown to him immediately and automatically), to reuse the course questions from one course to another, etc.
The tool allows you to create or import a questionnaire (in formats like HotPotatoes, IMS/QTI2 or XLS).
Creating a new test is very easy. Click the first icon on the left and give your test a title, then click on the confirmation button.
As there exist many types of different exercises, you might think the default options are not entirely good for what you want to obtain. That is why we have made the Advanced settings section available (see Illustration 39 below).
This form gives you many options. During the creation of the test (and also during its edition), you
39/152
Illustration 37: Exercises List
Illustration 38: Exercises – Simple creation

may choose :– whether the time is limited to answer the test – a realtime counter will appear to the user9,– the number of attempts allowed for each student, undefined or limited,– whether all the questions show on one single page, or only one question per page (last option
recommended for tracking purposes),– the questions order (random or not),– etc.
The questions asked might be of different types:– multiple choice, single answer,– multiple choice, multiple answers,– fill in the blanks or fill in the form (or even crosswords if you use it in combination with the table
feature of the online editor),– match,– open question,– hotspot,– exact combination… as well as variations of these types of questions.The answers to each question are given during its creation, and the results can be seen in the Reporting tab when learners have answered them. This tab also allows you to leave a comment, then to export the results found.
An exercise groups together a number of questions, not necessarily of the same type, under a common topic.
12.2 Feedback, score and correct answersIn order to fully understand the exercises feature, it is necessary to get a good grip of what specific terms mean in Chamilo.
12.2.1 Feedback
The feedback is a way to automate the learner's answer commenting. Typically, if he gives the right answer, you congratulate him: “Well done, I can see you have a good grasp on this concept!”.If he answers incorrectly, obviously you can use this opportunity to tell him so, but it is also an opportunity to go far beyond that and make the feedback part of the learning process. The learner might be wrong, but this is the best time for him to learn why and how to avoid that, next time. Use hints : “This is incorrect. Probably, you haven't read the Open Standards chapter deeply enough. A quick revision of Chapter 3 should help you out! Remember the example of OASIS and how it was designed?”. This feedback could also contain a direct link to the example “Chapter 3”.In short, it is a way to encourage and correct te learner during his autoevaluation attempts.
9 If the learner disconnects from the exercise, his time will continue counting down until it is completely expired, but he will be able to reconnect and continue his exercise right whee he left it. The time counter only works in one question per page mode.
40/152

12.2.2 Score
The score is a “raw” way of giving an evaluation of his skills to the learner. If you give a direct score to a learner, it becomes more difficult to finetune it afterwards. Updating a score can be necessary under specific circumstances where the exercise is complex and requires a manual review from the teacher.
12.2.3 Correct answers
The correct answers are a short and direct way to explain to the learner what he should have answered. Sometimes you might want to show these answers, but in the interest of the possibility to reuse tests, it is recommended you don't show any answer, and rather use the feedback to let the learner know how he should have answered and set him on the right course to get it right next time through his own efforts.
12.3 Test types
We gather a series of test types under the exercises label:– exams are exercises (generally timecontrolled) for which no feedback, nor any answer, is
given to the learner : he will obtain his results when the teacher considers it right.– the exercises allow you to evaluate the learner during the course, and are generally limited to
one to three attempts. The results (score) are shown to the learner, but not the correct answerds.
– the autoevaluation tests can generally be taken an unlimited number of times. They are generally not limited in time but display feedback, score and sometimes the correct answers to the user so he can improve through practice.
41/152

12.4 Creating an exerciseClick on New test and give your test a name.
The other settings are optional, but they allow you to indicate a few options:– the Give a context to the test icon allows you to associate media (text, sound, images, etc) through
the online editor. This information will appear at the beginning of the test,– give a Feedback to a learner, – the way it will appear: either all questions on one page or one question per page,– whether you want to show the score obtained to the student or not, – whether you want to use random questions order or not,– whether you want to shuffle the answers within the multiple choice questions,– whether you want to limit the number of attempts,– whether you want to limit the availability of the exercise between two dates (it then will disappear
to the user),– whether to propagate negative results from one question to another, or to limit the negative impact
to a minimum score of zero,– whether to enable time control, which will limit the time allowed in the test, and show a reverse
seconds counter during the test taking,– if the text indexing feature has been enabled by the administrator, you will be offered a set of
options to index the exercise description too.
Click Proceed to questions to add the first question to your test.
42/152
Illustration 39: Exercises – Creating an exercise – Advanced options

Note : the combination of the immediate feedback option with the autoevaluation gives access to an adaptative exercise type relatively different from the other types, which is not covered in this guide.
43/152

12.5 Creating a questionOnce the test has been created, choose the type of the first question within the different types proposed. If the test already exists and you need to add one or more questions, you can proceed the same way. It is possible to make the test harder to do by assigning a negative score to a wrong answer, which makes the learner think more. The exercise can be composed of several types of answers in order to break the monotony of an exercise and fill its evaluation requirements.
12.5.1 Type 1 : Multiple choice – Single answer
The classical multiple choice question is the one where only one proposal will be considered valid. It is possible to make the test a little bit more complicated by assigning a negative score to a wrong answer. When well indicated (either in the test introduction or the question itself), this ensures the learner will think more deeply before giving a random answer.
– give the question a title (1) – note that this is not the question itself (see 3),– enter the difficulty of the test (2),– click on the Give a context to the test link to add the question in itself, illustrated by images, audio,
etc (audio can be used for listening comprehension questions), through the internal editor (3),– add or reduce the number of answers proposed by clicking the Add answer option or Remove
answer option (4),– enter the answers proposed to the learners (a little bit of visual formatting and adding media
44/152
Illustration 40: Exercises – Question types
Illustration 41: Exercises Multiple answer question creation form
1 23
4
56 78
9

elements can be done through the tiny black arrow on top of the answer zone) (5)– select the right answer (6),– enter a comment (feedback) associated to each answer. Keep in mind the comment associated to a
wrong answer can be the start of a better learning and a reinforcement of the notions learned (7),– assign a score (positive, negative or null) to each proposed answer (8),– click on the Add this question to the test button to save the question (9).
12.5.2 Type 2 : Multiple choice – multiple answer
This question type is a variation of the first one. It allows you to assign several valid answers. Again, positive and negative scores are possible.
– Complete the question label,– enter the difficulty level for the question,– click on the Enrich question link to add media through the online editor,– add or reduce the number of answers proposed by clicking the Add answer option or Remove
answer option,– enter the answers proposed to the learners (a little bit of visual formatting and adding media
elements can be done through the tiny black arrow on top of the answer zone),– select the right answer(s),– enter a comment (feedback) associated to each answer. Keep in mind the comment associated to a
wrong answer can be the start of a better learning and a reinforcement of the notions learned,– assign a score (positive, negative or null) to each proposed answer,– click on the Add this question to the test button to save the question (9).
12.5.3 Type 3 : Fill the blanks
It is a text with holes question type. Its objective is to get learners to write words that have been previously removed from a text. This is the type of exercise generally used by language teachers at
45/152

the beginning of their courses.
– Complete the title for the question,– enter the difficulty of the question,– click on the Enrich question link to add media through the online editor,– enter the text to fill, by placing the expected words or expressions inside brackets,– affect a score (positive, negative or null) to each proposed answer,– click on the Add question to the test button to save the question.
12.5.4 Type 4 : Matching
This type of question can be selected to have the learner link elements as a set of P1 proposals with a second P2 set of proposals. It can also be used to ask a user to sort elements in a certain order.
46/152
Illustration 42: Exercises Fill the blanks

– Complete the question title,– enter the difficulty level,– click the Enrich question to add media using the online editor,– add or remove proposed elements (numerical) and matches (literal) clicking on the Add element or
Remove element,– enter the proposed elements details (as well as their matches),– complete the Matches to column to show the relation between proposed elements,– give a score (positive, negative or null) to each answer proposed,– click on the Add this question to the test to save the question
12.5.5 Type 5 : Open questions
Here, the learner's answer will be freely written. This answer will not be automatically evaluated at the end of the test, but will have to be evaluated by the teacher before the final test result can be scored.
47/152
Illustration 43: Exercises Open questions

– complete the question title (short version of the question),– enter the difficulty level,– click on the Enrich question link to add media through the online editor,– assign a score (positive, negative or null) to the question,– click on the Add this question to the test to save the question
12.5.6 Type 6 : Hotspot, or image area
In this type of question, the learner will be asked to identify areas within an image by clicking on them. These areas have been previously defined by the teacher. Building one of these questions require slightly more work than other types.
48/152

– fill the question title,– enter the level of difficulty,– click the Enrich question to add media using the online editor,– click the Browse button to import an image (in .jpg, .png or .gif format) from your computer,– click on the Go to question button,– describe the first area the learner will have to identify and add a comment (feedback),– select one of the shapes available (rectangle, ellipse, polygon or delineation for adaptive tests),
whichever is the most adapted to the area to identify. To close a polygon or delineation, clickright and select the Close polygon option,
– assign a score (positive, negative or null) to the first area to identify,– click on the Add hotspot button if the learner has to identify more than one area, and repeat the
previous steps– Click Add this question to the test to save it.
12.5.7 Type 7 : Exact combination
This is a variation of the multiple answer type test we've seen previously. The only difference is that no partiallycorrect combination will be accepted. This means that if you have possibilities ABCD and only B and D are correct, you will have to mark both B and D in order to be given the points assigned to this question.
49/152
Illustration 44: Exercises Hotspot question creation

– complete the question title,– enter the difficulty level of the question,– click the Enrich question to add media using the online editor,– add or remove answers by clicking the Add answer option or Remove answer option buttons,– enter the possible answers that will be given to the learners,– check the right answers' checkboxes,– enter comments (feedback),– assign a total score (positive, negative ou null) for the whole question. This score will only be
given if the learner selects the right combination of answers (no variation is allowed),– click the Add this question to the test button to save the question.
12.6 Recycling existing questionsAny question created, independently from the test or course to which it has been attached, feeds the questions database. This base can be very useful to reuse questions that are very general or to serve as a filler when you're short of a few questions in a new test.
During the test creation, the database shows questions from other tests, as well as orphan questions (which have belonged to a test which has been removed).When the question database shows, it presents a list of all existing questions inside the course. Use the Filter and Difficulty dropdown lists to filter the questions accordingly.
50/152
Illustration 45: Exercises Exact combination

51/152

Click the Reuse in current test button to include these questions in the current test.
It is only since version 1.8.8 of Chamilo that it is possible to reuse questions from other courses you teach.
12.7 Update a question belonging to several testsThe questions database allows you to recover questions from another exercise inside the current exercise. In case of updating a question belonging to other tests, the change was previously affecting all tests, which made it a very dangerous option. In recent versions, we have updated the process so the question is “copied” instead of reused. This effectively makes it impossible to simultaneously update in several questions at a time, but it is a much safer option.
12.8 HotPotatoes, IMS/QTI2 or Excel importsIt is also possible to import exercises built separately with HotPotatoes in the specific HotPotatoes format (which is just a combination of HTML and JavaScript), or in the IMS/QTI2 or XLS formats.– click on the corresponding icon above the tests list (they all show a representative icon),– click the Browse button and select the document on your computer,– import the document.
52/152
Illustration 46: Exercises – Questions database
Illustration 47: Exercises Import HotPotatoes Illustration 48: Exercises Import IMS/QTI2

12.9 Exercises resultsChamilo lets you analyse exercises results by clicking on the Results icon (chart icon, marked in the following illustration), which will give you all the results for the corresponding exercise.
Right side column options:– click on Details icon to review and comment learners' answers (opened questions can be scored),– click on the Delete icon (red x) to delete this learner's attempt (because it is not representative of
the learner's level, for example, or because the exercise was flawed at the time of the attempt).
Upper menu bar options:– the Back to test icon allows you to get back to the test– the Export icon (floppy) allows you to export the results in CSV or XLS formats to sort them and
generate graphical evaluation statistics,– the With individual feedback icon (“list of marks” icon) allows you to filter the results and see only
the ones which have already been reviewed (the default view shows only the ones to be reviewed)
53/152
Illustration 49: Exercises List
Illustration 50: Exercises – Results list

Chapter 13 Communication : ForumAlthough the natural order for this next chapter would be to delve into the learning paths tool (see Chapter 14 on page 62), it makes more sense to review the next most used tool on the platform.
The Forum tool allows you to organize the exchange of ideas, opinions and information on the course and the learning paths. The tool has been conceived so that learners with many questions about the course can easily find the information they are looking for without having to lool through a massive amount of information.
The forum is an asynchronous discussion tool (it means the people involved in a conversation do not have to be connected simultaneously to participate), just as email. As a major difference from email, though, the forum is a public or semipublic space, where several people can see information even if they were not part of the discussion initially, which boosts access to highly valuable information when a group of students and teachers exchange ideas in their specialization field.
The structure of the forum page is as follows:
In blue : the name of the forum Categories (or previously Folders),In red : the name of the forums, In orange : forum management tools.
Exchanges are organized in a hierarchical way, in the following example architecture :*Forum category
Forum→ Discussion thread→→ message→→→ answer to the message→→→→ answer to the message→→→→ message→→→ answer to the message→→→→ answer to the answer→→→→→
and so forth...
54/152
Illustration 51: Forum – Global view
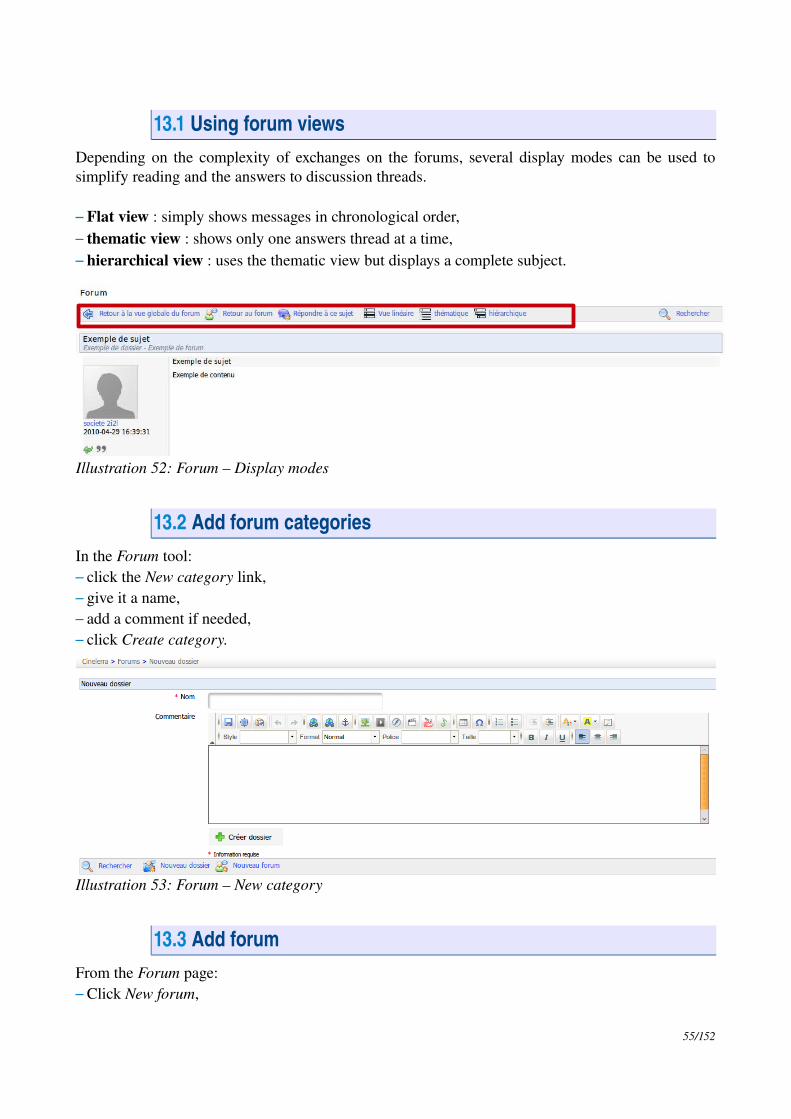
13.1 Using forum viewsDepending on the complexity of exchanges on the forums, several display modes can be used to simplify reading and the answers to discussion threads.
– Flat view : simply shows messages in chronological order,– thematic view : shows only one answers thread at a time,– hierarchical view : uses the thematic view but displays a complete subject.
13.2 Add forum categoriesIn the Forum tool:– click the New category link,– give it a name,– add a comment if needed,– click Create category.
13.3 Add forumFrom the Forum page:– Click New forum,
55/152
Illustration 52: Forum – Display modes
Illustration 53: Forum – New category

– give it a name,– add a description if necessary,– in the advanced settings, it is possible to:– authorize learners to modify their own answers,– authorize learners to create new discussion threads,– set the default view,– decide if the forum is the one of a group, if it is public or private,
– click the Create forum button.
13.4 Manage forum categoriesManaging forum categories makes use of familiar icons:
Icons Features
Update settings of a forum category
Delete the forum category and all its contents
Control visibility of a forum category
Lock / unlock a forum category to prevent its edition
56/152
Illustration 54: Forum – Forum creation form

Icons Features
Reorganize forum categories
13.5 Manage forumsManaging forums makes use of familiar icons:
Icons Features
Update forum settings
Delete the forum and all its contents
Control a forum's visibility
Lock / unlock a forum to prevent its edition (but previous articles can still be accessed)
Reorganize the forums position
Ask to be kept up to date by email when a message is added to the forum
13.6 Start a new topicWhen the content of a forum is shown:– click on the New message link,– complete the Name and Description fields,– advanced settings allow us to– score a discussion thread as a teacher and give it a maximum score. To do this:– select the “Mark this thread” box– set a maximum score to reflect the learners participation in a discussion thread,– enter or update the title of the corresponding column for the assessments tool, – give a weight to the participation in the discussions thread in comparison to the other
components of the assessment tool.
57/152

– receive email alerts if an answer is added to the discussion thread,– set a discussion thread to appear on top of the threads list,– add an attachment to any message, together with a comment,
– Click Create thread
13.7 Manage discussion threadsThe daytoday administration of topics (also called “discussion threads”) is identical to the one of categories or forums. You may, however, move a topic from one forum to another, better suited, one.
Icons Features
Change the settings (name, message and advanced settings: see previous page) of the topic
Delete (after approval) the topic and all the messages it contained
Control the visibility of a topic
Lock / unlock a topic to forbid its modification (but its reading will still be authorized)
Move a topic to another forum
Ask to be sent a notification by email when a new answer is added
Visualize the topic's participants and score their contributions if the topic has been marked as scored
58/152
Illustration 55: Forum – Discussion thread

Moving a topic from one forum to another has to be done through a dropdown list. Select within that list the destination forum, then click on the “Move Thread” button to proceed. The effect is immediate.
13.8 Manage messagesA message is an answer within one of the discussion threads.
Icons Features
Change the settings (name, text and advanced settings) of the message
Delete the message (after approval)
Control a message's visibility
Reply to the message
Move the message to another thread
Quote this message (and answer on the basis of the quoted message)
13.9 Score a learnerIf you chose to score a topic (or discussion thread), you will have assigned a maximum score to this thread. A new item will appear in the assessments and a ponderation is assigned to this element.
From the threads list in a forum: – click on the Learners list icon,– scroll down to see the list of learners,– click on the Mark activity icon next to the learner's name,– on the new page, locate the list of all the contributions (messages) written by the learner scored as
well as a statistical table based on these same contributions,– enter the score you want to assign the learner: helping yourself with the list of contributions,
choose a qualitative evaluation for these contributions. The statistical table allows a quantitative evaluation of the contributions,
– Click the Mark this thread button.
59/152

13.10 Give a score from a message– Click on the Mark activity icon under the user's picture,– The new page gathers the list of all messages posted by the learner as well as a statistical table
based on these messages,– Click the Mark this thread button.
The score given to the learners will be shown in the assessment tool.
13.11 Add a message to a threadIn the list of tools available to manage the discussion threads, locate the Reply to this thread icon. T allows you to add a message at the same hierarchical level as the starting message.– clicking the icon will give you access to the online editor to write your message. An area allowing
you to read the other messages of the thread appear at the bottom of the page,– give a short topic to your message,– enter your message,– choose whether you want to be notified by email in case anybody answers your message,– attach a document (optional) and, if you do, add a small comment describing the document,– click on the Reply to this thread button.
60/152
Illustration 56: Forum – Marking a thread

13.12 Reply to a specific messageThe Reply to this message icon ( ), located below the message author's picture allows you to give an answer which will be linked to the chosen message and will be hierarchically dependent on that message.
The reply procedure is the same as the previous one, except the message topic includes the inicial message, prefixing it with a « Re : » indicating the two messages are related.
13.13 Quote a previous messageInside a thread, within a forum, it is often most practical to be able to quote a whole or part of a message. This is the aim of this operation, triggered by the double quote icon ( ). The answer will be accompanied by the related message to which it is making reference (it will appear in another colour in your answer).
13.14 Reply or Reply to this topicThe main difference between those two options reside in the hierarchy of the different messages and their answers.Reply creates new answers which will be deleted altogether when the initial message s removed, while Reply to this thread creates messages which will be kept, even if the starting message is removed.
13.15 Search a forum elementAll the screens of the Forum tool include a search feature. The search can be executed in all the forums at once and you can combine search terms with the “+” sign. The results are sent in the form of a list indicating:– the forum category,– the forum title,– the title of the thread in which the searched words have been found.
61/152

Chapter 14 Structure: Learning paths
14.1 IntroductionA learning path is a learning sequence split into sections which contain activities or learning objects. It can be organized depending on the content. It will constitute a table of contents or, depending on the activities, it will be used as an agenda of things to do to acquire a knowledge, a skill.
A learning path can also be sequenced. This means some activities can be set as prerequisites for other activities (e.g. you can't access to activity B before you finish activity A).
The sequence can be suggestive (show sections one after another) or restrictive (the learner is forced to follow the sections in a preset order). It is important to understand that a learning path is more than just the dicedup course content: it is an itinerary through knowledge which might include tests, discussions, evaluations, experimentation, ...
In a course space, click on the Learning paths link:
Once inside the learning path tool, you are offered the possibility to import an AICC or SCORM content, but you can also create or edit a learning path:
14.2 Create a learning pathClick on the creation icon (icon with yellow star): Create a new course
62/152
Illustration 57: Learning paths – Access through course's homepage
Illustration 58: Learning paths List

Give a name to your learning path and click Continue. The learning path is created immediately (without content for now). It will appear in the learning paths list. Once the learning path is created, you get access to a series of tools to:
1. update the learning path's settings,2. use a view prepared for building the learning path,3. add an activity / object / document,4. add a new section,5. use a preview screen to check how it's going to look for learners,6. organize this course.
14.2.1 Learning path's settings
The example image on the right of the form represents what will be seen by the learner when using the learning path, depending on the options configured in the form.
63/152
Illustration 59: Learning paths Creation
Illustration 60: Learning paths – Elements edition page
123
45
6

14.2.2 Build
The Build tab allows you to come back to the main menu of the learning path creation screen.
64/152
Illustration 61: Learning paths Settings

14.3 Add an activity / object / documentThis tab is composed of two parts. One allows you to create a learning path from Chamilo, the other allows you to add resources which can come from external sources:
14.3.1 Create a new document
This option allows you to generate a document which will be added to the learning path and saved in the .html format in the learning path documents.
It is possible to use styles, add images, videos, etc. In other words, a complete learning path creation tool:
65/152
Illustration 62: Learning paths – Components edition
Illustration 63: Learning paths – Online creation

14.3.2 Use existing resources
You can import a document previously imported into the documents tool of the course (e.g. a SCORM course, .html pages, videos, images, etc. see On peut importer un document qui a été préalablement importé dans les documents du course (par exemple, un course SCORM, des pages en .html, des vidéos, des images, andc. : cf Creating a newdocument).
You can add tests, links, assignments and forums. The resource then appears inside the learning path, inside the list of other elements.
Links, tests, assignments an forums can be created previously in the Production or Interaction sections inside your course's homepage, then added from these sections into your learning path, or they can be created directly from the edition section:
14.3.3 Add a new section
Allows to separate learning paths to make the difference between several categories, chapters, etc inside the learning path.
66/152
Illustration 64: Learning paths – Importing existing resources
Illustration 65: Learning paths – New section

14.3.4 Show
Show the results of the learning path you just built:
1. See a learning path2. Through the small teacher's menu, get back to the list of learning paths or the edition screen,3. Progress of the learner inside the current learning path and buttons to move back and forward,4. Get back to the course's homepage
14.3.5 Organize
Shape your learning path, change the order of elements, update or remove any element and add audio files:
67/152
Illustration 66: Learning paths – Learner's view
3
2
14
Illustration 67: Learning paths – Organize view

14.4 Add audioTo increase the impact of a learning path, you can add audio to each document inside it. The audio file will have to be created in parallel (you could do it through the Documents tool, for example) and then attached to any step inside your path.
To attach an audio file to a step: – click on the Audio icon,– click on the Browse button located in front of the document name to which we want to attach the
audio,– once the file is associated to the document, click on the Save audio and organization.
Note : The screen which allows you to attach an audio to a document also lets you organize sections and learning paths steps, as well as edit the names (and contents) of sections (or documents).
14.5 Import AICC and SCORM Chamilo uses standards like SCORM and AICC for the exchange of contents. It's easy to import documents using this tool:
You can simply select the corresponding format document on your hard disk and click the Import button and that's it, your learning path is ready.
68/152
Illustration 68: Learning paths – Organize view – Upload audios
Illustration 69: Learning paths Import SCORM

Note : Chamilo 1.8 and all its derivations (including D0keos) only support SCORM in version 1.2.
14.6 Update a learning pathGo to My courses, pick a course and click Learning paths:
The rightside column includes tools to update your paths:
Icons Features
Update the learning path settings
Delete the learning path
Enter the edition screen to update the learning path
Display / hide the learning path
Show / hide the learning page on / from the course homepage
Export the learning path in the .zip format, which can then used as SCORM content inside other tools
Allow / prevent multiple attempts to learners
Set the learning path in fullscreen or normal view
Reorganize the learning paths
Export the complete learning path as a large multipages PDF document
14.7 PrerequisitesIf a learning path contains several documents, it is possible to indicate the goal and the use we expect the learner to do of the learning path through prerequisites.
69/152
Illustration 70: Learning paths List
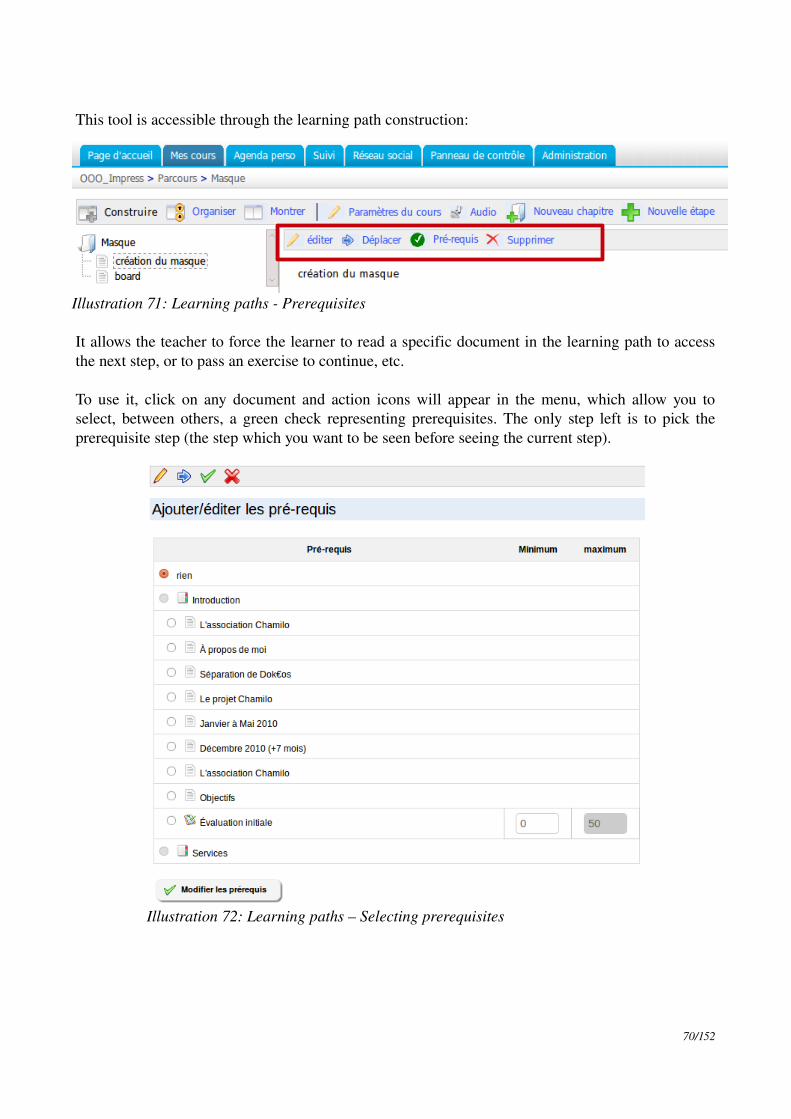
This tool is accessible through the learning path construction:
It allows the teacher to force the learner to read a specific document in the learning path to access the next step, or to pass an exercise to continue, etc.
To use it, click on any document and action icons will appear in the menu, which allow you to select, between others, a green check representing prerequisites. The only step left is to pick the prerequisite step (the step which you want to be seen before seeing the current step).
70/152
Illustration 71: Learning paths Prerequisites
Illustration 72: Learning paths – Selecting prerequisites

Chapter 15 ReportingSeveral tools let teachers follow the progress of their learners, either through the tracking tool, or through the assignment of homeworks and exercises during the course. This way, learners as well as course's resources can be tracked:
15.1 Tracking learnersThis tracking shows the way in which a learner uses the course thanks to several criteria like the Time corresponding to the total time spent in the course, or Details which include more information about the learner.
15.2 Show synthetic data for learnerClick on the Reporting tool leads you to a learners list. It is possible to use it as a synthesis table to find learners whose activity is too low or null (you can define a number of days between 2 and 30, or Never) by clicking the dropdown list located on top of the page.
15.3 Show learner's detailed reporting
From the synthetic table: – click the Details icon next to the name of the learner you want to check upon. The new page shows
the complete learner's activity inside the course, by tool or by activity type,– click the Access details icon on top of the page to show the list of logins and connection times of
the learner,– if necessary, it is possible to print the detailed reporting sheet or to export them in the MSExcel®
71/152
Illustration 73: Courses – Administration tools
Illustration 74: Reporting Learners

format (.xls).
15.4 Course reportingThis particular tracking type is base on the use of the course by the learners, globally.
The synthetic table of learners and the tools usage details can both be printed or exported to the .xls format (MSExcel®).
72/152
Illustration 75: Reporting – Details
Illustration 76: Reporting – Course reporting

15.5 Notify an inactive studentFrom the synthetic table of learners, using the dropdown list on top of the screen, the teacher will be able to choose and an inactivity period above which it will be necessary to “wake the learner up”.
The period can be chosen between 2 and 30 days. An icon representing a warning road sign shows next to the learners who match this criteria.
To send an email notification to the inactive learners:– click on the Remind inactive users icon,– on the new screen, create an announcement. The destinations have already been preselected and
you are offered a template email to be updated and sent,– in the announcement publication screen, if the box Send this announcement by email to selected
groups/users is checked, then the announcement will be added to the normal announcements of the course (destinations of the announcement will only be the ones related to the inactivity) and the inactive learners will receive the mail you just wrote.
73/152
Illustration 77: Reporting – Notify inactive students
Illustration 78: Reporting – Reminder announcement

Chapter 16 AssignmentsThis tool allows a learner or a group of learners to upload documents for the teacher to review. Thee assignments can be seen and downloaded by other learner if not configured otherwise (if the teacher checked this box in Visibility).
These documents can be homeworks required by the teacher or interesting files to share with others (we are generally speaking about the first case). It can be used to receive individual or collective reports, answers to open questions or any other form of document elaborated by the learners.
The tool also allows for the modification of the visibility of the assignments sent by the learners. They get the possibility to send files (exercises, reports, written production, …) to the course inside which the course delegate will evaluate them.
It also allows learners to check the assignments of one another. It is a way, for them, to learn more by benefiting from other's work, but it has to be used carefully as some learners are not ready to be given so much freedom. The choice between private (only visible to the teachers) or public assignments (all learners can see assignments from others) can be made by clicking the right visibility option.
16.1 Assignments creationIf the number of learners in your course is important, there will be many assignments to mark...
To ease the classification up a little and prepare their correction, Chamilo requires the creation of assignments in the form of “folders”. Each folder represents an assignment to be delivered and all learners will have to place their assignment in the same folder.
To create a new assignment:– click on the Create assignment link,– give your new assignment a name,– add a description (optional),– click the Create assignment button.
74/152
Illustration 79: Assignments Options

The advanced settings allow you to:– define whether the work will be marked inside the assessments tool– pick an expiration date for the assignment to be handed out (official date, see further)– pick an end date for the assignment (hidden, see further)– decide whether the expiration date should be added to the course agenda. If you didn't select
an expiration date, the assignment's creation date will appear in the agenda
16.2 Manage assignments foldersThe assignments folders management reuses a series of known icons:
Icons Features
Update the name of an assignment folder
Delete a folder and all the assignments it contains (confirmation popup)
16.3 Setting up the assignment evaluationYou can include assignments' evaluation inside the assessments. The marks assigned to the corrected assignments will be part of the assessment, with an importance depending on the weight defined for this assignment.
75/152
Illustration 80: Assignment Creation

To include assignments' evaluation in the assessments: – click on the Advanced settings link– add a Maximum score greater than 0– check the Add to gradebook box– click on the Create assignment button.
16.4 Expiration datesChamilo offers two timebased options for the assignments: – an expiration date,– an end date.
16.4.1 Expiration date
The date past which all assignments sent by the learners to the platform are marked “Expired” in red in the list of assignments. Past this date, assignments can still be sent, but they are marked to indicate late delivery.
16.4.2 End date
The date past which it becomes impossible for the learners to send an assignment in the corresponding folder. It is the definitive date after which the teacher will not consider any more work sent.
16.4.3 Sorting assignments
Inside the folder, it is possible to sort assignments: – by clicking on the column headers (Type, Title and Date)
76/152
Illustration 81: Assignments – Advanced settings

– by clicking on the filtering options in the actions bar above the list, which allow you to show : – assignments already marked,– assignments still to be marked.
16.5 Marking assignmentsTo mark a document uploaded by a learner:– click on the Correct and rate icon (green check) on the right side of the document's line,– in the following screen, you can:
– open or download the document by clicking the corresponding link,– enter the score in the Score.
To save the note, click the Update this task button.
16.6 Manage assignmentsAssignments management uses familiar options:
Icons Features
Update the document title, description or score.
Delete the document
Move an assignment to another assignments folder
Show/hide the document from the learners
77/152

Chapter 17 UsersThe users tool gathers all learners and teachers subscribed to the course. It allows you to manage the list of subscribed users, register new learners and assign them specific roles and responsibilities. It also allows you to follow the activities of all users subscribed to the course.
17.1 Subscribe usersLet's see how to subscribe new users...
– from the Users tool, click on the Enroll users to course icon. The list of users not subscribed appears,
– to subscribe only one person, click the Register link on the right side of the corresponding line,– to subscribe several people at once, check the users with the boxes on the left side of the table,
select the Register option in the dropdown list at the bottom of the table and click Validate, – a confirmation window appears to ensure you want to subscribe them,– once confirmed, a confirmation list appears indicating which users have been subscribed.
17.1.1 Add teachers
You can also subscribe another user as teacher in your course. Just click the Enroll teacher icon (second icon) and repeat the subscription process.
78/152
Illustration 82: Users – Main screen
Illustration 83: Users – Action buttons

17.1.2 Unsubscribe a user
You can unsubscribe any user individually or in group.
To unsubscribe a unique user, click the Unregister icon (last icon) next to the corresponding user and confirm your choice.
To unsubscribe a group of users, check the users' boxes on the left side of the tale and select Unregister in the action dropdown list at the bottom of the table, then click Validate.
Note : You cannot remove the main teacher of a course from this screen. Only the platform administrator can do that.
17.1.3 Add/update a user's description
– Click the Edit icon on the right side of a user's entry,– the user's details appear,– complete or update the Description field to inform other users of the role played by this user,– Save changes.
The Assistant box (previously titled Tutor) allows the assignment of a special Course assistant role and its corresponding permissions. These permissions will allow the user to see exercises and assignments results from other learners in the course, so he can assist the teacher in his fulfillment of his assistant role.
17.1.4 Search a subscribed learner
If the teacher needs to find a specific learner in the list of users subscribed to the course, the search feature will allow him to find one or several users from all or part of his firstname or lastname.
Just fill the search field with the corresponding characters and click the Search button. The matching users appear.
17.1.5 Export the list of subscribed users
From the subscribed users list:– click one of the export icons (CSV export or Excel export) to download the list of users in the
corresponding format,– you might want, independently from the backup copies taken by your careful administrator, to
keep a separate copy of your users list.
Note: not all users details are exported through this feature (their passwords, for example, are confidential information not available to other users, not even to the teacher).
17.1.6 Display learners reporting
Once in the users list: – click the Reporting icon next to the user's name
79/152

– the detailed course accesses report appears.
Within the extensive data available, you'll find options to review all exercises or learning paths results, see their details, or see the detail of accesses to the course (times and dates) through the Access details icon in the action bar on top of the screen. This general reporting screen gives a general idea of the participation of the learner, which is generally useful to judge of the involvement of the learner inside the course.
From this screen, you can:– export a reporting sheet,– send a reminder email to the
student,– print the report,– see the access details.
80/152
Illustration 84: Users – Access details

Chapter 18 AssessmentsThis tool allows you to define pedagogical objectives as well as the rules for the generation of digital certificates.
It allows you to prepare a skills report which will show a synthetic view of the results obtained by users in the course. These results are shown through the combination of activities coming from almost all parts of the course (or from your classroom).
Before we go further in the assessments tool, make sure you have at least one learner subscribed to your course. This is why we (smartly) put Chapter 17 : Users before this chapter. In this chapter, it will be much easier to go along the examples if you already have learners subscibed and a seriesof activities created. Don't forget the user will not be able to see the course anyway, if it is configured as closed.
81/152
Illustration 85: Assessments Example

18.1 Assessment preconfigurationThe assessment tool, in order to work perfectly, requires a few elements (reminded by corresponding orange warning messages) to be set: activities weighting, a minimum certification score, skills ranking and a certificate template.
18.1.1 Total weight and minimum certification score
Have a look at the general settings icons on the topright side of the screen.
The total weight is important for weighting of the activities (see further). The minimum certification score defines when the learner reaches the pedagogical objectives of the course.
18.1.2 Weights
The weights allow you to define the relative importance of each of the activities (from the platform or inperson) within the assessment. Click on the percentage icon (Weight in report) to go the general ponderations page. If you don't have any activity registered at this point, come back to this section a bit later.
82/152
Illustration 87: Assessments Weights
Illustration 86: Assessments – General settings

It is always recommended to define the total of weights to be 100 (or the value defined in the previous section), otherwise it becomes really complicated to understand all the possible relative scoring issues.
18.1.3 Skills ranking
Skills ranking allow you to define ranks for the scores, so that they can be represented literally and graphically more easily.Click on the podium icon (last icon).
On the resulting screen, check the two boxes, write 50 in the text box and click Validate.
The same screen now lets you add additional options: the names you want to give to any score span to make it faster to read generic reports.Get inspiration, if you like, from Illustration 89. We'll see further what this is used for.
83/152
Illustration 88: Assessments – Skills ranking
Illustration 89: Assessments – Skills ranking Advanced

18.1.4 Certificate template
Finally, it is possible to create a certificate generated automatically with the learner's data. To set this up, click the large certificate icon. You'll get to a screen similar to the document creation tool.
You'll find a few tokens above the edition area. These tokens, if placed (as is) in the certificate template, will autofill with the learner's data when he finally fulfills all the assessment's objectives. Create your own Certificate model or send one in HTML format.
Click on the icon to select this document as the default certificate template (small certificate icon,
84/152
Illustration 90: Assessments – Certificate template creation
Illustration 91: Assessments – Certificates templates list

get colored when selected). Finally, come back to the assessments screen throuh the breadcrumb navigation (click Assessments).
18.2 Add classroom activityA classroom activity is a component of the global assessment that you didn't organize inside the Chamilo platform. As such, it cannot be included in the platform except if you add it manually. This is what this element is about... Take an inclass exam, then add a classroom activity and make it part of your course assessment. Import learners' results and get going!
In the assessment tool, click on the Add classroom assessment icon (first icon on the left).
You must– give your activity a title,– give a weight and a maximum score (20, for example),– give a description (optional),– choose whether you want the results of this activity to be visible to learners,– choose whether you'll add the scores immediately or you just want to create the activity.
You will only be able to add results for classroom activities if there are learners subscribed to your course.
85/152
Illustration 92: Assessments – Classroom activity

18.3 Add online activityThis tool allows you to create a link from the assessment to one of the following types of resources in your course (these resources already have scoring capabilities):– Exercises,– Assignments,– Learning paths,– Forum threads,– Attendances,– Surveys
It is then visible in the list of activities for this assessment, and can be used as one of the pedagogical objectives.
18.4 List viewThis view allows you to list all learners and their results, as well as specific resultsrepartition charts for each resource and a combined chart for all resources.
86/152
Illustration 93: Assessments – Classroom activities – Filling results
Illustration 94: Assessments – Add online activity

Note: This view only works if skills ranking rules have been fully defined.
18.5 Manage activitiesIt is possible to manage activities swiftly thanks to the icons found next to each of them:
Icons Features
Update the activity's settings (title, weight, etc)
deleted, online activities detached from the assessment
Change the visibility of the results of the activity for the learner
Show the history of changes of this activity's settings
87/152
Illustration 95: Assessments – List view

Chapter 19 WikiThe wiki tool is a collective or collaborative redaction tool. It allows users to work together on one single document, as well as to follow the history of modifications. It also allows you to save time and be more efficient during a group task. It can complete the forum tool in many ways.
The wiki pages can contain many links to other pages, of which the content exist or is still to be created. The wiki pages can be updated. Each contributor posesses the same rights to write and edit content. Originally thought to favor the collaboration between learners, the wii can, at the beginning of a course, be composed only of a list of links inserted by the teacher, pointing to empty pages which each learner will haveto build thanks to the ideas, points of view and experiences of one another.
19.1 Start the wikiThe main page is the entry point of the wiki. It can be updated only by the teacher, which unlocks it that way. While he hasn't done it, learners cannot access it.
– Click the Edit this page icon,– Remove the existing content and replace it by new content (for example, a list of links pointing to
other pages of the wiki),– Add a comment explaining your contribution,– Click Save.
19.2 Add a new linked pageFrom the page you're going to add the link to:– click the Edit this page icon,– click the line you want to add the link on, then choose:
88/152
Illustration 96: Wiki – Main page

– whether to add the text between square brackets [[link to the page to be created]]. Once saved, the text entered between brackets will be transformed into a link to a new empty page,
– or to click the Insert/Edit Wiki Link icon in the editor to indicate the name of the new page to be created,
– click Save.
19.3 Add a new orphan pageBy clicking the Add new page link inside the dropdown menu icon, you create a new page, unrelated to the rest of the wiki. This is a way to prepare a page which will temporarily not be visible to users (at least not through usual ways).
Note : Orphan pages can be listed from the All pages link in the dropdown menu.
19.4 Commenting a pageBy clicking the Discuss this page icon, you get access to a form to add and see comments. This area is visible and can be updated by any user.
Other actions can be executed on wiki pages:
Icons Features
Check the history of changes of a page
Show a list of pages linked to the current page
Delete the current page
Export the page as an HTML document
Export the page as a PDF document
Get an email notification of all changes made to this page
Make a page visible/invisible to learners
Lock / Unlock a page for edition by learners
89/152

19.5 Other wiki featuresThe menu located in the top left corner (dropdown menu) gives access to other wiki features, whatever the current page is:– search titles or contents of pages,– display a list of all the pages,– list only the last modifications,– remove the whole wiki (be careful with this command),– see the most active users,– see the most visited pages,– see the most updated pages,– see all orphan pages,– see all empty pages (wanted pages) created that way as a way to suggest somebody else to add
content on that topic.
90/152

Chapter 20 LinksThis tool allows you t create a library of internal and external links to complete a course or learning path.
20.1 Links categoriesChamilo allows the creation of links categories, which allows for a better links structure when you have many of them. – Click the Add a category icon,– Give a clear name to your category,– Add a description if needed,– Click Add a category.
91/152
Illustration 97: Links Add category

20.2 LinksA link can be added in a category or at the root level:
To add a link:– Click the Add a link icon,– Add the link's URL,– Give it a label,– Add a description of what is on the other side of the link, if desired,– Select a category if desired,– Choose whether to show the link on the course homepage or not,– Click the Save link button.
20.3 Manage linksLinks management uses the same action icons as usual:
Icons Features
Update links or categories
Remove links or categories
Reorganize links and categories order
Show/Hide a link
92/152
Illustration 98: Links Add link

20.4 Links checkerSince version 1.8.8.4, you can (manually) check whether a link is alive. To do this, click the small magnifier icon on the right side of the link. After a few seconds (or less), an icon appears. A green icon means the link is valid. A red icon means the link is broken.
Note: the links checker effectively tries to connect to the given link from the server. As such, a link that works for you could not work for the server, and viceversa.
93/152
Illustration 99: Links – Link checker

Chapter 21 AnnouncementsThis tool lets you send a message by email to your learners and/or to publish an information directly in the course.
These announcements can be used to inform the learners, for example, of the recent availability of a document, of the expiration day of an assignment or any piece of information related to the course.
21.1 Add an announcementOnce inside the tool:– click the Add an announcement icon,– by default, the announcement will be sent to all users. It is possible to update the list of
destinations:
– the announcement can be sent by email to the course users (check the Send this announcement by email to selected groups/users box),
– add an announcement topic,– add a main announcement test,– add an attachment if desired,– click Send announcement.
Note: since version 1.8.8.4, you can use tokens inside your announcements (just copypaste them).
94/152
Illustration 100: Announcements List
Illustration 101: Announcements – Choose destinations

These tokens will be automatically replaced by the corresponding value when sent (by email) or shown (on the platform) to the users.
21.2 Announcements managementAnnouncements can be managed through common action icons:
Icons Features
Update the title, body or settings of the announcement
Delete the announcement
Reorder announcements position
Show / Hide announcement to learners
95/152
Illustration 102: Announcements Creation

Indicates the announcement has been published in the platform as well as sent by email
Indicates the announcement has been sent to some users of the course (if the announcement is sent to all users, this icon does not appear)
96/152

Chapter 22 GlossaryChamilo integrates a glossary tool to allow the teacher to define terms or expressions the same way as a dictionary. No term is defined by default and it is the teacher's responsibility to define important terms.
22.1 New termTo add a new term:– click on Add new glossary term,– give the term's name,– give the term's definition,– click the Save term button.
A definition can be enriched by images and links.
22.2 Glossary terms managementGlossary terms management is done through the usual action icons:
Icons Features
Edit term
Delete term
Show the list view
Show the table view
97/152
Illustration 103: Glossary – Terms list

Chapter 23 AttendancesIn 2010, a famous institute in Lima cofinanced the development of the attendances tool as well as the course progress tool (see corresponding chapter) with a set of basic specifications. Later, the tool got improved progressively thanks to community users (through many suggestions) and some customers (through financing). Today, it's a more advanced tool, but it is still very young, which explains its interface which leaves space for improvement.
The tool is structured at two levels: attendance sheets, which allow for the definition of several types of attendances, or maybe several teachers taking note of attendances, for example one sheet for laboratory sessions and one sheet for theoretical courses, and attendance dates, which are the dates of sessions to attend to, in any specific sheet.
Before you get deeper into this chapter, make sure you have learners subscribed to your course, as otherwise your tests will be all but realistic or complete. If you need, review the Users chapter on page 78. Without learners subscribed, it is practically impossible to make sense of the attendances tool.
23.1 Create an attendance sheetThe process to create a complete attendance sheet is long enough but it is scheduled for improvements in next versions of Chamilo. In short, you will have to:
– fill a short form– see the current list of dates (the first time, there are no dates)– create dates (generally with a specific repetition frequency)– get back to the list of dates
98/152
Illustration 104: Attendances – New attendances form

In Illustration 105, click on the clock icon to access the screen to register dates and times for the sessions to be attended.
Select the date of the first course session. If you want to indicate a weekly repetition, check the Repeat date box and select the Weekly option from the dropdown box. Then indicate the last repetition date for this weekly sequence.
99/152
Illustration 105: Attendances – Intermediary step for dates creation
Illustration 106: Attendances – Creating dates to be attended

The generated dates list appears. You can update or remove any of these dates in case of exception (there might be a holiday precisely on one of the selected dates). Click the first icon to go back to the attendances screen.
By default, all attendances will appear. You can change the filter in the dropdown list to see only today's attendances, only the ones that remain or a specific date.
23.2 Taking note of attendances
Once you get your course sessions all setup, you'll need to start taking note of your learners' attendances. To do that, get inside your attendances sheet (Illustration 108). You'll see a list of learners' names in the first column, then one column for each attendance date. Generally, the default
100/152
Illustration 107: Attendances – List of created dates
Illustration 108: Attendances – List of all dates

column enabled will be the first one that hasn't been modified yet.By default, the system assumes all learners are attending the course session, so you only take note of missing learners, by unchecking the learner's box to mark his absence.
A learner missing more than 10% of the total number of sessions will be marked by an orange background. A learner missing more than 25% of the sessions will be marked by a red background. These are specific rates which cannot, at this point in time, be modified inside the platform.
An attendance sheet can be used in the assessments tool as a marked resource, to be part of the pedagogical objectives.
101/152

Chapter 24 Course progressThe Course progress, or Course diary (the name of this tool is still in a decision process) allows the teacher to build a course program to be shown (optionally) on the course homepage and will include a progress status relative to the current teachers and learners' progress in the scheduled topic preparation.
This tool is only useful in the case of synchronous courses, in which the teacher progresses inside the course at the same rhythm than the learners.
The course progress configuration is quite easy, although quite a long process.
24.1 Create a thematic sectionThe thematic sections are the uppermost unit in the course progress' creation. You need to create sections in order to be able to create other levels of the structure.
To create the first section, create the New thematic section icon.
24.2 Define the thematic planOnce the section is created, you can edit its entry inside the Thematic plan column. The Thematic
102/152
Illustration 109: Course progress Buttons
Illustration 110: Course progress Creation

plan is the definition of the objectives, methodology and other details of the previously created course program section.
24.3 Create steps for the course progressThe steps (or thematic advance) are dates on which you will teach (in particular the content of the section previously defined)
103/152
Illustration 111: Course progress – Thematic plan
Illustration 112: Course progress – Steps creation

You can, for the definition of course sessions dates, recover dates previously defined in the attendance sheets (see Chapter 23 Attendances on page 98).
104/152

Chapter 25 AgendaThe agenda is a tool present both inside each course and as a personal too for each user. An agenda is attached to earch course.
The global agenda is also available from the Agenda tab. The agenda tab (global agenda) gathers all events of courses go which the user is subscribed and can be enriched with personal events which will not appear in other users' agendas. Teachers will see global events, courses events and personal events, and will be able to edit events from their courses or personal events. Learners will see the same but will only be able to edit their own personal events.
25.1 Add event to course agenda– click on the Add event link, – click on the Visible to link to choose whom this agenda event will be visible to. In each list (left
column are potential destinations, right column are designated destinations), you can multipleselect people. Just hold the CTRL key pressed while selecting the users,
– complete the Start date and End date fields: you can use the minicalendar to select these by clicking the Select icon ,
– if the event will be repeated over time, open the Repeat event section (clicking the Repeat event link), check the Repeat event box and indicate the type of periodic repetition (day, month, year),
– give the event a name,– add a description to the event (you can add an image, a video, a link, ...),– add an attachment (optional),– click the Add event link.
105/152
Illustration 113: Agenda List

25.2 Manage course agenda events
Daytoday administration of events in the agenda reuses icons you've seen before (for most):
Icons Features
Update the settings or data of an event (note that updating an event doesn't update its repetitions)
Delete an event (doesn't delete its repetitions)
Control an event's visibility
Add an event
Print the event
Display the view by month (grid)
Display the events as a list
106/152
Illustration 114: Agenda Creation
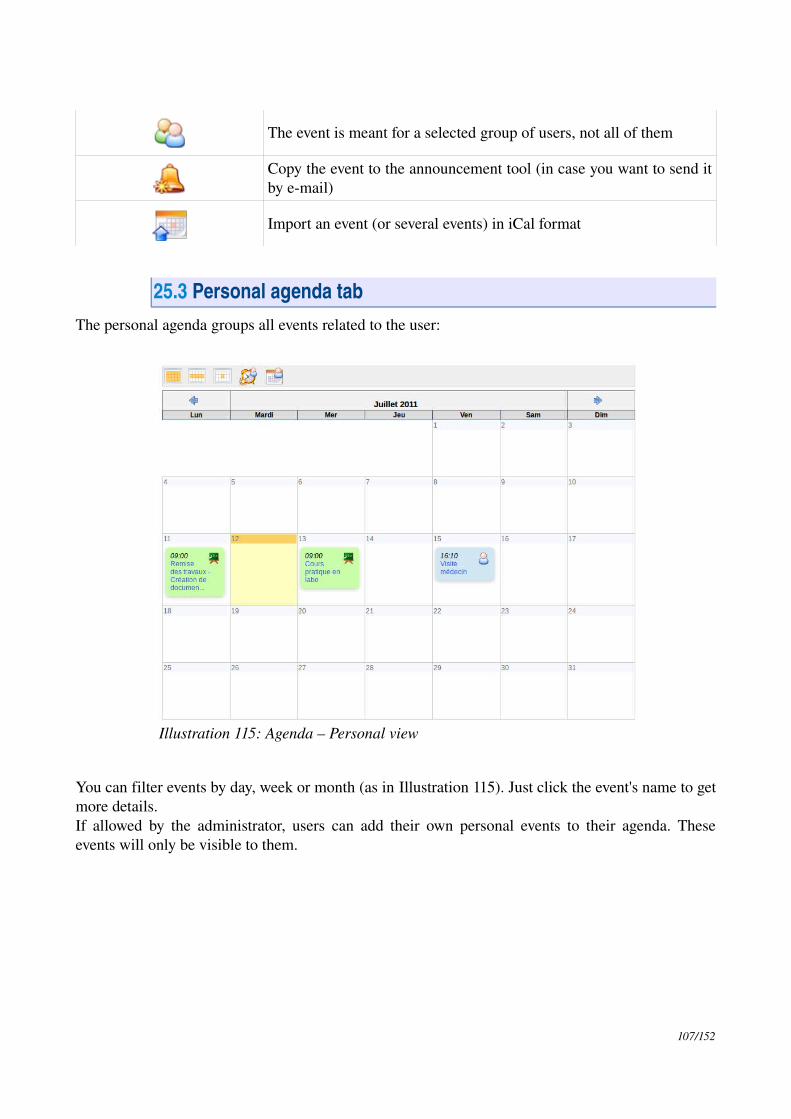
The event is meant for a selected group of users, not all of them
Copy the event to the announcement tool (in case you want to send it by email)
Import an event (or several events) in iCal format
25.3 Personal agenda tabThe personal agenda groups all events related to the user:
You can filter events by day, week or month (as in Illustration 115). Just click the event's name to get more details.If allowed by the administrator, users can add their own personal events to their agenda. These events will only be visible to them.
107/152
Illustration 115: Agenda – Personal view

Chapter 26 DropboxThe dropbox (or Documents sharing) allows users to leave files for each other, to be downloaded later and avoid heavy email downloads. Files can be “dropped” there from a teacher for the learners, from a learner to other learners (if the platform administrator enabled it) or from a learner to the teacher (although it is not meant for delivery of homeworks or assignments, for which the Assignments tool is the best option.The tool is similar to sites like dropbox.io, featurewise, although the feature predates the site considerably and is now suffering from its old age.
Shared work on a specific document can be much simplified for students and the tool manages versions very easily (see below).
Files sent by a user can be commented by the people who receive it. This allows the course teacher to take note of the contribution of each student.
26.1 Create foldersThe teacher can add folders to order his files a bit better. The shared files folders (be they sent or received) are invisible for learners and are only there for organizational purposes.
To create a new folder:– click on the Add a new folder icon,– give it a name,– click the Create category button
26.2 Send a file to specific users– click the Share a new file icon (blue arrow)– click the browse button and select the file on your computer,– in the Send to list, select the destination people (groups can also be selected) holding the CTRL
key pressed while clicking the names,– click the Upload button.
108/152
Illustration 116: Dropbox – Files received

1 The Sent to column indicates whom the file has been sent to, and the destination users can immediately have access to the file.
2 The Received files tab will contain the files received from other users (or yourself).
When sending the same file multiple times, the dropbox tool keeps all versions of the file, without renaming them but differenciating them through their upload time. This is, in a way, a management of the different files versions.
To maintain a single version of a file, check the Overwrite previous versions of same document? box.
26.3 Manage dropbox filesThe dropbox tool offers a series of new management icons:
Icons Features
Update the name of a folder
Delete a folder
Add a comment to the shared file
Shows next to the name of any new file
Move the file to another folder
109/152
Illustration 117: Dropbox – Sending a file

Save on your computer a compressed archive of all the files in the folder
Save a copy of the corresponding file on your computer
Note : When a learner deletes a file sent to the system, this file is still available to the teacher
26.4 Read and add comments attached to a file– click the Comment icon next to the file's name, – read the existing comments,– add a comment in the text area available,– click the Save feedback button.
110/152
Illustration 118: Dropbox Comments

Chapter 27 GroupsThe Groups tool allows you to create and manage working groups (by pair for laboratory practices, by four for more elaborate group work, etc).A freshly created group is always empty. You can fill them automatically or manually, then assign different tools to a group (documents, agenda, assignments, announcements, forum and wiki). If you configure them correctly, these tools can be set as private spaces for the groups themselves (no outside group or learner will be able to see their contents).
27.1 Create groupFrom the groups homepage:– click the Create new group(s) icon,– give a number of groups to create (this will speed up the process if you want to create more than
one),– click the Proceed to groups creation button,– give a name and a number of empty seats in the group,– click Create group(s).
27.2 Groups settingsFrom the groups homepage:– click the Edit settings (tools) icon,– update the group's name or number of seats,– choose whether users can subscribe to the groups or not,
111/152
Illustration 119: Groups List
Illustration 120: Groups Creation

– choose the type of access for each tool (public/private),– define group tutors and members,– click Edit settings.
27.3 Let learners subscribeThis mode lets learners subscribe to the groups by themselves, but it is only available if you updated the group properties correspondingly. Using this method, the teacher only partially controls the initial composition of groups, but he will still be able to update this composition later on.
27.4 Autofilling a groupFrom the groups homepage:– click the Add users icon (represented by a bucket) to fill a group automatically. Use the batch
processing (dropdown list at the bottom) to automatically fill several groups.
The groups composition is not controlled directly, but you can always update it afterward by editing the groups.
112/152
Illustration 121: Groups Registration
Illustration 122: Groups Autofill

27.5 Manual fillingIn the groups homepage, click the settings icon (tools) and add tutors and users manually:
27.6 Getting into a group spaceFrom the groups homepage:– click the name of a group.
The Forums, Documents, Agenda, Assignments, Announcements, Wiki and chat links all point to the private tool space of these groups.
From the group space, you can query a learner's information sheet by simply clicking on her name in the list of members in the lower part of the page.
113/152
Illustration 123: Groups – Manual filling
Illustration 124: Groups – Group space

27.7 Overview / Export of group membersIn the groups overview, you can see the list of groups and subscribed members. The export feature, which is described in the chapter dedicated to the Users tool is also available here:– click on the Excel export icon,– open or save the file on your computer.
27.8 Groups managementThe individual management of groups reuses common icons and a few new ones:
Icons Features
Update a group's settings
Delete a group (confirmation popup) and all its contents
Fill a group with users, randomly
Empty the group
27.8.1 Batch management
Batches management allows you to select several groups at once and use the dropdown list at the bottom of the table to:– delete or,– add users or,– unsubscribe users… from all groups at once.
114/152

Chapter 28 ChatThe Chat tool is an instant messaging tool which allows users in a course to exchange ideas, questions and answers in “live”, written conversation.
The big advantage of this tool compared to Messenger or other types of external chatting tools is it works as part of the platform and, as such, does not require any external tool to use it. It is thus guaranteed to work on all computers with the capability to use Chamilo.
The only disadvantage is it might take a little longer than normal chat tools to update and have less “advanced”, more complex features. The time between two updates of the chat is generally of 3 seconds. This can only be modified by a developer.
If users have configured their picture in the Social network (or Profile) tab, it will appear next to their name. It's up to the teacher to delete previous messages when he considers it necessary.
28.1 Send a messageEnter the text inside the field located at the bottom of the page, then click the Send message button. Inside the messages list, the messages from the teacher appear with a corresponding icon in front of the user's name.
28.2 Empty messagesYou can disconnect from the platform and still have access to previous messages, providing your
115/152
Illustration 125: Chat – TeacherLearner conversation

reconnect the same day.To delete a conversation before starting a new one, click the Clear the chat link.
Note: Chat history logs are normally saved inside the documents tool, in a hidden folder called Chat history. Clearing the chat will also delete the history of the chat for this whole date.
116/152

Chapter 29 SurveyThis tool allows you to query the opinion of learners through surveys.
29.1 Survey creation– click the Create survey icon,– give your survey a Code, a Title, a Subtitle (description),– optionally set a start and end date so the survey is only available for a limited time,– decide whether your survey will be anonymous (users' answers will not be identifiable),– give a sruvey introduction (this is a text that will appear just before the user starts the survey),– give a Final thanks message (this will appear when the users finish the survey, to thank them and
maybe inform them of when the results will be compiled and used),– in the Advanced settings, choose whether you want this survey to be considered an essential
element of the assessments tool (Gradebook), whether you want it to be attached to a parent survey (not documented in this guide yet), whether you want to have one question per page and whether you want to shuffle questions.
– click the Create survey button.
117/152
Illustration 126: Surveys – Creation form

29.2 Add survey questionsOnce the skeleton of your survey has been created, you'll have to define a series of questions from a few predefined types: open questions, percentage selection, multiple answers, etc.
29.3 Survey previewOnce the questions have been created, you can preview your survey before publishing it:– click the Preview icon,– the preview screen drives you through the questions as if you were a learner:
29.4 Survey publicationIf you are satisfied with the survey, you just need to publish it (make sure you are not contradicting yourself with the start date, sending the invitation by email for a survey which is not yet available...):– click the Publish icon– select the users you'll send the survey invitation to– add additional invitations through email addresses directly (semicolumn separation). These
invitations can be sent to people who are not registered as users of the platform (to maybe send the
118/152
Illustration 127: Surveys – Questions creation
Illustration 128: Surveys – Preview survey

invitation to potential customers, or to parents of learners)– add an email topic and invitation message– choose whether this is a first invitation message, a reminder to users who didn't answer yet, or a
reminder to all users– click the Publish survey button.
29.5 ResultsAnalyzing survey results can be an exhausting process. The tools provided in this section will probably be of great assistance.
These tools allow you to see:– a detailed report by question,
119/152
Illustration 129: Surveys – Publication options
Illustration 130: Surveys Results

– a detailed report by user,– a comparative table,– a complete and exportable .csv or .xls report.
29.6 Surveys managementA series of common icons are made available for the management of surveys, as well as a few specific icons.
Icons Features
Update the survey settings
Delete surveys
Empty survey results
Survey preview
Publish survey
Access report features
Change the order of the questions inside the survey
120/152

Chapter 30 NotebookThe Personal notes (or Notebook) tool is a kind of notepad attached to each course. It allows the users to take note of things they would otherwise write on a piece of paper.
Notes can be updated as needed and dates of creation and of last update are saved. Notes taken by a user are not visible by other users. In this sense, they are, indeed, personal.
30.1 Notes creation– click on the Add new note in my personal notebook icon, – give your note a short title,– write down your note,– click Create note.
30.2 Sort notesNotes can be sorted by creation date, last update or by title.
121/152
Illustration 131: Notebook List
Illustration 132: Notebook – Creation form

Chapter 31 ProjectsThe Projects or Blogs tool was developed in 2006 at the request of a large Belgian telecom company. The idea behind it was to implement a blog with lightweight project management features, which was tagged under the name of Smart blogs. Its philosophy is to allow for the assignment of tasks to the learners in order to write the contents of a storytelling type blog.
The teacher takes the responsibility to choose learners who will contribute to the blog and defines the project and the assignment of tasks (or roles taken by the learners). The creation of articles is shared between the teacher and the learners.
The tool can, however, be used as a classical blog.
Note : When a new project is created, it appears in the list of course production tools on the course homepage. Its visibility can be controlled as the one of other tools. As a main difference with other tools, one can create several blogs in the same course. They will appear as multiple entries in the production tool in much the same way as what can be done with links and learning paths.
31.1 Project creationFrom the projects homepage:– click the Create a new project icon,– give your project a name and a short description,– click Save blog.
122/152
Illustration 133: Projects List
Illustration 134: Blogs – Blog creation

31.2 Subscribe learners to a projectYour can manage several projects inside a same course. You can thus select the learners who will contribute to each project individually.
To subscribe learners to a project from the homepage of this project:– click the Users management icon, – check the boxes next to the learners you want to associate to this project,– click the Validate button.
31.3 New article/taskFrom the project's homepage: – click the New task icon, – give the article a name,– write down the real article,– attach a document (optional),– click the Save button.
31.4 Roles managementThe Roles management icon can be used to create detailed tasks of a project step or to assign roles to the members of a project.
To create a new task (or role): – click the Roles management icon,– click the Add a new role link,– give the role a title, description and assign permissions,– choose a color thanks to the dropdown bar,
123/152
Illustration 135: Projects – Users management

– click Save.
The new role appears in the roles list.→
31.5 Assign a role to a learnerOnce the role has been created, you must assign it to a learner: – click on the Assign roles link,– select a learner to assign the role to,– select the roles to be assigned,– select a date to achieve the objective of the role,– click the Validate button.
124/152
Illustration 136: Projects – New role
Illustration 137: Projects – Assign a role

31.6 Indicate the execution of a taskWhether for a teacher or a learner, tasks assigned to any user are shown at the bottom left of the projects page under section My tasks.
To indicate the successful execution of a task: – click on an executed task,– in the project steps list, select the article you want to attach the task to,– in the resulting screen, fill the task name, a comment and optionally a document,– click Save.
The execution report of the task appears as a comment to the article.
125/152
Illustration 138: Projects – Tasks comments

31.7 Learners' task management reportBy clicking the Users management, you get a list of users to be subscribed to the project and a list of users already subscribed.
126/152
Illustration 139: Projects – Users management

Chapter 32 Course settingsThe settings tool allows you to update the behaviour of the course (most options affect several tools). Although it is placed in a remote location at the bottom of the page (and at the end of this manual), it is generally a good idea to use it at the beginning of your course to manage subscription settings and course accesses (see further 32.2 Visibility and access section).
Note: Course tutors using the course inside the session will not have access to this tool as configuration changes might affect other sessions.
32.1 Update general course settingsIn this section, you an always:– update teachers and the course title,– update the general category to which the course belongs,– update the language in which the course interface is set (it can be set to another language than the
one of the platform, which is particularly useful for immersive language course).
Since version 1.8.8, you can also upload an image that will represent your course. It will appear in the course catalog. It is an easy way to motivate learners to subscribe to your course (this should be combined with a nice course description, as shortly described in 10.2.1 Course description on page 24)
127/152
Illustration 140: Course settings General

Note : the department is a feature for which support has been dropped so far. Depending on visual styles, the department might appear as a link in the campus header (for old, deprecated styles). This is all a department will change. In more recent version of Chamilo 1.8, if you need to manage courses by departments inside a university, we recommend you use the multiurl feature, described in the administrator's guide, little brother of this guide.
32.2 Visibility and accessThe Course access section allows you to define how open the access to your course will be through the Course visibility settings (already defined in Chapter 7 on page 18).
The additional options allow you to slightly alter these settings.Finally, the course password is a simple word or sentence which (if set to anything other than empty) will be required to subscribe to the course. Once subscribed, it is not necessary to give the password anymore.
32.3 Email notificationsEmail notifications are a good way to keep the teacher informed, in real time, of certain events happening in his course.
128/152
Illustration 141: Courses catalog – Example of courses illustrations
Illustration 142: Course settings – Email notifications

In this section, you can choose to receive an email notification if:– a user subscribed to your course (this feature has to be enabled by the platform admin),– a new file is submitted in the Assignments or the Dropbox tools,– a test is passed by a learner.
Furthermore, it is possible to set an email notification to all users when a new assignment is created.
32.4 User rightsThis section allows you to give special permissions to users in the limited context of your course:– add events to the course agenda, – add announcements in the course.
It also allows you to hide personal user pictures in the forums, as well as decide whether users have access to the users list. This is independent of the visibility of the tool in the course homepage and is a real access change (the visibility of tools is only a homepage setting and does not prevent users to enter the tool if they know the URL).
32.5 Chat settingsBy selecting the corresponding option, choose whether the chat opens in the page or in a new window.
129/152
Illustration 143: Configuration settings – Users permissions
Illustration 144: Course settings – Chat settings

32.6 Learning path settingsChamilo includes several graphical packages for the platform. These styles can be selected to display the course differently, independently for the global platform style.
If the platform administrator enabled this feature, the teacher can change the graphical style of his course. Another option allows the change of style per learning path, which is yet another level of control.A learner could theoretically enter his Chamilo campus, see the platform ina particular visual style, mostly blue, enter a course and see the style change to red, then enter a learning path and see the style mostly green... For visual comfort, it is recommended, however, to avoid style changes if they are not justified by a real pedagogical reason.
The autolaunch feature has been added in Chamilo 1.8.8.4 and allows the teacher to select one specific learning path to autostart when the user enters the course homepage.In order to use this feature, you'll need to:
– enable the option in the course settings– save– open the learning paths list– click on the rocket icon which represents the autolaunch of one of the learning paths
Only one learning path can be set as autolaunch at a time, and it will start as soon as the learner enters the course homepage. Other learning paths show a gray rocket icon.To test the effect of this option, you'll have to connect as a learner as it has been disabled for
130/152
Illustration 145: Course settings – Learning path settings
Illustration 146: Learning paths Autolaunch

teachers for practical reasons.
Note : the learner will be able to get back to the course homepage from the left menu inside the learning path. The idea is not to disable or hide the course homepage, but rather to speed his access to the course content.
32.7 Thematic advance configurationThis section allows you to choose which options of the Course progress (or Thematic advance) will be visible on the course homepage (on the right side of the introduction section).
These options require a good understanding of the course progress tool. The results of the third option, for example, will be similar to the ones show in Illustration 148 below).
131/152
Illustration 147: Courses settings Course progress
Illustration 148: Course progress – Display on course homepage

Chapter 33 BackupChamilo simplifies the course maintenance tasks by splitting maintenance tools from the course settings. Deleting, emptying, copying, saving or recovering the contents of a course (party or completely) can be executed quickly.
Note : Features for saving, copying, recovering etc. have been developed with the intention of managing content. For this reason, interactions with or between users are not saved. To save them, you'll have to ask your platform administrator to do a full backup of the portal. If you are the administrator, this procedure is described in the admin guide.
132/152
Illustration 149: Backup General

33.1 Create backupFor security or procedural reasons, it is recommended to create a backup copy of the complete contents of your course. This procedure is automated. It allows you to create a complete backup or a partial backup, based on your selection of elements to save, through a few simple clicks.
To start the backup: – click on the Create backup link,– on the page that shows, select whether you want a full copy or just a few elements (in this case you
will have to pick them on the next page),– click the Create backup button to launch the procedure.
The backup is made available in the form of a compressed file which you can download on your computer. It is also stored on the server for quick restoration if needed.
33.2 Import backupEach backup is a compressed file (a Zip file) which is stored on the server (in the archive/ directory). It can also be downloaded on your computer.
Chamilo also allows you to import the contents of a backup copy inside a new empty course. This can be useful for a teacher creating a new course.
To start the import: – click the Import backup link,– choose the source of backup: either a .zip file on your computer or one stored on the server,
133/152
Illustration 150: Maintenance – Backup creation

– choose whether you want to import the whole course or only specific sections (to be selected in the next screen),
– decide whether to duplicate specific files during the importation operation or to replace them,– click Import backup to start the import.
Note : A message will confirm the backup restoration executed successfully
33.3 Copy courseThis feature allows you to duplicate whole or part of a course to another (empty) course. To use it, you first need to have another course available to copy it to.
From the maintenance page: – click Copy course,– select the destination course– select the elements to copy (whole or parts of the origin course)– select what to do in case the files in the destination course already exist,– click the Copy course button.
Note : A message will confirm if the course copy was successful
33.4 Empty this courseThis tool empties (“recycles”) the whole course (or only a few elements). It deletes the documents, forums, links, etc. This procedure can be executed after a course has ended and you want to start
134/152
Illustration 151: Maintenance Import

anew in the same space. Of course, it is generally recommended to keep a history of these courses.
Warning: Before you empty the course, make sure you take a backup copy, just in case!
To empty a course:– click on the Empty this course link,– select whether you want to empty the whole course or just specific tools,– click the Empty this course button to proceed.
33.4.1 Delete the course area
Click the Delete the course area link to delete the course completely from the server.Given the fact there's no way back from this, we highly recommend you consider this twice before confirming it.
Warning : This feature should be used with extreme caution!
135/152
Illustration 152: Maintenance – Empty course
Illustration 153: Maintenance – Course deleting

Chapter 34 ReportingThe reporting tool, also available through the tab of the same name) is only specific to a course if you use the reporting link from inside the course to get to it. It allows you to get an overview of what's happening inside the course, while the Reporting tab allows you to get an overview of what's happening inside all your courses or sessions. In this chapter, we'll analyze the Reporting tab. Just know that the Reporting link inside a course is just a filtered version of the following and has been analyzed in details in Chapter 15 Reporting on page 71.
34.1 Own courses and sessions reportingThe first synthesis table shows the list of courses and sessions of which you are responsible. Each entry shows some statistical data which allows you to track the progress and the results of all learners as an average value.
By clicking the Details icon (double blue arrow), you'll get access to a more detailed list for this specific course or specific session. Clicking on any Details icon in any of those screens will get you at a deeper level of details. There are about 45 levels of details and this guide does not cover them all. We recommend you take some time to have a look through all the options and see which report is the most suited to your needs.
136/152
Illustration 154: Reporting – General courses and sessions reporting

Chapter 35 Social networkChamilo allows teachers and learners to use simple profile and social network features. An internal messaging system is available to users and it is possible to create groups of interest. Note that some of these features need to be enabled by the platform administrator.
35.1 Update profile informationTo update your personal details, go to the Social network tab:– click the Edit profile link,– update the fields,– click Save settings.
Simple profile options allow you to update your picture and language. The extended profile (if enabled by the administrator) allow you to add:– My competences,– My diplomas,– What I am able to teach,– My productions,– My personal open area.
137/152
Illustration 155: Social network Home

35.2 Internal messagingFrom the Social network tab, left menu, the Messages entry allows you to send or receive messages. It is similar to most messaging tools.
To write a message to another user (or a friend) subscribed to the platform:– click the Messages link below your picture,– click the Compose message icon,– start writing the first letters of the name of the user to write to and Chamilo will autocomplete it,– enter the topic and message (optionally you can add an attached file),– click the Send message button.
138/152
Illustration 156: Social network – Extended profile update
Illustration 157: Social network – Internal messaging Inbox

Note: If the other user has chosen to, the message will also be sent to his email as a notification of internal message. However, he will have to enter the platform to answer you.
35.3 “Friends”In the Social network tab, you can make contacts and invite them as Friends (which is a liberal notion of the friend title). You can search people through :– clicking the Invitations link in the left menu,– search for friends' names,– click Search.
By simply entering a few characters of the user firstname or lastname, Chamilo will help by proposing a list of users matching these characters. The invitation can then be sent to the user, who can choose whether to accept or refuse it.
The Friends link gathers all friends you have linked to on the platform. It allows you to see the shared profile of the user and send him a message with a click on his name.
139/152
Illustration 158: Social network – Invitation received

35.4 Social groupsThis tab gathers all groups that exist on the platform. These groups can only be created by administrators, unless they have enabled this option to all users.
There are two groups access types:– public, everybody can join,– private, the group admin must authorize the membership request.
The My groups entry gathers the groups of which you are a member. These groups work as a forum. The admnistrator (or moderator) creates discussion topics and users start contributing.
140/152
Illustration 159: Social network – Shared profile
Illustration 160: Social network – Social groups

141/152
Illustration 161: Social network – Social groups interface

Chapter 36 Session viewSince Chamilo 1.8.8, a new view type is available from the My courses tab when your platform makes use of course sessions. It is a special sessions screen, in which you can find a different (to say the least) way of presenting courses and their resources (learning paths and exercises, mostly).
As a main difference from previous versions of Chamilo, the session title is now a link which leads directly to a page of which the presentation differs in many aspects from the rest of Chamilo. It is a new way to present things that we will study during the next months, thanks to your help and feedback. Let us know what you think on the Chamilo forum: http://www.chamilo.org/
This new concept depends highly on a new timebased programming of exercises and learning paths. As such, it is not well suited to asynchronous teaching (purely remote elearning): by making sure each exercise and learning path has a start and end date, the data shown in these screens take much more sense.
There are 4 main options on the first screen: Courses, Learning paths, My MCQ (Multiple Choice Questions), and My statistics
142/152
Illustration 162: My courses Sessions
Illustration 163: Sessions – New sessions screen

36.1 Courses tabThe courses tab gives a list of courses available inside the sessions. Click on one of these courses to filter the rest of the tabs and show only items from this course.Clicking directly on one of the tabs will show a complete list of all corresponding resources in the session (the learning paths tab will show all learning paths of the session, all courses mixed, unless you previously clicked one specific course in the first tab).
36.2 Learning paths tabThis tab give a list of learning paths from the session, filtered on the course if you clicked a course in the first tab.
The publication date of each learning paths gives you an idea of the learning paths chronology. In case you have several simultaneous courses (which might be the cas in a session) which all offer several learning paths, organizing the right learning paths schedule will give a clear indication to the learner of the expected order in which we expect him to follow them.From this screen, the learner can enter directly the learning paths by simply clicking their name.
Note : there are three view types for learning paths: All, Per week, By course. They do not affect the way contents are ordered, so don't hesitate to try them out.
36.3 My MCQ tabThis tab contains all exercises of all courses in the session, sorted by publication date. Given the results of these exercises are given in a comparative fashion (in comparison to other learners' results) and in a chronological order, it is twice as important to define publication dates for all your exercises.
143/152
Illustration 164: Sessions – Learning paths

Exercises which remain without attempts are indicated by a yellow star. The number of attempts is indicated as well as the exercises tesults and the best results obtained by whichever learner of the session. Finally, the position shows his results' position as a learner within this session.By clicking the test title, the learner gets directly into the test or, in case all attempts have been used, into the test results screen.
36.4 My statistics tabThe My statistics tab brings an innovative set of features if publication dates have been used for exercises. Learners will then be able to see a visual result of their scores as a comparison with other learners.
By clicking the double blue arrow for any course, you'll get a series of more detailed results.
144/152
Illustration 165: Sessions – My QCM tab
Illustration 166: Sessions – My statistics tab

The detailed view allow us to have a graphical visualization of the scores repartition. Each bar represents a rank of results (020%, 2140%, 4160%, 6180%, 81100%). The global chart represents the repartition of all students' results for this exercise. The orange bar is the bar in which the current user's results are located. You can click the chart to have a greater version of this chart.
145/152
Illustration 167: Sessions – Statistical details

Chapter 37 Appendix
37.1 Glossary
– Administrator : The user who controls and manages the Chamilo portal globally.– Course administrator : See teacher– Student : See learner– Assistant de course : a learner who received additional rights inside the limited scope of a
course: he can track other learners' results and check their assignments and answers to their exercises
– Coach : teacher of a course inside the context of a session– Course : a course area, or course space, including its 20orso tools– Learner : The user who has the right, within a course, to access resources as the teacher
prepared them– Trainer : See teacher– Training : See course. In versions 1.8.5 to 1.8.8 of Chamilo, the term Training replaced the
term Course, which lead to an awful lot of confusion, not only in English, but also in other languages which depended on English for translations. The term can be redefined on each portal depending on the needs through the portal administration interface, but Course is used globally now.
– Teacher : The user who creates and/or controls a course (out of the session context)– Tutor : See Coach– User : Any user who has an access to your Chamilo portal, independent of his role
37.2 Frequently asked questionsThis list of short questions and answers might help you sort out how to do specific things with Chamilo which are not explicitly explained in the previous chapters.
37.2.1 How can I set a survey as a requirement to complete a course?
The notion of “completing a course” can only be built upon the Assessments tool, by setting up a certificate that will only be generated when achieving a certain set of learning objectives (exercises, learning paths, assignments, etc). Surveys can then be configured as a “locking” mechanism where a student cannot get a certificate if he doesn't complete the survey.
To do this, go to the survey tool and create your survey. In Advanced settings, check the Qualify in gradebook box and select a weight of 50 (yes, 50, that's usually quite large).
Now go to the Assessments tool and click the percentage icon (Weight in report). Whatever the total weight has been set to, ensure that the survey is worth half of it (if the total weight is 100, the survey must weight 50, but you can also set the total weight to 200 and make the survey weigh 100). The
146/152

other objectives, combined, will be worth half the weight. This means that, even if the learner has the best results, he will only ever be able to achieve a 50% score, which shouldn't be enough to get the certificate. Because the survey is just a yes/no type of result (answered or not answered), there is no other easy way to make the survey be a required element.
Once the learner has completed the survey, his results will jump up to the sufficient result to get his certificate.
Just make sure that the availability dates for your survey do not prevent completely a user to get his certificate, by not being able to take the validation survey.
37.2.2 How can I create a crosswordstype question?
In any exercise, create a new Fill the blanks type question. In the question edition box (online media editor), click the Table icon and choose how many rows and columns you want your crosswords to be. Now will the crosswords with letters. Once you're done, select the letters you want users to find out and replace them with the same letter with brackets around it. These letters will now disappear from the student view and they'll be able to complete the table that way.
37.3 Document license
All right reserved.
Rights given by the copyleft licenses are indicated below.
Copyright (c) 2007 2i2L Sarl. Permission is granted to copy, distribute and/or modify this document under the terms of the GNU Free Documentation License, Version 1.2 or any later version published by the Free Software Foundation ; with no Invariant Sections, no FrontCover Texts, and no BackCover Texts. A copy of the license is included in the section entitled "GNU Free Documentation License".
The contents of this tutorial are available under a double copyleft license:
GNU FDL : http://www.gnu.org/licenses/fdl.txtand CCBYSA : http://creativecommons.org/licenses/bysa/2.0/fr/
In the true spirit of software freedom, all fixes and updates to this tutorial are welcome at this email address: [email protected]
147/152

37.4 Illustrations indexIllustration 1: Icons label....................................................................................................................10Illustration 2: Folded help...................................................................................................................10Illustration 3: Unfolded help...............................................................................................................10Illustration 4: Contextual help popup.................................................................................................10Illustration 5: Homepage....................................................................................................................13Illustration 6: "My courses" page........................................................................................................14Illustration 7: Chamilo header.............................................................................................................15Illustration 8: Breadcrumb Navigation...............................................................................................15Illustration 9: Student view.................................................................................................................15Illustration 10: Personal menu blocks.................................................................................................16Illustration 11: Creating a course – short version...............................................................................16Illustration 12: Create a course – extended version............................................................................17Illustration 13: Course admin tools.....................................................................................................18Illustration 14: Course settings Visibility.........................................................................................18Illustration 15: Sort my courses..........................................................................................................19Illustration 16: Personal courses categories........................................................................................20Illustration 17: Courses catalog...........................................................................................................20Illustration 18: Course tools – Classical option..................................................................................22Illustration 19: Production tools in ipad type view.............................................................................22Illustration 20: Course homepage – Introduction text........................................................................23Illustration 21: Production tools.........................................................................................................24Illustration 22: Production tools – Learning paths.............................................................................25Illustration 23: Interaction tools..........................................................................................................27Illustration 24: Administration tool....................................................................................................29Illustration 25: Production tools..........................................................................................................31Illustration 26: Documents – Directories creation..............................................................................32Illustration 27: Documents – List of default directories.....................................................................33Illustration 28: Documents Icons Upload......................................................................................34Illustration 29: Documents – Documents upload...............................................................................34Illustration 30: Documents – Documents upload in progress.............................................................34Illustration 31: Documents – Document upload finished...................................................................35Illustration 32: Documents Icons – Creation....................................................................................35Illustration 33: Documents – Creating a new document....................................................................36Illustration 34: Documents – Download a copy.................................................................................37Illustration 35: Documents Options.................................................................................................37Illustration 36: Documents Quota....................................................................................................38Illustration 37: Exercises List...........................................................................................................39Illustration 38: Exercises – Simple creation.......................................................................................39Illustration 39: Exercises – Creating an exercise – Advanced options...............................................42Illustration 40: Exercises – Question types........................................................................................44Illustration 41: Exercises Multiple answer question creation form..................................................44Illustration 42: Exercises Fill the blanks..........................................................................................46Illustration 43: Exercises Open questions.........................................................................................47Illustration 44: Exercises Hotspot question creation........................................................................49
148/152

Illustration 45: Exercises Exact combination...................................................................................50Illustration 46: Exercises – Questions database..................................................................................52Illustration 47: Exercises Import HotPotatoes..................................................................................52Illustration 48: Exercises Import IMS/QTI2....................................................................................52Illustration 49: Exercises List...........................................................................................................53Illustration 50: Exercises – Results list...............................................................................................53Illustration 51: Forum – Global view..................................................................................................54Illustration 52: Forum – Display modes.............................................................................................55Illustration 53: Forum – New category...............................................................................................55Illustration 54: Forum – Forum creation form....................................................................................56Illustration 55: Forum – Discussion thread........................................................................................58Illustration 56: Forum – Marking a thread.........................................................................................60Illustration 57: Learning paths – Access through course's homepage................................................62Illustration 58: Learning paths List..................................................................................................62Illustration 59: Learning paths Creation..........................................................................................63Illustration 60: Learning paths – Elements edition page....................................................................63Illustration 61: Learning paths Settings............................................................................................64Illustration 62: Learning paths – Components edition.......................................................................65Illustration 63: Learning paths – Online creation...............................................................................65Illustration 64: Learning paths – Importing existing resources..........................................................66Illustration 65: Learning paths – New section....................................................................................66Illustration 66: Learning paths – Learner's view................................................................................67Illustration 67: Learning paths – Organize view.................................................................................67Illustration 68: Learning paths – Organize view – Upload audios.....................................................68Illustration 69: Learning paths Import SCORM..............................................................................68Illustration 70: Learning paths List..................................................................................................69Illustration 71: Learning paths Prerequisites....................................................................................70Illustration 72: Learning paths – Selecting prerequisites...................................................................70Illustration 73: Courses – Administration tools..................................................................................71Illustration 74: Reporting Learners...................................................................................................71Illustration 75: Reporting – Details.....................................................................................................72Illustration 76: Reporting – Course reporting.....................................................................................72Illustration 77: Reporting – Notify inactive students..........................................................................73Illustration 78: Reporting – Reminder announcement........................................................................73Illustration 79: Assignments Options...............................................................................................74Illustration 80: Assignment Creation................................................................................................75Illustration 81: Assignments – Advanced settings..............................................................................76Illustration 82: Users – Main screen...................................................................................................78Illustration 83: Users – Action buttons...............................................................................................78Illustration 84: Users – Access details................................................................................................80Illustration 85: Assessments Example..............................................................................................81Illustration 86: Assessments – General settings.................................................................................82Illustration 87: Assessments Weights...............................................................................................82Illustration 88: Assessments – Skills ranking.....................................................................................83Illustration 89: Assessments – Skills ranking Advanced.................................................................83Illustration 90: Assessments – Certificate template creation.............................................................84
149/152

Illustration 91: Assessments – Certificates templates list...................................................................84Illustration 92: Assessments – Classroom activity.............................................................................85Illustration 93: Assessments – Classroom activities – Filling results.................................................86Illustration 94: Assessments – Add online activity............................................................................86Illustration 95: Assessments – List view............................................................................................87Illustration 96: Wiki – Main page.......................................................................................................88Illustration 97: Links Add category..................................................................................................91Illustration 98: Links Add link.........................................................................................................92Illustration 99: Links – Link checker..................................................................................................93Illustration 100: Announcements List..............................................................................................94Illustration 101: Announcements – Choose destinations....................................................................94Illustration 102: Announcements Creation.......................................................................................95Illustration 103: Glossary – Terms list................................................................................................97Illustration 104: Attendances – New attendances form......................................................................98Illustration 105: Attendances – Intermediary step for dates creation.................................................99Illustration 106: Attendances – Creating dates to be attended............................................................99Illustration 107: Attendances – List of created dates........................................................................100Illustration 108: Attendances – List of all dates................................................................................100Illustration 109: Course progress Buttons......................................................................................102Illustration 110: Course progress Creation.....................................................................................102Illustration 111: Course progress – Thematic plan...........................................................................103Illustration 112: Course progress – Steps creation............................................................................103Illustration 113: Agenda List..........................................................................................................105Illustration 114: Agenda Creation...................................................................................................106Illustration 115: Agenda – Personal view..........................................................................................107Illustration 116: Dropbox – Files received........................................................................................108Illustration 117: Dropbox – Sending a file........................................................................................109Illustration 118: Dropbox Comments..............................................................................................110Illustration 119: Groups List...........................................................................................................111Illustration 120: Groups Creation...................................................................................................111Illustration 121: Groups Registration...............................................................................................112Illustration 122: Groups Autofill...................................................................................................112Illustration 123: Groups – Manual filling.........................................................................................113Illustration 124: Groups – Group space............................................................................................113Illustration 125: Chat – TeacherLearner conversation.....................................................................115Illustration 126: Surveys – Creation form.........................................................................................117Illustration 127: Surveys – Questions creation..................................................................................118Illustration 128: Surveys – Preview survey.......................................................................................118Illustration 129: Surveys – Publication options.................................................................................119Illustration 130: Surveys Results.....................................................................................................119Illustration 131: Notebook List.......................................................................................................121Illustration 132: Notebook – Creation form......................................................................................121Illustration 133: Projects List.........................................................................................................122Illustration 134: Blogs – Blog creation.............................................................................................122Illustration 135: Projects – Users management.................................................................................123Illustration 136: Projects – New role................................................................................................124
150/152

Illustration 137: Projects – Assign a role..........................................................................................124Illustration 138: Projects – Tasks comments....................................................................................125Illustration 139: Projects – Users management.................................................................................126Illustration 140: Course settings General.......................................................................................127Illustration 141: Courses catalog – Example of courses illustrations...............................................128Illustration 142: Course settings – Email notifications....................................................................128Illustration 143: Configuration settings – Users permissions...........................................................129Illustration 144: Course settings – Chat settings...............................................................................129Illustration 145: Course settings – Learning path settings................................................................130Illustration 146: Learning paths Autolaunch................................................................................130Illustration 147: Courses settings Course progress.........................................................................131Illustration 148: Course progress – Display on course homepage....................................................131Illustration 149: Backup General....................................................................................................132Illustration 150: Maintenance – Backup creation.............................................................................133Illustration 151: Maintenance Import.............................................................................................134Illustration 152: Maintenance – Empty course.................................................................................135Illustration 153: Maintenance – Course deleting..............................................................................135Illustration 154: Reporting – General courses and sessions reporting..............................................136Illustration 155: Social network Home...........................................................................................137Illustration 156: Social network – Extended profile update.............................................................138Illustration 157: Social network – Internal messaging Inbox.........................................................138Illustration 158: Social network – Invitation received......................................................................139Illustration 159: Social network – Shared profile.............................................................................140Illustration 160: Social network – Social groups..............................................................................140Illustration 161: Social network – Social groups interface................................................................141Illustration 162: My courses Sessions............................................................................................142Illustration 163: Sessions – New sessions screen..............................................................................142Illustration 164: Sessions – Learning paths......................................................................................143Illustration 165: Sessions – My QCM tab.........................................................................................144Illustration 166: Sessions – My statistics tab....................................................................................144Illustration 167: Sessions – Statistical details....................................................................................145
37.5 Alphabetical indexAICC.............................................................................................................................................62, 68AVI......................................................................................................................................................31feedback..............................................................................................................................................40fill in the blanks..................................................................................................................................40Flash....................................................................................................................................................31forum....................................................................................................................................................9HotPotatoes.........................................................................................................................................39HTML.................................................................................................................................................31IMS/QTI2...........................................................................................................................................39LibreOffice.........................................................................................................................................31MP3.....................................................................................................................................................31MSExcel®.........................................................................................................................................31
151/152

MSExcel® ........................................................................................................................................71MSPowerPoint®................................................................................................................................31MSWord.............................................................................................................................................31MSWord®..........................................................................................................................................31OGG....................................................................................................................................................31OpenOffice.org...................................................................................................................................31PDF...............................................................................................................................................31, 37Photoshop®........................................................................................................................................36Quicktime®.........................................................................................................................................31score....................................................................................................................................................41SCORM..................................................................................................................................62, 66, 68XLS...............................................................................................................................................39, 72
37.6 Document history
Date Collaborator Contact Updated
2010 2i2l.fr, Anaël Boulier [email protected] Rédaction du manuel pour Chamilo 1.8.7
April 2011
BeezNest Belgium SPRL, Yannick Warnier
[email protected] Mise à jour pour 1.8.8, correctifs, mise on page, ajouts de détails
July 2011
BeezNest Belgium SPRL, Yannick Warnier
[email protected] Mise à jour pour 1.8.8.4 and réorganisation des chapitres ; réécriture de l'introduction, listing des options, ajout des nouvelles fonctionnalités, révision du texte. À revoir : outils Suivi and Réseau social.
August 2011
BeezNest Belgium SPRL, Yannick Warnier
[email protected] Added FAQ, fixes and details.Translated to English.
152/152