CenturyLink Business Bundle...CenturyLink ® Business Bundle Your Business Bundle package includes...
13
CenturyLink ® Business Bundle Business Class Data & Voice Services Quick Start Guide Powered by Microsoft ® Office 365 QUICK START GUIDE
Transcript of CenturyLink Business Bundle...CenturyLink ® Business Bundle Your Business Bundle package includes...

CenturyLink® Business BundleBusiness Class Data & Voice Services Quick Start GuidePowered by Microsoft® Office 365
QUICK START GUIDE
Welcome to CenturyLink® Business Bundle
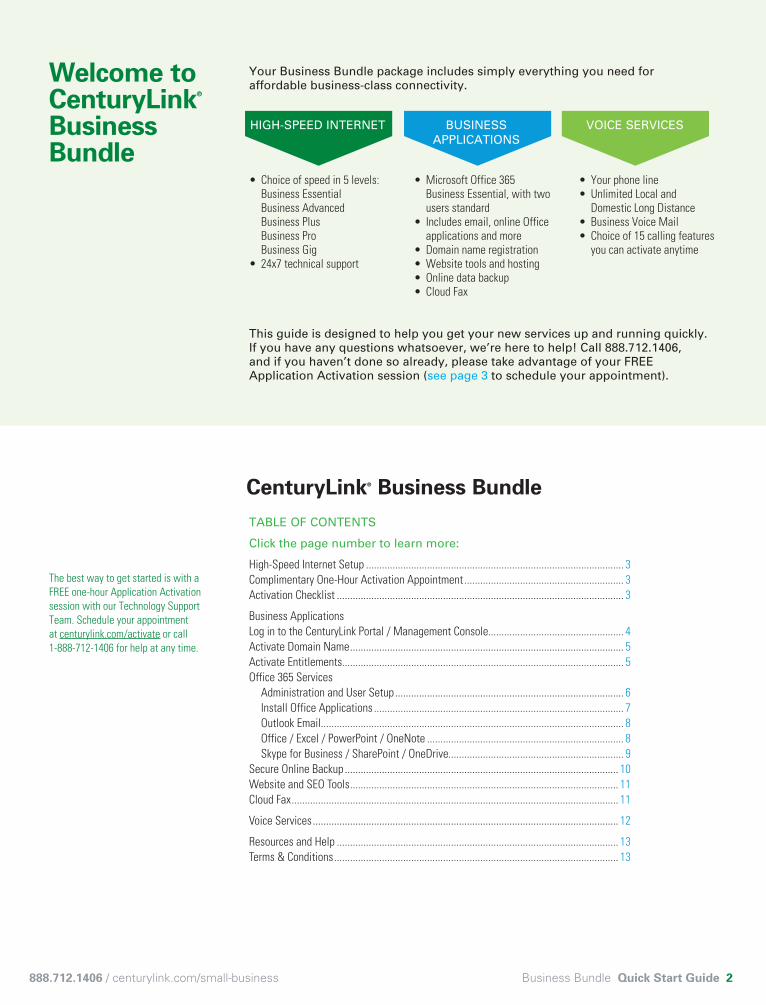
Your Business Bundle package includes simply everything you need for affordable business-class connectivity.
This guide is designed to help you get your new services up and running quickly. If you have any questions whatsoever, we’re here to help! Call 888.712.1406, and if you haven’t done so already, please take advantage of your FREE Application Activation session (see page 3 to schedule your appointment).
• Choice of speed in 5 levels: Business Essential Business Advanced Business Plus Business Pro Business Gig• 24x7 technical support
• Microsoft Office 365 Business Essential, with two users standard
• Includes email, online Office applications and more
• Domain name registration• Website tools and hosting• Online data backup • Cloud Fax
• Your phone line• Unlimited Local and
Domestic Long Distance• Business Voice Mail• Choice of 15 calling features
you can activate anytime
TABLE OF CONTENTS
Click the page number to learn more:
High-Speed Internet Setup ................................................................................................. 3Complimentary One-Hour Activation Appointment ............................................................ 3Activation Checklist ............................................................................................................ 3
Business ApplicationsLog in to the CenturyLink Portal / Management Console................................................... 4Activate Domain Name ....................................................................................................... 5Activate Entitlements.......................................................................................................... 5Office 365 Services Administration and User Setup ...................................................................................... 6 Install Office Applications .............................................................................................. 7 Outlook Email.................................................................................................................. 8 Office / Excel / PowerPoint / OneNote .......................................................................... 8 Skype for Business / SharePoint / OneDrive.................................................................. 9Secure Online Backup ....................................................................................................... 10Website and SEO Tools ..................................................................................................... 11Cloud Fax ........................................................................................................................... 11
Voice Services ................................................................................................................... 12
Resources and Help .......................................................................................................... 13Terms & Conditions ........................................................................................................... 13
888.712.1406 / centurylink.com/small-business Business Bundle Quick Start Guide 2
HIGH-SPEED INTERNET BUSINESS APPLICATIONS
VOICE SERVICES
The best way to get started is with a FREE one-hour Application Activation session with our Technology Support Team. Schedule your appointment at centurylink.com/activate or call 1-888-712-1406 for help at any time.
CenturyLink® Business Bundle
Getting Started
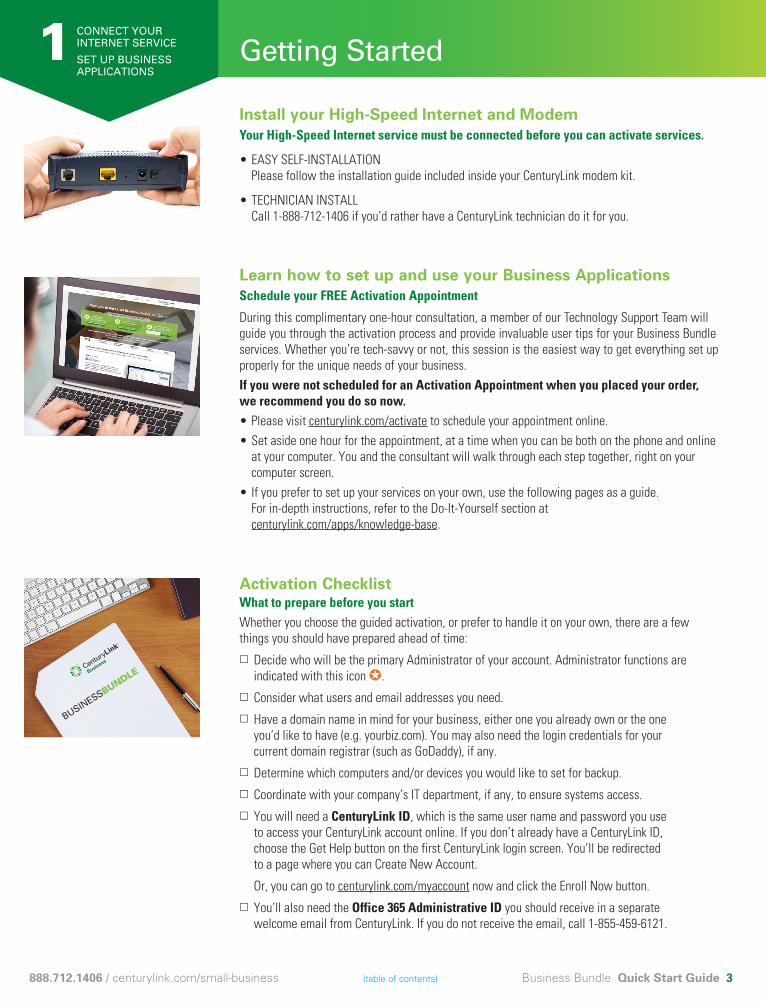
Install your High-Speed Internet and ModemYour High-Speed Internet service must be connected before you can activate services.
• EASY SELF-INSTALLATION Please follow the installation guide included inside your CenturyLink modem kit.
• TECHNICIAN INSTALL Call 1-888-712-1406 if you’d rather have a CenturyLink technician do it for you.
Learn how to set up and use your Business ApplicationsSchedule your FREE Activation Appointment
During this complimentary one-hour consultation, a member of our Technology Support Team will guide you through the activation process and provide invaluable user tips for your Business Bundle services. Whether you’re tech-savvy or not, this session is the easiest way to get everything set up properly for the unique needs of your business.
If you were not scheduled for an Activation Appointment when you placed your order, we recommend you do so now.• Please visit centurylink.com/activate to schedule your appointment online.
• Set aside one hour for the appointment, at a time when you can be both on the phone and online at your computer. You and the consultant will walk through each step together, right on your computer screen.
• If you prefer to set up your services on your own, use the following pages as a guide. For in-depth instructions, refer to the Do-It-Yourself section at centurylink.com/apps/knowledge-base.
Activation ChecklistWhat to prepare before you startWhether you choose the guided activation, or prefer to handle it on your own, there are a few things you should have prepared ahead of time:
Decide who will be the primary Administrator of your account. Administrator functions are indicated with this icon ✪.
Consider what users and email addresses you need.
Have a domain name in mind for your business, either one you already own or the one you’d like to have (e.g. yourbiz.com). You may also need the login credentials for your current domain registrar (such as GoDaddy), if any.
Determine which computers and/or devices you would like to set for backup.
Coordinate with your company’s IT department, if any, to ensure systems access.
You will need a CenturyLink ID, which is the same user name and password you use to access your CenturyLink account online. If you don’t already have a CenturyLink ID, choose the Get Help button on the first CenturyLink login screen. You’ll be redirected to a page where you can Create New Account.
Or, you can go to centurylink.com/myaccount now and click the Enroll Now button.
You’ll also need the Office 365 Administrative ID you should receive in a separate welcome email from CenturyLink. If you do not receive the email, call 1-855-459-6121.
888.712.1406 / centurylink.com/small-business (table of contents) Business Bundle Quick Start Guide 3
1 CONNECT YOUR INTERNET SERVICE
SET UP BUSINESS APPLICATIONS
BUSINESSBUNDLE
Log in via the CenturyLink Portal
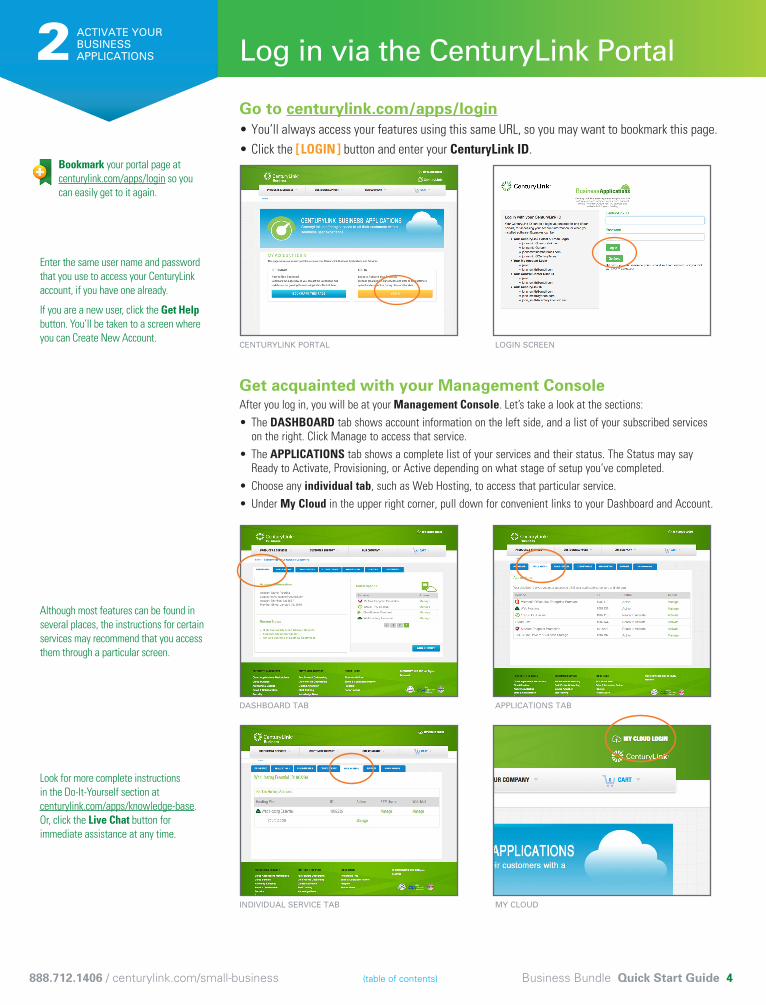
Go to centurylink.com/apps/login• You’ll always access your features using this same URL, so you may want to bookmark this page.
• Click the [ LOGIN ] button and enter your CenturyLink ID.
Get acquainted with your Management ConsoleAfter you log in, you will be at your Management Console. Let’s take a look at the sections:
• The DASHBOARD tab shows account information on the left side, and a list of your subscribed services on the right. Click Manage to access that service.
• The APPLICATIONS tab shows a complete list of your services and their status. The Status may say Ready to Activate, Provisioning, or Active depending on what stage of setup you’ve completed.
• Choose any individual tab, such as Web Hosting, to access that particular service.
• Under My Cloud in the upper right corner, pull down for convenient links to your Dashboard and Account.
888.712.1406 / centurylink.com/small-business (table of contents) Business Bundle Quick Start Guide 4
Bookmark your portal page at centurylink.com/apps/login so you can easily get to it again.
Enter the same user name and password that you use to access your CenturyLink account, if you have one already.
If you are a new user, click the Get Help button. You’ll be taken to a screen where you can Create New Account.
Although most features can be found in several places, the instructions for certain services may recommend that you access them through a particular screen.
Look for more complete instructions in the Do-It-Yourself section at centurylink.com/apps/knowledge-base. Or, click the Live Chat button for immediate assistance at any time.
CENTURYLINK PORTAL LOGIN SCREEN
DASHBOARD TAB APPLICATIONS TAB
INDIVIDUAL SERVICE TAB MY CLOUD
2 ACTIVATE YOUR BUSINESS APPLICATIONS
888.712.1406 / centurylink.com/small-business (table of contents) Business Bundle Quick Start Guide 5
Activate Entitlements
First, you have to ACTIVATE the services you plan to use before you can set up and use them.
• Log in to your Management Console: centurylink.com/apps/login as described on the previous page.
• You will be presented with the Entitlements screen, which lists all the services included in your package.
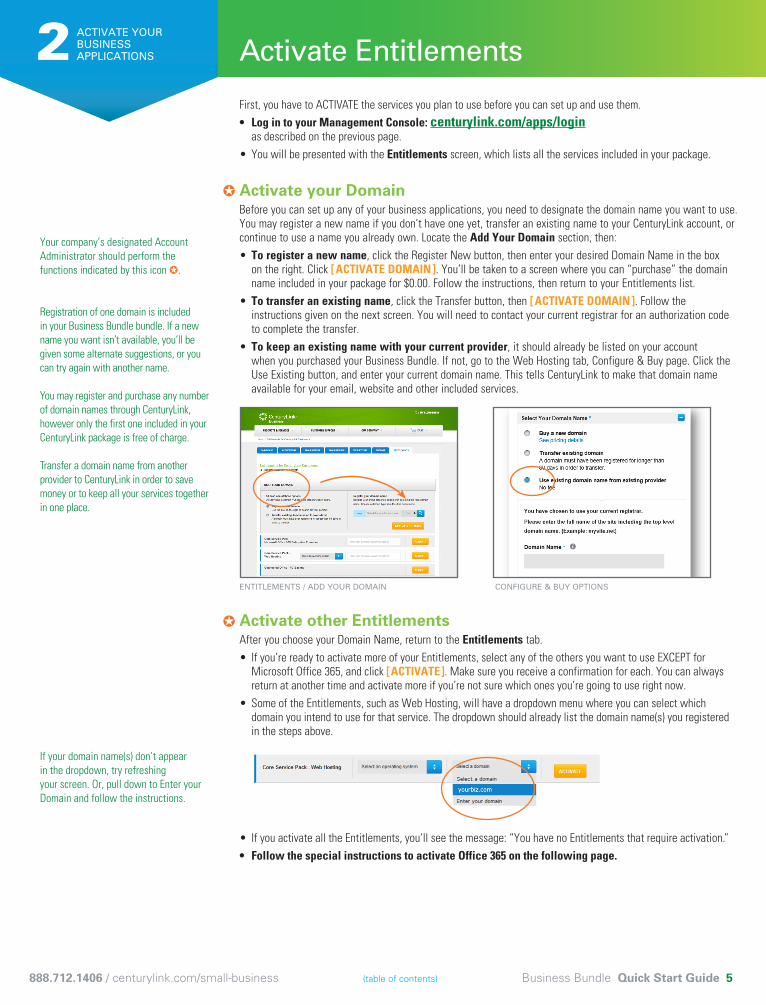
Activate your DomainBefore you can set up any of your business applications, you need to designate the domain name you want to use. You may register a new name if you don’t have one yet, transfer an existing name to your CenturyLink account, or continue to use a name you already own. Locate the Add Your Domain section, then:
• To register a new name, click the Register New button, then enter your desired Domain Name in the box on the right. Click [ ACTIVATE DOMAIN ]. You’ll be taken to a screen where you can “purchase” the domain name included in your package for $0.00. Follow the instructions, then return to your Entitlements list.
• To transfer an existing name, click the Transfer button, then [ ACTIVATE DOMAIN ]. Follow the instructions given on the next screen. You will need to contact your current registrar for an authorization code to complete the transfer.
• To keep an existing name with your current provider, it should already be listed on your account when you purchased your Business Bundle. If not, go to the Web Hosting tab, Configure & Buy page. Click the Use Existing button, and enter your current domain name. This tells CenturyLink to make that domain name available for your email, website and other included services.
Activate other EntitlementsAfter you choose your Domain Name, return to the Entitlements tab.
• If you’re ready to activate more of your Entitlements, select any of the others you want to use EXCEPT for Microsoft Office 365, and click [ ACTIVATE ]. Make sure you receive a confirmation for each. You can always return at another time and activate more if you’re not sure which ones you’re going to use right now.
• Some of the Entitlements, such as Web Hosting, will have a dropdown menu where you can select which domain you intend to use for that service. The dropdown should already list the domain name(s) you registered in the steps above.
• If you activate all the Entitlements, you’ll see the message: “You have no Entitlements that require activation.”
• Follow the special instructions to activate Office 365 on the following page.
ENTITLEMENTS / ADD YOUR DOMAIN CONFIGURE & BUY OPTIONS
Your company’s designated Account Administrator should perform the functions indicated by this icon ✪.
Registration of one domain is included in your Business Bundle bundle. If a new name you want isn’t available, you’ll be given some alternate suggestions, or you can try again with another name.
You may register and purchase any number of domain names through CenturyLink, however only the first one included in your CenturyLink package is free of charge.
Transfer a domain name from another provider to CenturyLink in order to save money or to keep all your services together in one place.
If your domain name(s) don’t appear in the dropdown, try refreshing your screen. Or, pull down to Enter your Domain and follow the instructions.
2 ACTIVATE YOUR BUSINESS APPLICATIONS
✪
✪
Microsoft® Office 365 Admin
Activating Office 365 requires a different activation procedure from the other Entitlements.
• Log in to your Management Console: centurylink.com/apps/login
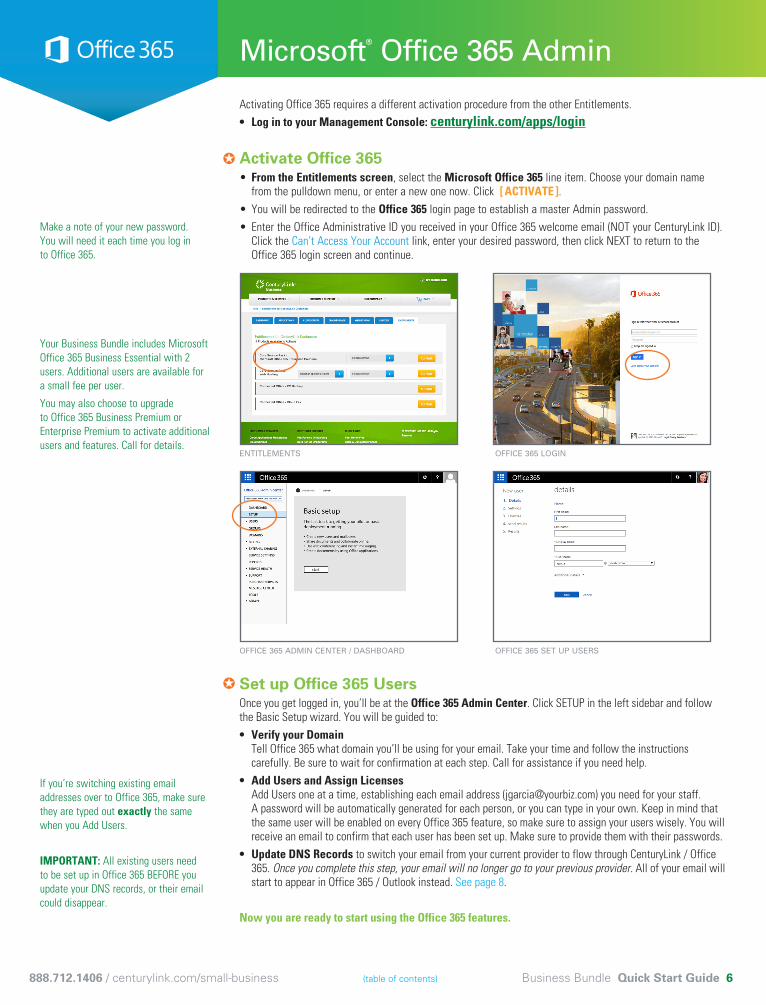
Activate Office 365• From the Entitlements screen, select the Microsoft Office 365 line item. Choose your domain name
from the pulldown menu, or enter a new one now. Click [ ACTIVATE ]. • You will be redirected to the Office 365 login page to establish a master Admin password.
• Enter the Office Administrative ID you received in your Office 365 welcome email (NOT your CenturyLink ID). Click the Can’t Access Your Account link, enter your desired password, then click NEXT to return to the Office 365 login screen and continue.
Set up Office 365 UsersOnce you get logged in, you’ll be at the Office 365 Admin Center. Click SETUP in the left sidebar and follow the Basic Setup wizard. You will be guided to:
• Verify your Domain Tell Office 365 what domain you’ll be using for your email. Take your time and follow the instructions carefully. Be sure to wait for confirmation at each step. Call for assistance if you need help.
• Add Users and Assign Licenses Add Users one at a time, establishing each email address ([email protected]) you need for your staff. A password will be automatically generated for each person, or you can type in your own. Keep in mind that the same user will be enabled on every Office 365 feature, so make sure to assign your users wisely. You will receive an email to confirm that each user has been set up. Make sure to provide them with their passwords.
• Update DNS Records to switch your email from your current provider to flow through CenturyLink / Office 365. Once you complete this step, your email will no longer go to your previous provider. All of your email will start to appear in Office 365 / Outlook instead. See page 8.
Now you are ready to start using the Office 365 features.
888.712.1406 / centurylink.com/small-business (table of contents) Business Bundle Quick Start Guide 6
ENTITLEMENTS OFFICE 365 LOGIN
Make a note of your new password. You will need it each time you log in to Office 365.
Your Business Bundle includes Microsoft Office 365 Business Essential with 2 users. Additional users are available for a small fee per user.
You may also choose to upgrade to Office 365 Business Premium or Enterprise Premium to activate additional users and features. Call for details.
If you’re switching existing email addresses over to Office 365, make sure they are typed out exactly the same when you Add Users.
IMPORTANT: All existing users need to be set up in Office 365 BEFORE you update your DNS records, or their email could disappear.
OFFICE 365 ADMIN CENTER / DASHBOARD OFFICE 365 SET UP USERS
✪
✪
888.712.1406 / centurylink.com/small-business (table of contents) Business Bundle Quick Start Guide 7
*P
*P
Using Microsoft® Office 365
Now that your Office 365 users are set up, each individual can access their own services.
• Log in to the CenturyLink Management Console: centurylink.com/apps/login with your CenturyLink user name and password. From the APPLICATIONS tab, choose Office 365 and Manage. or• Log in to Office 365 directly at: portal.office.com with your Office 365 email / user name and password.
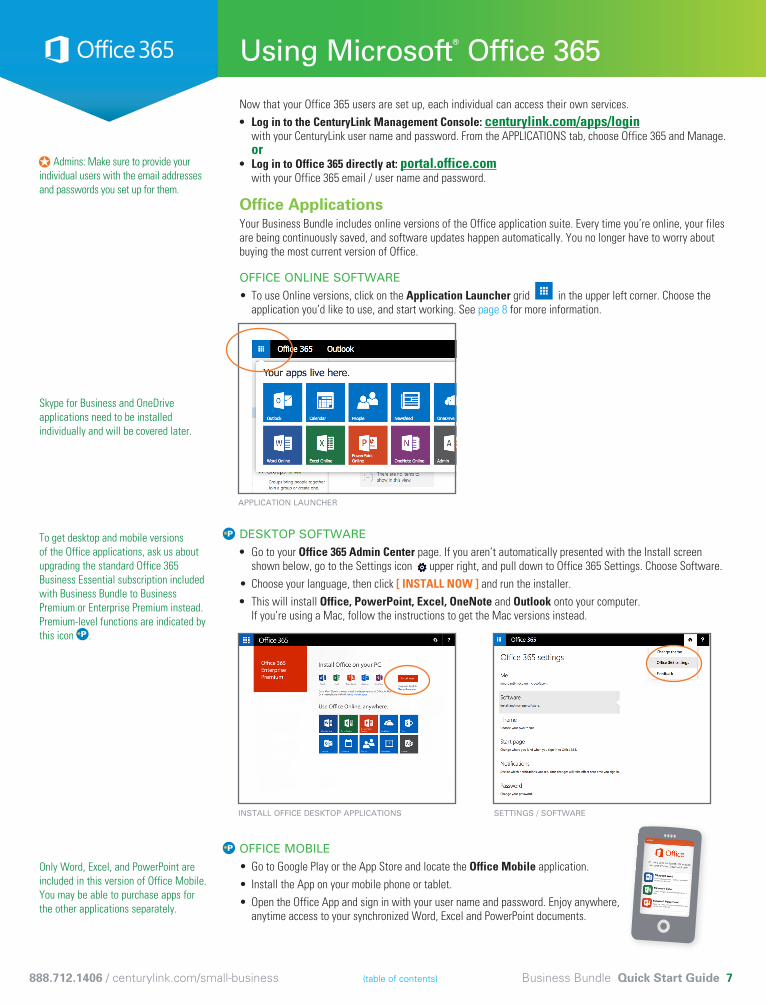
Office ApplicationsYour Business Bundle includes online versions of the Office application suite. Every time you’re online, your files are being continuously saved, and software updates happen automatically. You no longer have to worry about buying the most current version of Office.
OFFICE ONLINE SOFTWARE• To use Online versions, click on the Application Launcher grid in the upper left corner. Choose the
application you’d like to use, and start working. See page 8 for more information.
DESKTOP SOFTWARE• Go to your Office 365 Admin Center page. If you aren’t automatically presented with the Install screen
shown below, go to the Settings icon upper right, and pull down to Office 365 Settings. Choose Software.
• Choose your language, then click [ INSTALL NOW ] and run the installer.
• This will install Office, PowerPoint, Excel, OneNote and Outlook onto your computer. If you’re using a Mac, follow the instructions to get the Mac versions instead.
OFFICE MOBILE• Go to Google Play or the App Store and locate the Office Mobile application.
• Install the App on your mobile phone or tablet.
• Open the Office App and sign in with your user name and password. Enjoy anywhere, anytime access to your synchronized Word, Excel and PowerPoint documents.
INSTALL OFFICE DESKTOP APPLICATIONS SETTINGS / SOFTWARE
APPLICATION LAUNCHER
Admins: Make sure to provide your individual users with the email addresses and passwords you set up for them.
Skype for Business and OneDrive applications need to be installed individually and will be covered later.
To get desktop and mobile versions of the Office applications, ask us about upgrading the standard Office 365 Business Essential subscription included with Business Bundle to Business Premium or Enterprise Premium instead. Premium-level functions are indicated by this icon *P .
Only Word, Excel, and PowerPoint are included in this version of Office Mobile. You may be able to purchase apps for the other applications separately.
✪
Using Microsoft® Office 365
If you are not already at the Office 365 Admin Center:
• Log in to the CenturyLink Management Console: centurylink.com/apps/login with your CenturyLink user name and password. From the APPLICATIONS tab, choose Office 365 and Manage. or• Log in to Office 365 directly at: portal.office.com with your Office 365 email / user name and password.
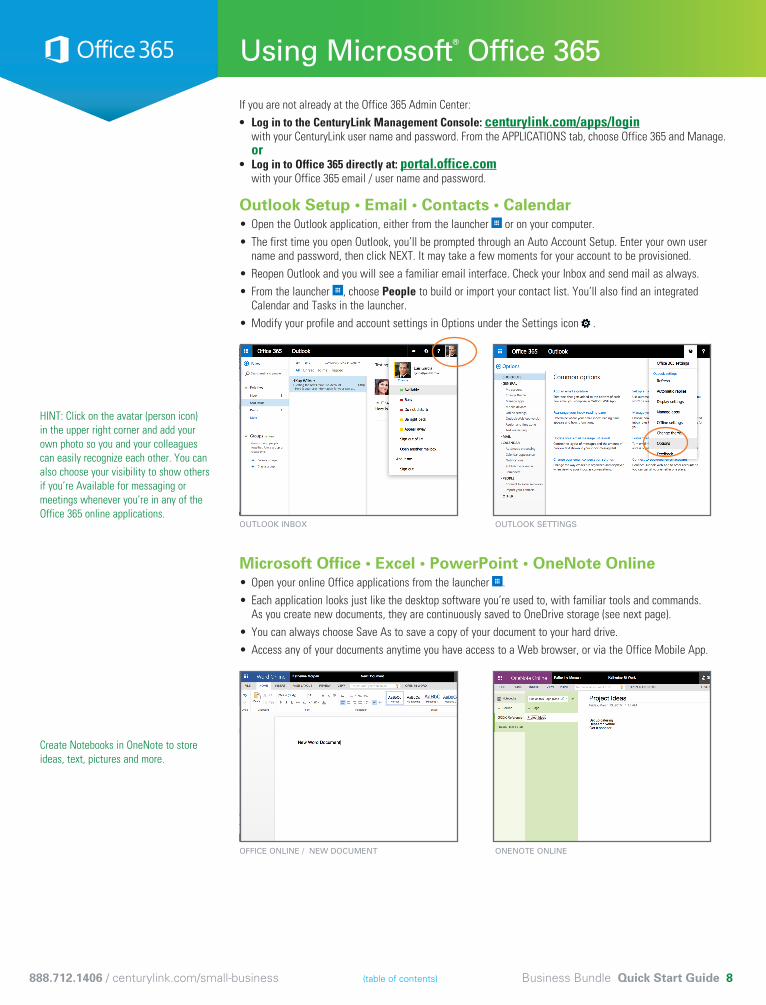
Outlook Setup • Email • Contacts • Calendar• Open the Outlook application, either from the launcher or on your computer.
• The first time you open Outlook, you’ll be prompted through an Auto Account Setup. Enter your own user name and password, then click NEXT. It may take a few moments for your account to be provisioned.
• Reopen Outlook and you will see a familiar email interface. Check your Inbox and send mail as always.
• From the launcher , choose People to build or import your contact list. You’ll also find an integrated Calendar and Tasks in the launcher.
• Modify your profile and account settings in Options under the Settings icon .
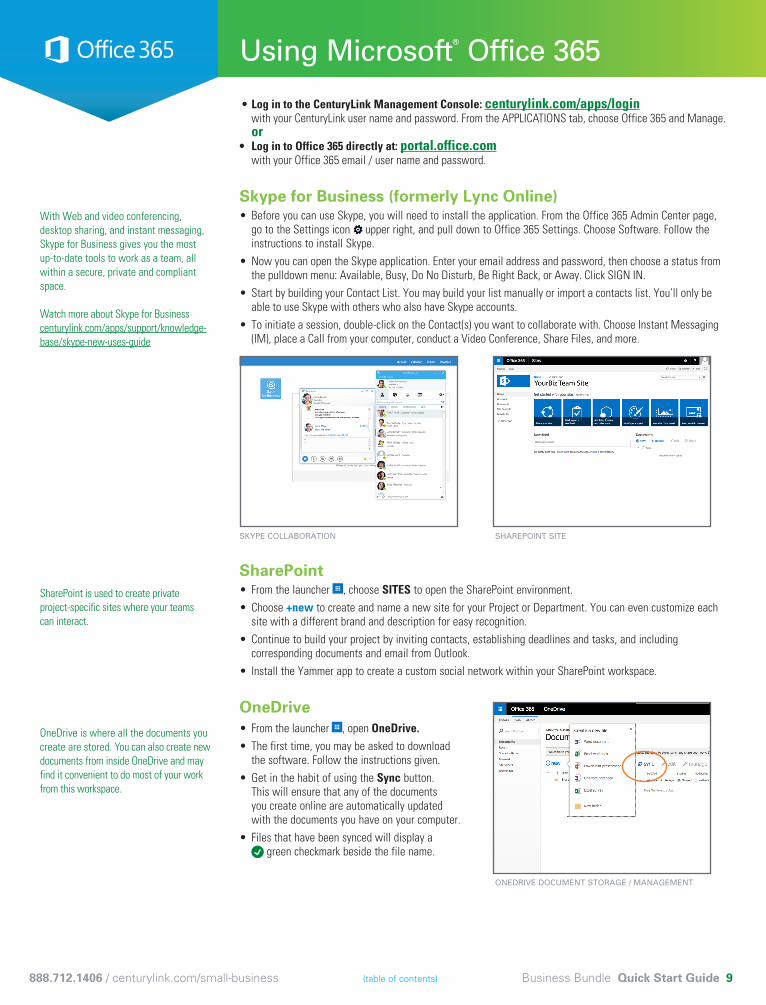
Microsoft Office • Excel • PowerPoint • OneNote Online• Open your online Office applications from the launcher .
• Each application looks just like the desktop software you’re used to, with familiar tools and commands. As you create new documents, they are continuously saved to OneDrive storage (see next page).
• You can always choose Save As to save a copy of your document to your hard drive.
• Access any of your documents anytime you have access to a Web browser, or via the Office Mobile App.
888.712.1406 / centurylink.com/small-business (table of contents) Business Bundle Quick Start Guide 8
OUTLOOK INBOX OUTLOOK SETTINGS
HINT: Click on the avatar (person icon) in the upper right corner and add your own photo so you and your colleagues can easily recognize each other. You can also choose your visibility to show others if you’re Available for messaging or meetings whenever you’re in any of the Office 365 online applications.
Create Notebooks in OneNote to store ideas, text, pictures and more.
OFFICE ONLINE / NEW DOCUMENT ONENOTE ONLINE
888.712.1406 / centurylink.com/small-business (table of contents) Business Bundle Quick Start Guide 9
With Web and video conferencing, desktop sharing, and instant messaging, Skype for Business gives you the most up-to-date tools to work as a team, all within a secure, private and compliant space.
Watch more about Skype for Business centurylink.com/apps/support/knowledge-base/skype-new-uses-guide
SharePoint is used to create private project-specific sites where your teams can interact.
OneDrive is where all the documents you create are stored. You can also create new documents from inside OneDrive and may find it convenient to do most of your work from this workspace.
ONEDRIVE DOCUMENT STORAGE / MANAGEMENT
Using Microsoft® Office 365
• Log in to the CenturyLink Management Console: centurylink.com/apps/login with your CenturyLink user name and password. From the APPLICATIONS tab, choose Office 365 and Manage. or• Log in to Office 365 directly at: portal.office.com with your Office 365 email / user name and password.
Skype for Business (formerly Lync Online)• Before you can use Skype, you will need to install the application. From the Office 365 Admin Center page,
go to the Settings icon upper right, and pull down to Office 365 Settings. Choose Software. Follow the instructions to install Skype.
• Now you can open the Skype application. Enter your email address and password, then choose a status from the pulldown menu: Available, Busy, Do No Disturb, Be Right Back, or Away. Click SIGN IN.
• Start by building your Contact List. You may build your list manually or import a contacts list. You’ll only be able to use Skype with others who also have Skype accounts.
• To initiate a session, double-click on the Contact(s) you want to collaborate with. Choose Instant Messaging (IM), place a Call from your computer, conduct a Video Conference, Share Files, and more.
SharePoint• From the launcher , choose SITES to open the SharePoint environment.
• Choose +new to create and name a new site for your Project or Department. You can even customize each site with a different brand and description for easy recognition.
• Continue to build your project by inviting contacts, establishing deadlines and tasks, and including corresponding documents and email from Outlook.
• Install the Yammer app to create a custom social network within your SharePoint workspace.
OneDrive• From the launcher , open OneDrive.• The first time, you may be asked to download
the software. Follow the instructions given.
• Get in the habit of using the Sync button. This will ensure that any of the documents you create online are automatically updated with the documents you have on your computer.
• Files that have been synced will display a green checkmark beside the file name.
SKYPE COLLABORATION SHAREPOINT SITE
Online Backup
• If you’re not already logged in, go to centurylink.com/apps/login
For more detailed instructions, go to centurylink.com/apps/knowledge-base
Secure Online BackupSecure all of your important files with external backup and cloud-based storage. Automatic backup provides peace of mind anytime, anywhere.
• From the CenturyLink Management Console, click the APPLICATIONS tab, locate PC Backup and click Activate, then Setup under the Action column.
• Fill out the Account Information and SAVE.
• You’ll see the Status change to Provisioning. Wait about 5 minutes, then return to the Applications tab or refresh your page. The Status should now say Active.
• Click Manage and you’ll see how many users you have available.
• Click NEW USER and set up the Name, Email and Password for the person who will use this account. That person will receive an email with installation instructions.
INDIVIDUAL USERS • From the email, launch the Installer to install the Backup software onto the PC or laptop you want to
have backed up.*
• During the installation, you will be required to create a Private Key and Account Key that you will need if you ever have to recover your data. Keep this information in a safe place! It cannot be recovered if you lose it. Click YES at the encryption screen.
• Secure Online Backup will now install and automatically initiate a full file backup.
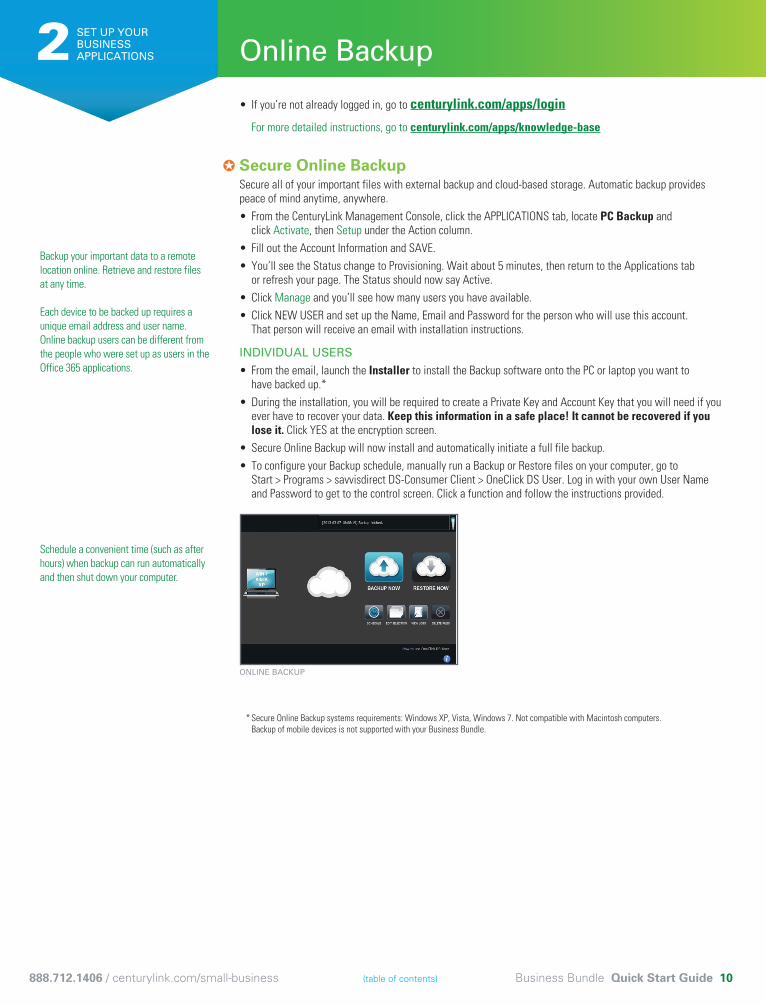
• To configure your Backup schedule, manually run a Backup or Restore files on your computer, go to Start > Programs > savvisdirect DS-Consumer Client > OneClick DS User. Log in with your own User Name and Password to get to the control screen. Click a function and follow the instructions provided.
* Secure Online Backup systems requirements: Windows XP, Vista, Windows 7. Not compatible with Macintosh computers. Backup of mobile devices is not supported with your Business Bundle.
Backup your important data to a remote location online. Retrieve and restore files at any time.
Each device to be backed up requires a unique email address and user name. Online backup users can be different from the people who were set up as users in the Office 365 applications.
Schedule a convenient time (such as after hours) when backup can run automatically and then shut down your computer.
888.712.1406 / centurylink.com/small-business (table of contents) Business Bundle Quick Start Guide 10
ONLINE BACKUP
SET UP YOUR BUSINESS APPLICATIONS2
✪
Web and Fax Services
• If you’re not already logged in, go to centurylink.com/apps/login
Web HostingSeveral services are included under the Web Hosting section, accessed either via the Web Hosting tab, or listed under Subscribed Services in the Dashboard.
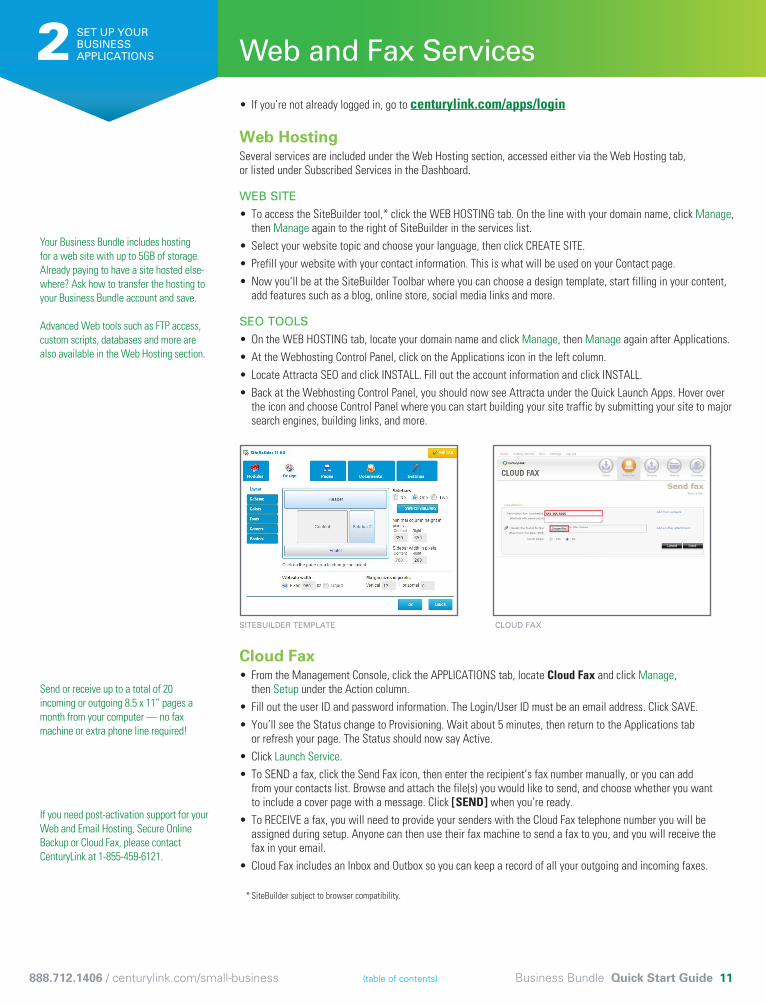
WEB SITE• To access the SiteBuilder tool,* click the WEB HOSTING tab. On the line with your domain name, click Manage,
then Manage again to the right of SiteBuilder in the services list.
• Select your website topic and choose your language, then click CREATE SITE.
• Prefill your website with your contact information. This is what will be used on your Contact page.
• Now you’ll be at the SiteBuilder Toolbar where you can choose a design template, start filling in your content, add features such as a blog, online store, social media links and more.
SEO TOOLS• On the WEB HOSTING tab, locate your domain name and click Manage, then Manage again after Applications.
• At the Webhosting Control Panel, click on the Applications icon in the left column.
• Locate Attracta SEO and click INSTALL. Fill out the account information and click INSTALL.
• Back at the Webhosting Control Panel, you should now see Attracta under the Quick Launch Apps. Hover over the icon and choose Control Panel where you can start building your site traffic by submitting your site to major search engines, building links, and more.
Cloud Fax• From the Management Console, click the APPLICATIONS tab, locate Cloud Fax and click Manage,
then Setup under the Action column.
• Fill out the user ID and password information. The Login/User ID must be an email address. Click SAVE.
• You’ll see the Status change to Provisioning. Wait about 5 minutes, then return to the Applications tab or refresh your page. The Status should now say Active.
• Click Launch Service.
• To SEND a fax, click the Send Fax icon, then enter the recipient’s fax number manually, or you can add from your contacts list. Browse and attach the file(s) you would like to send, and choose whether you want to include a cover page with a message. Click [ SEND ] when you’re ready.
• To RECEIVE a fax, you will need to provide your senders with the Cloud Fax telephone number you will be assigned during setup. Anyone can then use their fax machine to send a fax to you, and you will receive the fax in your email.
• Cloud Fax includes an Inbox and Outbox so you can keep a record of all your outgoing and incoming faxes.
* SiteBuilder subject to browser compatibility.
Your Business Bundle includes hosting for a web site with up to 5GB of storage. Already paying to have a site hosted else-where? Ask how to transfer the hosting to your Business Bundle account and save.
Advanced Web tools such as FTP access, custom scripts, databases and more are also available in the Web Hosting section.
Send or receive up to a total of 20 incoming or outgoing 8.5 x 11” pages a month from your computer — no fax machine or extra phone line required!
If you need post-activation support for your Web and Email Hosting, Secure Online Backup or Cloud Fax, please contact CenturyLink at 1-855-459-6121.
888.712.1406 / centurylink.com/small-business (table of contents) Business Bundle Quick Start Guide 11
SITEBUILDER TEMPLATE CLOUD FAX
SET UP YOUR BUSINESS APPLICATIONS2
Business Voice ServicesYour Business Bundle includes your telephone line, unlimited local and nationwide long-distance calls, and your choice of up to 15 calling features. Add or change features anytime at no additional charge.
This Quick Start Guide includes brief instructions for the features our customers choose most often. To download in-depth instructions for your CenturyLink features, visit the links below.
Set up Business Voice Mail and Phone FeaturesDetailed instructions for Business Voice Mail and all of the Voice Services included in your Business Bundle bundle can be downloaded from:
VOICE MAIL USER GUIDE
centurylink.com/Pages/Support/ProductGuides/VoiceMail/index.html
BUSINESS VOICE SERVICES
centurylink.com/static/PDF/Support/ProductGuides/simpleChoicePlan.pdf
VOICE SERVICES QUICK REFERENCE GUIDE
centurylink.com/static/PDF/Support/ProductGuides/simpleChoicePlan.pdf
You may be asked to enter your area code and prefix to be provided with the correct guide for your area.
Please review the important terms and conditions included in each User Guide.
Some of your phone features need to be set up before you can use them. We suggest that you set up your Business Voice Mail first so you can start receiving messages.
888.712.1406 / centurylink.com/small-business (table of contents) Business Bundle Quick Start Guide 12
3 SET UP VOICE MAIL AND PHONE FEATURES
Resources
MANAGE YOUR BUSINESS APPLICATIONS
centurylink.com/apps/login
SCHEDULE AN ACTIVATION APPLICATION APPOINTMENT
centurylink.com/activate
MANAGE YOUR CENTURYLINK ACCOUNT ONLINE
centurylink.com/myaccount
HELP AND TUTORIALS FOR BUSINESS APPLICATIONS
centurylink.com/apps/knowledge-base in the Do It Yourself sectionsupport.office.com
CUSTOMER ASSISTANCE / TECHNICAL SUPPORT
Voice Services 888.712.1406 Internet Services 800.786.6272 Email, Hosting, Cloud Fax, Online Backup 855.459.6121
888.712.1406 / centurylink.com/small-business (table of contents) Business Bundle Quick Start Guide 13
Bookmark the business application page centurylink.com/apps/login along with the others you will use most often.
TERMS AND CONDITIONSAt centurylink.com/Pages/AboutUs/Legal/TermsAndConditions/business.html (“Website”), the following information will direct you to the applicable terms and conditions for the CenturyLink Business Bundle:State: [Select the state of your service location]Entity: [Select Business Bundle]Service: [Select CenturyLink Business Bundle]Date: [Select the date you purchased CenturyLink Business Bundle]
Local Exchange Services. Local Exchange Services, including certain features and services, are a required component of the CenturyLink Business Bundle. Except as indicated below, CenturyLink local operating companies provide Local Exchange Services under Tariffs. These Tariffs are filed with, and approved by, respective federal and state regulatory commissions, and available at the Website. In the following states, the applicable Local Exchange Services have been detariffed and are provided under the CenturyLink Standard Terms and Conditions for Communications Services (and, for eligible customers, CenturyLink Local Government Customer Annex) and Local Terms of Service: CenturyLink Business Bundle, available at the Website: Alabama, Indiana, Iowa, Michigan, Nevada, Ohio, South Carolina, Tennessee, Washington, and Wyoming.Long-Distance Services. Long-distance services are a required component of the CenturyLink Business Bundle. Embarq Communications, Inc. provides long-distance services under the CenturyLink Standard Terms and Conditions for Communications Services (and, for eligible customers, CenturyLink Local Government Customer Annex) and CenturyLink Schedules, available at the Website. For customers in legacy CenturyTel markets, long-distance service is provided by CenturyTel Long Distance, LLC under its Service and Pricing Guide, available at the Website. The CenturyLink Schedules and CenturyTel Long Distance, LLC Service and Pricing Guide are available at the Website. Your usage of long-distance services may be monitored for the Unlimited Long Distance Plan, and you may be required to show compliance with the applicable terms and conditions if your usage exceeds 3,000 minutes per month or other non-complying activities are identified. International calling is not included in CenturyLink Business Bundle and must be purchased for an additional monthly charge.High-Speed Internet Services. High-Speed Internet Services are a required component of the CenturyLink Business Bundle. Depending on your High-Speed Internet service location, CenturyTel Broadband Services, LLC or the CenturyLink local operating company for your service location provides CenturyLink Business-Class High-Speed Internet Services under the CenturyLink Standard Terms and Conditions for Communications Services (and, for eligible customers, CenturyLink Local Government Customer Annex) and the CenturyLink Business-Class High-Speed Internet Services Annex, available at the Website.In addition to what is listed above, these terms and conditions contain additional provisions that apply to the CenturyLink Business Bundle, including, among other things, mutual confidentiality, your required indemnification of CenturyLink, CenturyLink’s limitations of liability, minimum required term commitment periods, and CenturyLink’s disclaimers of warranties.CenturyLink Business Bundle discounts and savings will apply after the first full month of billing, and do not apply to any other services. The monthly rates, fees, discounts, and savings in effect when you subscribe to the CenturyLink Business Bundle will apply until expiration of the applicable term commitment period. Lines of service later added to your CenturyLink Business Bundle will be subject to additional term commitment periods and the then-prevailing monthly rates, fees, discounts, and savings.Office 365: Office 365 is not sold separately. Must be bundled with qualifying CenturyLink service. Customer must accept CenturyLink terms and conditions located at centurylink.com/apps/terms-conditions, and all applicable third party terms and conditions, as required. Service level agreements (SLAs) in the terms and conditions describe customer’s sole remedy for service quality or performance issues of any kind. Features may be added, modified, or removed during the service period and customer should install updates when they become available. Office 365 is designed to work with the current or immediately previous version of Internet Explorer or Firefox, or the latest version of Chrome or Safari.
IMPORTANT INFORMATION ABOUT THE CENTURYLINK BUSINESS BUNDLE TERM COMMITMENT PERIOD AND APPLICABLE EARLY TERMINATION CHARGESYou are required to maintain all services in the CenturyLink Business Bundle for any term commitment periods listed on your order confirmation letter. If you fail to maintain all services for the listed term commitment periods or choose to remove any of the required components of the CenturyLink Business Bundle, you will be required to pay an early termination charge as listed in the order confirmation section and the following changes to your monthly charges will apply:• Local Exchange Services. Your termination of local exchange services before the completion of your CenturyLink Business Bundle term commitment period results in CenturyLink converting the
remaining services in the CenturyLink Business Bundle, including long-distance services and High-Speed Internet services, to their respective a la carte or nonbundled monthly charges.• Long-Distance Services. Your termination of long-distance services before the completion of your CenturyLink Business Bundle term commitment period results in CenturyLink converting the
remaining services in the CenturyLink Business Bundle, including local exchange services and High-Speed Internet services, to their respective a la carte or nonbundled monthly charges.• High-Speed Internet Services. Your termination of High-Speed Internet services before the completion of your term commitment period results in CenturyLink converting the remaining services
in the CenturyLink Business Bundle, including local exchange services and long-distance services, to their respective a la carte or nonbundled monthly charges.Upon completion of the listed term commitment periods, applicable discounts or savings will expire, and CenturyLink will charge you the then-prevailing monthly charges for your services. If you choose a new term commitment period, applicable discounts and savings that match your selected CenturyLink Business Bundle will apply for that new term commitment period.
CURRENT CENTURYLINK CUSTOMERS WITH OTHER BUNDLE DISCOUNTS OR SAVINGSIf you are transferring or changing existing CenturyLink services to the CenturyLink Business Bundle or adding the CenturyLink Business Bundle to your existing services, you will lose any current discounts or savings you currently may be receiving on your account.Product limitations may exist. If a product insert or specific instructions to obtain additional information were not provided for your product, please contact your CenturyLink Representative or call 1-888-712-1406 referring to your order date and order number, for product details, plan and feature restrictions and limitations.
©2015 CenturyLink. All Rights Reserved. The CenturyLink mark, pathways logo and certain CenturyLink product names are the property of CenturyLink. All other marks are the property of their respective owners. EBB15_BE 7/29/15