Celebr8 Thankful Heart Mini Album
18
1 Celebr8 Thankful Heart Mini Album Designed by Sandi Kok for Celebr8. You will need: Celebr8 Thankful Heart Mini Paper Pack Double-sided tape (DST) Celebr8 Mini Album kit (Base album) 2 x Graphite cardstock 2 x Sunflower cardstock A4 sheet acetate Brilliance Galaxy Gold 1m Thin piece of white ribbon. Scoreboard Bone folder Paper trimmer / craft knife Small, sharp scissors for fussy cutting 1 x Small gold brad 1mm Foam tape for shaker box ( cut in ½ lengthwise). Important Information, please read carefully before you start. • All measurements are given in centimetres. • Measurements are given width x height. • Cut all your base pages first and keep all the bits for matting and making tags etc. • Please note which side of the pattern paper is used! Large format photos of each page can be found in the cutting guide. • Cut fussy cutting element sheets as follows: o PP6119 Fussy cut elements sheet – cut both sheets. o PP6118 Tags, circles and tabs – cut one sheet. o PP6114 Sentiments – choose a few from one of the sheets – I used the following: ▪ The 3 sunflowers in a jug (pg 2) ▪ Single sunflower on black script (pg 3) ▪ The word “Love” (pg 12) ▪ Use balance of paper for matting etc. o PP6116 Choose the Journaling cards that appeal to you. You will need to keep 2 of them as a strip (pg 13) • Ensure that you use good quality double-sided tape. • DST = double-sided tape AS = Advertising strip (barcode) • RHS = Right hand side LHS = Left hand side • PP = Patterned Paper Album Cover (use photos below to assist) • From graphite cardstock, cut 2 identical pieces measuring 18cm x 22cm. • Join these 2 pieces of cardstock together to create a single piece of cardstock measuring 36cm x 22cm. • Adhere DST around the outside edge of the hardboard as well as a few strips in the centre of the hardboard. • Starting with the spine, place it in the centre (top and bottom and left to right {approx. 2cm border all around}) of this newly created “outer cover”, then add a piece of 6mm tape on either side of the
Transcript of Celebr8 Thankful Heart Mini Album

1
Celebr8 Thankful Heart Mini Album Designed by Sandi Kok for Celebr8.
You will need: Celebr8 Thankful Heart Mini Paper Pack Double-sided tape (DST)
Celebr8 Mini Album kit (Base album) 2 x Graphite cardstock
2 x Sunflower cardstock A4 sheet acetate
Brilliance Galaxy Gold 1m Thin piece of white ribbon.
Scoreboard Bone folder
Paper trimmer / craft knife Small, sharp scissors for fussy cutting
1 x Small gold brad 1mm Foam tape for shaker box ( cut in ½ lengthwise).
Important Information, please read carefully before you start. • All measurements are given in centimetres.
• Measurements are given width x height.
• Cut all your base pages first and keep all the bits for matting and making tags etc.
• Please note which side of the pattern paper is used! Large format photos of each page can be
found in the cutting guide.
• Cut fussy cutting element sheets as follows:
o PP6119 Fussy cut elements sheet – cut both sheets.
o PP6118 Tags, circles and tabs – cut one sheet.
o PP6114 Sentiments – choose a few from one of the sheets – I used the following:
▪ The 3 sunflowers in a jug (pg 2)
▪ Single sunflower on black script (pg 3)
▪ The word “Love” (pg 12)
▪ Use balance of paper for matting etc.
o PP6116 Choose the Journaling cards that appeal to you. You will need to keep 2 of them as a
strip (pg 13)
• Ensure that you use good quality double-sided tape.
• DST = double-sided tape AS = Advertising strip (barcode)
• RHS = Right hand side LHS = Left hand side
• PP = Patterned Paper
Album Cover (use photos below to assist)
• From graphite cardstock, cut 2 identical pieces measuring 18cm x 22cm.
• Join these 2 pieces of cardstock together to create a single piece of cardstock measuring 36cm x
22cm.
• Adhere DST around the outside edge of the hardboard as well as a few strips in the centre of the
hardboard.
• Starting with the spine, place it in the centre (top and bottom and left to right {approx. 2cm border
all around}) of this newly created “outer cover”, then add a piece of 6mm tape on either side of the

2
spine (you need this gap to stop the spine from tearing) before attaching the covers in line with the
base of spine.
• Pop some DST all around the outer edge of the cardstock. Mitre corners, remove DST and fold
cardstock in to complete the outer cover.
• From PP6109, cut a piece that measures 15cm x 16,7cm for the front inside cover and stick DST
around the outer edges on the wrong/plain side. Make sure that you cut the paper so that you have
the little image in your cut piece.
• From PP6108, cut a piece that measures 15cm x 16,7cm for the back inside cover and stick DST
around the outer edges on the wrong/plain side. Make sure that you cut the paper so that you have
the little image in your cut piece.
• To stop your inside covers from bulging, you will need to do the following:
o Add a strip of 12mm tape on each side of the 6mm DST on the hard board (4 pieces in total
running from top to bottom of the spine).
o Add another strip of tape to the spine.
o Add 2 strips of tape to the inside covers to assist with anchoring the pattern paper.
• Carefully remove the DST from the hardboard, including the DST from the 6mm gap between the
hardboard and the pattern paper, and attach the inside covers to both front and back.
• Make up the base pages as per the instructions in the Celebr8 Mini Album Kit and adhere to the
mini album.
• See photos below – (I have used white cardstock in the instructions, however, your will be using
Graphite cardstock for your base album)

3

4

5

6

7

8
Decorating the Front Cover and spine
• From PP6111, cut a piece measuring 12cm x 16,5cm – this is your “base page”.
• Sunflower cardstock, cut a piece measuring 10cm x 14cm – this will form the mat to your frame.
• From kraft, cut a piece measuring 9cm x 13cm. Measure in 1cm from the outer edge and draw a
line. Cut out the inner rectangle so that you are left with a frame.
• From PP6113, cut a piece measuring 12cm x 15cm. This will be used to cover your kraft paper
frame. Stick your frame onto the wrong side of the piece of paper. Cut a diagonal from inner corner
to inner corner as seen in
9
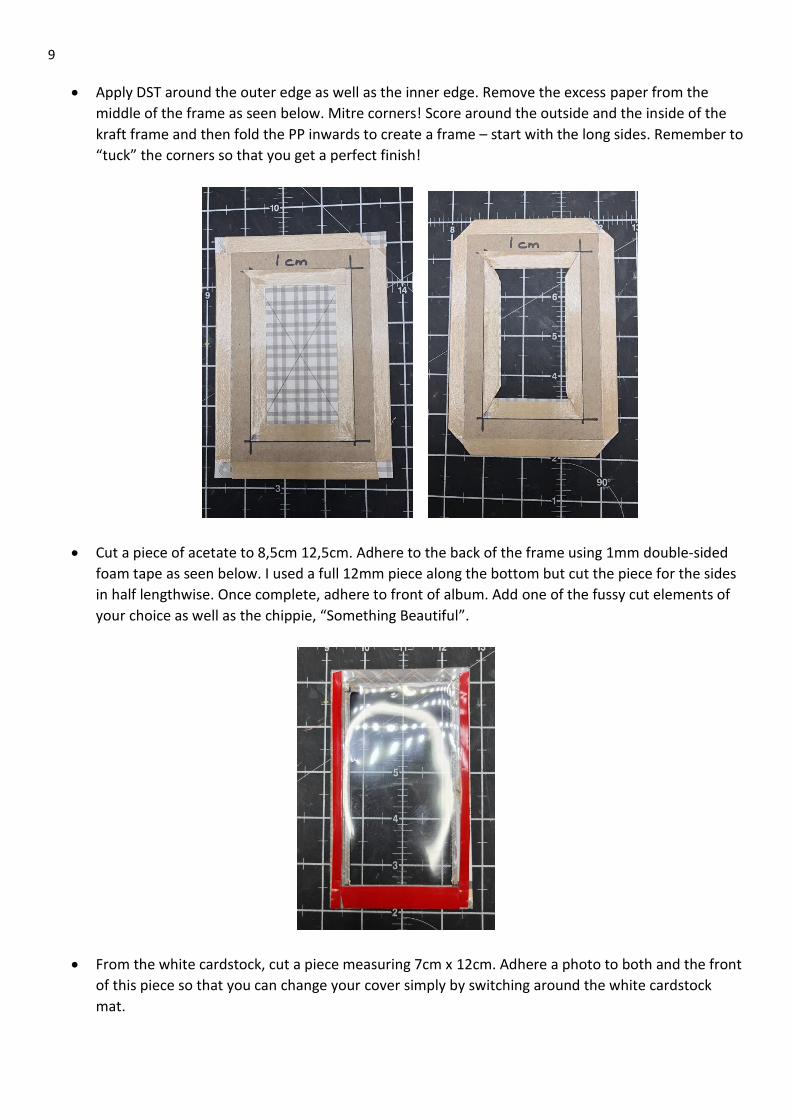
• Apply DST around the outer edge as well as the inner edge. Remove the excess paper from the
middle of the frame as seen below. Mitre corners! Score around the outside and the inside of the
kraft frame and then fold the PP inwards to create a frame – start with the long sides. Remember to
“tuck” the corners so that you get a perfect finish!
• Cut a piece of acetate to 8,5cm 12,5cm. Adhere to the back of the frame using 1mm double-sided
foam tape as seen below. I used a full 12mm piece along the bottom but cut the piece for the sides
in half lengthwise. Once complete, adhere to front of album. Add one of the fussy cut elements of
your choice as well as the chippie, “Something Beautiful”.
• From the white cardstock, cut a piece measuring 7cm x 12cm. Adhere a photo to both and the front
of this piece so that you can change your cover simply by switching around the white cardstock
mat.

10
Page no.
Pattern paper no.
No. to cut
Measurement
1 PP6108 PP6111
1 1
15cm x 14,7cm 3cm x 16,5cm
Score at 5cm on the 15cm side. (Use the off cut from the front cover to cut this) Score at 1cm and 15,5cm on the 16,5cm side. Apply DST to the 1cm area created by the score line on the right side of the PP. To close off the pocket, apply a strip of DST to the LHS of the strip. Mitre corners. Fold in and tape to flap.
2 PP6115 Sunflower cardstock
1 4
10cm x 14,7cm 9cm x 10cm
Adhere to album. Leave the AS on as you will use the off cut on page 3. Score at 1cm on the 10cm side. Add DST to the right side in the 1cm area created by the score line on each of the 4 pieces. Fold over to create a “hinge” to attach to your page. Start by attaching the top flap of the waterfall and then add each piece in turn.

11
Create a closure using one of the sentiments, matted onto cardstock, and a brad.
3 PP6115 Sunflower Cardstock
1 1
13cm x 6,5cm 9,5cm x 10cm
Use off cut from page 2 - Leave the AS on. Score at 1,5cm and 11,5cm on the 13cm side. Turn 90° and score at 5cm on the 6,5cm side. Add DST to the right side in the 1,5cm areas created by the score lines. Mitre corners and fold in sides, ready to attach to page. Stick pocket onto page 3 and then add sunflower mat. I also added a piece of patterned paper to tone down the yellow.
4 Sunflower cardstock PP6117
1 3
10cm x 14,7cm Adhere flat to page 4. Cut 3 strips of the “words”. Trim to fit the page so that they create a border.
5 PP6117
1 10cm x 14,7cm Adhere flat to page 5. Add a fussy cut element to create a tuck spot. Use journaling cards to create a photo mat.
6 PP6112
1 21cm x 14,7cm DO NOT REMOVE THE ADVERTISING STRIP! With the AS up against the LHS of the scoreboard, score at 1cm and 11cm on the 21cm side. Apply DST to the 1cm area created by the

12
score line (over the AS wording) to create a flap. Be careful when trimming to size that you don’t cut the wording on the AS…. You will need to cut a bit from the top and a bit from the bottom of the page.
7 PP6111
PP6111
1 1
10cm x 14,7cm 2,5cm x 15cm
Use off cut to create belly band. Score at 1cm and 14cm on the 15cm side. Add DST to the right side in the 1cm areas created by the score lines. Mitre corners and fold in “hinges”. Attach to page. Add the “Thankful” chippie as well as the wording from the AS as well as the bird from PP6118.
8 & 9
PP6110
2 10cm x 14,7cm
Cut page 8 and 9 together from the same sheet of paper.
10 PP6113
1 15cm x 19,5cm With diamond side up, score at 5cm on the 15cm side and
14,5cm on the 19,5cm side.

13
In the small square, cut a diagonal
from the bottom LH corner to the
intersection.
Fold flaps back to create
a “cut line”. Draw this
line in with pencil,
ensuring that the line
passes through the
intersection.

14
You will be left with
something that
looks like this. Do
not throw the little
triangles away.

15
Fold “sides” in to create
a pocket.
Stick one of the
little triangles over
the corner to close
the pocket. Add a
fussy cut element
to add interest.

16
11 Acetate
Acetate PP6114 PP6113
1 1 1 1
11cm x 14,5cm 10cm x 13,5cm 10cm x 14,7cm 7,5cm x 9cm
LHS score at 1cm on the 11cm side. Apply DST to the acetate in the 1cm areas created by the score line. RHS score at 1cm on the 10cm side. Apply DST to the acetate in the 1cm areas created by the score line. Once the acetate “pages” have been added to the page, stick this piece over the “hinges” to hide the acetate attachment. Use the off cut from the frame. Attach to LHS acetate page. Embellish acetate pages as per photos. I used off cuts once I had finished the basic album for the decorating.
12 PP6112
1 20cm x 14,7cm Score at 5cm and 15cm on the 20cm side to create a gatefold. Apply DST to the back of the middle piece (between the 5cm and 15cm score lines) to create a gatefold.

17
I added the “trellis” to create a closure for this gatefold.
13 PP6117 PP6116
1 1
10cm x 14,7cm 7,5cm x 20cm
Score at 10cm 0n the 20cm side (between journaling cards).
Apply DST to the bottom piece to create a flap.
14 PP6110
1 10cm x 20cm Score at 5cm on the 20cm side to create a fold over flap. Apply DST to the right side on the smaller flap section.

18
15 PP6115 PP6114
1 1
10cm x 14,7cm 5cm x 16,5cm
Score at 1cm and 15,5cm on the 16,5cm side. Apply DST to the 1cm areas created by the score lines on the right side of the PP. To close off the pocket, apply a strip of DST to the RHS of the strip. Mitre corners. Fold in and tape to flap.
16 PP6109
1 15cm x 14,7cm Score at 10cm on the 15cm side. Mat the journaling card from PP6116 on Sunflower cardstock and adhere to flap.