CEILING FAN LIGHT KIT - hw.menardc.com€¢ The fan images and instructions in this manual are...
9
9151 • 120715 CEILING FAN LIGHT KIT Owner’s Manual Models #20564 Turn of the Century TM If a problem cannot be remedied or you are experiencing difficulty in installation, please contact the Service Department: 1-877-459-3267, 9 a.m.- 5 p.m. Central time.
Transcript of CEILING FAN LIGHT KIT - hw.menardc.com€¢ The fan images and instructions in this manual are...

9151 • 120715
CEILING FAN LIGHT KIT
Owner’s ManualModels #20564
Turn of the CenturyTM
If a problem cannot be remedied or you are experiencing difficulty in installation, please contact the Service Department: 1-877-459-3267, 9 a.m.- 5 p.m. Central time.

TMTurn of the Century
PACKAGE CONTENTS
2
HARDWARE CONTENTS
MOUNTING OPTIONS
1. Canopy
2. Downrod
3. Hex Nut
4. Lock Washer
5. Light Kit Fitter
6. Bulbs (x 3)
7. Light Cage (x 3)
8. Hardware Kit
9. Owner’s Manual
Unpack your light kit and check the contents. You should have the following items:
PACKAGE CONTENTS
HARDWARE LIST
Note: Some of the hardware listed is pre-assembled to other parts. You will be instructed where to locate it.
Ceiling Fan Light Kit Ceiling Light Fixture
1018
1311 12
14 1516
17
10. Wire Connector (x 2)
11. Hex Nut
12. Lock Washer
13. IP Rod
14. Coupling
15. Mounting Bracket
16. Cap Nut (x 2)
17. Bracket Screw (x 2)
18. Pull Chain Extension
Har
dwar
e Ki
tO
wne
r’s
Man
ual
12
5
3 4
6 7
8
9

TMTurn of the Century
WARNING
READ ALL SAFETY INFORMATION AND INSTALLATION INSTRUCTIONS BEFORE BEGINNING TO INSTALL THE LIGHT KIT AND SAVE INSTRUCTIONS.
• This fixture is intended for use with an indoor ceiling fan. Not suitable for damp or outdoor locations.
• The fan images and instructions in this manual are generic, but in most cases the installation will be easy to follow. If unsure about installation, consult a qualified licensed electrician for proper installation.
• To avoid risk of electric shock, be sure to shut off power at the main fuse or circuit breaker box before installing or servicing this fixture. Turning off the electrical power by using the light switch is not sufficient to prevent electrical shock.
• Installation must comply with the national electrical code, ANSI/NFPA 70-1999 and local codes. If you are unfamiliar with the methods of installing electrical wiring, seek the services of a qualified licensed electrician.
• To avoid personal injury, the use of gloves or protective clothing may be necessary when handling fixture parts with sharp edges.
• To reduce the risk of fire, electrical shock or personal injury, do not connect this fixture to a ceiling fan is not properly grounded.
• To reduce the risk of fire, electrical shock, or personal injury, each wire connector used with this light kit should accept only one 18-gauge wire from the light kit and one 18-gauge wire from the ceiling fan.
• When mounting fixture to a ceiling fan, ensure the fan is mounted to an outlet box labelled “Acceptable for fan support” and is secured to the building structure.
• Wire colors from ceiling fan may not be the same color used in this manual. When in doubt, consult a qualified licensed electrician to determine the proper wiring.
SAFETY INSTRUCTIONS
NOTE: The net weight of the light kit is less than: 4.4 lbs.
3

Turn of the CenturyTM4
ASSEMBLY INSTRUCTIONS - FAN MOUNT
2
1
1. Turn OFF the electrical power at the main fuse or circuit breaker.
3. Remove the three switch housing screws in order to remove the switch housing (A) or switch housing cap (B) from the existing fan. If applicable, remove any wire connectors that connect wires from the fan to the switch housing and/or disconnect the male and female plugs.
Note: Save the three switch housing screws for later.
2. Select the configuration (A or B) which most closely matches your fan. Most ceiling fans have either a one-piece removable switch housing that connects to a fitter plate (A) or a permanent switch housing with a switch housing cap (B).
4
4. Use a screwdriver to push the plug button out of the switch housing (A) or switch housing cap (B).
Switch Housing
Switch Housing
Switch Housing
Switch Housing
Plug Button
Plug Button
Switch Housing Cap
Switch Housing Cap
Switch Housing Cap
Switch Housing Screw
Switch Housing Screw
Fitter Plate
3
A
A
A
B
B
B
For ceiling mount, skip to page 7.

5 Turn of the CenturyTM
ASSEMBLY INSTRUCTIONS - FAN MOUNT
6
5
6. Remove the hex nut and lock washer from the threaded rod at the top of the light kit fitter. Then, insert the wires and threaded rod from the light kit fitter through the center hole in the switch housing (A) or the switch housing cap (B). Secure the switch housing (A) or switch housing cap (B) to the light kit fitter using the lock washer and hex nut from the hardware bag.
5. Remove the four cage screws from the brackets inside the shade. Install the bulb in the socket. Then attach the light cage to the shade using the four cage screws. Repeat for each shade.
7. Use the wire connectors to connect the wires from the light kit fitter to the wires in the switch housing (A or B).
If your fan has a fitter plate (A), you may also need to connect the 9-pin connector from the fan to the 9-pin connector from the switch housing.
Note: If your fan has two single-pin connectors instead of bare wires, it will be necessary to cut the wire very close to the single-pin connectors and strip 1/2” of insulation from the end of the two wires in order to connect the fan wires to the wires of the light kit. IMPORTANT: DO NOT cut the wires to the 9-pin connectors.
Lock Washer
Light Cage
BracketBulb
Cage Screw
Shade
Lock Washer
Hex Nut
9-pin Connector
White to White
White to WhiteBlack to Blue
Black to Black
Hex Nut
8. Using the three previously removed switch housing screws, re-attach the switch housing to the fitter plate (A) or the switch housing cap to the switch housing (B).
7
8
A
A
A
B
B
B
Switch Housing Screw
Switch Housing Screw

6 Turn of the CenturyTM
ASSEMBLY INSTRUCTIONS - FAN MOUNT
9. Attach the pull chain extensions to the pull chains.
9
10
Pull Chain Extension
10. Restore the power at the main fuse or circuit breaker.

7 Turn of the CenturyTM
1
3
4
ASSEMBLY INSTRUCTIONS - CEILING MOUNT
1. Turn OFF the electrical power at the main fuse or circuit breaker.
2. Remove the four cage screws from the small brackets inside the shade. Install the bulb in the socket. Then attach the light cage to the shade using the four cage screws. Repeat for each shade.
2
Light Cage
Bulb
Cage Screw
Shade
3. Remove the hex nut and lock washer from the IP rod. Then, feed the wires through the coupling and IP rod. Then, screw the coupling onto the threaded rod on top of the light kit fitter.
IP Rod
Coupling
Downrod
Canopy
Hex NutLock Washer
4. Feed the wires through the downrod and canopy. Secure the downrod and canopy to the IP rod by reinstalling the lock washer and hex nut.

OUTLET BOX
8 Turn of the CenturyTM
6
7
ASSEMBLY INSTRUCTIONS - CEILING MOUNT
5. Attach the mounting bracket to the outlet box (not included) using the screws and washers provided with the outlet box.
Cap Nut
Bracket Screw
Outlet Box
Mounting Bracket
5
Cap Nut
Bracket Screw
Canopy
Pull Chain Extension
8. Restore the power at the main fuse or circuit breaker.
Assembly is complete.
8
7. Attach the pull chain extensions to the pull chains.
6. Remove the two cap nuts from the bracket screws. Lift the fixture until the end bracket screws extend through the holes in the canopy. Screw the cap nuts onto the bracket screws to secure the light kit to the outlet box.
TMTurn of the Century9
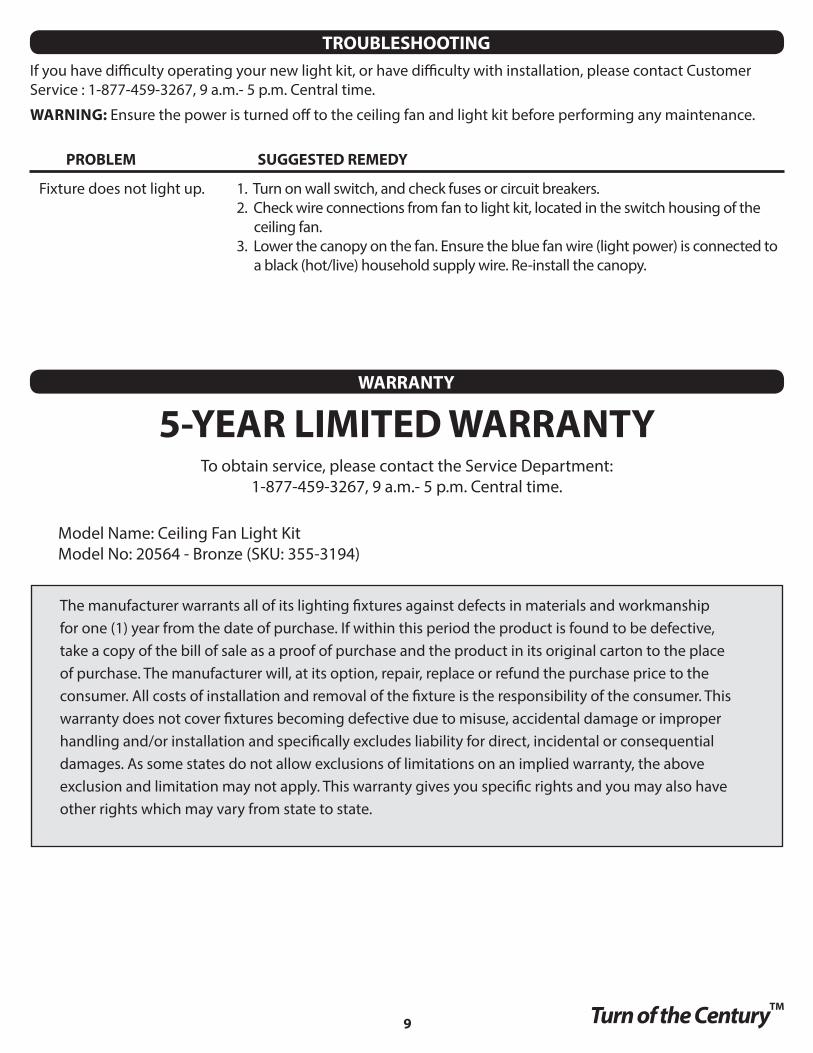
If you have difficulty operating your new light kit, or have difficulty with installation, please contact Customer Service : 1-877-459-3267, 9 a.m.- 5 p.m. Central time.
WARNING: Ensure the power is turned off to the ceiling fan and light kit before performing any maintenance.
PROBLEM SUGGESTED REMEDY
Fixture does not light up. 1. Turn on wall switch, and check fuses or circuit breakers.2. Check wire connections from fan to light kit, located in the switch housing of the
ceiling fan.3. Lower the canopy on the fan. Ensure the blue fan wire (light power) is connected to
a black (hot/live) household supply wire. Re-install the canopy.
TROUBLESHOOTING
WARRANTY
5-YEAR LIMITED WARRANTYTo obtain service, please contact the Service Department:
1-877-459-3267, 9 a.m.- 5 p.m. Central time.
Model Name: Ceiling Fan Light KitModel No: 20564 - Bronze (SKU: 355-3194)
The manufacturer warrants all of its lighting fixtures against defects in materials and workmanship for one (1) year from the date of purchase. If within this period the product is found to be defective, take a copy of the bill of sale as a proof of purchase and the product in its original carton to the place of purchase. The manufacturer will, at its option, repair, replace or refund the purchase price to the consumer. All costs of installation and removal of the fixture is the responsibility of the consumer. This warranty does not cover fixtures becoming defective due to misuse, accidental damage or improper handling and/or installation and specifically excludes liability for direct, incidental or consequential damages. As some states do not allow exclusions of limitations on an implied warranty, the above exclusion and limitation may not apply. This warranty gives you specific rights and you may also have other rights which may vary from state to state.