CBI Offroad Swing arm & Accessories
4
Swing arm & Accessories CBI Offroad installation instructions Hardware: CBI SWING ARM & ACCESSORIES INSTALLATION INSTRUCTIONS page 1–4 T1-RB-TR1-PKG 95.5-2004 Tacoma Trail Rider 1.0 Rear bumper w/swing arm T1-RB-OB1-PKG 95.5-2004 Tacoma Outback 1.0 Rear bumper w/swing arm T1-RB-BM1-PKG 95.5-2004 Tacoma Bushmaster 1.0 Rear bumper w/swing arm T2-RB-TR2-PKG 2005-2015 Tacoma Trail Rider 2.0 Rear bumper w/swing arm T2-RB-BM2-PKG 2005-2015 Tacoma Bushmaster 2.0 Rear bumper w/swing arm T3-RB-PKG 2016+ Tacoma Rear bumper w/swing arm T4R3-HYRB-PKG 96-2002 4Runner Hybrid Rear bumper w/swing arm T4R3-RB-PKG 96-2002 4Runner Rear bumper w/swing arm T4R4-RB-PKG 2003-2009 4Runner Rear bumper w/swing arm T4R5-RB-PKG 2010+ 4Runner Rear bumper w/swing arm Applications These installation instructions apply to the following CBI Off Road products IMPORTANT: ank you for purchasing this CBI product. Please read through this entire document before proceeding with installation. If you are not confident in your mechanical skills, please seek the help of a professional to perform the installation. Check your packages immediately upon arrival to ensure that everything listed is included, and to check for damage during shipping. If anything is missing or damaged, or if you need technical assistance with any aspect of this installation, call CBI at (208) 528-0664 as soon as possible. This document last updated October 2016. hub & swing assembly q(1) – spring pull pin q(1) – oil seal q(3) – sealed bearings q(1) – bump stop latch assembly q(1) –destaco latch kit q(6) – 5/16 ” x 1” button head bolts q(2) – 5/16” serrated flange nuts license plate relocation q(1) –led light q(2) –8mm screws q(2) – ” x ” button head bolts q(2) – ” serrated flange nuts tire mount q(10) – 7/16” x 1 ” GRD 8 hex bolts q(10) – 7/16” SAE washers q(10) – 7/16” serrated flange nuts q(3) – 12mm hex bolts q(3) – 12mm retaining washers q(3) – 12mm lug nuts hi-lift mount q(4) – ” x 1” button head bolts q(4) – ” serrated flange nuts q(2) – ” x 2” button head bolts q(2) – ” serrated flange nuts q(2) – ” wing nuts camp table q(2) – mounting brackets q(10) – ” x ” button head bolts q(10) – ” nylock nuts q(2) – ” polly spacers q(4) – cable ends q(2) – support cables q(2) – ball clamp catches q(2) – ball clamp spacers q(8) – #4 Philips head screws q(8) – #4 nuts & washers telescoping camp light q(2) – ” x 1” button head bolts q(2) – ” SAE washers q(2) – ” serrated flange nuts q(1) – ” thumb screw can carrier q(4) – 5/16” x 1” button head bolts q(4) – 5/16” SAE washers q(4) – 5/16” serrated flange nuts For questions or further help: Call: 866-522-0697 Email: info@cbioffroadfab.com
Transcript of CBI Offroad Swing arm & Accessories

Swing arm & AccessoriesCBI Offroad
i n s t a l l a t i o n i n s t r u c t i o n s
Hardware:
C B I S W I N G A R M & A C C E S S O R I E S I N S T A L L A T I O N I N S T R U C T I O N Spage 1–4
T1-RB-TR1-PKG 95.5-2004 Tacoma Trail Rider 1.0 Rear bumper w/swing armT1-RB-OB1-PKG 95.5-2004 Tacoma Outback 1.0 Rear bumper w/swing armT1-RB-BM1-PKG 95.5-2004 Tacoma Bushmaster 1.0 Rear bumper w/swing armT2-RB-TR2-PKG 2005-2015 Tacoma Trail Rider 2.0 Rear bumper w/swing armT2-RB-BM2-PKG 2005-2015 Tacoma Bushmaster 2.0 Rear bumper w/swing armT3-RB-PKG 2016+ Tacoma Rear bumper w/swing armT4R3-HYRB-PKG 96-2002 4Runner Hybrid Rear bumper w/swing armT4R3-RB-PKG 96-2002 4Runner Rear bumper w/swing armT4R4-RB-PKG 2003-2009 4Runner Rear bumper w/swing armT4R5-RB-PKG 2010+ 4Runner Rear bumper w/swing arm
ApplicationsThese installation instructions apply to the following CBI Off Road products
IMPORTANT: Thank you for purchasing this CBI product. Please read through this entire document before proceeding with installation. If you are not confident in your mechanical skills, please seek the help of a professional to perform the installation. Check your packages immediately upon arrival to ensure that everything listed is included, and to check for damage during shipping. If anything is missing or damaged, or if you need technical assistance with any aspect of this installation, call CBI at (208) 528-0664 as soon as possible.
This document last updated October 2016.
hub & swing assemblyq(1) – spring pull pinq(1) – oil seal q(3) – sealed bearingsq(1) – bump stoplatch assemblyq(1) –destaco latch kit q(6) – 5/16 ” x 1” button head bolts q(2) – 5/16” serrated flange nutslicense plate relocationq(1) –led light q(2) –8mm screwsq(2) – 1/4” x 1/2” button head boltsq(2) – 1/4” serrated flange nutstire mount q(10) – 7/16” x 1 1/4” GRD 8 hex boltsq(10) – 7/16” SAE washersq(10) – 7/16” serrated flange nutsq(3) – 12mm hex boltsq(3) – 12mm retaining washersq(3) – 12mm lug nutshi-lift mount q(4) – 3/8” x 1” button head bolts q(4) – 3/8” serrated flange nutsq(2) – 1/2” x 2” button head boltsq(2) – 1/2” serrated flange nutsq(2) – 1/2” wing nutscamp table q(2) – mounting bracketsq(10) – 1/4” x 3/4” button head boltsq(10) – 1/4” nylock nutsq(2) – 1/4” polly spacersq(4) – cable endsq(2) – support cablesq(2) – ball clamp catchesq(2) – ball clamp spacersq(8) – #4 Philips head screwsq(8) – #4 nuts & washerstelescoping camp light q(2) – 1/4” x 1” button head boltsq(2) – 1/4” SAE washersq(2) – 1/4” serrated flange nutsq(1) – 3/8” thumb screwcan carrier q(4) – 5/16” x 1” button head boltsq(4) – 5/16” SAE washersq(4) – 5/16” serrated flange nuts
For questions or further help:
Call: 866-522-0697Email: [email protected]
C B I S W I N G A R M & A C C E S S O R I E S I N S T A L L A T I O N I N S T R U C T I O N Spage 2–4
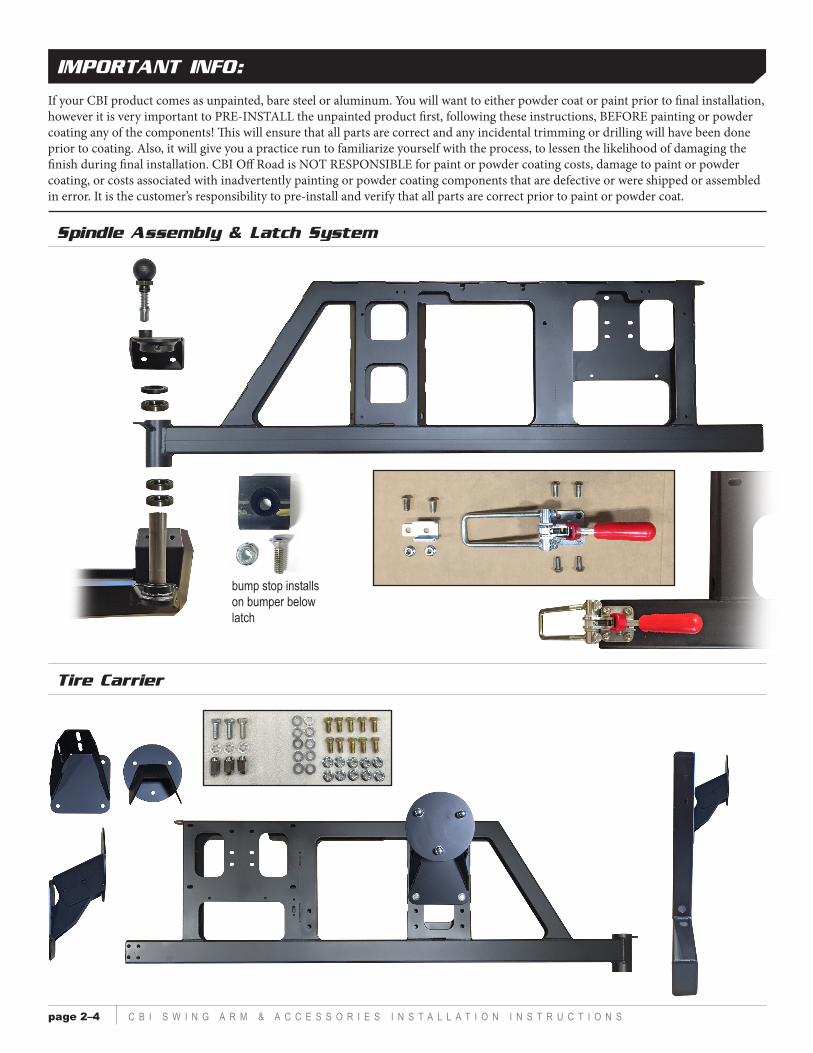
If your CBI product comes as unpainted, bare steel or aluminum. You will want to either powder coat or paint prior to final installation, however it is very important to PRE-INSTALL the unpainted product first, following these instructions, BEFORE painting or powder coating any of the components! This will ensure that all parts are correct and any incidental trimming or drilling will have been done prior to coating. Also, it will give you a practice run to familiarize yourself with the process, to lessen the likelihood of damaging the finish during final installation. CBI Off Road is NOT RESPONSIBLE for paint or powder coating costs, damage to paint or powder coating, or costs associated with inadvertently painting or powder coating components that are defective or were shipped or assembled in error. It is the customer’s responsibility to pre-install and verify that all parts are correct prior to paint or powder coat.
IMPORTANT INFO:
Spindle Assembly & Latch System
Tire Carrier
bump stop installs on bumper below latch

C B I S W I N G A R M & A C C E S S O R I E S I N S T A L L A T I O N I N S T R U C T I O N Spage 3–4
Camp Table & Hi-Lift Mount
Can Carrier & Light Bracket
Detail for Hi-Liftmounting hardware
Hole to run wiring
Light bracket mount
CBI can carrier mount
Can Carrier Hardwar
Hi-Lift mount hardware
Camp Light mount hardware
Table mount brackets
C B I S W I N G A R M & A C C E S S O R I E S I N S T A L L A T I O N I N S T R U C T I O N Spage 4-4
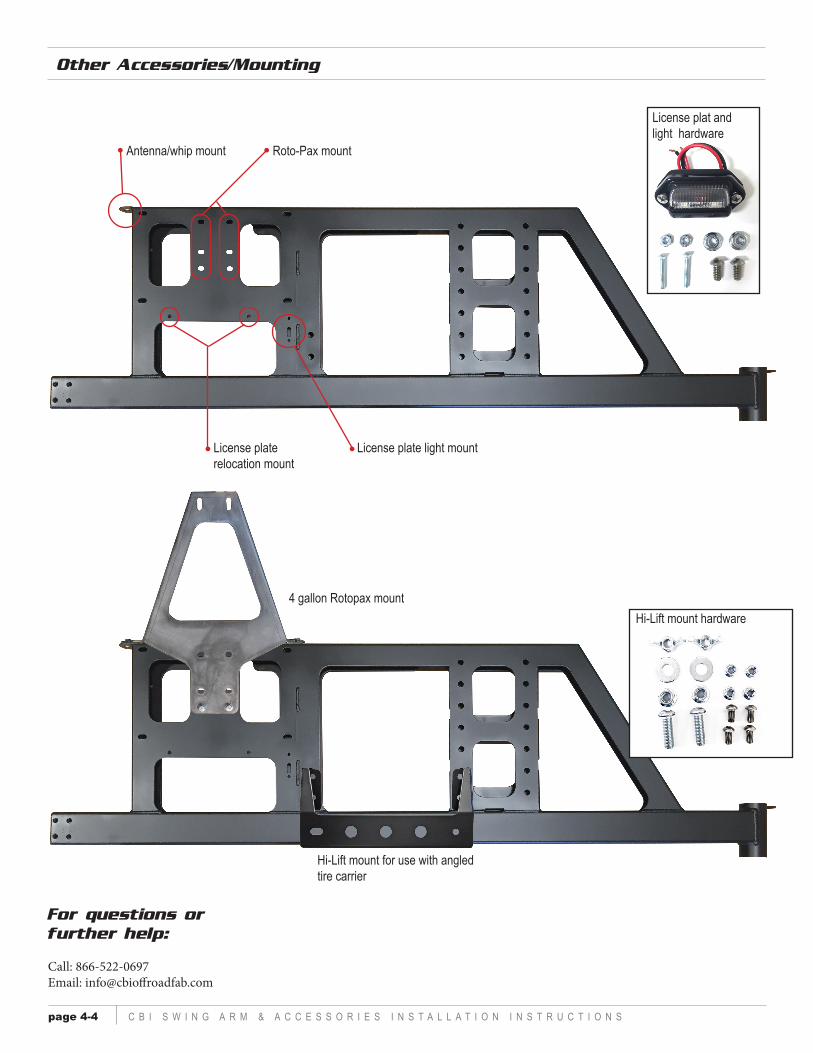
Other Accessories/Mounting
License plate light mountLicense plate relocation mount
Antenna/whip mount Roto-Pax mount
For questions or further help:
Call: 866-522-0697Email: [email protected]
Hi-Lift mount for use with angled tire carrier
4 gallon Rotopax mountHi-Lift mount hardware
License plat and light hardware