
CAREFREE RESIDENTIAL BALCONY AWNING
16
052993-001r3 Printed in USA January, 2007 CAREFREE RESIDENTIAL BALCONY AWNING Residential MOTORIZED OR MANUAL LATERAL ARM AWNING Installation and Operation The Carefree Balcony Awning is a state of the art lateral arm awning. When retracted, the housing provides protection against the elements with streamlined styling. The full tension canopy fabric allows the awning to be partially or fully extended for best shade coverage.
Transcript of CAREFREE RESIDENTIAL BALCONY AWNING

052993-001r3 Printed in USA January, 2007
CAREFREE
RESIDENTIAL BALCONY AWNING
Residential MOTORIZED OR MANUAL LATERAL ARM AWNING
Installation and Operation
The Carefree Balcony Awning is a state of the art lateral arm awning. When retracted, the housing provides protection against the elements with streamlined styling. The full tension canopy fabric allows the awning to be partially or fully extended for best shade coverage.

052993-001r3 Printed in USA January, 2007
TABLE OF CONTENTS Introduction ................................................................................................................................... 1
Product Overview ...................................................................................................................................1 Component Checklist..............................................................................................................................2
Installation ..................................................................................................................................... 3 Installation Using an Awning Rail ...........................................................................................................3 Installation Using the Mounting Plates....................................................................................................5 Bottom Bracket Installation .....................................................................................................................6 Manual Crank Clip ..................................................................................................................................6 Switch and Wiring Installation.................................................................................................................7
Operation ....................................................................................................................................... 9 Motorized Awning ...................................................................................................................................9
Manual Operation - Motorized Awning ...........................................................................................9 Manual Crank Awning.............................................................................................................................9 Using the Vertical Support Legs ...........................................................................................................10
Maintenance................................................................................................................................. 11 Fabric Care...........................................................................................................................................11
Mildew ..........................................................................................................................................11 Pooling .........................................................................................................................................11
Arm Care ..............................................................................................................................................11 Motor Maintenance...............................................................................................................................11
Limited Warranty ......................................................................................................................... 12
SAFETY INFORMATION
WARNING A WARNING INDICATES A POTENTIALLY HAZARDOUS SITUATION WHICH, IF NOT AVOIDED, COULD RESULT IN
DEATH OR SERIOUS INJURY AND/OR MAJOR PROPERTY DAMAGE.
CAUTION A CAUTION INDICATES A POTENTIALLY HAZARDOUS SITUATION THAT MAY CAUSE MINOR TO MODERATE
PERSONAL INJURY AND/OR PROPERTY DAMAGE. IT MAY ALSO BE USED TO ALERT AGAINST UNSAFE PRACTICES. NOTE: A note indicates further information about a product, part, or step. Tip: A tip provides helpful suggestions.
Safety Notes: • Always disconnect power source before working on or around the electrical system. • Always wear appropriate safety equipment (i.e. goggles). • Always use appropriate lifting devices and/or helpers when lifting or holding heavy objects. • When using fasteners, use care to not over tighten. Soft materials such as fiberboard, fiberglass and
aluminum can be "stripped out" and lose the ability to grip.
Carefree of Colorado 2145 W. 6th Avenue Broomfield, CO 80020 a Scott Fetzer company 303-469-3324 ♦ www.carefreeofcolorado.com

Carefree of Colorado Residential Balcony Awning
1 052993-001r3
INTRODUCTION PRODUCT OVERVIEW The Carefree Balcony Awning is a state of the art lateral arm awning. When retracted, the housing provides protection against the elements with streamlined styling. The full tension canopy fabric allows the awning to be partially or fully extended for best shade coverage.
Awning Specifications: • Fully retractable and self storing; • Available as manual or motorized; • The sealed awning motor operates on standard 12VDC (range 10VDC to 14VDC); • Available with Sunbrella Acrylic Fabrics; • Case and frame are constructed of high-strength aluminum extrusions, protected with a polyester paint finish; • Stainless steel fasteners and hardware. • Vertical supports are provided to add additional stability. Supports fold and store inside the lead rail.
AVAILABLE WIDTHS: 9' to 13' (in one inch increments) EXTENSION: 6' 6" LEADING EDGE POSITION ACTUATION AND CONTROL
Power: Lateral Arm Spring Minimum Tension Open Position Control: Motorized: Roll Out/In Controlled by Electrical Motor
Manual: Roll Out/In Controlled by Manual Crank MOTOR SPECIFICATIONS
Motor Type: Worm Drive Power Requirements: 12VDC, 30 Watts, 2.5 Amps Torque 52 in-lbs. Speed 15 rpm
CIRCUIT RATING: 20 amp POWER SOURCE: Power Converter
Input: 108VAC - 132VAC Input Watts: 500 Watts Output: 13.4 VDC Output Amps: 30 Amps
Manual
Motorized
Awning WidthFabric Width5”
(approx)3”
(approx)
Awning WidthFabric Width9 1/2”
(approx)3”
(approx)
5 1/2”
5 1/2”
5 3/4”
3 1/2”
RBA001
5”
7 5/8”
6” Minimumfrom Overhang
Figure 1. General Dimensions.

Carefree of Colorado Residential Balcony Awning
2 052993-001r3
COMPONENT CHECKLIST
RBA003
1
2
34
5 6 7 8
11
139
12
10 14
15
16 17
18
26
27
2021
23
2224
19
25
Figure 2. Component Checklist.
ITEM DESCRIPTION QTY NOTE 1 Awning Assembly 1 1 2 Awning Rail 1
HARDWARE KITS (application depending on Awning Length, see note 2) A B C 2 3 Mounting Plate 1 1/2" 1 1 2 4 Mounting Plate 3" 2 - - 5 Mounting Plate 18" - 2 2 6 Screw, Hex Head #10 x 3/4 20 20 20 7 Screw, Lag 1/4 x 1 1/2 8 12 13 8 Screw, Phillips Pan Head #6 x 3/8 5 5 6 9 Bottom Bracket 2 2 2 10 Screw, Flat Head #10 x 3/4 4 4 4 11 Crank Handle, "T" Motorized Version Only 1 1 1 12 Crank Handle, "Hook" Manual Crank Version Only 1 1 1 13 Crank Handle Clip Optional 2 2 2 14 Screw, Flat Head M4 x 25mm 4 4 4
ELECTRICAL 15 Transformer w/ Junction Box 1 16 Strain Relief Connector 4 17 Wire Nut 3 18 Screw, PPH 1/4 x 2 1/4 4 19 Spade Connector, Female 2 20 Switch Cover 1 21 Switch 1 22 Switch Plate, Mounting 1 23 Screw #6-20 x 1/2 2 24 Junction Box 1 25 Screw, Lag #10 x 2 8 26 Jacketed Wire, 16/2 6 ft 1 27 Plug and Wire 2 ft 1
Notes: 1. Manual configuration shown, awning configuration is specified at time of order, including awning length, fabric, color etc. Check awning assembly against original purchase order.
2. Hardware Kits are based on awning length: A = 8 - 9' B = 10'-11' C = 12'-13'

Carefree of Colorado Residential Balcony Awning
3 052993-001r3
INSTALLATION Two methods are available to securely mount the Balcony awning. The awning may be mounted using a standard awning rail. When this is not practical, the awning may be mounted using a set of mounting brackets that mounts to the wall (refer to page 5).
Prior to mounting the awning: • Review both mounting methods to determine the best mounting method for the particular application.
The awning rail must be attached to structural components for stability.
• Inspect and clean the mounting area. The area must be flat without ridges or irregularities. Smooth the area as required.
• Ensure that the awning will not interfere with other equipment such as light fixtures, exhaust vents, openings, etc.
Mounting to a Surface Below are some mounting suggestions; these may not cover all possible situations. If in doubt, consult a building contractor or engineer prior to installation.
RBA004Use for Wood Use for soft material such as Stucco
1 3/4”
O 1/4”
Concrete or Brick
Use for Brick and Concrete
Lag Shield(not furnished) Structure
Wall Surface
1/4 x 1 1/2 Screw (2)1 3/4”
O 3/16”
Standoff(not furnished)
O 3/16”
1 3/4”
1/4 x 2 1/2Screw (2) 1/4 x 1 1/2
Screw (2)Ream ToMatch Standoff
StructureWall Surface
Figure 3. Surface Mounting Suggestions.
NOTE: The hardware kit includes 1/4 x 1 1/2 lag screws for mounting the brackets. In some circumstances, the installer may have to furnish longer screws to properly fasten the hardware into the building structure.
INSTALLATION USING AN AWNING RAIL 1. Determine the optimum positioning of the awning.
• The centerline of the awning fabric is offset from the centerline of the awning assembly. To align the center of the fabric, use the backplate of the awning assembly for measurements.
• When installed, the bottom of the awning case (not including motor or hand crank) is 5 1/4” from the centerline of the awning rail. The rail must be mounted a minimum of 7” above openings to avoid interference. Adjust as necessary to avoid door and window casings and trim.
• Measure each end of the rail position from the ground so that the awning is mounted parallel to the ground.
• If the surface is rough, uneven or otherwise unacceptable, a 1 x 6 mounting board can be attached to the wall and structure using lag screws as shown above.
2. Mark the position with a chalk line.
3. Coat the back of the rail with silicone sealant or putty tape.
4. Align the awning rail onto the wall and secure with #10 x 3/4 screws. Use all the attach holes and ensure that the rail is straight, flat and securely mounted to the structural frame.
5. Lightly spray the inside track of the awning rail with a silicone lubricant.

Carefree of Colorado Residential Balcony Awning
4 052993-001r3
6. Using a minimum of two people, lift the awning up and tilt as shown.
MountingRail
AwningRail
FIII002
5 1/4"(ref)
Figure 4. Mount Using Awning Rail.
7. Hook the mounting rail into the awning rail and roll down.
NOTE: If the awning rail is warped or twisted, it may be necessary to slide the awning into the rail pressing the awning through the irregular portions of the awning rail.
8. Adjust the position of the awning horizontally as required. It may be necessary to lightly lift the awning so that it will slide in the awning rail.
10. Rotate the awning down.
11. Open the awning.
NOTE: To open the motorized awning, momentarily connect the motor wires to a 9-18VDC drill battery or car battery. If the motor runs in the reverse direction, reverse the leads.
12. (Refer to figure 4) Drill three (3) 3/16” holes through the back of the case into the mounting surface and into the structure. Use care to not drill through the inner wall.
Drill Area Drill Area Drill Area
Arm AnchorArm Anchor CenteredBetweenArms FIII016
Figure 5. Securing the Awning Case.
13. Drill out the 3/16” holes in the awning case to 5/16”. Do not allow the drill to extend into the wall.
CAUTION THE SCREWS MUST BE LOCATED IN THE OPEN AREAS OF THE AWNING CASE AS SHOWN. THE ARMS CANNOT
CLOSE COMPLETELY IF THE SCREW HEADS ARE UNDERNEATH. 14. Secure the awning using three (3) 1/4 x 1 1/2 lag screws.

Carefree of Colorado Residential Balcony Awning
5 052993-001r3
INSTALLATION USING THE MOUNTING PLATES 1. Determine the optimum positioning of the awning.
• The centerline of the awning fabric is offset from the centerline of the awning assembly. To align the center of the fabric, use the backplate of the awning assembly for measurements.
• The bottom of the mounting plates should be above any openings or frames to avoid interference when the awning is installed.
Edge of Back Plate
Edge of Back Plate Edge of Back Plate
Edge of Back Plate Edge of Back Plate
Equal Spacing
AB B
AC C
AC CA
8 - 9 foot Awning
10 - 11 foot Awning
12 - 13 foot Awning
A = 1 1/2" B = 3" C = 18"FIII017
Back PlateEdge of Back Plate
Figure 6. Mounting Plate Pattern.
2. Mark the position with a chalk line.
3. Determine the correct plate pattern then use the plates as a template and drill the appropriate mounting holes. Attach brackets (refer to "Mounting to a Surface" on page 3).
RBA006
Back Plate
Mounting Plate
#6 x 3/8Screw
Mounting Plate
1/4 x 1 1/2Lag Screw
3/16 Holesthru Wall
Figure 7. Mount Using Plates.
4. Set the awning into the hooks of the mounting plates.
5. Adjust the position of the awning horizontally as required.
6. (Refer to Figure 7) Attach the mounting plates to the awning case using the self-tapping #6 x 3/8 screws.

Carefree of Colorado Residential Balcony Awning
6 052993-001r3
BOTTOM BRACKET INSTALLATION The awning is equipped with vertical supports. These supports extend from the leading edge of the awning to a bracket mounted on the wall or may be used in a carport position on the ground.
1. Determine the location of the brackets: • Open the Awning approximately 6" or enough to see the support legs in the leading edge. • Mark the location of the pivot point of the legs. • At the marks made previously, measure down vertically and mark the location of the brackets. The ideal
location is 30" to 38" below the bottom of the awning. The brackets will work up to a maximum of 50 " below the awning.
FIII018Pivot Pivot
30” - 38”(optimum)
50”(maximum)
Bottom Bracket
#10 x 3/4Flat Head ScrewsorMoly Rivets
Support Legs (ref)
Leg Pivot O 5/32” Pilot Hole
Figure 8. Wall Mounted Support Plate.
2. Center the brackets on the location marks and using the bracket as a template, drill two (2) 5/32” pilot holes.
3. Attach the plate with two (2) #10 x 3/4 flat head screws.
MANUAL CRANK CLIP Optional clips are for handy storage of the manual crank handle. These may be mounted horizontally or vertically. Mount using the screws provided.
Mariner016
M4 x 25Screws
Figure 9. Manual Crank Clip.
Carefree of Colorado Residential Balcony Awning
7 052993-001r3
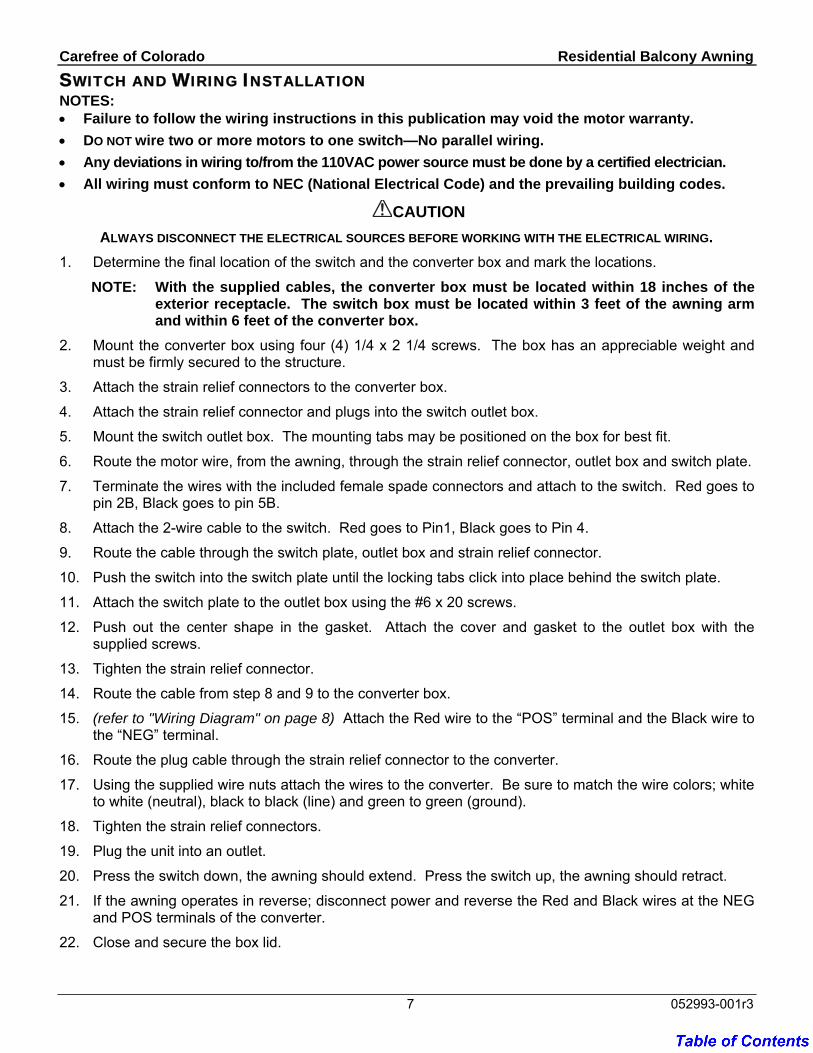
SWITCH AND WIRING INSTALLATION NOTES: • Failure to follow the wiring instructions in this publication may void the motor warranty. • DO NOT wire two or more motors to one switch—No parallel wiring. • Any deviations in wiring to/from the 110VAC power source must be done by a certified electrician. • All wiring must conform to NEC (National Electrical Code) and the prevailing building codes.
CAUTION ALWAYS DISCONNECT THE ELECTRICAL SOURCES BEFORE WORKING WITH THE ELECTRICAL WIRING.
1. Determine the final location of the switch and the converter box and mark the locations.
NOTE: With the supplied cables, the converter box must be located within 18 inches of the exterior receptacle. The switch box must be located within 3 feet of the awning arm and within 6 feet of the converter box.
2. Mount the converter box using four (4) 1/4 x 2 1/4 screws. The box has an appreciable weight and must be firmly secured to the structure.
3. Attach the strain relief connectors to the converter box.
4. Attach the strain relief connector and plugs into the switch outlet box.
5. Mount the switch outlet box. The mounting tabs may be positioned on the box for best fit.
6. Route the motor wire, from the awning, through the strain relief connector, outlet box and switch plate.
7. Terminate the wires with the included female spade connectors and attach to the switch. Red goes to pin 2B, Black goes to pin 5B.
8. Attach the 2-wire cable to the switch. Red goes to Pin1, Black goes to Pin 4.
9. Route the cable through the switch plate, outlet box and strain relief connector.
10. Push the switch into the switch plate until the locking tabs click into place behind the switch plate.
11. Attach the switch plate to the outlet box using the #6 x 20 screws.
12. Push out the center shape in the gasket. Attach the cover and gasket to the outlet box with the supplied screws.
13. Tighten the strain relief connector.
14. Route the cable from step 8 and 9 to the converter box.
15. (refer to "Wiring Diagram" on page 8) Attach the Red wire to the “POS” terminal and the Black wire to the “NEG” terminal.
16. Route the plug cable through the strain relief connector to the converter.
17. Using the supplied wire nuts attach the wires to the converter. Be sure to match the wire colors; white to white (neutral), black to black (line) and green to green (ground).
18. Tighten the strain relief connectors.
19. Plug the unit into an outlet.
20. Press the switch down, the awning should extend. Press the switch up, the awning should retract.
21. If the awning operates in reverse; disconnect power and reverse the Red and Black wires at the NEG and POS terminals of the converter.
22. Close and secure the box lid.

Carefree of Colorado Residential Balcony Awning
8 052993-001r3
Wiring Diagram
NEG
POS
6
5B
4
3
2B
1
Rear Viewof Switch
Red
Black
RedBlk
RedBlack
GreenBlack
White
To 110VACPower Source
Converter
RBA002
MAwningMotor
Outlet BoxSwitch Plate
6-20 X 1/2 Screw
Cover GFCI
Strain ReliefConnector
16/2 Jacketed Wire
Switch
MountingTab
ToAwningMotor
ToConverter
#10 x 2Screw
Switch Installation
Carefree of Colorado Residential Balcony Awning
9 052993-001r3
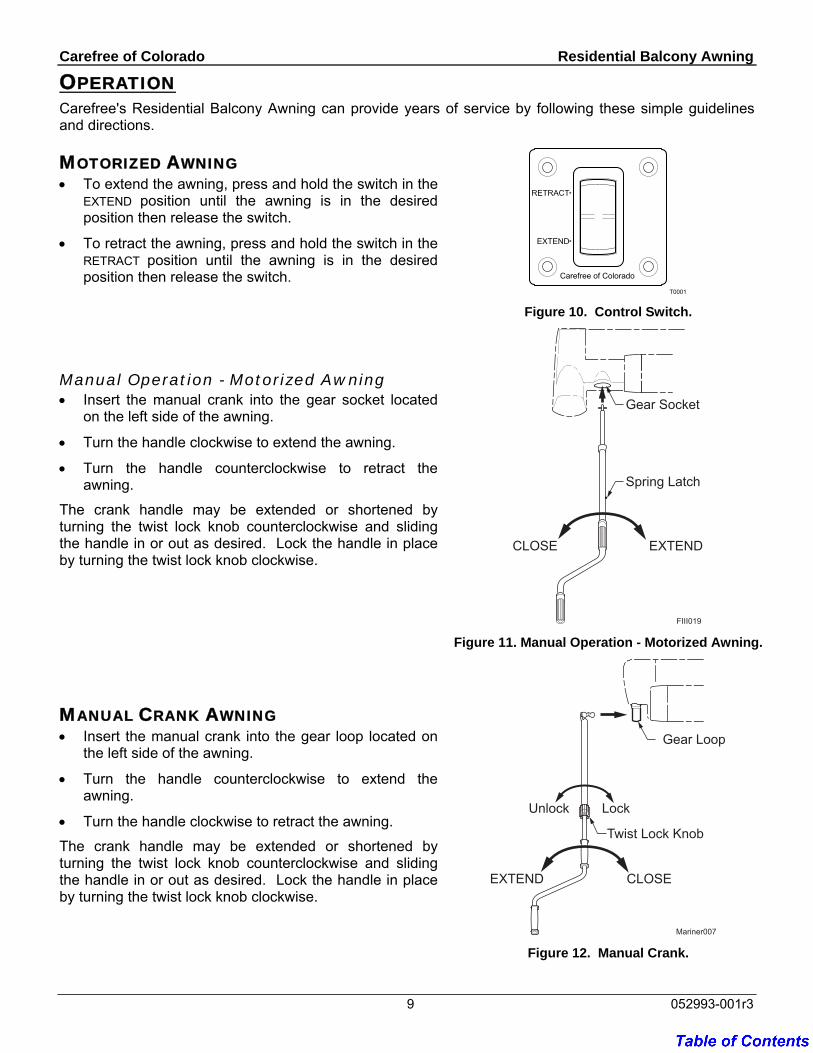
OPERATION Carefree's Residential Balcony Awning can provide years of service by following these simple guidelines and directions.
MOTORIZED AWNING • To extend the awning, press and hold the switch in the
EXTEND position until the awning is in the desired position then release the switch.
• To retract the awning, press and hold the switch in the RETRACT position until the awning is in the desired position then release the switch.
Manual Operation - Motorized Awning • Insert the manual crank into the gear socket located
on the left side of the awning.
• Turn the handle clockwise to extend the awning.
• Turn the handle counterclockwise to retract the awning.
The crank handle may be extended or shortened by turning the twist lock knob counterclockwise and sliding the handle in or out as desired. Lock the handle in place by turning the twist lock knob clockwise.
MANUAL CRANK AWNING • Insert the manual crank into the gear loop located on
the left side of the awning.
• Turn the handle counterclockwise to extend the awning.
• Turn the handle clockwise to retract the awning.
The crank handle may be extended or shortened by turning the twist lock knob counterclockwise and sliding the handle in or out as desired. Lock the handle in place by turning the twist lock knob clockwise.
T0001
Carefree of Colorado
Figure 10. Control Switch.
CLOSE EXTEND
Gear Socket
Spring Latch
FIII019 Figure 11. Manual Operation - Motorized Awning.
EXTEND CLOSE
LockUnlock
Gear Loop
Twist Lock Knob
Mariner007 Figure 12. Manual Crank.

Carefree of Colorado Residential Balcony Awning
10 052993-001r3
USING THE VERTICAL SUPPORT LEGS Two telescoping vertical support legs are stowed in the lead rail of the awning. These can be used to provide increased stability.
CAUTION THE GROUND SUPPORT LEGS DO OFFER INCREASED STABILITY BUT DO NOT COMPENSATE FOR HARSH WEATHER
CONDITIONS SUCH AS WIND AND/OR HEAVY RAIN. DURING INCLEMENT WEATHER, CLOSE THE AWNING.
FIII014
Unlock
Lock
Latch
ReleaseButton
Carport FootBottom Bracket
Retaining Pin
Figure 13. Using the Support Legs.
1. Extend the awning. When the awning is extended, the leading edge fascia lifts up to expose the legs.
2. Unsnap the leg from the storage position. To do so, open the latch and slide the foot out from the retaining clip.
3. Swivel the leg down.
4. Press the release catch and extend the first section of the leg until it locks in place with the ball lock.
5. For Carport Position: • Extend the second section of the support down to ground. • Hold the carport foot on the ground and lift the top section of the support until the awning is at the
desired height. Close the latch. • Stake the carport foot to the ground. (Stakes are not included)
6. For Wall Support: • Rotate and extend the leg to the bottom bracket. • Lift the retaining pin and insert the foot into the bracket. Allow the retaining pin to drop down over
the foot. • Lift the top section of the support until the awning is at the desired height. Close the latch.
7. Repeat for other side.
To stow the leg, reverse the above steps.
Carefree of Colorado Residential Balcony Awning
11 052993-001r3
MAINTENANCE Maintaining the Carefree Balcony awning is easy. Just follow these basic steps: • Always operate the awning according to the instructions. • Periodically check that the fasteners are tight. Tighten if necessary. • Keep the awning fabric and arms clean.
FABRIC CARE CAUTION
DO NOT USE OIL BASED CLEANERS OR ANY CAUSTIC, GRANULATED, OR ABRASIVE TYPE CLEANERS ON YOUR CAREFREE PRODUCT.
1. One of the best ways to keep the fabric looking good and to delay the need for deep or vigorous cleanings is to hose fabrics off on a monthly basis with clear water. This practice will help prevent dirt from becoming deeply imbedded in the fabric. In most environments, a thorough cleaning will be needed every two to three years.
2. When it’s time for a thorough cleaning, the fabric can be cleaned while still on an awning frame. • For Acrylic Fabric – Use a stiff brush and warm water with soap.
3. When cleaning the fabric, it is important to observe the following: • Always use a natural soap, never detergent. • Water should be cold to lukewarm, never more than 100°F. • Air-dry only. Never apply heat to the fabric. • Always allow the fabric to dry thoroughly before rolling up the awning.
Mildew Mildew is a fungus growth that looks like dirt. Vinyl coated polyester fabrics are mildew resistant because of a chemical biocide in the vinyl coating. Under ordinary conditions, mildew will not appear. However, in areas where high temperature and humidity are common, mildew can be a problem and required the material to be washed more frequently. Thoroughly rinse the fabric with clean water and allow to air dry completely before rolling up the awning.
Pooling When water collects on the top of the fabric, this is known as "pooling". This can occur during inclement weather or if a running air conditioner discharges over the awning. The water is dumped when the awning is retracted. It is recommended that if water accumulates on the top, briefly retract the awning to dump the water. This will help prevent the fabric from stretching or distorting.
ARM CARE The best method of keeping the arms and braces operating smoothly is to clean them. Dirt and debris can cause the channels not to slide easily.
Periodically wash out the channels with running water (i.e. a hose) to keep them clean. If the channels still do not slide easily, lightly spray the inside of the channels and pivot points with a dry silicone lubricant, after the arms have been cleaned and dried thoroughly.
MOTOR MAINTENANCE • Check all wiring and connections for wear. Repair when needed. • Check that the sealant is providing a good seal and no water is accumulating on the wiring.

Carefree of Colorado Residential Balcony Awning
12 052993-001r3
LIMITED WARRANTY Carefree of Colorado (hereafter referred to as Carefree) warrants to the FIRST retail Purchaser that the Residential Balcony Awning is free of defects in material and workmanship within the terms and conditions as set forth below. Carefree’s obligation under this warranty is limited to the repair or replacement, at Carefree’s option, of any defective component within the stated warranty period. THIS WARRANTY IS NOT TRANSFERABLE. 1. DURATION
a) 5 years on motor and canopy. b) 10 years on springs, rollers and hardware. c) 12 months on electronic components. d) For the first 12 months, should a failure occur and the initial purchaser has proof of purchase (warranty card
sent in or receipt of purchase) and notifies Carefree in a timely manner, all components, labor and frieght are covered 100%.
e) After the initial 12 months, any defects in the product will be replaced or repaired for a prorated amount of the cost of the part based upon the number of months since the initial date of purchase.
Warranty duration is not extended by the length of time the product is not in use or the time which the purchaser is deprived the use of the product. The duration of coverage is determined by the date of the original product purchase, not the date of repairs.
2. WHAT IS COVERED UNDER THIS WARRANTY Defects in the manufacturer’s material and workmanship of product under normal use, and which occur within the duration of the warranty period. The following components are covered only as listed: a) Fabrics – Free from quality defects (normal wear and fading are excluded). Cracking, peeling, hardening, sagging or
loss of strength provided that the damage is not the result of high winds or water pooling. b) Roller tube & Hardware – Free from extrusion defects. c) Springs – Defects. d) Electrical Components – Defects.
3. WHAT IS NOT COVERED UNDER THIS WARRANTY a) Fabric damage such as pinholes or tears not reported within ten (10) calendar days of purchase. b) Improper installation and/or any damage or failure that results from improper installation of the product, including fabric
damage caused by improper installation. c) Normal wear including the occasional need to re-tension the awning. d) Conditions that are not related to the material or workmanship of the product: including any failure that results from an
accident, wind, rain, water pooling, or other acts of God. e) Purchaser’s abuse, including but not limited to neglect; failure to operate, use or maintain the product in accordance
with the instructions provided with the product. f) Any component not sold or manufactured by Carefree. g) Any failure that results from the use of another manufacturer’s product with a Carefree product that is not specifically
approved by Carefree. h) Any incidental, indirect, or consequential loss, damage, or expense that may result from any defect, failure, or
malfunction of the Carefree product. i) The removal or alteration of any product component or device. In the event of such removal or alteration, this
warranty is void. j) Any expense related to delivery or pick-up of product to/from the service dealer.
4. RESPONSIBILITIES OF THE PURCHASER IN ORDER FOR THE WARRANTY TO BE HONORED, THE PURCHASER MUST HAVE PROOF OF PURCHASE: THE ORIGINAL RECEIPT OR THE WARRANTY CARD ON FILE AT CAREFREE OF COLORADO. FAILURE TO PROVIDE THE REQUIRED DOCUMENTATION MAY DELAY OR VOID ANY WARRANTY CLAIM. a) Retain dated proof of purchase for specified product, and provide it as requested. b) Inspect the shade upon purchase to confirm the condition of the canopy, hardware and proper operation of the
product. c) Perform “Periodic Maintenance” as specified in Owners Manual. d) Use reasonable care in maintenance, operation, use and storage of the product in accordance with the instructions
contained in the owner’s manual.
Carefree of Colorado Residential Balcony Awning
13 052993-001r3
5. WARRANTY CLAIM PROCEDURE a) Deliver any product claimed or found defective during warranty period to a Carefree of Colorado Authorized Service
Dealer. Visit www.carefreeofcolorado.com for the name of nearest Authorized Service Dealer, or call Carefree at the phone number shown.
b) Customer shall schedule a time with an Authorized Service Dealer. Repair or replacement will be scheduled and performed at the Authorized Service Dealer according to normal work flow and availability of replacement parts.
c) Work must be performed by a Carefree authorized service center. When warranty work/repair is performed by an authorized service agent, the agent is responsible for directly billing Carefree of Colorado for warranted parts and labor.
d) Carefree shall pay the respective servicing dealer or agent for performing any repairs authorized by Carefree as per the terms of this warranty. Company will allow for freight and labor charges - labor is based on Flat Rate Form.
e) All warranty claims shall be paid through the servicing agent. Carefree does not provide reimbursement for warranty claims paid for by the customer.
f) The customer shall pay only those costs not covered by warranty. The customer shall have no out-of-pocket expenses except as stated.
g) The Original Purchaser is responsible for any expenses related to delivery or pick up of product to/from the Service Dealer.
h) If the Purchaser does not receive satisfactory results from the Authorized Service Dealer, the Purchaser should contact the Carefree of Colorado Customer Care Department within 10 days after completion of the questionable service.
THIS WARRANTY GIVES THE OWNER SPECIFIC LEGAL RIGHTS. THE LAWS OF CERTAIN JURISDICTIONS MAY GRANT THE OWNER ADDITIONAL RIGHTS AND PRIVILEGES. Except as set forth above, Carefree makes no warranty, whether statutory or otherwise, including without limitation, any warranty of merchantability or fitness for a particular purpose. Carefree shall have no liability except to repair, replace or adjust defective products and parts. Carefree specifically excludes any liability, whether in contract, tort or otherwise, for personal injury, property damage, economic or consequential losses. Carefree has not authorized any person or company to alter the terms of this warranty. It is Carefree of Colorado’s policy and practice to continuously improve the company’s products and services. Therefore, Carefree reserves the right to make changes in design and components, without notice, whenever it is believed the quality of the product will be improved, but without incurring any obligation to incorporate such improvements in any product which has been shipped or in service.
FOR YOUR RECORDS: DEALER/INSTALLER
NAME:
ADDRESS:
PHONE:
PURCHASE DATE:
PART NUMBER:
SERIAL NUMBER: PRODUCT NAME OR DESCRIPTION:
Color: Length: Register your Carefree products on-line @ www.carefreeofcolorado.com
Carefree of Colorado 2145 W. 6th Avenue Broomfield, CO 80020 a Scott Fetzer company 303-469-3324 ♦ www.carefreeofcolorado.com


