CaptureShare - AVer USA
66
CaptureShare User Manual
Transcript of CaptureShare - AVer USA

CaptureShare
User Manual

COPYRIGHT ©2021 AVer Information Inc. All rights reserved. All rights of this object belong to AVer Information Inc. Reproduced or transmitted in any form or by any means without the prior written permission of AVer Information Inc. is prohibited. All information or specifications are subject to change without prior notice.
TRADEMARKS “AVer” is a trademark owned by AVer Information Inc. Other trademarks used herein for description purpose only belong to each of their companies.
DISCLAIMER No warranty or representation, either expressed or implied, is made with respect to the contents of this documentation, its quality, performance, merchantability, or fitness for a particular purpose. Information presented in this documentation has been carefully checked for reliability; however, no responsibility is assumed for inaccuracies. The information contained in this documentation is subject to change without notice. In no event will AVer Information Inc. be liable for direct, indirect, special, incidental, or consequential damages arising out of the use or inability to use this product or documentation, even if advised of the possibility of such damages.

Help
Global Download Center: https://www.aver.com/download-center Technical Support: https://www.aver.com/technical-support USA Download Center: https://www.averusa.com/education/support/ Technical Support: https://averusa.force.com/support/s/contactsupport European Headquarters Download Center: https://www.avereurope.com/download-center Technical Support: https://www.avereurope.com/technical-support
Contact Information Global AVer Information Inc. https://www.aver.com 8F, No.157, Da-An Rd., Tucheng Dist., New Taipei City 23673, Taiwan Tel: +886 (2) 2269 8535 USA AVer Information Inc. https://www.averusa.com 668 Mission Ct., Fremont, CA 94539, USA Tel: +1 (408) 263 3828 Toll-free: +1 (877) 528 7824 Technical support: [email protected] European Headquarters AVer Information Europe B.V. https://www.avereurope.com Westblaak 140, 3012KM, Rotterdam, Netherlands Tel: +31 (0) 10 7600 550 Technical support: [email protected]

Contents
OVERVIEW .............................................................................................................. 1
MINIMUM SYSTEM REQUIREMENT .................................................................... 1
PORTS USED BY CAPTURESHARE…. ............................................................... 2
DOWNLOADING THE APPLICATION ................................................................... 2
USING CAPTURESHARE ...................................................................................... 3
Start ...................................................................................................................... 3
Toolbar .................................................................................................................. 8
Add a Camera ..................................................................................................... 17
Via USB ........................................................................................................ 17
Camera Settings Main Menu ........................................................................ 19 Basic Image Setting .............................................................................. 19 Advanced Image Setting ....................................................................... 21 Video Output Mode ............................................................................... 23 Live view setting .................................................................................... 25 Tracking setting ..................................................................................... 28 Audio Setting ......................................................................................... 31 System Setting ...................................................................................... 33
Via Virtual Camera ........................................................................................ 35
Camera Settings Main Menu ........................................................................ 39 Advanced Image Setting ....................................................................... 39 Video Output Mode ............................................................................... 41 Audio Setting ......................................................................................... 43 Virtual device setting ............................................................................. 45 Web setting ........................................................................................... 47
Control Panel ...................................................................................................... 48
Camera Information ...................................................................................... 48
Pan/Tilt Buttons ............................................................................................. 49
Focus ............................................................................................................ 50
Zoom In/Zoom Out ........................................................................................ 50
Preset Setting ............................................................................................... 51
Tracking Control ............................................................................................ 52

Capture the Image .............................................................................................. 53
Recording ........................................................................................................... 54
Streaming ........................................................................................................... 55
Setup............................................................................................................. 55
USING AVERCAMERA SETTING TOOL ............................................................. 59
Setup Camera ..................................................................................................... 59

1
OVERVIEW CaptureShare is a software tool that you can use with cameras to set up, record, enable streaming, capture images, and use whiteboard function. You can add a camera either via USB or a camera IP address.
MINIMUM SYSTEM REQUIREMENT [Note] 1. Internet port 1935 is required for RTMP streaming. 2. When the system is overloaded, it may cause failed decoding and image
problems. 3. Minimal system requirements to the limitation
Supported devices Laptops & desktops for Windows® (Windows® 7, 10)
Laptops & desktops for Mac® (Mac® OS v10.14, 10.15 or above)
System requirements for Windows® desktop Intel® Core i3 or higher
4 GB of RAM or above
1024 x 768 or higher resolution display
DirectX 9.0c compatible video card
System requirements for Mac® Hardware
Intel® Core i3 or higher
4 GB of RAM or above
1024 x 768 or higher resolution display
Compliance
H.264 format is not supported by default UVC protocol
YUV422 format at 1280 x 960, 1280 x 720, 1600 x 900 resolution in
standard mode is not supported by default UVC protocol.

2
YUV422 format at 1280 x 960 resolution in 8M mode is not supported by
YUV422 format.
PORTS USED BY CAPTURESHARE If the computer (with CaptureShare installed) and camera are not on the same LAN, enable the ports listed below on your firewall. Search Port:
PTZCam: 8000
DocCam: 1900
VISCA Control Port: 52381
Command Port:
PTZCam: 80
DocCam: 9527
RTSP Port:
PTZCam: 554
DocCam: 8557
DOWNLOADING THE APPLICATION Please download the software from the following web links:
Global
https://www.aver.com/download-center
USA
https://www.averusa.com/education/support/
European Headquarters
https://www.avereurope.com/download-center
[Note]
1. AVerCamera Setting Tool will be installed automatically along with
CaptureShare. The user can use AVerCamera Setting Tool to control
cameras with 3rd party software.

3
USING CAPTURESHARE
Start 1. Double-click CaptureShare icon to launch it. 2. When you launch CaptureShare, a guidance for using CaptureShare will be
displayed. Click to go to the next page and click OK button to finish. If you prefer not to see guidance next time, uncheck “Keep this guidance next time!” option.

4
3. After launching CaptureShare, a Select Layout Mode dialog and a toolbar will be displayed at the center and bottom of Windows.
4. There are four layout modes. CaptureShare supports various AVer cameras and can connect up to two cameras simultaneously. When adding two cameras, one can be a PTZ camera and the other a document camera. When two AVer cameras work together, please choose Two cameras layout. You should see two user interfaces and the live view of both cameras on the pop-up windows.

5
- Desktop only: Shows no camera footage.
- One camera: Shows 1 camera footage.

6
- Two cameras: Shows 2 cameras on your desktop.
- PIP mode: Picture in Picture mode. The small camera footage is
displayed on the other full camera footage simultaneously. Sound is usually from the main program only.

7
5. After selecting the layout, camera footage will be displayed. You can select a camera source from the drop-down list.

8
Toolbar
When you launch CaptureShare, the toolbar is shown at the bottom of the desktop.
You can record, capture, enable live broadcasting, and display teaching materials on the toolbar. All of the recorded videos, screenshots, and live feeds capture the entire desktop, not just the camera live view.

9
Toolbar Controls:
(1) Hide the Toolbar
Click it to hide the toolbar. Click to make the whole toolbar appear. (2) Layout Mode
CaptureShare can connect up to two cameras simultaneously. There are four types of layout modes to choose from. You can switch to one of the layouts as needed.
(3) Capture Desktop Click the button to capture a screenshot of the desktop.
(4) Record Desktop Click the button to show the Desktop Control.
- Click the button to start recording all activities on the desktop.
- Click the button to pause recording.
- Click the button to stop recording.
(1) (2) (3) (4) (5) (6) (7) (8) (9)

10
- Click the button to choose the built-in microphone of the camera or
the wireless microphone.
- Use the volume slider to control the audio
recording levels. (5) Streaming Settings
You can broadcast the live feeds of your desktop to live streaming websites such as YouTube, Ustream, etc. Before starting live streaming, you need to setup streaming parameters. In the following example, you will see how to set up streaming on Youtube. For other live streaming platforms such as LIVE house.in and Ustream, the steps are the same. a. Click icon on the toolbar.
b. Select tab. c. Choose YouTube for Select Service.

11
d. Go to YouTube website and login. If you do not have a google account, please apply for one.
e. After logging in you account, click to create.
f. Select Go live.
g. You should see the Server URL and Stream name/key. Copy the “Server URL” and “Stream name/key” to the corresponding columns on Stream Setting dialog of CaptureShare. You can reveal the stream key to show stream key.

12
h. Click on the drop-down list to select a resolution.
i. Click Apply to save the setting. j. Click the button.
k. In Stream Setting dialog, make sure you enter Stream URL and Stream
Key. Then, click Apply to start live streaming.
(6) Open File Click the button to review all the recorded videos and captured screenshots.
(7) Other Settings: click on to access Other Settings. Language Settings: select a language for the user interface. If you select
Auto, the language will vary according to that of your windows operating system.

13
Software Update / Firmware Upgrade: click on to access the page for upgrade. Click the button to check if the version of software is the latest. Click the button to check if the version of the firmware is the latest. Update the software and firmware regularly for the best experience.
Stream Setting: click on to access stream setting.
- Select Service: YouTube, LIVE house.in, Ustream, or Others. - Stream Key: You can find the stream key in your google account. Log in
YouTube with your google account and find the stream key. - Resolution: 1080P, 720P, 480P, or 360P. Click to confirm the settings.

14
(8) Overlay tool
Click the button to show overlay toolbar.
Name Function
a. Mouse Mode Click the button to pause the Overlaytool function.
b. Whiteboard Mode Click the button to enter Whiteboard Mode. The full screen
transfers to a whiteboard. Click the button again to exit
Whiteboard Mode.
c. Insert Picture In the Whiteboard Mode, click the button to insert the picture.
d. Undo Click the button to cancel or reverse the effects of a previous
action.
e. Redo Click the button to reconstruct.
f. Capture Click the button to capture the screenshot. There are three
types of capture mode to choose from.
a b c d e f g h i j k l m n o p q

15
Name Function
- Click the button to capture a full screen shot.
- Click the button to select a specific interface and capture a
shot.
- Click the button to marquee a specific area and capture a
shot.
g. Select Click the button to select a specific object to modify or cancel.
h. Freehand Click the button to write or draw on the screen or the whiteboard
in the Whiteboard Mode.
i. Highlighter Click the button to use highlighter to emphasize a specific area
or object.
j. Line Click the button to make a line.
k. Shape Click the button to make six different types of shapes.
- Rectangle outline
- Rectangle
- Circle
- Circle outline
- Triangle outline
- Triangle
l. Text Click the button to enter text.
m. Erase Click the button to erase a specific object.
n. Linestyle When you use Freehand, Highlighter or Line function, click the
button to set the style of line. - Thickness: Small, Medium, or Large.
- Form: Solid, Dash, Arrow1 (Single arrow), or

16
Name Function
Arrow2 (Double-headed arrow).
o. Color When you use Freehand, Highlighter, Line, Shape or Text function,
click the button to set the color of line. There are six fixed colors
to choose: Red, Yellow, Green, Blue, Black, and
White. Or you can click the button to set more colors.
p. Clearall Click the button to clear all objects.
q. Return Back to toolbar mode.

17
Add a Camera You can add a camera via either a USB cable or camera IP address. After adding a camera onto CaptureShare, you can adjust its image, video, and audio settings. The following description uses DL30 as an example.
Via USB
After starting CaptureShare, select one camera mode among the four layout
modes.
Connect a camera to your computer via a USB cable. At the top of the camera live
view window, clicked on the camera drop-down list and select the camera you just
connected to the computer. Select to call out the Camera settings main menu. (The setup menu may vary depending on the camera model you are using).

18

19
Camera Settings Main Menu
Basic Image Setting
Select Basic image setting.

20
Basic image setting dialogue will pop up. The changes will be saved right after
you adjust the settings.
1. Contrast: Adjust the color and light of the view.
2. Saturation: Adjust the degree of purity of a color.
3. Sharpness: The higher the sharpness is, the clearer the view.
4. White balance: The white icon, , indicates Auto White Balance is on
whereas the grayed-out icon, , Manual White Balance. The White Balance
feature can be boiled down to the concept of color temperature. Color
temperature is a way of measuring the quality of a light source. Adjust R
Gain/B Gain to get the most accurate color. 5. Click to factory reset Basic image setting.
6. Click button to go back to Camera settings main menu. 7. Click button to close Basic image setting dialogue.

21
Advanced Image Setting
Select Advanced image setting.

22
Advanced image setting dialogue will pop up. The changes will be saved right
after you adjust the settings.
1. Power frequency: It depends on what voltage the country uses. 60Hz system
usually uses 110V (120V) while 50Hz system tends to use 220V or 230V.
2. Image orientation: Click to mirror the screen. Click to put screen to the upper edge.
3. Image rotation: Rotate the image to the left or right by 90 degrees.
4. Click button to go back to Camera settings main menu.
5. Click button to close Advanced image setting dialogue.

23
Video Output Mode
Select “Video output mode.”
24
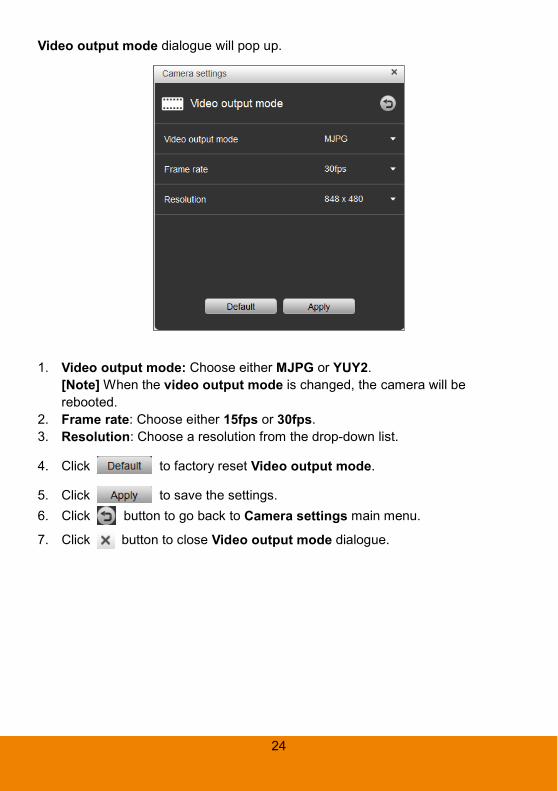
Video output mode dialogue will pop up.
1. Video output mode: Choose either MJPG or YUY2.
[Note] When the video output mode is changed, the camera will be rebooted.
2. Frame rate: Choose either 15fps or 30fps. 3. Resolution: Choose a resolution from the drop-down list.
4. Click to factory reset Video output mode.
5. Click to save the settings. 6. Click button to go back to Camera settings main menu.
7. Click button to close Video output mode dialogue.

25
Live view setting
Select “Live view setting.”

26
Live view setting dialogue will pop up.
Control settings
1. Pan speed: Adjust the pan speed with the slider.
2. Tilt speed: Adjust the tilt speed with the slider.
3. Zoom speed: Choose either Low or High. 4. Profile: loads up to 3 different settings of the camera. After selecting Load,
the camera will go back to Home position. Save to Profile: saves up to 3 different settings including preset settings
values, tracking mode, and tracking setting values of camera.
[Note] The settings of profiles will be cleared after factory reset.
5. Click to factory reset Control settings.
6. Click to save the settings. 7. Click button to go back to Camera settings main menu.
8. Click button to close Live view setting dialogue.

27
On Live view setting dialogue, click on Preset settings.
Preset settings
1. Video freeze while preset: turns on/off the screen view freeze function. When
Video freeze while preset is on, during the preset operation, the screen will
freeze until the operation is done.
2. Preset speed: Adjust the preset speed with the slider.
3. Click to factory reset Preset settings.
4. Click to save the settings.
5. Click button to go back to Camera settings main menu.
6. Click button to close Live view setting dialogue.

28
Tracking setting
Select Tracking setting.

29
Tracking setting dialogue will pop up.
Presenter 1. Time of return to initial shooting position: Use the slider to set the idle time
for the camera to return to the shooting position. The current value is displayed
at the left hand side of the slider.
2. Tracking sensitivity: Use the slider to set the sensitivity level of tracking. The
middle of the slider indicates the value 2.
3. Tracking point: You can adjust your camera and do the preset 1 settings on
the control panel.
4. People Size: selects the people in full or upper body while tracking.
5. Click OK to save the settings.
6. Click button to go back to Camera settings main menu.
7. Click button to close Tracking setting dialogue.

30
On Tracking setting dialogue, select Zone.
1. Time of return to initial shooting position: Use the slider to set the idle time
for the camera to return to the shooting position. The current value is displayed
at the left hand side of the slider.
2. Tracking sensitivity: Use the slider to set the sensitivity level of tracking. The
middle of the slider indicates the value 2.
3. Full screen merge view: Set up 2 to 4 block areas for the camera. Each block
corresponds to one preset position. Camera will switch between preset
positions when the presenter enters different blocks.
4. Tracking point: You can choose among Preset 6, Preset 7, Preset 8, and
Preset 9, if you chose 4-blocks in the field of Full screen merge view above.
You can configure Tracking point on the Web user interface of the camera.
5. Click OK to save the settings. 6. Click button to go back to Camera settings main menu.
7. Click button to close Tracking setting dialogue.

31
Audio Setting
Select Audio setting.

32
Audio setting dialogue will pop up.
1. Audio input: Select LINE In or MIC In in the drop-down list.
2. Use the slider to set Audio volume.
3. Click to factory reset Audio setting.
4. Click to save the settings. 5. Click button to go back to Camera settings main menu.
6. Click button to close Audio setting dialogue.

33
System Setting
Select System setting.

34
System setting dialogue will pop up.
1. Sleep timer: Choose 10 sec, 5 min, 10 min, or 20 min for the duration of sleep timer. When there is no UVC and RTSP connection and timer is up, the camera will enter sleep mode.
2. Factory default: Click Reset to factory reset the camera.
Click OK to proceed.
3. Click to factory reset Sleep timer.

35
Via Virtual Camera
You can add a camera by keying its IP address and be free from the restrictions of
a USB cable.
[Note]: When adding a camera, make sure its video mode is switched to Stream
Only or USB+Streaming.
1. Click on the camera drop-down list. Select Virtual camera.
2. On the pop-up window, select Go to setting to add a camera.

36
3. You can either click Auto search or manually key in the camera information to
add a camera. Click OK.
[Note]: The camera and the PC must be on the same LAN to execute Auto
search.
4. Select On and click OK to confirm.

37
5. You can see the live view. Blue camera model name indicates the camera is
properly connected.
[Note] You can see the live view of the cameras you added not only on
CaptureShare but also on applications which support USB cameras, such
as Skype, Microsoft Teams, Google Meets, and Zoom, under the
circumstances that you opened either CaptureShare or AVerCamera
Setting Tool beforehand.

38
6. Select on the CaptureShare user interface to call out the Camera settings main menu.

39
Camera Settings Main Menu
Advanced Image Setting
Select Advanced image setting.

40
Advanced image setting dialogue will pop up. The changes will be saved right
after you adjust the settings.
1. Image rotation: Rotate the image to the left or right by 90 degrees.
2. Click button to go back to Camera settings main menu.
3. Click button to close Camera settings main menu.

41
Video Output Mode
Select “Video output mode.”

42
Video output mode dialogue will pop up.
1. Video output mode is YUY2. 2. Resolution: Choose a resolution from the drop-down list.
3. Click to factory reset Video output mode.
4. Click to save the settings. 5. Click button to go back to Camera settings main menu.
6. Click button to close Video output mode dialogue.

43
Audio Setting
Select Audio setting.

44
Audio setting dialogue will pop up.
1. Use the slider to adjust Audio volume. 2. Click button to go back to Camera settings main menu.
3. Click button to close Audio setting dialogue.

45
Virtual device setting
Select Virtual device setting.

46
Virtual device setting dialogue will pop up.
1. Click Add to add more cameras.
2. Click the garbage can icon to delete the selected camera.
3. Click the globe icon to access the Web user interface of the camera. 4. Click button to go back to Camera settings main menu.
5. Click button to close Virtual device setting dialogue.
47
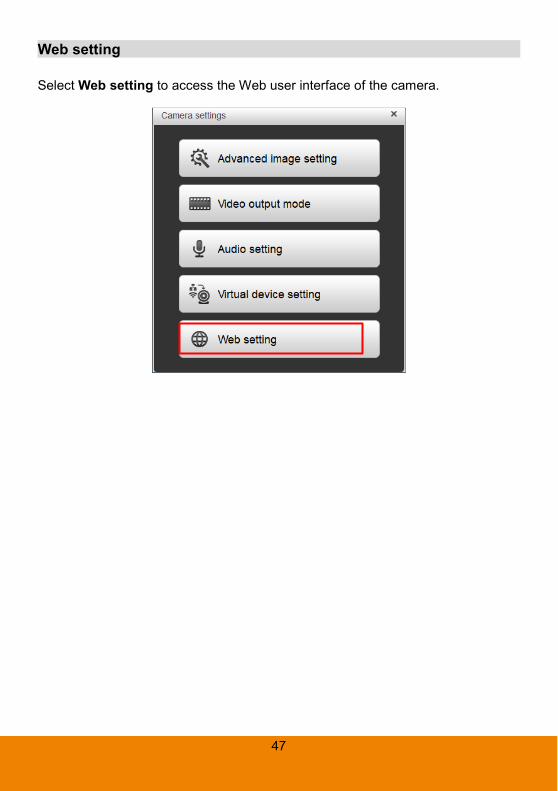
Web setting
Select Web setting to access the Web user interface of the camera.

48
Control Panel
Control panel allows you to configure the camera. Click button to hide the control panel. Click it again to call out the control panel.
Camera Information
Click to access the camera information.
Click OK to exit.

49
Pan/Tilt Buttons
Use the navigation buttons to control the camera direction. Click button to go back to Home position.

50
Focus
The default is auto focus, which enables the camera to capture the presenter automatically and promptly. Click to switch to manual focus. You can use the slider to adjust focus.
Zoom In/Zoom Out
Use the slider to zoom in (plus) or out (minus).

51
Preset Setting
CaptureShare supports up to 256 (0~255) preset positions.
To set up preset position, choose a number. Adjust the camera to your desired position and click Save button. A “Preset setting has been completed” message will pop up to indicate successful saving.
Click a number to view a configured preset position.

52
Tracking Control
Enable Auto tracking feature to track the target with a red frame. When tracking more targets, you will see blue frames for other targets.
If user wants to select a new target, just simply click button and click the new target in the camera view.
Select Presenter mode to focus on locked aim with less background images.
For a wider image with a long distance from the camera lens, select Zone mode to see more background images.

53
Capture the Image To snapshot the image from camera. [Note] The image can be taken during the recording. 1. In camera window, click button.
2. The image will be saved and displayed on screen. The default save location is “\AVer\my documents\AVer\CaptureShare\Picture”.

54
Recording
To record the live view of a camera:
1. In camera window, click button.
2. When count down is finished, the recording starts. The record icon is displayed beside button. To pause, click button. To stop recording, click button.

55
Streaming Streaming is a technology that the videos are broken up into several sections before sending to the end user. The process of the transmission and playback of the video are simultaneous in order to shorten the download times.
You can live broadcast the camera HD’s live video to live broadcast web site such as YouTube, LIVEhouse.in, etc. Setup
The following streaming setup use YouTube as an example. For other live broadcast web site such as LiveHouse.in and Ustream, the steps are the same. 1. Click icon at toolbar.
2. Select tab.
3. Select“Select Service” as “YouTube”.

56
4. Go to YouTube website and login. If you do not have google account, please apply one.
5. After login, click Create icon.
6. Select Go live.
7. You should see the Server URL and Stream name/key. Copy the “Server URL” and “Stream name/key” to correspond column on Stream setting dialog of CaptureShare. You can reveal the stream key to show stream key.

57
8. Select “Resolution” in Stream Setting dialog.
9. Click “Apply” button to save settings. 10. Click the button.

58
11. In Stream Setting dialog, check “Stream URL” and “Stream Key” are entered. Then, click “Apply” to start live streaming.

59
USING AVERCAMERA SETTING TOOL
Setup Camera
Connect the camera to your PC and open the 3rd party software such as Zoom or
Skype. You can setup image setting, video output, and audio of camera via
AVerCamera Setting Tool.
The following setup use Skype as an example.
1. Open Skype > Settings > Audio & Video > Select a camera from the drop-down list.

60
2. Open AVerCamera Setting Tool. Select to call out AVerCamera Setting
Tool dialog.
[Note] AVerCamera Setting Tool setup menu varies depending on the
camera model.

61
3. The setup menus of AVerCamera Setting Tool are very similar to that of CaptureShare. For Basic image setting, please refer to Basic Image Setting section. For Advanced image setting, please refer to Advanced Image Setting section. For Audio setting, please refer to Audio Setting section. For Control panel, please refer to Control Panel section.