Capture Connect - Fujitsu Connect 062615.pdf · To set up release to a cloud service using Capture...
20
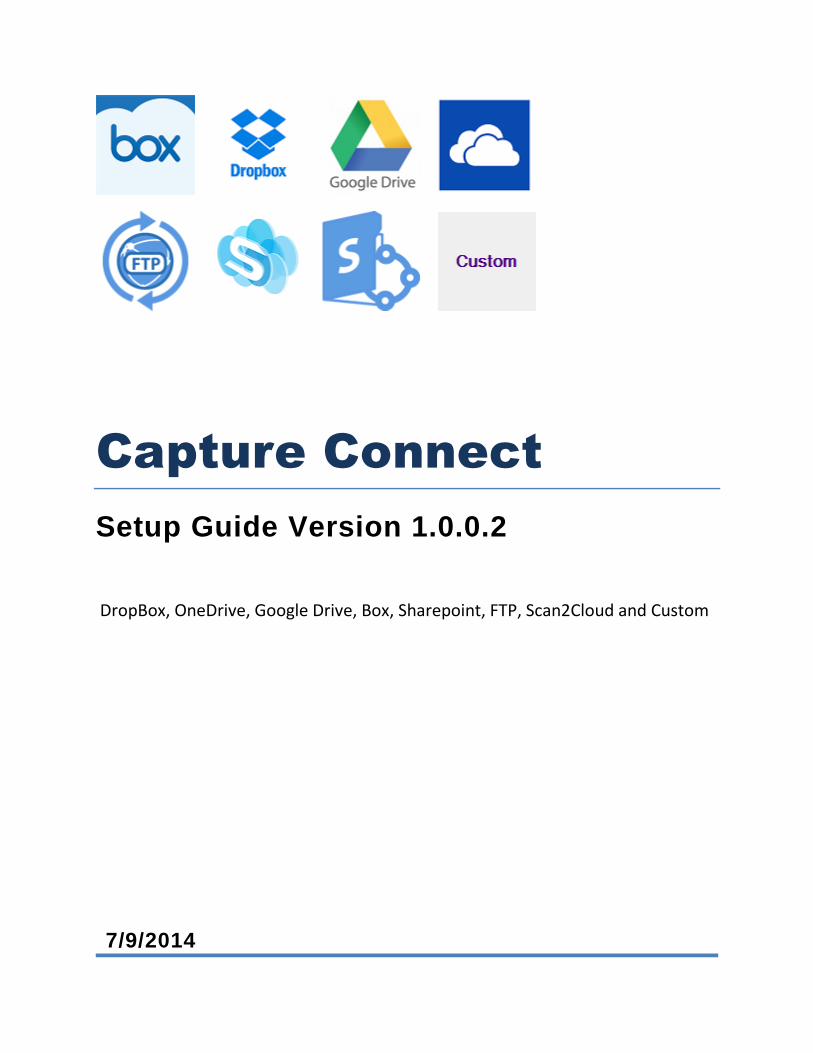
Capture Connect Setup Guide Version 1.0.0.2 DropBox, OneDrive, Google Drive, Box, Sharepoint, FTP, Scan2Cloud and Custom 7/9/2014
Transcript of Capture Connect - Fujitsu Connect 062615.pdf · To set up release to a cloud service using Capture...
Capture Connect
Setup Guide Version 1.0.0.2
DropBox, OneDrive, Google Drive, Box, Sharepoint, FTP, Scan2Cloud and Custom
7/9/2014
Capture Connect Setup Guide
1
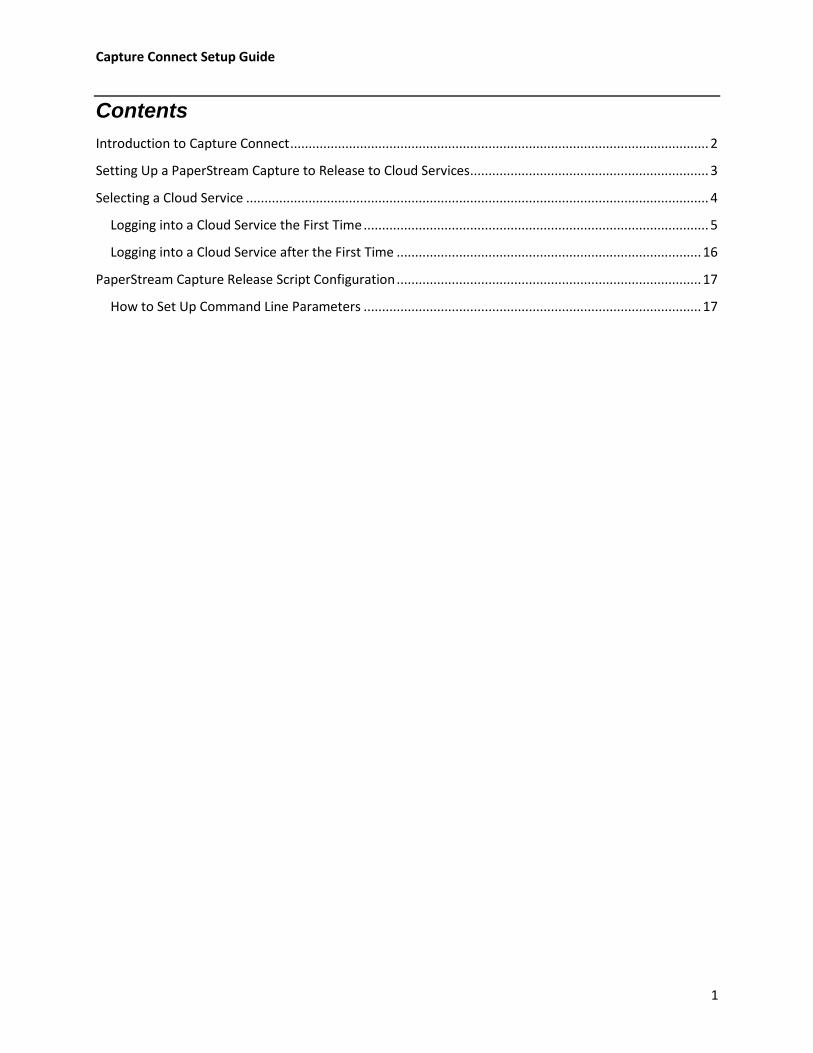
Contents
Introduction to Capture Connect .................................................................................................................. 2
Setting Up a PaperStream Capture to Release to Cloud Services ................................................................. 3
Selecting a Cloud Service .............................................................................................................................. 4
Logging into a Cloud Service the First Time .............................................................................................. 5
Logging into a Cloud Service after the First Time ................................................................................... 16
PaperStream Capture Release Script Configuration ................................................................................... 17
How to Set Up Command Line Parameters ............................................................................................ 17
Capture Connect Setup Guide
2
Introduction to Capture Connect
With Capture Connect, you can release scanned images automatically from the PaperStream Capture
scanning application to any of four cloud storage services.
PaperStream Capture is image capturing software focused on batch scanning. This easy to use capture
tool allows you to create batch scanning profiles which include all of the settings and configuration
required to control the scanning process from scan to the release of the image.
In this Capture Connect Guide, you will learn how to configure a Document Profile in the PaperStream
Capture scanning application for release to any of the following cloud storage services:
DropBox
Microsoft OneDrive (formally SkyDrive)
Google Drive
Box
Additional connectors:
SharePoint
FTP
Scan2Cloud
Custom
Additional uploads:
Copy to Folder
Before you get started, be sure to install Capture Connect on the same computer that you are using for
scanning from PaperStream Capture. Note the file path of the application for later use.
Capture Connect Setup Guide
3
Setting up PaperStream Capture to
Release to Cloud Services
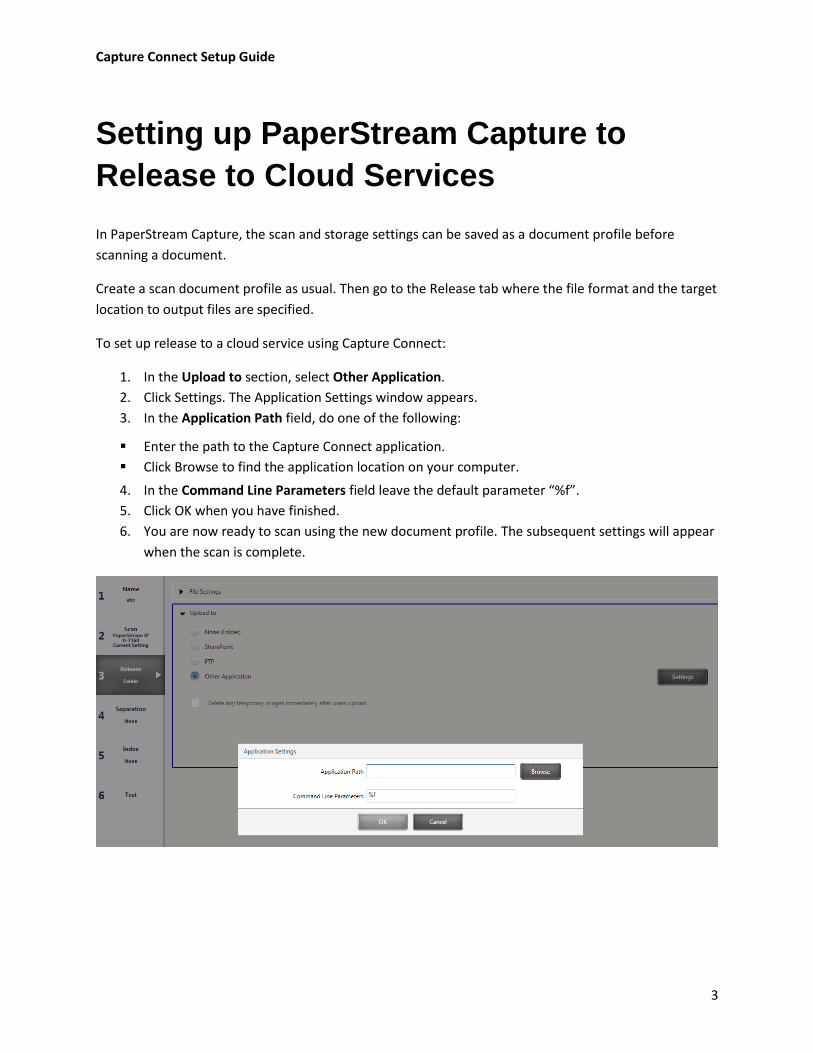
In PaperStream Capture, the scan and storage settings can be saved as a document profile before
scanning a document.
Create a scan document profile as usual. Then go to the Release tab where the file format and the target
location to output files are specified.
To set up release to a cloud service using Capture Connect:
1. In the Upload to section, select Other Application.
2. Click Settings. The Application Settings window appears.
3. In the Application Path field, do one of the following:
Enter the path to the Capture Connect application.
Click Browse to find the application location on your computer.
4. In the Command Line Parameters field leave the default parameter “%f”.
5. Click OK when you have finished.
6. You are now ready to scan using the new document profile. The subsequent settings will appear
when the scan is complete.
Capture Connect Setup Guide
4
Selecting a Cloud Service
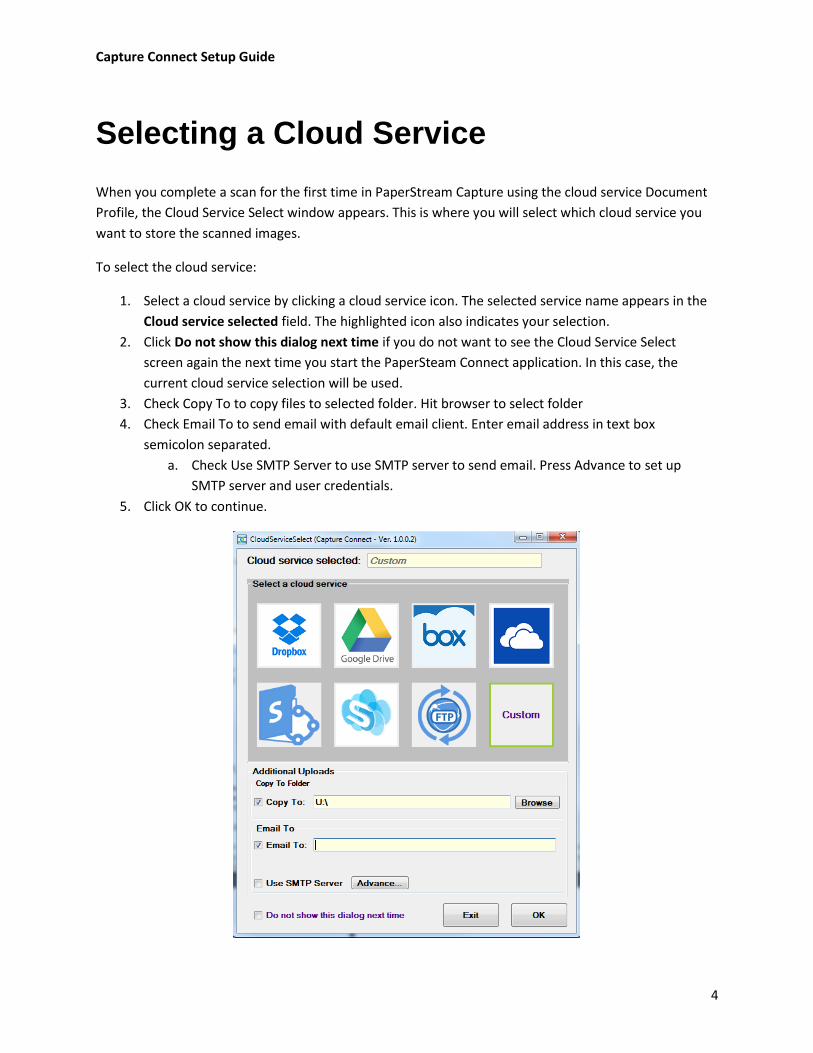
When you complete a scan for the first time in PaperStream Capture using the cloud service Document
Profile, the Cloud Service Select window appears. This is where you will select which cloud service you
want to store the scanned images.
To select the cloud service:
1. Select a cloud service by clicking a cloud service icon. The selected service name appears in the
Cloud service selected field. The highlighted icon also indicates your selection.
2. Click Do not show this dialog next time if you do not want to see the Cloud Service Select
screen again the next time you start the PaperSteam Connect application. In this case, the
current cloud service selection will be used.
3. Check Copy To to copy files to selected folder. Hit browser to select folder
4. Check Email To to send email with default email client. Enter email address in text box
semicolon separated.
a. Check Use SMTP Server to use SMTP server to send email. Press Advance to set up
SMTP server and user credentials.
5. Click OK to continue.
Capture Connect Setup Guide
5
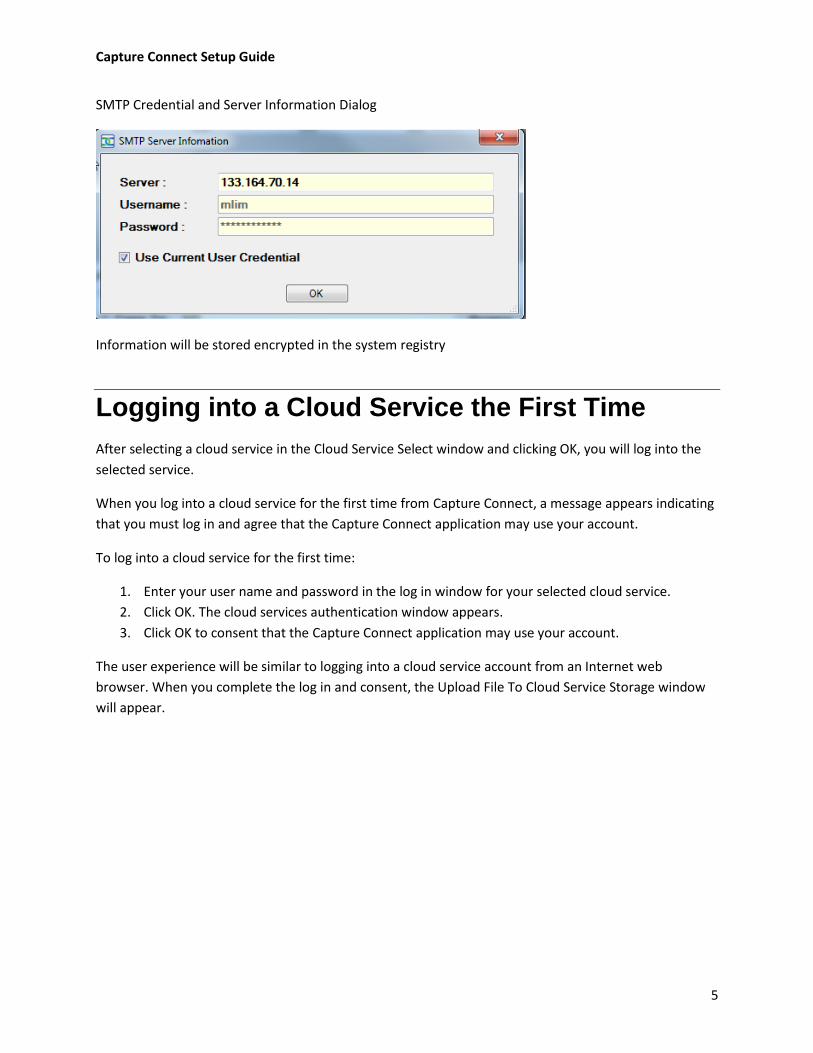
SMTP Credential and Server Information Dialog
Information will be stored encrypted in the system registry
Logging into a Cloud Service the First Time
After selecting a cloud service in the Cloud Service Select window and clicking OK, you will log into the
selected service.
When you log into a cloud service for the first time from Capture Connect, a message appears indicating
that you must log in and agree that the Capture Connect application may use your account.
To log into a cloud service for the first time:
1. Enter your user name and password in the log in window for your selected cloud service.
2. Click OK. The cloud services authentication window appears.
3. Click OK to consent that the Capture Connect application may use your account.
The user experience will be similar to logging into a cloud service account from an Internet web
browser. When you complete the log in and consent, the Upload File To Cloud Service Storage window
will appear.
Capture Connect Setup Guide
6
Cloud Service User Log in Window and Consent Messages
In this section, you can view the log in window and message indicators for the following cloud services:
DropBox, OneDrive, Google Drive, and Box.
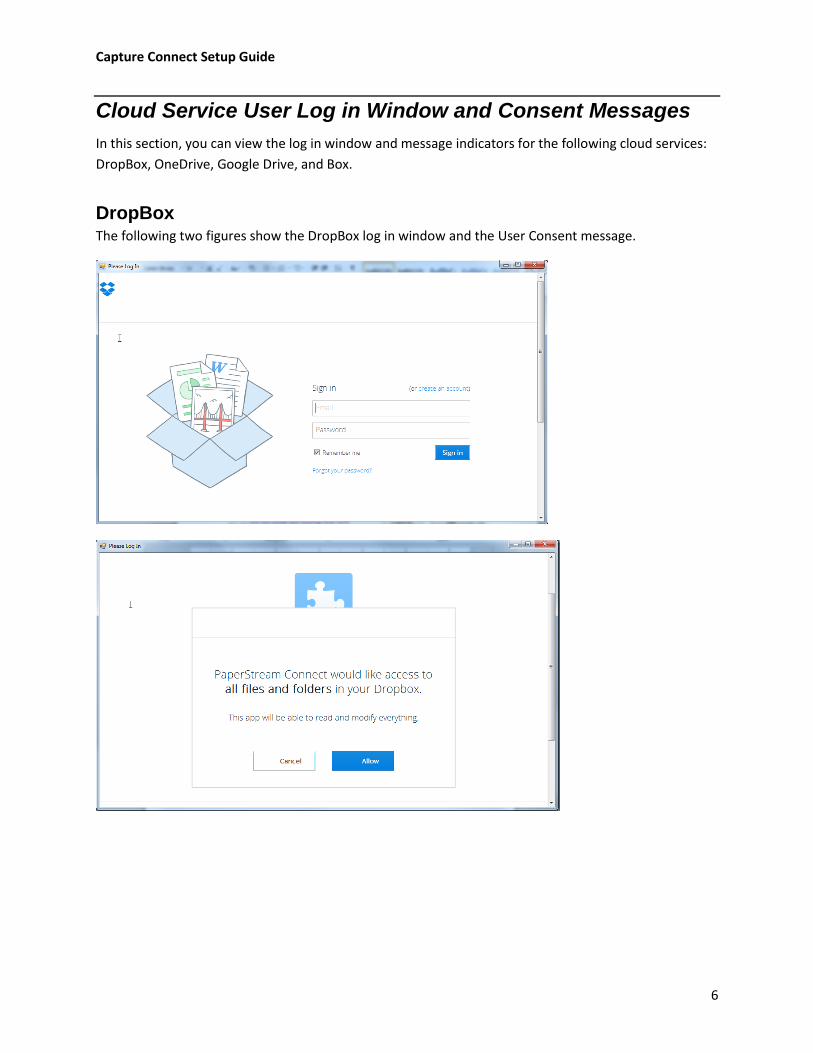
DropBox The following two figures show the DropBox log in window and the User Consent message.
Capture Connect Setup Guide
7
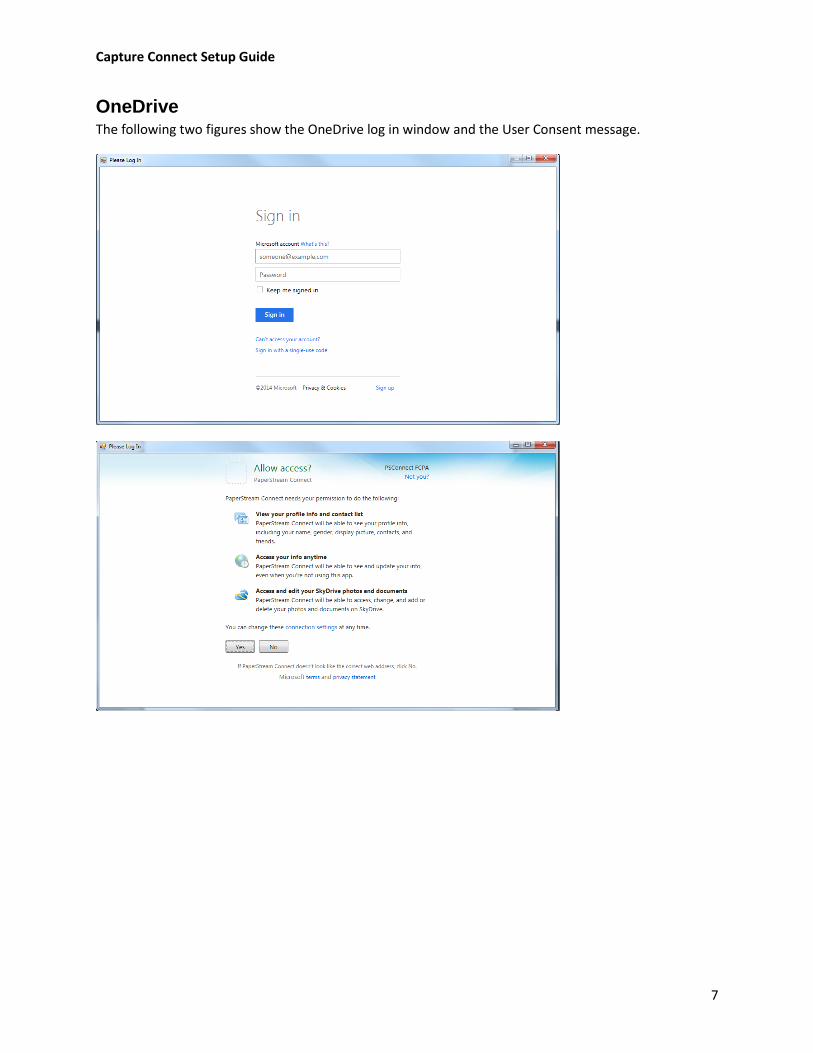
OneDrive The following two figures show the OneDrive log in window and the User Consent message.
Capture Connect Setup Guide
8
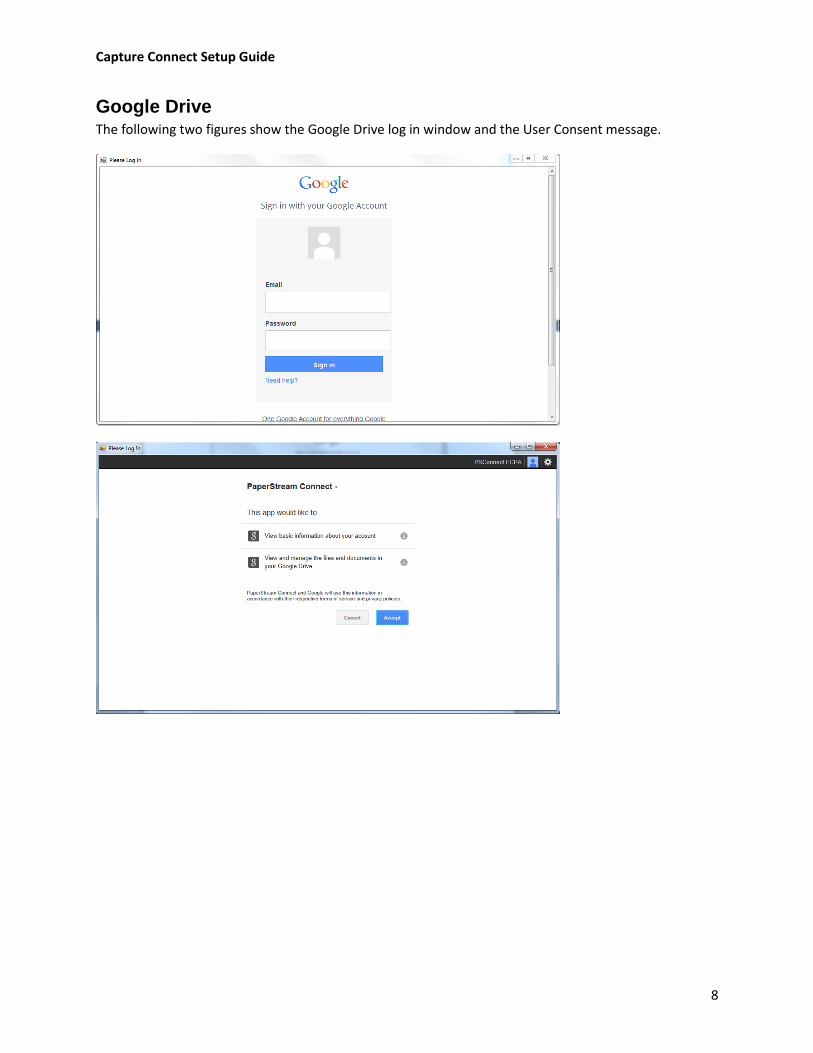
Google Drive The following two figures show the Google Drive log in window and the User Consent message.

Capture Connect Setup Guide
9
Box The following two figures show the Box log in window and the User Consent message.
Capture Connect Setup Guide
10
SharePoint, FTP, Scan2Cloud Service User Log in Window
In this section, you can view the log in window and message indicators for the following services:
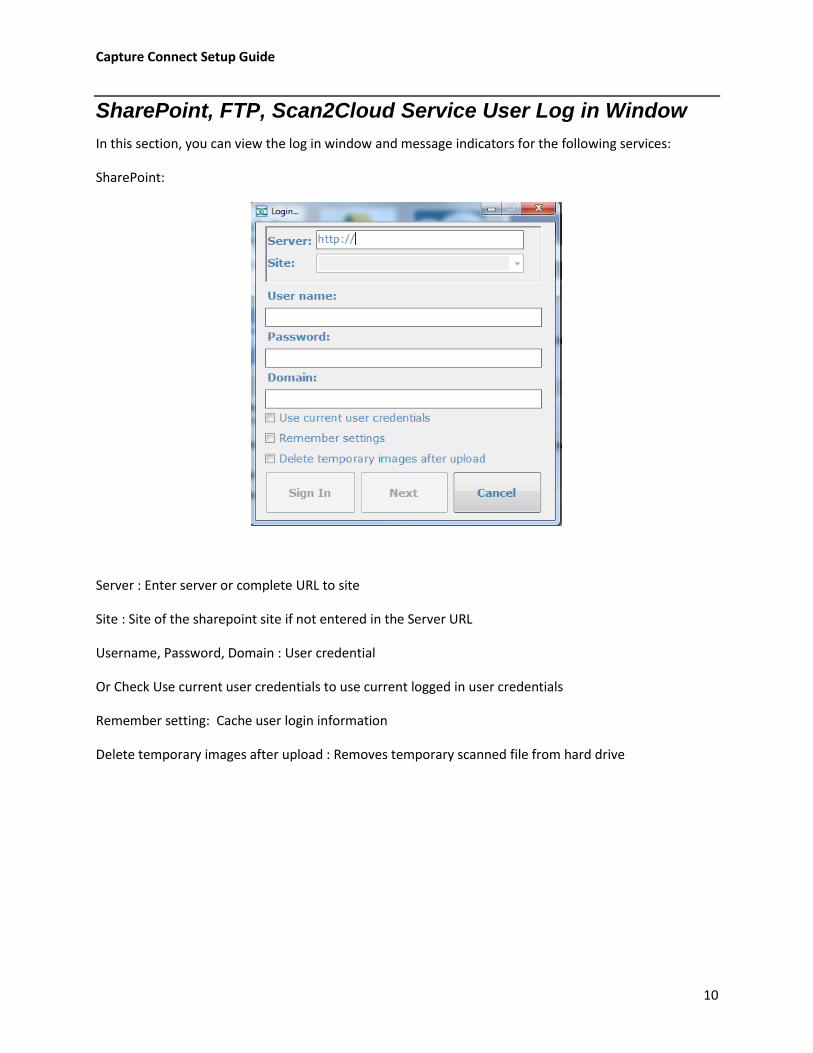
SharePoint:
Server : Enter server or complete URL to site
Site : Site of the sharepoint site if not entered in the Server URL
Username, Password, Domain : User credential
Or Check Use current user credentials to use current logged in user credentials
Remember setting: Cache user login information
Delete temporary images after upload : Removes temporary scanned file from hard drive
Capture Connect Setup Guide
11
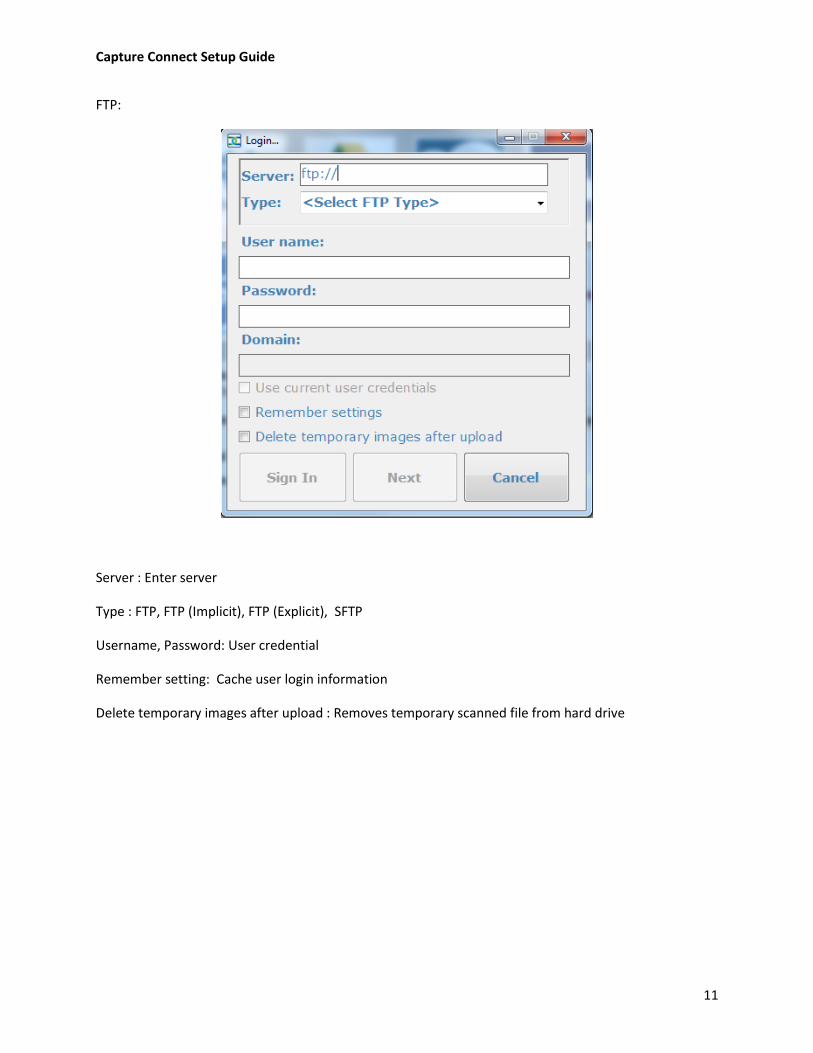
FTP:
Server : Enter server
Type : FTP, FTP (Implicit), FTP (Explicit), SFTP
Username, Password: User credential
Remember setting: Cache user login information
Delete temporary images after upload : Removes temporary scanned file from hard drive
Capture Connect Setup Guide
12
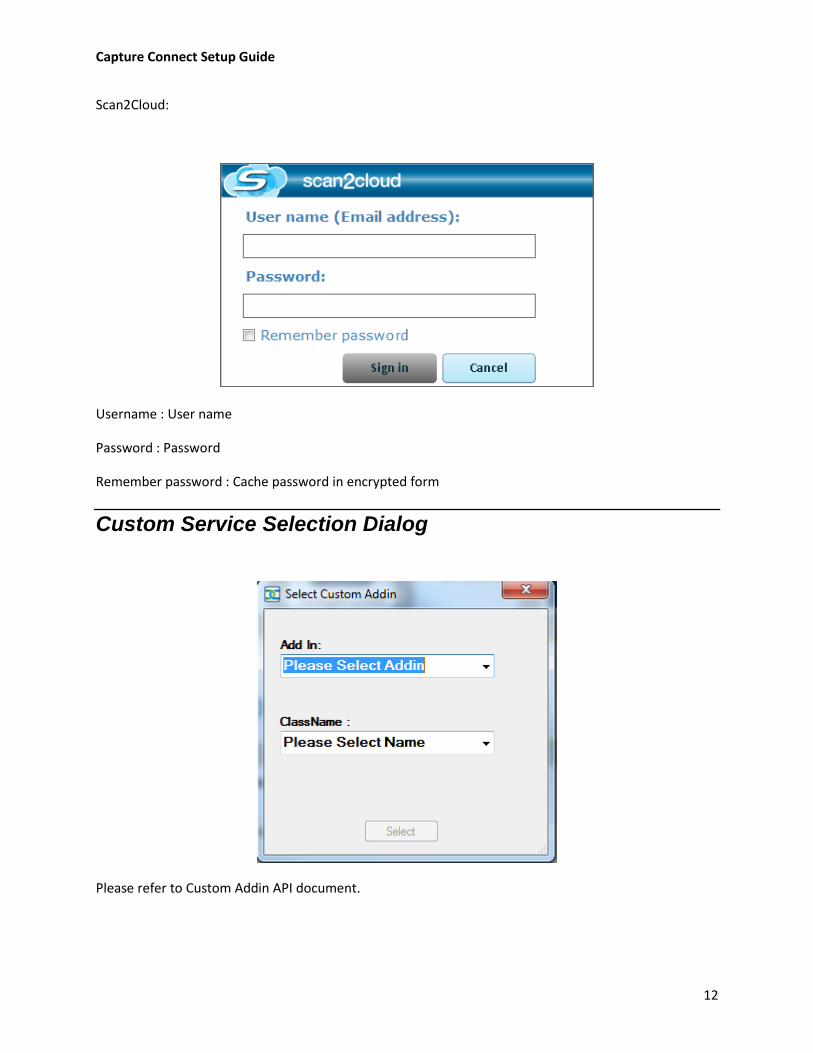
Scan2Cloud:
Username : User name
Password : Password
Remember password : Cache password in encrypted form
Custom Service Selection Dialog
Please refer to Custom Addin API document.

Capture Connect Setup Guide
13
Indexing fields entries for Sharepoint and Scan2Cloud:
Sharepoint:
Enter fields prompted. Required fields are indicated
Scan2Cloud:

Capture Connect Setup Guide
14
Enter all prompted fields Setting Up the Upload Files to
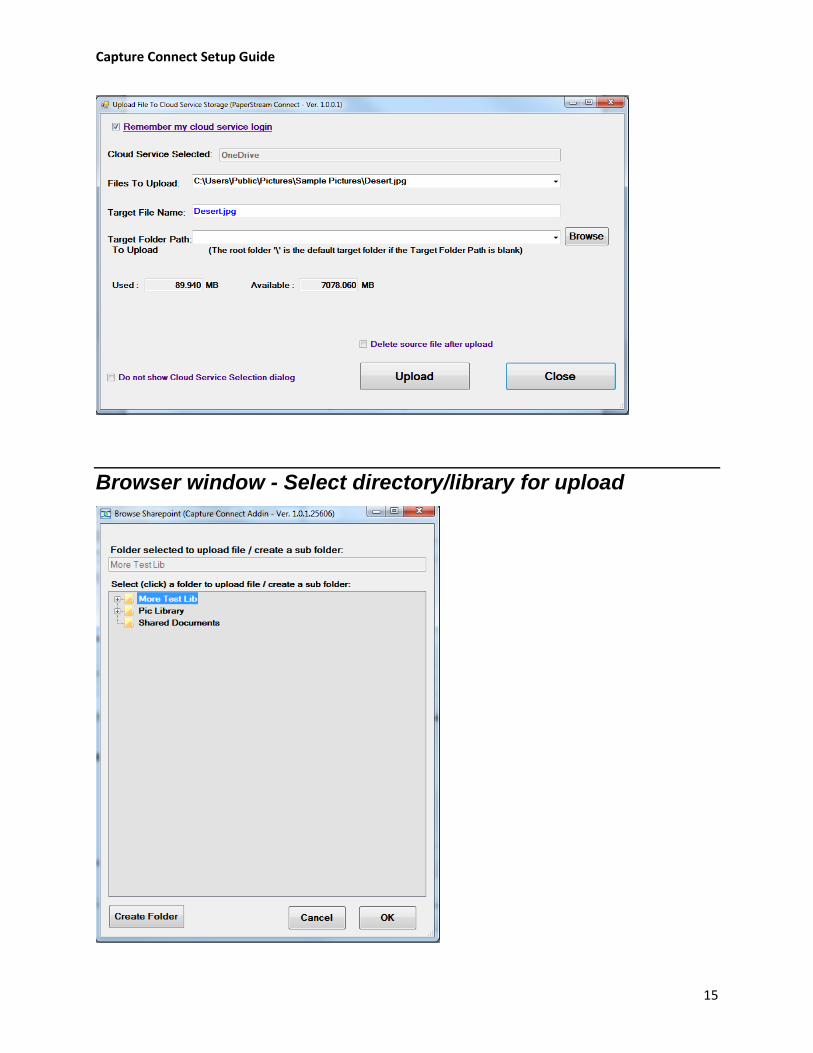
Cloud Services Window
The Upload File to Cloud Service Storage window appears after the log in and consent process is
complete.
To setup the Upload Files to Cloud Services:
1. Fill in the fields as required for your selected cloud service using the information in the table
below as your guideline.
2. When you have finished, click Upload. The File Upload status window appears and provides you
with the progress of the file upload.
3. Select Keep the Cloud Service and Target Folder for Next Upload unless specified checkbox if
you want the application to remember the cloud service details for the next upload.
4. When the upload is finished, a success message appears.
5. Click OK to close the window.
Field Description
Remember my cloud service login Selecting this option indicates that Capture Connect will remember your log in and consent, and automatically log you into the cloud service.
Cloud Service Selected This field is stationary and uses the cloud service you selected in the Cloud Service Select window.
Files to Upload This field is stationary and uses the file images that were scanned.
Target File Name The file names will be the same as the file names of the scanned images.
Target Folder Path Enter a target upload folder path on the cloud service or click Browse to select it from the cloud service folder structure. If no directory is selected or Target Folder Path to Upload is left blank, the files will upload to the root folder of the cloud storage.
Browse Click to browse the folder structure within the cloud service and select upload folder where you want to store your files. (See instruction below)
Delete Source File After Upload Select to delete the uploaded file from your computer hard drive.
Do not show Cloud Service Selection dialog
Select to toggle enable or disable of the Cloud Service Selection window.
Upload Click to upload the file. If the file name already exists in cloud storage, a message window will appear.
Close Closes the window.
Capture Connect Setup Guide
15
Browser window - Select directory/library for upload
Capture Connect Setup Guide
16
Logging into a Cloud Service after the First Time
After logging into a cloud service for the first time, the user will bypass the login window and consent
messages. The PaperSteam Connect application encrypts the refresh to speed up the log in process.
Capture Connect Setup Guide
17
PaperStream Capture Release Script
Configuration
To bypass the dialog windows aforementioned in this guide, you can set up a release script in
PaperStream Capture. This section includes instructions to set up the command line parameters.
How to Set Up Command Line Parameters
In PaperStream Capture, the scan and storage settings can be saved as a document profile before
scanning a document.
Create a scan document profile as usual. The file format and the target location to output files are
specified in the Release tab.
To set up release to cloud service using Capture Connect command line parameters:
1. In the Upload to section, select Other Application.
2. Click Settings. The Application Settings window appears.
3. In the Application Path field, do one of the following:
Enter the path to the Capture Connect application.
Click Browse to find the application location.
4. In the Command Line Parameters field, leave the default parameter “%f” and then enter the
variable for the selected cloud service and the target folder path as follows.
For example, the command line for Google Drive may look similar to this:
%f /g FP=/Documents/images/project1.
Cloud selection parameters
/d = DropBox
/g = Google Drive
/b = Box
/s = OneDrive
/sp = Sharepoint
/sc = Scan2Cloud
/f = FTP
/c = Custom (Please refer to Custom Addin API document)
Capture Connect Setup Guide
18
For /c option the following parameter must be specified
TN=Namespace.Classname
Target Folder path:
o FP=<Path>
Convenient options
Remember current login
o RM=Y/N
Delete temporary scanned file
o DF=Y/N
Additional Upload parameters
Copy to Folder
User must have permission to the folder
o CP=<Path>
Email To
There must be a default email client in the system or SMTP information setup for this
feature to work
o EM=<Email address List>
o ET=EMAIL/SMTP
SMTP option will only work if credential and server information entered
from SMTP Credential and Server Information dialog.
EMAIL option will only work if there is a default email client setup
One-click upload
o QT=Y/N
5. Click OK when you have finished.
Capture Connect Setup Guide
19
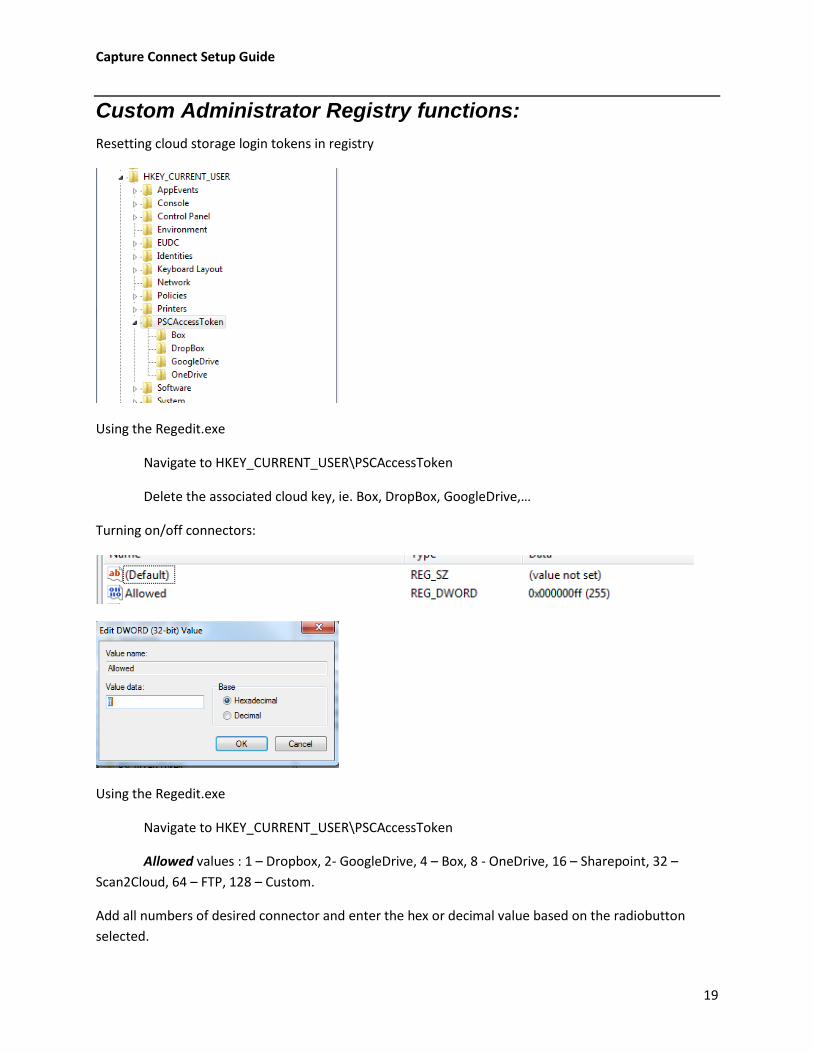
Custom Administrator Registry functions:
Resetting cloud storage login tokens in registry
Using the Regedit.exe
Navigate to HKEY_CURRENT_USER\PSCAccessToken
Delete the associated cloud key, ie. Box, DropBox, GoogleDrive,…
Turning on/off connectors:
Using the Regedit.exe
Navigate to HKEY_CURRENT_USER\PSCAccessToken
Allowed values : 1 – Dropbox, 2- GoogleDrive, 4 – Box, 8 - OneDrive, 16 – Sharepoint, 32 –
Scan2Cloud, 64 – FTP, 128 – Custom.
Add all numbers of desired connector and enter the hex or decimal value based on the radiobutton
selected.