Camera Arts - July/August 2981 - John Sextonjohnsexton.com/images/Camera-Arts_1982_Sexton.pdf ·...
11
Transcript of Camera Arts - July/August 2981 - John Sextonjohnsexton.com/images/Camera-Arts_1982_Sexton.pdf ·...


Camera Arts JULY I AUGUST 1982 VOLUME 2, NUMBER 4
DEPARTMENTS
Editor's Journal AND THE WINNER IS . . .
4 -Jim Hughes
Correspondence PATENTS AND PRESERVATIONS
7 Perspectives PHOTOGRAPHY IS NOT ART
8 A surrealist master considers the uneasy relation between photography and painting, between art and craft, and wonders when the human hand will catch up with the camera. -Man Ray
15 MAN TO MAN: A distinguished American poet recalls his several meetings with Man Ray. -Ron Padgett
Books THE STUFF OF HISTORY
16 Instantly, the present becomes the past. Neighborhood, a photographic record of contemporary East Baltimore, Maryland, underscores the characteristic power of the camera to memorialize the living subject. -Richard F. Snow
Technique GENESIS OF A FINE PRINT
66 The secrets of a fine print lie within the printer, not in chemicals or paper. Master printer John Sexton shares his techniques and philosophy in the darkroom through a step-by-step presentation of his craft. -John Sexton with Steve Pollock
End Paper EPILOGUE
1 0 2 -Robert Lowell
Photograph by Henri Cartier-Bresson Page 56
PHOTOGRAPHS
Philip Alan Rosenberg ASLEEP IN THE DEEP
26 Underwater photographs of the Japanese fleet sunk by American airpower in the lagoon at Truk. -Philip Alan Rosenberg
George W. Gardner AMERICA ILLUSTRATED
34 Middle America, seen through the eye of an itinerant chronicler of the American scene. -Jim Hughes
Dr. Erich Salomon KING OF THE INDISCREET
46 A selection of revealing shots of the diplomatic upper crust taken unawares, between the world wars, by the man for whom the term "candid camera" was coined. -Peter Hunter
John Sexton ISOLATIONS
56 A portfolio of black-and-white landscapes which concentrate on elements in a vista, and interpret them in glowing prints that define the state of the art. -Robert Baker
Todd Walker THE PRINTED DESERT
7 4 Photolithographic color images of the Arizona desert created specifically for Camera Arts by the artist from blackand-white negatives. -William Johnson
SERVICES
80 NOTES ON THE PHOTOGRAPHS
82 NEW & NOTEWORTHY
86 TOOLS OF THE ART
98 PHOTOGRAPHIC EXHIBITIONS
CAMERA ART S (ISSN-0271-1583) published monthly by Ziff-Davis Publishing Company, One Park Avenue, New York, New York 10016. Richard P Friese, President, Selwyn Taubman, Treasurer, Bertram A. Abrams, Secretary. One-year subscription in U.S. and Possessions, $18; Canada, 521; all other countries, 523, cash order only, payable in U.S. currency. POSTMASTER: Send address changes to Camera Arts, PO. Box2783, Boulder, Colorado80302. Second-class postage paid at New York, New York, and at additional offices.
COPYRIGHT c 1982 BY ZIFF-DAVIS PUBLISHING COMPANY. ALL RIGHTS RESERVED.
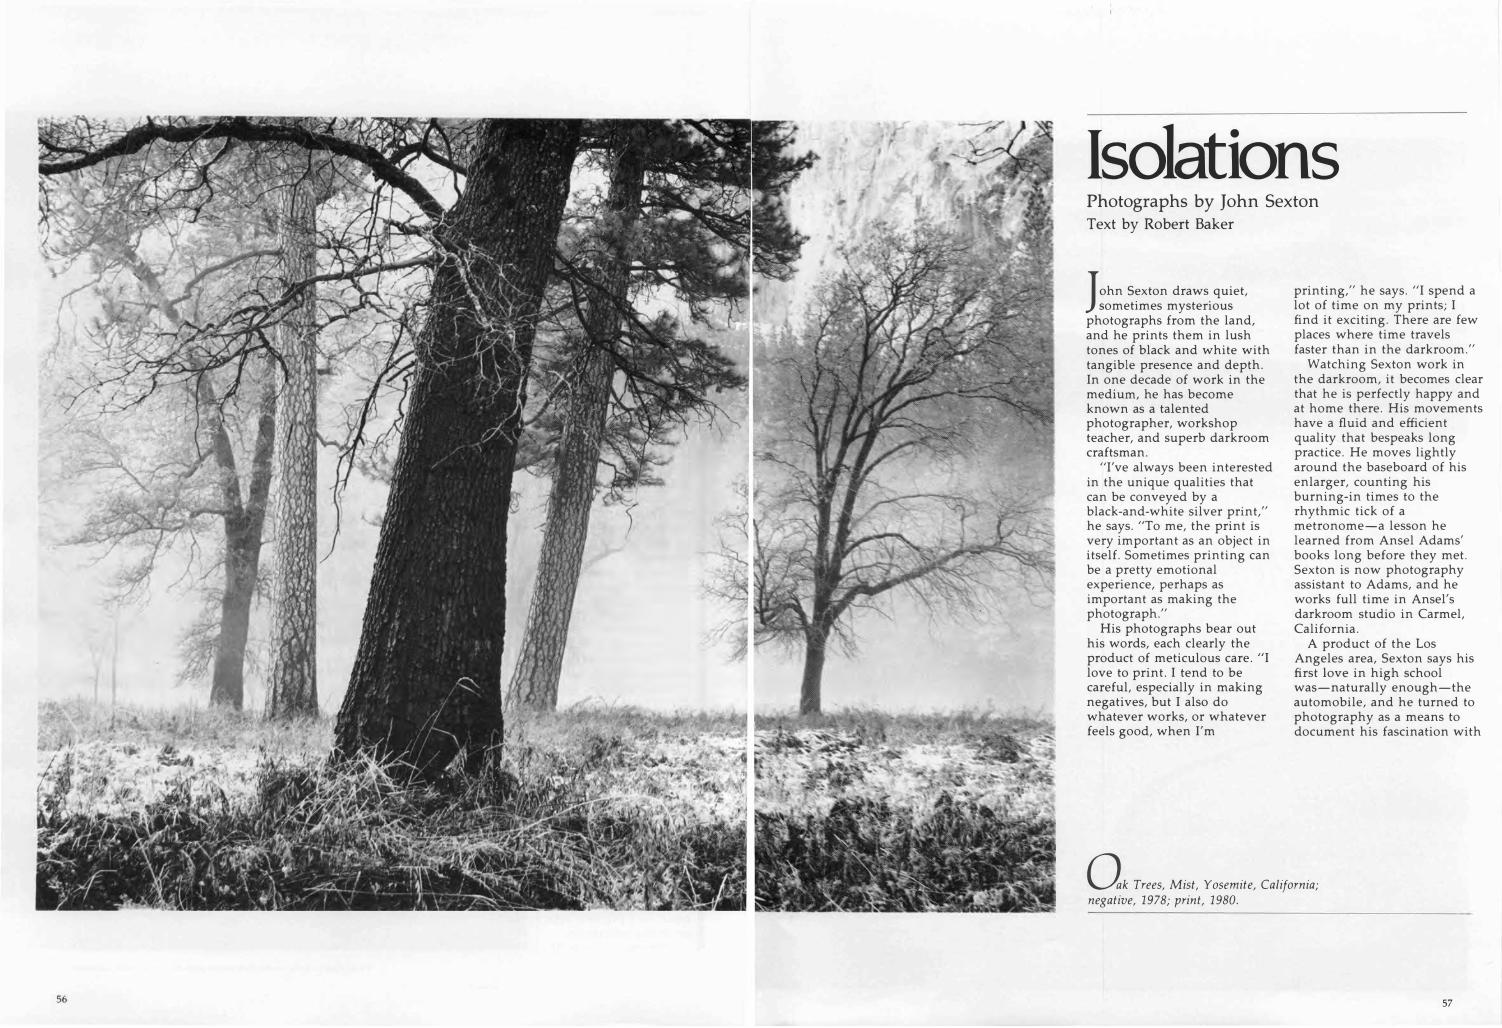
Isolations Photographs by John Sexton Text by Robert Baker
John S�xton draws. quiet,
sometimes mystenous photographs from the land, and he prints them in lush tones of black and white with tangible presence and depth. In one decade of work in the medium, he has become known as a talented photographer, workshop teacher, and superb darkroom craftsman.
"I've always been interested in the unique qualities that can be conveyed by a black-and-white silver print," he says. "To me, the print is very important as an object in itself. Sometimes printing can be a pretty emotional experience, perhaps as important as making the photograph."
His photographs bear out his words, each clearly the product of meticulous care. "I love to print. I tend to be careful, especially in making negatives, but I also do whatever works, or whatever feels good, when I'm
printing," he says. "I spend a lot of time on my prints; I find it exciting. There are few places where time travels faster than in the darkroom."
Watching Sexton work in the darkroom, it becomes clear that he is perfectly happy and at home there. His movements have a fluid and efficient quality that bespeaks long practice. He moves lightly around the baseboard of his enlarger, counting his burning-in times to the rhythmic tick of a metronome-a lesson he learned from Ansel Adams' books long before they met. Sexton is now photography assistant to Adams, and he works full time in Ansel's darkroom studio in Carmel, California.
A product of the Los Angeles area, Sexton says his first love in high school was-naturally enough-the automobile, and he turned to ·photography as a means to document his fascination with
Qk Trees, Mist, Yosemite, California; negative, 1978; print, 1980.
57

racing cars. He pursued photography in college, but for his first few years, he cast a somewhat suspicious eye on all art and artists. His ambition then was to be a hard-boiled industrial photographer doing executive portraits one day and recording corporate landscapes from the firm's helicopter the next.
John Sexton's idea of what photography can be changed drastically after he attended Ansel Adams' Yosemite Workshop in 1973: "For the first time, I saw people who didn't put down their cameras at 5 o'clock and go home." When Sexton went home, one of the first things he did was to quit his job as a wedding photographer. He was later offered a scholarship to attend Chapman College in California as a photography major, and began devouring art courses he had previously shunned.
A few of his photographs from these early years have survived among his personal favorites. But where many of his early photographs portray the beauty of the landscape, his more recent work reflects complexity and ambiguity. One influence in this direction was Wynn Bullock-what Sexton calls "the quality of strangeness" in some of
Sunset, Panther Beach, Near Santa Cruz, California; negative, 1978;
print, 198 1 (opposite). Frost Covered Boulders, Yosemite National Park; negative, 1980; print, 198 1 (following page).
59


Bullock's work, particularly the ghostly images of water in motion. He also credits Paul Caponigro as an influence on his seeing.
"The things that strike me, photographically, are often those that are eerie or strange: With some of my forest photographs, for example-! don't know how long people would want to wander in that forest. And I'm not sure I want it to be completely comfortable for them.
Of Sunset, Panther Beach, one of the more mysterious and evocative of his images, the photographer says, "It has some universal quality; it's not just about that one person in the ocean. I have another negative I made there without the man in it; I guess at one time I would have printed that one. But I selected the one with the figure in it because it has that eerie quality."
Cows is another mysterious image. Sexton likes the "unreality" of it, but there is another element that appeals to him: "I consider it humorous. We photographers sometimes take ourselves a little too seriously." No one ever accused Sexton of lack of humor; he is well known in the Carmel area for his impish impersonations of
wite Branch, Merced River, Yosemite Valley, California; negative, 1974; print, 198 1.
63

I
64
voice and mannerism. He once startled Ansel Adams out of his chair by addressing him from behind in the unmistakable voice of Brett Weston.
Sexton's photographs tend to speak softly. Seldom does he portray the landscape on a grand scale, and he notes that relatively few of his images even include sky or clouds. Instead, he approaches the large issues of life through details and isolated views. Isolation, in fact, is a word he considers more relevant to his work than the more usual notion of composition:
"What is left out of the photograph is probably at least as important as what is included. You can certainly change the effect of a photograph by leaving out a telephone pole, or a car, or a person. Photographs at best are all contrived to some extent, and you have to make a determination as to the information you are going to supply the viewer. I like the fact that I can partly manipulate what the viewer is going to feel or see."
Sexton's other great love is teaching workshops. He has taught at and directed Adams' Yosemite Workshop, and others-the Maine Photographic Workshop and several offerings of the
Friends of Photography in Carmel. With fellow photographers Ray McSavaney and Bruce Barnbaum, he directs the Owens Valley Photography Workshops in Agoura, California.
Sexton manages to be ebullient and serious about photography at the same time, and students clearly find this an appealing combination. At the Yosemite Workshop, he became known as someone who gave unstintingly of his time; print critiques and discussions in his class became a principal focus of activity into the small hours of the morning, night after night.
This energy and dedication are typical of John Sexton. "It's a lot of fun, and it's a lot of hard work. But above all, I enjoy photography," he declares. "I try to give a lot to photography because it has given me a lot."
John Sexton is represented by Susan Spiritus Gallery, Newport Beach, and Weston Gallery, Carmel, both in California, and Eloquent Light Gallery, Rochester, Michigan. Robert Baker is collaborating on a revision of Ansel Adams' Photography Series books; The Camera and The Negative are completed.
Cws, Reflections, Near Mariposa, California; negative, 1980; print, 198 1.
Please turn page for technical information.
65

TECHNIQUE
By John Sexton with Steve Pollock
The Genesis of a Fine Print To make a superb black-and-white print requires an artist's eye, a craftsman's hands, and much practice. Start here.
I have no secrets in my printing process. I've never met a good photographer who does. The secret for each of us lies within ourselves, not in some particu
lar type of chemistry or brand of paper. But there are some methods that make things easier.
The image of the Two Chairs was made during October, 1977, in a ghost town called Bodie, California. It's an old gold-mining town, which has been a state historic park for the last 20 years or so, preserved in a state of arrested decay. I was teaching a workshop, and we had come there for a day to photograph. I gave the students an assignment: to make a photograph within one building, to convey something about their feelings for Bodie. I decided to provide a good example and try a portrait myself. I selected one of the workshop members as a subject. He remained seated, and I left the empty chair next to him just where it was. I set up my 4x5 view camera and 210-mm lens for some test photographs on Polaroid Type 52 black-and-white film.
As I focused and composed the image on the groundglass, I began to have doubts that the picture would work as a portrait. After making several Polaroid prints, I tactfully asked this student to help me improve my photograph by removing himself from it.
After he left, I made another Polaroid. The print was overexposed, but I was quite pleased with the composition, so I made a second. Then I made an exposure on Tri-X Professional 4x5 film. At the time, I was using the thin-base film in 16-sheet packs, for convenience, lack of bulk, and ease of working in the field. Later, I discov-
66
ONE PRINT'S PROGRESS
Tri-X Professional 4x5 film-pack negative was slightly underexposed.
�'!red that the Tri-X negative had been underexposed; I suspect that I forgot to reset the light meter from my usual Polaroid rating of ASA 640 to my Tri-X exposure index of 200.
I don't use the Polaroid material as a light meter, as its speed seems to vary somewhat with the ambient temperature. Also, it's a positive material, so I place the highlight values where I want them and let the shadows fall as they may. (I can exert a little control over them by altering the developing time.) But when I work with a negative, I am very concerned about placing the shadow values and then controlling the highlight densities
Original Polaroid image, with workshop student in place.
Straight print on Oriental Seagull grade-No. 2 paper, developed in Dektol diluted 1:2, is much too soft.
Camera Arts
through development. So I always re-meter and frequently have to give quite a different exposure than I might to get an acceptable Polaroid print.
I find printing my negatives almost as exciting as making those negatives in the field, and spend a great deal of time working with them. The Two Chairs neg
ative is an important photograph for me, and a particularly difficult one to print. Because it is a lit�le on the thin side, the image needs to be printed on a high-contrast grade of paper, so any slight variation between two prints is going to be exaggerated. Also, I find that if the exposure or processing is off by ten or even five percent in any direction, the image just doesn't work.
Printing is not always a smooth experience. Every time I print a negative-even one that I have printed frequently-! try to explore it in a slightly different way. As Ansel Adams has often said, the negative is the equivalent of a composer's score, and the print is the performance. Just as with music, the same negative can be "performed" in a variety of ways by the same photographer, over a period of time.
Original Polaroid image with student removed.
Photography has a technical accuracy and realism that other visual media may not share. For me, it is very important to make prints with as high quality and careful craftsmanship as possible. That craft starts with proper exposure, development, handling, and storage of the negative; it continues through careful focusing, exposure, processing, drying, spotting, and mounting of the print.
There is no way to make a significant image out of a negative that has no significance. A perfect print won't help. However, the intensity of feeling in a worthwhile photograph can be enhanced by appropriate printing. Each photographer, I trust, prints his negatives in a unique way that goes along with what he's trying to say through photography.
I should mention that proper focusing of the negative is vital. First of all, I always insert a sheet of doubleweight paper in the easel, under the focusing magnifier. I wear glasses and find it difficult to focus accurately without the grain magnifier (which, as the name suggests, allows one to focus on the negative's grain, rather than having to depend on finding sharp image detail). The Omega Micromega is the best focuser that I've used-its optical quality is excellent, and it continues to operate off axis, clear to the edge of the frame.
I focus with the lens wide open, then close down by at least two stops to the working aperture. Then I recheck the focus, and adjust it if necessary. This technique is used to correct for focus shift as the lens aperture is changed. Fortunately, this is not a problem with my current EL-Nikkor enlarging lenses.
It is also important to prevent vibration during the enlarging exposure, because this can greatly impair print sharpness. A simple cause of vibration would be bumping the enlarging table, while subtler ones might be traced to a ventilation fan or to passing traffic.
When printing, I consider the paper underneath the enlarger, in the easel, as a negati.ve. Most people think of it as a positive, because that's what we see when we
Straight grade-No. 3 Seagull rendition still lacks sufficient contrast.
Grade-No. 4 print is too harsh. A rendition between No.3 and No. 4 seems to be indicated.
July I August 1982 67

TECHNIQUE
look at the print. But we have a negative in the enlarger, and we reverse the tones in that negative with another piece of negative material, which happens to be printing paper.
When making an exposure in the field, I am guided by an old and accurate adage, actually th"e basis for the Zone System: "Expose for the shadows, develop for the highlights." Exposure governs those areas that record the shadows, the areas of the film that do not receive much light and, therefore, have little density. Development gives flexibility and control in the highlights, the areas of the negative that have received a lot of light and have great density.
N ow we go into the darkroom with a negative that, hopefully, has been properly exposed and processed. We are going to create a positive from
it by exposing another piece of negative material, this time called printing paper. Once again, we have control of exposure and development. Here I think in terms of exposing for the light areas of the print, which don't receive much light from the enlarger and have little silver density. (They are analogous, in this respect, to the
THE MASTER PRINT
shadow areas of the negative.) Exposure determines those light areas, and then "development" controls the dark areas of the print, the shadows, which have lots of silver.
Those quotes around development include a number of factors. One is the amount of development-the longer you develop the print, the more contrast you get (theoretically). In practice, varying developing time doesn't give enough contrast control with most current developers and papers. Another variable is the type of developer used. Compared with the "standard" Dektol, some developer formulas give higher contrast. On the other hand, Selectol Soft is less contrasty than Dektol and can sometimes give beautiful results with a four-or five-minute developing time. Developing partially in Selectol Soft and partially in Dektol gives intermediate contrast.
Another part of "development" control is the selection of a paper grade. I always start with a soft paper and then move step by step into harder grades until I've achieved the appropriate contrast. If the negative in question looks as though it's going to require grade No.
Finished print on Seagull grade No. 4, slightly cropped, extensively burned-in and dodged, and developed in Selectol Soft and Dektol, in that order.
68 Camera Arts
2 or 3, I will alwars select the No. 2. It's hard to come back to a soft print once you've looked at an image on a more contrasty grade of paper. The reaction is "Oh, it just looks gray. I'll go with the contrastier image." However, if you start on a soft paper and slowly work up in contrast, it's usually much easier to recognize the appropriate contrast. Suddenly the print will start to glow, to have a feeling of light, and you will know that you're there.
Whenever I work with a negative, whether I've printed it before or not, I start by making a test strip. I don't jump right in, look at the negative, and decide that it looks like a ten-second image. I use a half sheet of paper for the test strip, which gives me plenty of exposure information. The key is to put the test strip in an area that contains both important light and dark values. This lets me determine exposure in the light areas and contrast in the darker areas. I find the exposure by looking at an important light area in which I want some detail, not a pure white wave or a reflection off a chrome car bumper. (For those who use the Zone System, I usually look for a Zone VII or VIII value.)
Then I look at an important dark area, in which I want some detail-about Zone III or IV. If the exposure is correct for the highlight value, and the dark area is too gray, then I know that I need more contrast. This can be accomplished by going up to the next grade of paper, giving longer development, or switching developers. If the shadow is too black, without sufficient detail, I lower the contrast, using one or more of these options.
When making a test strip, I want one end to be much too light and the other to be far too dark. If a strip is not too light on one end, how can you tell that a little lighter wouldn't be better? And the same with the other end-15 seconds may look great, but maybe 16 would be even more effective. I generally work in exposure increments of three seconds, which are large enough to see, but still create fairly subtle differences. If necessary, I do another "fine-tuning" strip at one-second intervals.
After doing the test strips, I make a full-frame straight print-no dodging, no burning-in, no messing around in any way. This is an extremely important print, although everyone has a tendency to skip it at least some of the time. It serves as a reference for all future steps. So, as with every print, I make notations on the back in soft pencil, detailing exposure, paper grade and type, and development. That way, if my printing veers in the wrong direction later, I can backtrack and find where I went wrong. (For the same reason, I label and retain test strips.)
When students are beginning to explore black-andwhite printing, they often share a common misconception. They believe that if you get a deep black and a pure white in a print, you have gotten a good print and can go on to the next negative. Because of this, students often print with too much contrast, in order to get those solid blacks and whites. They somehow overlook the subtleties, the shades of gray that make up the palette of black-and-white photography. They should realize that once you achieve a good black and a good white in a print, you have just begun to print the negative. It's printing that negative, playing those subtle silvery gray values, that makes for a fine print.
In fact, a good print does not need to have a pure black or a pure white. In some cases, a scale of grays may be just what an image needs. It's difficult to pull off such
July I August 1982
a print, but it can work exceedingly well. My first printing of the Two Chairs negative started
with a straight version on Oriental Seagull No. 2 paper. That was much too soft, so I made a straight print on No. 3, but it was still not contrasty enough. However, a straight No. 4 print was too harsh. So I decided to try for an intermediate grade of contrast by developing No. 4 paper in both Selectol Soft and Dektol developers, in that order. The soft-working Selectol gives very full development to the highlights and middle values, but (with short processing times) does not tend to give full development of the black areas. That's Dektol's job.
In this case, I developed the print for 1 minute, 45 seconds in Selectol Soft, diluted 1:1, at a temperature of 70° F. This was followed by two minutes in Dektol, diluted 1:2, naturally at the same temperature. Contrast is manipulated by varying the respective times in the two developers. I would never advise giving less than 30 seconds of development in Dektol when it is used as the second developer, because it takes about 20 seconds for the Dektol to displace the Selectol Soft in the paper. So when you transfer the carefully drained print to the Dektol, you have to wait at least that long before the shadow areas start to "move."
Next, I determined what burning and dodging was needed. By burning-in, I mean adding more light, to darken an area after the basic exposure. Dodging involves using an opaque object to cast a shadow, to lessen the amount of light strikfng an area during an exposure. A dodged area is rendered lighter than it would be if printed "straight." I always think of dodging and burning in terms of percentage of the basic exposure. That way, even if different prints need very different exposure times, I still have a good idea of what a ten-percent burn or a five-percent dodge would mean.
I find it helpful to put a straight print, on the right grade of paper, on my viewing board. Then I put a small strip of the same type of paper on the easel and give it the basic exposure plus appropriate burning and dodging. Once again, I make notes on the back. After making several experiments in various areas of the image and with different manipulation times, I process all the strips. Then I overlay them, sort of like a jigsaw puzzle, onto the straight print. When the entire "puzzle" looks right, I simply peel off the strips and look on the back for burning and dodging information. On the final print, I make a kind of map to show where and how much manipulation is needed. 0 ne of the keys to successful dodging and burn
ing is always to overlap the area that you are manipulating. This allows for a transition or
blending that disguises the area so that it isn't obvious to the viewer. If you're going to dodge a dark area next to a large highlight, it is important for the soft shadow of the. dodging tool to overlap that area and for it to move up and down to create this blend.
When burning-in the sky above a building or mountain range, start burning-in below the area that you want to darken, then move up gradually. Thus, the edge of the mountain gets a little darker, and the sky remains a little lighter right next to the building than it is further up. If you do this smoothly, the effect looks quite natural.
Many people use their hands to burn and dodge. I usually can't manipulate my hands consistently enough under the enlarger, so I use a two-card burning-in sys-
69

TECHNIQUE
tern. These cards are white on the top, for easy viewing of the image, and black on the bottom to prevent reflection. One card has a hole in it, and the other is solid, so that it acts as a "shutter" to start and stop the burning-in of a particular area. I can create different shapes by playing with the two cards together or by combining them with my hands in various operations.
I can't think of many negatives that I print without some degree of dodging and burning, even if it's only edge burning. The latter is often necessary because many enlargers, both condenser and cold-light types, tend to fall off in light output near the edges of the frame, especially with 4x5 negatives.
The edge burning can be done in two ways. One is to take the card and burn in each edge separately. This way, each edge gets a certain percentage of exposure, but each corner gets twice that, because it is part of two adjacent edges. Another technique is to use a dodging tool, close under the enlarging lens, to burn all four edges at once. Move the tool up and down, continually, to create a very soft edge. One of the cardboard sheets is used as a shutter to start and end the process. Edge burning, like all other relevant data, is recorded on the back of the print.
Once I've g�tten close to a final exposure, some of the excess water must be eliminated from the surface of the print. This compensates for "dry down," the tendency of a print that looks luminous and glowing while wet to get rather dull once dry. There are two reasons for this change: The surface gloss of water tends to give blacks an increased richness, and water-caused swelling of gelatin causes silver grains in light areas to separate and allows more light to be reflected back from the white paper base. Both of these contrast-enhancing effects disappear when the print dries.
F irst, place the print on a flat board and squeegee it to remove surface water. I keep this area illuminated by a 75-watt reflector-flood bulb, positioned
at a rather steep angle to minimize reflections. To get a very quick and complete drying, I often place test prints only in a microwave oven. This causes prints to wrinkle slightly and may alter their chemical structure, so I never dry final prints in this way. As an alternative, I place the print in a dry-mount press, between pieces of four-ply rag mounting board that have been reserved specifically for the purpose.
After the print has been developed, it is stopped in an acetic-acid bath. Next comes a three-minute first fixing bath using Kodak's F-6 formula, but with half the recommended potassium alum hardener. (I mix the fixer fresh for each printing session and monitor it carefully throughout.) The print is agitated constantly in all of these solutions. Next, it is thoroughly rinsed in running water to remove excess fixer and placed in a large tray of running water to await further treatment.
Once all of the prints from a day's work are accumulated, I clear out the main darkroom sink, rinse out all the trays thoroughly with hot water, and set up the following trays: plain hypo fixer (two pounds of sodium thiosulfate plus l/4 pound of sodium sulfite per gallon of water); Kodak Rapid Selenium Toner, diluted 1:20 with working-strength Kodak Hypo Clearing Agent (my standard dilution for Seagull paper); plain workingstrength Hypo Clearing Agent; and a holding bath of running water. Prints are fixed for three minutes in the plain hypo bath with continuous agitation, then transferred directly into the toner without rinsing. They are
70
DARKROOM: THE DRY SIDE
• Sexton stores negatives in frosted polyester sleeves, similar in composition to film base. Matte surface prevents "ferrotype" effect. Sleeves prevent abrasion and are kept in Light Impressions archival paper envelopes.
Negative receives careful and thorough dusting with a came/'s-hair brush. Negative is held at an angle so the dust will fall off.
enlarger. Carrier has been filed out to include the entire image area and a slight surround.
Author focuses on grain with Omega Micromega magnifier, resting on a sheet of double-weight enlarging paper. EL Nikkor enlarging lens is then stopped down and rechecked for focus.
Camera Arts
Cardboard circle on end of old bicycle spoke is kept in constant motion during dodging of print area, to create natural-looking transition. Positioned close to lens, it can be used to burn-in all four edges of the print.
July I August 1982
Two cardboard sheets are used for burning-in. One has small hole in the center, other is solid, acts as a shutter. Both are white on top for visibility, black on bottom to prevent reflection.
Sexton keeps detailed records of print exposure, burning and dodging, paper grade, developing time, temperature, and chemicals. Errors can be traced, results repeated.
71

TECHNIQUE
DARKROOM: THE WET SIDE
Trays are set up for developer (two baths), acetic-acid short stop, first fixer (Kodak F-6 formula with half the recommended hardener), running-water rinse, holding oath. When printing is completed, trays are washed, filled with second fixer, toner, washing aid, and water rinse .
• Test strip, on Seagull No. 3 paper, is made in three-second steps, ranging from much too light to far too dark. Author uses half sheet of paper, includes highlight areas (to determine exposure) and shadows (to check contrast).
72
Straight print on No. 3 paper is pulled from the rinse for evaluation. It will be placed on viewing board, lighted by a 75-watt reflector lamp to give even, standard illumination. When wet, shadows and highlights are accentuated.
Prints with varying contrast, exposure, burning & dodging times are compared directly.
Dodged and burned-in strips are placed over print in a "jigsaw" pattern. Once image looks right, they are peeled off to reveal exposure data on back.
Before exposure, Sexton labels print with exposure, development, and paper type. Diagram shows burning (plus) and dodging (minus) areas and times.
Prints are loaded into a Zone VI archival washer, where they will be washed for about 1112 hours in running water at 70 ° F. They have already been rinsed, toned, and treated in two washing aids, then rinsed again.
Camera Arts
Microwave oven is convenient way to quick-dry test prints, but may cause chemical changes in paper, so it should not be used for final prints.
Optional method of drying test prints quickly is between pieces of mounting board (reserved for the purpose), heated in a Seal dry-mount press. Only test prints are dried this way.
Final prints are air-dried on fiberglass screens, in homemade rack. Drying times vary depending on ambient temperature and humidity. Only archivally washed prints are dried here.
• After mounting prints (using museum board, Seal color-mounting tissue and press), author spots them with Spotone dyes and a small, almost dry brush.
July/August 1982
toned until they look right (turning slightly "cool" from an untoned image's color, which takes about three minutes for the Two Chairs picture), and treated for three minutes in washing aid, with continuous agitation.
After the two washing aids, I rinse the prints several times in running water to remove some of the hypo and hypo-clearing agent. I generally wash prints for about 1112 hours at a temperature of 70° F, in a Zone VI brand archival washer. (Zone VI is also the source of the coldlight head mounted on my Beseler enlarger.) I would not recommend washing below 65° F, even after using washing aid. Finally, the prints are squeegeed and placed face-down in a fiberglass-screen dryer.
While we're waiting for the prints to dry, a small digression about negative storage: I keep my sheet-film negatives in frosted polyester sleeves, which are then placed in Light Impressions archival envelopes. Because the polyester is chemically similar to the film base, it should be archivally safe. It also protects the film against physical wear and tear from the paper envelope.
W hen the prints are dry, I am ready to mount one, using Seal color-mounting tissue and dry-mount press. This tissue works well with
fiber-base black-and-white paper and can be used at a comparatively low temperature. (Some photographers do not mount prints for fear of heat damage and possible print contamination by the mounting tissue. However, Ansel Adams has been mounting his prints for many years without apparent ill effects.) I tack the print to its four-ply Lenox museum mount board, then thoroughly dust and clean the print, the mount, and the cover sheet. Then I sandwich this ensemble between two other pieces of museum board and insert it into the press. The print is pressed for three minutes, then removed, inspected for damage, and stacked for cooling.
I prefer to spot prints after they have been drymounted. It often takes me a considerable time to do a good spotting job; if a piece of foreign material in the dry-mounting setup were to ruin the print, all this work would be wasted. I work with a fairly dry brush and Spotone dyes, diluted with distilled water. White gloves prevent skin oil from damaging the prints.
If I were to give just one tip for improving print quality, it would be to simplify. Take one printing paper and find out what it can do-not on a weekend, nor in a week, nor even a month. Work with that paper, explore its palette; when you find its deficiencies, you'll have a much better idea of what sort of paper might produce the results that you want. In addition to Oriental Seagull paper (used for the Two Chairs image), I often use Ilford Galerie and Zone VI Brilliant. Each paper is different in tone, contrast, and surface, which lets me fit a particular image to the right paper.
Strive for consistency in printing, and try to eliminate unnecessary variables. If you spend a lot of time looking at original prints, not reproductions, you will take away useful pieces of different techniques.
Printing is not easy, but it can be very rewarding if you stay with it. Last year, I was working with Ansel Adams, who on one particular day was printing a negative that he had made in the early 1930s. He had spent the whole morning fighting this negative, going back and forth between the darkroom and the microwave dryer, not getting it quite right. A short time later, there was Ansel, with an ear-to-ear grin, holding the print: "I finally got it. This is the way I wanted this picture to look when I made the photograph, 50 years ago." �
73