Cambridge HMIS ETO Guide - WordPress.com · Homeless Management Information System (HMIS) is a...
16
Cambridge HMIS ETO Guide cambridgehmis.etosoftware.com T ABLE OF CONTENTS S ECTION P AGE Introduction 2 Enrolling Participants/Families 2 - 4 Adding New Participants/Families 4 - 5 Quick Search 5 - 7 HUD Requirements Demographics 7 Bed Register (for Emergency Shelters) 7 - 9 HUD Assessments 9 - 12 Recording Services 12 Dismissals 13 Dashboards 14 To Do List 14 -15 Contact 16
Transcript of Cambridge HMIS ETO Guide - WordPress.com · Homeless Management Information System (HMIS) is a...
Cambridge HMIS ETO Guide
cambridgehmis.etosoftware.com
TABLE OF CONTENTS
SECTION PAGE Introduction 2 Enrolling Participants/Families 2 - 4 Adding New Participants/Families 4 - 5 Quick Search 5 - 7 HUD Requirements Demographics 7
Bed Register (for Emergency Shelters) 7 - 9 HUD Assessments 9 - 12 Recording Services 12 Dismissals 13 Dashboards 14 To Do List 14 -15 Contact 16
2
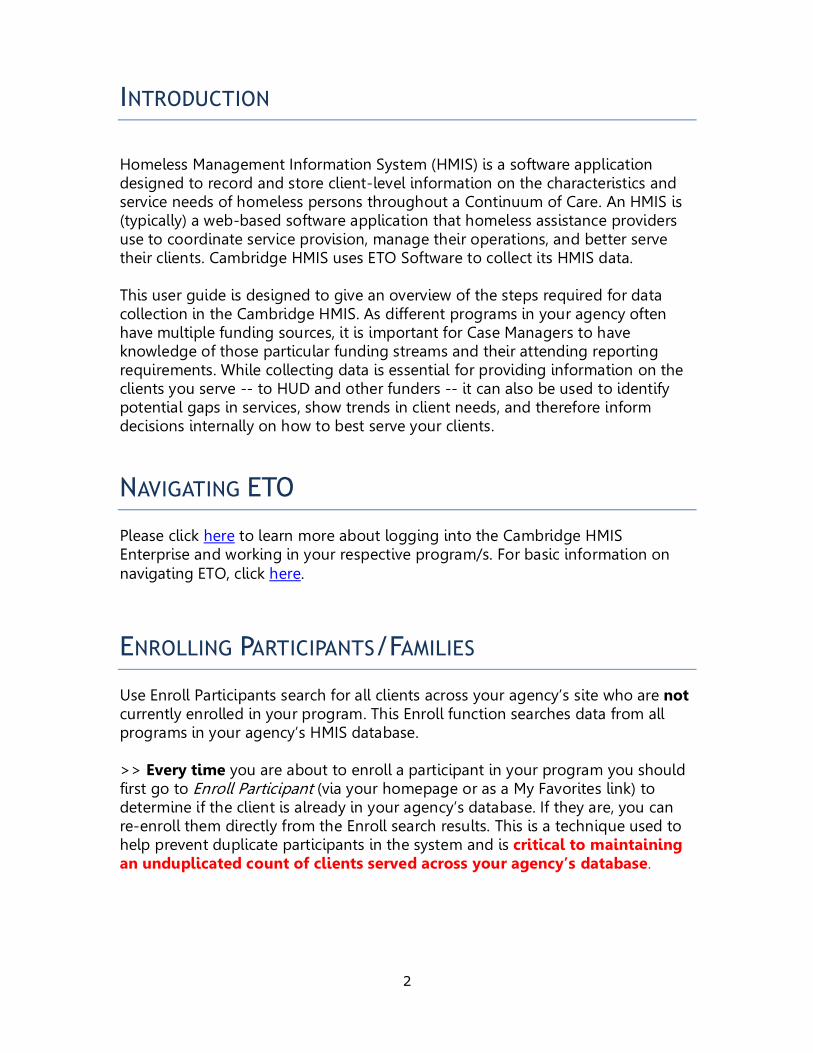
INTRODUCTION
Homeless Management Information System (HMIS) is a software application designed to record and store client-level information on the characteristics and service needs of homeless persons throughout a Continuum of Care. An HMIS is (typically) a web-based software application that homeless assistance providers use to coordinate service provision, manage their operations, and better serve their clients. Cambridge HMIS uses ETO Software to collect its HMIS data. This user guide is designed to give an overview of the steps required for data collection in the Cambridge HMIS. As different programs in your agency often have multiple funding sources, it is important for Case Managers to have knowledge of those particular funding streams and their attending reporting requirements. While collecting data is essential for providing information on the clients you serve -- to HUD and other funders -- it can also be used to identify potential gaps in services, show trends in client needs, and therefore inform decisions internally on how to best serve your clients.
NAVIGATING ETO
Please click here to learn more about logging into the Cambridge HMIS Enterprise and working in your respective program/s. For basic information on navigating ETO, click here.
ENROLLING PARTICIPANTS/FAMILIES
Use Enroll Participants search for all clients across your agency’s site who are not currently enrolled in your program. This Enroll function searches data from all programs in your agency’s HMIS database. >> Every time you are about to enroll a participant in your program you should first go to Enroll Participant (via your homepage or as a My Favorites link) to determine if the client is already in your agency’s database. If they are, you can re-enroll them directly from the Enroll search results. This is a technique used to help prevent duplicate participants in the system and is critical to maintaining an unduplicated count of clients served across your agency’s database.
3
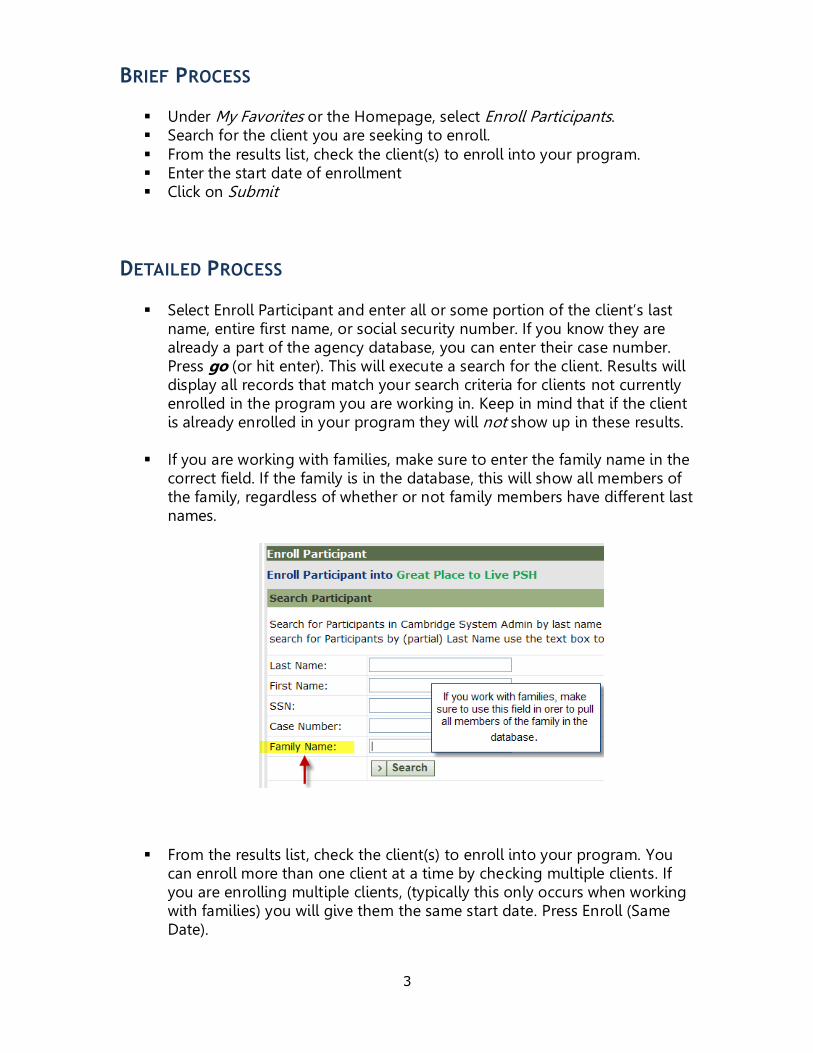
BRIEF PROCESS
Under My Favorites or the Homepage, select Enroll Participants. Search for the client you are seeking to enroll. From the results list, check the client(s) to enroll into your program. Enter the start date of enrollment Click on Submit
DETAILED PROCESS
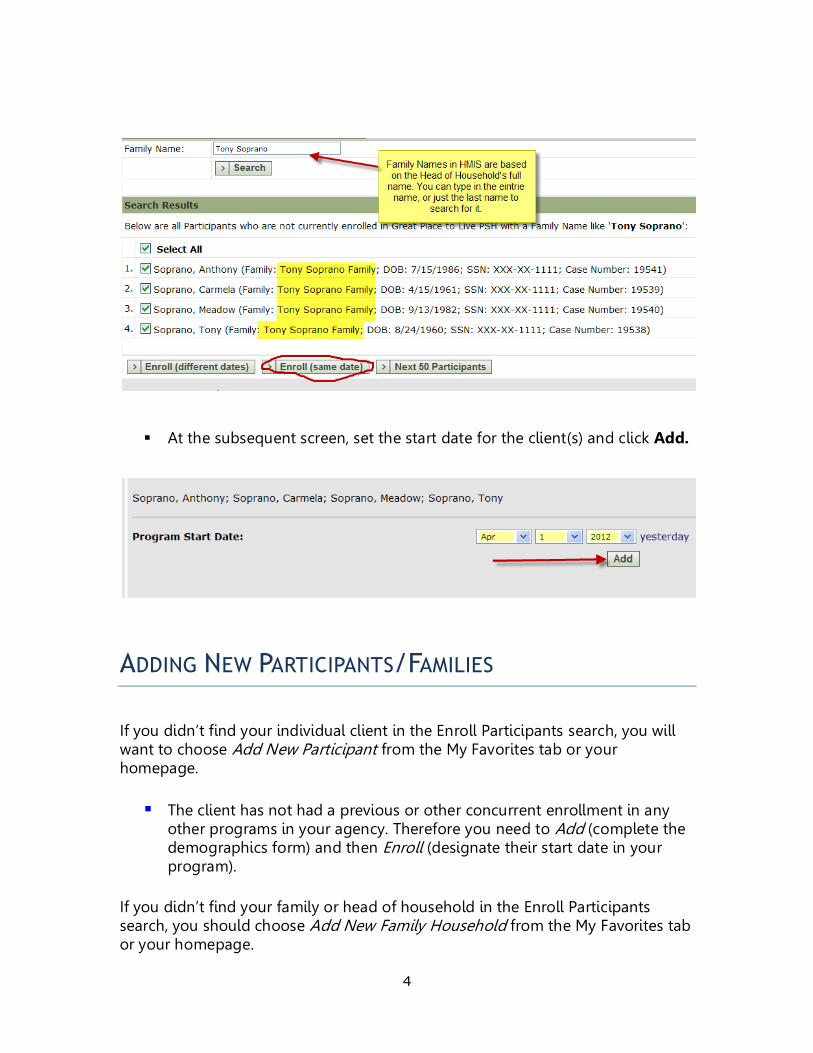
Select Enroll Participant and enter all or some portion of the client’s last name, entire first name, or social security number. If you know they are already a part of the agency database, you can enter their case number. Press go (or hit enter). This will execute a search for the client. Results will display all records that match your search criteria for clients not currently enrolled in the program you are working in. Keep in mind that if the client is already enrolled in your program they will not show up in these results.
If you are working with families, make sure to enter the family name in the
correct field. If the family is in the database, this will show all members of the family, regardless of whether or not family members have different last names.
From the results list, check the client(s) to enroll into your program. You
can enroll more than one client at a time by checking multiple clients. If you are enrolling multiple clients, (typically this only occurs when working with families) you will give them the same start date. Press Enroll (Same Date).
4
At the subsequent screen, set the start date for the client(s) and click Add.
ADDING NEW PARTICIPANTS/FAMILIES
If you didn’t find your individual client in the Enroll Participants search, you will want to choose Add New Participant from the My Favorites tab or your homepage.
The client has not had a previous or other concurrent enrollment in any
other programs in your agency. Therefore you need to Add (complete the demographics form) and then Enroll (designate their start date in your program).
If you didn’t find your family or head of household in the Enroll Participants search, you should choose Add New Family Household from the My Favorites tab or your homepage.
5
The family has not been enrolled in any of your agency’s programs before.
You need to Add and then enroll them, with the date and demographic information for each person.
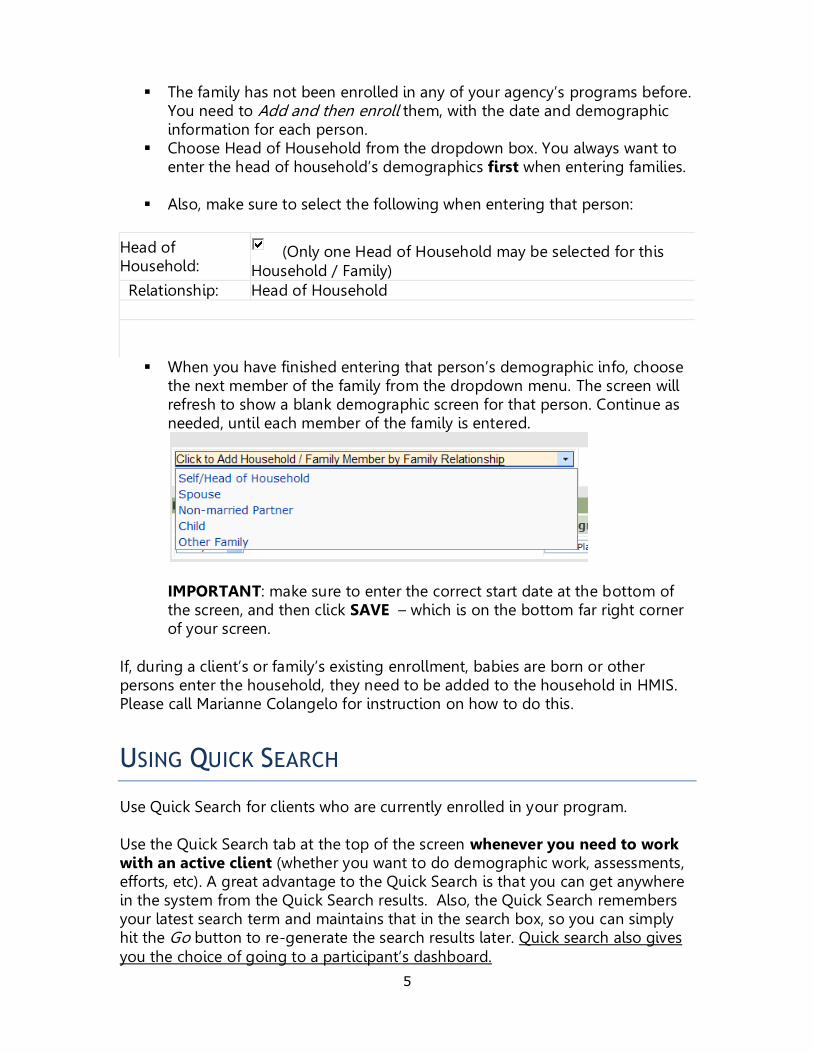
Choose Head of Household from the dropdown box. You always want to enter the head of household’s demographics first when entering families.
Also, make sure to select the following when entering that person:
Head of Household:
(Only one Head of Household may be selected for this Household / Family)
Relationship: Head of Household
When you have finished entering that person’s demographic info, choose the next member of the family from the dropdown menu. The screen will refresh to show a blank demographic screen for that person. Continue as needed, until each member of the family is entered.
IMPORTANT: make sure to enter the correct start date at the bottom of the screen, and then click SAVE – which is on the bottom far right corner of your screen.
If, during a client’s or family’s existing enrollment, babies are born or other persons enter the household, they need to be added to the household in HMIS. Please call Marianne Colangelo for instruction on how to do this.
USING QUICK SEARCH
Use Quick Search for clients who are currently enrolled in your program. Use the Quick Search tab at the top of the screen whenever you need to work with an active client (whether you want to do demographic work, assessments, efforts, etc). A great advantage to the Quick Search is that you can get anywhere in the system from the Quick Search results. Also, the Quick Search remembers your latest search term and maintains that in the search box, so you can simply hit the Go button to re-generate the search results later. Quick search also gives you the choice of going to a participant’s dashboard.
6
BRIEF PROCESS
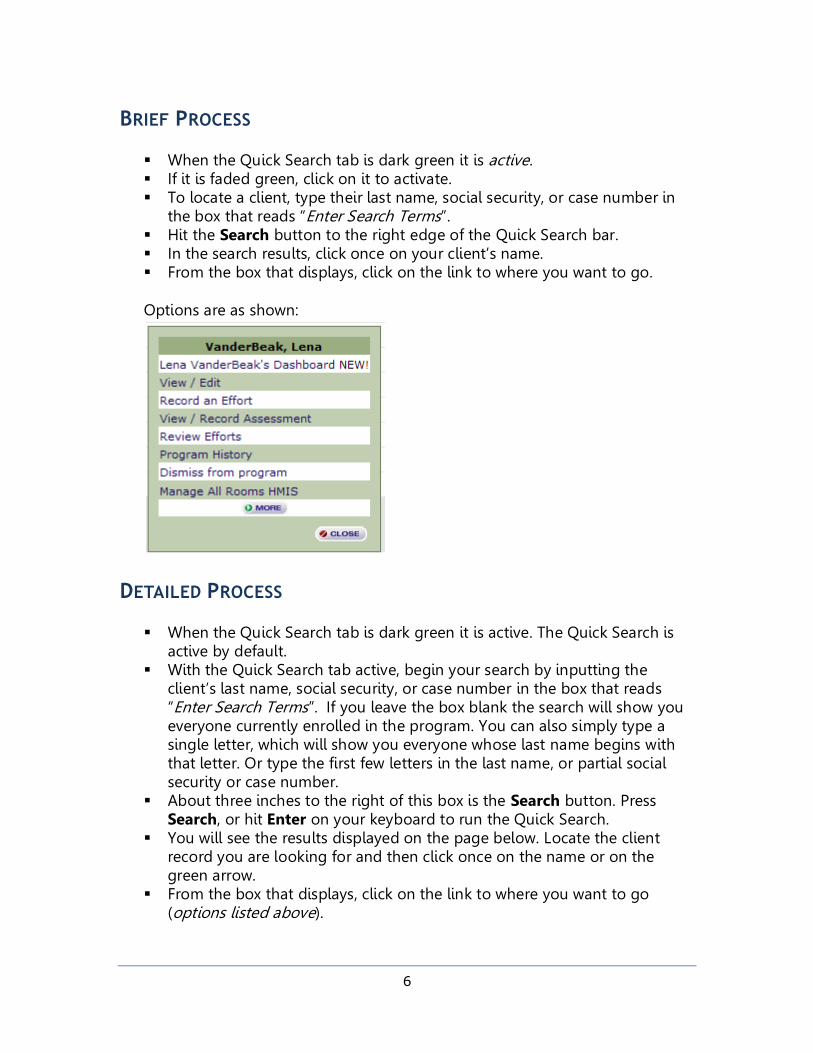
When the Quick Search tab is dark green it is active. If it is faded green, click on it to activate. To locate a client, type their last name, social security, or case number in
the box that reads “Enter Search Terms”. Hit the Search button to the right edge of the Quick Search bar. In the search results, click once on your client’s name. From the box that displays, click on the link to where you want to go.
Options are as shown:
DETAILED PROCESS
When the Quick Search tab is dark green it is active. The Quick Search is active by default.
With the Quick Search tab active, begin your search by inputting the client’s last name, social security, or case number in the box that reads “Enter Search Terms”. If you leave the box blank the search will show you everyone currently enrolled in the program. You can also simply type a single letter, which will show you everyone whose last name begins with that letter. Or type the first few letters in the last name, or partial social security or case number.
About three inches to the right of this box is the Search button. Press Search, or hit Enter on your keyboard to run the Quick Search.
You will see the results displayed on the page below. Locate the client record you are looking for and then click once on the name or on the green arrow.
From the box that displays, click on the link to where you want to go (options listed above).
7
DEMOGRAPHICS
Demographics are completed when adding a new client or family members to the HMIS database.
In HMIS, the demographics form is accessed when you select Add New Participant or Add New Family Household. All questions in yellow must be completed in order to successfully add/enroll.
Demographics in HMIS are comprised primarily of HUD Universal Data elements, which are part of the baseline data collection requirements for all programs that are part of a Continuum of Care. Other Universal Data elements are collected through completing a Participant Assessment. (For more information about the HUD-mandated Universal Data elements, please refer to the City of Cambridge HMIS Policies and Procedures document.)
Demographic element answers typically do not change over time, therefore they will likely remain constant for someone who may return to your program with multiple enrollments over a period of time. Once a client is added to your agency’s HMIS site, you will not need to alter these fields upon subsequent enrollments. If you do need to make a correction, choose View/Edit Participant from the navigation bar, quick search menu, my favorites or homepage.
Issue:
Where there are response choices that include “don’t know” and “refused,” please be mindful that those more specifically refer to an answer denoting the client does not know or the client refused to answer. These choices should not be made in reference to whether or not the Intake staff did not know, etc.
For more information about searching the HMIS database using View/Edit Participant and viewing a participant’s program history, see the ETO Help Manual here.
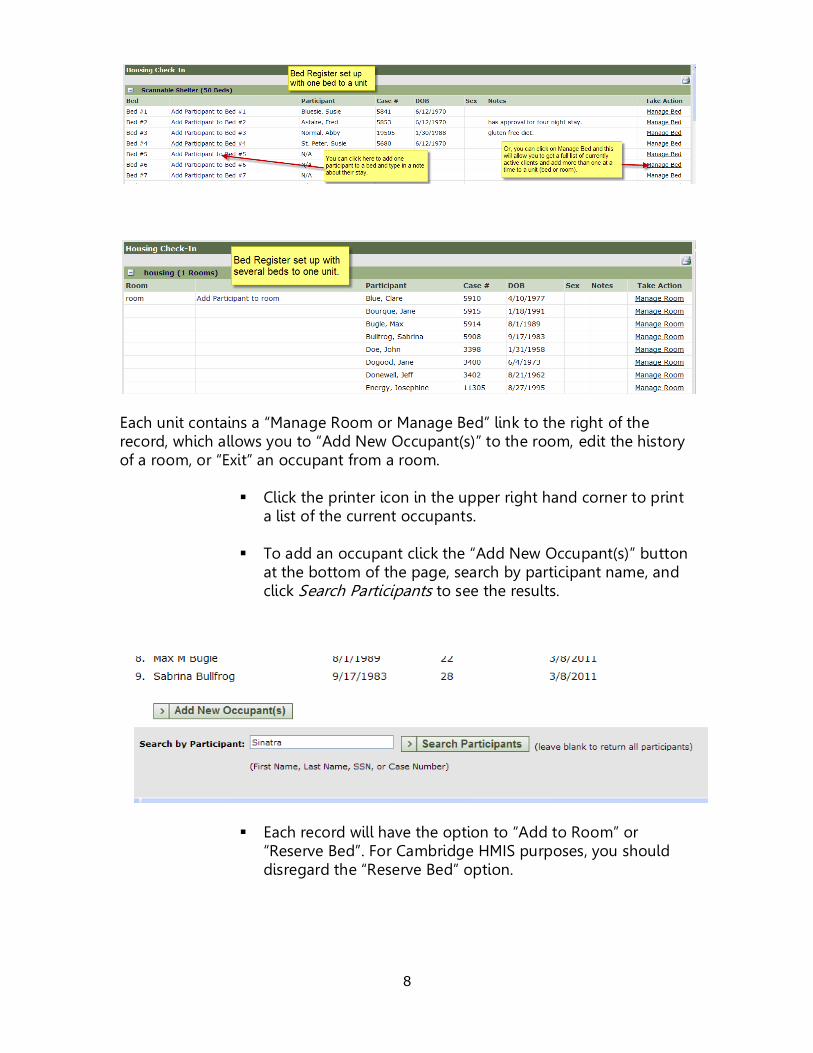
THE BED REGISTER FOR SHELTERS
Bed Registers are used in all Emergency Shelter programs in Cambridge HMIS. The Housing Check-in functionality starts with a full list of all your rooms and current occupant information when applicable.
8
Each unit contains a “Manage Room or Manage Bed” link to the right of the record, which allows you to “Add New Occupant(s)” to the room, edit the history of a room, or “Exit” an occupant from a room.
Click the printer icon in the upper right hand corner to print a list of the current occupants.
To add an occupant click the “Add New Occupant(s)” button at the bottom of the page, search by participant name, and click Search Participants to see the results.
Each record will have the option to “Add to Room” or “Reserve Bed”. For Cambridge HMIS purposes, you should disregard the “Reserve Bed” option.
9
Select the participants you would like to add to the room. If you are backdating the start date of occupancy, check the box at the bottom of the list and select the desired date.
Click “Add” to place the participants in the room. Housing Check-out functionality The software has an automatic check out feature, which can be turned on for emergency shelters that enter and exit clients from beds each night/day. For manual check out of clients, use the Housing Check-out link on your site’s homepage or My Favorites. Important for Emergency Shelter staff: Familiarize yourself with all the housing features in HMIS. For more information on housing check in and housing check out, please refer to the ETO manual, accessed here.
HUD ASSESSMENTS
The Intake Assessment is to be completed at entry.
The HUD Assessment is easily accessible using the Quick Search (see above for instructions). It should be filled out at the time of client enrollment into the program. The Intake Assessment is a ‘snapshot’ of the client at the time of entry. Do not “update” the Intake Assessment over a client’s stay in your program. Instead choose: “Take a new assessment” and complete a Mid-Program Assessment to record changes. HUD requires Mid-program Assessments to be taken at least once per year, but you can complete them more frequently if you need to reflect changes in any of the assessment areas. If your program completes an Annual Performance Reports (APR) each year, you should take a Mid-program assessment for active participants prior to the end of the program year, if there are changes to note (e.g. income, access to treatment, etc.). This will populate the APR with the most current information on the client. In addition, the Exit Assessment collects necessary information required for reporting on the client at exit.
10
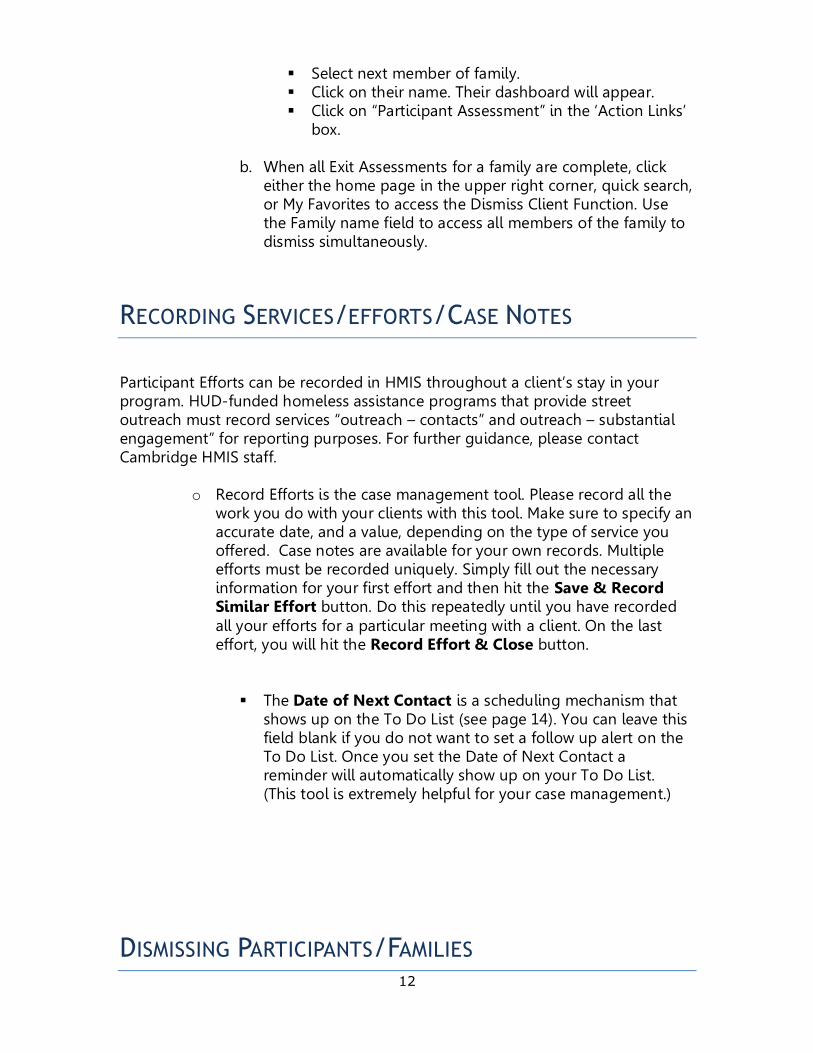
First fill in the date at the top of the assessment. Make doing this first a habit.
You should date the Intake assessment the same day as the
date of enrollment for the client/family. (If the Intake assessment date is earlier, the data won’t show up in reports.) The Enrollment date shows up on the top left of the assessment page for your convenience.
There are three tabs of pages for the Intake assessment.
Minor children do not require as much information on the assessment, but all members of a family must have assessments – Intake, Mid-Program (if enrolled for longer than one year), and Exit.
The Exit Assessment should be filled out at the time of exit, before dismissing a client.
o The Exit Assessment is located in the Assessments area. It should be
filled out right before a client is dismissed from the program. The Exit Assessment is a ‘snapshot’ of the client at the time of exit. Be mindful of the date you give this assessment – it should be identical to the dismissal date you will use, or earlier. Exit assessments with dates later than the dismissal date will prevent that data from populating correctly in HMIS reports.

11
Important for Exit Assessments: on the first tab you will have to give an updated answer to question A-4 (see below). There is one additional tab entitled “Exit Information.” This contains two questions.
Issue:
When you are recording an assessment for a client that already has a previous assessment, you will have the choice to Populate with a previous assessment. If you choose to do this, please be mindful of also manually making changes to earlier answers that have changed during the client’s enrollment.
After you complete the required elements of the assessment, click “Submit,” and a summary screen will appear – either review your answers here or disregard this screen and click “Continue.” You will then be brought to the View Assessments page screen that lists all of the assessments for your client.
For HMIS users working in programs that serve families:
You must complete Exit assessments for all members of a family.
a. Click on the client’s name at the top left side of screen to go to their dashboard. Once on their dashboard, to continue completing “Exit Assessments” for the other members of the client’s family:
12
Select next member of family. Click on their name. Their dashboard will appear. Click on “Participant Assessment” in the ‘Action Links’
box.
b. When all Exit Assessments for a family are complete, click either the home page in the upper right corner, quick search, or My Favorites to access the Dismiss Client Function. Use the Family name field to access all members of the family to dismiss simultaneously.
RECORDING SERVICES/EFFORTS/CASE NOTES
Participant Efforts can be recorded in HMIS throughout a client’s stay in your program. HUD-funded homeless assistance programs that provide street outreach must record services “outreach – contacts” and outreach – substantial engagement” for reporting purposes. For further guidance, please contact Cambridge HMIS staff.
o Record Efforts is the case management tool. Please record all the work you do with your clients with this tool. Make sure to specify an accurate date, and a value, depending on the type of service you offered. Case notes are available for your own records. Multiple efforts must be recorded uniquely. Simply fill out the necessary information for your first effort and then hit the Save & Record Similar Effort button. Do this repeatedly until you have recorded all your efforts for a particular meeting with a client. On the last effort, you will hit the Record Effort & Close button.
The Date of Next Contact is a scheduling mechanism that shows up on the To Do List (see page 14). You can leave this field blank if you do not want to set a follow up alert on the To Do List. Once you set the Date of Next Contact a reminder will automatically show up on your To Do List. (This tool is extremely helpful for your case management.)
DISMISSING PARTICIPANTS/FAMILIES
13
When clients are done receiving services from your program they should be dismissed from your program in real time. Please note that most programs require completion of an Exit Assessment before dismissal.
DETAILED PROCESS
Verify that your client has a full client record, including complete Demographics, Assessments, and Efforts (if applicable).
If required for your program, complete the Exit Assessment (for all members of the household)
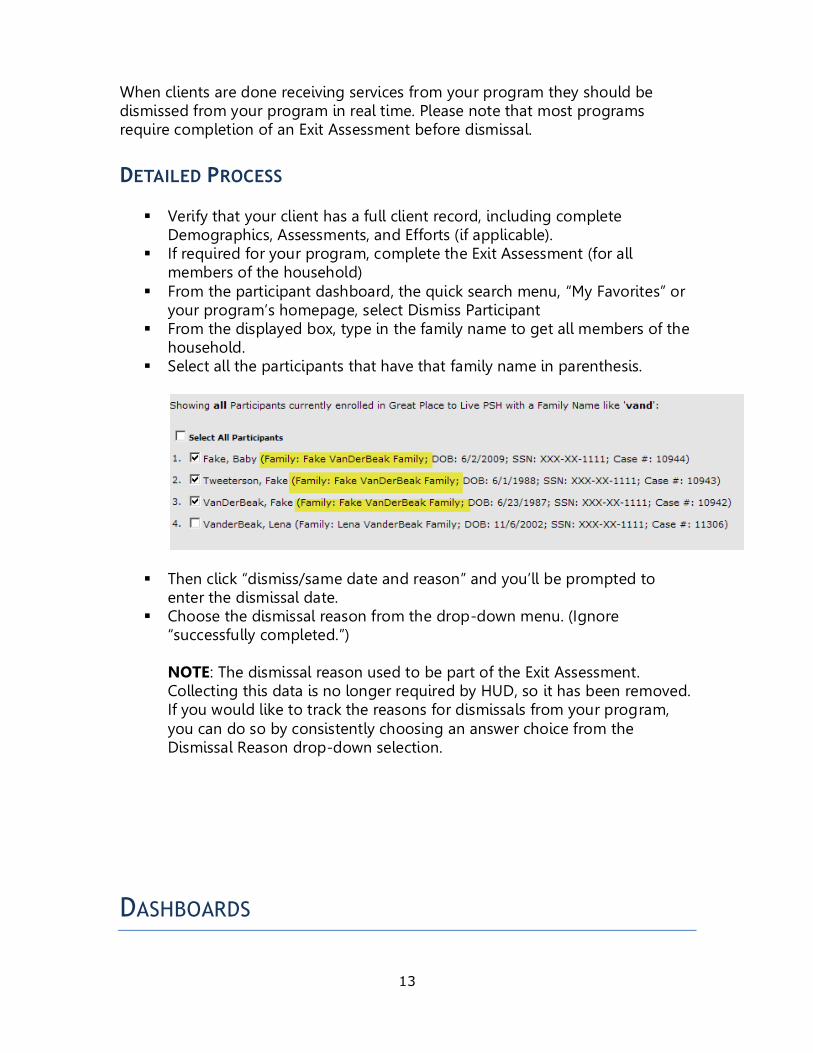
From the participant dashboard, the quick search menu, “My Favorites” or your program’s homepage, select Dismiss Participant
From the displayed box, type in the family name to get all members of the household.
Select all the participants that have that family name in parenthesis.
Then click “dismiss/same date and reason” and you’ll be prompted to enter the dismissal date.
Choose the dismissal reason from the drop-down menu. (Ignore “successfully completed.”) NOTE: The dismissal reason used to be part of the Exit Assessment. Collecting this data is no longer required by HUD, so it has been removed. If you would like to track the reasons for dismissals from your program, you can do so by consistently choosing an answer choice from the Dismissal Reason drop-down selection.
DASHBOARDS
14
As you regularly use the system the dashboard will become extremely helpful to you.
The participant dashboard lets you see relevant client information all in
one place, including: Participant Information, Programs, Household Information (other family members), Recent Assessments, Recent Efforts, and Dashboard Search.
If your program works with families, you can set the Participant Dashboard to show you all the Household Information (family members) on each person’s dashboard. To do this, from any clients dashboard click on “edit dashboard” on the top right, then select “add ETO parts” and in the ETO Part Catalog, click “Household Information,” click ADD at the bottom, and then “done editing.” You can add other features to the dashboard in this same way.
My Dashboard is one of the Quick Tabs at the top of the screen. My
Dashboard is very similar to the Participant Dashboard, but it contains data that you most recently entered (versus data most recently entered for a selected Participant).
TO DO LIST
As you regularly use the system the To Do List will become your case load manager. The To Do List is the tab located to the right of Quick Search on the top navigation. Items on your To Do List can be displayed for a period of time, Point of Service, or by Participants. Click on the To Do List tab and then click Go to activate it. You will see drop down boxes on the right for Period, Show and Scope. Select how you want to view the To Do List from the following options:
o Time Period: Today, etc. - This is compiled from your Participant efforts and any reminders you set on a participant assessment to take another one, starting with contacts due today, and including any past-due contacts in red. Where contacts fall on the same day, they are viewable in the order of Participant. You will note that if you’re working with a Participant on a number of different outcomes, each of these records that are due today (or in the past) will appear on your To Do: Today list. You can also choose other ranges of time in the past or the future.

15
o To Do: Participants – this list is focused solely on your caseload. Every Participant with whom you’ve worked on any Outcome that includes a Date of Next Contact will appear on this list. This option is helpful because it allows you to see the most recent effort recorded for the client, as well as an option to view the entire case note history for that client in one glance.
o To Do: Calendar View - this allows you see a list of your contacts
for a range of dates or a date in the future. The calendar defaults to the current week. Use the arrows to span ahead to future dates. This is one of the most popular views used by Case Managers. See the example in the screen shot below.
Once you’ve selected how you wish to display the To Do List the screen will refresh to that view. Items on your To Do List will be displayed on the following page, with direct links to take the necessary follow up actions.
16
CONTACT: Marianne Colangelo Email: [email protected] Office: 617-349-6966 Elizabeth Mengers Email: [email protected] Office: 617-349-6209 Website: cambridgehmis.etosoftware.com Address: 51 Inman Street, Cambridge, MA 02139 For additional online help, please refer to the Social Solutions ETO Help Manual. Last updated 4/11/14