CALLISTO eye 3.5 with EDIS - ZEISS
66
CALLISTO eye Software Version 3.5 Anja Beer Use Case Guideline Version 1 MM # EN_30_070_0001I
Transcript of CALLISTO eye 3.5 with EDIS - ZEISS

CALLISTO eye Software Version 3.5
Anja Beer
Use Case Guideline Version 1
MM # EN_30_070_0001I

2 CZM, Use Case Guideline
Agenda
1
2
3
4
5
6
Configuration: User
Configuration: LUMERA 700
Configuration: Assistant functions
Workflow
CALLISTO eye with EDIS
Introduction
MM # EN_30_070_0001I

3 CZM, Use Case Guideline
Introduction
CALLISTO eye – computer assisted cataract surgery CALLISTO eye® makes precise1, premium IOL surgery fast and easy! It helps our customers to meet patient expectations today and tomorrow with assistance functions projected directly into their surgical field. CALLISTO eye works as one with the ZEISS OPMI Lumera® family2
of surgical microscopes. View all assistance information in the surgical field and control ZEISS CALLISTO eye from the foot control panel of the surgical microscope. HD video recording and photos that include the assistance functions meet even the most demanding requirements in quality management, teaching and for presentations This guideline shows the key functionalities and configuration steps for common use cases of CALLISTO eye. It should help the user to operate and set up the system in the OR. The first pages give brief information about the available assistance functions which support the surgeons in terms of accuracy and precision.
1. Data on file 2. OPMI LUMERA 700, S88 / OPMI Lumera T, OPMI Lumera i, S7 / OPMI Lumera
MM # EN_30_070_0001I

4 CZM, Use Case Guideline
Introduction
Assistant Live Video The „Live video“ function enables large-format display of a connected surgical microscope or a connected camera on CALLISTO eye. It provides HD video recording and capturing images. Data injection can be switched on or off by pressing the DIS button.
MM # EN_30_070_0001I

5 CZM, Use Case Guideline
Introduction
Assistant K TRACK K TRACK® is used in combination with the integrated Keratoscope of OPMI LUMERA® 700. The reflection of the LED ring on the cornea is checked regarding shape and centricity. Therefore, K TRACK allows to check intraoperatively whether the patient´s cornea is astigmatic or not. K TRACK cannot be used to measure and to quantify the astigmatism. It might be used as an indicator for astigmatism. K TRACK is an option for Assistant License. To use this function a keratoscope on OPMI LUMERA 700 is required.
MM # EN_30_070_0001I
6 CZM, Use Case Guideline
Introduction
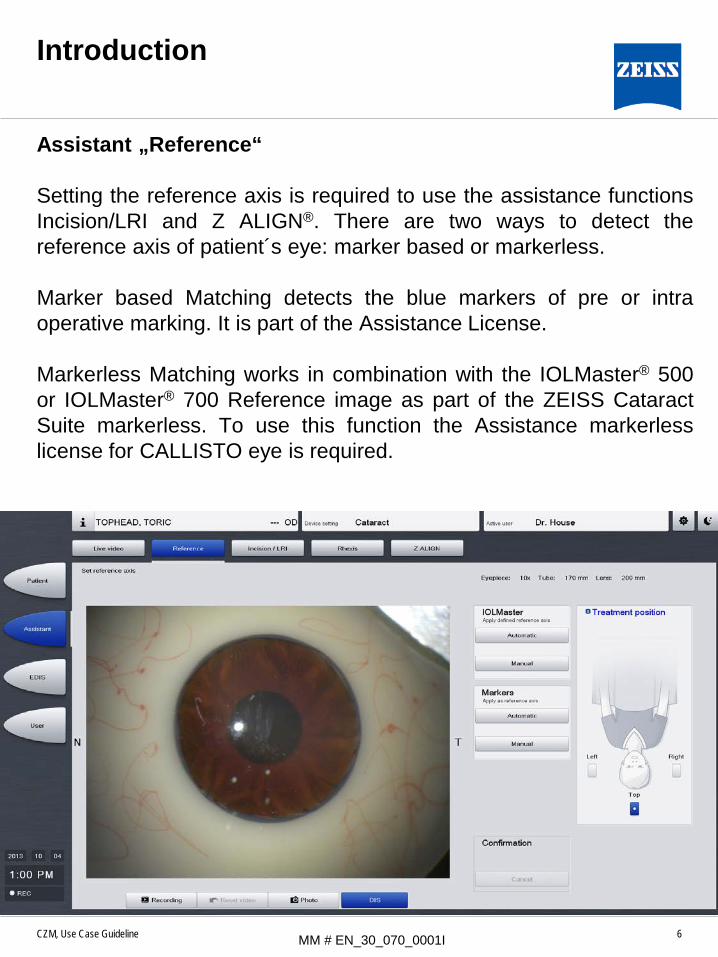
Assistant „Reference“ Setting the reference axis is required to use the assistance functions Incision/LRI and Z ALIGN®. There are two ways to detect the reference axis of patient´s eye: marker based or markerless. Marker based Matching detects the blue markers of pre or intra operative marking. It is part of the Assistance License. Markerless Matching works in combination with the IOLMaster® 500 or IOLMaster® 700 Reference image as part of the ZEISS Cataract Suite markerless. To use this function the Assistance markerless license for CALLISTO eye is required.
MM # EN_30_070_0001I

7 CZM, Use Case Guideline
Introduction
Assistant Incision/LRI The assistance function Incision/LRI visualizes the planned main incision and/ or planned limbal relaxing incisions. Limbal relaxing incisions sizes are given in degrees in accordance with planning nomograms. To use this assistant function a matching (markerless or marker based) is necessary.
MM # EN_30_070_0001I

8 CZM, Use Case Guideline
Introduction
Assistant Rhexis The assistant function Rhexis supports the surgeon to tear the capsulorhexis in the exact size and shape. The circular overlay can be set manually to the desired size and is displayed on CALLISTO eye screen and in the OPMI´s eyepiece. The following values are required to provide a correct rhexis overlay: - Anterior chamber depth (ACD) - Corneal radius (CR) - White to white distance (WTW) The assistant function Rhexis can be used without referencing.
This information is automatically integrated if IOLMaster 500 or IOLMaster 700 values have been applied (prepare surgery)
MM # EN_30_070_0001I

9 CZM, Use Case Guideline
Introduction
Assistant Z ALIGN Z ALIGN supports the surgeon to align the toric intra ocular lens (IOL). It shows the reference axis (yellow) and the target axis (three blue lines) as an overlay on CALLISTO eye screen and in the eyepiece provided that a data injection system is installed. The optical offset is measured by IOLMaster 500 or IOLMaster 700. It displays the difference between geometric center of pupil and visual axis of the patient´s eye.
MM # EN_30_070_0001I

10 CZM, Use Case Guideline
Introduction
Prepare Surgery With CALLISTO eye surgery can be planned in advance to safe time during treatment. Incisions, Capsulorhexis size and target axis for toric IOL implantation can be set before surgery. The patient does not have to be present for preparation. Furthermore, IOLMaster values can be applied automatically to avoid manual data input. Prepare surgery is part of the assistance licence.
MM # EN_30_070_0001I

11 CZM, Use Case Guideline
Introduction
Switching on CALLISTO eye How it is done? 1. Press the button to switch CALLISTO eye on/off. 2. The touch function can be deactivated to prevent unintended
operation, such as when cleaning the touchscreen. When pressing the button the touchscreen is deactivated and the Power button goes off. To reactivate the touch function, hold the button down until the power button lights up again
1 2
MM # EN_30_070_0001I

12 CZM, Use Case Guideline
Introduction
Set Date and Time Setting date and time properly will help to relate and track the acquired data to each patient. How is it done? 1. Configuration 2. Control Center 3. CALLISTO eye 4. Time
1
2
3 4
MM # EN_30_070_0001I

13 CZM, Use Case Guideline
Agenda
1
2
3
4
5
6
Configuration: User
Configuration: LUMERA 700
Configuration: Assistant functions
Workflow
CALLISTO eye with EDIS
Introduction
MM # EN_30_070_0001I

14 CZM, Use Case Guideline
Configuration: User
Why is it done? Multiple users can be defined. Each user can set his/her personalized configuration of OPMI LUMERA 700 and device settings (=profiles) according to surgical treatments. It is recommended to configure users and profiles on OPMI LUMERA 700 first and then import them to CALLISTO eye. The synchronization is limited to the import of OPMI LUMERA 700 to CALLISTO eye, not vice versa. If you proceed just as recommended all user settings will be available on OPMI LUMERA 700 even if CALLISTO eye is disconnected.
MM # EN_30_070_0001I

15 CZM, Use Case Guideline
Configuration: User
Import Users from OPMI LUMERA 700 To make sure that user settings and profiles are available even if CALLISTO eye is disconnected it is recommended to create them on OPMI LUMERA 700 and then import them. All users can then be found in user management. Please note that users who already exist on CALLISTO eye will not be overwritten. How is it done? 1. LUMERA 700 2. Configuration 3. System 4. User import 5. Click on Import
1
2
3
4
5
MM # EN_30_070_0001I

16 CZM, Use Case Guideline
Configuration: User
Create a user by copying an existent user When desired settings are similar to an already existing profile it is recommended to create a new user by copying the existing one. This saves time in configuration. To add, copy or delete users you have to be logged in as systemadministrator (password CZMS). How is it done? 1. Make sure you are logged in as Systemadministrator 2. User 3. Configuration 4. Highlight the intended user 5. Copy
1
2
3
4 5
MM # EN_30_070_0001I

17 CZM, Use Case Guideline
Configuration: User
Rename a copied user The new user appears in the "User" list after copying. The name assigned to the new user is that of the copied user with an extension ("…_2", "…_3", …). How is it done? 1. Highlight the copied profile 2. Rename, change language, set password if desired
2 1
MM # EN_30_070_0001I

18 CZM, Use Case Guideline
Configuration: User
Create New Users on CALLISTO eye Users can only be created by the preconfigured user Systemadministrator. To login as Systemadminstrator you have to type in the following password: CZMS How it is done? 1. Make sure you are logged in as Systemadministrator 2. User 3. Change to configuration 4. Press on „Add“ 5. Type in name of user
1
3 4
5 2
MM # EN_30_070_0001I
19 CZM, Use Case Guideline
Configuration: User
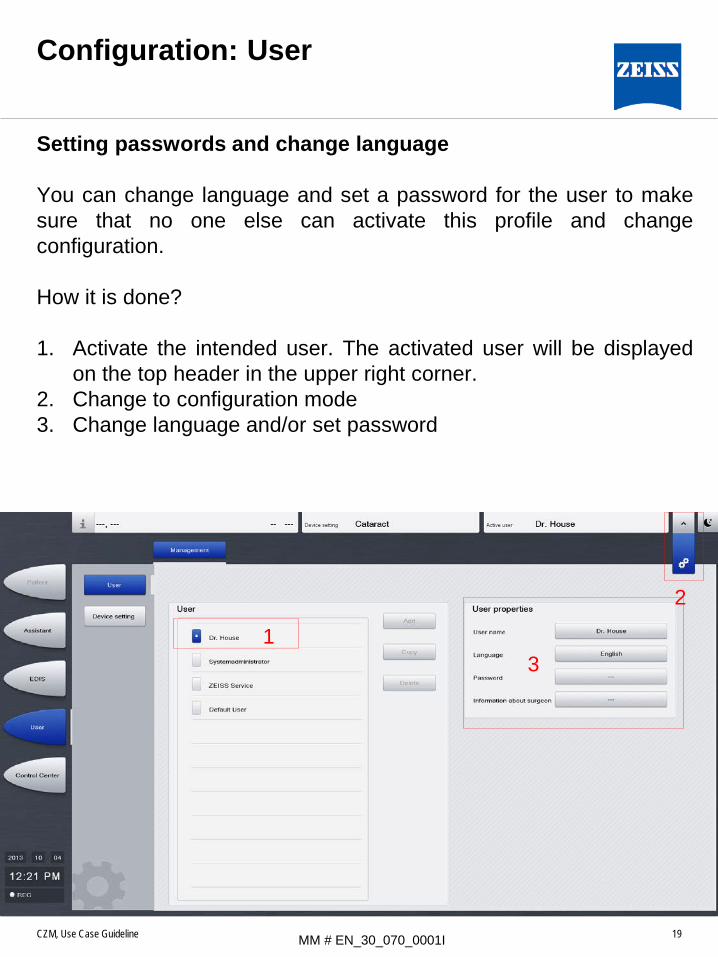
Setting passwords and change language You can change language and set a password for the user to make sure that no one else can activate this profile and change configuration. How it is done? 1. Activate the intended user. The activated user will be displayed
on the top header in the upper right corner. 2. Change to configuration mode 3. Change language and/or set password
1
2
3
MM # EN_30_070_0001I

20 CZM, Use Case Guideline
Configuration: User
Device settings Proceeding as recommended the device settings (=profiles) are imported from OPMI LUMERA 700. These device settings can be renamend, copied or deleted on CALLISTO eye. You can also create new device settings. Please note that any changes you make on CALLISTO eye will not be available on LUMERA 700 when CALLISTO eye is disconnected. How it is done? 1. Configuration mode 2. Device settings 3. Add/ rename/ copy/ delete device settings
1 2
3
MM # EN_30_070_0001I

21 CZM, Use Case Guideline
Configuration: User
Configuration: Automatic Recording on/off The user can decide whether video recording should start right away when the treatment is started or if it should be switched on or off manually. How is it done? 1. Configuration mode 2. Control Center 3. CALLISTO eye 4. Video 5. Automatic Recording on/off
1
2
4
3
5
MM # EN_30_070_0001I

22 CZM, Use Case Guideline
Agenda
1
2
3
4
5
6
Configuration: User
Configuration: LUMERA 700
Configuration: Assistant functions
Workflow
CALLISTO eye with EDIS
Introduction
MM # EN_30_070_0001I

23 CZM, Use Case Guideline
Configuration: LUMERA 700
Why is it done? The OPMI´s foot control panel (FCP) or handgrip can be used to control CALLISTO eye. Following functions are available:
- Confirmation of matching
- Cancellation of matching
- Next assistant function
- Previous assistant function
- Video Recording
- Snapshot
- Data injection
These functions cannot be configured on OPMI LUMERA 700. They have to be added on CALLISTO eye.
MM # EN_30_070_0001I

24 CZM, Use Case Guideline
Configuration: LUMERA 700
Configuration Controls The OPMI LUMERA 700 can be used as a remote control for CALLISTO eye. CALLISTO eye functions can be added on FCP or handgrip. OPMI functionalities can be changed as well. How is it done? 1. LUMERA 700 2. Configuration 3. Controls 4. Foot control panel 5. First choose position, then function
1
2
3
4
5
5
MM # EN_30_070_0001I
25 CZM, Use Case Guideline
Configuration LUMERA 700
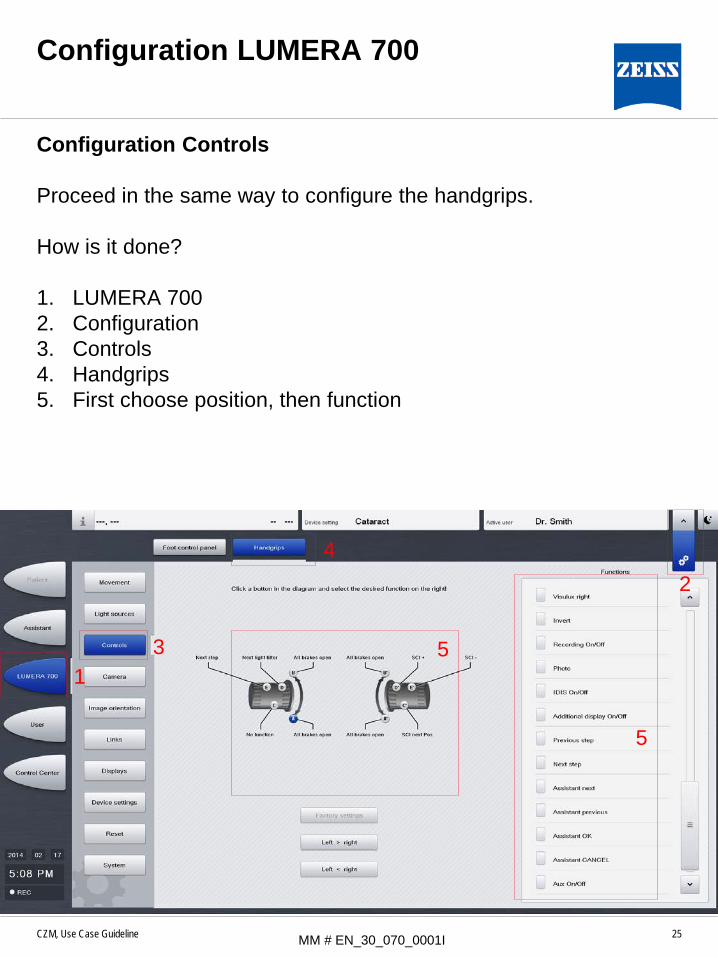
Configuration Controls Proceed in the same way to configure the handgrips. How is it done? 1. LUMERA 700 2. Configuration 3. Controls 4. Handgrips 5. First choose position, then function
1
2
3
4
5
5
MM # EN_30_070_0001I

26 CZM, Use Case Guideline
Configuration: LUMERA 700
Data injection into the eyepiece Several parameters can be configured to be visible in the OPMI´s eyepiece. How is it done? 1. LUMERA 700 2. Configuration 3. Displays 4. Parameter 5. Postion Data source Parameter
1
2
4
3
5
MM # EN_30_070_0001I

27 CZM, Use Case Guideline
Configuration: LUMERA 700
Data Injection into the eyepiece Color, text size and overall brightness of data injection can be customized to the surgeon´s preferences. In additional settings you can set IDIS to be activated automatically when a treatment was started. OPMI parameters which are visible in the eyepiece can be displayed just when settings were changed (hide parameters after display): The video section can be displayed in the eyepiece to make sure that everything is in the area to be recorded. 1. LUMERA 700 2. Configuration 3. Displays 4. Parameter 5. Set color, text size, brightness and additional settings
1
2
4
3
5
MM # EN_30_070_0001I

28 CZM, Use Case Guideline
Agenda
1
2
3
4
5
6
Configuration: User
Configuration: LUMERA 700
Configuration: Assistant functions
Workflow
CALLISTO eye with EDIS
Introduction
MM # EN_30_070_0001I

29 CZM, Use Case Guideline
Configuration: Assistant functions
Configuration of Limbus/ Rhexis The assistant function overlays for CALLISTO eye screen and data injection in the eyepiece can be changed in color and width. How is it done? 1. Configuration Mode 2. Assistant 3. Configuration 4. Limbus/ Rhexis 5. Change Color and width of Rhexis and Limbus Circle
1 2
3
4
5
MM # EN_30_070_0001I

30 CZM, Use Case Guideline
Configuration: Assistant functions
Configuration of Incisions/ LRI Continue with the configuration of incisions accordingly.
1 2
3
1 2
3
MM # EN_30_070_0001I

31 CZM, Use Case Guideline
Configuration: Assistant functions
Configuration of Z ALIGN Additionally to configuration of color and width of lines, you can choose to have either one or three target axes. How is it done? 1. Configuration Mode 2. Assistant 3. Configuration 4. Z ALIGN 5. Change color, width and the number of target axes
1 2
3
4
5
MM # EN_30_070_0001I

32 CZM, Use Case Guideline
Configuration: Assistant functions
Configuration Sounds Customize volume of signal sounds or switch sound on/ off. How is it done? 1. Configuration Mode 2. Assistant 3. Configuration 4. Sounds 5. Change volume or switch sound on/off
1 2
3
4
5
MM # EN_30_070_0001I

33 CZM, Use Case Guideline
Configuration: Assistant functions
Configuration video overlay Several parameters can be configured to be displayed on CALLISTO eye screen. The parameters will then also be visible in recorded videos. Please note that parameter configuration for Data Injection and CALLISTO eye screen has to be done seperately (for Configuration of data injection refer to Configuration: LUMERA 700). How is it done? 1. Configuration Mode 2. Assistant 3. Video 4. Parameter 5. Position Data source Parameter
1
2
3
4
5
MM # EN_30_070_0001I

34 CZM, Use Case Guideline
Configuration Assistant functions
Configuration video overlay Color and text size of video overlay can be customized to the user´s preferences. If you activate „hide parameters after display“ parameters will only appear shortly when a value has been changed. Please note that the data injection for the eyepieces has to be configured seperately (refer to Configuration: LUMERA 700). How is it done? 1. Configuration Mode 2. Assistant 3. Video 4. Parameter 5. Adjust color and text size; activate „hide parameters after display“
1
2
3
4
5
MM # EN_30_070_0001I

35 CZM, Use Case Guideline
Agenda
1
2
3
4
5
6
Configuration: User
Configuration: LUMERA 700
Configuration: Assistant functions
Workflow
CALLISTO eye with EDIS
Introduction
MM # EN_30_070_0001I

36 CZM, Use Case Guideline
Workflow User management
Activate User Activate the user who will perform surgery and the associated device setting. How it is done? 1. User menu 2. Select user and device setting 3. The activated user will be displayed in the top header
1
2
3
MM # EN_30_070_0001I

37 CZM, Use Case Guideline
Workflow Patient management
Import Patient Patient data can be imported to CALLISTO eye via DICOM or USB Stick. How it is done? 1. Patient menu 2. Administration 3. Import patient 4. A window will pop up asking for the data source of import. You
can choose between IOLMaster via USBstick, CSV or import from FORUM®.
1 2
3
4
MM # EN_30_070_0001I
38 CZM, Use Case Guideline
Workflow Patient management
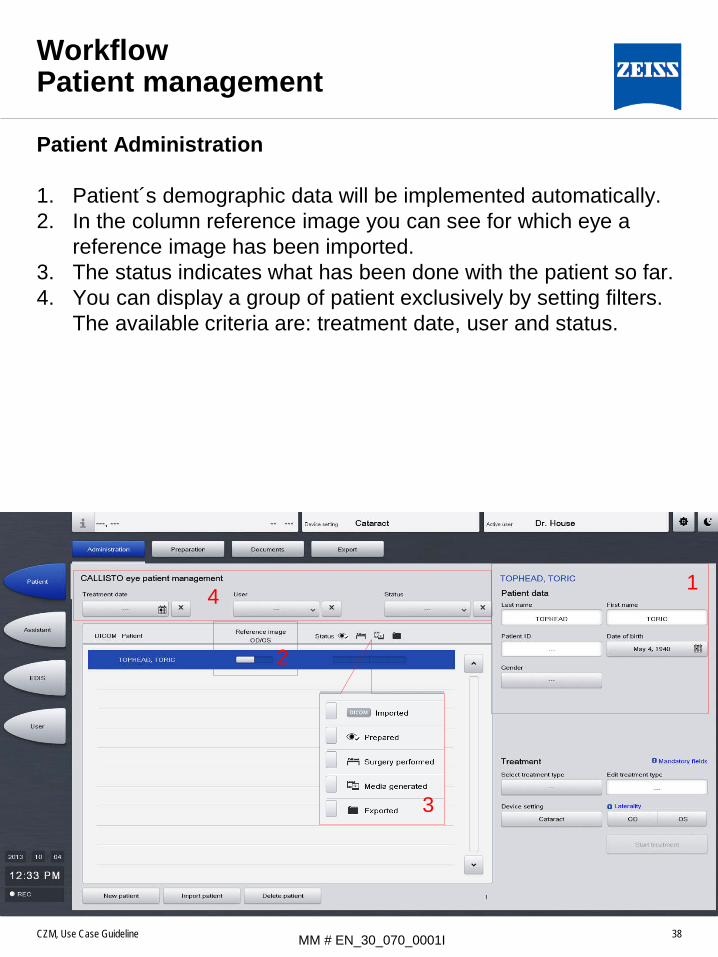
Patient Administration 1. Patient´s demographic data will be implemented automatically. 2. In the column reference image you can see for which eye a
reference image has been imported. 3. The status indicates what has been done with the patient so far. 4. You can display a group of patient exclusively by setting filters.
The available criteria are: treatment date, user and status.
1
2
3
4
MM # EN_30_070_0001I

39 CZM, Use Case Guideline
Workflow Patient management
Create a new patient In case there is no patient data available on thumb drive or via DICOM, patient can be created on CALLISTO eye directly. It is recommended to enter name and date of birth so that data is related to the right patient and can be tracked. However, a treatment can be started without entering any patient data. The patient is then named according to the starting point of treatment. („Patient_YYYYMMDD_Time“). How is it done? 1. Patient 2. Administration 3. New Patient 4. Enter patient´s demographic.
1 2
3
4
MM # EN_30_070_0001I

40 CZM, Use Case Guideline
Workflow Patient management
Prepare Surgery Surgery can be planned in advance to save time during treatment. For preparation the patient does not have to be present. Preparation is an option. The treatment can also be started right away. How it is done? 1. Patient Menu 2. Preparation 3. On the upper left corner the name of the planned patient is
displayed 4. The several preparation steps are indicated in status list 5. Choose laterality and treatment position
1
2 3
4
5
MM # EN_30_070_0001I

41 CZM, Use Case Guideline
Workflow Patient management
Prepare Surgery IOLMaster values can be implemented in assistant functions to calculate position and size of overlays, especially for assistant functions Rhexis and Z ALIGN. How is it done? 1. Press „Apply IOLMaster values“ button to adopt the data. If not,
CALLISTO eye will calculate with standard values.
1
MM # EN_30_070_0001I
42 CZM, Use Case Guideline
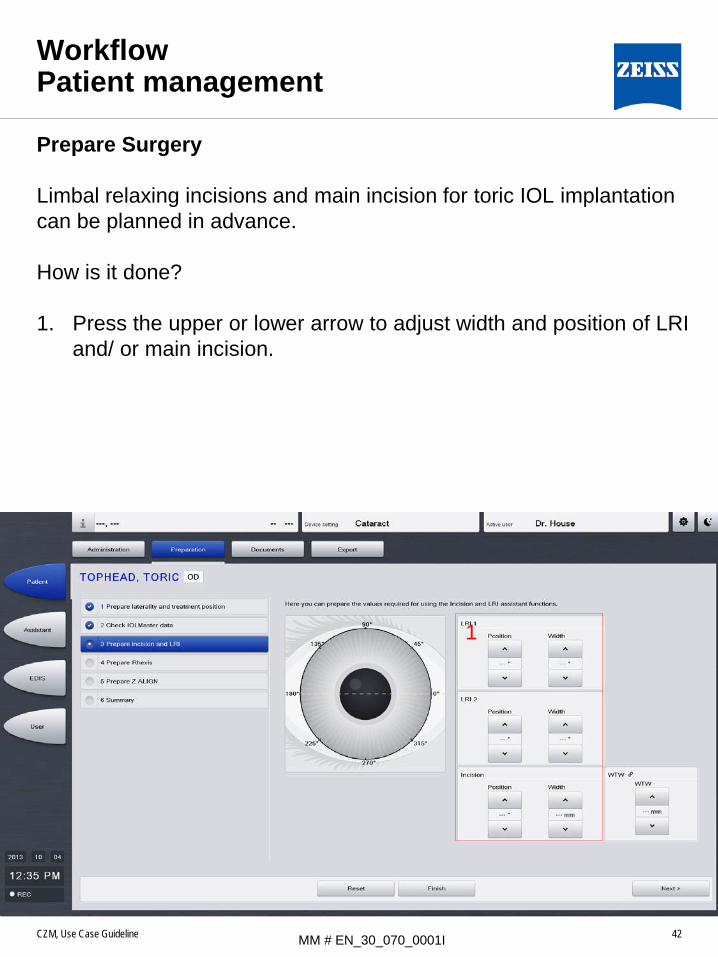
Workflow Patient management
Prepare Surgery Limbal relaxing incisions and main incision for toric IOL implantation can be planned in advance. How is it done? 1. Press the upper or lower arrow to adjust width and position of LRI
and/ or main incision.
1
MM # EN_30_070_0001I

43 CZM, Use Case Guideline
Workflow Patient management
Prepare surgery Circles can be displayed as an overlay to support surgeons by tearing the capsulorhexis. How it is done? 1. Press the upper or lower arrow to change size of circles. You can
also have just one circle displayed. 2. The size of Rhexis overlay depends on ACD and corneal radii.
When IOLMaster values are applied these fields will be filled automatically. You can also type in data manually.
1
2
MM # EN_30_070_0001I

44 CZM, Use Case Guideline
Workflow Patient management
Prepare surgery Z ALIGN helps the surgeon to align the lens along the target axis. How is it done? 1. The target axis can be adjusted manually by pressing the upper
and lower arrow 2. Optical offset and white to white distance are adopted from
IOLMaster if applied.
1
2
MM # EN_30_070_0001I

45 CZM, Use Case Guideline
Workflow Patient management
Prepare surgery The entered values can be reviewed in a summary at the end of configuration. How is it done? 1. To edit the settings press the „Edit“ button 2. If the values are correct go back to administration. The settings
will be saved automatically.
1
2
MM # EN_30_070_0001I

46 CZM, Use Case Guideline
Workflow Patient management
Start Surgery The status bar now indicates that preparation has been finished for this patient. However, surgery can also be started without preparation. The surgery must be started to have the assistant functions available. How is it done? 1. Patient 2. Administration 3. Select the patient to be treated 4. Choose laterality Start treatment 1
2
3
4
MM # EN_30_070_0001I

47 CZM, Use Case Guideline
Workflow Assistant functions
Live video The Assistant function Live Video is part of the Basic License of CALLISTO eye. It enables the user to record videos and capture images at any stage during surgery. Recording can be started automatically when patient is activated or manually. Reset video deletes the last recorded sequence and starts a new one. How it is done? 1. Assistant 2. Live video 3. Record and reset video; take photos 4. Data injection within the surgeon´s microscope can be switched
on or off
1
2
3 4
MM # EN_30_070_0001I

48 CZM, Use Case Guideline
Workflow Assistant functions
Reference In the Reference tab you can choose between markerless or markebased eye tracking. For markerless tracking a reference image from IOLMaster is required. For marker based tracking the patient´s eye has to be marked pre operatively. Please note that the video section should show 2/3 of limbus. How it is done? 1. Assistant 2. Reference 3. Treatment position 4. Choose between markerless or marker based referencing
1
2
3
4
MM # EN_30_070_0001I

49 CZM, Use Case Guideline
Workflow Assistant functions
Matching markerless CALLISTO captures an image of the patient and compares the structure of blood vessels within the two indicated semi-circles with the Reference Image imported from IOLMaster. The user is in charge of checking the matching by comparing the shape and position of blood vessels between the reference image from IOLMaster (black and white) and the microscope image.
1. Assistant 2. Reference 3. Rotate the OPMI image to align the blood vessels Change image
quality to increase the contrast (Level 1 recommended) Compare the pictures side by side or overlaid
4. Confirm or cancel the matching
1
2
3
4
MM # EN_30_070_0001I

50 CZM, Use Case Guideline
Workflow Assistant functions
Matching marker based CALLISTO eye detects the blue marker ink automatically and tracks it during surgery. How it is done? 1. Assistant 2. Reference 3. Rotate the reference axis if necessary 4. Confirm or cancel the reference axis detection
1
2
3
4
MM # EN_30_070_0001I

51 CZM, Use Case Guideline
Workflow Assistant functions
Incision/ LRI The planned incisions from surgery preparation are automatically displayed. You can also change the settings during treatment at any time. This assistant function is only available when matching (markerless or marker based) has been done before. For Matching please refer to assistant function reference. How it is done? 1. Assistant 2. Incision/ LRI 3. Change position and width of incisions
1
2
3
MM # EN_30_070_0001I

52 CZM, Use Case Guideline
Workflow Assistant functions
Rhexis The rhexis size depends on the anterior chamber depth and corneal radius. Provided that IOLMaster values have been applied, the exact values of patient´s eye will be adapted automatically and used to calculate the rhexis circle overlays. This assistant function is available without referencing. How it is done? 1. Assistant 2. Rhexis 3. Adjust rhexis circles, eye parameters and optical offset if
necessary
1
2
3
MM # EN_30_070_0001I

53 CZM, Use Case Guideline
Workflow Assistant functions
Z ALIGN The user can align the toric IOL along the target axis (either three or one line). If surgery has been prepared the target axis will be displayed automatically. You can change it at any time. This assistant function is only available when matching (markerless or marker based) has been done before. For Matching please refer to assistant function „Reference“. How is it done? 1. Assistant 2. Z ALIGN 3. Adjust target axis and optical offset if necessary
1
2
3
MM # EN_30_070_0001I

54 CZM, Use Case Guideline
Workflow Data Management
Stop treatment Before data can be reviewed or exported the treatment needs to be stopped on CALLISTO eye. How is it done? 1. Patient 2. Administration 3. Stop treatment
1 2
3
MM # EN_30_070_0001I

55 CZM, Use Case Guideline
Workflow Data Management
Review images and documents You can review, delete or export selected data via USB Stick. Videos need to be exported and can be watched with any video player which reads mpg 2 files. How is it done? 1. Patient 2. Documents 3. Export, delete or open the selected files
1 2
3
MM # EN_30_070_0001I

56 CZM, Use Case Guideline
Workflow Data Management
Export Data via DICOM or USB Stick The whole treatment including all acquired data can be exported via DICOM or USB Stick by just a click of a button. A system clean up can be set individually to avoid data overload. How is it done? 1. Patient 2. Export 3. Highlight the desired treatment 4. Export choose DICOM or USB stick 5. Please note that system clean up has to be started manually
1
2
3
4
5
MM # EN_30_070_0001I
57 CZM, Use Case Guideline
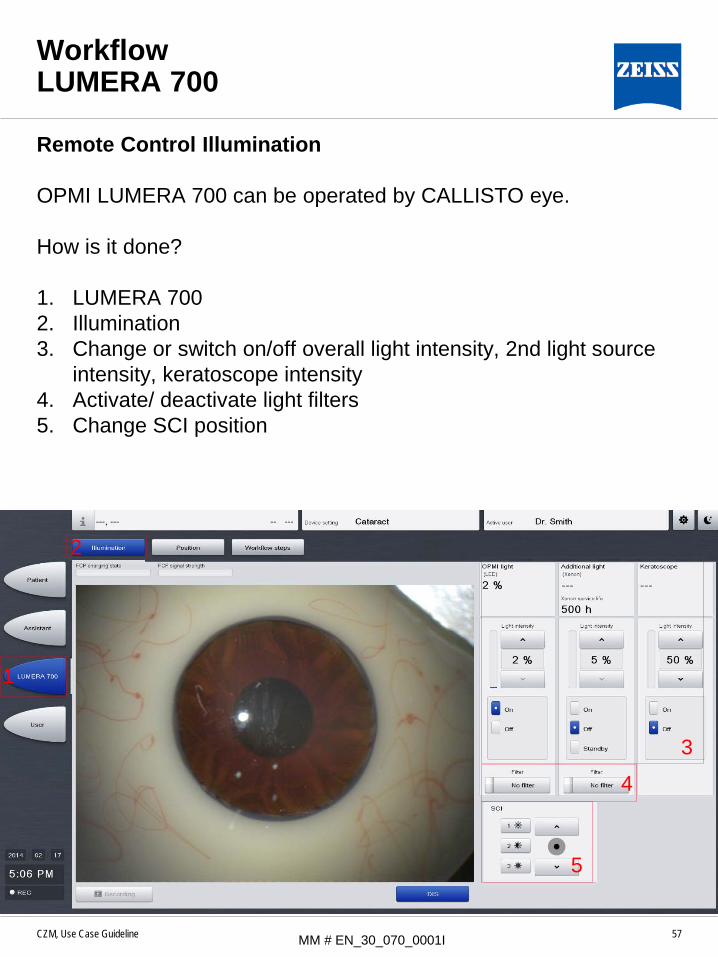
Workflow LUMERA 700
Remote Control Illumination OPMI LUMERA 700 can be operated by CALLISTO eye. How is it done? 1. LUMERA 700 2. Illumination 3. Change or switch on/off overall light intensity, 2nd light source
intensity, keratoscope intensity 4. Activate/ deactivate light filters 5. Change SCI position
1
2
3
4
5
MM # EN_30_070_0001I

58 CZM, Use Case Guideline
Workflow LUMERA 700
Remote Control Position CALLISTO eye can be used to change OPMI´s position. How is it done? 1. LUMERA 700 2. Position 3. Change Focus and Zoom 4. Change postion of OPMI or VISULUX
1
2
3
4
MM # EN_30_070_0001I

59 CZM, Use Case Guideline
Workflow LUMERA 700
Remote Control Device Settings CALLISTO eye can be used to change device settings (= workflow steps) How is it done? 1. LUMERA 700 2. Workflow steps 3. Select the desired device setting (=workflow steps)
1
2
Cataract
Retina
3
MM # EN_30_070_0001I

60 CZM, Use Case Guideline
Agenda
1
2
3
4
5
6
Configuration: User
Configuration: LUMERA 700
Configuration: Assistant functions
Workflow
CALLISTO eye with EDIS
Introduction
MM # EN_30_070_0001I

61 CZM, Use Case Guideline
CALLISTO eye with EDIS
Introduction When OPMI Lumera® family microscope1 is equipped with EDIS some functions are restricted. CALLISTO eye is not controllable by the OPMI and vice versa. The remote connection (AUX) of the surgical microscope can be used to configure a button of the foot control panel switching the EDIS on and off. These functions are available with both IDIS (OPMI LUMERA 700) and EDIS (OPMI Lumera family): - Patient management - Assistant functions - Video management - Data management - Data injection of assistants functions into microscope eyepiece These functions are not available with EDIS - Import of users and profiles from OPMI.
Users must be created on CALLISTO eye. However, the created profiles and device settings will not influence microscope settings.
- microscope configuration. Only data injection can be configured to see several information in the eyepiece.
The following pages show the differences in configuration when working with EDIS. 1. S88 / OPMI Lumera T, OPMI Lumera i, S7 / OPMI Lumera
MM # EN_30_070_0001I

62 CZM, Use Case Guideline
CALLISTO eye with EDIS Workflow
Rhexis Please note that when CALLISTO eye is connected to the external data injection system, the Limbus tracking for Assistant function Rhexis can only be detected if a white to white value is defined. How is it done? 1. Assistant 2. Rhexis 3. Make sure a white to white value is defined
1
2
3
MM # EN_30_070_0001I

63 CZM, Use Case Guideline
CALLISTO eye with EDIS
Configuration: Eyepiece/ Tube/ Lens If an EDIS is connected to CALLISTO eye, the settings on the surgical microscope for the eyepiece, tube and lens must be entered in CALLISTO eye. If the settings on the microscope and in CALLISTO eye do not match, data injection in the EDIS is erroneous. How is it done?. 1. Configuration Mode 2. EDIS 3. Adjust Eyepiece, Tube and Lens settings to the components
mounted on the microscope
1
2
3
MM # EN_30_070_0001I

64 CZM, Use Case Guideline
CALLISTO eye with EDIS
Data injection into the eyepiece Several parameters (target axis for toric IOL alignment, recording on/off) can be configured to be visible in the microscope´s eyepiece. How is it done? 1. Configuration 2. EDIS 3. Parameter 4. Postion Data source Parameter
1
2
3
4
MM # EN_30_070_0001I

65 CZM, Use Case Guideline
CALLISTO eye with EDIS
Data Injection into the eyepiece Color, text size and overall brightness of data injection can be customized to the surgeon´s preferences. The video section can also be visualized within the eyepiece. 1. Configuration 2. EDIS 3. Parameter 4. Adjust Color, Text size and brightness 5. Show video section on/off
1
2
3
4
5
MM # EN_30_070_0001I

66 CZM, Use Case Guideline MM # EN_30_070_0001I