Calligraphy
6
Hobbies & Leisure Try your hand at this ageless art. Calligraphy may be an ancient craft, but it's still the go-to style for formal invitations, certificates, and more. Hiring a professional calligrapher can cost an arm and leg, so harness your creativity and learn to: Choose calligraphy supplies and create a workstation Hold and move your pen correctly and with precision Form popular calligraphic scripts and embellishments • • • published by Barnes & Noble Calligraphy how to do it TM Calligraphy Basics Calligraphy is derived from the Greek word kalligraphia, which means “beautiful handwriting.” Today, the term is used to refer to both the art form of beautiful handwriting as well as the technique used to create it. Uses for Calligraphy Since ancient times, calligraphy has been used in paintings, books, and historical documents. Today, this ornate hand- writing remains a popular choice for applications such as party invitations, formal correspondence, and certificates. Many people choose to hire professional calligraphers to create calligraphy. With training and practice, though, just about anyone can learn this time-honored craft. This chart provides instruction on general calligraphy techniques, including lining your paper, maneuvering your pen, and forming stokes. You'll also learn to apply these techniques in subtly different ways to create various calligraphic alpha- bets, also known as scripts ( see Calligraphy Scripts). What You’ll Need to Get Started To start learning calligraphy, you’ll need the following inex- pensive and easy-to-find supplies: Pencil Ruler Soft eraser Paper Calligraphy pen Depending on the type of calligraphy pen you use, you may also need calligraphy ink. Calligraphy Pens Calligraphy requires a special type of pen. The tip of all calligraphy pens, called the nib, has a flat edge rather than the round point found on everyday ball- point pens. Calligraphers can vary the weight, or thickness, of the lines they use to form letters by controlling how much of the nib’s flat edge they allow to contact the paper. The width of the nib’s flat front edge, known as the nib width (n.w.) , is equal to the width of the thickest line that can be drawn with that pen. • • • • • Types of Calligraphy Pens The three types of calligraphy pens are dip pens, fountain pens, and felt-tip pens (also called markers). Dip Pens Dip pens have metal nibs that fit into one end of their solid shafts. The nib of the pen must be dipped into an ink bottle periodically as the calligrapher writes. Pros: Dip pens are the highest-quality calligraphy pens. They have precise, interchangeable nibs that can be switched to suit the type of script you’re writing. Cons: These are the most expensive and difficult pens to use. Their delicate nibs can bend and snag on paper, the ink can get messy if the nib is not perfectly dipped, and the nib must be cleaned thoroughly after each use. Fountain Pens Fountain pens have hollow shafts that contain ink car- tridges that supply ink to the nib. Pros: Fountain pens have a better quality than felt-tip pens and are easier to use than dip pens. They are easy to load with ink and require no dipping. Cons: Fountain pens aren't as precise as dip pens and are more expensive than markers. On some, the ink can stop flowing when you push the pen forward. To change the ink, you must change the cartridge and clean the nib. Felt-Tip Pens (Markers) Felt-tip pens have a one-piece nib and shaft and come pre- loaded with ink that cannot be refilled. Pros: The least expensive pens and the easiest to write with, they require no maintenance and won’t leak. Cons: Markers are the least precise pens. Their non- refillable ink tubes dry out quickly, their nibs wear with use, and the quality of their line decreases over time. • • • • • • Choosing a Calligraphy Pen When learning calligraphy, it’s generally best to start with markers, which are the easiest to use, and then to move up to fountain pens and dip pens as your calligraphy skills improve and you want more precision. Nib Width Measurements There is no definitive measurement system when it comes to nib width. Pen manufacturers use two different methods to specify it: Specific measurements: Nib widths are measured according to their exact size in millimeters, which typically ranges from 0.3 to 2. Descriptive letters: This system uses one or two letters to describe nib widths in more general terms. These letter codes range from EF (extra fine) to 3B (triple broad). Some scripts require thicker lines (and thus wider nib widths), while others require thinner lines (and thus nar- rower nib widths). Below you’ll find several of the most com- • • .5 mm EF .6 mm F .8 mm M 1 mm B 1.5 mm BB 2 mm 3 B nib width nib
-
Upload
constantinus-magnus -
Category
Documents
-
view
128 -
download
0
description
Calligraphy
Transcript of Calligraphy

Hobbies & Leisure
Try your hand at this ageless art.
Calligraphy may be an ancient craft, but it's still the go-to style for formal
invitations, certificates, and more. Hiring a professional calligrapher can cost an arm
and leg, so harness your creativity and learn to:
Choose calligraphy supplies and create a workstation
Hold and move your pen correctly and with precision
Form popular calligraphic scripts and embellishments
•
•
•
published by Barnes & Noble
Calligraphyhow to do it TM
Calligraphy BasicsCalligraphy is derived from the Greek word kalligraphia, which means “beautiful handwriting.” Today, the term is used to refer to both the art form of beautiful handwriting as well as the technique used to create it.
Uses for CalligraphySince ancient times, calligraphy has been used in paintings, books, and historical documents. Today, this ornate hand-writing remains a popular choice for applications such as party invitations, formal correspondence, and certificates. Many people choose to hire professional calligraphers to create calligraphy. With training and practice, though, just about anyone can learn this time-honored craft. This chart provides instruction on general calligraphy techniques, including lining your paper, maneuvering your pen, and forming stokes. You'll also learn to apply these techniques in subtly different ways to create various calligraphic alpha-bets, also known as scripts (see Calligraphy Scripts).
What You’ll Need to Get StartedTo start learning calligraphy, you’ll need the following inex-pensive and easy-to-find supplies:
PencilRulerSoft eraserPaperCalligraphy pen
Depending on the type of calligraphy pen you use, you may also need calligraphy ink.
Calligraphy PensCalligraphy requires a special type of pen. The tip of all calligraphy pens, called the nib, has a flat edge rather than the round point found on everyday ball-point pens. Calligraphers can vary the weight, or thickness, of the lines they use to form letters by controlling how much of the nib’s flat edge they allow to contact the paper. The width of the nib’s flat front edge, known as the nib width (n.w.), is equal to the width of the thickest line that can be drawn with that pen.
•••••
Types of Calligraphy Pens The three types of calligraphy pens are dip pens, fountain pens, and felt-tip pens (also called markers).
Dip PensDip pens have metal nibs that fit into one end of their solid shafts. The nib of the pen must be dipped into an ink bottle periodically as the calligrapher writes.
Pros: Dip pens are the highest-quality calligraphy pens. They have precise, interchangeable nibs that can be switched to suit the type of script you’re writing. Cons: These are the most expensive and difficult pens to use. Their delicate nibs can bend and snag on paper, the ink can get messy if the nib is not perfectly dipped, and the nib must be cleaned thoroughly after each use.
Fountain PensFountain pens have hollow shafts that contain ink car-tridges that supply ink to the nib.
Pros: Fountain pens have a better quality than felt-tip pens and are easier to use than dip pens. They are easy to load with ink and require no dipping. Cons: Fountain pens aren't as precise as dip pens and are more expensive than markers. On some, the ink can stop flowing when you push the pen forward. To change the ink, you must change the cartridge and clean the nib.
Felt-Tip Pens (Markers)Felt-tip pens have a one-piece nib and shaft and come pre-loaded with ink that cannot be refilled.
Pros: The least expensive pens and the easiest to write with, they require no maintenance and won’t leak. Cons: Markers are the least precise pens. Their non-refillable ink tubes dry out quickly, their nibs wear with use, and the quality of their line decreases over time.
•
•
•
•
•
•
Choosing a Calligraphy PenWhen learning calligraphy, it’s generally best to start with markers, which are the easiest to use, and then to move up to fountain pens and dip pens as your calligraphy skills improve and you want more precision.
Nib Width MeasurementsThere is no definitive measurement system when it comes to nib width. Pen manufacturers use two different methods to specify it:
Specific measurements: Nib widths are measured according to their exact size in millimeters, which typically ranges from 0.3 to 2.Descriptive letters: This system uses one or two letters to describe nib widths in more general terms. These letter codes range from EF (extra fine) to 3B (triple broad).
Some scripts require thicker lines (and thus wider nib widths), while others require thinner lines (and thus nar-rower nib widths). Below you’ll find several of the most com-
•
•
.5 mmEF
.6 mmF
.8 mmM
1 mmB
1.5 mmBB
2 mm3 B
nib width
nib

Copyright © 2007 Quamut.
All rights reserved.
Quamut is a registered trademark of
Barnes & Noble, Inc.
10 9 8 7 6 5 4 3 2 1
Printed in the United States
Writer: Rachel Mannheimer
www.quamut.com
The information contained in this and every Quamut guide is intended only for the general interest of its readers and should not be used as a basis for making medical, investment, legal or other important decisions. Though Quamut makes efforts to create accurate guides, editorial and research mistakes can occur. Quamut cannot, therefore, guarantee the accuracy of its guides. We disclaim all warranties, including warranties of merchantability or fitness for a particular purpose, and must advise you to use our guides at your own risk. Quamut and its employees are not liable for loss of any nature resulting from the use of or reliance upon our charts and the information found therein.
Photo Credits: Page 1: age fotostock/SuperStock (photo 1), Vincent & Jennifer Keane/Lucence Photographic (photo 2), Mauro Bighin/Shutterstock (photo 3), Dave King, Andy Crawford, Steve Gorton/Dorling Kindersley/Getty Images (photo 4), Vincent & Jennifer Keane/Lucence Photographic (photo 5); Page 2: Scott B. Rosen/Bill Smith Studio (photo 1), Vincent & Jennifer Keane/Lu-cence Photographic (photo 2), Scott B. Rosen/Bill Smith Studio (photos 3-4); Page 3: Stockdisc Classic/Getty Images (photos 1-2); Page 4: Illustration reproduced with permission of Lark Books A Division of Sterling Publishing Co., Inc., NY, NY from The Art & Craft of Hand Lettering: techniques, projects, inspiration ©2004 by Sterling Publishing Co., Inc. (illustration 7). All other illustra-tions by Precision Graphics.
www.quamut.com Calligraphy
You might eventually consider buying a ready-made cal-ligraphy drawing board, which costs $25–50 and is available at most art supply stores. These boards feature metal posts that help you achieve the proper writing angle, and rubber feet that prevent slippage without the need for an anchor.
Setting Up a Good Light SourceTo learn and practice calligraphy, you need to see your work clearly, so adequate lighting is crucial. A drafting lamp that attaches to your desk and can be positioned to shine directly on your drawing board is ideal. Drafting lamps are sold at art stores and cost about $15 and up. Place the lamp to your left (or your right, if you’re a lefty) so your hand won’t cast a shadow.
Creating a Light TableMany beginners find it helpful to learn calligraphy by tracing letters. It helps to use a light table—a hard, translucent drawing surface lit from underneath—as it allows you to see through the paper as you trace. You can buy light tables, also known as light boxes, for about $100, or you can make one yourself in a few easy steps.
Buy a sheet of glass or hard, clear acrylic at your local hardware store. Make sure it's the same size as your drawing board. Prop up the sheet as you would your drawing board and place a portable fluorescent light under it. Mount the paper containing the letters you’d like to trace onto the glass or acrylic using masking tape. Place your sheet of calligraphy paper on top. When you turn on the light, you should be able to see straight through to the letters you’d like to trace.
Guard SheetPrevent your hand’s sweat and oils from staining your paper or smudging your ink by using a piece of absorbent paper known as a guard sheet. To set up a guard sheet, follow these steps:
Cut a piece of absorbent blotting paper into a sheet that’s wider than but not as tall as the calligraphy paper you’ll be writing on. This piece of paper will serve as your guard sheet. Place this guard sheet near the bottom edge of your board, then tape its sides up vertically (do not tape across the top or bottom of the sheet).
1.
2.
3.
4.
1.
2.
a portable flourescent lighta portable flourescent light
monly available nib widths (with specific measurements and descriptive letters), plus a sample line drawn with each.
Calligraphy Paper It’s fine to practice calligraphy on regular white photocopy paper, or even scrap paper. When you’re ready to create a final piece of work, though, you’ll want to use better– quality paper.
Choosing Your Calligraphy PaperWhile some paper is specifically labeled “calligraphy paper,” art stores carry a vast selection of papers that work just as well. For instance, papers labeled expressly for use with pastels or charcoal can also be used for calligraphy. When selecting paper, keep these main factors in mind:
Weight: Paper weight, or thickness, is measured in pounds (lb)—the higher the number of pounds, the thicker the paper. Lightweight paper can ripple and cause ink to spread, so stick with 20 lb paper or higher.Texture: Very rough paper makes it hard to keep strokes straight, while smooth, glossy paper causes ink to pool and prevents crisp strokes. Opt for paper with a middle-of-the-road texture and a fine tooth, or grain. Longevity: For important projects, use archival acid-free paper, which will not break down or discolor. Paper made with acid can turn yellow and brittle.
Calligraphy InkIf you’re using a dip or fountain pen, you’ll need to buy ink in either bottles or cartridges. Inks come in a variety of colors, and can be either waterproof or washable.
Waterproof: Waterproof ink is opaque, permanent, and typically oil-based.Washable: Washable ink is transparent (like watercolor paint) and can fade over time. It’s usually water-based.
Fountain pens always use washable ink, but dip pens can use either kind. If you’re using a dip pen, the type of ink you choose will be a matter of personal preference.
Loading Your Fountain Pen with InkTo load your fountain pen with a new ink cartridge, sim-ply unscrew the shaft, remove the old cartridge (if one is loaded), and pop in the new cartridge. If you’re loading a cartridge of ink that’s a different color from the previous ink, it’s a good idea to first wash out the pen with water and let it dry before installing the new cartridge.
Loading Your Dip Pen with InkLoading a dip pen with ink involves dipping it into an ink bottle. But you have to be careful, because if you submerge the entire nib in ink, the nib will flood and leak. There are two main ways to apply ink to your dip pen:
Dip your pen only as deep as the length of the slit that runs down the middle of the nib.
•
•
•
•
•
•
Apply ink to the nib with a thin paintbrush or an eyedropper. Place one drop on the nib’s underside.
Cleaning Your Dip PenIf you choose to write with a dip pen, it’s important to keep the nib clean in order to prevent it from clogging.
While you’re writing: Dip the nib in water occasionally and dab it dry with a paper towel. When you’re finished writing: Remove the nib, rinse it with water, and wipe it dry with a soft cloth.
You should also clean new nibs before using them for the first time, since they often come with a protective coating that can leave an adhesive residue. Soak new nibs in hot water for about half an hour, then wipe them clean.
Ink ReservoirsAn ink reservoir is a piece of plastic or metal that attaches to fountain and dip pens above the nib. The reservoir serves two purposes: it stores additional ink to delay refilling and dipping, and it makes the ink flow from the nib more con-sistently as you write. Many dip pens come with reservoirs attached, but you can buy them separately as well. In foun-tain pens, reservoirs are used to supplement ink stored in the ink cartridge.
How to Get Set UpBefore you can start practicing calligraphy, you’ll need to establish a workspace that allows you to work neatly and comfortably. This entails setting up a writing surface, a good light source, and a guard sheet.
Setting Up a Writing SurfaceYou should practice calligraphy on a slanted surface that’s hard and flat. Doing so will help you to:
Hold your pen at an ideal angle to the paperMaintain good posture (no hunching)Move your writing arm freely by not leaning on it
To set up a calligraphy writing surface:
Prop up a drawing board against some books on a table. A drawing board can be any hard, flat, wooden or synthetic surface (such as plywood or melamine), and should be about 2 feet wide and 1 foot deep. Anchor your board at the corners closest to you with a heavy object. This will keep the board from slipping. Tape a few large sheets of construction paper onto the board to make the surface smooth and slightly cushioned. Mount your calligraphy paper on top of these sheets.
•
•
•
•••
1.
2.
3.
ink reservoir
tip of nib
a light box

www.quamut.com Calligraphy
Slide your calligraphy paper under and behind the guard sheet. To work on the calligraphy paper, inch it up or down while resting your writing hand against the guard sheet.
How to Line Calligraphy Paper Lined calligraphy paper contains a precise framework of horizontal and vertical lines that help you to create letters of a consistent size and angle. You can line your own paper, but it’s helpful first to understand the basic structure of calligraphy letters.
The Structure of Calligraphy LettersEvery calligraphy letter has four main traits: the body, the ascender, the descender, and the slant angle.
Body: The core part of the letter contained between the waistline (top line) and the baseline (bottom line). Ascender: The part of the letter extending above the waistline. Only with some letters, such as b, d, f, h, k, l, and t, have ascenders.Descender: The part of the letter extending below the baseline. Only with some letters, including f, g, j, p, q, and, y, have descenders.Slant angle: The angle, if any, at which the letters of the script should be written in relation to the horizontal lines.
Horizontal LinesThe distance you create between the horizontal lines on your paper will help you draw your letters to the proper height. This distance will depend on the script you choose and the nib width of your pen.
Determining Horizontal Line HeightEach calligraphy script has a fixed set of core traits that determine the distance between its horizontal lines. No matter what script you choose, the traits you should know in order to line your paper properly are x-height, ascender height, and descender height.
x-height: Distance between baseline and waistline Ascender height: Vertical length of ascendersDescender height: Vertical length of descenders
3.
•
•
•
•
•••
Determining x-Height, Ascender Height, Descender Height x-height, ascender height, and descender height all depend on the script you’re writing and the nib width of your pen. Each script has fixed single-digit numbers for its x-height, ascender height, and descender height that determine the number of nib widths (n.w.) you should use to create your horizontal lines. For instance, if a script has an x-height of 5 n.w., the waistline and baseline should be 5 n.w. apart. According to this system, the height of your letters will de-pend on the size of your nib. The taller the letters you’d like to draw, the broader the nib should be on the pen you use.
Why Line Height MattersThe height of your letters in relation to the size of the nib you’re using determines the letter weight, or the thickness of the lines that comprise each letter. If you don’t use the correct line height, you won’t be able to create the proper contrast between thick and thin strokes.
Vertical LinesThe vertical lines on lined calligraphy paper are used to:
Provide general guidelines for the width of the letters you produce (in contrast to horizontal lines, which precisely define the height of the letters)Help you produce letters at the correct slant angle
The Distance Between Vertical LinesThere is no hard and fast rule used regarding how much distance there should be between vertical lines on lined paper. In general, calligraphers space their vertical lines a distance equal to the x-height of the script they are writing. For instance, if the x-height is 5 n.w., the vertical lines should be 5 n.w. apart.
Letter WidthYour letters don’t have to be any specific width per se. It’s more important that they be an appropriate width relative to one another. As you practice, you’ll develop a feel for keeping your letters’ widths consistent. The following rules of thumb may be useful:
All letters except lowercase l and both upper- and lowercase m and w should be about the same width.Lowercase l should be narrower than other letters.Upper- and lowercase m and w should be wider than other letters.
Spacing Between LettersThe amount of horizontal space you create between letters is largely a matter of personal style. Experiment to see what distance you like best for a particular project. These general guidelines may help:
Two curved letters should be closest together.A curved and a straight letter should be slightly farther apart than two curved letters.Two straight letters should be slightly farther apart than a curved letter and a straight letter.
To form a space between two words, imagine an invisible lowercase o between the words.
Slant AngleThe slant angle is the precise degree to which the vertical lines on your calligraphy paper (and therefore your letters) should be angled to the right. A script with a slant angle of 5° should be drawn on calligraphy paper with vertical lines that intersect the horizontal lines at a 5° angle. Each script has a precise slant angle (even if that angle is 0°).
Drawing Horizontal and Vertical LinesIn addition to your basic calligraphy supplies (see Calligraphy Basics), you’ll need the following tools in order to draw horizontal and vertical lines:
•
•
•
••
••
•
Protractor: For drawing your script’s slant angle90° ruling triangle: To help render lines evenly
For the following demonstration, assume you’re working on lowercase Italic, a script with these traits:
x-height: 5 n.w.Ascender and descender height: 4 n.w.Slant angle: 5°
Drawing the Horizontal LinesEach line of calligraphy you write actually requires four hori-zontal lines: the baseline, the waistline, the line at the top of the ascender, and the line at the bottom of the descender.
Using a piece of scrap paper, create a nib ladder, a vertical stack of your pen’s widest strokes. The number of stacked strokes on your nib ladder should equal the sum of the x-height (5 n.w.), ascender height (4 n.w.), and descender height (4 n.w.). The actual width of these strokes doesn’t matter; it’s the height of each (equal to the nib’s width) that’s key. Draw horizontal lines on your nib ladder at the top and bottom of the x-height, the top of the ascender height, and the bottom of the descender height. Extend these lines all the way to the right edge of your scrap paper.Line up the right edge of the scrap paper that contains your nib ladder against the left edge of a fresh sheet of calligraphy paper. Align the topmost line of the nib ladder 4 n.w. from the top of the calligraphy paper. Starting at the top, make a light dot with your pencil on the calligraphy paper at the point at which each of the four lines on the nib ladder meets the paper. Move the nib ladder down four n.w. from the fourth dot you placed on the calligraphy paper and mark off four more dots. Repeat until you’ve dotted the entire length of the calligraphy paper’s left edge.Place the corner of the 90° angle on your 90° ruling triangle at the topmost dot you marked on the calligraphy paper. Draw a horizontal line across the paper using the edge of the ruler that extends across the sheet. Repeat at each dot.
You should now have several sets of horizontal lines spaced properly for the script and the pen you intend to use.
Drawing the Vertical LinesThe process of drawing vertical lines differs depending on whether your script has a slant angle.
For Scripts with No Slant AngleRotate your nib ladder counterclockwise. Starting from the left edge of your paper, mark a light dot along each of the horizontal lines on your paper. The distance between the dots should be equal to the x-height.Use a ruler to draw vertical lines through the dots you marked along the horizontal lines.
For Scripts with a Slant AngleAlign the bottom of your paper about one inch from the bottom of your drawing board. The paper and drawing board should be parallel to each another.
••
•••
1.
2.
3.
4.
5.
6.
1.
2.
1.
ascenderheight(4 n.w.)
x-height(5 n.w.)
nibwidth
descenderheight(4 n.w.)
ascenderheight(4 n.w.)
x-height(5 n.w.)
nibwidth
descenderheight(4 n.w.)
guardsheet
writing paper blotting paper
drawing board tape
slant angle
waistline
baseline
ascender
body
descender
protractor 90˚ ruling triangle

www.quamut.com Calligraphy
Lefties and Nib AngleLefties will inevitably have problems holding calligraphy pens at a nib angle that’s both comfortable and practical for calligraphy writing. To solve this problem, lefties can use pens equipped with an offset pen holder that helps position the nib at an angle conducive to calligraphy writing. Some left-handed calligraphers prefer to alter the position of the paper instead.
Moving the PenWhen writing calligraphy, never change the position of your hand, wrist, and fingers. Instead, form each stroke by moving your entire arm from your shoulder down while keeping your wrist, hands, and fingers fixed in place. The only exception to this rule occurs when you write very small letters (roughly 1/2" tall or less). In that case, you’ll need to form the letters carefully with your fingers. Most beginners work only with larger-scale letters.
Types of StrokesThe motions you use to form calligraphic letters are called strokes. There are three main types of strokes:
Upstrokes: Move the pen upward (away from you) to the left or right.Downstrokes: Move the pen downward (toward you) to the left or right.Continuous strokes: Move the pen in a single, continuous motion.
Forming StrokesThere are a few rules you should follow in order to form precise, consistent strokes:
Use your entire arm to move the pen.Keep your nib at the proper angle (45°, for example).Form each stroke with the entire width of the nib.Use light yet consistent pressure on the paper.
Practice StrokesThe two practice strokes below give you a chance to prac-tice moving the pen and to try out all three types of strokes. Use a nib angle of 45° for both practice strokes.
Zigzag: Make connected diagonal strokes. Your downstrokes should be thicker than your upstrokes.Loop: Make a continuous, looping stroke. Your whole arm should move in a circular motion.
Solving Pen ProblemsEven if you hold and move the pen perfectly, you'll still sometimes encounter writing problems that stem from your pen itself. These problems result most often from either too much or too little ink flow. If this problem occurs with a marker, you’ll need to buy a new marker. If you’re using a dip pen or a fountain pen, refer to the following table for possible solutions:
•
•
•
••••
•
•
Use the nib ladder to mark dots along the line closest to the bottom of your page only. The distance between the dots should be equal to the x-height.Place the horizontal measuring line of your protractor along this same line. The left edge of the protractor should align with the left edge of your paper. Keeping the protractor still and the center of the paper in the same spot, rotate the top-right corner of the paper counterclockwise until the line you’ve dotted meets the protractor’s 5° marker. Note that protractors measure angles from 0–180° in both directions (left to right and right to left). Use the numbers that go from 0–180° from right to left to mark your slant angle.Once you’ve rotated the paper to the correct angle, tape it down in place. Line up the bottom edge of your 90° ruling triangle with the bottom edge of your drawing board. Slide the 90° ruling triangle along the bottom of the drawing board until it lines up with the first series of dots. Draw a vertical line. Repeat across the sheet of paper. Once you return your paper to a horizontal position, the resulting lines should be angled to the right at 5°.
How to Hold and Move Your PenLearning how to hold and move your pen is the most challenging part of calligraphy. Once you master this step, forming letters will come naturally.
Holding the Pen Grip the pen between your thumb and forefinger.Rest the pen on the side of your middle finger. Extend your pinky finger slightly for extra stability.Keep your wrist straight, not bent to the left or right.
Nib AngleThe nib angle is the angle at which the nib of your pen should intersect with the horizontal lines you drew on the paper. It is measured in degrees from 0–180°. Each calligraphy script calls for a specific nib angle, which affects the width and quality of the line you produce as you move your pen in different directions to form the let-ters. Using the proper nib angle for a script helps you draw the script’s letters as easily and beautifully as possible. For instance, many (though not all) scripts are best written with a nib angle of 45°. If you’re not sure you have your pen at the right nib angle for the script you’re working on, you can check it using a protractor.
1.
2.
3.
4.
5.
6.
1.
2.
3.
4.
Pen Type Ink Flowing Too Quickly
Ink Not Flowing Quickly Enough
Dip Make strokes on a piece of scrap paper until the ink flow returns to normal.
The ink on the nib may have dried, or the nib may have become clogged. If refreshing the ink doesn’t help, rinse the nib with water.
Fountain Check the ink in the cartridge. Ink flows quickly when the car-tridge is nearly empty.
The cartridge may be empty. Check and, if necessary, refill. The nib might be clogged. Try rinsing it with water.
Calligraphy SerifsCalligraphers enhance the appearance of scripts by add-ing embellishments, or decorative lines. These are also known as flourishes or swashes. The most popular types of calligraphy embellishment are serifs, small strokes added to the ends of:
Vertical and diagonal strokes that don’t attach to other strokes, such as the vertical line in a lowercase pHorizontal strokes, such as the top-right hook of the r
Types of SerifsThere are dozens of types of serifs. The most popular are:
Hairline serifs: These short, thin upstrokes are used on the ascenders of b, d, h, k, and l.Curved serifs: Tiny lines that curve up into strokes or flick up at the ends of strokes. Used on all letters except on the ascenders of b, d, h, k, and l. Slab serifs: Unlike other serifs, which are flourishes added to the letter’s main strokes, slab serifs require separate strokes. The shape they form also differs from most other serifs—each slab serif resembles a small, wavy parallelogram.
Calligraphy ScriptsThere are hundreds of different calligraphy scripts (also called alphabets). Many, though not all, have both an uppercase version and a lowercase version. This chart will focus on the two most popular scripts, Gothic and Italic.
Key Traits of Calligraphic ScriptsIn calligraphy, the different appearance of each script results primarily from differences in five key traits: x-height, ascender and descender height, nib an-gle, slant, and embellishments such as serifs. All calligraphy books, websites, and other resources include the specifications of these five traits for each script they cover. Some also include general guidelines for the width of the script’s letters.
Exemplars of Calligraphy ScriptsAn exemplar of a calligraphy script is every letter in that script written out as an example. Some exemplars include the formed letters only, but others include helpful instructions for forming the letters. These instructions are called stroke guides.
•
•
•
•
•
21serif.ai
serif
17nib_angle.ai
45˚nib angle
nib0˚ 180˚
hairlineserif curved
serif
slab serif
bottom of drawing boardlined up with 90˚ ruling triangle
draw lines along edge

www.quamut.com Calligraphy
Stroke GuidesA stroke guide is a system of numbered lines that shows the order and the direction in which to draw the strokes that form each letter. The exemplars in this guide all include stroke guides. The sample letter and stroke guide in this section shows a finished upper-case letter A in the Italic script (on the bottom) and its stroke guide (on the top). Notice that the stroke guide’s system of arrows and letters shows:
The order in which to write the strokes, as indicated by the numbers 1, 2, 3 and 4The direction in which to move the pen to form each stroke, as indicated by the arrows
How to Practice Calligraphy ScriptsExtensive practice is the only way to perfect your ability to draw calligraphy scripts. Your practice sessions should include the following guidelines:
Line your paper: Though lining your paper may feel like a waste of time, it's the only way to ensure that you form your letters to the right height and to an attractive width (see How to Line Calligraphy Paper).Follow the stroke guide: If you deviate from the stroke guide and try to draw the letters based on their appearance alone, you’ll have trouble forming the letters properly and will likely develop bad habits.Use the proper form: Beginners often forget to hold and move the pen properly when focusing on learning new letters. Concentrating on the proper form will make drawing letters easier in the long run, even if it’s more difficult in the beginning (see How to Hold and Move Your Pen).Trace if necessary: If you’re having trouble forming letters on your own, trace some or all of the letters to help you get started. Follow the stroke guide, even when tracing.
The Italic ScriptItalic is an elegant, easy-to-read script. It’s also the most popular calligraphic script and the one that most beginners learn first. Developed first in Italy during the Renaissance, the Italic script has become an all-purpose script used in everything from greeting cards and academic papers to government documents.
Key Traits of Lowercase Italic ScriptTraditionally, the lowercase Italic script has the following specifications:
x-height: 5 n.w. Nib angle: 45°Slant angle: 5°Ascender and descender height: 3–4 n.w. above or below the x-height, with one exception—the letter t should have a somewhat shorter ascender Serifs: Hairline and curved
The Lowercase Italic LettersBelow is an exemplar of the full lowercase Italic alphabet. Note that in lowercase Italic, all the strokes are downstrokes (made with a downward pulling motion), which is typically the easiest type of stroke for beginners to master.
••
•
•
•
•
••••
•
Key Traits of the Uppercase Italic Script Uppercase Italic shares all of lowercase Italic’s key traits, with two exceptions:
x-height: 7 n.w. instead of 5 n.w. Width: Roughly twice as wide as their corresponding lowercase letters
The Uppercase Italic LettersBelow is an exemplar of the uppercase Italic alphabet.
••
www.quamut.com Calligraphy
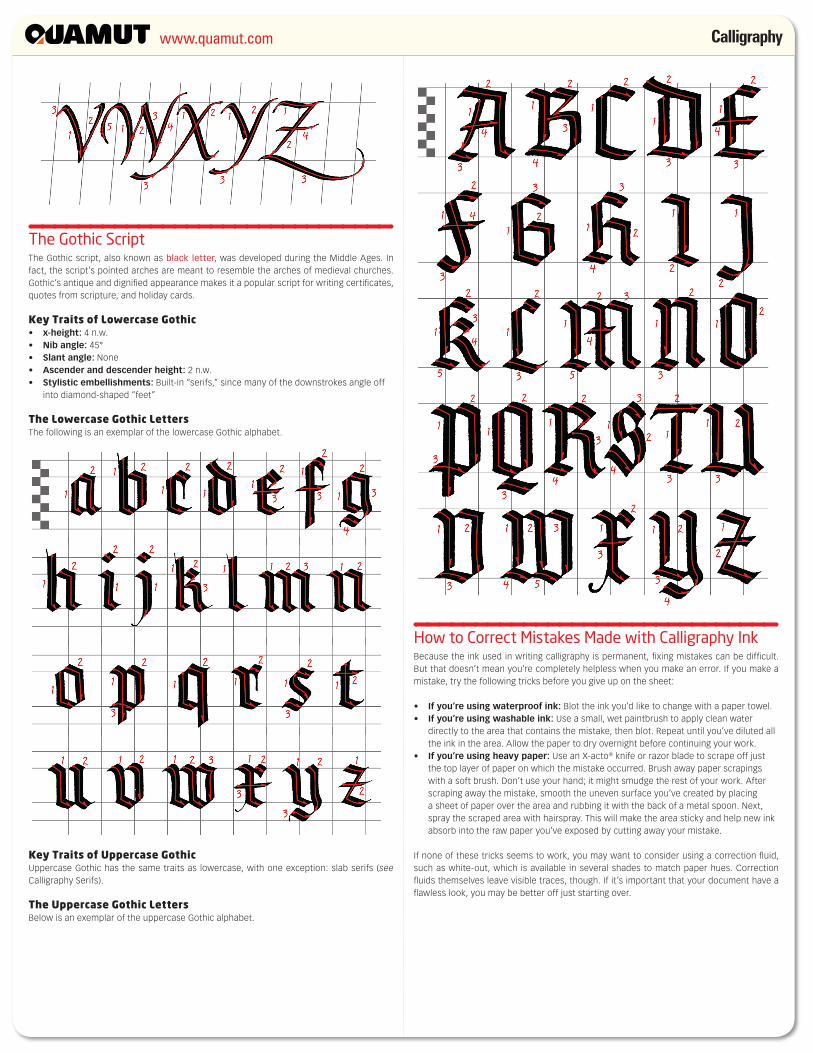
The Gothic ScriptThe Gothic script, also known as black letter, was developed during the Middle Ages. In fact, the script’s pointed arches are meant to resemble the arches of medieval churches. Gothic’s antique and dignified appearance makes it a popular script for writing certificates, quotes from scripture, and holiday cards.
Key Traits of Lowercase Gothicx-height: 4 n.w. Nib angle: 45°Slant angle: NoneAscender and descender height: 2 n.w. Stylistic embellishments: Built-in “serifs,” since many of the downstrokes angle off into diamond-shaped “feet”
The Lowercase Gothic LettersThe following is an exemplar of the lowercase Gothic alphabet.
Key Traits of Uppercase GothicUppercase Gothic has the same traits as lowercase, with one exception: slab serifs (see Calligraphy Serifs).
The Uppercase Gothic LettersBelow is an exemplar of the uppercase Gothic alphabet.
•••••
How to Correct Mistakes Made with Calligraphy InkBecause the ink used in writing calligraphy is permanent, fixing mistakes can be difficult. But that doesn’t mean you're completely helpless when you make an error. If you make a mistake, try the following tricks before you give up on the sheet:
If you’re using waterproof ink: Blot the ink you’d like to change with a paper towel.If you’re using washable ink: Use a small, wet paintbrush to apply clean water directly to the area that contains the mistake, then blot. Repeat until you’ve diluted all the ink in the area. Allow the paper to dry overnight before continuing your work. If you’re using heavy paper: Use an X-acto® knife or razor blade to scrape off just the top layer of paper on which the mistake occurred. Brush away paper scrapings with a soft brush. Don’t use your hand; it might smudge the rest of your work. After scraping away the mistake, smooth the uneven surface you’ve created by placing a sheet of paper over the area and rubbing it with the back of a metal spoon. Next, spray the scraped area with hairspray. This will make the area sticky and help new ink absorb into the raw paper you’ve exposed by cutting away your mistake.
If none of these tricks seems to work, you may want to consider using a correction fluid, such as white-out, which is available in several shades to match paper hues. Correction fluids themselves leave visible traces, though. If it’s important that your document have a flawless look, you may be better off just starting over.
••
•