
Call Shop Web Interface - Login
21
v0.6 Call Shop Web Interface Owner and Operator Guide
Transcript of Call Shop Web Interface - Login

v0.6
Call Shop Web Interface Owner and Operator Guide

Call Shop Owner and Operator Guide v0.6
2
Table of Contents
1 Introduction ............................................................................................... 3 1.1 Preface ................................................................................................ 3 1.2 Hardware and Software Requirements ............................................... 3 1.3 Getting Up and Running ...................................................................... 3
2 Configuration ............................................................................................ 4 2.1 Logging In ............................................................................................ 4 2.2 Configuring Essential Options ............................................................. 5 2.3 Setting up Rates .................................................................................. 7
2.3.1 Adding Rates ................................................................................. 8 2.3.2 Editing Rates ................................................................................. 8 2.3.3 Deleting Rates ............................................................................... 9 2.3.4 Searching Rates .......................................................................... 10
3 Operation ................................................................................................. 11 3.1 Using the Latest Calls Screen ............................................................ 11
3.1.1 Viewing the Call Charges ............................................................. 12 3.1.2 Recording Payment of Call Charges ........................................... 14 3.1.3 Enabling / Disabling a Booth ........................................................ 15
4 Advanced ................................................................................................ 16 4.1 Setting Up Rates with Rates Upload Feature .................................... 16
4.1.1 Uploading a .CSV File ................................................................. 16 4.1.2 Editing a .CSV File ....................................................................... 17
4.2 Marking Calls as 'Free' ...................................................................... 18 4.3 Creating Cashier Reports .................................................................. 20

Call Shop Owner and Operator Guide v0.6
3
1 Introduction 1.1 Preface This manual describes the most typical methods for working with the call shop web interface. Here you will find the information for correctly setting up and configuring your call shop. 1.2 Hardware and Software Requirements • Browser: Internet Explorer 6.0 or higher; Firefox 1.5 or higher • Internet Connection: high speed to effectively use the web interface • Spreadsheet Program: MS Excel or similar, to effectively process tariffs • Display Settings: minimum screen resolution is 1024 x 768 1.3 Getting Up and Running To begin, follow these steps:
• log into the web interface of your call shop • configure the Options • set up the Rates This is all you need to start running your call shop business. The remainder of this guide will describe the above steps in more detail, cover call shop operation, and describe advanced functions.

Call Shop Owner and Operator Guide v0.6
4
2 Configuration 2.1 Logging In • open your web-browser and go to the call shop page • type in the «Login» and «Password» received from your service provider • press «Submit» button

Call Shop Owner and Operator Guide v0.6
5
2.2 Configuring Essential Options Click the Options button (see the screen below).
You will now see the Options page where you can set up all the basic call shop preferences.

Call Shop Owner and Operator Guide v0.6
6
Here is a brief description of the basic options: • Billing Increment (seconds) — calls will be divided into intervals of this
length, and billed for each interval (e.g. 60 means «per minute» billing; 1 means the calls will be billed for every second).
• Number of decimal places to show in cost — if set to 0, the cost of the
calls will be displayed with full currency amounts (e.g. $2, $10, etc); if set to 2, the cost will be shown with decimals (e.g. $2.56, $3.00, etc).
• Amount to round money to — rounds the total cost of the call up to be a
multiple of this setting (e.g. setting to 0.05 will round $2.26 to $2.30; setting of 1.00 will round $2.26 to $3.00).
• Currency sign — symbol (or name) of your currency. • Minimum billable duration (seconds) — specifies the minimum time after
which the call will be charged (e.g. if set to 30 seconds, any call shorter than 30 seconds will incur no charge, but a call of 31 seconds will be charged).
• Local time offset from CDR time (hours) — you must set this option if you
are not located in the New York time zone in order to correctly display your call records. New York time zone is ‘GMT - 5hrs’ (e.g. if your local time zone is ‘GMT + 3hrs’, set this option to 8; if your local time zone is ‘GMT - 2hrs’, set this option to 3).
• Local time offset from Server Time (hours) — you must set this option in
order to correctly displays your call records. Set this option to the local time zone offset from the GMT (e.g. if your local time zone is ‘GMT +7h’, set this option to 7).
• Allow enable/disable of booths — set this option to Yes to give the booth
operators ability to disable and re-enable booths at any time. Disabling a booth will prevent any new calls from being made.
After you finish changing the preferences, press the «Set Options» button.

Call Shop Owner and Operator Guide v0.6
7
2.3 Setting up Rates Press the Rate Editor button to enter the Rate Editor page.

Call Shop Owner and Operator Guide v0.6
8
2.3.1 Adding Rates Set needed values (such Prefix, Description and Rate) in the fields at the top of the Rate Editor, and then click the «ADD» button.
2.3.2 Editing Rates Change the prefix of country where call will be dialed in the Prefix field. Set the new cost per minute for this country in the Rate field. Note: There is no need to fill-in the country name. It will be filled-in automatically based on the prefix.
Press «Save Changes» button to finalize your changes. Repeat this procedure for as many rates as necessary.

Call Shop Owner and Operator Guide v0.6
9
2.3.3 Deleting Rates You should Left-click to select the rate that you want to delete and then click on the «Delete selected rates» button. If you need to delete multiple rates, select them by clicking the rates while holding down the Ctrl key on the keyboard.

Call Shop Owner and Operator Guide v0.6
10
2.3.4 Searching Rates With a large number of rates, it may be difficult to find a particular rate. In this case, you can use the Search feature in the Rate Editor. Type the prefix or country code, Country name, or description in the «Search» field and click on the magnifying lens icon near the field.
Only the rates matching the search criteria will be displayed. Click the «X» icon to clear the search criteria and return to the full rate list.

Call Shop Owner and Operator Guide v0.6
11
3 Operation The Operation section describes the basic web interface actions that the call shop operator will perform on a regular basis. 3.1 Using the Latest Calls Screen
Click on the Latest Calls button to bring up the Latest Calls Screen. The status column marks all calls which are completed but not yet paid for with «Red Flags».

Call Shop Owner and Operator Guide v0.6
12
3.1.1 Viewing the Call Charges After the caller completes all calls, the operator can view individual charges for each call, the total amount due and can print a receipt for the caller. • Click on the booth number in the left column. In the example below, a
customer in booth 2 has finished all calls, and the operator wants to see the charges and print a receipt.

Call Shop Owner and Operator Guide v0.6
13
The Receipt Screen for the selected booth will be displayed. The example screen bellow shows a total cost of the calls made from booth 1, as well as the total amount for the caller to pay.
Call Shop Owner and Operator Guide v0.6
14
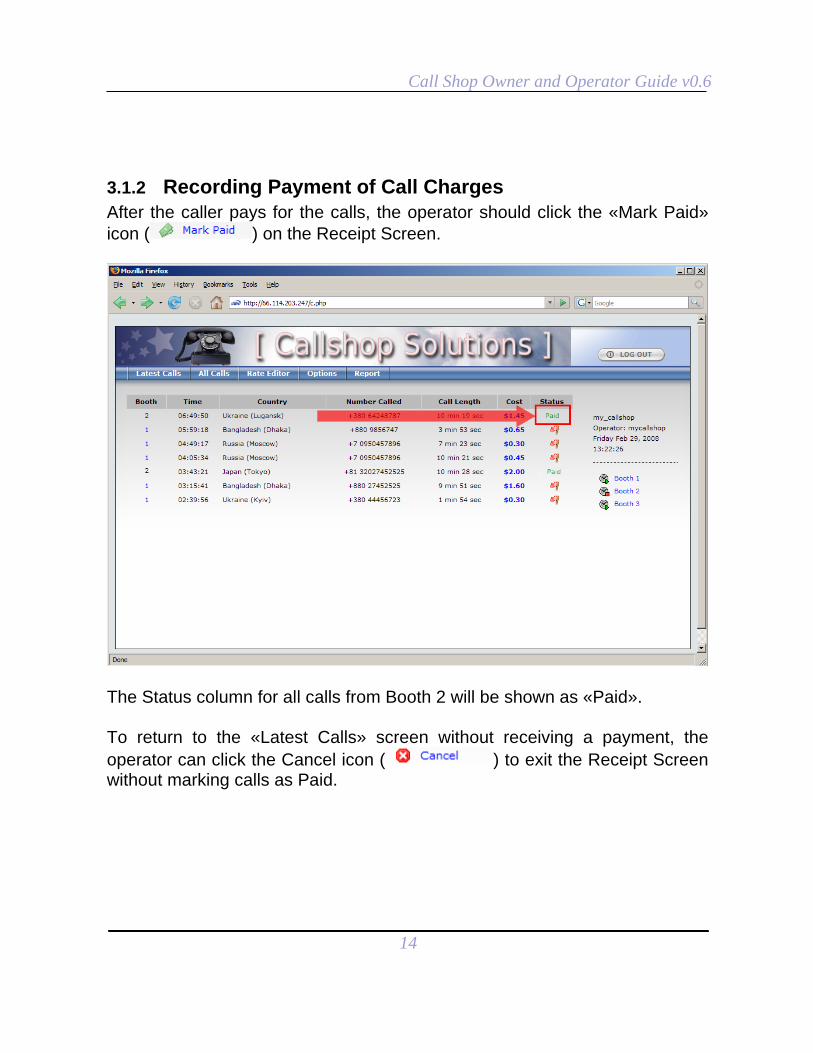
3.1.2 Recording Payment of Call Charges After the caller pays for the calls, the operator should click the «Mark Paid» icon ( ) on the Receipt Screen.
The Status column for all calls from Booth 2 will be shown as «Paid». To return to the «Latest Calls» screen without receiving a payment, the operator can click the Cancel icon ( ) to exit the Receipt Screen without marking calls as Paid.

Call Shop Owner and Operator Guide v0.6
15
3.1.3 Enabling / Disabling a Booth This feature is only accessible if you set the “Allow enable/disable of booths” option to “YES” on the Options Screen. Typically the “Enable Booth” feature is for the operator to enable the booth for a caller, and prevent unauthorized use of the call shop.. The “Booth Disable” feature is particularly beneficial for crowded call shops where the operator may overlook unauthorized callers. When a caller enters a booth, the operator enables the booth by clicking the «Enable» Button ( ) next to the Booth’s name on the right side of the «Latest Calls» screen.
When the caller exits the booth, the operator should click the «Disable» button ( ).

Call Shop Owner and Operator Guide v0.6
16
4 Advanced 4.1 Setting Up Rates with Rates Upload Feature 4.1.1 Uploading a .CSV File If you have a large number of rates, adding them one by one may be time consuming. Creating a .CSV file with rates and uploading this file via the web interface can significantly reduce time to set a large number of rates. Follow these steps to create a .CSV file: • If your default Windows locale is not set to «English (United States)»,
check to make sure that List Separator type is set to “,”. This is necessary for the web interface to open your uploaded .CSV files. In the Windows start menu, go to My Computer -> Control Panel -> Regional and Language Options. Click on «Customize» and under Numbers, set the List Separator type to be “,”.
• Open a spreadsheet program: (e.g. MS Excel) and enter your rates as
shown below:

Call Shop Owner and Operator Guide v0.6
17
• After completing the CSV file, save it, and proceed to the Rate Editor
Screen on the Call Shop web interface. • Press the Browse button and select the .CSV file you just saved. • Click on the «Upload CSV» button. • In case of failure, an error message will appear on screen.
4.1.2 Editing a .CSV File If you need to make corrections to your rates: • Press the «Download CSV» button on the Rate Editor Screen. • Save the file in your local directory. • Open this file in a spreadsheet program and make necessary corrections
to your rates • Follow the “Uploading a CSV File” procedure described above to upload
your modified rates via the web interface.

Call Shop Owner and Operator Guide v0.6
18
4.2 Marking Calls as 'Free' If you would like to give the Call Shop operator the ability to mark some calls as free (for example if there was a false answer), do the following: • Click the Options tab. • Set the desired value for «Max amount to allow marking free» option. • Press the «Set Options» button to save.

Call Shop Owner and Operator Guide v0.6
19
• Now all calls which have cost less than (or equal) can be marked ‘free’ by clicking on the call’s cost. Clicking repeatedly on the cost will toggle whether the call is ‘free’ or should be paid for.

Call Shop Owner and Operator Guide v0.6
20
4.3 Creating Cashier Reports To create a report of all calls: • Click the Report button to bring up the Report Screen.
• Select the time interval for the report by entering the «From Date» and
«To Date». Click on the calendar icon to the right of the field to change. A small calendar will be displayed. Clicking on the desired square to select the date.

Call Shop Owner and Operator Guide v0.6
21
• Finally, click the Show Report button to display your report on the screen.

![XMEye IOS APP User Manual - Secumax Security ProductsLocal login:On user login interface (3.1a), no need to input user ID nor password, directly click [local login] button to get](https://static.fdocuments.net/doc/165x107/5fdf3849174f1d6669144ae5/xmeye-ios-app-user-manual-secumax-security-local-loginion-user-login-interface.jpg)


![Present by: Noppadol Phanpanyalert Version 3.0 [ May 2016]€¦ · Mobile Application Interface and Login SOLUTIONS-Implement Centralized architecture IMSI software-Customize interface](https://static.fdocuments.net/doc/165x107/5f0ce4667e708231d437a5d3/present-by-noppadol-phanpanyalert-version-30-may-2016-mobile-application-interface.jpg)
