
CALENDAR 4YOU FOR VTIGER CRM 5 - its4you.sk · CALENDAR 4YOU FOR VTIGER CRM 5.X Introduction The...
28
http://www.its4you.sk/en/ 1 CALENDAR 4Y OU FOR VTIGER CRM 5.X Introduction The Calendar 4You module for vtiger CRM is module which allows users to maintain and oversee their activities like tasks, calls, meetings and invites. The intention was to provide within new module flexible calendar view with better overview. The flexibility is achieved using new calendar view panels which allow quick show/hide of activities depending on their activity type, status or user ownership. The implementation of the colors within calendar view provides the better overview as well. The Calendar 4You benefits are: calendar view allows quick activities edit / drag & drop (chapter 3) calendar view panels with quick show/hide activities (chapter 3) colors in calendar view (chapter 4.1.1) personal or more users view (chapter 3) tasks (to dos) visible in calendar view (chapter 3) synchronization of the events with Google calendar (chapters 4.1.3) documents can be attached to the activities (chapter 5.1) invites are visible in calendar as separate activities (chapter 3) introducing the sharing access settings (chapter 4.4) The Calendar 4You module was designed mainly for vtiger CRM users which need to maintain their own activities as well as activities of colleagues, subordinates. The group leaders or managers can easy select the group of the people and see all their activities. The colors in this case are used to distinguish activities of single users. The Google synchronization as well as extended CalendarView and User settings make the Calendar 4You suitable tool for your daily business.
Transcript of CALENDAR 4YOU FOR VTIGER CRM 5 - its4you.sk · CALENDAR 4YOU FOR VTIGER CRM 5.X Introduction The...

http://www.its4you.sk/en/ 1
CALENDAR 4YOU FOR VTIGER CRM 5.X
Introduction The Calendar 4You module for vtiger CRM is module which allows users to maintain and oversee their
activities like tasks, calls, meetings and invites. The intention was to provide within new module flexible
calendar view with better overview. The flexibility is achieved using new calendar view panels which allow
quick show/hide of activities depending on their activity type, status or user ownership. The implementation
of the colors within calendar view provides the better overview as well.
The Calendar 4You benefits are:
calendar view allows quick activities edit / drag & drop (chapter 3)
calendar view panels with quick show/hide activities (chapter 3)
colors in calendar view (chapter 4.1.1)
personal or more users view (chapter 3)
tasks (to dos) visible in calendar view (chapter 3)
synchronization of the events with Google calendar (chapters 4.1.3)
documents can be attached to the activities (chapter 5.1)
invites are visible in calendar as separate activities (chapter 3)
introducing the sharing access settings (chapter 4.4)
The Calendar 4You module was designed mainly for vtiger CRM users which need to maintain their own
activities as well as activities of colleagues, subordinates. The group leaders or managers can easy select the
group of the people and see all their activities. The colors in this case are used to distinguish activities of
single users. The Google synchronization as well as extended CalendarView and User settings make the
Calendar 4You suitable tool for your daily business.
http://www.its4you.sk/en/ email: [email protected] phone: +421-51-7732370

http://www.its4you.sk/en/ 2
Content Introduction ......................................................................................................................................................... 1
License agreement .............................................................................................................................................. 3
Terms and conditions .......................................................................................................................................... 3
Private policy ....................................................................................................................................................... 3
1 How to install Calendar 4You ...................................................................................................................... 4
2 How to add activity ...................................................................................................................................... 7
3 CalendarView ............................................................................................................................................... 8
4 Calendar 4You settings .............................................................................................................................. 10
4.1 CalendarView settings ....................................................................................................................... 10
4.1.1 Colors in calendar ...................................................................................................................... 10
4.1.2 Displayed info ............................................................................................................................ 11
4.1.3 Google Synch ............................................................................................................................. 12
4.2 User settings ...................................................................................................................................... 13
4.2.1 Time settings ............................................................................................................................. 13
4.2.2 Calendar sharing ........................................................................................................................ 14
4.2.3 Google authentication ............................................................................................................... 15
4.3 Module manager settings .................................................................................................................. 22
4.3.1 Profiles ....................................................................................................................................... 22
4.3.2 License settings .......................................................................................................................... 23
4.3.3 Upgrade ..................................................................................................................................... 24
4.3.4 Uninstall Calendar 4You ............................................................................................................ 25
4.4 Sharing Access settings ...................................................................................................................... 26
5 Additional features .................................................................................................................................... 26
5.1 Documents assigned to activities ...................................................................................................... 26
6 Tips & tricks ............................................................................................................................................... 27
6.1 Google synchronization tip ................................................................................................................ 27
Change log of Calendar 4You ............................................................................................................................ 28
Change log of Manual for Calendar 4You .......................................................................................................... 28

http://www.its4you.sk/en/ 3
License agreement The Calendar 4You License will be referred to as "The license" in the remainder of this text.
This irrevocable, perpetual license covers all versions 1.xx of Calendar 4You.
This license gives the holder right to install Calendar 4You on ONE productive vtiger CRM installation
and ONE develop vtiger CRM installation for unlimited users.
The license holder is allowed to make modifications to the Calendar 4You sources but in no event
will the original copyright holders of this library be held responsible for action or actions resulting
from any modifications of the source.
The license holder is not required to publicize or otherwise make available any software used in
conjunction with Calendar 4You.
The license holder may not re-distribute the library or versions thereof to third party without prior
written permission of the copyright holder.
Calendar 4You License does not allow the library to be redistributed as part of another product.
The license may be transferred to another vtiger CRM installation only with prior written permission.
The wording of this license may change without notice for future versions of Calendar 4You.
Terms and conditions We accept all major credit cards, PayPal and Bank transfer. Our deliveries:
Credit Card: delivered immediately
PayPal: delivered immediately
Bank transfer: delivered in 2 - 5 days
After payment you will obtain email with link for download Calendar 4You and your license key as well.
Private policy During installation it is necessary to exchange following information:
vtigerCRM version (e.g. 5.4.0)
Calendar 4You version (e.g. 540.2.0)
Date and time
Domain in md5 coding format (e.g. 916b25c201a77a6721003c0030977f3b)
Action provided by you (INSTALL, REACTIVATE, DEACTIVATE)

http://www.its4you.sk/en/ 4
1 How to install Calendar 4You Please provide following steps in order to install Calendar 4You:
1. Install the .zip package of the Calendar 4You module via Settings -> Module Manager. Click on
the button.
Picture 1.1 Installation of Calendar 4You – step 1
2. Select the module zip (package) file that was previously exported or created. Click on the
button.
Picture 1.2 Installation of Calendar 4You – step 2
It is highly recommended to finish the installation without any interruption. For successful
installation we need to exchange information (see previous chapter for details).

http://www.its4you.sk/en/ 5
3. Verify the import details parsed from the zip file. Please check that you accepted the license
agreement and click to proceed or to cancel.
Picture 1.3 Installation of Calendar 4You – step 3
4. Click on to complete the module import.
Picture 1.4 Installation of Calendar 4You – step 4

http://www.its4you.sk/en/ 6
In order to finish installation, please provide following validation steps.
1. Calendar 4You Validation Step. Please insert a license key and make sure that your server has
internet access. Click on .
Picture 1.5 Validation step 1
2. If Calendar 4You is installed successfully you will see following screen. Click on .
Picture 1.6 Validation step 2 – Finish installation

http://www.its4you.sk/en/ 7
2 How to add activity There are several approaches how to add new activity (event or to do):
directly from CalendarView (recommended) - the order is same for Day, Week or Month view and is
described below – the advantage of this approach is that start date and time is automatically
defined by your selection and you can easily see whether the time slot is empty for your activity as
well as invited colleagues
using Add event button
using action buttons , from records of the modules like Contacts,
Organizations
The recommended and quick approach is using CalendarView. It allows creating activity directly from the
Day, Week or Month view for particular time. In order to add new activity:
1. Switch to Day, Week or Month view according to your needs.
2. Click to place in CalendarView to select start time of your activity.
3. Select activity type (Call, Meeting, etc).
4. The new window “Add Event” (for Call, Meeting, etc.) or “Create To Do” (for tasks) will appear
on the screen.
5. Fill the form and save it using button .
Picture 2.1 How to add new activity in Calendar View
The windows “Add Event” (for Call, Meeting, ...) and “Create To Do” (for task) are well known from module
Calendar and have same usage and design. Therefore detailed description is not necessary in this manual.
Please refer also to https://wiki.vtiger.com/index.php/Calendar_Module for more details.

http://www.its4you.sk/en/ 8
3 CalendarView The CalendarView has several possibilities to be adjusted according to your needs and provides new
functionalities. The following two pictures present some of CalendarView functions:
1. Calls, meetings and invites or other activities are represented by rectangular areas which cover
places with respect to real start/end time of the activities. You can easily drag and drop activities,
simply extend end time or easily to switch to EditView or DetailView of the activities.
2. Tasks/To Dos are shown in the CalendarView as well in the above part “all-day”.
3. Day, Week and Month calendar are provided. Just click to change the view.
4. Navigation buttons to quick selection of the date can be used.
5. User Settings – deals with Time settings, Calendar sharing and Google authentication – please
refer to chapter 4.2 for more details.
6. Module manager settings – profile privileges, license settings, upgrade and uninstallation can be
found here – please refer to chapter Module manager settings for more details.
7. Add new activity button (It opens new window to create new activity for current day).
8. Within Activity List panel you can easily show/hide different types of activities. In addition you can
define colors, displayed info and set up Google synchronization here (see chapter 4.1.3 for details).
As you can see in the Picture 3.1 the activities are shown in colors in case you are viewing only
activities assigned to one user. Please note that new feature introduced within Calendar 4You is
viewing your invites.
Picture 3.1 CalendarView with activities of one user

http://www.its4you.sk/en/ 9
9. The panel “Assigned To” is used to show/hide activities for more users in parallel or just to see other
user activities. In this case the colors are used to easy distinguish activity of the correspondent user.
Using checkboxes you can easily select users of the group of interest. The advantage is that selected
group is remembered under “All selected” value and can be used again in next login to the system.
10. Using checkboxes of the panel “Event status” you can show/hide events based on their status.
11. Using checkboxes of the panel “Task status” you can show/hide tasks based on their status.
Picture 3.2 CalendarView – more users view

http://www.its4you.sk/en/ 10
4 Calendar 4You settings The Calendar 4You settings consist of:
CalendarView settings – available for all users via Activity list panel
User Settings – user specific settings initiated via button
Module manager settings - initiated using button
Sharing Access settings – you can define organization-level sharing rules
4.1 CalendarView settings There are some additional settings related to CalendarView which can be initiated directly from Activity list
panel as shows in the below picture. The CalendarView settings consist of the following tabs:
Colors in calendar
Displayed info (not available for Invite)
Google Synch (not available for Task and Invite)
Picture 4.1 CalendarView settings initialization
4.1.1 Colors in calendar
Within our CalendarView we introduced colors. The intention was to provide better overview by using
different colors for single activity type or user depending on current view. In addition you can select your
own color for single activity/user. In order to select the color, please initiate the CalendarView settings and
provide following few simple steps:
1. Go to “Colors in calendar” tab and click on icon .
2. Select the color.
3. Save the settings using button .
Picture 4.2 Colors in calendar

http://www.its4you.sk/en/ 11
4.1.2 Displayed info
The ‘Displayed info’ tab allows you to define how much info is displayed in CalendarView for all single views
separately, i.e. for day calendar, week calendar as well as month calendar. In addition you can define
displayed info separately for each activity type. The use of this tab is simple. In order to view more
information fields please select them from “Available informations” and click on button .
You can find default field which will be used on the top of the selected informations (marked purple in the
following picture).
Picture 4.3 Displayed info
http://www.its4you.sk/en/ 12
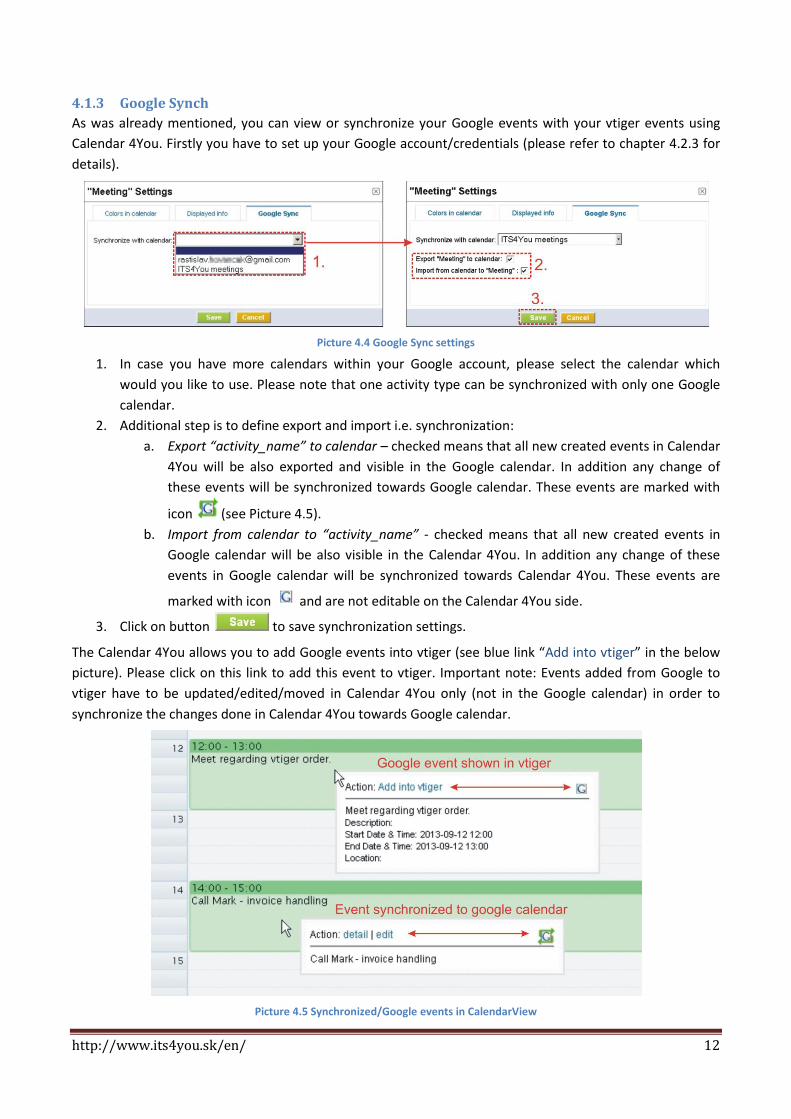
4.1.3 Google Synch
As was already mentioned, you can view or synchronize your Google events with your vtiger events using
Calendar 4You. Firstly you have to set up your Google account/credentials (please refer to chapter 4.2.3 for
details).
Picture 4.4 Google Sync settings
1. In case you have more calendars within your Google account, please select the calendar which
would you like to use. Please note that one activity type can be synchronized with only one Google
calendar.
2. Additional step is to define export and import i.e. synchronization:
a. Export “activity_name” to calendar – checked means that all new created events in Calendar
4You will be also exported and visible in the Google calendar. In addition any change of
these events will be synchronized towards Google calendar. These events are marked with
icon (see Picture 4.5).
b. Import from calendar to “activity_name” - checked means that all new created events in
Google calendar will be also visible in the Calendar 4You. In addition any change of these
events in Google calendar will be synchronized towards Calendar 4You. These events are
marked with icon and are not editable on the Calendar 4You side.
3. Click on button to save synchronization settings.
The Calendar 4You allows you to add Google events into vtiger (see blue link “Add into vtiger” in the below
picture). Please click on this link to add this event to vtiger. Important note: Events added from Google to
vtiger have to be updated/edited/moved in Calendar 4You only (not in the Google calendar) in order to
synchronize the changes done in Calendar 4You towards Google calendar.
Picture 4.5 Synchronized/Google events in CalendarView

http://www.its4you.sk/en/ 13
4.2 User settings User settings part contains following:
Time Settings – allows to define several views of the calendar from time point of view
Calendar sharing – deals with sharing of the calendar
Google account settings – allows to add Google account
4.2.1 Time settings
The description of several time view calendar settings is described in the following table. Please refer also to
Picture 4.6 to see examples of the usage.
Name Description
Start my calendar time at Define your calendar start time. This setting is available for day and week calendar.
Use 24 hours format Switch between 12 and 24 hours format.
Show weekends Show/hide weekends.
Default Activity View Define your calendar default activity view – day, week or month.
Default User View Define your calendar default user view – Me (your activities only), All selected.
Week starts at Define start day of the week – Monday, Sunday
Picture 4.6 Time Settings

http://www.its4you.sk/en/ 14
4.2.2 Calendar sharing
The Calendar sharing within Calendar 4You is same as built-in calendar module for vtiger. You need just to
select from Available Users. Please for more details refer to vtiger forums or other online manuals.
Picture 4.7 Calendar sharing

http://www.its4you.sk/en/ 15
4.2.3 Google authentication The Calendar 4You functionality “Google Sync” requires setting the Google account. Please provide following
steps:
1. Please visit page: https://console.developers.google.com and sign in
Picture 4.8 Google authentication step 1
2. Click on button
Picture 4.9 Google authentication step 2
3. Type Project name and click on button and your project will be created
Picture 4.10 Google authentication step 3
http://www.its4you.sk/en/ 16
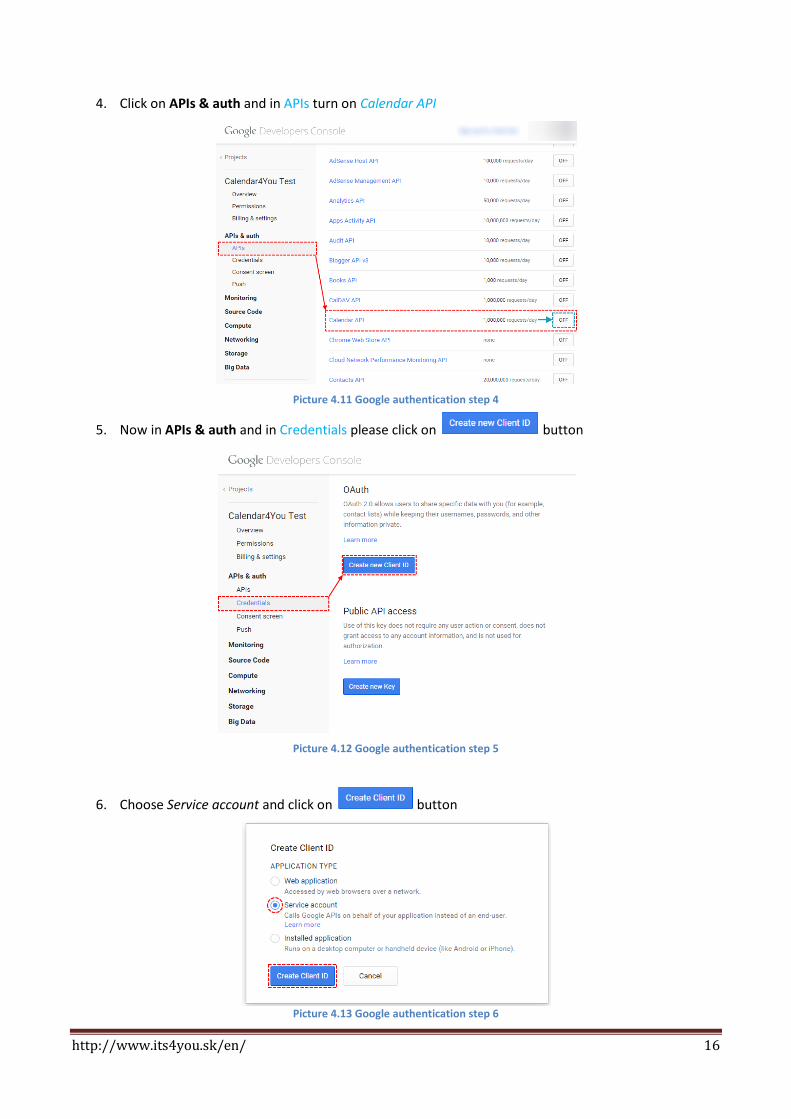
4. Click on APIs & auth and in APIs turn on Calendar API
Picture 4.11 Google authentication step 4
5. Now in APIs & auth and in Credentials please click on button
Picture 4.12 Google authentication step 5
6. Choose Service account and click on button
Picture 4.13 Google authentication step 6

http://www.its4you.sk/en/ 17
7. Now, your key will be generated and downloaded, please save it. You will need this file. Then click on
button
Picture 4.14 Google authentication step 7
8. You can see your Service Account info. Then please click on button (if it is not working, click on different link e.g. APIs and then on Credentials again and button will be working)
Picture 4.15 Google authentication step 8
9. Please choose Server key
Picture 4.16 Google authentication step 9

http://www.its4you.sk/en/ 18
10. Click on button
Picture 4.17 Google authentication step 10
11. Now, you can see your Key for server applications that you will need in your CRM. Please check
chapter 4.1.3 Google Synch.
Picture 4.18 Google authentication step 11
12. Open your CRM system click on More -> Calendar4You
Picture 4.19 Google authentication step 12

http://www.its4you.sk/en/ 19
13. Click on button
Picture 4.20 Google authentication step 13
14. First upload downloaded file from step 7
Picture 4.21 Google authentication step 14
15. Now, click on button again, fill required data and click on button
a. Login – login into Google account
b. Api Key – API KEY from Key for server applications from step 11
c. ClientID – ClientID from Service Account from step 8 without “.apps.googleusercontent.com”
d. FileKe – name of downloaded file that you upload in step 14 without “.p12”
Picture 4.22 Google authentication step 15
Note: In case of trouble with error message: Error refreshing the OAuth2 token, message: '{ "error" : "invalid_grant" }', please go to the page: https://wiki.debian.org/NTP and install it on your server.

http://www.its4you.sk/en/ 20
16. Go to your Google account and choose Calendar
Picture 4.23 Google authentication step 16
17. Click on button and choose Settings
Picture 4.24 Google authentication step 17
18. Choose Calendars
Picture 4.25 Google authentication step 18

http://www.its4you.sk/en/ 21
19. Click on Share this calendar
Picture 4.26 Google authentication step 19
20. For Email address use email that you can find in Service account info from step 8 then choose Make
changes AND manage sharing and click on button.
Picture 4.27 Google authentication step 20
21. Now please check chapter 4.1.3 Google Synch to synchronize your events.

http://www.its4you.sk/en/ 22
4.3 Module manager settings
The Calendar 4You settings can be initiated using button from the Calendar 4You or CRM Settings >
Module Manager > Custom modules. In the module manager settings you can find (Picture 4.28):
Profiles – manage user-specific Calendar 4You access to different roles
License – manage all settings related to your license
Upgrade – initiate upgrade of the Calendar 4You
Uninstall Calendar 4You – completely remove Calendar 4You
Picture 4.28 Calendar 4You settings
4.3.1 Profiles
You may define Calendar 4You privileges for all profiles. You may select Create/Edit, View and Delete. Just
use checkboxes and click on button to save changes.
Picture 4.29 Manage profiles

http://www.its4you.sk/en/ 23
4.3.2 License settings
In case that some problem occurs with license key or in case you need to reinstall Calendar 4You you have to
deactivate and reactivate license key. To deactivate license key please provide following steps:
1. Click on button.
2. Confirm deactivation using button in next window.
3. You are informed about successful deactivation of the license. Just click on .
Picture 4.30 Deactivate license
After deactivation of license you cannot use Calendar 4You at all but all inputs created within built in
Calendar will be again visible in the Calendar 4You after activation of the license.
To activate license you have to provide following steps:
1. Insert the license key and click on button if you are activating license after previous
deactivation.
2. Activation continues with validations steps well known from installation process; please refer to
chapter 1, Picture 1.5, Picture 1.6.
Picture 4.31 License activation

http://www.its4you.sk/en/ 24
4.3.3 Upgrade
The upgrade of Calendar 4You can be started using Upgrade link in the module manager. Please browse
the package using button and click on button .
Picture 4.32 Upgrade of the Calendar 4You – step 1
The upgrade continues with following window. Please verify the upgrade details parsed from the zip file.
Please check that you accepted the license agreement and click to proceed or to cancel.
Picture 4.33 Upgrade of Calendar 4You – step 2
Click on to complete the module upgrade.
Picture 4.34 Finish upgrade

http://www.its4you.sk/en/ 25
In case that installed version of Calendar 4You matches the package version, upgrade will be not provided
and following information will appear on the screen.
Picture 4.35 Upgrade failure
4.3.4 Uninstall Calendar 4You
The uninstallation of Calendar 4You is fully automatic. Within uninstallation also Calendar 4You license is
deactivated and Calendar 4You related directories are deleted. For uninstallation provide following steps:
1. Click on button .
2. Please confirm uninstallation via button in dialog box.
Picture 4.36 Uninstall Calendar 4You

http://www.its4you.sk/en/ 26
4.4 Sharing Access settings We introduced the possibility to define organization-level sharing rules for Calendar4You. It means you can
define all different options for sharing access i.e. Private, Public (Read Only), Public (Read, Create/Edit),
Public (Read, Create/Edit, Delete). This is very useful feature especially for working in groups. Please refer to
https://wiki.vtiger.com/index.php/Sharing_Access for more details how to define sharing access.
Picture 4.37 Calendar 4You sharing access
5 Additional features
5.1 Documents assigned to activities The Calendar 4You provides new possibility to assign the documents to events or tasks. It means that
meeting presentations or other discussed documents related to calendar activity can be found in the
DetailView of the activity. You can easily to do it using well known steps via “More Information” tab in the
DetailView of the event or task. Just use the buttons or .
Picture 5.1 Documents in More Information tab

http://www.its4you.sk/en/ 27
6 Tips & tricks
6.1 Google synchronization tip Below you can find simple example of synchronization with Google via separate activity “Google events”.
How to do it:
1. Using CRM Settings > Picklist Editor create for the “Events” new Activity Type called “Google events”
(you can name it as you wish).
2. In the Google calendar create new separate calendar – in the example the name was used ITS4You
meetings (again, you can name it according to your needs).
3. Set up synchronization with calendar.
4. As you can see “Google events” are visible in Calendar 4You in separate activity type and color as
well.
This approach is recommended in case you don’t want to mix original vtiger activities with imported events
from the Google account. It is also suitable in case you don’t need to synchronize your activities with Google
anymore and you would like to “clear” vtiger.
Picture 6.1 Synchronization with Google in separate activity type

http://www.its4you.sk/en/ 28
Change log of Calendar 4You January 2015: 540.4.0
o Google synchronization fixed (chapter 4.2.3)
Change log of Manual for Calendar 4You January 2015: first initiate of manual based on Calendar 4You version:540.4.0


